computer basics and word processing workbook
TRANSCRIPT

Adult Computer
and Employment Skills
Computer Basics and Word Processing
Using a Computer
Windows
Word Processing
PowerPoint
Jessica Grace Jones
Minnesota Literacy Council
2007

Contents:
Vocabulary .......................................................................................................................... 3
Computer Basics and Word Processing Pre-Test ............................................................... 4
STUDENT DICTIONARY ................................................................................................ 6
Mavis Beacon Teaches Typing ......................................................................................... 13
What is Microsoft Word? .................................................................................................. 17
Microsoft WORD Screen Quiz ......................................................................................... 18
Microsoft Word: Exercise 1 .............................................................................................. 19
Microsoft Word: Exercise 2 .............................................................................................. 23
Microsoft Word: Exercise 3 .............................................................................................. 26
Microsoft Word: Exercise 4 .............................................................................................. 31
Microsoft Word: Exercise 5 .............................................................................................. 39
Microsoft Word: Exercise 6 .............................................................................................. 47
Microsoft Word: Exercise 7 .............................................................................................. 51
Microsoft Word: Exercise 8 .............................................................................................. 53
Microsoft Word: Exercise 9 .............................................................................................. 56
Microsoft Word: Exercise 10 ............................................................................................ 60
Microsoft Word: Exercise 11 ............................................................................................ 63
Microsoft Word: Exercise 12 ............................................................................................ 65
What is Microsoft PowerPoint? ........................................................................................ 70
Microsoft PowerPoint Exercise ........................................................................................ 71

3
Vocabulary
1. Microsoft Word 2. word processing 3. hardware 4. software 5. operating system 6. laptop 7. desktop 8. PC 9. Mac 10. mouse 11. monitor 12. Central Processing Unit 13. USB drive 14. headset 15. icon 16. start menu 17. drive 18. file 19. folder 20. document 21. minimize 22. maximize 23. Microsoft Windows 24. delete 25. backspace 26. enter 27. font 28. bold 29. italic 30. align right 31. copy 32. cut
33. paste 34. spell check 35. change 36. ignore 37. ignore all 38. Microsoft PowerPoint 39. slide 40. text box 41. animation 42. clipart 43. CD-R 44. CD-RW 45. DVD-R 46. DVD-RW
Related Vocabulary
1. skimming 2. scanning 3. main idea 4. business letter 5. memo 6. poster 7. flyer 8. advertisement 9. story 10. essay 11. poem 12. report 13. schedule 14. assignment 15. envelope 16. mailing label

4
Computer Basics and Word Processing Pre-Test
1. What is this? _______________________
2. What is this? _______________________ 3. What is this? _______________________
4. Circle the key that moves the cursor one space.
5. Circle the key that moves the cursor down to the next line.
6. Circle three keys that make capital or uppercase letters.
5
7. What is a program?______________________________________________
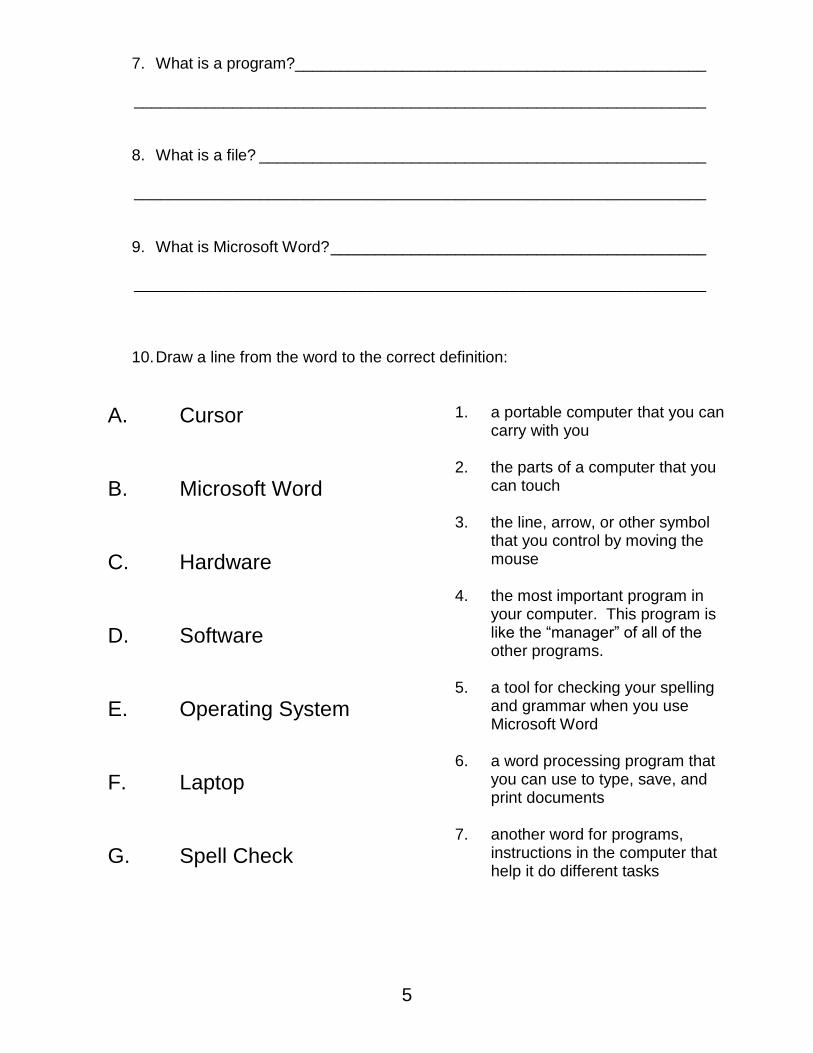
________________________________________________________________ 8. What is a file? __________________________________________________ ________________________________________________________________ 9. What is Microsoft Word? __________________________________________ ________________________________________________________________ 10. Draw a line from the word to the correct definition:
A. Cursor
B. Microsoft Word
C. Hardware
D. Software
E. Operating System
F. Laptop
G. Spell Check
1. a portable computer that you can carry with you
2. the parts of a computer that you
can touch 3. the line, arrow, or other symbol
that you control by moving the mouse
4. the most important program in
your computer. This program is like the “manager” of all of the other programs.
5. a tool for checking your spelling
and grammar when you use Microsoft Word
6. a word processing program that
you can use to type, save, and print documents
7. another word for programs,
instructions in the computer that help it do different tasks
6
STUDENT DICTIONARY
Computer Basics and Word Processing
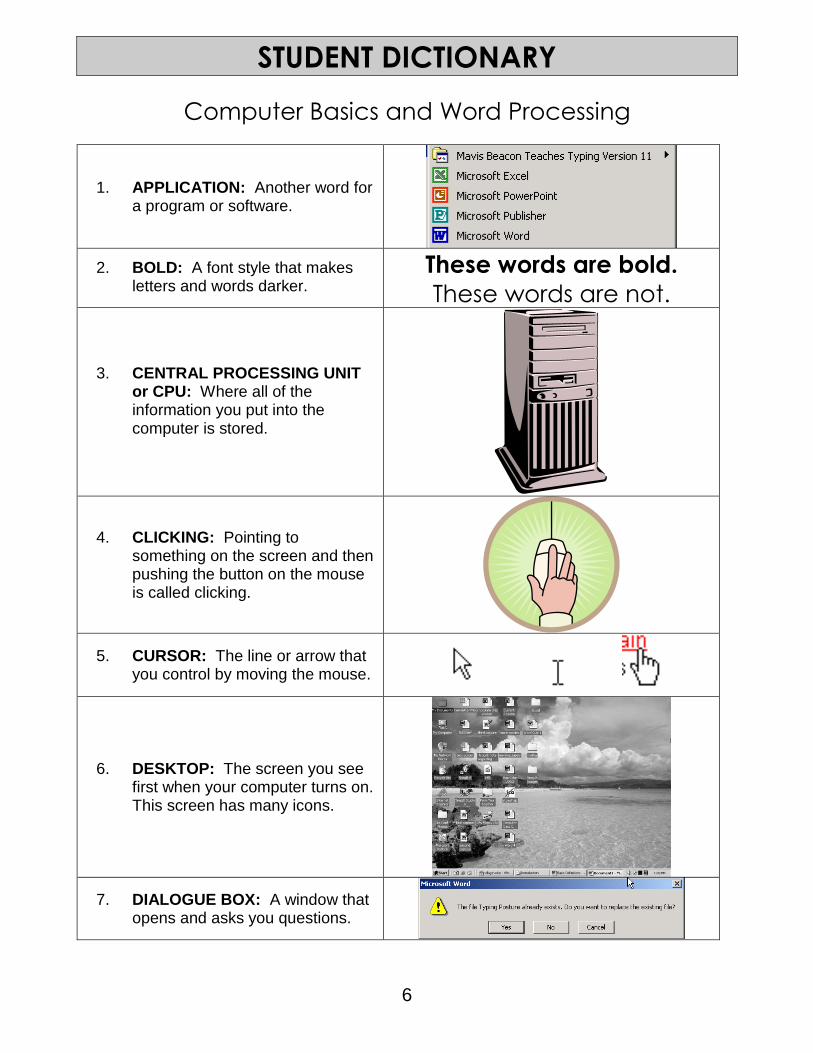
1. APPLICATION: Another word for a program or software.
2. BOLD: A font style that makes
letters and words darker. These words are bold.
These words are not.
3. CENTRAL PROCESSING UNIT or CPU: Where all of the information you put into the computer is stored.
4. CLICKING: Pointing to something on the screen and then pushing the button on the mouse is called clicking.
5. CURSOR: The line or arrow that
you control by moving the mouse.
6. DESKTOP: The screen you see first when your computer turns on. This screen has many icons.
7. DIALOGUE BOX: A window that
opens and asks you questions.

7
8. DISK DRIVE: The place where you put your floppy disk so that you can save files on it.
9. DISKS: One way to save your work, like recording on a video tape.
10. DOCUMENT: Anything you create in Microsoft Word is called a document.
11. FILE: A piece of computer information such as a document or part of a computer program.
12. FOLDER: Like a file folder in a
filing cabinet, a file is where documents (letters, spreadsheets, etc.) are kept.
13. FONT: The way letters and words look.
14. FORMAT: Changing the way that text looks on the page.
THIS is formatted. This is not formatted.
15. HARDWARE: All the parts of the computer that you can touch: the monitor, CPU, printer, mouse, and keyboard.

8
16. HARD DRIVE: The place inside your computer where programs and files are stored.
17. HEADSET: Earphones and a microphone that you wear on your head.
18. HIGHLIGHT/SELECTING: Click
and drag across a word or sentence to highlight it. When it is highlighted you can make changes to it.
19. ICON: Symbols or pictures that you can click on to perform an action. Each program has its own icon.
20. ITALICS: A font style that slants words to the right.
21. KEYBOARD: Like a typewriter, it’s where you type and enter numbers. It is one way to tell the computer what you want it to do.
22. LAPTOP: A portable computer that you can carry with you.
23. Mac or MACINTOSH: A computer
that is made to use the Macintosh operating system. There are two basic kinds of computers: PCs and Macs.
9
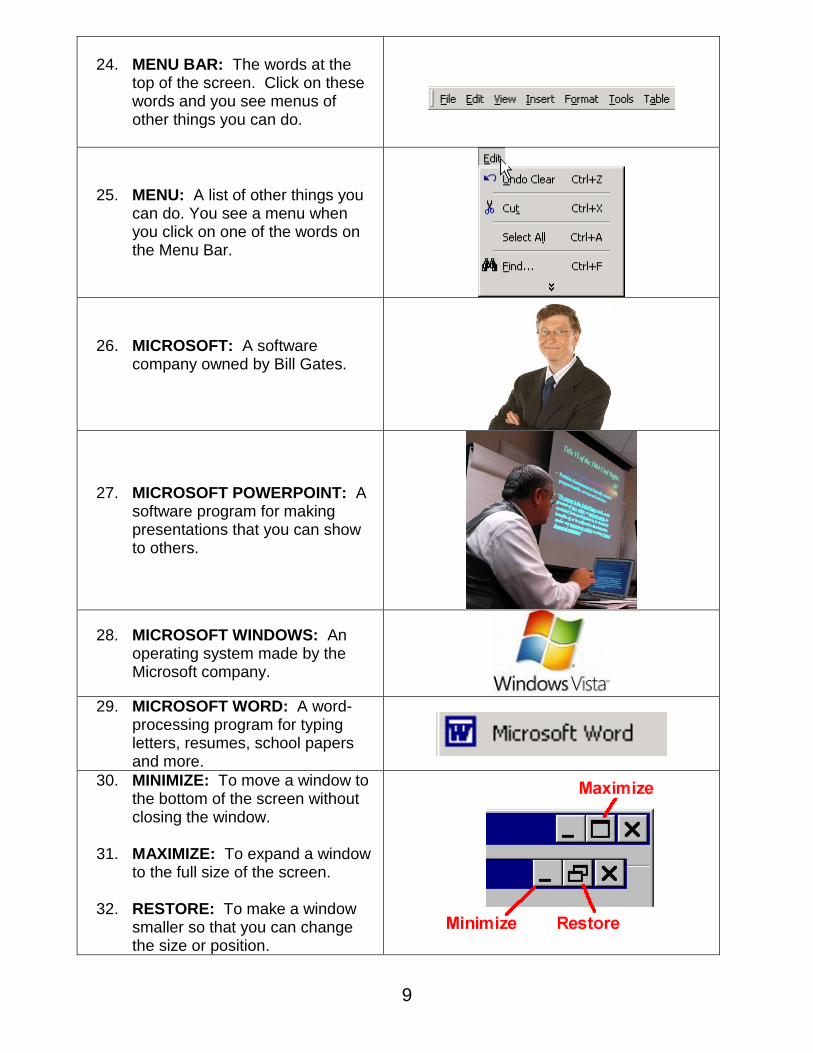
24. MENU BAR: The words at the
top of the screen. Click on these words and you see menus of other things you can do.
25. MENU: A list of other things you can do. You see a menu when you click on one of the words on the Menu Bar.
26. MICROSOFT: A software company owned by Bill Gates.
27. MICROSOFT POWERPOINT: A software program for making presentations that you can show to others.
28. MICROSOFT WINDOWS: An
operating system made by the Microsoft company.
29. MICROSOFT WORD: A word-
processing program for typing letters, resumes, school papers and more.
30. MINIMIZE: To move a window to
the bottom of the screen without closing the window.
31. MAXIMIZE: To expand a window
to the full size of the screen.
32. RESTORE: To make a window smaller so that you can change the size or position.

10
33. MONITOR: Your computer’s screen
34. MOUSE: The tool you can use tell the computer what to do. For example you can open programs and files by clicking or double clicking.
35. OPEN: A command on the File Menu that brings files onto the screen so that you can see them.
36. OPERATING SYSTEM: The
most important program in your computer. This program is like the “manager” of all of the other programs.
37. PC = PERSONAL COMPUTER: A computer that is made to use the Windows operating system. There are two basic kinds of computers: PCs and Macs.
38. POINT: The size of text. 12 point 16 point 24 point 39. PROGRAMS: Another word for
software or applications.

11
40. SCREEN SAVER: A design on the screen that turns on if you don’t use your computer for a few minutes.
41. SCROLL BARS: The bars on the sides of the screen that allow you to move up or down the page.
42. SOFTWARE: Another word for programs, instructions in the computer that help it do different tasks.
43. SPELL CHECK: When you’re
using Microsoft Word, you can click on this button to look for spelling and grammar mistakes.
44. SPREADSHEET: Organizes information into rows and columns and often uses math and numbers.
45. TOOL BARS: The bars across
the top of the screen that have icons you click on to do different things.

12
46. USB DRIVE: A disk that you can save information on. Also called a flash drive, jump drive, or thumb drive.
47. WORD PROCESSING: Typing documents on a computer. Word processing also allows you to format, save, and edit your writing.

13
Mavis Beacon Teaches Typing
Open the Program
1. Double-click on the icon for Mavis Beacon Teaches Typing.
2. Click on Run Mavis.
3. Click on your name.
You might need to click on the arrow to see all the names in the list.
*If your name is not on the list, read the instructions on
the next page to make a new account.
4. Click on Enter Classroom.

14
Start a new account (do this the 1st time only)
The very first time that you use Mavis Beacon on your computer you will need to make an account.
After that, the program will remember your name and what lessons you need to work on.
1. Click on Create a New User.
2. Click on Next.
3. Click on English. 4. Click in the box and type your name.
5. Click on Next.
6. Click on Use Defaults.

15
7. Click on the picture of the computer screen to start the lesson.
8. Choose beginner or test typing level.

16
9. Every time you see this blue oval, read the information then click on Start Lesson.
10. Look at the hands on the screen. Now put your hands on your computer’s keyboard.
11. Type the letters and words at the top of the screen.
Correct letters will be blue. Incorrect letters will be red.
12. THE MOST IMPORTANT THING: If you want to learn to type fast, you must practice without looking at your fingers. Over time you will be able to type very fast without looking.

17
What is Microsoft Word?
Microsoft Word is a word-processing program sold by Bill Gates’s company, Microsoft. Word lets you efficiently produce professional-looking documents, such as letters, reports, essays, and newsletters. Word offers many features that help you edit (change) text in a document. You can add, delete, and rearrange text. You can also check your document for spelling and grammar errors and use Word’s build-in thesaurus to find more suitable words. The spelling and grammar check is particularly useful if you are typing an assignment for your English class. You can format a document to enhance the appearance of the document. You can use various fonts, styles, and colors to emphasize important text. You can also center text on a page, adjust the spacing between lines of text, change the margins and create newspaper columns. Word comes with many types of pictures, or graphics, that you can use to make a document more interesting and entertaining. Clip art is a collection of pictures already in the program that you can add to a document, such as a children’s story, to make the document more interesting. You can also import pictures that you take on your camera. Imagine, for example, that you are making a poster to advertise your. Including a picture of your car will make the advertisement more successful. You can make a paper copy of a document to you create. Before printing, you can preview how the document will appear on a printed page. You can also print envelopes and mailing labels. Word-processing programs, like Microsoft Word, have made many tasks easier. Students can check their work when they write essays, poems, and reports. Office workers can make changes and see their work before they print. People can make professional-looking documents, such as posters, newsletters, and memos, even from home.
18
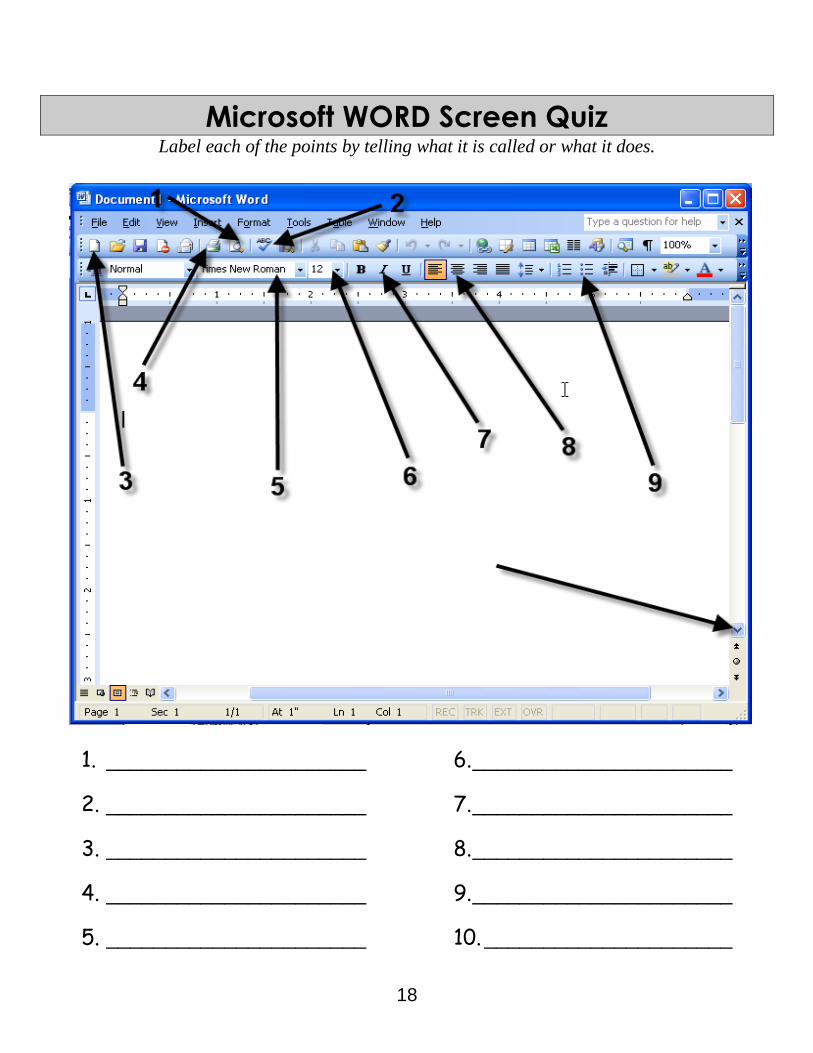
Microsoft WORD Screen Quiz Label each of the points by telling what it is called or what it does.
1. ______________________
2. ______________________
3. ______________________
4. ______________________
5. ______________________
6. ______________________
7. ______________________
8. ______________________
9. ______________________
10. _____________________

19
Microsoft Word: Exercise 1
In this exercise you will learn about:
Using the toolbar
Highlighting text
Copy and Paste functions
Font and Font size
Common keyboard operations
Bold, Italics, Underline
1. Click on the START menu.
2. Click on PROGRAMS
or ALL PROGRAMS.
3. Click on MICROSOFT OFFICE
4. Click on MICROSOFT WORD.
5. Now the program, Microsoft Word, is open.
Look at the screen.
Are the words Microsoft Word at the top of the
screen?
6. Slowly Move the Cursor across the Standard Toolbar. It looks like the picture below.
Don’t Click. When you point to a picture you will see the name for that picture or tool.
7. Type the alphabet in lower-case letters. No spaces.
Like this: abcdefghijklmnopqrstuvwxyz

20
8. Click and Drag from the “a” to the “z”. This is called Highlighting. When all the letters are
highlighted. Take your finger off the mouse. Practice this a few times.
9. There is another way to highlight the letters. Use your left hand to Hold Down the SHIFT key. Use
your right hand to Press the Right Arrow Key many times until all the letters are highlighted.
10. Now, Click on the Copy button.
The computer will remember the text that is highlighted.
11. Click after the “z” to put the cursor there.
12. Now Click the Paste button.
Look at what happened. You should now have two alphabets.
13. Click on the EDIT menu. You will see a drop down menu.
14. Click on SELECT ALL. This is another way to highlight all the words on the page.

21
15. Now, look at your Formatting Toolbar.
Click on the little arrow next to “Times New Roman”.
16. Click on another font name to change the way
the letters look.
17. Change the font 3 times for practice.
18. Click on the arrow next to the number 12.
Click on a larger number.
This will change the size of the letters.
19. Click between the “n” and
“o” in the first alphabet to
place the cursor there.
20. On your keyboard,
Press the
BACKSPACE key
several times to erase
everything before “o.”

22
21. Click just after “d” in the second
alphabet to place your cursor there.
22. On your keyboard, Press the Delete key several times to erase everything between “d” and “o.”
23. Highlight all of the text. (Click and drag across the letters).
24. Click on the Center button from the Formatting Toolbar.
25. When the text is highlighted, Click on the B to make the text bold.
26. Click on the I button on the Formatting Toolbar to make the text italic.
27. Click on the Underline button to add a line under the words.
28. Now you are done.
Ask a teacher to check your work. Your teacher will sign in this box.
29. Click on FILE. Then Click on CLOSE. Do not save.

23
Microsoft Word: Exercise 2
In this exercise you will learn:
Basic keyboard keys
Formatting text
Cut and Paste
Saving to a disk
Using the undo button
1. Click on the START menu. Then Click on PROGRAMS.
2. Click on MICROSOFT OFFICE. Then Click on MICROSOFT WORD.
3. Type your first and last name in the blank document. Capitalize the first letter of your first and last
name using the SHIFT key.
4. Press the ENTER key to move down one line.
5. Type your street address.
6. Press the ENTER key to move down one line.
7. Type your city, state, and zip code.
8. Press the ENTER key to move down one line.
9. Type your phone number. Your document should look something like this:
10. Select all your text. (Click on EDIT and click on SELECT ALL).
11. Change the font size to 18.

24
12. Change the font style.
13. Highlight just the phone number.
14. Click on the Cut button on the Standard toolbar.
Your phone number will disappear.
15. Click after your name to put the cursor there.
16. Click the PASTE button. (Or click on EDIT and click on PASTE). Your phone number should be
right after your name.
17. Click between your name and phone number.
18. Press the TAB key to put a space between your name and phone number.
19. Click at end of the first line.
20. Press the ENTER key. This will put a space between the first and
second line.
21. Highlight your full name. Click on the FORMAT menu.
You will see a dropdown menu.
22. Click on CHANGE CASE from the dropdown menu.
23. Click on the circle next to the word UPPERCASE. Click on
OK.

25
24. Click on the UNDO button on the toolbar.
This button will let you go back one step. It is a good way to correct your mistakes.
25. Click the REDO button on the toolbar.
This button will let you go forward one step after you have used the undo button.
26. Click before your phone number and Press the ENTER key.
27. Now, Highlight your phone number.
28. Click on the U key on the formatting toolbar. This will underline your phone number.
29. Now select all the text. Click on the EDIT menu. Click on SELECT ALL from the dropdown
menu.
30. Center all the text using the Center button on the Formatting toolbar.
31. Change the font size of your name to 22.
32. Make your first and last name Bold.
33. Italicize your address.
34. Now you will save this document.
Follow the directions below:
35. Click on the FILE menu.
36. Click on SAVE AS.
37. Click on MY COMPUTER.
38. Select the area of the computer where
you want to save.
If you’re using a floppy disk,
Click on 3 ½ Floppy A:
If you’re using a USB drive,
Click on Removable Disk.
39. Click in the file name box.
40. Type a name for this document. Name it Word 2.
41. Click on SAVE.
42. Now you are done. Ask a teacher to check your work and sign in this box.

26
Microsoft Word: Exercise 3
Using Spelling Check
This exercise will teach you how to use the computer to help you correct your spelling and
grammar. When you type a word in this exercise, type it exactly as it is written. Many of the
words are spelled incorrectly to show you how you can use the computer to correct your
spelling.
Microsoft Word has a dictionary in the computer. This dictionary knows many English
words. It does not know the names of people, the names of places, or words that are not
English.
1. Open Microsoft Word.
2. Type: computtor
3. Press the ENTER key.
4. Do you see a red line on the screen? The red line means that the computer does not
have this word in it’s dictionary.
5. Right-click on the word Computtor.
6. Click on the correct spelling for the word that matches this
picture.
7. Press the ENTER key.
8. Type: Mowse.
9. Press the ENTER key.
10. Click on the SPELLING & GRAMMAR CHECK button.
11. The word mowse is red because the computer does not have this word in its
dictionary.

27
12. Click on the correct spelling for the word that
matches this picture.
13. Click on CHANGE.
14. Click on OK.
15. Type: Kibor.
16. Press the ENTER key.
17. Click on the Spelling and Grammar Check button.
18. The correct spelling for this picture is not on the list.
If the spelling is very wrong the
computer cannot find the correct spelling.

28
19. Highlight the word and type the correct spelling: Keyboard.
20. Click on CHANGE.
21. Click on OK.
22. Type: Mukta.
23. Press the ENTER key.
24. Mukta is a woman’s name.
The computer doesn’t know the names of people.
Click on the Spelling and Grammar Check button.
25. The name is red because the computer does not know this word.
Click on IGNORE (Ignore Once).
26. Now the computer knows that Mukta is not a mistake. Click on OK.
27. Type: addis ababa.
28. Press the ENTER key.
29. This is the capitol city of the country
Ethiopia. Remember, the computer
does not know the names of places.
Click on the Spelling and Grammar
Check button.
30. The city name is red because the
computer thinks it is a mistake.
Click on IGNORE (Ignore Once).

29
31. Now the city name is green because the computer thinks it is a grammar mistake. The
name of a city should start with a capital letter.
32. Click on the capitalized spelling.
33. Click on CHANGE.
34. Type: Salsa verde
35. Press the ENTER key.
36. Salsa verde is a sauce used in Mexican cooking.
Verde is a Spanish word.
The computer only has an English dictionary.
It doesn’t know Spanish words.
37. Right-click on the word verde.
38. Click on IGNORE (Ignore All).
39. Type: his name George. he is eating
40. Press the ENTER key.
41. Sometimes the computer will automatically change the first letter
of a sentence to a capital letter.
Look at the last two sentences. Is the first letter capitalized?
If not, capitalize his and he.
42. Click on the Spelling and Grammar
Check button.
43. “His name George.” is a fragment. It
is not a complete sentence.
Click between “name” and “George.”
44. Type: is
45. Click on CHANGE.

30
46. When the spell check is complete, Click on OK.
47. Spell check cannot find all mistakes. There is still a problem with the last sentence.
Every sentence should have a period at the end of the sentence.
Click after the word “eating” Type a period.
48. Type: Please turn on the lamb.
49. Press the ENTER key. There are no red or green lines. But there is a problem.
50. The correct word is lamp NOT lamb.
The computer did not show a red line under the word because lamb is in the English
dictionary. But it is not the correct word for this sentence.
51. Erase the word “lamb.” Type: lamp.
52. Remember, spelling and grammar check is very useful but you still need to look
carefully at what you type and use your brain!
53. Ask a teacher to check your work. They will sign in this box.
54. Close the document. Do not save.

31
Microsoft Word: Exercise 4
This is Azeb. She is an English student.
You will help Azeb fix the mistakes in her homework.
Follow the directions below to open her homework.
1. Open your Internet browser
(like Internet Explorer).
2. Click on the website address.
3. Press the DELETE key.
4. Type this website address:
www.teacherweb.com/mn/MLC/aces
5. Click on COMPUTER EXERCISE FILES.
6. Click on MY NAME IS AZEB.
7. Click on SAVE.

32
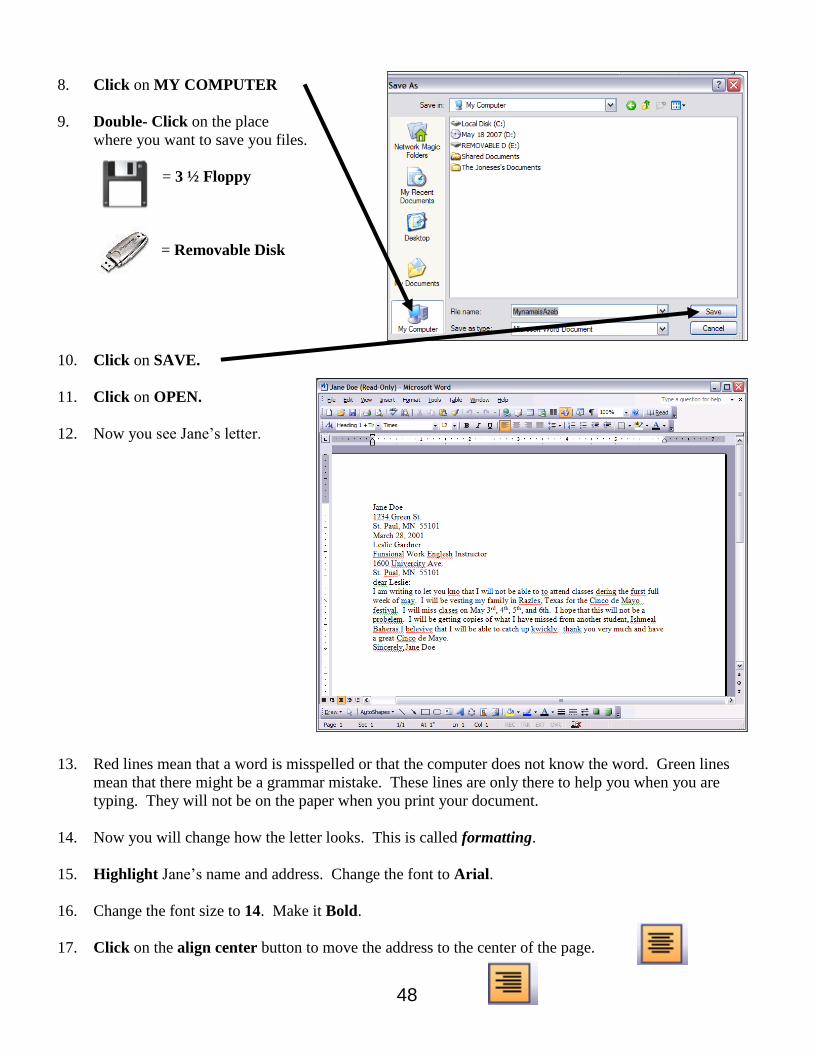
8. Click on MY COMPUTER.
9. Double- Click on the place
where you want to save you files.
= 3 ½ Floppy
= Removable Disk
10. Click on SAVE.
11. Click on OPEN.
This is Azeb’s English homework.
There are a few mistakes.
Follow the directions to correct the mistakes in
Azeb’s homework.
12. See the red lines. These words
might be spelling mistakes.
33
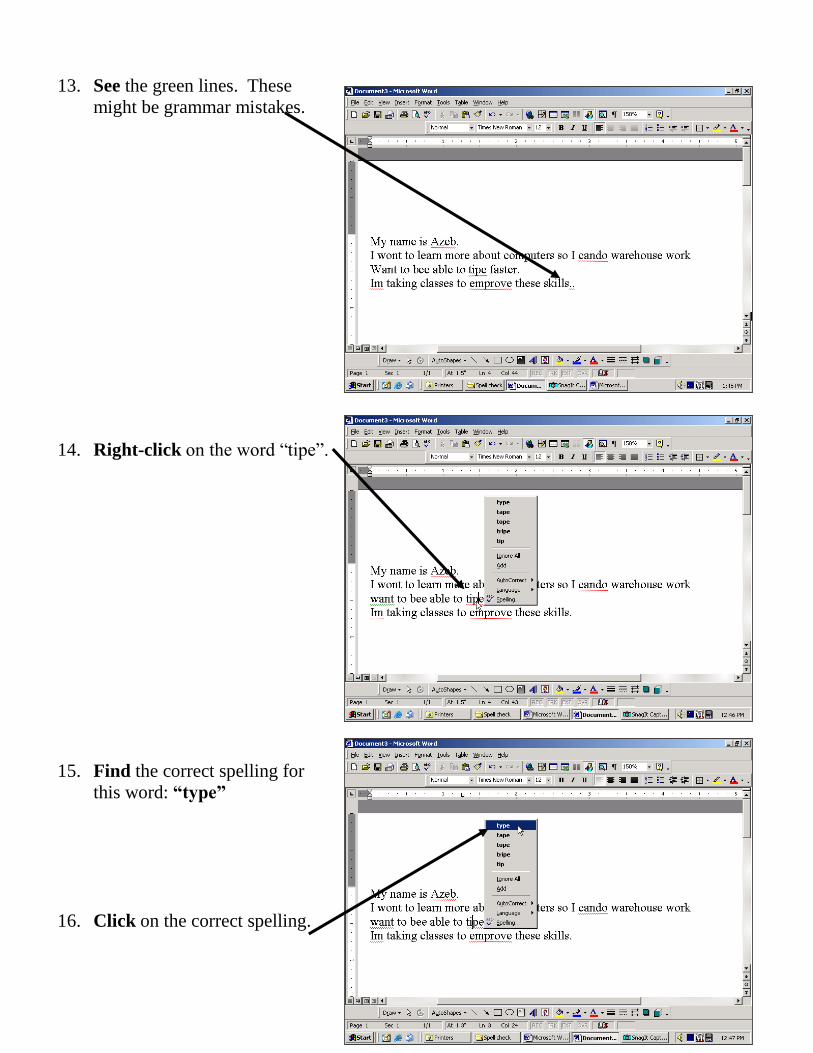
13. See the green lines. These
might be grammar mistakes.
14. Right-click on the word “tipe”.
15. Find the correct spelling for
this word: “type”
16. Click on the correct spelling.

34
17. Click in front of the word “My”.
18. Click on the Spell Check button.
19. Look at the red word.
Is this a mistake? __________
20. Click on the IGNORE button.
21. Look at the red word.
Is this a mistake? __________
22. See that the correct spelling is
not on the list.
23. In the spell check box, Click
between the words can and do.
24. Press the space bar to add a
space.

35
25. Click on CHANGE.
26. Look at the red word.
Is this a mistake? __________
27. Click on the correct spelling.
28. Click on CHANGE.
29. Look at the next red word.
Is this a mistake? __________
30. Click on the correct spelling.
31. Click on CHANGE.
36
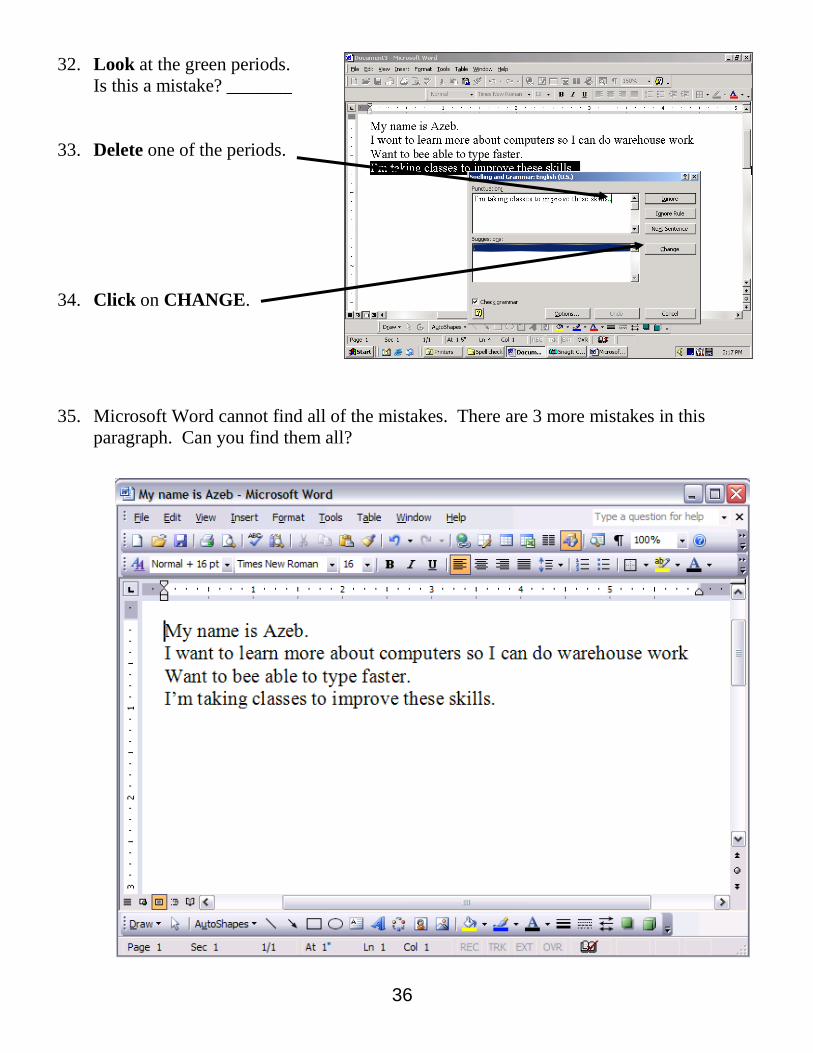
32. Look at the green periods.
Is this a mistake? _______
33. Delete one of the periods.
34. Click on CHANGE.
35. Microsoft Word cannot find all of the mistakes. There are 3 more mistakes in this
paragraph. Can you find them all?

37
36. Did you find all the mistakes?
37. Do you know what changes need to be made? Correct all the mistakes.

38
38. Check your work. Did you make these corrections?
39. Save this on your disk. Name it Word 3.
40. Have a teacher check you work. They will sign in this box.
41. Open a new document.
42. Type 4 sentences about yourself.
43. Use spell check to correct any mistakes.
44. Save it on your disk.
45. Have a teacher check your work again. They will sign in this box.

39
Microsoft Word: Exercise 5
You DO NOT need to use the computer for this exercise. You DO need a pencil or a pen. INSTRUCTIONS: On each spell check window circle IGNORE if it is not a mistake, or CHANGE if it is a mistake.
This is a mistake: This is not a mistake:

40

41

42

43

44

45

46
Ask a teacher to check your work. They will sign in this box.

47
Microsoft Word: Exercise 6 This is Jane Doe. Jane is going on vacation.
She wrote a letter to her teacher about her vacation.
The letter has many spelling and grammar mistakes.
In this exercise, you will download Jane’s letter from the Internet.
You will fix the spelling and grammar mistakes and format the
letter to make it look better.
To start, follow the step-by-step instructions.
1. Open your Internet browser
(like Internet Explorer).
2. Click on the website address.
3. Press the DELETE key.
4. Type this website address:
www.teacherweb.com/mn/MLC/aces
5. Click on
COMPUTER EXERCISE FILES.
6. Click on JANE DOE.
7. Click on SAVE.
48
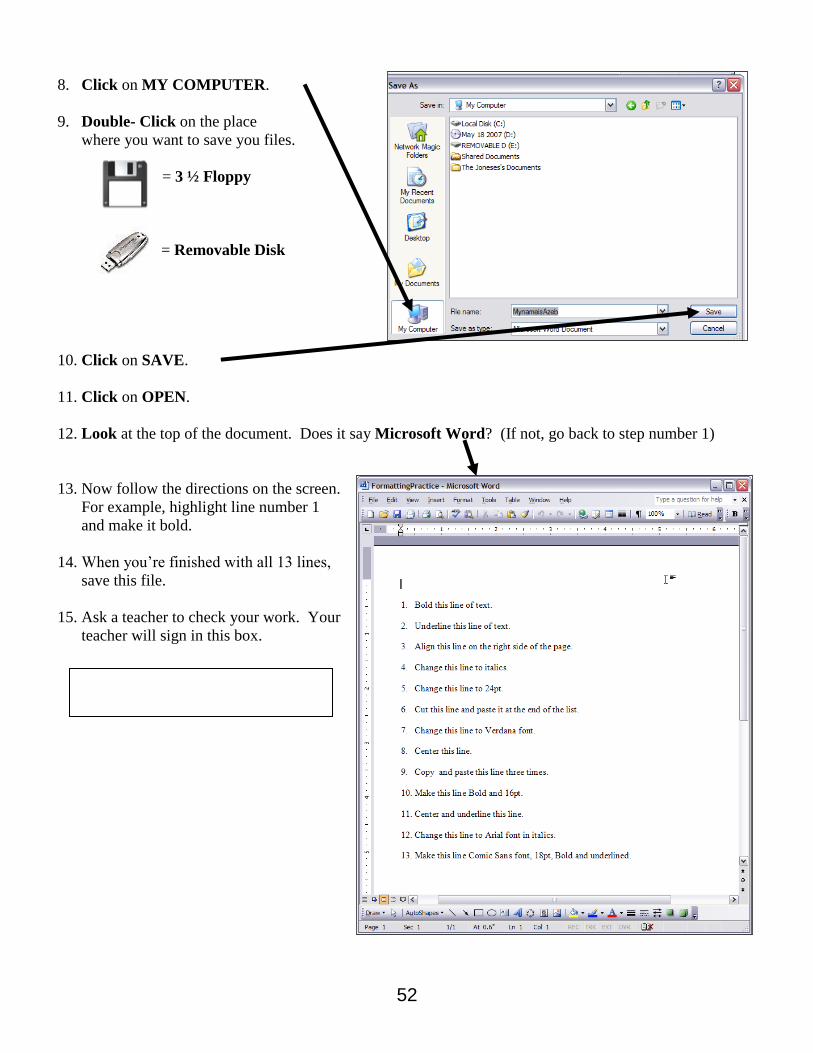
8. Click on MY COMPUTER
9. Double- Click on the place
where you want to save you files.
= 3 ½ Floppy
= Removable Disk
10. Click on SAVE.
11. Click on OPEN.
12. Now you see Jane’s letter.
13. Red lines mean that a word is misspelled or that the computer does not know the word. Green lines
mean that there might be a grammar mistake. These lines are only there to help you when you are
typing. They will not be on the paper when you print your document.
14. Now you will change how the letter looks. This is called formatting.
15. Highlight Jane’s name and address. Change the font to Arial.
16. Change the font size to 14. Make it Bold.
17. Click on the align center button to move the address to the center of the page.

49
18. Highlight the date. Click on the align right button.
19. Click in front of “dear Leslie”.
20. Press the ENTER key. This moves the words down.
21. Use the Enter key to make spaces between the lines as shown below:
22. Highlight the text from the date to the end of the letter. Change the font to Arial 12pt.
23. Highlight the words May 3rd
, 4th
, 5th
, and 6th
. Underline them.
24. Move the cursor to the beginning of the document.
25. Click on the Spelling and Grammar Check button.
26. For each mistake, click on CHANGE or IGNORE.
27. Finish the Spelling and Grammar Check now.
28. After you finish the spell check look for other words in your letter that might still be spelled wrong.
Do you see the word vesting? This word is not correct. It should be visiting. Spell check did not mark
this mistake because this is an English word but it is not correct in this sentence. Please change it now.
29. Highlight the word Sincerely at the bottom of your letter.
30. Click on TOOLS, Click on LANGUAGE then THESAURUS.
31. A Thesaurus is a book, like a dictionary. A Thesaurus helps you find
words that mean the same thing or similar to the word you have
highlighted. Microsoft Word can help you find similar words.

50
32. Choose a new word to replace “Sincerely.”
If you see an arrow, click on the arrow, click on INSERT.
33. Click on the Print Preview button.
You can see what the letter will look like
when you print it on paper.
34. Your document should look like the one below.
Jane Doe
1234 Green St. St. Paul, MN 55101
March 28, 2003
Leslie Gardner Functional Work English Instructor 1600 University Ave. St. Paul, MN 55101 Dear Leslie: I am writing to let you know that I will not be able to attend classes during the first full week of May. I will be visiting my family in Razles, Texas for the Cinco de Mayo festival. I will miss classes on May 3rd, 4th, 5th, and 6th. I hope that this will not be a problem. I will be getting copies of what I have missed from another student, Ishmeal Baheras. I believe that I will be able to catch up quickly. Thank you very much and have a great Cinco de Mayo. Truly, Jane Doe
35. Save this document on your disk.
36. Ask a teacher to check you work. Your teacher will sign in this box.

51
Microsoft Word: Exercise 7 In this exercise, you will practice what you have learned so far. You will download a
document from the Internet. You will highlight each line and follow the directions in that
line.
To start, follow the step-by-step directions.
1. Open your Internet browser
(like Internet Explorer).
2. Click on the website address.
3. Press the DELETE key.
4. Type this website address:
www.teacherweb.com/mn/MLC/aces
5. Click on
COMPUTER EXERCISE FILES.
6. Click on FORMATTING PRACTICE.
7. Click on SAVE.
52
8. Click on MY COMPUTER.
9. Double- Click on the place
where you want to save you files.
= 3 ½ Floppy
= Removable Disk
10. Click on SAVE.
11. Click on OPEN.
12. Look at the top of the document. Does it say Microsoft Word? (If not, go back to step number 1)
13. Now follow the directions on the screen.
For example, highlight line number 1
and make it bold.
14. When you’re finished with all 13 lines,
save this file.
15. Ask a teacher to check your work. Your
teacher will sign in this box.

53
Microsoft Word: Exercise 8
Your boss needs a schedule of your classes and other activities so that she can decide who
should work each shift. In this exercise, you will learn how to make a table with many
boxes. You will type your weekly activities in this table.
To start, follow the step-by-step instructions.
1. Open a new Microsoft Word document.
2. On the menu bar, Click on TABLE.
3. Click on INSERT TABLE.
4. Change the number of columns to 7 and the
number of rows to 2. Click on OK.
5. Highlight the top row of cells. Click here and Drag to here.
Sunday Monday Tuesday Wednesday Thursday Friday Saturday
54
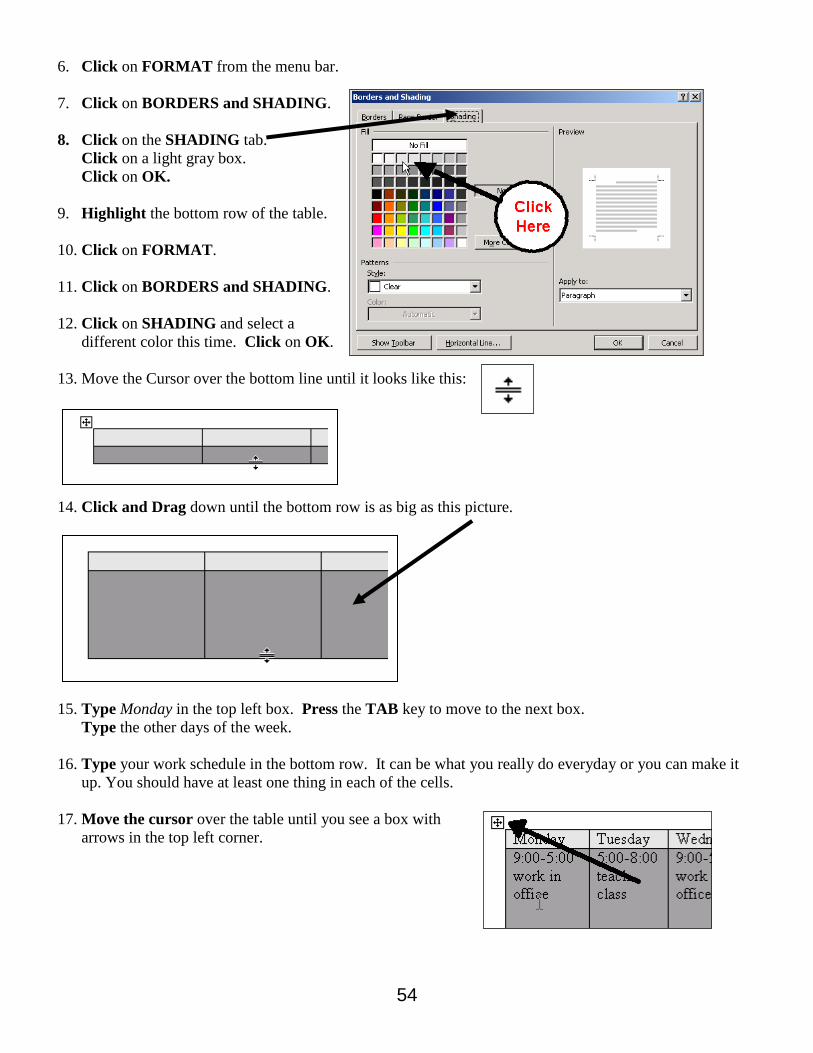
6. Click on FORMAT from the menu bar.
7. Click on BORDERS and SHADING.
8. Click on the SHADING tab.
Click on a light gray box.
Click on OK.
9. Highlight the bottom row of the table.
10. Click on FORMAT.
11. Click on BORDERS and SHADING.
12. Click on SHADING and select a
different color this time. Click on OK.
13. Move the Cursor over the bottom line until it looks like this:
14. Click and Drag down until the bottom row is as big as this picture.
15. Type Monday in the top left box. Press the TAB key to move to the next box.
Type the other days of the week.
16. Type your work schedule in the bottom row. It can be what you really do everyday or you can make it
up. You should have at least one thing in each of the cells.
17. Move the cursor over the table until you see a box with
arrows in the top left corner.

55
18. Move the cursor over this box until it also looks like four arrows.
19. Click and Drag down until you see the dotted outline. When you let go, the table should have moved
down on the page.
20. Double Click above the table to put the cursor there.
21. Click on the CENTER button.
22. Type the words WEEKLY SCHEDULE above the table.
23. Change the font and font size to something that you like.
24. Spell check your document.
25. Save the document on your disk.
26. Ask a teacher to check your work. The teacher will sign in this box.

56
Microsoft Word: Exercise 9
1. Open a new Microsoft Word document.
2. Click on the right alignment button on the toolbar.
3. Type today’s date.
4. Now Move the cursor to the center of the page a few lines below the date. The cursor should have
several small lines next to it. As you move the cursor from the right to the left the lines will change
to show how the program will align the text if you click there.
5. When the cursor looks like this, Double-click.
6. Type the words Chocolate Chip Cookies. See that the title is aligned to the center.
7. Press the ENTER key twice.
8. Click on the LEFT ALIGNMENT button on the toolbar.
9. Type this list of ingredients:
½ cup Lard
½ cup Butter
2 ½ cups All Purpose Unbleached Flour
¾ cup White Sugar
¾ cup Packed Brown Sugar
2 Eggs
1 tsp. Vanilla
½ tsp. Baking Soda
¾ Bag of Milk Chocolate Chips

57
10. Press the ENTER key two times.
11. Type these directions:
Directions: Mix the Lard and Butter until creamy. Mix in some of the flour (about half), the
brown sugar, white sugar, eggs, vanilla, and baking soda. Stir until ingredients are thoroughly
mixed, then blend in the remaining flour. Add chocolate chips and stir. Drop by spoonfuls
onto an ungreased baking sheet. Bake at 375 degrees for 8-10 minutes, then enjoy!
12. Highlight just the ingredients.
13. Click on the FORMAT menu.
14. Click on COLUMNS.
15. Click on the picture of two columns.
16. Click on OK.
17. The ingredients should be in two columns. Like this:

58
18. Now you will indent the paragraph of directions. First Look at the picture below to see what an
indent looks like.
19. Highlight the paragraph of baking directions.
20. Look for the indenting symbols in the top left corner
of the screen. They look like this:
21. Click and Drag the top triangle until it is over the
number 1 on the ruler. See how the paragraph
changed.
22. Click on the undo button.
23. Now Click and Drag the bottom triangle until it is under the number 1 on the ruler. See how the
paragraph changed.
24. Click on the UNDO button.
25. Now Click and Drag the bottom square until it is under the number 1 on the ruler. See how the
paragraph changed.
26. Look on the right side of the ruler for another triangle. Click and Drag this triangle until it is under
the number 5 on the ruler.
27. Now Click and Drag the top triangle on the left until it is between the number 1 and number 2 on the
ruler.

59
28. Check your work. Your document should look like this:
29. Highlight the title Chocolate Chip Cookies. Bold and Underline the title.
30. Save this document on your disk.
31. Ask a teacher to check your work. Your teacher will sign in this box.

60
Microsoft Word: Exercise 10
1. Open a new Word Document.
2. Type the following sentences on three separate lines:
This is a dog.
This is a hog.
This is a log.
3. Highlight all three sentences. Click on the bullet button on the toolbar.
4. Now you will change how the bullets look. Click on the FORMAT menu.
5. Click on BULLETS and NUMBERING.
6. Click on the BULLETED tab. Click on the picture of the square bullets.
7. Click on OK.
8. Click on the FORMAT menu again. Go to the bullet menu again.
9. Click on CUSTOMIZE.
10. Click on the BULLET button.
11. Click on any of the small pictures. When you find one you like Click on OK.
12. Click on the FONT button. Change the font size to 16. This will only change the size of the bullet.
13. Click on OK. Click on OK again. Notice that the bullets are a different shape and size.
14. Place the cursor at the end of the first line and Press the ENTER key 4 times. Do this after the second
line also.

61
15. Now you will insert a picture of a dog. Click on the INSERT menu. Click on PICTURE. Then Click
on CLIP ART.
16. Type DOG in the search box.
17. Click on a picture of a dog.
18. Click on the picture in your Word document. You will see a box
around it.
19. Move the cursor over the corner of the picture
until it looks like an arrow.
20. Move the Mouse to make the picture smaller.
21. Now Click and Drag from the picture to the end of the word dog.
The cursor will look like a dotted line. Look at the example below.
22. Click between the picture and the word Dog. Press the TAB key 2 times.

62
23. Check your work. It should look like this:
24. Click below “This is a dog.”
25. Click on the little arrow next to the Outside Border button on the toolbar.
26. Click on the Horizontal Line button.
27. Save this document on your disk.
28. Repeat the steps you have learned.
Insert pictures for “Hog” and “Log”.
29. Insert a line between each picture.
30. When you are done Save and Print one copy.
31. Ask a teacher to check your work. Your teacher will sign in this box.

63
Microsoft Word: Exercise 11
1. Open the program MICROSOFT WORD.
2. Click on the HELP menu. Click on MICROSOFT OFFICE WORD HELP.
3. You will see a search box.
You can type a question in the white box and Microsoft
Word will try to find an answer.
The best way to write your question is to use only one or
two words.
4. Click in the white box.
5. Type the words draw a circle.
Click on SEARCH or Press ENTER.
6. Microsoft Word will show all the topics that it
thinks could help you. Each one of these is a link.
If you click on it you will be able to see more
information.
7. Click on CREATE A DRAWING to see the
directions for adding a circle.
8. You will see directions like these:

64
9. Some of the words in these instructions are links to more information. The links are blue. Click on the
blue word TOOLBAR. You will see more information about toolbars. Click in a blank area to make it
go away.
10. Click on the word TIP to show more information.
11. Read the Microsoft Word Help directions. Then Practice adding a circle and a square to your blank
document.
12. If your directions disappear while you are working on the circle, Click on the MICROSOFT WORD
HELP box at the bottom of the screen.
13. Microsoft Word Help directions are not easy. If you are having problems, try reading all the directions 2
or 3 times before you try to draw the circle.
14. When you are done adding a circle and a square, ask a teacher to check your work. Your teacher will
sign in this box.
15. Click on the MICROSOFT WORD HELP box at the bottom of the screen.
16. Think of something you’d like to search for.
17. Type your words in the search box. Press ENTER.
18. Choose on of the topics and read the directions.
19. Try to follow the help directions. Use the directions to make something you can show your teacher.
20. Ask a teacher to check your work. Your teacher will sign in this box.
21. You do not need to save.

65
Microsoft Word: Exercise 12
1. Open the program MICROSOFT WORD.
2. Click on the TOOLS menu.
3. Click on LETTERS and MAILINGS then Click on ENVELOPES AND LABELS.
4. Click on the LABELS tab. Type your address in the large filed below ADDRESS.
5. Click in the circle next to the words FULL PAGE OF THE SAME LABEL.
6. There are many different sizes and shapes of labels. You
must choose the one you want. Look on the sheet of labels
for the name and number.
7. Click on OPTIONS.

66
8. Select the brand name in the area next to LABEL PRODUCT.
9. Select the label number in the
area next to PRODUCT
NUMBER.
10. Click on OK.
11. Click on NEW
DOCUMENT.
12. You will see your labels. You will have many labels that all look the same. If you want to change
anything you can Click on the text and Type just like a normal Word document.
13. Save your document.
14. Ask your teacher to show you how to put the sheet of labels into the printer.
15. Click on PRINT. Ask a teacher to check your work. Your teacher will sign in this box.
16. Now you will make many different labels. Click on the TOOLS menu. Click on ENVELOPES
AND LABELS.
17. Click on the LABELS tab. The address field should be blank. Erase any words in this field.
18. Click in the circle next to the words FULL PAGE OF THE SAME LABEL.
19. Click on OPTIONS.
20. Select the brand name in the area next to LABEL PRODUCT.
21. Select the label number in the area next to PRODUCT NUMBER.

67
22. Click on OK. Click on NEW DOCUMENT. You will see a page of blank labels.
23. Click in the first label. Type your address.
24. Press the TAB key 2 times to move to the next label. Type your friend’s address.
25. Type a few more addresses. Save this document.

68
26. Now you will print an address on an envelope. Go to the ENVELOPES AND LABELS window
again. Click on the ENVELOPES tab.
27. Type the address you want to send to in the field marked DELIVERY ADDRESS.
28. Type your address in the field marked RETURN ADDRESS.
29. Click on OPTIONS. Under Delivery Address Click on FONT. In this window you can format the
delivery address. Click on OK.
30. Under Return Address Click on FONT. In this window you can format the return address. Click on
OK. Click on OK again.
31. Look at the picture of the envelope with the arrow. This picture shows you how to put the envelope
in the printer.
32. Try putting the envelope in the printer as the picture shows. Ask your teacher if you are correct.
33. Click on PRINT. Check your work. Does the envelope look correct?
34. Ask a teacher to check your work. Your teacher will sign in this box.

69
35. Now you will write a letter and make an envelope to go with the letter. Open a new Word document.
36. Type a letter to a member of your government (Senator, Representative, Mayor, President, etc.) Tell
him or her about a problem you’d like them to fix.
37. Ask a teacher to help you find the address to send your letter. They can find the address on the
Internet.
38. Use what you have learned about envelopes to make an envelope for this letter. When you are done
DO NOT print.
39. Click on ADD TO DOCUMENT.
40. You will see your envelope and then the letter. Now every time you want to print this letter you can
also print an envelope for it.
41. Save this document.
42. Ask a teacher to check your work. Your teacher will sign in this box.
43. Print your envelope and letter.

70
What is Microsoft PowerPoint?
Why Would I Want to Use PowerPoint?
PowerPoint is a presentation software program that is part of the Microsoft Office group of programs.
Many people have seen a PowerPoint presentation before but don’t even realize it. PowerPoint presentations use pictures and text to help illustrate what you’re talking about. PowerPoint is usually used with a projector so that everyone in the room can see your presentation at the same time.
PowerPoint is widely used in business and classrooms and is an effective tool when used for training purposes. A PowerPoint presentation is sometimes called a slideshow. While you are talking, a slideshow gives listeners something to look at. The text and pictures in a slideshow can help listeners better understand and remember what you’re talking about.
Presentations made with PowerPoint can be simple or elaborate. If you are a beginner or don’t have a lot of time you might want to use a PowerPoint template. Templates are presentations that already include beautiful backgrounds and fonts. You only need to add the text and pictures that relate to your presentation. On the other hand, you can create presentations from scratch without the help of the computer. You can add animation, sound, and even video.
So, why would you use PowerPoint? It is easy to use and offers attractive designs. Having something to look at during your presentation can help your listeners understand and remember the content. All in all, PowerPoint is a useful program for anyone who gives frequent presentations.

71
Microsoft PowerPoint Exercise
In this exercise, you will create a presentation about yourself. You will show your
presentation to the class.
As you type your information, think about what you will say when you present. You should
NOT read exactly what you have typed. You should type short sentences or phrases that you
will talk about during your presentation.
To start, follow the step-by-step instructions.
1. Open MICROSOFT POWERPOINT from the Start menu.
SLIDE 1
2. You will see a blank first slide. It has two text boxes. Click in the top box and Type your name.
3. Click in the bottom box and Type a title for your
presentation. You are now finished with your first slide.
SLIDE 2
4. Click on INSERT from the Menu bar.
5. Click on NEW SLIDE from the dropdown menu.
6. On the right side, place the mouse over each slide layout to
see the name. Click on the slide TITLE and 2 COLUMN
TEXT.

72
7. You will see a blank slide with three text boxes.
8. Click in the top box and Type the words About My Family.
9. Click in the bottom left text box and Type any information about your family that you would like to
include. Between each piece of information, Press the ENTER key. When the left text box fills up,
Click in the right text box and continue to type information about your family.
SLIDE 3
10. Click on INSERT from the Menu bar.
11. Click on NEW SLIDE from the dropdown menu.
12. You will see the NEW SLIDE Window. Scroll Down until
you see OTHER LAYOUTS on the right side of the screen.
Click on the slide called TITLE, CLIP-ART and TEXT.
13. You will see a blank slide with two text boxes and a picture
box. Click in the top box and Type the words My Work
History.
14. Click in the bottom text box and Type any information about
your work history that you would like to include. Between
each piece of information, Press the ENTER key.
15. Save your work now.
16. Now it’s time to put a picture in your presentation. There are two ways you can add a picture.
Choose one of the boxes on this page. Follow the directions below:
Using Microsoft Clipart
1. Double click in the Clip Art box.
2. Type a word in the search box.
3. Press ENTER
4. Once you find a picture you like, click on the picture.
Using Internet Images
1. Open INTERNET EXPLORER but don’t close PowerPoint.
2. Go to www.google.com
3. Click on the IMAGES tab.
4. Search for a word that describes the picture you are looking for.
5. Right click on the picture that you like.
6. Click on COPY.
7. Now go back to your PowerPoint presentation.
8. Click the box where you want to put the picture.
9. Click on the Paste button.

73
SLIDE 4
17. Click on INSERT from the Menu bar.
18. Click on NEW SLIDE from the dropdown menu.
19. Look for OTHER LAYOUTS on the right side of the screen. Click on the slide called TITLE,
TEXT and CLIP-ART.
20. You will see a blank slide with two text boxes and one picture box.
21. Click in the top box and Type the words My Interests.
22. Click in the bottom text box and type any information about your interests that you would like to
include. Between each piece of information, Press the ENTER key.
23. Add a picture in the clip art box. (Instructions are on the previous page)
SLIDE 5
24. Click on INSERT from the Menu bar.
25. Click on NEW SLIDE from the dropdown menu.
26. Look for OTHER LAYOUTS on the right side of the screen. Click on the slide called TITLE,
CLIP-ART and TEXT.
27. You will see a blank slide with two text boxes and a Clip Art box.
28. Click in the top box and Type the words Goals For The Future.
29. Click in the bottom text box and Type any information about your goals for the future that you
would like to include. Between each piece of information, Press the ENTER key.
30. Insert a picture in the clip art box. SLIDE 6
31. Click on the INSERT menu.
32. Click on NEW SLIDE.
33. Choose a layout from the menu on the right side.
34. Choose a topic for this slide. It should be something about your. Type the topic in the top box.
35. Add text and images for this slide.
36. Click on the SPELLING and GRAMMAR CHECK button.
37. Complete the spelling and grammar check.
38. Read the presentation again to look for other mistakes.

74
Formatting Your Presentation
1. Click on the FORMAT menu. Click on SLIDE DESIGN.
2. On the right side of the screen, Click on any design example to see how it looks on your presentation.
3. Scroll Down to see more design examples. Select the design you like the most.
4. Now you will format the text in your presentation. Click on the picture of slide 1 on the left side of
the screen.
5. Highlight the text in the first box.
6. Click on the FORMAT menu and Click on FONT.
7. In this window you can change the font, font size, and font color.
8. By checking the boxes in the left corner you can try special effects like shadows or embossing
(makes the letters look like they stick out).
9. When you are done making changes Click on OK.
10. Change one piece of text on each slide.

75
11. Now you will add animation to your presentation slideshow.
Animation makes the words and pictures move on the screen.
Click on the SLIDE SHOW menu. Select ANIMATION
SCHEMES.
12. On the left side, Click on slide number 1.
13. On the right side, each word or phrase is a different way
to move the words and pictures on the page.
Click on any of the words.
14. Scroll Down. Click on several different
animation schemes.
15. When you find the one you like, Click on slide number 2.
16. Choose an animation scheme for each slide.
17. Click on the SLIDE SHOW menu.
Select SLIDE TRANSITION.
18. On the right side, each word or phrase is a different way to
change to the next slide. Click on any of the words.
19. Select one that you like the best.
20. Click on APPLY to ALL SLIDES.
21. Save your presentation now.
22. Now you will see how the finished presentation will
look when you show it to the class. Click on
SLIDESHOW. Select VIEW SHOW.
23. Use spacebar or click with the mouse to show the next
piece of information.
24. Watch your entire presentation.
25. Correct any mistakes that you saw.
26. Click on SLIDE SHOW. Select VIEW SHOW.
27. Watch the presentation again.
This time think about what information you will tell the class when you show everyone your
presentation.

76
28. Ask a teacher to check your work. Your teacher will sign in the boxes below.
Presentation has at least 6 slides Presentation has at least 2 images Presentation has a background design Presentation has some formatted text Presentation has animation and slide transitions Presentation has no major spelling or grammar errors Student knows how to open the presentation to full-screen