conducting transfers in citss
TRANSCRIPT

User Guide - Volume III
Conducting Transfers in the CITSS
Compliance Instrument Tracking System Service
(CITSS)
December 2012
Sections of this User Guide have been Superseded. Please see inside cover.
September 2017
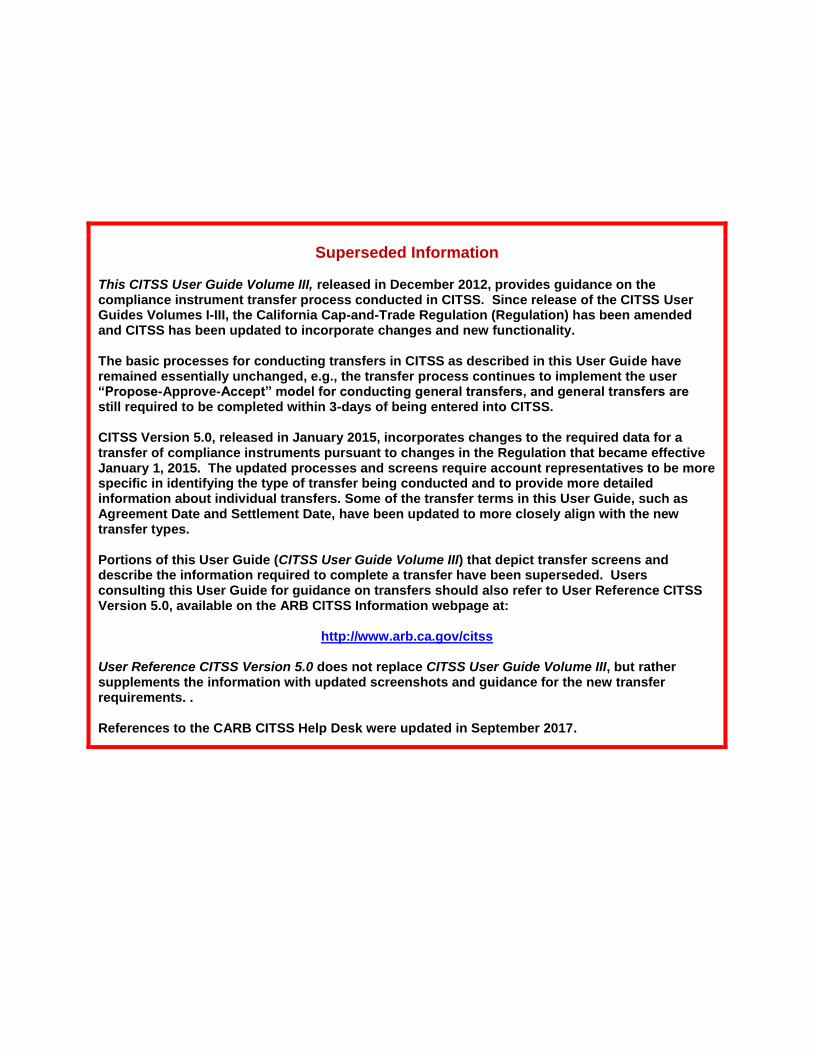
Superseded Information This CITSS User Guide Volume III, released in December 2012, provides guidance on the compliance instrument transfer process conducted in CITSS. Since release of the CITSS User Guides Volumes I-III, the California Cap-and-Trade Regulation (Regulation) has been amended and CITSS has been updated to incorporate changes and new functionality. The basic processes for conducting transfers in CITSS as described in this User Guide have remained essentially unchanged, e.g., the transfer process continues to implement the user “Propose-Approve-Accept” model for conducting general transfers, and general transfers are still required to be completed within 3-days of being entered into CITSS. CITSS Version 5.0, released in January 2015, incorporates changes to the required data for a transfer of compliance instruments pursuant to changes in the Regulation that became effective January 1, 2015. The updated processes and screens require account representatives to be more specific in identifying the type of transfer being conducted and to provide more detailed information about individual transfers. Some of the transfer terms in this User Guide, such as Agreement Date and Settlement Date, have been updated to more closely align with the new transfer types. Portions of this User Guide (CITSS User Guide Volume III) that depict transfer screens and describe the information required to complete a transfer have been superseded. Users consulting this User Guide for guidance on transfers should also refer to User Reference CITSS Version 5.0, available on the ARB CITSS Information webpage at:
http://www.arb.ca.gov/citss User Reference CITSS Version 5.0 does not replace CITSS User Guide Volume III, but rather supplements the information with updated screenshots and guidance for the new transfer requirements. . References to the CARB CITSS Help Desk were updated in September 2017.
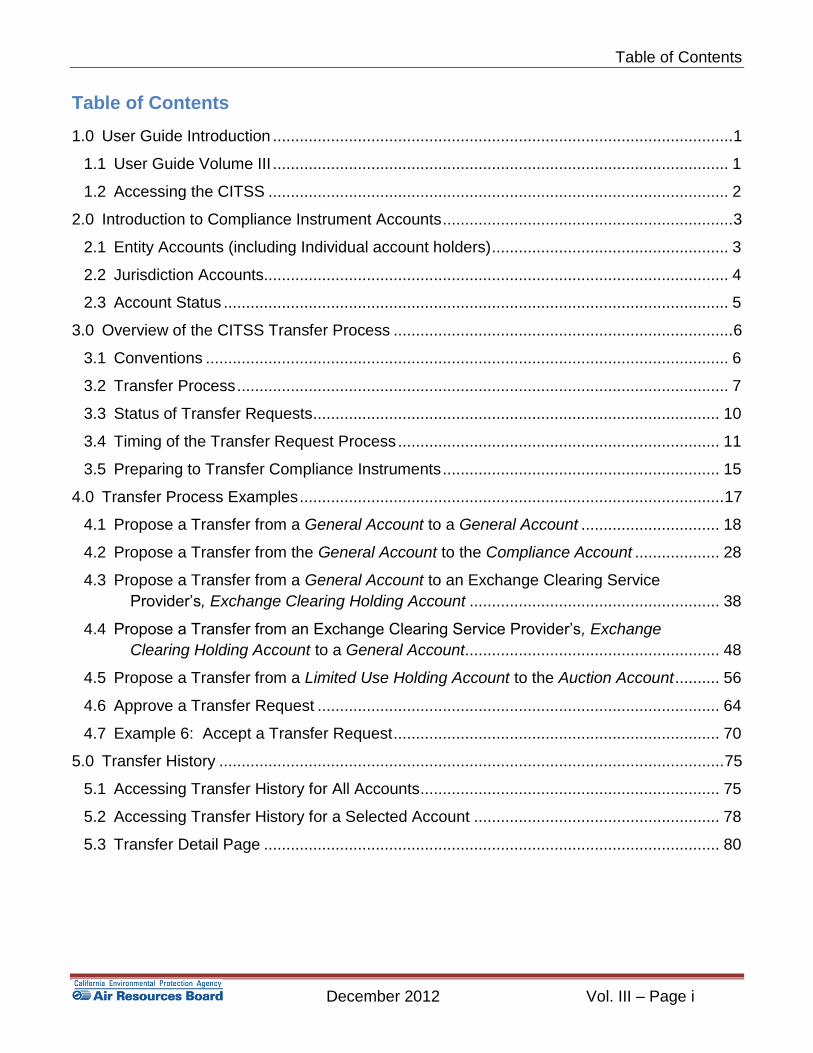
Table of Contents
December 2012 Vol. III – Page i
Table of Contents
1.0 User Guide Introduction ....................................................................................................... 1
1.1 User Guide Volume III ...................................................................................................... 1
1.2 Accessing the CITSS ....................................................................................................... 2
2.0 Introduction to Compliance Instrument Accounts ................................................................. 3
2.1 Entity Accounts (including Individual account holders) ..................................................... 3
2.2 Jurisdiction Accounts........................................................................................................ 4
2.3 Account Status ................................................................................................................. 5
3.0 Overview of the CITSS Transfer Process ............................................................................ 6
3.1 Conventions ..................................................................................................................... 6
3.2 Transfer Process .............................................................................................................. 7
3.3 Status of Transfer Requests ........................................................................................... 10
3.4 Timing of the Transfer Request Process ........................................................................ 11
3.5 Preparing to Transfer Compliance Instruments .............................................................. 15
4.0 Transfer Process Examples ............................................................................................... 17
4.1 Propose a Transfer from a General Account to a General Account ............................... 18
4.2 Propose a Transfer from the General Account to the Compliance Account ................... 28
4.3 Propose a Transfer from a General Account to an Exchange Clearing Service
Provider’s, Exchange Clearing Holding Account ........................................................ 38
4.4 Propose a Transfer from an Exchange Clearing Service Provider’s, Exchange
Clearing Holding Account to a General Account. ........................................................ 48
4.5 Propose a Transfer from a Limited Use Holding Account to the Auction Account .......... 56
4.6 Approve a Transfer Request .......................................................................................... 64
4.7 Example 6: Accept a Transfer Request ......................................................................... 70
5.0 Transfer History ................................................................................................................. 75
5.1 Accessing Transfer History for All Accounts ................................................................... 75
5.2 Accessing Transfer History for a Selected Account ....................................................... 78
5.3 Transfer Detail Page ...................................................................................................... 80

Table of Contents
Vol. III – Page ii December 2012
List of Figures
Figure 1 - CITSS Sign in Page .................................................................................................. 2
Figure 2 - CITSS User Home Page Showing Account Numbers ............................................. 15
Figure 3 - CITSS Account Page Showing Account Detail Button ............................................ 16
Figure 4 - CITSS Account Detail Page Showing Entity Reference Code ................................. 16
Figure 5 - CITSS User Home Page ......................................................................................... 19
Figure 6 - CITSS General Account Page ................................................................................. 21
Figure 7 - CITSS Select Type of Transfer Page ...................................................................... 23
Figure 8 - CITSS Propose Transfer from: General Account Page ........................................... 25
Figure 9 - CITSS Compliance Instrument Transfer Detail Page .............................................. 27
Figure 10 - CITSS User Home Page ....................................................................................... 29
Figure 11 - CITSS General Account Page ............................................................................... 31
Figure 12 - CITSS Select Type of Transfer Page .................................................................... 33
Figure 13 - CITSS Propose Transfer from: General Account Page ......................................... 35
Figure 14 - CITSS Compliance Instrument Transfer Detail Page ............................................ 37
Figure 15 - CITSS User Home Page ....................................................................................... 39
Figure 16 - CITSS General Account Page ............................................................................... 41
Figure 17 - CITSS Select Type of Transfer Page .................................................................... 43
Figure 18 - CITSS Propose Transfer from: General Account Page ......................................... 45
Figure 19 - CITSS Compliance Instrument Transfer Detail Page ............................................ 47
Figure 20 - CITSS User Home Page ....................................................................................... 49
Figure 21 - CITSS Exchange Clearing Holding Account Page ................................................ 51
Figure 22 - CITSS Propose Transfer from: Exchange Clearing Account Page ........................ 53
Figure 23 - CITSS Compliance Instrument Transfer Detail Page ............................................ 55
Figure 24 - CITSS User Home Page ....................................................................................... 57
Figure 25 - CITSS Limited Use Holding Account Page ........................................................... 59
Figure 26 - CITSS Propose Consignment Transfer: Limited Use Holding Account Page ........ 61
Figure 27 - CITSS Compliance Instrument Transfer Detail Page ............................................ 63
Figure 28 - CITSS User Home Page ....................................................................................... 65
Figure 29 - CITSS Compliance Instrument Transfer Detail Page ............................................ 67
Figure 30 - CITSS General Account Page ............................................................................... 69
Figure 31 - CITSS User Home Page ....................................................................................... 71
Figure 32 - CITSS Compliance Instrument Transfer Detail Page ............................................ 73
Figure 33 - CITSS General Account Page ............................................................................... 74
Figure 34 - CITSS User Home Page ....................................................................................... 75
Figure 35 - CITSS Transfer History for All Accounts ............................................................... 77
Figure 36 - CITSS Transfer History – Sample Excel Download (partial) ................................. 77
Figure 37 - CITSS General Account Page ............................................................................... 79
Figure 38 - CITSS Account Page –Transfers Tab ................................................................... 79
Figure 39 - CITSS Compliance Instrument Transfer Detail Page ............................................ 81

Table of Contents
December 2012 Vol. III – Page iii
List of Tables
Table 1. Type of Entity Accounts, by Entity Type ...................................................................... 4
Table 2. Three-Step Transfer Process ...................................................................................... 7
Table 3. Two-Step Transfer Process ......................................................................................... 7
Table 4. Timing Requirement to Report a Transfer Following the Settlement Date ................. 12
Table 5. Timing Requirements of the Transfer Process .......................................................... 12
Table 6. Transfer Process Settlement Date is Before a Transfer Request is Proposed .......... 13
Table 7. Transfer Process Settlement Date is After a Transfer Request is Proposed ............. 13
Table 8. Transfer Process Settlement Date is After a Transfer Request is Complete ............. 14
List of Acronyms
AAR Alternate Account Representative
ARB California Air Resources Board
AVA Account Viewing Agent
CITSS Compliance Instrument Tracking System Service
D&B Dun & Bradstreet
DOE U.S. Department of Energy
DUNS Data Universal Numbering System number
EDU Electrical Distribution Utility
EIA U.S. Energy Information Agency
ETS Emissions Trading System
GHG greenhouse gas
ID identification
KYC Know-Your-Customer
MRR Mandatory Reporting Regulation
MTCO2e metric tons carbon dioxide equivalent
NAICS North American Industry Classification System
ORIS Office of Regulatory Information Systems
PAR Primary Account Representative
POU Publicly Owned Utility
SOS California Secretary of State
WCI Western Climate Initiative

Table of Contents
Vol. III – Page iv December 2012
This Page Intentionally Blank
User Guide Introduction
December 2012 Vol. III - Page 1
Compliance Instrument Tracking System Service User Guide
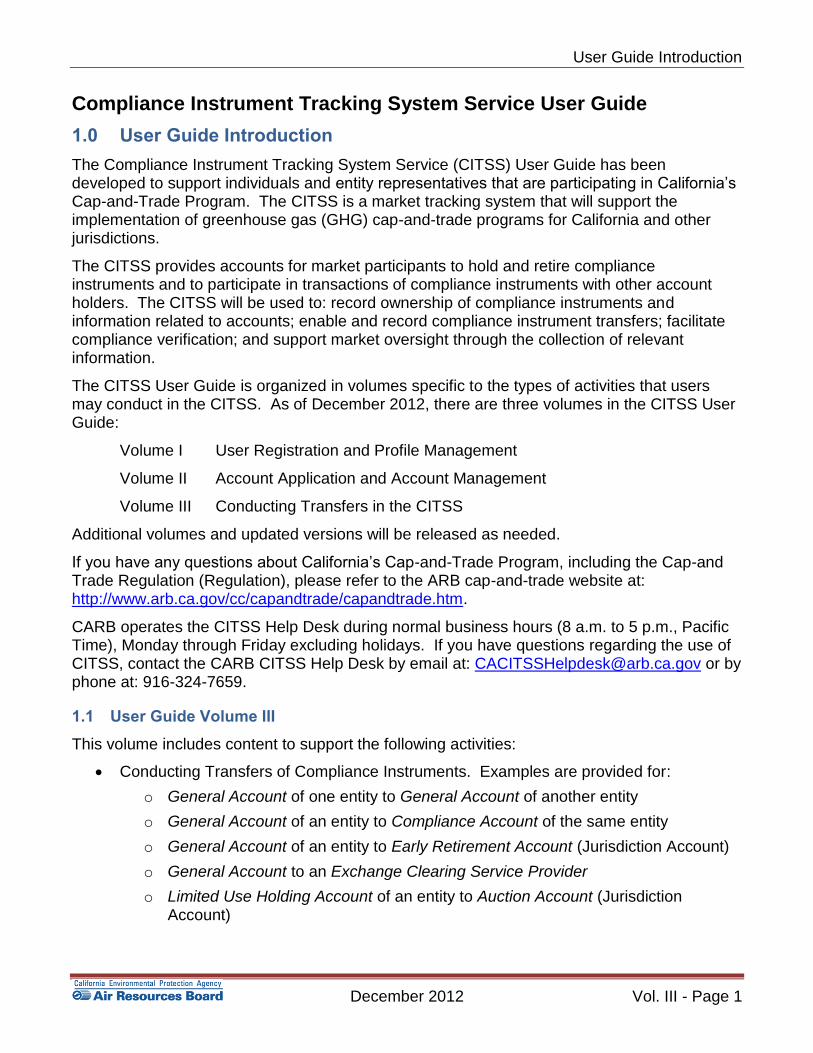
1.0 User Guide Introduction
The Compliance Instrument Tracking System Service (CITSS) User Guide has been developed to support individuals and entity representatives that are participating in California’s Cap-and-Trade Program. The CITSS is a market tracking system that will support the implementation of greenhouse gas (GHG) cap-and-trade programs for California and other jurisdictions.
The CITSS provides accounts for market participants to hold and retire compliance instruments and to participate in transactions of compliance instruments with other account holders. The CITSS will be used to: record ownership of compliance instruments and information related to accounts; enable and record compliance instrument transfers; facilitate compliance verification; and support market oversight through the collection of relevant information.
The CITSS User Guide is organized in volumes specific to the types of activities that users may conduct in the CITSS. As of December 2012, there are three volumes in the CITSS User Guide:
Volume I User Registration and Profile Management
Volume II Account Application and Account Management
Volume III Conducting Transfers in the CITSS
Additional volumes and updated versions will be released as needed.
If you have any questions about California’s Cap-and-Trade Program, including the Cap-and Trade Regulation (Regulation), please refer to the ARB cap-and-trade website at: http://www.arb.ca.gov/cc/capandtrade/capandtrade.htm.
CARB operates the CITSS Help Desk during normal business hours (8 a.m. to 5 p.m., Pacific Time), Monday through Friday excluding holidays. If you have questions regarding the use of CITSS, contact the CARB CITSS Help Desk by email at: [email protected] or by phone at: 916-324-7659.
1.1 User Guide Volume III
This volume includes content to support the following activities:
Conducting Transfers of Compliance Instruments. Examples are provided for:
o General Account of one entity to General Account of another entity
o General Account of an entity to Compliance Account of the same entity
o General Account of an entity to Early Retirement Account (Jurisdiction Account)
o General Account to an Exchange Clearing Service Provider
o Limited Use Holding Account of an entity to Auction Account (Jurisdiction Account)

User Guide Introduction
Vol. III - Page 2 December 2012
1.2 Accessing the CITSS
You can access the CITSS at https://www.wci-citss.org.
You can also find links to the CITSS on the ARB webpage at: http://www.arb.ca.gov/citss.
The CITSS Home Page (Figure 1) is the point of entry for any action in the CITSS. On the main CITSS page, you will click Login, enter your approved User ID and password and click Sign In to gain access to the secure content of the CITSS, including the ability to submit an account application, or a transfer request or act on a pending transfer request. Figure 1 - CITSS Sign in Page
General Guidelines:
The CITSS is compatible with the following web browsers: Internet Explorer 7, 8, and 9, Firefox, Safari, Chrome, or Opera. Certain functions will operate with slight differences, depending on the browser.
As a security measure, delete your browser history if multiple people can access the same computer used to create the CITSS account.
The CITSS is typically available for access 24 hours a day, 7 days a week (except for periodic maintenance).
CARB operates the CITSS Help Desk during normal business hours (8 a.m. to 5 p.m., Pacific Time), Monday through Friday excluding holidays. If you have questions regarding the use of CITSS, contact the CARB CITSS Help Desk by email at: [email protected] or by phone at: 916-324-7659.

Introduction to Compliance Instrument Accounts
December 2012 Vol. III - Page 3
2.0 Introduction to Compliance Instrument Accounts
The Compliance Instrument Tracking System Service (CITSS) tracks the status and ownership of compliance instruments (allowances and offsets) in the California Cap-and-Trade Program. The CITSS also tracks transactions (transfers) of compliance instruments within an entity’s accounts, between accounts of different entities, and between entities and jurisdiction accounts. Each entity in the CITSS is assigned accounts; the number and type of accounts depends on the type of entity or organization. In addition, ARB has several jurisdiction accounts that are used to administer the creation, allocation, surrender, and retirement of compliance instruments within the CITSS.
2.1 Entity Accounts (including Individual account holders)
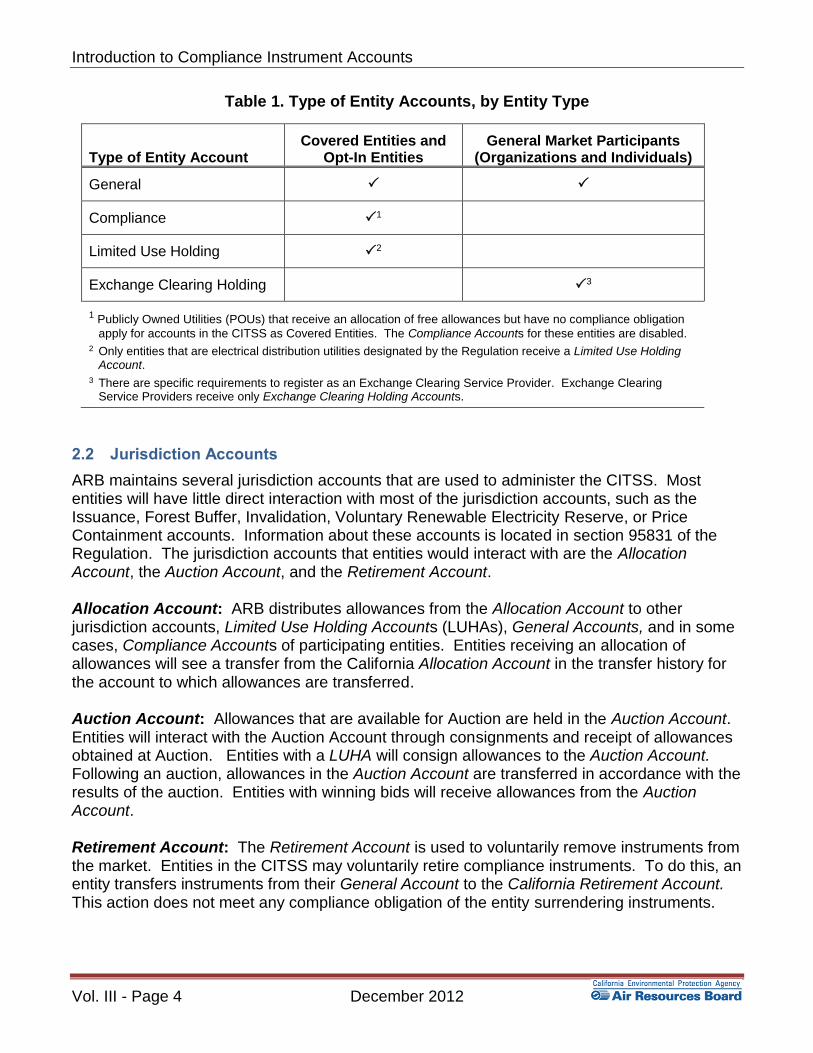
There are four types of accounts that can be assigned to an entity in the CITSS: a General Account (Holding Account in the Regulation), a Limited Use Holding Account, a Compliance Account, and an Exchange Clearing Holding Account. Each account type is described below. Accounts are assigned based on the type of entity. As explained below, no entity needs or could receive all four account types. Table 1 summarizes the types of accounts that can be assigned to each entity type.
General Account: A General Account is the most common type of account. Except for Exchange Clearing Service Providers, every entity in the CITSS has a General Account for holding compliance instruments. Routine transfers (buying/selling) of compliance instruments between entities occur between General Accounts. Allocations of free allowances to industrial entities typically are placed in the entities’ General Accounts. In the Regulation, the General Account is referred to as the Holding Account.
Compliance Account: Compliance Accounts are assigned only to Covered Entities and Opt-In Entities. A Compliance Account is used to surrender compliance instruments to the State of California to satisfy Cap-and-Trade Program compliance obligations. Publicly Owned Utilities (POUs) that receive an allocation of free allowances but have no compliance obligation apply for accounts in the CITSS as Covered Entities, and receive a Compliance Account. However, the Compliance Account for these entities is disabled in the CITSS.
Limited Use Holding Account: Only entities that are electrical distribution utilities (EDUs) designated by the Regulation receive a Limited Use Holding Account. Allocations of free allowances are in some cases issued into an EDU’s Limited Use Holding Account. Allowances placed in a Limited Use Holding Account can only be consigned to the California Auction Account. Owners of a Limited Use Holding Account should consult the Regulation regarding the requirements for consignment of allowances to Auction.
Exchange Clearing Holding Account: An Exchange Clearing Holding Account is issued to organizations voluntarily participating in the Cap-and-Trade Program to provide exchange clearing services. An entity providing clearing services takes only temporary possession of compliance instruments for the purpose of clearing transactions between two entities registered with the Cap-and-Trade Program. To qualify as a clearing services provider, an entity must be a derivatives clearing organization as defined in the Commodities Exchange Act (7 U.S.C. § 1a(9)) that is registered with the U.S. Commodity Futures Trading Commission pursuant to the Commodities Exchange Act (7 U.S.C. § 7a-1(a)).
Introduction to Compliance Instrument Accounts
Vol. III - Page 4 December 2012
Table 1. Type of Entity Accounts, by Entity Type
Type of Entity Account Covered Entities and
Opt-In Entities General Market Participants
(Organizations and Individuals)
General
Compliance 1
Limited Use Holding 2
Exchange Clearing Holding 3
1 Publicly Owned Utilities (POUs) that receive an allocation of free allowances but have no compliance obligation
apply for accounts in the CITSS as Covered Entities. The Compliance Accounts for these entities are disabled. 2 Only entities that are electrical distribution utilities designated by the Regulation receive a Limited Use Holding
Account.
3 There are specific requirements to register as an Exchange Clearing Service Provider. Exchange Clearing Service Providers receive only Exchange Clearing Holding Accounts.
2.2 Jurisdiction Accounts
ARB maintains several jurisdiction accounts that are used to administer the CITSS. Most entities will have little direct interaction with most of the jurisdiction accounts, such as the Issuance, Forest Buffer, Invalidation, Voluntary Renewable Electricity Reserve, or Price Containment accounts. Information about these accounts is located in section 95831 of the Regulation. The jurisdiction accounts that entities would interact with are the Allocation Account, the Auction Account, and the Retirement Account. Allocation Account: ARB distributes allowances from the Allocation Account to other jurisdiction accounts, Limited Use Holding Accounts (LUHAs), General Accounts, and in some cases, Compliance Accounts of participating entities. Entities receiving an allocation of allowances will see a transfer from the California Allocation Account in the transfer history for the account to which allowances are transferred. Auction Account: Allowances that are available for Auction are held in the Auction Account. Entities will interact with the Auction Account through consignments and receipt of allowances obtained at Auction. Entities with a LUHA will consign allowances to the Auction Account. Following an auction, allowances in the Auction Account are transferred in accordance with the results of the auction. Entities with winning bids will receive allowances from the Auction Account. Retirement Account: The Retirement Account is used to voluntarily remove instruments from the market. Entities in the CITSS may voluntarily retire compliance instruments. To do this, an entity transfers instruments from their General Account to the California Retirement Account. This action does not meet any compliance obligation of the entity surrendering instruments.

Introduction to Compliance Instrument Accounts
December 2012 Vol. III - Page 5
2.3 Account Status
There are seven status conditions that can be assigned to accounts by the Jurisdiction Registrar. The status of an account determines the ability to transfer compliance instruments into or out of the account. In addition, account status determines if information from the CITSS can be sent to the Auction Administrator to support the auction application process. The account status conditions are: Active: Typical account state; is able to send/receive instruments in accordance with all rules and regulations. Entity and representative registration data are included in the information provided to the Auction Administrator unless a representative of the entity indicates through the CITSS that the entity does not intend to participate in upcoming auctions. Restricted - Can't Transfer: Account is prevented from transferring compliance instruments but can still accept transfers. Entity and representative registration data is included in the information provided to the Auction Administrator unless a representative of the entity indicates through the CITSS that the entity does not intend to participate in upcoming auctions. Restricted - Can't Receive: Account is prevented from receiving any compliance instruments but can still send transfers to other accounts and entities. Entity and representative registration data are included in the information provided to the Auction Administrator unless a representative of the entity indicates through the CITSS that the entity does not intend to participate in upcoming auctions. Restricted - Can't Transfer or Receive: Account is prevented from both transferring and receiving compliance instruments. This status is also used to disable the Compliance Account for POUs that do not have a compliance obligation. Entity and representative registration data are included in the information provided to the Auction Administrator unless a representative of the entity indicates through the CITSS that the entity does not intend to participate in upcoming auctions. Suspended: Account is prevented from both transferring and receiving instruments. Entity and representative registration data are NOT included in the information provided to the Auction Administrator. Regulatory requirements and additional restrictions are in place for Suspended Accounts. Inactive: Used primarily for General Market Participant accounts that have not transferred compliance instruments for three years or more. Inactive accounts are prevented from both transferring and receiving instruments. Entity and representative registration data are NOT included in the information provided to the Auction Administrator. This status is not automatically set after a period of inactivity, but requires action to be taken by the Registrar. Closed: Closed accounts are prevented from both transferring and receiving compliance instruments. Entity and representative registration data are NOT included in the information provided to the Auction Administrator. The Registrar must manually change an entity’s status to Closed.

Transfer Process Examples
Vol. III - Page 6 December 2012
3.0 Overview of the CITSS Transfer Process The CITSS tracks the status and ownership of compliance instruments (allowances and offsets) in the California Cap-and-Trade Program. Transactions (transfers) of compliance instruments within an entity’s accounts, between accounts of different entities, and between entities and jurisdiction accounts are reported in the CITSS. 3.1 Conventions
The following are naming conventions used in describing the transfer process:
Transferring “Transferring” is used to describe the source of the compliance instruments, i.e., the entity or account from which funds are being transferred. Compliance instruments are moved from the transferring account to the receiving account.
Receiving “Receiving” is used to describe the entity or account into which the transferred compliance instruments are being moved, i.e., the recipient of the transfer. Compliance instruments are moved from the transferring account to the receiving account.
Transfer Request A transfer request tracks the progress of a transfer from proposal to completion. A representative of the transferring entity enters the information about a compliance instrument transaction into the CITSS to create a transfer request.
Agreement Date When a contract or other written agreement is prepared to facilitate a transaction, the agreement date is the date the agreement/contract is signed.*
Settlement Date When a contract or other written agreement is prepared to facilitate a transaction, the Settlement Date is the date that the agreement/contract is fulfilled.*
* Regardless of agreement or settlement date, the transfer of ownership occurs when the status of the transfer request in the CITSS is Complete.

Transfer Process Examples
December 2012 Vol. III - Page 7
3.2 Transfer Process
As shown in Table 2, the CITSS process to report the transfer of compliance instruments between entities requires three steps: Propose, Approve, and Accept.
Table 2. Three-Step Transfer Process
Transferring Entity Receiving Entity
(1) Propose
(2) Approve
(3) Accept
The following transfers are Completed using a two-step process, with no Acceptance required.
Transfers between different account types held by the same entity: o General Account to Compliance Account
Transfers to Jurisdiction Accounts: o General Account to Retirement Account o Limited Use Holding to Auction Account
Transfers to and From an Exchange Clearing Service Provider o General Account to Exchange Clearing Service Account o Exchange Clearing Service Account to General Account
Table 3. Two-Step Transfer Process
Transferring Entity
(1) Propose
(2) Approve

Transfer Process Examples
Vol. III - Page 8 December 2012
3.2.1 Transfer Process Steps
STEP 1: Propose
Propose - The Primary Account Representative (PAR) or one of the Alternate Account Representatives (AARs) of the transferring entity must prepare a transfer request in the CITSS by providing information about the transaction. Depending on the type of transfer being proposed, required information can include the number and type of instruments, information about the receiving entity and account, agreement and settlement date, and the price paid and currency type. After the required information is entered in the CITSS, the representative submits the transfer request, and the status of the request is set as Proposed. A Proposed transfer request will appear as a “Pending Transfer” on the home page of the PAR and AARs of the transferring entity only. An email indicating that a transfer request has been proposed is sent to the PAR and AARs of the transferring entity, indicating that a Proposed transfer request requires Approval. When a transfer request is proposed, the compliance instruments remain the property of the transferring entity and remain in the transferring entity’s account until the transfer request is Completed. However, the number of instruments proposed for transfer is subtracted from the transferring entity’s Available Account Balance to reflect their pending status. The difference between Account Balance and Available Account Balance is the number of instruments in pending transfers. The representative of the transferring entity that entered the initial transfer proposal can Cancel the Proposed Transfer prior to the second representative Approving the Proposed Transfer.
STEP 2: Approve/Deny
Approve - A representative of the transferring entity, who cannot be the same individual that proposed the transfer, must Approve the Proposed transfer request within two days of the Proposal or the transfer request will expire in the CITSS (refer to Section 3.3 for more information on timing requirements). Individual General Market Participants that have no AARs associated with their account can take both actions on a transfer request - Propose and Approve. If an Individual General Market Participant has AARs associated with their account, a second individual must Approve proposed transfers.
Upon completion of this step, the status of the transfer request will change to Approved. An email is sent to the representatives of the transferring and receiving entities informing them that the status of a transfer request has changed and providing the Transfer ID, Transfer Status, and accounts involved in the transfer.
Two-step transfers such as transfers within an entity’s accounts (General to Compliance) and transfers to a jurisdiction account (General to Retirement, LUHA to Auction) only require Proposal and Approval and are Completed when Approved by the second representative of the transferring entity. Transfers between entities require all 3 steps to be completed including an Acceptance from a representative of the receiving entity. In this case, following Approval by the second
Transfer Process Examples
December 2012 Vol. III - Page 9
representative of the transferring entity, the Approved transfer request appears as a “Pending Transfer” on the home page of the PAR and AARs of the receiving entity.
Deny - A representative of the transferring entity, who cannot be the same individual that
proposed the transfer, has the option to Deny a Proposed transfer request. Upon completion of this step, the status of the transfer request will change to Denied and the transfer will be shown only in the Transfer History of the transferring entity. An email is sent to the representatives of the transferring entity, informing them that the transfer was Denied. No notification is sent to the representatives of the receiving entity. When a transfer request is Denied, the compliance instruments remain in the transferring entity’s account, the number of instruments proposed for transfer is returned to the transferring entity’s Available Account Balance.
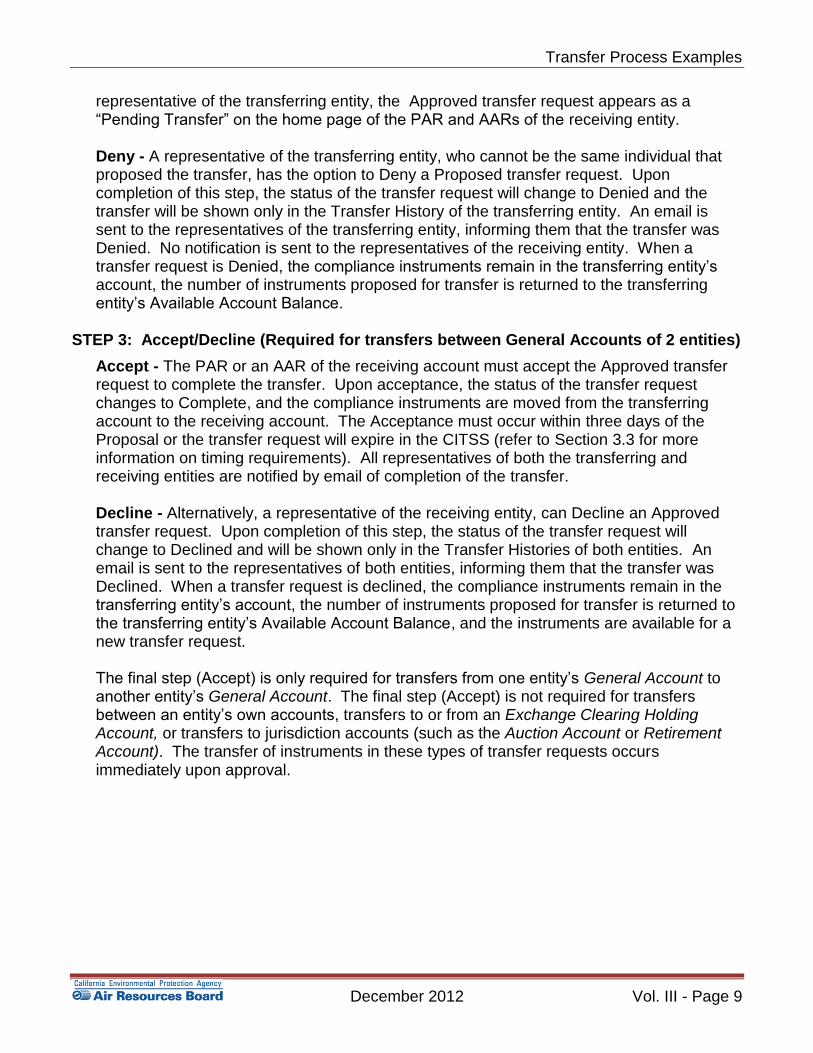
STEP 3: Accept/Decline (Required for transfers between General Accounts of 2 entities)
Accept - The PAR or an AAR of the receiving account must accept the Approved transfer request to complete the transfer. Upon acceptance, the status of the transfer request changes to Complete, and the compliance instruments are moved from the transferring account to the receiving account. The Acceptance must occur within three days of the Proposal or the transfer request will expire in the CITSS (refer to Section 3.3 for more information on timing requirements). All representatives of both the transferring and receiving entities are notified by email of completion of the transfer. Decline - Alternatively, a representative of the receiving entity, can Decline an Approved transfer request. Upon completion of this step, the status of the transfer request will change to Declined and will be shown only in the Transfer Histories of both entities. An email is sent to the representatives of both entities, informing them that the transfer was Declined. When a transfer request is declined, the compliance instruments remain in the transferring entity’s account, the number of instruments proposed for transfer is returned to the transferring entity’s Available Account Balance, and the instruments are available for a new transfer request. The final step (Accept) is only required for transfers from one entity’s General Account to another entity’s General Account. The final step (Accept) is not required for transfers between an entity’s own accounts, transfers to or from an Exchange Clearing Holding Account, or transfers to jurisdiction accounts (such as the Auction Account or Retirement Account). The transfer of instruments in these types of transfer requests occurs immediately upon approval.
Transfer Process Examples
Vol. III - Page 10 December 2012
3.3 Status of Transfer Requests
Proposed status: The transfer request has been Proposed by a PAR or AAR and is awaiting approval from another account representative of the transferring entity. If this is a transfer between entities, the transfer request is not yet viewable by the representatives of the receiving entity while it is in this status.
Approved status: The transfer request has been Approved by a second account representative (PAR or AAR) of the transferring entity. If this is a two-step transfer (transfer between accounts of the same entity, between entity and jurisdiction accounts, or to or from an exchange clearing account), the transfer is now Complete. If the transfer is between entities, the representatives of the receiving entity have been notified of the transfer request and the transfer is viewable as a pending transfer on the home page of the account representatives of the receiving entity. An account representative of the receiving entity must now either Accept or Decline the transfer request.
Accepted status: The transfer request has been Accepted by an account representative of the receiving entity. The transfer is now Complete.
Complete status: The transfer request is complete, and the compliance instruments have been transferred to the receiving entity’s account. For transfers requiring acceptance, this occurs when the receiving entity Accepts. For transfers that do not require acceptance, the transfer is Complete when the transfer request is Approved.
Cancelled status: A transfer request was Cancelled by the account representative of the transferring entity that initially proposed the transfer. Only the representative that entered the initial Proposal can Cancel the proposed transfer. If the proposed transfer was to another entity, the representatives of the receiving entity were not notified of the proposed transfer or cancellation. The compliance instruments have not been transferred.
Denied status: The transfer request was Denied by a second account representative of the transferring entity (following Proposal). The representatives of the transferring entity were notified that the proposed transfer was denied. If the proposed transfer was to another entity, the representatives of the receiving entity were not notified of the proposed transfer or the subsequent denial. The compliance instruments have not been transferred.
Declined status: The transfer request was Declined by an account representative of the receiving entity. The representatives of both the transferring and acquiring entities were notified of the action by email. The compliance instruments have not been transferred.
Expired status: Either the transfer request was not Approved before midnight (Eastern Time) of the second calendar day following proposal or the transfer request or was not Accepted before midnight (Eastern Time) of the third calendar day following Proposal of the transfer request. The transfer request has timed-out, and the compliance instruments have not been transferred. If the transfer still needs to be recorded, a new transfer proposal must be entered by a representative of the transferring entity.

Transfer Process Examples
December 2012 Vol. III - Page 11
3.4 Timing of the Transfer Request Process
Reporting a transfer in the CITSS is subject to two types of timing requirements: (1) a transfer between entities must be reported within three days of the settlement date, (2) a transfer request must be Approved (second action by the transferring entity) within two days of being proposed, and Accepted (if required) within three days of being proposed. A violation of (1) does not prevent completion of a transfer in the CITSS. A violation of (2) leads to a transfer request expiring, which stops any additional action on that transfer request in the CITSS. (1) The Regulation requires that a transfer of compliance instruments between entities must be
reported to the accounts administrator within three calendar days of the Settlement Date. “Reported” means that the status of the transfer request in the CITSS must be Complete. Settlement Date is the date that the agreement/contract is fulfilled. If a transfer request is not Accepted/Completed by the end of Day 3 following Settlement Date, the transfer violates the regulatory requirement to report in the CITSS. A transfer request in Proposed or Approved status does not satisfy this requirement. CITSS will allow the transfer to be completed as long as no other timing requirements are violated but will notify the entities and ARB that a regulatory requirement has potentially been violated.
(2) The Regulation also requires time frames by which actions on pending transfer requests must be completed within the CITSS.
a. Any proposed transfer request in the CITSS must be Approved within two days of being Proposed. If the transfer request is not Approved by the end of Day 2, the CITSS automatically expires the transfer request, no additional action can be taken on that transfer request, and the compliance instruments are not transferred and are returned to the available balance of the transferring account. The transferring entity may Propose a new transfer request to transfer the instruments if the original transfer request expires. (Once a transfer request is Proposed, the second representative of the transferring entity can Approve the transfer request at any time within 2 days.)
b. For transfers between entities, the transfer must be Accepted within three days of
being Proposed. If the transfer request is not Accepted by the end of Day 3, the CITSS automatically expires the transfer request, no additional action can be taken on that transfer request, and the compliance instruments are not transferred and are returned to the available balance of the transferring account. The transferring entity may Propose a new transfer request to transfer the instruments if the original transfer request expires. (Once a transfer request is Approved, the representative of the receiving entity can Accept the transfer request at any time, as long as the action is taken within 3 days.)

Transfer Process Examples
Vol. III - Page 12 December 2012
3.4.1 Timing Requirements of the Transfer Process
All scheduling within the CITSS is based on prevailing Eastern Time (ET), i.e., Eastern Time with seasonal adjustments for daylight savings. A “day” begins at midnight (12:00 a.m.) and lasts until 11:59 p.m. the next evening. Each requirement period begins at midnight (12:00 a.m.) ET, i.e., Day 1 is the first 24-hour day following the Settlement Date or following the day that the transfer request is proposed. These requirements are explained in tables 3–7.
Table 4. Timing Requirement to Report a Transfer Following the Settlement Date
12 a.m. ET 12 a.m. ET 12 a.m. ET 12 a.m. ET
Friday Saturday Sunday Monday
Settlement Date Day 1 Day 2 Day 3
The three-day period to report a transfer begins at midnight (12 a.m. ET) of the day following the Settlement Date.
A transfer request must be Accepted within three days, i.e., not later than 11:59 p.m. on Day 3.
If the transfer request is not Accepted by the end of Day 3, the transfer violates the regulatory requirement to report within 3 days of the settlement date.
Table 5. Timing Requirements of the Transfer Process
12 a.m. ET 12 a.m.ET 12 a.m. ET 12 a.m. ET
Friday Saturday Sunday Monday
Transfer Request Proposed
Day 1 Day 2 Day 3
A representative of the transferring entity Proposes a transfer request.
The three-day period begins at midnight (12 a.m.) ET of the day following Proposal of the transfer request.
A second representative of the transferring entity must Approve the Proposed transfer request no later than two days after it is proposed, i.e., by 11:59 p.m. of Day 2.
When applicable, a representative of the receiving entity must Accept the transfer request within three days, i.e., not later than 11:59 p.m. on Day 3.
If the transfer request is not Accepted by the end of Day 3, the CITSS automatically expires the transfer request.
If the transfer request is not Approved by the end of Day 2, the CITSS automatically expires the transfer request.
The transfer status is PROPOSED
The transfer status changes to APPROVED
The transfer status changes to COMPLETE
There are no requirements to prevent the shortest possible completion of the transfer process, i.e., all three steps (Propose, Approve, and Accept) could be completed on the same day.
Transfer Process Examples
December 2012 Vol. III - Page 13
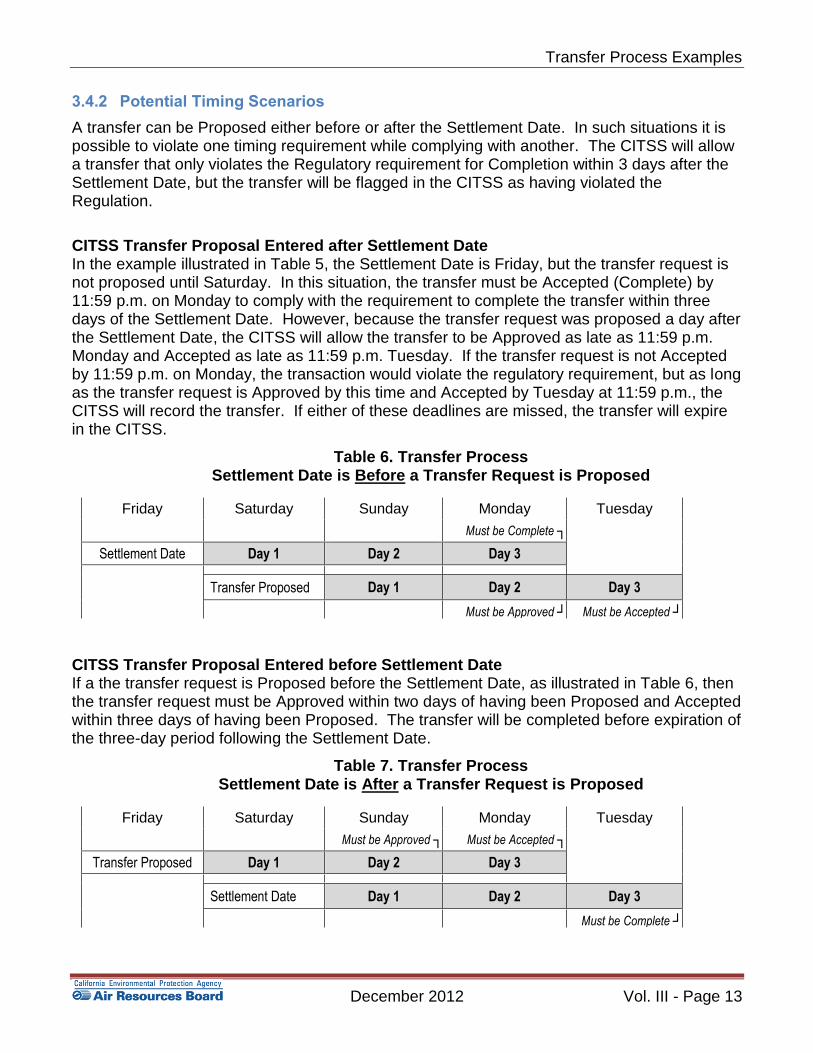
3.4.2 Potential Timing Scenarios
A transfer can be Proposed either before or after the Settlement Date. In such situations it is possible to violate one timing requirement while complying with another. The CITSS will allow a transfer that only violates the Regulatory requirement for Completion within 3 days after the Settlement Date, but the transfer will be flagged in the CITSS as having violated the Regulation.
CITSS Transfer Proposal Entered after Settlement Date In the example illustrated in Table 5, the Settlement Date is Friday, but the transfer request is not proposed until Saturday. In this situation, the transfer must be Accepted (Complete) by 11:59 p.m. on Monday to comply with the requirement to complete the transfer within three days of the Settlement Date. However, because the transfer request was proposed a day after the Settlement Date, the CITSS will allow the transfer to be Approved as late as 11:59 p.m. Monday and Accepted as late as 11:59 p.m. Tuesday. If the transfer request is not Accepted by 11:59 p.m. on Monday, the transaction would violate the regulatory requirement, but as long as the transfer request is Approved by this time and Accepted by Tuesday at 11:59 p.m., the CITSS will record the transfer. If either of these deadlines are missed, the transfer will expire in the CITSS.
Table 6. Transfer Process Settlement Date is Before a Transfer Request is Proposed
Friday Saturday Sunday Monday Tuesday
Must be Complete ┐
Settlement Date Day 1 Day 2 Day 3
Transfer Proposed Day 1 Day 2 Day 3
Must be Approved ┘ Must be Accepted ┘
CITSS Transfer Proposal Entered before Settlement Date If a the transfer request is Proposed before the Settlement Date, as illustrated in Table 6, then the transfer request must be Approved within two days of having been Proposed and Accepted within three days of having been Proposed. The transfer will be completed before expiration of the three-day period following the Settlement Date.
Table 7. Transfer Process Settlement Date is After a Transfer Request is Proposed
Friday Saturday Sunday Monday Tuesday
Must be Approved ┐ Must be Accepted ┐
Transfer Proposed Day 1 Day 2 Day 3
Settlement Date Day 1 Day 2 Day 3
Must be Complete ┘

Transfer Process Examples
Vol. III - Page 14 December 2012
CITSS Transfer Completed before Settlement Date Finally, it is important to describe the situation where a transfer request is completed before the Settlement Date. When a transfer request is Accepted, the CITSS changes the status of a transfer request to Complete and transfers ownership of the compliance instruments. If a transfer request is Complete before the Settlement Date, the CITSS will transfer ownership regardless of the status of any outside contract requirements, including a Settlement Date in the future.
Table 8. Transfer Process Settlement Date is After a Transfer Request is Complete
Friday Saturday Sunday Monday In the Future
Approved ┐ Accepted and ..
ownership transferred ┐
Transfer Proposed Day 1 Day 2 Day 3 ◄► Settlement Date

Transfer Process Examples
December 2012 Vol. III - Page 15
3.5 Preparing to Transfer Compliance Instruments
Assembling the information required to Propose a transfer request beforehand will avoid interruptions and the necessity to stop and start while in the data entry process. The information needed to propose a transfer request varies with the type of request.
Preparation of a transfer request begins at the CITSS transfer screen, which includes Tooltips to assist users with the required entries. Tooltips are activated by hovering the mouse cursor over the question mark (?) to the right of each data field.
The following information is required to prepare and propose a request to transfer allowances between entities, from a General Account to another General Account.
Account Number of Receiving Account (obtained from representative of receiving entity)
Entity Reference Code of Receiving Entity (obtained from representative of receiving entity)
Type, vintage, and quantity of Compliance Instruments to be transferred
Transfer to Corporate Associate (yes/no)
Price (average price per compliance instrument)
Currency involved (USD, CAD)
Trading Venue (Exchange, OTC)
Type of Contract (Forward, Future, Spot, Other)
Settlement Date
Agreement Date
Locating Account Numbers and Entity Reference Codes For transfers to other entities, the representatives of the receiving entity must provide the Account Number and the Entity Reference Code to the representative of the transferring entity. The Account Number can be found on the User Home page, as shown in Figure 2. Figure 2 - CITSS User Home Page Showing Account Numbers

Transfer Process Examples
Vol. III - Page 16 December 2012
The Entity Reference Code is located on the Account Details page for each account. To access the Accounts Detail Page, select an account by clicking on the View Button for the Account in the Actions column of the Users Home Page (see Figure 2). This will take you to the Account Page shown in Figure 3. Figure 3 - CITSS Account Page Showing Account Detail Button
Access the Account Detail page by clicking on the Account Detail button highlighted in Figure 3. The entity reference code is located on the Account Detail page, shown in Figure 4.
Figure 4 - CITSS Account Detail Page Showing Entity Reference Code

Transfer Process Examples
December 2012 Vol. III - Page 17
4.0 Transfer Process Examples
This section presents examples of transfers entered in in the CITSS. Each example consists of step-by-step instructions to complete the transfer process for each type of transfer.
The CITSS has been designed so that the steps to accomplish a transfer are essentially the same, regardless of the type of transfer, with only small differences. This design minimizes the number of iterations that users must learn and reduces the chance of errors. There are two general types of transfers:
1. Three steps Transfers - Transfers between entities (two parties). These transfers require three steps (Propose, Approve, and Accept), and both the transferring and receiving entities must participate in the transfer process. Instruments are transferred, and the transfer status changes to Complete when the transfer request is Accepted.
2. Two step Transfers - Transfers between one entity’s own accounts, an entity and an exchange clearing service provider, or an entity and jurisdiction accounts only require the Propose and Approve steps to be Complete. The receiving account does not have to Accept the transfer. Compliance instruments are transferred, and the transfer status changes to Complete when the transfer request is Approved.
The CITSS requires that covered entities, opt-in entities, and general market participants (organizations) have at least two account representatives - a Primary Account Representative (PAR) and an Alternate Account Representative (AAR) - to be able to complete the Propose and Approve steps in a transfer. An Individual General Market Participant is allowed to act as both the PAR and an AAR on their account, so a single representative of an individual general market participant account can Propose and Approve transfers without a second representative. If an individual general market participant chooses to designate one or more AARs, then they must follow the requirement of a second individual Approving transfers. This section presents the following step-by-step examples:
1: Propose a Transfer from a General Account to the General Account of another entity
2: Propose a Transfer From a General Account to a Compliance Account
3: Propose a Transfer From a General Account to an Exchange Clearing Service Account
4: Propose a Transfer From an Exchange Clearing Service Account to a General Account
5: Propose a Transfer From a Limited Use Holding Account to the Auction Account
6: Approve a Transfer Request
7: Accept a Transfer Request

Transfer Process Examples
Vol. III - Page 18 December 2012
4.1 Propose a Transfer from a General Account to a General Account
This example presents the steps required to transfer instruments from a General Account to the General Account of another entity.
STEP 1 Log in to the CITSS. If you log in to the CITSS as a registered user, you begin at the User Home Page which should look similar to Figure 5. The page is titled “Welcome to WCI CITSS” and provides access to three key categories of information: My Accounts, Account Applications, and Pending Transfers.
STEP 2 Review My Accounts. My Accounts shows entity accounts for which the user is the PAR, an AAR, or an AVA. My Accounts summarizes the information about each account, including the Legal and Operating Name of the entity, and the Account Type, Number, Jurisdiction, and Status.
There are four types of accounts that can be assigned to an entity in the CITSS: a General Account, a Limited Use Holding Account, a Compliance Account, and/or an Exchange Clearing Holding Account. A Covered Entity always has a General Account and a Compliance Account. Only entities that are electrical distribution utilities designated by the Regulation receive a Limited Use Holding Account. Only entities that are registered as Exchange Clearing Service providers receive an Exchange Clearing Service Account.
Each account has a unique account number. Account numbers are needed to Propose transfer requests in the CITSS. When proposing a transfer, CITSS will fill in the number of the transferring account that you select. However, the account number of the receiving account must be obtained from a representative of the receiving entity and manually entered. As shown, the User Home Page is a convenient location to locate account numbers.
STEP 3 Select the Transferring Account. In the example in Figure 5, you have access to a General Account, a Compliance Account, and a Limited Use Holding Account for the Sacramento Power Agency. You may transfer instruments from a General Account or a Limited Use Holding Account. In this example, compliance instruments are to be transferred from the General Account. To select the desired account, click
on the View button located in the Actions column on the far right. In this example
we will transfer compliance instruments from the General Account. Click on the
View button to select the General Account.
This action will switch you from the User Home Page to the General Account Page (Figure 6) for the selected account.

Transfer Process Examples
December 2012 Vol. III - Page 19
Figure 5 - CITSS User Home Page

Transfer Process Examples
Vol. III - Page 20 December 2012
Select Compliance Instruments to be Transferred Figure 6 shows the General Account Page for the Sacramento Power Agency. The General Account is assigned account number CA1000-1000. The General Account Page shows information about this account. Information summarized on this page includes account number, type, status, balance, and available balance. More detailed information can be
accessed through the Account Detail button.
The two tabs in the window on the lower half of the page are identified as Holdings and Transfers. The Holdings tab presents a detailed list of the compliance instruments currently in the account. The Transfer tab presents a history of transfers for this account. Transfer history can also be accessed using the menu link in the upper left of the screen.
STEP 4 Review the Transferring Account Information. On the General Account page for the Sacramento Power Agency, you:
Review the account name, number, and type to ensure that you have selected the correct transferring account.
Review the account status to ensure the account is in a status that allows transfers.
Review account balance and available balance to ensure there are sufficient compliance instruments in the account to transfer.
STEP 5 Select Compliance Instruments to be Transferred. Begin preparation of a transfer request by determining which compliance instruments you wish to transfer.
The Holdings tab presents a list of the compliance instruments that are currently in this account by Vintage, Jurisdiction, Type, Sub-type, Category, Project Code, and Quantity. Note that several of these fields (Sub-type, Category, and Project Code) are only applicable to offsets and will be blank for allowance records.
STEP 6 Once you have selected the instruments that you wish to transfer, you must press
the Initiate Transfer button at the right end of the line to begin preparation of a
transfer request. Click on the Initiate Transfer button at the right end of the
line of the instruments you wish to transfer.
This action will take you to the Select Type of Transfer page (Figure 7).

Transfer Process Examples
December 2012 Vol. III - Page 21
Figure 6 - CITSS General Account Page

Transfer Process Examples
Vol. III - Page 22 December 2012
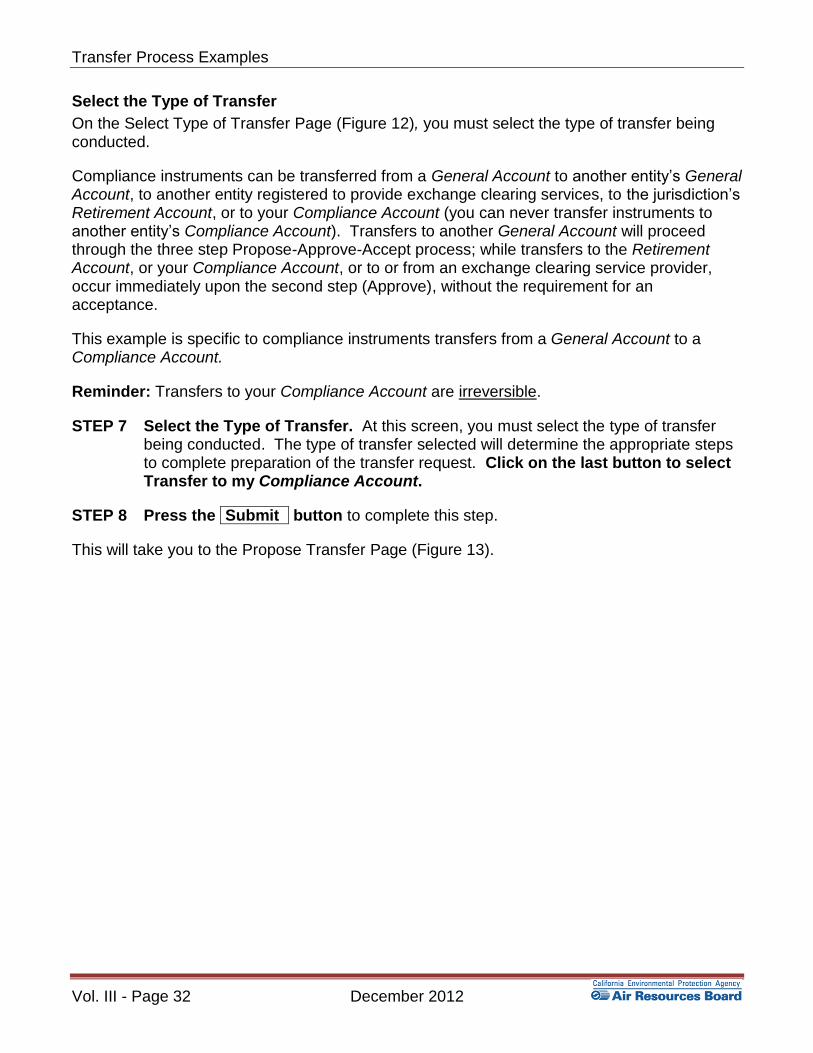
Select the Type of Transfer
On the Select Type of Transfer Page (Figure 7), you must select the type of transfer being conducted.
Compliance instruments can be transferred from a General Account to another entity’s General Account, to another entity registered to provide exchange clearing services, to a voluntary Retirement Account, or to your Compliance Account (you can never transfer instruments to another entity’s Compliance Account). Transfers to another General Account will proceed through the three step Propose-Approve-Accept process, while transfers to the Retirement Account, your Compliance Account, or to or from an exchange clearing service provider, occur immediately upon the second step (Approve), without the requirement for an acceptance.
This example is specific to compliance instruments transfers from a General Account to another entity’s General Account.
STEP 7 Select the Type of Transfer. At this screen, you must select the type of transfer being conducted. The type of transfer selected will determine the appropriate steps to complete preparation of the transfer request. Click on the first button to select Transfer to another entity’s General Holding Account.
STEP 8 Press the Submit button to complete this step.
This will take you to the Propose Transfer page (Figure 8).

Transfer Process Examples
December 2012 Vol. III - Page 23
Figure 7 - CITSS Select Type of Transfer Page

Transfer Process Examples
Vol. III - Page 24 December 2012
Provide Transfer Details
On the Propose Transfer from: General Account Page (Figure 8), the account representative will identify the receiving account and provide the details of the transfer. This screen provides Tooltips to assist users in completing the fields. Each tooltip is viewed by hovering the cursor over the magenta question mark located immediately to the right of the data field.
Transferring Account Detail – The CITSS automatically fills in the Transferring Account Detail based on the previously selected transfer type and instrument type.
Receiving Account and Transfer Information – The representative enters the details of the transfer in these fields.
STEP 9 Provide the Account Number and Entity Reference Code of the receiving entity. The Account Number and Entity Reference Code are obtained from a representative of the receiving entity. The account number consists of the two-letter abbreviation of the jurisdiction (CA), followed by a four-digit number, a hyphen, and a second four-digit number, e.g., CA1234-1234. The Entity Reference Code is an eight-digit number, e.g., 12345678.
STEP 10 Provide the quantity of instruments to be transferred. Quantity must be entered in whole numbers. Enter the number of compliance instruments you are proposing to transfer. This number cannot exceed your available account balance.
STEP 11 Identify if the transfer is to a corporate associate. If the entities involved in the transfer are direct corporate associates but are not part of a consolidated account, check this box. If you check this box, the entities must be designated as corporate associates on each entity’s Corporate Associations and Structure Form. If the “Transfer to Corporate Associate” box is checked, the price and currency fields become optional entries.
STEP 12 Enter the price and currency. Indicate the average price per compliance instrument (not the total price) and the currency involved, US or Canadian. Entering the average price is required for transfers to another CITSS entity that is not a direct corporate associate or exchange clearing service provider. In certain circumstances a zero price is acceptable and will be accepted by the CITSS. For instance, if an EDU buys power from a generator under a "pass-through" arrangement, or for contracts in which compliance instruments are transferred along with or in return for bundles of goods and services, with no basis for calculating payment for the compliance instruments.
STEP 13 Enter the trading venue and type of contract from the drop-down menus. Venue options are Exchange, Over the Counter, and other. Exchange generally indicates a standard forward contract or an exchange-based spot contract. An Over the Counter (OTC) contract is between parties not through an exchange. The choices for type of contract are Forward, Future, Spot, or other.
STEP 12 Enter the agreement and settlement dates. The Agreement Date is the date the agreement is reached or the contract signed, while the Settlement Date is the date that the agreement/contract is fulfilled. Regardless of agreement or settlement date, the transfer of ownership occurs when the status of the transfer request in the CITSS is Complete.
Transfer Process Examples
December 2012 Vol. III - Page 25
STEP 13 Enter a comment (not required). Comments are viewable by all representatives and viewing agents of the transferring entity and the receiving entity.
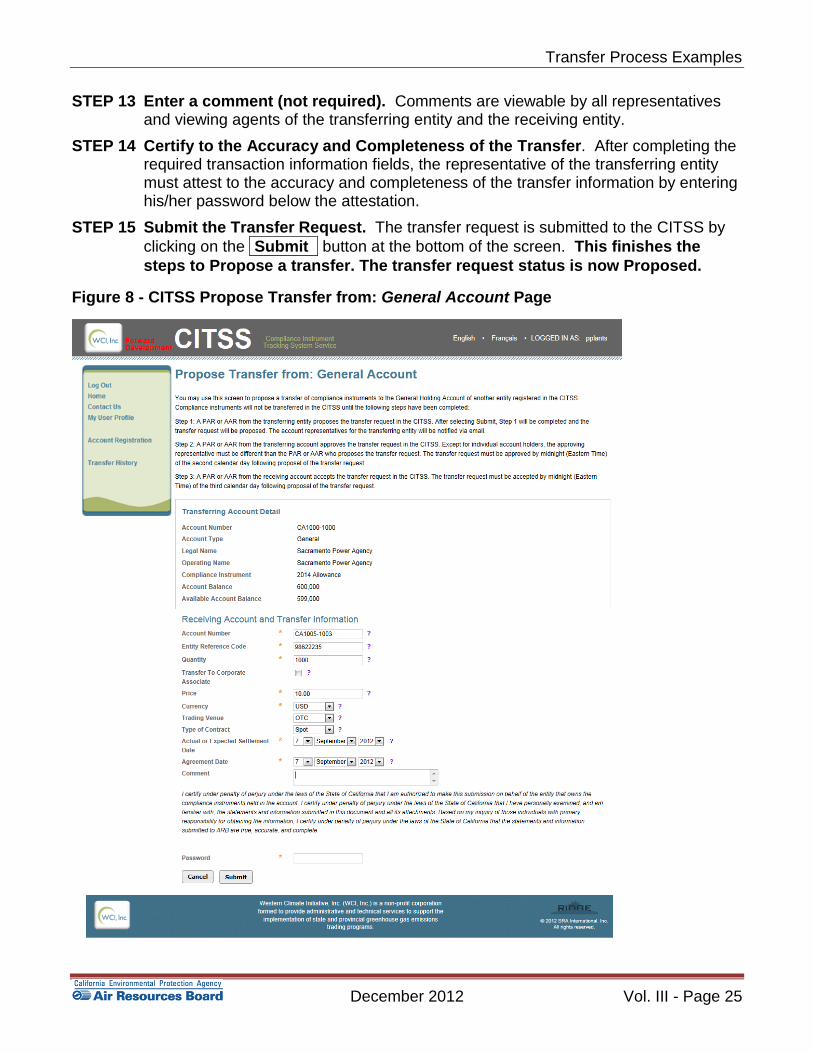
STEP 14 Certify to the Accuracy and Completeness of the Transfer. After completing the required transaction information fields, the representative of the transferring entity must attest to the accuracy and completeness of the transfer information by entering his/her password below the attestation.
STEP 15 Submit the Transfer Request. The transfer request is submitted to the CITSS by
clicking on the Submit button at the bottom of the screen. This finishes the
steps to Propose a transfer. The transfer request status is now Proposed.
Figure 8 - CITSS Propose Transfer from: General Account Page

Transfer Process Examples
Vol. III - Page 26 December 2012
Review the Submitted Transfer Request.
The page shown in Figure 9 is presented after a transfer to another entity’s General Account has been Proposed. The transfer is in the Proposed status awaiting approval by a second representative of the transferring entity. All Proposed transfers require Approval from a second representative of the transferring entity. See Section 4.6: Approving a Transfer Request.
The transfer is now identified by a unique Transfer ID number. This six-digit number can be found just below the account number and account type on this page. The Transfer ID number will be the identifier for this transaction in the CITSS.
The Transfer Event History window on this page shows the time and date that the transfer request was proposed, as well as the representative that submitted the proposal. The transfer can be cancelled by the representative who entered the initial proposal as long as it is remains in the Proposed status.
Transfers to another entity’s General Account will require the transferring entity to complete the two steps, Propose and Approve and the receiving entity to Accept the transfer. The transfer occurs when the third step (Accept) is entered by a representative from the receiving entity.
The steps to Approve a Proposed Transfer are presented in Section 4.6.

Transfer Process Examples
December 2012 Vol. III - Page 27
Figure 9 - CITSS Compliance Instrument Transfer Detail Page

Transfer Process Examples
Vol. III - Page 28 December 2012
4.2 Propose a Transfer from the General Account to the Compliance Account
This example presents the steps to transfer instruments from a General Account to a Compliance Account.
Every covered and opt-in entity has a Compliance Account. The Compliance Account is the account from which instruments are surrendered to the ARB at the end of a compliance period. Transfers to the Compliance Account are irreversible and instruments transferred into the Compliance Account cannot be removed at a future date.
STEP 1 Log in to the CITSS. If you log in to the CITSS as a registered user, you begin at the User Home Page which should look similar to Figure 10. The User Home Page is titled “Welcome to WCI CITSS” and provides access to three key categories of information: My Accounts, Account Applications, and Pending Transfers.
STEP 2 Review My Accounts. My Accounts shows entity accounts for which the user is the PAR, an AAR, or an AVA. My Accounts summarizes the information about each account, including the Legal and Operating Name of the entity, and the Account Type, Number, Jurisdiction, and Status.
There are four types of accounts that can be assigned to an entity in the CITSS: a General Account, a Limited Use Holding Account, a Compliance Account, and/or an Exchange Clearing Holding Account. A Covered Entity always has a General Account and a Compliance Account. Only entities that are electrical distribution utilities designated by the Regulation receive a Limited Use Holding Account. Only entities that are registered as Exchange Clearing Service Providers receive an Exchange Clearing Service Account.
Each account has a unique account number. Account numbers are needed to Propose transfer requests in the CITSS. When proposing a transfer, CITSS will fill in the number of the transferring account that you select. However, the account number of the receiving account must be obtained from a representative of the receiving entity and manually entered. As shown, the User Home Page is a convenient location to locate account numbers.
STEP 3 Select the Transferring Account. In the example in Figure 10, you have access to a General Account, a Compliance Account, and a Limited Use Holding Account for the Sacramento Power Agency. You may transfer instruments from a General Account or a Limited Use Holding Account. To select the desired account, click on
the View button located in the Actions column on the far right. In this example we
will transfer compliance instruments from the General Account. Click on the View button to select the General Account.
This action will switch you from the User Home Page to the General Account Page (Figure 11) for the selected account.

Transfer Process Examples
December 2012 Vol. III - Page 29
Figure 10 - CITSS User Home Page

Transfer Process Examples
Vol. III - Page 30 December 2012
Select Compliance Instruments to be Transferred
Figure 11 shows the General Account Page for the Sacramento Power Agency. The General Account is assigned account number CA1000-1000. The General Account Page shows information about this account. Information summarized on this page includes account number, type, status, balance, and available balance. More detailed information can be
accessed through the Account Detail button.
There are two tabs in the window on the lower half of the page identified as Holdings and Transfers. The Holdings tab presents a detailed list of the compliance instruments currently in the account. The Transfer tab presents a history of transfers for this account. Transfer History can also be accessed using the link in the menu located in the upper left of the page.
STEP 4 Review the Transferring Account Information. On the General Account page for the Sacramento Power Agency, you:
Review the account name, number, and type to ensure that you have selected the correct transferring account.
Review the account status to ensure the account is in a status that allows transfers.
Review account balance and available balance to ensure there are sufficient compliance instruments in the account to transfer.
STEP 5 Select Compliance Instruments to be Transferred. After ensuring that account information and balances are in order, you begin preparation of a transfer request by determining which compliance instruments you wish to transfer.
The Holdings tab presents a list of the compliance instruments that are currently in this account. The list provides an itemized list of instruments in the account by Vintage, Jurisdiction, Type, Sub-type, Category, Project Code, and Quantity. Note that several of these fields (Sub-type, Category, and Project Code) are only applicable to offsets and will be blank for allowance records.
STEP 6 Once you have identified the instruments that you wish to transfer, you must press
the Initiate Transfer button at the right end of the line to begin preparation of a
transfer request. Click on the Initiate Transfer button at the right end of the
line of the instruments you wish to transfer.

Transfer Process Examples
December 2012 Vol. III - Page 31
Figure 11 - CITSS General Account Page
Transfer Process Examples
Vol. III - Page 32 December 2012
Select the Type of Transfer
On the Select Type of Transfer Page (Figure 12), you must select the type of transfer being conducted.
Compliance instruments can be transferred from a General Account to another entity’s General Account, to another entity registered to provide exchange clearing services, to the jurisdiction’s Retirement Account, or to your Compliance Account (you can never transfer instruments to another entity’s Compliance Account). Transfers to another General Account will proceed through the three step Propose-Approve-Accept process; while transfers to the Retirement Account, or your Compliance Account, or to or from an exchange clearing service provider, occur immediately upon the second step (Approve), without the requirement for an acceptance.
This example is specific to compliance instruments transfers from a General Account to a Compliance Account.
Reminder: Transfers to your Compliance Account are irreversible.
STEP 7 Select the Type of Transfer. At this screen, you must select the type of transfer being conducted. The type of transfer selected will determine the appropriate steps to complete preparation of the transfer request. Click on the last button to select Transfer to my Compliance Account.
STEP 8 Press the Submit button to complete this step.
This will take you to the Propose Transfer Page (Figure 13).

Transfer Process Examples
December 2012 Vol. III - Page 33
Figure 12 - CITSS Select Type of Transfer Page

Transfer Process Examples
Vol. III - Page 34 December 2012
Provide Transfer Details
On the Propose Transfer from: General Account Page (Figure 13), the account representative will provide the details of the transfer. This screen provides Tooltips to assist users in completing the fields with the correct information. Each tooltip is viewed by hovering the mouse cursor over the magenta question mark located immediately to the right of the data field.
Transferring Account Detail – For this type of transfer, CITSS automatically fills the Transferring Account Detail based on the previously selected transfer type and instrument type.
Receiving Account Details – CITSS automatically fills the Receiving Account Detail based on the previously selected transfer type. The representative enters the remaining details of the transfer in these fields.
STEP 9 Propose the number of instruments for the transfer.
STEP 10 Enter a comment if you wish (not required). Comments are viewable by all representatives and viewing agents of the transferring entity.
STEP 11 Certify to the Accuracy and Completeness of the Transfer. After completing the required transaction information fields, the representative of the transferring entity must attest to the accuracy and completeness of the transfer information by entering his/her password below the attestation.
STEP 12 Submit the Transfer Request. The transfer request is submitted to the CITSS by
clicking on the Submit button at the bottom of the screen. This finishes the
steps to Propose a transfer. The transfer request status is now Proposed.

Transfer Process Examples
December 2012 Vol. III - Page 35
Figure 13 - CITSS Propose Transfer from: General Account Page

Transfer Process Examples
Vol. III - Page 36 December 2012
Review the Submitted Transfer Request
The page shown in Figure 14 is presented after a transfer to the Compliance Account has been Proposed. The transfer is in the Proposed status awaiting approval by a second representative of the transferring entity. All Proposed transfers require Approval from a second representative of the transferring entity. See Section 4.6: Approving a Transfer Request.
The transfer is now identified by a unique Transfer ID number. This six-digit number can be found just below the account number and account type on this page. The Transfer ID number will be the identifier for this transaction in the CITSS.
The Transfer Event History window on this page shows the time and date that the transfer request was proposed, as well as the representative that submitted the proposal. The transfer can be cancelled by the representative who entered the initial proposal as long as it is remains in the Proposed status.
Transfers to a Compliance Account only require the transferring entity to complete the two steps, Propose and Approve. The transfer occurs immediately upon the second step (Approve), without the requirement for an acceptance.

Transfer Process Examples
December 2012 Vol. III - Page 37
Figure 14 - CITSS Compliance Instrument Transfer Detail Page

Transfer Process Examples
Vol. III - Page 38 December 2012
4.3 Propose a Transfer from a General Account to an Exchange Clearing Service Provider’s, Exchange Clearing Holding Account
This example presents the steps required to transfer instruments from a General Account to an Exchange Clearing Service Provider’s, Exchange Clearing Holding Account.
An exchange clearing service provider is an entity that will only take temporary possession of compliance instruments for the purpose of clearing transactions between two entities registered with the Cap-and-Trade Program. All of the compliance instruments received by an exchange clearing holding account must be transferred to one or more destination accounts within five days of receiving them. A request to transfer compliance instruments to or from an exchange clearing holding account does not require confirmation by an account representative of the receiving account.
STEP 1 Log in to the CITSS. If you log in to the CITSS as a registered user, you begin at the User Home Page which should look similar to Figure 15. The User Home Page is titled “Welcome to WCI CITSS” and provides access to three key categories of information: My Accounts, Account Applications, and Pending Transfers.
STEP 2 Review My Accounts. My Accounts shows entity accounts for which the user is the PAR, an AAR, or an AVA. My Accounts summarizes the information about each account, including the Legal and Operating Name of the entity, and the Account Type, Number, Jurisdiction, and Status.
There are four types of accounts that can be assigned to an entity in the CITSS: a General Account, a Limited Use Holding Account, a Compliance Account, and/or an Exchange Clearing Holding Account. A Covered Entity always has a General Account and a Compliance Account. Only entities that are electrical distribution utilities designated by the Regulation receive a Limited Use Holding Account. Only entities that are registered as Exchange Clearing Service Providers receive an Exchange Clearing Service Account.
Each account has a unique account number. Account numbers are required for transfers in the CITSS. When proposing a transfer, CITSS will fill in the number of the transferring account that you select. However, the account number of the receiving account must be obtained from a representative of the receiving entity and manually entered.
STEP 3 Select the Transferring Account. In the example in Figure 15, you have access to a General Account, a Compliance Account, and a Limited Use Holding Account for the Sacramento Power Agency. You may transfer instruments from a General Account or a Limited Use Holding Account. You may transfer instruments from a General Account or a Limited Use Holding Account. To select the desired account,
click on the View button located in the Actions column on the far right. In this
example, compliance instruments are to be transferred from the General Account.
Click on the View button to select the General Account.
This action will switch you from the User Home Page to the General Account Page (Figure 16) for the selected account.

Transfer Process Examples
December 2012 Vol. III - Page 39
Figure 15 - CITSS User Home Page

Transfer Process Examples
Vol. III - Page 40 December 2012
Select Compliance Instruments to be Transferred
Figure 16 shows the General Account Page for the Sacramento Power Agency. The General Account is assigned account number CA1000-1000. The Account Page shows information about this account. Information summarized on this page includes account number, type, status, balance, and available balance. More detailed information can be accessed through
the Account Detail button.
There are two tabs in the window on the lower half of the page identified as Holdings and Transfers. The Holdings tab presents a detailed list of the compliance instruments currently in the account. The Transfer tab presents a history of transfers for this account. Transfer History can also be accessed using the link in the menu located in the upper left of the page.
STEP 4 Review the Transferring Account Information. On the General Account page for the Sacramento Power Agency, you:
Review the account name, number, and type to ensure that you have selected the correct transferring account.
Review the account status to ensure the account is in a status that allows transfers.
Review account balance and available balance to ensure there are sufficient compliance instruments in the account to transfer.
STEP 5 Select Compliance Instruments to be Transferred. After ensuring that account information and balances are in order, you begin preparation of a transfer request by determining which compliance instruments you wish to transfer.
The Holdings tab presents a list of the compliance instruments that are currently in this account. The list provides an itemized list of instruments in the account by Vintage, Jurisdiction, Type, Sub-type, Category, Project Code, and Quantity. Note that several of these fields (Sub-type, Category, and Project Code) are only applicable to offsets and will be blank for allowance records.
STEP 6 Once you have identified the instruments that you wish to transfer, you must press
the Initiate Transfer button at the right end of the line to begin preparation of a
transfer request. Click on the Initiate Transfer button at the right end of the line of the instruments you wish to transfer.
This will take you to the Select Type of Transfer Page (Figure 17).

Transfer Process Examples
December 2012 Vol. III - Page 41
Figure 16 - CITSS General Account Page

Transfer Process Examples
Vol. III - Page 42 December 2012
Select the Type of Transfer
On the Select Type of Transfer Page (Figure 17), you must select the type of transfer being conducted.
Compliance instruments can be transferred from a General Account to another entity’s General Account, to another entity registered to provide exchange clearing services, to a voluntary Retirement Account, or to your Compliance Account (you can never transfer instruments to another entity’s Compliance Account). Transfers to another General Account will proceed through the three step Propose-Approve-Accept process, while transfers to the Retirement Account, an Exchange Clearing Service Provider, or your Compliance Account occur immediately upon the second step (Approve), without the requirement for an acceptance.
This example is specific to compliance instruments transfers from a General Account to an Exchange Clearing Service Provider’s, Exchange Clearing Holding Account. STEP 7 Select the Type of Transfer. At this screen, you must select the type of transfer
being conducted. The type of transfer selected will determine the appropriate steps to complete preparation of the transfer request. Click on the button to select Transfer to another entity registered to provide exchange clearing services.
STEP 8 Press the Submit button to complete this step. This will take you to the Propose Transfer Page (Figure 18).

Transfer Process Examples
December 2012 Vol. III - Page 43
Figure 17 - CITSS Select Type of Transfer Page

Transfer Process Examples
Vol. III - Page 44 December 2012
Provide Transfer Details
On the Propose Transfer from: General Account Page (Figure 18), the account representative will provide the details of the transfer and the receiving account. This screen provides Tooltips to assist users in completing the fields with the correct information. Each tooltip is viewed by hovering the mouse cursor over the magenta question mark located immediately to the right of the data field.
Transferring Account Detail – The CITSS automatically fills the Transferring Account Detail based on the previously selected transfer type and instrument type.
Provide the Receiving Account and Transfer Information – The representative enters the details of the transfer in these fields. Required information includes identification of the receiving account, number of compliance instruments being transferred, and details of the transfer.
STEP 9 Provide the Account Number and Entity Reference Code of the receiving entity and the amount of the transfer. The Account Number and Entity Reference Code are obtained from a representative of the receiving entity. The account number consists of the two-letter abbreviation of the jurisdiction (CA), followed by a four-digit number, a hyphen, and a second four-digit number, e.g., CA1234-1234. The Entity Reference Code is an eight-digit number, e.g., 12345678.
STEP 10 Provide the quantity of instruments to be transferred. Quantity must be entered in whole numbers. Enter the number of compliance instruments you are proposing to transfer. This number cannot exceed your available account balance.
STEP 11 Enter the price and currency, if known. These are optional fields since the transferring (selling) entity may not know the price.
STEP 12 Enter the agreement and settlement dates. The Agreement Date is the date the agreement is reached or the contract signed, while the Settlement Date is the date that the agreement/contract is fulfilled. Again, these are optional fields.
STEP 13 Enter a comment if you wish (not required). Comments are viewable by all representatives and viewing agents of the transferring entity.
STEP 14 Certify to the Accuracy and Completeness of the Transfer. After completing the required transaction information fields, the representative of the transferring entity must attest to the accuracy and completeness of the transfer information by entering his/her password below the attestation.
STEP 15 Submit the Transfer Request. The transfer request is submitted to the CITSS by
clicking on the Submit button at the bottom of the screen.
The transfer request is now in a Proposed status.
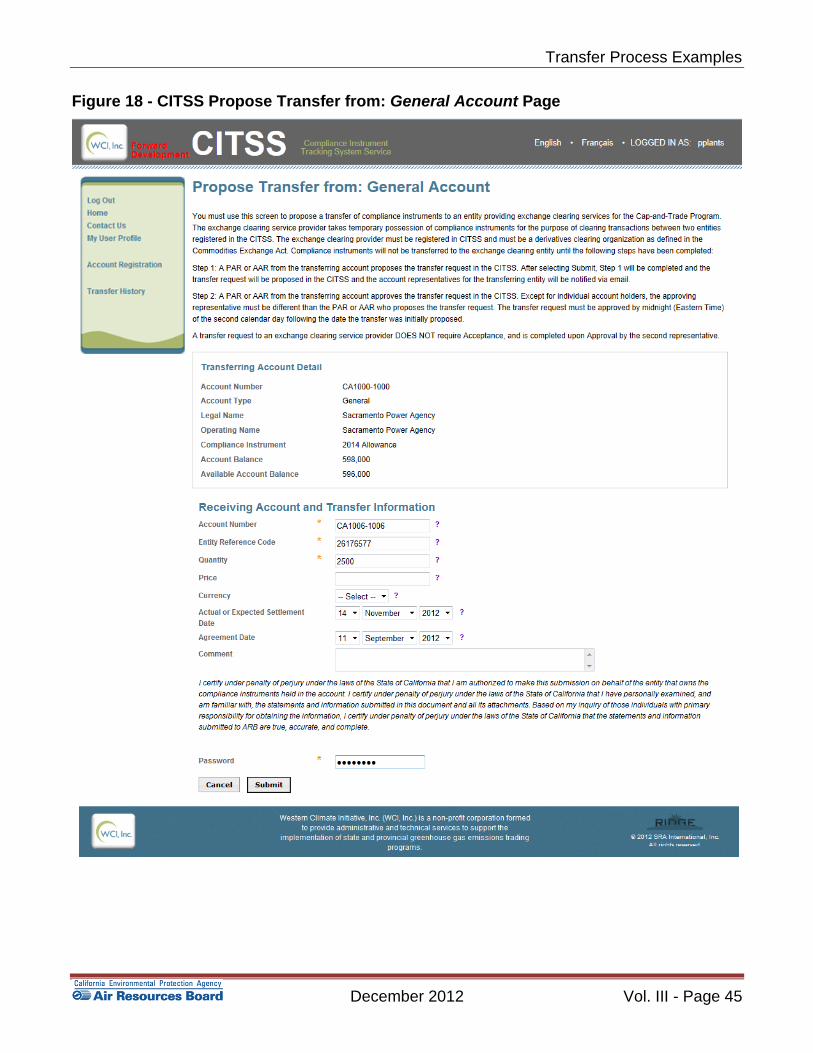
Transfer Process Examples
December 2012 Vol. III - Page 45
Figure 18 - CITSS Propose Transfer from: General Account Page
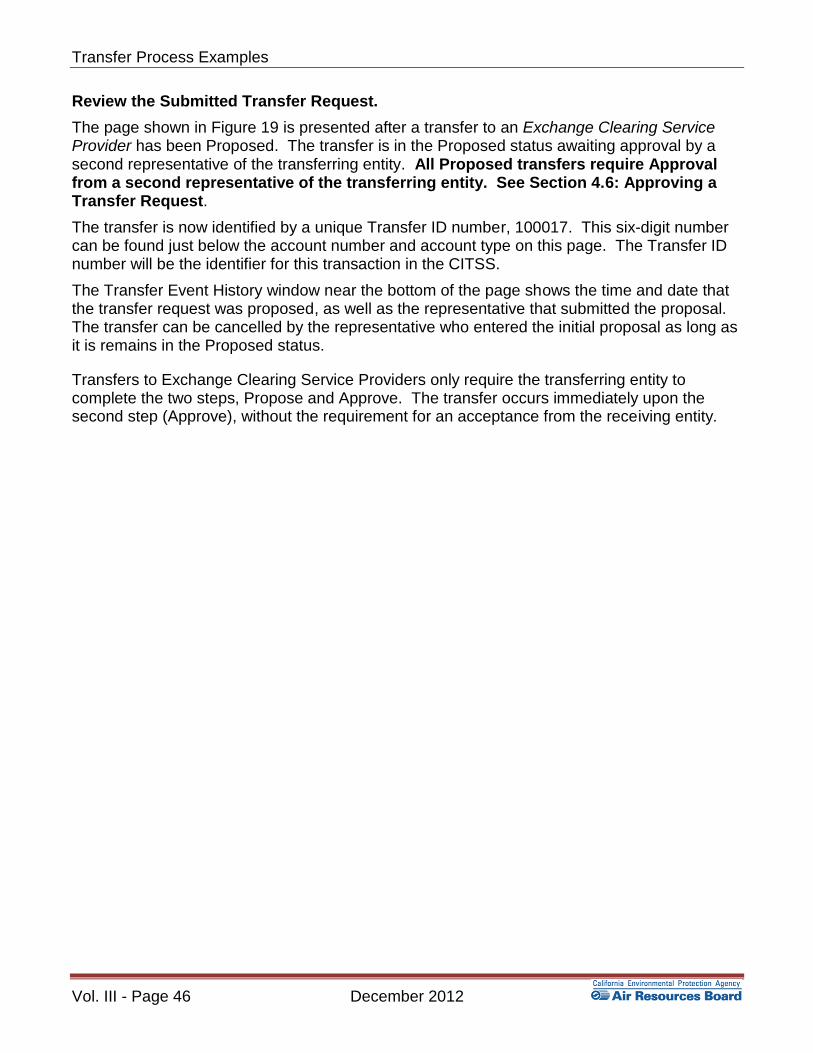
Transfer Process Examples
Vol. III - Page 46 December 2012
Review the Submitted Transfer Request.
The page shown in Figure 19 is presented after a transfer to an Exchange Clearing Service Provider has been Proposed. The transfer is in the Proposed status awaiting approval by a second representative of the transferring entity. All Proposed transfers require Approval from a second representative of the transferring entity. See Section 4.6: Approving a Transfer Request.
The transfer is now identified by a unique Transfer ID number, 100017. This six-digit number can be found just below the account number and account type on this page. The Transfer ID number will be the identifier for this transaction in the CITSS.
The Transfer Event History window near the bottom of the page shows the time and date that the transfer request was proposed, as well as the representative that submitted the proposal. The transfer can be cancelled by the representative who entered the initial proposal as long as it is remains in the Proposed status.
Transfers to Exchange Clearing Service Providers only require the transferring entity to complete the two steps, Propose and Approve. The transfer occurs immediately upon the second step (Approve), without the requirement for an acceptance from the receiving entity.

Transfer Process Examples
December 2012 Vol. III - Page 47
Figure 19 - CITSS Compliance Instrument Transfer Detail Page

Transfer Process Examples
Vol. III - Page 48 December 2012
4.4 Propose a Transfer from an Exchange Clearing Service Provider’s, Exchange Clearing Holding Account to a General Account.
This example presents the steps required to transfer instruments from an Exchange Clearing Service Provider’s, Exchange Clearing Holding Account to a General Account.
An exchange clearing service provider is an entity that will only take temporary possession of compliance instruments for the purpose of clearing transactions between two entities registered with the Cap-and-Trade Program. All of the compliance instruments received by an exchange clearing holding account must be transferred to one or more destination accounts within five days of receiving them. A request to transfer compliance instruments to or from an exchange clearing holding account does not require confirmation by an account representative of the destination account.
STEP 1 Log in to the CITSS. If you log in to the CITSS as a registered user, you begin at the User Home Page which should look similar to Figure 15. The User Home Page is titled “Welcome to WCI CITSS” and provides access to three key categories of information: My Accounts, Account Applications, and Pending Transfers.
STEP 2 Review My Accounts. My Accounts shows entity accounts for which the user is the PAR, an AAR, or an AVA. My Accounts summarizes the information about each account, including the Legal and Operating Name of the entity, and the Account Type, Number, Jurisdiction, and Status.
There are four types of accounts that can be assigned to an entity in the CITSS: a General Account, a Limited Use Holding Account, a Compliance Account, and/or an Exchange Clearing Holding Account. A Covered Entity always has a General Account and a Compliance Account. Only entities that are electrical distribution utilities designated by the Regulation receive a Limited Use Holding Account. Only entities that are registered as Exchange Clearing Service Providers receive an Exchange Clearing Service Account.
Each account has a unique account number. Account numbers are required for transfers in the CITSS. When proposing a transfer, CITSS will fill in the number of the transferring account that you select. However, the account number of the receiving account must be obtained from a representative of the receiving entity and manually entered.
STEP 3 Select the Transferring Account. In the example in Figure 20, you are acting as a representative of an Exchange Clearing Service Provider named, Carbon Trades Inc., which has only an Exchange Clearing Holding Account. You may only transfer instruments from this account to another entity’s General Account. To select the
Exchange Clearing Service Account, click on the View button located in the
Actions column on the far right column.
This action will switch you from the User Home Page to the Exchange Clearing Holding Account Page (Figure 21)
.

Transfer Process Examples
December 2012 Vol. III - Page 49
Figure 20 - CITSS User Home Page

Transfer Process Examples
Vol. III - Page 50 December 2012
Select Compliance Instruments to be Transferred
Figure 21 shows the Exchange Clearing Holding Account Page for Carbon Trades Inc., assigned account number CA1016-1026. The Account Page shows information about this account. Information summarized on this page includes account number, type, status, balance, and available balance. More detailed information can be accessed through the
Account Detail button.
There are two tabs in the window on the lower half of the page identified as Holdings and Transfers. The Holdings tab presents a detailed list of the compliance instruments currently in the account. The Transfer tab presents a history of transfers for this account. Transfer History can also be accessed using the link in the menu located in the upper left of the page.
STEP 4 Review the Transferring Account Information. On the Exchange Clearing Holding Account Page for the Carbon Trades Inc., you:
Review the account name, number, and type to ensure that you have selected the correct transferring account.
Review the account status to ensure the account is in a status that allows transfers.
Review account balance and available balance to ensure there are sufficient compliance instruments in the account to transfer.
STEP 5 Select Compliance Instruments to be Transferred. After ensuring that account information and balances are in order, you begin preparation of a transfer request by determining which compliance instruments you wish to transfer.
The Holdings tab presents a list of the compliance instruments that are currently in this account. The list provides an itemized list of instruments in the account by Vintage, Jurisdiction, Type, Sub-type, Category, Project Code, and Quantity. Note that several of these fields (Sub-type, Category, and Project Code) are only applicable to offsets and will be blank for allowance records.
STEP 6 Once you have identified the instruments that you wish to transfer, you must press
the Initiate Transfer button at the right end of the line to begin preparation of a
transfer request. Click on the Initiate Transfer button at the right end of the line of the instruments you wish to transfer.
This will take you to the Select Type of Transfer Page (Figure 22).

Transfer Process Examples
December 2012 Vol. III - Page 51
Figure 21 - CITSS Exchange Clearing Holding Account Page

Transfer Process Examples
Vol. III - Page 52 December 2012
Provide Transfer Details
On the Propose Transfer from: Exchange Clearing Account Page (Figure XX), the account representative will provide the details of the transfer and the receiving account. This screen provides Tooltips to assist users in completing the fields with the correct information. Each tooltip is viewed by hovering the mouse cursor over the magenta question mark located immediately to the right of the data field.
Transferring Account Detail – The CITSS automatically fills the Transferring Account Detail based on the previously selected transfer type and instrument type.
Receiving Account and Transfer Information – The representative enters the details of the transfer in these fields. Required information includes identification of the receiving account, number of compliance instruments being transferred, and details of the transfer.
STEP 9 Provide the Account Number and Entity Reference Code of the receiving entity. The Account Number and Entity Reference Code are obtained from a representative of the receiving entity. The account number consists of the two-letter abbreviation of the jurisdiction (CA), followed by a four-digit number, a hyphen, and a second four-digit number, e.g., CA1234-1234. The Entity Reference Code is an eight-digit number, e.g., 12345678.
STEP 10 Provide the quantity of instruments to be transferred. Quantity must be entered in whole numbers. Enter the number of compliance instruments you are proposing to transfer. This number cannot exceed your available account balance.
STEP 11 Enter the price and currency, if known. These are optional fields for this type of transfer.
STEP 12 Enter the settlement and agreement dates. The Settlement Date is the date that the agreement/contract is fulfilled, while the Agreement Date is the date the agreement is reached or the contract signed. Again, these are optional fields.
STEP 13 Enter a comment if you wish (not required). Comments are viewable by all representatives and viewing agents of the transferring entity and receiving entity.
STEP 14 Certify to the Accuracy and Completeness of the Transfer. After completing the required transaction information fields, the representative of the transferring entity must attest to the accuracy and completeness of the transfer information by entering his/her password below the attestation.
STEP 15 Submit the Transfer Request. The transfer request is submitted to the CITSS by
clicking on the Submit button at the bottom of the screen.
The transfer is now Proposed.

Transfer Process Examples
December 2012 Vol. III - Page 53
Figure 22 - CITSS Propose Transfer from: Exchange Clearing Account Page

Transfer Process Examples
Vol. III - Page 54 December 2012
Review the Submitted Transfer Request.
The page shown in Figure 23 is presented after a transfer to an Exchange Clearing Service Provider has been Proposed. The transfer is in the Proposed status awaiting Approval by a second representative of the transferring entity. All Proposed transfers require Approval from a second representative of the transferring entity. See Section 4.6: Approving a Transfer Request.
The transfer is now identified by a unique Transfer ID number, 100011. This six-digit number can be found just below the account number and account type on this page. The Transfer ID number will be the identifier for this transaction in the CITSS.
The Transfer Event History window near the bottom of the page shows the time and date that the transfer request was proposed, as well as the representative that submitted the proposal. The transfer can be cancelled by the representative who entered the initial proposal as long as it is remains in the Proposed status.
Transfers to Exchange Clearing Service Providers only require the transferring entity to complete the two steps, Propose and Approve. The transfer occurs immediately upon the second step (Approve), without the requirement for an acceptance from the receiving entity.
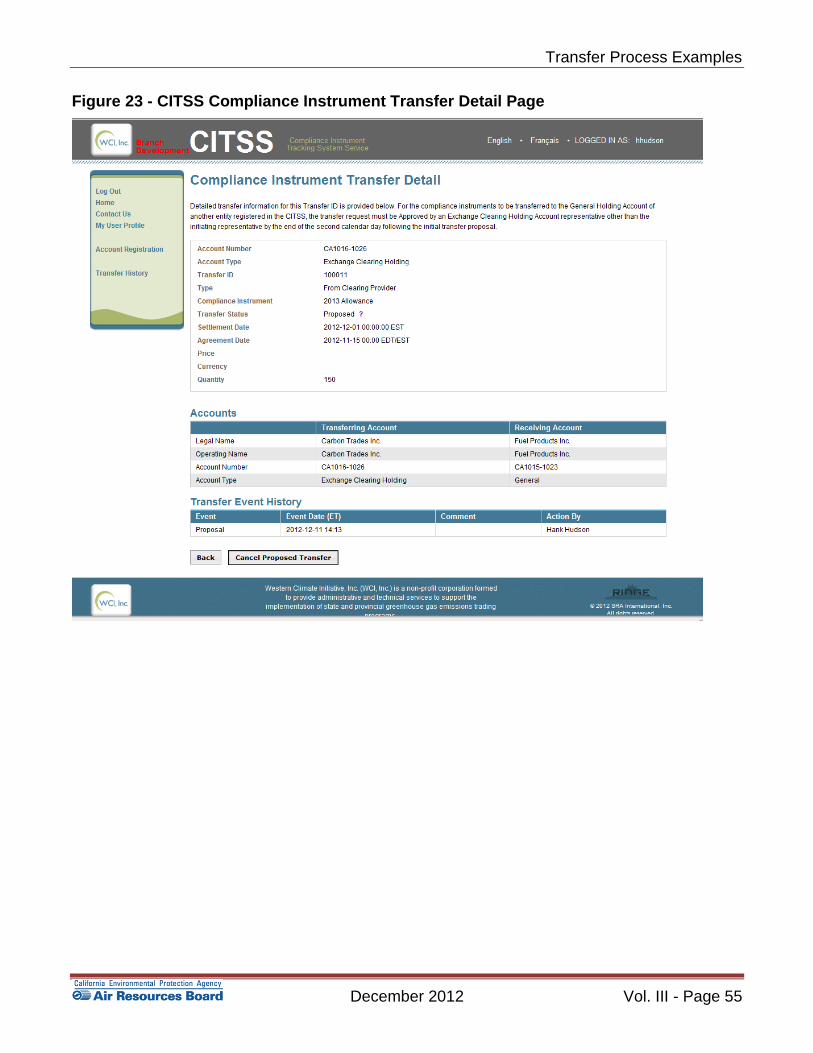
Transfer Process Examples
December 2012 Vol. III - Page 55
Figure 23 - CITSS Compliance Instrument Transfer Detail Page

Transfer Process Examples
Vol. III - Page 56 December 2012
4.5 Propose a Transfer from a Limited Use Holding Account to the Auction Account
This example presents the steps to transfer instruments from a Limited Use Holding Account to the Auction Account.
Only entities that are electrical distribution utilities (EDUs) designated by the Regulation receive a Limited Use Holding Account which contains allowances allocated by ARB. EDUs are required to consign allowances from their Limited Use Holding Account to quarterly auctions. Allowances in a Limited Use Holding Account can only be transferred (consigned) to the jurisdiction’s Auction Account.
The process to prepare a transfer request from a Limited Use Holding Account is essentially the same as the process to transfer from a General Account to the Compliance Account. A transfer from a Limited Use Holding Account to the Auction Account is an irreversible transfer.
STEP 1 Log in to the CITSS. If you log in to the CITSS as a registered user, you begin at the User Home Page which should look similar to Figure 24. The User Home Page is titled “Welcome to WCI CITSS” and provides access to three key categories of information: My Accounts, Account Applications, and Pending Transfers.
STEP 2 Review My Accounts. My Accounts shows entity accounts for which the user is the PAR, an AAR, or an AVA. My Accounts summarizes the information about each account, including the Legal and Operating Name of the entity, and the Account Type, Number, Jurisdiction, and Status.
There are four types of accounts that can be assigned to an entity in the CITSS: a General Account, a Limited Use Holding Account, a Compliance Account, and/or an Exchange Clearing Holding Account. A Covered Entity always has a General Account and a Compliance Account. Only entities that are electrical distribution utilities designated by the Regulation receive a Limited Use Holding Account. Only entities that are registered as Exchange Clearing Service providers receive an Exchange Clearing Service Account.
Each account has a unique account number. Account numbers are needed to Propose transfer requests in the CITSS. When proposing a transfer, CITSS will fill in the number of the transferring account that you select. However, the account number of the receiving account must be obtained from a representative of the receiving entity and manually entered. As shown, the User Home Page is a convenient location to locate account numbers.
STEP 3 Select the Transferring Account. As shown in Figure 20, in this example, the representative has access to a General Account, a Compliance Account, and a Limited Use Holding Account for the Sacramento Power Agency. To select the
desired account, click on the View button located in the Actions column on the far
right. In this example we will transfer compliance instruments from the Limited Use Holding Account. Click on the View button to select the Limited Use Holding Account.
This action will move you from the User Home Page to the Limited Use Holding Account Page for the selected account (Figure 25).
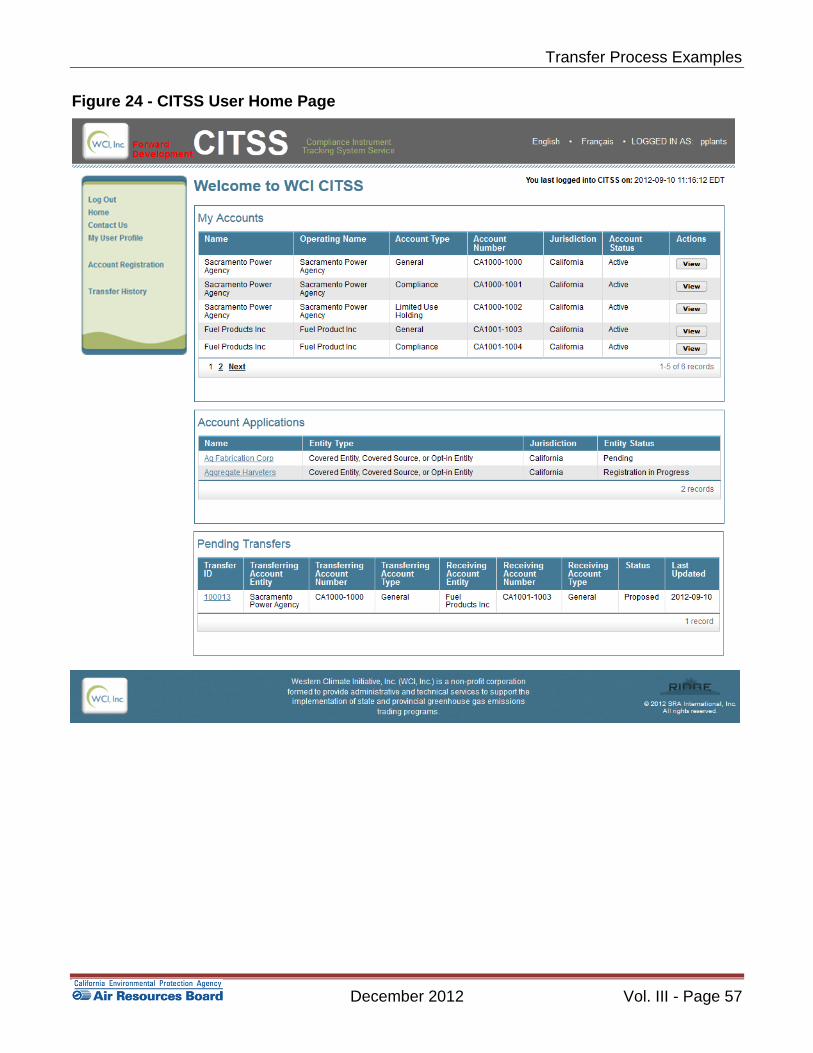
Transfer Process Examples
December 2012 Vol. III - Page 57
Figure 24 - CITSS User Home Page

Transfer Process Examples
Vol. III - Page 58 December 2012
Select Compliance Instruments to be Transferred
Figure 25 shows the Limited Use Holding Account Page for the Sacramento Power Agency. The Limited Use Holding Account is assigned account number CA1000-1002. The Limited Use Holding Account Page shows information about this account. Information summarized on this page includes account number, type, status, balance, and available balance. More
detailed information can be accessed through the Account Detail button.
There are two tabs in the window on the lower half of the page identified as Holdings and Transfers. The Holdings tab presents a detailed list of the compliance instruments currently in the account. The Transfer tab presents a history of transfers for this account. Transfer history can also be accessed using the link in the menu located in the upper left of the screen.
STEP 4 Review the Transferring Account Information. On the Limited Use Holding Account page for the Sacramento Power Agency, you.
Review the account name, number, and type to ensure that you have selected the correct transferring account.
Review the account status to ensure the account is in a status that allows transfers.
Review account balance and available balance to ensure there are sufficient compliance instruments in the account to transfer.
STEP 5 Select Compliance Instruments to be Transferred. After ensuring that account information and balances are in order, you begin preparation of a transfer request by determining which compliance instruments you wish to transfer.
The Holdings tab presents a list of the compliance instruments that are currently in this account. The list provides an itemized list of instruments in the account by Vintage, Jurisdiction, Type, Sub-type, Category, Project Code, and Quantity. Note that several of these fields (Sub-type, Category, and Project Code) are only applicable to offsets and will be blank for allowance records.
STEP 6 Once you have selected the instruments that you wish to transfer, you must press
the Initiate Transfer button at the right end of the line to begin preparation of a
transfer request. Click on the Initiate Transfer button at the right end of the line of the instruments you wish to transfer.
This action will take you to the Propose Consignment Transfer: Limited Use Holding Account page (Figure 26).

Transfer Process Examples
December 2012 Vol. III - Page 59
Figure 25 - CITSS Limited Use Holding Account Page

Transfer Process Examples
Vol. III - Page 60 December 2012
Propose Consignment Transfer
Transferring Account Detail – The CITSS automatically fills the Transferring Account Detail based on the previously selected transfer type and instrument type.
Receiving Account Details – CITSS automatically fills the Receiving Account Detail based on the previously selected transfer type. The representative enters the remaining details of the transfer in these fields.
STEP 7 Enter the desired number of allowances to transfer. The number of allowances that are to be transferred to the Auction Account is entered in the quantity field under the heading Receiving Account Transfer Information.
STEP 8 Enter a comment if you wish (not required). Comments are viewable by all representatives and viewing agents of the transferring entity and the jurisdiction representatives.
STEP 9 Certify to the Accuracy and Completeness of the Transfer. After completing the required transaction information fields, the representative of the transferring entity must attest to the accuracy and completeness of the transfer information by entering his/her password below the attestation.
STEP 10 Submit the Transfer Request. The transfer request is submitted to the CITSS by
clicking on the Submit button at the bottom of the screen. This finishes the
steps to Propose a transfer. The transfer request status is now Proposed.
Consigning allowance to the Jurisdiction’s Auction Account is a permanent and irreversible action. The consignment will be complete when the transfer is Approved by a second representative of the transferring entity.

Transfer Process Examples
December 2012 Vol. III - Page 61
Figure 26 - CITSS Propose Consignment Transfer: Limited Use Holding Account Page

Transfer Process Examples
Vol. III - Page 62 December 2012
Review the Submitted Transfer Request.
The page shown in Figure 27 is presented after a transfer to the Auction Account has been Proposed. The transfer is in the Proposed status awaiting approval by a second representative of the transferring entity. All Proposed transfers require Approval from a second representative of the transferring entity. See Section 4.6: Approving a Transfer Request.
The transfer is now identified by a unique Transfer ID number. This six-digit number can be found just below the account number and account type on this page. The Transfer ID number will be the identifier for this transaction in the CITSS.
The Transfer Event History window near the bottom of the page shows the time and date that the transfer request was proposed, as well as the representative that submitted the proposal. The transfer can be cancelled by the representative who entered the initial proposal as long as it is remains in the Proposed status.
Transfers from a Limited Use Holding Account to the Auction Account only require the transferring entity to complete the two steps, Propose and Approve. The transfer occurs immediately upon the second step (Approve), without the requirement for an acceptance from the receiving entity.

Transfer Process Examples
December 2012 Vol. III - Page 63
Figure 27 - CITSS Compliance Instrument Transfer Detail Page
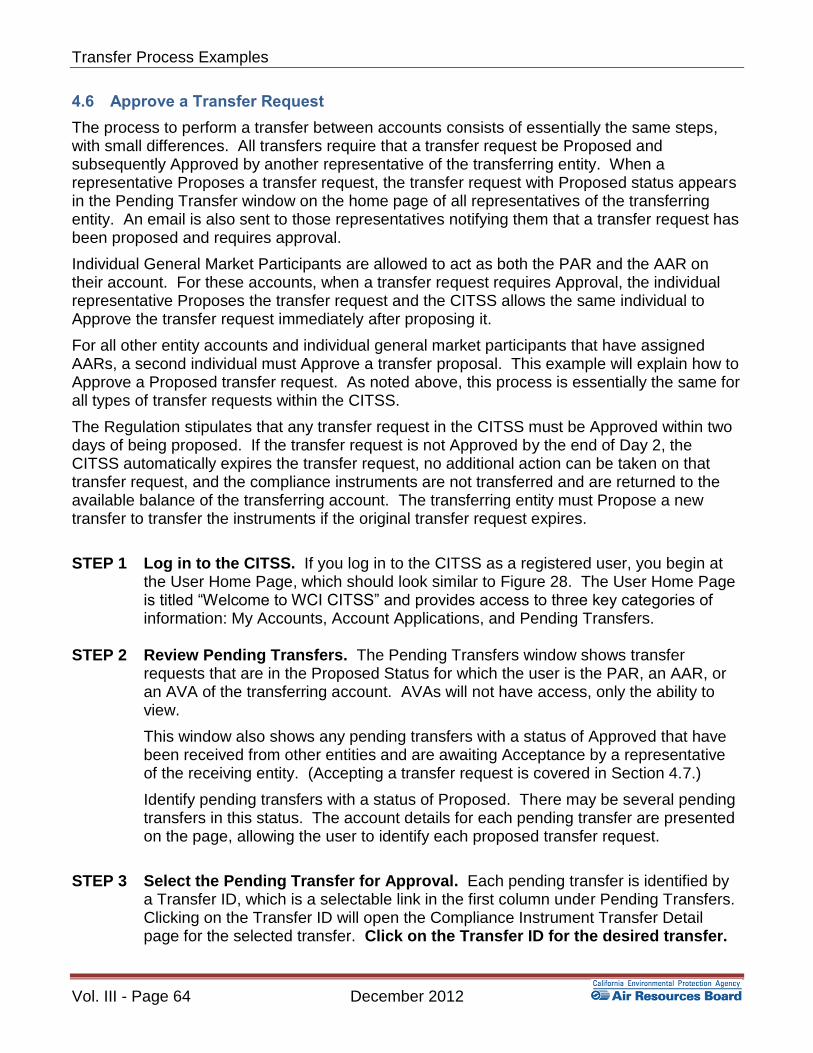
Transfer Process Examples
Vol. III - Page 64 December 2012
4.6 Approve a Transfer Request
The process to perform a transfer between accounts consists of essentially the same steps, with small differences. All transfers require that a transfer request be Proposed and subsequently Approved by another representative of the transferring entity. When a representative Proposes a transfer request, the transfer request with Proposed status appears in the Pending Transfer window on the home page of all representatives of the transferring entity. An email is also sent to those representatives notifying them that a transfer request has been proposed and requires approval.
Individual General Market Participants are allowed to act as both the PAR and the AAR on their account. For these accounts, when a transfer request requires Approval, the individual representative Proposes the transfer request and the CITSS allows the same individual to Approve the transfer request immediately after proposing it.
For all other entity accounts and individual general market participants that have assigned AARs, a second individual must Approve a transfer proposal. This example will explain how to Approve a Proposed transfer request. As noted above, this process is essentially the same for all types of transfer requests within the CITSS.
The Regulation stipulates that any transfer request in the CITSS must be Approved within two days of being proposed. If the transfer request is not Approved by the end of Day 2, the CITSS automatically expires the transfer request, no additional action can be taken on that transfer request, and the compliance instruments are not transferred and are returned to the available balance of the transferring account. The transferring entity must Propose a new transfer to transfer the instruments if the original transfer request expires.
STEP 1 Log in to the CITSS. If you log in to the CITSS as a registered user, you begin at
the User Home Page, which should look similar to Figure 28. The User Home Page is titled “Welcome to WCI CITSS” and provides access to three key categories of information: My Accounts, Account Applications, and Pending Transfers.
STEP 2 Review Pending Transfers. The Pending Transfers window shows transfer
requests that are in the Proposed Status for which the user is the PAR, an AAR, or an AVA of the transferring account. AVAs will not have access, only the ability to view.
This window also shows any pending transfers with a status of Approved that have been received from other entities and are awaiting Acceptance by a representative of the receiving entity. (Accepting a transfer request is covered in Section 4.7.)
Identify pending transfers with a status of Proposed. There may be several pending transfers in this status. The account details for each pending transfer are presented on the page, allowing the user to identify each proposed transfer request.
STEP 3 Select the Pending Transfer for Approval. Each pending transfer is identified by
a Transfer ID, which is a selectable link in the first column under Pending Transfers. Clicking on the Transfer ID will open the Compliance Instrument Transfer Detail page for the selected transfer. Click on the Transfer ID for the desired transfer.

Transfer Process Examples
December 2012 Vol. III - Page 65
Figure 28 - CITSS User Home Page

Transfer Process Examples
Vol. III - Page 66 December 2012
Approve a Proposed Transfer
STEP 4 Review the Proposed Transfer Request. The Compliance Instrument Transfer Detail Page (Figure 29) summarizes the selected Proposed transfer request.
The Transfer Event History window shows the time and date that the transfer request was proposed, as well as the representative that submitted the proposal.
A transfer request in Proposed Status can be cancelled by the individual who entered the proposal until the transfer request is approved.
STEP 5 Approve / Deny Transfer. Select the appropriate button to either approve or deny the Proposed transfer request. You may enter a comment if desired. Comments are viewable by all representatives and viewing agents of the transferring entity and the receiving entity.
STEP 6 Certify to the Accuracy and Completeness of the Transfer. After reviewing the required transaction information fields and designating an action (approve or deny), the representative of the transferring entity must attest to the accuracy and completeness of the information by entering his/her password below the attestation.
STEP 7 Approve the Transfer Request. The Approval (or Denial) is submitted to the
CITSS by clicking on the Process Transfer button at the bottom of the screen.
Transfers between an entity’s own accounts (General Account to Compliance Account), transfers to or from an Exchange Clearing Service Provider, or transfers to jurisdiction accounts (General Account to Retirement Account or Limited Use Holding Account to Auction Account) do not require acceptance by the receiving entity. These transfers only require the Propose and Approve steps to complete the transfer. In these transfers, the status of the Transfer will move to Complete as soon as the Approval is submitted. Transfers from one entity’s General Account to another entity’s General Account require Acceptance by a representative of the receiving entity. In these transfers, after the Approval is complete, the status of the transfer changes to Approved, the transfer shows in the Pending Transfer screen of the representatives of the receiving entity, and an email is sent to the representatives of both the transferring and receiving entity informing them that a change in the status of a transfer occurred.

Transfer Process Examples
December 2012 Vol. III - Page 67
Figure 29 - CITSS Compliance Instrument Transfer Detail Page

Transfer Process Examples
Vol. III - Page 68 December 2012
Review the Approved Transfer Request
After a transfer has been Approved, the CITSS returns to the Account Page for the account from which compliance instruments will be transferred when Complete, in this example the General Account Page (Figure 30). STEP 8 Review the Approved Transfer Request. The CITSS confirms the Approved or
Denied action taken on the Proposed transfer.
In this example, the message at the top of the General Account Page (Figure 30) indicates that the transfer has been Approved. CITSS logs the details of the action, and the transfer request status will change to Approved or Denied as appropriate.
If the transfer request does not require acceptance by the receiving entity, the CITSS will log the details of the approval and change the transfer status to Complete.
To review current and completed transfers, move to the Transfers Tab on the Account Page or the Transfer History accessible through the left hand navigation menu. Transfer History and the Transfer Tab are covered in Section 5 of this volume of the Users Guide.
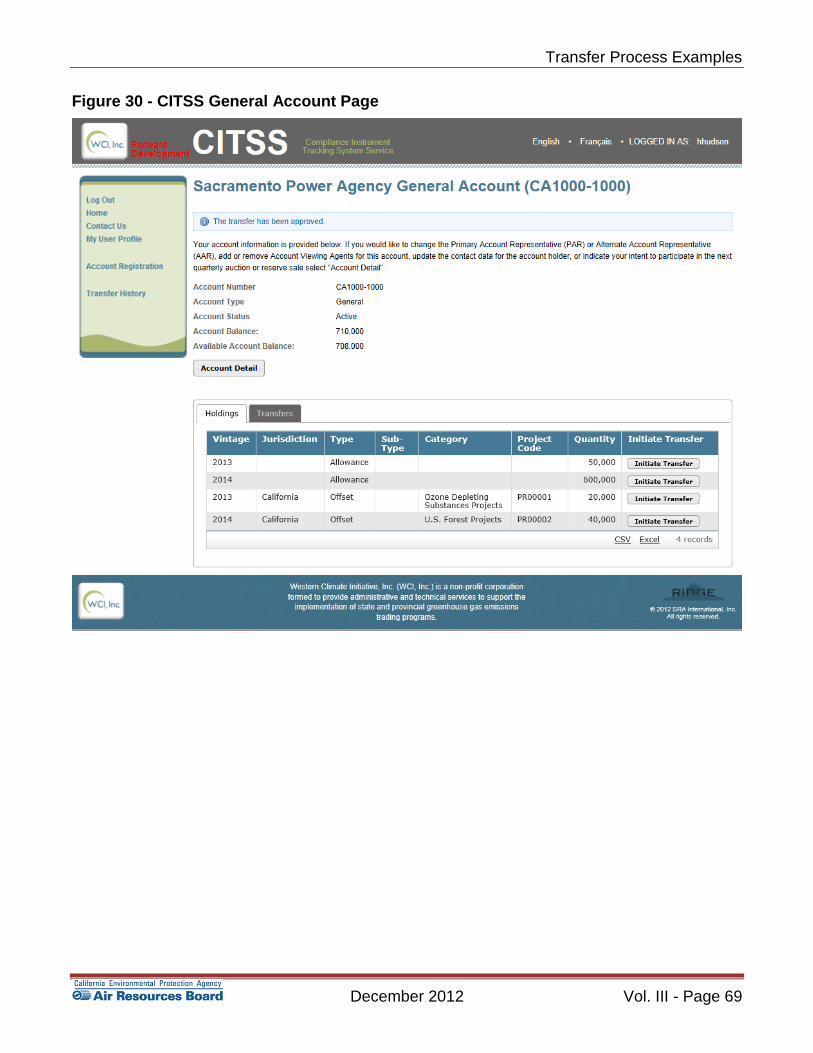
Transfer Process Examples
December 2012 Vol. III - Page 69
Figure 30 - CITSS General Account Page
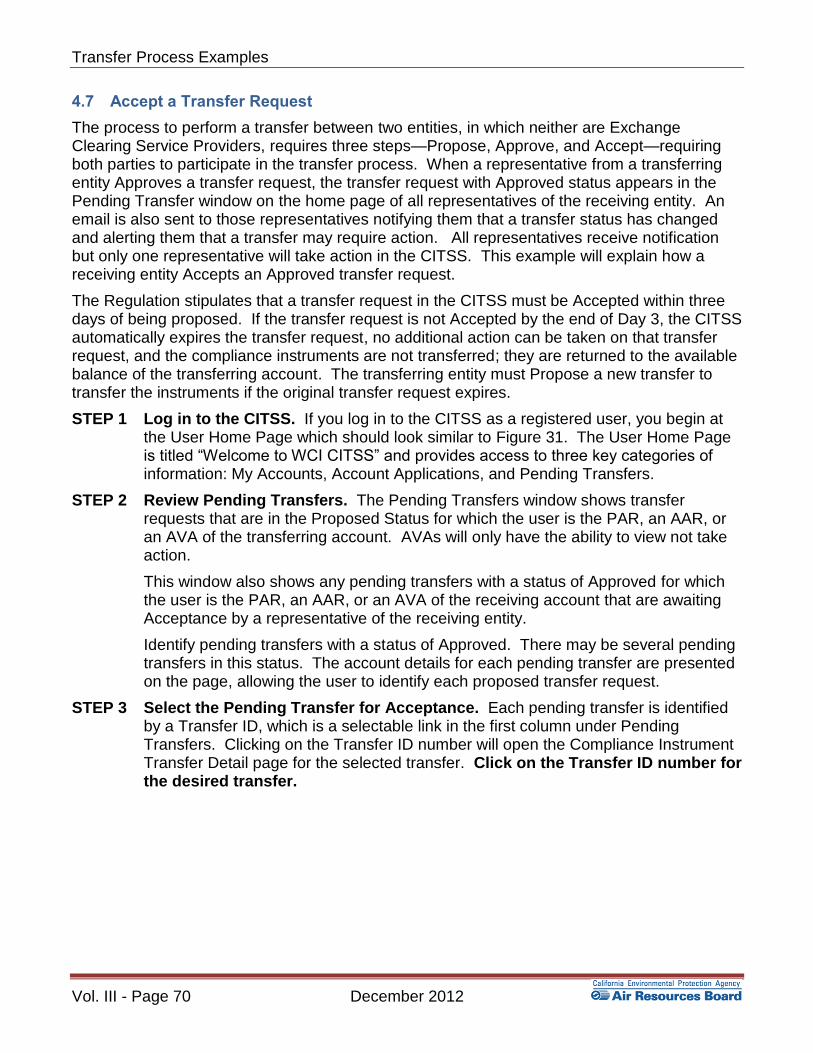
Transfer Process Examples
Vol. III - Page 70 December 2012
4.7 Accept a Transfer Request
The process to perform a transfer between two entities, in which neither are Exchange Clearing Service Providers, requires three steps—Propose, Approve, and Accept—requiring both parties to participate in the transfer process. When a representative from a transferring entity Approves a transfer request, the transfer request with Approved status appears in the Pending Transfer window on the home page of all representatives of the receiving entity. An email is also sent to those representatives notifying them that a transfer status has changed and alerting them that a transfer may require action. All representatives receive notification but only one representative will take action in the CITSS. This example will explain how a receiving entity Accepts an Approved transfer request.
The Regulation stipulates that a transfer request in the CITSS must be Accepted within three days of being proposed. If the transfer request is not Accepted by the end of Day 3, the CITSS automatically expires the transfer request, no additional action can be taken on that transfer request, and the compliance instruments are not transferred; they are returned to the available balance of the transferring account. The transferring entity must Propose a new transfer to transfer the instruments if the original transfer request expires.
STEP 1 Log in to the CITSS. If you log in to the CITSS as a registered user, you begin at the User Home Page which should look similar to Figure 31. The User Home Page is titled “Welcome to WCI CITSS” and provides access to three key categories of information: My Accounts, Account Applications, and Pending Transfers.
STEP 2 Review Pending Transfers. The Pending Transfers window shows transfer requests that are in the Proposed Status for which the user is the PAR, an AAR, or an AVA of the transferring account. AVAs will only have the ability to view not take action.
This window also shows any pending transfers with a status of Approved for which the user is the PAR, an AAR, or an AVA of the receiving account that are awaiting Acceptance by a representative of the receiving entity.
Identify pending transfers with a status of Approved. There may be several pending transfers in this status. The account details for each pending transfer are presented on the page, allowing the user to identify each proposed transfer request.
STEP 3 Select the Pending Transfer for Acceptance. Each pending transfer is identified by a Transfer ID, which is a selectable link in the first column under Pending Transfers. Clicking on the Transfer ID number will open the Compliance Instrument Transfer Detail page for the selected transfer. Click on the Transfer ID number for the desired transfer.

Transfer Process Examples
December 2012 Vol. III - Page 71
Figure 31 - CITSS User Home Page

Transfer Process Examples
Vol. III - Page 72 December 2012
Accept the Approved Transfer
STEP 4 Review the Approved Transfer Request. The Compliance Instrument Transfer Detail Page (Figure 32) summarizes the selected transfer request, showing the Transfer Status as Approved.
The Transfer Event History window shows the time and date that the transfer request was proposed and approved. The names of the representatives taking action on behalf of the transferring entity are not shown to the receiving entity representatives, only to representatives of the transferring entity.
STEP 5 Accept / Decline the selected Transfer. Select the appropriate button to either accept or decline the Approved transfer request. You may enter a comment if you wish. Comments are viewable by all representatives and viewing agents of the transferring entity and the receiving entity.
STEP 6 Certify to the Accuracy and Completeness of the Transfer. After reviewing the required transaction information fields and designating an action, the representative of the transferring entity must attest to the accuracy and completeness of the information by entering his/her password below the attestation.
STEP 7 Accept the Transfer Request. The acceptance of the transfer request is submitted
to the CITSS by clicking on the Process Transfer button at the bottom of the
screen.

Transfer Process Examples
December 2012 Vol. III - Page 73
Figure 32 - CITSS Compliance Instrument Transfer Detail Page

Transfer Process Examples
Vol. III - Page 74 December 2012
Review the Accepted Transfer Request
STEP 8 Review the Accepted Transfer Request. The CITSS confirms the Accepted or Declined action on the Account Page (Figure 33). In this example, the General Account Page indicates that the transfer has been accepted and the compliance instruments have been transferred.
CITSS logs the details of the acceptance and changes the transfer request status to Complete.
Figure 33 - CITSS General Account Page
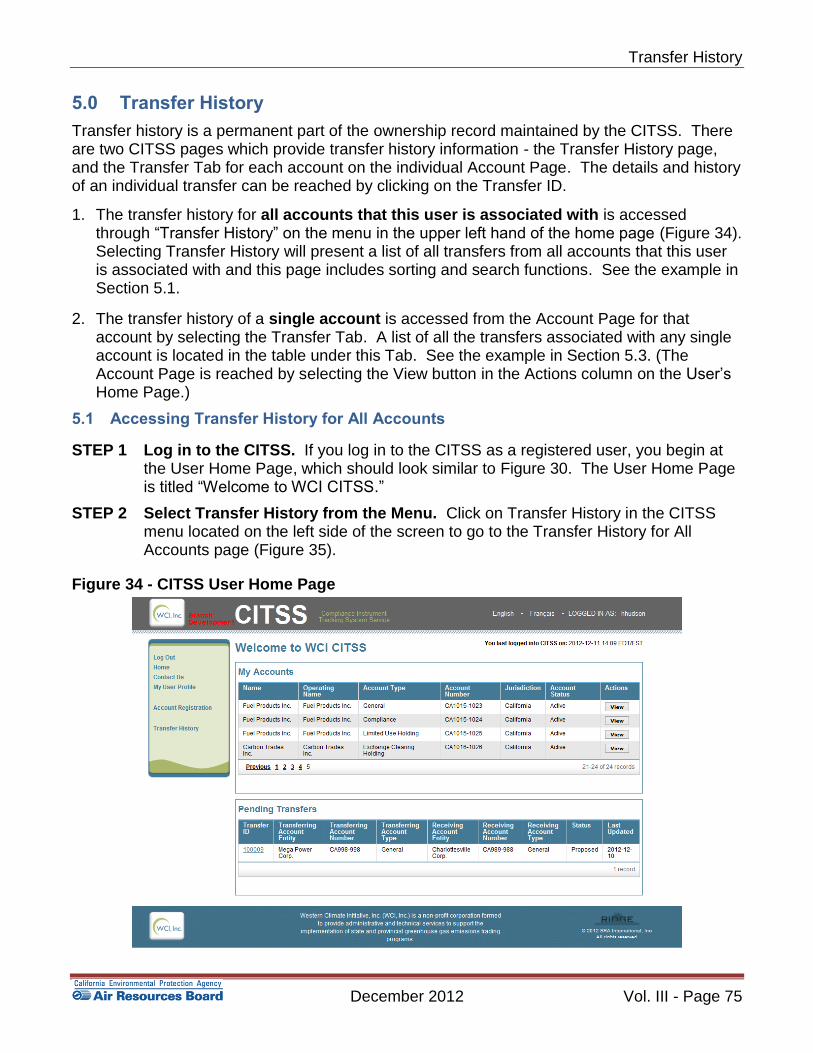
Transfer History
December 2012 Vol. III - Page 75
5.0 Transfer History
Transfer history is a permanent part of the ownership record maintained by the CITSS. There are two CITSS pages which provide transfer history information - the Transfer History page, and the Transfer Tab for each account on the individual Account Page. The details and history of an individual transfer can be reached by clicking on the Transfer ID.
1. The transfer history for all accounts that this user is associated with is accessed through “Transfer History” on the menu in the upper left hand of the home page (Figure 34). Selecting Transfer History will present a list of all transfers from all accounts that this user is associated with and this page includes sorting and search functions. See the example in Section 5.1.
2. The transfer history of a single account is accessed from the Account Page for that account by selecting the Transfer Tab. A list of all the transfers associated with any single account is located in the table under this Tab. See the example in Section 5.3. (The Account Page is reached by selecting the View button in the Actions column on the User’s Home Page.)
5.1 Accessing Transfer History for All Accounts
STEP 1 Log in to the CITSS. If you log in to the CITSS as a registered user, you begin at the User Home Page, which should look similar to Figure 30. The User Home Page is titled “Welcome to WCI CITSS.”
STEP 2 Select Transfer History from the Menu. Click on Transfer History in the CITSS menu located on the left side of the screen to go to the Transfer History for All Accounts page (Figure 35).
Figure 34 - CITSS User Home Page

Transfer History
Vol. III - Page 76 December 2012
STEP 3 Review and Search Transfer History for All Accounts. The list of transfers begins at the bottom of this page. The transfer list provides key information about each transfer, including:
Transfer ID
Date and Time Last Updated
Status
Transferring Account Name
Transferring Account Type
Receiving Account Name
Receiving Account Type
Quantity of Instruments The Transfer History for All Accounts page (Figure 31) provides a search function to locate transfers based on the following search fields:
Transfer ID
Transfer Status
Transfer Type
Account Name (for both the transferring and receiving accounts)
Account Number (for both the transferring and receiving accounts)
Account Type (for both the transferring and receiving accounts)
When conducting a search, select the desired search attributes, click the Search button to
initiate the search. The list of transfers will change to reflect the search results. Clicking on the Clear button resets the search, clearing all selected criteria. If none of the search attributes are selected, the list of transfers includes all transfers associated with the entity. The list will use as many pages as needed to display the transfers that meet the search criteria. You can also produce an Excel spreadsheet or a comma separated value (CSV) text file of the displayed transfers by selecting the appropriate link available in the lower right corner of the table. See Figure 36 for a partial sample downloaded excel spreadsheet.

Transfer History
December 2012 Vol. III - Page 77
Figure 35 - CITSS Transfer History for All Accounts
Figure 36 - CITSS Transfer History – Sample Excel Download (partial)

Transfer History
Vol. III - Page 78 December 2012
5.2 Accessing Transfer History for a Selected Account
The CITSS provides the capability to locate the transfer history of all transfers conducted on a single account on the Account Page, Transfers Tab. This example will illustrate the Transfer History for the General Account associated with Fuel Products Inc.
STEP 1 Log in to the CITSS. If you log in to the CITSS as a registered user, you begin at the User Home Page (refer back to Figure 34). The User Home Page is titled “Welcome to WCI CITSS.”
STEP 2 Select the Account. Click on the View button of the selected account; in this
example, the General Account. The button is located in the Action column. This will bring you to the Account Page for the selected account (Figure 37).
Account Page
Figure 37 shows the Account Page for the General Account, assigned account number CA1015-1023 and owned by Fuel Products Inc. The Account Page provides access to detailed information about this account. Information about the account summarized on this page includes account number, type, status, balance, and available balance. More information
is available via the Account Detail button.
Tabbed Tables
This page features two tables, located in the tabbed window in the lower half of the page. By default, this page opens to the Holdings tab. The Holdings tab presents a detailed list of the compliance instruments currently in the account.
STEP 3 Select the Transfers Tab. Click on the Transfers Tab next to the Holdings Tab. The Transfer tab, Figure 38, presents a history of transfers for this account.
The transfer list provides key information about each transfer, including:
Transfer ID
Date and Time Last Updated
Status
Transferring Account Name
Receiving Account Name
Quantity of Instruments Proposed for Transfer
Quantity of Instruments Transferred
You can also produce an Excel spreadsheet or a comma separated value (CSV) text file of the transfers in this table by selecting the appropriate link available in the lower right corner of the table.
The detailed history of an individual transfer is always reached by clicking on the Transfer ID number in the left column of the transfer history tables located on this page, as well as in the transfer table on the Transfer History of the All Accounts page.

Transfer History
December 2012 Vol. III - Page 79
Figure 37 - CITSS General Account Page
Figure 38 - CITSS Account Page –Transfers Tab

Transfer History
Vol. III - Page 80 December 2012
5.3 Transfer Detail Page
The Transfer Detail Page (Figure 39) for an individual transfer is always reached by clicking on the Transfer ID number. This number is located in the left column of the transfer history tables located on the Transfer History for All Accounts page (Figure 35) or the individual Account Page, Transfers Tab (Figure 38).
As shown in Figure 39, the Transfer Detail Page presents all the transfer information as well as the history of actions taken on the transfer.
The top window on this page provides the detail of the transfer as entered in the CITSS when the transfer was Proposed. This display will vary depending on the type of transfer just as the data that was entered in the CITSS to conduct a transfer varies depending on the type of transfer. The fields that will always be displayed include the transferring account number and type, the transfer ID, the transfer type, type of instruments involved, the status and the quantity of instruments entered for the transfer request. Figure 35 displays the Transfer Detail for a transfer occurring between two entity’s general accounts so it also includes the additional fields that were entered when this transfer was Proposed, including settlement and agreement dates, type of contract, trading venue, identification if the transfer was to a corporate associate, price and currency.
The next window on this page, labeled Accounts, will always display the transferring and receiving account details.
The window near the bottom of the page, labeled Transfer Event History, include the following columns: Event, Event Date, Comments, and Action By.
The Event column identifies the actions that were conducted on this transfer sequentially. Possible actions are: Proposed, Cancelled, Approved, Denied, Accepted, Declined, Expired and Complete. Each of these actions is described in the transfer process section of this user guide.
The Event Date includes the date and time each action was submitted to the CITSS in prevailing Eastern Time, i.e., Eastern Time seasonally adjusted for Daylight Savings.
Any comments made during the event are viewable by all representatives and viewing agents of the transferring entity and the receiving entity.
The name of the individual that performed each action is only viewable by representatives of the same entity as the individual making the entry. For instance, the name and any comment entered by a representative of the transferring entity are only viewable to the other representatives of the transferring entity. Similarly, the names of the representative of the receiving entity will be visible to representatives of the receiving entity.
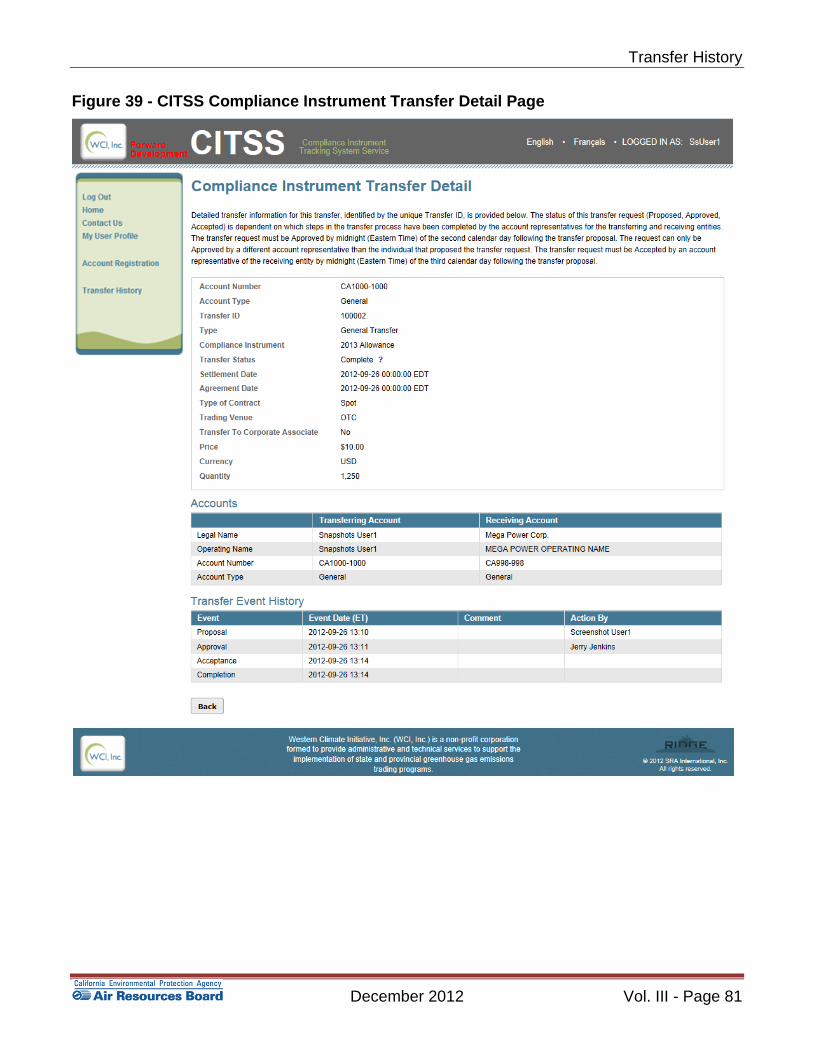
Transfer History
December 2012 Vol. III - Page 81
Figure 39 - CITSS Compliance Instrument Transfer Detail Page

Back Cover
Volume III CITSS User Guide