course introduction course goals - washington state criminal justice training commission - patrol...
TRANSCRIPT
Washington State Criminal Justice Training Commission - Patrol Rifle Instructor Course 2010
Course Introduction
The Patrol Rifle Instructor Course is intended for law enforcement personnel who have completed the CJTC Level I Handgun Instructor Course and have a working knowledge of operation, deployment and application of the Patrol Rifle in the law enforcement environment and teach them how to impart these skills to other law enforcement personnel. This is not designed as an operator’s course or a “shooting” course. Although it is expected that attendees’ abilities will be enhanced as they are exposed to the course curriculum. Participation will require a demonstration of safe weapon handling, marksmanship and manipulation skills by successful completion of the qualification course to gain entrance.
Course Goals Upon successful completion of this course, students will have demonstrated the following:
• Model and instruct others in safe weapon handling, on and off the range.
• Model and instruct others in the fundamentals of marksmanship as applied to the patrol rifle including similarities and differences to handgun fundamentals.
• Model and instruct others in the safe and efficient operation, manipulation, and
application of the patrol rifle.
• Develop lesson plans containing all required elements.
• The ability to manage a safe and effective firing line for dry and live fire exercises.
• Knowledge of general weapon maintenance procedures as it relates to the patrol rifle.
• Knowledge and basic understanding of internal, external and terminal ballistics as it relates to ammunition commonly used in the patrol rifle.
• Knowledge and basic understanding of the issues required to assist their agencies in
establishing a patrol rifle program or improving existing programs, specifically regarding weapons, ammunition, equipment, training, and policies.
Students will be evaluated by instructors throughout the course. Successful completion will be demonstrated according to performance objectives listed in the lesson plans for each block of instruction and may include verbal and written tests, homework assignments and class presentations.
Section 1 - Page 1 of 24 Rev. - 011310
Washington State Criminal Justice Training Commission - Patrol Rifle Instructor Course 2010
Acknowledgments
The Washington State Criminal Justice Training Commission claims no domain over the information in this manual. The information contained herein is an attempt to standardize generally accepted skills, practices and techniques in the area of law enforcement firearms related issues. The information in this manual is drawn from the vast body of knowledge of local, statewide, national and international firearms instructors. We thank those who have blazed the trail and taken time to put their findings and experiences into writing. It is doubtful that originators of techniques or skills could be traced with certainty, but when possible, we have endeavored to give credit to those who first published the information used in this manual. The need for statewide uniformity of instruction requires that we settle on one or two techniques to accomplish a given task. While an attempt has been made to teach the best skills and techniques, we recognize that occasionally, the student’s physical and mental differences require consideration of options. We are determined to present the best total package for the safety and well being of Washington State’s law enforcement as well as civilian community. In that context, we will continue to review and update the information covered in this manual. Please direct any questions or comments concerning any aspect of this course manual to the Program Director, Professional Development Division at the Washington State Criminal Justice Training Commission. (206) 835-7300.
CONTINUING EDUCATION
The following are suggested reading to enhance your knowledge of riflecraft.
Books Cooper, Jeff. (August 1997). The Art of the Rifle. Paladin Press. ISBN: 0873649311 Fairburn, Richard. (1994). Police Rifles - Selecting the Right Rifle for Street Patrol and Special
Tactical Situations. Boulder, Colorado: Paladin Press Book. Farnam, John S. (January 1, 1998). The Farnam Method of Defensive Shotgun and Rifle
Shooting. Defense Training International Publications, Inc. ISBN: 0965942201 Felter, Brian A. (1991). Police Shotguns And Carbines. Englewood Cliffs, New Jersey: Prentice-
Hall. Lauck, Dave M. (May 1996) The Tactical Marksman. Paladin Press. ISBN: 0873648811 Plaster, Maj. John L. (January 1993).The Ultimate Sniper: An Advanced Training Manual for
Military and Police Snipers. Paladin Press. ISBN: 0873647041 Lamb, Kyle E.(2008). Green Eyes & Back Rifles: Warriors Guide to the Combat Carbine.
Trample and Hurdle Publishers
Section 1 - Page 2 of 24 Rev. - 011310
Washington State Criminal Justice Training Commission - Patrol Rifle Instructor Course 2010
Manuals
Paladin Press. (1996). How To Shoot Your M16 / AR-15 In Training And Combat. Boulder, Colorado: Paladin Press.
U.S. Army / U.S. Marine. Operator’s Manual w/components list, Rifle 5.56mm -M16A2. Colt Safety and Instruction Manual. Colt AR-15 Semi-Automatic Rifles.
Articles Roberts, Gary K. (D.D.S.) and Bullian, Michael E. (Special Agent, Calif. Dept. of Justice) Comparison of the Wound Ballistic Potential of 9mm vs. 5.56mm (.223) Cartridges for Law
Enforcement Entry Applications.
Section 1 - Page 3 of 24 Rev. - 011310

Washington State Criminal Justice Training Commission - Patrol Rifle Instructor Course 2010
The Four General Safety Rules
No mechanical device has a will of its own. Any tool in any profession must always be
handled with respect for its potential for injury. Unfortunately, familiarity with tools can lead to a casual attitude, sometimes resulting in injury or even death. You cannot rely on experience as your only teacher. Your first mistake may very well be your last. The human element is the unpredictable variable in establishing safety standards for the operation of firearms. Our busy lives are filled with mental distraction. Pressures from fatigue, illness, occupations and relationships do not disappear simply because we are handling a firearm. The following safety rules must not only be memorized, but must also be indelibly etched into our subconscious minds. This occurs only when they are practiced without compromise. Unfortunately, stating an “absolute rule” and then expanding on it by listing obvious exceptions renders the rule impotent and thereby easily ignored. It leads to the student thinking: “If the instructor’s exceptions to a rule are OK, why aren’t my exceptions just as valid?” The desire to minimize this discrepancy leads us to reconsider The Four Safety Rules and hopefully, to refine their wording, thereby clarifying how they are to be applied in the always-fluid 360° world of law enforcement.
1. ALWAYS TREAT ALL GUNS AS LOADED.Handling a firearm casually when it is “unloaded” (i.e.: during dry practice and cleaning) and carefully when “loaded” is a sure recipe for disaster. Intelligence and memory are subject to the human frailties described above. For example, as firearms instructors, it is not uncommon for us to have both inert and live weapons in our hands in the course of a training day. If we are thoughtless in our handling of inert weapons in demonstrations, that attitude will inevitably carry over to our handling of live weapons. Don’t take that chance. Treat all weapons the same. The frequent response that “I didn’t know it was loaded” is of no comfort to those affected by the consequences.
2. NEVER POINT THE WEAPON AT ANYONE YOU DO NOT INTEND TO
SHOOT There is an undeniable need to develop and reinforce habits that are thoroughly ingrained as unconscious competence. These habits must be applied every time we have a weapon in our hands. The same amount of cautious muzzle awareness that we use when cleaning the weapon, training at the range or at home, and demonstrating in the classroom, must be practical as well as applicable to dealing with suspects on the street. Despite our best efforts and intentions, weapons can discharge unintentionally (Sec. 1). It is in our best interests to ensure that if this does occur, there are NO unintended gunshot victims and the LEAST amount of property damage possible. At the same time, we are obligated to ensure that the READY position (Sec. 1) of the weapon allows for the most efficient and accurate response to a threat without putting the officer at a disadvantage.
Section 1 - Page 4 of 24 Rev. - 011310
Washington State Criminal Justice Training Commission - Patrol Rifle Instructor Course 2010
The Four General Safety Rules
Continued
3. KEEP YOUR TRIGGER FINGER INDEXED ABOVE THE TRIGGER GUARD UNTIL YOUR SIGHTS ARE ON-TARGET AND YOU HAVE DECIDED TO FIRE.This is one of the most commonly violated of all the safety rules. When violated along with Rule #2, it frequently leads to disaster. When the human being is startled, loses balance, or performs certain physically demanding tasks, there is an unavoidable physical response. If, at that time, the finger is in a position where it can get to the trigger, the weapon will fire. To minimize this risk, when not firing the weapon, the shooter must “index” the trigger finger above the trigger guard alongside the receiver. This is addressed in more detail in Sec. 1.
4. BE SURE OF THE TARGET, AS WELL AS THE SURROUNDINGS AND
BEYOND. This rule stresses first, the need to confirm that our target is indeed one that we intend to shoot, and secondly, that if we do shoot, we will not endanger innocent bystanders who may be in front of, alongside, or behind the threat.
Before we start, a safety note: Anytime one of these ARs is picked up, the handler should manipulate it with the strong hand on the pistol grip, trigger finger straight alongside the lower receiver, and the strong thumb should be resting on top of the horizontal safety lever (selector). Grabbing the pistol grip is easy as that is what it was designed for, straightening the trigger finger to index is not natural and must be trained, and the thumb on top of the safety gives immediate tactile knowledge that the selector is on “safe” (lefties can use their trigger finger on the selector). Some instructors around the country refer to this manipulation skill as the “Tactical Index”. From day one a student should be mandated to handle these weapons in this fashion as this is the way they should be handled in the class room, on the range, and in the street. As an instructor you need to ensure that you not only model, but enforce this behavior. Condition Check Rule: Whenever taking possession of a rifle, immediately confirm that the safety is engaged and perform a “press check” (sec. 4) to determine whether or not it is loaded.
Section 1 - Page 5 of 24 Rev. - 011310
Washington State Criminal Justice Training Commission - Patrol Rifle Instructor Course 2010
Involuntary Muscle Contractions and Unintentional Discharges *
Involuntary contractions are contractions of the muscles of the body (including limbs) that occur without conscious intent or decision. They are “hard wired” into the human being and no amount of training can keep them from occurring. In the realm of handling firearms, it is imperative that users, as well as those who train them, understand the consequences of the body of scientific evidence and conduct training accordingly. Research indicates that there are at least three uncontrollable stimuli that could cause involuntary contractions of sufficient energy to result in unintentional discharges if the index finger is in position to come into contact with the trigger of the firearm. Each of these stimuli is routinely present in the world of the law enforcement officer. 1. Startle Reaction - An unexpected auditory or visual stimulus can cause an immediate, uncontrollable response by the muscles of the body causing (among other things) the trigger finger to suddenly contract with enough force to fire a weapon. “The Startle reaction evokes rapid involuntary contractions that begin with an eye blink and progress to include bending of the neck, trunk and shoulders, elbows, fingers, and legs. The reaction in the hands, which occurs less than 200 ms (milliseconds) after the stimulus (loud sound), is for the person to make a fist.”*1 2. Loss of Balance – Also referred to as Postural Instability. “It is essentially impossible for one body segment to perform an action without causing other body segments to (also) move.”*1 When balance is disturbed, rapid involuntary contractions are evoked in an attempt to return the body to a position of equilibrium. A person who slips on ice for example, who is holding a weapon will instinctively clutch it. The location of the index finger when that occurs again sets up the possibility of an unintentional discharge. 3. Sympathetic Contractions - Also referred to as Overflow Effect or Mirror Movement. This is defined as an involuntary contraction that occurs in the muscles of one limb when the same muscles in the other limb are performing an intended forceful action. Studies show that a sudden exertion with one hand causes approximately 25% (average) of that force to be transferred to the other hand. Enoka points out that “for an average man (20-45 years, 170 lbs, 5ft. 10 in), peak handgrip strength is about 125 lbs. The index finger contributes between 30 to 60% of the force to peak grip strength, depending on the position of the thumb and the width of the grip. Based on an average index finger contribution of 45%, the index finger in opposition with the thumb is capable of exerting 56 lbs of force during a maximal handgrip contraction…a maximal sympathetic contraction would involve an index finger force of about 14 lbs, which is sufficient to overcome most trigger pulls on handguns.”*1 It should also be noted that the amount of energy transferred appears to increase with the amount of stress. While no amount of training will absolutely prevent involuntary muscle contractions, data “indicates that it is possible, with training, to modify the involuntary muscle contractions that are associated with reflexes.”*2 It would appear therefore, that incidents of unintended discharges of firearms would be minimized by rigid reinforcement in three areas of training.3
Section 1 - Page 6 of 24 Rev. - 011310
Washington State Criminal Justice Training Commission - Patrol Rifle Instructor Course 2010
Involuntary Muscle Contractions and Unintentional Discharges *
Continued 1. Insist on what is commonly referred to as trigger finger “indexing.” This is the practice of resting the trigger finger alongside the receiver of the weapon, above the trigger guard any time you are not firing the weapon which is in your hand. (Safety rule #3) Since the
larger muscles of the forearm can overcome the muscles of the fingers this, by itself is not to be considered a “failsafe” solution to the problem of unintentional discharges.*1
It is a vital part, but only a part, of the system which needs to be put in place to minimize such occurrences.
2. Personnel should regularly participate in realistic, job-related scenario training which
should include situations incorporating weapon handling and decision making under stress.
3. Studies would indicate that in spite of training to the contrary, some officers under stress
may violate Safety Rule #3 and unknowingly, perhaps briefly, move the index finger from its “indexed” position to the trigger. This is frequently referred to as “trigger affirmation.”*3 If one of the aforementioned stimuli was to occur during this act and the weapon was pointed at a subject being challenged or held at gunpoint, an unintended discharge could have disastrous ramifications for all involved. Training should occur that addresses both trigger-finger indexing and challenging/covering suspects at gunpoint with the weapon held in a guard/low ready position off of the subject. If an unintended discharge of the weapon were to occur while the weapon was in this position, both the officer and the suspect would likely be protected from undesired consequences. This guard/low ready position would additionally provide the officer with the tactical advantage of a more open field-of-view of potential danger. Officers should be trained using this technique to develop skill and confidence in their ability to deliver timely, accurate shots without sacrificing Safety Rules #2 and #3.
*The above is a brief summary of the following studies included in the resource section of this manual
1 Involuntary Muscle Contractions and the Unintentional Discharge of a Firearm Dr. Roger Enoka Feb.13, 2003 (Pg. 8) (Pg. 3) (Pg. 6) (Pg. 9)
2Does the finger obey the brain – The risk of unintentional discharge of firearms Christopher Heim, Dietmar Schmidtbleicher, & Eckhard Nieberhall – University of Frankfurt, Germany (Sec. 7.2.1) 3The Trigger Finger dilemma Thomas J Aveni
Section 1 - Page 7 of 24 Rev. - 011310
Washington State Criminal Justice Training Commission - Patrol Rifle Instructor Course 2010
Range Procedures
Whether addressing handguns or long-guns, range procedures are fundamentally the same. Range procedures from the Level I Handgun manual are essentially recreated here but have been expanded to address specific issues concerning training with long-guns. COLD RANGE: All firearms are in an unloaded condition when not engaged in a shooting exercise or drill. They will be loaded only on the command of the instructor or range officer in charge and unloaded prior to leaving the firing line. This procedure may be appropriate when instructing novice or unknown-skill shooters or to fulfill specific goals of the training session. The weapon is nevertheless treated as if it is a loaded weapon at all times in compliance with Safety Rule #1. HOT RANGE: The weapon is loaded, either on command of the instructor or because it was transported onto the range in that condition. The shooter is expected to make every attempt to keep the firearm fully loaded and ready to fire (“continuity of fire” is a term defined: Sec. 1) at all times unless given specific instructions to the contrary. For the purposes of this Patrol Rifle Instructor Course, unless directed otherwise, we will be conducting a “Hot” range. Students will be expected to comply with the following:
1. Compliance with The Four General Safety Rules (Section 1) as well as where the rifle
should and should-not be, (Section 1) will be strictly enforced at all times.
2. Handguns are to be kept holstered at all times unless the student is actively participating in training requiring the immediate use of the handgun. When not actively participating in dry or live fire exercises, all long-guns will be carried in a prescribed sling-carry mode or, as directed by range instructors. Muzzle discipline must be maintained at all times!
3. Whether the training is being conducted on a “square range” or during scenario-based or
live-fire-house type of training, students must keep the muzzle of all weapons pointed in a safe direction. This includes when scanning, communicating with instructors, dealing with malfunctions or any other weapon manipulation.
4. Whenever the handgun is holstered all retention devices must be immediately secured.
Whenever the rifle is hanging hands-free from the sling the safety will be ON.
5. You may pick up any dropped equipment or ammunition from the ground if it is immediately accessible and does not put you or anyone else in the line of fire. YOU MUST BE MUZZLE CONSCIOUS! (SEE RULE # 2) Pick up dropped equipment in a safe and tactical manner. As accomplished firearms instructor you will be held to the HIGHEST SAFETY STANDARDS. You must demonstrate MUZZLE AWARENESS at all times. Patrol rifles don’t have convenient holsters into which the weapon can be secured.
Section 1 - Page 8 of 24 Rev. - 011310
Washington State Criminal Justice Training Commission - Patrol Rifle Instructor Course 2010
Range Procedures
Continued
6. Unless specifically instructed to the contrary, students may manipulate their weapons and magazines during training when no other person is downrange and when doing so does not put their own safety or the safety of another at risk.
7. No live ammunition is permitted in the weapon cleaning area(s) 8. No eating, drinking, (including camel backs) or use of any tobacco products will be
allowed on the ranges or in the weapon cleaning areas. 9. Be aware that during live fire exercises, hot spent shell casings may find their way inside
a student’s shirt or behind eye protection. Heat generated from a spent shell casing from a rifle is much more intense than that from a handgun. Should this occur, it is the student’s responsibility to ensure that the muzzle of their weapon never points at themselves or others and their trigger finger remains “indexed.” They shall not move from the firing line/position. They should safely holster any handguns and control the muzzles of any long-guns, placing the Safety ON, before and during any attempt to remove the offending casing.
10. Should conditions arise making it unsafe for firing to continue, the person observing that
hazard (student or instructor) shall shout “cease fire.” All persons will immediately stop their activity, loudly repeat the “cease fire” command, holster their handgun (if it is not already holstered,) engage the weapon’s safety, sling their long-guns as prescribed while controlling the muzzles, and stand fast until they receive further instructions.
Section 1 - Page 9 of 24 Rev. - 011310
Washington State Criminal Justice Training Commission - Patrol Rifle Instructor Course 2010
Range Safety Equipment
Individual ranges and range configuration may require specific regulations. Among many other tasks, the firearms instructor is responsible for the safety of those they are training. Planning ahead can mean more time spent training and less time spent treating the wounded. We should constantly strive to provide as relevant and realistic training as possible without exposing our students to undue risk. All range rules should be published, posted and reviewed with the students prior to the training session. It needs to be clear that the range rules and procedures apply to all present regardless of position, rank, complexity of training, or skill level of the students. Since clear understanding of instructions and immediate compliance to commands is vital to range safety, a system of voice amplification should be in place and used during all live fire exercises. This public address/bullhorn system should be tested with student ear protection in place to ensure its effectiveness. Range instructors should be easily identifiable by uniform clothing/caps. Red is the preferable color for instructors on the range during daytime hours. Since the color red tends to look black in darkness, consideration should be given to the use of yellow or orange for training under night conditions. Special consideration should be given to the use of lights or chemical illumination sticks for identifying all instructors during any adverse lighting conditions. The following are items of equipment each student is required to wear while on the range during training conducted by CJTC personnel.
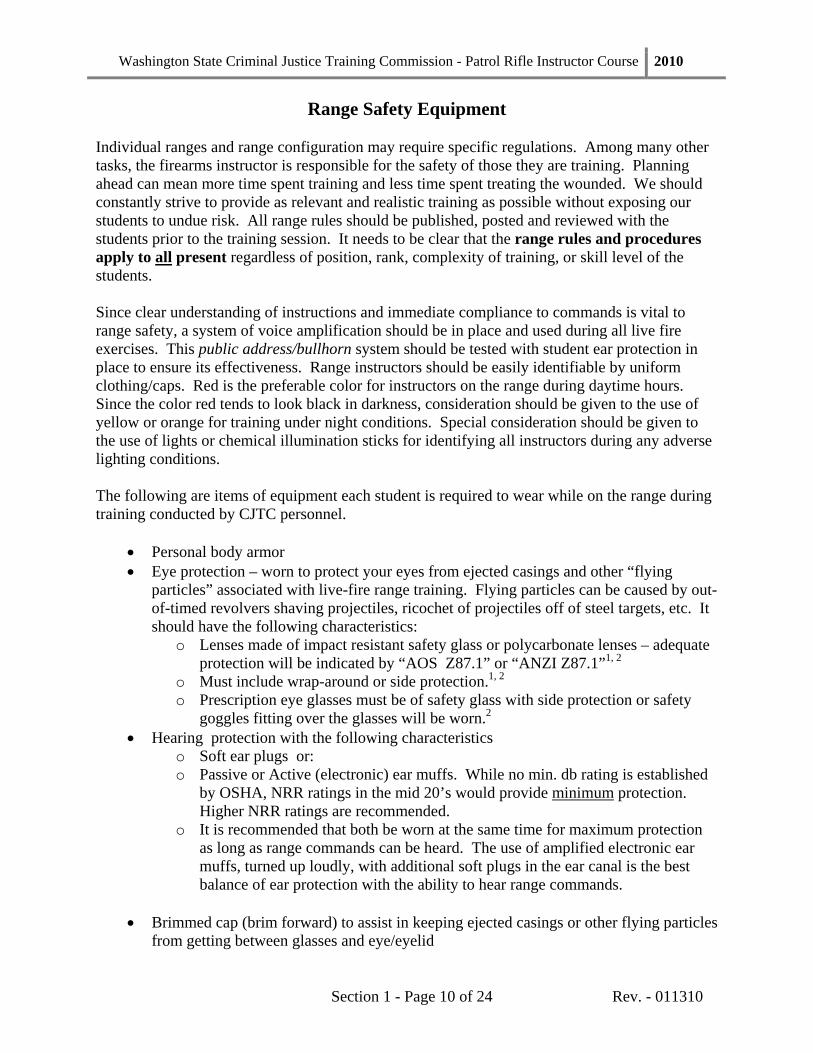
• Personal body armor • Eye protection – worn to protect your eyes from ejected casings and other “flying
particles” associated with live-fire range training. Flying particles can be caused by out-of-timed revolvers shaving projectiles, ricochet of projectiles off of steel targets, etc. It should have the following characteristics:
o Lenses made of impact resistant safety glass or polycarbonate lenses – adequate protection will be indicated by “AOS Z87.1” or “ANZI Z87.1”1, 2
o Must include wrap-around or side protection.1, 2 o Prescription eye glasses must be of safety glass with side protection or safety
goggles fitting over the glasses will be worn.2 • Hearing protection with the following characteristics
o Soft ear plugs or: o Passive or Active (electronic) ear muffs. While no min. db rating is established
by OSHA, NRR ratings in the mid 20’s would provide minimum protection. Higher NRR ratings are recommended.
o It is recommended that both be worn at the same time for maximum protection as long as range commands can be heard. The use of amplified electronic ear muffs, turned up loudly, with additional soft plugs in the ear canal is the best balance of ear protection with the ability to hear range commands.
• Brimmed cap (brim forward) to assist in keeping ejected casings or other flying particles
from getting between glasses and eye/eyelid
Section 1 - Page 10 of 24 Rev. - 011310
Washington State Criminal Justice Training Commission - Patrol Rifle Instructor Course 2010
Range Safety Equipment
Continued Prior to the training session students should receive emergency procedures/first aid briefing to include identification of on-sight EMTs and locations of:
• 1st Aid Kits • Fire extinguishers • AEDs • Emergency telephones to include dialing procedures (“9 + Number”) • Hand/Eye washing stations • Appropriate weapon loading/unloading stations or areas • Safe weapon maintenance areas
Weapon cleaning areas need to be equipped with:
• Rubber gloves • Eye protection • Hand washing stations • Eye washing stations • Hearing protection while using compressed air
1 OSHA regulations per Safety Glasses USA.com included in Resource section 2 OSHA regulations per U.S. Dept. of Labor included in Resource section
Section 1 - Page 11 of 24 Rev. - 011310

Washington State Criminal Justice Training Commission - Patrol Rifle Instructor Course 2010
Where the Rifle Should and Should Not Be
The manner in which we handle our firearms is one indicator of professionalism. Good initial habits need to be established by trainers and reinforced throughout the career of the law enforcement officer. When we allow complacent, casual handling of firearms by our students we do them a disservice. When we are poor models of good weapon handling we are failing to equip them with the tools to be winners of the deadly force confrontations they may face on the streets. The world of law enforcement has plenty of hazards without us getting complacent in handling our firearms. Whether at the range, in your residence, or working on the street, some basic guidelines can work to our advantage to keep ourselves, our family, our fellow officers, and the public safer and at the same time equip us for a more efficient response to a deadly force confrontation. Make it habit! The following are examples of proven guidelines focusing on where the rifle should and should not be.
Where the Rifle should be Unless you are cleaning or performing maintenance on your rifle, it should ONLY be in one of the following places.
1. STORED: When the rifle is not needed to respond to an immediate perceived threat or to train for such an occasion, it should be “stored.” When it is not under the immediate control of the owner/operator it should be secured to keep it from falling into the hands of any unauthorized persons. Locking it in an armory, a gun safe, a storage rack, or vehicle trunk would be examples of unattended secure storage.
Note: While a patrol vehicle trunk may fit the requirements of secured storage, it is far from the ideal place to store a patrol rifle. The patrol rifle should be up front with the officer where they would have immediate access to the weapon. The time delay it would take to exit the vehicle, go to the trunk, obtain the rifle, and make it operational could be the difference between life and death. In addition to that, the last thing we want officers to have to do when faced with a deadly encounter is to focus their attention (bury their eyes/head) in the trunk of their car and take their eyes off the threat. And finally we have learned over the years that the trunk of a vehicle is an extremely hostile environment for storing any type of equipment. The 100 degree temperatures of summer, the sub freezing and thawing cycles of winter, and the constant changes in humidity all conspire to destroy any metal or electronic components stored inside. The patrol rifle belongs up front, with the officer.
It should be noted that agency policy may modify the definition of “secure storage.” Unlike handguns, long guns do not have a holster to store the weapon on the person. Therefore, whenever possible, the rifle should be outfitted with an appropriate sling which secures the weapon to the officer. For the purposes of CJTC training, approved sling carry (Methods of Carry: Sec. 10) satisfies the definition of stored. Additionally, as long as the weapon is under the observation of authorized personnel, it will be considered to be “stored” when grounded or placed in a rifle rack on the range.
Section 1 - Page 12 of 24 Rev. - 011310
Washington State Criminal Justice Training Commission - Patrol Rifle Instructor Course 2010
Vehicle Rack Tactical Sling
Where the Rifle Should be continued
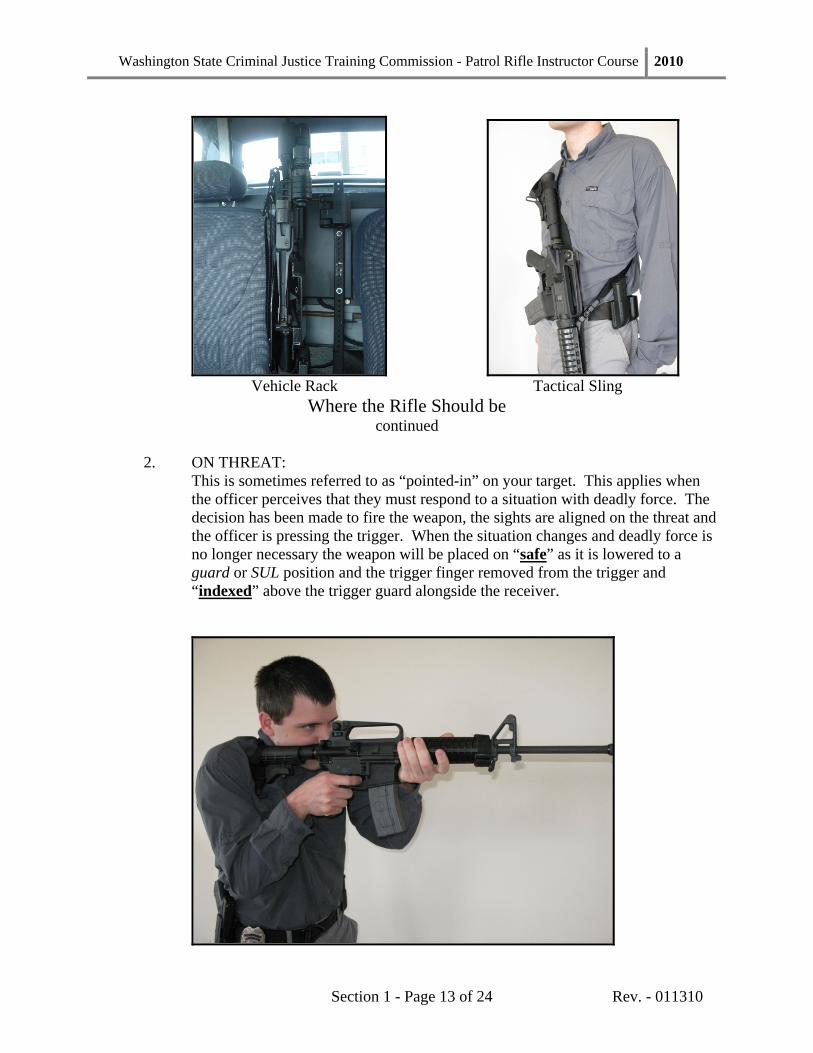
2. ON THREAT:
This is sometimes referred to as “pointed-in” on your target. This applies when the officer perceives that they must respond to a situation with deadly force. The decision has been made to fire the weapon, the sights are aligned on the threat and the officer is pressing the trigger. When the situation changes and deadly force is no longer necessary the weapon will be placed on “safe” as it is lowered to a guard or SUL position and the trigger finger removed from the trigger and “indexed” above the trigger guard alongside the receiver.
Section 1 - Page 13 of 24 Rev. - 011310
Washington State Criminal Justice Training Commission - Patrol Rifle Instructor Course 2010
Where the Rifle Should be
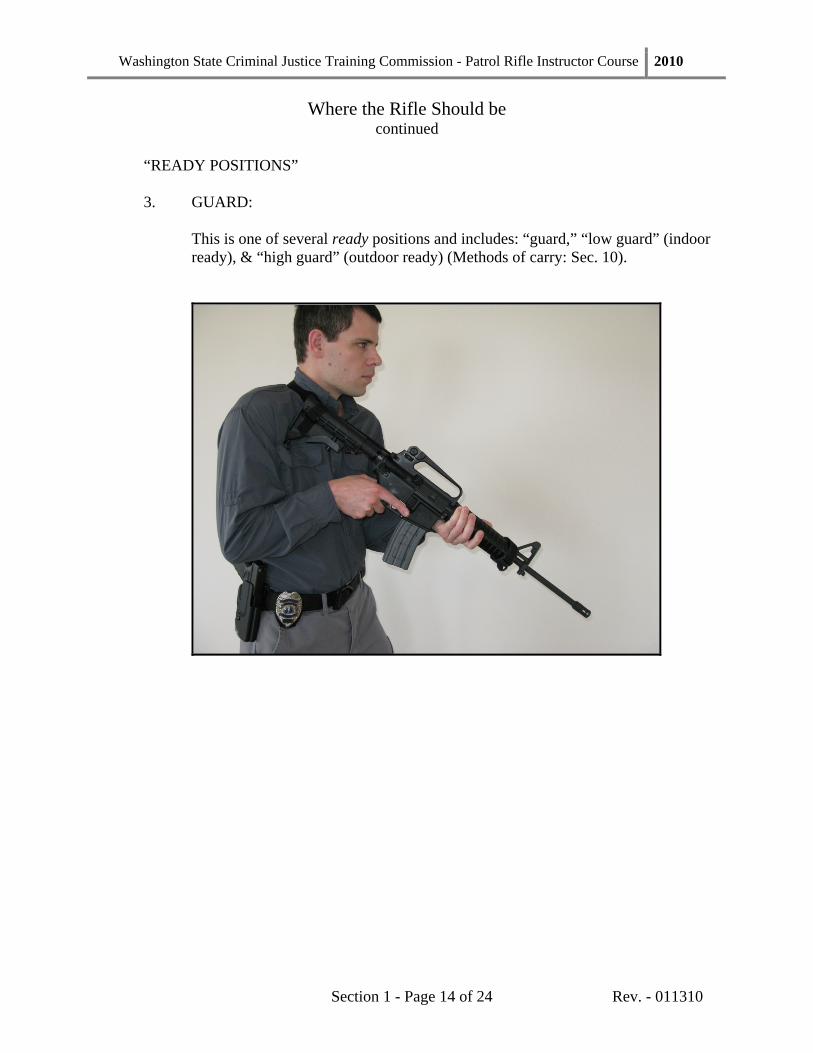
continued “READY POSITIONS” 3. GUARD:
This is one of several ready positions and includes: “guard,” “low guard” (indoor ready), & “high guard” (outdoor ready) (Methods of carry: Sec. 10).
Section 1 - Page 14 of 24 Rev. - 011310

Washington State Criminal Justice Training Commission - Patrol Rifle Instructor Course 2010
Where the Rifle Should be
continued
4. SUL:
This alternative “ready” position allows the officer to safely negotiate crowded environments without pointing the muzzle of the weapon at bystanders. (Methods of carry: Sec. 10)
Section 1 - Page 15 of 24 Rev. - 011310
Washington State Criminal Justice Training Commission - Patrol Rifle Instructor Course 2010
Where the Rifle Should be
continued
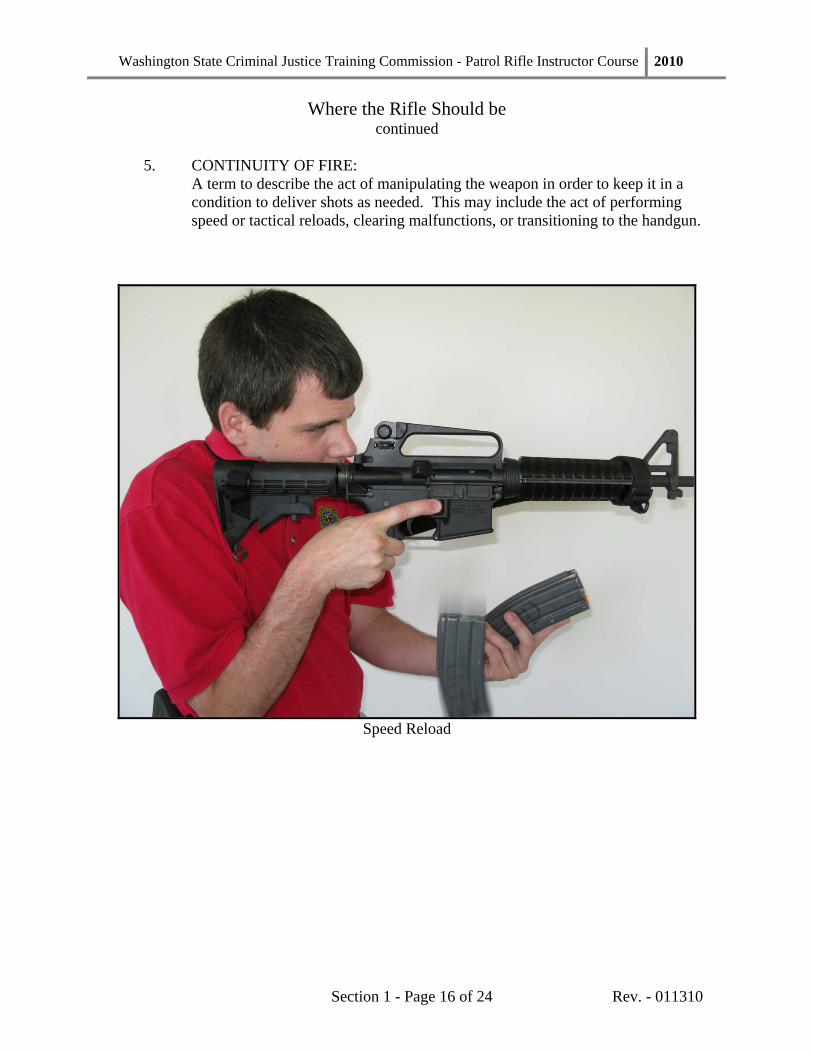
5. CONTINUITY OF FIRE: A term to describe the act of manipulating the weapon in order to keep it in a condition to deliver shots as needed. This may include the act of performing speed or tactical reloads, clearing malfunctions, or transitioning to the handgun.
Speed Reload
Section 1 - Page 16 of 24 Rev. - 011310

Washington State Criminal Justice Training Commission - Patrol Rifle Instructor Course 2010
Where the Rifle Should Not Be
The following are some, but not all, of the places that the rifle should never be
1. UNSECURED:
No firearm should ever be left unattended or unsecured for any reason. Responsible gun ownership dictates that reasonable safeguards are always taken to keep the weapon from falling into the wrong hands regardless of age.
2. DANGLING: Operators must maintain positive control over the weapon at all times and never allow the weapon to simply hang at their side. Carrying the rifle at the balance point or by the handle or grip of an AR 15 allows for very little muzzle control especially when moving.
Where the Rifle Should Not Be
Section 1 - Page 17 of 24 Rev. - 011310
Washington State Criminal Justice Training Commission - Patrol Rifle Instructor Course 2010
Continued
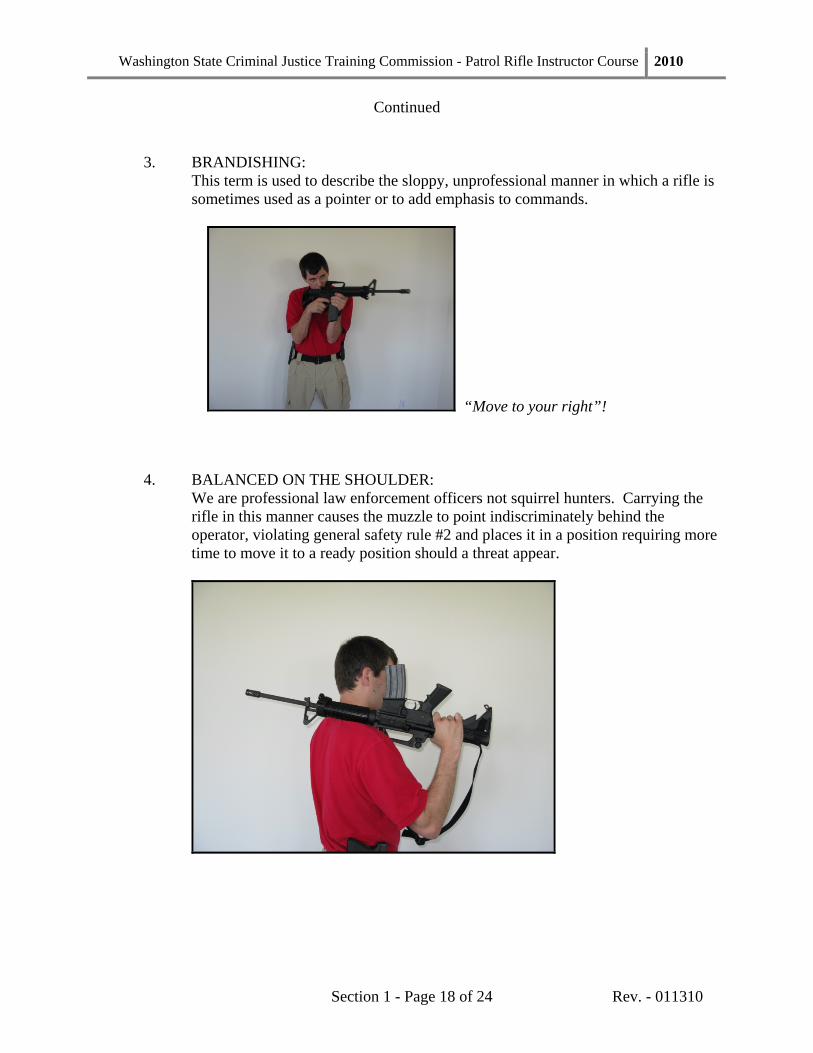
3. BRANDISHING: This term is used to describe the sloppy, unprofessional manner in which a rifle is sometimes used as a pointer or to add emphasis to commands.
“Move to your right”!
4. BALANCED ON THE SHOULDER: We are professional law enforcement officers not squirrel hunters. Carrying the rifle in this manner causes the muzzle to point indiscriminately behind the operator, violating general safety rule #2 and places it in a position requiring more time to move it to a ready position should a threat appear.
Section 1 - Page 18 of 24 Rev. - 011310
Washington State Criminal Justice Training Commission - Patrol Rifle Instructor Course 2010
Range Commands
Below is a list of range commands that you will hear while training during this course of instruction. You are expected to familiarize yourself with them and follow them immediately when they are given. Upon returning to your own range you may choose to use them or modify them to suit your agency’s needs. To safely conduct firearms training it is absolutely necessary that commands, like all procedures must be clear, uniform and understood by students and instructors alike. It is strongly suggested that Commands and Procedures be published and posted throughout the range. 1. “MAKE READY” – Protect your eyes and ears, and prepare your firearm as instructed
for the training session. Ensure that all magazines are loaded appropriately with live and/or dummy rounds and are properly positioned in their pouches. Make sure all needed equipment is in place in preparation for training.
2. “UNLOAD” – While facing in a safe direction, and keeping the firearm muzzle pointed
in a safe direction, students will remove all removable magazines or all ammunition from weapons not equipped with removable magazines. They will then open the action/cylinder of the firearm and visually and physically inspect the chamber(s) and magazine well to determine that they are empty. After doing so, they will then close the action and holster the handgun. Long guns will be positioned as instructed. Typically: Safety ON, bolt forward, hanging from tactical sling, magazine out. Stand fast and await further instructions.
3. “GO TO THE GUARD” – Shooter assumes a firing stance with the rifle in the guard
position, also known as the Ready position. The weapon is NOT on threat, and the thumb is on the safety, trigger finger straight. Focus is on the target. The safety remains ON.
4. “FIRE” – A verbal command to initiate live or dry fire training. This may or may not be
preceded by a preparatory command. Other terminology, whistles, horns, signals or simply targets turning, may also be used to initiate the exercise. Commands used to initiate the exercise must be established prior to the training. This is the point at which the safety comes off.
5. “CHALLENGE’ – Performed while at the guard position with muzzle depressed
appropriately and trigger finger indexed. The safety is ON and the thumb is resting on the safety/selector. Students will deliver clear loud concise verbal commands to effect compliance from a suspect. IE: “Police, Stop.”
Section 1 - Page 19 of 24 Rev. - 011310
Washington State Criminal Justice Training Commission - Patrol Rifle Instructor Course 2010
Range Commands
(Continued)
6. “CEASE FIRE” – A verbal command requiring all students to stop whatever they are doing, holster all handguns, engage safeties as applicable. All long guns should be moved to a low (indoor) ready or SUL position ensuring muzzle control and correct trigger finger indexing. Students then await further instructions. Any alternative signals to achieve the same results must be established prior to the exercise. This command may be given by any instructor or student who observes a situation occurring which would make it unsafe to continue. In this situation the command of “cease fire” should be loudly repeated by all on the line to ensure that it is heard.
7. “STANDBY” – A preparatory command sometimes given immediately before the fire
command to let students know that a fire command will follow. This allows instructors to confirm that everyone is ready for the drill.
8. “STAND EASY” – A command given to notify students of a short delay prior to the next
command. It may be given to permit other participants time to complete preparations for the drill. This is NOT permission to relax or leave the firing line.
Section 1 - Page 20 of 24 Rev. - 011310
Washington State Criminal Justice Training Commission - Patrol Rifle Instructor Course 2010
Dry Practice
Shooting a firearm well is an extremely perishable skill. Without reinforcement, those skills learned during a training session at the range will deteriorate quickly. Most of our schedules and bank accounts make it impractical for us to spend as much time at the range as is needed to maintain our skills. Yet it is well known by successful shooters in the tactical and competition world that skills can be maintained and even increased by incorporating regular dry practice into a weekly schedule. There are several advantages. Resulting noise and recoil from firing live ammunition can mask and even reinforce bad habits. This can lead the frustrated student of the game to abandon hope of getting better. The elimination of the explosion frequently reveals the offending habit. Once revealed, it can be dealt with during dry repetition. A quick trip to the range can then verify the lesson learned at home. Done correctly, dry practice costs nothing but time. Done incorrectly, it can not only be a waste of time but can be detrimental and unfortunately, can sometimes result in tragedy. We’ve all heard the saying that “practice makes perfect.” Yet, we’ve come to realize that only “perfect practice makes perfect.” Therefore, it is not enough to say to our students “dry practice” without adding guidelines for them to be successful. Sometimes conscientious students’ well-intentioned efforts have led to property damage, injury, or even death because they have not been given or have failed to follow proven guidelines. The following Dry Practice Ritual has been developed to address these issues. Each step should be strictly adhered to any time the student practices away from the range.
1. Set-up and control your training environment. Make provisions to eliminate interruptions and distractions. Be completely alone. Friends and family should not be able to walk in unexpectedly. Television and radio should be shut off. They can be a distraction. Distractions can lead to deviations from the ritual. It is the ritualistic nature of this practice technique that makes the session productive and safe.
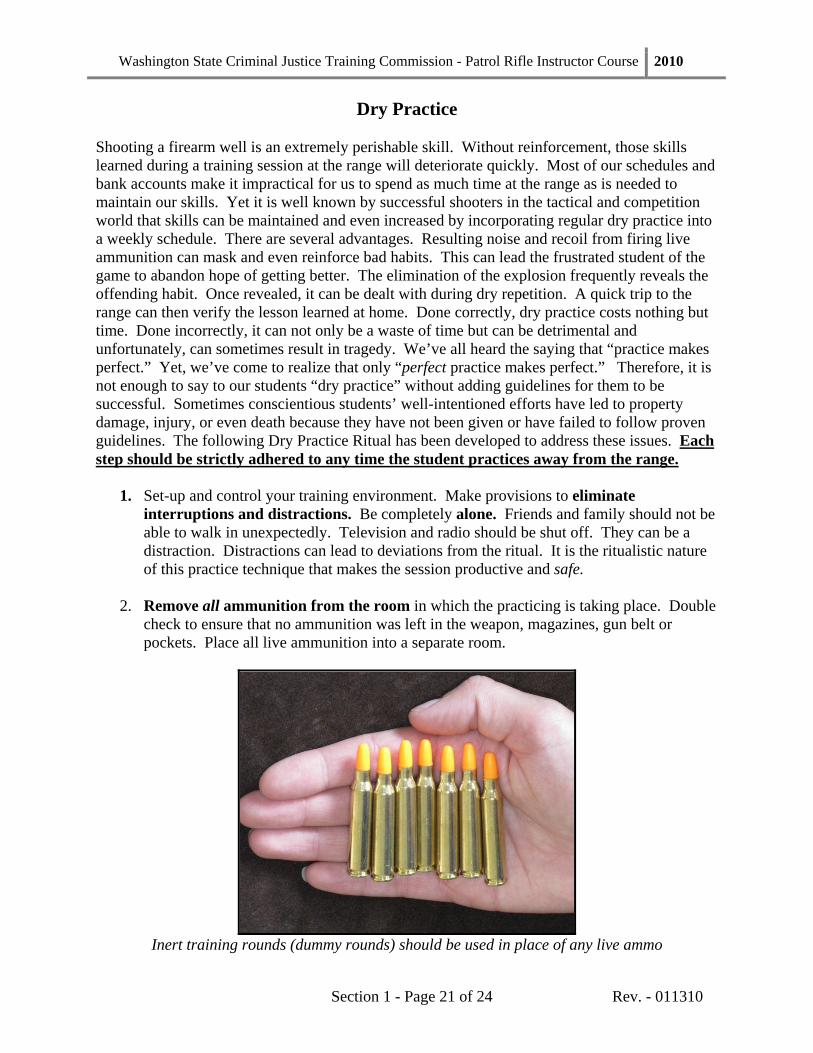
2. Remove all ammunition from the room in which the practicing is taking place. Double check to ensure that no ammunition was left in the weapon, magazines, gun belt or pockets. Place all live ammunition into a separate room.
Inert training rounds (dummy rounds) should be used in place of any live ammo
Section 1 - Page 21 of 24 Rev. - 011310
Washington State Criminal Justice Training Commission - Patrol Rifle Instructor Course 2010
Dry Practice
Continued
3. Make a mental shift to the practice mode. This is done by actually saying out loud: “This is practice. The weapon is unloaded.” The human being needs this psychological benchmark to shift from reality to practice.
4. Ensure that you have a safe aim point! The aiming area must be solid enough to stop the ammunition normally carried in your weapon. A concrete wall, basement, or masonry fireplace would be examples of this. Keep in mind that your soft body armor does NOT stop .223 cal. rifle ammunition. The redundant steps in this ritual are designed to ensure the reliability of this system.
5. Once each of the above steps has been completed it is safe to dry practice. The “what to” should be addressed at this time. Many rifle manipulation and accuracy skills can be addressed as a dry practice issue: Trigger control, shooting positions, reloading, and malfunction clearances can each be practiced in the dry practice mode. The “how to” aspects can be the subject of some debate. In any case, the focus should be on precision and smoothness, not speed. Attention spans vary from person to person. When the inability to concentrate on the precision of the exercise wanes, the session should be ended. Think of each repetition as imprinting information onto your computer. Sloppy imprecise repetitions are putting sloppy data into the data banks to be drawn out later under stress. Three to five minutes of precise weapon manipulations are of immensely more value than 20 minutes of repetition where half of them were casual and imprecise.
6. When dry practice is completed and the weapon is put back into the desired condition (loaded or unloaded), the student must make the mental shift to reality. This is again done by actually saying; “The weapon is now loaded” and/or “I am done practicing.”
7. The weapon must then be placed out of sight and immediate reach for at least 30 minutes. Failure to follow this step is a large contributor to unintentional discharges.
If unintentional discharges are to be avoided during dry practice, ALL of these steps must be followed in order each and every time. As with most aspects of training, there are no shortcuts!
Section 1 - Page 22 of 24 Rev. - 011310
Washington State Criminal Justice Training Commission - Patrol Rifle Instructor Course 2010
Health Hazards – Lead *
As trainers we must continually update our education in all aspects of firearms instruction. One of the subtle, sometimes overlooked, yet very serious hazards to both instructors and their students is the health consequences of working in the toxic range environment. Lead is a heavy metal and a toxic substance. The human metabolism is designed to absorb some trace metals. Lead is not one of them. Unfortunately, the human body treats lead as calcium and sends it to the bones for storage. Once stored in the bones and teeth, it takes approx. 20 years for half of it to be broken down and passed from your body. This is referred to as “half-life.”*1 For many, this means that much of the lead you have absorbed will still be in your body long after you retire from law enforcement. Absorbed in sufficient quantity, lead can result in very serious health problems. Due to the toxic nature of lead, any over-exposure can lead to poisoning. Short-term over-exposure in high doses can lead to brain dysfunction, seizures, coma, and death by cardio-respiratory arrest. Long-term over-exposure may lead to the damage of blood-producing, nervous, digestive, and reproductive systems. Common symptoms include:
• Loss of memory and difficulty in concentration • Fatigue • Irritability and aggressiveness • Loss of sexual interest • Insomnia • Depression • Headaches • Neurological symptoms, such as muscle twitching • Encephalopathy (major brain & CNS dysfunction) • Elevated blood pressure • Digestive difficulties and abdominal pain • Weight loss • Joint pain, particularly in long bone joints • Kidney and/or liver damage • In women, menstrual irregularity and decreased fertility • Potential birth defects to an unborn fetus • Sore or bleeding gums • Hyperactivity
Working on a range exposes one to lead from several sources. Ammunition primers, when ignited, release lead azide or lead styphnate into the air along with vaporized lead from the base of an exposed projectile. Non-jacketed ammunition causes microscopic amounts of lead to be released from the friction of the bullet against the barrel rifling as well as the impact of the projectile against the target and backstop. Eventually the airborne particles drop to the ground and become a part of the range environment. One way for this lead to enter the human body is through inhalation of the vaporized particles
Section 1 - Page 23 of 24 Rev. - 011310
Washington State Criminal Justice Training Commission - Patrol Rifle Instructor Course 2010
Health Hazards – Lead
(Continued)
at and shortly after, the moment of ignition of the firearm. Inadequate range hygiene can cause lead to be ingested into the stomach. This same lack of preventive measures allows us to take the lead from the range into the vehicle and home environments. In the home, the risk to small children and pregnant women is much higher than to the average adult. In any range environment, (indoor or outdoor) contamination can be limited if you follow some simple guidelines.
• Use ammunition which has totally encapsulated jacketed bullets. These will be labeled “TMJ” (total metal jacket.) This ammunition is frequently labeled “Clean Fire” (or “CF”) and is mandatory on most indoor ranges at this time. Bullets labeled “full metal jacket” have the lead exposed at the base and therefore release lead particulates into the air when fired.
• No eating, drinking or use of tobacco products allowed on the range at any time. • Wash hands, forearms and faces with cold soapy water immediately upon leaving the
range and prior to eating, smoking, drinking or putting anything in your mouth. The use of hot water opens the pores of the skin allowing it to absorb more of the lead from the environment.*1
• Blow your nose immediately upon leaving the range • Do not put empty shell casings in your mouth or collect them in your cap. • Gloves, clothing and soles of shoes collect lead and should be changed prior to entering
the home environment. • Clothing worn on the range should be laundered separately from the family wash. • Shower as soon as possible after spending time on the range. Pay particular attention to
head and facial hair. • Remember that the weapon you are cleaning after shooting is contaminated. Follow all
applicable precautions after weapon cleaning. • Pregnant women should not be allowed onto the range.
A generation ago, only the “wimps” wore hearing protection on the range. Due to that attitude, there are a lot of retired cops running around answering phones that aren’t ringing. Protect yourself. You are one of the good guys. We want you to train hard to win the fights but we also want you to have a long, enjoyable life. Information contained in this section has been gleaned from the following published articles which are located in the Resource section. *1The Baltimore County Police Department Range Lead poisoning warnings Feb. 2003 (Pg.3) 2Public Health Statement for Lead - ATSDR (Agency for Toxic Substances and Disease Registry) Sept. 2005 3Why Measure Lead in Bone - Mt. Sinai School of Medicine N.Y. 2006
Section 1 - Page 24 of 24 Rev. - 011310