create a registration form - information technology...
TRANSCRIPT

1
Create a Registration Form
For this lesson, we will be inserting form controls into a forms document. The form was created using the Tables feature in Word. The method explained in this lesson for creating a form is available in Word 2007 or later, but cannot be saved or created in Word 2003 or earlier. The cell references are determined by counting the number of cells in the columns and rows. The Registration Form can be found on the Word 2013 page on the Training Web Site.
PRELIMINARY STEPS Open the Registration Form from the folder where it was stored. Click the Home Tab. In the Paragraph Group, click the Show/Hide button (see illustration below).
If the Developer Tab does not show on the Ribbon, complete the steps below to display it: Click the File Tab. Click the Options link under Help (see illustration at right). Click the Customize Ribbon link. The Word Options window will display. Under the Customize the Ribbon area on the right side of the window, click the Developer
check box. Click the OK button to exit the Word Options window.
INSERT A TEXT CONTENT CONTROL Click cell C3. This is the cell to the right of the one that contains the word Name. Click the Developer Tab. In the Controls Group, click the Rich Text Content Control button (see illustration below).
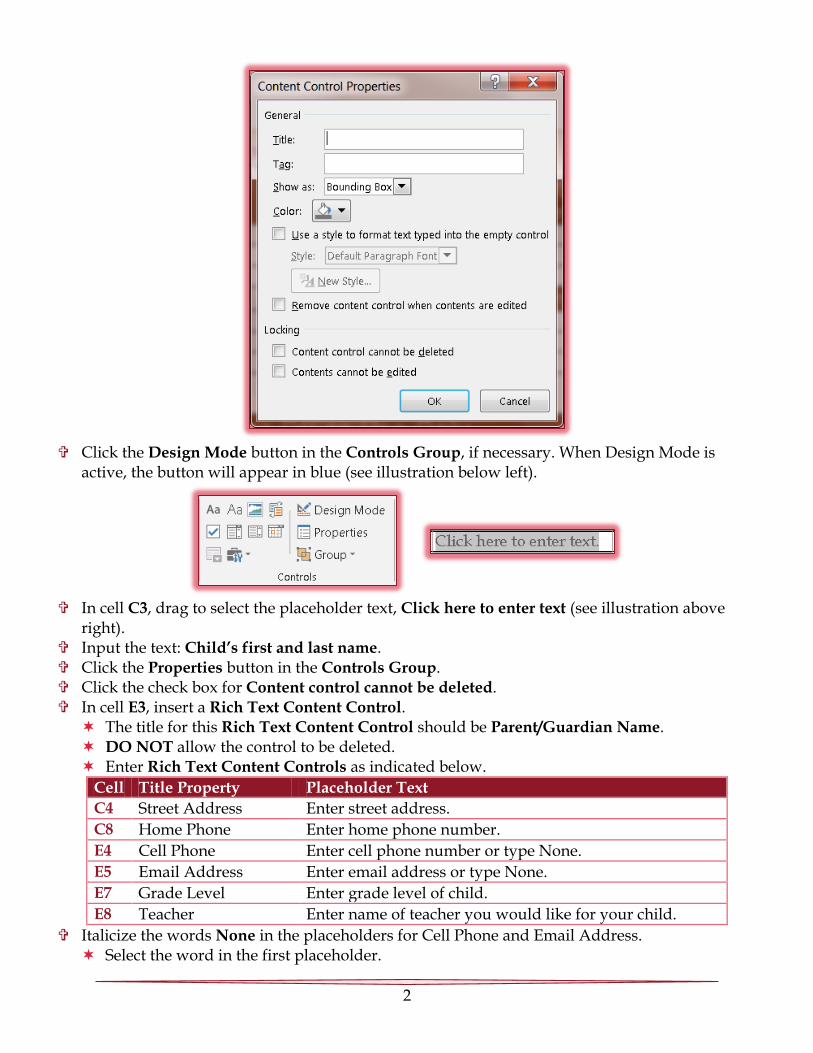
A Text Content Control will be inserted into cell C3. In the Controls Group, click the Properties button. The Content Controls Properties dialog box will open (see illustration on next page). Type Child Name in the Title text box. Click the Use a style to format contents check box.
Click the Style arrow. Click Balloon Text.
Click a blank area of the form to deselect the Content Control.
Show/Hide Button
Rich Text Content Control
2
Click the Design Mode button in the Controls Group, if necessary. When Design Mode is active, the button will appear in blue (see illustration below left).
In cell C3, drag to select the placeholder text, Click here to enter text (see illustration above right).
Input the text: Child’s first and last name. Click the Properties button in the Controls Group. Click the check box for Content control cannot be deleted. In cell E3, insert a Rich Text Content Control.
The title for this Rich Text Content Control should be Parent/Guardian Name. DO NOT allow the control to be deleted. Enter Rich Text Content Controls as indicated below.
Cell Title Property Placeholder Text
C4 Street Address Enter street address.
C8 Home Phone Enter home phone number.
E4 Cell Phone Enter cell phone number or type None.
E5 Email Address Enter email address or type None.
E7 Grade Level Enter grade level of child.
E8 Teacher Enter name of teacher you would like for your child.
Italicize the words None in the placeholders for Cell Phone and Email Address. Select the word in the first placeholder.
3
Click the Home Tab. In the Fonts Group, click the Italics button. Do the same for the word in the second placeholder.
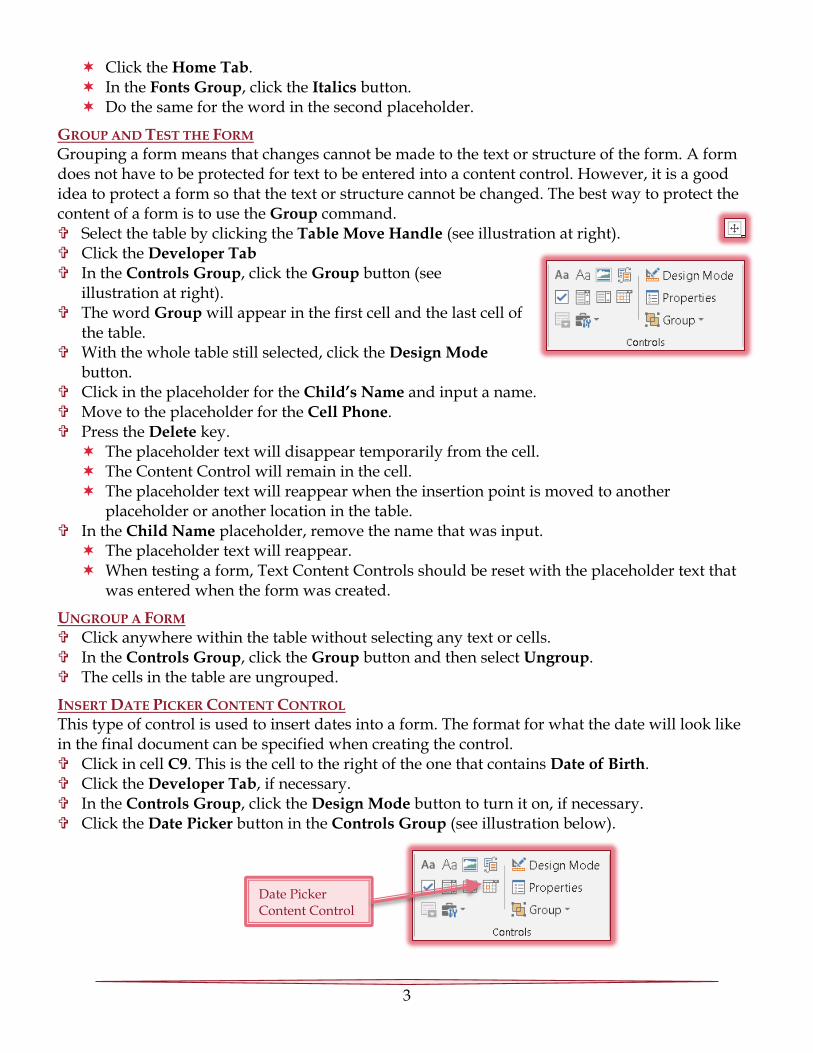
GROUP AND TEST THE FORM Grouping a form means that changes cannot be made to the text or structure of the form. A form does not have to be protected for text to be entered into a content control. However, it is a good idea to protect a form so that the text or structure cannot be changed. The best way to protect the content of a form is to use the Group command. Select the table by clicking the Table Move Handle (see illustration at right). Click the Developer Tab In the Controls Group, click the Group button (see
illustration at right). The word Group will appear in the first cell and the last cell of
the table. With the whole table still selected, click the Design Mode
button. Click in the placeholder for the Child’s Name and input a name. Move to the placeholder for the Cell Phone. Press the Delete key.
The placeholder text will disappear temporarily from the cell. The Content Control will remain in the cell. The placeholder text will reappear when the insertion point is moved to another
placeholder or another location in the table. In the Child Name placeholder, remove the name that was input.
The placeholder text will reappear. When testing a form, Text Content Controls should be reset with the placeholder text that
was entered when the form was created.
UNGROUP A FORM Click anywhere within the table without selecting any text or cells. In the Controls Group, click the Group button and then select Ungroup. The cells in the table are ungrouped.
INSERT DATE PICKER CONTENT CONTROL This type of control is used to insert dates into a form. The format for what the date will look like in the final document can be specified when creating the control. Click in cell C9. This is the cell to the right of the one that contains Date of Birth. Click the Developer Tab, if necessary. In the Controls Group, click the Design Mode button to turn it on, if necessary. Click the Date Picker button in the Controls Group (see illustration below).
Date Picker Content Control
4
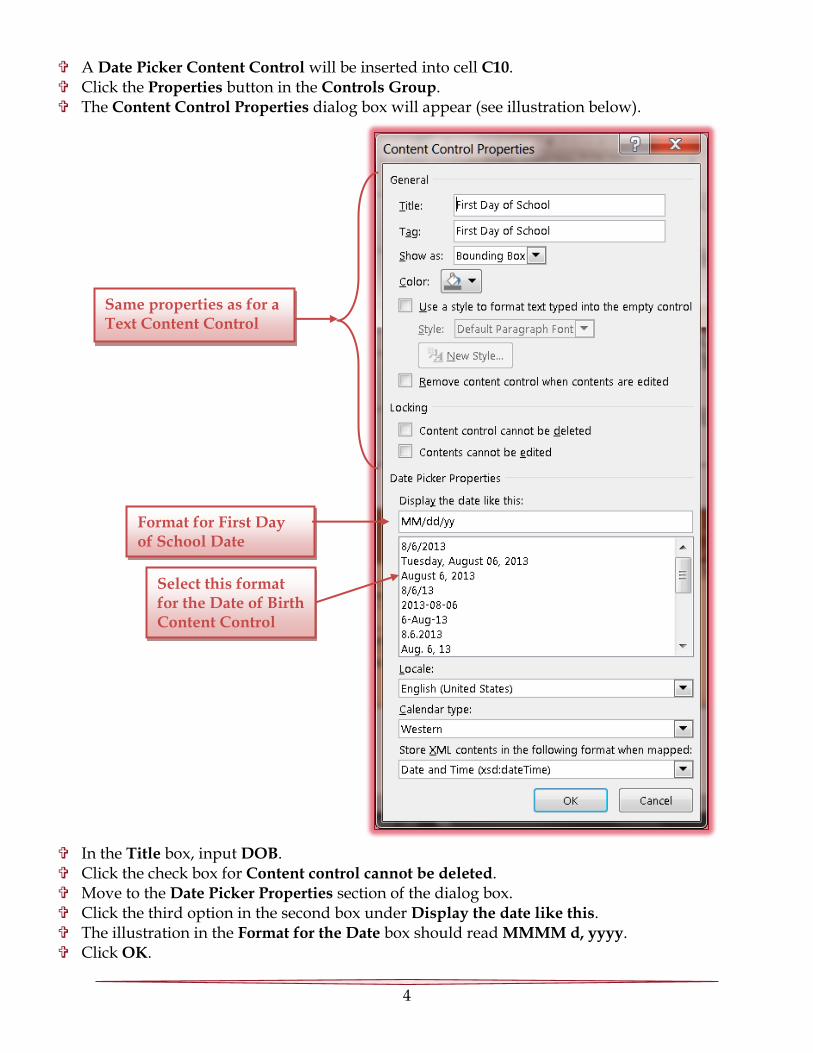
A Date Picker Content Control will be inserted into cell C10. Click the Properties button in the Controls Group. The Content Control Properties dialog box will appear (see illustration below).
In the Title box, input DOB. Click the check box for Content control cannot be deleted. Move to the Date Picker Properties section of the dialog box. Click the third option in the second box under Display the date like this. The illustration in the Format for the Date box should read MMMM d, yyyy. Click OK.
Same properties as for a Text Content Control
Format for First Day of School Date
Select this format for the Date of Birth Content Control
5
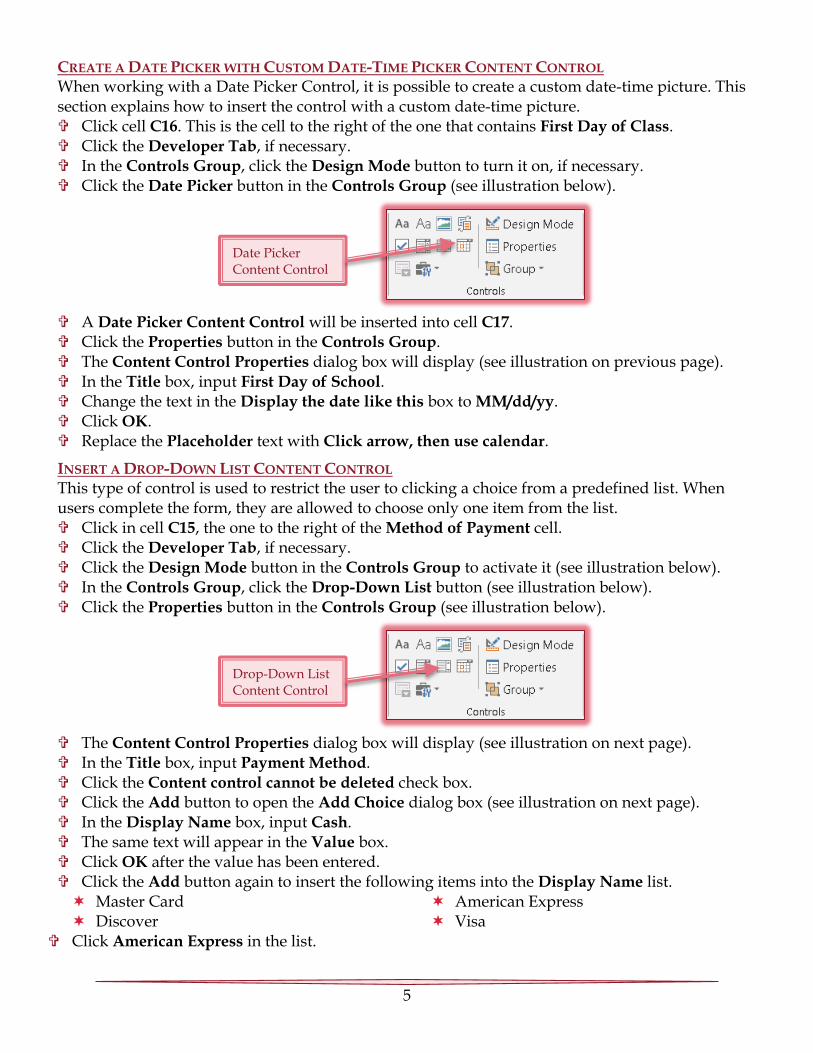
CREATE A DATE PICKER WITH CUSTOM DATE-TIME PICKER CONTENT CONTROL When working with a Date Picker Control, it is possible to create a custom date-time picture. This section explains how to insert the control with a custom date-time picture. Click cell C16. This is the cell to the right of the one that contains First Day of Class. Click the Developer Tab, if necessary. In the Controls Group, click the Design Mode button to turn it on, if necessary. Click the Date Picker button in the Controls Group (see illustration below).
A Date Picker Content Control will be inserted into cell C17. Click the Properties button in the Controls Group. The Content Control Properties dialog box will display (see illustration on previous page). In the Title box, input First Day of School. Change the text in the Display the date like this box to MM/dd/yy. Click OK. Replace the Placeholder text with Click arrow, then use calendar.
INSERT A DROP-DOWN LIST CONTENT CONTROL This type of control is used to restrict the user to clicking a choice from a predefined list. When users complete the form, they are allowed to choose only one item from the list. Click in cell C15, the one to the right of the Method of Payment cell. Click the Developer Tab, if necessary. Click the Design Mode button in the Controls Group to activate it (see illustration below). In the Controls Group, click the Drop-Down List button (see illustration below). Click the Properties button in the Controls Group (see illustration below).
The Content Control Properties dialog box will display (see illustration on next page). In the Title box, input Payment Method. Click the Content control cannot be deleted check box. Click the Add button to open the Add Choice dialog box (see illustration on next page). In the Display Name box, input Cash. The same text will appear in the Value box. Click OK after the value has been entered. Click the Add button again to insert the following items into the Display Name list. Master Card Discover
American Express Visa
Click American Express in the list.
Date Picker Content Control
Drop-Down List Content Control

6
Click the Move Up button to move the item directly below the Cash entry. Do the same thing to move Discover directly below American Express. Once all the items have been added, click the OK button in the Content Control Properties dialog
box. In the placeholder, input Click to select a payment method.
INSERT A COMBO BOX CONTENT CONTROL A combo box provides a list of the most likely choices for an item, but also allows the user to input their own information if it is not in the list provided. Click in cell C5, the one to the right of the City cell. Click the Developer Tab, if necessary. Click the Design Mode button in the Controls Group to activate it (see illustration below).
In the Controls Group, click the Combo Box button (see illustration above).
Combo Box Content Control

7
Click the Properties button in the Controls Group. The Content Control Properties dialog box will display. This dialog box looks the same as the one
for the Drop-Down List (see illustration on previous page). In the Title box, input City. Add Adrian as an item in the list. Modify the first item in the list to read, Click to select Adrian or type your city/town. Click OK to exit the dialog box. In the placeholder, input Click, then click arrow. Click cell C6, insert a Combo Box with State as the Title. Replace the first item in the list with Click to select MI or type your two-letter state abbreviation. Add MI as an item in the list. Click OK to exit the dialog box. In the placeholder, input Click, then click arrow. In cell C7, insert a Combo Box with the Title as Zip Code. Replace the first item in the list to read, Click to select zip code or enter by typing. Click the Add button and then input 49221. Click OK to return to the Control Content Properties dialog box. Click Add again and then input 49228. Click OK to return to the Control Content Properties dialog box. Click OK to exit the Control Content Properties dialog box. In the placeholder, input Click, then click arrow.
INSERT A PICTURE CONTENT CONTROL This control is used to insert pictures into a form. A picture can be chosen from any accessible folder on the computer. Scroll to the top of the form. Click in cell B10. This is the cell to the left of the one that contains Special Needs. Click the Picture Content Control button in the Controls Group (see illustration below).
Click the Properties button in the Control Group. The Content Control Properties dialog box will open (see illustration on next page). In the Title box, input Child Photo. Click the Content control cannot be deleted check box. Click OK. Click the Child Photo Title Tab on the Content Control.
This will select the entire control. The control should be highlighted.
Click the Table Tools Layout Tab. In the Alignment Group, click the Align Top Center button. Click a blank area of cell D1 to deselect the control. Press the right arrow key on the keyboard to move the insertion point to the right of the picture.
Picture Content Control

8
Press the Enter key to insert a blank line below the picture control. Type Insert a picture of your child in this area. Select the text that was just input. Make the following formatting changes to the text.
Change the font to Verdana. Change the font size to 9 point. Deselect the text.
Click the Design Mode button to turn it off. Point to the button in the middle of the Picture Content Control. A Screen Tip should appear saying to click the button to insert a picture.
INSERT A LEGACY CHECK BOX FORM FIELD Click cell E9, the one to the right of the cell that contains Uniform Needed. Input Click check box to remove the X if child doesn’t need a uniform. Press the spacebar. Click the Developer Tab. In the Controls Group, click the Legacy Tools button (see illustration below left).
A menu of Form Field tools will open. In the first row under Legacy Tools, click the Check Box Form Field button (see illustration above
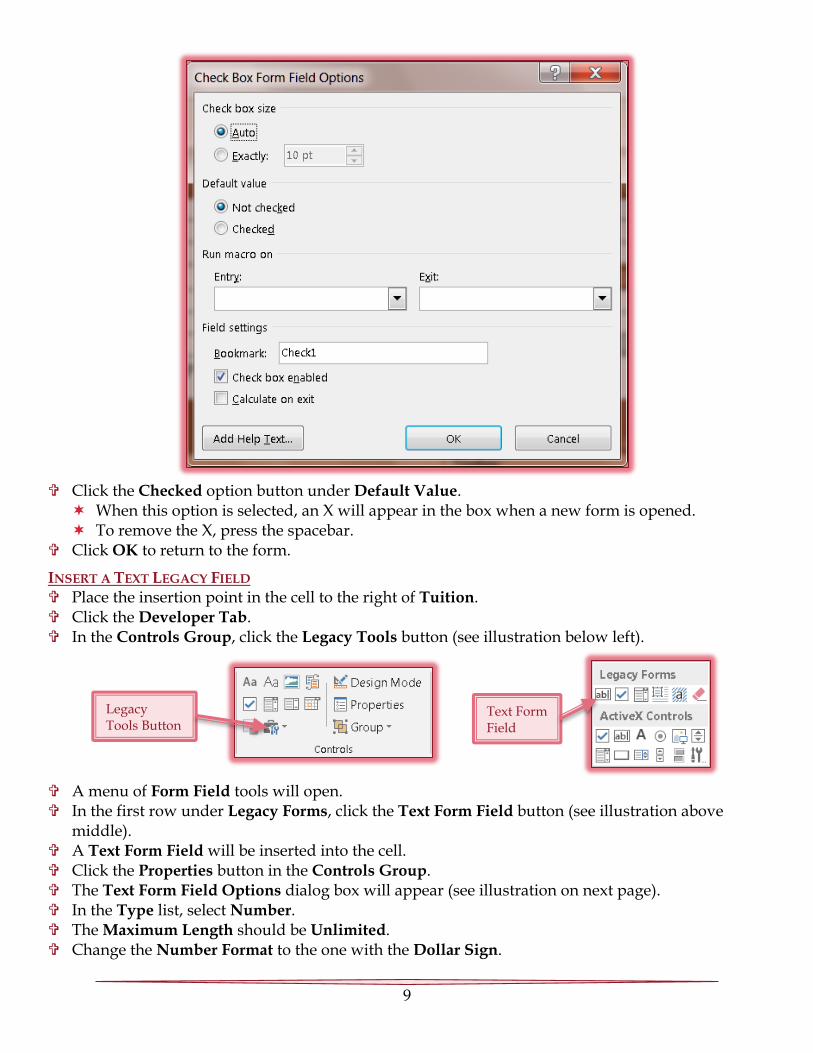
middle). A Check Box Form Field will be inserted into the cell. Click the Properties button in the Control Group. The Check Box Form Field Options dialog box will appear (see illustration on next page).
Legacy Tools Button
Check Box Form Field
9
Click the Checked option button under Default Value. When this option is selected, an X will appear in the box when a new form is opened. To remove the X, press the spacebar.
Click OK to return to the form.
INSERT A TEXT LEGACY FIELD Place the insertion point in the cell to the right of Tuition. Click the Developer Tab. In the Controls Group, click the Legacy Tools button (see illustration below left).
A menu of Form Field tools will open. In the first row under Legacy Forms, click the Text Form Field button (see illustration above
middle). A Text Form Field will be inserted into the cell. Click the Properties button in the Controls Group. The Text Form Field Options dialog box will appear (see illustration on next page). In the Type list, select Number. The Maximum Length should be Unlimited. Change the Number Format to the one with the Dollar Sign.
Legacy Tools Button
Text Form Field

10
Click the OK button.
INSERT A TEXT FIELD Place the insertion point to the right of the words Special Needs. Click the Developer Tab. In the Controls Group, click the Design Mode button (see illustration below). In the Controls Group, click the Plain Text Content Control button (see illustration below).
Click the Properties button in the Control Group. The Content Control Properties dialog box will appear (see illustration on next page). In the Title box, input Special Needs. Under Locking, click the check box for Content control cannot be deleted. Under Plain Text Properties, click the Allow carriage returns check box. Click OK. Complete the steps above to create a Text Field for the Special Accommodations and the Notes
cells.
Text Field

11
PROTECT THE DOCUMENT Once a form has been completed, the document must be protected before information can be entered into it. The Group command can only be used with Content Controls, but not with Legacy Controls. To protect the form, it cannot be in Design Mode. Therefore, Design Mode must be turned off before Protection can be applied. Click the Developer Tab. In the Controls Group, click the Design Mode button to deactivate it. In the Protect Group, click the Restrict Editing button (see illustration below).
The Restrict Editing Task Pane will open (see illustration above).
12
In Section 2 of the Task Pane, click Allow only this type of editing in the document. The list box below the check box will become active. Additional text will appear below that.
Click the Section 2 arrows. Click Filling in Forms.
When protecting the entire document, it must be specified that it is protected for Filling in
Forms. This means the user will be able to enter content in the Content Controls and Form Fields.
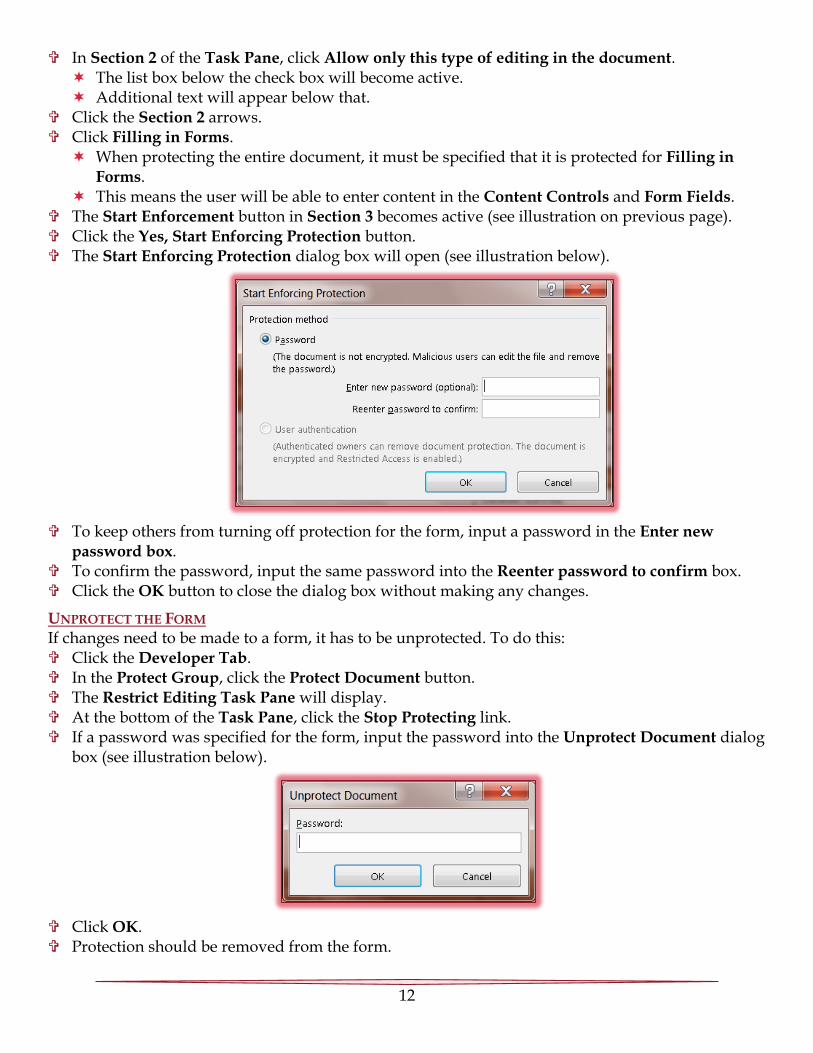
The Start Enforcement button in Section 3 becomes active (see illustration on previous page). Click the Yes, Start Enforcing Protection button. The Start Enforcing Protection dialog box will open (see illustration below).
To keep others from turning off protection for the form, input a password in the Enter new
password box. To confirm the password, input the same password into the Reenter password to confirm box. Click the OK button to close the dialog box without making any changes.
UNPROTECT THE FORM If changes need to be made to a form, it has to be unprotected. To do this: Click the Developer Tab. In the Protect Group, click the Protect Document button. The Restrict Editing Task Pane will display. At the bottom of the Task Pane, click the Stop Protecting link. If a password was specified for the form, input the password into the Unprotect Document dialog
box (see illustration below).
Click OK. Protection should be removed from the form.