create travel advance - california state controller · create travel advance 1 create_ta.doc...
TRANSCRIPT

Create Travel Advance 1 create_ta.doc 04/17/03
Create Travel AdvanceThese instructions will assist you in Creating a new Travel Advance. Instructions for creating aTravel Advance start on the Work Queue screen (the first screen displayed after signing in to theCalATERS system). Listed below is a table of contents identifying the steps required in creating aTravel Advance.
Table of Contents
Section Title Page(s)I. Work Queue 2 - 3
New Forms List 3
Travel Advance Information 3
II. Exit and Save the Form 3
III. Adding a Note to the Travel Advance 4
Add a Note 4
Modify a Note 4
Delete a Note 4
IV. Profile Information 5
V. Check Delivery Options Tab 6 - 7
VI. Travel Advance Tab 7 - 9
VII. Completion Tab 10 – 15
Review Items Tab 10
Summary Tab 11
Travel Advance Submission
Change or Select an Alternate Default Approver
Add an Approver with Your Current Approver
Remove an Added Approver
12 – 15
13
14
14
VIIII. Print ReportSample of Travel Advance Summary Sheet
15
16
Revised: 04/03

Create Travel Advance create_ta.doc 04/17/032
I. Work Queue
Please note that within the following instructions there are separate procedures for thoserequesting Travel Advances for yourself versus Travel Advances that are being keyed foranother employee by a Submitter or Preparer (Submitters and Preparers are employeeswithin the department that have been designated by an individual to complete a TravelAdvance on their behalf).
For Employees Requesting Their Own Travel Advance:
At the top of the Work Queue screen click on the icon. Proceed to New Forms List onthe following page.
For Submitters or Preparers Requesting a Travel Advance for Another Employee:
Click on the icon for Submitters or the icon for Preparers.
Note: These icons will not display, if you have not been selected by an employeeas their Preparer or Submitter.
Click on the name of the employee for which you will be creating the Travel Advance.
NewForm
Preparer/Submitter

Create Travel Advance create_ta.doc 04/17/033
I. Work Queue (continued)
New Forms List
Click on Travel Advance Form, then click the button.
Note: If the New Forms List does not display, your department does not use the Travel Advance form on CalATERS.
Travel Advance Information
Key a name for the Travel Advance in the Report Name field. Note: Your department mayhave a form naming policy.
Click the button.
II. Exit and Save the form
At any point during the creation of a Travel Advance you may exit and save the information.To exit, from the Menu Bar, click FILE then click Close or from the top right hand corner,
click on the box with the X . A Save Confirmation box will appear:
Click on Yes to save the changes. This action will take you back to the Work Queue.

Create Travel Advance create_ta.doc 04/17/034
III. Adding a Note to the Travel Advance
The Note Log function is a multi-purpose feature. Notes may be used to provide additionalinformation about the Travel Advance request. Notes can also be used by approvers toprovide additional detailed information regarding the reason a form has been adjusted,returned, etc.
To access the Note Log functions click on the icon. Notes can be accessed andupdated from any screen within the form.
To Add a Note:1) Type in the desired information in the Subject field.2) Type in the desired information in the Comment field.
3) Click on .
To Modify a Note (only the creator can modify a Note):1) Click on the note to be modified.2) Type in the corrected information in the Subject or/or Comment Name area.
3) Click on .
To Delete a Note (only the creator can delete a Note):1) Click on the note to be deleted.2) Click on .
When all Notes have been updated/deleted, click .
Click on a note to modify or delete.

Create Travel Advance create_ta.doc 04/17/035
IV. Profile Information
Profile information used for this Travel Advance is viewable from any screen within thisTravel Advance request. The system will take a “snap shot” image of the Profile at the timethe form is created. Updates to the Profile will not change the “snap shot” image attached tothis form.
If Profile information that impacts the auditing of the form is inaccurate, the form may be returned or disapproved and the Profile must be corrected. A new form must then be created.
To access the attached employee Profile, click Edit from the Menu Bar, then click Profile.The Profile screen will display.
Profile screen will display with the current information. If the information on the Profile is incorrect (e.g. incorrect approver), update the profile. Instructions for making changes to the Profile are in Update Your Profile located on the CalATERS web site. For Submitters orPreparers who do not have employee profile update capability, contact the employee tocorrect the Profile information.
Click here for Profile.

Create Travel Advance create_ta.doc 04/17/036
V. Check Delivery Options Tab
Click the down arrow , then click on a delivery option. Additional information may berequired depending on the selection that is made.
There are 3 methods of delivery for Travel Advances:
1) Pick up – requires no additional information
2) Mail – When Mail is clicked, a second set of selections will display. Click on:
Profile – Will display the Profile – Mailing Address. If the Travel Advance should be sent to a different address, use the next option “Other”.
Reminder: If the Profile – Mailing Address requires correction, instructions are in Update Your Profile located on the CalATERS web site.
Other – Will allow you to request a mailing address different than the Profile mailing address.
3) Call for Pick up – Will allow you to place a phone number to be contacted when the Travel Advance is ready for pick up.
Click on the desired method of delivery and complete any additional fields.
Continued on next page

Create Travel Advance
V. Check Delivery Options Tab (continued)
Indicate date check is needed field - You may key the information directly into the field or click the calendar button. To advance the calendar to the next month, point the cursor to the “ ” symbol located to the right of the month/year, then click on the date.
Click on tab 2. Travel Advance.
VI. Travel Advance Tab
Click the down arrow in the Claim Type field. Click on the desired Claim Type (Fordefinitions of Claim Types, click Definitions from the CalATERS web site.
Select a Start and End Date. You may key the information directly into the fields or use the calendar button.
Complete all rem
AdvanceCalendar
CalendarButton
Click toaccess calendar.
Click to selectClaim Type.
create_ta.doc 04/17/037
aining fields then click .
Continue on next page

Create Travel Advance create_ta.doc 04/17/038
VI. Travel Advance Tab (continued)
System rules are established based on your department’s travel advance policies.When rules are transgressed the Travel Advance Review Items – Exceptions screen will appear. Departments may elect to display additional information when the button is
clicked. Complete the information requested, then click to update.
After the screen has been updated a button will appear. Clicking on this button will display the Travel Advance Review Items – Exceptions screen.
A claim can be deleted or information changed by highlighting the Claim Type in the Travel Advance Trip(s) Summary area. To delete a Claim Type, click on the claim to be deleted inthe Travel Advance Trip(s) Summary area, then click the button.
Continue on next page
Detail button
Click button to delete Claim Type.
Click on a claim todisplay information.

Create Travel Advance create_ta.doc 04/17/039
VI. Travel Advance Tab (continued)
If additional Travel Advance claims are being added, after entering the first request:
1) At the bottom of the screen in the Travel Advance Trip(s) Summary field, New Entry must be highlighted. Travel Advance information fields will be blank.
2) Select the new Claim Type (instructions from previous page) and complete the fields with the new information.
3) Click to add the new request.4) Repeat the above step for each additional Claim Type.
At the bottom of the screen, the Travel Advance Trip(s) Summary will list all Claim Types requested.
When all Claim Types have been keyed, click tab 3. Completion.
1) Click on New Entry.
2) Key Travel Advanceinformation.
3) Click Enter button toupdate.
Create Travel Advance create_ta.doc 04/17/0310
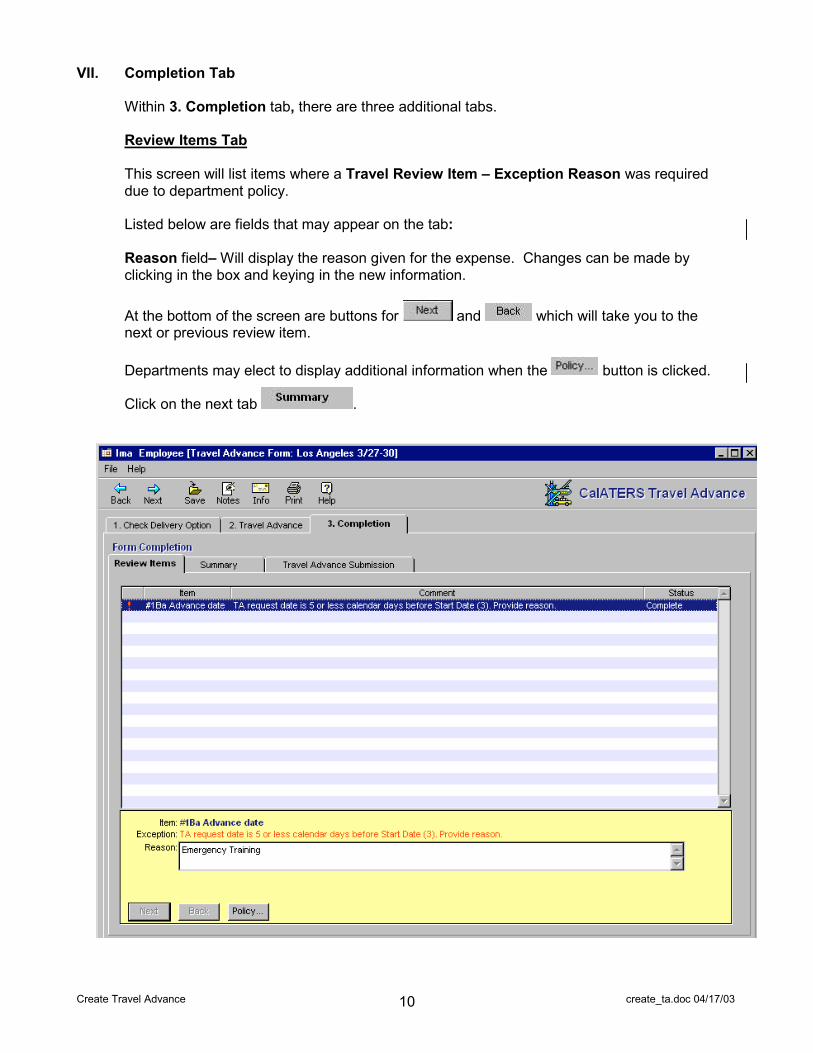
VII. Completion Tab
Within 3. Completion tab, there are three additional tabs.
Review Items Tab
This screen will list items where a Travel Review Item – Exception Reason was requireddue to department policy.
Listed below are fields that may appear on the tab:
Reason field– Will display the reason given for the expense. Changes can be made by clicking in the box and keying in the new information.
At the bottom of the screen are buttons for and which will take you to the next or previous review item.
Departments may elect to display additional information when the button is clicked.
Click on the next tab .

Create Travel Advance create_ta.doc 04/17/0311
VII. Completion Tab (continued)
Summary Tab
Verify this screen. This screen summarizes the data from the previous screens. Ifinformation is not correct click on tab 1. Check Delivery Option or tab 2. Travel Advanceand correct the information as appropriate.
If the information on the Summary screen is correct, click on the Travel AdvanceSubmission Tab.
Click on the next tab .

Create Travel Advance 12
VII. Completion Tab (continued)
Travel Advance Submission
This screen is used to submit the Travel Advance and to identify the person(s) responsible for approving the Travel Advance. If the approver is missing, incorrect or requires an alternate approver or additional approvers procedures are provided on the following pages.
Note: Approvers cannot be added or changed by a Preparer.
Continued on next
Current Approver
Ad
Add an approver if noapprover displays orchange the approver.
create_ta.doc 04/17/03
page
d Additional Approver

Create Travel Advance create_ta.doc 04/17/0313
VII. Completion Tab (continued)
Travel Advance Submission (continued)
To Change or Add an Alternate Approver:1) Click on the button. The Select Approver screen will display.
2) Key the last name of the approver, then click .
3) The Select A Person screen will display. To change the approver, click on the desired
name, then click the button. The Travel Advance will go to the selected approver and a copy of the form will be sent to your default approver.
Note: If the change to the default approver should apply to all future Travel Advances and Expense Reimbursements, correct the approver on the Profile. Specific information regarding the Profile can be found in Update Your Profile instructions located on the CalATERS web site.
Continued on next page

Create Travel Advance create_ta.doc 04/17/0314
VII. Completion Tab (continued)Travel Advance Submission (continued)
To Add an Approver in addition to the Current Approver:
1) Click on the button. The Select Approver screen will display.
2) Key the last name of the approver, then click .
3) The Select A Person screen will display. To add the approver, click on the name, then
click the button. The Travel Advance will first be routed to the Default Approver, then to the added approver.
To Remove an Added Approver:
Click on the button.
The added approver will be removed.

Create Travel Advance create_ta.doc 04/17/0315
VII. Completion Tab (continued)
Travel Advance Submission (continued)
Once approvers are established, read the Submission Statement.
To submit your Travel Advance, click in the Password field and key your CalATERS sign in
password then click the button.
For Employee/Submitters: The Travel Advance will be forwarded to the designatedApprover(s). An email will be sent by the system to theApprover to notify him/her that a Travel Advance has beenkeyed requiring review/approval on CalATERS.When submitted by a Submitter, a “Copy” of the form will besent to the employee.
For Preparers: Once the Travel Advance is submitted, the form will beforwarded to the employee’s Work Queue with the Status ofDraft. The Preparer’s Work Queue will display the form withthe Status of Prepared.
The employee must go into the form from their Work Queueand submit the Travel Advance to their Approver(s).
Note: The progress of the form can be monitored using the Form Status buttonavailable on your Work Queue. Specific information regarding Form Status can be found in the Work Queue instructions located on the CalATERS web site.
VII. Print Report
Once the Travel Advance is submitted, the Print Report screen will display. Click on one of the following options:
Will print the Travel Advance Summary Sheet and exit the Travel Advance. See the following page for a sample of the summary sheet.
Will allow you to view the Travel Advance Summary Sheet.
Will exit the Travel Advance without printing the Travel Advance Summary Sheet.
Continued on next page

Create Travel Advance create_ta.doc 04/17/0316
VIII. Print Report (continued)
Sample of Travel Advance Summary Sheet