create your first lightpainting | by ben willmore 1
TRANSCRIPT

Create Your First Lightpainting | By Ben Willmore 1

Create Your First Lightpainting | By Ben Willmore 2
Learning to Paint with Light
I created my first light painting back when I was in high school and shot film.
I found the process and results to be one of the most enjoyable experiences. I have now been
painting with light for almost 30 years and even now the idea of light painting really excites me.
I created this free how-to guide in order to make light painting more approachable to anyone who wants to give it a try. Please share it with anyone you think might benefit from its contents.
My very first light painting. I created this image in the 1980’s while I was still in high school.
Create Your First Lightpainting | By Ben Willmore 3
This guide is designed to walk you through the essential concepts, show you the camera settings needed and teach you how to think about your first attempt to paint with light. Here’s how we’ll go about it:
1. We’ll start by talking about the general concept of painting with light so it doesn’t feel like too foreign of an idea.
2. Next, we’ll get into the exact settings you should dial in on your camera and how to think about your first attempt at light painting.
3. Finally, once you’ve gotten a few light paintings under your belt, I’ll show you where to find more inspiration and information about becoming better at painting with light.
I think your first attempt at painting with light will be both fun and frustrating. The fun part comes from how you can quickly transform an otherwise boring subject into something exciting, while the frustration comes from a process that might feel foreign and needs more experimentation than you might be used to. You’ll get less and less frustrated as you become more experiences and you should continue to have fun as you progress in your ability to paint with light. It is my hope that you’ll still enjoy the process of painting with light many years from now.
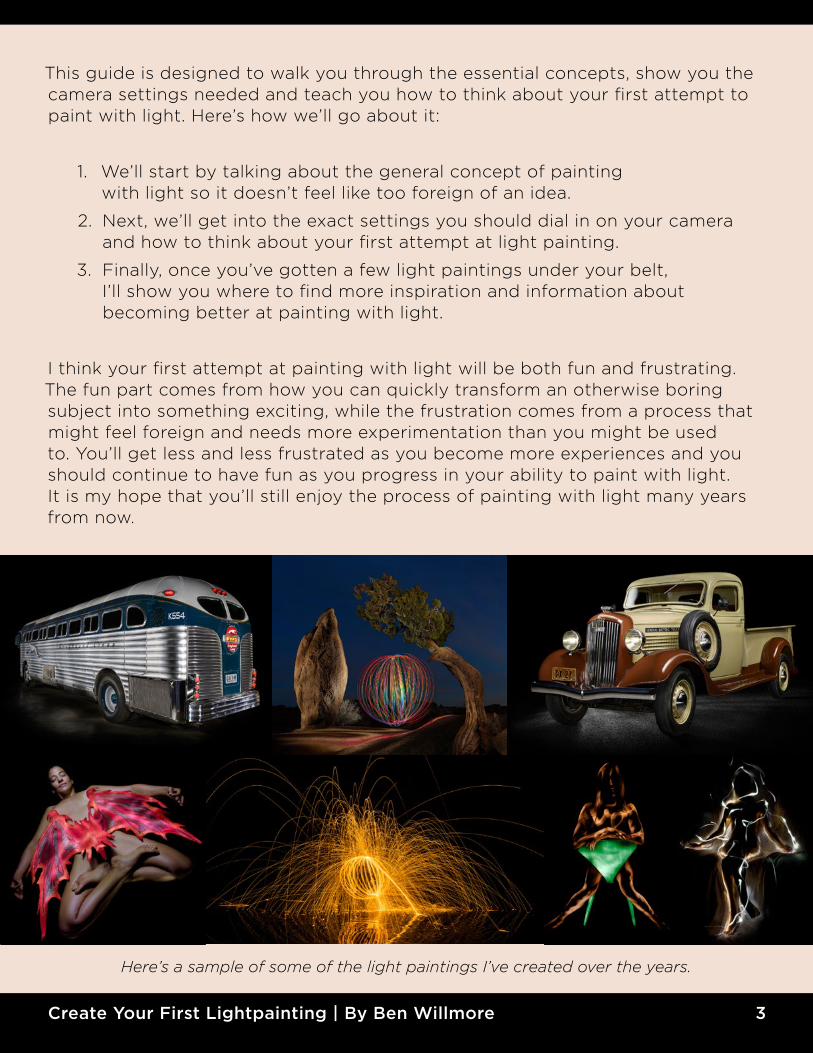
Here’s a sample of some of the light paintings I’ve created over the years.

Create Your First Lightpainting | By Ben Willmore 4
THE CONCEPTIt starts with total darknessMost light paintings start with nothing... no ambient light, that is. That means a 30-second exposure would produce a black frame with no discernible detail, which is not unlike what you’d get if you left the lens cap in place.
Your camera captures only what you lightWatching someone paint with light looks similar to seeing a search light scanning a scene; you only see what is actively being lit by a flashlight at any moment in time. But to the camera, that light will act more like paint coming out of a can of spray paint. That’s because the camera’s shutter will be open during the entire process and will therefore record the full path of the light as it is moved. If you pass the light over an area more than once, it will cause twice as much light to built up in that area. Pause and linger in one spot and the light will also build up to produce a brighter result.
Trail of light. Flash-light is moved as if it were scanning a surface.
Circle of light. Flash-light is aimed at one spot & doesn’t move.
Scene lightpainted The same scene lit with ambient light

Create Your First Lightpainting | By Ben Willmore 5
If you don’t light something, it will remain blackWhen working in a dark environment, a camera will only capture areas that are lit by the flashlight. That means the photographer is free to walk right in front of the camera during the exposure and they will not show up in the resulting photograph. That’s because the flashlight will never be pointing in their direction. Just make sure that you don’t stand where you’d block the camera’s view of the area that your flashlight is illuminating.
Light trumps subject & compositionWhen you look at a photograph, your eye is naturally drawn to the brightest area in a scene. With a naturally-lit photograph, you have little control over where the brightest area of a scene will be. But, with light painting, everything is different. We start with blackness and the brightness of any area is totally under our control. If you want someone’s eye to be drawn to an otherwise insignificant area of the scene, just spend more time letting the light build up in that area than anywhere else in the scene. If there’s a distracting object you want everyone to ignore, then never point the flashlight in that direction and it will be rendered as black. This level of control can be used to transform a boring scene into a piece of art.

Create Your First Lightpainting | By Ben Willmore 6
If you’ve never painted with light, then reading about it can only help so much. It’s best to just jump in and create a few light paintings so you can get a feel-ing for the process before you read too much about the techniques.
The only gear that you will need for your first light painting is a digi-tal camera that offers manual expo-sure settings and a flashlight. Here’s how I’d go about capturing your first image:
1. Use manual mode
Switch your camera over to Manual mode, set the aperture setting to f11, set the shutter speed to 30 seconds, and use the default ISO setting (100 for most cameras, 200 for some Nikons).
2. Find a dark environment
Find a dark area where you’d either need a flashlight to see your way around, or where your eyes would take multiple minutes to adjust in order to produce good night vision. If you’re outside, that means at least 30 minutes after sunset.
YOUR FIRST LIGHTPAINTING: SETUP

Create Your First Lightpainting | By Ben Willmore 7
3. Start with a simple subject
Choose an otherwise unexciting subject like an ordinary chair, table or wine bot-tle. This should be something that has no moving parts, is no larger than a ta-bletop and can stay stationary for hours on end. The idea is to let the light make the image special and to get comfort-able lighting something familiar before you get too fancy with your subject matter.
4. Steady your camera
Your camera will need to remain in the same position for at least 30 seconds, which means that you’ll need to find a surface to support it (chair, table or counter top for example), or ideally, use a sturdy tripod.
5. Frame the subject
Adjust the angle of the camera to frame your subject while using the light of a flashlight to illuminate the scene. This can take some practice, so don’t expect an award-winning result on your first try. Switch your lens over to manual focus mode, shine the flashlight on the most important part of your subject and then adjust focus. Manual focus mode is es-sential when light painting, otherwise your camera with hunt for focus in the dark when you press the shutter and prevent you from starting an exposure.
Now that all your gear is set up and ready, with flashlight in hand, press the shutter release button to start an expo-sure and consider the following when creating your first light painting:
Get in close
Move in close to your subject. The small-er the subject, the closer you’ll need to be to get a painterly look. For table-
top-sized subjects, I usually hold the flashlight between six inches and two feet away from the subject.
YOUR FIRST LIGHTPAINTING: SHOOTING
Create Your First Lightpainting | By Ben Willmore 8
Don’t block the camera’s view
Try to avoid blocking the camera’s view of the subject by keeping your body off to the left or right side of the subject.
Paint away
Turn on the flashlight while it’s pointed at the subject and scan over the en-tire subject as if you were using a can of spray paint to coat the entire object with paint. Try *not* to light the ob-ject evenly. Instead, spend a little more time allowing the light to fall on areas where you’d like the viewer to look first. The flashlight-to-subject distance has a big influence on how long you need to keep the light on a particular area. Move very fast if the flashlight is six inches away and spend more time lighting areas if you’re a few feet away.
Wait for shutter to close
You don’t have to spend the full length
of the 30-second exposure lighting the subject. If you feel you’ve lit what needs to be lit, then turn off the flashlight and wait for the sound of the shutter clos-ing before you turn on any other light sources. If the shutter closes before you’re done lighting the subject, then paint faster on your next exposure.
Only light subject
While the camera’s shutter is open, be mindful to avoid pointing the flashlight toward the camera or yourself and con-sider not lighting the background if you want the subject to really stand out.
Review results
After you’ve completed your first expo-sure, review the resulting image using the screen on the back of your digital camera. Don’t expect your first try to produce a masterpiece. It will most like-ly be way too bright or dark.
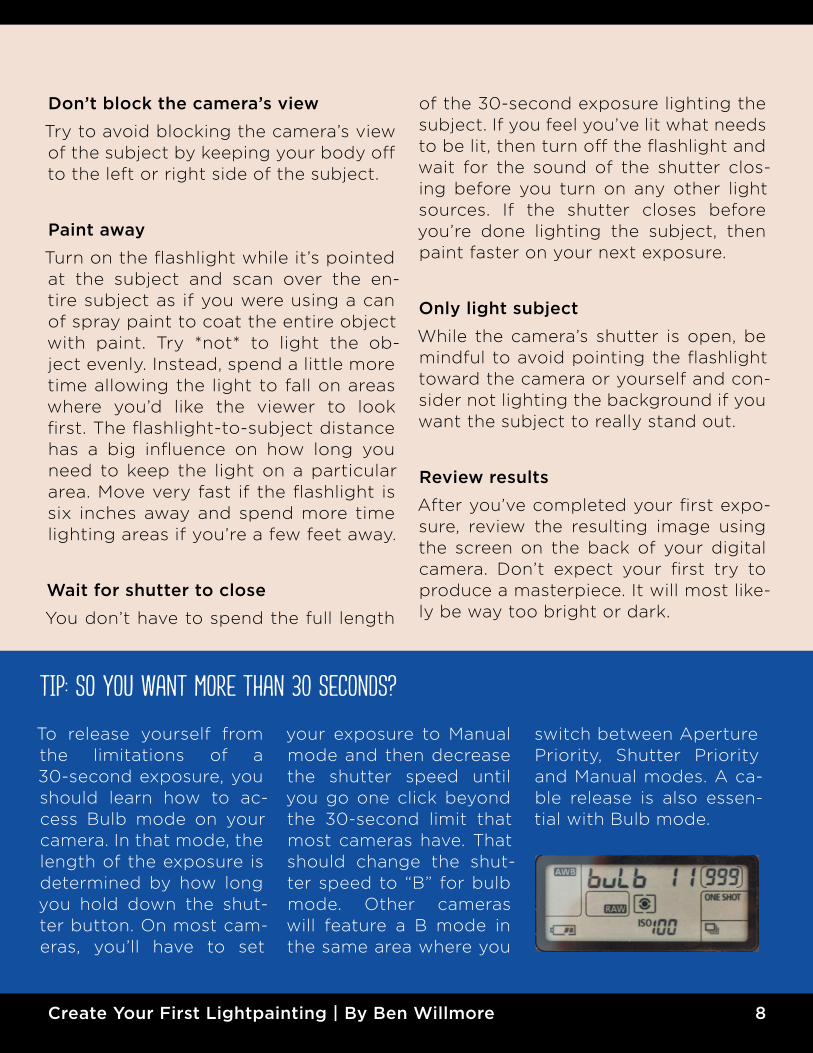
TIP: SO YOU WANT MORE THAN 30 SECONDS?
To release yourself from the limitations of a 30-second exposure, you should learn how to ac-cess Bulb mode on your camera. In that mode, the length of the exposure is determined by how long you hold down the shut-ter button. On most cam-eras, you’ll have to set
your exposure to Manual mode and then decrease the shutter speed until you go one click beyond the 30-second limit that most cameras have. That should change the shut-ter speed to “B” for bulb mode. Other cameras will feature a B mode in the same area where you
switch between Aperture Priority, Shutter Priority and Manual modes. A ca-ble release is also essen-tial with Bulb mode.
Create Your First Lightpainting | By Ben Willmore 9
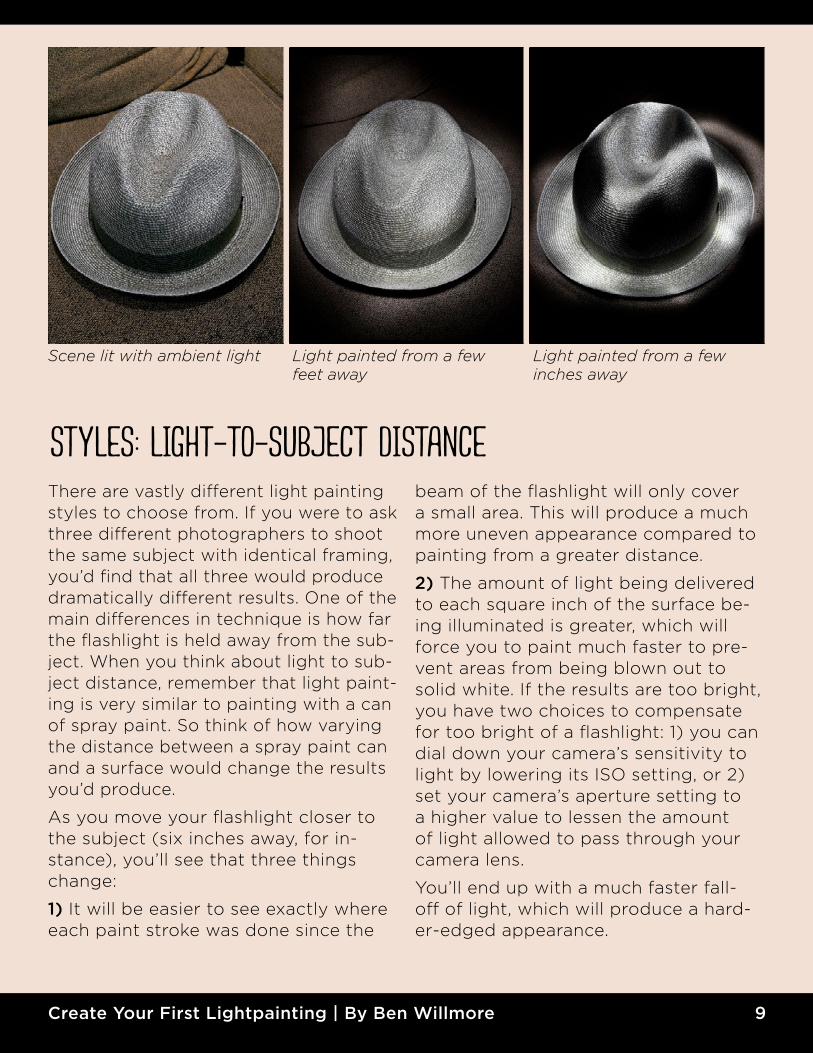
There are vastly different light painting styles to choose from. If you were to ask three different photographers to shoot the same subject with identical framing, you’d find that all three would produce dramatically different results. One of the main differences in technique is how far the flashlight is held away from the sub-ject. When you think about light to sub-ject distance, remember that light paint-ing is very similar to painting with a can of spray paint. So think of how varying the distance between a spray paint can and a surface would change the results you’d produce.
As you move your flashlight closer to the subject (six inches away, for in-stance), you’ll see that three things change:
1) It will be easier to see exactly where each paint stroke was done since the
beam of the flashlight will only cover a small area. This will produce a much more uneven appearance compared to painting from a greater distance.
2) The amount of light being delivered to each square inch of the surface be-ing illuminated is greater, which will force you to paint much faster to pre-vent areas from being blown out to solid white. If the results are too bright, you have two choices to compensate for too bright of a flashlight: 1) you can dial down your camera’s sensitivity to light by lowering its ISO setting, or 2) set your camera’s aperture setting to a higher value to lessen the amount of light allowed to pass through your camera lens.
You’ll end up with a much faster fall-off of light, which will produce a hard-er-edged appearance.
Scene lit with ambient light Light painted from a few feet away
Light painted from a few inches away
STYLES: LIGHT-TO-SUBJECT DISTANCE

Create Your First Lightpainting | By Ben Willmore 10
As you move the flashlight farther away from the subject (two feet away, for instance), you’ll notice three things changing:
1) It will be more difficult to see exactly where you painted because the flash-light will cover such a wide area. It will be difficult to isolate objects without getting overspray on the surroundings.
2) As you move farther away, the amount of light falling on the subject will decrease. If you double the dis-tance from flashlight to subject, that will cause only 1/4 of the light to fall on the subject. Tripling the distance will deliver 1/9th the light and quadrupling it will deliver only 1/16th the light. To compensate for this, you’ll most like-ly have to increase your camera’s ISO setting to make it more sensitive to light and/or paint slower to allow the light to build up. Think back to a can of spray paint. As you move farther away,
the same amount of paint is spread over a much wider area, causing each area to get a thinner coat of paint than if you were to get close and concen-trate the paint onto a smaller area.
3) Moving the flashlight away from the subject will produce a much soft-er light quality where the light slowly fades out on the edge instead of stop-ping abruptly.
I’ve found that multi-bulb flashlights used at close proximity to the sub-ject will produce a hybrid look where the edge of the light has a soft fall off (similar to a single bulb light used a few feet away), but can be used to more selectively light the subject by being at a close range. I typically use a flashlight that features at least a dozen bulbs when going for this look.
Painting from a few feet away produces a soft result where it is difficult to tell exactly where the flashlight was pointed during the exposure.
Painting from a only a few inches away from the subject makes it easy to see your paint strokes.
Create Your First Lightpainting | By Ben Willmore 11
LAST PAGE ! WHAT THE HECK SHOULD I DO NEXT? This might be the last page of this free how-to guide, but I hope it’s only your first step in a never-ending journey of learning how to have fun with light paint-ing. Below are a few ideas on what to experiment with next and then I’ll share sources for inspiration and education.
• Try finding a flashlight/camera setting combo that produces dim results and then use Bulb mode to allow you to relax and paint at less of a frenzied pace.
• When lighting humans, light the face first, from a few feet away, then feel free to move closer if you want a more painterly look for the rest of the body. Tell your subject to be as still as a statue and give them something to think about so you don’t get a blank stare on their face.
• Get a set of colored filters to hold in front of the flashlight to produce multi-colored images (common brands are Roscolux and Lee).
• Experiment shining your flashlight through stuff like the holes in your kitchen colander or a beer bottle to see what kind of light you get.
• Try pointing your flashlight toward the camera instead of your subject to produce light graffiti (use a smaller, lower power flashlight for this).
• Experiment with different light sources such as glow sticks, sparklers and Electroluminescent wire (Google it).
I find that the number of ways to light paint is virtually unlimited. One way to get more ideas is to look at what others are doing. Consider searching for “light painting” on the following web sites and then try to guess how each result might have been produced:
www.google.com (click on the Images choice near the top after searching)
www.flickr.com www.pinterest.com
Many of my more complex images were created by capturing multiple exposures where I find the ideal angle to light each element of a scene and then combine them using Photoshop. If you’d like to learn more about that process and get more advice from me on light painting, then check out the 94-page e-book I’ve written, titled “The Fine Art of Painting with Light,” which goes way beyond what we’ve covered here. It’s available for less than ten bucks at www.DigitalMastery.com/lightpaintebook
Finally, please share this PDF file with anyone you think would benefit from it.