creating a high-performance boot drive - highpoint tech · creating a high-performance boot drive...
TRANSCRIPT
Creating a High-Performance Boot Drive This HyoerDuo Build-guide assumes the RocketHybrid is already physically installed, and that you have installed the Marvell Storage Utility (MSU) interface, for the operating system. For the purposes of this guide, the system boot drive was attached to the RocketHybrid’s Port (Port 0 using MSU) and the SSD to port 2 (port 1 using MSU). However, you are free to attach either disk to either port.
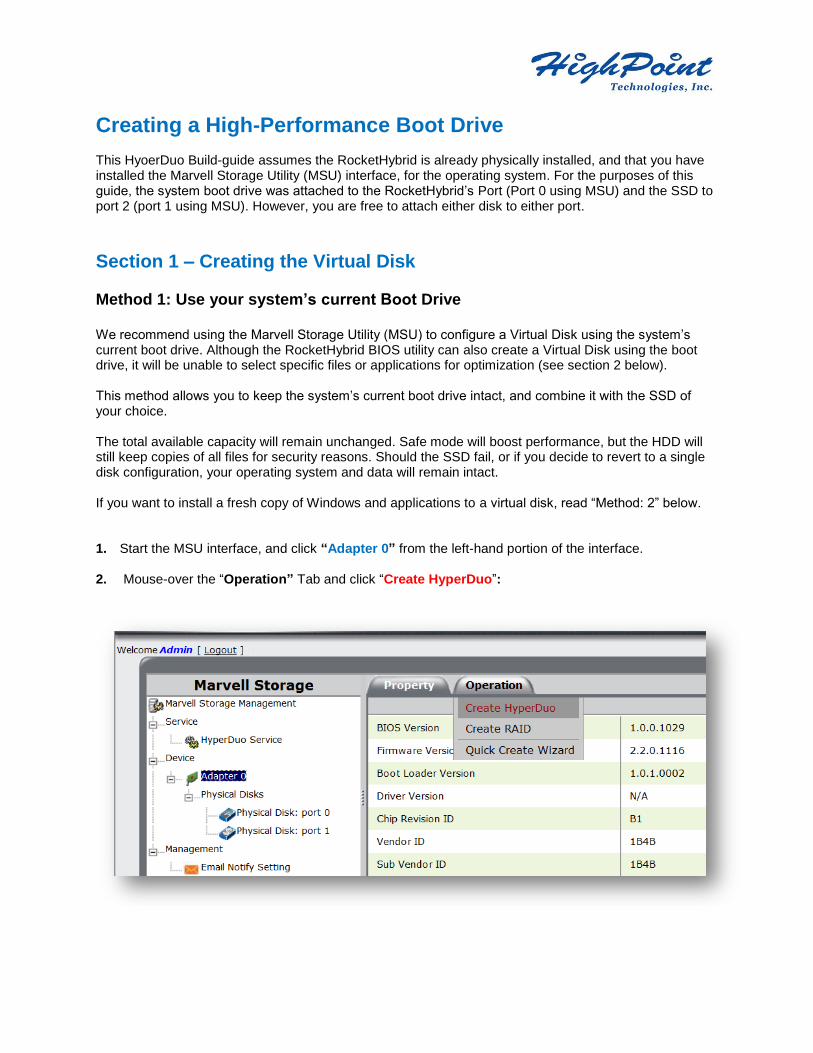
Section 1 – Creating the Virtual Disk Method 1: Use your system’s current Boot Drive We recommend using the Marvell Storage Utility (MSU) to configure a Virtual Disk using the system’s current boot drive. Although the RocketHybrid BIOS utility can also create a Virtual Disk using the boot drive, it will be unable to select specific files or applications for optimization (see section 2 below). This method allows you to keep the system’s current boot drive intact, and combine it with the SSD of your choice. The total available capacity will remain unchanged. Safe mode will boost performance, but the HDD will still keep copies of all files for security reasons. Should the SSD fail, or if you decide to revert to a single disk configuration, your operating system and data will remain intact. If you want to install a fresh copy of Windows and applications to a virtual disk, read “Method: 2” below. 1. Start the MSU interface, and click “Adapter 0” from the left-hand portion of the interface. 2. Mouse-over the “Operation” Tab and click “Create HyperDuo”:
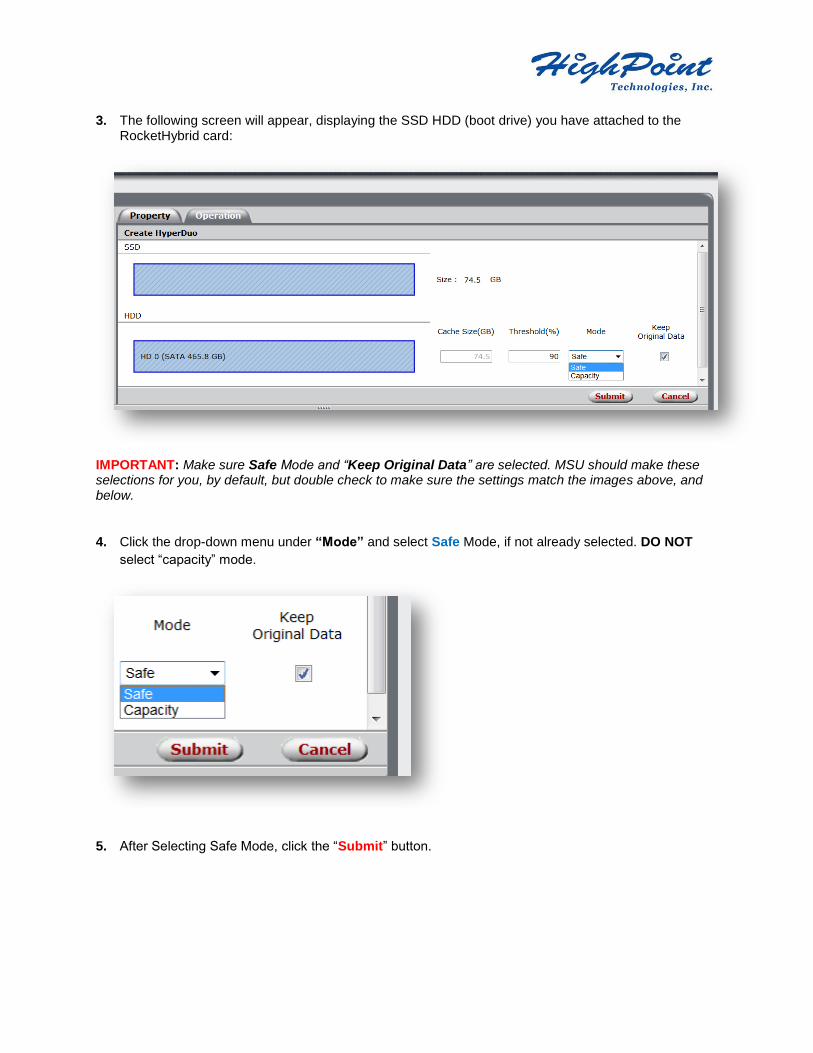
3. The following screen will appear, displaying the SSD HDD (boot drive) you have attached to the RocketHybrid card:
IMPORTANT: Make sure Safe Mode and “Keep Original Data” are selected. MSU should make these selections for you, by default, but double check to make sure the settings match the images above, and below.
4. Click the drop-down menu under “Mode” and select Safe Mode, if not already selected. DO NOT
select “capacity” mode.
5. After Selecting Safe Mode, click the “Submit” button.
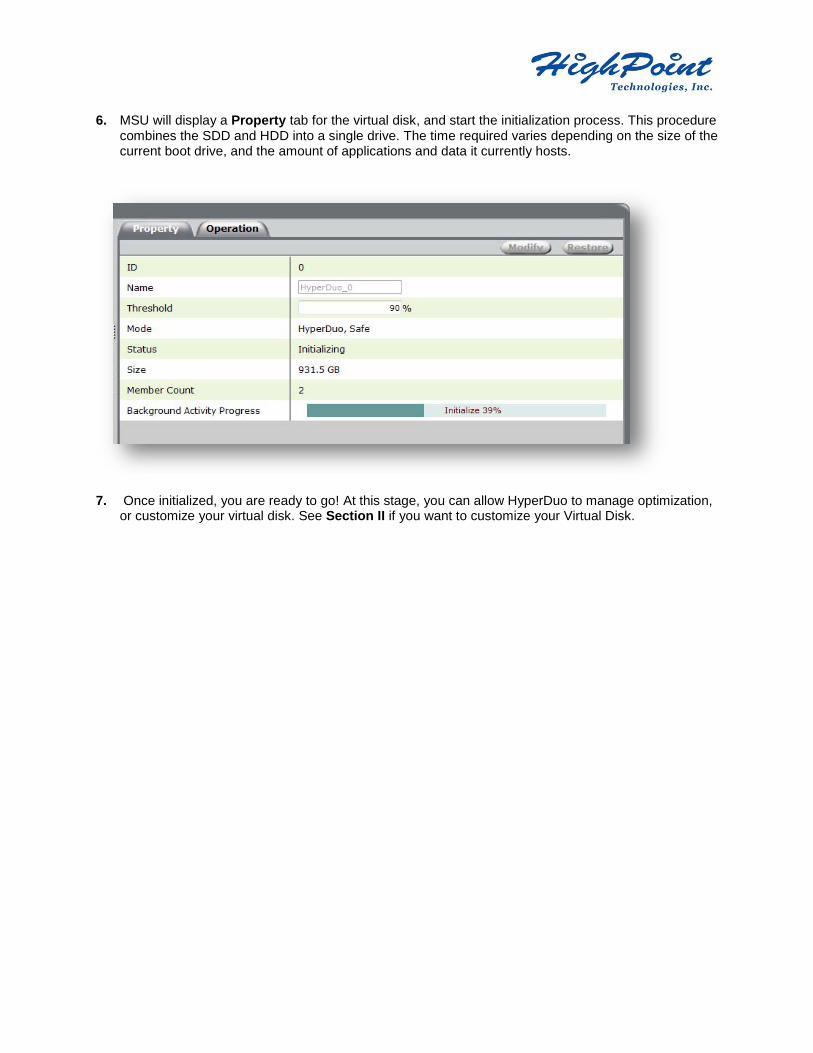
6. MSU will display a Property tab for the virtual disk, and start the initialization process. This procedure combines the SDD and HDD into a single drive. The time required varies depending on the size of the current boot drive, and the amount of applications and data it currently hosts.
7. Once initialized, you are ready to go! At this stage, you can allow HyperDuo to manage optimization,
or customize your virtual disk. See Section II if you want to customize your Virtual Disk.
Method 2: Installing a fresh copy of Windows to a Virtual Disk
You will need to use the BIOS interface to create a virtual disk for a Windows installation session.
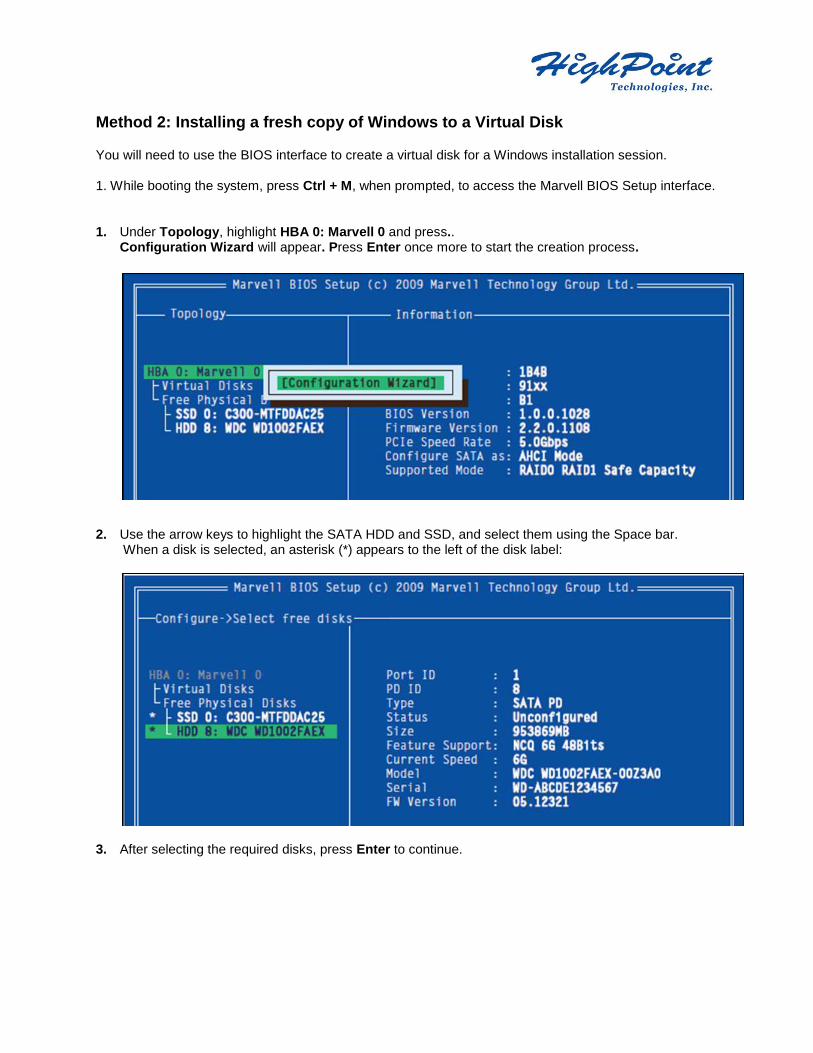
1. While booting the system, press Ctrl + M, when prompted, to access the Marvell BIOS Setup interface.
1. Under Topology, highlight HBA 0: Marvell 0 and press..
Configuration Wizard will appear. Press Enter once more to start the creation process.
Free Physical Disks
2. Use the arrow keys to highlight the SATA HDD and SSD, and select them using the Space bar. When a disk is selected, an asterisk (*) appears to the left of the disk label:
3. After selecting the required disks, press Enter to continue.
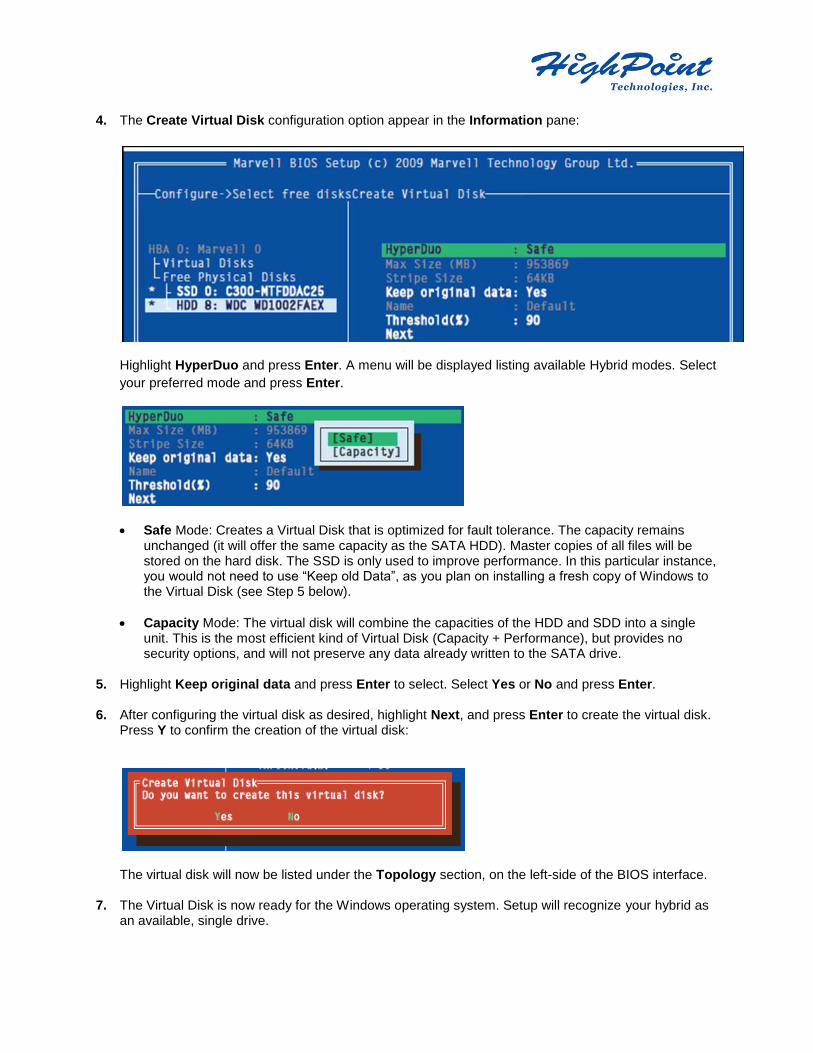
4. The Create Virtual Disk configuration option appear in the Information pane:
09 M Highlight HyperDuo and press Enter. A menu will be displayed listing available Hybrid modes. Select
your preferred mode and press Enter.
Safe Mode: Creates a Virtual Disk that is optimized for fault tolerance. The capacity remains unchanged (it will offer the same capacity as the SATA HDD). Master copies of all files will be stored on the hard disk. The SSD is only used to improve performance. In this particular instance, you would not need to use “Keep old Data”, as you plan on installing a fresh copy of Windows to the Virtual Disk (see Step 5 below).
Capacity Mode: The virtual disk will combine the capacities of the HDD and SDD into a single unit. This is the most efficient kind of Virtual Disk (Capacity + Performance), but provides no security options, and will not preserve any data already written to the SATA drive.
5. Highlight Keep original data and press Enter to select. Select Yes or No and press Enter.
Marvell BIOS Setup (c) 2009 Marvell Technology Group Ltd.
6. After configuring the virtual disk as desired, highlight Next, and press Enter to create the virtual disk. Press Y to confirm the creation of the virtual disk:
The virtual disk will now be listed under the Topology section, on the left-side of the BIOS interface.
7. The Virtual Disk is now ready for the Windows operating system. Setup will recognize your hybrid as an available, single drive.

Section 2 - Customizing your Virtual Disk
By default, HyperDuo will automatically select folders and files for optimization. You can allow HyperDuo to manage optimization for you – it will periodically monitor how you use your PC, and adjust file acceleration accordingly. However, advanced users may want to make their own selections. To customize your Virtual Disk: When starting out, the first thing you must do is to remove the “Auto” status from your folder list. 1. On the left-hand section of the interface, click “HyperDuo Service”. 2. Folders already selected for optimization will be listed with a status of “Accelerated”, and the “Auto”
box will be checked.
3. Uncheck these folders and click “Submit”.
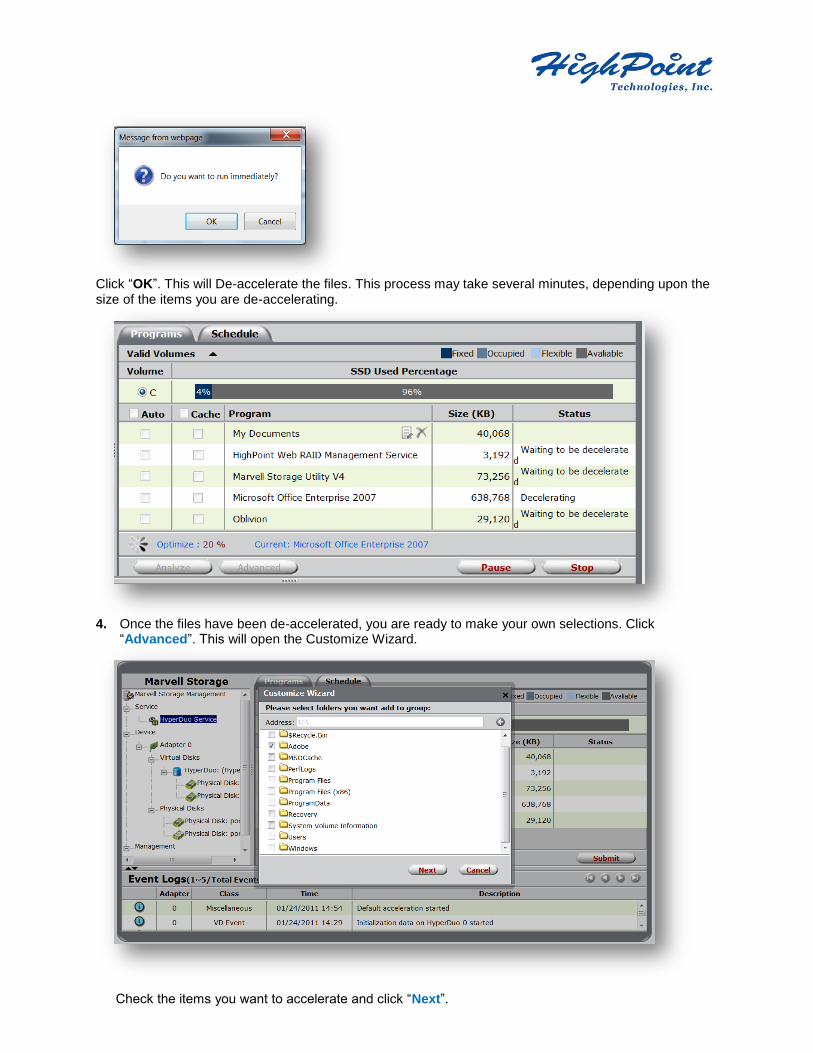
Click “OK”. This will De-accelerate the files. This process may take several minutes, depending upon the size of the items you are de-accelerating.
4. Once the files have been de-accelerated, you are ready to make your own selections. Click
“Advanced”. This will open the Customize Wizard.
Check the items you want to accelerate and click “Next”.
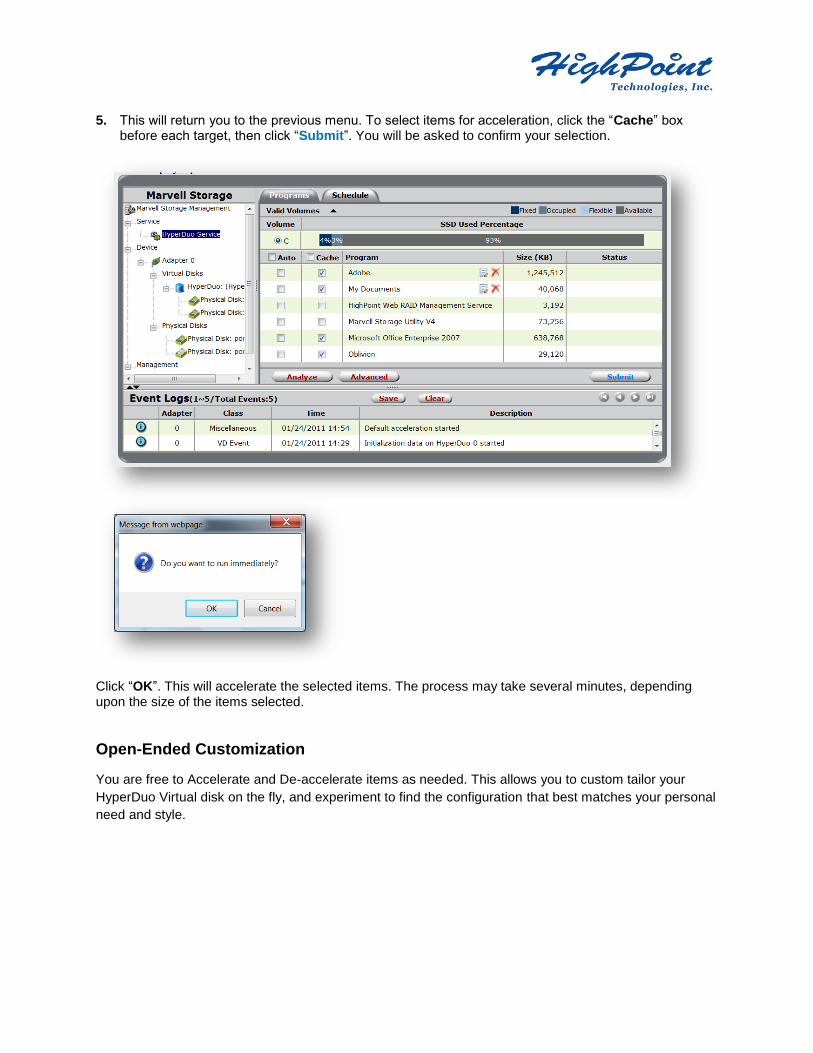
5. This will return you to the previous menu. To select items for acceleration, click the “Cache” box before each target, then click “Submit”. You will be asked to confirm your selection.
Click “OK”. This will accelerate the selected items. The process may take several minutes, depending upon the size of the items selected.
Open-Ended Customization
You are free to Accelerate and De-accelerate items as needed. This allows you to custom tailor your
HyperDuo Virtual disk on the fly, and experiment to find the configuration that best matches your personal
need and style.