creating talking books - fdlrs...
TRANSCRIPT

Lourdes Day, Technology Specialist FDLRS Sunrise
Florida Diagnostic and Learning Resource System-FDLRS Sunrise
Creating Talking Books PowerPoint 2007
Florida Diagnostic and Learning Resources System (FDLRS) is funded through IDEA, Part B and State General Revenue
Funds to provide support services to Florida’s Exceptional Student Education Programs

[email protected] 11/7/08
Table of Contents Why create PowerPoint talking books? ........................................................................................................ 1
Create a Folder .............................................................................................................................................. 1
Launch PowerPoint 2007 .............................................................................................................................. 1
Insert a Slide .................................................................................................................................................. 1
Change a slide ........................................................................................................................................... 2
Reposition and Resize the Text Box .............................................................................................................. 2
Duplicate the Text Box (optional) ................................................................................................................. 2
Create Page Turners ...................................................................................................................................... 3
Replace the Speaker Symbol (Optional) ....................................................................................................... 3
Navigation ..................................................................................................................................................... 3
Duplicate Pages ............................................................................................................................................. 4
Page Transition ............................................................................................................................................. 4
Save as a Template ....................................................................................................................................... 4
Text Color ...................................................................................................................................................... 5
Add Speech ................................................................................................................................................... 5
PowerTalk ................................................................................................................................................. 5
Recorded Speech ...................................................................................................................................... 5
Record ................................................................................................................................................... 5
Change File Size Settings ....................................................................................................................... 6
Associate the Recorded Speech with the Read Symbol (optional) ............................................................... 6
Read Text Automatically ............................................................................................................................... 6
Run the Show ................................................................................................................................................ 6
Backgrounds .................................................................................................................................................. 7
Clip Art .......................................................................................................................................................... 7
Add ClipArt from Microsoft ....................................................................................................................... 7
Free Clip Art .............................................................................................................................................. 8
Make Clips Available Offline ..................................................................................................................... 8
Download Pictures from Other Sites ........................................................................................................ 8
Digital Pictures .......................................................................................................................................... 8

[email protected] 11/7/08
Add Speech to Pictures ................................................................................................................................. 9
Alt Text ...................................................................................................................................................... 9
Record Sound with Picture ....................................................................................................................... 9
Add Sounds to Pictures ................................................................................................................................. 9
Sounds from the Gallery ........................................................................................................................... 9
Associate the Sound to the Picture ........................................................................................................... 9
Sounds from the Web ............................................................................................................................. 10
Hyperlink ..................................................................................................................................................... 10
Switch Access .............................................................................................................................................. 10
Problem Solving Sound ............................................................................................................................... 11
Strategies for Creating Talking Books for Struggling Readers .................................................................... 12
100 Most Frequently Used Words in Books for Beginning Readers ........................................................... 13
Dolch Frequency List ................................................................................................................................... 14
Fry List ......................................................................................................................................................... 15
[email protected] Page 1 of 18 11/7/08
Creating Talking Books With PowerPoint 2007
Why create PowerPoint talking books? Using a tool such as PowerPoint to create digital books gives children a fun and creative way to improve
literacy skills. PowerPoint books can be played back on a computer so students who are unable to
physically turn pages can use an interface and a switch to move to the next slide. Students and teachers
can create projects ranging from big books to research presentations in a new and exciting format. This
is a great way to provide auditory and visual information. Save them to a flash drive, CD or email them
home so that students can share their creations with their families.
Create a Folder Create a folder for each book as a way to organize and store the media for each book.
1. Right click on the desktop or the “My Documents” folder
2. From the submenu choose New and then Folder
3. Don’t Click. Simply type the name of the folder and it will replace the highlighted “New Folder”
title with the preferred name.
Launch PowerPoint 2007 1. Click on the Start Menu
2. Choose All Programs
3. Click on Microsoft Office and choose Microsoft Office PowerPoint 2007
PowerPoint will open with the Title slide. Type your title
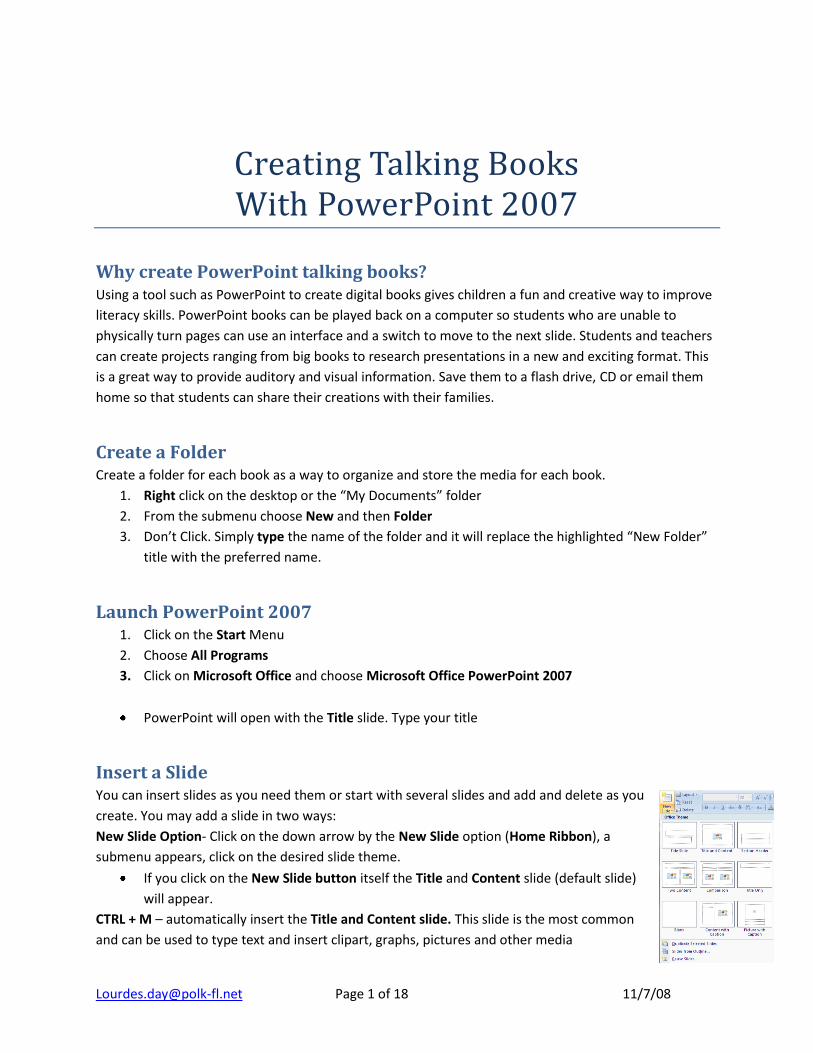
Insert a Slide You can insert slides as you need them or start with several slides and add and delete as you
create. You may add a slide in two ways:
New Slide Option- Click on the down arrow by the New Slide option (Home Ribbon), a
submenu appears, click on the desired slide theme.
If you click on the New Slide button itself the Title and Content slide (default slide)
will appear.
CTRL + M – automatically insert the Title and Content slide. This slide is the most common
and can be used to type text and insert clipart, graphs, pictures and other media

[email protected] Page 2 of 18 11/7/08
You may use the Title and Content Slide to type purpose questions for the book. We will learn
how to hyperlink the purpose slide later.
Add another slide to begin your story
Change a slide Once a slide is inserted you may change the slide arrangement by choosing the Layout
button on the Home tab and clicking on the preferred layout.
The Title Only slide may be the easiest to work with
Reposition and Resize the Text Box Reposition the Title Only slide by clicking on the edge of the box (stay away from the circles)
and dragging the box to a new location.
Resize the text box, if necessary by clicking on one of the corner circles and dragging towards
the center to make it smaller or away from the center to make it larger.
Duplicate the Text Box (optional) A second Title box may be used to contain the navigation arrows, comments and reading icon. This is
optional but can be helpful for some students with emerging literacy skills and those who are non
verbal.
1. Click on the title text box to select it
2. Press the Ctrl Key and D (Duplicate)
3. Drag the text box to the desired location
4. Immediately fill it with color
a. Select the text box and a Drawing Tools tab will
appear above the Format Ribbon
b. Click on the Drawing Tools tab and then click on the
down arrow by the Shape Fill option.
c. Choose a color.
If you do not fill the duplicated text box immediately with color it will
disappear when click away from it.
Resizing handles Reposition

[email protected] Page 3 of 18 11/7/08
Create Page Turners 1. On the Insert tab, in the illustration group, click Shapes
2. Drag to the bottom of the menu to Action Buttons.
a. Click the button pointing to the right (takes you to
the next slide)
i. Click, hold and drag the cross hair until you
achieve the desired Action button size
ii. A window will open:”Hyperlink to the next slide”
iii. Click OK
b. Click the button pointing to the left-(takes you to the
previous slide)
i. Click, hold and drag the cross hair until you
achieve the desired Action button size
ii. A window will open:”Hyperlink to the previous slide”
iii. Click OK
If you want the “Previous action button” to be the same size as the “Next slide button”:
create the previous button on top of the next slide button. Use the arrow keys on the
keyboard to separate the buttons and keep the tops of both buttons aligned
Copy and paste the navigation buttons on the title and purpose slide(if applicable)
Replace the Speaker Symbol (Optional) You may prefer to use a different picture other than the speaker to represent the read symbol. A mouth,
book or a person reading may be good substitution.
1. Click on the Insert Tab and choose Clip Art
2. A task pane will open on the right
3. In the Search line type the desired picture, example “mouth”
4. Press Go or the Enter key
5. Click on the preferred picture to insert it
6. Click on the center of the picture and drag the picture to the desired location
Navigation There are several ways to turn the pages in PowerPoint. The most common is to press the Enter key,
space bar, right or down arrow. You can press the left or up arrow to move back in the book. If you want
the students to use the newly created button to navigate
1. Click on the Slide Show Tab
2. In the Set Up Group click on the Set up Slide Show option
3. At the new window, choose Browsed at Kiosk (full
screen)
4. Click OK

[email protected] Page 4 of 18 11/7/08
Duplicate Pages Once you have created the navigation bar duplicate the pages until you have the number if
pages needed for your book.
1. Click to select the slide on the left task pane to be duplicated
2. Press the CTRL key + D to duplicate the slide
3. Repeat this process until you have the desired number of slides
Page Transition Create a slide transition to give the illusion of a turning page, example: Wipe or Cover Left
1. Choose the Animation Tab
2. Click on the down arrow by Transition to this slide to see more options
3. Choose a transition
4. Click on Apply to All.
Save as a Template To save time in the future you may want to save the presentation you
just created with the navigation buttons as a template. A template is a
presentation that can be used over and over again. The content will
change to reflect the ideas in the new book.
1. Click on the Office button on the top left side
2. Drag to Save As and choose Other Formats
3. At the next window click on the down arrow by Save
As Type
4. Choose PowerPoint Template(.pptx)
5. Choose the Save location ( If you don’t pick a different
location the presentation will be Saved into the Template folder)
6. Click Save
Close the template and then double click to reopen. (This is IMPORTANT because you do not
want to create a specific book on the template. Notice the Template looks like it is bound at
the top.
To edit the template-right click on the template and choose Open

[email protected] Page 5 of 18 11/7/08
Text Color 1. Type your text
2. Highlight the text
3. On the Home tab click the down arrow by the font color option
4. Choose your font color
*Alternative use the mini toolbar that appears when text is highlight and click on the font color
option
Add Speech There are two way to add speech to a presentation
First is to use a download utility called PowerTalk ( http://fullmeasure.co.uk/powertalk/)
Or
You may record your own speech
PowerTalk After you have downloading the PowerTalk program, right click on the presentation to open it and
choose Narrate with PowerTalk.
If Narrate with PowerTalk is not an option choose Open with and browse until you the
PowerTalk Exe.
Recorded Speech Recorded speech adds the appropriate prosody that is needed to bring a book to life. Recorded speech
will increase the size of your file. When using recorded or digitized speech:
Use a peer of similar age to model good reading. Students will find the story more appealing.
Recording speech is motivating to many students. Have a poor reader rehearse the story so they
can then record the story for others.
Change the embedded file setting to 50,000 kb.
Record
1. Click on the Insert tab and click on the arrow below the Sound icon
2. Choose Record a Sound
3. A “Record Sound’ window will open
4. Name the sound file before you record
5. Click on the red button and begin to record your speech
6. Click on the rectangle to stop the recording
7. Click on the right arrow to playback
8. Click Ok
9. A small speaker will appear in the presentation
10. Repeat the above steps until all your pages have been narrated
[email protected] Page 6 of 18 11/7/08
Change File Size Settings
This is a very important step so that when you save your presentation the recorded speech will be
embedded in the presentation and can be easily transferred to another computer.
1. Click on one of the speakers in the presentation
2. A Sound Tools tab will appear at the end of the ribbons. Click on the Sound Tools
Tab
3. In Sound Option Group Change the “Max Sound File Size(KB) to 50,000
Changing this setting effects all subsequent presentations so you only need to do this step
once
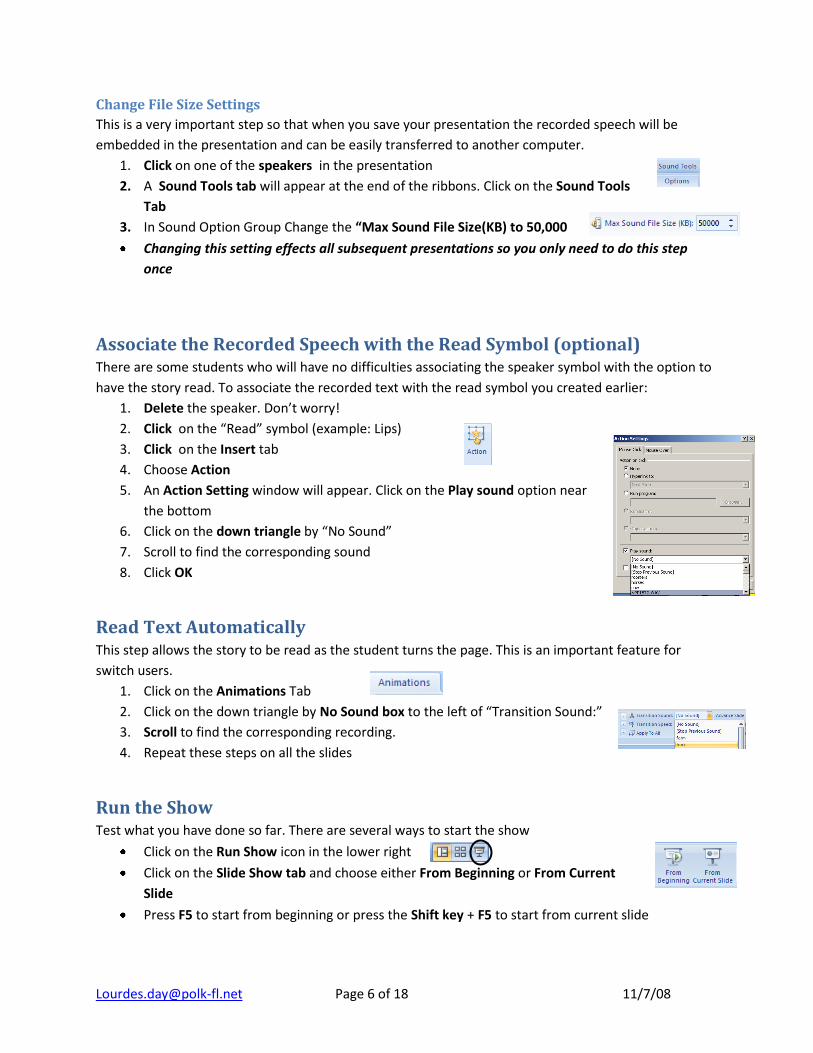
Associate the Recorded Speech with the Read Symbol (optional) There are some students who will have no difficulties associating the speaker symbol with the option to
have the story read. To associate the recorded text with the read symbol you created earlier:
1. Delete the speaker. Don’t worry!
2. Click on the “Read” symbol (example: Lips)
3. Click on the Insert tab
4. Choose Action
5. An Action Setting window will appear. Click on the Play sound option near
the bottom
6. Click on the down triangle by “No Sound”
7. Scroll to find the corresponding sound
8. Click OK
Read Text Automatically This step allows the story to be read as the student turns the page. This is an important feature for
switch users.
1. Click on the Animations Tab
2. Click on the down triangle by No Sound box to the left of “Transition Sound:”
3. Scroll to find the corresponding recording.
4. Repeat these steps on all the slides
Run the Show Test what you have done so far. There are several ways to start the show
Click on the Run Show icon in the lower right
Click on the Slide Show tab and choose either From Beginning or From Current
Slide
Press F5 to start from beginning or press the Shift key + F5 to start from current slide

[email protected] Page 7 of 18 11/7/08
Backgrounds Most books contain pictures so it is best to keep the background as simple as possible. To change the
background from white to a different color:
1. Click on Design Tab
2. From the Background Group choose click on the down arrow by Background
Styles
3. Choose “Format Background”. A window will open
4. Click on the paint can in the center of the window and choose your preferred
color
5. Choose Apply to All if you want all your pages to have the same background
6. Click Close
Clip Art Adding pictures and animated gifs to your presentation will add a spark and interest to your book.
1. Click on the Insert Tab and choose Clip Art
2. A task pane will open on the right
3. In the Search line type the desired picture, example “mouth”
4. Press Go or the Enter key
5. Click on the preferred picture to insert it
a. A picture with a globe on the corner indicates the picture resides on
the internet and is not a permanent part of the library. SO if the
computer is not connected to the Internet the picture is not accessible.
b. A picture with a star in the corner indicates that it is an animated gif and moves when
the presentation is run.
6. Click on the center of the picture and drag the picture to the desired location
7. Resize the picture by using one of the corner resizing circles or
a. Right click on the picture
b. Choose Size and Position
c. Change the Height number lower to make it smaller or larger to
make the picture bigger.
d. Click Close
Add ClipArt from Microsoft The advantage to adding clipart from the Microsoft web site is that the picture
automatically is added to your library AND is accessible even if the Internet is not
connected.
1. Click on the Insert Tab and choose Clip Art
2. A task pane will open on the right
3. Choose “Clip art on Office Online” (Located below the task pane)
4. When the Internet opens type the name of the picture you desire and click Search
5. Click in the box below the picture to choose it for download

[email protected] Page 8 of 18 11/7/08
6. Repeat this step until you have chosen all your pictures
7. Click on Download # Items and follow the directions on the screen (Download and
Open Commands)
To find the downloaded clip art: Open the clipart gallery and type the same
name you used to locate the picture in the Internet library. You will notice
that the downloaded picture no longer contains the globe icon in the corner
Free Clip Art There are some wonderful free clipart web sites
1. www.picsearch.com
2. http://www.animationfactory.com/en/ (there is a small member ship rate)
3. http://school.discovery.com/clipart
4. http://www.dorlingkindersley-uk.co.uk/static/cs/uk/11/clipart
5. http://etc.usf.edu/clipart
6. http://www.slatersoftware.com/document.html (click on the Literacy Support on the right and
type the name of the picture in the search line)
7. http://www.clip-art.com/index.php (This is an index of lots of free clipart websites. Explore on
your own
Make Clips Available Offline 1. From the Clip Art Task Pane place your cursor on the desired picture
2. A down arrow will appear on the right side of the picture
3. Choose Make Available Offline
4. Pick the Favorite Category and click Ok
5. When you press the command you will see the picture on the task without a globe in the corner
Download Pictures from Other Sites 1. Right click on the picture
2. Choose Save Picture As
3. Select the Save location (Usually it is the Picture Folder inside My
Documents or in the same folder as the book)
4. Name the picture and click Save
Digital Pictures There is something very exciting for students to see themselves in a book or to actually take digital
pictures for their own books.
1. Follow the download directions from your camera and place the digital photos in the Picture
folder inside the My Documents folder or in the same folder as the book
2. Click on the Insert Tab and choose the Picture option
3. The Picture folder will open or browse until you locate the picture
4. Select the Picture and choose Insert

[email protected] Page 9 of 18 11/7/08
Add Speech to Pictures
Alt Text For students who are blind or have low vision, placing an alt text tag on the picture will allow a screen
reader program such as “Jaws” to describe the picture to the student. If you use
PowerTalk to read your story it will read the text boxes first then any alt tag you have
placed on the picture.
1. Right click on the picture choose Size and Position
2. Click on the Alt Text tab
3. Type a description in the window and click Close
Record Sound with Picture 1. Follow the directions above “Record, in the Recorded Speech section”
2. Then associate the recorded message to the picture by using the same directions above,
“Associate Recorded Speech with Read symbol”
The student will have to click on the picture to hear it
Add Sounds to Pictures
Sounds from the Gallery 1. Click on the Insert Tab and choose Clip Art
2. A task pane will open on the right
3. In the Search line type the desired sound, example “cow or moo”. This will
result in moo sounds
4. Click on the down arrow by “Selected Media file types”
5. Uncheck everything except Sounds(This will make the serach faster)
6. Press Go or the Enter key
7. Click on the preferred sound to insert it
8. Choose either “Automatically” or “When clicked”.
Associate the Sound to the Picture 1. Delete the speaker icon
2. Click on the picture
3. Click on the Insert tab and Choose Action
4. An Action Setting window will appear. Click on the down triangle by “No Sound”
5. Scroll to find the corresponding sound and click to choose it
6. Click OK
The student will have to click on the picture to hear it

[email protected] Page 10 of 18 11/7/08
Sounds from the Web There are several websites that you can use to download some fee sounds and music.
www.findsounds.com (remove the check by Aiff and AU)
www.classictvhits.com (lots of advertisements)
www.simplythebest.net/sounds
1. Locate your sound on the web
2. Right click and choose Save target as
3. Save the sound in the same folder as your book.
7. Click on the Insert Tab and choose Sound
8. Click Sound from File. Locate the sound you downloaded
9. At the next window choose either automatically or when clicked. It
doesn’t matter because you will be deleting the speaker and associating it
with the picture when the picture is clicked.
10. Delete the speaker
11. Click on the Picture
12. Click on the Insert tab and Choose Action
13. An Action Setting window will appear. Click on the down triangle by “No Sound”
14. Scroll to find the corresponding sound and click to choose it
15. Click OK
The student will have to click on the picture to hear it
Hyperlink Hyperlink the Purpose questions to the first slide
1. Highlight all the questions
2. Right click and choose Hyperlink Or click on the Insert
Tab and choose Hyperlink
3. Click on the “Place in the Document”
4. Choose the slide which you want to link to
5. Click OK
All the lines will be underlined to indicate they are linked
Switch Access Students who are physically unable to turn pages in a book or can not click a mouse can be independent
turning the pages of a PowerPoint book while using a switch and an interface. An example of switch
interface is the switch Hooper from RJ Cooper ($109.95) or Switch Interface from Don Johnston ($99)
Contact the schools occupational or physical therapist to help select the best switch and placement to
meet the student’s needs.
It is very important that for these students you follow the “Read text Automatically” section
[email protected] Page 11 of 18 11/7/08
Problem Solving Sound
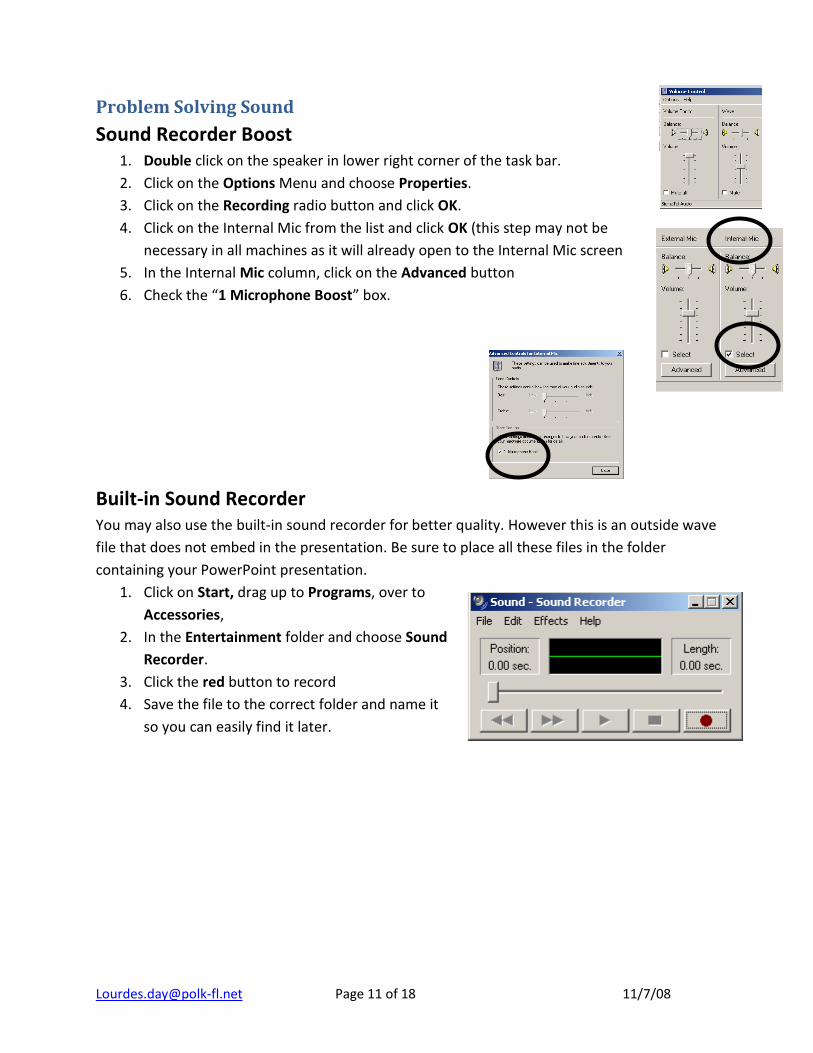
Sound Recorder Boost 1. Double click on the speaker in lower right corner of the task bar.
2. Click on the Options Menu and choose Properties.
3. Click on the Recording radio button and click OK.
4. Click on the Internal Mic from the list and click OK (this step may not be
necessary in all machines as it will already open to the Internal Mic screen
5. In the Internal Mic column, click on the Advanced button
6. Check the “1 Microphone Boost” box.
Built-in Sound Recorder You may also use the built-in sound recorder for better quality. However this is an outside wave
file that does not embed in the presentation. Be sure to place all these files in the folder
containing your PowerPoint presentation.
1. Click on Start, drag up to Programs, over to
Accessories,
2. In the Entertainment folder and choose Sound
Recorder.
3. Click the red button to record
4. Save the file to the correct folder and name it
so you can easily find it later.

[email protected] Page 12 of 18 11/7/08
Strategies for Creating Talking Books for Struggling Readers
1. Include high frequency words and word families in your story
2. Build background and access prior knowledge. This can be done with pictures, videos (www.unitedstreaming.com ) and field trips.
3. Pair new vocabulary with pictures
4. Reread each story 4-5 times
5. Pick ONE purpose for listening/reading each time
6. Make some of your books humorous. Remember children’s humor is different that adults
7. Create books that are that are predictable or have repeated lines, rhyme or can be sung to a familiar tune or rap
8. Use a different color font for: new vocabulary, repeated lines, drawing attention to root words
9. Add music or sounds to enhance the story
10. Turn the volume off after the 3rd or 4th time and let the child try to read the story independently
Resource: Dr. Caroline Ramsey Musselwhite, www.aacintervention.com

[email protected] Page 13 of 18 11/7/08
100 Most Frequently Used Words in Books for Beginning Readers 1. the 26. he 51. be 76. cat
2. a 27. out 52. now 77. them
3. and 28. that 53. when 78. tree
4. to 29. one 54. there 79. where
5. I 30. big 55. into 80. away
6. in 31. go 56. day 81. time
7. is 32. was 57. look 82. as
8. on 33. like 58. eat 83. water
9. you 34. what 59. make 84. home
10. it 35. not 60. his 85. made
11. of 36. do 61. here 86. long
12. said 37. then 62. your 87. has
13. can 38. this 63. an 88. help
14. for 39. no 64. back 89. good
15. my 40. too 65. mom 90. going
16. but 41. she 66. dog 91. by
17. all 42. went 67. very 92. how
18. we 43. see 68. did 93. house
19. are 44. will 69. her 94. dad
20. up 45. so 70. from 95. or
21. at 46. some 71. had 96. two
22. with 47. down 72. got 97. red
23. me 48. little 73. put 98. am
24. they 49. come 74. came 99. over
25. have 50. get 75. just 100. saw

