database migration to snowflake: a complete how-to guide · migration from a microsoft sql server...
TRANSCRIPT

Database Migration to Snowflake: A Complete
How-to Guide

Summary Introduction 4
Disclaimer 6
Readme.txt 7
Pre-Requisites 8 Microsoft SQL Server 9 Snowflake 10
Create an empty database in Snowflake 10 Create identical 32-bit and 64-bit ODBC connections to Snowflake 12
Migrating the Database 13 Move the database from Microsoft SQL Server to Snowflake 13
Open Microsoft SQL Server Management Studio 13 Select the database to migrate (e.g.: AdventureWorks2017) 14 Choose a Data Source 16 Choose a Destination 17 Specify Table Copy or Query 18 Configure Flat File Destination 19 Save and Run Package 20 Complete the Wizard 21 The execution was successful 22 Repeat for SalesOrderDetail and SalesOrderHeader 23
Create Tables in Snowflake 25 Import Data via CSV into Snowflake 28
Load Data - Warehouse 29 Load Data - Source Files 30 Load Data - File Format 31 Repeat for SALESORDERDETAIL and SALESORDERHEADER 34
What’s Next? 35
Updating SAP BusinessObjects 36 Copying Universes 36
Create a Universe Connection to Snowflake 36
1

Create a New Local Project 38 Retrieve the Universe 39 Create a Relational Connection Shortcut 41 Repoint the Data Foundation to the Snowflake Connection 42 Change the Qualifier/Owner of the Tables in the Data Foundation 44 Set the Tables and Columns Case 47 Refresh Universe Foundation Structure 49 Validate the Business Layer with the Snowflake Data Foundation 56 Rename the Universe 59 Publish the Business Layer with the Snowflake Data Foundation 60
Updating Web Intelligence 62 Modify your Web Intelligence 62 Change Data Source 63
Updating Crystal Reports 70 Crystal Reports “Desktop” 71 Central Management Console (CMC) 77
Testing Content 80 Comparing Data 80 Comparing Performance 81
With 360Suite Automation: Reducing time, cost and risks 82
2

Introduction This guide will show you how to migrate a relational database from Microsoft SQL 1
Server 2019 for example, to Snowflake. Then how to manually manage your SAP BusinessObjects content:
● Universe(s) and their connections to Snowflake And if necessary, how to:
● Repoint your Web Intelligence document(s) to your Snowflake Universe(s) ● Repoint your Crystal Reports document(s) to your Snowflake ODBC
1. Identify which Universes, Reports, and Users will be impacted by repointing the database connectivity to Snowflake.
This step can also be used to identify and document which tables and columns in your databases are used (and not used) by SAP BusinessObjects. This can help identify the data that needs to be migrated, in which order or not at all.
2. This is the migration step by the customer.
3. There are two scenarios:
1 More definitions here: https://mssql.tosnowflake.com/
3

a. Simply repointing the Universe Connection to Snowflake works, the Universe passes all integrity checks, you can start the validation of the Webi reports (step 5). If you have Crystal Reports pointing directly at the database and not via a Universe, they will need to be updated with the new database connections (step 4).
b. Due to changes in the Snowflake Schema, Column Type or just vendor-specific SQL inside the Universe means that we need to make changes to the Universe.
This step is also applicable if you are converting from a UNV to a UNX. Here we will work with a copy of the existing Universe and apply the necessary changes so they are fully operational. Depending on your strategy, you may need to later repoint all the documents that use the old Universe to the new one (step 4).
4. Back-up: before making any changes to your content, make sure that you
have a reliable and performant back-up.
5. Repointing Webi and Crystal Documents (tutorial video here) to the new / updated universes.
6. Testing and Validation: ensure user satisfaction and meet regulatory needs by testing the data, its security, the layout of the documents, the network connectivity and performance of your documents.
4

Disclaimer This blog demonstrates the concepts of a database migration and how to manage SAP BusinessObjects content affected by this project. Every case is different and the steps mentioned here may not be the same for you. Here we took the example of a migration from a Microsoft SQL Server to Snowflake, but this guide can apply to a multitude of different databases. For completeness of this document we are simulating the workflow where migrating the database will require changes to the schema: database name, table names therefore involving changes in the Universe(s).
This guide will cover the Lift & Shift Advanced scenario showing all the steps involved when simply changing the Universe connection is not sufficient.
5

Readme.txt Before any migration project, it is important to carry out a Pre-Migration Impact Analysis first in order to decide what needs to be migrated over. You should also analyze what will be impacted by this project to help avoid any risks during the whole process. Examples:
● Universes: ○ List of Connections pointing to the database(s) to Migrate ○ List of Universes pointing to these Universe Connections ○ List of Universe Restrictions (aka overloads) ○ Document Universes Usage / Non-Usage ○ Document Universe Objects (dimensions, details, measure) Usage /
Non-Usage
● Content: ○ List of Web Intelligence, Crystal Reports and other documents pointing
to these Universes ○ List of Web Intelligence, Crystal Reports and other documents directly
pointing to these database(s). E.g. Crystal Reports 2016 ○ Document Web Intelligence formulas that might be affected ○ Document impacted content Usage / Non-Usage ○ Document Instances impacted by this migration
● Users:
○ Document users impacted (based on actions and ownership) - For better communication
● Data:
○ Document Database Tables to be migrated based on Impact Analysis and Usage / Non-Usage
○ Document Columns in Tables to be migrated based on Impact Analysis and Usage / Non-Usage
6

Pre-Requisites This blog assumes you have SAP BusinessObjects 4.2 SP08 or higher as it is the earliest release officially supporting Snowflake. It also assumes you have Universe(s), Web Intelligence and Crystal Reports documents pointing to a Microsoft SQL Server Database. This scenario can similarly be applied to any relational database. Also, you need to have Snowflake ODBC and/or JDBC connectivity configured for SAP BusinessObjects. See this blog for more details: https://blogs.sap.com/2020/03/12/snowflake-for-sap-businessobjects-4.2-sp08/
7

Microsoft SQL Server Version: Microsoft SQL Server 2019 Database to Migrate: AdventureWorks2017 (https://docs.microsoft.com/en-us/sql/samples/adventureworks-install-configure?view=sql-server-ver15) Database Size: 336 MB (71 Tables for over 760k rows)
8

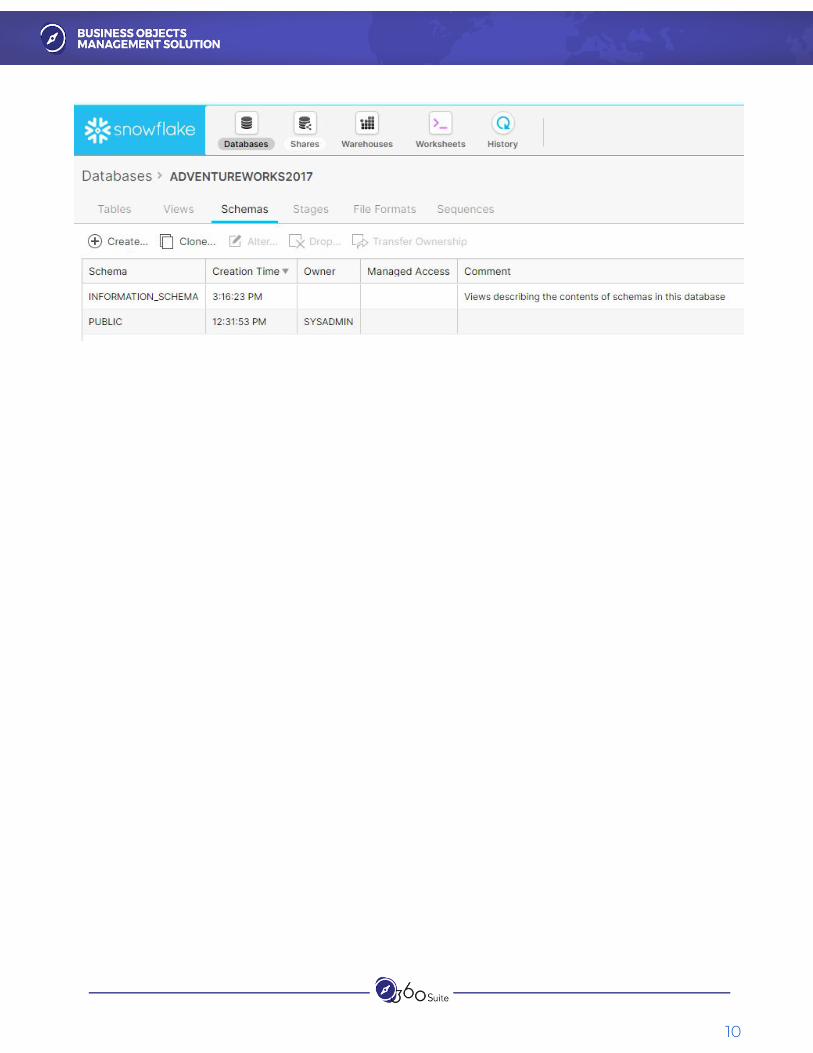
Snowflake
Create an empty database in Snowflake
Database Name: AdventureWorks2017
Note: Unless you create tables and columns using double-quotes (therefore case sensitive) these identifiers will be displayed in uppercase but are case-insensitive. Suggested Reading: Identifiers in Snowflake
Schema (PUBLIC) available:
9
10

Create identical 32-bit and 64-bit ODBC connections to Snowflake
Note: See this blog for more details: https://blogs.sap.com/2020/03/12/snowflake-for-sap-businessobjects-4.2-sp08/
Note: You can use JDBC connections if you prefer. Please refer to the blog above.
11

Migrating the Database Move the database from Microsoft SQL Server to Snowflake There are many strategies to run this task. In this blog, we’ll use the SQL Server Import and Export Wizard via SQL Server Integration Services (SSIS) to generate Comma Separated Values (CSV) file and manually import them into Snowflake.
Open Microsoft SQL Server Management Studio
12

Select the database to migrate (e.g.: AdventureWorks2017)
Right-Click > Tasks > Export Data...
13

Click: Next
14

Choose a Data Source
Data source: SQL Server Native Client 11.0 Server name: [ENTER YOUR SERVER NAME / INSTANCE] Authentication: [ENTER YOUR CREDENTIALS] Database: [ENTER YOUR DATABASE] (E.g.: AdventureWorks2017) Click: Next
15

Choose a Destination
Destination: Flat File Destination File name: [BROWSE TO PATH AND ENTER A FILE NAME] Click: Next
16

Specify Table Copy or Query
Click: Next
17

Configure Flat File Destination
Select: [Sales].[Customer] Note: These are the tables used in our SAP BusinessObjects Universe. Click: Next
18

Save and Run Package
Click: Next
19

Complete the Wizard
Click: Finish
20
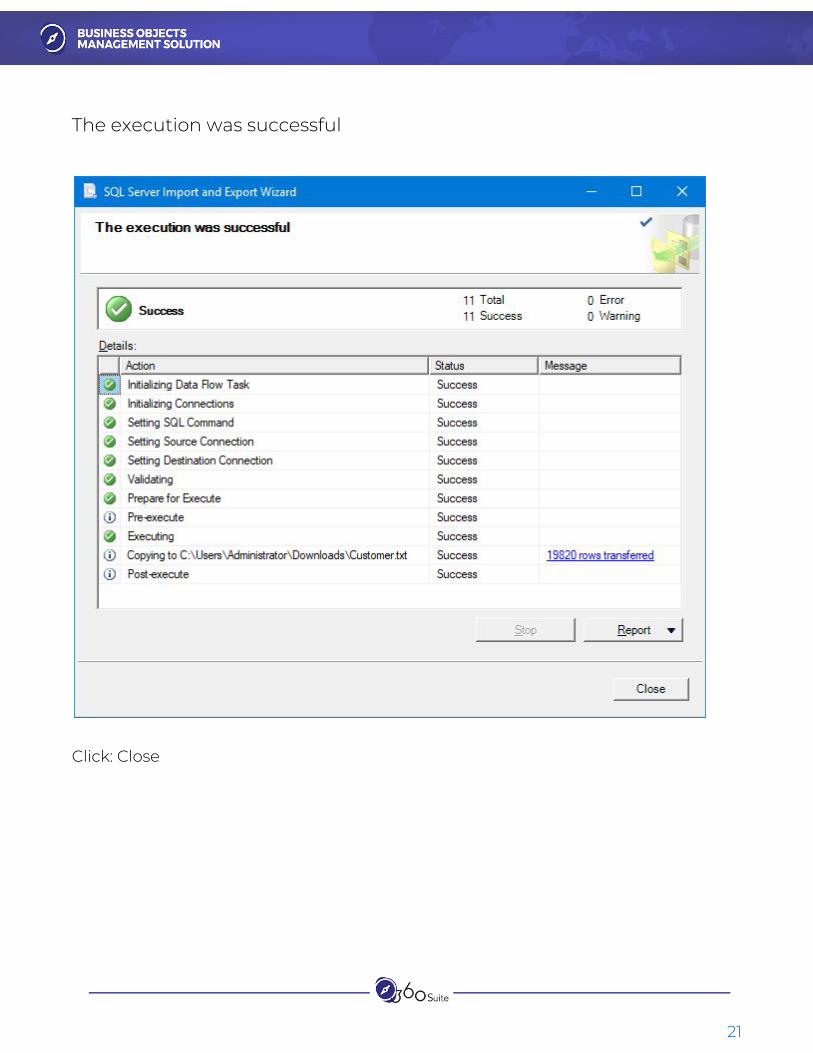
The execution was successful
Click: Close
21

Repeat for SalesOrderDetail and SalesOrderHeader
22

23

Create Tables in Snowflake
Logon to Snowflake Click: Worksheets
24

Copy / Paste this SQL Query to create the new tables: CREATE TABLE ADVENTUREWORKS2017.PUBLIC.CUSTOMER ( CUSTOMERID INTEGER NOT NULL, PERSONID INTEGER, STOREID INTEGER, TERRITORYID INTEGER, ACCOUNTNUMBER VARCHAR(10) NOT NULL, ROWGUID VARCHAR(50) NOT NULL, MODIFIEDDATE TIMESTAMP NOT NULL ); CREATE TABLE ADVENTUREWORKS2017.PUBLIC.SALESORDERDETAIL ( SALESORDERID INTEGER NOT NULL, SALESORDERDETAILID INTEGER NOT NULL, CARRIERTRACKINGNUMBER VARCHAR, ORDERQTY INTEGER NOT NULL, PRODUCTID INTEGER NOT NULL, SPECIALOFFERID INTEGER NOT NULL, UNITPRICE DECIMAL(19,4) NOT NULL, UNITPRICEDISCOUNT DECIMAL(19,4) NOT NULL, LINETOTAL NUMERIC(38,6) NOT NULL, ROWGUID VARCHAR(50) NOT NULL, MODIFIEDDATE TIMESTAMP NOT NULL ); CREATE TABLE ADVENTUREWORKS2017.PUBLIC.SALESORDERHEADER ( SALESORDERID INTEGER NOT NULL, REVISIONNUMBER INTEGER NOT NULL, ORDERDATE TIMESTAMP NOT NULL, DUEDATE TIMESTAMP NOT NULL, SHIPDATE TIMESTAMP, STATUS INTEGER NOT NULL, ONLINEORDERFLAG BOOLEAN NOT NULL, SALESORDERNUMBER VARCHAR NOT NULL, PURCHASEORDERNUMBER VARCHAR, ACCOUNTNUMBER VARCHAR, CUSTOMERID INTEGER NOT NULL,
25

SALESPERSONID INTEGER, TERRITORYID INTEGER, BILLTOADDRESSID INTEGER NOT NULL, SHIPTOADDRESSID INTEGER NOT NULL, SHIPMETHODID INTEGER NOT NULL, CREDITCARDID INTEGER, CREDITCARDAPPROVALCODE VARCHAR(15), CURRENCYRATEID INTEGER, SUBTOTAL DECIMAL(19,4) NOT NULL, TAXAMT DECIMAL(19,4) NOT NULL, FREIGHT DECIMAL(19,4) NOT NULL, TOTALDUE DECIMAL(19,4) NOT NULL, COMMENT VARCHAR, ROWGUID VARCHAR(50) NOT NULL, MODIFIEDDATE TIMESTAMP NOT NULL ); Click: Run
26

Import Data via CSV into Snowflake Logon to Snowflake Click: Databases Click: ADVENTUREWORKS2017
Select: CUSTOMER Click: Load Data…
27

Load Data - Warehouse
Click: Next
28
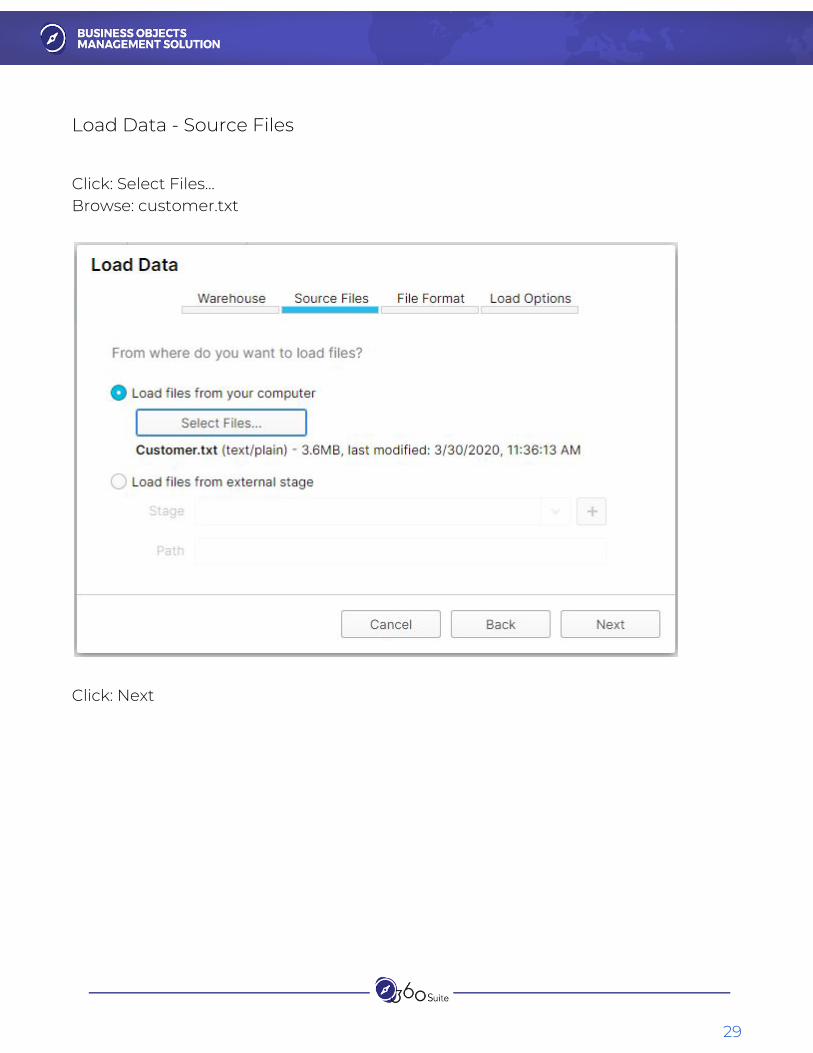
Load Data - Source Files
Click: Select Files… Browse: customer.txt
Click: Next
29
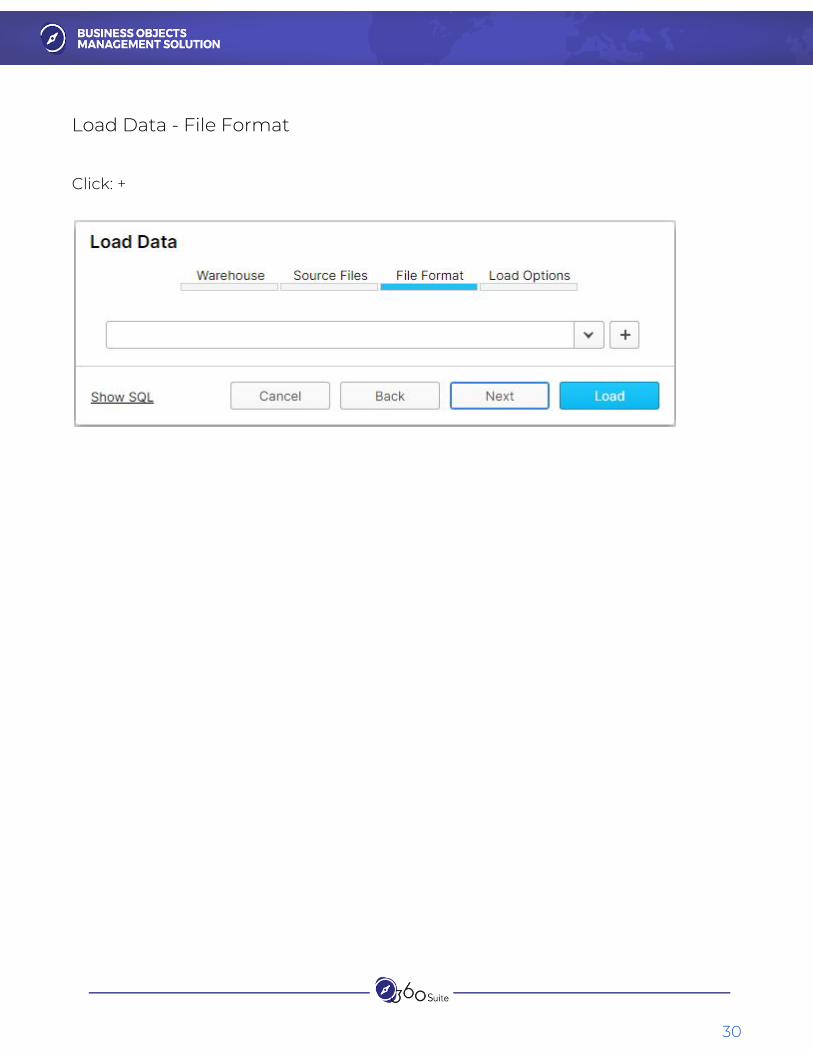
Load Data - File Format
Click: +
30

Name: [ENTER A NAME] Header lines to skip: Change 0 to 1
Click: Finish
31

Click: Load
32

Repeat for SALESORDERDETAIL and SALESORDERHEADER
33

What’s Next? Now that we have our data into Snowflake, we need to work with SAP BusinessObjects to make its content e.g.: Universes and Connections, Web Intelligence and Crystal Reports point to the new data source. As mentioned in the introduction, some of you will only be required to repoint the Universe Connection to Snowflake. This may be true if there are no changes to the owners, qualifiers, schema or presence of vendor specific SQL in the Universes. Others for reasons mentioned above will need first to make a copy of the existing Universe to not affect Production before repointing it to Snowflake. Next is to repair the Universes where required. Finally and based on your scenario, you may have to repoint all content to this new Universe. The next sections will demonstrate this use case. Not all steps may be applicable to your project. These steps can be done manually and/or via automated solutions by 360Suite to reduce time, cost, and risks. Finally, it is important to perform enough functional, data, and performance testing to ensure the project is successful.
34
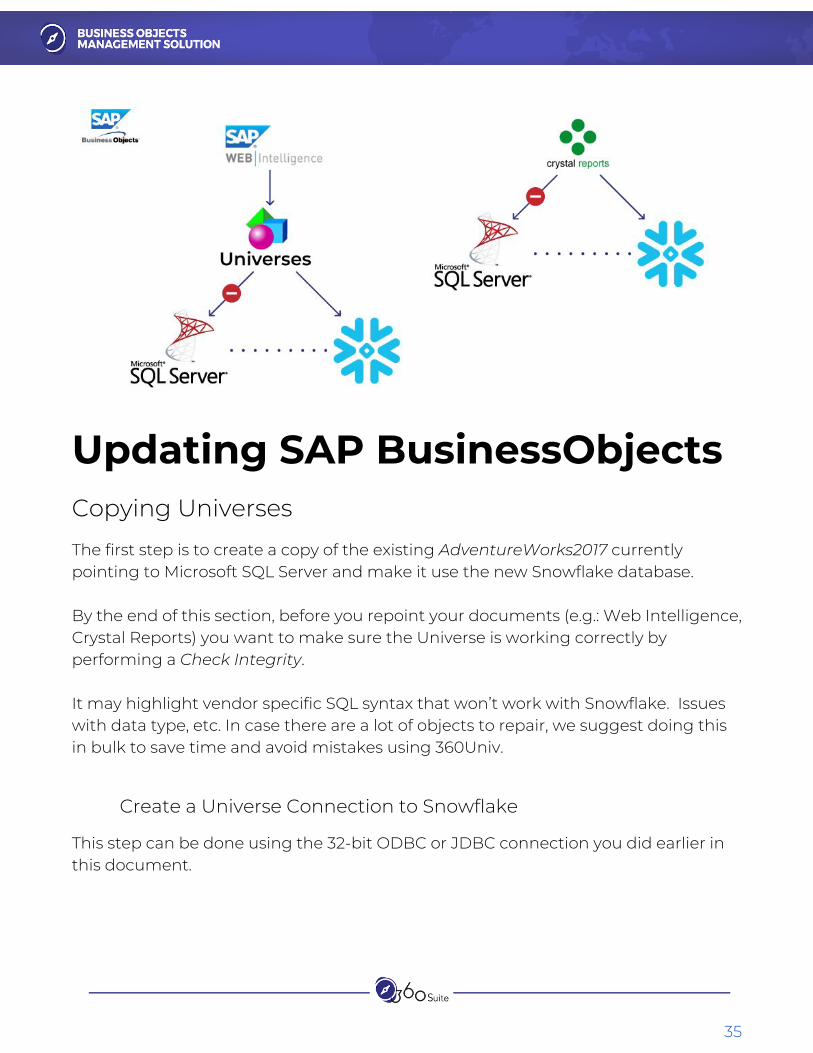
Updating SAP BusinessObjects Copying Universes
The first step is to create a copy of the existing AdventureWorks2017 currently pointing to Microsoft SQL Server and make it use the new Snowflake database. By the end of this section, before you repoint your documents (e.g.: Web Intelligence, Crystal Reports) you want to make sure the Universe is working correctly by performing a Check Integrity. It may highlight vendor specific SQL syntax that won’t work with Snowflake. Issues with data type, etc. In case there are a lot of objects to repair, we suggest doing this in bulk to save time and avoid mistakes using 360Univ.
Create a Universe Connection to Snowflake
This step can be done using the 32-bit ODBC or JDBC connection you did earlier in this document.
35

Note: See this blog for more details: https://blogs.sap.com/2020/03/12/snowflake-for-sap-businessobjects-4.2-sp08/
36

Create a New Local Project
Project Name: Blog - Microsoft SQL to Snowflake Click: Finish
37

Retrieve the Universe
38

Select a Local Project
Click: OK
39

Create a Relational Connection Shortcut
1. Right-Click AdventureWorks2017 Snowflake
2. Click: Create Relational Connection Shortcut
3. Select a Local Project: Blog - Microsoft SQL to Snowflake
4. Click: OK
40

Repoint the Data Foundation to the Snowflake Connection
1. Open AdventureWorks2017 (DF).dfx
Under Connection > Right-Click AdventureWorks2017 Click: Change…
41

2. Select: AdventureWorks2017 Snowflake.cns
3. Click: Finish
4. Save the Data Foundation
42

Change the Qualifier/Owner of the Tables in the Data Foundation
1. Open AdventureWorks2017 (DF).dfx
Under Master > Right-Click: SalesOrderDetail table Select Change Qualifier/Owner...
43

2. Change Table Qualifier/Owner
Enter Qualifier: ADVENTUREWORKS2017 Enter Owner: PUBLIC Click: OK
3. Repeat for tables: SalesOrderHeader and Customer
Note: You can multiple select tables and change qualifiers in bulk.
4. Save the Data Foundation
Note: At this stage you are able to preview data from the tables in the Data Foundation using “Show Table Values”.
44

45

Set the Tables and Columns Case
Although you can now preview data, the Information Design Tool doesn’t correctly identify the tables in uppercase under Connection (left) with the tables in mixed case under Master (right). As mentioned in the introduction, this is because the identifiers in Snowflake are case-insensitive but displayed in uppercase.
The following step could be seen as optional as at this stage, the Universe is functional. But if you check the integrity of the Universe it will fail because of this.
46

5. Open AdventureWorks2017 (DF).dfx
Under Master > Right-Click: SalesOrderDetail table Click: Set Cast To > Upper Case (Tables and Columns)
6. Repeat for tables: SalesOrderHeader and Customer
Note: You can multiple select tables and change qualifiers in bulk.
7. Save the Data Foundation
47

Refresh Universe Foundation Structure
1. Open AdventureWorks2017 (DF).dfx
Under Master > Right-Click in the white area Click: Refresh Structure…
48

2. Select Tables
Click: Next
49

3. Missing Tables
Click: Next
50

4. Missing Columns
Click: Next
51
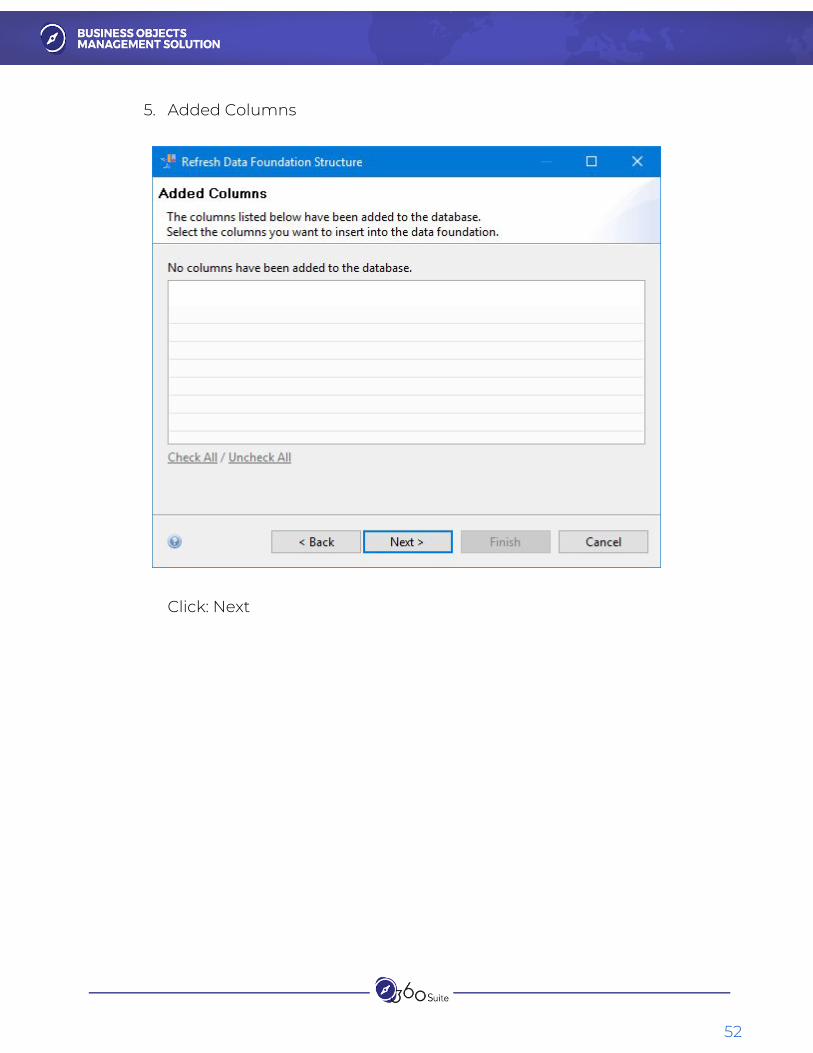
5. Added Columns
Click: Next
52

6. Modified Columns
Click: Next
53

7. Summary of Changes
Click: Finish
8. Save the Data Foundation
54

Validate the Business Layer with the Snowflake Data Foundation
1. Open AdventureWorks2017 (BL).blx
2. Check Integrity…
Under Business Layer > Right-Click Adventureworks2017 Click: Check Integrity...
55

3. Check Integrity
Click: Check all Click: Check Integrity
56

4. Confirm Results
Click: Close
57

Rename the Universe
1. Open AdventureWorks2017 (BL).blx
Name: [ENTER NEW NAME] E.g. AdventureWorks2017 Snowflake
2. Save the Business Layer
58

Publish the Business Layer with the Snowflake Data Foundation
1. Open AdventureWorks2017 (BL).blx
Under Local Projects > Right-Click Adventureworks2017 (BL).blx Click: Publish > To a Repository Click: Next
59

Select where you want to save the Universe
Click: Finish
Click: Close
60

Updating Web Intelligence
These steps are to update your Web Intelligence documents to point to the new Snowflake Universe. You can do this either within your current report or as we will do here, make a copy (backup) first and then modify the new one. Note: These steps are to be repeated for every document.
Modify your Web Intelligence
Right-Click the Web Intelligence Click: Modify
61

Change Data Source
1. Change Source
Click Data Access tab > Tools tab > Change Source Click: Orders (this is the query to modify)
62

2. Change Source Wizard
Click: Specify a new data source Check: Apply changes in all queries sharing the same data source. Click: Universe... Note: You will need to repeat these steps for queries not sharing the same data source.
63

3. Select a universe for the query
Click: AdventureWorks2017 Snowflake.unx Click: OK
64
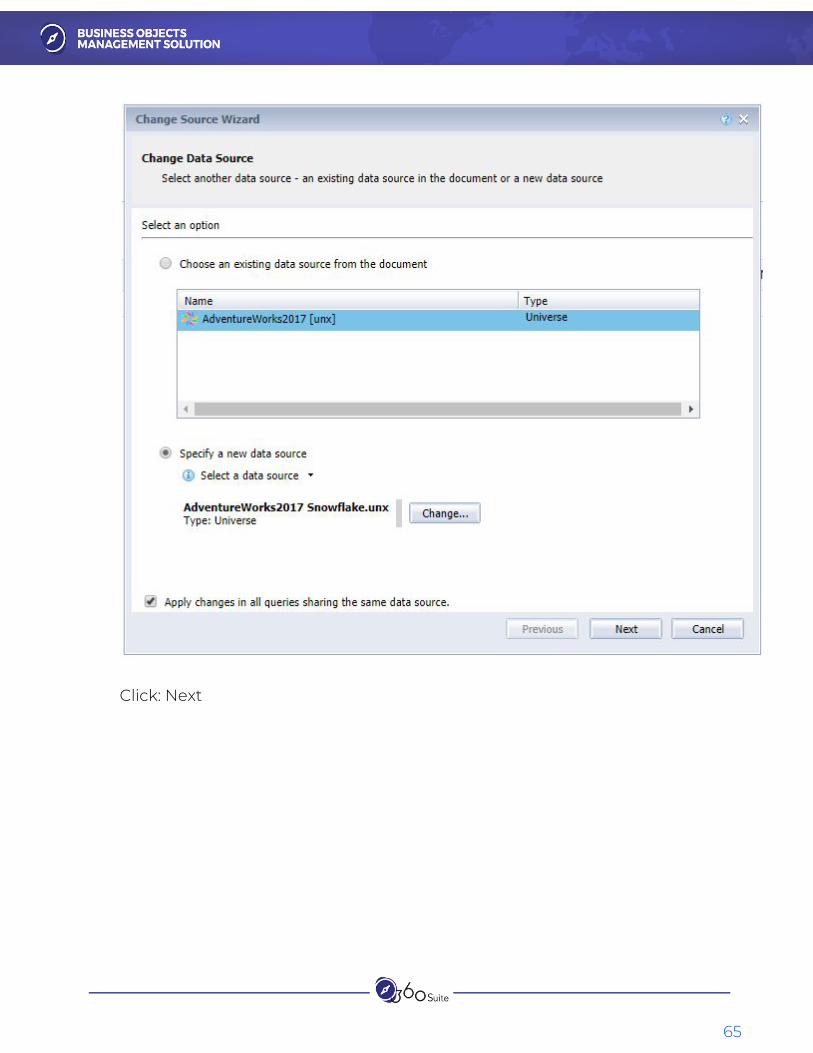
Click: Next
65

4. Strategy Selection
Click: Next
66

5. Object Mapping
Click: Finish
67

6. Query Panel
Click: Run Queries
7. Save the Web Intelligence document
68

Updating Crystal Reports These steps are to update your Crystal Reports documents to update the database connection string(s) within the reports. You can do this either within your current report or as we will do here, make a copy (backup) first and then modify the new one. There are two methods:
1. In Crystal Reports “Desktop” 2. In the Central Management Console (CMC)
Note: These steps are to be repeated for every document.
69

Crystal Reports “Desktop”
1. Open your Crystal Reports
Under Database Select: Set Datasource Location...
2. Set Datasource Location
70

Under ODBC (RDO) Select: Make a New Connection
71

Select: Blog Snowflake AdventureWorks Click: Next
72

Enter: User ID Enter: Password Click: Finish
73
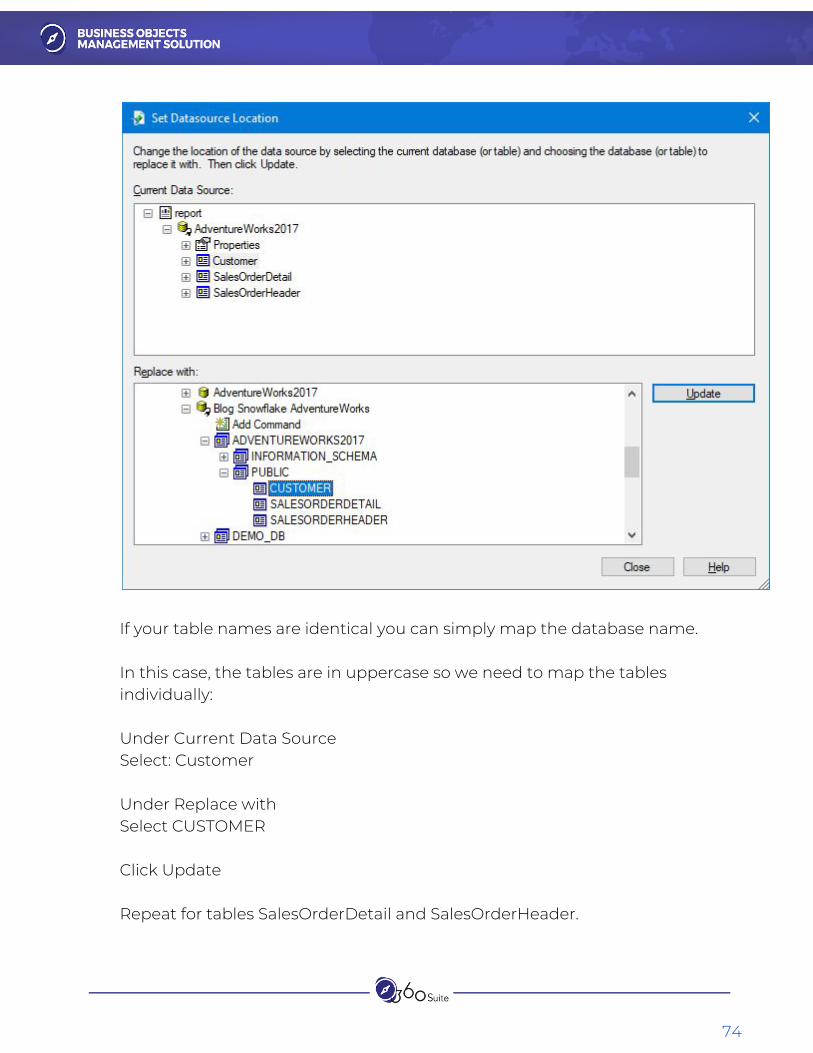
If your table names are identical you can simply map the database name.
In this case, the tables are in uppercase so we need to map the tables individually:
Under Current Data Source Select: Customer
Under Replace with Select CUSTOMER
Click Update
Repeat for tables SalesOrderDetail and SalesOrderHeader.
74

Tables are now remapped to Blog Snowflake Adventure Works Click: Close
3. Save the Crystal Reports
75

Central Management Console (CMC)
1. Logon to the Central Management Console (CMC)
Find your Crystal Reports Right-Click > Database Configuration
76

3. Database Configuration
Select: Use custom database logon information specified here. Enter: Server: Blog Snowflake AdventureWorks Enter: Table Prefix > Specify a custom table prefix
ADVENTUREWORKS.PUBLIC. Click: Save
77

Note: If the name (and case) of your tables are not exactly the same, you cannot update your Crystal Reports this way and you will need to use the method described previously, in Crystal Reports “Desktop”.
78

Testing Content If you have made a copy of your Web Intelligence documents, you can do side by side comparisons. In this section, we will validate that the documents appear to be the same and compare the refresh time between Microsoft SQL Server and Snowflake.
Comparing Data
Unfortunately, using SAP BusinessObjects, this manual task involves opening both Web Intelligence documents and comparing values.
Note: As this task is manual (i.e. not automated), it will be time-consuming to execute therefore you will likely only test a subset of your reports. Mistakes are very likely as documents will have a lot of tables, columns, rows over many pages. It will be difficult to document evidence of testing and accuracy of these tests.
79

Comparing Performance
Unfortunately, once again using SAP BusinessObjects, this manual task is to schedule both Web Intelligence documents and compare running times.
Note: As this task is manual (i.e. not automated), it will be time-consuming to execute therefore you will likely only test a subset of your reports. It will be difficult to document.
80
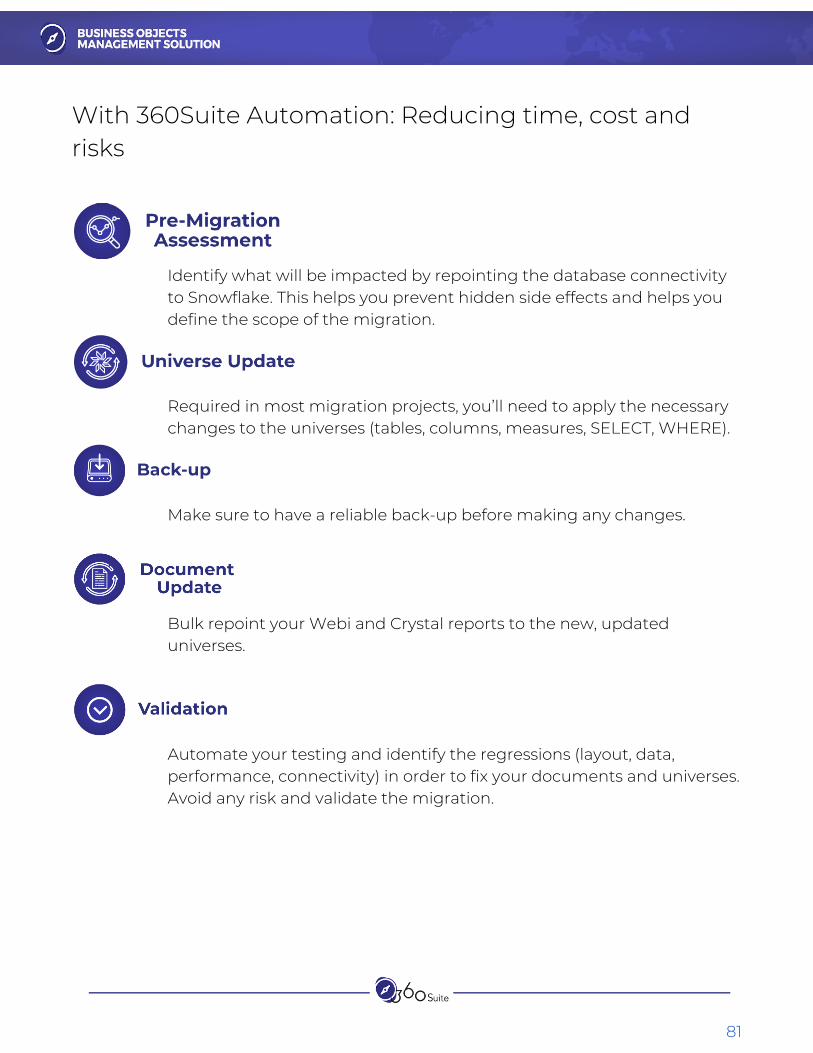
With 360Suite Automation: Reducing time, cost and risks
Identify what will be impacted by repointing the database connectivity to Snowflake. This helps you prevent hidden side effects and helps you define the scope of the migration.
Required in most migration projects, you’ll need to apply the necessary changes to the universes (tables, columns, measures, SELECT, WHERE).
Make sure to have a reliable back-up before making any changes.
Bulk repoint your Webi and Crystal reports to the new, updated universes.
Automate your testing and identify the regressions (layout, data, performance, connectivity) in order to fix your documents and universes. Avoid any risk and validate the migration.
81

Schedule Your Pre-Migration Assessment With Us
Author:
Patrick Perrier is Analytics CoE Director and is passionate about helping companies maximize their SAP BusinessObjects investment with complex issues such as regulations, migration, and administration. He has over 20 years of experience in Business Intelligence, starting back when he worked at Crystal Decisions and then Business Objects. More recently, he held roles such as Head of Technical Architecture, BI, and Training
.
82