daytonregionalstemcenter.orgdaytonregionalstemcenter.org/.../2016/12/the-body-guar… · web...
TRANSCRIPT

Printable ResourcesThe Body Guardian
Appendix A: Technical BriefAppendix B: Force Impact Testing Apparatus Building InstructionsAppendix C: Teacher’s Guide to Understanding Arduino SetupAppendix D: Pre/Post Test & Answer KeyAppendix E: Muscle Contusions WorksheetAppendix F: Pedigree Practice WorksheetAppendix G: Hemophilia Investigation HomeworkAppendix H: Engineering Design Challenge & RubricAppendix I: Protection Gear Analysis Data Recording LogAppendix J: Student Design PlanAppendix K: Mid-Construction Review HomeworkAppendix L: Student Design SummaryAppendix M: National Hemophilia Foundation ProposalAppendix N: Picture Resources

The Body GuardianAppendix A: Technical BriefContusionsThere are three different types of contusions. A contusion, or bruise, is caused by blunt force trauma to the body which breaks blood vessels. Upon breaking, the blood vessels allow blood to escape into the muscle and tissue. The visible pooled blood is called a bruise. There are three different types of contusions; subcutaneous, muscular, and periosteal. The most common type of contusion is a subcutaneous contusion. These bruises form just below the skin and can be visible for up to weeks. It is caused by trauma from falling, running into an object, etc.
Bruises may go deeper into the body and affect the muscles. A muscular contusion may be classified as intramuscular or intermuscular. Intramuscular contusions are less likely to cause visible bruising, as they only involve tearing of the muscle. In an intermuscular bruise, both the muscle and its surrounding sheath are torn. Recovery from an intermuscular bruise is generally quicker, as the blood is able to escape through the tear in the muscle sheath rather than building up inside the muscle itself.
The deepest type of bruise is a periosteal contusion, or bone bruise. This injury penetrates all the way to the bone, causing swelling and pain. Swelling between the bone and its covering, the periosteum, can linger for an extended period of time due to lack of circulation. A periosteal contusion is generally the most painful and long-lasting type of bruise.
Contusion Background from: http://www.wisegeek.com/what-are-the-different-types-of-contusion.htm
PedigreePedigrees show how a genetic trait is inherited or passed from one generation to the next. When reading a pedigree, circles represent females and squares represent males. A person affected with the trait has their shape shaded in. Unaffected individuals will remain unshaded.
http://linuxishbell.wordpress.com/2010/11/09/relationship-based-on-pedigree/
HemophiliaHemophilia is an inherited genetic disorder in which the blood does not clot properly after injury and individuals can bleed to death. Most people with hemophilia stay away from contact sports or any activity in which bruising or injury can occur.
Draft: 5/5/2023 Page 2

The Body GuardianOrganic ChemistrySeveral meanings can be given to the word “organic”. For example, the term originally related to living organisms, and thus, organic became in the original sense a characteristic of living things. In contrast, the term “inorganic” referred to substances that came from minerals or could be synthesized in a laboratory. That is to say, then, that something that is organic either occurs or develops naturally without being forced, manufactured, or engineered. There are many compounds that are isolated or derived from plants or animals (living or extinct, i.e. products of the decay of plants or animals). What is common to these compounds is the carbon atom itself. Thus, this class of chemical compounds became known as carbon-containing compounds and defined the branch of chemistry known today as organic chemistry.
The simplest organic compounds are known as hydrocarbons, which contain only atoms of hydrogen and carbon, and are classified as either aliphatic or aromatic. These hydrocarbons may be straight-chained, branched, or even cyclic in structure and may contain only single bonds (saturated) or perhaps double and even triple bonds (unsaturated). More complex structures contain other atoms (i.e. oxygen or the halogens) or groups of atoms (i.e. functional groups known as hydroxyl groups, carbonyl groups, and amino groups which give rise to alcohols, aldehydes, and amines respectively) which may be substituted for a single hydrogen atom or attached to a hydrocarbon and give rise to families of organic compounds with characteristic chemical and physical properties.
Large organic compounds which are naturally occurring and contain hundreds of thousands of atoms are known as “macromolecules”. Polysaccharides, proteins, and nucleic acids are naturally occurring macromolecules. There are other macromolecules that are man-made through a process known as polymer synthesis. Chain polymerization and step-wise polymerization are the two major schemes by which the classification of materials known as polymers is synthesized. In chain polymerization (also known as addition or free-radical polymerization), a starting building block or monomer is added to another one in such a way that the product contains all the atoms of the starting monomer. In step-wise polymerization (i.e. condensation polymerization), some part of each monomer is not incorporated into the final polymer and another small molecule such as water or ammonia is formed as a byproduct of polymerization. The chain of carbon or hydrocarbon atoms is called the backbone, while the functional groups attached to the backbone are called pendant groups. Polymers can be processed by many methods. The most common processing methods are molding processes such as compression molding, transfer molding, injection molding, extrusion molding, and blow molding. These polymerization schemes and processing methods enable the production of polymers of varying size. However, the polymer size has very little effect on chemical properties, meaning the functional group behaves the same regardless of if the molecule is large or small. It is in the physical properties that macromolecules differ from ordinary molecules. Lastly, the molecular structure of polymers is generally of two kinds and is indicative of the polymers’ response to heating and processing. Thermoplastics are polymers which are more or less crystalline, soften upon heating, and therefore, can be molded or extruded. Thermoset plastics are polymers that are highly cross-linked with a rigid or networked structure that, therefore, does not soften upon heating because softening would require the breakage of covalent bonds.
Draft: 5/5/2023 Page 3

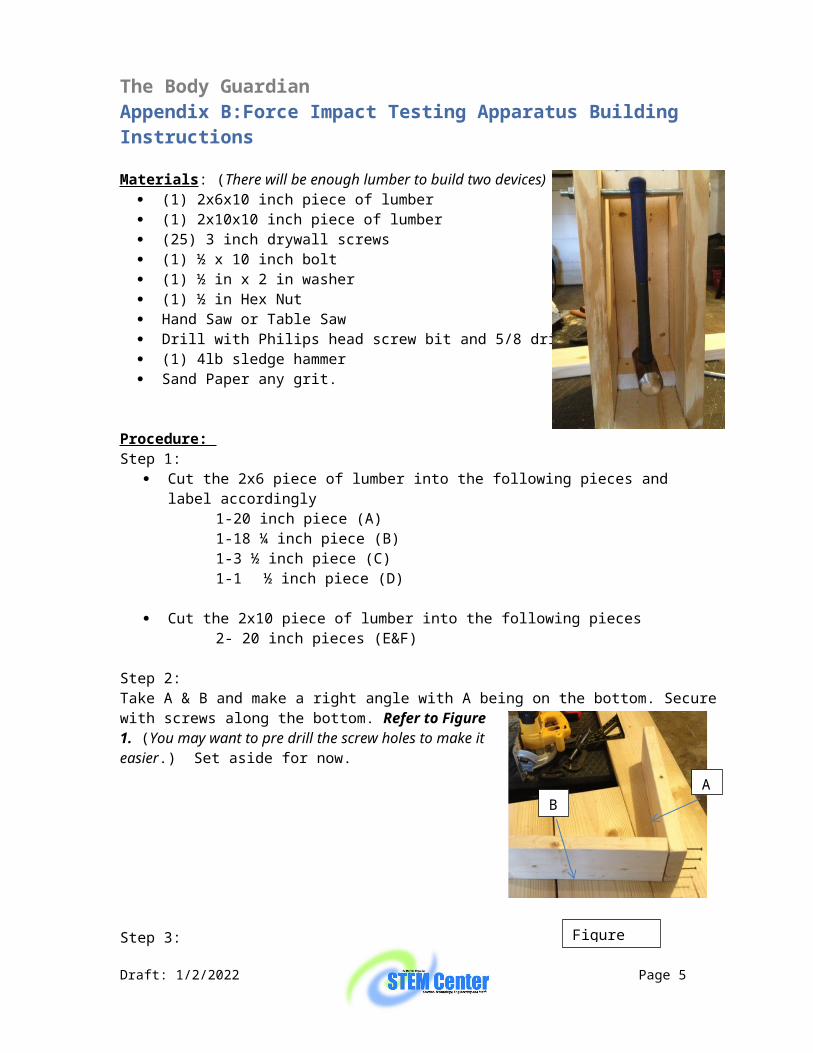
The Body GuardianAppendix B:Force Impact Testing Apparatus Building Instructions
Materials: (There will be enough lumber to build two devices) (1) 2x6x10 inch piece of lumber (1) 2x10x10 inch piece of lumber (25) 3 inch drywall screws (1) ½ x 10 inch bolt (1) ½ in x 2 in washer (1) ½ in Hex Nut Hand Saw or Table Saw Drill with Philips head screw bit and 5/8 drill bit. (1) 4lb sledge hammer Sand Paper any grit.
Procedure: Step 1:
Cut the 2x6 piece of lumber into the following pieces and label accordingly1-20 inch piece (A)1-18 ¼ inch piece (B)1-3 ½ inch piece (C)1-1 ½ inch piece (D)
Cut the 2x10 piece of lumber into the following pieces2- 20 inch pieces (E&F)
Step 2: Take A & B and make a right angle with A being on the bottom. Secure with screws along the bottom. Refer to Figure 1. (You may want to pre drill the screw holes to make it easier.) Set aside for now.
Step 3: Take E and measure 2 inches down and 2 inches over from one of the corners, make a mark and drill a 5/8 inch hole. By laying E on F make an exact hole on F that matches E.
Draft: 5/5/2023 Page 4
Figure 1:
BA
The Body GuardianStep 4: Take E and place on the side of the right angle you just made. Secure with screws along the bottom and side. Refer to Figure 2.
Step 5:Take C and place in the corner where ABE meet. Secure up from the bottom of A with two screws. Refer to Figure 3.
Step 6:Take F and secure the side and bottom to the AB right angle.
Draft: 5/5/2023 Page 5
Figure 3:
Figure 2:
E
C
B
E
A

The Body GuardianStep 7:Drill a 5/8 inch hole into the handle of the sledge hammer. Ensure that full range of motion can be achieved with the placement of this hole. Put the bolt through E then the sledgehammer and then through F and secure with a washer and nut. Swing the sledge hammer to make sure it can move freely. Refer to Figure 4.
Step 8: Take D and place at the handle of the sledge hammer between E & F, make sure there still is a range of motion and then secure to E & F with screws. Refer to Figure 5.
Step 9: Sand the lumber to prevent splinters.
Draft: 5/5/2023 Page 6
Figure 4: Figure 5:
D E
F
B
Ballistics Gel
5/8” hole placement
Protection Gear Placement

The Body GuardianAppendix C: Teacher’s Guide to Understanding Arduino SetupThe Arduino is an open source electronics prototyping platform that consists of a microcontroller hardware device as well as the Arduino Environment software. As implied by the name open-source, both the hardware and software can be modified by the user without any special permission required from the developers. It is intended to be an easy-to-use learning tool for anyone interested in creating interactive objects or environments.
Figure 1: Impact Force Testing Setup
The Arduino in this project is used solely to calculate the acceleration of the mass impacting the shin guard. This scalar value is then used to calculate the associated force. Multiple accelerometers are used not only to calculate the force experienced at the surface of the skin beneath the guard, but under the skin at bone-level as well. This tutorial is written at a basic level for those teachers without any experience in basic circuit knowledge on how to wire a breadboard, or familiarity with any programming language. While it is written to be “plug n’ play” and will attempt to help with basic troubleshooting, knowledge in these areas will assist in further troubleshooting if problems occur. When certain concepts are mentioned that aren’t explained in detail, a keyword is listed in parenthesis to assist in an internet search for further information.
Draft: 5/5/2023 Page 7

The Body GuardianParts
The parts used in this setup are shown below, followed by a short description of some of the items.
Required items:- Arduino Uno (w/Atmega 328 Microcontroller)- (2) ADXL345 Accelerometer “breakout board”
o Be sure to purchase header pins, if not included- (1) USB Type A to B cord- (1) Breadboard (small to medium in size)- (11) 2-3ft, 22-26 gauge (AWG) wire (Consider cat5(e) Ethernet cable)- (11) Female-Female jumper wire or 90 degree headers - (2) 1K Ω resistor- Assortment of “Jumper” wires
Optional Items to aid setup:- (1) Multimeter- (1) Wire strippers- Assortment of resistors (in case 1KΩ resistor doesn’t work properly for the
accelerometers used- (1) Soldering Iron (in case header pins need to be installed) – Required for triple axis
accelerometers- Solder
Optional: Items needed for LCD- (1) Hitachi HD44780 compatible chipset LCD- (1) 10KΩ potentiometer- Assortment of “Jumper” wires
Optional: Items needed for external power- (1) 4-slot AA battery case- (1) 2.1mm x 5.5mm male power plug- Any necessary linking components (see Implementing optional LCD and/or external
power supply)
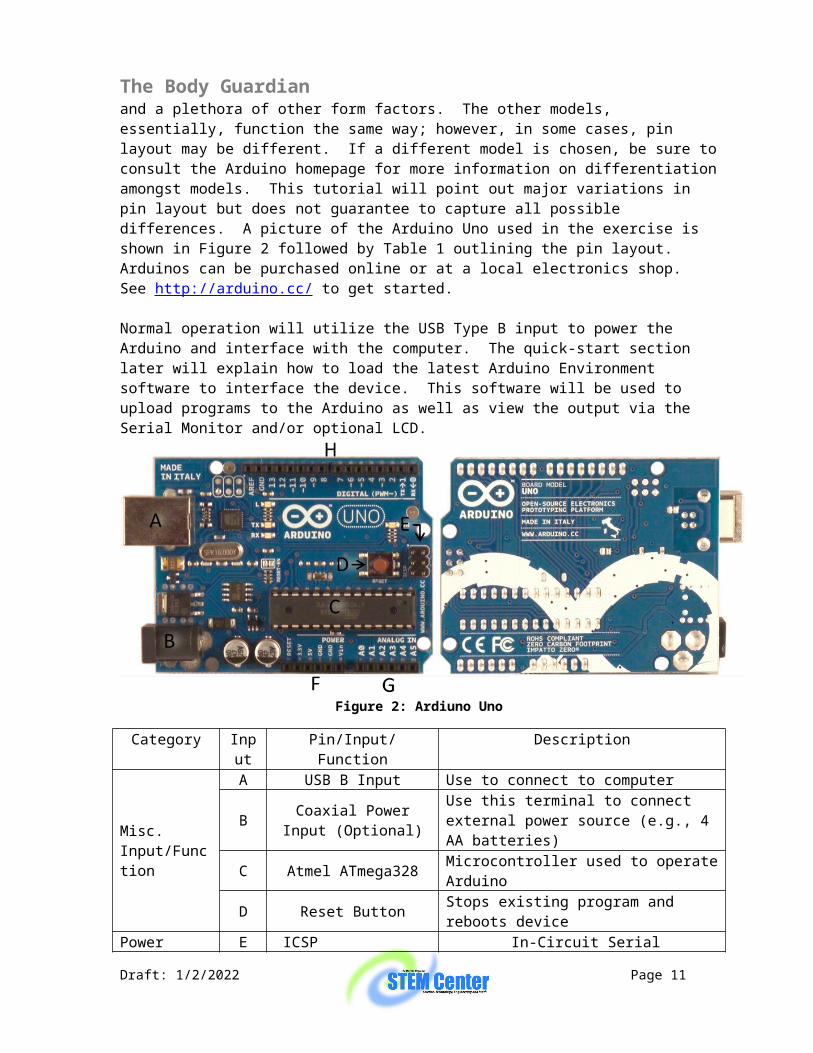
ArduinoIt is important to note that the success of the re-creation of this setup is not solely dependent on matching the exact equipment models listed. The Arduino for instance, is a microcontroller that has had many upgrades over the years and is available in 6 different models and a plethora of other form factors. The other models, essentially, function the same way; however, in some cases, pin layout may be different. If a different model is chosen, be sure to consult the Arduino homepage for more information on differentiation amongst models. This tutorial will point out major variations in pin layout but does not guarantee to capture all possible differences. A picture of the Arduino Uno used in the exercise is shown in Figure 2 followed by Table 1 outlining the pin layout. Arduinos can be purchased online or at a local electronics shop. See http://arduino.cc/ to get started.
Draft: 5/5/2023 Page 8

The Body GuardianNormal operation will utilize the USB Type B input to power the Arduino and interface with the computer. The quick-start section later will explain how to load the latest Arduino Environment software to interface the device. This software will be used to upload programs to the Arduino as well as view the output via the Serial Monitor and/or optional LCD.
Figure 2: Ardiuno Uno
Category Input Pin/Input/Function Description
Misc. Input/Function
A USB B Input Use to connect to computer
B Coaxial Power Input (Optional)
Use this terminal to connect external power source (e.g., 4 AA batteries)
C Atmel ATmega328 Microcontroller used to operate Arduino
D Reset Button Stops existing program and reboots device
Power
E ICSP In-Circuit Serial Programming: Allows for alternate microcontroller programming
F
Reset Resets currently running program3.3V 3.3V Supply voltage5V 5V Supply voltageGND Ground Terminal
V ¿Input voltage for use when using external power source
Analog In G A0−A 5 Analog input/output pins
Digital H
0−13 Digital input/output pinsGND Ground Terminal
AREFAnalog Reference: Allows for configuration of reference voltage for analog input
Table 1: Arduino Uno Input Connections
As detailed in Table 1, the Arduino receives power from either the computer via USB, Input A, or an external power supply (i.e., batteries) Input B. Since there is no internal battery on the device, it will only operate when one of these power sources is applied. This tutorial primarily uses USB for power but includes a little information on the external power option. Each USB port on the computer has an associated serial port
Draft: 5/5/2023 Page 9

The Body Guardian(keyword: serial communication). The Arduino uses this port to communicate back and forth with the computer as well as some devices. While there isn’t any physical interaction required with
Input C, the microcontroller, it is important to note that this module is like the heart of the Arduino. Input D depicts the reset button. This button can be used to restart programs running on the Arduino without removing power. The header pins in Input E depict the in-circuit serial programming capability allowing for alternate programming of the Arduino. Input F shows the power connections to interface with other devices. There are 2 DC power outputs available. This exercise will use the 3.3V input for the accelerometers and uses the 5V terminal for the LCD option. There are multiple ground connections available for use. Inputs G and H show the Analog and Digital inputs respectively. These inputs are used for various applications in interfacing the Arduino with other devices.
ADXL345The accelerometer used in this exercise was chosen because of the wide variety of readily available code for Arduino projects. That is not to say that another accelerometer cannot be used or that there isn’t available code for other models. A simple internet search on “accelerometers for Arduino” should yield suitable results. Suggestions for purchasing the accelerometer used in this setup will be discussed later in this section.
The ADXL345 Accelerometer, from Analog Devices, by itself is simply a small chip with 12 pins. The datasheet is included in this packet. In order to interface with the microcontroller, this chip needs to be placed on a circuit board (also referred to as a breakout board) with a few other components. Figure 3 shows the breakout board used in this exercise. Table 2 explains the pin layout. This will be discussed in more detail later.
Figure 3: ADXL345 used in setup, purchased online from Amazon from “365Buying”
Pin Connection Description
5V Optional 5V voltage (Not recommended for use for accelerometer)
3V 3(3.3V ,V CC ,V DD¿
Input voltage (ADXL345 requires from 2-3.6V)
GND Ground TerminalV S Supply Voltage (Unused in this setup)CS Chip SelectSCL I 2C /SPI :Serial Clock Line
SDA I 2C :Serial Data Line, SPI: Master In Serial Out (MISO)
SDO I 2C: Not Connected (tied high), SPI: Master Out Serial In (MOSI)
Draft: 5/5/2023 Page 10
The Body Guardian¿1 Interrupt Line 1 (Unused in this setup)¿2 Interrupt Line 2 (Unused in this setup)
Table 2: ADXL345 breakout board pin connections
An internet search on the ADXL345 yielded a few vendors to purchase from. As previously mentioned, the chip itself is manufactured by a company called Analog Devices. The breakout board it’s placed on for ordinary customer use is manufactured by various vendors. To keep the overall cost of this project low, this setup used the board in Figure 3, purchased from an Amazon vendor called “365Buying” for $9.99. This was thought to be a highly competitive price as others ranged above $30/board. The programmer however, found that while the Arduino interfaced well with one accelerometer, it would not work with more than one. In order to interface with 2 accelerometers as this project suggests, multiple resistors had to be removed from the board. For those teachers with no experience with a soldering iron, it is suggested they avoid this accelerometer for this project. Others that are confident in their soldering abilities or looking to save $10-20 per device should view the supplemental instructions in the appendix for specifics on how to use this model.
The code used in this setup was modified from open-source code specifically written to support the ADXL345. The original code used a version of the board produced and distributed by Sparkfun Electronics. At the time this document was written, the cost was $27.95. This is admittedly the most popular based on the amount of code seen written referencing this board. Once again, that is not to say that other boards will not work. Another reputable site that sells this board and has code to support it is Adafruit Industries. At the time this document was written, it was selling for $19.95. Table 3, below, summarizes this discussion.
NOTE: Keep in mind, since the main interaction with the board is through the chip, ideally, any of the code available for the ADXL345 should work for any ADXL345 breakout board. The boards referenced in the table below are only a subset of the ADXL345 model breakout boards available. This document does not endorse or guarantee the proper function of any particular model.
Name Vendor/Model
Price (excludes shipping)
Website Notes Image
ADXL345 3-axis Digital Tilt Sensors Acceleration Module for Arduino
365Buying (Amazon)
N/A
$9.99 www.amazon.com
Used in this setup. Works “as-is” with 1 device using I 2C bus. Requires small modification to work with multiple devices.
Triple Axis Accelerometer Breakout – ADXL345
Sparkfun Electronics
SEN-09836
$27.95 www.sparkfun.com
Saw that many sites referenced this board in their code, including the code derived for this setup. Solder Required.
Draft: 5/5/2023 Page 11

The Body Guardian
ADXL345 – Triple Axis Accelerometer
Adafruit Industries
ID: 1231
$19.95 www.adafruit.com
This is another reputable company that offers Arduino products and code to support them. There is also code to accompany this device.Solder Required.
Table 3: ADXL345 Vendor Comparison
Header pinsIf the accelerometer purchased does not come installed with header pins, they will need to be soldered on. They can be purchased online or at a local electronics shop. There are many references on the internet on how to install (keyword: how to solder header pins).
2-3 ft. WireIt is important to ensure that the wire is long enough to prevent damage to the equipment during the test, but not too long causing communication issues on the I 2C bus. To keep things simple, avoid lengths longer than 1m. 22+ gauge electrical wire is available at a local electronics shop; however, consider an unused cat5 Ethernet cable as well. See the tutorial in the appendix for more details.
Impact Force Testing Setup
Arduino Quick-start GuideFor specific instructions on how to get started with the Arduino, navigate to the Arduino website, http://arduino.cc/, and select the Getting Started tab. The website includes step-by-step instructions on how to install and load the software, connect to the Arduino and run a simple test program to ensure operation. There is also a troubleshooting section in the event problems occur.
Download test softwareThe software to run the program is stored in a zip file accompanied with this document (ImpactAccel).
Load SoftwareThe zip file contains the Arduino Environment code as well as the C++ libraries needed. The files will need to be stored in the Arduino file workspace. This is typically located under the Documents folder for Windows-based operating systems. See the Arduino homepage for more assistance. The Ardiuno Environment (.ino) file folder should be placed in the main directory under Arduino and the library files must be stored in the libraries folder.
Draft: 5/5/2023 Page 12

The Body Guardian
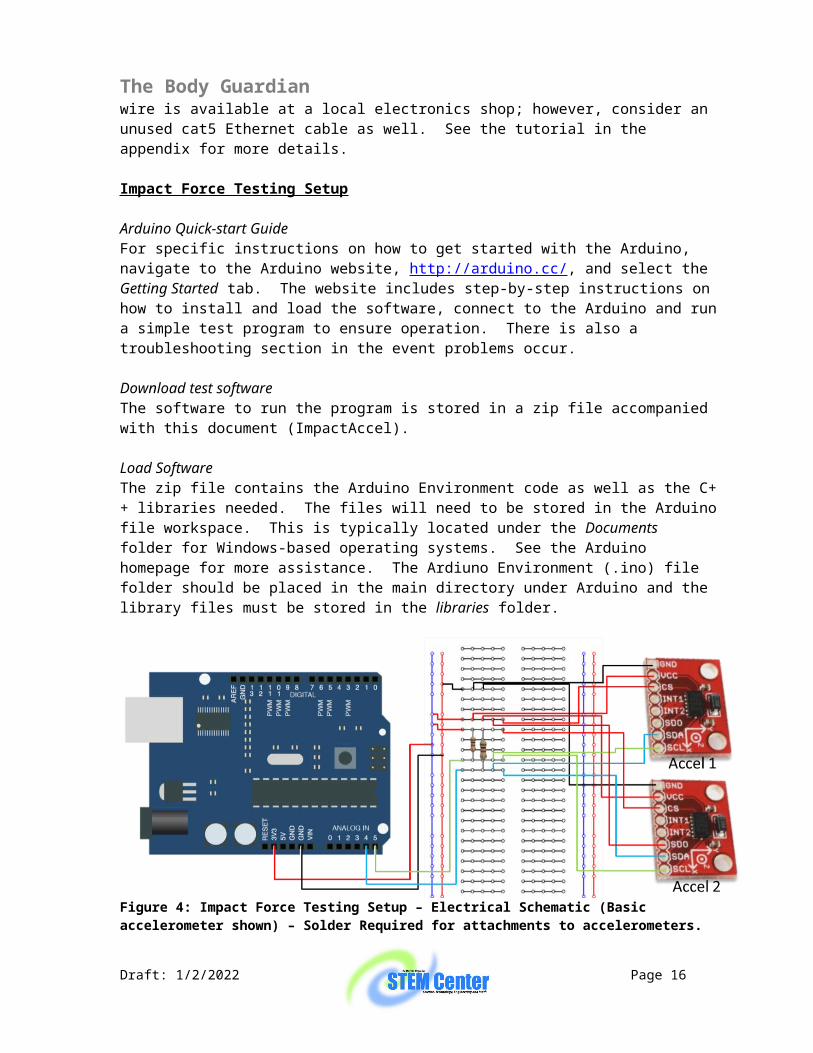
Figure 4: Impact Force Testing Setup – Electrical Schematic (Basic accelerometer shown) – Solder Required for attachments to accelerometers.
Connect Arduino to AccelerometerFigure 4 shows the wire diagram of the setup. See the appendix for minor tips on how to use a breadboard and make pin connections. With the USB cord unplugged from the computer, connect the Arduino and accelerometers to the breadboard. Be sure to connect the power line to the 3V 3 input of the Arduino. This ensures 3.3V will be sent to the accelerometers vs. 5V that would be sent using the other power pin. As described in Table 2, the ADXL345 requires no more than 3.6V to operate. A 5V input will not damage the accelerometers initially but can cause chip damage over time.
Take note of the CS, SDO, SDA, and SCL pins on the board. The CS pin is “tied high” or connected to the input voltage line to tell the Arduino that the device connected will be speaking to it via the I 2C bus. Two methods of communication with devices are to utilize I 2C or SPI communication channels. See the appendix for a slightly more detailed explanation. While all Arduinos can interface using I 2C and SPI, each model varies in the pins it uses to do so. Consult the user manual or the Arduino webpage for more information. The Arduino Uno uses pins 4 and 5 for I 2C. Pin 4 is the serial data line (SDA) and pin 5 is the serial clock line (SCL). Finally, the ADXL345 has the capability of operating under two I 2C identifiers, or addresses. While it isn’t necessary to have an understanding of the specifics about the addresses, it is important to ensure proper pin connection. The code is written assigning the device called Accel 1 in Figure 4 as primary and the device called Accel 2 as alternate. The importance is two-fold. First, the alternate device must be connected with its SDO pin tied high. This will ensure the accelerometer identifies itself by its alternate name. If this isn’t completed, then when the Arduino attempts to communicate with the primary device, both accelerometers will attempt to answer. Second, recall the purpose of having multiple accelerometers was to observe the ripple effect of force from the “skin” surface to the “bone”. Both accelerometers will sense acceleration until the primary, Accel 1, experiences the impact. Upon impact, both Accel 1 and 2 will display their accelerations. For a more accurate result, Accel 1 should be placed just under the skin surface.
Draft: 5/5/2023 Page 13

The Body Guardian
When both accelerometers are connected to the Arduino there is a larger draw on current than there would be if just one device was connected. This results in a voltage drop on the SCL and SDA lines below the operational limit of the device. In other words, the red light signifying power will be lit, but there will be no output. To overcome this, it’s necessary to use “pull-up” resistors. This implementation required 1KΩ resistors to be added from both the SCL and SDA line to the input voltage line to literally “pull up” the voltage. Similarly, if this resistance is connected to ground, it’s known as a “pull-down” resistor. (keyword: pull-up resistors). Since there is no polarity on resistance, simply insert either end of the resistor on the line of the breadboard with power and the other end on the clock and data line each.
Connect Arduino to ComputerOnce all connections have been made, double check the setup with the schematic in Figure 4. It is easy to make mistakes and this will help save time troubleshooting if issues arise. Connect the USB cable to the Arduino and then the computer. If the computer is powered on, the red LED on the accelerometer should be lit.
Load sketchOpen the Arduino environment. This can be done by navigating to and double-clicking on the .ino file in the software download or by opening the Arduino Environment (Arduino.exe) and opening the file manually under the File menu. If the file was properly saved in the Arduino workspace, it should be available for selection under File Sketchbook. Before uploading the file, be sure to check a couple things:
- Under Toolso Verify that the correct serial port is selected. See Getting Started on the
Arduino homepage for more information.o Verify that the correct Arduino board is selected under Board
Next, click the upload button in the Arduino environment or select, File Upload. A status bar should appear near the bottom of the Arduino Environment along with a status message that the program is compiling, then uploading to the Arduino.
Run ProgramAs soon as the Arduino is powered, it starts running the last program that was uploaded until another program is uploaded or it loses power. Any programs involving serial output, such as this one will wait in standby mode until the Serial Monitor is opened. To open the Serial Monitor to view the output, select ToolsSerial Monitor. Next, at the bottom right hand corner of the window, ensure the baud rate reads 57600. Update if necessary by clicking the box and selecting the correct option. At this time, the monitor should read “System Ready” to signify that the program is functional and ready to sense accelerations.
Test Accelerometer “Tap” ProgramThe goal of this setup is to sense the acceleration at the instance in time the mass impacts the test device. The basic function of the accelerometer is to sense accelerations. From the
Draft: 5/5/2023 Page 14

The Body Guardianmoment it is powered up, it is sensing and is prepared to either output data or complete a function given that pre-defined parameters were met. This program stores the maximum acceleration magnitude vector at each measurement while continuously checking for large changes in acceleration. When the mass hits the first accelerometer, it will continue to sense for an additional period of time while the impact ripples through to the back accelerometer. It is assumed that the maximum acceleration sensed is directly proportional to the force that caused it. Therefore, those values are output to the Serial Monitor.
Test to ensure that when Accel 2 is tapped, nothing occurs but when Accel 1 is tapped, the program outputs accordingly.
Running the ExperimentOnce the initial device setup is confirmed to be working, integrate it into the test setup. Remove power, and then place each accelerometer in its respective location on the test apparatus. Figure 1 shows the complete test setup. Note, the Arduino and breadboard are safely out of the way. In order to protect the equipment, be sure to use wire about 2-3ft in length. Also for best results, ensure that the wire is the same length. Once in place, power-up the Arduino. As before, the program is already loaded and will start once the serial monitor is open. The test can now begin.
Upon impact of the apparatus, the monitor will display the acceleration experienced at both
accelerometers at the point of impact in ms2 . To conduct another test, first, physically reset
the apparatus ensuring everything is in place. Then, press the RESET button on the Arduino.
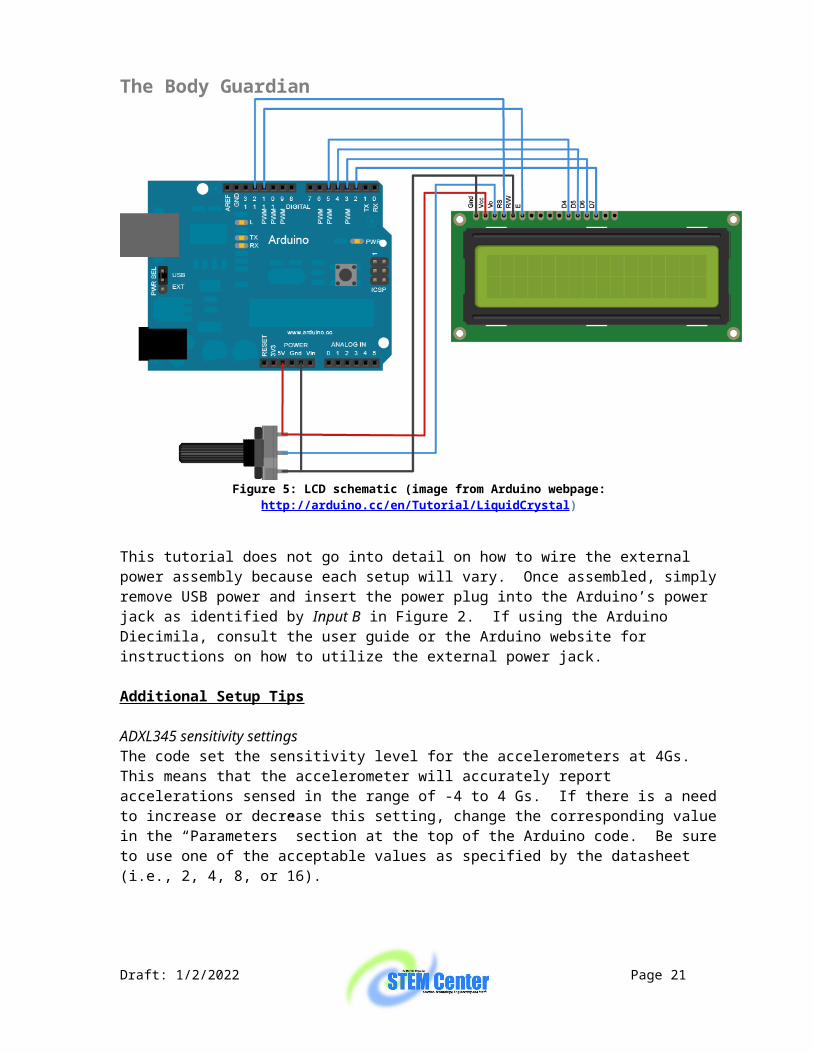
Implementing optional LCD and/or external power supplyTo connect the LCD, use the diagram in Figure 5 from the “Hello World” example in the Liquid Crystal library on the Arduino webpage. The black device in the bottom of the figure is the potentiometer. This is needed to adjust the screen contrast. Despite the way its depicted in the figure, typically the ground pin of the potentiometer is in the middle. To be sure, simply test the nodes using a multimeter.
Draft: 5/5/2023 Page 15
The Body Guardian
Figure 5: LCD schematic (image from Arduino webpage: http://arduino.cc/en/Tutorial/LiquidCrystal)
This tutorial does not go into detail on how to wire the external power assembly because each setup will vary. Once assembled, simply remove USB power and insert the power plug into the Arduino’s power jack as identified by Input B in Figure 2. If using the Arduino Diecimila, consult the user guide or the Arduino website for instructions on how to utilize the external power jack.
Additional Setup Tips
ADXL345 sensitivity settingsThe code set the sensitivity level for the accelerometers at 4Gs. This means that the accelerometer will accurately report accelerations sensed in the range of -4 to 4 Gs. If there is a need to increase or decrease this setting, change the corresponding value in the “Parameters” section at the top of the Arduino code. Be sure to use one of the acceptable values as specified by the datasheet (i.e., 2, 4, 8, or 16).
Draft: 5/5/2023 Page 16

The Body GuardianAppendix
Contents:
A1. I 2C and SPI interface tutorialA2. Supplemental instruction for “365Buying”-version of ADXL345 accelerometerA3. Cat5 Ethernet cable wire extraction tutorialA4. Breadboard and pin connection tutorial
A1. I 2C and SPI interface tutorial
There are a few different methods the Arduino can communicate with connected devices. Two of which, are I 2C and SPI. The SPI bus, or serial peripheral interface, typically communicates using 4 wires as shown in Table 4.
Pin Connection Description
Slave Select (SS) or Chip Select (CS) Designates which device the Arduino will communicate with
Master Output, Slave Input (MOSI) Data communication from Arduino to deviceMaster Input, Slave Output (MISO) Data communication from device to ArduinoSerial Clock (SCLK) or (SCL) Clock reference from Arduino to devices
Table 4: SPI Pin Connections
In order for the Arduino or a similar microcontroller to communicate with a device, it first sets that device’s SS line low to put it in “listening” mode. The device will receive the message on the MOSI line and send any required messages on the MISO line. This ideally allows the microcontroller to communicate with multiple devices.
I 2C, utilized in this setup, communicates using 2 wires: serial data (SDA) and serial clock (SCL). As in SPI, the Arduino can communicate with multiple devices using I 2C as well. First, any devices that have the capability to communicate SPI must have their CS line tied high to turn off SPI communication. Next, the Arduino identifies the device to communicate with by its address. This is like an ID number for the device. The Arduino uses the address to notify a device to expect a message, which is sent on the data line. The device then responds on the same data line. The clock reference is provided by the Arduino on SCL.
The ADXL345 can communicate with both SPI and I 2C, however only has two addresses associated for I 2C. In other words, the Arduino can communicate with no more than two ADXL345 accelerometers in I 2C mode.
A2. Supplemental instruction for “365Buying”-version of ADXL345 accelerometer
As it is no secret that annual supply budgets for teachers to use in projects such as this are low, this accelerometer was considered solely for its competitive price. In designing the test setup and program, many hardware issues had to be overcome in interfacing this device with the accelerometer. While there were no issues running this board in I 2C with one device, the “out-of-the-box” board will not function in I 2C
Draft: 5/5/2023 Page 17

The Body Guardianwith two devices and will not function in SPI at all. To overcome these issues, multiple resistors had to be removed.
Figure 6: ADXL345, “365 Buying” version – (left) “out of the box” image. (right) modified version showing removal of resistors R2, R3, and R4.
To modify the “365 Buying”-version of this board, resistors R2, R3, and R4 must be removed as shown in Figure 6. Removing R2 and R3 will aid the possible future use of this accelerometer in SPI. Removing R4 will allow the alternate address to be used when interfacing with multiple accelerometers as required in this project.
The resistors on this board are specially designed for use on miniature circuit boards. Known as surface mounted devices (SMD) they are connected by solder on the surface of the board. Removal is easier if using a vice or a second person to hold the accelerometer still. To remove a resistor, first, double check to ensure removing the correct one. Use a soldering iron in one hand to heat the solder on both ends of the resistor. With the other hand, pull up on the resistor lightly with a pair of tweezers until it comes loose. Be sure to alternate ends frequently when heating. If possible, use a thin or even flat-head tip on the soldering iron. This will help ensure accuracy of placement of iron on the resistor end, preventing unintentional burning of the board or other parts.
A3. Cat5 Ethernet cable wire extraction tutorial
In addition to cat5, there are many variations of Ethernet cable. Any of these will suffice. Follow the steps below and refer to Figure 7 for instructions on extracting the wire.
Draft: 5/5/2023 Page 18

The Body Guardian
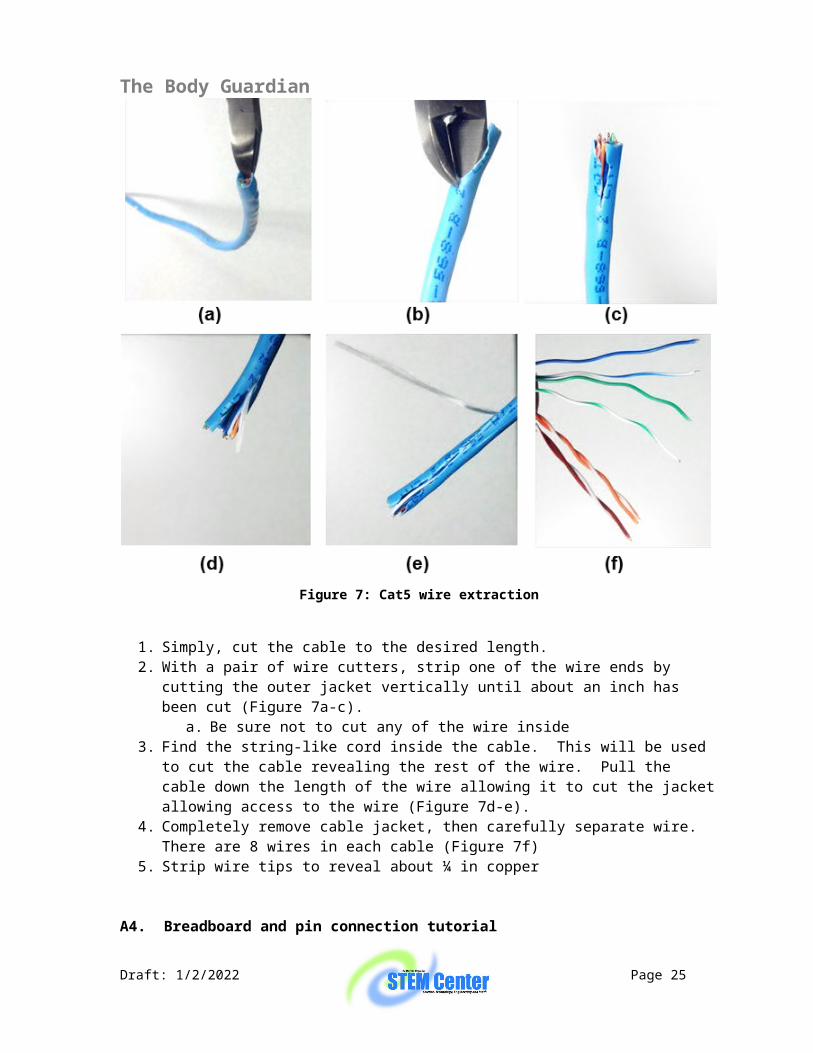
Figure 7: Cat5 wire extraction
1. Simply, cut the cable to the desired length.2. With a pair of wire cutters, strip one of the wire ends by cutting the outer jacket
vertically until about an inch has been cut (Figure 7a-c).a. Be sure not to cut any of the wire inside
3. Find the string-like cord inside the cable. This will be used to cut the cable revealing the rest of the wire. Pull the cable down the length of the wire allowing it to cut the jacket allowing access to the wire (Figure 7d-e).
4. Completely remove cable jacket, then carefully separate wire. There are 8 wires in each cable (Figure 7f)
5. Strip wire tips to reveal about ¼ in copper
A4. Breadboard and pin connection tutorial
The breadboard in Figure 8 depicts a typical layout. The pins corresponding to the vertical red and blue lines on the sides are typically used for input voltage or ground. The length of each line signifies a single connection. Therefore if there is 5V connected to any one pin on the line, the entire line is 5V as well. Some larger breadboards will group these red and blue lines into various sections signified by a break in color. Any separations in color represent a
Draft: 5/5/2023 Page 19

The Body Guardiannew line or connection. The horizontal lines are a bit different. Each of the five pins in a horizontal row are connected but there is no connection between rows.
Figure 8: Standard breadboard layout
To connect the male end of the wire to the female input of the Arduino, simply ensure that about 1/4 in. of the wire has been stripped on either end, and then insert it into the Arduino pin slot.
To connect the wire to the male end of the accelerometer without the use of an additional breadboard, female-female pin connectors will be required. Insert one female end of the connecter onto the accelerometer and the other onto the wire.
Draft: 5/5/2023 Page 20
The Body GuardianAppendix D: Pre-Test/Post-Test
Name _____________________________
1. Compare and contrast a contusion with a laceration.
2. Describe what physical evidence one might find visible on the human body after an impact of significant force.
3. What is hemophilia? How are the lives of hemophilia patients altered by the disorder?
4. What is the force of an object if its mass is 2kg and following a collision, its acceleration is 6m/s2?
5. Explain how a pendulum moves. Use the terms momentum and conservation in your answer.
Draft: 5/5/2023 Page 21

The Body Guardian6. Explain what safety precautions one might take when expecting a collision
7. Given the following data set: (0, 0), (0, 2), (1, 7), (2, 5), (3, 8), (4, 6), (5, 3), and (7, 8), plot on a scatter plot, and determine a linear regression line equation from the data set.
8. Describe the process of collecting quantative data of the impact force from a collision.
9. Explain the role of a computer engineer, materials scientist, physiologist and physicist in the analysis of a protection gear system for a patient with hemophilia.
10. Describe the steps of the Engineering Design Process and its application to the development of a protective gear system.
Draft: 5/5/2023 Page 22

The Body GuardianAnswer Key
1. Compare and contrast a contusion with a laceration.
A laceration breaks skin, whereas a contusion implies internal bleeding
2. Describe what physical evidence one might find visible on the human body after an impact of significant force.
Lacerations, contusions, dizziness, shortness of breath, etc.
3. What is hemophilia? How are the lives of hemophilia patients altered by the disorder?
Hemophilia is a blood clotting disorder where a patient lacks the appropriate number of platelets for normal blood clotting to occur. If injured, their loss of blood is much more significant.
4. What is the force of an object if its mass is 2kg and following a collision, its acceleration is 6m/s2?
F = m * aF = 2kg * 6m/s2F = 12 N
5. Explain how a pendulum moves. Use the terms momentum and conservation in your answer.
A pendulum moves in periodic motion. Under perfect conditions, energy and momentum are conserved as a pendulum swings back and forth.
6. Explain what safety precautions one might take when expecting a collision
Helmets, padding, protective clothing, guards, etc.
7. Given the following data set: (0, 0), (0, 2), (1, 7), (2, 5), (3, 8), (4, 6), (5, 3), and (7, 8), plot on a scatter plot, and determine a linear regression line equation from the data set in slope-intercept form.
y = 0.6609x + 3.0575
8. Describe the process of collecting quantative data of the impact force from a collision.
Answers will vary.
9. Explain the role of a computer engineer, materials scientist, physiologist and physicist in the analysis of a protection gear system for a patient with hemophilia.
Answers will vary.
Draft: 5/5/2023 Page 23

The Body Guardian10. Describe the steps of the Engineering Design Process and its application to the
development of a protective gear system.
Answers will vary.
Draft: 5/5/2023 Page 24
The Body GuardianAppendix E: Muscle Contusions WorksheetMuscle Contusion (Bruise)Athletes in all contact sports have many opportunities to get a muscle contusion (bruise). Contusions are second only to strains as a leading cause of sports injuries.
Most contusions are minor and heal quickly, without the athlete needing to be removed from the game. But, severe contusions can cause deep tissue damage and can lead to complications and/or keep the athlete out of sports for months.
CauseContusions occur when a direct blow or repeated blows from a blunt object strike part of the body, crushing underlying muscle fibers and connective tissue without breaking the skin. A contusion can result from falling or jamming the body against a hard surface.
SymptomsSometimes a pool of blood collects within damaged tissue, forming a lump over the injury (hematoma).
In severe cases, swelling and bleeding beneath the skin may cause shock. If tissue damage is extensive, you may also have a fractured bone, dislocated joint, sprain, torn muscle, or other injuries.
Contusions to the abdomen may damage internal organs.
DiagnosisSee your doctor right away for complete diagnosis. A physical examination will determine the exact location and extent of injury.
Diagnostic imaging tools may be used to better visualize inside the injured area of your body. These tools include ultrasound, magnetic resonance imaging (MRI), or computed tomography (CT) scans.
For some injuries, your doctor may also need to check for nerve injury.
TreatmentContusions cause swelling and pain and limit joint range of motion near the injury. Torn blood vessels may cause bluish discoloration. The injured muscle may feel weak and stiff.
To control pain, bleeding, and inflammation, keep the muscle in a gentle stretch position and use the RICE formula:
Rest: Protect the injured area from further harm by stopping play. You may also use a protective device (i.e., crutches, sling).
Ice: Apply ice wrapped in a clean cloth. (Remove ice after 20 minutes.) Compression: Lightly wrap the injured area in a soft bandage or ace wrap. Elevation: Raise it to a level above the heart.
Most athletes with contusions get better quickly without surgery. Your doctor may give you nonsteroidal anti-inflammatory drugs (NSAIDs) or other medications for pain relief. Do not massage the injured area.
Draft: 5/5/2023 Page 25

The Body GuardianDuring the first 24 to 48 hours after injury (acute phase), you will probably need to continue using rest, ice, compression bandages, and elevation of the injured area to control bleeding, swelling, and pain. While the injured part heals, be sure to keep exercising the uninjured parts of your body to maintain your overall level of fitness.
If there is a large hematoma that does not go away within several days, in some cases the doctor may drain it surgically to speed healing.
RehabilitationAfter a few days, inflammation should start to go down and the injury may feel a little better. At this time, the doctor may tell you to apply gentle heat to the injury and start the rehabilitation process. Remember to increase your activity level gradually.
Depending upon the extent of your injuries, returning to your normal sports activity may take several weeks or longer. If you put too much stress on the injured area before it has healed enough, excessive scar tissue may develop and cause more problems.
In the first phase of rehabilitation, your doctor may prescribe gentle stretching exercises that begin to restore range of motion to the injured area.
Later, when the doctor says range of motion has improved enough, he or she may prescribe weightbearing and strengthening exercises.
When you have normal, pain-free range of motion, the doctor may let you return to non-contact sports.
Return to PlayYou may be able to return to contact sports when you get back your full strength, motion, and endurance. When the doctor says you are ready to return to play, he or she may want you to wear a customized protective device to prevent further injury to the area that had a contusion.
Depending upon your sport, you may get special padding made of firm or semi-firm materials. The padding spreads out the force of impact when direct blows from blunt objects strike your body.
ComplicationsGetting prompt medical treatment and following your doctor's advice about rehabilitation can help you avoid serious medical complications that occasionally result from deep muscle contusions. Two complications include compartment syndrome and myositis ossificans.
Compartment SyndromeIn certain cases, rapid bleeding may cause extremely painful swelling within the muscle group of your arm, leg, foot, or buttock. Build-up of pressure from fluids several hours after a contusion injury can disrupt blood flow and prevent nourishment from reaching the muscle group. Compartment syndrome may require urgent surgery to drain the excess fluids.
Myositis OssificansYoung athletes who try to rehabilitate a severe contusion too quickly sometimes develop myositis ossificans. This is a condition in which the bruised muscle grows bone instead of new muscle cells.
Draft: 5/5/2023 Page 26

The Body GuardianSymptoms may include mild to severe pain that does not go away and swelling at the injury site. Abnormal bone formations can also reduce your flexibility. Vigorous stretching exercises may make the condition worse.
Rest, ice, compression and elevation to reduce inflammation will usually help. Gentle stretching exercises may improve flexibility. Surgery is rarely required.
Co-developed with the American Orthopaedic Society for Sports Medicine
Taken from: http://orthoinfo.aaos.org/topic.cfm?topic=a00341
Draft: 5/5/2023 Page 27

The Body GuardianStudent Questions:
1. Name two different causes for a contusion.
2. How does the doctor diagnose a muscle contusion?
3. What does RICE formula mean?
4. What would be the stages of rehabilitation an athlete might go through if they had a muscle contusion?
5. What is compartment syndrome?
6. What are Myositis Ossifications?
7. Suzy receives a bruise to her thigh as a result from a softball injury. What would be the treatment regimen she would undergo until the healing is complete. Begin with injury treatment immediately after injury to being able to play again.
Draft: 5/5/2023 Page 28

The Body GuardianAppendix F: Pedigree Practice Worksheet
Hemophilia: THE “ROYAL” DISEASE Hemophilia is an inherited disorder. Those who suffer from it lack a necessary protein that allows their blood to clot. A classic example of how hemophilia is passed on from generation to generation is found in the royal families of Europe during the 1800’s and early 1900’s. This pedigree details the inheritance of hemophilia in the descendants of Queen Victoria (1891-1901) of England. Carefully study the pedigree and answer the questions that follow.
1. What is the pattern of inheritance shown by hemophilia in the royal families of Europe?
2. Briefly justify your answer for the pattern listed above. Why did you choose this type of inheritance?
3. Queen Victoria was the first person that hemophilia could be traced back to, although she did not show it herself. What must her genotype have been?
4. Leopold was Victoria’s only son affected by hemophilia. What must his genotype have been?
5. Currently, none of the royal families of Europe show hemophilia. However, the Spanish lineage could still produce the disease. Why is this statement true? Use any necessary terms to help clarify your position.
Draft: 5/5/2023 Page 29

The Body Guardian6. Interestingly, even though hemophilia in the royal families began in England, they were actually the only one of these four families to NOT be affected by it. If Alice’s daughter Alix had accepted a marriage proposal from George V, this may have changed history greatly. If we were to rewrite history, pairing Alix and George V together, what is the probability any of their offspring would have hemophilia? Use a Punnett square to justify your answer.
7. Instead, Alix accepted a proposal from Tsar Nikolas II of Russia. Looking at the Russian royalty, there are a number of unknown issues. Both Alix and Nikolas II, along with all five of their children, were assassinated during the Russian Revolution. It is known that their only son, Alexis, was a sufferer of hemophilia (therefore Alix must have been a carrier). None of their daughters expressed the disease, but they were too young to have had children, so we do not know if they were carriers. Knowing what you do about genotypes and inheritance, what is the probability any of their daughters would have been a carrier for hemophilia?Use a Punnett square to justify your answer.
8. Although Alexis did have a number of health issues, he may have survived long enough to produce a child. If his wife was homozygous for normal clotting, what would the probability be that one of his sons would be a hemophiliac?
Use a Punnett square to justify your answer.
9. As was stated earlier, Queen Victoria was the first person within the English royal family to have an allele for hemophilia. Propose how this allele might have appeared in Queen Victoria?
10. If we have a male hemophiliac (such as Leopold) marry a normal female, is there any way to have sons who have hemophilia? Provide a justification for your response.
Draft: 5/5/2023 Page 30

The Body GuardianAppendix G: Hemophilia Investigation Homework
1. Describe the daily life of a person with hemophilia. Note any chronic symptoms.
2. What kinds of activities must a person with hemophilia avoid? Why?
3. What are the most common treatments of hemophilia, and what kinds of side effects to they cause?
4. What is the life expectancy of people diagnosed with hemophilia?
5. Describe any other ailments people with hemophilia might experience.
Draft: 5/5/2023 Page 31

The Body GuardianAppendix H: Engineering Design Challenge & Rubric
The Challenge:The Hemophilia Foundation is soliciting proposals for a protection gear system (i.e. a shin guard) for patients with hemophilia to use during normal and sport activity. Your team has been asked to develop a system that will protect human flesh from harmful contusions that can be serious for a patient with hemophilia. Using the materials provided, your team must construct, test and analyze the effectiveness of the design. A ballistics gelatin should be used to represent human flesh, and the protective gear should work to dampen the force the gelatin experiences. Your team must determine the impact force of a pendulum apparatus, investigate materials for use in construction of the protection gear, and analyze the data obtained from sensors. Following completion of testing and redesign, your design team will compose a proposal to the Hemophilia Foundation in support of your team’s design.
Team Roles: Electrical and Computer Engineer: ______________________________________
This person will oversee the use of the Arduino and pendulum apparatus. He/she is responsible for placing the accelerometers and reading the peak acceleration levels.
Materials Engineer: ______________________________________________
This person is responsible for maintaining the materials for the protective gear prototype(s). He/she will focus on deformation or deflection of the materials used in the protective gear.
Hematologist/Physiologist: _______________________________________
This person is responsible for ensuring the team design is ergonomically appropriate and analyzing the ballistics gel during and after testing. This person is responsible for the Qualitative Data section of the Recording Log.
Physicist: _______________________________________________
This person is responsible for leading the group in analysis of data obtained from testing. He/she will oversee the use of Microsoft Excel in creation of regression lines and functions.
Draft: 5/5/2023 Page 32
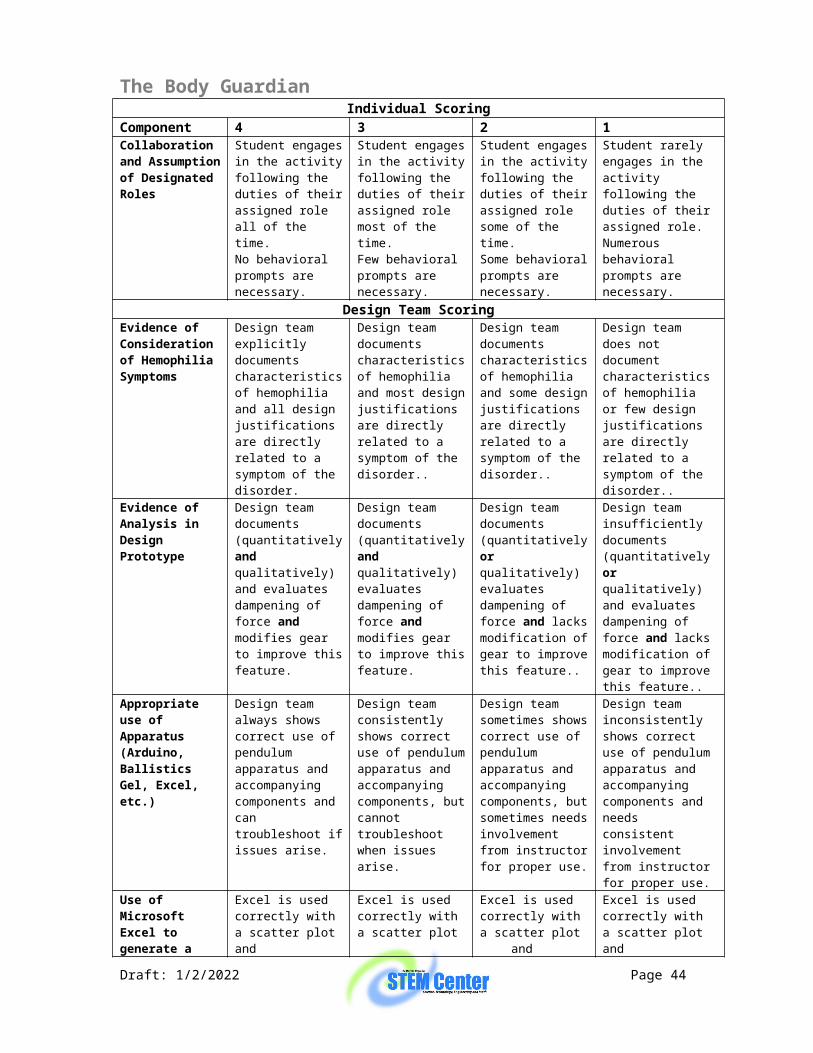
The Body GuardianIndividual Scoring
Component 4 3 2 1Collaboration and Assumption of Designated Roles
Student engages in the activity following the duties of their assigned role all of the time.No behavioral prompts are necessary.
Student engages in the activity following the duties of their assigned role most of the time.Few behavioral prompts are necessary.
Student engages in the activity following the duties of their assigned role some of the time.Some behavioral prompts are necessary.
Student rarely engages in the activity following the duties of their assigned role.Numerous behavioral prompts are necessary.
Design Team ScoringEvidence of Consideration of Hemophilia Symptoms
Design team explicitly documents characteristics of hemophilia and all design justifications are directly related to a symptom of the disorder.
Design team documents characteristics of hemophilia and most design justifications are directly related to a symptom of the disorder..
Design team documents characteristics of hemophilia and some design justifications are directly related to a symptom of the disorder..
Design team does not document characteristics of hemophilia or few design justifications are directly related to a symptom of the disorder..
Evidence of Analysis in Design Prototype
Design team documents (quantitatively and qualitatively) and evaluates dampening of force and modifies gear to improve this feature.
Design team documents (quantitatively and qualitatively) evaluates dampening of force and modifies gear to improve this feature.
Design team documents (quantitatively or qualitatively) evaluates dampening of force and lacks modification of gear to improve this feature..
Design team insufficiently documents (quantitatively or qualitatively) and evaluates dampening of force and lacks modification of gear to improve this feature..
Appropriate use of Apparatus (Arduino, Ballistics Gel, Excel, etc.)
Design team always shows correct use of pendulum apparatus and accompanying components and can troubleshoot if issues arise.
Design team consistently shows correct use of pendulum apparatus and accompanying components, but cannot troubleshoot when issues arise.
Design team sometimes shows correct use of pendulum apparatus and accompanying components, but sometimes needs involvement from instructor for proper use.
Design team inconsistently shows correct use of pendulum apparatus and accompanying components and needs consistent involvement from instructor for proper use.
Use of Microsoft Excel to generate a linear regression
Excel is used correctly with a scatter plot and appropriately labeled axes, etc. and analysis 100% of the time.
Excel is used correctly with a scatter plot and appropriately labeled axes, etc. and analysis 80% of the time.
Excel is used correctly with a scatter plot and appropriately labeled axes, etc. and analysis 60% of the time.
Excel is used correctly with a scatter plot and appropriately labeled axes, etc. and analysis less than 60% of the time.
Calculation of Force of Impact and Dispersion Force
Forces of impact and dispersion are calculated using correct computation and analysis 100% of the time.
Forces of impact and dispersion are calculated using correct computation and analysis 80% of the time.
Forces of impact and dispersion are calculated using correct computation and analysis 60% of the time.
Forces of impact and dispersion are calculated using correct computation and analysis less than 60% of the time.
Algebraic Functions and Manipulations
All algebraic formulas are correctly utilized and answers are labeled with appropriate units.
All algebraic formulas are correctly utilized but answers are not labeled with appropriate units.
Some algebraic formulas are correctly utilized and some answers are labeled with appropriate units.
Few algebraic formulas are correctly utilized and few answers are labeled with appropriate units.
Draft: 5/5/2023 Page 33

The Body GuardianAppendix I: Protection Gear Analysis Data Recording Log
Using the pendulum apparatus, record the peak acceleration as indicated on the Arduino device readout.
Angle (Degrees) Acceleration (m/s^2)
Strike Force (steel plate)
Ballistics Gelatin (bare flesh)
Gelatin and Gear
Gelatin and Gear (Redesign)
1030
6090
120
150180
Using Microsoft Excel, create a scatter plot for each set of data points. Generate a linear regression line and record the following data:
Strike Force (steel plate)
Ballistics Gelatin (bare flesh)
Gelatin and Gear
Gelatin and Gear (Redesign
Linear Equation
Slope (m)
y-intercept (b)
Correlation Coefficient (r^2)
Function Type
Draft: 5/5/2023 Page 34

The Body GuardianForce Calculations: Using the equation F = m a, calculate the force at each of the angles and through each medium.Angle (Degrees) Force
(Newtons)Strike Force (steel plate)
Ballistics Gelatin (bare flesh)
Gelatin and Gear
Gelatin and Gear (Redesign)
10
30
60
90
120
150
180
Draft: 5/5/2023 Page 35

The Body GuardianQualitative Data: Record information regarding deformation of the gel, guard, etc. and any other observations made during testing. Strike Force (steel plate)
Ballistics Gelatin (bare flesh)
Gelatin & Gear
Gelatin & Gear (Redesign)
Draft: 5/5/2023 Page 36

The Body GuardianAppendix J: Student Design Plan Team Name:Team Members:1.2.3.4.
Overview of Problem: -What are the objectives and constraints of the problem?
Plan: Design Schematic –What elements are the most important in your design? Why? Draw a sketch of your design below.
Safety Measures/ Concerns: - What precautions does your team need to consider during this challenge?
Draft: 5/5/2023 Page 37

The Body GuardianAppendix K: Mid-Construction Review Homework
Directions: Now that you and your group have begun working on the design challenge, you need to individually evaluate the group’s successes and failures. In order to advance the design, answer the following questions based upon your current design and your expected design.
1. What were the group challenges in terms of designing and building?
2. What worked well in the initial design? Why? Think in terms of the user application of this prototype.
3. What are the potential areas of improvement to increase design effectiveness?
4. What design change needs to occur for each improvement to be incorporated?
Draft: 5/5/2023 Page 38

The Body Guardian
Appendix L: Student Design SummaryTeam Name:Team Members:1.2.3.4.
Objectives: -What were objectives and constraints of the problem? Evaluate the achievement of each of these items.
Draft: 5/5/2023 Page 39

The Body Guardian
Testing Results: Describe the results of your protection gear prototype. Include data gained from the testing and how that pertains to your design. Include a detailed schematic or free body diagram of your design
Draft: 5/5/2023 Page 40

The Body GuardianConclusions: How well did your shin guard perform both quantitatively and qualitatively? How would you explain any failures to your design? What modifications would your make to your design if any? In specific detail, describe how you would market your design to an athlete with hemophilia?
Draft: 5/5/2023 Page 41

The Body GuardianAppendix M: National Hemophilia Foundation Proposal
Name: ________________________________________
Following construction and analysis of your team’s protective gear, you are tasked with writing a proposal to the National Hemophilia Foundation in support of your design. The Foundation is looking for potential gear for people with hemophilia to wear during normal and exercise activity that will prevent damage to flesh and potential serious contusions. Your proposal must contain sections on each of the following: (1500-3000 words)
Introduction: What is the subject of the proposal? For whom is this proposal intended?How do you intend the proposed technology to be used?Who is part of the design team? Describe each person and their role in the process.
Purpose of the Proposal: What are the symptoms of hemophilia?How is the disease inherited and who is at risk?What are hazards that people with hemophilia must face?How could this technology change the lives of people suffering from hemophilia?
Proposed Solution(s) or Plan(s), Including the Methods or Procedures: What is the design team’s proposed design?How was the design tested? Describe the methods used in analysis.What data was collected regarding effectiveness of the design?Include tables and graphs where appropriate.
Conclusion/Recommendations: What conclusions can be drawn from analysis of the design prototype? Provide any graphs or tables with relevant information.What remains to be investigated?What additional research/testing should be completed?
Additional Information to be used in Explication of the Proposed Solutions: Provide design schematics and recording logs with submission
Works Cited/References used in the Text of the Proposal: MLA Format should be used
Writing ConventionsInclude an introductory statement.Develop the claims of the proposal thoroughly and address counterclaims.Use transitions between sections of the proposal.Utilize appropriate subject vocabulary and content specific to the topic.Utilize a formal tone and style throughout the proposal.Provide a concluding statement that supports the claims from the proposal.
Adapted from: http://facstaff.gpc.edu/~ebrown/pracguid.htm
Draft: 5/5/2023 Page 42

The Body GuardianAppendix N: Picture Resources
Draft: 5/5/2023 Page 43
The Body Guardian
Draft: 5/5/2023 Page 44
