dec s 340—operations management - amazon web … · web viewinput boxes, message boxes, yes-no...
TRANSCRIPT
MgtOp 556—Advanced Business Modeling
Professor Munson
Topic 1
VBA Programming in Excel forDecision Support Systems
(Set 5—User Forms: Becoming a True “Windows Programmer”)
“Working with user forms is arguably the most fun part of VBA application development. You can use your creative and artistic talents to design the dialog boxes that user interact with.”
Albright, S. Christian, VBA for Modelers, 5th Ed., Cengage Learning, 2016, p. 231
Creating Dialog Boxes (User Forms)Input boxes, message boxes, Yes-No boxes, and form controls (e.g., list boxes, spin buttons, etc.) work well for specific tasks, but they are limited by basically being able to perform only one operation. Many practical applications, however, necessitate “dialog boxes” that may require the user to enter several different responses into the same box. Programmers can employ “user forms” to accommodate such situations. These are the primary means for getting users’ inputs.
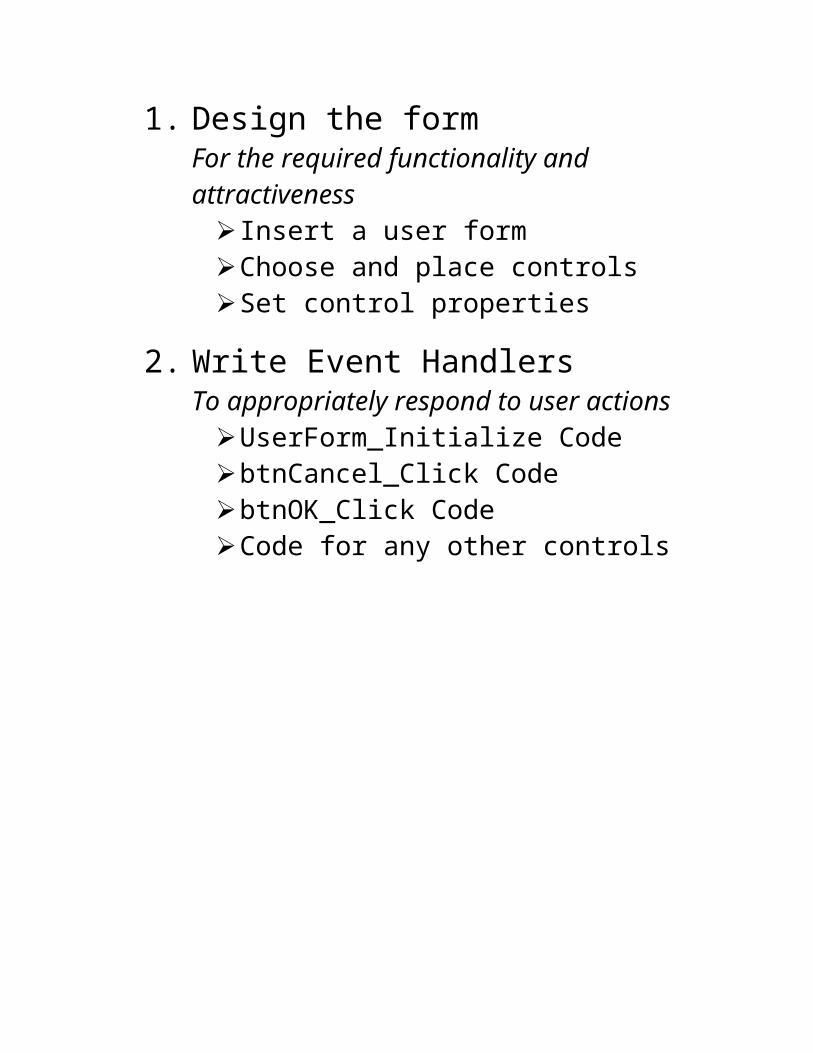
Two Parts to Creating User Forms1. Design the form
For the required functionality and attractiveness Insert a user formChoose and place controlsSet control properties
2. Write Event HandlersTo appropriately respond to user actions
UserForm_Initialize CodebtnCancel_Click CodebtnOK_Click CodeCode for any other controls
Designing User FormsGetting Started1. Project Explorer and Properties Window
should be visible (use the View tab if they’re not).
2. →Insert→UserForm (A blank form will appear with the Toolbox)
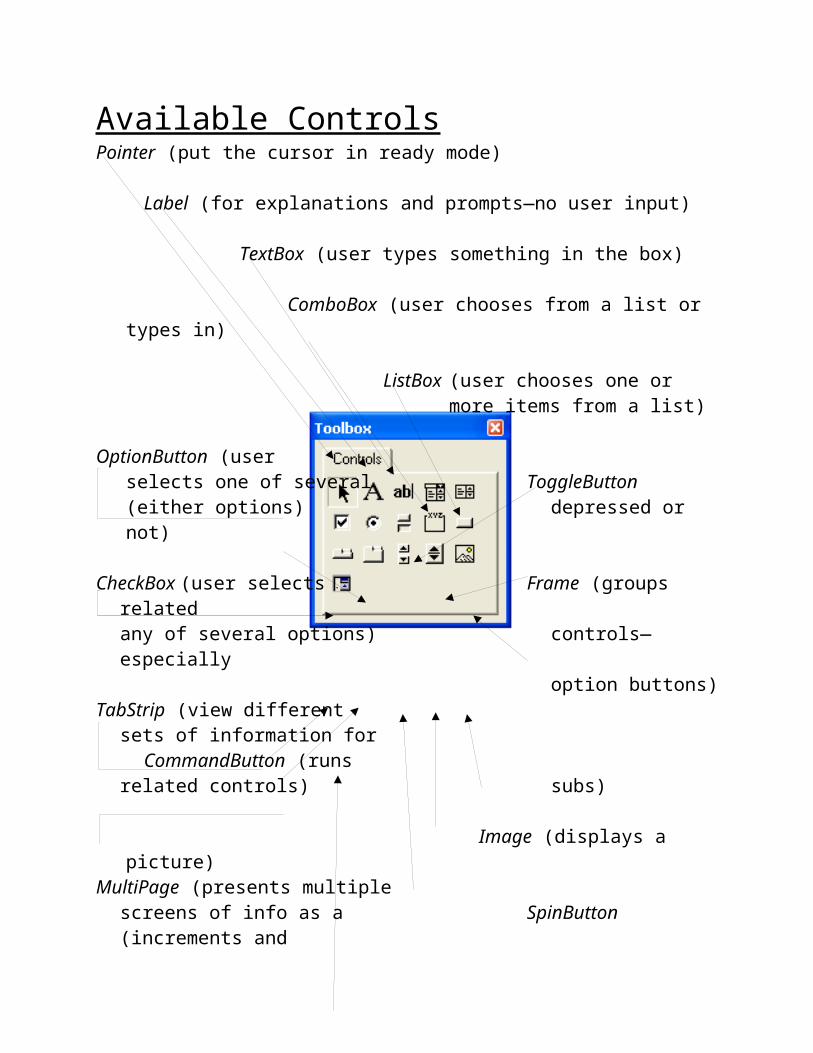
Available ControlsPointer (put the cursor in ready mode)
Label (for explanations and prompts—no user input)
TextBox (user types something in the box)
ComboBox (user chooses from a list or types in)
ListBox (user chooses one or more items from a list)
OptionButton (user selects one of several ToggleButton (either options) depressed or not)
CheckBox (user selects Frame (groups relatedany of several options) controls—especially
option buttons)TabStrip (view different
sets of information for CommandButton (runsrelated controls) subs)
Image (displays a picture)MultiPage (presents multiple
screens of info as a SpinButton (increments andsingle set) decrements numbers)
ScrollBar (returns or sets the value of another control based on the position of the scroll box)
RefEdit (similar to a TextBox control, but usedspecifically to let the user select a worksheet range)
Note: Many other controls can be added to the Toolbox. To see them, right-click on any of the controls in the tool box, and select →Additional Controls…. A useful one is Microsoft Date and Time Picker Control 6.0 (SP6), which lets you put a date box on the form where the user selects the date from a calendar.

Adding Controls to the User Form To add any control, click it in the Toolbox
and then drag it onto the form.
Size a control by selecting it and then clicking and dragging one of the eight handles on the outside.
Move a control by clicking it and dragging.
Copy a control by first selecting it and then pressing Ctrl while dragging (to copy a Frame, place the cursor on the edge of the Frame before dragging).
Resize and align either visually or with the Format menu (numerous options). To format several items together, →<Ctrl>→<Click> each one to select the set, then visit the Format tab.
View the form by selecting the user form itself and pressing <F5>. Return to VBE by clicking on the X button (closing the form).
Setting Properties of ControlsUse the Properties Window to establish control parameters. Selecting a control automatically displays the appropriate properties window. Most settings do not need to be changed!
Common Properties to SetAll or most controls:
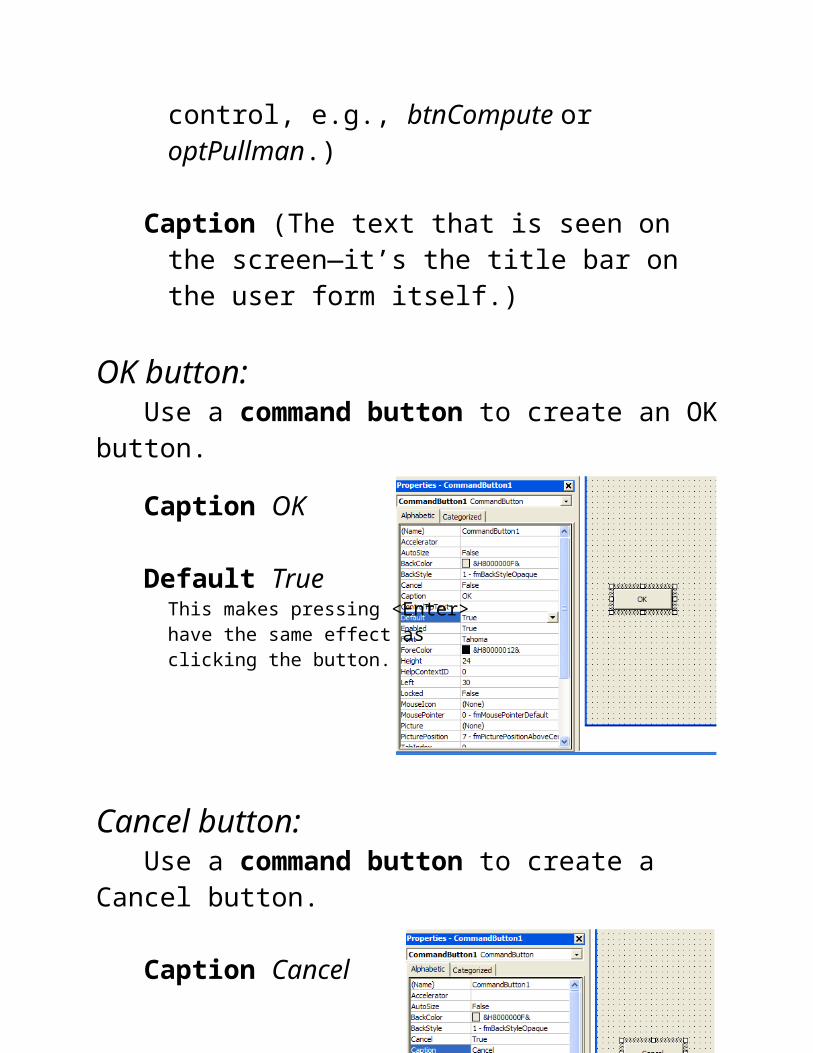
Name (Not what the user sees but what VBA code uses for that control—like a variable name. It’s a good idea to begin each name with an abbreviation for the control, e.g., btnCompute or optPullman.)
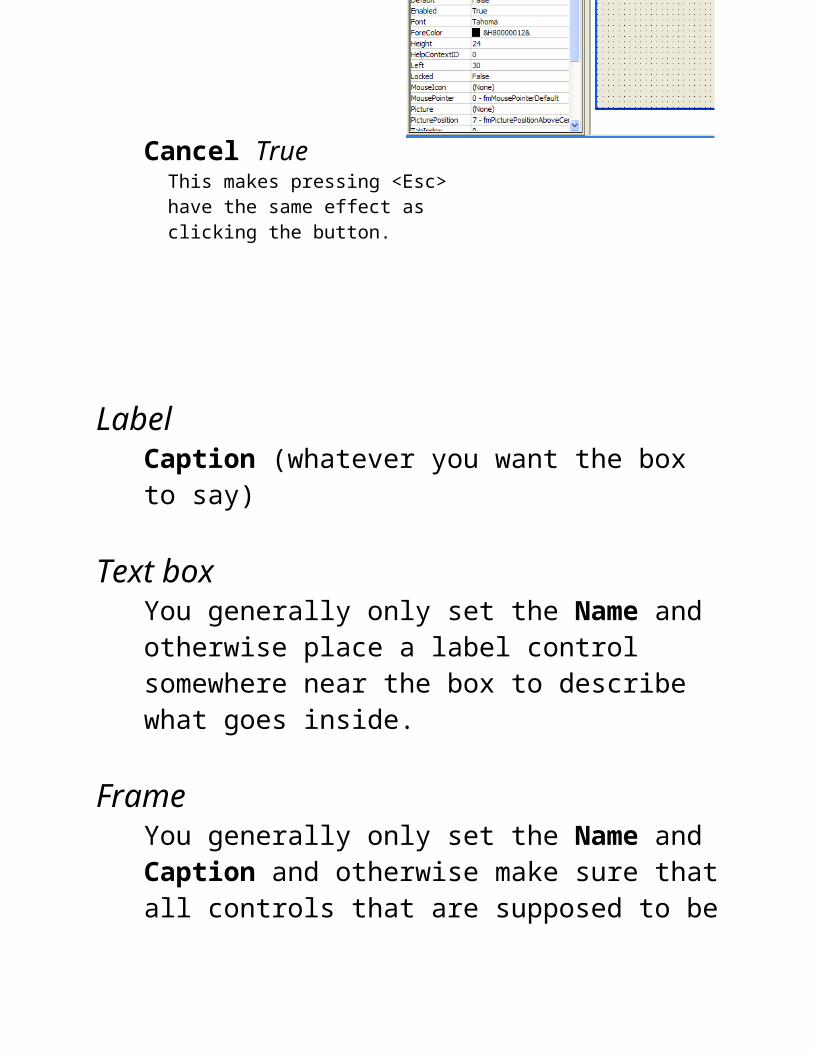
Caption (The text that is seen on the screen—it’s the title bar on the user form itself.)
OK button:Use a command button to create an OK button.
Caption OK
Default TrueThis makes pressing <Enter>have the same effect asclicking the button.
Cancel button:Use a command button to create a Cancel button.
Caption Cancel
Cancel TrueThis makes pressing <Esc>have the same effect as clicking the button.
LabelCaption (whatever you want the box to say)
Text boxYou generally only set the Name and otherwise place a label control somewhere near the box to describe what goes inside.
FrameYou generally only set the Name and Caption and otherwise make sure that all controls that are supposed to be grouped in the frame lie completely inside it.
Option buttonYou generally only set the Name and Caption. Make sure that all mutually exclusive options lie within the same Frame.
Check boxYou generally only set the Name and Caption. Make sure that all related options lie within the same Frame.
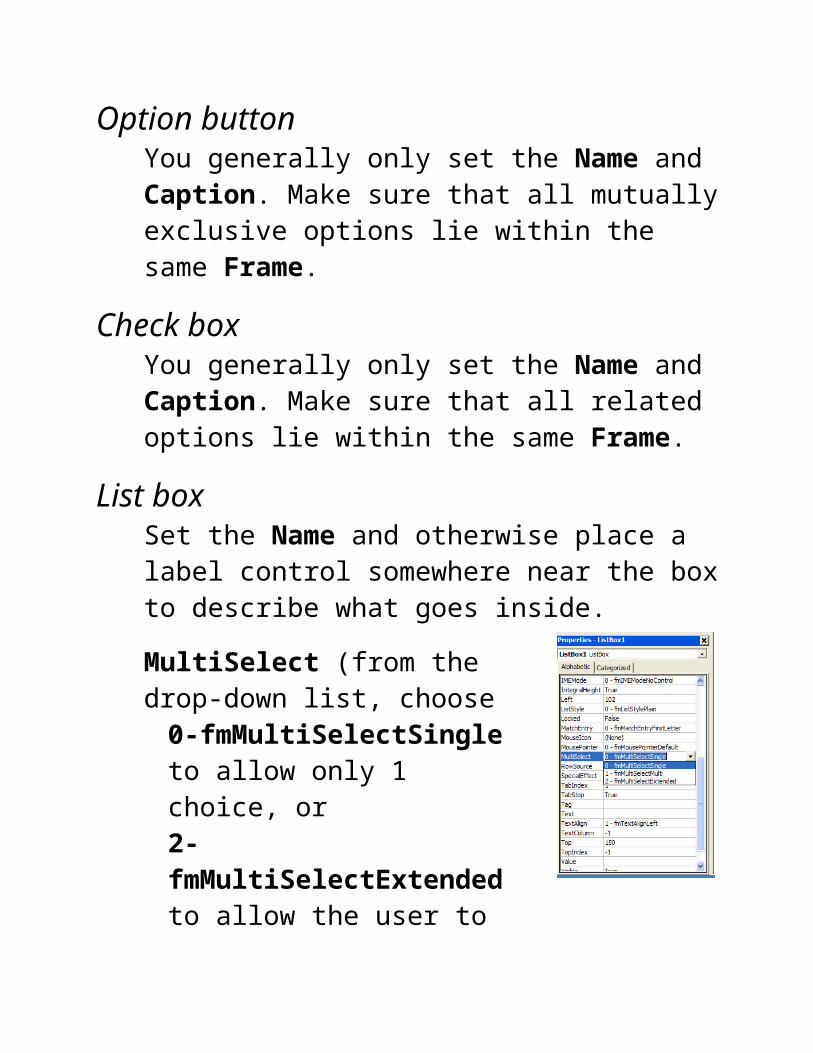
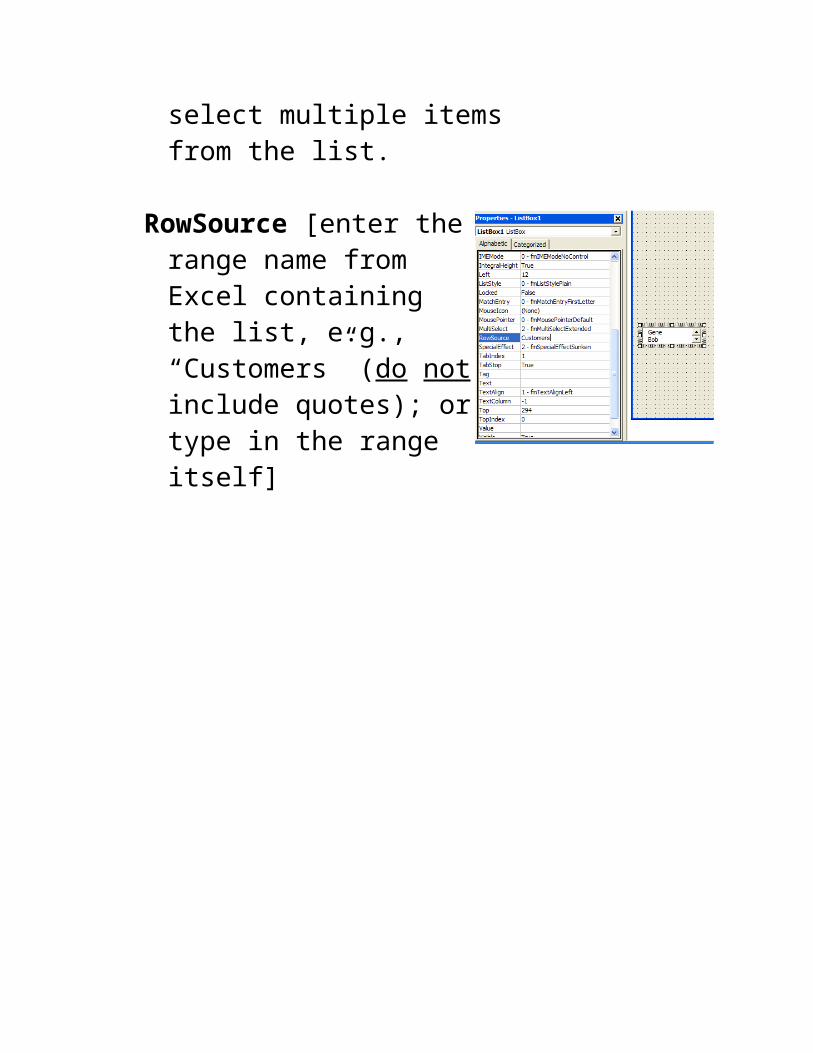
List boxSet the Name and otherwise place a label control somewhere near the box to describe what goes inside.
MultiSelect (from the drop-down list, choose
0-fmMultiSelectSingle to allow only 1 choice, or2-fmMultiSelectExtended to allow the user to select multiple items from the list.
RowSource [enter the range name from Excel containing the list, e.g., “Customers” (do not include quotes); or type in the range itself]

Writing Event Handlers
In Windows, an “event” occurs whenever the user does something (e.g., clicking on a button, selecting a worksheet, clicking on a cell, etc.). An “event handler” is a Sub that contains code to provide instructions on what to do after a specific event occurs.
Note: Event handlers are not placed in modules (as regular VBA code is). Instead, they are placed in a user form’s associated Code Window. Toggle between the design window and the code window by pressing <Shift><F7> and <F7>, respectively.
Creating an Event Handler SubIn general, there is no need to learn the syntax for the first and last statement of each Sub. VBA will insert it for you.
Each control has a default event. To create a Sub for that event, simply double-click on the control in the design box. VBA will automatically take you to the code window and insert the first and last lines.
For all other events of a control, use the drop-down lists at the top of the code window. The figures below illustrates choosing the MouseDown event for a command button:
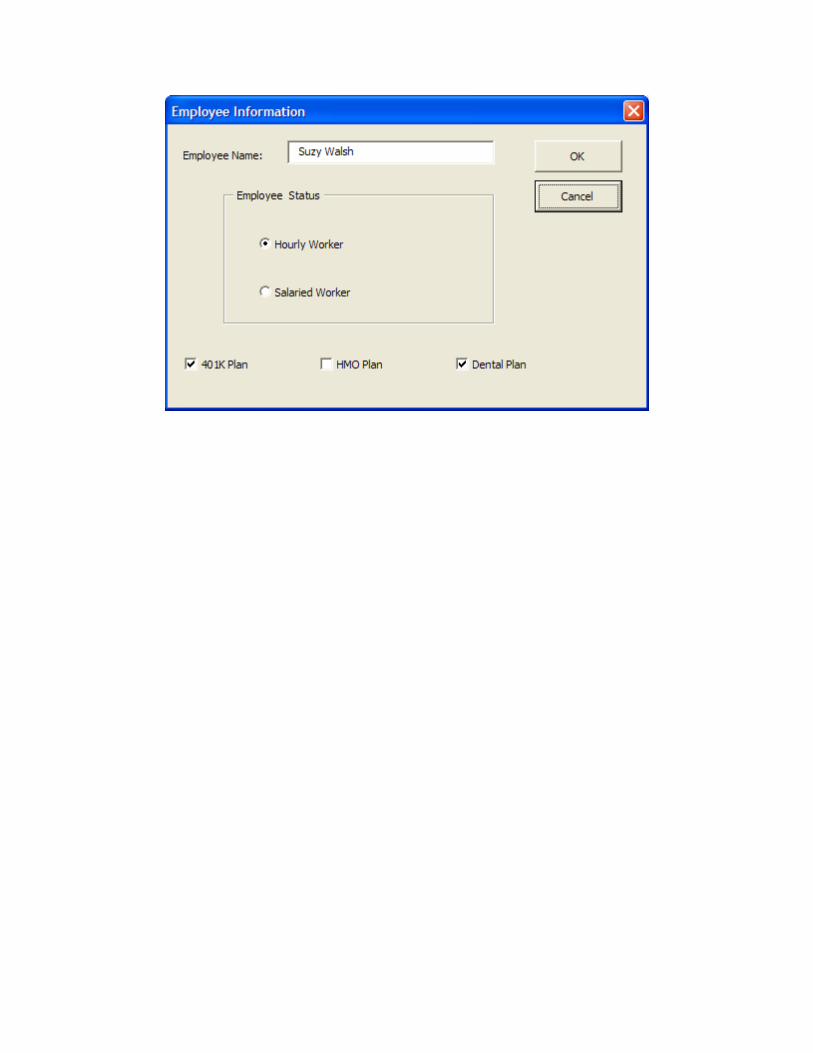
UserForm_InitializeThis Sub always has this name, and it determines how the user form will look when the user first sees it. It’s generally used to indicate, for example, which buttons are initially pressed or to insert a default name into a text box.
Ex: Private Sub UserForm_Initialize()txtEmployee.Value = “Suzy Walsh”optHourlyWorker.Value = Truechk401KPlan.Value = TruechkDentalPlan.Value = True
End Sub
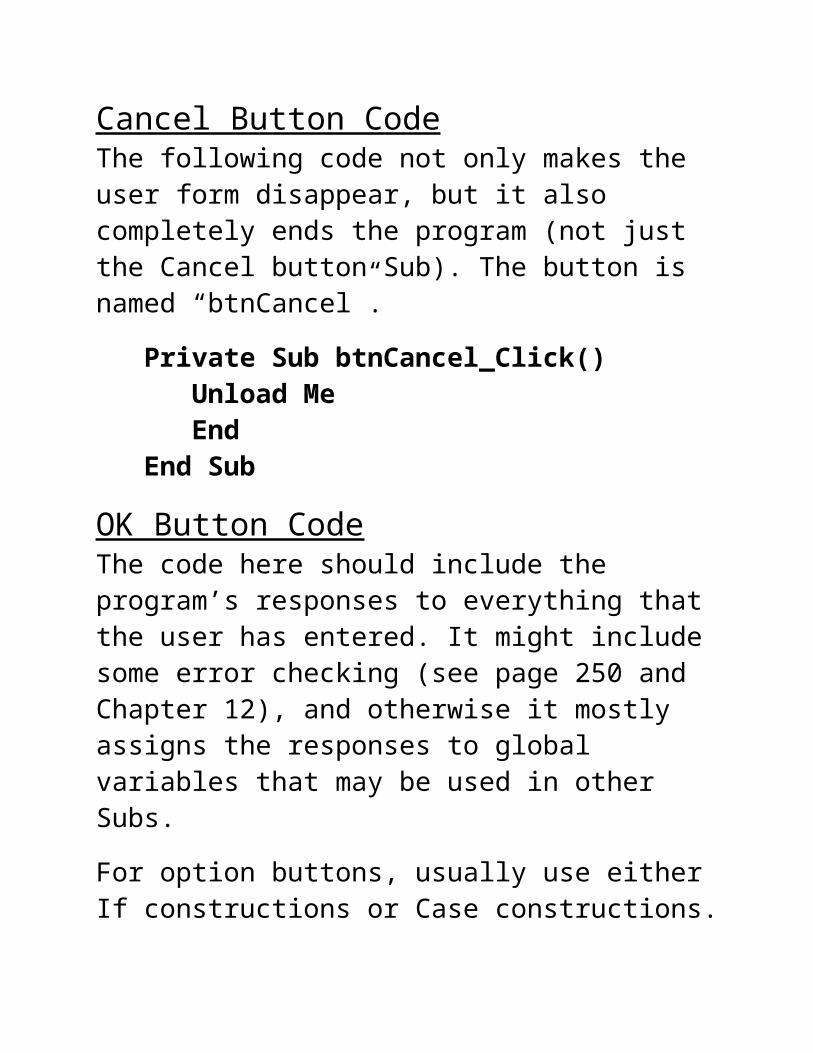
Cancel Button CodeThe following code not only makes the user form disappear, but it also completely ends the program (not just the Cancel button Sub). The button is named “btnCancel”.
Private Sub btnCancel_Click()Unload MeEnd
End Sub
OK Button CodeThe code here should include the program’s responses to everything that the user has entered. It might include some error checking (see page 250 and Chapter 12), and otherwise it mostly assigns the responses to global variables that may be used in other Subs.
For option buttons, usually use either If constructions or Case constructions.
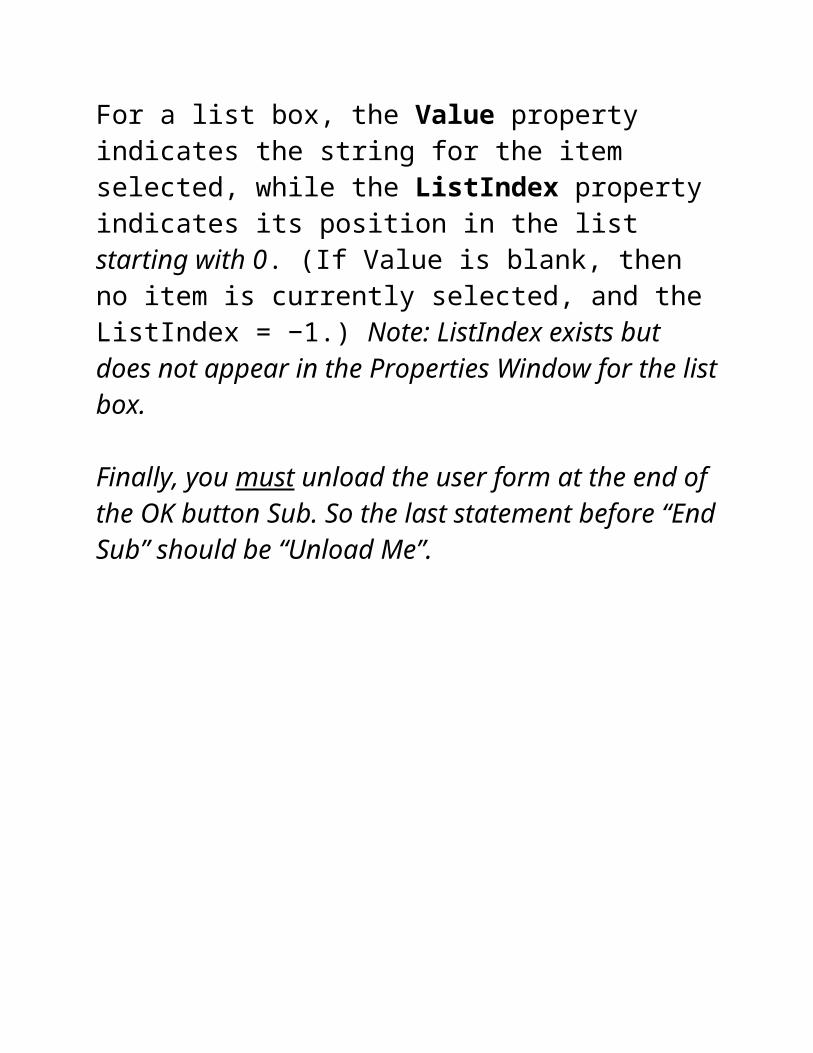
For a list box, the Value property indicates the string for the item selected, while the ListIndex property indicates its position in the list starting with 0. (If Value is blank, then no item is currently selected, and the ListIndex = −1.) Note: ListIndex exists but does not appear in the Properties Window for the list box.
Finally, you must unload the user form at the end of the OK button Sub. So the last statement before “End Sub” should be “Unload Me”.
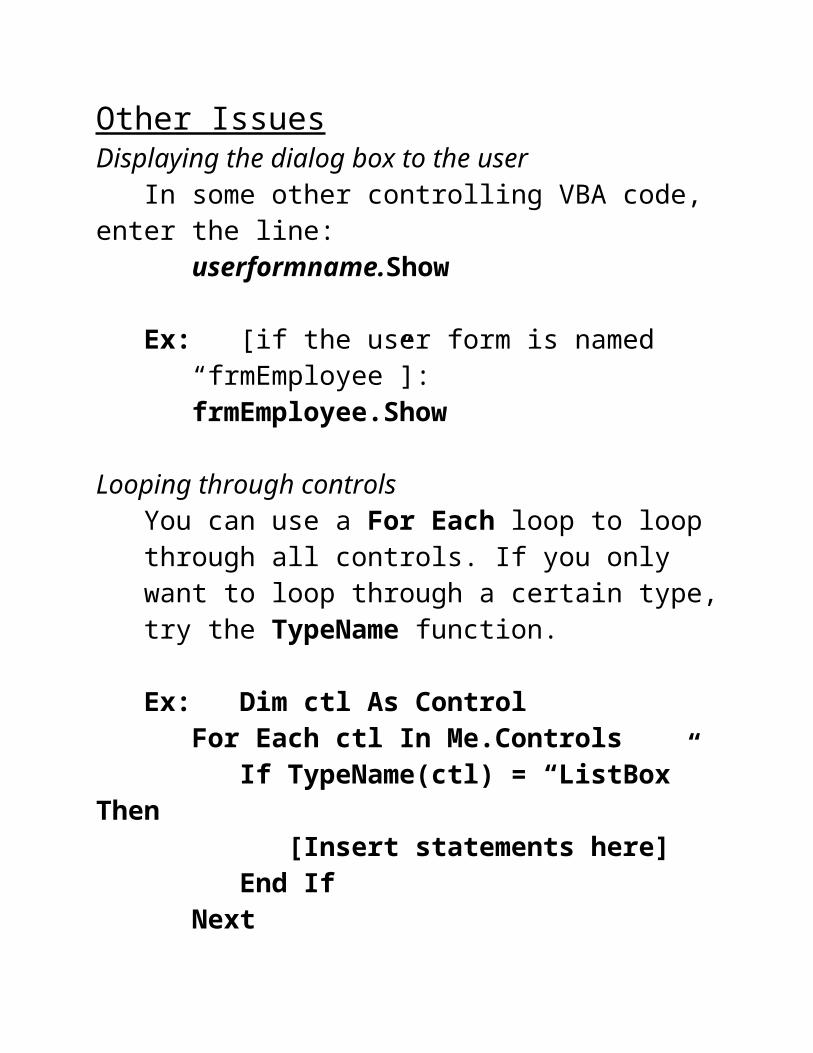
Other IssuesDisplaying the dialog box to the user
In some other controlling VBA code, enter the line:userformname.Show
Ex: [if the user form is named “frmEmployee”]:frmEmployee.Show
Looping through controlsYou can use a For Each loop to loop through all controls. If you only want to loop through a certain type, try the TypeName function.
Ex: Dim ctl As ControlFor Each ctl In Me.Controls
If TypeName(ctl) = “ListBox” Then[Insert statements here]
End IfNext
Multi-list boxesUse the Selected property of the list box. The (Boolean) property acts like an array (0-based) for each member of the list. Also, the ListCount property counts the number of items in the list.
Ex: For i = 1 to lbProducts.ListCountisChosen(i) = lbProducts.Selected(i-1)
Next
Exercise: Create the following user form for an online dating service. Write the event handler Subs for the Cancel and OK buttons that assign values to global variables defined elsewhere in the program.

Step 1: Adding Controls to the User Form1. Enter VBE and click on InsertUserForm.2. Resize the User Form to make it wider and taller.3. Insert an 8×3 label (Label1) in the upper left. (The
8×3 means approximately 8 dots wide and 3 dots tall.)4. Insert a 27×3 text box (TextBox1) next to Label1.5. Insert an 8×3 label (Label2) to the right of TextBox1.6. Insert a 5×3 text box (TextBox2) next to Label2.7. Insert a 3×3 spin button (SpinButton1) next to
TextBox2.8. Insert an 18×6 command button (CommandButton1)
in the upper right of the User Form.9. Insert an 18×6 command button (CommandButton2)
below CommandButton1. (Can use copy/paste.)10. Insert an 18×10 frame (Frame1) in the 2nd row of the
User Form.

11. Insert a 12×4 option button (OptionButton1) in Frame1.
12. Insert a 12×4 option button (OptionButton2) below OptionButton1 within Frame1. (Can use copy/paste.)
13. Insert an identically sized frame with option buttons (Frame2 and OptionButton3 and OptionButton4) to the right of Frame1. (Can use copy/paste.)
14. Insert a 27×42 frame (Frame3) below Frame1.15. Insert 10, 23×4 check boxes within Frame3. (Can use
copy/paste.)16. Insert a 22×3 label (Label3) next to the top of Frame3.17. Insert a 22×18 list box (ListBox1) right below Label3.18. Insert a 22×21 MultiPage next to ListBox1. Insert a
third page by right-clicking on the tabs and clicking New Page.
19. Insert an 18×3 label (Label4) below ListBox1. 20. Finally, add a 10×3 date and time selector
(DTPicker1) next to Label4. To add it to your controls Toolbox, right-click on the Controls tab, and click on Additional Controls… Then check Microsoft Date and Time Picker Control 6.0 (SP6) click <OK>.

Step 2: Setting Properties of Controls1. UserForm1: Caption = Meet Your Spouse Dating
Service Questionnaire2. Label1: Caption = Your Name:3. Label2: Caption = Your Age:4. TextBox2: Value = 215. CommandButton1: Caption = OK
Default = True6. CommandButton2: Caption = Cancel
Cancel = True7. Frame1: Caption = Your Gender8. OptionButton1: Caption = Male9. OptionButton2: Caption = Female10. Frame2: Caption = Companion’s Gender11. OptionButton3: Caption = Male12. OptionButton4: Caption = Female13. Frame3: Caption = Your Interests (Check All That
Apply)14. CheckBox1: Caption = Romance15. CheckBox2: Caption = Dancing16. CheckBox3: Caption = Watching Sports17. CheckBox4: Caption = Playing Sports18. CheckBox5: Caption = Music19. CheckBox6: Caption = Fine Wine20. CheckBox7: Caption = Outdoors21. CheckBox8: Caption = Movies22. CheckBox9: Caption = Long Conversations23. CheckBox10: Caption = Short Conversations24. Label3: Caption = Most Desired Trait (Choose One)

25. For ListBox1, List the traits in the Excel sheet:A1: AggressiveA2: Submissive A3: FunnyA4: TalkativeA5: RebelliousA6: KindA7: Non-CommittalA8: Party AnimalA9: PrincessA10: NerdA11: New Jersey
In Excel, name the Range A1:A11 as “Traits”Back in VBE, ListBox1: Rowsource = TraitsListBox1: Value = Nerd [This chooses Nerd as the
default desired trait; it can be left blank or identified by a different trait if desired.]
26. Page 1: Right-click on the tab, then select Rename… Change the caption to Non-Smoker and click <OK>. Similarly, change the caption for Page 2 to Smoker, and change the caption for Page 3 to Drinker.
27. Insert a 16×6 Toggle Button (ToggleButton1) onto the Non-Smoker page. Its caption = Press if You Would Date Such a Person
28. Copy ToggleButton1, and paste it onto the Smoker and Drinker pages (creating ToggleButton2 and ToggleButton3).
29. Label4: Caption = Desired Marriage Date
Step 3: Writing Event Handler Subs1. Double-click on SpinButton1
2. Select SpinUp
3. Insert the following code in the SpinUp() Private Sub:TextBox2.Value = TextBox2.Value + 1
4. Repeat the procedure for SpinDown using “- 1”:
5. Press <Shift><F7> to return to the design page.
6. Double-click on the Cancel button.
7. Insert the following code into the CommandButton2_Click() Private Sub:
Unload MeEnd
8. Press <Shift><F7> to return to the design page.
9. Double-click on the OK button.
10. For the CommandButton1_Click() Private Sub, the following code would assign values from the user form to global variables defined in another module (see #11 below):Private Sub CommandButton1_Click() YourName = TextBox1.Value YourAge = TextBox2.Value If OptionButton1.Value = True Then YourGender = "Male" ElseIf OptionButton2.Value = True Then YourGender = "Female" End If If OptionButton3.Value = True Then CompGender = "Male" ElseIf OptionButton4.Value = True Then CompGender = "Female" End If 'Note that the following variables for the check boxes are Boolean isRomance = CheckBox1.Value isDancing = CheckBox2.Value isWatchingSports = CheckBox3.Value isPlayingSports = CheckBox4.Value isMusic = CheckBox5.Value isFineWine = CheckBox6.Value isOutdoors = CheckBox7.Value isMovies = CheckBox8.Value isLongTalks = CheckBox9.Value isShortTalks = CheckBox10.Value Trait = ListBox1.Value 'Note that the following variables for the MultiPages are Boolean willNonSmoker = ToggleButton1.Value willSmoker = ToggleButton2.Value willDrinker = ToggleButton1.Value MarriageDate = DTPicker1.Value Unload Me End Sub
11. The following code might appear in a separate module. It first defines global (public) variables for all of the items on the user form. (Note how these definitions appear before any subs.) Then the sub called Main calls up the user form and produces a message box that displays some of the user’s entries.
Option Explicit
Public YourName, YourAge, YourGender, CompGender, Trait As String Public isRomance, isDancing, isWatchingSports, isPlayingSports, isMusic, _ isFineWine, isOutdoors, isMovies, isLongTalks, isShortTalks, _ willNonSmoker, willSmoker, willDrinker As Boolean Public MarriageDate As Date Public Sub Main() UserForm1.Show MsgBox "Your information is:" & vbCrLf & "Your name is " & YourName _ & vbCrLf & "Your age is " & YourAge & vbCrLf & "Your gender is " _ & YourGender & vbCrLf & "Your companion's gender is " & CompGender _ & vbCrLf & "Your most desired trait is " & Trait _ & vbCrLf & "You want to be married on " & MarriageDate, _ vbInformation, "Your Data"
End Sub
Conclusion: Event handlers are not as daunting as they may first appear. For many applications, you only need one for the Cancel button that contains two short lines of code, and a second for the OK button that simply assigns the values of all of the choices to previously defined public variables (and closes the user form).