definity® extender remote module user's guidepdf.textfiles.com/manuals/telecom-a-e/definity...
TRANSCRIPT
555-230-796Comcode 107634560Issue 2July 1997
DEFINITY® ExtenderRemote Module
User’s Guide
Cvrfrnt.fm Page 1 Monday, July 28, 1997 11:39 AM
Copyright 1997, Lucent Technologies 555-230-796All Rights Reserved Issue 2Printed in USA July 1997
NoticeEvery effort was made to ensure that the information in this book was complete and accurate at the time of printing. However, information is subject to change.
Your Responsibility for Your System’s SecurityToll fraud is the unauthorized use of your telecommunications system by an unauthorized party, for example, persons other than your company’s employees, agents, subcontractors, or persons working on your company’s behalf. Note that there may be a risk of toll fraud associated with your telecommunications system and, if toll fraud occurs, it can result in substantial additional charges for your telecommunications services.
You and your system manager are responsible for the security of your system, such as program-ming and configuring your equipment to prevent unauthorized use. The system manager is also responsible for reading all installation, instruction, and system administration documents pro-vided with this product in order to fully understand the features that can introduce risk of toll fraud and the steps that can be taken to reduce that risk. Lucent Technologies does not warrant that this product is immune from or will prevent unauthorized use of common-carrier telecommu-nication services or facilities accessed through or connected to it. Lucent Technologies will not be responsible for any charges that result from such unauthorized use.
Lucent Technologies Fraud InterventionIf you suspect that you are being victimized by toll fraud and you need technical support or assis-tance, call the National Customer Care Center at 1 800 643-2353.
Federal Communications Commission StatementThis equipment has been tested and found to comply with the limits for a Class A digital device, pursuant to Part 15 of the FCC Rules. These limits are designed to provide reasonable protection against harmful interference when the equipment is operated in a commercial environment. This equipment generates, uses, and can radiate radio frequency energy and, if not installed and used in accordance with the instruction manual, may cause harmful interference to radio communica-tions. However, there is no guarantee that interference will not occur in a particular installation. For further FCC information, see "Customer Support Information" below.
Industry Canada (IC) Interference InformationThis digital apparatus does not exceed the Class B limits for radio noise emissions set out in the radio interference regulations of the Canadian Department of Communications.Le Présent Appareil Numérique n'émet pas de bruits radioélectriques dépassant les limites appli-cables aux appareils numériques de la class B préscrites dans le reglement sur le brouillage radioélectrique édicté par le ministère le ministère des Industrie Canada.
Cvrfrnt.fm Page 2 Monday, July 28, 1997 11:39 AM

TrademarksDEFINITY is a registered trademark of Lucent Technologies in the US and other countries.
Ordering InformationCall: Lucent Technologies Publications Center
Voice 1 800 457-1235 International Voice 765 361-5353Fax 1 800 457-1764 International Fax 765 361-5355
Write: Lucent Technologies Publications CenterP.O. Box 4100Crawfordsville, IN 47933
Order: Document No. 555-230-796Comcode 107634560Issue 2, July 1997
For more information about Lucent Technologies documents, refer to the section entitled “Related Documents” in “About This Book”
Support Telephone NumberIn the continental US, Lucent Technologies provides a toll-free customer helpline 24 hours a day. Call the Lucent Technologies Helpline at 1 800 242-2121 or your Lucent Technologies authorized dealer if you need assistance when installing programming, or using your system. Outside the continental US, contact your local Lucent Technologies representative.
WarrantyLucent Technologies provides a limited warranty on this product. Refer to “Limited Warranty” in “Customer Support Information.”
Cvrfrnt.fm Page 3 Monday, July 28, 1997 11:39 AM
Contents
Issue 2 July 1997 i
Customer Support Information ........................ ix
■ Support Telephone Number..................................... ix■ Security of Your System:
Preventing Toll Fraud ...............................................x■ Lucent Technologies Fraud Intervention..................xi■ Limited Warranty ......................................................xii■ FCC Notification and Repair Information .................xiii■ Installation and Operational Procedures ..................xiv■ Federal Communications Commission (FCC)
Electromagnetic Interference Information ................xvi
About This Book ....................................................xvii
■ Intended Audience ...................................................xvii■ Terms and Conventions ...........................................xviii■ Typographical Conventions......................................xix■ How to Use This Book..............................................xix■ Product Safety Labels ..............................................xx■ Related Documents..................................................xxi■ How to Comment on This Document .......................xxiii
Contents
ii Issue 2 July 1997
1 Introduction ............................................................ 1-1
■ System Operation and Configuration....................... 1-2Equipment List .................................................... 1-3Compatibility ....................................................... 1-5Options ............................................................... 1-5
■ Specifications........................................................... 1-6■ Considerations......................................................... 1-8
2 Installation .....................................................................2-1
■ Location Requirements............................................ 2-2■ Electrical Requirements........................................... 2-2■ Connecting the Remote Module .............................. 2-3■ Installation Procedure .............................................. 2-4
Connections for Data Transmission ................... 2-6

Contents
Issue 2 July 1997 iii
3 Programming ................................................................3-1
■ Using the Telephone for Programming ....................3-2■ Setting the Telephone Number ................................3-3■ Setting the Mode of Dialing ......................................3-4
Setting Pulse Dialing ...........................................3-4Setting Tone Dialing ............................................3-5
■ Setting the Connect Rate .........................................3-6■ Setting the COM Port Baud Rate .............................3-8■ Exiting Programming................................................3-9
4 Operating the Remote Module............................4-1
■ Starting the Operation ............................................4-2■ Disconnecting .........................................................4-4■ Changing a Password ............................................4-6■ Checking System Software ....................................4-9

Contents
iv Issue 2 July 1997
5 Troubleshooting ..........................................................5-1
■ Troubleshooting ..................................................... 5-2■ LED Sequences ..................................................... 5-3■ Error Messages ..................................................... 5-3
GL Glossary ...........................................................................GL-1

Figures
Issue 2 July 1997 v
1 Introduction
1-1 System Configuration.........................................1-2
2 Installation
2-1 Remote Module Back Panel...............................2-32-2 RS-232 Cable Pin Connections .........................2-7
4 Operating the Remote Module
4-1 Connect Sequence for the Remote Module.......4-3

Tables
vi Issue 2 July 1997
1 Introduction
1-1 Remote Module Specifications.......................... 1-7
2 Installation
2-1 DIP Switch Configuration................................... 2-5
3 Programming
3-1 Telephone Keys Used in Programming............. 3-2
5 Troubleshooting
5-1 Error Messages ................................................. 5-4

Important Safety Instructions
Issue 2 July 1997 vii
The exclamation point in an equilateral triangleis intended to alert the user to the presence ofimportant operating and maintenance(servicing) instructions in the literatureaccompanying the product.
IMPORTANT SAFETY INSTRUCTIONS
When installing telephone equipment, always follow basic safetyprecautions to reduce the risk of fire, electrical shock, and injury topersons, including:
■ Read and understand all instructions.
■ Follow all warnings and instructions marked on or packed withthe product.
■ Never install this unit or telephone wiring for it during a lightningstorm.
■ Never install a telephone jack in a wet location unless the jackis specifically designed for wet locations.
■ Never touch uninsulated telephone wires or terminals unlessthe telephone wiring has been disconnected at the networkinterface.
■ Use caution when installing or modifying telephone lines.
■ Use only Lucent Technologies-manufactured DEFINITYEnterprise Communications Server (ECS) circuit packs, carrierassemblies, and power units in the DEFINITY ECS control unit.
■ Use only Lucent Technologies-recommended/approvedDEFINITY ECS accessories.

Important Safety Instructions
viii Issue 2 July 1997
■ Do not install this product near water, for example, in a wetbasement location.
■ Do not overload wall outlets, as this can result in the risk of fireor electrical shock.
■ Do not attach the power supply cord to building surfaces. Donot allow anything to rest on the power cord. Do not locate thisproduct where the cord will be abused by persons walking on it.
■ Unplug the product from the wall outlet before cleaning. Use adamp cloth for cleaning. Do not use cleaners or aerosolcleaners.
■ Do not operate the system if chemical gas leakage is suspectedin the area. Use telephones located in some other safe area toreport the trouble.
WARNING:
DO NOT open the Remote Module. There are nouser serviceable parts inside the unit. Only anauthorized technician should open the unit forrequired maintenance or upgrading purposes.
SAVE THESE INSTRUCTIONS

Customer Support Information
Issue 2 July 1997 ix
Support Telephone Number
In the USA only , Lucent Technologies provides a toll-treecustomer Helpline (1 800 242-2121) 24 hours a day. If you needassistance when installing, programming, or using your system, callthe Helpline, or your Lucent Technologies authorizedrepresentative.
Outside the USA , if you need assistance when installing,programming, or using your system, contact your LucentTechnologies authorized representative.

Customer Support Information
x Issue 2 July 1997
Security of Your System:Preventing Toll Fraud
As a customer of a new telephone system, you should be awarethat there is an increasing problem of telephone toll fraud.Telephone toll fraud can occur in many forms, despite thenumerous efforts of telephone companies and telephoneequipment manufacturers to control it. Some individuals useelectronic devices to prevent or falsify records of these calls.Others charge calls to someone else’s number by illegally usinglost or stolen calling cards, billing innocent parties, clipping on tosomeone else’s line, or breaking into someone else’s telephoneequipment physically or electronically. In certain instances,unauthorized individuals make connections to the telephonenetwork through the use of remote access features.
Common carriers are required by law to collect their tariffedcharges. While these charges are fraudulent charges made bypersons with criminal intent, applicable tariffs state that thecustomer of record is responsible for payment of all long-distanceor other network charges. Lucent Technologies cannot beresponsible for such charges and will not make any allowance orgive any credit for charges that result from unauthorized access.
To minimize the risk of unauthorized access to your DEFINITYECS:
■ When possible, restrict the off-network capability of off-premises callers, using calling restrictions, Facility RestrictionLevels, and Disallowed List capabilities.
■ When possible, block out-of-hours calling.
■ Frequently monitor system call detail reports for quickerdetection of any unauthorized or abnormal calling patterns.
Customer Support Information
Issue 2 July 1997 xi
■ Limit Outcalling to persons on a need-to-have basis.
The DEFINITY ECS, through proper administration, can help youreduce the risk of unauthorized persons gaining access to thenetwork. However, phone numbers and authorization codes can becompromised when overheard in a public location, lost throughtheft of a wallet or purse containing access information, or whentreated carelessly (writing codes on a piece of paper andimproperly discarding them).
Additionally, hackers may use a computer to dial an access codeand then publish the information to other hackers. Substantialcharges can accumulate quickly. It is your responsibility to takeappropriate steps to implement the features properly, to evaluateand administer the various restriction levels, and to protect andcarefully distribute access codes.
Under applicable tariffs, you will be responsible for payment of tollcharges. Lucent Technologies cannot be responsible for suchcharges and will not make any allowance or give any creditresulting from unauthorized access.
Lucent Technologies FraudIntervention
If you suspect you are being victimized by toll fraud and you needtechnical support or assistance, call the National Customer ServiceCenter at 1 800 242-2121.

Customer Support Information
xii Issue 2 July 1997
Limited Warranty
Lucent Technologies Inc. warrants this equipment to be free ofdefects in materials and workmanship for a period of one year fromdate of shipment. All defects within this time will be repaired withoutcharge upon return of the unit to the factory.
This warranty is null and void if the manufacturer determines thatany modifications have been made to the unit or the unit has beensubjected to physical or electrical stress.
This warranty covers parts and labor only and does not includeshipping costs, travel expenses, or travel time.
Installation of the equipment is the sole responsibility of thepurchaser. The manufacturer, its agents, or its distributors acceptno responsibility for malfunction or damage caused by impropertreatment or connection of the unit.
The manufacturer, its agents, or its distributors are not liable forany losses incurred through use or malfunction of the equipment orany losses or damages incurred by the use of the equipment in anymeans whatsoever.
This warranty is limited to the repair of the equipment to its normalfunctioning capability.
This warranty is complete as stated and all other warranties,expressed or implied, are invalid.
The DEFINITY Extender System should be installed only byqualified personnel. No user-serviceable parts are contained withinthe units. Installation or programming should not begin prior toreview of all sections of this manual.

Customer Support Information
Issue 2 July 1997 xiii
FCC Notificationand Repair Information
This equipment is registered with the FCC in accordance with Part68 of its rules. In compliance with those rules, you are advised ofthe following:
■ Means of Connection. Connection of this equipment to thetelephone network shall be through a standard networkinterface jack, USOC RJ11C. These USOCs must be orderedfrom your telephone company.
■ Party Lines and Coin Telephones. This equipment can not beused with party lines or coin telephone lines.
■ Notification to the Telephone Companies. Before connectingthis equipment, you or your equipment supplier must notify yourlocal telephone company’s business office of the following:
— The telephone number(s) you will be using with thisequipment.
— The appropriate registration number and ringer equivalencenumber (REN), which can be found on the back or bottomof the control unit.
— For each jack, the sequence in which lines are to beconnected, the line types, the Facility Interface Code (FIC),and the Ringer Equivalence Number (REN) by positionwhen applicable.

Customer Support Information
xiv Issue 2 July 1997
■ Ringer Equivalence Number (REN). The REN is used todetermine the number of devices that can be connected to thetelephone line. Excessive RENs on the line can result in thedevices not ringing in response to an incoming call. In most, butnot all, areas the sum of the RENs should not exceed five (5.0).To be certain of the number of devices that can be connectedto the line, as determined by the total RENs, contact the localtelephone company to determine the maximum REN for thecalling area.
■ Disconnection. You must also notify your local telephonecompany if and when this equipment is permanentlydisconnected from the line(s).
Installation and OperationalProcedures
This manual contains information about installation and operationalprocedures.
■ Repair Instructions. If you experience trouble because yourequipment is malfunctioning, the FCC requires that theequipment not be used and that it be disconnected from thenetwork until the problem has been corrected. Repairs to thisequipment can be made only by the manufacturers, theirauthorized agents, or others who may be authorized by theFCC. In the event repairs are needed on this equipment,contact your authorized Lucent Technologies dealer or, in theUSA only , contact the National Service Assistance Center(NSAC) at 1 800 242-2121.

Customer Support Information
Issue 2 July 1997 xv
■ Rights of the Local Telephone Company. If this equipmentcauses harm to the telephone network, the local telephonecompany may discontinue your service temporarily. If possible,they will notify you in advance. But if advance notice is notpractical, you will be notified as soon as possible. You will alsobe informed of your right to file a complaint with the FCC.
■ Changes at Local Telephone Company. Your local telephonecompany may make changes in its facilities, equipment,operations, or procedures that affect the proper functioning ofthis equipment. If they do, you will be notified in advance to giveyou an opportunity to maintain uninterrupted telephone service.
■ New Network Area and Exchange Codes. The DEFINITYECS software does not restrict access to any new area codesor exchange codes established by a local telephone company.If the user has established toll restrictions on the system thatcould restrict access, then the user should check the lists ofallowed and disallowed dial codes and modify them as needed.
■ Equal Access Codes. This equipment is capable of providingusers access to interstate providers of operator servicesthrough the use of access codes. Modifications of thisequipment by call aggregators to block access dialing codes isa violation of the Telephone Operator Consumers Act of 1990.

Customer Support Information
xvi Issue 2 July 1997
Federal CommunicationsCommission (FCC)Electromagnetic InterferenceInformation
This equipment has been tested and found to comply with the limitsfor a Class B digital device, pursuant to Part 15 of the FCC Rules.These limits are designed to provide reasonable protection againstharmful interference when the equipment is operated in aresidential environment. This equipment generates, uses, and canradiate radio frequency energy and, if not installed and used inaccordance with the instruction manual, may cause harmfulinterference to radio communications.
About This Book
Issue 2 July 1997 xvii
Intended Audience
This book is intended to help in the installation, systemadministration, and maintenance of the DEFINITY ExtenderRemote Module. It is intended for use as a reference by anyoneneeding such information, including system managers, supportpersonnel, sales representatives, and account executives. It is alsointended for technicians who are responsible for systeminstallation, maintenance, and troubleshooting.

About This Book
xviii Issue 2 July 1997
Terms and Conventions
The DEFINITY Extender Remote Module will henceforth bereferred to as the Remote Module.
The DEFINITY Extender Switch Module will henceforth be referredto as the Switch Module.
Throughout this document, toll fraud security hazards are indicatedby an exclamation point inside a triangle and the words SecurityAlert.
Security Alert:
Security Alert indicates the presence of toll fraudsecurity hazard. Toll fraud is the unauthorized use ofyour telecommunications system by an unauthorizedparty (e.g., persons other than your company’semployees, agents, subcontractors, or personsworking on your company’s behalf). Be sure to read“Your Responsibility for Your System’s Security” onthe inside front cover of this book and “Security ofYour System: Preventing Toll Fraud” in About ThisBook.

About This Book
Issue 2 July 1997 xix
Typographical Conventions
Certain type fonts and styles act as visual cues to help you rapidlyunderstand the information presented:
Example Purpose
Do not recycle old passwords. Italics indicate emphasis.
If you do not want to disconnect,go to Step 3.
Italics also tell you instructionsabout what to do next in aprocedure.
At the "Go Online" screen, press3 until the following screenappears:
A number in a shaded box is usedto designate a key on yourtelephone.
Press the Drop button fourtimes.
The names of fixed-feature,factory-imprinted buttons on atelephone appear in bold.
2:OK 3:Next Plain constant-width type in ashaded box indicates text thatappears on the telephone display.
How to Use This Book
This book is organized into chapters that give information onprocedures necessary for the proper installation and administrationof your DEFINITY Extender Remote Module.
“Related Documents,” later in this section, provides a complete listof system documentation, together with ordering information.

About This Book
xx Issue 2 July 1997
If you have problems with your Remote Module, contact yoursystem administrator. If the problem can not be solved by thesystem administrator, in the continental US, your systemadministrator will call our toll-free Helpline, available 24 hours aday, at 1 800 242-2121. Outside of the continental US, contact yourLucent Technologies representative or local Authorized Dealer.
Product Safety Labels
Throughout this document, hazardous situations are indicated byan exclamation point inside a triangle and the word Caution orWarning.
WARNING:
Warning indicates the presence of a hazard thatcould cause death or severe personal injury if thehazard is not avoided.
CAUTION:
Caution indicates the presence of a hazard that couldcause minor personal injury or property damage if thehazard is not avoided.
About This Book
Issue 2 July 1997 xxi
Related Documents
The documents listed below are part of the DEFINITY ECSdocumentation set. These documents can be ordered from theLucent Technologies Publications Center.
Call: Lucent Technologies Publications Center
Voice 1 800 457-1235Fax 1 800 457-1764
International Voice 765 361-5353International Fax 765 361-5355
Write: Lucent Technologies Publications CenterP.O. Box 4100Crawfordsville, IN 47933
About This Book
xxii Issue 2 July 1997
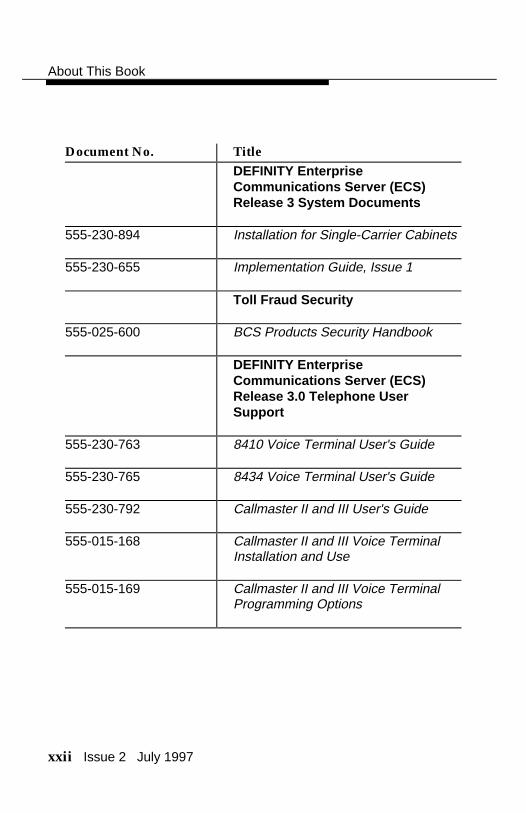
Document No. TitleDEFINITY EnterpriseCommunications Server (ECS)Release 3 System Documents
555-230-894 Installation for Single-Carrier Cabinets
555-230-655 Implementation Guide, Issue 1
Toll Fraud Security
555-025-600 BCS Products Security Handbook
DEFINITY EnterpriseCommunications Server (ECS)Release 3.0 Telephone UserSupport
555-230-763 8410 Voice Terminal User's Guide
555-230-765 8434 Voice Terminal User's Guide
555-230-792 Callmaster II and III User's Guide
555-015-168 Callmaster II and III Voice TerminalInstallation and Use
555-015-169 Callmaster II and III Voice TerminalProgramming Options

About This Book
Issue 2 July 1997 xxiii
How to Comment on ThisDocument
We welcome your comments, both positive and negative. Pleaseuse the feedback form on the next page to let us know how we cancontinue to serve you. If the feedback form is missing, write directlyto:
Documentation ManagerLucent Technologies211 Mount Airy RoadRoom 2W-226Basking Ridge, NJ 07920-2332

FEEDBACK FORM
DEFINITY® Enterprise Communications Server (ECS), Release 3
Title: DEFINITY® Extender Remote Module
Document No.: 555-230-796 Issue: 2 Date: July 1997
1. Please rate the effectiveness of this book in the following areas:
Excellent Good Fair Poor NotApplicable
Ease of Use
Clarity
Completeness
Accuracy
Organization
Appearance
Examples
Illustrations
OverallSatisfaction
2. Please check ways you feel we could improve this book:
❑ Improve the overview ❑ Add more step-by-step procedures❑ Add more examples ❑ Improve the table of contents❑ Add more detail ❑ Make it less technical❑ Improve the organization ❑ Make it more concise❑ Improve the index/glossary ❑ Include more illustrations❑ Add troubleshooting ❑ Add more/better quick information
reference aids

❑ Other
3. What did you like most about this book?
4. Feel free to write any comments below or on an attached sheet.
If we may contact you about your comments, please complete the following:
Name: Telephone Number:
Company/Organization:
Date:
Address:
Send completed forms to: Documentation Manager, Lucent Technologies,211 Mount Airy Road, Room 2W-226, Basking Ridge, NJ 07920-2332. Fax:908 953-6912.
THIS FORM MAY BE PHOTOCOPIED
Issue 2 July 1997 1-1
Introduction 1An overview of the functioning and specifications of theDEFINITY® Extender
The DEFINITY® Extender enables DEFINITY telephone users tobe a fully functional part of the PBX telephone system with a digitaltelephone located any distance off-premise. The Extender istransparent to the user and retains access to the features andfunctions of the DEFINITY Enterprise Communications Server(ECS). In addition, an RS-232 data port extension is incorporated,allowing the user to connect off-premise RS-232 equipment toequipment at the PBX location.

Introduction
1-2 Issue 2 July 1997
System Operation andConfiguration
The DEFINITY Extender system is designed for use with aDEFINITY ECS of Version 3, Release 3 or later. The Extendersystem consists of two modules. One module, identified as theSwitch Module, connects to your PBX. The other module, identifiedas the Remote Module, connects to your DEFINITY telephone atyour off-premise location. Figure 1-1 shows the Extender systemconfiguration.
Figure 1-1. System Configuration
The modules communicate via a single analog telephone line (alsocalled a “plain old telephone service” [POTS] line), which canextend your DEFINITY telephone to virtually unlimited distances.See “Specifications” later in this chapter for detailed circuitspecifications.

Introduction
Issue 2 July 1997 1-3
The Switch Module emulates your telephone, and the RemoteModule emulates your PBX. Each module features a V.32terbointernal modem for the transmission of all signals between the twomodules. With the use of Lucent Technologies’ DEFINITYExtender system, the features and capabilities of your on-premisetelephones are extended to those off-premise.
! Security Alert:Using the Remote Module gains access to the features ofthe DEFINITY ECS, including access to WATS lines, FXlines, etc., which are subject to toll fraud. Guard passwordscarefully!
Equipment List
Your Remote Module package should include:
■ One Remote Module (identified on the top of the unit)
■ One 7-foot standard telephone line cord
■ One AC adapter
■ DEFINITY® Extender Remote Module User's Guide
NOTE:A DEFINITY telephone and its associated telephone cord arenot supplied with the Remote Module and must be orderedseparately. Contact your system administrator or LucentTechnologies representative for information. The SwitchModule(s) is also ordered and shipped separately.

Introduction
1-4 Issue 2 July 1997
You must supply the following for installation:
■ DEFINITY ECS display telephone
■ Telephone cord
■ If you use an 8434D telephone, an MSP-1 power supply
■ If you are connecting the Remote Module to a 240-vac outlet,an adapter to convert to 120 vac.
■ Power and central office line suppressor. Lucent Technologiesrecommends the 147C AC/CO Line Surge Protector (#8310-006). Contact your Lucent Technologies representative forordering instructions.
NOTE:Save your packing materials. Even though the Remote Module is areliable product, it may be necessary to return it for maintenance.When returning the module, use the original package.

Introduction
Issue 2 July 1997 1-5
Compatibility
The DEFINITY Extender is compatible with the followingcommercial two-wire DEFINITY ECS display telephones.
■ 8410D
■ 8434D
NOTE:The power supply that comes with the DEFINITY ExtenderRemote Module cannot produce the power required by the8434D telephone. An MSP-1 (WP924644) power supply mustbe used. Check with your Lucent Technologies representativefor ordering information.
■ 603 E Callmaster III
NOTE:A telephone identical to the 8410D but certified for residential useis being designed. This telephone will be available in the nearfuture. Contact your Lucent Technologies representative forinformation and availability dates.
Options
You can order a wall-mounted metal bracket with a slide-in stylesleeve for use with the Remote Module. Contact your LucentTechnologies representative for ordering information.

Introduction
1-6 Issue 2 July 1997
Specifications
The DEFINITY Extender system should operate properly with anystandard telephone service (also called “plain old telephoneservice” [POTS] line). Line conditioning may be required if theSwitch and Remote Modules do not connect at a data rate of19.2 kbps.
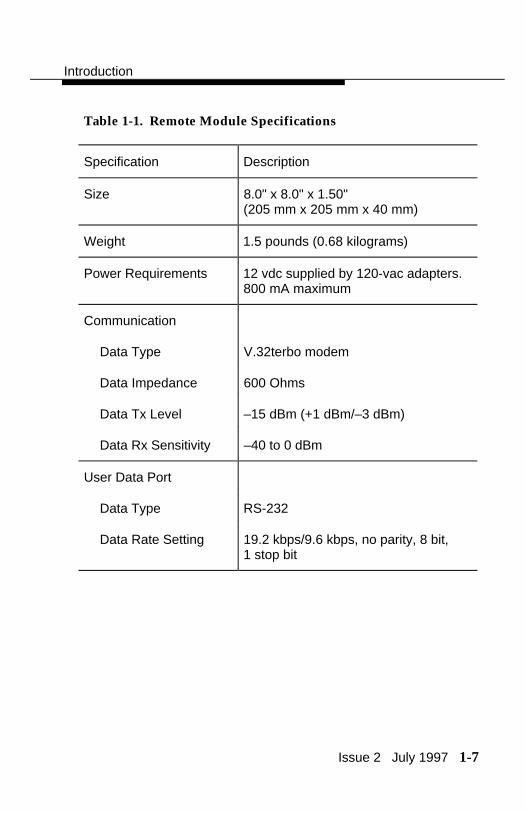
Table 1-1 shows the specifications of the DEFINITY ExtenderRemote Module.
NOTE:Specifications are subject to change without notice as technologicalor manufacturing changes warrant.
Introduction
Issue 2 July 1997 1-7
Table 1-1. Remote Module Specifications
Specification Description
Size 8.0" x 8.0" x 1.50"(205 mm x 205 mm x 40 mm)
Weight 1.5 pounds (0.68 kilograms)
Power Requirements 12 vdc supplied by 120-vac adapters.800 mA maximum
Communication
Data Type V.32terbo modem
Data Impedance 600 Ohms
Data Tx Level –15 dBm (+1 dBm/–3 dBm)
Data Rx Sensitivity –40 to 0 dBm
User Data Port
Data Type RS-232
Data Rate Setting 19.2 kbps/9.6 kbps, no parity, 8 bit,1 stop bit

Introduction
1-8 Issue 2 July 1997
Considerations
Keep the following in mind when you use the DEFINITY Extendersystem:
■ The DEFINITY Extender system is to be used with a DEFINITYECS of Version 3, Release 3 or later.
■ No custom calling features, such as Call Waiting or CallForwarding, should be ordered for the line to which you connectthe Remote Module.
NOTE:A Call Waiting tone causes an interruption in the call, and theRemote Module will begin the reconnect sequence.
■ Use of the speakerphone on the DEFINITY telephoneconnected to the Remote Module will degrade voice quality.
■ When you use voice and data simultaneously on the RemoteModule, the voice transmission will have priority over the datatransmission.
■ Sessions can be established only from the Remote Module.
■ Authorized connections require a password 8 to 10 digits inlength.

Introduction
Issue 2 July 1997 1-9
! Security Alert:Using the Remote Module gains access to the features ofthe DEFINITY ECS, including access to WATS lines, FXlines, etc., which are subject to toll fraud. Passwords shouldbe as long as allowed. Passwords should be hard to guessand therefore should not contain:
■ all the same numbers (for example, 88888888)
■ sequential characters (for example, 987654321)
■ character strings associated with you or with yourbusiness. These include:
— Names
— Birthdays
— Business name
— Telephone number
— Social security number
■ Words and commonly used names
Passwords should use as wide a variety of characters aspossible. Passwords should be changed regularly, at leaston a quarterly basis. Do not recycle old passwords.
Issue 2 July 1997 2-1
Installation 2How to install the DEFINITY® Extender Remote Module
Installing the Remote Module involves choosing a proper location andplugging in the LINE, PORT, and power cords.
Installation
2-2 Issue 2 July 1997
Location Requirements
To ensure successful operation of the DEFINITY Extender system,place the Remote Module within 400 feet (120 meters) of theDEFINITY telephone. The Extender module may be mounted inany position or may be wall-mounted by using the optional wall-mount bracket. Install the module's power supply and cabling awayfrom high-power/high-RF noise devices such as computers, fans,fluorescent ballasts, and power supplies.
Electrical Requirements
Use only the AC adapters provided with the DEFINITY Extendersystem. The Extender has been designed to operate from 120 vac60 Hz.
! CAUTION:Do not apply power to the Extender module until specificallyinstructed in the installation procedures.

Installation
Issue 2 July 1997 2-3
Connecting the Remote Module
All connections to the Remote Module are done via the back panel(see Figure 2-1). Presently no ports are installed for VOICE orCOM 2. The current back panel elements are:
■ LINE is the connection between the Remote Module and thecentral office line for transmission of the signaling information tothe Switch Module.
■ PORT is the connection between the DEFINITY telephone andthe Remote Module.
■ COM 1 provides for simultaneous RS-232 communicationbetween equipment at the off-premise site and equipment atthe on-premise site.
■ COM 2 is reserved for future use
■ +12VDC is the connection for the A/C adapter.
■ The DIP switch under OPT is used for system configuration.
Figure 2-1. Remote Module Back Panel

Installation
2-4 Issue 2 July 1997
In addition to the back panel connections, a three-color light-emitting diode (LED) is visible through the top of each unit andprovides information about the status of the equipment.
Installation Procedure
Installing the Remote Module involves connecting the line cords,the telephone cord, the power cord, and, at your option, theRS-232 cable. The line cord and power cord are supplied with yourRemote Module, and the telephone cord and any power cordsrequired for the operation of the telephone are supplied with thedisplay telephone.
Follow these steps to install the Remote Module:
! CAUTION:Do not plug the A/C adapters into the electrical outlets untilinstructed to do so in the following procedure.
1. Ensure that the module has the proper DIP switch configuration(see Table 2-1).

Installation
Issue 2 July 1997 2-5
Table 2-1. DIP Switch Configuration
Switch # OFF ON
1 Normal operation Reserved
2 Normal operation Dedicated lines
3 Normal operation Reserved
4 Normal operation Test mode
NOTE:If you are using a standard central office line, you do not have tochange the factory-set DIP switches. Check with your systemadministrator before making any changes. Your systemadministrator may have changed DIP switch 3 to the ONposition for normal operation. Do not change this setting withoutcontacting your system administrator.
2. Connect one end of the line cord provided with the RemoteModule to the telephone company phone jack and the other endto the LINE jack of the Remote Module.
3. Connect the DEFINITY telephone to the PORT jack of theRemote Module by using the cord provided with the telephone.
! CAUTION:Do not plug the line cord provided with the Remote Moduleinto the PORT jack of the Remote Module. Damage tocircuits may result.

Installation
2-6 Issue 2 July 1997
4. Connect the AC adapter provided with your system to theRemote Module. Plug the adapter into a standard 120-vacelectrical outlet.
! CAUTION:Do not plug the A/C adapters into a 240-vac outlet becauseyou will damage the adapter and the module. You must firstobtain an adapter to convert 240 vac to 120 vac.
5. The display on the telephone will initialize and read “GoOnline?”
Connections for Data Transmission
By using the COM 1 port on the Remote Module, you can establishsimultaneous data transmission between the off-premise locationand the on-premise location. Typically this involves a personalcomputer (a “remote data terminal”) at the off-premise locationcommunicating with an RS-232 server link on-premise (at theDEFINITY ECS location).
You will need two straight-through, 9-pin RS-232 cables toestablish data transmission.
Connect the data terminal at the remote location to the COM 1 portof the Remote Module by using the straight-through cable (seeFigure 2-2).

Installation
Issue 2 July 1997 2-7
Figure 2-2. RS-232 Cable Pin Connections
NOTE:The DEFINITY Extender modules use the CTS line for flow control.When the internal buffer is 32 characters from full, the CTS line isturned off. While CTS is off, up to an additional 32 characters canbe transmitted without any loss of data. If hardware flow control isnot enabled or if a cable without the CTS line connected is used,characters will be lost when this buffer overflows.
The DEFINITY Extender modules use the DCD line to indicatewhether or not the modules have made a connection. When thisline is on, the modules have made connection.
Issue 2 July 1997 3-1
Programming 3How to program the operating parameters for the DEFINITY®
Extender Remote Module
Before you can use the Remote Module, you must program theoperating parameters, such as the phone number, the type of dialing,and the baud rate of communication.

Programming
3-2 Issue 2 July 1997
Using the Telephone forProgramming
Use the DEFINITY telephone to program the operating parametersat the remote location. Prompts will appear on the telephonedisplay. To respond to the prompts, press the dial pad keys on thetelephone. Table 3-1 shows the keys used to move to or selectprogramming options.
Table 3-1. Telephone Keys Used in Programming
Telephone Key Function
1 Allows user to move backward throughprogramming menu.
2 Allows user to select a parameter forprogramming.
3 Allows user to move forward throughprogramming menu.
After you connect your Remote Module and DEFINITY telephone,the following will appear on the telephone display:
Programming
Issue 2 July 1997 3-3
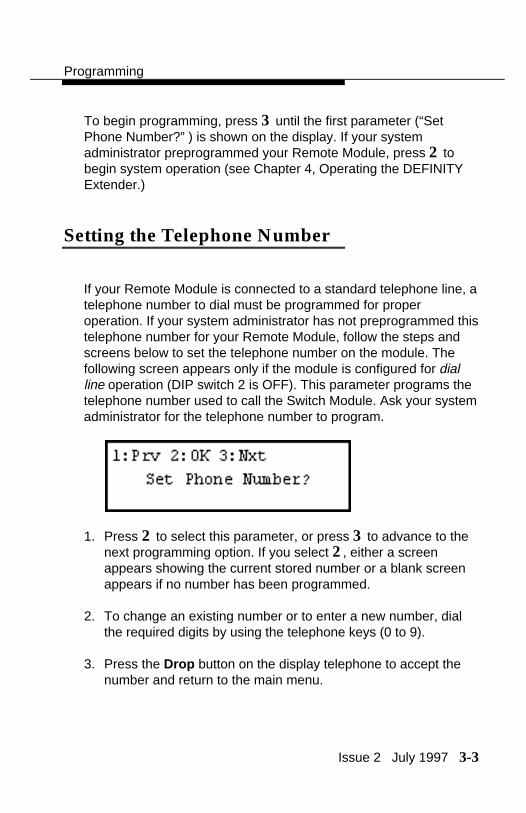
To begin programming, press 3 until the first parameter (“SetPhone Number?” ) is shown on the display. If your systemadministrator preprogrammed your Remote Module, press 2 tobegin system operation (see Chapter 4, Operating the DEFINITYExtender.)
Setting the Telephone Number
If your Remote Module is connected to a standard telephone line, atelephone number to dial must be programmed for properoperation. If your system administrator has not preprogrammed thistelephone number for your Remote Module, follow the steps andscreens below to set the telephone number on the module. Thefollowing screen appears only if the module is configured for dialline operation (DIP switch 2 is OFF). This parameter programs thetelephone number used to call the Switch Module. Ask your systemadministrator for the telephone number to program.
1. Press 2 to select this parameter, or press 3 to advance to thenext programming option. If you select 2, either a screenappears showing the current stored number or a blank screenappears if no number has been programmed.
2. To change an existing number or to enter a new number, dialthe required digits by using the telephone keys (0 to 9).
3. Press the Drop button on the display telephone to accept thenumber and return to the main menu.
Programming
3-4 Issue 2 July 1997
Setting the Mode of Dialing
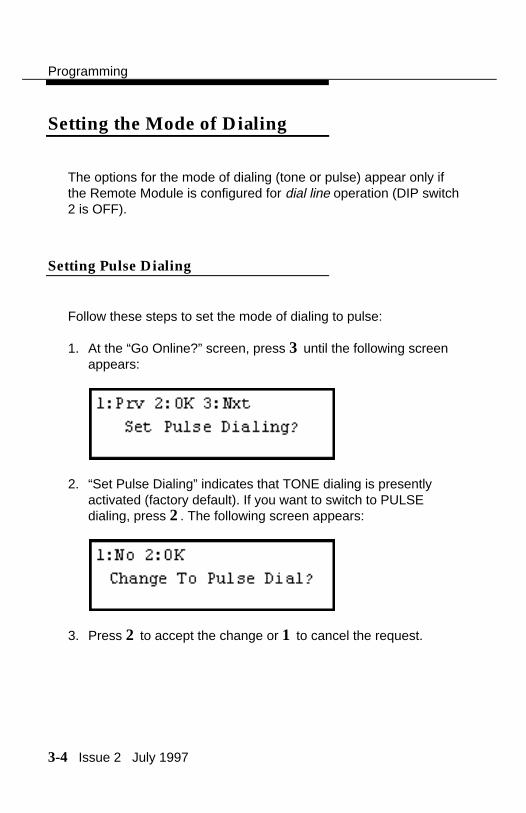
The options for the mode of dialing (tone or pulse) appear only ifthe Remote Module is configured for dial line operation (DIP switch2 is OFF).
Setting Pulse Dialing
Follow these steps to set the mode of dialing to pulse:
1. At the “Go Online?” screen, press 3 until the following screenappears:
2. “Set Pulse Dialing” indicates that TONE dialing is presentlyactivated (factory default). If you want to switch to PULSEdialing, press 2. The following screen appears:
3. Press 2 to accept the change or 1 to cancel the request.
Programming
Issue 2 July 1997 3-5
Setting Tone Dialing
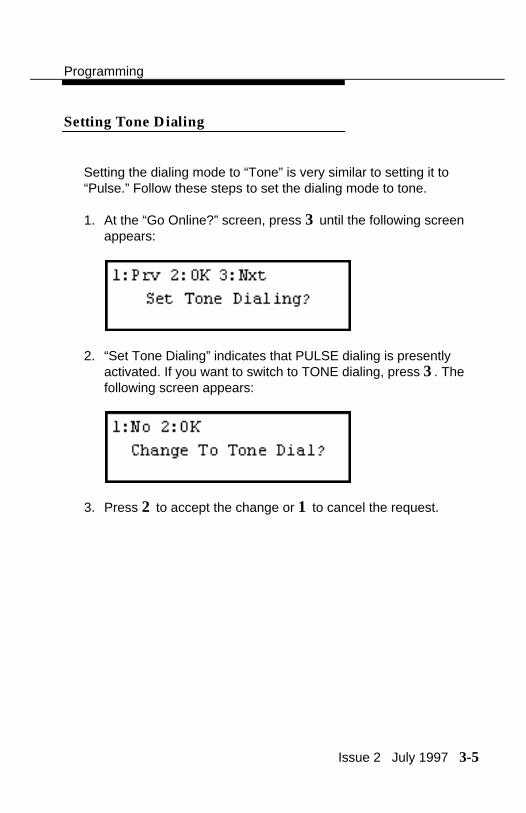
Setting the dialing mode to “Tone” is very similar to setting it to“Pulse.” Follow these steps to set the dialing mode to tone.
1. At the “Go Online?” screen, press 3 until the following screenappears:
2. “Set Tone Dialing” indicates that PULSE dialing is presentlyactivated. If you want to switch to TONE dialing, press 3. Thefollowing screen appears:
3. Press 2 to accept the change or 1 to cancel the request.

Programming
3-6 Issue 2 July 1997
Setting the Connect Rate
Setting the Connect Rate establishes the baud rate in kilobits persecond (kbps) for the communications between the Switch andRemote Modules. Follow the steps and screens below to set theConnect Rate.
1. At the “Go Online?” screen, press 3 until the following screenappears:
2. Press 2 to change the connect rate. The following screenappears:
3. Press 3 until the Connect Rate you want appears. There aresix choices:
■ Auto—(Factory default). When the auto setting is selected,the module tries to connect at the speed that will providethe best performance with the fewest errors. The speed willvary depending on line performance. If the module isunable to connect at any of the available speeds, an errormessage appears.
■ F-- —The Remote Module will connect at 19.2 kbps only,the fastest rate.

Programming
Issue 2 July 1997 3-7
■ FM- —The Remote Module will connect at 19.2 or 16.8kbps.
■ -M- —The Remote Module will connect at 16.8 kbps only.
■ -MS —The Remote Module will connect at 16.8 or 14.4kbps.
■ --S —The Remote Module will connect at 14.4 kbps only,the slowest rate.
NOTE:In some situations, selection of a slower connect rate mayresult in a more reliable connection. The higher the connect rateyou choose, the greater is the possibility of data errors. When ahigh number of data errors is detected, your call connectionmay be interrupted while the Remote Module attempts toreconnect. When this happens, you and your caller will hear abeep followed by a message (called the “retrain” prompt):
Please remain on the line. This call isexperiencing technical difficulties. Your call willresume momentarily.
After this message, you and your caller will hear a second beep.The call is restored immediately after the second beep.
NOTE:If the line problems cause the call to completely disconnect, youand your caller will hear the following message:
We are (still) experiencing technical difficulties on thiscall. We apologize for this inconvenience. If youinitiated this call, please hang up and place your callagain.
Programming
3-8 Issue 2 July 1997
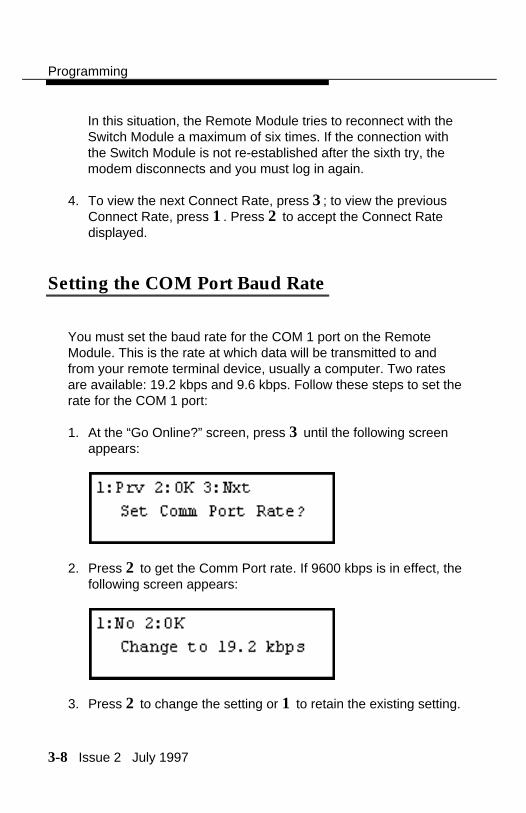
In this situation, the Remote Module tries to reconnect with theSwitch Module a maximum of six times. If the connection withthe Switch Module is not re-established after the sixth try, themodem disconnects and you must log in again.
4. To view the next Connect Rate, press 3; to view the previousConnect Rate, press 1. Press 2 to accept the Connect Ratedisplayed.
Setting the COM Port Baud Rate
You must set the baud rate for the COM 1 port on the RemoteModule. This is the rate at which data will be transmitted to andfrom your remote terminal device, usually a computer. Two ratesare available: 19.2 kbps and 9.6 kbps. Follow these steps to set therate for the COM 1 port:
1. At the “Go Online?” screen, press 3 until the following screenappears:
2. Press 2 to get the Comm Port rate. If 9600 kbps is in effect, thefollowing screen appears:
3. Press 2 to change the setting or 1 to retain the existing setting.
Programming
Issue 2 July 1997 3-9
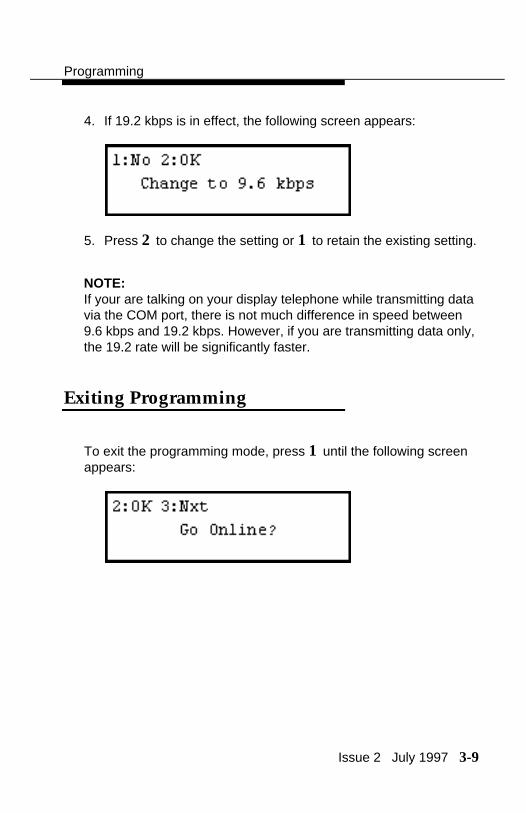
4. If 19.2 kbps is in effect, the following screen appears:
5. Press 2 to change the setting or 1 to retain the existing setting.
NOTE:If your are talking on your display telephone while transmitting datavia the COM port, there is not much difference in speed between9.6 kbps and 19.2 kbps. However, if you are transmitting data only,the 19.2 rate will be significantly faster.
Exiting Programming
To exit the programming mode, press 1 until the following screenappears:

Issue 2 July 1997 4-1
Operating the RemoteModule 4Operating the Remote Module of the DEFINITY Extender
Once you have installed and programmed the Remote Module, youare ready to use it. After you have established a connection with theSwitch Module (and consequently the DEFINITY ECS), you can useyour DEFINITY telephone as you would any other telephone on thesystem.

Operating the Remote Module
4-2 Issue 2 July 1997
Starting the Operation
You start the operation of the Remote Module by a process similarto logging in on other systems. Follow these steps to start theoperation of the Remote Module:
1. At the “Go Online?” screen, press 2 to start the operation of theDEFINITY Extender system.
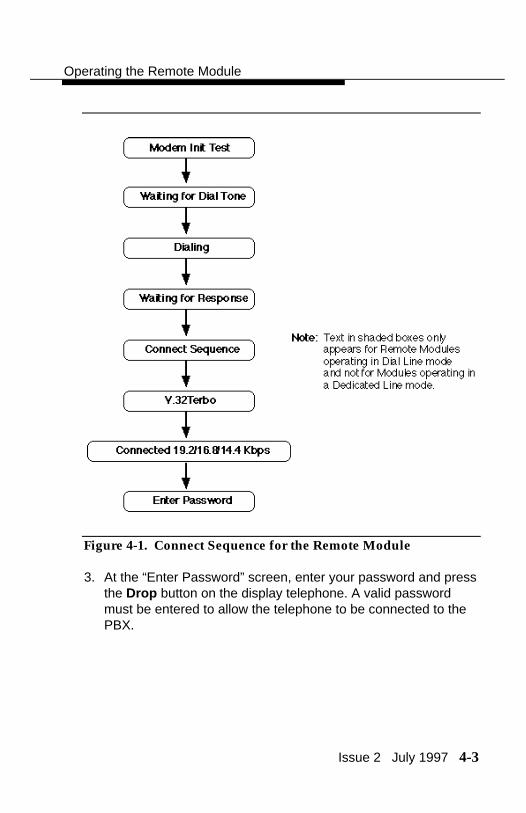
2. At this point, the Remote Module dials the Switch Module at theprogrammed number (see “Setting the Telephone Number” inChapter 3, Programming). Figure 4-1 shows the sequence ofmessages that appear on the telephone display duringconnection of the Extender system.
Operating the Remote Module
Issue 2 July 1997 4-3
Figure 4-1. Connect Sequence for the Remote Module
3. At the “Enter Password” screen, enter your password and pressthe Drop button on the display telephone. A valid passwordmust be entered to allow the telephone to be connected to thePBX.

Operating the Remote Module
4-4 Issue 2 July 1997
NOTE:You must enter your current valid password. The first time youuse your Remote Module, the password will be the one initiallyassigned to you by your system administrator. A valid passwordcontains 8 to 10 digits.
4. If a valid password has been entered, the Remote Modulecompletes the connect sequence and the telephone will beoperational. If an invalid password has been entered, you will beprompted to re-enter the password. If after three attempts avalid password has not been entered, the Remote Module willdisconnect and the “Go Online?” prompt will be displayed.Check your current password with your system administrator;as necessary, reset your password and repeat the procedurefrom Step 1.
Disconnecting
To discontinue operation of the DEFINITY Extender system, followthese steps:
1. Press the Hold button on the display telephone four times. Thisscreen appears:
2. This “Disconnect” screen allows you to change your mindbefore totally disconnecting. To disconnect, press 2. Thedisconnect sequence appears on the display; after a fewseconds the “Go Online?” screen appears. This indicates youare disconnected.

Operating the Remote Module
Issue 2 July 1997 4-5
! CAUTION:Be sure that you have completely logged off by waiting forthe “Go Online?” screen to appear. If you do not completelylog off, the Remote Module may continue to try to re-establish the connection, and you will be liable for anyapplicable toll charges incurred.
3. If you do not want to disconnect, press 3 at the “Disconnect”screen. The following screen appears:
4. Do one of the following:
■ Press 1 to return to the “Disconnect” screen and disconnectthe system. The “Go Online?” screen appears, indicatingthat the DEFINITY Extender system is no longer connected.
■ Press 2 to retain connection.
■ Press 3 to go to the Change Password screen.

Operating the Remote Module
4-6 Issue 2 July 1997
Changing a Password
Follow these steps to change your password.
1. If you are not connected to the PBX, follow the steps in “Startingthe Operation” above to connect to the PBX.
2. Once you are connected, press the Hold button on the displaytelephone four times and the following screen appears:
3. Press 3 and the following screen appears:
4. Press 3 and the following screen appears:

Operating the Remote Module
Issue 2 July 1997 4-7
NOTE:If you press 3 and the “View S/W Version” screen appears,check with your system administrator. This indicates that youcannot change your own password.
5. Press 2 change a password. You will be prompted to enter theold password (a * will appear for each digit entered).
6. If the old password is correct, a prompt for the new passwordappears. Enter the new password (8 to 10 digits). Be sure thenew password includes the first two digits of your old password.The first two digits identify your user number.
If the old password is not correct, the message “InvalidPassword” appears and you are returned to the “ChangePassword?” screen. Check your password, and repeat Step 5.If you continue to have problems, check with your systemadministrator.

Operating the Remote Module
4-8 Issue 2 July 1997
! Security Alert:Using the Remote Module gains access to the features ofthe DEFINITY ECS, including access to WATS lines, FXlines, etc., which are subject to toll fraud. Passwords shouldbe as long as allowed. Passwords should be hard to guessand therefore should not contain:
■ all the same numbers (for example, 88888888)
■ sequential characters (for example, 987654321)
■ character strings associated with you or with yourbusiness. These include:
— Names
— Birthdays
— Business name
— Telephone number
— Social security number
■ Words and commonly used names
Passwords should use as wide a variety of characters aspossible. Passwords should be changed regularly, at leaston a quarterly basis. Do not recycle old passwords.
7. Re-enter the new password at the prompt. Press the Dropbutton on the display telephone to accept the password.

Operating the Remote Module
Issue 2 July 1997 4-9
NOTE:The system administrator (user 0) can change all user passwords(see “Changing Passwords” in the “Programming” chapter in theDEFINITY® Extender Switch Module User's Guide). The remainingusers can change only their own passwords (user 1 can changeonly the password which begins with 01). The new password alsomust begin with 01).
NOTE:In some cases your system administrator may have disabled yourability to change your password. Check with your systemadministrator if you have problems.
Checking System Software
You can check the system software version used for the SwitchModule and the Remote Module. Follow these steps to check thesoftware version.
1. If you are not connected to the PBX, follow the steps in "Startingthe Operation" above to connect to the PBX.
2. Press the Hold button on the display telephone four times, andthe following screen appears:
Operating the Remote Module
4-10 Issue 2 July 1997
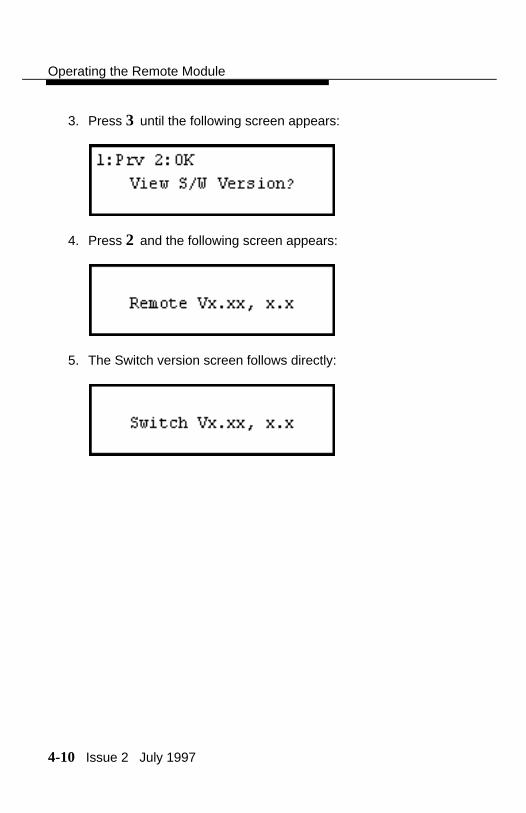
3. Press 3 until the following screen appears:
4. Press 2 and the following screen appears:
5. The Switch version screen follows directly:
Issue 2 July 1997 5-1
Troubleshooting 5Troubleshooting, LED Activity, and Error Messages
As with all equipment of a sophisticated nature, occasionally an errorin connection or transmission may occur. The DEFINITY Extendersystem provides indication of any errors via light-emitting diodes(LEDs) on the Remote and Switch Modules and by error messages onthe display telephone connected to the Remote Module.

Troubleshooting
5-2 Issue 2 July 1997
Troubleshooting
When an error occurs in the operation of the Remote Module, youshould check for malfunctions in an organized manner. Followthese steps when troubleshooting the Remote Module:
1. Verify that the programmed telephone number is correct.
2. Check all interconnecting cables to ensure that they areproperly seated.
3. Verify that the DIP switches are set correctly.
4. Check the circuits to ensure that they are free of noise andmeet the specifications listed in Chapter 1, Introduction.
5. Verify that the power LEDs are illuminated.
6. If you cannot locate the source of the problem, contact yoursystem administrator and describe the problem.
Troubleshooting
Issue 2 July 1997 5-3
LED Sequences
The following flash sequences may be observed on the RemoteModule:
■ 1 Green: Online to Switch Module
■ 2 Green: Waiting for dial tone
■ 3 Green: Dedicated Line mode connect sequence
■ 4 Green: Dial mode connect sequence
■ 5 Green: Program mode (entering parameters)
■ 2 Red: Waiting for telephone connection
■ 3 Yellow: Test mode
Error Messages
If a problem has been encountered during the connection process,an error message will appear on the display telephone. Table 5-1shows the error messages and the suggested actions to take.

Troubleshooting
5-4 Issue 2 July 1997
Table 5-1. Error Messages
Message Cause Action
No Dial Tone The Remote Moduleis not properlyconnected to thelocal telephonecompany.
Connect a regulartelephone to thetelephone company jack,and listen for dial tone.Make sure the line isproperly connected to thejack on the RemoteModule. If you still do nothear dial tone, contactyour systemadministrator.
Line Busy The line that theSwitch Module isconnected to isalready in use.
Contact your systemadministrator, and verifythat the correcttelephone number hasbeen programmed andthat no one else is usingthe Switch Module youare trying to call.
No AnswerTone
The Switch Moduleis not responding.The Remote Moduledoes not receive aRing-Back tone or anAnswer Back tone.
Report the problem toyour systemadministrator, and verifythat the correcttelephone number hasbeen programmed.
Continued on next page
Troubleshooting
Issue 2 July 1997 5-5
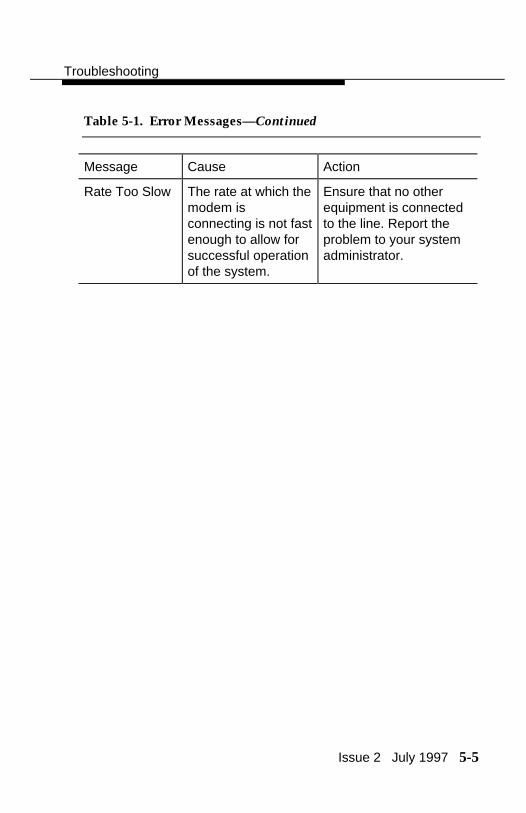
Table 5-1. Error Messages—Continued
Message Cause Action
Rate Too Slow The rate at which themodem isconnecting is not fastenough to allow forsuccessful operationof the system.
Ensure that no otherequipment is connectedto the line. Report theproblem to your systemadministrator.

Issue 2 July 1997 GL-1
Glossary
+12 vdc12 volt direct current.
120 vac120 volt alternating current (North American standard electrical supply).
B
Baud RateThe speed in kbps at which digital data can be transmitted.
D
Direct LineA dedicated circuit or private leased line.
Dedicated Subscriber LinesCommunication lines (usually twisted pair) that are used to connect on-premise telephone equipment (such as a PBX) to the Central Office. Alsoreferred to as direct lines.
Glossary
GL-2 Issue 2 July 1997
Dial LineA telephone line which is part of the Public Switched Telephone Networkand is accessed through the DEFINITY Extender’s automatic dial-upfunction.
F
FacilityTransmission facilities. Usually a two metallic pair set of cords, but can beTelco carriers, T-1, microwave or dial-up telecommunications lines.
L
LEDLight-emitting diode. A semiconductor diode which emits light when acurrent is passed through it, indicating that the power is on.
O
On-premise LinesCommunication lines (usually twisted-pair) that are used to connect thePBX to the DEFINITY telephone.

Glossary
Issue 2 July 1997 GL-3
P
PBXPrivate Branch Exchange.
R
Remote ModuleThe DEFINITY Extender module that connects to the remote DEFINITYtelephone.
S
Switch ModuleThe DEFINITY Extender module that connects to the DEFINITY PBX.