delft university of technology development of
TRANSCRIPT

Delft University of Technology
Development of recommendations for proof load testing of reinforced concrete slabbridges
Lantsoght, Eva; van der Veen, Cor; Hordijk, Dick; de Boer, A.
DOI10.1016/j.engstruct.2017.09.018Publication date2017Document VersionAccepted author manuscriptPublished inEngineering Structures
Citation (APA)Lantsoght, E., van der Veen, C., Hordijk, D., & de Boer, A. (2017). Development of recommendations forproof load testing of reinforced concrete slab bridges. Engineering Structures, 152, 202-210.https://doi.org/10.1016/j.engstruct.2017.09.018
Important noteTo cite this publication, please use the final published version (if applicable).Please check the document version above.
CopyrightOther than for strictly personal use, it is not permitted to download, forward or distribute the text or part of it, without the consentof the author(s) and/or copyright holder(s), unless the work is under an open content license such as Creative Commons.
Takedown policyPlease contact us and provide details if you believe this document breaches copyrights.We will remove access to the work immediately and investigate your claim.
This work is downloaded from Delft University of Technology.For technical reasons the number of authors shown on this cover page is limited to a maximum of 10.

-1-
Development of recommendations for proof load testing of reinforced concrete slab bridges
1
Eva O.L. Lantsoghta,b,c ([email protected] Tel: +593 2 297-1700 ext. 1186 -
2
Corresponding Author), Cor van der Veenb ([email protected]), Dick A. Hordijk
b
3
([email protected]), Ane de Boerd ([email protected])
4
aUniversidad San Francisco de Quito, Politecnico, Diego de Robles y Vía Interoceánica,
5
Quito, Ecuador
6
bDelft University of Technology, Concrete Structures, Stevinweg 1, 2628 CN Delft, The
7
Netherlands
8
cAdstren, Plaza del Rancho, Of. 203, Via Tanda, Cumbaya, Quito, Ecuador
9
dMinistry of Infrastructure and the Environment, Griffioenlaan 2, 3526 LA Utrecht, The
10
Netherlands
11
12
13
14
© 2017 Manuscript version made available under CC-BY-NC-ND 4.0 license https://creativecommons.org/licenses/by-nc-nd/4.0/ Postprint of Engineering StructuresVolume 152, 1 December 2017, Pages 202–210Link to formal publication (Elsevier): https://doi.org/10.1016/j.engstruct.2017.09.018

-2-
Abstract 1
As the bridge stock in the Netherlands and Europe is ageing, various methods to analyze 2
existing bridges are being studied. Proof load testing of bridges is an option to experimentally 3
demonstrate that a given bridge can carry the prescribed live loads. Based on extensive research 4
on proof load testing of reinforced concrete slab bridges carried out in the Netherlands, a 5
recommendations for proof load testing of reinforced concrete slab bridges were developed. The 6
recommendations for the preparation, execution, and post-processing of a proof load test are 7
summarized in this paper. The novelty of the recommendations is that proof load testing for 8
shear is studied, and that a proposal for stop criteria for shear and bending moment has been 9
formulated. Further research on the shear behavior is necessary, after which the 10
recommendations will be converted in guidelines for the industry. 11
Keywords 12
assessment; bridge maintenance; bridge tests; codes and guidelines; concrete slabs; field tests; 13
flexural strength; load testing; shear strength 14
15
1 Introduction 16
Many of the existing bridges in the Netherlands were built in the decades following the 17
Second World War. As these bridges are approaching the end of their originally devised service 18
life, methods are developed to identify which bridges need replacement, or strengthening, and 19
which bridges are still safe for the traveling public [1]. A large subset of the Dutch bridge stock 20
consists of reinforced concrete slab bridges, and these bridges typically have low ratings for 21
shear as a result of the higher live load models and the lower shear capacities in the recently 22
-3-
introduced Eurocodes [2, 3]. These bridges are typically short span bridges, with span lengths of 1
around 10 m. 2
For the assessment of reinforced concrete slab bridges, a method with different levels of 3
approximation was developed [4]. The first level is a spreadsheet-based method [5, 6] that takes 4
recommendations developed based on experiments [7-10] into account. The second level 5
includes linear finite element models [11], and the third level nonlinear finite element models 6
[12] and probabilistic methods [13]. The highest level, which is used when regular analysis 7
methods are insufficient (for example, due to a lack of information, or because the effect of 8
material degradation on the structural behavior is unknown), includes load testing. 9
Two types of load testing exist: diagnostic load testing and proof load testing. Diagnostic 10
load testing [14-19] can be used to update the analytical model of the bridge, so that the load 11
rating can be refined. Proof load testing [20-25] is used to demonstrate that a bridge can carry its 12
prescribed factored live loads without permanent structural damage. Therefore, higher load 13
levels are required in a proof load test than in a diagnostic load test. The inherent danger of proof 14
load testing is that, since large loads are used, permanent damage or collapse of the structure can 15
be caused. To avoid this risk, the structural responses have to be monitored carefully during 16
proof load testing with an extensive sensor plan. If the measurements indicate distress in the 17
structure, the proof load test has to be terminated and further loading will not be permitted. 18
Determining whether the measurements indicate distress is done based on the so-called “stop 19
criteria”, which are criteria based on the measurements that indicate if further loading could 20
result in permanent damage or collapse. Current codes and guidelines for proof load testing [26-21
31] do not permit proof load testing of shear-critical structures, and at most describe stop criteria 22
for flexure. 23

-4-
The research that lies at the basis for the presented recommendations for proof load 1
testing of reinforced concrete slab bridges involves field testing, laboratory testing, and desk 2
research. In terms of field testing, six pilot proof load tests were carried out [32], and one 3
collapse test was carried out [13, 33, 34]. The laboratory testing involved testing of beams sawn 4
from the bridge used for the collapse test [20, 33], and additional testing of beams cast in the 5
laboratory to further analyze the measurements and propose stop criteria [35, 36]. The desk 6
research included an extensive literature review on the application of diagnostic and proof load 7
testing and on the currently available codes and guidelines [37, 38] and an analysis of the pilot 8
proof load tests [39] to formulate recommendations with regard to load application, target proof 9
load, and stop criteria. As a result of this research, recommendations for proof load testing of 10
flexure- and shear-critical structures can be formulated, and a proposal for stop criteria for both 11
shear and flexure has been formulated. The inclusion of proof load testing for shear forms a 12
significant advancement with regard to the current practice described in the available codes and 13
guidelines for proof load testing, which do not permit testing of shear-critical structures. 14
However, further experimental research and theoretical analyses are required before proof load 15
testing of shear-critical bridges can be transferred to the industry, as the interpretation of the 16
measurements in real-time still remains in the realm of research. For long span bridges and 17
bridge types other than reinforced concrete slab bridges, the insights from this research are not 18
directly applicable. 19
For diagnostic load testing, strain distributions over the height at different locations of the 20
slab are necessary to calibrate the finite element model, which is not practical for field testing of 21
slab bridges, so that proof load testing can be considered as more suitable. For girder bridges, on 22
the other hand, applying the strain sensors on the individual girders, is straight-forward. 23

-5-
Additionally, the transverse distribution in reinforced concrete slabs changes as the load is 1
increased [40], although a diagnostic load test can give insight in the transverse load distribution 2
at the linear elastic load levels. For flexure-critical bridges, the goals for a proof load test need to 3
be clearly defined prior to the test, as often the available calculations methods combined with 4
material research can suffice to improve the assessment. 5
In the Netherlands, proof load testing of reinforced concrete slab bridges [41] should be 6
carried out within the framework of the guidelines for the assessment of bridges (“RBK”) [42], 7
which apply to all bridges owned by the Dutch Ministry of Infrastructure and the Environment. 8
In these guidelines, the safety levels at which an assessment should be carried out are prescribed. 9
The same safety levels should be obtained by proof load testing. International guidelines and 10
codes that were consulted in developing the presented recommendations are the German 11
guideline [28], ACI 437.2M-13 [26], the Manual for Bridge Rating through Load Testing [29], 12
which lies at the basis of the Manual for Bridge Evaluation [27] for the section about load 13
testing, the Irish guidelines [30], and the British guidelines [31]. Note that none of these existing 14
guidelines allow proof load testing of shear-critical structures, nor describe stop criteria for 15
shear-critical structures. As such, the current research marks an advancement of the state-of-the-16
art for proof load testing of reinforced concrete slab bridges. 17
For the measurements, deformations, displacements, and deflections can be used. The 18
terms deformations is used in a general sense, and deformations that cause a translation in any 19
direction are defined as displacements. The displacements in the direction of gravity are defined 20
as deflections. 21
22

-6-
2 Considerations prior to a proof load test 1
2.1 Goals of proof load test 2
The main goal of a proof load test is to directly demonstrate that a structure can carry the 3
factored live loads. It also should be demonstrated that the structural response of the bridge for 4
the applied loads is small enough, so that no permanent damage or collapse results from the load 5
test. 6
2.2 Load factors and load combinations 7
For all highway bridges, Consequences Class 3 from NEN-EN 1990:2002 [43] is 8
governing. The load combination that is used for the preparation of the proof load test, is the 9
combination of self-weight, superimposed dead load, and live load (Load Model 1 from NEN-10
EN 1991-2:2003 [3]). For the assessment of existing structures, the Dutch code NEN 8700:2011 11
[44] and the RBK [42] should also be considered. The RBK prescribes different safety levels, 12
associated with different reliability indices, and associated load factors, see Table 1. These load 13
factors for the different safety levels and reference periods were derived based on an economic 14
optimization for existing structures [45] and do not consider local WIM data for each bridge that 15
is to be load tested individually. 16
In Table 1, the definition of the load factors for permanent loads depends on which of 17
Equations 6.10a and b from NEN-EN 1990:2002 is governing. These equations are: 18
, , ,1 0,1 ,1 , 0, ,
1 1
" " " " " "G j k j P Q k Q i i k i
j i
G P Q Q
(1)19
, , ,1 ,1 , 0, ,
1 1
" " " " " "j G j k j P Q k Q i i k i
j i
G P Q Q
(2) 20
Equation 6.10a (Eq. (1)) uses a factor for the combination value of a variable action, 21
whereas Equation 6.10b (Eq. (2)) uses a reduction factor ξ for unfavourable permanent loads. 22
The symbol “+” implies “to be combined with”, and Σ implies “the combined effect of.” 23

-7-
Equations (1) and (2) use partial factors γG for permanent actions Gk, γP for prestressing actions 1
P, γQ,1 for the leading variable action Qk,1 and γQ,i for the accompanying variable actions Qk,i. The 2
factor ψ0 defines the combination value of a variable action. For the application to proof load 3
tests, γsw = 1.10, see Table 2. Typically, the load factor is a combination of the variation on the 4
geometry and a model factor. Since the geometry for an existing structure is not a random 5
variable anymore, only the model factor of 1.08 remains, which is rounded off to 1.10 for 6
determining the action of the self-weight. 7
2.3 Safety during proof load test 8
Prior to the proof load test, an inspection must be carried out. After this inspection, a 9
report of all possible dangerous situations and problems during preparation, execution. and 10
dismantling of the testing setup must be prepared. A safety engineer is required to prepare the 11
safety card for the test site, including phone numbers and addresses of the nearest hospital, 12
general practitioner and pharmacy, and phone number of emergency services, police and 13
firefighters. This card must be accessible to all site personnel. A first-aid kit and at least one 14
person with first-aid training should be on site. 15
Each person entering the site should receive a safety instruction from the safety engineer. 16
During the proof load test, only the executing personnel is allowed on the bridge, and nobody is 17
allowed under the bridge, except when explicit permission is given. 18
The safety of the traveling public near the test location, and of press and other interested 19
persons, also has to be guaranteed. Information can be provided by a communications expert of 20
the road authority, and access of unqualified personnel to the test site is not allowed. A traffic 21
control plan must be developed with the road authority. 22

-8-
For the structural safety, careful preparations and measurements are required, so that the 1
stop criteria can be evaluated during the proof load test. These measurements must be closely 2
monitored during the load test by at least two qualified testing engineers. The safety philosophy 3
from the German guideline [28] is followed, see Fig. 1. The target load Ftarget is the required 4
load, in addition to the permanent loads G1, to approve the bridge. The actual capacity of the 5
structure is represented by effRu, and is unknown. The load at which nonlinear behavior occurs is 6
Flim – which is a priori unknown. Therefore, measurements are used to evaluate the structural 7
behavior. Two levels can be distinguished: 1) risk of irreversible damage; and 2) risk of collapse. 8
If signals of the first level are observed, further loading can be permitted after permission of a 9
qualified engineer and the bridge owner. Signals of the second level can never be ignored, and 10
must lead to the termination of the proof load test. Two scenarios are thus possible: 1) G1 + Ftarget 11
≤ Flim: the bridge has successfully passed the proof load test; or 2) G1 + Ftarget > Flim: the target 12
proof load could not be achieved, and further evaluation of the test results should indicate if the 13
bridge fulfills a lower safety level. 14
15
3 Preparation of proof load test 16
3.1 Planning, preparation, and required information 17
The planning of the proof load test has to be coordinated with all parties involved. A 18
general planning of the project is necessary, including the required activities for the preparation 19
of the proof load test, the required time for the actual test, and the agreed delivery date of the 20
final report. A preparation report, including the sensor plan, must be delivered at least two weeks 21
prior to the start of the activities on site. The full safety plan must be delivered at least five days 22
prior to the start of the activities on site. These deadlines are set by the bridge owner, which for 23

-9-
the Dutch highway bridges is the Ministry of Infrastructure and the Environment. A detailed 1
planning of all on-site activities is required, showing the task division for all personnel involved, 2
to permit efficient use of time on site. This planning requires an inspection. 3
The following information of the bridge, if available, needs to be collected prior to the 4
test: 5
original design drawings 6
original as-built drawings 7
original calculations 8
information about the materials used in the bridge 9
inspection reports 10
assessment reports 11
reports regarding changes to the bridge 12
This information must be summarized in the preparation report. If crucial information is missing, 13
it should be measured or calculated. The concrete compressive strength, required for the shear 14
calculations, should be verified with core tests (minimum 6 samples for verification, or at least 15
30 if the probability density function of the compressive strength is required), as prescribed by 16
the Dutch guidelines for the determination of concrete properties [46]. The steel yield and tensile 17
strength, necessary to determine the bending moment capacity, may be verified by testing 18
material samples. 19
An analytical assessment of the cross-sections for shear and bending moment, based on 20
the Unity Checks (ratio of load effect to capacity) must be prepared. The sectional moment and 21
shear can be determined with a linear finite element model. The sectional moment can be 22
-10-
averaged over 2dl (rule of thumb used in Dutch practice), and the peak shear stress over 4dl [11]. 1
The expected critical failure mode (bending or shear) should be reported. 2
3.2 Inspection 3
A crucial part of the preparation of a proof load test, is the inspection of the bridge and its 4
surroundings. Possible changes to the bridge as compared to the available plans have to be 5
checked for. The joints and bearings have to be inspected. A map of the cracks must be 6
developed, indicating the crack width for cracks wider than 0.15 mm. Cracks that could develop 7
into a shear crack should be pointed out, and monitored during the proof load test. Shear-critical 8
proof load tests always have to be carried out by a specialized party. Additionally, site 9
limitations related to the site access and for the execution of the proof load test have to be noted. 10
3.3 Preparatory calculations 11
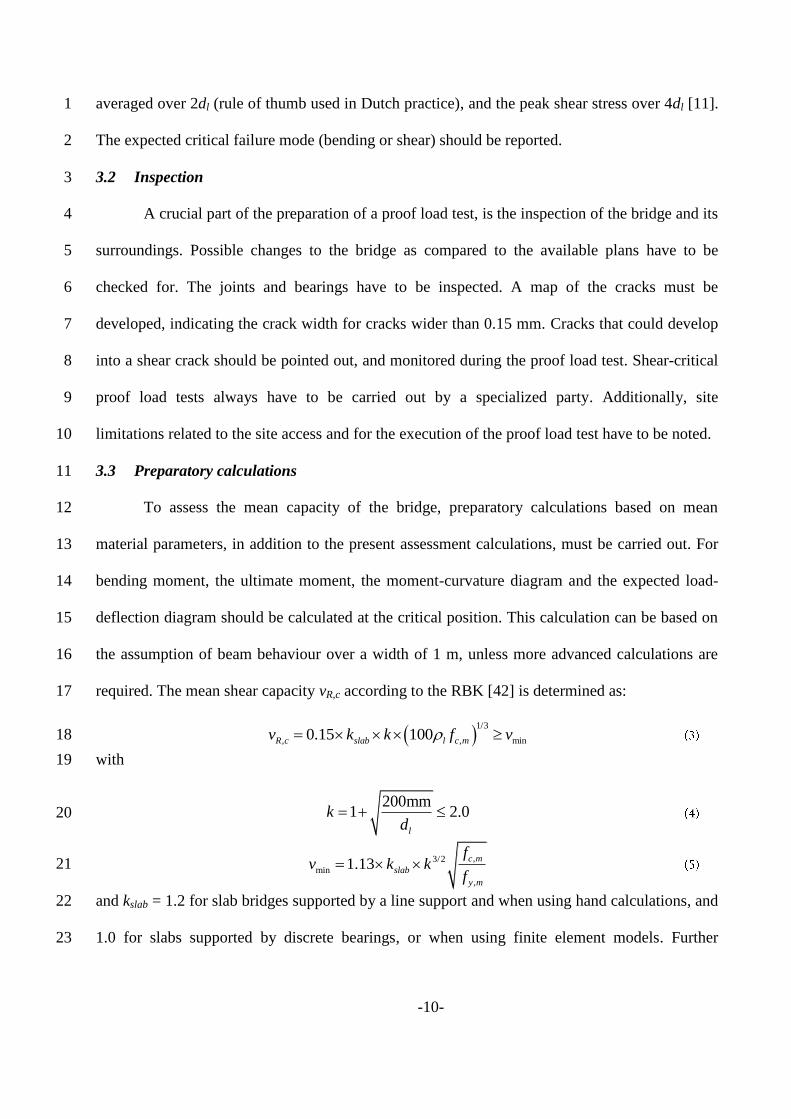
To assess the mean capacity of the bridge, preparatory calculations based on mean 12
material parameters, in addition to the present assessment calculations, must be carried out. For 13
bending moment, the ultimate moment, the moment-curvature diagram and the expected load-14
deflection diagram should be calculated at the critical position. This calculation can be based on 15
the assumption of beam behaviour over a width of 1 m, unless more advanced calculations are 16
required. The mean shear capacity vR,c according to the RBK [42] is determined as: 17
1/3
, , min0.15 100R c slab l c mv k k f v 18
with 19
200mm1 2.0
l
kd
20
,3/2
min
,
1.13c m
slab
y m
fv k k
f 21
and kslab = 1.2 for slab bridges supported by a line support and when using hand calculations, and 22
1.0 for slabs supported by discrete bearings, or when using finite element models. Further 23

-11-
research may result in an increase of kslab to 1.2 for the combination with finite element models. 1
The other parameters are the size effect factor k, the amount of longitudinal reinforcement ρl, the 2
measured mean concrete cylinder compressive strength fc,m and the mean yield strength of the 3
steel fy,m. The lower bound of the mean shear capacity vR,c is vmin. A check for punching must be 4
carried out as well. 5
3.4 Determination of required proof load position and magnitude 6
The required proof load position and magnitude for flexure and shear are determined 7
based on a linear elastic finite element model using shell elements, and deviates from existing 8
codes and guidelines for proof load testing. The uncracked modulus of elasticity of the concrete 9
can be used, and the Poisson’s ratio is taken as 0.15. The self-weight of the concrete, and 10
concrete wearing surface (if present) are modelled with a load of 25 kN/m3. If the geometry is 11
simplified for the finite element model, the removed parts should be modelled as an external 12
load. The weight of asphalt, if present, must be taken as 23 kN/m3. The live loads from Load 13
Model 1 of NEN-EN 1991-2:2003 [3] are used. The distributed live loads are applied over 3 m, 14
the width of the notional lanes. The concentrated live loads are distributed to the center of the 15
cross-section to determine the size of the wheelprint in the model, see Fig. 2. The design tandems 16
are placed in the middle of the notional lane of 3 m width. The load combinations from Table 2 17
should be considered. Note that the linear finite element model is only used to study the loading 18
side of the equation, and that the provisions of the governing codes are used for determining the 19
capacity. The effect of material degradation and deterioration are thus not considered in the finite 20
element model. 21
To find the required proof load magnitude and position for bending moment, the position 22
resulting in the largest bending moment is sought by moving the design tandems from the code 23

-12-
over the span direction. When this critical position is found, the Eurocode live loads (distributed 1
and concentrated live loads) are removed from the finite element model, and replaced with a 2
single tandem, the “proof load tandem”, at the critical position. The load on the proof load 3
tandem is then increased until the same average bending moment is found as for the Eurocode 4
load combination. 5
For shear, the critical position is fixed at a face-to-face distance between the load and the 6
support of 2.5dl [1]. The peak shear stress is then averaged in the width direction over 4dl [11]. 7
Again, the Eurocode live loads are removed and replaced by the proof load tandem, on which the 8
load is increased until the same sectional shear is found as for the Eurocode load combination. 9
For more complex bridges, or when a better estimation of the displacements is required 10
prior to the test, non-linear finite element models are recommended. 11
3.5 Preparation of sensor plan 12
The following parameters should be measured during a proof load test on a reinforced 13
concrete slab bridge: 14
deflection for at least five positions in the longitudinal direction 15
deflection for at least three positions in the transverse direction 16
deflection at the supports on both sides of the tested span 17
strains at the bottom for at least one position 18
reference strain measurement to assess the influence of temperature and humidity 19
crack width for at least one existing bending crack, if the bridge is already 20
cracked in bending 21
applied load, for each wheel print separately 22

-13-
other parameters can be measured, but are not compulsory, unless these were 1
identified as critical parameters during the technical inspection. 2
The first two requirements result in a minimum of seven deflection measurement points in the 3
span of the slab. The minimum number of positions was based on the experience obtained from 4
the pilot proof load tests [47]. 5
Prior to the proof load test, a calculation must be made to determine the expected values of 6
the measurements during the test. To measure the structural response, the testing engineer can 7
select the sensors, provided that: 8
the measurement range is large enough, based on the calculations for the expected 9
responses 10
the accuracy of the selected sensor or technique must be suitable for the considered 11
parameter of the structural response 12
the sampling frequency of the sensor must be suitable for the proof load test, and several 13
measurements should be taken while the load is increased. The sampling frequency in all 14
pilot proof load tests was 1 Hz, which allowed for real-time plotting of the measurements 15
in the measurement analysis software. 16
the sensor must be suitable for field measurements and should not be influenced by 17
weather conditions. 18
All sensors must be calibrated and revised prior to the proof load test. The effect of temperature 19
and humidity on the sensors must be understood prior to the proof load test. When all sensors are 20
selected, the sensor plan can be developed. A drawing of the bottom face, top face, and side 21
faces of the bridge, indicating the type of sensors, their positions, and their measurement ranges, 22
must be developed. Spare sensors and a spare computer should be taken to the test location. 23

-14-
Amplifiers and data acquisition systems must be available for the real-time data analysis 1
during the test. All equipment should be suitable for field testing, and be robust and reliable in 2
outdoor conditions. 3
Finally, the loading system is selected. The choice of loading system is open, provided 4
that it fulfills the following requirements: 5
the loading system should apply the required proof load in a safe manner 6
the risk of collapse of the bridge at large deformations should be avoided 7
the system should be suitable for applying the load in a controlled manner according to 8
the prescribed loading protocol 9
the system must be suitable for keeping the load constant 10
the system must be suitable for applying a cyclic loading protocol 11
the system must have wheel prints that correspond with the Eurocode live load design 12
tandem, see Fig. 3. 13
In the Netherlands, two methods have been used in the pilot proof load tests [47]: the use of a 14
special load testing vehicle from Germany [48], and the use of a steel spreader beam, 15
counterweights, and hydraulic jacks. An example of a resulting sensor plan can be seen in Fig. 4. 16
17
4 Execution of proof load test 18
4.1 Determination of loading protocol 19
The definitions of a load step, load cycle, and load level are given in Fig. 5. The loading 20
speed during the test should be constant and controlled, and range between 3 kN/s and 10 kN/s. 21
At least four load levels should be applied during the proof load test: 22

-15-
1. Level 1: a low load level (20% - 30% of Level 4) to check if all measurements 1
function properly 2
2. Level 2: the load level corresponding to the serviceability limit state 3
3. Level 3: an intermediate level between Levels 2 and 4 4
4. Level 4: the highest load level that has to be demonstrated by the proof load test, 5
typically RBK Usage, plus 5% to cover the uncertainties of proof load testing. 6
At least three load cycles per load step should be carried out to verify the linearity of the 7
response. To reach the next load level (after Level 2), the load should be increased in small steps, 8
and at each intermediate load level, the load should remain constant for three minutes for 9
verification of the measurements. After reaching the load level, three load cycles without 10
intermediate steps can be applied. In the load cycles, unloading should be to a low load level (not 11
0 kN) to make sure all sensors and actuators remain activated. An example of a resulting loading 12
protocol is shown in Fig. 6. This loading protocol for proof load testing was developed based on 13
laboratory testing [35]. 14
4.2 Measurements during proof load test 15
The load-deflection diagram must be followed in real-time during the proof load test to 16
see indications of non-linearity. The test engineers must also pay attention to the distribution of 17
the total load over the four separate wheel prints to verify if the load is equally distributed. 18
A proof load test can be stopped prior to reaching Ftarget for two reasons: 1) indications 19
that further loading can cause irreversible damage; or 2) indications that further loading can 20
cause collapse of the bridge. For the first case, further loading can be possible after approval of 21
the test engineer and the bridge owner. For the second case, further loading is never allowed. If 22
the proof load test is stopped prior to reaching Ftarget, the conclusion is that the bridge does not 23

-16-
fulfil the required safety level. The structural responses that are analysed to evaluate the 1
behaviour of the bridge are given in Table 3. In this table, a distinction is made between bending 2
moment and shear, and between a bridge uncracked in bending prior to the load test, or 3
previously cracked in bending. The suggested stop criteria for shear are a first step towards the 4
application of proof load testing for shear-critical structures, but are still subject to further 5
research and need further experimental validation. A limiting crack width for shear-critical slabs 6
still needs to be developed, and a theoretical basis for the limiting strain needs to be developed, 7
and verified with further experimental results. The requirement for the concrete strains is taken 8
from the German guideline [28]: 9
0c c,lim c (6) 10
The measured strain εc should be smaller than the limiting strain εc,lim (0.6 ‰, or 0.8 ‰ if the 11
concrete compressive strength is larger than 25 MPa) minus the strain εc0 due to the permanent 12
loads. Crack widths smaller than 0.05 mm are ignored. The requirements for the crack widths are 13
modified from the German guideline [28]. The stiffness is determined as the tangent to the load-14
deflection diagram. The deflection profiles should be plotted during the test based on the 15
deflection sensors in the longitudinal and transverse directions. If during the inspection and 16
preparation, other elements of the bridge were identified that could be critical during the 17
execution of the proof load test, their response should be followed and analyzed during each 18
loading step. During the test, the estimated effect of temperature and humidity should be 19
considered when analyzing the measured response. 20
4.3 Practical aspects 21
During the proof load test, the communication between the load operators and the test 22
engineers is important. Loading to the next load level is only allowed after the test engineers 23

-17-
have checked the measurements and confirmed that the bridge behaviour is stable. The safety of 1
all personnel involved is important during the execution of the proof load test. If it is observed 2
during Level 1 that a sensor is not functioning properly, two people need to go under the bridge 3
to correct or replace this sensor. It must be clearly communicated to the load operator that people 4
are working under the bridge and that all loading operations should be paused. 5
6
5 Post-processing of proof load test 7
5.1 Post-processing of measurements 8
A proof load test demonstrates directly that the tested bridge can carry the prescribed 9
factored live loads. The post-processing of the measurements and results is required for the final 10
report of the proof load test. The first parameter that needs to be reported is the total applied 11
load: the measured applied load plus the load of the equipment used for applying the load. It 12
must be checked and reported that the load was distributed equally over the four wheelprints. 13
The measurements of deflections in the longitudinal and transverse direction must be corrected 14
with the deflection of the supports to find the net deflection of the slab. Moreover, the 15
measurements should be corrected for the influence of temperature and humidity. The load cells 16
should be recalibrated and changes should be reported. From the corrected data, the following 17
output should be developed for the report: 18
Load-deflection diagram of the test as executed, with all load cycles, and the 19
envelope of the load-deflection diagram. 20
Measured loading protocol: load versus time diagram. The measured forces in the 21
four wheelprints separately should be plotted as well to show that the load was 22
distributed equally. 23

-18-
Deflection profiles: for each load level, the deflection profiles in the longitudinal 1
and transverse direction should be shown. 2
Crack width: the opening of the measured crack(s) should be presented as a 3
function of time and as a function of applied load. 4
Strains: the results of the measured strains as a function of time and as a function 5
of the applied load should be plotted. 6
The verification of the stop criteria from Table 3 after each load cycle should be reported, 7
based on the corrected measurements. The strains and the deflection profiles should be compared 8
to the output of the linear finite element model that was used to prepare the proof load test. 9
Differences between the analytical and experimental results should be identified and explained, 10
and the finite element model can be updated with the experimental results [49] if an assessment 11
for other load combinations or special vehicles is required. 12
5.2 Evaluation of tested bridge 13
The Unity Check is determined prior to the load test, and should be stated in the final 14
report. At the tested cross-section, it is known after the proof load test that the Unity Check is 15
equal to or smaller than 1. As such, the Unity Check of the critical cross-section can be updated 16
through the proof load test. The safety level that is demonstrated by the proof load test 17
corresponds to the tested safety level (Table 1 and Table 2). 18
5.3 Decision-making after proof load test 19
The decisions about the tested structure that are taken after a proof load test, remain the 20
full responsibility of the bridge owner. In the report of the proof load test, an advice can be 21
given, but the responsibility of the execution of this advice or for ordering further research and 22
testing of the considered bridge lies with the bridge owner. 23

-19-
6 Discussion 1
Before the proposed recommendations can be published in a final version of the Dutch 2
guidelines for proof load testing of reinforced concrete slab bridges, a further confirmation and 3
extension of the proposed stop criteria for shear is required. Research is needed to determine a 4
limiting crack width, to determine a limiting strain, and to extrapolate the results of the beam 5
tests in the laboratory to the behavior of slabs failing in shear, where the transverse distribution 6
plays an important role. For now, it is recommended that proof load testing of shear-critical 7
bridges be carried out with an advising role of a research-oriented party that has experience with 8
shear testing. 9
In the Netherlands, recommendations are available for the determination of the concrete 10
material properties [46]. For the determination of the steel properties, similar guidelines should 11
be developed to have an industry standard on how to determine the steel properties based on 12
sample tests. 13
The distribution width in the finite element model that is used for bending moment in the 14
Netherlands is currently 2dl, which is a rule of thumb. Analyses of the distribution in the finite 15
element model of viaduct De Beek [50] resulted in a the recommendation for a larger distribution 16
width of 3 m, the notional lane width. Further research and parameter studies, as well as 17
discussion with industry partners are required to finalize this recommendation. 18
Besides the recommended measurements, which are all obtained from contact sensors or 19
locally installed non-contact sensors (laser triangulation sensors directly under the slab), future 20
research on the use of non-contact measurements (for example radar interferometry and 21
photogrammetry) is necessary. Such an independent measurement system is important to check 22
the results of the contact sensors. For cases where the accessibility of the tested span makes the 23

-20-
application of the contact sensors impossible, non-contact sensors can also become necessary to 1
see if a load test can be carried out. 2
3
7 Summary and Conclusions 4
This paper gives an overview of the recently developed recommendations for proof load 5
testing of reinforced concrete slab bridges. Many slab bridges were built in the decades after the 6
Second World War. As this bridge type typically rates too low for shear for the currently 7
governing codes, methods for assessment are developed specifically for this bridge type. 8
Improved analytical methods are available. If an analytical assessment is not possible or shows 9
insufficient capacity, proof load testing can be carried out. A number of pilot proof load tests 10
have been carried out in the Netherlands. Based on the analysis of these tests, as well as 11
laboratory testing and desk research, recommendations for proof load testing of reinforced 12
concrete slab bridges were developed, which fit within the framework of the codes and 13
guidelines for existing structures in the Netherlands. 14
A good preparation prior to the proof load test is important. This preparation includes 15
preparatory calculations, a site inspection, and the development of a clear planning. Based on a 16
linear finite element model, the magnitude and position for the proof load tandem are determined 17
in such a way that the most critical loading case is achieved for bending moment and shear. 18
Another crucial part of the preparation is the development of the sensor plan. 19
The proof load testing guideline prescribes a new cyclic loading protocol with at least 20
four different load levels. The loading speed is prescribed as well. The maximum response 21
values that can be obtained during the proof load test are given as the stop criteria. 22

-21-
The post-processing of the results from the proof load test include correcting the 1
measured data for the influence of temperature and humidity, and for the effect of the 2
displacements at the supports. With the corrected data, the graphs of the proof load test are 3
developed for the final report. An overview of the stop criteria for each load cycle needs to be 4
reported as well. Finally, the information of the proof load test with regard to the updated Unity 5
Check of the bridge needs to be reported, and advice for the management of the bridge can be 6
formulated. 7
8
Notation List 9
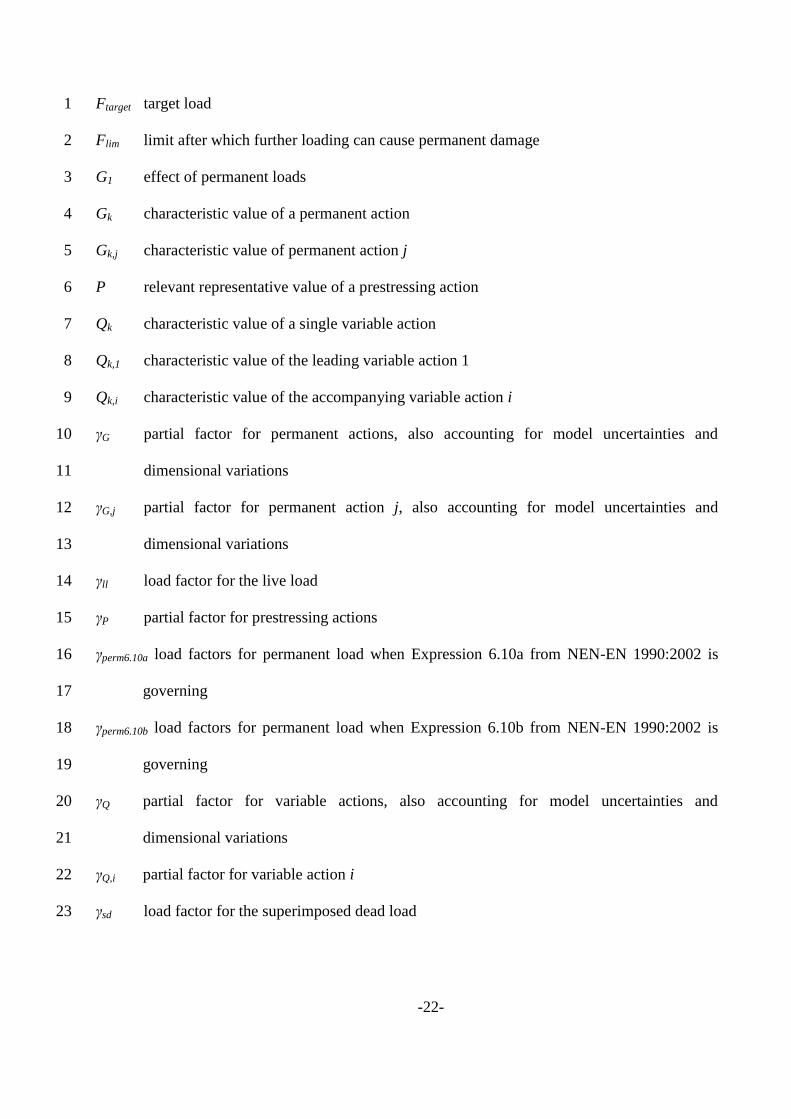
The following symbols are used in this paper: 10
dasphalt thickness of asphalt layer 11
dl effective depth to the longitudinal reinforcement 12
effRu capacity of the bridge 13
fc,m mean concrete compressive strength 14
fy,m mean steel yield strength 15
h thickness of slab 16
k size effect factor 17
kslab factor that takes into account the increased redistribution capacity of slabs around weak 18
spots 19
vmin lower bound to shear capacity 20
vR,c mean predicted shear capacity 21
wmax maximum crack width during load cycle 22
wres residual crack width at the end of the load cycle 23
-22-
Ftarget target load 1
Flim limit after which further loading can cause permanent damage 2
G1 effect of permanent loads 3
Gk characteristic value of a permanent action 4
Gk,j characteristic value of permanent action j 5
P relevant representative value of a prestressing action 6
Qk characteristic value of a single variable action 7
Qk,1 characteristic value of the leading variable action 1 8
Qk,i characteristic value of the accompanying variable action i 9
γG partial factor for permanent actions, also accounting for model uncertainties and 10
dimensional variations 11
γG,j partial factor for permanent action j, also accounting for model uncertainties and 12
dimensional variations 13
γll load factor for the live load 14
γP partial factor for prestressing actions 15
γperm6.10a load factors for permanent load when Expression 6.10a from NEN-EN 1990:2002 is 16
governing 17
γperm6.10b load factors for permanent load when Expression 6.10b from NEN-EN 1990:2002 is 18
governing 19
γQ partial factor for variable actions, also accounting for model uncertainties and 20
dimensional variations 21
γQ,i partial factor for variable action i 22
γsd load factor for the superimposed dead load 23

-23-
γsw load factor for the self-weight 1
c strain measured during proof loading 2
c,lim limit value of the concrete strain : 0.8 ‰ if the concrete compressive strength ≥ 25 MPa. 3
c0 analytically determined short-term strain in the concrete caused by the permanent loads 4
that are acting on the structure before the application of the proof load 5
ξ a reduction factor for unfavourable permanent actions G 6
ρl ratio of longitudinal reinforcement 7
ψ0 factor for combination value of a variable action 8
Σ implies “the combined effect of” 9
“+” implies “to be combined with” 10
11
Acknowledgement 12
The authors wish to express their gratitude and sincere appreciation to the Dutch Ministry of 13
Infrastructure and the Environment (Rijkswaterstaat) for financing this research work. The 14
contributions and help during the pilot proof load tests of our current and former colleagues 15
Albert Bosman, Sebastiaan Ensink, Sonja Fennis, Rutger Koekkoek, Patrick Van Hemert and 16
Yuguang Yang of Delft University of Technology are gratefully acknowledged. The fruitful 17
discussions with Frank Linthorst and Danny den Boef of Witteveen+Bos, responsible for 18
logistics and safety during the pilot proof load tests, and Otto Illing and the late Chris Huissen of 19
Mammoet, responsible for applying the load during the pilot proof load tests, are also 20
acknowledged. 21
22

-24-
References 1
[1] Lantsoght EOL, van der Veen C, de Boer A, Walraven JC. Recommendations for the Shear 2
Assessment of Reinforced Concrete Slab Bridges from Experiments Structural Engineering 3
International. 2013;23:418-26. 4
[2] CEN. Eurocode 2: Design of Concrete Structures - Part 1-1 General Rules and Rules for 5
Buildings. NEN-EN 1992-1-1:2005. Brussels, Belgium: Comité Européen de Normalisation; 6
2005. p. 229. 7
[3] CEN. Eurocode 1: Actions on structures - Part 2: Traffic loads on bridges, NEN-EN 1991-8
2:2003. Brussels, Belgium: Comité Européen de Normalisation; 2003. p. 168. 9
[4] Lantsoght EOL, De Boer A, Van der Veen C. Levels of Approximation for the shear 10
assessment of reinforced concrete slab bridges. Structural Concrete. 2017;18:143-52. 11
[5] Vergoossen R, Naaktgeboren M, ‘t Hart M, De Boer A, Van Vugt E. Quick Scan on Shear in 12
Existing Slab Type Viaducts. International IABSE Conference, Assessment, Upgrading and 13
Refurbishment of Infrastructures. Rotterdam, The Netherlands2013. p. 8. 14
[6] Lantsoght EOL, van der Veen C, de Boer A, Walraven J. Using Eurocodes and AASHTO for 15
assessing shear in slab bridges. Proceedings of the Institution of Civil Engineers – Bridge 16
Engineering. 2016;169:285-97. 17
[7] Lantsoght EOL, van der Veen C, Walraven JC. Shear in One-way Slabs under a Concentrated 18
Load close to the support. ACI Structural Journal. 2013;110:275-84. 19
[8] Lantsoght EOL, van der Veen C, De Boer A, Walraven J. Influence of Width on Shear 20
Capacity of Reinforced Concrete Members. ACI Structural Journal. 2014;111:1441-50. 21
[9] Lantsoght EOL, van der Veen C, de Boer A, Walraven J. One-way slabs subjected to 22
combination of loads failing in shear. ACI Structural Journal. 2015;112:417-26. 23
[10] Lantsoght EOL, van der Veen C, Walraven J, de Boer A. Experimental investigation on 24
shear capacity of reinforced concrete slabs with plain bars and slabs on elastomeric bearings. 25
Engineering Structures. 2015;103:1-14. 26
[11] Lantsoght EOL, de Boer A, Van der Veen C, Walraven JC. Peak shear stress distribution in 27
finite element models of concrete slabs. In: Zingoni A, editor. Research and Applications in 28
Structural Engineering, Mechanics and Computation. Cape Town, South Africa: Taylor and 29
Francis; 2013. p. 475-80. 30
[12] Rijkswaterstaat. Guidelines for Nonlinear Finite Element Analysis of Concrete Structures. 31
2012. p. 65. 32
[13] Lantsoght EOL, van der Veen C, de Boer A, Hordijk DA. Probabilistic prediction of the 33
failure mode of the Ruytenschildt Bridge. Engineering Structures. 2016;127:549-58. 34
[14] Sanayei M, Reiff AJ, Brenner BR, Imbaro GR. Load Rating of a Fully Instrumented Bridge: 35
Comparison of LRFR Approaches. Journal of Performance of Constructed Facilities. 36
2016;2016:2. 37
[15] Olaszek P, Lagoda M, Ramon Casas J. Diagnostic load testing and assessment of existing 38
bridges: examples of application. Structure and Infrastructure Engineering. 2014;10:834-42. 39
[16] Matta F, Bastianini F, Galati N, Casadei P, Nanni A. Distributed Strain Measurement in 40
Steel Bridge with Fiber Optic Sensors: Validation through Diagnostic Load Test. Journal of 41
Performance of Constructed Facilities. 2008;22:264-73. 42
[17] Luca AD, Galati N, Nanni A, Alkhrdaji T. In-Situ Load Testing: A Theoretical Procedure to 43
Design a Diagnostic Cyclic Load Test on a Reinforced Concrete Two-Way Slab Floor System. 44
2007. 45

-25-
[18] Chajes MJ, III HWS, Finch WW. Diagnostic and In-Service Testing of Transit Railway 1
Bridge. Transportation Research Record. 2001;1770:51-7. 2
[19] Russo FM, Wipf TJ, Klaiber FW. Diagnostic Load Tests of a Prestressed Concrete Bridge 3
Damaged by Overheight Vehicle Impact. Transportation Research Record. 2000;1696:103-10. 4
[20] Lantsoght EOL, Yang Y, Tersteeg RHD, van der Veen C, de Boer A. Development of Stop 5
Criteria for Proof Loading. IALCCE 2016. Delft, The Netherlands2016. p. 8 pp. 6
[21] Anay R, Cortez TM, Jáuregui DV, ElBatanouny MK, Ziehl P. On-Site Acoustic-Emission 7
Monitoring for Assessment of a Prestressed Concrete Double-Tee-Beam Bridge without Plans. 8
Journal of Performance of Constructed Facilities. 2016;30. 9
[22] Aguilar CV, Jáuregui DV, Newtson CM, Weldon BD, Cortez TM. Load Rating a 10
Prestressed Concrete Double-Tee Beam Bridge without Plans by Proof Testing. Transportation 11
Research Board Annual Compendium of Papers. Washington DC2015. p. 19. 12
[23] Casas JR, Gómez JD. Load Rating of Highway Bridges by Proof-loading. KSCE Journal of 13
Civil Engineering. 2013;17:556-67. 14
[24] Faber MH, Val DV, Stewart MG. Proof load testing for bridge assessment and upgrading. 15
Engineering Structures. 2000;22:1677-89. 16
[25] Saraf V, Sokolik AF, Nowak AS. Proof Load Testing of Highway Bridges. Transportation 17
Research Record. 1996;1541:51-7. 18
[26] ACI Committee 437. Code Requirements for Load Testing of Existing Concrete Structures 19
(ACI 437.2M-13) and Commentary Farmington Hills, MA2013. p. 24. 20
[27] American Association of State Highway and Transportation Officials. The manual for 21
bridge evaluation. 2nd ed. Washington, D.C.: American Association of State Highway and 22
Transportation Officials; 2011. 23
[28] Deutscher Ausschuss für Stahlbeton. DAfStb-Guideline: Load tests on concrete structures. 24
Deutscher Ausschuss fur Stahlbeton,; 2000. p. 7 (in German). 25
[29] NCHRP. Manual for Bridge Rating through Load Testing. Washington, DC1998. p. 152. 26
[30] NRA. Load Testing for Bridge Assessment. Dublin, Ireland: National Roads Authority; 27
2014. p. 11. 28
[31] The Institution of Civil Engineers - National Steering Committee for the Load Testing of 29
Bridges. Guidelines for the Supplementary Load Testing of Bridges. London, UK1998. p. 44. 30
[32] Lantsoght EOL, Van der Veen C, De Boer A, Hordijk DA. Proof load testing of reinforced 31
concrete slab bridges in the Netherlands. Structural Concrete. in press:29. 32
[33] Lantsoght E, Yang Y, van der Veen C, de Boer A, Hordijk D. Ruytenschildt Bridge: field 33
and laboratory testing. Engineering Structures. 2016;128:111-23. 34
[34] Lantsoght EOL, Van der Veen C, De Boer A, Hordijk DA. Collapse test and moment 35
capacity of the Ruytenschildt Reinforced Concrete Slab Bridge Structure and Infrastructure 36
Engineering. available online ahead of print. 37
[35] Lantsoght EOL, Y.Yang, Van der Veen C, De Boer A, Hordijk DA. Determination of 38
loading protocol and stop criteria for proof loading with beam tests. fib symposium 2017. 39
Maastricht, the Netherlands2017. 40
[36] Lantsoght EOL, Yang Y, van der Veen C, de Boer A, Hordijk DA. Beam experiments on 41
acceptance criteria for bridge load tests. ACI Structural Journal. (in press). 42
[37] Lantsoght E. Literature review on load testing. Delft University of Technology; 2016. p. 43
102. 44
[38] Lantsoght EOL, van der Veen C, Hordijk DA, de Boer A. State-of-the-art on load testing of 45
concrete bridges. Engineering Structures. in review. 46

-26-
[39] Lantsoght E. Overview of existing information of proof load tests - Executed by Delft 1
University of Technology. Delft University of Technology; 2016. p. 65. 2
[40] Lantsoght EOL, van der Veen C, de Boer A, Walraven J. Transverse Load Redistribution 3
and Effective Shear Width in Reinforced Concrete Slabs. Heron. 2015;60:145-80. 4
[41] Lantsoght EOL. Proposal for Guidelines for Proof Load Testing of Reinforced Concrete 5
Slab Bridges (in Dutch)2016. 6
[42] Rijkswaterstaat. Guidelines Assessment Bridges - assessment of structural safety of an 7
existing bridge at reconstruction, usage and disapproval (in Dutch). 2013. p. 117. 8
[43] CEN. Eurocode – Basis of structural design, NEN-EN 1990:2002 Brussels, Belgium: 9
Comité Européen de Normalisation; 2002. p. 103. 10
[44] Code Committee 351001. Assessement of structural safety of an existing structure at repair 11
or unfit for use - Basic Requirements, NEN 8700:2011 (in Dutch). Delft, The Netherlands: Civil 12
center for the execution of research and standard, Dutch Normalisation Institute; 2011. 13
[45] Steenbergen RDJM, Vrouwenvelder ACWM. Safety philosophy for existing structures and 14
partial factors for traffic loads on bridges. Heron. 2010;55:123-40. 15
[46] Rijkswaterstaat. Guidelines for coring, transporting, and testing of concrete cores and the 16
determination of the compressive and splitting tensile strength. Rijkswaterstaat; 2014. 17
[47] Lantsoght EOL, Van der Veen C, De Boer A, Hordijk DA. Proof load testing of reinforced 18
concrete slab bridges in the Netherlands. Structural Concrete. (in press):29. 19
[48] Bretschneider N, Fiedler L, Kapphahn G, Slowik V. Technical possibilities for load tests of 20
concrete and masonry bridges. Bautechnik. 2012;89:102-10 (in German). 21
[49] Barker MG. Quantifying Field-Test Behavior for Rating Steel Girder Bridges. Journal of 22
Bridge Engineering. 2001;6:254-61. 23
[50] Lantsoght EOL, Koekkoek RT, van der Veen C, Hordijk DA, de Boer A. Case study: Pilot 24
proof load test on viaduct De Beek. Journal of Bridge Engineering. in press. 25
[51] Vos W. Stop criteria for proof loading - The use of stop criteria for a safe use of ‘Smart 26
Proof loading’. Delft, The Netherlands: Delft University of Technology; 2016. 27
28

-27-
List of Figures 1
Fig. 1: Safety philosophy for proof load testing [28, 51]. 2
Fig. 2: Distribution of the concentrated live loads (wheel prints) to the center of the slab cross-3
section. 4
Fig. 3: Dimensions of proof load tandem. 5
Fig. 4: Example of resulting sensor plan, as applied to viaduct De Beek [50]: (a) vertical 6
displacements; (b) concrete and steel strains. 7
Fig. 5: Definition of load step, load cycle, and load level. 8
Fig. 6: Example of resulting prescribed loading protocol. 9

-28-
List of Tables 1
Table 1. Overview of different safety levels and load factors prescribed by the RBK and NEN 2
8700:2011 for the assessment of existing highway bridges [42]. 3
Safety level β Reference period γperm,6.10a γperm,6.10b γll γwind γvar
RBK Design1
4.3 100 years 1.40 1.25 1.50 1.65 1.65
RBK Reconstruction2
3.6 30 years 1.30 1.15 1.30 1.60 1.50
RBK Usage3
3.3 30 years 1.25 1.15 1.25 1.50 1.30
RBK Disapproval4
3.1 15 years 1.25 1.10 1.25 1.50 1.30
1 These values correspond to Consequences Class 3 from NEN-EN 1990:2002. 4
2 These values correspond to the reconstruction level for Consequences Class 3 from NEN 5
8700:2011, taking the values for structures built before 2012. 6
3 These values correspond to the disapproval level for Consequences Class 3 from NEN 7
8700:2011, not taking the values for structures built before 2012. 8
4 These values correspond to the disapproval level for Consequences Class 3 from NEN 9
8700:2011, taking the values for structures built before 2012. 10
11
Table 2. Overview of different safety levels and corresponding load factors for the preparation 12
of proof load tests [41] 13
Safety level γsw γsd γll
RBK Design 1.10 1.25 1.50
RBK Reconstruction 1.10 1.15 1.30
RBK Usage 1.10 1.15 1.25
RBK Disapproval 1.10 1.10 1.25

-29-
Table 3. Overview of stop criteria for proof load tests on reinforced concrete slab bridges 1
2
Previously cracked in bending moment or not?
Failure mechanism Uncracked Cracked
Flexural failure Concrete strains (Eq. (4))
wmax ≤ 0.5 mm
wres ≤ 0.1 mm
wres < 0.3wmax
Stiffness reduction ≤ 25 %
Deflection profiles
Load-deflection graph
Concrete strains (Eq. (4))
wmax ≤ 0.5 mm
wres ≤ 0.1 mm
wres < 0.2wmax
Stiffness reduction ≤ 5 %
Deflection profiles
Load-deflection graph
Shear failure Concrete strains (Eq. (4))
Stiffness reduction ≤ 5 %
Deflection profiles
Load-deflection graph
Concrete strains (Eq. (4))
Stiffness reduction ≤ 5 %
Deflection profiles
Load-deflection graph
3