deployment solution 7
TRANSCRIPT

TFE World Tour 2013 APJ/EMEA
Deployment Solution 7.5 Deep Dive By: Rob Barker
Date published: 2012_10
Document Version:
2.0 Updated: 2013_10
Symantec Education Services

2 of 47
Description This course is designed to provide a deep dive look into Deployment Solution 7.5.
This lab assumes a basic and general understanding of the Symantec Management Platform and operating system imaging. Basic Microsoft Windows skills are recommended.
At the end of this lab, you should be able to
§ Have a good understanding of the new features in Deployment Solution 7.5 (DS 7.5)
§ Understand the architectural changes in DS 7.5 and how they differ from DS 7.1
§ Appropriately configure DS 7.5 for image deployment using a distributed architecture
§ Have a basic understanding of configuring the F8 Boot menu for customized scenarios
§ Have a general knowledge on how to customize WinPE
§ Understand the flow of data in DS 7.5
Notes
§ A brief presentation will introduce this lab session and discuss key concepts.
§ The lab will be directed and provide you with step-by-step walkthroughs of key features.
§ Feel free to follow the lab using the instructions on the following pages. You can optionally perform this lab at your own pace.
§ Be sure to ask your instructor any questions you may have.
§ Thank you for coming to our lab session.

3 of 47
Table of Contents Cheat Sheet .................................................................................................................................... 5
Architecture/Process Diagrams ................................................................................................ 5 Site Server Locations ............................................................................................................... 6 SMP Locations ......................................................................................................................... 6 Important Notes/Things to Remember ..................................................................................... 7
Unboxing Deployment Solution 7.5/First Time Setup ...................................................................... 8 Differences in PXE Services ........................................................................................................ 8 Configuring DHCP Options .......................................................................................................... 8 Sysprep Configuration ............................................................................................................... 10 Adding OS License Keys ........................................................................................................... 11 Creating the Personality Capture Template ............................................................................... 11 Installing the Symantec NetBoot Service ................................................................................... 12
Creating WinPE Images ................................................................................................................ 16 Creating the Basic WinPE Image .............................................................................................. 16 Creating the Advanced WinPE Image ....................................................................................... 20
Creating Jobs & Tasks .................................................................................................................. 21 Creating the Initial Deployment Job ........................................................................................... 21 Creating the Basic Capture and Deploy Jobs ............................................................................ 23
Create the Image Capture Job ............................................................................................... 23 Create the Image Deployment Job ........................................................................................ 25 Creating the Re-Deployment Image Job ................................................................................ 26
Configuring Deployment Solution for Network Boot ...................................................................... 28 Configuring Predefined Computers ........................................................................................... 28 Configuring the Initial Deployment Policy .................................................................................. 30 Customizing Deployment Solution Network Boot Policies ......................................................... 33
Enabling the NBS Global Policy ............................................................................................. 33 Configuring the NBS General Policy ...................................................................................... 34
Testing the Boot Scenarios ........................................................................................................... 36 Booting from an Unknown Computer (Initial Deployment) ......................................................... 36 Booting from Predefined Computer ........................................................................................... 38 Booting from a Managed Computer ........................................................................................... 40
Optional Exercises ........................................................................................................................ 42 Adding Preboot Drivers .............................................................................................................. 42 Importing Existing Images ......................................................................................................... 44
Post SSL Configuration Workaround (Optional) ............................................................................ 45 Enabling the SSL Certificate Policies ........................................................................................ 45

4 of 47
Updating the Resource Membership Filters .............................................................................. 46 Editing the PECTAgent.ini Files ................................................................................................. 46

5 of 47
Cheat Sheet This section is designed to provide you with a quick reference for navigating Deployment Solution 7.5 and locating important Deployment Solution 7.5 resources.
Architecture/Process Diagrams
Deployment Solution 7.1 vs. 7.5 Site Server Architecture
Deployment Solution 7.1 vs. 7.5 PXE Architecture
6 of 47
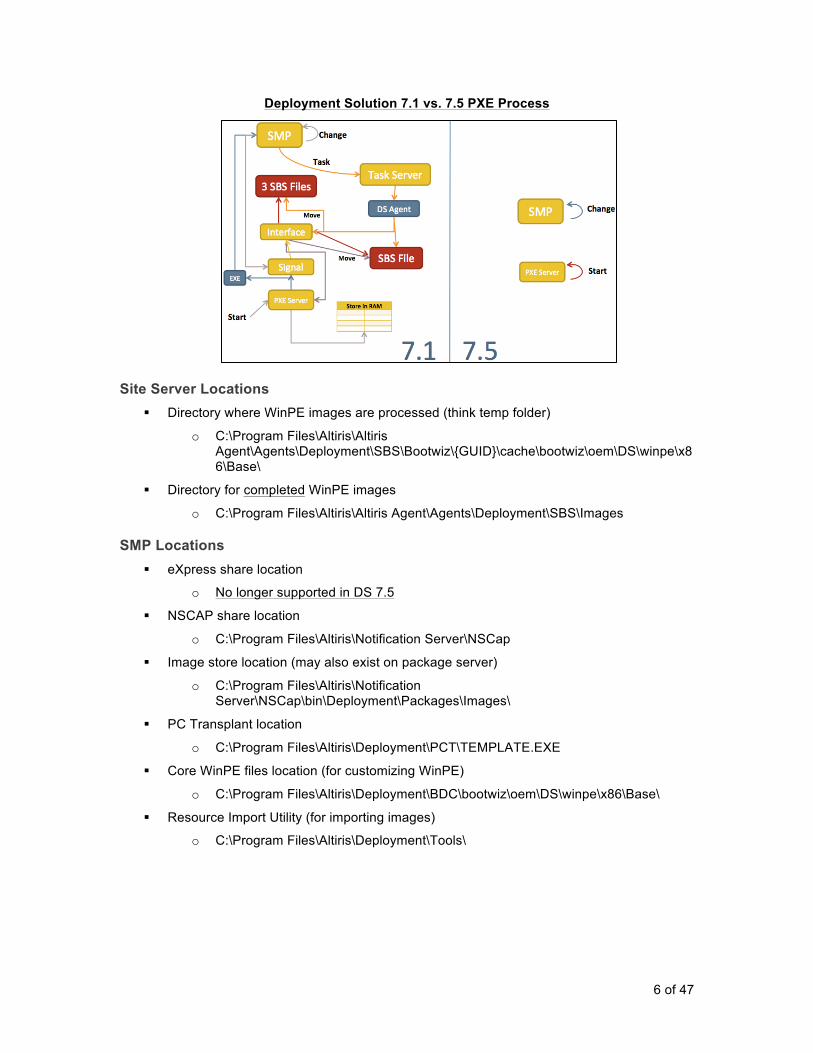
Deployment Solution 7.1 vs. 7.5 PXE Process
Site Server Locations § Directory where WinPE images are processed (think temp folder)
o C:\Program Files\Altiris\Altiris Agent\Agents\Deployment\SBS\Bootwiz\{GUID}\cache\bootwiz\oem\DS\winpe\x86\Base\
§ Directory for completed WinPE images
o C:\Program Files\Altiris\Altiris Agent\Agents\Deployment\SBS\Images
SMP Locations § eXpress share location
o No longer supported in DS 7.5
§ NSCAP share location
o C:\Program Files\Altiris\Notification Server\NSCap
§ Image store location (may also exist on package server)
o C:\Program Files\Altiris\Notification Server\NSCap\bin\Deployment\Packages\Images\
§ PC Transplant location
o C:\Program Files\Altiris\Deployment\PCT\TEMPLATE.EXE
§ Core WinPE files location (for customizing WinPE)
o C:\Program Files\Altiris\Deployment\BDC\bootwiz\oem\DS\winpe\x86\Base\
§ Resource Import Utility (for importing images)
o C:\Program Files\Altiris\Deployment\Tools\

7 of 47
Important Notes/Things to Remember § If you are sure you have correctly installed/configured the Symantec Netboot Service but
your clients will still not PXE boot, try restarting the “Symantec Network Boot Service” and also verifying DHCP settings
§ You must have an image available in the system before you can create any task/job that would deploy an image
§ Do not forget to enter in Windows Product keys in the “OS Licenses” screen – Our Sysprep files are generated with SMP Tokens and having a blank or “null” license key may result in a failed image deployment (fails on post image sysprep configuration)
§ Make sure DNS is properly configured in your environment AND that your DHCP options reflect the correct DNS Name Server. The SMP processes are inconsistent when it comes to using Fully Qualified Domain Names (SMP.ses.local) and/or IP Addresses (192.168.64.131). You will likely have failed jobs/policies/deployments/etc without proper DNS configuration
§ Remember that any WinPE changes you make (driver additions/customizations/etc) will result in the need to recreate any or all WinPE images on each NBS Site Server. This can be a time consuming process – be patient and use the methods in this lab to help you verify completion
§ Regarding SSL – At the time of this writing there has been an issue identified that will prevent Deployment Solution 7.5 from properly functioning if SSL has been enabled after the installation of the SMP. The current supported method for SSL in DS is to enable SSL support during the installation of the platform. The section titled “Post SSL Configuration Workaround” will detail a currently working method for resolving this issue.

8 of 47
Unboxing Deployment Solution 7.5/First Time Setup
Differences in PXE Services In Deployment Solution 7.1 the PXE architecture was included with the base installation of Deployment Solution. This is no longer the case in 7.5. The PXE Services have been rebranded as “Symantec NetBoot Services or NBS”. These services are also now part of the Site Server and must be manually deployed. Note: Do not confuse Symantec NetBoot Services with Apple’s Netboot Services. While they share a name and even in some cases, functionality, they are two separate technologies.
Configuring DHCP Options DHCP must be configured in order for the Symantec PXE Services to manage boot clients. In addition to the exercise below make sure your DHCP Scope options accurately reflect the DNS and Gateway services in your environment. Misconfigured DNS is a common problem in PXE troubleshooting (Note: Some portions of these exercises have been completed for you. It is still important to review the methodologies and motions).
1) On the SMP virtual machine open DHCP from the Start menu (Or using the utilities folder on the desktop)
2) Right click on the DHCP node and choose Add Server
3) Type “DC” for the server name
4) Expand and select DHCP > DC.ses.local > IPv4 > Server Options
5) Right-click on Server Options and select Configure Options
6) Locate “Option 003” (Router) and check the box
7) In the “IP Address” field type: 192.168.64.2
8) Locate “Option 006” (DNS Server) and check the box
9) In the “IP Address” field type: 192.168.64.130
10) Locate “Option 046” (WINS/NBT Node Type) and check the box

9 of 47
11) Change the Byte option to “0x8”
12) Click OK.
13) Close the DHCP Management Console. Note: If the DHCP Server Role is installed on the same server as DS 7.5, DS will automatically add option 060 as soon as the PXE services are started for the first time. Since DHCP is not on the DS Server in this lab, option 60 will not be there.
10 of 47
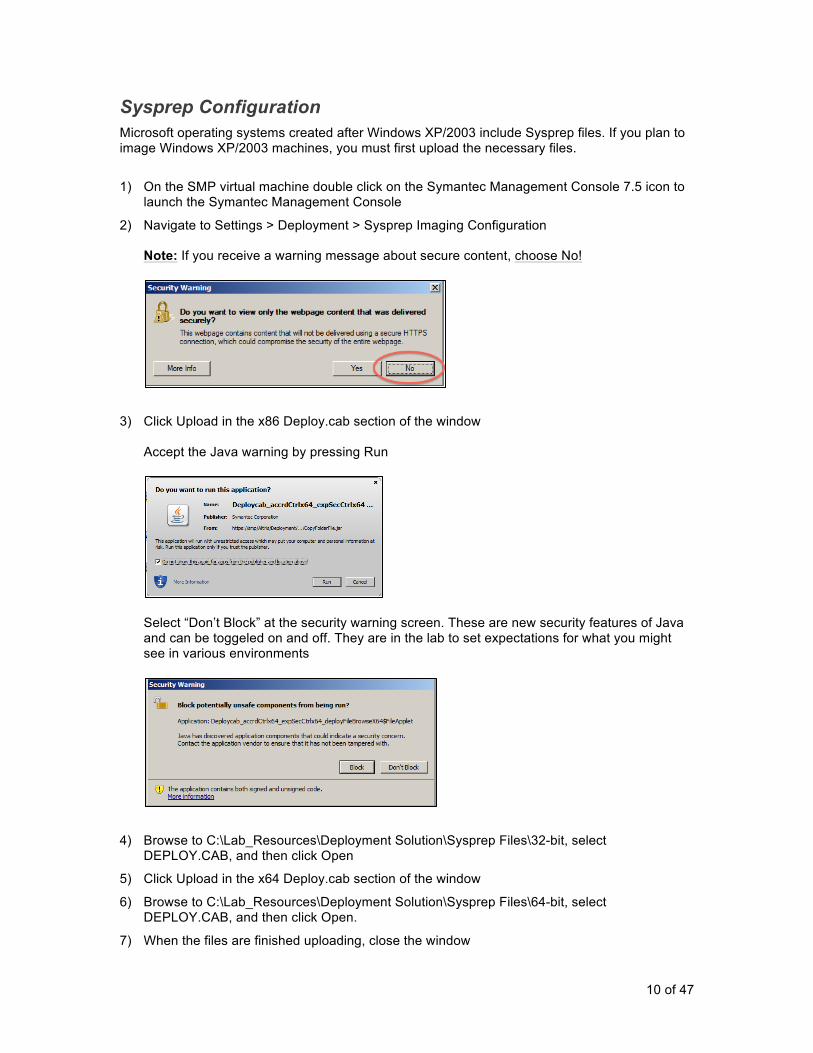
Sysprep Configuration Microsoft operating systems created after Windows XP/2003 include Sysprep files. If you plan to image Windows XP/2003 machines, you must first upload the necessary files.
1) On the SMP virtual machine double click on the Symantec Management Console 7.5 icon to launch the Symantec Management Console
2) Navigate to Settings > Deployment > Sysprep Imaging Configuration Note: If you receive a warning message about secure content, choose No!
3) Click Upload in the x86 Deploy.cab section of the window Accept the Java warning by pressing Run
Select “Don’t Block” at the security warning screen. These are new security features of Java and can be toggeled on and off. They are in the lab to set expectations for what you might see in various environments
4) Browse to C:\Lab_Resources\Deployment Solution\Sysprep Files\32-bit, select DEPLOY.CAB, and then click Open
5) Click Upload in the x64 Deploy.cab section of the window
6) Browse to C:\Lab_Resources\Deployment Solution\Sysprep Files\64-bit, select DEPLOY.CAB, and then click Open.
7) When the files are finished uploading, close the window

11 of 47
Adding OS License Keys In order for several of the imaging tasks to function correctly, a valid operating system license key must be available.
1) On the SMP virtual machine double click on the Symantec Management Console 7.5 icon to launch the Symantec Management Console
2) Navigate to Settings > Deployment > OS Licenses.
3) Click Add.
4) Select “Windows 7 Professional Service Pack 1 (x64)” as the Operating System.
5) Enter “HYF8J-CVRMY-CM74G-RPHKF-PW487” as the Product Key. Note: This is a “default” key that Microsoft provides for unattended installations.
6) Click OK.
7) Close the window. Note: In a production environment this step would need to be completed for each key/OS combination you will be using.
Creating the Personality Capture Template In this exercise, we will build a PC Transplant template that will be used to migrate a user’s wallpaper, computer name, desktop icons, Internet favorites, music, documents, and pictures. In a production implementation this exercise would be extensively detailed to include all the import aspects of a Users and Workstations personality. In many cases you will end up with multiple PCT templates.
1) On the SMP virtual machine, browse to and execute the following application: C:\Program Files\Altiris\Deployment\PCT\TEMPLATE.EXE Note: You may be prompted to update the PCT product – Choose “Don’t remind me again”
2) Click Next.
3) Leave the default options selected and click Next.
4) Leave all fields blank and click Next.
5) Click the Desktop tab, click Clear All, scroll down and select “Wallpaper”.
6) Click the Network tab, click Clear All, and select “Computer name”.
7) Click Next.
12 of 47
8) Click the Folders tab and select “Desktop”, “Favorites”, “Music”, “My Documents”, and “Pictures”.
9) Click Next.
10) Leave the default options selected and click Next.
11) Leave the default options selected and click Next.
12) Save the file as C:\Program Files\Altiris\Deployment\PCT\Client\EN\Migration
13) Click OK and click Finish
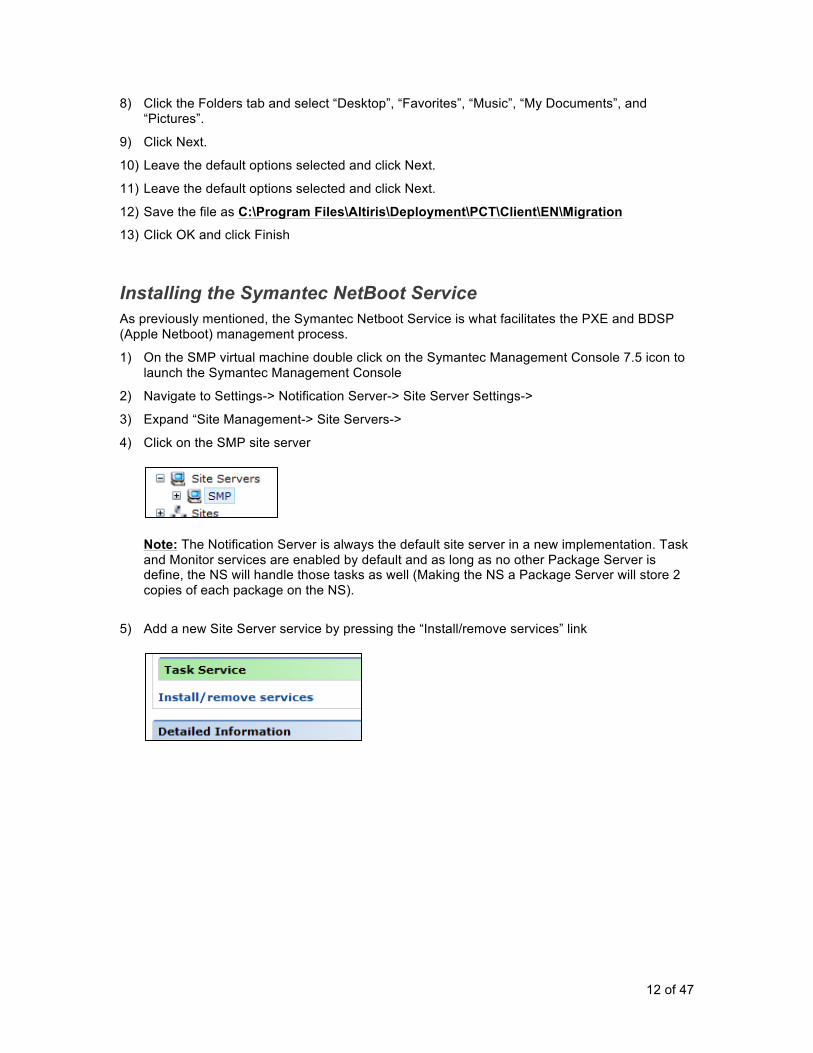
Installing the Symantec NetBoot Service As previously mentioned, the Symantec Netboot Service is what facilitates the PXE and BDSP (Apple Netboot) management process.
1) On the SMP virtual machine double click on the Symantec Management Console 7.5 icon to launch the Symantec Management Console
2) Navigate to Settings-> Notification Server-> Site Server Settings->
3) Expand “Site Management-> Site Servers->
4) Click on the SMP site server
Note: The Notification Server is always the default site server in a new implementation. Task and Monitor services are enabled by default and as long as no other Package Server is define, the NS will handle those tasks as well (Making the NS a Package Server will store 2 copies of each package on the NS).
5) Add a new Site Server service by pressing the “Install/remove services” link

13 of 47
6) Select “Network Boot Service” from the list
Note: Remember the PXE is no longer dependant on Task and Package Services being on the same site server.
7) Press “Next” *** DO NOT PRESS OK just yet ***
8) Naviate to C:\Program Files\Altiris
9) Right click on the Altiris directory and choose “Disk Pulse – Monitor Changes…”
Note: Disk Pulse is freeware utility that monitors file system traffic. It is not affiliated with Symantec in anyway nor is it required to complete this exercise.

14 of 47
10) When the Disk Pulse profile window appears, press “Start” (the button in Disk Pulse, NOT the Windows Start Menu) to begin the file system monitoring process
Note: Disk Pulse is currently “watching” the C:\Program Files\Altiris\ directory for any new, modified or deleted files or folders. This allows us to watch in “real time” as the Symantec Management Agent consumes the Site Server Policy and deploys the Symantec Netboot Service.
11) Switch back to the Symantec Management Console
12) Press “OK” to confirm the installation of the Network Boot Service
13) Navigate to Settings-> Notification Server-> Resource Membership Update
14) Press the Run button next to “Delta update schedule”
Note: This will force the NS to update the filter group for the site server deployments. It may take a few minutes. Normally this will occur on a schedule

15 of 47
15) Now press the Run button to force the “Policy update schedule”
Note: This will force the NS to update the policies for the site server deployments. It may take a few minutes. Normally this will occur on a schedule
16) You may now either wait for the Symantec Management Agent to check in or force it by double clicking the agent icon in the system tray, pressing the settings button and then the update button When the agent receives the site server policy it will begin installing the site server components and then install the Symantec Netboot Service. Disk Pulse will show you a flurry of files that are being modified and created. These are the actual files and respective locations of the Site Server Network Boot Service
17) Verify the Symantec Netboot Service is up and running by clicking on the services icon in the utilities folder on the desktop (pair of gear icons) and looking for the following services: Symantec Network Boot Service (PXE and BSDP) Symantec Network Boot Service (TFTP)

16 of 47
Creating WinPE Images
Creating the Basic WinPE Image WinPE is a preboot operating environment that is based on versions of Microsoft Windows. WinPE 4.0 is the version Deployment Solution 7.5 uses and is based on the Windows 8.0 OS.
1) On the SMP virtual machine double click on the Symantec Management Console 7.5 icon to launch the Symantec Management Console
2) Navigate to Settings-> Deployment-> Create Preboot Configurations->
3) Check the box to “Apply Policy Immediately”
This setting essentially forces any NBS Servers to check in right away to build the WinPE image. Note: In the previous version of Deployment Solution an administrator had to either wait for the agents to check in based on their policies OR manually force each server to check in for the build process to be initiated
4) Press the “Add” button Note: You may be prompted for Java client authentication, if so enter the following credentials (make sure to check the box to remember password in your password list): Username: Administrator Password: Symc4now! Domain: ses
5) Name the Preboot configuration “Basic WinPE”
6) Make sure only x86 architecture is selected
7) Make sure “Inject imaging tools” is selected

17 of 47
8) Choose to create “PXE”
9) Press “OK” *** DO NOT PRESS Save Changes yet
10) Switch to the DiskPulse application and press the “Reset” button on the Disk Pulse Menu
Note: This will clear the Disk Pulse change log so we can view the WinPE build process and has no direct effect on the WinPE build process itself, it is just for visual/instructional purposes
11) Switch back to the Symantec Management Console and press “Save Changes” on the Preboot Configurations page

18 of 47
12) Switch to DiskPulse and note that Disk Pulse has already (if not shortly) begun picking up changes in the Altiris directory.
Browse through the Disk Pulse change log as the WinPE build is being processed. What kinds of files are being created on the SMP virtual machine? Note: It is important to remember that a Site Server with the Symantec Netboot Service on it does not initially contain the required components to build a WinPE image. Upon the initial preboot environment (WinPE) build request, the WinPE (or other) build components are copied to the Site Server VIA package delivery (in the case of the NS being the NBS server, the components are copied into the appropriate folder structures). After the components have been copied, the Site Server can process the build request. This is by design to avoid large amounts of data being deployed along with the Symantec Netboot Service. Your instructor can explain in more detail as the process can initially be a bit confusing Note: The process of building the WinPE image(s) can take anywhere from 5 minutes to 30 minutes per WinPE instance. The forthcoming exercises will explain how to verify the WinPE image process has completed
13) To verify that the WinPE build process completed navigate to the following directory: C:\Program Files\Altiris\Altiris Agent\Agents\Deployment\SBS\Images\

19 of 47
14) Verify that the “Basic WinPE” directory exists Note: The directory name gets its name directly from the Preboot Configuration form that was used earlier in the lab. It is highly recommended that you use some type of standardized naming convention in a production environment. While there are various use cases for using multiple WinPE instances, other than architecture (x86/x64) there is no delineation between instances of WinPE. You will need to rely on the description field in the Symantec Management Console’s Preboot Configuration Screen or on a naming convention (preferably both).
15) Switch back to the Symantec Management Console
16) Close the “Preboot Configurations” window

20 of 47
Creating the Advanced WinPE Image Symantec does not officially support the customization of the core WinPE environment. With the exception of drivers, no mechanism exists to customize an instance of WinPE. Although unsupported in the traditional sense, making customizations to WinPE is very typical in a customer environment. This exercise walks through a process whereby additional files are added to the Symantec core WinPE directory that will be processed (mixed in with the WinPE image the next time a build request is made.
This Symantec KB article may help as well: http://www.symantec.com/docs/HOWTO55908
1) On the SMP virtual machine locate the shortcut on the desktop labeled “Enable_Advanced_WinPE_Tools” and run it. Note: This will copy the advanced tool kit from the Lab_Resources folder into the WinPE folder on the SMP. (C:\Program Files\Altiris\Deployment\BDC\bootwiz\oem\DS\winpe\x86\Base\) Note: Remember that even though you may copy files/folders into this directory, they will still need to “replicate” down to each site server that is building a new WinPE Image. Site Servers will not receive these files until a task is generated to build a WinPE image. This helps reduce unnecessary network traffic.
2) Double click on the Symantec Management Console 7.5 icon to launch the Symantec Management Console
3) Navigate to Settings-> Deployment-> Create Preboot Configurations->
4) Press the “Add” button
5) Name the new Preboot Configuration “Advanced WinPE”
6) Select “x86” for the architecture”
7) Make sure the box labeled “Inject Imaging Tools” is checked
8) Select the “PXE” radio button under “Select which preboot environments to build”

21 of 47
9) Press “OK”
10) Make sure the “Apply Policy Immediately” box is checked and press the “Save Changes” button
11) Close the Preboot Configurations Window
12) Switch to DiskPulse to view the Advanced WinPE files being created/moved Disk Pulse should already be picking up the changes in the Altiris directory
13) Navigate to the following folder to verify WinPE Image creation C:\Program Files\Altiris\Altiris Agent\Agents\Deployment\SBS\Images\ Note: Completed WinPE Images show up as folders with their respective names Note: This will take approximately 5 to 10 minutes to complete
Creating Jobs & Tasks
Creating the Initial Deployment Job The Initial Deployment feature in Deployment Solution allows an administrator to pre-assign a job(s) to an unknown resource (unknown in this case is a machine that the SMP has no prior information of)
1) On the SMP virtual machine double click on the Symantec Management Console 7.5 icon to launch the Symantec Management Console
2) Navigate to Manage-> Jobs and Tasks->
3) Expand “System Jobs and Tasks”
4) Right click on “System Jobs and Tasks” and select New-> Folder->
5) Name the folder “Initial Deployment”
6) Right click the newly created folder and choose New-> Client Job
7) Name the job “Initial Deployment Job”
8) Add a new task by pressing the “New” button
9) Select “Deploy Image”
10) From the “Image Name” drop down select “Fake_Win7_Image.gho” Note: This is NOT a valid image file and is here for illustrative purposes

22 of 47
11) Select the product key from the drop down
12) Press “OK”
13) Add a new task by pressing the “New” button
14) Select “Boot To”
15) Rename the task “Boot To Production”
16) Select the “Production” radio button
17) Press “OK”
18) Press “Save Changes” Your job should now look like this:

23 of 47
Creating the Basic Capture and Deploy Jobs Throughout the typical day to day operations of an imaging administrator basic imaging jobs may be required. These exercises focus on creating simple, yet powerful image capture and image deployment jobs. In a production environment these jobs could be further customized to support a wide array of imaging scenarios.
Create the Image Capture Job 1) On the SMP virtual machine double click on the Symantec Management Console 7.5 icon to
launch the Symantec Management Console
2) Navigate to Manage-> Jobs and Tasks->
3) Expand “System Jobs and Tasks”
4) Right click on “System Jobs and Tasks” and select New-> Folder->
5) Name the folder “ Capture”
6) Repeat the process and create another folder called “ Deploy”
7) Repeat the process and create another folder called “ Redeploy Image”
8) Right click on the “ Capture” folder and select New-> Client Job->
9) Name the job “ Basic Image Capture”
10) Add a new task by pressing the “New” button
11) Select “Prepare for Image Capture” from the list
12) Make sure the “Windows” radio button is selected and choose “Windows 7 Professional Service Pack 1 (x64) from the “OS Type” drop down
13) In the “Product Key” drop down select the product key from the list
14) Enter the following credentials to rejoin the domain: User name: ses\administrator Password: Symc4now! Confirm Password: Symc4now!

24 of 47
15) In the “Boot To” section choose “PXE” then choose “Basic WinPE” from the drop down and choose “x86” as the architecture
16) Press “OK”
17) Add a new task by pressing the “New” button
18) Select “Create Image”
19) Enter “Win7” for the image name
20) Press “OK”
21) Add a new task by pressing the “New” button
22) Select “Boot To”
23) Rename the task to “Boot To Production”
24) Select the “Production” radio button
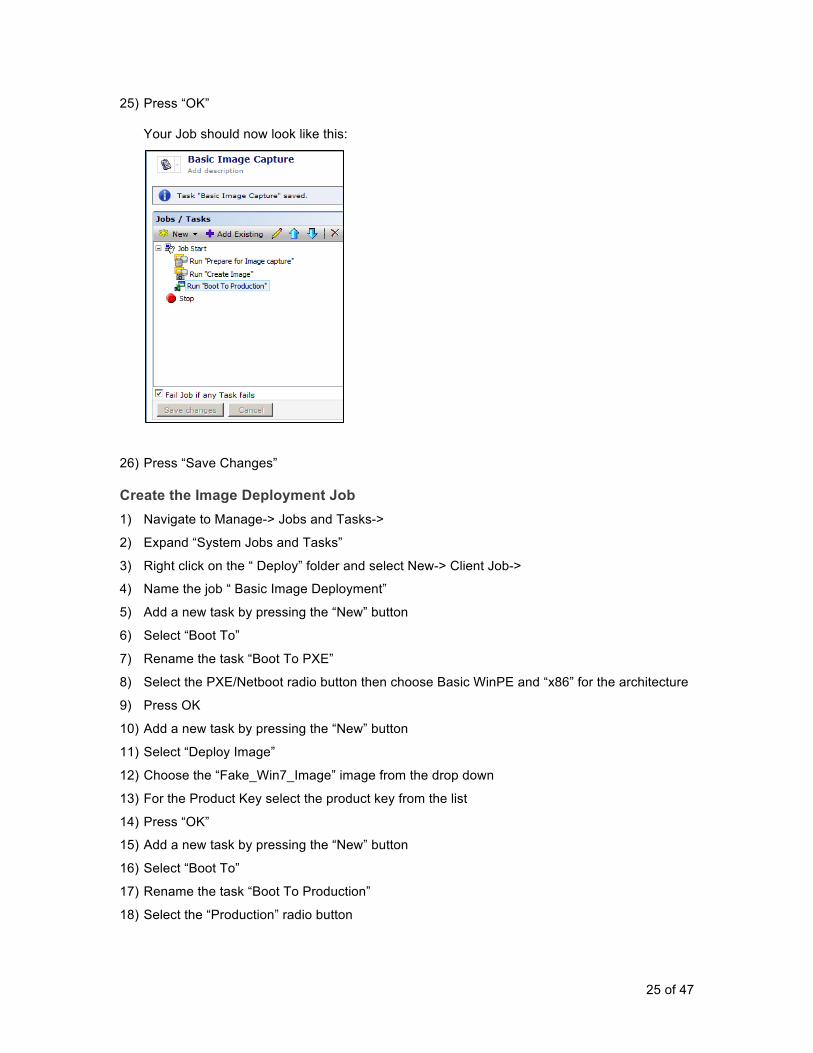
25 of 47
25) Press “OK” Your Job should now look like this:
26) Press “Save Changes”
Create the Image Deployment Job 1) Navigate to Manage-> Jobs and Tasks->
2) Expand “System Jobs and Tasks”
3) Right click on the “ Deploy” folder and select New-> Client Job->
4) Name the job “ Basic Image Deployment”
5) Add a new task by pressing the “New” button
6) Select “Boot To”
7) Rename the task “Boot To PXE”
8) Select the PXE/Netboot radio button then choose Basic WinPE and “x86” for the architecture
9) Press OK
10) Add a new task by pressing the “New” button
11) Select “Deploy Image”
12) Choose the “Fake_Win7_Image” image from the drop down
13) For the Product Key select the product key from the list
14) Press “OK”
15) Add a new task by pressing the “New” button
16) Select “Boot To”
17) Rename the task “Boot To Production”
18) Select the “Production” radio button

26 of 47
19) Press “OK” Your job should now look like this:
20) Press “Save Changes”
Creating the Re-Deployment Image Job 1) Navigate to Manage-> Jobs and Tasks->
2) Expand “System Jobs and Tasks”
3) Right click on the “ Redeploy Image” folder and select New-> Client Job->
4) Name the job “ Redeploy Image”
5) Add a new task by pressing the “New” button
6) Select “Deploy Image”
7) Choose the “Fake_Win7_Image.gho” image from the drop down
8) Select the product key from the drop down
9) Press “OK”
10) Add a new task by pressing the “New” button
11) Select “Boot To”
12) Rename the task “Boot To Production”
13) Select the “Production” radio button
27 of 47
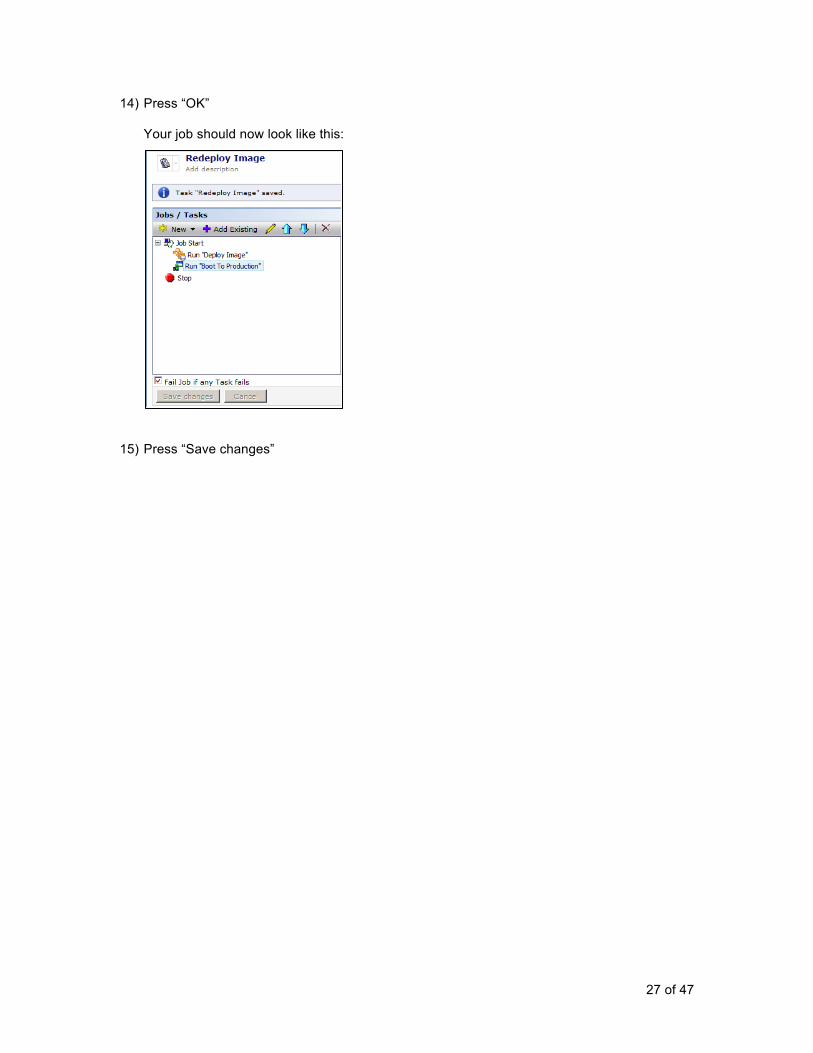
14) Press “OK” Your job should now look like this:
15) Press “Save changes”

28 of 47
Configuring Deployment Solution for Network Boot Now that the foundational configuration process is complete, it is time to configure Deployment Solution to accept network based boot clients. Although it is technically possible to complete some of this exercise much earlier on, waiting until the end prevents an administrator from having to unnecessarily revisit these configuration steps.
Configuring Predefined Computers Predefined Computers allow an administrator to provide Deployment Solution with basic information about a computer before the computer has physically been communicated with on the network. This allows for job and task pre-assignment as well as various other tasks such as inclusion in Organizational Views and Groups and Filter assignment.
1) On the SMP virtual machine double click on the Symantec Management Console 7.5 icon to launch the Symantec Management Console
8) Navigate to Settings-> Deployment-> Predefined Computers Note: If you receive a warning message about secure content, choose No!
If prompted for Java credentials, enter the following: User name: administrator Password: Symc4now! Domain: Ses

29 of 47
2) Press the “Add” button Note: If you receive a warning message about Predefined Boot Images, press OK to ignore it
3) Fill out the form as follows: Name: PredefinedPC MAC Address: 00-50-56-3C-74-CF
4) Press “OK”
5) Close the Predefined Computers window

30 of 47
Configuring the Initial Deployment Policy The Initial Deployment policy is where an administrator may assign jobs and tasks for an unknown resource to consume. A default job may be set as well allowing for “zero touch imaging” to take place.
1) On the SMP virtual machine double click on the Symantec Management Console 7.5 icon to launch the Symantec Management Console
2) Navigate to Settings-> Deployment-> Initial Deployment Note: At first glance this policy will seem to conflict with another configuration policy found later in this guide. It is important to understand that all of the information on this page (timeouts, job selection, etc) apply specifically to the initial deployment process itself and have nothing to do with PXE, WinPE or Automation Folders
3) Under the “Initial Deployment (Unknown Computer) Menu” section press the “Add” button
4) Expand Tasks-> Jobs and Tasks-> System Jobs and Tasks-> Initial Deployment
5) Select the “ Initial Deployment Job”
6) Press “OK”
7) Select the “Run default job after” radio button
31 of 47
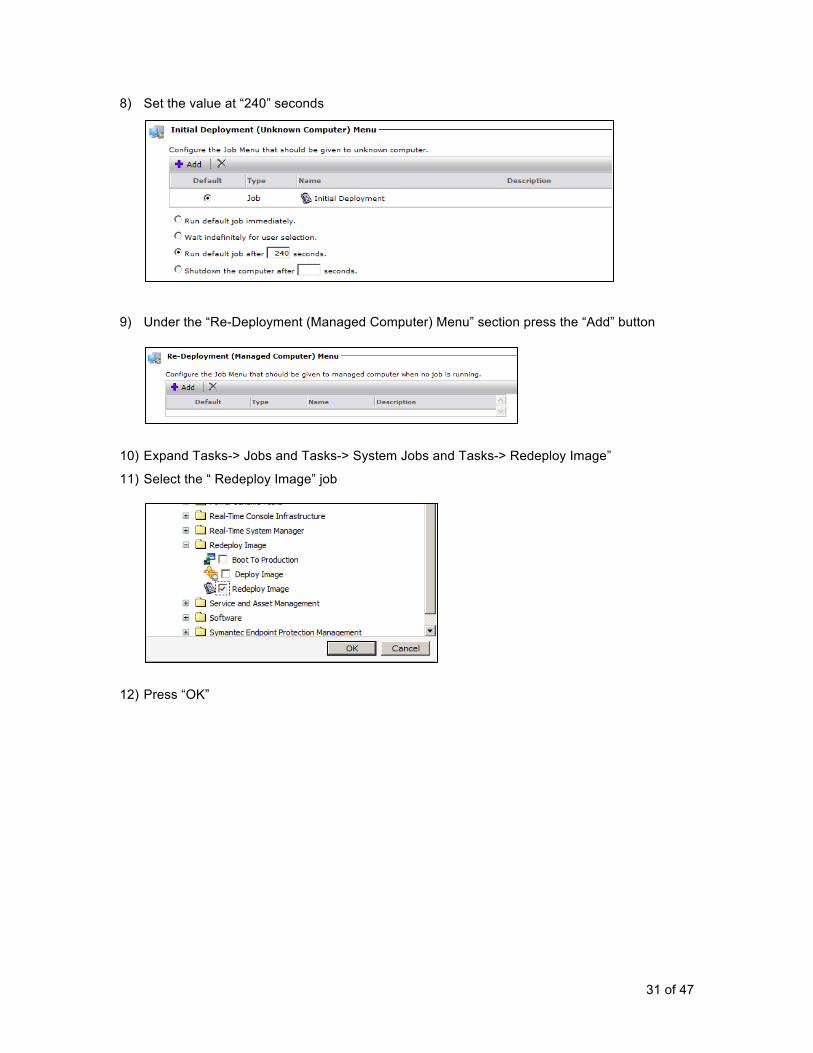
8) Set the value at “240” seconds
9) Under the “Re-Deployment (Managed Computer) Menu” section press the “Add” button
10) Expand Tasks-> Jobs and Tasks-> System Jobs and Tasks-> Redeploy Image”
11) Select the “ Redeploy Image” job
12) Press “OK”

32 of 47
13) Select the “Wait indefinitely for user selection” radio button
14) Press “Save changes”
15) Close the Initial Deployment screen
33 of 47
Customizing Deployment Solution Network Boot Policies The Symantec NetBoot Service policies control how Deployment Solution responds to resources based on a known or unknown state.
Enabling the NBS Global Policy 1) On the SMP virtual machine double click on the Symantec Management Console 7.5 icon to
launch the Symantec Management Console
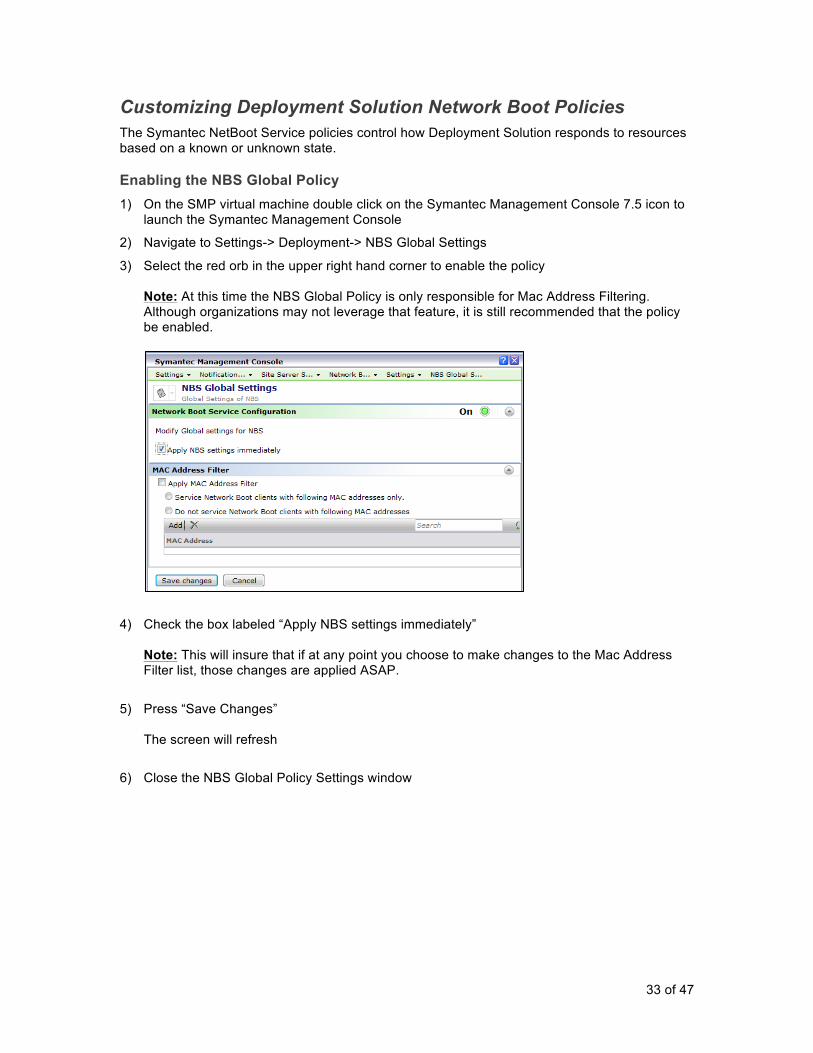
2) Navigate to Settings-> Deployment-> NBS Global Settings
3) Select the red orb in the upper right hand corner to enable the policy Note: At this time the NBS Global Policy is only responsible for Mac Address Filtering. Although organizations may not leverage that feature, it is still recommended that the policy be enabled.
4) Check the box labeled “Apply NBS settings immediately” Note: This will insure that if at any point you choose to make changes to the Mac Address Filter list, those changes are applied ASAP.
5) Press “Save Changes” The screen will refresh
6) Close the NBS Global Policy Settings window

34 of 47
Configuring the NBS General Policy Although we have configured the Symantec Network Boot Services and created a boot image, a boot client still needs to fall into either of the following two scenarios in order to successfully PXE boot (assuming of course all required services have been correctly configured)
• Client is instructed VIA a job or task that it “needs” to be in a PXE state (i.e. “reboot to” task – This requires that the operating system be in a “Production” state and that a functioning Symantec Management Agent be installed
• The “NBS General Settings” Policy can be configured to automatically respond to clients based on 1 of 3 scenarios:
o “Initial Deployment (Unknown Computer) – Symantec Management Platform has no record of client in the CMDB
o “Redeployment (Predefined Computer) – Symantec Management Platform has been manually informed (initial deployment record created) of clients information but initial contact has not been made
o Redeployment (Managed Computer) – Symantec Management Platform has a corresponding record of client in CMDB and previous contact has been made
1) While still in the Symantec Management Console navigate to Settings-> Deployment-> NBS General Settings Note: That the Policy is enabled by default
2) Check the box labeled “Apply NBS settings immediately”
3) In the section labeled “Initial Deployment (Unknown Computer)” check the box to “Respond to unknown computers”
4) For the “PXE boot image” select “Basic WinPE”
5) Select the “Run default boot option after” radio button
35 of 47
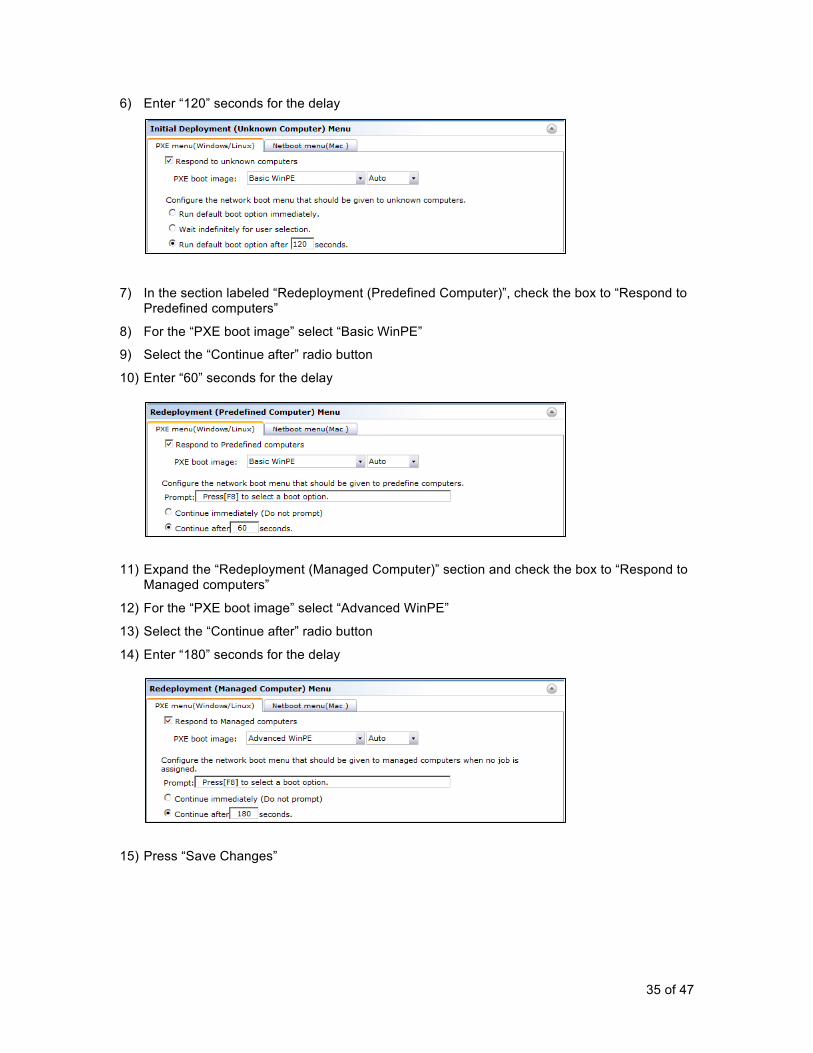
6) Enter “120” seconds for the delay
7) In the section labeled “Redeployment (Predefined Computer)”, check the box to “Respond to Predefined computers”
8) For the “PXE boot image” select “Basic WinPE”
9) Select the “Continue after” radio button
10) Enter “60” seconds for the delay
11) Expand the “Redeployment (Managed Computer)” section and check the box to “Respond to Managed computers”
12) For the “PXE boot image” select “Advanced WinPE”
13) Select the “Continue after” radio button
14) Enter “180” seconds for the delay
15) Press “Save Changes”

36 of 47
16) Close the “NBS General Settings” policy window Configuration Summary:
Boot Menu Name PXE Boot Image Boot Menu Option Menu Timeout
Initial Deployment (Unknown Computer)
Basic WinPE Run Default Boot Option After
120 Seconds
Redeployment (Predefined Computer)
Basic WinPE Run Default Boot Option After
60 Seconds
Redeployment (Managed Computer)
Advanced WinPE Run Default Boot Option After
180 Seconds
Testing the Boot Scenarios
Booting from an Unknown Computer (Initial Deployment) In this exercise you will see how Deployment Solution responds to an unknown computer and presents it with the Initial Deployment Screen.
1) Locate and launch the “Initial Deployment” virtual machine Note: This virtual machine has been minimally configured with: 1 CPU Core 1024MB of RAM 30GB Hard Drive (non formatted) First boot device – Intel e1000 NIC Note: When the F8 menu loads, how many seconds does the delay start with?
After 2 minutes have passed, the system will boot into WinPE

37 of 47
Note: You can skip the 2 minute delay by pressing F8 and choosing the “Basic WinPE” instance After a brief period, the Initial Deployment menu will load (it can take up to 5 minutes)
2) Click on the “ Initial Deployment Job” line item to interrupt the countdown
3) Press “OK” to manually launch the initial deployment job Note: Had we not interrupted the countdown, this job would have automatically run after 120 seconds. It is very important that you instruct customers to be careful with the Initial Deployment settings and process. It is highly possible for an “Unknown” (perhaps the CEO’s new laptop) machine to accidentally boot to the network. If automatic imaging is configured, you can potentially destroy sensitive data.
Note: After Ghost attempts to launch you will receive an error and/or Ghost will never actually launch. This is due to us using an invalid image file.

38 of 47
Booting from Predefined Computer In this exercise you will see how Deployment Solution is able to pre-assign a job or task to a resource based on an administrator providing information.
1) Locate and launch the “Predefined” virtual machine Note: This virtual machine has been minimally configured with: 1 CPU Core 1024MB of RAM 30GB Hard Drive (non formatted) First boot device – Intel e1000 NIC Note: When the F8 menu loads, how many seconds does the delay start with? After 60 seconds have passed, the system will boot into WinPE Note: You can skip the 60 second delay by pressing F8 and choosing the “Basic WinPE” instance After a brief period, WinPE will load and present you with an Altiris Automation Background
2) Switch to the SMP virtual machine
3) On the SMP virtual machine double click on the Symantec Management Console 7.5 icon to launch the Symantec Management Console
4) Navigate to Manage-> Jobs and Tasks
5) Expand System Jobs and Tasks-> Redeploy
6) Select the “ Redeploy Image” job
7) Press the “Quick Run” button and select “PredefinedPC” from the list

39 of 47
8) Press the “Run Button” Note: Automatic job processing is only supported for Initial Deployment or Re-Deployment scenarios. Since this is a “Predefined Computer” we need to manually assign a job to this computer (or a Saved Search with this computer in it). This does not have to be done after the client boots. The advantage to Predefined Computers is that you can schedule jobs and tasks long before the machine boots to the network.

40 of 47
Booting from a Managed Computer This exercise is primarily designed to show not only that Deployment Solution responds to known, managed computers in a different way, but also to showcase some of the possible use cases for customizing WinPE.
1) Locate and launch the “Win7” virtual machine Note: This virtual machine has been configured with: 1 CPU Core 1024MB of RAM 40GB Hard Drive (NTFS Formatted) First boot device – Intel e1000 NIC Windows 7 installed Symantec Management Agent Installed Note: The 180 second countdown before the boot process continues.
2) Press F8 to bypass the countdown
3) Select “Advanced WinPE” from the list
4) When the “Initial Deployment” window pops up, press “Cancel” Note: There is a dramatic difference between the previous WinPE instances and this one. This exercise is designed to not only differentiate the boot scenarios supported by Deployment Solution but to showcase some of the more advanced potential use cases. Your instructor will explain the process used to customize this particular instance of WinPE
5) Hover over each icon on the object dock for a description of functionality
41 of 47
6) Locate and execute the “PECTAgent Log File” Note: Nothing has been done to alter the log file itself, rather a GUI mechanism (Notepad) has been implemented to allow for easier viewing of log file information
7) Close Notepad
8) Locate and execute the “Explorer” application Note: This is a GUI file system explorer that allows you visually navigate the WinPE file system. This is highly useful for troubleshooting or editing files that are typically locked when the system is in production
9) Locate and execute the “Run SEP Scan” application
10) Select “Continue loading endpoint recovery”
11) Select “English”
12) Enter the following PIN number KDCG3V9D8DB63
13) Press “I Agree” to accept the EULA
14) Press the “Start Scan” button Note: Symantec Endpoint Protection has the ability to run inside of WinPE to perform “offline” threat detection. It is not unheard of for a system to be compromised to a point where localized threat management solutions cannot clean the workstation. Note: Typically this process would be a bit more automated, allowing for automatic “scan on boot”.
15) Continue investigating the other options/utilities on the object dock

42 of 47
Optional Exercises
Adding Preboot Drivers Deployment Solution 7.5 utilizes WinPE 4.0 which is based on Windows 8. Windows should typically have all of the necessary drivers to boot a machine and begin the imaging process. That being said, it is highly likely that at some point an administrator will need to add additional drivers to the system.
1) On the SMP virtual machine double click on the Symantec Management Console 7.5 icon to launch the Symantec Management Console
2) Navigate to Settings-> Deployment-> Driver Management
3) Click on the Preboot tab.
4) Click Add. Note: If you see a warning about the digital signature we use, check the box to “Always trust content from this publisher” and then click Run.
5) Add drivers by doing the following:

43 of 47
6) Click the folder icon to the right of Location and browse into: C:\Lab_Resources\Deployment Solution\VMware Drivers\LSI_Driver\.
Note: You won’t see anything inside the folder, but the root will be selected. Note: You may see a brief message that says “Loading…” Click OK.
7) Click Open.
8) Press the “Add” button to load the driver into the database
9) Once the process is complete you will receive confirmation
10) Press “Close” and close the Driver Management screen

44 of 47
Importing Existing Images Deployment Solution utilizes Symantec Ghost as the primary imaging engine. As such, any images previously created with Ghost may be imported directly into Deployment Solution for immediate use.
1) On the SMP virtual machine browse to: C:\Program Files\Altiris\Deployment\Tools\
2) Run “ResourceImportTool.exe”
3) Click Browse, navigate to C:\Lab_Resources\Deployment Solution\Images\Windows 7, select “Windows7Base.gho”, and then click Open. Note: that you can select multiple files at a time in this window using the CTRL and Shift keys (i.e. – the image you are importing is split into multiple files).
4) Select “Windows 7 Professional Service Pack 1” as the OS.
5) Click Import.
When the image is finished uploading, a message will appear indicating the import was successful. Acknowledge the message and then close the Import Tool.

45 of 47
Post SSL Configuration Workaround (Optional) This section is only required if you have installed Deployment Solution 7.5 and then enabled SSL communication between the clients and the server. The issue is due to the fact that several configuration files and polices are not updated appropriately if SSL is not enabled during the installation of the Symantec Management Platform.
Enabling the SSL Certificate Policies 1) On the SMP virtual machine double click on the Symantec Management Console 7.5 icon to
launch the Symantec Management Console
2) Navigate to Settings-> All Settings-> Agents/Plug-ins-> Deployment and Migration-> Windows (x86)-> Extract SSL Certificate (x86) – Install
3) Enable the policy by clicking on the red orb and choosing “On”
4) Press “Save Changes”
5) Navigate to Settings-> All Settings-> Agents/Plug-ins-> Deployment and Migration-> Windows (x64)-> Extract SSL Certificate (x64) – Install
6) Enable the policy by clicking on the red orb and choosing “On”
7) Press “Save Changes”
46 of 47
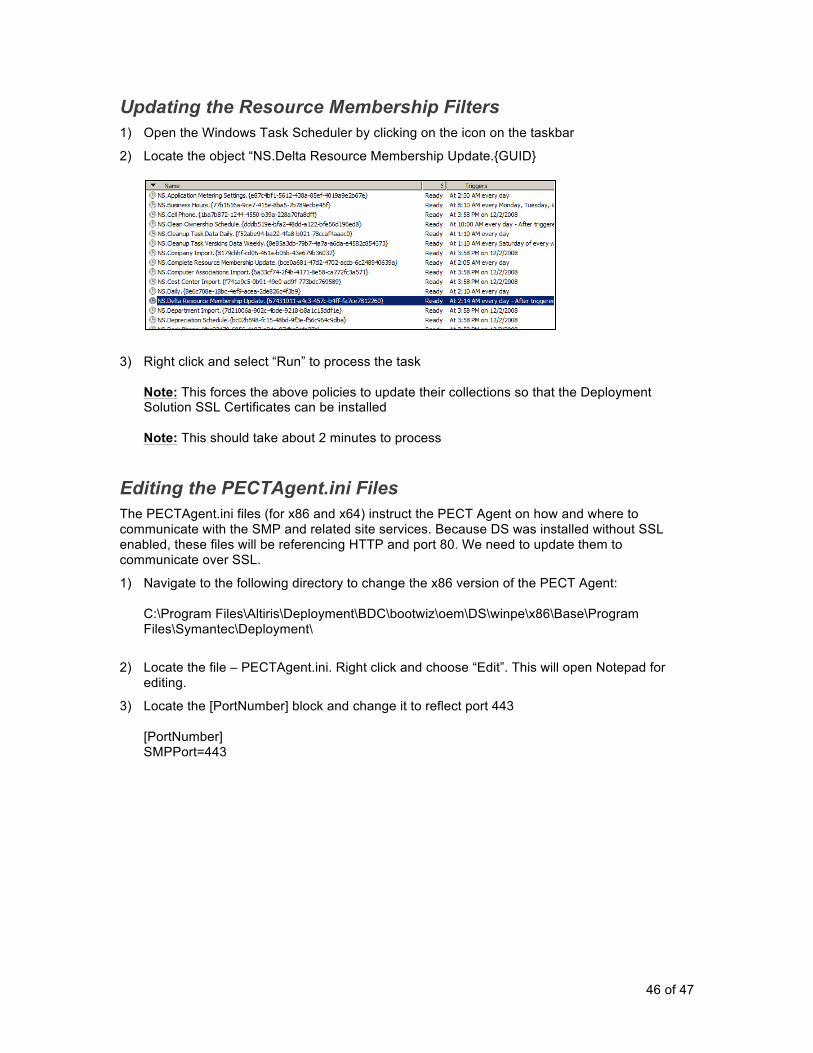
Updating the Resource Membership Filters 1) Open the Windows Task Scheduler by clicking on the icon on the taskbar
2) Locate the object “NS.Delta Resource Membership Update.{GUID}
3) Right click and select “Run” to process the task Note: This forces the above policies to update their collections so that the Deployment Solution SSL Certificates can be installed Note: This should take about 2 minutes to process
Editing the PECTAgent.ini Files The PECTAgent.ini files (for x86 and x64) instruct the PECT Agent on how and where to communicate with the SMP and related site services. Because DS was installed without SSL enabled, these files will be referencing HTTP and port 80. We need to update them to communicate over SSL.
1) Navigate to the following directory to change the x86 version of the PECT Agent: C:\Program Files\Altiris\Deployment\BDC\bootwiz\oem\DS\winpe\x86\Base\Program Files\Symantec\Deployment\
2) Locate the file – PECTAgent.ini. Right click and choose “Edit”. This will open Notepad for editing.
3) Locate the [PortNumber] block and change it to reflect port 443 [PortNumber] SMPPort=443

47 of 47
4) Locate the [Communication] block and change it to reflect protocol https [Communication] SMPPort=https Note: It is very important that the https be lowercase!! Any uppercase letters will result in a failed communication attempt
5) Navigate to the following directory to change the x64 version of the PECT Agent: C:\Program Files\Altiris\Deployment\BDC\bootwiz\oem\DS\winpe\x64\Base\Program Files\Symantec\Deployment\
6) Locate the file – PECTAgent.ini. Right click and choose “Edit”. This will open Notepad for editing.
7) Locate the [PortNumber] block and change it to reflect port 443 [PortNumber] SMPPort=443
Locate the [Communication] block and change it to reflect protocol https [Communication] SMPPort=https Note: It is very important that the https be lowercase!! Any uppercase letters will result in a failed communication attempt