desert leathercraft llc ferdco pro-2000 saga - iinet.comstelmack/training/ferdco saga.pdf · desert...
TRANSCRIPT
FERDCO Pro-2000 Saga -- Page 1
Desert Leathercraft LLC FERDCO Pro-2000 SagaRepairing after an accident...and again...
Revised 4-21-2015 Copyright © 2015 by Bob Stelmack, All Rights Reserved
Story of One MachineThis is the story of a FERDCO Pro-2000 that has had two owners and a rough life.
It Started with IvanWhen I first moved to the Tri-Cities area in Washington State, I was looked for fellow leather crafters to share ideas. Ivan re-sponded to a kpr.craigslist.org advertisement to form a local leather group. Ivan and I got together and started gather others to form a small leather group.
Ivan had a very nice leather room just off his kitchen. Then I got my first look at his FERDCO Pro-2000. I was jealous—I had sewing machine fever. I wanted THE MA-CHINE that would do everything.
The FERDCO company sponsored the An-nual Leather Show held in November at Pendelton, OR (now sponsored by Sheridan Leather Outfitters, WY) and showed their sewing machines. Ron helped me narrow
Contents1 Story of One Machine1 It Started with Ivan1 The Transfer2 The Accident2 First Re-Construction3 Second Re-Construction3 Step 1 - Remove machine4 Step 2 - Remove & Rotate
table4 Step 3 - Countersink Bolts4 Step 4 - Fill Holes4 Step 5 - Mark New
Locations4 Step 6 - Install Formica4 Step 7 - Drill5 Step 8 - Shorten Pedals5 Step 9 - Mount Accessories5 Finished (?) Table5 FutureModifications
down the machine that would best fit my needs. I wound up purchasing a FERDCO 1245 (clone of the Pfaff 1245) for about one-third the cost of a FERDCO Pro-2000. Even got a show discount and they would drive by the Tri-Cities and Ivan would help me pick it up from the truck stop. I was in heaven and my hand sewing leather book covers were at an end.
The TransferYears passed, Ivan moved, not far, but to a smaller home. Some unexpected expenses
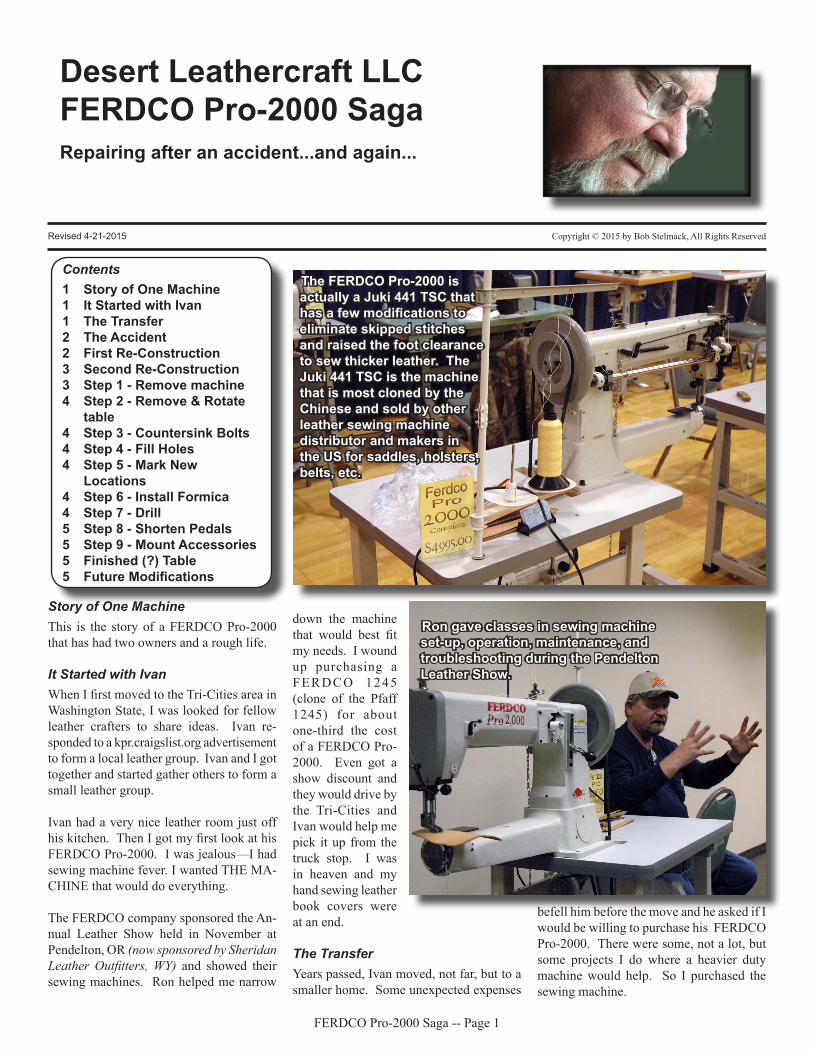
Ron gave classes in sewing machine set-up, operation, maintenance, and troubleshooting during the Pendelton Leather Show.
The FERDCO Pro-2000 is actually a Juki 441 TSC that hasafewmodificationstoeliminate skipped stitches and raised the foot clearance to sew thicker leather. The Juki 441 TSC is the machine that is most cloned by the Chinese and sold by other leather sewing machine distributor and makers in the US for saddles, holsters, belts, etc.
befell him before the move and he asked if I would be willing to purchase his FERDCO Pro-2000. There were some, not a lot, but some projects I do where a heavier duty machine would help. So I purchased the sewing machine.

FERDCO Pro-2000 Saga -- Page 2
Notice the plywood sheets leaning against the wall. Also notice how much space the machine takes up in the configuration that FERDCO produced.
The large area for the drive belt left little support for the for the heavy machine. Granted, that the anticipation of the heavy plywood falling on it was not a design concept of the original table.
This is the damaged flat table that had the single bolt-on design.
Since I do a lot of flat work, FERDCO sold me a flat table add-on for my machine. It was a little (well, a lot) clumsy. In fact, initial alignment and the set-up / take-down was a hassle. I tried another flat table that used screw the bolted into the sewing ma-chine arm. I put it on and left it on and found that the FERDCO Pro-2000 was seldom used in leather book cover manufacturing. Mostly used for belts, and large repairs.
The AccidentI do some wood working, actual I prefer the term “wood butcher”, so I keep some 4 by 8-foot 3/4-inch sheets of plywood in the garage, leaned up against the wall, in front of the car.
Someone, only two of us live here, must have pulled into the garage and pulled far enough forward to push the plywood up to a vertical position removing the “leaning” of the wood.
We left the next day, and watched in horror as the plywood tipped forward hitting the sewing machine and the hood of the car.
The dent in the car hood was not too bad, but the sewing machine table was not so lucky.
Amazingly, the sewing machine was undam-aged and was tested immediately by turning the hand wheel. However, the particle board sewing table did not fair so well.
The overall issue with the sewing table was the particle board construction (and more likely the poor planning of the plywood storage).
First Re-ConstructionUsed broken table as a template to make the new table. That way the holes for the motor, speed reducer, drive belt, and the sewing machine head would be correct. The new table was made out of two pieces of 3/4 inch plywood glued together and screwed with additional oak trim. It was only fitting to use plywood for the sewing table—the same plywood that broke the table!
The table top was finished off with some off-cut Formica from the carpet and tile store.
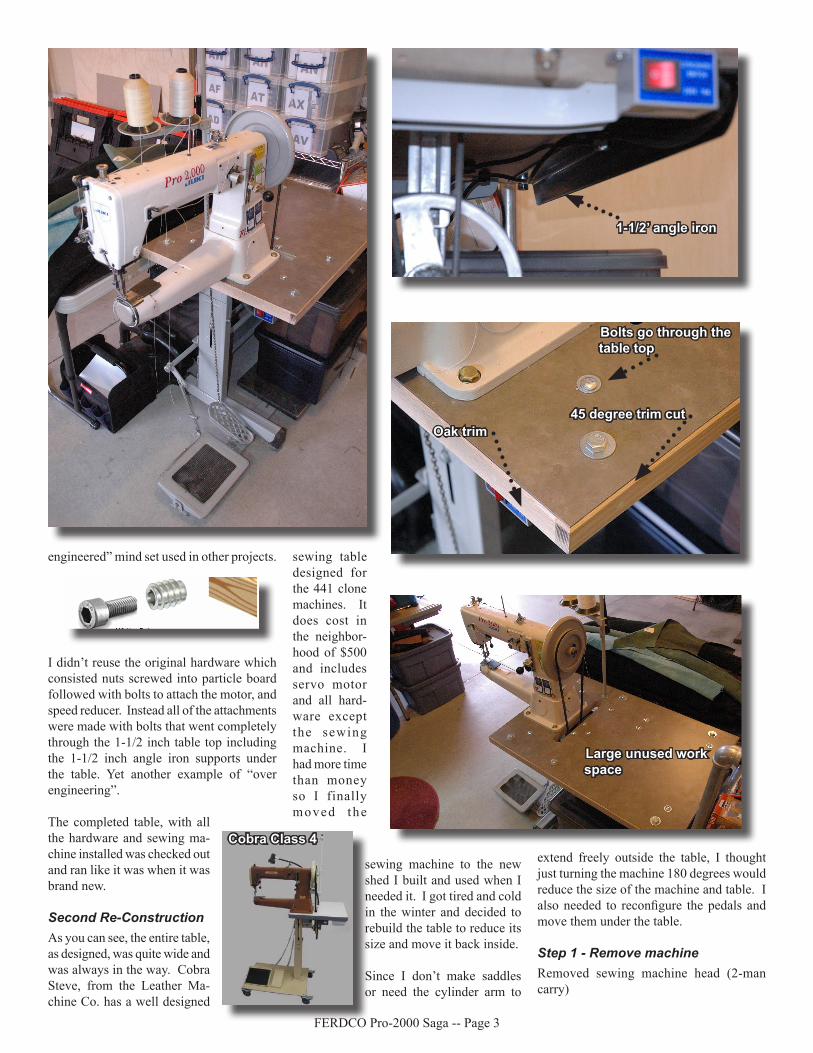
Since I was overly cautious, I included two 1-1/2 inch angle iron supports to run the length of the table. This is the same “over
FERDCO Pro-2000 Saga -- Page 3
engineered” mind set used in other projects.
I didn’t reuse the original hardware which consisted nuts screwed into particle board followed with bolts to attach the motor, and speed reducer. Instead all of the attachments were made with bolts that went completely through the 1-1/2 inch table top including the 1-1/2 inch angle iron supports under the table. Yet another example of “over engineering”.
The completed table, with all the hardware and sewing ma-chine installed was checked out and ran like it was when it was brand new.
Second Re-ConstructionAs you can see, the entire table, as designed, was quite wide and was always in the way. Cobra Steve, from the Leather Ma-chine Co. has a well designed
sewing table designed for the 441 clone machines. It does cost in the neighbor-hood of $500 and includes servo motor and all hard-ware except the sewing machine. I had more time than money so I finally moved the
sewing machine to the new shed I built and used when I needed it. I got tired and cold in the winter and decided to rebuild the table to reduce its size and move it back inside.
Since I don’t make saddles or need the cylinder arm to
extend freely outside the table, I thought just turning the machine 180 degrees would reduce the size of the machine and table. I also needed to reconfigure the pedals and move them under the table.
Step 1 - Remove machineRemoved sewing machine head (2-man carry)
Cobra Class 4
1-1/2’ angle iron
Bolts go through the table top
Oak trim45 degree trim cut
Large unused work space
FERDCO Pro-2000 Saga -- Page 4
Step 2 - Remove & Rotate tableRemove table top and rotate 180 degrees and temporally bolted down.
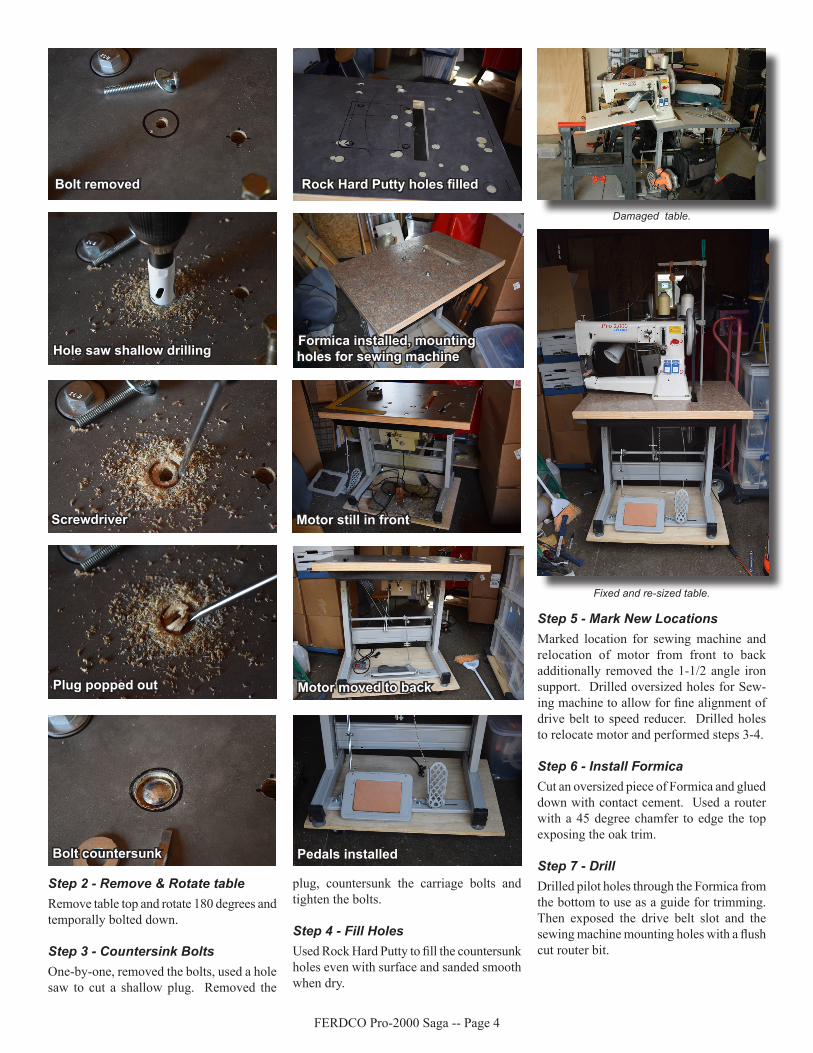
Step 3 - Countersink BoltsOne-by-one, removed the bolts, used a hole saw to cut a shallow plug. Removed the
plug, countersunk the carriage bolts and tighten the bolts.
Step 4 - Fill HolesUsed Rock Hard Putty to fill the countersunk holes even with surface and sanded smooth when dry.
Step 5 - Mark New LocationsMarked location for sewing machine and relocation of motor from front to back additionally removed the 1-1/2 angle iron support. Drilled oversized holes for Sew-ing machine to allow for fine alignment of drive belt to speed reducer. Drilled holes to relocate motor and performed steps 3-4.
Step 6 - Install FormicaCut an oversized piece of Formica and glued down with contact cement. Used a router with a 45 degree chamfer to edge the top exposing the oak trim.
Step 7 - DrillDrilled pilot holes through the Formica from the bottom to use as a guide for trimming. Then exposed the drive belt slot and the sewing machine mounting holes with a flush cut router bit.
Damaged table.
Fixed and re-sized table.
Bolt removed
Hole saw shallow drilling
Screwdriver
Plug popped out
Bolt countersunk
RockHardPuttyholesfilled
Formica installed, mounting holes for sewing machine
Motor still in front
Motor moved to back
Pedals installed
FERDCO Pro-2000 Saga -- Page 5
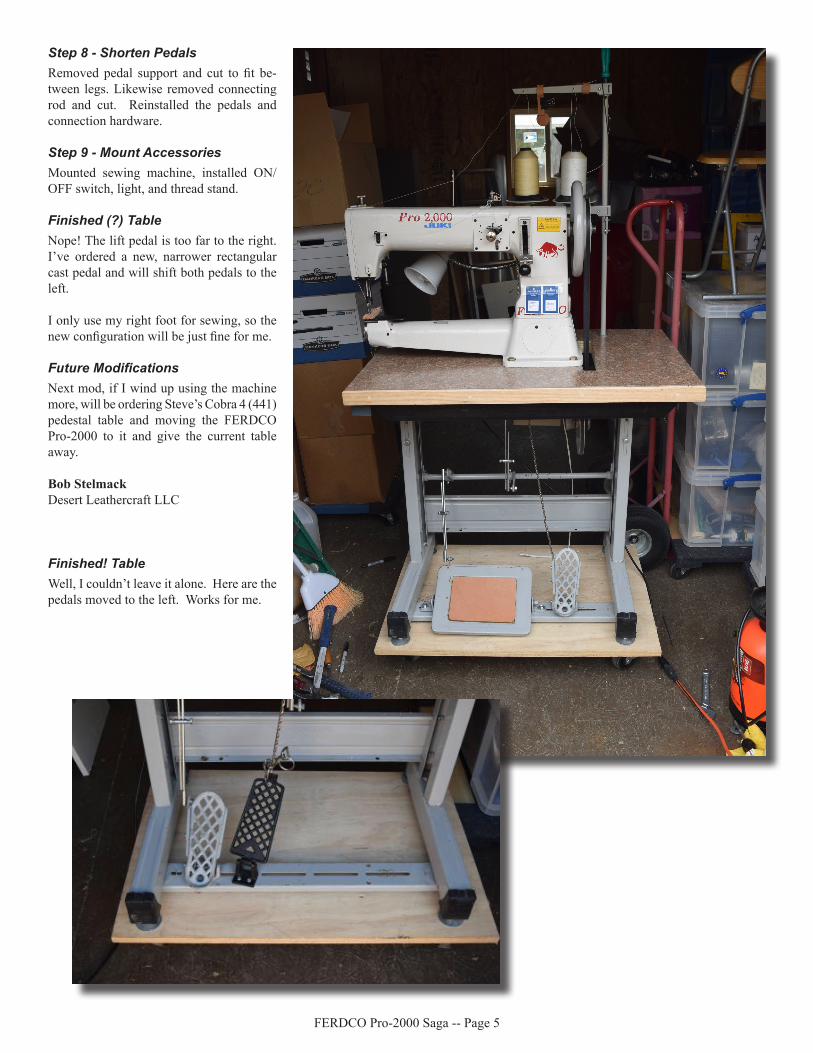
Step 8 - Shorten PedalsRemoved pedal support and cut to fit be-tween legs. Likewise removed connecting rod and cut. Reinstalled the pedals and connection hardware.
Step 9 - Mount AccessoriesMounted sewing machine, installed ON/OFF switch, light, and thread stand.
Finished (?) TableNope! The lift pedal is too far to the right. I’ve ordered a new, narrower rectangular cast pedal and will shift both pedals to the left.
I only use my right foot for sewing, so the new configuration will be just fine for me.
Future ModificationsNext mod, if I wind up using the machine more, will be ordering Steve’s Cobra 4 (441) pedestal table and moving the FERDCO Pro-2000 to it and give the current table away.
Bob StelmackDesert Leathercraft LLC
Finished! TableWell, I couldn’t leave it alone. Here are the pedals moved to the left. Works for me.