designing and creating earth science lessons with - steve kluge
TRANSCRIPT
Designing and Creating Earth Science Lessons with Google Earth™
Steve Kluge – Fox Lane HS, Bedford, NY and Purchase College, SUNY, Purchase, NYDrew Patrick – Fox Lane HS, Bedford, NY
Eric Fermann – Eastchester HS, Eastchester, NY
Contact the authors at [email protected]
The intent of this project is to provide teachers with little Google Earth™ experience the information and ideas that will enable them to develop high quality, good looking lessons using the Google Earth™ geospatial tool. During the winter of 2006–2007, the manual was field tested by a group of Earth Science teachers under the guidance of several experienced mentors.
Acknowledgments
Thanks to the following educators for their contributions as field testers of this manual:
Martha Calaban Nicole LaDueEric Cohen Karen ManningRobert Dedrick Sue MitchellMark Dineen Bob MozerKevin Finerghty Tracy VarailiJessica Floridia Bethany WeisbergerKathleen Gavin Kristin Woodell
Use Permissions
This work was supported by a grant from the National Science Foundation (EAR-0426260).
All screenshots and images courtesy of Google Earth™ mapping service.
The user of this manual is granted the right, without any fee or cost, to access and use this manual for any non-profit training, research, or educational purpose and not for any direct or indirect commercial purpose or advantage. Any copyright notices contained in this manual shall remain intact and unaltered and shall be affixed to any subsequent reproduction of materials from this manual. To reproduce or adapt the Google images for any purpose outside of this publication you must obtain explicit written permission from Google. The user must include an appropriate citation crediting the source of all or any portion of this manual as follows:
“The source of this material is the Digital Library for Earth System Education website at http://www.dlese.org. All Rights Reserved. © UCAR 2007”
This edition of the manual was published in May of 2007 in both html and pdf versions

Contents
Note: The examples and illustrations in this manual are taken from the Giant Peak Tour. You should have the tour up and running in Google Earth while you work through this manual. Get the tour here:
http://www.stevekluge.com/projects/dlesege/dlesegemanual/Giant Peak, Adirondack Mts., NY.zip
Planning a Lesson ......................................1What Can I Do With GE ..............................1What Can I Include in a GE Lesson .............3Organizing Your Lesson ...............................4
Creating a Google Earth Lesson ...............5Creating Folder and Placemarks ..................5Saving and Sharing your GE Lesson ...........7Images and Hyperlinks in Placemarks .........8Adding a Map Overlay ...............................10
Useful Tools ...............................................13Image Processing .......................................13Text Editing ................................................13Image Hosting ............................................13
Appendix: Using Google Earth.................15Downloading and Installing GE .................15Controls and Navigation ............................15View Menu Option .....................................16Tools Menu Option ....................................17Moving and Editing Placemarks ................19Lesson Planning Tool .................................20

1
Planning a Lesson
What Can I Do With Google Earth?
Since its release in the summer of 2005, Google Earth has provided an uncomplicated means of combining aerial imagery with geologic and geographic information in dramatic fashion. The 3D rendering of surface features of the earth can be manipulated easily and incorporated into the Earth Science classroom in a variety of ways. Without a doubt, Google Earth visualizations grab students’ attention. It’s the thoughtful teacher’s job to integrate these visualizations into lessons that include important content and inquiry-based learning activities.
When you design a classroom lesson around the Google Earth program, your students will see the earth from a new perspective. The scale of the Earth, and features that are created or responsible for many of the important earth science processes are often too large and too complex to see easily as a sketch, a drawing on the board, a stationary photograph, or even on a real-life field trip. The aerial imagery in GE can provide a realistic and appropriately scaled representation of the Earth. There are at least three unique ways that Google Earth can be used in a classroom setting:
1. As a demonstration tool: Tours can be developed that will allow students to ‘fly’ from one location to the next with a brief pause at each stop. During a tour, students will have the chance to view locations that have been identified and connected by the instructor as geologically or geographically important. Different layers supplied with the program (earthquakes, volcanoes, etc) can be activated to illustrate key points along with an oral narration for each stop.
2. As a supplement to previously established lab activities: By including a Google Earth tour with an established activity, students will be able to draw greater connections between their activity and the Earth. For example, students may construct a river profile manually to understand how the idealized profile shape of a river is interrupted by nick-points such as waterfalls and dams. A tour from the mouth to the head and back to the mouth along the same river will help students recognize what they did with graph paper and pencil actually represents a real location with real waterfalls and dams.
2
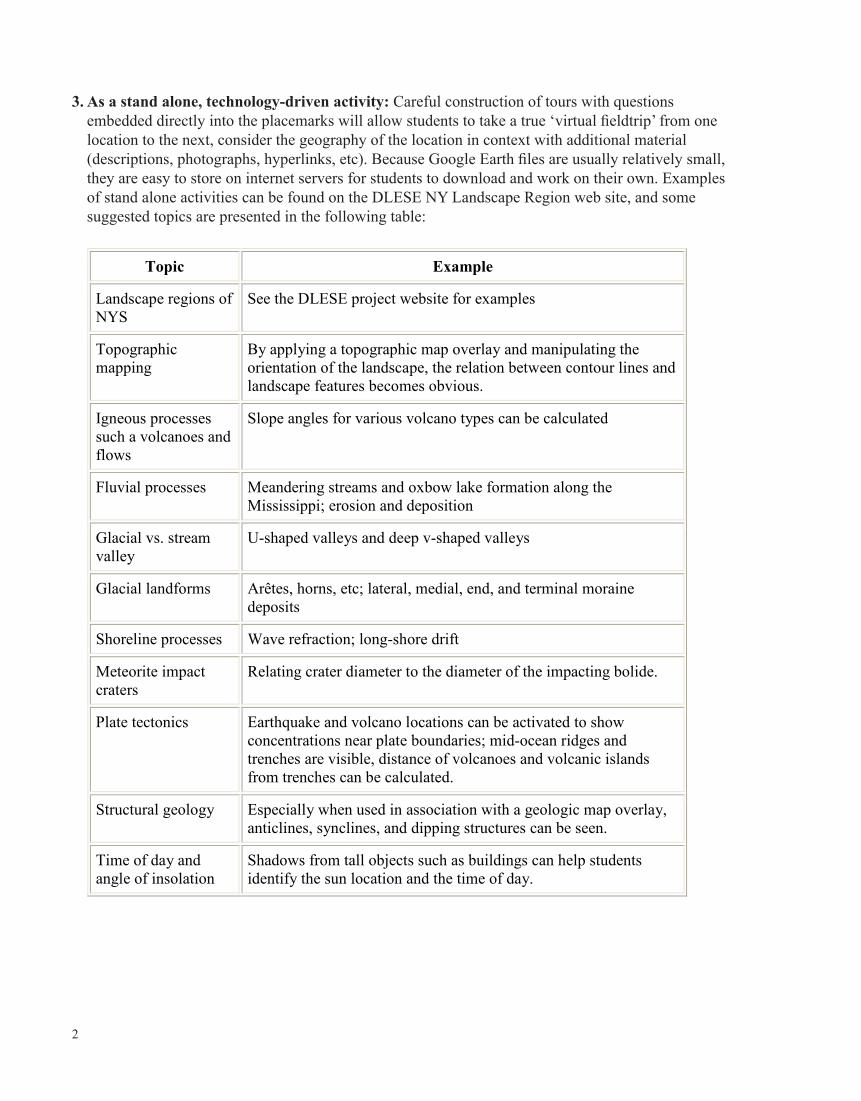
3. As a stand alone, technology-driven activity: Careful construction of tours with questions embedded directly into the placemarks will allow students to take a true ‘virtual fieldtrip’ from one location to the next, consider the geography of the location in context with additional material (descriptions, photographs, hyperlinks, etc). Because Google Earth files are usually relatively small, they are easy to store on internet servers for students to download and work on their own. Examples of stand alone activities can be found on the DLESE NY Landscape Region web site, and some suggested topics are presented in the following table:

3
What Can I Include in a GE Lesson?
There is a continuum of features that can be included in your GE lesson, depending on your objectives. The list that follows provides an overview of these features. Once you have identified the objectives of your inquiry, you can begin to select which features best suit your needs. Examples of each feature can be viewed by navigating to the Giant Peak and the DLESE NY Landscape Regions GE tours.Placemarks. A placemark is the most basic GE tool, and it is used to identify a particular location, landscape or geologic feature, or point of interest. Placemarks should be included whenever you need to provide specific information: a description, question, image, link or instructions.
Hyperlinks. Hyperlinks can be included in the pop-up window associated with each placemark. Hyperlinks enable the user to navigate to a web site that may contain additional information and details related to your objective, or may point the user in a whole new direction of inquiry.
Images. Images add tremendous value to a placemark. Images can become the basis for a specific question (see example left), or can illustrate a feature described in the placemark.
Overlays. Overlays are a “value-added” component of GE. Overlays can include images, maps, or diagrams that correspond to a geographic feature or location on Earth. Once included, an overlay can appear with varying degrees of transparency, and represent an added “layer” of information, much like a GIS system.
Lesson Files. Handouts, instructions, directions, and worksheets can be embedded as hyperlinks into placemarks. These support materials add tremendous value to your GE tour, and serve as a clear way to know if students are meeting the objectives of the lesson. As with any hyperlink, these materials can be in a variety of document formats.

4
Deciding on a Lesson Topic
The lesson you choose will depend on the objectives you set forth. Start by visiting the ideas/uses listed earlier in this section, and by carefully considering the following questions:
1. What will students need to know to get started? (Think both in terms of content and using the technology)
2. How much time will be devoted to this lesson? Can you access the computer lab for that length of time?
3. What will the student outcome or product look like? Is your purpose to stimulate discussion, or should there be a written product?
Perhaps the most important question is the last one. If you are unclear of your purpose, you are likely to open GE, zoom around, and get frustrated. If you have successfully answered these questions, you will be ready to begin making some specific decisions.
Organizing Your Lesson
As with all good field trips, careful planning is necessary, and the virtual Google Earth tour is no different. When developing a lesson in Google Earth, consider developing a list (mentally or written) of the desired locations for the tour placemarks, and imagine that students will eventually use the tour of placemarks as a virtual field trip. This field trip will include several stops that have some geologic/geographic significance.
Think, too, about how and where you want to link your classroom lesson into your GE tour. It might consist of an activity at each stop with instructions to students embedded right in the placemark. Or, the lesson may be a Word or .pdf document linked from the placemark, as is the case in the sample Giant Mt. tour. (See the Image and File Hosting section on page 16.)
You may find the “planning tool” in the APPENDIX helpful as you organize your thoughts and materials.
Once you complete your planning, you are ready to move into GE and start building your tour!

5
Creating a Google Earth™ Lesson
Creating and Saving Folders and Placemarks
2. Click on “My Places” in the places frame to select that destination for the new folder.
3. From the toolbar, click “Add” and then “Folder” as indicated above. The “New” folder dialog box will open as shown to the right above. Type in a name for your folder. Then type in a description of the contents of the folder. The image above is a screen shot of the folder that contains the sample tour and lesson that accompanies this manual. When you press “OK,” the folder will be created and saved in “My Places.” See also Moving Folders and Editing Folders in the appendix.
Creating a PlacemarkIndividual placemarks can be added to the folder you’ve just created. The steps for creating a place-mark are similar to those required to make a folder:
1. Navigate to the exact view you want your audience to see when they view the placemark.
2. In the Places frame, click on the folder you want to create your placemark in.
3. From the toolbar, click “Add” and then “Placemark” as indicated in the figure to the right.
Creating a FolderA Google Earth tour with more than one stop should be created in its own folder in “My Places.” Making a new folder in the Places frame involves 3 simple steps:
1. Navigate to the place you want your audience to see when they open the folder. Adjust the zoom and tilt to suit your liking/needs.

6
4. In the dialog box that opens, type in the name and description of your placemark (this is the text that will appear when your placemark is displayed in GE). The screen shot below was made as the “Glacial Landforms in the Adirondacks” placemark was made.
The default placemark icon is , and it is easily changed by clicking the icon in the New placemark dialog box. For the Giant Mountain folder, we’ve chosen the icon.
Once you’ve selected an alternate icon, all subsequent placemarks will default to the alternate.The Latitude, Longitude, and View are all set automatically to match the display you set as you began to make your placemark. You can play with the Style, Color and Altitude settings, but the defaults will work fine. See also Moving and Editing Placemarks in the appendix.

7
Ordering Placemarks in a TourWhen creating and adding placemarks to a tour folder, each successive placemark will be added to the top of selected folder in the Places frame.
Tours play in order from the top down. Creating placemarks in your folder in a logical sequence will create a ‘backwards’ tour (i.e. the first location created will be the last ‘stop’ on the tour).
Tour placemarks can be rearranged by clicking and dragging each stop into its appropriate position in the tour list (See also Moving Placemarks in the appendix).
One suggestion to aid with the re-arrangement of the tour is to number the stops sequentially. When re-ordering the placemarks, ‘stop’ number 1 should be at the top of the tour folder, and stops should continue in numerical order. Notice that a number of the stops in the sample Giant Mt. tour are numbered. Remember, placemarks can be edited at any time.
Saving and Sharing Folders and PlacemarksPutting images and hyperlinks neatly into placemarks requires the knowledge of just a little HTML. But don’t worry, it’s not that hard, and what you need to know is very limited. In this section, you’ll learn the basic HTML tags you’ll use, and if all else fails, how to “steal” the necessary code from existing placemark descriptions.
Once you have created folders and placemarks in Places, GE will save them there. But if you want to bring your GE tours to another computer, send them to a friend, or post them to the web, you will have to save them as separate .kml or .kmz files.
To save a folder or placemark, simply right click the folder/placemark you wish to save, and select “save as” as indicated in the image to the right.
Select or create and select a folder on your hard drive to hold your GE files. You can save your files in either .kml (Keyhole Markup Language file) or .kmz (Keyhole Markup Zip file) format. It makes sense to save folders containing several placemarks as .kmz files.
When you click a .kml or .kmz file in My Computer, it will automatically open with Google Earth.

8
Images and Hyperlinks in Placemarks
Putting images and hyperlinks neatly into placemarks requires the knowledge of just a little HTML. But don’t worry, it’s not that hard, and what you need to know is very limited. In this section, you’ll learn the basic HTML tags you’ll use, and if all else fails, how to “steal” the necessary code from existing placemark descriptions.
The image and information link in the placemark below were found through a simple Google search for “Giant of the Valley.” Using a few HTML tags, it was easy to display the image and link to the site within the placemark description. The “How To” follows.
This Placemark… ...was generated by this description:
All instructions, or tags, in HTML are enclosed by < and > brackets. For instance, typing <CENTER> into a placemark description will center all the content (images and text) that follows. A particular instruction can be turned off by placing / within the < and > brackets, before the instruction. </CENTER> will turn off centering, and all content that follows will default to the left margin. The table below contains all the HTML you need to make a good looking and functional placemark.
In the table above the HTML is black, and annotations are in red. Google Earth supports other HTML in descriptions, too. If you know a little HTML, you can change fonts and create tables to display images and/or text side by side, but that is beyond the scope of this manual.

9
The image below, also annotated in red, is the description that produced the “View from the Summit” placemark in the accompanying GE tour.
If All Else Fails(Or even if it doesn’t) you can find a placemark in an existing lesson or tour that you like the appearance of. Right click it in the Places frame, and select Properties. Copy the Description to your new placemark, and replace URLs and text while keeping the HTML intact. (See Editing Descriptions in the appendix, too.)
Re-sizing Images from the InternetYou’re quite likely to want to include images you’ve found on the internet, but the image size may be too large to fit your placemark they way you’d like. The remedy is quite simple, and just involves adding width and height specifications to the <IMG SRC=" "> tag. Follow these steps to resize an image in your placemark:
1. Right click the image you’re interested in and select “properties.” Jot down the image size on a piece of scrap paper.
2. Multiply both the width and height measurements by the same reduction factor (0.5 will produce an image 1/4 the size of the original), and jot down those new dimensions.
3. Edit your <IMG SRC=" "> tag by adding width and height specs as follows: <IMG SRC=" " WIDTH="your calculated width" HEIGHT="your calculated height">
To reduce an image whose original size is 900 by 387 pixels, for instance, use this IMG SRC tag:
<IMG SRC="http://www.stevekluge.com/icecrystals/icecrystalepodweb.jpg" WIDTH="450" HEIGHT="193">

10
Using Your Own ImagesRather than linking to someone else’s images, you may want to use your own. While images that you own can be attached to a .kmz file, the image will greatly increase the size of the file and increase file download times as well. Furthermore, we have experienced some trouble getting images to reliably travel with a GE file. For those reasons, we recommend hosting your images at one of the sites listed in the Image Hosting section on page 15 of this manual. Instructions for uploading your images are at those sites, and generally you will have to open a free account to do so. Once your picture is up on the host site, you can retrieve its URL by right clicking the image and selecting “properties.” You can cut the URL from the properties window that opens and paste it between the " " in the <IMG SRC=" "> tag in your placemark description.
It is quite likely, however, that your images will be the wrong size to fit your placemark. You can resize the images right in your placemark (see the resize section on the previous page). Alternatively, you can download and install Easy Thumbs, a free and easy to use image resizing and editing tool (URLs and other options are listed in the Imaging Processing section of on page 15of this manual).
Generally, images will need to be no larger than 450 pixels wide or high, and since they will be viewed on screen, jpg quality can be set to 70% with no significant degradation of appearance.
Adding Map Overlays to your Google Earth Tour
One of the most dramatic things you can do with Google Earth is to drape a map over the three dimensional landscape display. In order to do this, you need a digital image of a map of the area you wish to overlay. There are several sources of such maps: Topozone.com, Maptech.com, USGS, and scanned paper maps are a few. We’ve found the maps at MapTech’s free map server to be of high quality at various zoom levels and sized right for GE overlays. Once you’ve located the map you want at the scale you want, right click the map and save it to your hard drive with an appropriate name.
The Giant Mt. overlay map in the screen shot to the left was saved from the MapTech™ site as giantmap.jpg.
Once you’ve saved your map, upload it to your image hosting site. Right click the map image at your hosting site, view properties, and note/copy the URL of your map image. You will need the URL when you create your overlay.

11
Adding an Overlay to the DisplayFirst, make the following adjustments in the Layers frame: turn on “Roads” and turn off “Terrain.” You may want to turn off everything else as well. On the dispay, Use the navigation controls to set North to the top of the display, and adjust the view so that you are looking directly down on the center of the area where your map will drape over the landscape. Make sure the display area is a little larger than the area your map will cover.
Click on the folder you created in “My Places” to select the destination for the overlay.
From the toolbar, click “Add” and then “Image Overlay” as indicated to the right. A green square will appear on the display, and the “New” image overlay dialog box will open as shown below.
Type in a name for your overlay in the New overlay dialog box. Then enter the URL of the map you want to overlay. Google Earth will fetch the map, and place it in the green square on the display.Finally, adjust the Transparency slider to the middle of the scale.

12
Adjusting Your Map Overlay
It’s unlikely that your map ended up exactly where it should be. Use your mouse on the green guides to re-center, stretch, shrink, rotate, and otherwise prod the map into position.
Use roads and bodies of water, and any other landmarks that appear on both map and GE display to align the map properly.
You can slide the Transparency: control back and forth to check the “fit” of your overlay too.
The first few times you do this, you’re likely to be a little frustrated. Don’t worry, it gets easier.
When you’re done, click “Okay” and Google Earth will save your properly positioned map to your folder in My Places.
13
Useful ToolsImage ProcessingEasy Thumbs (http://www.fookes.com/ezthumbs/?Easy%20Thumbnails=2800) is a free utility that allows you to quickly and easily adjust the size and quality of photos.MS Paint is an image processing program that comes with Windows. You can do basic image processing in Paint: resizing, cropping, etc. If you can’t find an MS Paint icon on your machine, click Start > Search and type MS Paint in the search dialog box.iPhoto is the image processing program on the Mac platform.ImageJ (http://rsb.info.nih.gov/ij/) is a free, Java based image processing program created by Wayne Rasband at the U.S. National Institutes of Health. You can find more information about ImageJ at http://imagejdocu.tudor.lu/. If you’ve never done any image processing, it will take you some time to learn to use the various tools.MWSnap (http://www.mirekw.com/winfreeware/mwsnap.html) is a handy freeware program that will allow you to capture any part of your screen and save it as an image file.
Text EditingNoteTab Light (http://www.notetab.com/) is a handy, free, text editing program with built in html creating and editing functions from Fookes software.
Image and File HostingThere are several free places to host your images on line. The following are well known and widely used sites:Flickr (http://www.flickr.com/)Kodak Gallery (http://www.kodakgallery.com/)Yahoo Photos (http://www.photos.yahoo.com/)
Using Images Hosted at Yahoo Photos
The following section describes how to use images hosted at Yahoo Photos. Other image hosting sites will work in much the same way.
First, go to Yahoo Photos (http://photos.yahoo.com) and either create a new account or log onto your existing account. Follow the instructions there to create an “album” to hold your GE images, and upload your photos to that album. Then click the album to view it, and click the thumbnail of the image you wish to use in your GE placemark or overlay. A full size image will display to the right of your album list.
You can right click ON THE IMAGE to get its URL. The images on the following page show you how to do it in Internet Explorer and Firefox.

14
In Internet Explorer...
...In FireFox
There are also sites that will host your .doc files. File Den (http://www.fileden.com/) will keep your files indefinitely, and you can link directly to them from your Google Earth placemarks. For a list and reviews of other image and file sharing sharing, visit Free WebHosts at
(http://www.free-webhosts.com/free-image-hosting.php).

15
APPENDIX
Using Google Earth™
Downloading and Installing Google EarthGoogle Earth can be downloaded from the internet site: http://earth.google.com. There are free and paid versions. The paid versions provide the user with more features and function, including the ability to upload GPS data directly into the program. This manual will focus on the features that are included and can be used with the free version. At this writing, Google Earth Version 4 (Beta) is available. If you have an older version, you may want to upgrade as this manual is written for version 4. To install the program, visit the web address above and follow their directions.
Controls and NavigationThe screen you’ll see when you open Google Earth appears below. Various aspects of the program have been highlighted and briefly explained
16
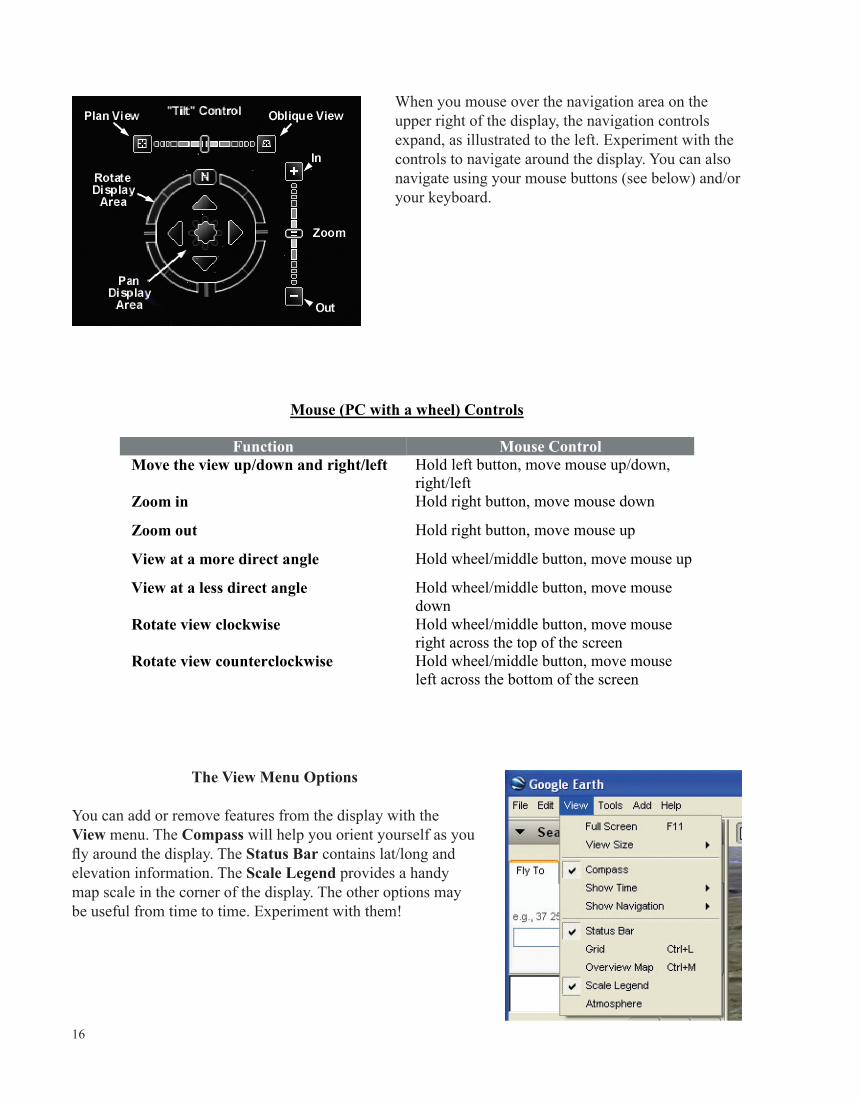
When you mouse over the navigation area on the upper right of the display, the navigation controls expand, as illustrated to the left. Experiment with the controls to navigate around the display. You can also navigate using your mouse buttons (see below) and/or your keyboard.
The View Menu Options
You can add or remove features from the display with the View menu. The Compass will help you orient yourself as you fly around the display. The Status Bar contains lat/long and elevation information. The Scale Legend provides a handy map scale in the corner of the display. The other options may be useful from time to time. Experiment with them!

17
Tools Menu Options
Having both the Toolbar and Sidebar active will make working with Google Earth more efficient. Several other Options are discussed below. You will find that adjusting those options will be necessary from time to time. Clicking Options... will open the window below:
In the 3D View tab you can set the display to lat/long or UTM and select english or metric units. The most frequently adjusted setting, however, will be the elevation exaggeration. Use a setting of 3 when viewing areas of low local relief, and a lower setting in mountainous regions.

18
In the Cache tab, you can adjust the memory and disk cache sizes that Google Earth creates. If you notice that the program is slowing down, try clearing the memory cache.
In the Touring tab you can make adjustments to the tours that you will be creating. Look the options over, but the default setting will work fine for now. If you find later on that your tour flies too fast or slow, come back here to make adjustments.

19
Editing Folders, Placemarks, and Overlays
If at any time you want to edit a folder, placemark, or overlay, simply right click on it in the Places frame and select properties. From there, the procedure is the same as adding new content.
Moving Folders, Placemarks, and Overlays
It’s easy to move folders, placemarks, and overlays. Simply drag and drop them anywhere within the Places frame. You can use this feature to relocate and re-order placemarks that you have created.

20
Lesson Planning Tool
Use this form to plan your Google Earth lesson. You can include links to the locations of specific resources, as necessary. This will enable you to gather all of the components of your lesson in one document, making the construction of the GE tour much easier.
1. The big idea we are working toward understanding is…
2. Students who complete this tour will be able to…
3. The following resources (images, overlays, links) will be included:
Type of Resource Description of Resource Location of Resource (Image, Overlay, Link) (personal, on the web, hosted by my school, etc.)
4. How much time should it take to complete this GE tour?
5. How will I know if the students have met the objectives?
6. Instructions/Notes for students: