diagnostic assessment 2018
TRANSCRIPT


2
i
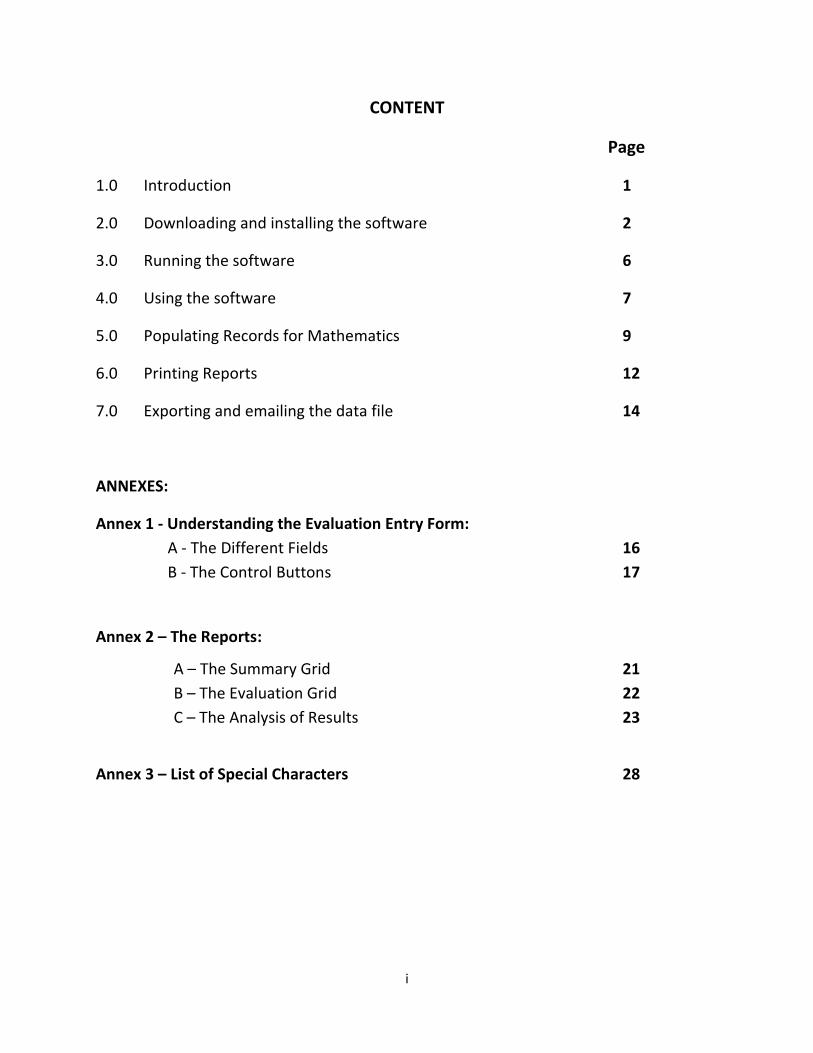
CONTENT
Page
1.0 Introduction 1
2.0 Downloading and installing the software 2
3.0 Running the software 6
4.0 Using the software 7
5.0 Populating Records for Mathematics 9
6.0 Printing Reports 12
7.0 Exporting and emailing the data file 14
ANNEXES:
Annex 1 - Understanding the Evaluation Entry Form:
A - The Different Fields 16
B - The Control Buttons 17
Annex 2 – The Reports:
A – The Summary Grid 21
B – The Evaluation Grid 22
C – The Analysis of Results 23
Annex 3 – List of Special Characters 28

1
1.0 INTRODUCTION
The Diagnostic Assessment Data Entry software has been developed by the Mauritius
Examinations Syndicate (MES) to enable the recording and analysis of results for the Diagnostic
Assessment at Grade 3. This guide provides step-by-step instructions for the installation and use
of the software.
Important Notes
1. This software should only be used to record the Diagnostic Assessment results for Grade 3
pupils.
2. The information recorded will be used by the MES for tracking pupils’ progress. It is thus
important that the particulars (Name, NID & Gender) of each pupil are carefully recorded as
per his/her Birth Certificate.
3. Information about each student should be recorded for both subjects, ENGLISH and
MATHEMATICS. To avoid duplicating the operation as at (2) above, you will be required
to:
3.1. start entering the data for ENGLISH first.
3.2. click on the button [Populate Records for MATHEMATICS] after you have finished
entering all the data for ENGLISH. A record with the details of particulars for each
pupil will thus be created automatically to be used for MATHEMATICS. The record
can be edited to input the assessment results in MATHEMATICS.
4. This software is a stand-alone application. The database will be installed on the PC on which
the application is set up. At the end of the exercise, the data file(s) should be emailed to the
Mauritius Examinations Syndicate (MES) at the following email address: [email protected]
NOTE: The software can be installed on more than one PC. The software will work
independently of one another on the different PCs. Consequently, if three PCs are involved,
data will be saved in three different data files. Under such circumstances, it is imperative
that all entries for ENGLISH & MATHEMATICS for a particular CLASS be saved on the
same PC. At the end of the exercise, if 3 PCs are used, 3 different data files (one from each
PC) would have to be emailed to the MES after renaming each data file appropriately – this
is explained in Section 7.0: Exporting and emailing the data file.
2
5. An internet connection will be required to download the software from the website of the
MES. Once downloaded, the application may be copied and installed on any PC. An
internet connection is not required to run the application after it has been downloaded.
2.0 DOWNLOADING AND INSTALLING THE SOFTWARE
2.1 Access the MES website by entering the following link: mes.intnet.mu
2.2. On the Home Page,
click on the [Examinations] tab found on the menu bar shown on the screenshot
below,
click on [Primary Level] in the drop down menu,
click on [Diagnostic Assessment at Grade 3] on the side menu as illustrated below:
3
OR,
Go to ‘Quick Links’ found in the right-hand side bar of the Home Page (indicated above), and
click on [Diagnostic Assessment at Grade 3]
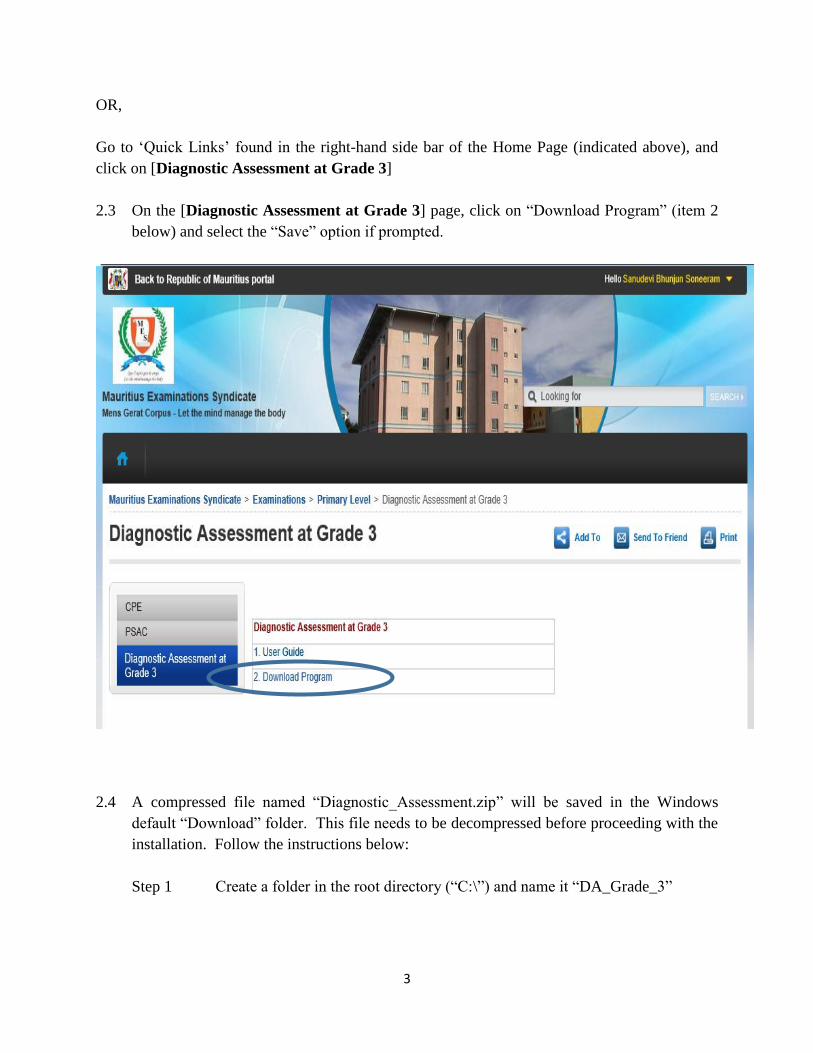
2.3 On the [Diagnostic Assessment at Grade 3] page, click on “Download Program” (item 2
below) and select the “Save” option if prompted.
2.4 A compressed file named “Diagnostic_Assessment.zip” will be saved in the Windows
default “Download” folder. This file needs to be decompressed before proceeding with the
installation. Follow the instructions below:
Step 1 Create a folder in the root directory (“C:\”) and name it “DA_Grade_3”
4
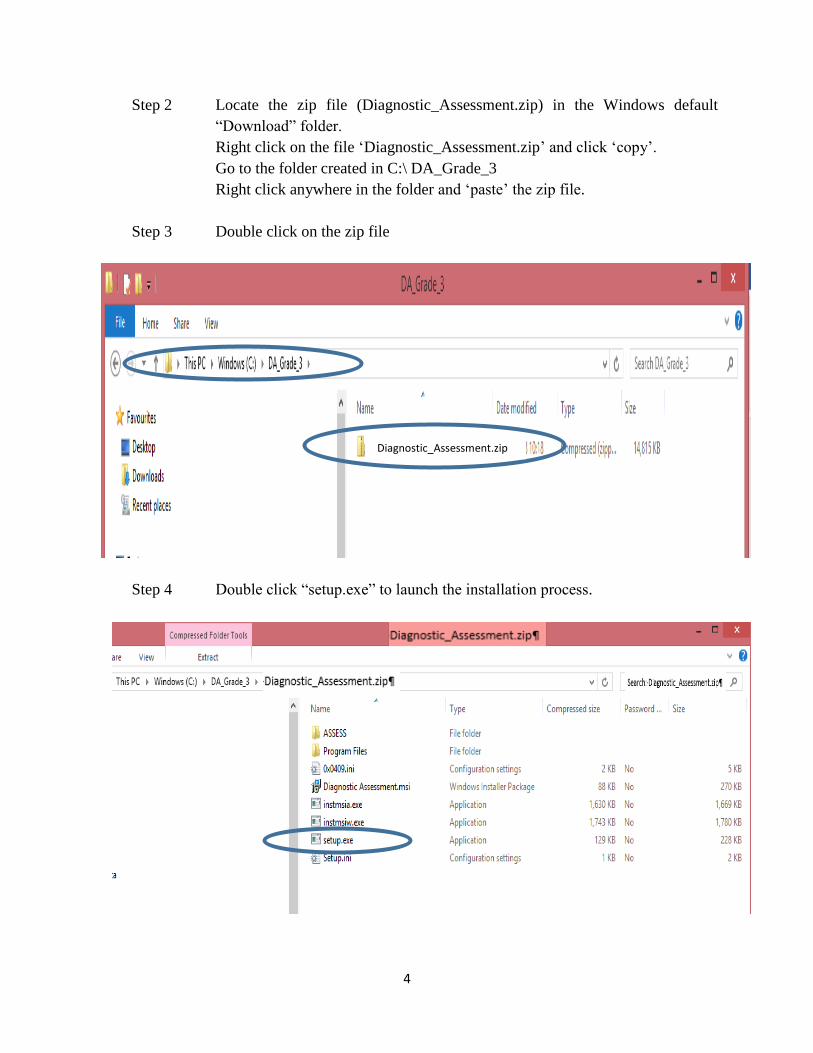
Step 2 Locate the zip file (Diagnostic_Assessment.zip) in the Windows default
“Download” folder.
Right click on the file ‘Diagnostic_Assessment.zip’ and click ‘copy’.
Go to the folder created in C:\ DA_Grade_3
Right click anywhere in the folder and ‘paste’ the zip file.
Step 3 Double click on the zip file
Step 4 Double click “setup.exe” to launch the installation process.
Diagnostic_Assessment.zip

5
Step 5 Wait until the following screen appears and click on the [Next >] button.
Step 6 The screen below appears and shows where the program will be installed
(note the drive letter – in the example below it is “C:\”). Click on the [Install]
button.
Step 7 Finally click [Finish] to complete the installation.
After the application has been successfully installed, an icon labeled “Diagnostic Assessment”
will be created on the Desktop.
6
3.0 RUNNING THE SOFTWARE
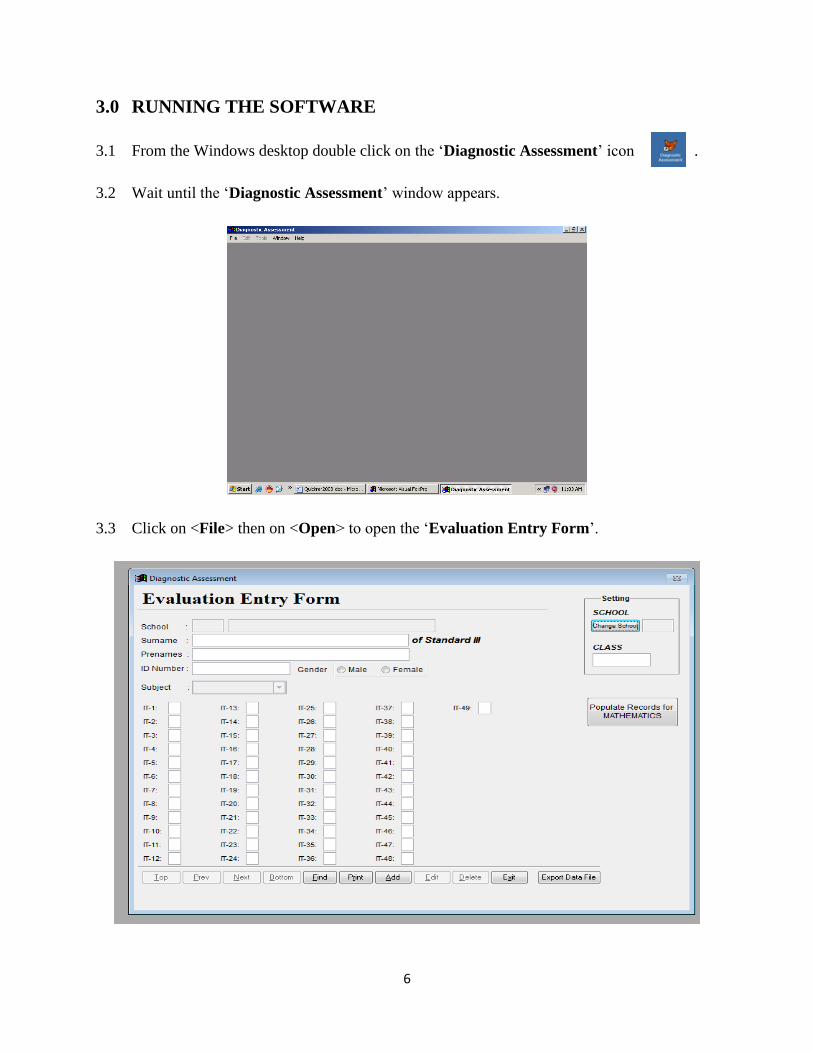
3.1 From the Windows desktop double click on the ‘Diagnostic Assessment’ icon .
3.2 Wait until the ‘Diagnostic Assessment’ window appears.
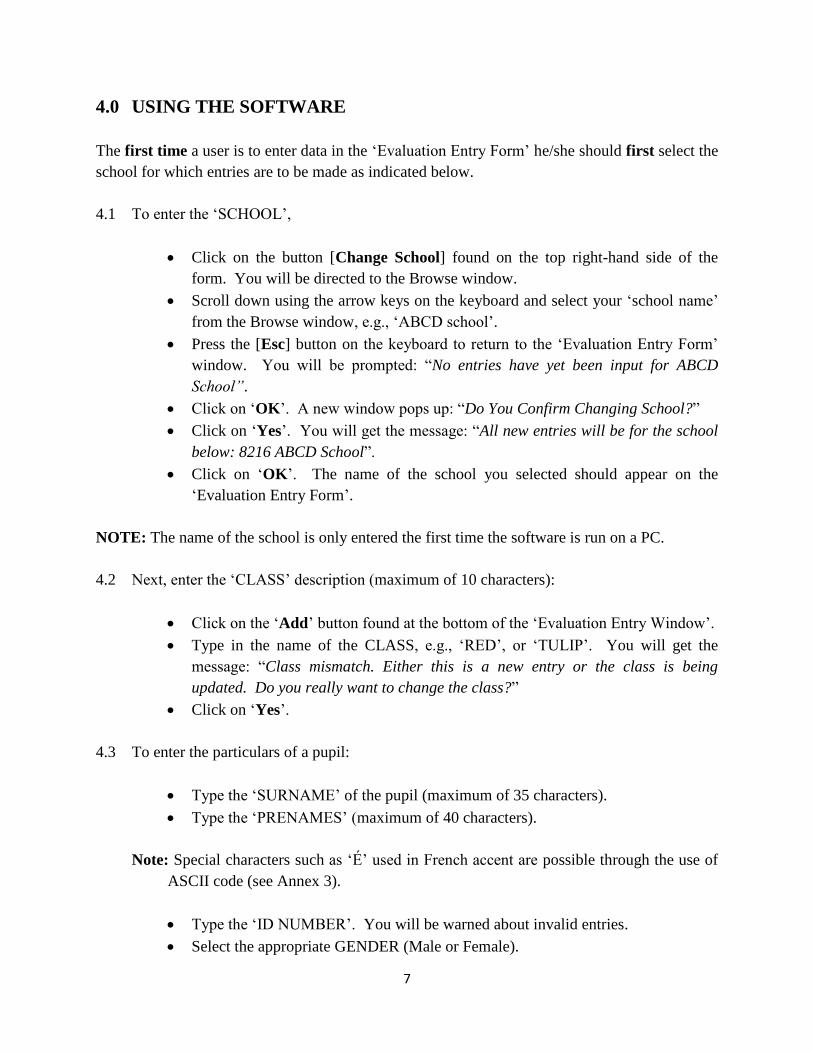
3.3 Click on <File> then on <Open> to open the ‘Evaluation Entry Form’.
7
4.0 USING THE SOFTWARE
The first time a user is to enter data in the ‘Evaluation Entry Form’ he/she should first select the
school for which entries are to be made as indicated below.
4.1 To enter the ‘SCHOOL’,
Click on the button [Change School] found on the top right-hand side of the
form. You will be directed to the Browse window.
Scroll down using the arrow keys on the keyboard and select your ‘school name’
from the Browse window, e.g., ‘ABCD school’.
Press the [Esc] button on the keyboard to return to the ‘Evaluation Entry Form’
window. You will be prompted: “No entries have yet been input for ABCD
School”.
Click on ‘OK’. A new window pops up: “Do You Confirm Changing School?”
Click on ‘Yes’. You will get the message: “All new entries will be for the school
below: 8216 ABCD School”.
Click on ‘OK’. The name of the school you selected should appear on the
‘Evaluation Entry Form’.
NOTE: The name of the school is only entered the first time the software is run on a PC.
4.2 Next, enter the ‘CLASS’ description (maximum of 10 characters):
Click on the ‘Add’ button found at the bottom of the ‘Evaluation Entry Window’.
Type in the name of the CLASS, e.g., ‘RED’, or ‘TULIP’. You will get the
message: “Class mismatch. Either this is a new entry or the class is being
updated. Do you really want to change the class?”
Click on ‘Yes’.
4.3 To enter the particulars of a pupil:
Type the ‘SURNAME’ of the pupil (maximum of 35 characters).
Type the ‘PRENAMES’ (maximum of 40 characters).
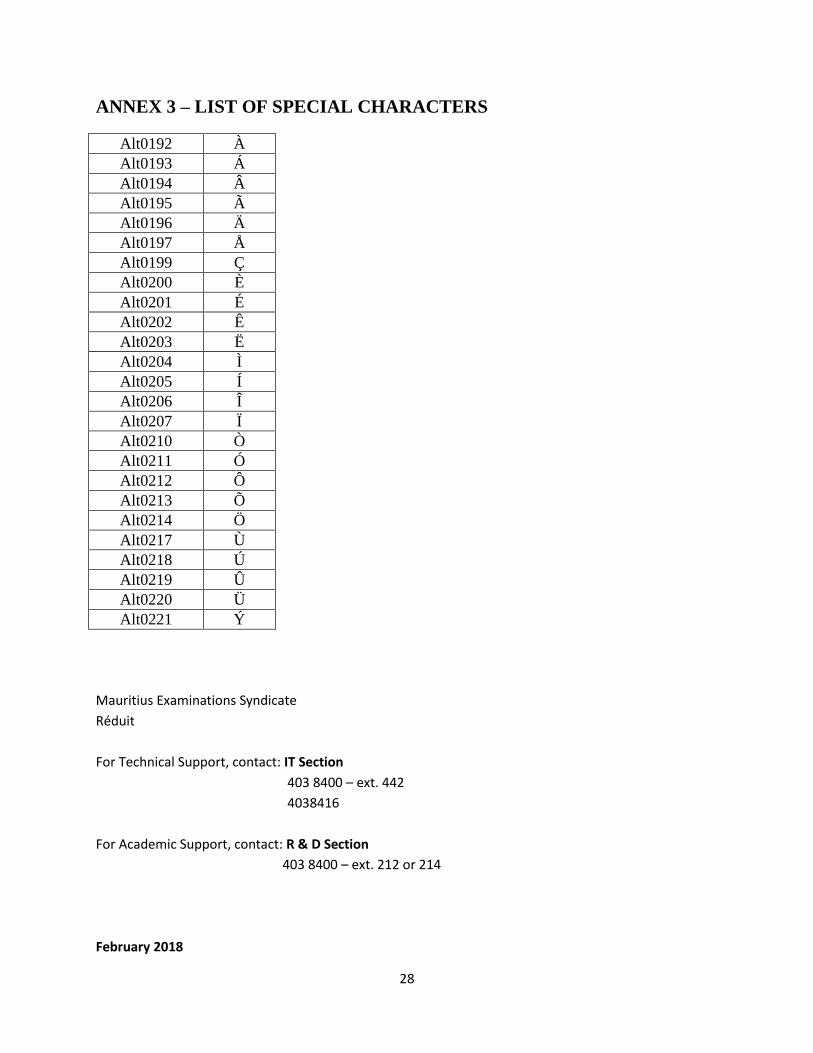
Note: Special characters such as ‘É’ used in French accent are possible through the use of
ASCII code (see Annex 3).
Type the ‘ID NUMBER’. You will be warned about invalid entries.
Select the appropriate GENDER (Male or Female).
8
4.4 To enter the ‘SUBJECT’:
Click on the arrow found on the right hand side of the box.
Select ‘ENGLISH’. REMEMBER that you should always start by entering
the data for ENGLISH.
4.5 To input the pupil’s assessment results in ENGLISH:
Enter only ‘0’ or ‘1’ in the boxes (IT-1 to IT-49).
Type ‘1’ for a correct answer.
Type ‘0’ for either an incorrect answer or no answer given.
Click on the ‘Save’ button which will have appeared at the bottom of the
‘Evaluation Entry Form’.
The data for this pupil is now recorded and saved.
4.6 Once the data for one pupil has been entered, click on the ‘Add’ button and repeat steps 4.3
to 4.5 to enter the data for the next pupil.
NOTES:
1. For practical reasons, you may wish to enter the particulars of ALL the pupils in a class
before entering their assessment results. In this case, you will have to:
click on the ‘Save’ button after step 4.4.
click on ‘Add’ to enter the particulars of the next pupil.
enter the “static” data, ‘Surname’, ‘Prename’, ‘ID Number’, ‘Gender’, and ‘Subject’
of the next pupil. Remember to select ‘ENGLISH’ for the subject.
click on ‘Save’. Click on ‘Add’ and repeat the process until the particulars of all
the pupils have been entered. You may then close the application.
To ensure that the above “static” data are correct, a report could be printed as
explained in Section: 6.0 - Printing Reports and the information cross-checked
against the Birth Certificate of each pupil.
Any input error in static data should be corrected at this stage. Editing a record is
explained under Annex 1B: The Control Buttons – Sub-section “Edit”.
When completing this step, all static data are expected to be error free.
9
When you open the application again, you will need to click on ‘Edit’ to be able to
make any change to the record of a pupil.
follow step 4.5 above. You will be prompted to type in the ‘CLASS’ again. Type
the ‘CLASS’ name.
click on ‘Save’ again.
click on ‘Next’ and use the ‘Edit’ button to input the results of the next pupil.
click on ‘Save’. Repeat the process until the assessment results for all the pupils
have been entered.
2. For practical reasons, you may also wish to fill in the Evaluation Entry Form for a number
of pupils and to continue the process at a later time. In this case, you will need to go
through steps 4.3 to 4.6 above, close the application and re-open it when ready to use. You
may be prompted to type in the ‘CLASS’ each time the application is closed and re-opened.
3. REMEMBER to always click on ‘Edit’ to either enter new data or to change the data in the
record of a pupil.
4. For a better understanding of what the ‘Control Buttons’ and the ‘Fields’ allow you to do,
go to ‘Annex 1 – Understanding the Evaluation Entry Form’.
5.0 POPULATING RECORDS FOR MATHEMATICS
The assessment is done in both English and Mathematics. Therefore, for each pupil, there will
be one record for English and one for Mathematics. As mentioned in the previous section, each
record contains static data like Surname, Prenames, Gender, NID. To avoid typing in the static
data twice, a rule for the Data Entry exercise has been setup.
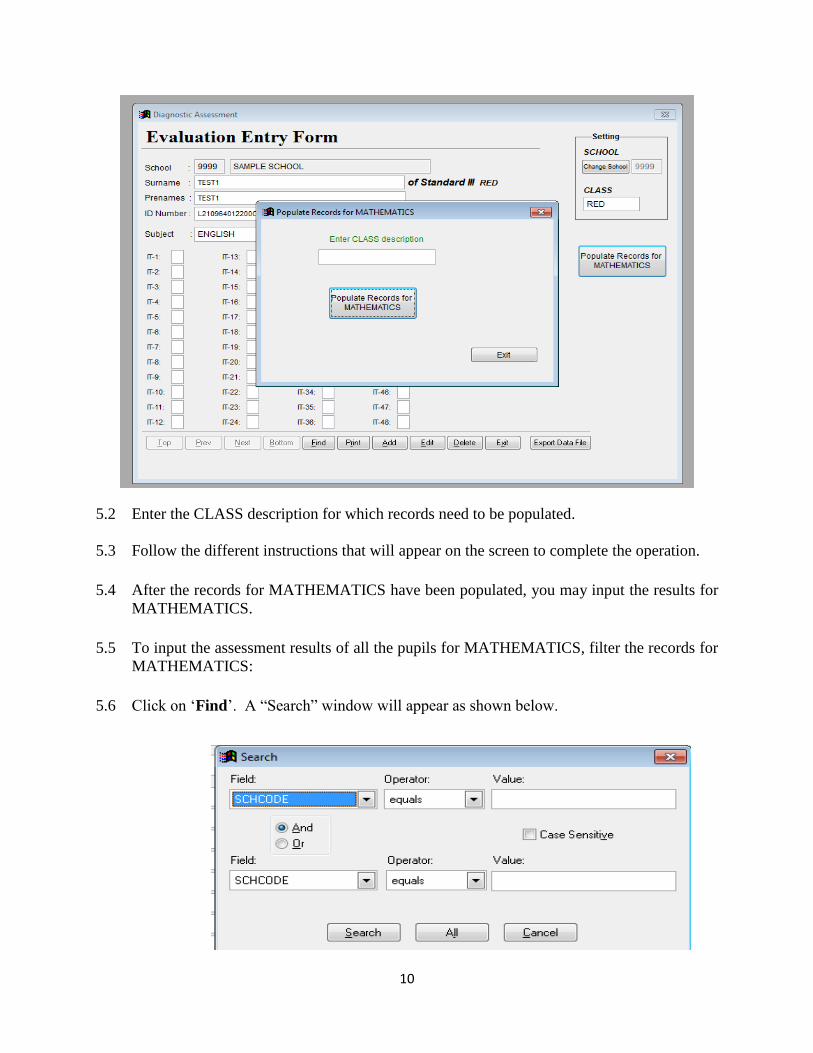
5.1 Before entering the records for MATHEMATICS, click on the button [Populate Records
for Mathematics] to open the window shown below:
10
5.2 Enter the CLASS description for which records need to be populated.
5.3 Follow the different instructions that will appear on the screen to complete the operation.
5.4 After the records for MATHEMATICS have been populated, you may input the results for
MATHEMATICS.
5.5 To input the assessment results of all the pupils for MATHEMATICS, filter the records for
MATHEMATICS:
5.6 Click on ‘Find’. A “Search” window will appear as shown below.
11
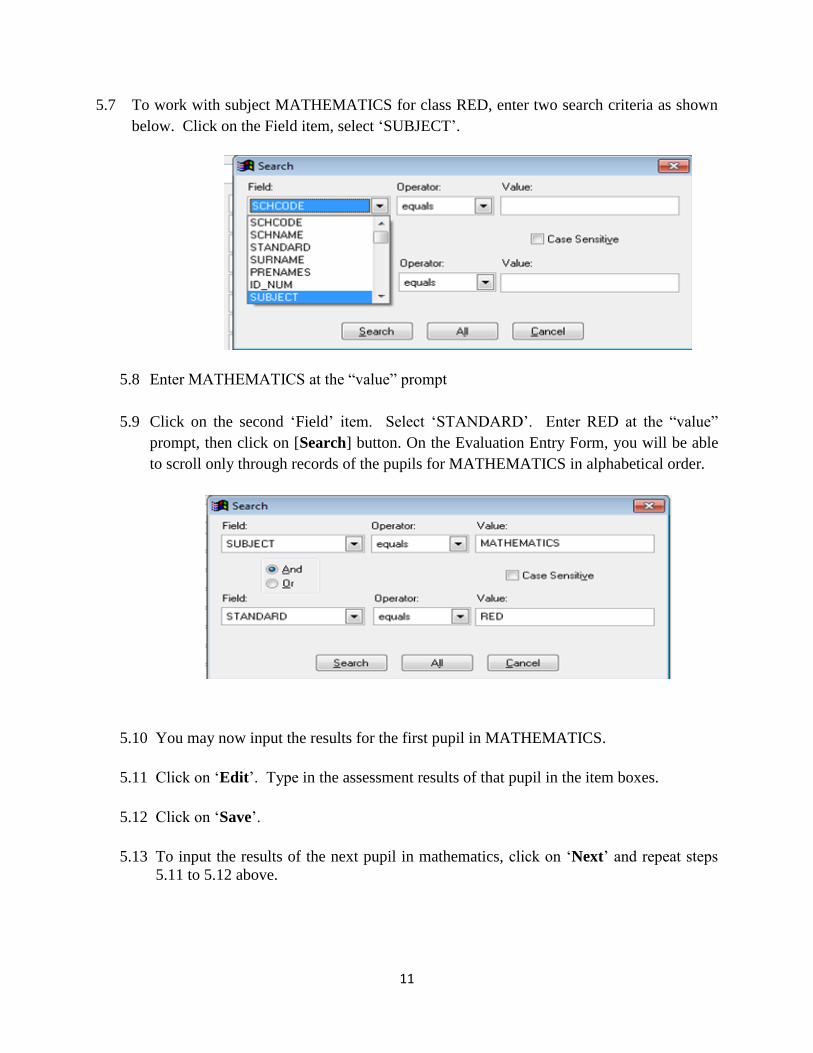
5.7 To work with subject MATHEMATICS for class RED, enter two search criteria as shown
below. Click on the Field item, select ‘SUBJECT’.
5.8 Enter MATHEMATICS at the “value” prompt
5.9 Click on the second ‘Field’ item. Select ‘STANDARD’. Enter RED at the “value”
prompt, then click on [Search] button. On the Evaluation Entry Form, you will be able
to scroll only through records of the pupils for MATHEMATICS in alphabetical order.
5.10 You may now input the results for the first pupil in MATHEMATICS.
5.11 Click on ‘Edit’. Type in the assessment results of that pupil in the item boxes.
5.12 Click on ‘Save’.
5.13 To input the results of the next pupil in mathematics, click on ‘Next’ and repeat steps
5.11 to 5.12 above.
12
6.0 PRINTING REPORTS
The Diagnostic Assessment program can generate four distinct reports:
(1) Two types of Summary Grids (a Summary Grid for each Grade 3 class and another
Summary Grid which combines all the Grade 3 classes in a particular school).
(2) An Evaluation Grid for each pupil in English and Mathematics separately.
(3) Two Analysis of Results files (one with details for each Grade 3 class and one combining
all Grade 3 classes in a particular school).
(4) Candidates Particulars – a list of candidates class-wise.
The above reports can be generated by performing the following operations from a Evaluation
Entry Form:
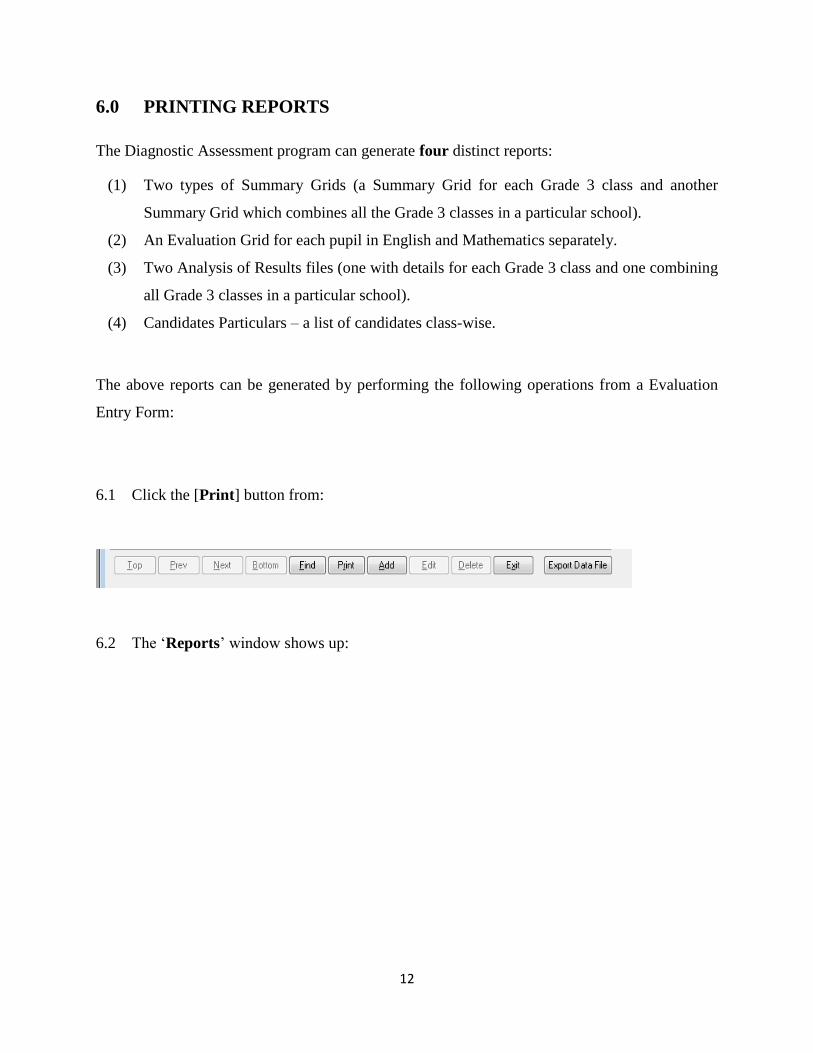
6.1 Click the [Print] button from:
6.2 The ‘Reports’ window shows up:
13
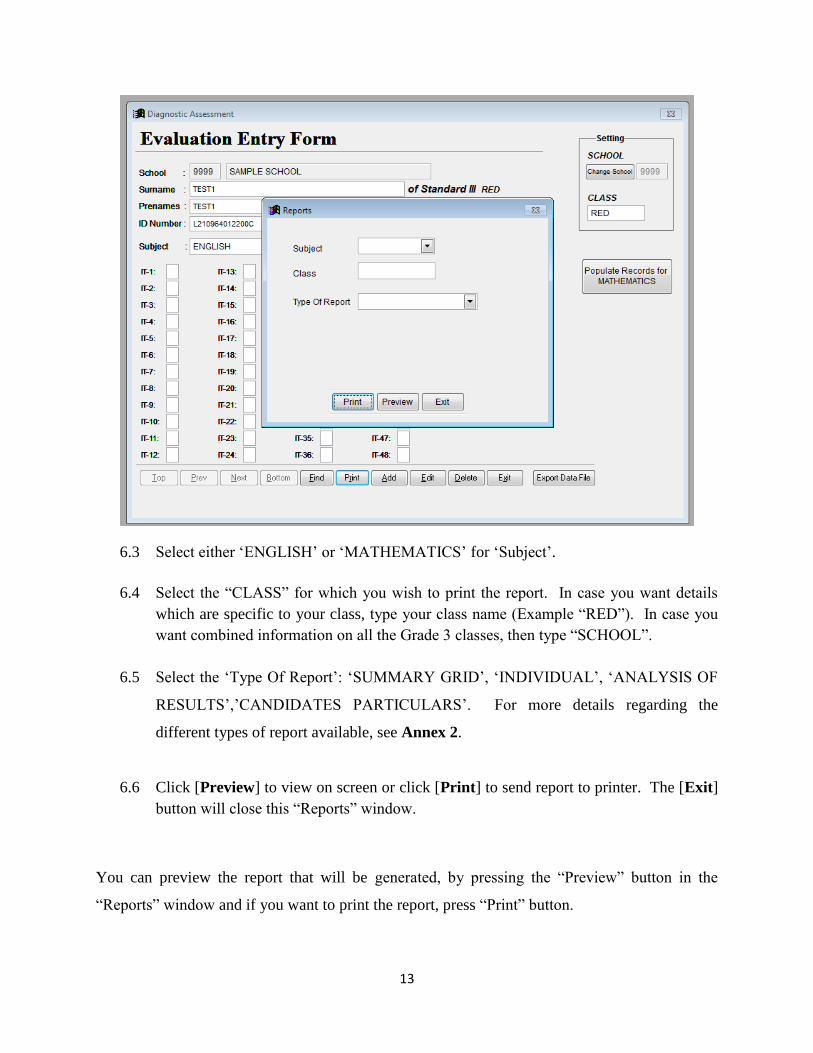
6.3 Select either ‘ENGLISH’ or ‘MATHEMATICS’ for ‘Subject’.
6.4 Select the “CLASS” for which you wish to print the report. In case you want details
which are specific to your class, type your class name (Example “RED”). In case you
want combined information on all the Grade 3 classes, then type “SCHOOL”.
6.5 Select the ‘Type Of Report’: ‘SUMMARY GRID’, ‘INDIVIDUAL’, ‘ANALYSIS OF
RESULTS’,’CANDIDATES PARTICULARS’. For more details regarding the
different types of report available, see Annex 2.
6.6 Click [Preview] to view on screen or click [Print] to send report to printer. The [Exit]
button will close this “Reports” window.
You can preview the report that will be generated, by pressing the “Preview” button in the
“Reports” window and if you want to print the report, press “Print” button.
14
VERY IMPORTANT: The Summary Grid comes on two pages – the number of columns
cannot be printed on one A4 sheet. Therefore, you will be prompted to click [Print] twice to
print the Summary Grid completely. To preview the complete Summary Grid, click on
[Preview]. The first page of the Summary Grid will open. Press the [Esc] key from the
keyboard followed by [PgDn] to display the second page of the Summary Grid.
7.0 EXPORTING AND EMAILING THE DATA FILE
Each school has to email their data files to the MES at the following address: [email protected].
However, before the data can be emailed to the MES, it needs to be ‘Exported’ (see Annex 1B).
7.1 To EXPORT the data file:
click on the ‘Export Data File’ button. The following prompt will appear: A copy of
the Data file will be made in the folder C:\Assess\Export. Press Ok to continue.
click on ‘OK’. A new message appears: Operation Complete.
click on ‘OK’.
NOTE:
The file created in the “Export” folder is given a computer generated name in the format:
cands<school Code>.dbf. For example, for Adolphe De Plevitz G S, the school code is
9501. The file created in the “Export” folder will be named “cands9501.dbf”
automatically. The “Export” folder is located in the main folder called “Assess” created
automatically during the installation process (refer to step 6 of 2.4).
If all the entries for all the classes in a school have been made on one and the same PC,
the file created, “cands9501.dbf”, can be emailed to the MES as an attachment directly.
However, if the software is installed on, say, three different PCs, a file called
“cands9501.dbf” will be created on each PC. The three files would have the same name
on the different PCs. Emailing different files carrying the same name can lead to confusion
and may result in some of the files being over-written.
15
To avoid this problem, each file found on a different PC should be renamed before it is
emailed to the MES. To ensure consistency, it is recommended that the name of the file be
renamed using the ‘Class’ description as prefix. For example, for Class ‘RED’, the file
could be renamed as ‘REDcands9501.dbf’ and for Class ‘TULIP’ the file could be renamed
as ‘TULIPcands9501.dbf’.
All the different files (if applicable) should be sent in a single e-mail.
WARNING: Opening the file, e.g., “cands9501.dbf” on your PC may corrupt the file and the
data it contains. DO NOT open the file on your PC.
7.2 To EMAIL the data file of your school to the MES, follow the instructions below:
Open the email account of the school.
Select ‘New Email’ or ‘Create Email’.
In the ‘New Message Window’, click on ‘Attach file’. The ‘Insert file’ window will
open.
Open the directory where the program has been installed (refer to pg. 4) by clicking
on ‘C:\’ in the ‘Insert file’ window.
Double click on the folder named ‘ASSESS’.
Double click on the folder named ‘EXPORT’.
Select data file, e.g., cands9501.dbf or REDcands9501.dbf. DO NOT open this file
on your PC. Therefore, do not double click on the file. If you double click on the file
inadvertently, close any window that will open and click “No” if asked whether you
want to save any changes.
Click ‘Insert’.
Close the ‘Insert file’.
Type ‘DA G3 - <name of your school>’ in the subject line of the email.
Send the email to the following address: [email protected]

16
ANNEX 1 - UNDERSTANDING THE EVALUATION ENTRY FORM
A THE DIFFERENT FIELDS
Note: A record is all the data for one subject that has been input for one pupil.
Fields Description
1 [Change School] Clicking on the button [Change School] allows the user to
select, from a list that will appear, the school for which
entries are to be made.
2 CLASS Allows the user to type in the name (up to a maximum of 10
characters) of the class, e.g. ‘RED’, ‘TULIP’, etc.
3 Surname Allows the user to type the surname (up to a maximum of 35
characters) of a pupil
Special characters such as ‘É’ used in French accent are
possible through the use of ASCII code. (see Annex 3).
4 Prenames Allows the user to type in the other names (up to a maximum
of 40 characters) of a pupil
Special characters such as ‘É’ used in French accent are
possible through the use of ASCII code. (see Annex 3).
5 ID Number Allows the user to type in the NID from the birth certificate
of the pupil. It is important that the correct ID is entered or it
will not be accepted.
6 Gender Allows the user to indicate gender (Male or Female) of the
pupil as appropriate.
7 Subject Allows the user to select the subject for which entries are to
be made (ENGLISH or MATHEMATICS). You should start
with ENGLISH.
8 IT-1 to IT- 51 Only ‘0’ and ‘1’ should be entered in these boxes to indicate
whether a pupil gave a correct or an incorrect answer. For
English, IT-1 to IT-49 should be filled and for Mathematics
IT-1 to IT-51 should be filled.
17
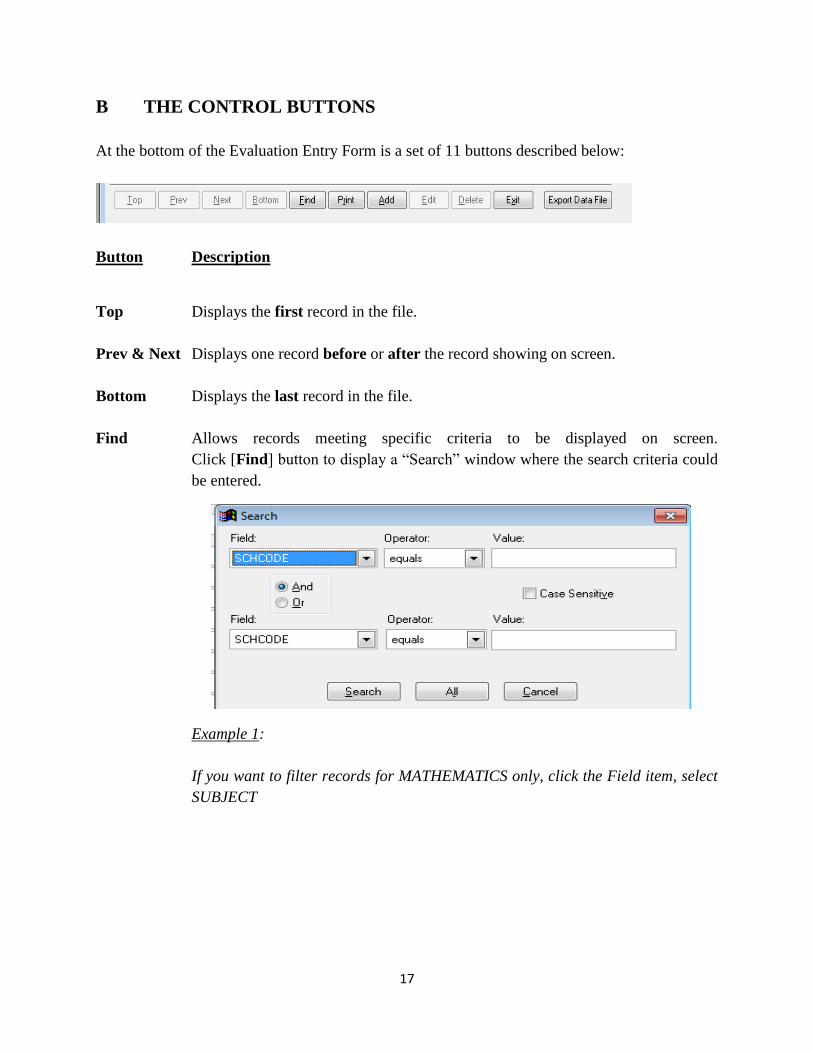
B THE CONTROL BUTTONS
At the bottom of the Evaluation Entry Form is a set of 11 buttons described below:
Button Description
Top Displays the first record in the file.
Prev & Next Displays one record before or after the record showing on screen.
Bottom Displays the last record in the file.
Find Allows records meeting specific criteria to be displayed on screen.
Click [Find] button to display a “Search” window where the search criteria could
be entered.
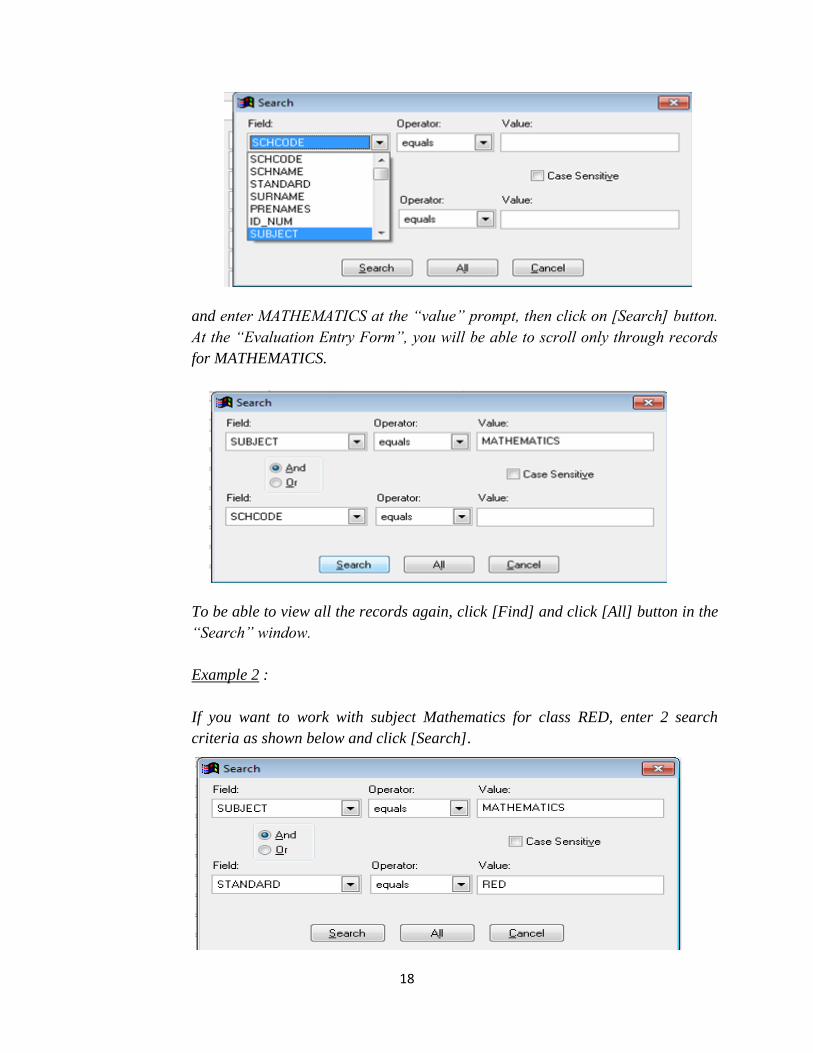
Example 1:
If you want to filter records for MATHEMATICS only, click the Field item, select
SUBJECT
18
and enter MATHEMATICS at the “value” prompt, then click on [Search] button.
At the “Evaluation Entry Form”, you will be able to scroll only through records
for MATHEMATICS.
To be able to view all the records again, click [Find] and click [All] button in the
“Search” window.
Example 2 :
If you want to work with subject Mathematics for class RED, enter 2 search
criteria as shown below and click [Search].
19
Note: STANDARD is referred as CLASS in the Evaluation Entry Form
Print Explained under Section 6.0: Printing Reports.
Add Clicking on [Add] button will allow the user to enter a new record.
Note: 1) If a school has not been selected, an error message will appear.
Follow the on-screen instruction:
Click [OK] to return to the main screen. Click the [Change School]
button at the top right hand corner of the screen, select a School
name from the ‘Browse’ window for which entries are to be made
and press the [Esc] button on the keyboard. Confirm the selected
choice through the next Message boxes that will appear on screen.
The selected School name will be displayed at the ‘School’ prompt.
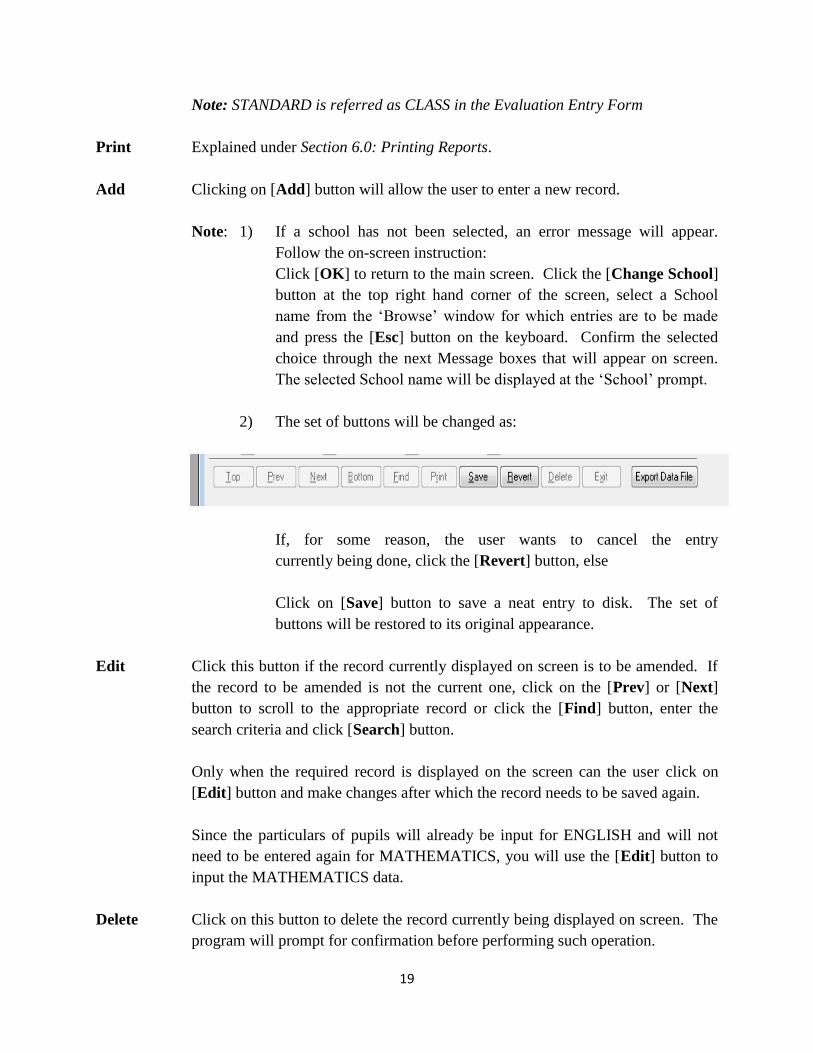
2) The set of buttons will be changed as:
If, for some reason, the user wants to cancel the entry
currently being done, click the [Revert] button, else
Click on [Save] button to save a neat entry to disk. The set of
buttons will be restored to its original appearance.
Edit Click this button if the record currently displayed on screen is to be amended. If
the record to be amended is not the current one, click on the [Prev] or [Next]
button to scroll to the appropriate record or click the [Find] button, enter the
search criteria and click [Search] button.
Only when the required record is displayed on the screen can the user click on
[Edit] button and make changes after which the record needs to be saved again.
Since the particulars of pupils will already be input for ENGLISH and will not
need to be entered again for MATHEMATICS, you will use the [Edit] button to
input the MATHEMATICS data.
Delete Click on this button to delete the record currently being displayed on screen. The
program will prompt for confirmation before performing such operation.

20
Exit This button will close the ‘Evaluation Entry’ form. To quit the program select
‘File’ from the menu (top left hand corner) then ‘Exit’.
Export Data This will allow the user to copy the file where all the entries are stored, in a
specific format, to the ‘Export’ Folder before it is e-mailed to the MES at the
following email address: [email protected]

21
ANNEX 2 – THE REPORTS
There are four types of reports which the software can generate:
1. Summary Grid Produces a Summary Grid for your class
OR all Grade 3 classes combined.
2. Individual Produces an Evaluation Grid for each pupil.
3. Analysis of Results Produces statistical information for each
question. This can be used for further analysis.
4. Candidates Particulars A list of ‘Candidates Particulars’ for each class
separately.
Which Reports to Print Out?
There are two reports which are immediately important to the educators, the Summary Grid for
the class and the Evaluation Grid for each of their pupils.
The remaining reports contain data that can be used for a more in-depth analysis of the
performance of the pupils in the diagnostic assessment.
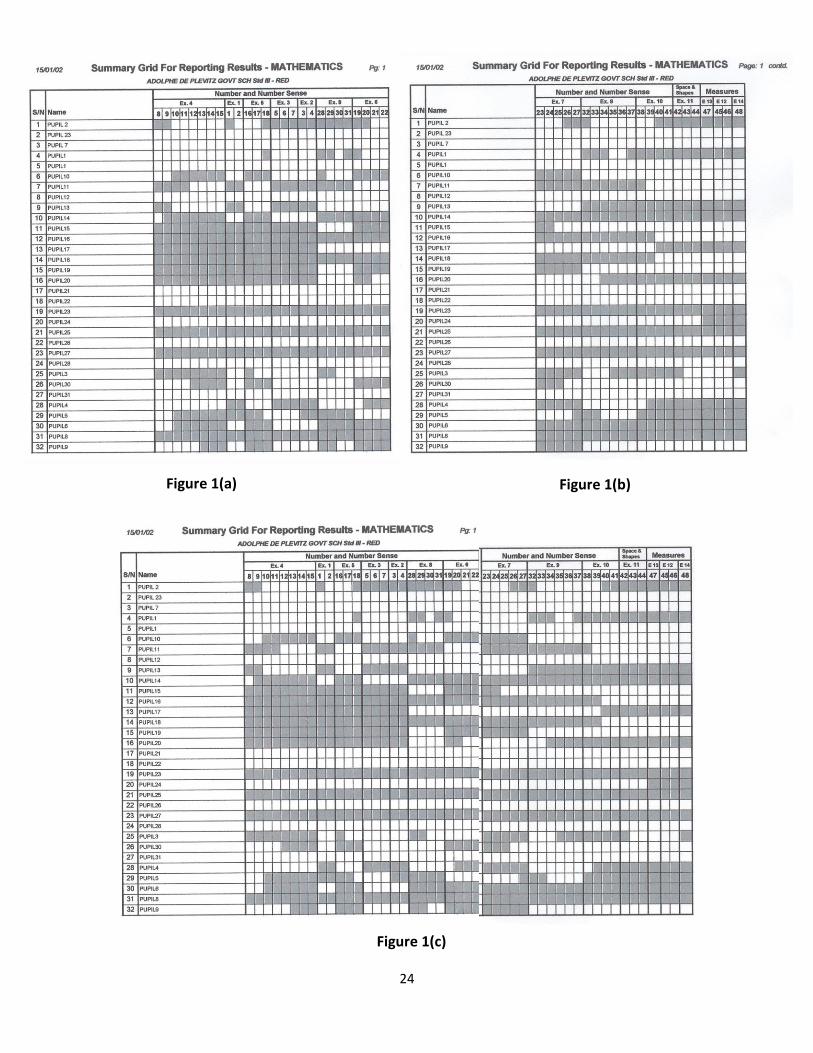
A THE SUMMARY GRID (For your class)
The Summary Grid illustrates graphically the performance of every child in a class in the
diagnostic assessment. An item is represented by a box. If a child wrongly attempts, or does not
attempt, an item then the corresponding box is shaded. The Summary Grid is printed on two
pages, as the number of items cannot all be fitted on one page. The two pages of the Summary
Grid are illustrated in Figures 1 (a) and (b). In order to have a better view of the performance of

22
the pupils, it is advisable that you merge the two files in Figure 1(a), Figure 1(b) as shown in
Figure 1(c).
Interpreting the Summary Grid
Each item is represented by a box in the Summary Grid. An item which has wrongly been
attempted or not attempted by the child will be indicated by a shaded box.
Two types of information that can be obtained from the Summary Grid are:
(i) The strengths and weaknesses of each child. (reading the Summary Grid horizontally).
(ii) The items which have caused problems (reading the Grid vertically).
If a similar analysis is required for the pupils in all the Grade 3 classes in your school then use
the Summary Grid for the School, which can be printed out by selecting the “SCHOOL” option.
B THE EVALUATION GRID (For each pupil)
The Evaluation Grid, see Figure 2, is a sheet that can be printed out for each pupil of a class. It
shows which items were correctly attempted by the pupils and which ones were not. An item
which is correctly attempted will be represented by “1” and one which is not will be represented
by “0”. For each exercise, the number of items which are correctly answered by the pupil is
indicated in the corresponding shaded box.

23
C THE ANALYSIS OF REPORTS (for Further Analysis)
In order to get quantitative information about the performance of pupils in your class on each
item, print the file “Analysis of Results” shown in Figure 3(a). The percentage of pupils in your
class who were able to attempt successfully a particular item is summarised.
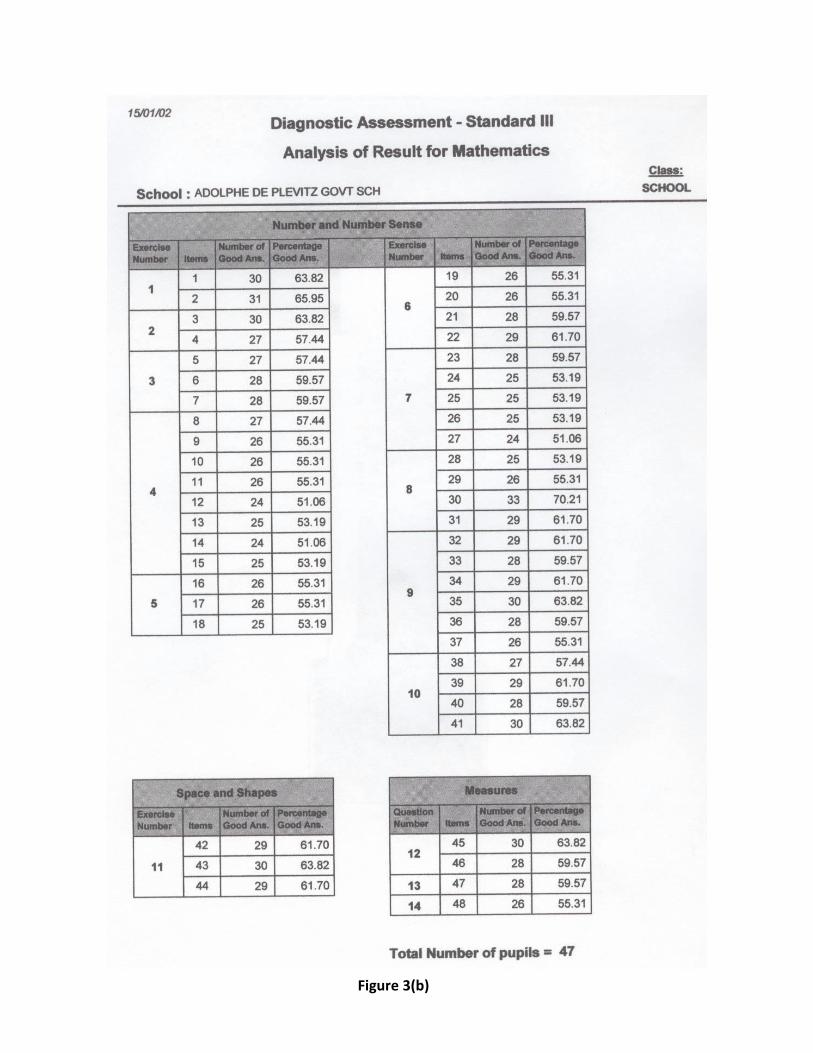
A similar grid, Figure 3(b), showing the corresponding percentages, but this time for all the
Grade 3 classes in your school can also be generated. This is done by choosing the “SCHOOL”
option in the “Reports” window which opens up when you press the “PRINT” button.
24
Figure 1(a) Figure 1(b)
Figure 1(c)

25
Figure 2
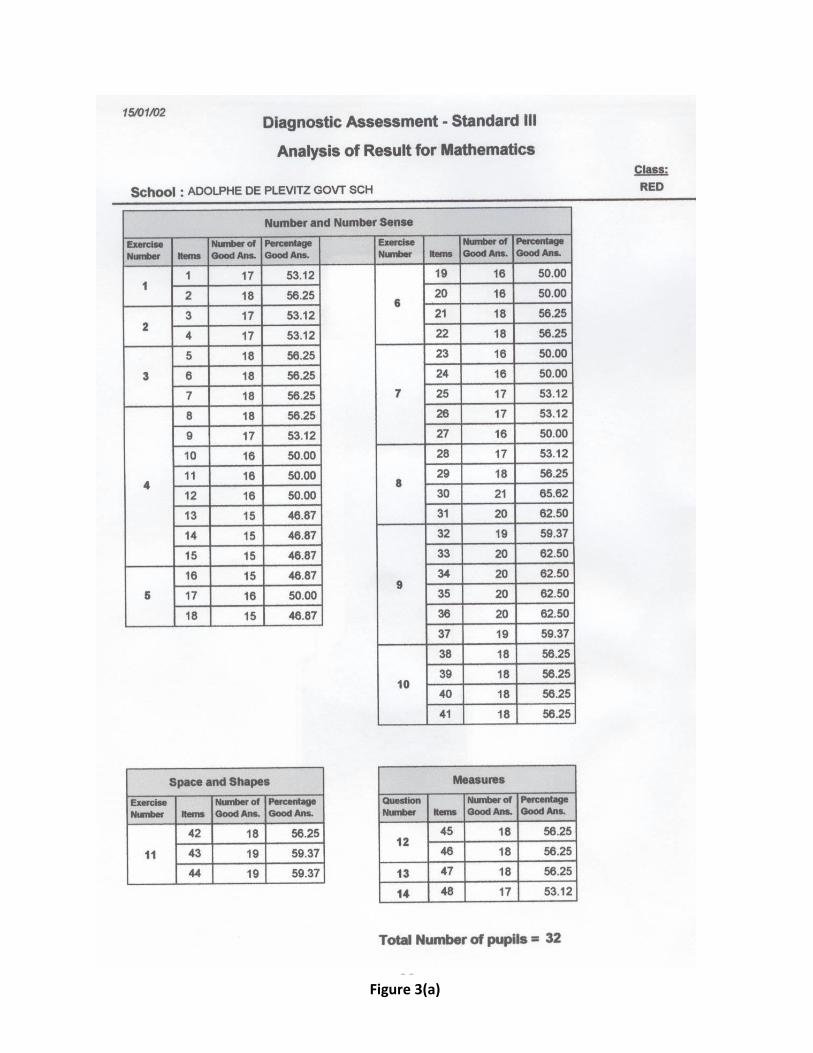
26 Figure 3(a)
27
Figure 3(b)
28
ANNEX 3 – LIST OF SPECIAL CHARACTERS
Alt0192 À
Alt0193 Á
Alt0194 Â
Alt0195 Ã
Alt0196 Ä
Alt0197 Å
Alt0199 Ç
Alt0200 È
Alt0201 É
Alt0202 Ê
Alt0203 Ë
Alt0204 Ì
Alt0205 Í
Alt0206 Î
Alt0207 Ï
Alt0210 Ò
Alt0211 Ó
Alt0212 Ô
Alt0213 Õ
Alt0214 Ö
Alt0217 Ù
Alt0218 Ú
Alt0219 Û
Alt0220 Ü
Alt0221 Ý
Mauritius Examinations Syndicate
Réduit
For Technical Support, contact: IT Section
403 8400 – ext. 442
4038416
For Academic Support, contact: R & D Section
403 8400 – ext. 212 or 214
February 2018