digital photo printer chc-s2145 operation manual · prepared date july 28, 2006 revision date...
TRANSCRIPT

Prepared date July 28, 2006Revision dateRevision Number First edition
SHINKO ELECTRIC CO., LTD.
Digital Photo PrinterCHC-S2145
Operation Manual


Handling of this Manual
1. All rights reserved. No part of this operation manual coveredby the copyright herein maybe reproduced or copied in any formor by any means, including translation, without the writtenpermission of Shinko Electric Co., Ltd.
2. The specifications in this operation manual are subject tochange without prior notice.
3. In case of having any difficulties or finding the fault in thismanual, your information to Shinko will be highly appreciated.

IntroductionThis manual describes detailed instructions for handling of andbasic operation of Digital Photo Printer CHC-S2145.We will describe this product as “the printer” in the manual.Read this manual thoroughly to understand how to install andoperate the printer before using it.
● Keep this manual near the printer and operators canrefer to this manual periodically.
● In case, lost or damaged this manual, contact yourdealers.
● In the case of transfer, do not forget to put this manualtogether with the printer.
Notice

(i)
CONTENTSPREFACE
Chapter 1. Important Safety InstructionChapter 1. Important Safety InstructionChapter 1. Important Safety InstructionChapter 1. Important Safety Instruction ・・・・・・・・・・・・・・・・・・・・・・・・・・・・・・・・・・ 1-1Environments・・・・・・・・・・・・・・・・・・・・・・・・・・・・・・・・・・・・・・・・・・・・・・・・・・・・・・・・・ 1-2Handling Instruction ・・・・・・・・・・・・・・・・・・・・・・・・・・・・・・・・・・・・・・・・・・・・・・・・・・ 1-3Handling Instruction - Continued from previous page ・・・・・・・・・・・・・・・・・・・・ 1-4Handling Instruction for Consumable and Printed Output ・・・・・・・・・・・・・・・・ 1-5
Chapter 2. Installing and Set UpChapter 2. Installing and Set UpChapter 2. Installing and Set UpChapter 2. Installing and Set Up ・・・・・・・・・・・・・・・・・・・・・・・・・・・・・・・・・・・・・・・・・ 2-1Unpacking and checking the accessories・・・・・・・・・・・・・・・・・・・・・・・・・・・・・・・・・ 2-1Parts Name and Function・・・・・・・・・・・・・・・・・・・・・・・・・・・・・・・・・・・・・・・・・・・・・・ 2-2Connecting Power Cord ・・・・・・・・・・・・・・・・・・・・・・・・・・・・・・・・・・・・・・・・・・・・・・・・ 2-3Connecting USB Cable ・・・・・・・・・・・・・・・・・・・・・・・・・・・・・・・・・・・・・・・・・・・・・・・・ 2-4Installing Dust Box・・・・・・・・・・・・・・・・・・・・・・・・・・・・・・・・・・・・・・・・・・・・・・・・・・・・ 2-4Opening the Front Cover・・・・・・・・・・・・・・・・・・・・・・・・・・・・・・・・・・・・・・・・・・・・・・・ 2-5Closing the Front Cover・・・・・・・・・・・・・・・・・・・・・・・・・・・・・・・・・・・・・・・・・・・・・・・・ 2-5Loading Ink Ribbon ・・・・・・・・・・・・・・・・・・・・・・・・・・・・・・・・・・・・・・・・・・・・・・・・・・・ 2-6Loading Paper ・・・・・・・・・・・・・・・・・・・・・・・・・・・・・・・・・・・・・・・・・・・・・・・・・・・・・・・・ 2-7Transporting the Printer・・・・・・・・・・・・・・・・・・・・・・・・・・・・・・・・・・・・・・・・・・・・・・・ 2-9
Chapter 3. Operation PanelChapter 3. Operation PanelChapter 3. Operation PanelChapter 3. Operation Panel ・・・・・・・・・・・・・・・・・・・・・・・・・・・・・・・・・・・・・・・・・・・・・・ 3-1Operation Panel・・・・・・・・・・・・・・・・・・・・・・・・・・・・・・・・・・・・・・・・・・・・・・・・・・・・・・・ 3-1LCD Display・・・・・・・・・・・・・・・・・・・・・・・・・・・・・・・・・・・・・・・・・・・・・・・・・・・・・・・・・・ 3-2User Set Up Mode・・・・・・・・・・・・・・・・・・・・・・・・・・・・・・・・・・・・・・・・・・・・・・・・・・・・・ 3-3Switching Print Mode ・・・・・・・・・・・・・・・・・・・・・・・・・・・・・・・・・・・・・・・・・・・・・・・・・ 3-4Switching Display Language ・・・・・・・・・・・・・・・・・・・・・・・・・・・・・・・・・・・・・・・・・・・ 3-4
Chapter 4. Routine MaintenanceChapter 4. Routine MaintenanceChapter 4. Routine MaintenanceChapter 4. Routine Maintenance ・・・・・・・・・・・・・・・・・・・・・・・・・・・・・・・・・・・・・・・・・ 4-1Cleaning of Thermal Head, Platen, Cleaning Roller ・・・・・・・・・・・・・・・・・・・・・・ 4-1Cleaning of Outer Cabinet ・・・・・・・・・・・・・・・・・・・・・・・・・・・・・・・・・・・・・・・・・・・・・ 4-3Cleaning of Filter ・・・・・・・・・・・・・・・・・・・・・・・・・・・・・・・・・・・・・・・・・・・・・・・・・・・・・ 4-3
Chapter 5. Error HandlingChapter 5. Error HandlingChapter 5. Error HandlingChapter 5. Error Handling・・・・・・・・・・・・・・・・・・・・・・・・・・・・・・・・・・・・・・・・・・・・・・・ 5-1Error Message and Corrective Action ・・・・・・・・・・・・・・・・・・・・・・・・・・・・・・・・・・・ 5-1Failure Symptoms・・・・・・・・・・・・・・・・・・・・・・・・・・・・・・・・・・・・・・・・・・・・・・・・・・・・・ 5-2Paper Jam・・・・・・・・・・・・・・・・・・・・・・・・・・・・・・・・・・・・・・・・・・・・・・・・・・・・・・・・・・・・ 5-3Power Supply Interrupted during Printing ・・・・・・・・・・・・・・・・・・・・・・・・・・・・・・ 5-4When the ribbon is snapped ・・・・・・・・・・・・・・・・・・・・・・・・・・・・・・・・・・・・・・・・・・・・ 5-4
Chapter 6. After-sales ServiceChapter 6. After-sales ServiceChapter 6. After-sales ServiceChapter 6. After-sales Service ・・・・・・・・・・・・・・・・・・・・・・・・・・・・・・・・・・・・・・・・・・・・ 6-1
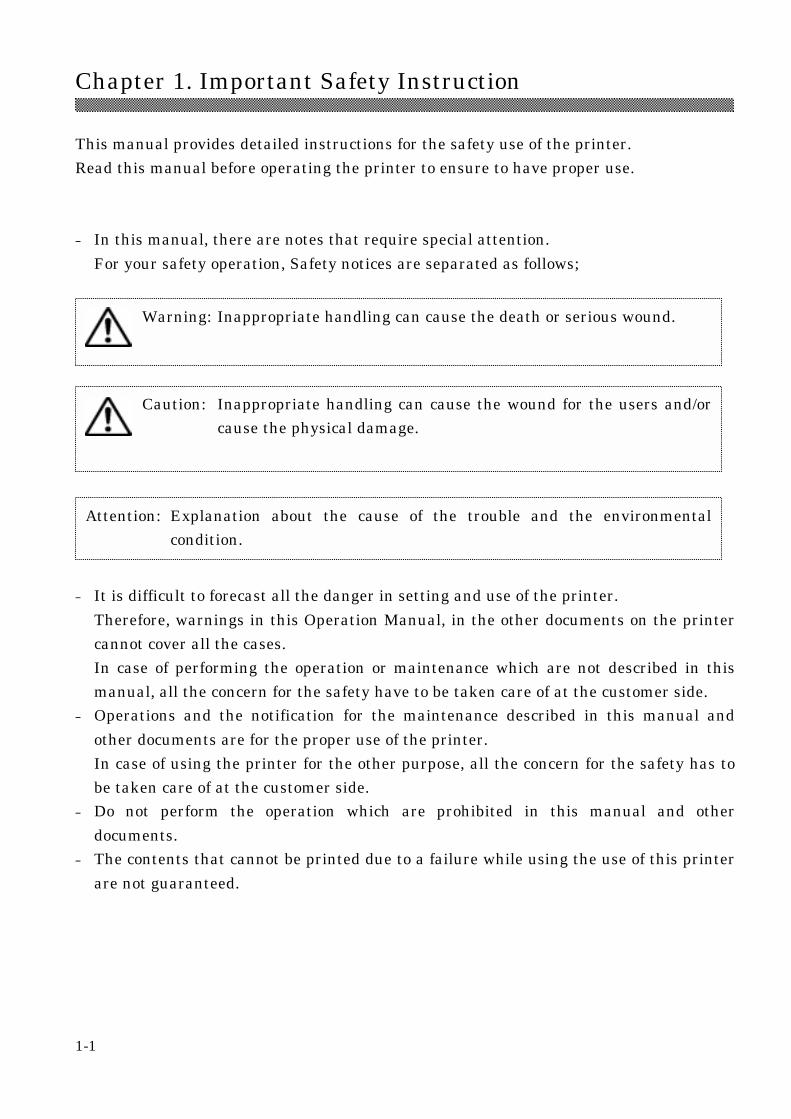
Chapter 1. Important Safety Instruction
1-1
This manual provides detailed instructions for the safety use of the printer.Read this manual before operating the printer to ensure to have proper use.
◆ In this manual, there are notes that require special attention.For your safety operation, Safety notices are separated as follows;
◆ It is difficult to forecast all the danger in setting and use of the printer.Therefore, warnings in this Operation Manual, in the other documents on the printercannot cover all the cases.In case of performing the operation or maintenance which are not described in thismanual, all the concern for the safety have to be taken care of at the customer side.
◆Operations and the notification for the maintenance described in this manual andother documents are for the proper use of the printer.In case of using the printer for the other purpose, all the concern for the safety has tobe taken care of at the customer side.
◆Do not perform the operation which are prohibited in this manual and otherdocuments.
◆The contents that cannot be printed due to a failure while using the use of this printerare not guaranteed.
Attention: Explanation about the cause of the trouble and the environmentalcondition.
Caution: Inappropriate handling can cause the wound for the users and/orcause the physical damage.
Warning: Inappropriate handling can cause the death or serious wound.

Chapter 1. Important Safety Instruction
1-2
EnvironmentsTo use the printer safety, please pay attention to the followings:
Caution: Do not let children to touch the printer or the cables.It can cause accidents or electric shock.
Attention: Do not place the printer under the low temperature such as ski gelande,skating rink or open-air with direct sunlight.
Warning: Do not block the openings of the printer. In case, the openingblocked, the heat will remain inside and it can cause the fire.
Caution: Do not place the printer on rickety place and/or inclined place.Printer may fall down or tumble and it can cause injury.
Caution: Do not place the printer under humid or dusty place.It can cause a fire, electric shock or printer problem.Do not place the printer with dust, sand and high humidity such asbathing place, bathroom, hot spring, on the street.
Warning: Do not put vase, flowerpot, and cup with water inside or metricitems.In case the water spilt or metric items fall into the printer, it cancause the fire and electric shock.
Warning: Do not insert or fall the metallic items or flammable items into theprinter through the openings of the printer, it can cause the fireand electric shock.

Chapter 1. Important Safety Instruction
1-3
Handling InstructionIn handling the printer, please pay attention to the followings;
Warning: Lift the printer from its box and put it onto a flat table or desk.
Warning: The printer is heavier at front side than rear side so that please becareful in transportation.When moving the printer, hold the handles provided at the front andthe rear.The printer must be handled by more than two persons during thetransportation.
Warning: Be careful when you transport the printer on the slippery floor.
Warning: In case you drop the printer, firstly turn off the power of the printerand remove the power cord, then contact the dealers or servicecenter. To use the printer without any checking, can cause the fire orelectric shock.
Attention: At installation, appropriate interface cable will be required with yourcomputer.
Warning: At nearly 20Kg, the printer is too heavy to be lifted by one person.Also please take a good care of your hands and fingers when liftingthe printer from the box.
Warning: Do not dismantle or remodel the printer.Some sections of the printer contain a high voltage or become veryhot. Ignoring this warning may cause electric shock, fire, or burns.

Chapter 1. Important Safety Instruction
1-4
Handling Instruction - Continued from previous page
Warning: Secure the power cable firmly.
Warning: The thermal head reaches high temperature during operation butthis is normal. Do not touch the thermal head.
Attention: Touching the surface of the thermal directly can cause the damage tothermal head. When a hard object get into the printer, it can cause thedamage to the printer mechanism. In such case, please do not use theprinter.
Warning: Do not attempt to service the printer beyond the instructionspecified in this document. In case, impossible to recover from theproblem, please contact to the dealers or service center.
Warning: This product must be grounded, and always used with only thespecified power cable or the power cable accompanying this product.If the product is used without ground, and current leakage occurs,fire or electrical shock is most likely to result, and also cause signal-receiving interference to a radio, a television receiver, and othersimilar electric appliances.If the proper grounding connection is not possible, please contact tothe dealers or service center.

Chapter 1. Important Safety Instruction
1-5
Handling Instruction for Consumable and Printed OutputIn handling the ink ribbon, paper and printed output, please pay attention to thefollowings;
Attention: Paper Handling�Use the paper specified by Shinko Electric.�Store the paper flat.�Store the paper in a dry and dark place to avoid the direct Sunlight.
(Temperature less than 30℃, Humidity: lass than 60%).�Do not touch the paper surface before printing to avoid the fingerprints.
Attention: Ink Ribbon Handling�Use the ink ribbon specified by Shinko Electric.�Store the ink ribbon in cool place to avoid the direct sunlight.
(Temperature less than 30°C, Humidity: lass than 60%)
Attention: Printed Output Handling�Store the printed output in a dark place to avoid the direct sunlight.�Store the printed output away from the organic fluid such as benzine,
thinner and alcohol which may change or deteriorate the colors.
Caution: When abandon the ink ribbon, please handle it as harmfulindustrial waste.
Caution: Be careful not to injure your hands with the paper edge whenhandling paper.

Chapter 1. Important Safety Instruction
1-6
<MEMO>

Chapter 2. Installing and Set Up
2-1
This chapter explains the unpacking and set up of the printer.Before proceeding to this chapter, please make sure to read Chapter 1. Important SafetyInstruction.
Unpacking and checking the accessories
1. Open the box and remove the box containingthe accessories and protection materials.
2. Take out the printer by holding the handlesprovided at the front and rear of the printer.
3. Take out the accessories from the accessory box and check the contents.
Ink ribbon cassette Dust box Paper flange (white) Paper flange (blue)
Spacer (2 pieces) Operation Manual Ferrite core Power cable
Attention: Keep the packaging materials.The box and protection materialsare necessary when moving ortransporting the printer. Makesure that they are retained.
Caution: This printer weighs about 20Kg.Please handle it carefully.When lifting the printer, alwaysuse the handles. Otherwise, theprinter may be damaged.

Chapter 2. Installing and Set Up
2-2
Parts Name and Function
<Front View> <Rear View>
<Internal View>
No. Name Function
� Operation Panel Control buttons, LCD and printer status display lamps are located on thepanel.
� Front Cover Open the front cover when replacing an ink ribbon or paper, or whenperforming maintenance.
� Handle (Front) When moving the printer, hold this handle and the rear handle.
� Power Switch
This switch turns on/off the power of the printer. When the “|” markedside of the switch is pressed, the power is turned on.When the “○” marked side of the switch is pressed, the power is turnedoff.<Caution> Once the printer is turned off, wait at least 3 seconds before
turning it on again.� Power Connector To be used to connect the power cord.� USB Connector To be used to connect the USB cable.� Handle (Rear) When moving the printer, hold this handle and the front handle.
�Paper SettingLamp
When setting the paper, insert the paper until the lamp is lit. When thelamp blinks, remove the paper until the lamp goes off.
�
�
�
�
�
�
�
�

Chapter 2. Installing and Set Up
2-3
Connecting Power Cord
Connect the power cord according to the safety instructions below.
1. Insert the power cord attached to the printerinto the power connector located on the rearof the printer.
Warning: When moving the printer, make sure to turn off the power of theprinter, remove the power cord in order to have no connection withother devices. Otherwise, the power cord might be damaged and itcan cause the fire and electric shock.Also there is a possibility to fall down caught by the cord.
Warning: Avoid “piled up” connection. It can cause the fire and electric shock.
Warning: In case of not using the printer for a long time, remove the power cordfor safety.
Warning: Make sure to turn off the power of the printer before inserting thepower cord.
Warning: Make sure to insert the power cord correctly. If not, it can cause thefire or the printer problem.
Warning: Do not insert or remove the power cord with wet hands.It can cause the electric leakage.
Warning: Do not make any damage or any modification to the power cord. Putthe heavy items on the power cord, give a strong pull to the powercord and twist the power cord can cause the fire and electric shock.

Chapter 2. Installing and Set Up
2-4
Connecting USB Cable
1. Install the ferrite core to the USB cable to beconnected.
2. Connect the USB cable from the personalcomputer to the USB connector located onthe left rear side of the printer.Be sure to insert the USB cable all the way.
Installing Dust Box
1. Insert the claw of the dust box first andinsert the projected section of the printer inthe hole at the bottom of the dust box.
Attention: To remove the USB cable, make sure that the printer is inthe waiting status.Removing the USB cable during data transfer may not beable to print data correctly.
Approx.30mm

Chapter 2. Installing and Set Up
2-5
Opening the Front Cover
1. Turn on the power of the printer by pressing"|" on the power switch.
2. Press the Open button on the operationpanel.After the Error lamp blinks several times,the front cover opens automatically.
3. Open the front cover by holding the uppersection of the front cover.
Closing the Front Cover
1. Close the front cover firmly by pressing thecenter of the upper section of the front cover.The printer is initialized automatically.
Attention: Do not press the front coverwhen opening the front cover.Otherwise, the front cover willno longer be opened.
Attention: Do not open the front coverquickly or with unnecessaryforce.Do not press the front cover orplace a heavy object other thanpaper after opening the frontcover.
Caution: Close the front covercarefully so as not to catchyour fingers.
||||
○○○○

Chapter 2. Installing and Set Up
2-6
Loading Ink Ribbon
1. Set the ink ribbon in the ink ribbon cassetteas shown in the diagram.Insert the ribbon until it clicks into position.
2. Stretch the ink ribbon by turning the core onthe ink ribbon feed side.
3. Match the color of the core of the ink ribbonand the color of the rail and insert the inkribbon cassette to the end along the rail
Attention: Do not set the ink ribbon if theguard of the ink ribbon sticks outfrom the ribbon.

Chapter 2. Installing and Set Up
2-7
Loading Paper
Install spacers in the paper flanges first when using L size paper or 2L size paper.When using PC size paper or 6 × 9 size paper, proceed with Step 3 without installingthe spacers.
1. Install the spacers in the paper flange(white) and paper flange (blue).The two spacers are identical.
2. Rotate the spacer until it clicks into position.Two locks are provided. Check that the twosections are locked.
3. Install the paper flange (white) and paperflange (blue) in the paper.The paper is not set correctly if there is agap of about 10mm between the paper flangeand paper. Match the notch of the paperflange and the notch of the paper core byrotating the paper flange.Do not remove the seal attached to the paperuntil the paper is set in the printer.
4. Set the paper in the printer.Set the paper by matching the color of thepaper flange and the color of the holder.After setting the paper, remove the seal fromthe paper.

Chapter 2. Installing and Set Up
2-8
5. Insert the edge of paper under the roller byrotating the paper flanges.
6. Insert the edge of the paper between therollers by rotating the paper flanges.Match both ends of the paper to the line ofthe seal.
7. Insert the paper until the paper setting lampis lit.
8. Close the front cover.When the front cover is closed, initializationstarts and four sheets of paper are ejectedautomatically.

Chapter 2. Installing and Set Up
2-9
Transporting the Printer
The following cautions are necessary in transportation of the printer.Since an incorrect transportation method causes a printer fault, follow the correctmethod.
1. Remove the ink ribbon and paper from the printer before transporting the printer.If the ink ribbon or paper cannot be removed due to a fault, consult with thedistributor.
2. Use a genuine box.If the box used at the purchase cannot be used, consult with your distributor andpurchase a new box.
3. Do not turn off the power while the front cover is open.Close the front cover while the power is ON and turn off the power when "No ribbon,paper" is displayed on the LCD of the operation panel.
No Ribbon, Paper

Chapter 2. Installing and Set Up
2-10
<MEMO>

Chapter 3. Operation Panel
3-1
Operation Panel
The buttons, LEDs and LCD display on the operation panel are shown below.
The LED Displays � to � have the following meanings.
No. Name Color Description� power Lamp Orange Light when power is ON.� ready Lamp Green Light when ready to print.� error Lamp Red Light when error occurs.
Individual Operation Buttons � to � have the following function.
No. Name Function
� open ButtonPress this button when opening the frontcover. The front cover cannot be opened inStandby mode.
� menu ButtonIf this button is pressed in Standby mode, theprinter is set to a User Set Up mode. (See page3-3.) Use this button to select an item in themenu.
� enter Button Use this button to determine the selectedsetting contents in User Set Up mode.
� clear ButtonIn User Set Up mode, control exits from themenu that is displayed when this button ispressed.
� + Button Not used since the button is for maintenance. - Button Not used since the button is for maintenance.
�
�
�
��
��
�

Chapter 3. Operation Panel
3-2
LCD Display
The LCD Display � indicates the following printer status.
LCD Display Description
Ready: 4 × 6Printable statusDisplay is changed depending on ink ribbon beingset in the printer.
Initializing Printer is in initialization.Ribbon Checking Winding the ink ribbon.Paper Loading Paper is being loaded.Paper Reloading Paper is being reloaded.Printing Printing.
Cooling DownThe thermal head is being cooled down.Printing is interrupted temporarily until thethermal head is cooled down.
Warming UpThe thermal head is being warmed up.Printing is interrupted temporarily until thethermal head is warmed up.

Chapter 3. Operation Panel
3-3
User Set Up Mode
To set the User Set Up Mode, press the Menu button in standby mode.When the Menu button is pressed again, the display changes as follows.To change to the standby mode from each menu, press the Clear button.
Ready: 4x6“
Remain XXX/YYY
Test Print Mode
Printed XXXXXX
MAIN Ver. XX.XX
Print Mode
DSP Ver. XX.XX
TABLE Ver. XX.XX
Language
menu
menu
menu
menu
menu
menu
menu
menu
menu
USB Ver. XX.XX
menu
"XXX" indicates the number of copies that can be printed and "YYY"indicates the number of copies that can be printed by one ink ribbon.Displays "0/0" when the front cover is opened or a ribbon is not set.
Test print can be performed.To execute test print, press the Enter button.
Displays the total number of copies printed since the factory shipment.
Displays the version number of the MAN firmware.
Allows the switching of the print mode. See "Switching Print Mode" fordetails of the menu.
Displays the version number of the DSP firmware.
Displays the version number of the print parameter table.
Allows the switching of the language that is displayed on the LCD. See"Switching Display Language" for details of the menu.
Displays the version number of the USB firmware.

Chapter 3. Operation Panel
3-4
Switching Print Mode
Display the print mode switching menu in User Set Up Mode and press the Enterbutton.The print mode that is set in the printer is displayed.
When the Menu button is pressed, the LCD display is switched.
When the Enter button is pressed, the LCD blinks for a moment and the print modethat is displayed is set in the printer.This setting becomes effective from the next printing.
When the Clear button is pressed twice, the printer returns to the standby mode.
Switching Display Language
Display the language display switching menu of the User Set Up mode and press theEnter button.The display language that is set in the printer is displayed.
When the Menu button is pressed, the LCD display is switched.
When the Enter button is pressed, the LCD blinks for a moment and the displaylanguage that is displayed is set in the printer.This setting becomes effective from the next printing.
When the Clear button is pressed twice, the printer returns to the standby mode.
(Note)The lower level of the LCD display field is allocated to the Japanese setting.The upper level is allocated to the English setting.
Print Mode Mode: Standardenter
Mode: Standardmenu
Mode: Fine
Mode: Fine
Language
ゲンゴ
Lang. :English
ゲンゴ :エイゴ
enter
Lang. :Japanese
ゲンゴ :ニホンゴ
Lang. :English
ゲンゴ :エイゴ
menu
Lang. :Japanese
ゲンゴ :ニホンゴ

Chapter 4. Routine Maintenance
4-1
Cleaning of Thermal Head, Platen, Cleaning Roller
By using thermal transfer technology, daily maintenance is not really necessary if theprinter is being use properly.However, in order to keep the best print quality, it is recommended to do the cleaningof Thermal Head, Platen and Cleaning Roller once in a month.
1. Using gauze, clean the heat element (glassbar) of the thermal head with isopropylalcohol or ethyl alcohol.
2. Using gauze dipped with isopropyl alcohol orethyl alcohol, clean the edge of the peel-apart plate.
3. Using gauze dipped with isopropyl alcohol orethyl alcohol, clean the rubber section of theplaten roller.
Caution: Make sure that the power is turned off before starting cleaning.Thermal Head reaches high temperature just after printing. Do nottouch directly by hand. Make sure that the thermal head has beensufficiently cooled down before starting cleaning.When fingerprint stick to the heat element, it can damage theThermal Head. Do not touch directly by hand.Be careful not to be hurt by the projections of the printer.

Chapter 4. Routine Maintenance
4-2
4. Using gauze dipped with isopropyl alcohol orethyl alcohol, clean the rubber section of thecleaning roller (paper feed side).
5. The cleaning roller (ejection side) can beremoved by pulling the black knobs on theleft and right sides.
6. Using gauze dipped with isopropyl alcohol orethyl alcohol, clean the rubber section of thecleaning roller (ejection side).
7. After cleaning, return the rollers to theoriginal positions and insert until it clicksinto position.
Attention: Printing should be performed after the alcohol dried upcompletely (approx. 5 minutes)

Chapter 4. Routine Maintenance
4-3
Cleaning of Outer Cabinet
Wipe the printer outer cabinet with a soft cloth.If the stains are not removed, wet the cloth and apply weakened neutral Detergent toit.
Cleaning of Filter
1. If the dust collects on the openings, clean itwith vacuum cleaner.
Caution: Do not use volatile solvents or spray insecticide on the printer outercabinet. Otherwise, discoloration or crack may result.
Warning: Continuous use under the abnormal condition such as hightemperature, smoke and strange smell can cause the fire and electricshock.Turn off the power and make sure to remove the power cord,then contact the dealers or service center.
Warning: In case, the foreign substance get into the printer, turn off the powerof printer, remove the power cord and contact the dealers or servicecenter. Continuous use of the printer under such condition can causethe fire and electric shock.

Chapter 4. Routine Maintenance
4-4
<MEMO>

Chapter 5. Error Handling
5-1
Error Message and Corrective Action
When the error happens, error message will be displayed on LCD on the operationpanel.
LCD Message Status Corrective Action
No Ribbon, Paper An ink ribbon and paper are notset. Set an ink ribbon and paper.
No Paper Paper is not set. Set paper.Paper Empty Run out of paper. Replace paper.
Unmatch Paper The paper that was set does notmatch the ink ribbon that is set.
Check the type of the paper andthe type of the ink ribbon thatare set.
No Ribbon An ink ribbon is not set. Set the ink ribbon.Ribbon Empty The ink ribbon is empty. Replace the ink ribbon.
Unmatch RibbonThe ink ribbon that is set doesnot match the size of the paperthat has been set.
Check the type of the paper andthe type of the ink ribbon thatare set.
IncorrectRibbon X (*) The ink ribbon that is set is notsupported.
Ink ribbon or printerabnormality is assumed.Consult with the ServiceDepartment.
Cover Open The front cover is opened. Close the front cover.
Cover Open Error The front cover is not opened. Press the Open button againand reset the error.
Control Error XX (*) Trouble of printer control board.
Mecha Error XX (*) The printer mechanical sectionis faulty.
Sensor Error XX (*) The sensor inside of the printeris faulty.
TempSensErr XX (*) Trouble of temperature sensorin the printer.
If the printer does not recoverfrom the error after turningpower ON and OFF, repairs arenecessary. Consult with theService Department.
Paper Jam XX (*) Paper jam occurred.Remove the paper. If paperjam occurs frequently, consultwith the service center.
* XX means the code number for maintenance.Please inform this number when you contact the dealers or service center.

Chapter 5. Error Handling
5-2
Failure Symptoms
When detecting a failure symptom, check the printer using the following table.
Symptom Action
Power is not turned on. � Check if the power cable is connected to theplug socket or the printer.
The personal computer does notrecognize the printer.
� Check if the USB cable is connected to thepersonal computer or printer.
The printer does not become ready.
� Check if the front cover is closed.� Check if paper is jammed in the printer.� When the paper setting lamp is blinking,
remove the edge of the paper until the papersetting lamp goes off.
The front cover does not open.
� Check if the printer is installed in a flatlocation.
� Check if any object is placed in front of thefront cover.
A straight stripe area is not printed.
� The thermal head may be dirty. Clean thethermal head as described in Chapter 4,"Routine Maintenance".
� If the blank area remains after cleaning thethermal head, the head may have beendisconnected. Consult with the ServiceDepartment.
Dotted areas are not printed.� The cleaning roller may be dirty. Clean the
thermal head as described in Chapter 4,"Routine Maintenance".

Chapter 5. Error Handling
5-3
Paper Jam
1. Open the front cover.
2. Cut off the folded section or printed sectionwith scissors.When the paper is folded inside of theprinter, pull it out slowly.
3. Pull out the paper until the paper settinglamp goes off.
Attention: � If the paper is used without cutting off the folded section or printedsection, paper jam occurs again or the ink ribbon may snap duringprinting. Always cut off the creased section or printed section of thepaper.
�Cut off the paper straight and at right angles to the roll paper direction.� If paper jam occurs frequently, a defect in the mechanical section is
assumed. Consult with the service center.

Chapter 5. Error Handling
5-4
Power Supply Interrupted during Printing
In case, power supply interrupted during the printing, Thermal Head will be keptpushing to Platen. Laving this situation for a long time, shape of Platen can be warped.In order to avoid this situation, please follow the instruction below.
1. Turn off the power of the printer.2. Turn on the power for 3 or more seconds after turning off the power.3. Paper Jam is displayed on the LCD of the operation panel, open the front cover and
take the necessary action according to the instruction provided in 5-3, "Paper Jam".
When the ribbon is snapped
1. Remove the ribbon cassette.
2. Stick the broken part of the ribbon with atape.
3. Turn the ribbon on the rewinding side andrewind the taped section completely.

Chapter 6. After-sales Service
6-1
Contact your dealers or service center for the details about after-sales service.


YTE8-J0288ERevision: First edition