division of health sciences & human performance … · 5. using sterile scrub brush, apply...
TRANSCRIPT

DIVISION OF HEALTH SCIENCES & HUMAN PERFORMANCE
SURGICAL TECHNOLOGY PROGRAM
ST 105 SURGICAL TECHNOLOGY I APPLICATION
COLLEGE LABORATORY GUIDE
CLINICAL ACTIVITIES FROM A TO Z
FALL 2005

Sep-04 Page 2
DIVISION OF HEALTH SCINECES AND HUMAN PERFORMANCE
SURGICAL TECHNOLOGY PROGRAM
Course Description
This course acquaints the student with the skills necessary to function as a beginning technologist. A
satisfactory performance is required in the activities. Emphasis is placed on the surgical scrub, gowning, and
gloving, establishing a sterile field, draping materials, needles, sutures, basic instrumentation, preparation and
sterilization of supplies. The laboratory will allow the student to develop his/her skills in positioning and
transporting of patients as well as developing proficiency as a beginning Surgical Technologist.
Credit
In order to receive a passing course grade for ST 105, the student must satisfactorily complete all college
lab activities with an "Acceptable" score from the instructor.
Offered
Fall Semester
Prerequisite
Enrollment in ST 100
Surgical Technology - I
Introduction
The college laboratory is the place of study for the basic skills or activities necessary to function as a
beginning surgical technologist. The emphasis is placed upon activities related to concepts identified in the ST 105
Syllabus.
The laboratory has been equipped to provide for the demonstration, observation, and practice of the
activities necessary for the student to accomplish the clinical performance and evaluation. At various times after
demonstration, observation, and practice, the student's performance of the activity will be evaluated. If the student
is found to need additional practice to achieve proficiency, he/she will arrange for additional practice time as needed
to achieve competency.
Course Objectives
Upon completion of the course the student will be able to:
Don surgical attire
Identify OR furniture and equipment
Perform surgical hand scrub
Don surgical gown and gloves
Gown and glove team members
Perform patient identification, vital signs, and urinary catheterization
Transport the patient to the OR
Position the patient and attach ESU pad
Obtain information about resources at the LRC
Perform shave and scrub preps on surgical patient
Select supplies and open for procedure
Drape OR furniture and the surgical patient
Prepare the field for procedure
Evaluate and identify documentation
Utilize dressings, packing, drains, and collection systems
Identify sponges and perform counts
Receive/Deliver drugs onto the sterile field

Sep-04 Page 3
Perform OR Sanitation - concurrent and terminal
Prepare surgical instruments, supplies, and equipment for sterilization
Identify, load, and pass surgical sutures/needles
Identify, assemble & pass surgical instruments
Perform end of case routine and turn around
Laboratory Guidelines
1. Attendance is mandatory. Missed labs must be made up in order to complete clinical activities before the
activity can be practiced in the clinical facility.
2. Laboratory time is to be spent on demonstration, practice, observation, and evaluation of proficiency of student.
3. Independent learning is encouraged in addition to scheduled lab hours. Open lab hours are posted on lab door.
Additional hours can be arranged.
Student Evaluation
1. Deadlines for evaluation are necessary to insure competency before a student may proceed to accomplish a
correlated clinical activity.
2. Participation in demonstration of an activity does not constitute evaluation of an activity. After practice, a
student should arrange to demonstrate competency of demonstrated activities with the instructor.
3. Check off lists signed by the instructor may be presented to the clinical coordinator before the correlated
clinical activity may be undertaken.
4. Failure to secure successful lab evaluations will prevent the student from completing clinical activities
necessary for successful completion of the course.
Texts
Association of Surgical Technologists, Inc. Surgical Technology for the Surgical Technologist.
Delmar. Albany, NY: 2001.
Miltex Instrument Company: Surgical Instruments.
Beckett, Brent J., Identifying Surgical Instruments, 3rd ed. 1999.
Recommended Texts (available at the bookstore)
Goldman, Maxine: Pocket Guide to the Operating Room, F.A. Davis
Miller and Keane Encyclopedia and Dictionary of Medicine, Nursing, and Allied Health, Latest edition, W.B.
Saunders
Gruendemann, Meeker:
Alexanders Care of the Patient in Surgery, Latest edition, C.V. Mosby.

Sep-04 Page 4
Date ______________________ Student Name ____________________
COLLEGE LABORATORY GUIDE
ST 105 SURGICAL TECHNOLOGY I APPLICATION
ACTIVITY A
Focus: Donning Surgical Attire
Objective: Proper donning of surgical attire to include cap, shirt, pants, shoe covers, protective eyewear, and masks.
Content:
1. Obtaining proper surgical attire and cap.
2. Changing from "street clothes" in the dressing room to scrubs.
Clinical correlation: Clinical activity 1
Activities:
1. Demonstration by instructor
2. Read: AST, p. 89-90, 239-242
3. View film Pre-operative Preparations
Evaluation Need Improvement Acceptable
1. Obtain proper sized scrubs - shirt and pants
2. Obtain cap, put on first, cover all hair, don scrubs
3. Obtain and put on shoe covers over surgical shoes
4. Remove jewelry - rings and watch may be pinned to shirt
or tied to scrub pants; all other jewelry must be left at
home or in locker.
5. Obtain mask, apply over nose pitching metal strip to form,
tie top ties, then bottom ties
6. Obtain and put on protective eyewear
Comments:____________________________________________________________________________________
_____________________________________________________________________________________________
_____________________________________________________________________________________________
____________________________
Instructor’s Signature
Tech Tip: 1. OR cap should be put on (donned) first to avoid allowing hair and scalp flakes to fall onto scrub attire.
2. The OR shoes ARE NOT worn outside of the clinical facility.

Sep-04 Page 5
Date ______________________ Student Name ____________________
COLLEGE LABORATORY GUIDE
ST 105 SURGICAL TECHNOLOGY I APPLICATION
ACTIVITY B
Focus: Introduction to the Operating Room.
Objective: Orientation and identification of furniture and placement in the operating room.
Content:
1. Introduction to surgical laboratory.
2. ST 105 Syllabus
Clinical correlation: Clinical activity 1
Activities:
1. Orientation by instructor.
2. Read: AST, p. 58-64
3. View Film OR Supplies, Instruments, and Equipment
Evaluation Need Improvement Acceptable
1. Identify and properly place in the operating room:
� Ring stand
� Mayo stand
� Kick bucket
� Back table
� Surgical table and accessories
� IV pole
� Step stool
� X-ray view box
� Cautery machine
� Suction
� Anesthesia machine
� OR lights
� Prep Table
Comments:____________________________________________________________________________________
___________________________________________________________
____________________________
Instructor’s Signature
Tech Tip: Remove excess OR furniture from the room - this allows more space for the setup and decreases the
chances of contamination.

Sep-04 Page 6
Date ______________________ Student Name ____________________
COLLEGE LABORATORY GUIDE
ST 105 SURGICAL TECHNOLOGY I APPLICATION
ACTIVITY C
Focus: Surgical hand scrub.
Objective: Demonstrate a surgical hand scrub following principles of asepsis.
Content:
1. Hand scrubbing procedures
Clinical correlation: Clinical activity 2
Activities:
1. Read: AST, p. 246-249
2. View film: "Scrubbing, Gowning, and Gloving" and CD ROM "Aseptic Technique"
3. Instructor demonstration and practice.
Evaluation Need Improvement Acceptable
1. Check hands and arms for cuts or infections.
Fingernails should be short, free from polish and/or
artificial nails
2. Turn on water to moderate flow and adjust water
temperature. Avoid touching faucets throughout
completion of procedure
3. Wet hands and arms, apply antimicrobial soap and
lather from fingertips to 2" above elbows.
4. Rinse hands and arms. Open sterile scrub brush and
obtain nail file. Clean each fingernail under running
water
5. Using sterile scrub brush, apply antimicrobial soap
and scrub nails on both hands (30 strokes on each
hand) Note: A stroke is considered on back and forth
motion.
6. Scrub from fingertips to 2" above elbows using the
timed method as demonstrated: 1 ½ minutes per each
hand, 1 minute on each arm.
7. Rinse hands and arms with a unidirectional motion,
fingertips first, then arms. Keep hands higher than
elbows.
8. Turn off water; if applicable, hold arms over sink with
hands elevated to allow excess water to drain off
elbows. Proceed to OR holding hands above waist.
9. Repeat steps 1-5. Scrub from fingertips to 2" above
elbows used the counted stroke method as
demonstrated: 20 strokes each side of fingers, hands
and arms. Proceed with steps 7 and 8.

Sep-04 Page 7
Comments:____________________________________________________________________________________
_____________________________________________________________________________________________
____________________________
Instructor’s Signature
Tech Tip: 1. The rule of direction for the surgical hard scrub is fingertips to elbows.
2. Skin CANNOT be sterilized.
3. Once hands and arms are scrubbed, they must remain above the waist, below the chest, and IN
VIEW at all times.

Sep-04 Page 8
Date ______________________ Student Name ____________________
COLLEGE LABORATORY GUIDE
ST 105 SURGICAL TECHNOLOGY I APPLICATION
ACTIVITY D
Focus: Drying Hands after Surgical Scrub.
Objective: Drying hands after surgical scrub using aseptic technique.
Content: Proper drying of hands
Clinical correlation: Clinical activity 2
Activities:
1. Read: AST, P. 246-249
2. View film "Scrubbing, Gowning, and Gloving." and CD ROM "Aseptic Technique"
3. Instructor demonstration and practice
Evaluation Need Improvement Acceptable
1. With one hand, pick up sterile towel by "pinching" it
from the top. Lift it straight up and away from gown
pack without touching gown or dripping water onto
pack.
2. Step away from sterile field, continue to face it, bend
at waist so towel DOES NOT TOUCH scrubs as it
unfolds.
3. Using ½ of towel, begin at fingertips and dry up to 2"
above elbow of first hand with blotting, rotating
motions. Note: Do not return to an area once it is
dried
4. Grasp opposite ½ of towel and repeat steps to dry
other hand and arm.
5. Discard towel as appropriate. Keep hands above waist
and in view at all times.
Comments:____________________________________________________________________________________
_____________________________________________________________________________________________
_____________________________________________________________________________________________
_________________________
____________________________
Instructor’s Signature
Tech Tip: If the drying towel touches the scrub attire, drop the towel immediately and obtain another.
Sep-04 Page 9
Date ______________________ Student Name ____________________
COLLEGE LABORATORY GUIDE
ST 105 SURGICAL TECHNOLOGY I APPLICATION
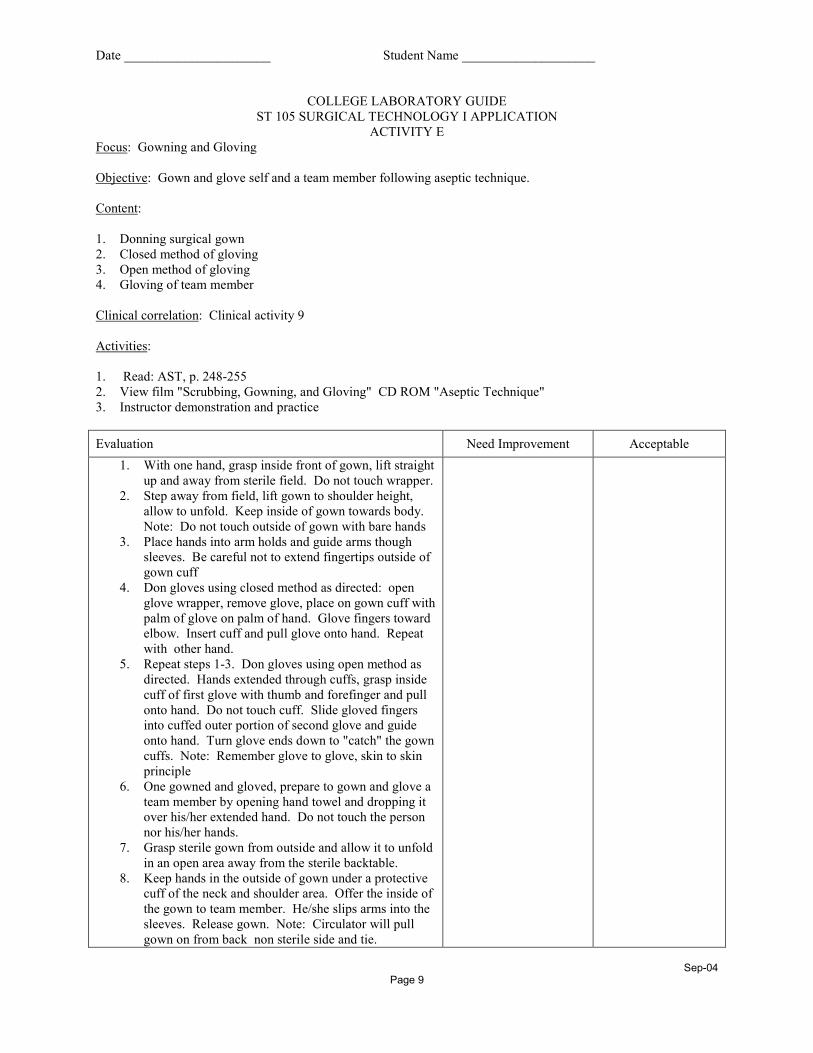
ACTIVITY E
Focus: Gowning and Gloving
Objective: Gown and glove self and a team member following aseptic technique.
Content:
1. Donning surgical gown
2. Closed method of gloving
3. Open method of gloving
4. Gloving of team member
Clinical correlation: Clinical activity 9
Activities:
1. Read: AST, p. 248-255
2. View film "Scrubbing, Gowning, and Gloving" CD ROM "Aseptic Technique"
3. Instructor demonstration and practice
Evaluation Need Improvement Acceptable
1. With one hand, grasp inside front of gown, lift straight
up and away from sterile field. Do not touch wrapper.
2. Step away from field, lift gown to shoulder height,
allow to unfold. Keep inside of gown towards body.
Note: Do not touch outside of gown with bare hands
3. Place hands into arm holds and guide arms though
sleeves. Be careful not to extend fingertips outside of
gown cuff
4. Don gloves using closed method as directed: open
glove wrapper, remove glove, place on gown cuff with
palm of glove on palm of hand. Glove fingers toward
elbow. Insert cuff and pull glove onto hand. Repeat
with other hand.
5. Repeat steps 1-3. Don gloves using open method as
directed. Hands extended through cuffs, grasp inside
cuff of first glove with thumb and forefinger and pull
onto hand. Do not touch cuff. Slide gloved fingers
into cuffed outer portion of second glove and guide
onto hand. Turn glove ends down to "catch" the gown
cuffs. Note: Remember glove to glove, skin to skin
principle
6. One gowned and gloved, prepare to gown and glove a
team member by opening hand towel and dropping it
over his/her extended hand. Do not touch the person
nor his/her hands.
7. Grasp sterile gown from outside and allow it to unfold
in an open area away from the sterile backtable.
8. Keep hands in the outside of gown under a protective
cuff of the neck and shoulder area. Offer the inside of
the gown to team member. He/she slips arms into the
sleeves. Release gown. Note: Circulator will pull
gown on from back non sterile side and tie.

Sep-04 Page 10
9. Pick up right glove under cuff. Turn palm of glove
toward team member. Place fingers under glove cuff
and spread them to create an opening. Allow team
members to place hand into glove. Exert upward
pressure on cuff as team member inserts his/her hand.
10. Bring glove cuff well over the gown cuff and release.
Repeat with other glove
Comments:____________________________________________________________________________________
_____________________________________________________________________________________________
_____________________________________________________________________________________________
_________________________
____________________________
Instructor’s Signature
Tech Tip: When putting on (donning) or removing gloves, the rule is skin to skin and glove to glove.

Sep-04 Page 11
Date ______________________ Student Name ____________________
COLLEGE LABORATORY GUIDE
ST 105 SURGICAL TECHNOLOGY I APPLICATION
ACTIVITY F
Focus: Vital Signs in the Circulating Role.
Objective: Monitor the vital signs of a preoperative and postoperative patient.
Content:
1. Pulse
2. Temperature
3. Respirations
4. Blood pressure
Clinical correlation: Clinical activity 16
Activities:
1. Read: AST, p. 129-133
2. Demonstration by instructor
3. View films "Vital Signs"
4. Practice
5. Obtain and record vitals on assigned partner
Evaluation Need Improvement Acceptable
1. Assemble equipment and wash hands
2. Identify patient (partner) and explain procedure
3. As demonstrated obtain and record radial pulse using first
two fingers over radial artery of patients wrist, hold and
count for one full minute. Note: Do not use your thumb
as it has a pulse of its own.
4. As demonstrated, obtain and record respirations using
watch or room clock to count rise and fall of chest for one
full minute.
5. As demonstrated, obtain and record temperature using an
oral mercury thermometer under the tongue for 3 minutes
6. As demonstrated, obtain and record blood pressure using a
stethoscope and sphygmomanometer to locate the brachial
artery "pulse"
7. Wash hands when task is completed.
Comments:___________________________________________________________________
____________________________________________________________________________
_____________________________
Instructor’s Signature
Tech Tip: Always make sure equipment is functioning before using on the patient.

Sep-04 Page 12
Date ______________________ Student Name ____________________
COLLEGE LABORATORY GUIDE
ST 105 SURGICAL TECHNOLOGY I APPLICATION
ACTIVITY G
Focus: Identification and transportation to the operating room in the non scrubbed role.
Objectives:
1. Demonstrate identification and preop check of the patient.
2. Demonstrate review of the chart.
3. Demonstrate moving preoperative patient onto a stretcher.
4. Demonstrate safe transportation of a patient to surgery.
5. Demonstrate moving a patient from a stretcher to the OR table.
Content:
1. Identification of surgical patient
2. Transportation to the OR
3. Moving patient to the OR table
Clinical correlation: Clinical activity 17
Activities:
1. Read: AST, p. 119-124
2. View film "Transportation of the Patient to the Operating Room"
3. Demonstration by Instructor and class
4. Practice and Role Playing
Evaluation Need Improvement Acceptable
1. Obtain patient's info from charge nurse, get stretcher, put
on cover gown and shoe covers
2. Go to floor, get patient's nurse, proceed to room and verify
patient's I.D. and preop check
3. Review patient’s chart for completeness
4. Safely transfer patient from hospital bed to OR stretcher
and transport to OR department
5. Check patient in, remove your cover gown and change
shoe covers, put hat on patient and other "coverings" as
needed.
6. When notified, transport patient to operating room and
check in with circulator.
7. With circulator, transfer patient to OR bed, secure safety
straps, remove stretcher, and leave room.
Comments:____________________________________________________________________________________
____________________________________________________________________________________________
Instructor’s Signature
Tech Tip: Once patient is on the OR table, unlock stretcher, move it away AND immediately move to stand next to
the patient’s bedside. Remain there until all safety straps are secured.

Sep-04 Page 13
Date ______________________ Student Name ____________________
COLLEGE LABORATORY GUIDE
ST 105 SURGICAL TECHNOLOGY I APPLICATION
ACTIVITY H
Focus: Positioning surgical patients on the operating room table in the circulating role. Placement of ESU pad.
Objective: Demonstrate surgical positioning of patients. Demonstrate proper placement of ESU grounding pad.
Content:
1. The operating room table and fracture table.
2. Positioning surgical patients
3. Placement of ESU pad, machine, and foot pedal
4. Safety considerations
Clinical correlation: Clinical activity 7
Activities:
1. Read: AST p. 124-133, 202-204
2. Demonstration by instructor and class
3. Practice, role playing
4. View film, "Positioning the Surgical Patient" and "The Champaign Fracture Table"
Evaluation Need Improvement Acceptable
1. Before patient enters room test OR table to make sure it is
working properly, assemble all necessary equipment and
obtain and apply clean sheets, lifter, etc to table.
2. Check electrosurgical unit (ESU), prepare grounding pad
so it is ready for patient.
3. As demonstrated, position the patient on the bed in
supine\Dorsal recumbent.
4. As demonstrated, position the patient on the bed in
Trendelenburg.
5. As demonstrated, position the patient on the bed in
Reverse Trendelenburg.
6. As demonstrated, position the patient on the bed in Kraske.
7. As demonstrated, position the patient on the bed in
Lithotomy.
8. As demonstrated, position the patient on the bed in
Fowler's\Semi Fowler’s.
9. As demonstrated, position the patient on the bed in Simms.
10. As demonstrated, position the patient on the bed in Prone
and Knee-chest.
11. As demonstrated, position the patient on the bed in Prone
with Wilson frame.
12. As demonstrated, position the patient for a spinal
anesthetic.
13. Demonstrate appropriate safety precautions as necessary
for each procedure as: padding bony prominence,
watching for hyper extension of joints, covering all tables
and arm boards, moving patient by keeping body aligned,
support head, wait for anesthesia to give "go ahead."
Sep-04 Page 14
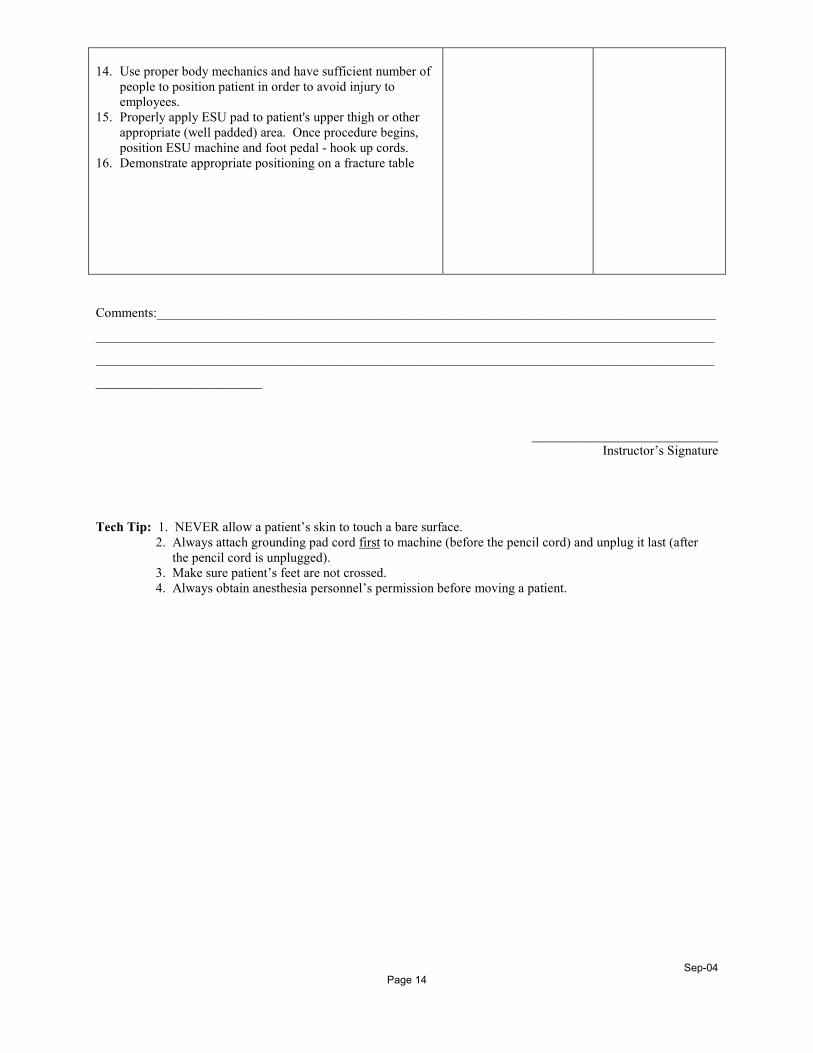
14. Use proper body mechanics and have sufficient number of
people to position patient in order to avoid injury to
employees.
15. Properly apply ESU pad to patient's upper thigh or other
appropriate (well padded) area. Once procedure begins,
position ESU machine and foot pedal - hook up cords.
16. Demonstrate appropriate positioning on a fracture table
Comments:____________________________________________________________________________________
_____________________________________________________________________________________________
_____________________________________________________________________________________________
_________________________
____________________________
Instructor’s Signature
Tech Tip: 1. NEVER allow a patient’s skin to touch a bare surface.
2. Always attach grounding pad cord first to machine (before the pencil cord) and unplug it last (after
the pencil cord is unplugged).
3. Make sure patient’s feet are not crossed.
4. Always obtain anesthesia personnel’s permission before moving a patient.

Sep-04 Page 15
Date ______________________ Student Name ____________________
COLLEGE LABORATORY GUIDE
ST 105 SURGICAL TECHNOLOGY I APPLICATION
ACTIVITY I
Focus: Learning field trips to the Learning Resource Center and Good Samaritan Hospital Surgery.
Objective: Acquire knowledge necessary to utilize the LRC for research papers and become familiar with a working
hospital Operating Room.
Content:
1. Field trips to both facilities.
2. Information and guided tours at both facilities.
Evaluation Need Improvement Acceptable
1. Participation in trip to LRC
a. Info on computer access
b. Info on medical references
c. Info on student assistance by LRC staff
2. Participation in trip to Good Samaritan
a. Don proper attire in dressing room
b. Scrub at sinks
c. Identify furniture and accessory equipment in OR
rooms
d. Info on warmers, autoclaves, steris, laminar flow
e. Info on OR suite layout and schedule board
Comments:____________________________________________________________________________________
_____________________________________________________________________________________________
_____________________________________________________________________________________________
_________________________
____________________________
Instructor’s Signature
Tech Tip: The best learning resources in the universe won’t help if you don’t utilize them.

Sep-04 Page 16
Date ______________________ Student Name ____________________
COLLEGE LABORATORY GUIDE
ST 105 SURGICAL TECHNOLOGY I APPLICATION
ACTIVITY J
Focus: Preoperative Shave Prep in the circulating role.
Objective: Demonstrate procedure for performing a preoperative shave prep.
Content:
1. Procedure for shave preps
2. Methods and steps for shave preps
3. Safety considerations for the patient
Clinical correlation: Clinical activity 18
Activities:
1. Read: AST, p. 134-138
2. Instructor demonstration
3. Role play - preoperative shave for knee surgery using beds in LPN lab and mock shaves of mannequins
Evaluation Need Improvement Acceptable
1. Obtain and don cover gown and shoe covers. Obtain shave
prep kit and patient information
2. Identify patient (partner) and explain procedure at bedside
3. Assemble needed supplies, wash hands, ensure patient
privacy.
4. Perform shave prep for arthroscopy of right knee using
techniques as demonstrated.
5. Clean up area, properly dispose of supplies
6. Repeat steps for mock appendectomy on mannequin
Comments:____________________________________________________________________________________
_____________________________________________________________________________________________
__________________________________________
____________________________
Instructor’s Signature
Tech Tip: Use warmed prep solutions and water on the awake patient.

Sep-04 Page 17
Date ______________________ Student Name ____________________
COLLEGE LABORATORY GUIDE
ST 105 SURGICAL TECHNOLOGY I APPLICATION
ACTIVITY K
Focus: Scrub prep of the surgical site in the circulating role.
Objective:
1. Identify correct prep sites for procedures.
2. Demonstrate open gloving to preps
3. Demonstrate a flat surface prep.
4. Demonstrate a limb prep.
5. Demonstrate perineal prep.
6. Identify dirty areas.
Content:
1. Procedure for a scrub prep and donning gloves
2. Non flat and flat surfaces
3. Important considerations
4. Dirty areas
Clinical correlation: Clinical activity 7
Activities:
1. Read: AST, p. 134-138
2. Instructor demonstration with fellow students and mannequins
3. Practice
Evaluation Need Improvement Acceptable
1. Identify prep areas for procedures: Abdominal, vaginal,
lumbar, back, extremities, neck, face, chest, and rectal.
2. Assemble prep supplies, verify prep site, check chart for
allergies, verify patient ready per anesthesia (or patient if
local)
3. Open prep kit and pour solutions using aseptic technique.
Expose prep site, adjust lights. Note: This must be
accomplished before sterile gloves are donned
4. Don sterile gloves using open method, but do not "turn
cuffs" as you do not have on a sterile gown. Note: skin to
skin and glove to glove principle.
5. Arrange supplies within kit, avoid touching open wrapper
edges which are non sterile. block off area with towels.
6. Take out sponge with antimicrobial soap, begin at incision,
circular motions extending outward to cover prep area. If
abdominal prep, clean umbilicus first before beginning
scrub. Discard sponge. Note: never go back over
previously prepped area. Do dirty areas last.
7. Prep continues with next sponge for a total of 5 or 10
minutes depending upon procedure and doctor's preference

Sep-04 Page 18
8. Dry area by lying towel over area and blotting. Use two
hands to remove towel. Don’t drag it.
9. If applying antiseptic solution (paint) begin at the incision
and work outward as with scrub
10. Dry if applicable, discard/count sponges according to
policy. Discard prep kit. Remove gloves in appropriate
manner.
11. Demonstrate prep for an extremity
12. Demonstrate prep for an abdominal procedure
13. Demonstrate prep for an vaginal procedure
14. Demonstrate prep for a hernia.
Comments:____________________________________________________________________________________
_____________________________________________________________________________________________
_____________________________________________________________________________________________
_________________________
____________________________
Instructor’s Signature
Tech Tip: Always check patient’s chart for allergies, especially for Iodine and Shellfish.

Sep-04 Page 19
Date ______________________ Student Name ____________________
COLLEGE LABORATORY GUIDE
ST 105 SURGICAL TECHNOLOGY I APPLICATION
ACTIVITY L
Focus: Selecting supplies for a procedure in the non scrubbed role.
Objective:
1. Demonstrate use of physician's preference card
2. Demonstrate selection of supplies for a procedure.
Content:
1. Physician's preferences
2. Selecting supplies
Clinical correlation: Clinical activity 8
Activities:
1. Read: Lecture notes, AST, p. 256-260
2. Demonstration by instructor and examples
3. Practice
Evaluation Need Improvement Acceptable
1. Make up a doctors preference card as instructed.
2. Use preference card to pull for procedure by pulling card
going to CS and room cabinet and pulling supplies for
procedure
3. Check supplies and preference card - what is to be opened,
what is "have in room."
Comments:____________________________________________________________________________________
_____________________________________________________________________________________________
_____________________________________________________________________________________________
_________________________
____________________________
Instructor’s Signature
Tech Tip: Pull supplies which “out date” the soonest when possible to help rotation. Always check expiration date,
sterilization indicators, and package integrity.

Sep-04 Page 20
Surgeon:
Procedure:
Glove size:
Position of patient:
Skin prep:
Drapes:
Sutures & Needles
Instruments & Supplies
Ties:
Peritoneum:
Fascia:
Muscle:
Sub-Q:
Retention:
Skin:
Other:
_________________________________
Dressing:
Mayo Stand Set up:
Draping Order:
Surgeon’s Special Requests:
Equipment / Positioning Aides / Furniture:

Sep-04 Page 21
Date ______________________ Student Name ____________________
COLLEGE LABORATORY GUIDE
ST 105 SURGICAL TECHNOLOGY I APPLICATION
ACTIVITY M
Focus: Surgical draping of OR furniture in scrubbed role.
Objective:
1. Demonstrate draping backtable
2. Demonstrate draping Mayo stand
3. Demonstrate preparing the sterile field
Content:
1. Basic principles of asepsis.
2. Types of drapes
3. Draping procedure
Clinical correlation: Clinical activity 8, 9
Activities:
1. Read: AST, p. 256-260
2. Demonstration by instructor
3. Practice
Evaluation Need Improvement Acceptable
1. Remove drapes and supplies from backtable to reinforce
drape (if applicable)
2. Replace supplies to proper place on backtable. Obtain
Mayo drape from supplies and drape Mayo by placing foot
on base of Mayo stand and pushing drape into stand.
Protect gloved hands in Mayo stand cover folded cuff.
3. Tuck excess corner edges under stand tray, place towel
over top of tray.
4. Fold towel to place on top of mayo for instruments. Note:
If sterile, remain on the inside or on top of sterile items
principle
Comments:____________________________________________________________________________________
___________________________________________________________
____________________________
Instructor’s Signature
Tech Tip: When scrubbed, always keep gloved hands on top of and inside of sterile field (drapes).

Sep-04 Page 22
Date ______________________ Student Name ____________________
COLLEGE LABORATORY GUIDE
ST 105 SURGICAL TECHNOLOGY I APPLICATION
ACTIVITY N
Focus: Surgical draping of the patient in the scrubbed role.
Objective:
1. Demonstrate standard four (4) towel drape (laparotomy).
2. Demonstrate orthopedic draping
3. Demonstrate head draping
4. Demonstrate lithotomy draping
Content:
1. Basic principles
2. Types of drapes
3. Draping procedure
4. Aseptic technique
Clinical correlation: Clinical activity 12
Activities:
1. Read: AST, p. 256-260
2. Demonstration by instructor
3. Practice, role playing
4. View film, "Draping the Orthopedic Patient"
Evaluation Need Improvement Acceptable
1. Fold towels with cuffs - 3 away and 1 toward you. Hand to
surgeon. Hand towel clamps if needed.
2. Hand Steri-drape (if used) and drape sheets as appropriate for
site.
3. Cuff drapes to protect gloved hands from non-sterile areas -
allow drapes to fall over edges and keep hands above waist.
4. If using procedural drapes - place slit opening over operative
site.
5. Demonstrate a head drape
6. Demonstrate an extremity drape
7. Demonstrate a laparotomy drape
8. Demonstrate a lithotomy/cystodrape
Comments:____________________________________________________________________________________
_____________________________________________________________________________________________
__________________
Instructor’s Signature
Tech Tip: 1. Always check with anesthesia personnel for permission before draping the patient.
2. Once a drape is laid, it stays.

Sep-04 Page 23
Date ______________________ Student Name ____________________
COLLEGE LABORATORY GUIDE
ST 105 SURGICAL TECHNOLOGY I APPLICATION
ACTIVITY O
Focus: Beginning the procedure in the sterile role.
Objective:
1. Pull up Mayo with instruments, sponges and light handles
2. Hook up appropriate equipment on field
3. Place sponges at site and hand scalpel to surgeon
Content:
1. Mayo stand to appropriate place at field
2. Types of equipment to be hooked up
3. Supplies needed to begin procedure
Clinical correlation: Clinical activity 8, 9, 10
Activities:
1. AST, p. 265-270
2. Handouts
3. Demonstration by instructor with class
4. Practice and role playing
Evaluation Need Improvement Acceptable
1. Pull up Mayo stand to appropriate site at the field
2. Anchor cautery pencil (ESU) with protector on field.
Allow enough cord for surgeon’s use. Hand end off to
circulator. "Stick" scratch pad at site. Make sure proper
tip is inserted into pencil.
3. Connect suction tubing to suction tip, anchor tubing and
tip on field. Allow enough tubing for surgeons use. Hand
end off to circulator.
4. Place two sponges at incisions site, attach light handles (or
hand them to surgeon to attach) handle scalpel to surgeon.
Comments:____________________________________________________________________________________
_____________________________________________________________________________________________
____________________________
Instructor’s Signature
Tech Tip: 1. Pull Mayo up to field and immediately hand suction tubing, cautery pencil and light handles to
surgeon - this gives you time to bring your table around, place sponges, and prepare to begin.
2. If catheters are on your table, always check balloons or trach tubes.

Sep-04 Page 24
Date ______________________ Student Name ____________________
COLLEGE LABORATORY GUIDE
ST 105 SURGICAL TECHNOLOGY I APPLICATION
ACTIVITY P
Focus: Opening Sterile Supplies in circulating role. Tying up surgical gowns
Documentation in the circulating role
Objective:
1. Opening sterile supplies observing sterile technique
2. Opening supplies to scrub person or onto sterile area.
3. Pouring solutions.
4. Tying the sterile scrub's surgical gown
5. Identifying and evaluating surgical documentation
Content:
1. Opening linen wrappers, paper and plastic wrappers.
2. Handing sterile supplies to scrub person
3. Placing sterile supplies on sterile area.
4. Pouring solutions into proper containers.
5. Opening bundles and gown pack.
6. Tying the sterile scrub's surgical gown.
7. Identifying and evaluating surgical documents
Clinical correlation: Clinical activity 5
Activities:
1. Read: AST, p. 80-91, 243-246
2. Practice
3. View film "Aseptic Technique: Stressing the Fundamentals" CD ROM "Aseptic Technique"
Evaluation Need Improvement Acceptable
1. Inspect all packages for integrity, expiration date, strike
through contamination, and indicator type. If
unacceptable, obtain new item
2. Remove outer (dust) cover if applicable and hold inner
package in hand or place package on a non-sterile surface
(table, Mayo stand, prep table, etc.)
3. Remove tape, lift flap away from you first if hand held and
always toward you if package on table. Note: Avoid
reaching across a sterile field.
4. Open all four flaps of package. Keeping your hands on
outside of package. If peel package grasp package edges
with both hands and pull apart. Note: If non-sterile -
remain on the outside or underneath sterile items principle.
5. Check sterility indicators on inside of package (if possible)
6. Flip sterile item onto sterile field or "hand" it to scrubbed
person. If a peel package - use a steady even pressure
while pulling package edges apart.
1. Obtain a bottle of solution, check expiration date and twist
seal to remove cap. Remove cap without touching rim or
lip of bottle.
2. Hold bottle approximately 12" from sterile container rim
overlapping sterile rim of bottle to edge of container. Pour

Sep-04 Page 25
solution, avoid dripping down bottle or onto table by
giving bottle a "dip" to finish delivering solution.
3. Discard bottle and any remaining solution. It can not be
reused.
1. Reach inside gown shoulder and pull gown onto scrubbed
team members arms and shoulders.
2. Tie inside tie, fasten neck fasteners, and tug gown bottom.
3. Receive the tie from scrubbed person. Stand safe distance
away so person turns around. Pull off tab.
Comments:____________________________________________________________________________________
_____________________________________________________________________________________________
_____________________________________________________________________________________________
_________________________
____________________________
Instructor's Signature
Tech Tip: 1. When non-scrubbed, always keep hands underneath and on the outside of the sterile field (drapes.)
2. When opening sterile packages, the flap away from you is first - the flap toward you is last.

Sep-04 Page 26
Date ______________________ Student Name ____________________
COLLEGE LABORATORY GUIDE
ST 105 SURGICAL TECHNOLOGY I APPLICATION
ACTIVITY Q
Focus: Catheters, drains, and collection systems - non scrubbed role
Objective:
1. Identify for use catheters, drains, and collection systems.
2. Demonstrate catheterization.
3. Connect Hemovac, Jackson Pratt, and chest drainage system.
Content:
1. Urinary catheters.
2. Other drainage catheters
3. Collection systems, types and usage
4. Aseptic technique - catheterization.
Clinical correlation: Clinical activity 13
Activities:
1. Read: AST, p. 133-134, 141, 209-211
2. Demonstration by instructor
3. Role playing, catheterization of mannequin
4. View films "Catheterization"
Evaluation Need Improvement Acceptable
1. Identify urinary catheters by types and usage
2. Identify drainage catheters by types and usage
3. Identify drains by types and usage
4. Identify collection systems - properly connect
5. Compress collection bulb or prepare seal chamber and
connect drain to its collection unit. Do not touch inside of
tubing or unit.
6. Close part and apply dressing (to incision and) around
drain. Tape securely.
7. Demonstrate catheterization on mannequin, male and
female
Comments:____________________________________________________________________________________
__________________________________________________________
___________________________________________________________________________
____________________________
Instructor's Signature
Tech Tip: 1. Wash hands initially and when gloves are removed.
2. If you encounter difficulty inserting the catheter, discontinue task and consult the surgeon.

Sep-04 Page 27
Date ______________________ Student Name ____________________
COLLEGE LABORATORY GUIDE
ST 105 SURGICAL TECHNOLOGY I APPLICATION
ACTIVITY R
Focus: Dressings, sponges, and packing.
Objective:
1. Identify dressings, sponges, and packing.
2. Demonstrate proper use of surgical sponges
3. Demonstrate application of routine dressing.
Content:
1. Dressing sponges and uses by layers
2. Surgical gauze
3. Surgical laps.
4. Packing.
Clinical correlation: Clinical activity 13, 15
Activities:
1. Read: AST, p. 207-208, 220-221
2. Demonstration of uses by instructor
3. Practice-role playing
Evaluation Need Improvement Acceptable
1. Identify each of the following types of sponges
a. Plain
b. Radiopaque
c. Peanut
d. Laps
2. Properly load a sponge forceps using a rraytec sponge in
scrub role
3. Identify the following dressing layers and examples of
each
a. Inner dressings
b. Intermediate dressings
c. Outer dressings
d. Special dressings
4. Apply dressings in the scrubbed role by cleansing area
with sterile saline on a sponge to remove blood and prep
solutions. Then dry area with second sponge
5. Apply appropriate dressing per surgeons preference.
6. Apply tape in the circulating role as required

Sep-04 Page 28
Comments:____________________________________________________________________________________
_____________________________________________________________________________________________
_____________________________________________________________________________________________
_________________________
____________________________
Instructor’s Signature
Tech Tip: 1. Radiopaque sponges should not be used as dressing.
2. Dressings should not be opened onto the backtable until the final count is completed.

Sep-04 Page 29
Date ______________________ Student Name ____________________
COLLEGE LABORATORY GUIDE
ST 105 SURGICAL TECHNOLOGY I APPLICATION
ACTIVITY S
Focus: Receiving drugs onto a sterile field in the scrubbed role. Delivering drugs to the sterile field in circulating
role.
Objective:
1. Demonstrate the method to identify and transfer drugs to the sterile field
Content:
1. Identification of medications
2. Techniques for transferring meds onto the sterile field
Clinical correlation: Clinical activity 15
Activities:
1. Lecture notes, Read: AST, p. 156-157
2. Demonstrations by instructor
3. Practice and role playing
Evaluation Need Improvement Acceptable
1. Uses proper aseptic technique in identifying and receiving
a drug solution poured into a container as scrub
2. Uses proper aseptic technique in identifying and pouring a
drug/solution into a container as circulator.
3. Uses proper aseptic technique in identifying and aspirating
a drug from a vile.
4. Labels and identifies all medicines on backtable as scrub
5. Keeps all medicine vials and containers in view and
accessible as circulator
Comments:____________________________________________________________________________________
_____________________________________________________________________________________________
____________________________
Instructor’s Signature
Tech Tip: In the scrub role - do not discard sterile medicine vials, keep on back table for reference.
In the circulating role - do not discard medicine vials, keep in room for reference.

Sep-04 Page 30
Date ______________________ Student Name ____________________
COLLEGE LABORATORY GUIDE
ST 105 SURGICAL TECHNOLOGY I APPLICATION
ACTIVITY T
Focus: Operating Room Sanitation in the non scrubbed role.
Objective: Demonstrate proper routine for cleaning and disinfecting the operating room and equipment.
1. Initial daily cleaning
2. Between cases cleaning
3. Terminal decontamination
Content:
1. Methods of disinfection
2. Disinfection procedures
Clinical correlation: Clinical activity 4
Activities:
1. Read: AST, p. 114-117
2. Demonstration by instructor
3. Practice and end of 10 week period - terminal disinfection of lab (OR).
Evaluation Need Improvement Acceptable
1. Performs initial daily disinfection of lab "operating room"
2. Performs between case disinfection of lab "operating
room"
3. Performs terminal decontamination of lab "operating
room"
Comments:___________________________________________________________________
____________________________________________________________________________
____________________________________________________________________________
___________________________
Instructor’s Signature
Tech Tip: 1. Always wear non-sterile gloves to clean.
2. Look for blood splatters on lights, walls, floors, and ceiling - don’t forget the wheels on kickbuckets.

Sep-04 Page 31
Date ______________________ Student Name ____________________
COLLEGE LABORATORY GUIDE
ST 105 SURGICAL TECHNOLOGY I APPLICATION
ACTIVITY U
Focus: Steam Sterilization of surgical supplies in the non-scrubbed role.
Objective:
1. Prepare linen supplies
2. Wrap packs for sterilization
3. Sterilize supplies using the steam autoclave
Content:
1. Linen supplies in surgery
2. Wrapping and packaging
3. Sterilize supplies using the steam autoclave
Clinical correlation: Clinical activity 3
Activities:
1. Read: AST, p. 104-110
2. Demonstration by instructor'
3. Practice
4. View film, "in Hospital Sterilization"
Evaluation Need Improvement Acceptable
1. Wrap item for sterilization with a linen or paper wrapper.
Place indicator strip in/on items. Use at least 2 thickness
of wrappers.
2. Grasp corners of wrapper and bring over to cover item as
demonstrated, seal with indicator tape and label with item
identification, your initials, and expiration date.
3. Place item into steam sterilizer (autoclave) in central
supply as demonstrated.
1. Operate a high speed steam sterilizer (autoclave) by
placing unwrapped instruments into tray.
2. Place indicator strip in tray, close and lock autoclave door.
3. Set timer and temperature as directed (most are preset in
the clinical sites) Start autoclave
4. When cycle completed, signal will sound. Check graph or
printout to verify autoclave reached correct temp and
times. Open door slowly.

Sep-04 Page 32
Comments:____________________________________________________________________________________
_____________________________________________________________________________________________
_____________________________________________________________________________________________
____________________________
Instructor’s Signature
Tech Tip: 1. Check wrapper integrity before wrapping package.
2. Make sure wrapper is of adequate size for the item.

Sep-04 Page 33
Date ______________________ Student Name ____________________
COLLEGE LABORATORY GUIDE
ST 105 SURGICAL TECHNOLOGY I APPLICATION
ACTIVITY V
Focus: Sutures, needles, and suturing.
Objective:
1. Identify types of needles and sutures
2. Demonstrate opening suture packets and loading of ligatures in the scrubbed role
3. Thread a free needle
4. Demonstrate tying, tagging, and cutting of sutures in the scrubbed role
5. Demonstrate use of auto suture equipment in the scrubbed role
Content:
1. Types of needles and their uses
2. Opening suture packets and loading suture
3. Load and thread a free needle
4. Tying and cutting suture.
5. Types of suturing material
6. Passing free tie
7. Suture with auto suture.
Clinical correlation: Clinical activity 13
Activities:
1. Read: AST, Chapter 8
2. Identify needles and suture types.
3. Practice - role playing with wound and appendix models in the scrubbed role
Evaluation Need Improvement Acceptable
1. Identify
2. Load and pass suture ligature
3. Tie, tag, and cut sutures
4. Passing free tie
5. Identify and properly use auto suture
Comments:___________________________________________________________________
____________________________
Instructor’s Signature
Tech Tip: 1. Do not lean over a sterile field to flip sutures.
2. Thread needles from the outside in.

Sep-04 Page 34
Date ______________________ Student Name ____________________
COLLEGE LABORATORY GUIDE
ST 105 SURGICAL TECHNOLOGY I APPLICATION
ACTIVITY W
Focus: Sponge, needle and instrument counts in scrubbed and circulating role.
Objective:
1. Demonstrate procedure for sponge counts.
2. Demonstrate procedure for instrument counts
3. Demonstrate procedure for needle and sharp counts.
Content:
1. Demonstrate protocol for sponge counts
2. Demonstrate protocol for instrument counts
3. Demonstrate procedure for needle and sharp counts
Clinical correlation: Clinical activity 13
Activities:
1. Read: AST, p. 270 - 272
2. Demonstration by instructor
3. Practice, role playing
4. View film, "Sponge, Needle, and Instrument Counts"
Evaluation Need Improvement Acceptable
1. Demonstrates correct procedure for sponge count
2. Demonstrates correct procedure for needles/sharps counts
3. Demonstrates correct procedure for instrument counts
Comments:___________________________________________________________________
____________________________
Instructor’s Signature
Tech Tip: 1. Count on field first, then Mayo/backtable, then off the field last.
2. Always be aware of sponges and needles, do not wait until first closing count.
3. As the scrub, always open sponges before throwing them off the sterile field.

Sep-04 Page 35
Date ______________________ Student Name ____________________
COLLEGE LABORATORY GUIDE
ST 105 SURGICAL TECHNOLOGY I APPLICATION
ACTIVITY X
Focus: Instrumentation.
Objective:
1. Demonstrate knowledge of surgical instrumentation
2. Identify surgical instruments
3. Assemble instruments
4. Demonstrate correct passing of surgical instruments
5. Demonstrate safe handling of sharp instruments
6. Demonstrate knowledge of surgical hand signs
7. Demonstrate techniques for retractor usage\tissue exposure
Content:
1. Types of instruments
2. Passing of instruments
3. The scalpel
4. Hand signs
5. instrument pack
6. Applying and holding retractors
Clinical correlation: Clinical activity 4
Activities:
1. Read: AST, Chapter 7
2. Practice passing instruments with class members
3. Identify instruments by sight
4. Assemble abdominal instrument set
5. Identify specialty instruments
Evaluation Need Improvement Acceptable
1. Passes instruments:
a. Clamps
b. Scalpel
c. Retractors - apply and hold
2. Name instruments in abdominal set
3. Assemble abdominal instrument set
4. Identify vascular instruments
5. Identify GI instruments
6. Identify thoracic instruments
7. Identify OB/GYN instruments
8. Identify ENT instruments
9. Identify orthopedic instruments
10. Identify neuro instruments

Sep-04 Page 36
11. Wraps sets for sterilization
Comments:____________________________________________________________________________________
_____________________________________________________________________________________________
_____________________________________________________________________________________________
_________________________
____________________________
Instructor’s Signature
Tech Tip: 1. Always check that instruments are in proper working order and that screws, tips, etc., are in place
and secure before the incision is made.
2. Pass instruments decisively and in the position of use.
Sep-04 Page 37
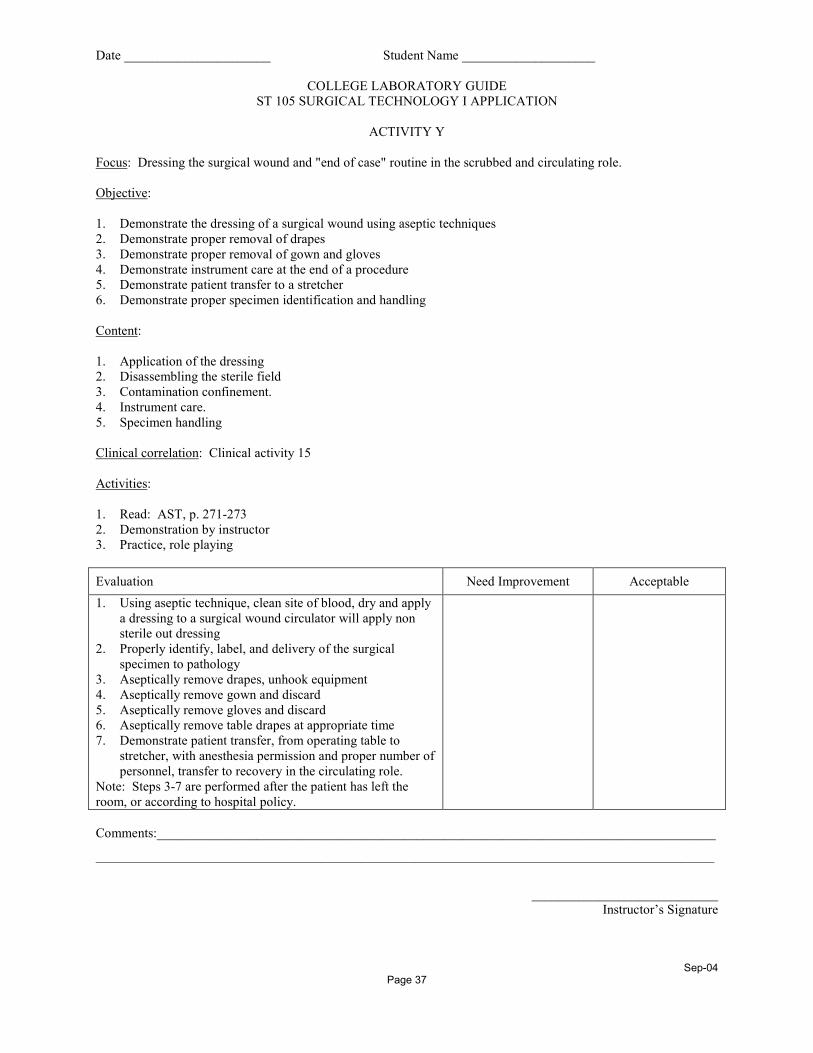
Date ______________________ Student Name ____________________
COLLEGE LABORATORY GUIDE
ST 105 SURGICAL TECHNOLOGY I APPLICATION
ACTIVITY Y
Focus: Dressing the surgical wound and "end of case" routine in the scrubbed and circulating role.
Objective:
1. Demonstrate the dressing of a surgical wound using aseptic techniques
2. Demonstrate proper removal of drapes
3. Demonstrate proper removal of gown and gloves
4. Demonstrate instrument care at the end of a procedure
5. Demonstrate patient transfer to a stretcher
6. Demonstrate proper specimen identification and handling
Content:
1. Application of the dressing
2. Disassembling the sterile field
3. Contamination confinement.
4. Instrument care.
5. Specimen handling
Clinical correlation: Clinical activity 15
Activities:
1. Read: AST, p. 271-273
2. Demonstration by instructor
3. Practice, role playing
Evaluation Need Improvement Acceptable
1. Using aseptic technique, clean site of blood, dry and apply
a dressing to a surgical wound circulator will apply non
sterile out dressing
2. Properly identify, label, and delivery of the surgical
specimen to pathology
3. Aseptically remove drapes, unhook equipment
4. Aseptically remove gown and discard
5. Aseptically remove gloves and discard
6. Aseptically remove table drapes at appropriate time
7. Demonstrate patient transfer, from operating table to
stretcher, with anesthesia permission and proper number of
personnel, transfer to recovery in the circulating role.
Note: Steps 3-7 are performed after the patient has left the
room, or according to hospital policy.
Comments:____________________________________________________________________________________
_____________________________________________________________________________________________
____________________________
Instructor’s Signature

Sep-04 Page 38
Tech Tip: 1. Always check the surgeon’s face, mask, and hat for blood before he/she goes to talk with the family.
2. Stay sterile until the patient leaves the room.
3. No trash is removed from the room until the end of a procedure.
4. The scrub will wash the surgical site with a “sloppy wet” sponge, then dry with a sponge before
dressing is applied.

Sep-04 Page 39
Date ______________________ Student Name ____________________
COLLEGE LABORATORY GUIDE
ST 105 SURGICAL TECHNOLOGY I APPLICATION
ACTIVITY Z
Focus: "DRESS REHEARSAL".
Objective: Role playing from any of the activities previously learned and practiced in the college lab.
Content: A series of tasks will be given to each individual student which must be correctly performed within 4
attempts. The student will be evaluated by the instructor and critiqued by the other students.
Activities:
1. Role playing
Evaluation Need Improvement Acceptable
1. Full participation and correctly accomplishing tasks.
Comments:____________________________________________________________________________________
_____________________________________________________________________________________________
_____________________________________________________________________________________________
_________________________
____________________________
Instructor’s Signature
Tech Tip: There is a reason for every action in surgery. Always adhere to aseptic technique to keep
microrganisms to an irreducible minimum in the OR.