dmx usb pro mk2 - dol2kh495zr52.cloudfront.net · dmx usb pro mk2 (pn 70314) ... led status pro mk2...
TRANSCRIPT
User Manual 70314
For latest version visit: www.enttec.com
1 ID: 3647846
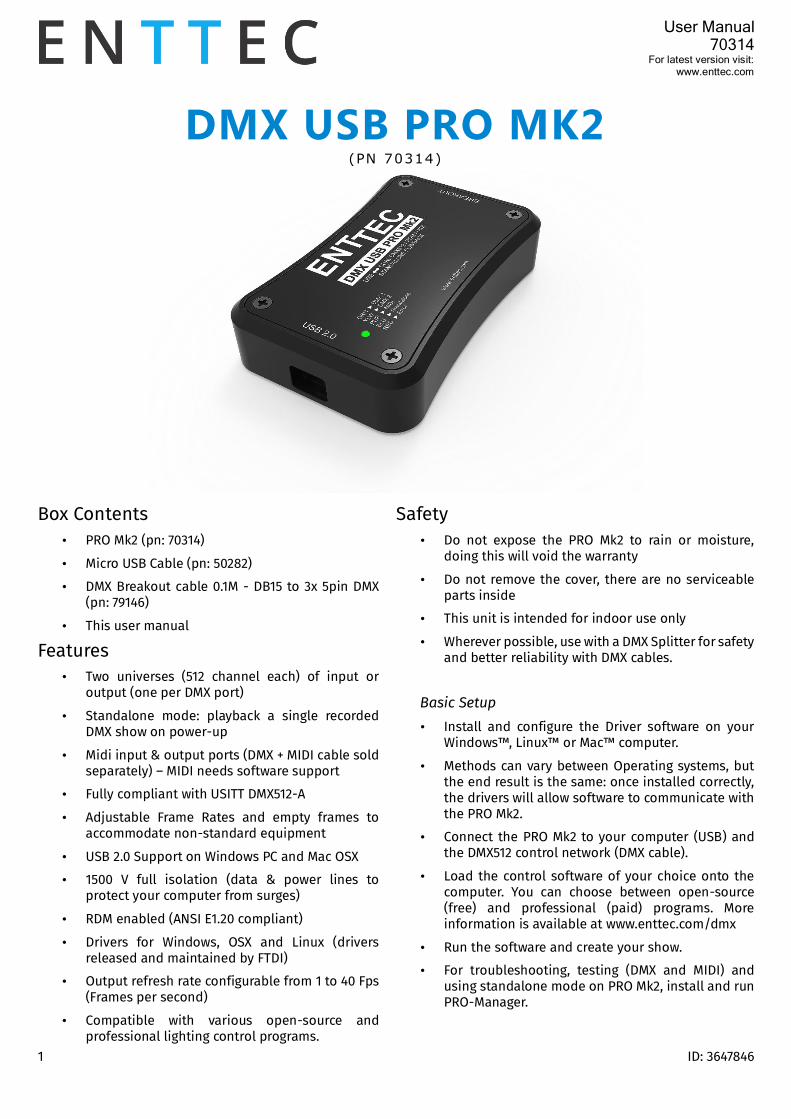
DMX USB PRO MK2
(PN 70314)
Box Contents • PRO Mk2 (pn: 70314)
• Micro USB Cable (pn: 50282)
• DMX Breakout cable 0.1M - DB15 to 3x 5pin DMX (pn: 79146)
• This user manual
Features • Two universes (512 channel each) of input or
output (one per DMX port)
• Standalone mode: playback a single recorded DMX show on power-up
• Midi input & output ports (DMX + MIDI cable sold separately) – MIDI needs software support
• Fully compliant with USITT DMX512-A
• Adjustable Frame Rates and empty frames to accommodate non-standard equipment
• USB 2.0 Support on Windows PC and Mac OSX
• 1500 V full isolation (data & power lines to protect your computer from surges)
• RDM enabled (ANSI E1.20 compliant)
• Drivers for Windows, OSX and Linux (drivers released and maintained by FTDI)
• Output refresh rate configurable from 1 to 40 Fps (Frames per second)
• Compatible with various open-source and professional lighting control programs.
Safety • Do not expose the PRO Mk2 to rain or moisture,
doing this will void the warranty
• Do not remove the cover, there are no serviceable parts inside
• This unit is intended for indoor use only
• Wherever possible, use with a DMX Splitter for safety and better reliability with DMX cables.
Basic Setup
• Install and configure the Driver software on your Windows™, Linux™ or Mac™ computer.
• Methods can vary between Operating systems, but the end result is the same: once installed correctly, the drivers will allow software to communicate with the PRO Mk2.
• Connect the PRO Mk2 to your computer (USB) and the DMX512 control network (DMX cable).
• Load the control software of your choice onto the computer. You can choose between open-source (free) and professional (paid) programs. More information is available at www.enttec.com/dmx
• Run the software and create your show.
• For troubleshooting, testing (DMX and MIDI) and using standalone mode on PRO Mk2, install and run PRO-Manager.

User Manual 70314
For latest version visit: www.enttec.com
2 ID: 3647846
LED Status PRO Mk2 comes with a RGB LED indicator located on the top (above the usb connector). The LED will blink between these colours, and each colour signifies the related activity:
• White: PRO Mk2 is powered on and idle
• Green: DMX1 send or receive (DMX Port 1)
• Yellow: DMX2 send or receive (DMX Port 2)
• Blue: Standalone mode (show playback)
• Purple: MIDI in or out
• Red: error or unsupported request
At any given time, the PRO Mk2 led will blink amongst a combination of these colours or just one of these colours
It is advised to re-connect the usb cable if led is solid red (not blinking) to reset the PRO Mk2.
If the led stays red – a restore might be required to reset the PRO Mk2. Restore or firmware update can be performed by PRO-Manager.
Install Drivers PRO Mk2 is supported by FTDI drivers for the following Operating Systems:
• Windows 10, Windows 8, Windows 7, Windows XP, Windows Server 2003, Windows Vista, Windows Server 2008, Windows Server 2008 R2. (32 bit and 64 bit versions)
• Mac OS X (Mac OS X 10.4 or later)
• Linux - Raspberry Pi is supported, others will require driver or library (please check FTDI)
To proceed, you need the driver setup file, which is available from:
• Download PRO-Manager (includes the driver setup) from the ENTTEC website: enttec.com/pro-manager
• For the latest drivers and OS support, please visit FTDI website: ftdichip.com/Drivers/D2XX.htm
Setting up on Windows Execute the setup file and let the drivers install on your Windows machine. If using PRO-Manager setup, click Yes when prompted to install FTDI Drivers
Click on Extract, and follow the setup procedure by clicking Next. It will go through the drivers install process and copy the needed files. Once done it will show the completion screen, highlighting that the drivers have been installed correctly
In most cases the USB port you plug the DMX USB PRO into will automatically fall into an acceptable range with respect to the other elements of your computer’s communications ports, but if you are having problems or conflicts between the ports, here is what you can do to change the COM port. Before making any changes. it is advisable to keep a record of which serial port has been used in each attempt to configure the hardware and drivers. That way you will be able to retrace your steps should you decide to go back and try something again but with different settings elsewhere.
Device Manager Open Device Manager on your Windows machine. (Control Panel → Device Manager) Expand the “Ports” section, and identify the DMX USB PRO, which usually is “USB Serial Port”

User Manual 70314
For latest version visit: www.enttec.com
3 ID: 3647846
Right click on it and select Properties. Under “Port Settings”, click on “Advanced”, and you can then change the COM Port No. under this screen:
Setting up on Mac
Download and install PRO-MANAGER on your Mac (OSX 10.6 onwards). The “D2XX” drivers are copied by PRO-MANAGER and made ready for use.
In some cases, there might be a conflict with other drivers on your Mac, to resolve such conflicts you will need to disable “Serial drivers” on your Mac.
Follow detailed instructions on how to do this, using FAQ/Support links on the PRO Mk2 web-page: www.enttec.com/promk2
DMX Breakout Cable
Supplied with every PRO Mk2 is a DMX Breakout cable (pn: 79146). It has a DB15 connector on one end, to connect to the PRO Mk2, and 3x 5pin DMX connectors on the other end, to connect to DMX fixtures as needed.
Only ENTTEC branded cables should be used for DMX or MIDI Breakout, with PRO Mk2.
DMX + MIDI breakout cable (pn: 79147), can be purchased separately and is needed to allow MIDI input or output.
DMX Out (DMX 1 and DMX 2)
The DMX Out socket(s) should be connected to the network of DMX512 devices that are to be controlled by the PRO Mk2. Both ports can be used to output at the same time (allowing 2 universe of DMX together). Please refer to the software support to confirm whether it supports both outputs with PRO Mk2 or not.
It is not necessary to have any connection to the DMX Out socket while programming the PRO Mk2.
DMX In (DMX 1 and DMX 2)
The DMX In socket(s) should be connected to the DMX512 controller or console whose output is to be captured by the PRO Mk2. Input is captured and sent to the software interfacing with the PRO Mk2.
• Although there is only one DMX Input (DMX1) socket in the breakout cable, the other socket (DMX2) can also be used as an input by using a Gender Changer
• Each port can only be used as input or output at any single time.
• Both ports are isolated and separated, so one can be used to receive DMX input, and the other to output DMX, as long as the software supports this operation.
PRO-MANAGER ENTTEC provides a free cross-platform app to configure, test and update PRO Mk2. The app is available for Windows on the CD or you can download the latest version for Windows or Mac from the ENTTEC website www.enttec.com/pro-manager
• Use this App to test your PRO Mk2 - change default parameters (Refresh rates, Break Time), test DMX Send and Receive, and setup standalone mode.
• This App is merely a troubleshooting tool and not Lighting Control software.
• PRO-Manager runs inside a browser window and it opens up the page by default, however you can also use the address: http://localhost:55555/ in your browser to connect to it.
User Manual 70314
For latest version visit: www.enttec.com
4 ID: 3647846
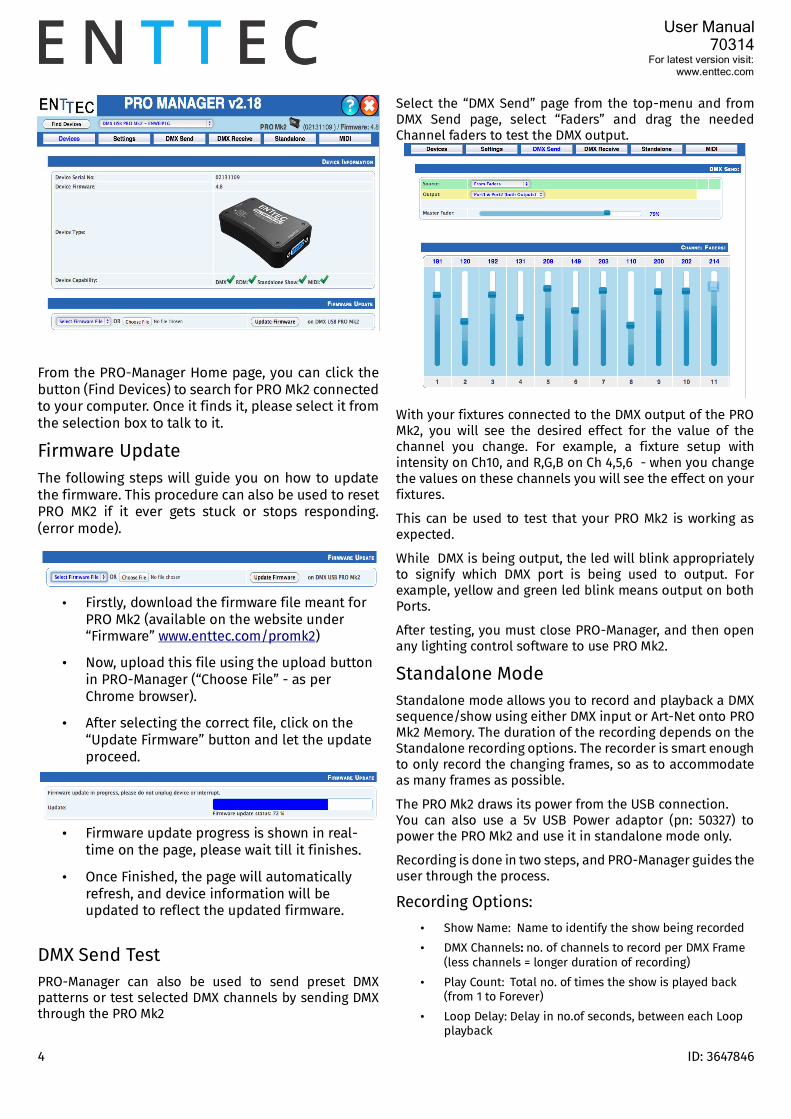
From the PRO-Manager Home page, you can click the button (Find Devices) to search for PRO Mk2 connected to your computer. Once it finds it, please select it from the selection box to talk to it.
Firmware Update
The following steps will guide you on how to update the firmware. This procedure can also be used to reset PRO MK2 if it ever gets stuck or stops responding. (error mode).
• Firstly, download the firmware file meant for PRO Mk2 (available on the website under “Firmware” www.enttec.com/promk2)
• Now, upload this file using the upload button in PRO-Manager (“Choose File” - as per Chrome browser).
• After selecting the correct file, click on the “Update Firmware” button and let the update proceed.
• Firmware update progress is shown in real-time on the page, please wait till it finishes.
• Once Finished, the page will automatically refresh, and device information will be updated to reflect the updated firmware.
DMX Send Test
PRO-Manager can also be used to send preset DMX patterns or test selected DMX channels by sending DMX through the PRO Mk2
Select the “DMX Send” page from the top-menu and from DMX Send page, select “Faders” and drag the needed Channel faders to test the DMX output.
With your fixtures connected to the DMX output of the PRO Mk2, you will see the desired effect for the value of the channel you change. For example, a fixture setup with intensity on Ch10, and R,G,B on Ch 4,5,6 - when you change the values on these channels you will see the effect on your fixtures.
This can be used to test that your PRO Mk2 is working as expected.
While DMX is being output, the led will blink appropriately to signify which DMX port is being used to output. For example, yellow and green led blink means output on both Ports.
After testing, you must close PRO-Manager, and then open any lighting control software to use PRO Mk2.
Standalone Mode Standalone mode allows you to record and playback a DMX sequence/show using either DMX input or Art-Net onto PRO Mk2 Memory. The duration of the recording depends on the Standalone recording options. The recorder is smart enough to only record the changing frames, so as to accommodate as many frames as possible.
The PRO Mk2 draws its power from the USB connection. You can also use a 5v USB Power adaptor (pn: 50327) to power the PRO Mk2 and use it in standalone mode only.
Recording is done in two steps, and PRO-Manager guides the user through the process.
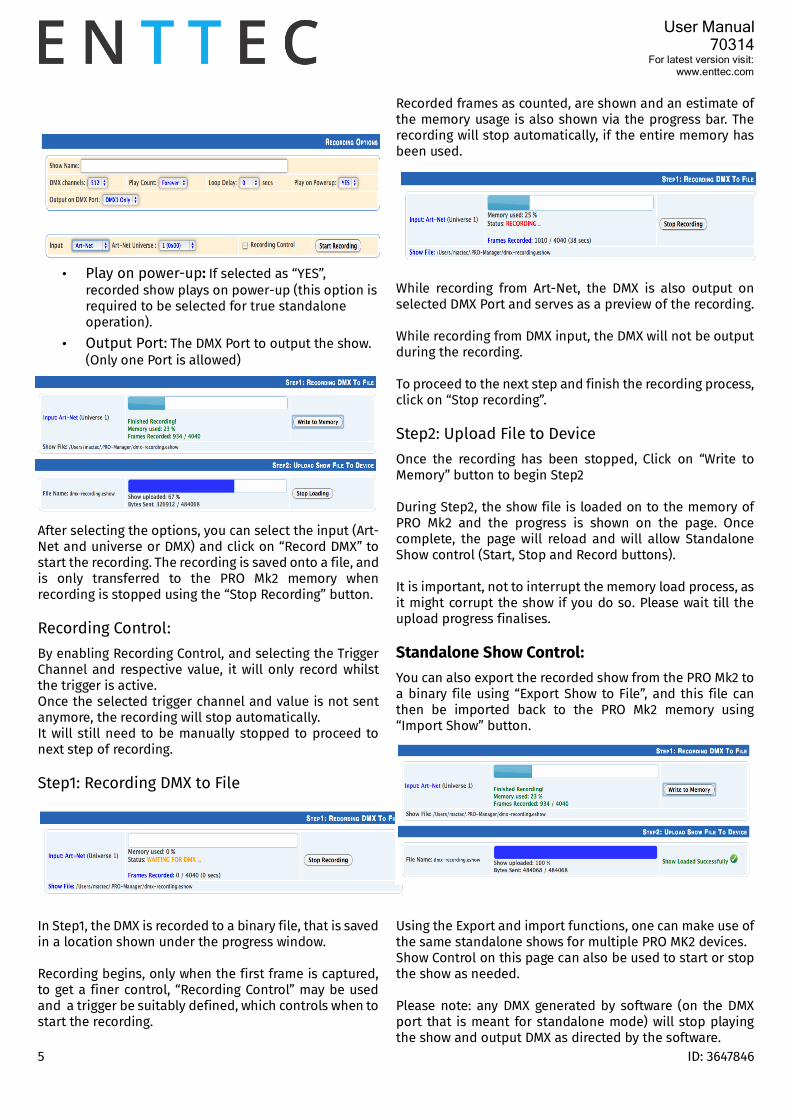
Recording Options:
• Show Name: Name to identify the show being recorded
• DMX Channels: no. of channels to record per DMX Frame (less channels = longer duration of recording)
• Play Count: Total no. of times the show is played back (from 1 to Forever)
• Loop Delay: Delay in no.of seconds, between each Loop playback
User Manual 70314
For latest version visit: www.enttec.com
5 ID: 3647846
• Play on power-up: If selected as “YES”, recorded show plays on power-up (this option is required to be selected for true standalone operation).
• Output Port: The DMX Port to output the show. (Only one Port is allowed)
After selecting the options, you can select the input (Art-Net and universe or DMX) and click on “Record DMX” to start the recording. The recording is saved onto a file, and is only transferred to the PRO Mk2 memory when recording is stopped using the “Stop Recording” button.
Recording Control:
By enabling Recording Control, and selecting the Trigger Channel and respective value, it will only record whilst the trigger is active. Once the selected trigger channel and value is not sent anymore, the recording will stop automatically. It will still need to be manually stopped to proceed to next step of recording.
Step1: Recording DMX to File
In Step1, the DMX is recorded to a binary file, that is saved in a location shown under the progress window. Recording begins, only when the first frame is captured, to get a finer control, “Recording Control” may be used and a trigger be suitably defined, which controls when to start the recording.
Recorded frames as counted, are shown and an estimate of the memory usage is also shown via the progress bar. The recording will stop automatically, if the entire memory has been used.
While recording from Art-Net, the DMX is also output on selected DMX Port and serves as a preview of the recording. While recording from DMX input, the DMX will not be output during the recording. To proceed to the next step and finish the recording process, click on “Stop recording”.
Step2: Upload File to Device
Once the recording has been stopped, Click on “Write to Memory” button to begin Step2 During Step2, the show file is loaded on to the memory of PRO Mk2 and the progress is shown on the page. Once complete, the page will reload and will allow Standalone Show control (Start, Stop and Record buttons).
It is important, not to interrupt the memory load process, as it might corrupt the show if you do so. Please wait till the upload progress finalises.
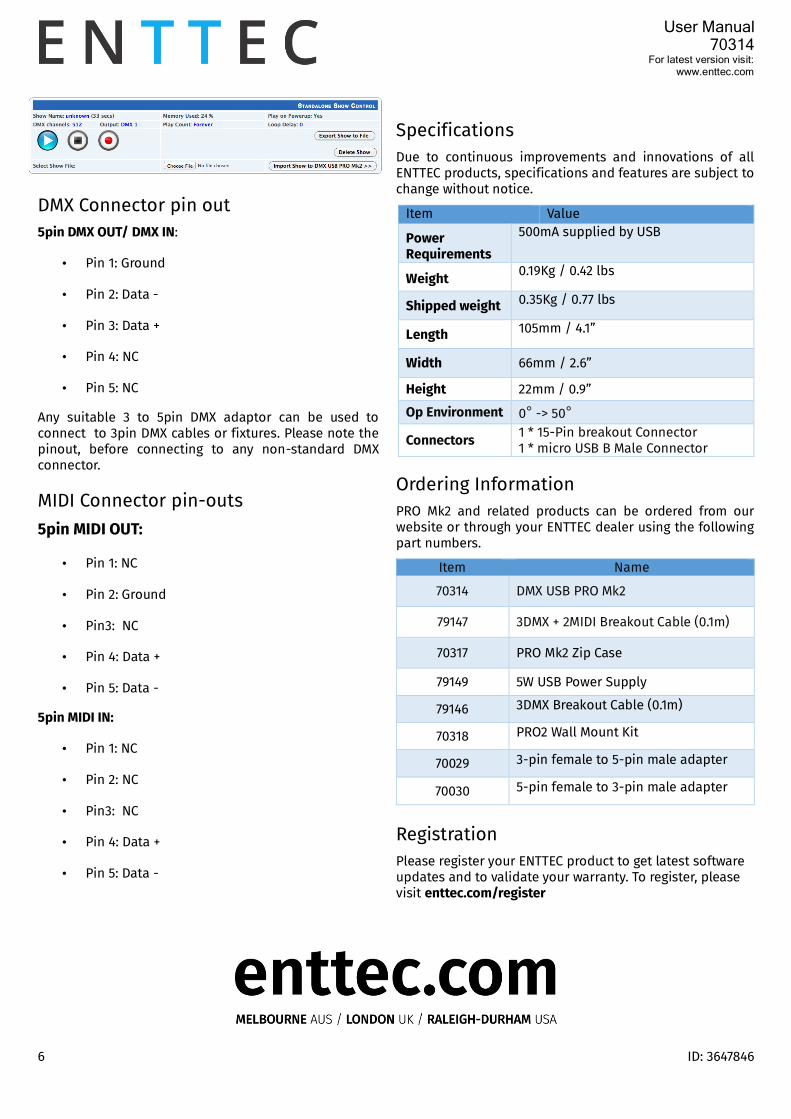
Standalone Show Control:
You can also export the recorded show from the PRO Mk2 to a binary file using “Export Show to File”, and this file can then be imported back to the PRO Mk2 memory using “Import Show” button.
Using the Export and import functions, one can make use of the same standalone shows for multiple PRO MK2 devices. Show Control on this page can also be used to start or stop the show as needed. Please note: any DMX generated by software (on the DMX port that is meant for standalone mode) will stop playing the show and output DMX as directed by the software.
User Manual 70314
For latest version visit: www.enttec.com
6 ID: 3647846
DMX Connector pin out 5pin DMX OUT/ DMX IN:
• Pin 1: Ground
• Pin 2: Data -
• Pin 3: Data +
• Pin 4: NC
• Pin 5: NC
Any suitable 3 to 5pin DMX adaptor can be used to connect to 3pin DMX cables or fixtures. Please note the pinout, before connecting to any non-standard DMX connector.
MIDI Connector pin-outs
5pin MIDI OUT:
• Pin 1: NC
• Pin 2: Ground
• Pin3: NC
• Pin 4: Data +
• Pin 5: Data -
5pin MIDI IN:
• Pin 1: NC
• Pin 2: NC
• Pin3: NC
• Pin 4: Data +
• Pin 5: Data -
Specifications
Due to continuous improvements and innovations of all ENTTEC products, specifications and features are subject to change without notice.
Item Value
Power Requirements
500mA supplied by USB
Weight 0.19Kg / 0.42 lbs
Shipped weight 0.35Kg / 0.77 lbs
Length 105mm / 4.1”
Width 66mm / 2.6”
Height 22mm / 0.9”
Op Environment 0° -> 50°
Connectors 1 * 15-Pin breakout Connector 1 * micro USB B Male Connector
Ordering Information
PRO Mk2 and related products can be ordered from our website or through your ENTTEC dealer using the following part numbers.
Item Name
70314 DMX USB PRO Mk2
79147 3DMX + 2MIDI Breakout Cable (0.1m)
70317 PRO Mk2 Zip Case
79149 5W USB Power Supply
79146 3DMX Breakout Cable (0.1m)
70318 PRO2 Wall Mount Kit
70029 3-pin female to 5-pin male adapter
70030 5-pin female to 3-pin male adapter
Registration Please register your ENTTEC product to get latest software updates and to validate your warranty. To register, please visit enttec.com/register