document management and archiving software
TRANSCRIPT

ELO
Document Management and Archiving Software
ELO QuickScan (iOS)
July 2018
ELO Digital Office GmbH
http://www.elo.com
Copyright © 2018 ELO Digital Office GmbH
All rights reserved[25.07.2018-14:57 - en - 11.0.1]


Table of Contents 3
Table of ContentsIntroduction..................................................................................5
Conventions....................................................................................................6
Setup and operation.................................................................. 8Installing the app......................................................................................... 9
Settings in ELOoffice................................................................................. 11
Program interface...................................................................................... 13
Configuration.............................................................................................. 16
Creating scans.............................................................................................21
Uploading scans......................................................................................... 27
Deleting scans.............................................................................................32
Index............................................................................................ 35

4 Table of Contents
Introduction 5
Introduction
Copyright notices ELO Digital Office GmbH holds the copyright to this program. Theproduct may only be copied and used in accordance with the Li-cense Agreement.
It is illegal to copy, to reproduce, or to distribute ELO QuickScan(iOS) in whole or in part.
No part of this manual may be reproduced, distributed, translat-ed, or otherwise duplicated without the prior written consent ofELO Digital Office GmbH. The contents of this manual in no wayrepresent an entitlement on the part of the purchaser.
Trademarks ELO QuickScan (iOS) is a registered trademark of ELO Digital OfficeGmbH.
Microsoft Windows, Microsoft Word, Microsoft Excel, and Mi-crosoft PowerPoint are registered trademarks of the MicrosoftCorporation. All other product names are protected by copyrightand are registered trademarks or brand names of their respectiveowners.
Please note We have made every effort to supply product documentation thatis as accurate as possible. However, as we are continuously devel-oping ELO QuickScan (iOS) and produce multiple versions in par-allel, the status of the program changes very quickly. For this rea-son, there may be minor discrepancies between the descriptionsand images in the manual and in the app. We ask for your under-standing if this occurs.

6 Introduction
Conventions
This manual describes a large number of interactions, program di-alogs, menus, and interfaces. The following conventions apply.
Information Important information is displayed in a gray box with an informa-tion icon. The following types of note are used in this guide:
Information: This is additional information that makes workingwith ELO easier.
Please note: Take this note into account to ensure the smooth op-eration of your program.
Warning: It is essential that you adhere to this note to avoid sig-nificant restrictions in the operation of your program.
Italics The names of menus, options, dialog boxes, folders, references tochapters, paths, and file extensions are written in italics.
Example: Click ELO > Configuration and choose the Display option.
Keyboard shortcuts Shortcuts are written in UPPER CASE. A plus sign (+) between thekey descriptions means the keys should be pressed simultaneous-ly.
Example: CTRL + C
Bold Notes and highlighted information are marked in bold in theuser manual. This also applies for the words alternative, optional,and the names of examples.
Courier Program code, program outputs, inputs and scripts are written inCourier font.
Example: MsgBox "Hello world!"
Paths This manual differentiates between three types of paths:

Introduction 7
Navigation paths: These paths describe the order of buttons andmenu items you click through to use certain functions. You canrecognize navigation paths by the pointy brackets (>) and the italicfont.
Example: Click the ELO > Configuration > Display > Repository lay-out.
Filing paths: These paths describe filing paths within the ELOrepository. You can recognize filing paths by the pilcrow sign (¶).
Example: Save the document under ¶ Filing ¶ Year ¶ Month.
Document and filing paths: These paths describe storage loca-tions for files within the operating system. We indicate this by us-ing backslashes (\).
For example: Save the document under C:\Documents\Vacation.
8 Setup and operation
Setup and operation
You can use the ELO QuickScan app (iOS edition), known here sim-ply as ELO QuickScan, to take pictures (scans) of documents. Youthen transfer these pictures to the ELO repository as PDF files.
Information: ELO QuickScan is optimized for use with iPhone, butcan also be used with iPads. All of the following information ap-plies for use with Apple iPhone.
The following chapter describes how to set up and use the app.

Setup and operation 9
Installing the app
The ELO QuickScan app is installed like any other iOS app. Thefollowing instructions will guide you through the installationprocess.
To install the ELO QuickScan app, you need the App Store app andan Apple ID.
Requirements The ELO QuickScan app requires iOS 10.3 or higher. It is compati-ble with iPhone, iPad, and iPod Touch.
Installation via theApp Store
1. Open the App Store on your iOS device.
2. Call up the search by tapping the magnifying glass icon in theaction bar at the top of the screen.
3. Tap the search field.
The search field is now active.
Fig. 1: Search field in the App Store
4. Enter elo quickscan in the search box.
Information: The search is not case-sensitive.
A list of possible hits appears.
5. Tap the suggestion ELO QuickScan.
6. Tap the Load button.

10 Setup and operation
Fig. 2: 'Install' button
The Install button appears.
7. Tap Install.
Optional: The logon dialog box for the iTunes Store may appear.Enter your Apple ID and password.
The app download starts. After the app downloads, it is automat-ically installed on your iOS device. You can now start ELO QuickS-can.
Setup and operation 11
Settings in ELOoffice
For ELO QuickScan to establish a connection to the ELO repository,the following settings have to be made in the ELOoffice Configu-ration dialog box.
Information: Normally, the required settings are made automat-ically when installing or updating the app.
Activate ELO QuickS-can
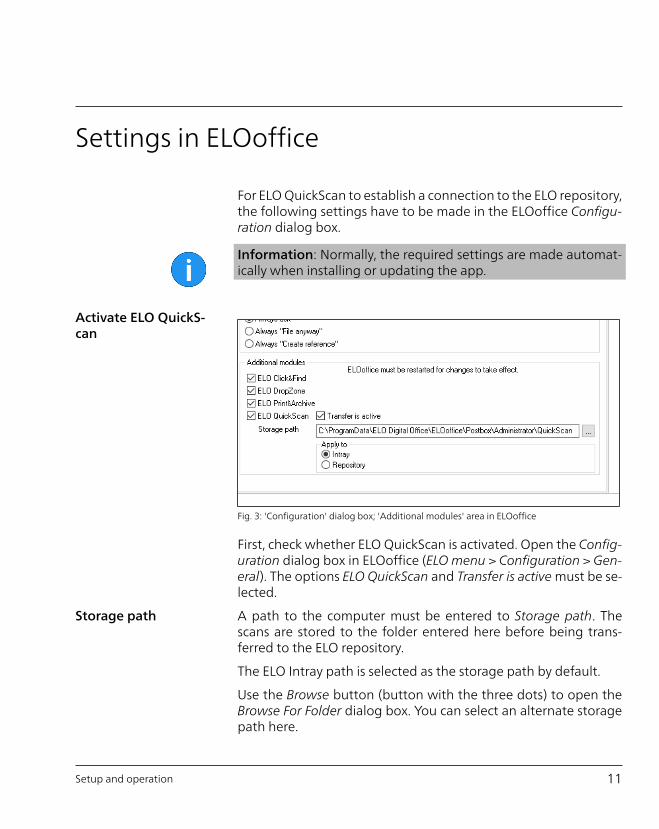
Fig. 3: 'Configuration' dialog box; 'Additional modules' area in ELOoffice
First, check whether ELO QuickScan is activated. Open the Config-uration dialog box in ELOoffice (ELO menu > Configuration > Gen-eral). The options ELO QuickScan and Transfer is active must be se-lected.
Storage path A path to the computer must be entered to Storage path. Thescans are stored to the folder entered here before being trans-ferred to the ELO repository.
The ELO Intray path is selected as the storage path by default.
Use the Browse button (button with the three dots) to open theBrowse For Folder dialog box. You can select an alternate storagepath here.

12 Setup and operation
Apply to In the Apply to area, select whether you want to file the scan tothe Intray work area or the Repository work area.
Information: If the option Intray is selected, the File QuickScandocuments dialog box appears for every uploaded scan. Select thefiling location for each scan in the File QuickScan documents di-alog box. The scan is then filed with the Basic Entry keywordingform.
Firewall settings
Fig. 4: 'Windows Security Alert' Windows dialog box
Warning: Confirm the Windows Security Alert with Allow access.Otherwise, ELO QuickScan cannot communicate with your com-puter. In case of an issue, check whether your firewall software orthe antivirus program is blocking ELO QuickScan. If any connectionproblems occur, check whether ports UDP: 5555 and TCP: 5556are open.

Setup and operation 13
Program interface
This section briefly introduces the individual areas of ELO QuickS-can.
You will find the ELO QuickScan app menu at the bottom of thestart screen.
App menu
Fig. 5: 'App menu' area

14
Camera
Fig. 6: 'Camera with scan' area
Setup and operation 15
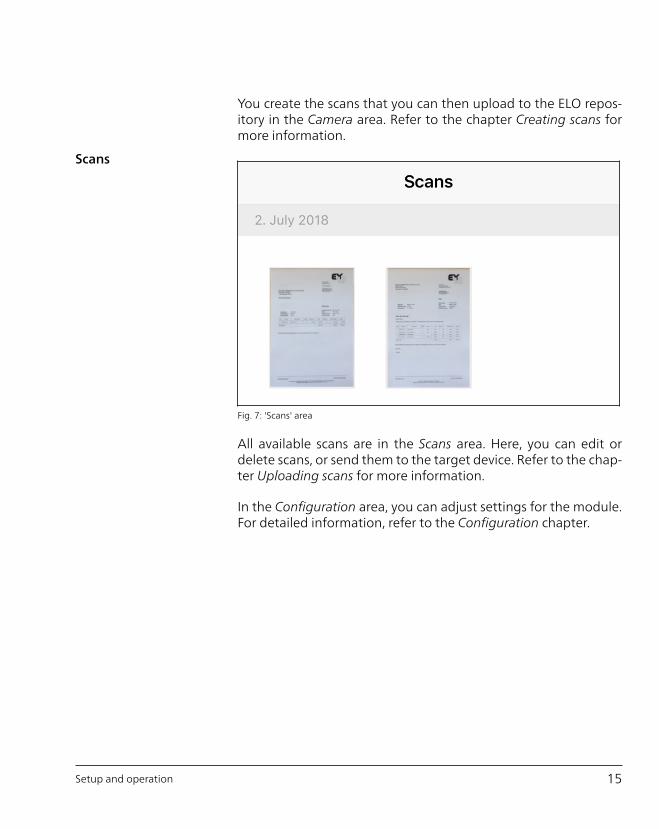
You create the scans that you can then upload to the ELO repos-itory in the Camera area. Refer to the chapter Creating scans formore information.
Scans
Fig. 7: 'Scans' area
All available scans are in the Scans area. Here, you can edit ordelete scans, or send them to the target device. Refer to the chap-ter Uploading scans for more information.
In the Configuration area, you can adjust settings for the module.For detailed information, refer to the Configuration chapter.

16 Setup and operation
Configuration
The following explains which settings you can make within theELO QuickScan app.
Fig. 8: "Configuration" area
To configure ELO QuickScan, tap the gear icon on the start screen.

17Fig. 9: "Configuration" area

18 Setup and operation
The Configuration dialog box appears. There are four categories inthe Configuration area that will be explained briefly.
Recipient In the Recipient category, you can specify the target device for yourscanned files. To open the Recipient menu, tap No recipient select-ed.
Fig. 10: 'Recipient' area
In the Recipient submenu, you see all available devices to whichyou can upload files.
The blue check mark indicates which device is currently selectedas the target device.
Please note: To select a target device for uploading, this devicemust be on the same network as the Apple device you want toupload data from. ELOoffice must also be open on the target de-vice. Check whether ELO QuickScan is activated in ELOoffice (seeSettings in ELOoffice section).
Adding recipients In ELO QuickScan, you can also add recipients manually.
Fig. 11: 'Add recipient' area
1. Tap the plus icon in the header.
Setup and operation 19
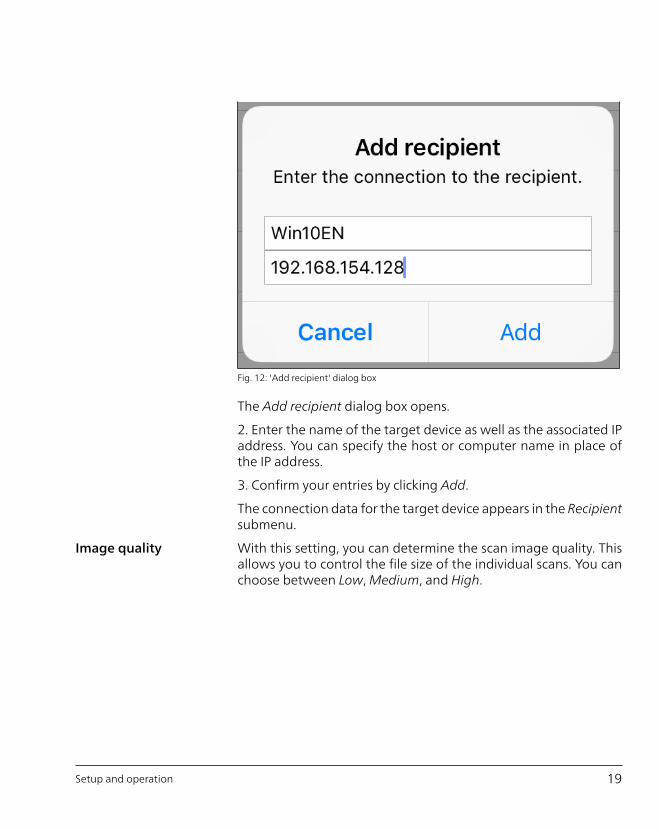
Fig. 12: 'Add recipient' dialog box
The Add recipient dialog box opens.
2. Enter the name of the target device as well as the associated IPaddress. You can specify the host or computer name in place ofthe IP address.
3. Confirm your entries by clicking Add.
The connection data for the target device appears in the Recipientsubmenu.
Image quality With this setting, you can determine the scan image quality. Thisallows you to control the file size of the individual scans. You canchoose between Low, Medium, and High.

20 Setup and operation
Fig. 13: 'Image quality' area
The image quality for scans in ELO QuickScan is set to High by de-fault.
Log ELO QuickScan can output a log file when transferring scanneddocuments to the target device. Enable logging using the slidernext to Enable logging.
Fig. 14: 'Enable logging' function

Setup and operation 21
Creating scans
This section describes how to create scans.
Fig. 15: 'Select camera' area
1. In the app menu, tap the camera icon.

22 Setup and operation
Fig. 16: 'Camera' area
Camera The Camera area appears. The following control elements areavailable:

Setup and operation 23
(1) Flash: Press the Flash button to turn the flash on your deviceon or off.
(2) Capture area: Everything inside the capture area will be in-cluded in the scan and marked in green. The selected section canbe corrected later on in edit mode.
(3) Trigger: Press the Trigger button to create a scan.
2. Select the desired section of the screen.
3. Press the Trigger.
The camera captures the image. This may take a few moments.Hold the device as stable as possible.
If you capture multiple scans one after another, ELO QuickScancombines all scans into a single file numbered serially.

24 Setup and operation
Preview mode for sin-gle-page scans
Fig. 17: 'Preview mode' area
Setup and operation 25
As soon as the image has been captured successfully, the appswitches to preview mode. In preview mode, you can edit the sec-tion or upload it straight to the target device.
Preview mode offers additional functions for scans already cap-tured in ELO QuickScan. Refer to the chapter Preview mode forcaptured scans for more information.
Edit mode for a sin-gle-page scan
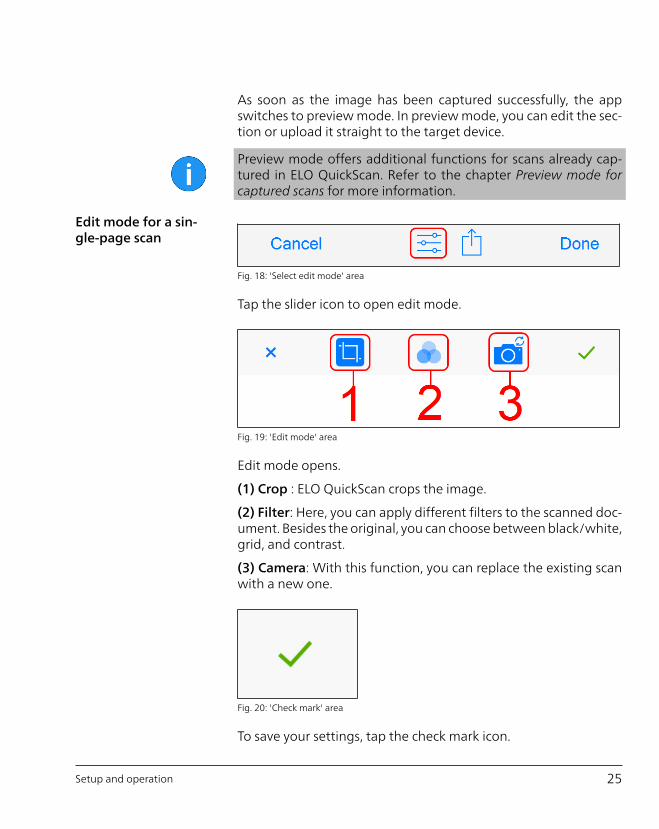
Fig. 18: 'Select edit mode' area
Tap the slider icon to open edit mode.
Fig. 19: 'Edit mode' area
Edit mode opens.
(1) Crop : ELO QuickScan crops the image.
(2) Filter: Here, you can apply different filters to the scanned doc-ument. Besides the original, you can choose between black/white,grid, and contrast.
(3) Camera: With this function, you can replace the existing scanwith a new one.
Fig. 20: 'Check mark' area
To save your settings, tap the check mark icon.

26 Setup and operation
The scan is saved. ELO QuickScan switches to edit mode.
Edit mode for a mul-ti-page scan
Preview mode offers an additional function for scans with multiplepages.
Fig. 21: 'Edit mode for a multi-page scan' area
The Recycle bin function allows you to delete individual pages. Seethe Delete scans chapter for more information on this option.

Setup and operation 27
Uploading scans
This section describes how to upload scans from ELO QuickScanto the ELO repository. In this example, we use ELOoffice as the re-cipient on the target device.
Scans can be uploaded to the target device directly after scanningor at a later point in time. The following steps show how to uploadscans that have already been captured in ELO QuickScan.
Fig. 22: 'Select' button
1. In the app menu, tap the Select button.
2. Tap the scan you want to send to the target device.
Information: Multiple selection is possible.
28 Setup and operation
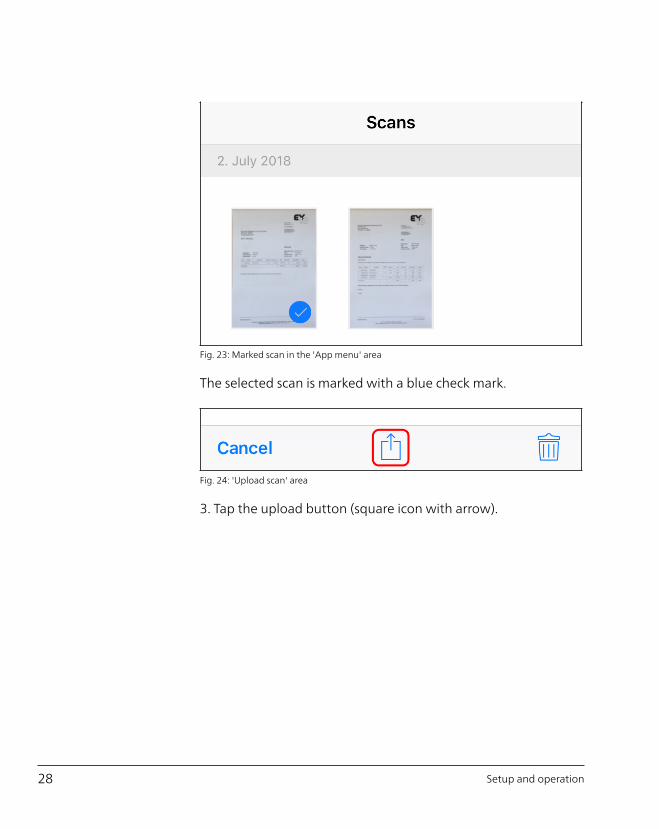
Fig. 23: Marked scan in the 'App menu' area
The selected scan is marked with a blue check mark.
Fig. 24: 'Upload scan' area
3. Tap the upload button (square icon with arrow).

Setup and operation 29
Fig. 25: 'Send to' area
A selection dialog box opens.
4. In the selection dialog box, tap ELOoffice.
A PDF file is created from the scan and uploaded to the ELO repos-itory.
Preview mode forcaptured scans
Preview mode offers additional functions for scans already cap-tured in ELO QuickScan.
Preview mode for captured scans opens when you tap the scanin the app menu. You do not have to mark scans with the Selectbutton. However, multiple selection is not possible.
Fig. 26: 'App menu, view with selected scan' area
(1) Edit mode: Tap the slider icon to open edit mode. Refer to thechapter Edit mode for more information.
(2) Add scan: Use this function to add scans to the existing scan.Additional scans are captured page by page.

30 Setup and operation
(3) PDF preview: Creates a PDF preview of the scan.
(4) Upload scan: Tap the upload button (square icon with arrow)to upload the scan to the ELO repository on the target device.
Uploading to the ELOfor Mobile Devicesapp
Tapping the PDF preview icon opens another upload button(square icon with a circle) to import and file the scan.
Fig. 27: 'File and import' selection menu.
If you have installed the ELO for Mobile Devices app on your device,an ELO button appears. Tap this button to send the scan to ELOfor Mobile Devices and file it in the ELO repository.

Setup and operation 31
To file in this way, the ELO for Mobile Devices app must be installedon your mobile device.
On the target device
Fig. 28: 'File received' notification
On successful upload, a File received notification appears on thetarget device.
Fig. 29: QuickScan data transfer dialog box
The QuickScan dialog box then opens. Here, you will see theprogress of the upload to the target device.
Information: If the Intray option is selected in the ELOoffice Con-figuration, the File QuickScan documents dialog box appears forevery uploaded scan. Select the filing location for each scan in theFile QuickScan documents dialog box.

32 Setup and operation
Deleting scans
This section describes how to delete scans from ELO QuickScan.
Fig. 30: 'Select scan' area
1. In the app menu, tap the Select button.
2. Tap the scan you want to delete.
Information: Multiple selection is possible.
The selected scan is marked with a check mark.
Fig. 31: 'Select Recycle bin' area
3. Tap the Recycle bin icon.
Fig. 32: 'Delete document' dialog box

Setup and operation 33
A selection dialog box opens.
4. Confirm with Delete document.
The selected scan is deleted from ELO QuickScan.

34

Index
Index 35
Activate, ELOoffice - 11
App menu - 13
App Store - 9
Camera - 15, 25
Capture area - 23
Configuration - 15
Configuration, ELOoffice - 11
Conventions - 6
Copyright notices - 5
Crop - 25
Delete - 32
Display mode - 25
ELOoffice - 29
ELOoffice, activate - 11
ELOoffice, configuration - 11
ELOoffice, storage path - 11
Filter - 25
Flash - 23
Image quality - 19
Installation - 9
Interface - 13
Log file - 20
Menu - 13
Multi-page scan, delete - 26
Multi-page scans - 26
PDF preview - 30
Preview - 25
Program interface - 13
Recipient, add - 18
Recipient, select - 18
Requirements - 9
Scan, add - 29
Scan, create - 21
Scan, delete - 32
Scan, upload - 27
Scans - 15, 26
Send to ELOoffice - 29
Setup - 8
Storage path, ELOoffice - 11
Trademarks - 5
Trigger - 23
Upload - 27
Upload, to ELO for Mobile Devices - 30