document management system (dms) user guidesupport.pharmaready.com/implementation/prsi/user guides...
TRANSCRIPT

© 2008 TAKE Solutions, Inc. All Rights Reserved. Page 1 of 255
Document Management System (DMS)
User Guide
Version 5.0
File: Document Management System User Guide_Version 5.0.doc
Author(s): Kavitha N
Document Version: 2.0
Status: Final
Last Updated: 20thOctober 2011
PharmaReady™ DMS User Guide
© 2008 TAKE Solutions, Inc. All Rights Reserved. Page 2 of 255
Table of Contents
PREFACE ...................................................................................................................... 10
ABOUT THIS USER GUIDE .................................................................................................... 11
Intended Audience ...................................................................................................... 11
Informational Notes .................................................................................................... 11
Notational Conventions................................................................................................ 12
Organization .............................................................................................................. 13
CONTACT DETAILS ............................................................................................................. 14
Support ..................................................................................................................... 14
Documentation ........................................................................................................... 15
1. INTRODUCTION TO THE PHARMAREADY DMS SYSTEM ......................................... 16
1.1 ABOUT THE DMS SYSTEM ............................................................................................ 17
1.2 UNDERSTAND VALUE OF DMS SYSTEM ............................................................................. 17
1.3 UNDERSTAND DMS DATA STRUCTURE ............................................................................. 17
1.4 LOGON TO PHARMAREADY ............................................................................................ 18
2. PHARMAREADY HOME PAGE ................................................................................. 20
2.1 HOME PAGE ITEMS .................................................................................................... 21
2.1.1 Modules ......................................................................................................... 22
2.1.2 Navigations ..................................................................................................... 24
3. DMS MODULE ....................................................................................................... 34
3.1 DMS HOME PAGE SPECIFIC ITEMS ................................................................................. 35
3.1.1 Menu / Sub Menu and Sub Menu Item ................................................................ 36
3.1.2 Dashboard ...................................................................................................... 40
3.1.3 DMS Action Item ............................................................................................. 40
3.1.4 My DMS Quick View List ................................................................................... 41
4. LIBRARIES AND CATEGORIES .............................................................................. 42
4.1 RIGHTS TO THE ADMIN MENU ....................................................................................... 43

PharmaReady™ DMS User Guide
© 2011 TAKE Solutions, Inc. All Rights Reserved. Page 3 of 255
4.2 UNDERSTANDING LIBRARIES AND CATEGORIES ................................................................... 44
4.2.1 Library ........................................................................................................... 44
4.2.2 Category ........................................................................................................ 44
4.3 CREATING LIBRARIES ................................................................................................. 45
4.3.1 Admin Libraries Page ....................................................................................... 45
4.3.2 Add New Library Page ...................................................................................... 46
4.4 BUILDING LIBRARY DIRECTORIES ................................................................................... 53
4.4.1 Admin Libraries Page ....................................................................................... 53
4.4.2 Maintain Library Page ....................................................................................... 53
4.4.3 Folder Maintenance Page .................................................................................. 55
4.5 CLONING LIBRARIES .................................................................................................. 57
4.5.1 Admin Libraries Page ....................................................................................... 58
4.5.2 Maintain Library Page ....................................................................................... 59
4.5.3 Maintain Library Page (clone) ............................................................................ 60
4.6 CREATING CATEGORIES .............................................................................................. 62
4.6.1 Admin Categories Page..................................................................................... 62
4.6.2 Add New Category Page ................................................................................... 63
5. PEOPLE AND SUPPORTING DATA ......................................................................... 66
5.1 THE BIG PICTURE OF PEOPLE SUPPORTING DATA ................................................................. 67
5.2 UNDERSTANDING DOCUMENT AUDIENCES ......................................................................... 67
5.3 CREATE READER GROUPS ............................................................................................ 68
5.3.1 Admin Reader Groups Page ............................................................................... 68
5.3.2 Add New Reader Group Page............................................................................. 69
5.3.3 Online Report – People by Reader Group ............................................................ 71
5.4 CREATE REVIEWER GROUPS ......................................................................................... 71
5.4.1 Admin Reviewer Groups Page ............................................................................ 72
5.4.2 Add New Reviewer Group Page .......................................................................... 72
5.4.3 Online Report – People by Reviewer Group ......................................................... 74
5.5 CREATE APPROVER GROUPS ......................................................................................... 74

PharmaReady™ DMS User Guide
© 2011 TAKE Solutions, Inc. All Rights Reserved. Page 4 of 255
5.5.1 Admin Approver Groups Page ............................................................................ 75
5.5.2 Add New Approver Group Page .......................................................................... 75
5.5.3 Online Report – People by Approver Group ......................................................... 78
5.6 CREATE SITES (OPTIONAL) .......................................................................................... 79
5.6.1 Admin Sites Page ............................................................................................ 79
5.6.2 Add New Site Page .......................................................................................... 79
5.7 CREATE DEPARTMENT ................................................................................................. 81
5.7.1 Admin Departments Page ................................................................................. 81
5.7.2 Add New Department Page ............................................................................... 82
5.8 CREATE PROJECT (OPTIONAL) ....................................................................................... 83
5.8.1 Admin Projects Page ........................................................................................ 83
5.8.2 Add New Project Page ...................................................................................... 84
5.9 UNDERSTAND STANDARD ACCESS ROLES .......................................................................... 87
5.10 CLONING TO CREATE NEW FUNCTIONAL ACCESS ROLES ...................................................... 88
5.10.1 An important note about creating roles from scratch ......................................... 88
5.10.2 Admin Roles Page ......................................................................................... 89
5.10.3 Maintain Roles Page ...................................................................................... 90
5.11 CREATING AND EDITING PEOPLE ................................................................................. 92
5.11.1 Admin People Page ...................................................................................... 93
5.11.2 Add New People Page .................................................................................... 94
5.11.3 Import People from Active Directory .............................................................. 100
5.11.4 Edit Person Details ...................................................................................... 104
5.11.5 Clone a Person ........................................................................................... 105
6. SYSTEM MAINTENANCE AND MONITORING ....................................................... 108
6.1 SYSTEM SETTINGS .................................................................................................. 109
6.1.1 Understand System Settings Page (General) ..................................................... 109
6.1.2 Understand System Settings Page (DMS) ......................................................... 116
6.2 SYSTEM PRINTERS (OPTIONAL) .................................................................................... 118
6.2.1 Add New Printer Page..................................................................................... 119

PharmaReady™ DMS User Guide
© 2011 TAKE Solutions, Inc. All Rights Reserved. Page 5 of 255
6.3 REMINDERS (OPTIONAL) ............................................................................................ 120
6.3.1 Add New Reminder Page ................................................................................ 120
6.4 MONITORING ACTIVITY WITH THE AUDIT LOG VIEWER......................................................... 124
6.4.1 Audit Log Viewer Page .................................................................................... 124
6.4.2 Types and Associated Activities ....................................................................... 125
7. CREATE DOCUMENTS.......................................................................................... 128
7.1 ROLES AND WORKFLOW ............................................................................................ 129
7.1.1 DMS Roles .................................................................................................... 129
7.1.2 DMS Workflow ............................................................................................... 130
7.2 CREATING NEW DOCUMENTS ...................................................................................... 131
7.2.1 Create Document Page ................................................................................... 131
7.2.2 Document Properties Page .............................................................................. 134
7.2.3 Work with Documents Page ............................................................................ 147
7.3 CREATING A NEW DOCUMENT USING A TEMPLATE (OPTIONAL) ............................................... 149
7.4 UPLOAD DOCUMENTS IN A BATCH ................................................................................. 152
7.4.1 Batch Upload Page ......................................................................................... 153
8. EDIT, REVIEW & APPROVE DOCUMENTS ............................................................ 159
8.1 DOCUMENT STATUSES .............................................................................................. 160
8.1.1 Document Status, Roles, & the DMS Workflow .................................................. 161
8.2 WORKFLOW NAVIGATION ........................................................................................... 161
8.2.1 Work with Documents Page ............................................................................ 161
8.2.2 DMS Central Page .......................................................................................... 162
8.3 EMAIL NOTIFICATIONS AND WORKFLOW ......................................................................... 163
8.4 CHECKING OUT DOCUMENTS ....................................................................................... 164
8.4.1 Work with Documents Page ............................................................................ 165
8.4.2 Check Out a Document Page ........................................................................... 166
8.4.3 In-Place Editing (Non-Hosted Clients)............................................................... 167
8.4.4 Saving the Document ..................................................................................... 168
PharmaReady™ DMS User Guide
© 2011 TAKE Solutions, Inc. All Rights Reserved. Page 6 of 255
8.5 CHECKING IN DOCUMENTS ......................................................................................... 169
8.5.1 Work with Documents Page ............................................................................ 170
8.5.2 Check In a Document Page ............................................................................. 171
8.5.3 Work with Documents Page ............................................................................ 172
8.6 UPDATING ACTIVITY MODE ........................................................................................ 173
8.6.1 Work with Document Page .............................................................................. 173
8.6.2 Document Properties Page .............................................................................. 175
8.7 REVIEWING DOCUMENTS ........................................................................................... 176
8.7.1 DMS Central Page .......................................................................................... 177
8.7.2 Opening/Saving the Document ........................................................................ 178
8.7.3 DMS Central Page .......................................................................................... 179
8.7.4 Review a Document Page ............................................................................... 181
8.8 APPROVING DOCUMENTS ........................................................................................... 182
8.8.1 DMS Central Page .......................................................................................... 183
8.8.2 Opening/Saving the Document ........................................................................ 184
8.8.3 Central Page ................................................................................................. 185
8.8.4 Approve a Document Page .............................................................................. 185
9. PUBLISH, DISTRIBUTE & READ DOCUMENTS ..................................................... 187
9.1 PUBLISHING DOCUMENTS .......................................................................................... 188
9.1.1 Work with Documents Page ............................................................................ 188
9.1.2 Publish a Document Page ............................................................................... 189
9.2 DISTRIBUTING DOCUMENTS ....................................................................................... 194
9.2.1 Work with Documents Page ............................................................................ 194
9.2.2 Distribute a Document Page ............................................................................ 195
9.3 READING REQUIRED DOCUMENTS ................................................................................. 196
9.3.1 Central Page ................................................................................................. 196
9.3.2 Reading a Document ...................................................................................... 197
9.4 VERIFYING READING A DOCUMENT ................................................................................ 198
9.4.1 Central Page ................................................................................................. 198

PharmaReady™ DMS User Guide
© 2011 TAKE Solutions, Inc. All Rights Reserved. Page 7 of 255
9.4.2 Verify Read Page ........................................................................................... 198
9.5 LOCATING DOCUMENTS ............................................................................................. 199
9.5.1 Browse Documents Page ................................................................................ 200
9.5.2 The Search Page ........................................................................................... 201
10. DIFFERENT TYPES OF REPORTS ......................................................................... 204
10.1 ARCHIVE REPORT ................................................................................................. 205
10.2 BATCH EXPORT REPORT ......................................................................................... 206
10.3 BATCH UPLOAD REPORT ......................................................................................... 207
10.4 DATE DUE REVIEW REPORT ..................................................................................... 208
10.5 DELEGATED APPROVALS REPORT ............................................................................... 209
10.6 DOC APPROVE HISTORY REPORT ............................................................................... 210
10.7 DOC CHECK IN OUT SUM........................................................................................ 211
10.8 DOC FOLDER LIST REPORT ...................................................................................... 212
10.9 DOC REVIEW HISTORY REPORT................................................................................. 213
10.10 DOC WORKFLOW ASSIGN ..................................................................................... 214
10.11 PENDING DOC ACTION ........................................................................................ 215
10.12 PEOPLE WORKFLOW ASSIGN ................................................................................. 216
10.13 PUB DOC BY READERS ........................................................................................ 217
10.14 PUBLISHED DOC LIST ......................................................................................... 218
10.15 READ VERIFY SUMMARY ....................................................................................... 219
10.16 ACCESS REPORT ............................................................................................... 221
10.17 DELEGATION REPORT .......................................................................................... 222
10.18 READ VERIFY ACTIVITY ....................................................................................... 222
10.19 READER SUMMARY ............................................................................................. 223
10.20 REQUIRED READING REPORT ................................................................................. 225
10.21 RETENTION DATE .............................................................................................. 226
10.22 AUDIT LOG LISTING ........................................................................................... 227
10.23 ACCESS RIGHTS REPORT ..................................................................................... 228
10.24 DATA SUMMARY REPORT ...................................................................................... 229

PharmaReady™ DMS User Guide
© 2011 TAKE Solutions, Inc. All Rights Reserved. Page 8 of 255
10.25 PEOPLE BY DEPARTMENT ...................................................................................... 230
10.26 PEOPLE BY PROJECT ........................................................................................... 231
11. ADDITIONAL DOCUMENT FUNCTIONALITY ........................................................ 232
11.1 ARCHIVE DOCUMENTS ........................................................................................... 233
11.2 CREATING DOCUMENT NUMBERS MANUALLY .................................................................. 234
11.2.1 Doc Number Manager Page .......................................................................... 235
11.2.2 Add a New Document Number Page .............................................................. 236
11.3 CREATING DOCUMENT TEMPLATES ............................................................................. 238
11.3.1 Doc Template Manager Page ........................................................................ 239
11.3.2 Add a New Document Template Page ............................................................ 239
11.4 CREATING DOCUMENT PROPERTIES TEMPLATES .............................................................. 242
11.4.1 Admin Doc Prop Templates Page ................................................................... 242
11.4.2 Add New Doc Prop Template Page ................................................................. 243
11.4.3 Admin Doc Prop Template Page .................................................................... 253
12. APPENDIX .......................................................................................................... 254
12.1 GLOSSARY ......................................................................................................... 254

PharmaReady™ DMS User Guide
© 2011 TAKE Solutions, Inc. All Rights Reserved. Page 9 of 255
Copyright
Copyright © 2008 “TAKE Solutions, Inc.”. All rights reserved.
The information in this user guide is protected under the terms of the TAKE Solutions License Agreement.
There are specific copy restrictions in the license agreement. All information supplied in this user guide is to
be treated as TAKE Solutions, Inc. confidential information. No part of this document may be reproduced,
stored in or introduced into a retrieval system, transmitted into any form or by any means (electronic,
mechanical, photocopy, recording, or otherwise) or for any other purpose, without the express or written
permission of “TAKE Solutions”.
Disclaimer
Information in this document is subject to change without notice and should not be constructed as a
commitment on the part of the “TAKE Solutions”.
“TAKE Solutions” does not assume any responsibility or make any warranty against errors that may appear in
this document and disclaims any implied warranty of merchantability or fitness for a particular purpose. If
you find any problems, please report them to “TAKE Solutions” in writing immediately.
Trademark Notice
The names of actual companies, brands and products mentioned within this document are the trademark or
registered trademark of their respective owners. The examples given, as companies, organizations, products,
people and events, depicted are fiction. No association with any real company, organization, product,
person, or event is intended or should be inferred. Any rights not expressly granted herein are reserved.

PharmaReady™ DMS User Guide
© 2011 TAKE Solutions, Inc. All Rights Reserved. Page 10 of 255
PREFACE
Welcome to the PharmaReady Document Management System
(DMS) User Guide.
This User Guide contains the most up-to-date information on the
PharmaReady Document Management System (will be mentioned as
DMS going forward) and provides all the details pertaining to the
DMS system.
The following topics are covered in this section below.
Topic Page
About this User Guide 11
o Intended Audience 11
o Informational Notes 11
o Notational Conventions 12
o Organization 13
Contact Details 14
o Support 14
o Documentation 15

PharmaReady™ DMS User Guide
© 2011 TAKE Solutions, Inc. All Rights Reserved. Page 11 of 255
About This User Guide
This User Guide contains fundamental information necessary for all users of the PharmaReady
Document Management System module, describes all the features available in the DMS System,
providing step-by-step instructions to assist the user in working on the DMS Application
independently.
Intended Audience
This User Guide is intended for audiences who are associated with pharmaceutical organizations,
and the DMS System is designed for organizations conducting business in accordance with United
States Food and Drug Administration (USFDA) regulations and other federal laws concerning the
use of computerized systems for data management.
Informational Notes
The following reader aids are used in this User Guide:
Reader Aid Description
Note : Contains supplemental information.
Tip : Contains methods of performing a task more quickly.
Important : Contains information that is essential to complete a task.
See also : Contains references to other sources of information.
Caution : Contains valuable information about loss of data; be sure to read this
information carefully.
Specific : Feature is explained, but applicable for a different Module(e.g.
Training Management System [TRMS Module]).

PharmaReady™ DMS User Guide
© 2011 TAKE Solutions, Inc. All Rights Reserved. Page 12 of 255
Notational Conventions
The following style conventions and terminologies are used in this User Guide:
Element Meaning Examples
Bold font Table Captions, Figure
Captions, Table
Headings
Table 2.1:Central Page Items
Figure 2.1: Logon Page
Italic font Page Name Logon page
Central page
Underline with
Blue color font
Hyperlinks Chapter1 :Introduction to the PharmaReady DMS
System
Numbers Pointed: For easy understanding, numbers are marked around fields in the
screenshots, and their corresponding functionality or usages are explained below them along
with their respective numbers.

PharmaReady™ DMS User Guide
© 2011 TAKE Solutions, Inc. All Rights Reserved. Page 13 of 255
Organization
The User Guide is organized as chapters. The following lists the chapters in this User Guide, and a
brief description of each chapter’s contents:
Chapter Description
Chapter 1 : Introduction to the
PharmaReady DMS System
This Chapter provides the fundamental information
necessary for all users of the PharmaReady Document
Management System (DMS) module.
Chapter 2 : PharmaReady Home Page
The PharmaReady Home Page serves as the starting
point for all the PharmaReady functions It describes
about the navigation to modules & Menu navigation.
Chapter 3 : DMS Module
Describes Menu and Sub Menu Navigation inside DMS,
Dashboard, DMS Action item and My DMS Quick view
list.
Chapter 4 : Libraries and Categories
Describes rights to the Admin menu, how to create
libraries, build library directories, clone libraries and
create categories.
Chapter 5: People and Supporting
Data
Describes how to create a reader group, site,
department, project, explains standard access roles,
clone and create new functional roles and how to
create and edit people.
Chapter 6 : System Maintenance and
Monitoring
Describes global and DMS specific system settings,
setup system printers, reminders, and monitor system
activity with the audit log viewer.
Chapter 7 : Create Documents
Describes roles and workflow, how to create new
document, new document using template, and upload
documents in a batch.
Chapter 8 : Edit, Review and Approve
Documents
Describes document status and workflow, email
notifications, how to checkout and check-in a
document, update document’s activity mode, review a
document and approve a document.

PharmaReady™ DMS User Guide
© 2011 TAKE Solutions, Inc. All Rights Reserved. Page 14 of 255
Chapter 9 : Publish Distribute and
Read Documents
Describes how to publish a document, distribute a
document, read a document, verify and locate
documents at every life cycle stage.
Chapter 10 :Different Types of
Reports
Describes all delivered reports pertaining to
documents, people, and monitoring system activity are
accessed from the Reports menu.
Chapter 11 : Additional Document
Functionality
Describes how to create doc no’s manually, document
templates and doc. properties template
Chapter 12 :Appendix
Describes how to publish a document, distribute a
document, read a document, verify and locate
documents at every life cycle stage.
Contact Details
Support
TAKE Solutions’ applications are designed and developed to provide users with high quality, easy–
to-use products. However, should any user experience a problem with any application, the TAKE
Solutions Support Center is ready to assist users in identifying and resolving any issue.
Contact Information
Asia Pacific - Registered Office
Chennai, India 2nd Floor, Block - A1
Shriram "The Gateway SEZ",
No.16, GST Road, Perungalathur,
Chennai-600063, India
Tel : +91 44 4590 9367/9369
Fax : +91 44 4590 9099
North America – Head Quarters
Princeton, NJ
502 Carnegie Center, Suite 100
Princeton, NJ 08540
Tel : +1 609 720 1002
Fax : +1 609 720 1003
Email: [email protected]
Website: www.takesolutions.com

PharmaReady™ DMS User Guide
© 2011 TAKE Solutions, Inc. All Rights Reserved. Page 15 of 255
Documentation
TAKE Solutions appreciates any comments and/or suggestions regarding this user guide. Any
provided input will have a direct impact on future releases of user guides. Please send any
comments or suggestions regarding product documentation to
support.PharmaReady@TAKESolutionscom.

PharmaReady™ DMS User Guide
© 2008 TAKE Solutions, Inc. All Rights Reserved. Page 16 of 255
CHAPTER 1
1. Introduction to the
PharmaReady DMS System
About this Chapter
The PharmaReady Document Management System (DMS) is
designed for organizations conducting business in accordance
with United States Food and Drug Administration (USFDA)
regulations and other federal laws concerning the use of
computerized systems for data management.
This chapter describes how to get started and navigate within the
DMS System.
This chapter includes the following sections:
Contents
Topic Page
About the DMS System 17
Understand value of DMS system 17
Understand DMS data structure 17
Pre – Installation Requirements 18
Logon to PharmaReady 19

3. Introduction to the PharmaReady DMS System PharmaReady™ DMS User Guide
© 2008 TAKE Solutions, Inc. All Rights Reserved. Page 17 of 255
1.1 About the DMS System
PharmaReady DMS is a web-based Document Management System that automates and
seamlessly manages document control process to ensure compliance with international regulatory
authorities like FDA (USA), EMEA (European Union), Health Canada (Canada), TGA (Australia),
and HSA (Singapore).
1.2 Understand Value of DMS System
Many organizations are required by the FDA and other federal laws to implement controls for the
software and systems that manage data as part of their operations and product development.
One such regulation is Title 21 CFR Part 11, which deals with the FDA guidelines on electronic
records and electronic signatures in the United States. Part 11, as it is often called, defines the
criteria under which electronic records and electronic signatures are considered to be trustworthy,
reliable, and equivalent to paper records.
The PharmaReady DMS ensures compliance to Part 11 and other federal laws through:
Technical FDA Compliance.
Role-based people management; each user must have a unique Logon ID and cannot be
logged into PharmaReady at more than one workstation.
Document security through use of electronic signatures (e-signatures).
Role-based, system-driven workflow that ensures document and version management
while creating necessary audit trails.
By managing your document lifecycle with the PharmaReady DMS, you can easily provide auditors
precise document audit logs and reports, including information on which users have read a
document or played a role in the document lifecycle.
1.3 Understand DMS Data Structure
Before we begin viewing and entering data into the PharmaReady DMS, let’s discuss how data is
housed in the DMS.
As you would imagine with a document management system, the structure of the DMS surrounds
the documents themselves. In terms of organization, documents are housed in libraries and typed
by category.

1. Introduction to PharmaReady DMS System PharmaReady™ DMS User Guide
© 2011 TAKE Solutions, Inc. All Rights Reserved. Page 18 of 255
From a user perspective, each person is assigned one or more roles and is a member of one or
more document audiences. The roles and membership enable document workflow.
Figure 1.1: DMS Data Structure
1.4 Logon to PharmaReady
PharmaReady is a Web-based application. The logon screen and all PharmaReady pages are
accessed via a Web Browser.
1. Launch a browser window and enter the appropriate URL.
This opens a Logon page and prompts you for your Logon Id and Password, as shown in the
below figure:
Library Document People
Role
Audience
Membership
Category

1. Introduction to PharmaReady DMS System PharmaReady™ DMS User Guide
© 2011 TAKE Solutions, Inc. All Rights Reserved. Page 19 of 255
Figure 1.2: Logon Page
Note: Each DMS user has a unique Logon ID that determines their access to various areas of the
system. To get the Logon ID and Password, contact your System Administrator.
Caution: For security purposes, you cannot be logged into PharmaReady at more than one
workstation.
2. In the Logon ID field, type your Login ID.
3. In the Password field, type your Password.
4. Click Logon button, which opens the PharmaReady Home Page as shown below:
Note: Logon Text is displayed as configured in Admin > System Settings.

PharmaReady™ DMS User Guide
© 2008 TAKE Solutions, Inc. All Rights Reserved. Page 20 of 255
CHAPTER 2
2. PharmaReady Home Page
About this Chapter
The PharmaReady Home Page serves as the starting point for all
the PharmaReady functions.
This chapter includes the following sections:
Contents
Topic Page
Home Page Items 21
o Modules 22
o Navigations 24

2. PharmaReady Home Page PharmaReady™ DMS User Guide
© 2008 TAKE Solutions, Inc. All Rights Reserved. Page 21 of 255
2.1 Home Page Items
Figure 2.1: PharmaReady Home Page
The buttons, menu and navigations present in the PharmaReady Home Page Items are explained
in the Table below:
Table 2.1: PharmaReady Home Page Items
PharmaReady Home Page Items
A. Different Types of Modules
1. DMS
2. eCTD
3. SPL
4. TRMS

2. PharmaReady Home Page PharmaReady™ DMS User Guide
© 2011 TAKE Solutions, Inc. All Rights Reserved. Page 22 of 255
B. Menu and Sub Menu
5. Reports
6. Admin
C. Common Page Buttons & Navigations
7. Help
8. My Prefs
9. About
10. Log Off
11. Home (Pharma Ready)
12. User
13. Search
14. Home (DMS)
2.1.1 Modules
As specified in the table above, there are four different modules available in PharmaReady. These
are listed below one-by-one.
Table 2.2: Four types of Modules
# Item Description& Instruction
1 DMS Click on the required module to work on the specific module.
This user guide deals with the DMS Module.
Specific: The instructions for the other 3 modules (eCTD,
SPL and TRMS) are explained in the respective
Help Guide.
2 eCTD
3 SPL
4 TRMS

2. PharmaReady Home Page PharmaReady™ DMS User Guide
© 2011 TAKE Solutions, Inc. All Rights Reserved. Page 23 of 255
2.1.1.1 DMS
Click on the DMS module which opens the DMS Home Page as shown in the figure below:
Figure 2.2: PharmaReady DMS Home Page
Note: The menu and all the instructions pertaining to DMS are explained in this user guide.
2.1.1.2 eCTD
Click on the eCTD module which opens the eCTD Home Page as shown in the figure below:
Figure 2.3: PharmaReady eCTD Home Page

2. PharmaReady Home Page PharmaReady™ DMS User Guide
© 2011 TAKE Solutions, Inc. All Rights Reserved. Page 24 of 255
2.1.1.3 SPL
Click on the SPL module which opens the SPL Home Page as shown in the figure below:
Figure 2.4: PharmaReady SPL Home Page
2.1.1.4 TRMS
Click on the TRMS module which opens the TRMS Home Page as shown in the figure below:
Figure 2.5: PharmaReady TRMS Home Page
2.1.2 Navigations
The two main navigation components of PharmaReady are menu items (Main Menu and Sub-
Menu) and Page Elements.
2.1.2.1 Main Menu and Sub Menu
The PharmaReady Main Menu appears at the top of every PharmaReady page and is the primary
means of navigation throughout the system.
2. PharmaReady Home Page PharmaReady™ DMS User Guide
© 2011 TAKE Solutions, Inc. All Rights Reserved. Page 25 of 255
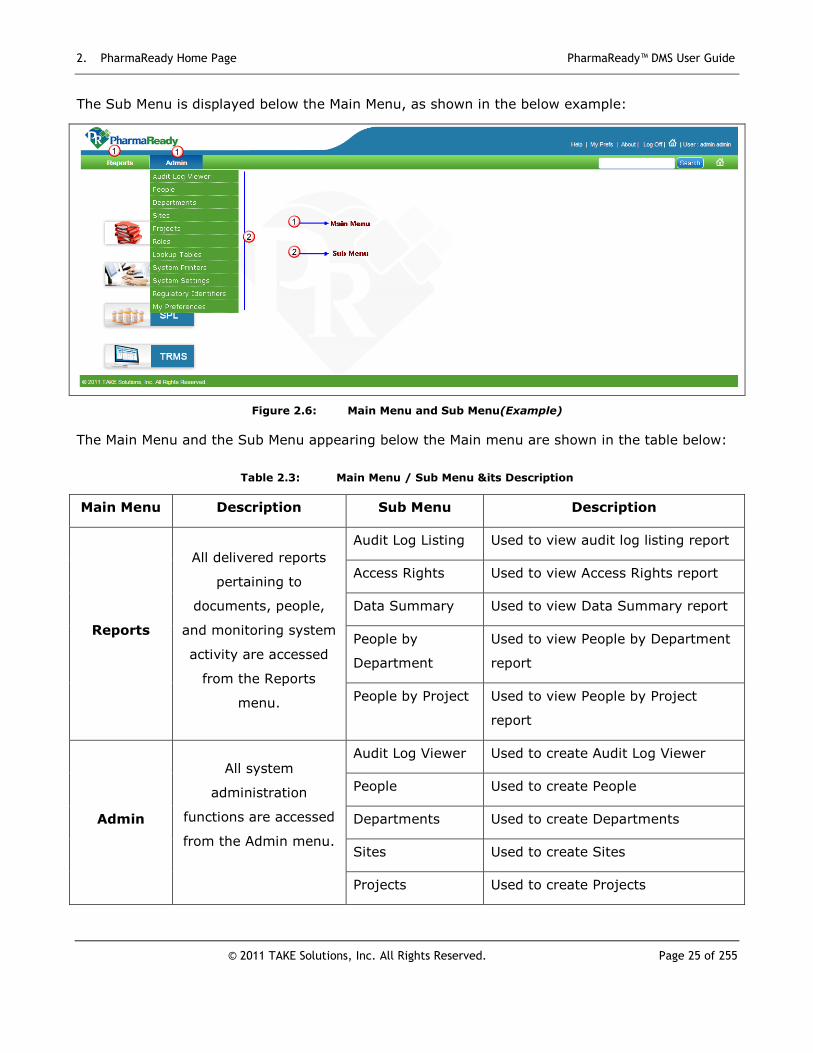
The Sub Menu is displayed below the Main Menu, as shown in the below example:
Figure 2.6: Main Menu and Sub Menu(Example)
The Main Menu and the Sub Menu appearing below the Main menu are shown in the table below:
Table 2.3: Main Menu / Sub Menu &its Description
Main Menu Description Sub Menu Description
Reports
All delivered reports
pertaining to
documents, people,
and monitoring system
activity are accessed
from the Reports
menu.
Audit Log Listing Used to view audit log listing report
Access Rights Used to view Access Rights report
Data Summary Used to view Data Summary report
People by
Department
Used to view People by Department
report
People by Project Used to view People by Project
report
Admin
All system
administration
functions are accessed
from the Admin menu.
Audit Log Viewer Used to create Audit Log Viewer
People Used to create People
Departments Used to create Departments
Sites Used to create Sites
Projects Used to create Projects

2. PharmaReady Home Page PharmaReady™ DMS User Guide
© 2011 TAKE Solutions, Inc. All Rights Reserved. Page 26 of 255
Roles Used to create Roles
Lookup Tables Used to create Lookup Tables
System Printers Used to create System Printers
System Settings Used to create System Settings
Regulatory
Identifiers
Used to create Regulatory
Identifiers
My Preferences Used to access the My Preferences
Note : For users without administrative rights, My Preferences Menu item is alone available under
admin menu.
Note : The menu items and sub-items will vary depending on your user rights.
Caution : Do not use Web Browser buttons (Back, Forward, Home, etc), to navigate within
PharmaReady.
2.1.2.2 Page Elements
Elements appearing on PharmaReady page allow you to orient yourself and/or serve as a means
of navigation. These elements are explained in the below table.
Table 2.4: Page Elements and Description
Page Element Description
User Name Your user name (with which you entered into the system)is always
displayed in the User Identification area of the menu bar (top right
2. PharmaReady Home Page PharmaReady™ DMS User Guide
© 2011 TAKE Solutions, Inc. All Rights Reserved. Page 27 of 255
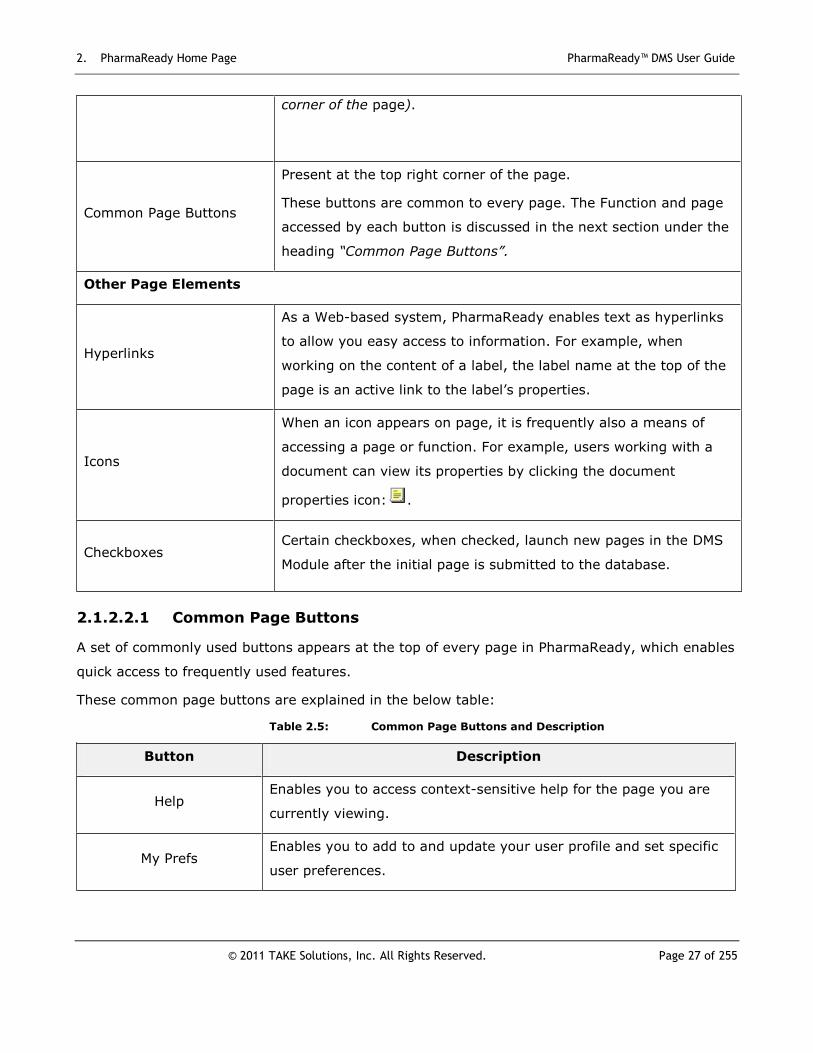
corner of the page).
Common Page Buttons
Present at the top right corner of the page.
These buttons are common to every page. The Function and page
accessed by each button is discussed in the next section under the
heading “Common Page Buttons”.
Other Page Elements
Hyperlinks
As a Web-based system, PharmaReady enables text as hyperlinks
to allow you easy access to information. For example, when
working on the content of a label, the label name at the top of the
page is an active link to the label’s properties.
Icons
When an icon appears on page, it is frequently also a means of
accessing a page or function. For example, users working with a
document can view its properties by clicking the document
properties icon: .
Checkboxes Certain checkboxes, when checked, launch new pages in the DMS
Module after the initial page is submitted to the database.
2.1.2.2.1 Common Page Buttons
A set of commonly used buttons appears at the top of every page in PharmaReady, which enables
quick access to frequently used features.
These common page buttons are explained in the below table:
Table 2.5: Common Page Buttons and Description
Button Description
Help Enables you to access context-sensitive help for the page you are
currently viewing.
My Prefs Enables you to add to and update your user profile and set specific
user preferences.
2. PharmaReady Home Page PharmaReady™ DMS User Guide
© 2011 TAKE Solutions, Inc. All Rights Reserved. Page 28 of 255
About Enables to display the version, build, license, module(s), and other
installation information for your current PharmaReady session.
Log off Enables to end your PharmaReady Session.
Home Button
(PharmaReady) Enables to view the PharmaReady Home Page.
Home Button (Module) Enables to view the Module Home Page (based on the module the
user had selected).
Search Enables you to perform search on a word or words in a document.
Search is not valid for a DMS-only implementation.
The usage of these buttons is explained below in detail:
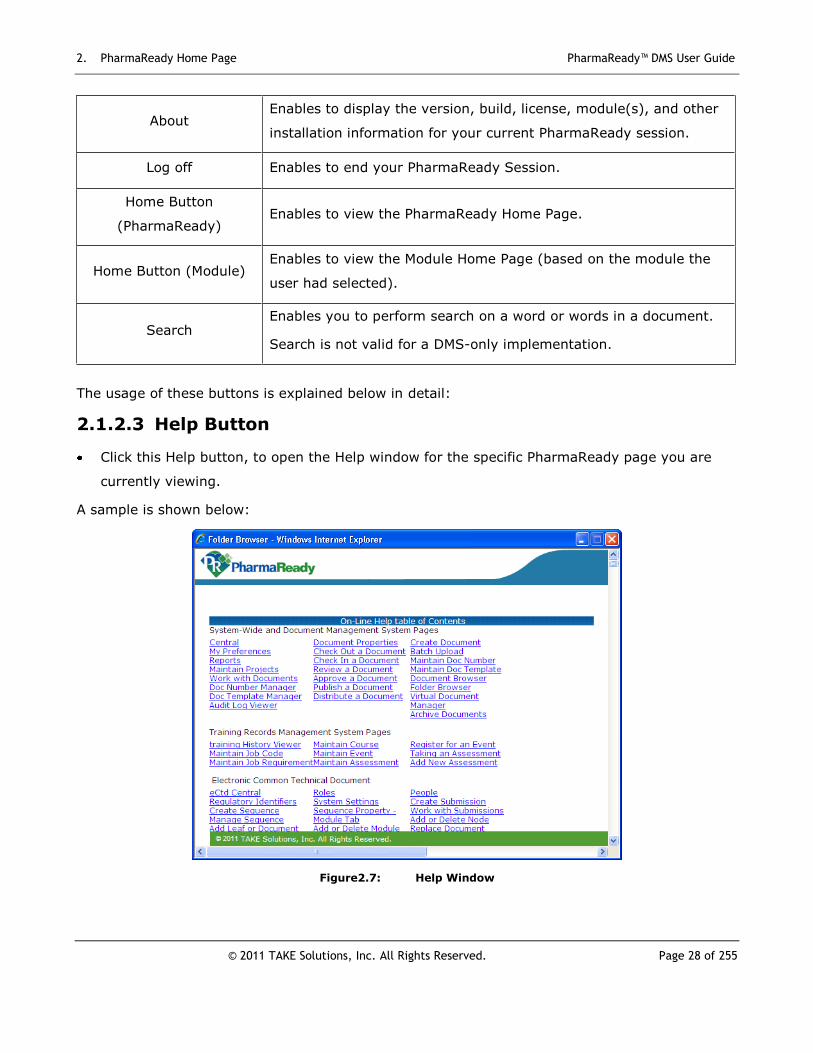
2.1.2.3 Help Button
Click this Help button, to open the Help window for the specific PharmaReady page you are
currently viewing.
A sample is shown below:
Figure2.7: Help Window

2. PharmaReady Home Page PharmaReady™ DMS User Guide
© 2011 TAKE Solutions, Inc. All Rights Reserved. Page 29 of 255
2.1.2.4 My Preferences Button
The My Preferences page allows you to add to and update your personal profile. It is also where
you select user system settings such as the date and time format and system password
Click this My Preferences button, which opens the My Preferences page, as shown in the figure
below:
Figure2.8: My Preferences Page
Tip : You can also access your My Preferences page by selecting Admin > Preferences in the
PharmaReady Home page.

2. PharmaReady Home Page PharmaReady™ DMS User Guide
© 2011 TAKE Solutions, Inc. All Rights Reserved. Page 30 of 255
The fields present in the My Preferences page are explained in the below table:
Table 2.6: My Preferences Fields & Description
# Fields Description / Instruction
1 My Information
Enter your First Name, Last Name and Email address which are
mandatory fields.
Enter your Unit Name (e.g. Data Management, Reg. Affairs, etc.)
Enter your primary and secondary Phone number.
Select the Number of Rows to indicate the number of table entries to
display on PharmaReady pages before automatic paging starts.
Check the Email Notify checkbox, to receive emails from PharmaReady,
notifying you of system events.
Select the required Date Format and Time format, which would get
displayed throughout the application.
Select a default printer to override the default system printer of
PharmaReady. The printer selected here becomes the default for the
Document Direct-Print feature in PharmaReady. The Document Direct-
Print functionality prints a document directly from PharmaReady without
viewing and is available whenever you see the Printer icon: .
Note : The default printer field will display printers added to the
PharmaReady Server. Your organization may not use this feature.
2 Change
Password
This is used to set a new password. PharmaReady may require you to change
your Password on a scheduled basis or your System Administrator may
require you to reset it. Follow these steps to change your Password:
Enter your Current Password. When you enter the Password, the
characters are hidden.
Enter your New Password.
Retype your new password, in the Confirm New Password field.
You can use the new password to logon to the system.
2. PharmaReady Home Page PharmaReady™ DMS User Guide
© 2011 TAKE Solutions, Inc. All Rights Reserved. Page 31 of 255
3
Delegate DMS
Review Authority
Select one person who has the right to perform reviews and approvals
during a defined absence. Delegate DMS
Approval
Authority
4 Save Changes
Click the Submit button to save the specified information or the Cancel
button to end the function, which will not save the changes you have
entered.
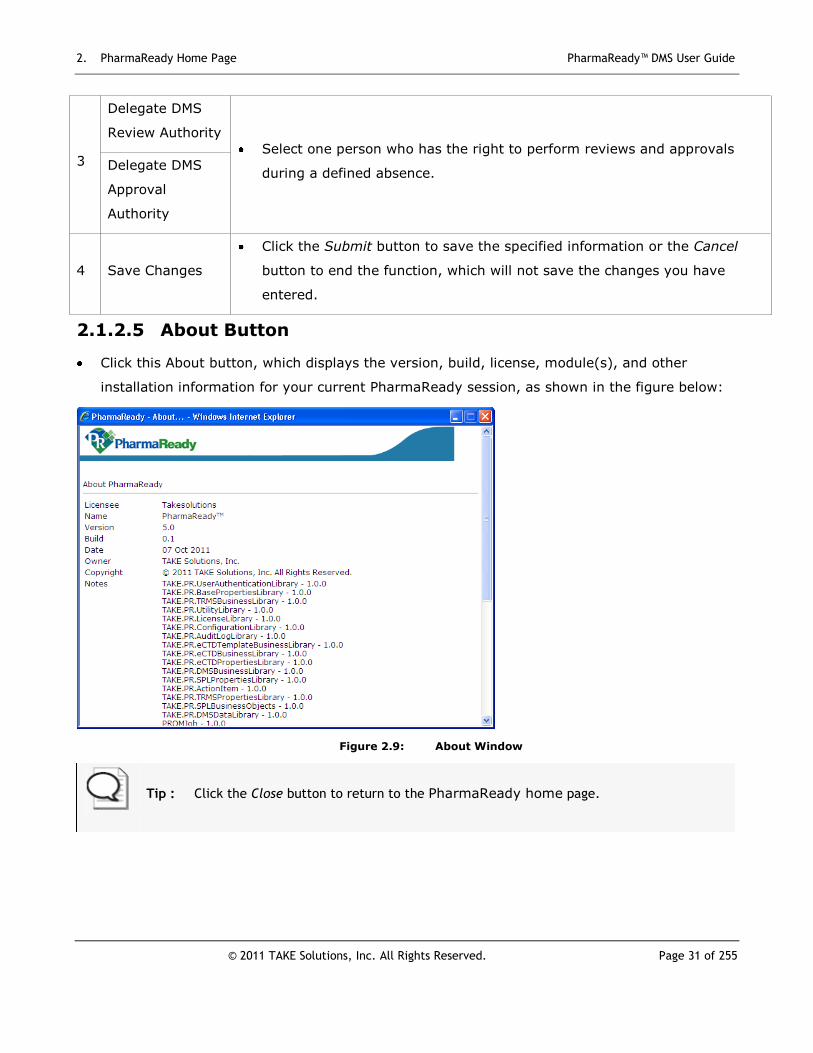
2.1.2.5 About Button
Click this About button, which displays the version, build, license, module(s), and other
installation information for your current PharmaReady session, as shown in the figure below:
Figure 2.9: About Window
Tip : Click the Close button to return to the PharmaReady home page.
2. PharmaReady Home Page PharmaReady™ DMS User Guide
© 2011 TAKE Solutions, Inc. All Rights Reserved. Page 32 of 255
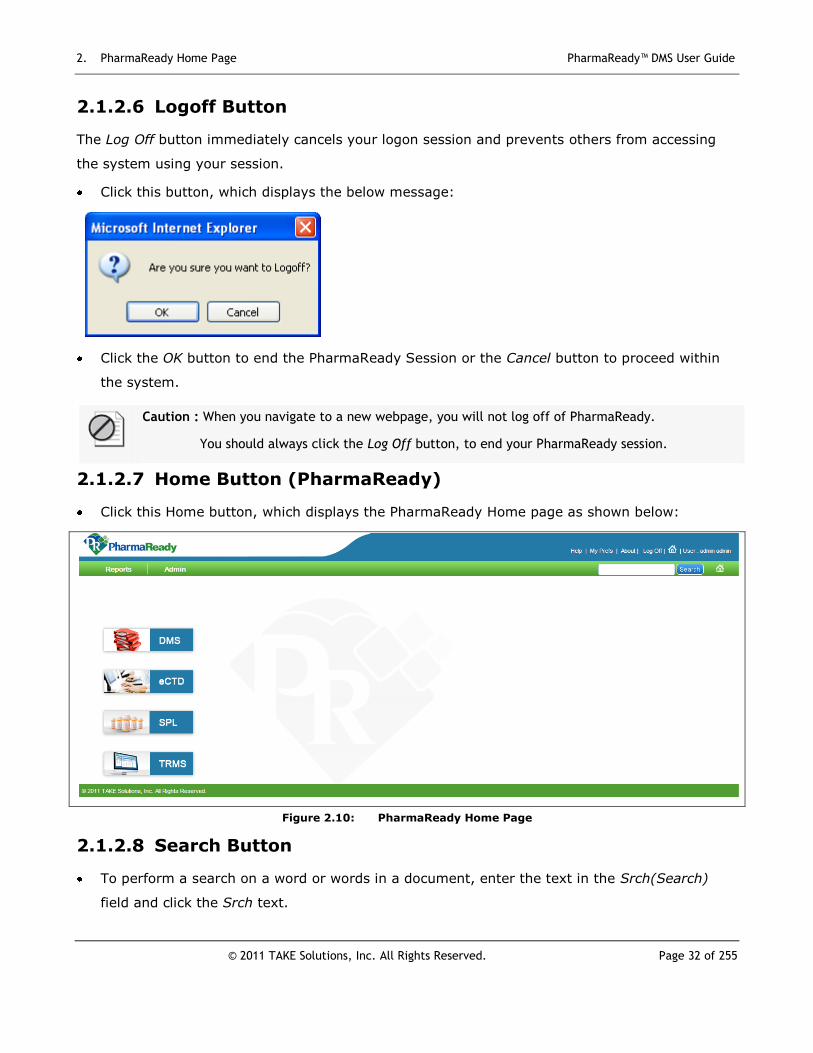
2.1.2.6 Logoff Button
The Log Off button immediately cancels your logon session and prevents others from accessing
the system using your session.
Click this button, which displays the below message:
Click the OK button to end the PharmaReady Session or the Cancel button to proceed within
the system.
2.1.2.7 Home Button (PharmaReady)
Click this Home button, which displays the PharmaReady Home page as shown below:
Figure 2.10: PharmaReady Home Page
2.1.2.8 Search Button
To perform a search on a word or words in a document, enter the text in the Srch(Search)
field and click the Srch text.
Caution : When you navigate to a new webpage, you will not log off of PharmaReady.
You should always click the Log Off button, to end your PharmaReady session.

2. PharmaReady Home Page PharmaReady™ DMS User Guide
© 2011 TAKE Solutions, Inc. All Rights Reserved. Page 33 of 255
To perform an advanced search using multiple criteria, click the Srch text to display the
Search page.
Note : Search is valid only for DMS implementation.
2.1.2.9 Home Button (Module Main Page)
This Home button takes the user to the Home Page of the selected Module. For example, if the
user is in DMS Module, then DMS Module Main page is displayed.
Note : This button does not get highlighted, if the user has not selected any of the modules.
A sample is shown below:
Figure 2.11: DMS Module Main Page
PharmaReady™ DMS User Guide
© 2008 TAKE Solutions, Inc. All Rights Reserved. Page 34 of 255
CHAPTER 3
3. DMS Module
About this Chapter
PharmaReady DMS is a web-based Document Management
System that automates and seamlessly manages document
control process to ensure compliance with the international
regulatory authorities like FDA (USA), EMEA(European Union),
Health Canada (Canada), TGA (Australia), and HSA (Singapore).
As specified earlier, this user guide deals with the DMS Module.
This chapter includes the following sections:
Contents
Topic Page
Menu and Sub Menu 38
Dashboard 42
DMS Action 42
My DMS Quick View ‘List 43

3. DMS Module PharmaReady™ DMS User Guide
© 2008 TAKE Solutions, Inc. All Rights Reserved. Page 35 of 255
3.1 DMS Home Page Specific Items
Figure 3.1: DMS Home Page Specific Items
3. DMS Module PharmaReady™ DMS User Guide
© 2011 TAKE Solutions, Inc. All Rights Reserved. Page 36 of 255
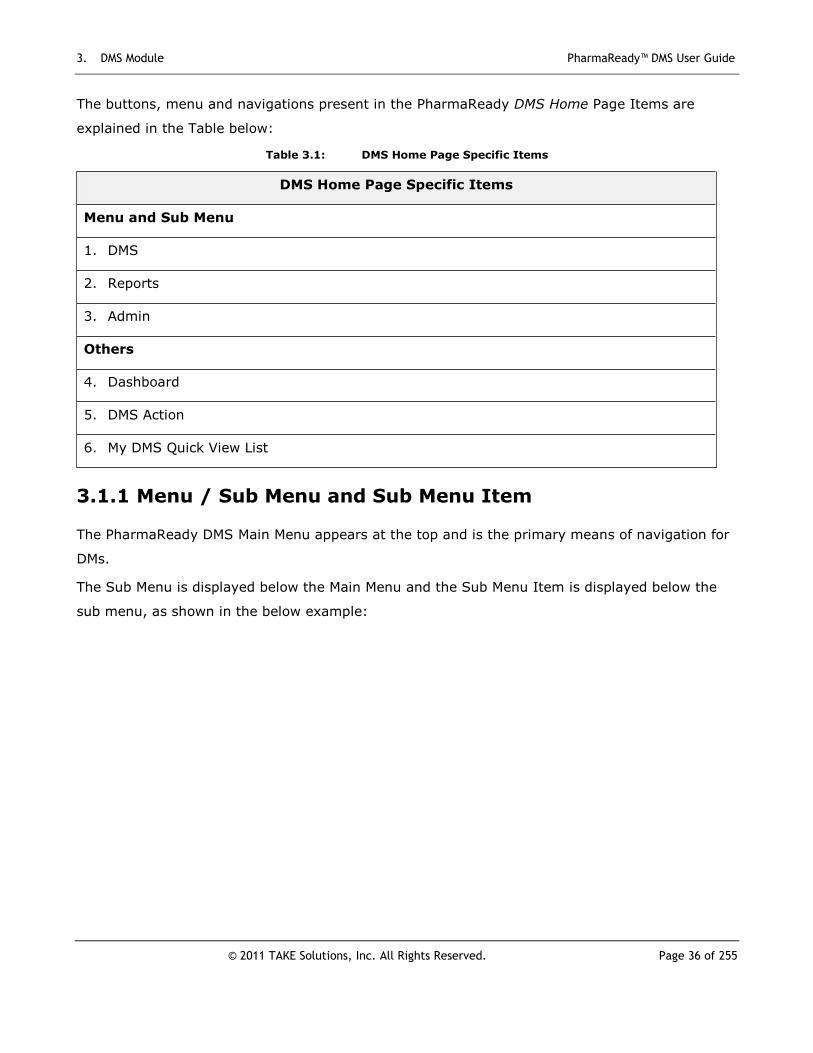
The buttons, menu and navigations present in the PharmaReady DMS Home Page Items are
explained in the Table below:
Table 3.1: DMS Home Page Specific Items
DMS Home Page Specific Items
Menu and Sub Menu
1. DMS
2. Reports
3. Admin
Others
4. Dashboard
5. DMS Action
6. My DMS Quick View List
3.1.1 Menu / Sub Menu and Sub Menu Item
The PharmaReady DMS Main Menu appears at the top and is the primary means of navigation for
DMs.
The Sub Menu is displayed below the Main Menu and the Sub Menu Item is displayed below the
sub menu, as shown in the below example:

3. DMS Module PharmaReady™ DMS User Guide
© 2011 TAKE Solutions, Inc. All Rights Reserved. Page 37 of 255
Figure 3.2: Main Menu / Sub Menu and Sub Menu Item(Example)
The Main Menu and the Sub Menu appearing below the Main menu are shown in the table below:
Table 3.2: Main Menu / Sub Menu & its Description
Main Menu Description Sub Menu Description
DMS
This menu is used for
Document creation,
Browse Documents
Batch Upload,
Documents archive,
Doc Numbers /
Templates
Central Used to view the DMS Central Page
Browse
Documents
Used to browse documents, print,
read and verify the documents that
are read
Create Document Used to create documents
Batch Upload Used to upload batch of documents
Work with
Documents
Used to work with the documents

3. DMS Module PharmaReady™ DMS User Guide
© 2011 TAKE Solutions, Inc. All Rights Reserved. Page 38 of 255
Archive
Documents
Used to archive documents
Doc Numbers Used to create/manage document
numbers
Doc Templates Used to create/manage document
templates
Reports
All delivered reports
pertaining to
documents, people,
and monitoring system
activity are accessed
from the Reports
menu.
Archive Report Used to view audit log listing report
Batch Export
Report
Used to view Batch Export Report
Batch Upload
Report
Used to view Batch Upload Report
Date Due Review Used to view Date Due Review
Report
Delegated
Approvals
Used to view Delegated Approvals
Doc Approve
History
Used to view Doc Approve History
Report
Doc Chk InOut
Sum
Used to view Doc Check In and
Check Out Sum report
Doc Folder List Used to view Doc Folder List report
Doc Review
History
Used to view Doc Review History
Doc Workflow
Assign
Used to view Doc Workflow Assign
Pending Doc
Action
Used to view Pending Doc Action
report
People Wrkflw
Assign
Used to view People Workflow
Assign report
3. DMS Module PharmaReady™ DMS User Guide
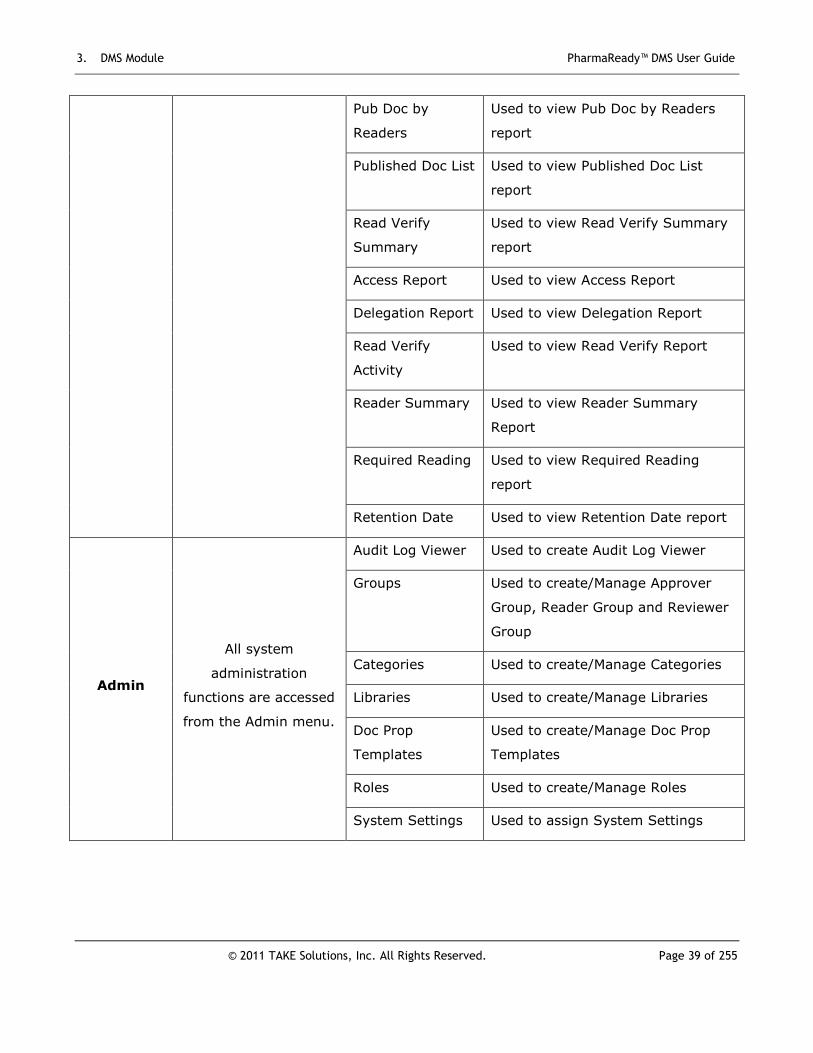
© 2011 TAKE Solutions, Inc. All Rights Reserved. Page 39 of 255
Pub Doc by
Readers
Used to view Pub Doc by Readers
report
Published Doc List Used to view Published Doc List
report
Read Verify
Summary
Used to view Read Verify Summary
report
Access Report Used to view Access Report
Delegation Report Used to view Delegation Report
Read Verify
Activity
Used to view Read Verify Report
Reader Summary Used to view Reader Summary
Report
Required Reading Used to view Required Reading
report
Retention Date Used to view Retention Date report
Admin
All system
administration
functions are accessed
from the Admin menu.
Audit Log Viewer Used to create Audit Log Viewer
Groups Used to create/Manage Approver
Group, Reader Group and Reviewer
Group
Categories Used to create/Manage Categories
Libraries Used to create/Manage Libraries
Doc Prop
Templates
Used to create/Manage Doc Prop
Templates
Roles Used to create/Manage Roles
System Settings Used to assign System Settings

3. DMS Module PharmaReady™ DMS User Guide
© 2011 TAKE Solutions, Inc. All Rights Reserved. Page 40 of 255
Note : The menu items and sub-items will vary depending on your user rights.
3.1.2 Dashboard
DMS Action Item tab is explained in the below table:
Table 3.3: DMS Home Page Items
# Item Description
3 Dashboard The number of Documents, number of People Logged on, number
of Locked Accounts and Pending Action Items are displayed in
the Dashboard, as shown in the sample below:
3.1.3 DMS Action Item
DMS Action Item tab is explained in the below table:
Table 3.4: DMS Home Page Items
# Item Description
3 DMS Actions This section contains a list of documents needing your attention.
The items in your list are generated automatically by
PharmaReady according to your role(s) and current document
activity.
PharmaReady can also be configured to send email notifications
for required actions. Each user can determine whether they want
to receive user email notifications.

3. DMS Module PharmaReady™ DMS User Guide
© 2011 TAKE Solutions, Inc. All Rights Reserved. Page 41 of 255
3.1.4 My DMS Quick View List
My DMS Quick View List Item is explained in the below table:
Table 3.5: DMS Home Page Items
# Item Description
4 My DMS Quick View
List
This section, commonly referred to as the Quick View, is a list of
documents selected by you for the purpose of quick access. You
can think of Quick View as your favorites list in PharmaReady.
Any document to which you have rights can be added to your
Quick View list.
Posting to Quick View is discussed in detail, in this user guide as
you go along.

PharmaReady™ DMS User Guide
© 2008 TAKE Solutions, Inc. All Rights Reserved. Page 42 of 255
CHAPTER 4
4. Libraries and Categories
About this Chapter
One of the key decisions made while implementing a Document
Management System (DMS) is the organization of documents.
In the PharmaReady DMS, the basis for this organization is
libraries, which house your documents, and categories, which
“type” your documents. In this chapter, Administrators will
learn to set up both structures in the DMS.
This chapter includes the following sections:
Contents
Topic Page
Rights to the Admin Menu 45
Understanding Libraries and Categories 46
Creating Libraries 47
Building Library Directories 55
Cloning Libraries 59
Creating Categories 64

4. Libraries and Categories PharmaReady™ DMS User Guide
© 2008 TAKE Solutions, Inc. All Rights Reserved. Page 43 of 255
4.1 Rights to the Admin Menu
Before we begin working with libraries and categories, a brief discussion of the Admin menu is
warranted.
All the pages required for administration of the DMS are accessed via the Admin menu, which
displays the options as shown below:
Figure 4.1: Admin menu Options
Visibility and access to Admin menu items is determined by role, as shown in the table below:
Table 4.1: DMS Role and Menu Items
DMS Role Accessible Menu Items
System Administrator All Admin menu items
People Administrator People, Sites, and Departments
Library Admin Audit Log Viewer; all items under the Documents menu
All Roles My Preferences
Important : At a minimum, you must have libraries, categories, and people set up in the system
before users can begin managing their documents in the DMS.
Additional features and functionality are optional, including setup and use of
departments, projects, sites, and reader groups (although reader groups are highly
recommended).

4. Libraries and Categories PharmaReady™ DMS User Guide
© 2011 TAKE Solutions, Inc. All Rights Reserved. Page 44 of 255
4.2 Understanding Libraries and Categories
Libraries and categories are the two main organizational structures for documents in the DMS.
Every document in the DMS is assigned to a single library and category.
The distinction between libraries and categories lies in organization versus typing based on
business purpose.
4.2.1 Library
Definition : A Library is a repository for documents within PharmaReady. Libraries contain
folders and subfolders that house documents, so a simple way to visualize a
library is to picture a filing cabinet.
Below is an example of libraries in PharmaReady. Your organization will establish its own set of
libraries.
4.2.2 Category
Definition : Category represents a means of typing a document based on business need and spans across libraries.
For example, you do not need to house all of your Standard Operating Procedures (SOP) in a
single library. Instead, create a category of SOP. Your SOPs can then be housed in any library
while maintaining their distinction as a Standard Operating Procedure.

4. Libraries and Categories PharmaReady™ DMS User Guide
© 2011 TAKE Solutions, Inc. All Rights Reserved. Page 45 of 255
4.3 Creating Libraries
Libraries act as repositories for documents within PharmaReady. Every document in the system must
be assigned to a library, thus libraries must exist before users can create documents.
Libraries can support hierarchical folder structures for virtual cataloging and storage of documents.
Important : This activity is performed by the System Administrator.
4.3.1 Admin Libraries Page
The button to add a new library is located at the bottom of the Admin Libraries page.
1. Select Admin>Libraries in the DMS Home page.
This opens the Admin Libraries page, as shown in the figure below:
Figure 4.2: Admin Libraries Page
2. Click the Add New Library button at the bottom of the Admin Library page.
This displays the Add New Library page as shown below:

4. Libraries and Categories PharmaReady™ DMS User Guide
© 2011 TAKE Solutions, Inc. All Rights Reserved. Page 46 of 255
4.3.2 Add New Library Page
Figure 4.3: Add New Library Page
4. Libraries and Categories PharmaReady™ DMS User Guide
© 2011 TAKE Solutions, Inc. All Rights Reserved. Page 47 of 255
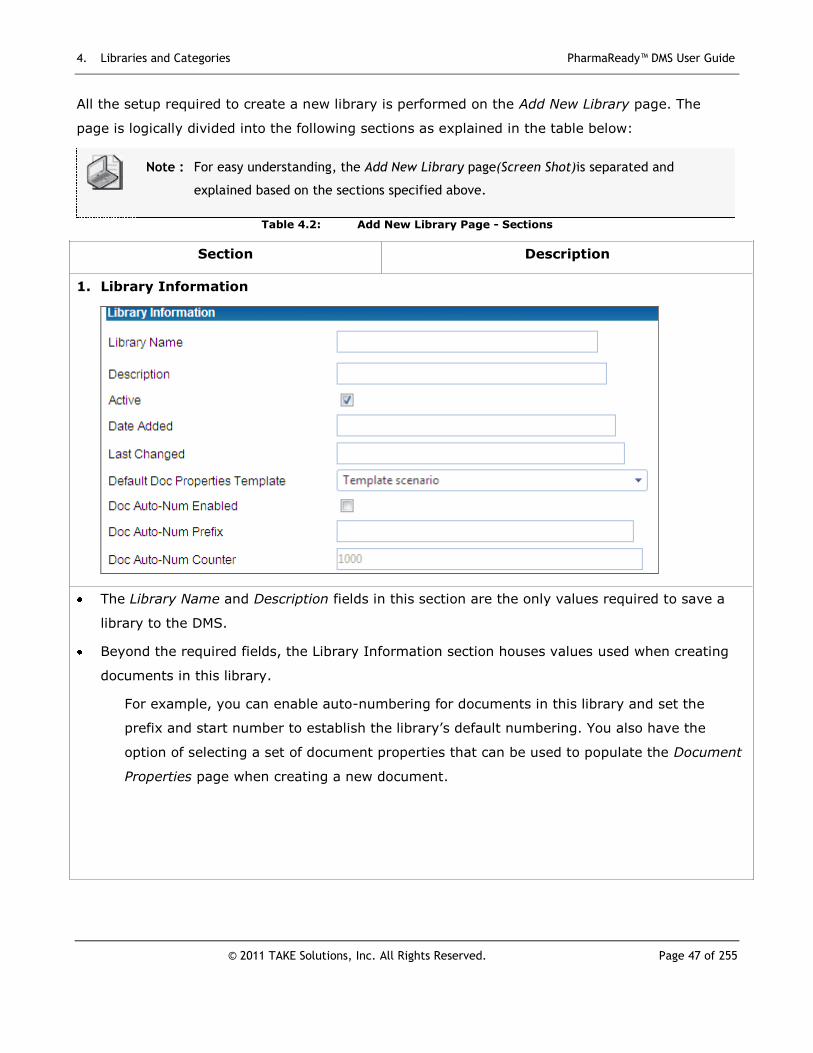
All the setup required to create a new library is performed on the Add New Library page. The
page is logically divided into the following sections as explained in the table below:
Note : For easy understanding, the Add New Library page(Screen Shot)is separated and
explained based on the sections specified above.
Table 4.2: Add New Library Page - Sections
Section Description
1. Library Information
The Library Name and Description fields in this section are the only values required to save a
library to the DMS.
Beyond the required fields, the Library Information section houses values used when creating
documents in this library.
For example, you can enable auto-numbering for documents in this library and set the
prefix and start number to establish the library’s default numbering. You also have the
option of selecting a set of document properties that can be used to populate the Document
Properties page when creating a new document.

4. Libraries and Categories PharmaReady™ DMS User Guide
© 2011 TAKE Solutions, Inc. All Rights Reserved. Page 48 of 255
2. Workflow Settings
The Workflow Settings section allows you to establish rules and provide information to users in
support of document workflow. Options include requiring approvals prior to publishing and
including comments and reports in the notification emails triggered by events in the document
life cycle.
Options available in the Workflow Settings section are explained below:

4. Libraries and Categories PharmaReady™ DMS User Guide
© 2011 TAKE Solutions, Inc. All Rights Reserved. Page 49 of 255
Table 4.3: Options in Workflow Settings
Checkbox Description
Require Approval to Publish Documents Requires that every document in the library
have all approvals prior to publishing.
Require Child Documents be Published
for Virtual Document to be Published
Requires that all child documents of a virtual
document be published before the parent can be
published.
Include Document Description in
Workflow Emails
Includes the Description field from the
Document Properties page in all workflow
emails, including Read Required, Review,
Approve, Publish, and Reminders.
Include Check In/Out Comments in
Review Email
Attaches a PDF copy of the Document Check
In/Out Summary report to the email sent to
Document Reviewers when the document is
placed in Review mode.
Include Review Comments in Review
Complete Email
Attaches a PDF copy of the Document Review
History report to the email sent to Document
Owners when all reviews are completed for a
document.
Include Approve Comments in Approve
Complete Email
Attaches a PDF copy of the Document Approval
History report to the email sent to Document
Owners when all approvals are completed for a
document. Will also send the same report
attached to an email when a document is not
approved.

4. Libraries and Categories PharmaReady™ DMS User Guide
© 2011 TAKE Solutions, Inc. All Rights Reserved. Page 50 of 255
3. PDF Publishing Defaults
The PDF Publishing Defaults section allows you to enable or disable specific functions related to
creating portable documents.
Options available in the PDF Publishing Defaults section are explained below:
Table 4.4: Options in PDF Publishing Defaults
Checkbox Description
Publish Watermark The text here automatically populates the PDF
options on the Document Properties page when
publishing a document to this library. You can
edit or omit this text per document prior to
publishing.
Include Watermark test Applies the text entered in the Published
Watermark field as a watermark on each page
of the final published document.
Include version and published Date
watermark
Applies the version number and date the
document was published as a watermark on
each page of the published document.
Create Bookmarks from Style Settings
(for Word Docs Only)
Creates hyperlinks in the PDF file based on
predefined styles from Microsoft Word.

4. Libraries and Categories PharmaReady™ DMS User Guide
© 2011 TAKE Solutions, Inc. All Rights Reserved. Page 51 of 255
Append Document Control information
page
Adds a final page to the published document
providing Document Control data (doc #,
version, library, author, key dates, and reader
rights).
Prevent PDF from being Printed Allows readers to view the document, but
disables printing options.
Prevent PDF contents from being
Copied or Saved as another Format
Allows readers to view the document, but
disables copy and save options in Adobe
Acrobat.
Include Printed Date in Document Includes date on document when printed.
4. E-Signature Settings
Each library has its own set of e-signatures which you can customize in terms of which actions
are required and the possible meanings of each action.

4. Libraries and Categories PharmaReady™ DMS User Guide
© 2011 TAKE Solutions, Inc. All Rights Reserved. Page 52 of 255
5. Custom Document Property Fields
You have the option of creating custom fields unique to each library in PharmaReady.
Four types of fields are available as custom fields. A library can have multiple custom fields of a
single type, and any field can be set as required. Not only can you record your specific data
using custom fields, these fields are added to the Search page, thus enabling you to perform
searches using custom field values.
6. Save Changes
After entering Library details and additional values according to the desired set up for this
library, click the Submit button in the Add New Library page, to save the library to
PharmaReady.
Once when the details are submitted, you are returned to Admin Libraries page, which displays
the added library, as shown in the sample below:
Figure 4.4: Admin Libraries Page

4. Libraries and Categories PharmaReady™ DMS User Guide
© 2011 TAKE Solutions, Inc. All Rights Reserved. Page 53 of 255
4.4 Building Library Directories
Important : This activity is performed by a Library or System Administrator.
Once a library is saved to PharmaReady, you can build its hierarchical folder structure.
Documents can be assigned to any level in the hierarchy.
You also have the option of pulling from a network share any folder structure to build your entire
library or add to any subfolder.
4.4.1 Admin Libraries Page
As stated earlier, the Admin Libraries page displays the libraries created by your organization in
PharmaReady.
1. Select Admin>Libraries in the DMS Home page.
To locate a library, you can sort the list by any heading. By default, only active libraries appear in
this list. To view all the libraries, clear the Active Only checkbox.
Figure 4.5: Admin Libraries Page
2. Click the name of the desired library.
This opens the Maintain Library page as shown below:
4.4.2 Maintain Library Page
The Maintain Library page (partially displayed in the below figure)includes two additional buttons.
We will use the Maintain Folders button in this chapter.

4. Libraries and Categories PharmaReady™ DMS User Guide
© 2011 TAKE Solutions, Inc. All Rights Reserved. Page 54 of 255
Figure 4.6: Maintain Library Page

4. Libraries and Categories PharmaReady™ DMS User Guide
© 2011 TAKE Solutions, Inc. All Rights Reserved. Page 55 of 255
3. Click the Maintain Folders button.
This displays the Folder Maintenance page as shown below.
4.4.3 Folder Maintenance Page
Figure 4.7: Folder Maintenance Page
The library’s existing directory structure is displayed on the Folder Maintenance page. If this is a
new library, you will see only the root directory.
Note : The root folder is the library itself and is created automatically by the system. All values
for the folder are defined at the library level, thus no additional data is entered here.
From this page, you can:
Add new folders and subfolders.
Modify the values of existing folders and subfolders.
Delete folders and subfolders.
4. Click the Add a Folder button to create a new folder below the folder currently highlighted in
the Library Folders hierarchy.

4. Libraries and Categories PharmaReady™ DMS User Guide
© 2011 TAKE Solutions, Inc. All Rights Reserved. Page 56 of 255
Figure 4.8: Folder Maintenance Page (Folder Details entered)
5. Click the Submit Folder Changes button when finished, which displays the specified folder in
the Library Folder Section of the Folder Maintenance page:
Figure 4.9: Library Folders Section
4.4.3.1 Adding Folders from a File Share (optional)
Your organization may allow you to pull existing folder structures from a network drive into a
library. When pulling folders into PharmaReady, be aware that all folders below the one you
specify are created in the library, but no documents are added.
4. Libraries and Categories PharmaReady™ DMS User Guide
© 2011 TAKE Solutions, Inc. All Rights Reserved. Page 57 of 255
Note : At least one network directory must be tied to PharmaReady to allow you to create
library folders from a file share.
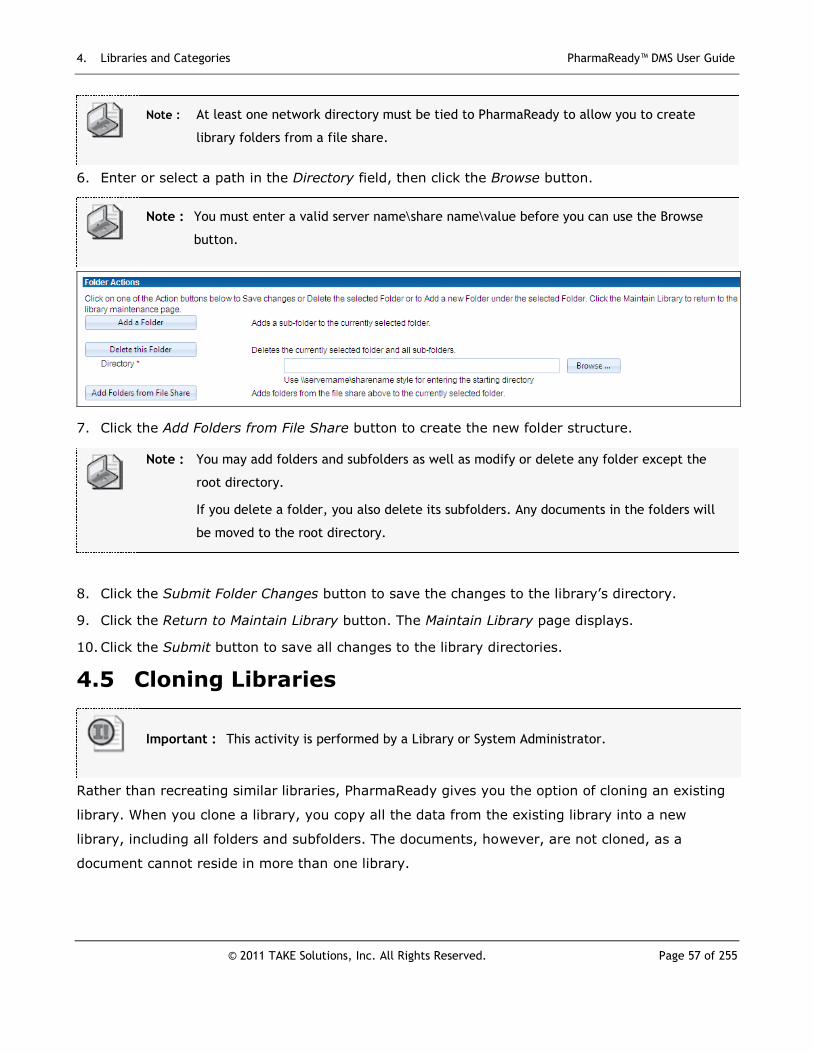
6. Enter or select a path in the Directory field, then click the Browse button.
Note : You must enter a valid server name\share name\value before you can use the Browse
button.
7. Click the Add Folders from File Share button to create the new folder structure.
Note : You may add folders and subfolders as well as modify or delete any folder except the
root directory.
If you delete a folder, you also delete its subfolders. Any documents in the folders will
be moved to the root directory.
8. Click the Submit Folder Changes button to save the changes to the library’s directory.
9. Click the Return to Maintain Library button. The Maintain Library page displays.
10. Click the Submit button to save all changes to the library directories.
4.5 Cloning Libraries
Important : This activity is performed by a Library or System Administrator.
Rather than recreating similar libraries, PharmaReady gives you the option of cloning an existing
library. When you clone a library, you copy all the data from the existing library into a new
library, including all folders and subfolders. The documents, however, are not cloned, as a
document cannot reside in more than one library.

4. Libraries and Categories PharmaReady™ DMS User Guide
© 2011 TAKE Solutions, Inc. All Rights Reserved. Page 58 of 255
4.5.1 Admin Libraries Page
The Admin Libraries page displays the libraries created by your organization in PharmaReady.
1. Select Admin>Libraries in the DMS Home page.
Figure 4.10: Admin Libraries Page
2. Click the name of the library you want to clone.
This opens the Maintain Library page as shown below:

4. Libraries and Categories PharmaReady™ DMS User Guide
© 2011 TAKE Solutions, Inc. All Rights Reserved. Page 59 of 255
4.5.2 Maintain Library Page
Figure 4.11: Maintain Library Page
The Maintain Library page looks very similar to the Add New Library page with the addition of two
new buttons. We will use the Clone Library button in this chapter.
Note : Roles and people and their relationship to libraries are covered in greater detail in the
People and Supporting Data chapter of this user guide.
3. Click the Clone Library button. A warning message appears.
4. Libraries and Categories PharmaReady™ DMS User Guide
© 2011 TAKE Solutions, Inc. All Rights Reserved. Page 60 of 255
The message reminds you that cloning copies the roles for this library and the people assigned to
those roles into the new library.
4. Click the OK button to perform the cloning process.
4.5.3 Maintain Library Page (clone)
Note : The Doc Auto-Num Enabled checkbox will be clear by default on a cloned library, even if
the original library used auto-numbering. This is because you cannot have two libraries
with the same Auto-Number prefix.
Caution : Remember that the Library Name and Description will include the prefix of CLONE.
Modify as desired.
5. After cloning, edit the fields from the original library before submitting the new library to
PharmaReady, as shown in the sample below:

4. Libraries and Categories PharmaReady™ DMS User Guide
© 2011 TAKE Solutions, Inc. All Rights Reserved. Page 61 of 255
Figure 4.12: Maintain Library Page (Details modified)

4. Libraries and Categories PharmaReady™ DMS User Guide
© 2011 TAKE Solutions, Inc. All Rights Reserved. Page 62 of 255
6. Click the Submit button to create the new library.
This displays the cloned library in the Admin Libraries page as shown below:
Figure 4.13: Admin Libraries Page (Cloned Library displayed)
Note : The folder structure is pulled from the original library. Follow the Build a Library
Directory procedure to add, modify, and delete folders.
4.6 Creating Categories
Important : This activity is performed by a Library or System Administrator.
As stated earlier, every document must be assigned to a category in the DMS. Categories are
separate from libraries and can span libraries.
Think of a category as a document type. For example, you may establish categories for your
standard operating procedures, another for work instructions, another for policy documents, and
so on.
Like libraries, categories include auto-number and custom field functionality.
4.6.1 Admin Categories Page
The Admin Categories page displays the categories created by your organization in PharmaReady.
1. Select Admin>Categories in the DMS Home page.
The button to add a new category is located at the bottom of the Admin Categories page.

4. Libraries and Categories PharmaReady™ DMS User Guide
© 2011 TAKE Solutions, Inc. All Rights Reserved. Page 63 of 255
Figure 4.14: Admin Categories Page
2. Click the Add a New Category button. This opens the Add New Category page.
4.6.2 Add New Category Page
Figure 4.15: Add New Category Page
All the setup required to create a new category is performed on the Add New Category page. The
page is divided into two main sections:
4. Libraries and Categories PharmaReady™ DMS User Guide
© 2011 TAKE Solutions, Inc. All Rights Reserved. Page 64 of 255
Category Information
Custom Document Property Fields
Note : For easy understanding, the Add New Categorypage(Screen Shot)is separatedand
explained based on the sections specified above.
Table 4.5: Add New Category Page - Sections
Section and Description
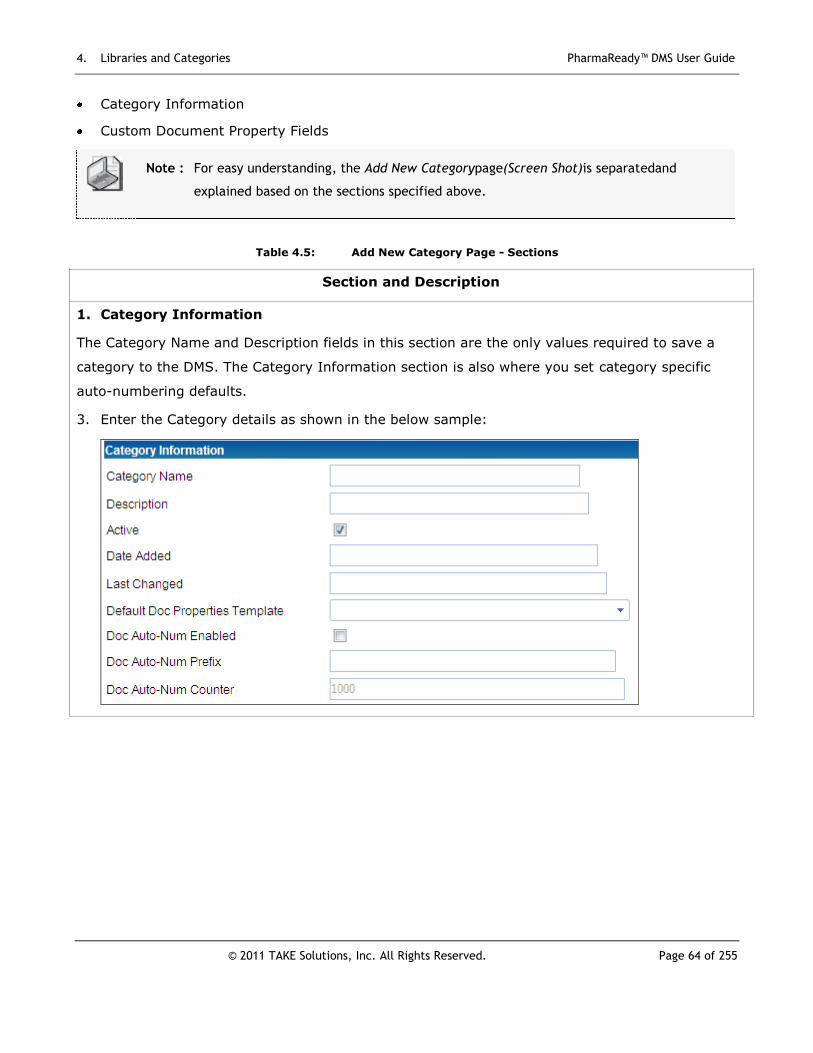
1. Category Information
The Category Name and Description fields in this section are the only values required to save a
category to the DMS. The Category Information section is also where you set category specific
auto-numbering defaults.
3. Enter the Category details as shown in the below sample:

4. Libraries and Categories PharmaReady™ DMS User Guide
© 2011 TAKE Solutions, Inc. All Rights Reserved. Page 65 of 255
2. Custom Document Property Fields
You have the option of creating custom fields unique to each category in PharmaReady.
Four types of fields are available as custom fields. A category can have multiple custom fields of a
single type, and any field can be set as required.
4. Enter additional values according to the desired setup for this category, as shown in the sample
below:
3. Save Changes
5. After entering Category details and additional values according to the desired set up for this
category, click the Submit button in the Add New Category page, to save the category to
PharmaReady.
Once when the details are submitted, you are returned to Admin Categories page, which displays
the added category, as shown in the sample below:
Figure 4.16: Admin Categories Page

PharmaReady™ DMS User Guide
© 2008 TAKE Solutions, Inc. All Rights Reserved. Page 66 of 255
CHAPTER 5
5. People and Supporting Data
About this Chapter
Before users can begin managing documents in the DMS, the
users’ accounts must be established. Set up of user accounts
requires that other supporting data, such as reader groups, be
established first. In this lesson, Administrators will learn the
procedures required to set up users as well as the
recommended order of user and supporting data setup.
This chapter includes the following sections:
Contents
Topic Page
Understand the big picture of people-supporting data 69
Understand document audiences 69
Create Reader group 70
Create Reviewer group 73
Create Approver group 77
Create a site (optional) 81
Create a department 83
Create a project (optional) 85
Describe standard access roles 89
Clone and create new functional access roles 90
Create and edit people 94
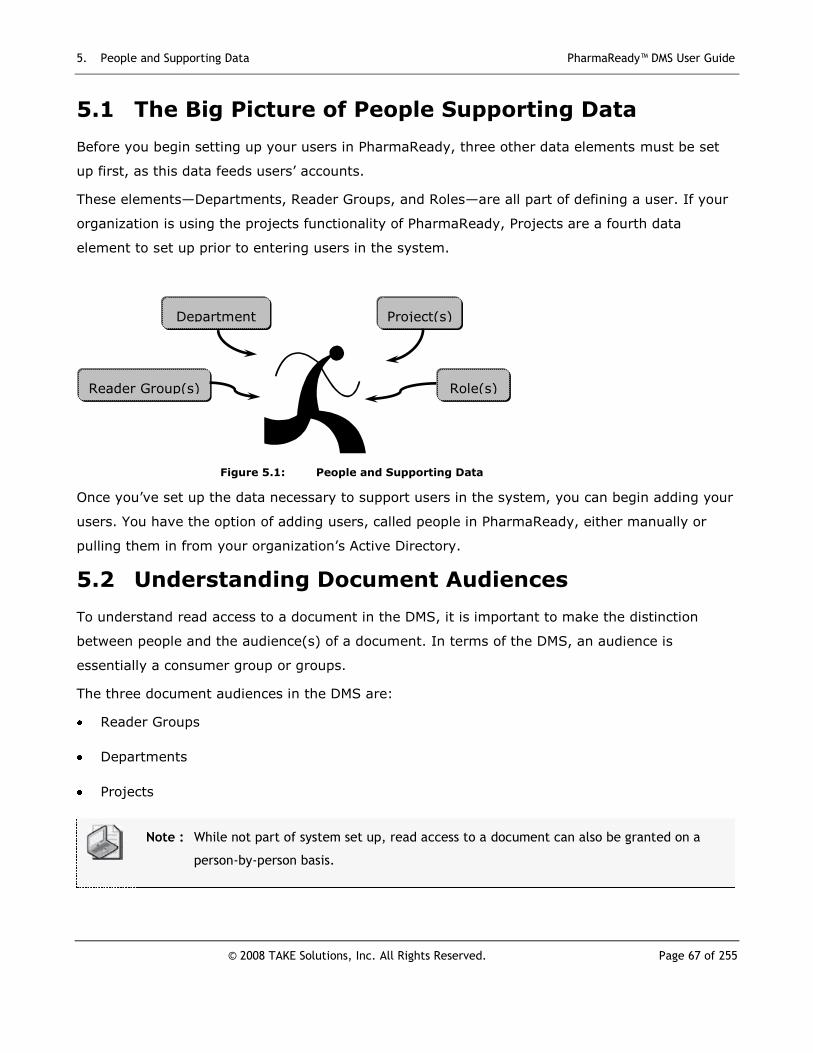
5. People and Supporting Data PharmaReady™ DMS User Guide
© 2008 TAKE Solutions, Inc. All Rights Reserved. Page 67 of 255
5.1 The Big Picture of People Supporting Data
Before you begin setting up your users in PharmaReady, three other data elements must be set
up first, as this data feeds users’ accounts.
These elements—Departments, Reader Groups, and Roles—are all part of defining a user. If your
organization is using the projects functionality of PharmaReady, Projects are a fourth data
element to set up prior to entering users in the system.
Figure 5.1: People and Supporting Data
Once you’ve set up the data necessary to support users in the system, you can begin adding your
users. You have the option of adding users, called people in PharmaReady, either manually or
pulling them in from your organization’s Active Directory.
5.2 Understanding Document Audiences
To understand read access to a document in the DMS, it is important to make the distinction
between people and the audience(s) of a document. In terms of the DMS, an audience is
essentially a consumer group or groups.
The three document audiences in the DMS are:
Reader Groups
Departments
Projects
Note : While not part of system set up, read access to a document can also be granted on a
person-by-person basis.
Reader Group(s)
Department
Project(s)
Role(s)
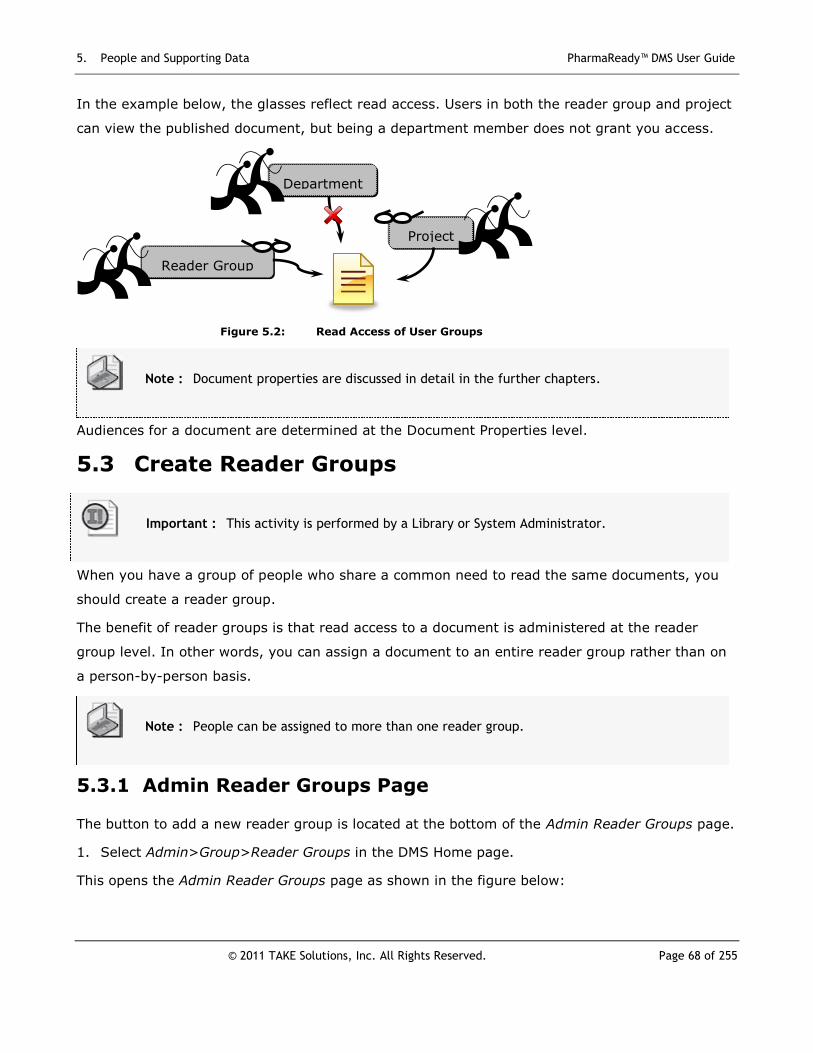
5. People and Supporting Data PharmaReady™ DMS User Guide
© 2011 TAKE Solutions, Inc. All Rights Reserved. Page 68 of 255
In the example below, the glasses reflect read access. Users in both the reader group and project
can view the published document, but being a department member does not grant you access.
Figure 5.2: Read Access of User Groups
Note : Document properties are discussed in detail in the further chapters.
Audiences for a document are determined at the Document Properties level.
5.3 Create Reader Groups
Important : This activity is performed by a Library or System Administrator.
When you have a group of people who share a common need to read the same documents, you
should create a reader group.
The benefit of reader groups is that read access to a document is administered at the reader
group level. In other words, you can assign a document to an entire reader group rather than on
a person-by-person basis.
Note : People can be assigned to more than one reader group.
5.3.1 Admin Reader Groups Page
The button to add a new reader group is located at the bottom of the Admin Reader Groups page.
1. Select Admin>Group>Reader Groups in the DMS Home page.
This opens the Admin Reader Groups page as shown in the figure below:
Reader Group
Project
Department

5. People and Supporting Data PharmaReady™ DMS User Guide
© 2011 TAKE Solutions, Inc. All Rights Reserved. Page 69 of 255
Figure 5.3: Admin Reader Groups Page
2. Click the Add a New Reader Group button, at the bottom of the page.
This opens the Add New Reader Group page as shown in the figure below:
5.3.2 Add New Reader Group Page
Creating a reader group is as simple as entering the name and a description. Once saved, the
new reader group can be assigned to any user in the system.
Figure 5.4: Add New Reader Groups Page
The Add New Reader Group page details are described in the table below:
Table 5.1: Add New Reader Groups Page – Sections

5. People and Supporting Data PharmaReady™ DMS User Guide
© 2011 TAKE Solutions, Inc. All Rights Reserved. Page 70 of 255
Section Instruction
Reader Group
Information
3. Enter the Reader Group and Name as shown in the sample below:
Note : If you already have users established in PharmaReady, you can
add them to the new group at this time.
Caution : Remember that no two Reader Groups can use the same
name.
Note : You can assign and edit reader group members from either the
reader group itself or on the user’s People page.
Because we are setting up your PharmaReady system, we won’t
be adding users at the reader group level. Users will be added to
reader groups later in this chapter.
Save Changes After entering Reader Group Details, click the Submit button in the Add New
Reader Groups page, to save the Reader Group to PharmaReady.

5. People and Supporting Data PharmaReady™ DMS User Guide
© 2011 TAKE Solutions, Inc. All Rights Reserved. Page 71 of 255
Once when the details are submitted, you are returned to Admin Reader Groups page, which
displays the added Reader Group, as shown in the sample below:
Figure 5.5: AdminReader Groups Page
5.3.3 Online Report – People by Reader Group
1. Click on the No. of Members assigned to the Reader Group (as specified in the above figure).
This displays the Report of People by Reader Group as shown in the sample below:
Figure 5.6: Online Report (People by Reader Group)
5.4 Create Reviewer Groups
When you have a group of people who share a common need to review the same documents, you
should create a reviewer group.
Note : People can be assigned to more than one reviewer group.

5. People and Supporting Data PharmaReady™ DMS User Guide
© 2011 TAKE Solutions, Inc. All Rights Reserved. Page 72 of 255
5.4.1 Admin Reviewer Groups Page
The button to add a new Reviewer group is located at the bottom of the Admin Reviewer Groups
page.
2. Select Admin>Group>Reviewer Groups in the DMS Home page.
This opens the Admin Reviewer Groups page as shown in the figure below:
Figure 5.7: Admin Reviewer Groups Page
3. Click the Add a New Reviewer Group button, at the bottom of the page.
This opens the Add New Reviewer Group page as shown in the figure below:
5.4.2 Add New Reviewer Group Page
Creating a reviewer group is as simple as entering the name and a description. Once saved, the
new reviewer group can be assigned to any user in the system.
Figure 5.8: Add New Reviewer Groups Page
The Add New Reviewer Group page details are described in the table below:

5. People and Supporting Data PharmaReady™ DMS User Guide
© 2011 TAKE Solutions, Inc. All Rights Reserved. Page 73 of 255
Table 5.2: Add New Reviewer Groups Page – Sections
Section Instruction
Reviewer
Group
Information
4. Enter the Reviewer Group and Name as shown in the sample below:
Note : If you already have users established in PharmaReady, you can
add them to the new group at this time.
Caution : Remember that no two Reviewer Groups can use the same
name.
Note : You can assign and edit reviewer group members from either the
review group itself or on the user’s People page.
Because we are setting up your PharmaReady system, we won’t
be adding users at the reviewer group level. Users will be added
to reviewer groups later in this chapter.
Save
Changes
After entering Reviewer Group Details, click the Submit button in the Add New
Reviewer Groups page, to save the Reviewer Group to PharmaReady.

5. People and Supporting Data PharmaReady™ DMS User Guide
© 2011 TAKE Solutions, Inc. All Rights Reserved. Page 74 of 255
Once when the details are submitted, you are returned to Admin Reviewer Groupspage, which
displays the added Reviewer Group, as shown in the sample below:
Figure 5.9: Admin Reviewer Groups Page
5.4.3 Online Report – People by Reviewer Group
1. Click on the No. of Members assigned to the Reviewer Group (as specified in the above
figure).
This displays the Report of People by Reviewer Group as shown in the sample below:
Figure 5.10: Online Report (People by Reviewer Group)
5.5 Create Approver Groups
When you have a group of people who share a common need to review the same documents, you
should create a approver group.

5. People and Supporting Data PharmaReady™ DMS User Guide
© 2011 TAKE Solutions, Inc. All Rights Reserved. Page 75 of 255
Note : People can be assigned to more than one approver group.
5.5.1 Admin Approver Groups Page
The button to add a new Approver group is located at the bottom of the Admin Approver Groups
page.
1. Select Admin>Group>Approver Groups in the DMS Home page.
This opens the Admin Approver Groups page as shown in the figure below:
Figure 5.11: Admin Approver Groups Page
2. Click the Add a New Approver Group button, at the bottom of the page.
This opens the Add New Approver Group page as shown in the figure below:
5.5.2 Add New Approver Group Page
Creating a approver group is as simple as entering the name and a description. Once saved, the
new approver group can be assigned to any user in the system.

5. People and Supporting Data PharmaReady™ DMS User Guide
© 2011 TAKE Solutions, Inc. All Rights Reserved. Page 76 of 255
Figure 5.12: Add New Approver Groups Page

5. People and Supporting Data PharmaReady™ DMS User Guide
© 2011 TAKE Solutions, Inc. All Rights Reserved. Page 77 of 255
The Add New Approver Group page details are described in the table below:
Table 5.3: Add New Approver Groups Page – Sections
Section Instruction
Approver
Group
Information
5. Enter the Approver Group and Name as shown in the sample below:
Note : If you already have users established in PharmaReady, you can
add them to the new group at this time.
Caution : Remember that no two Reviewer Groups can use the same
name.
Note : You can assign and edit approver group members from either the
review group itself or on the user’s People page.
Because we are setting up your PharmaReady system, we won’t
be adding users at the approver group level. Users will be added
to approver groups later in this chapter.
Save After entering Approver Group Details, click the Submit button in the Add New

5. People and Supporting Data PharmaReady™ DMS User Guide
© 2011 TAKE Solutions, Inc. All Rights Reserved. Page 78 of 255
Changes Approver Groups page, to save the Reviewer Group to PharmaReady.
Once when the details are submitted, you are returned to Admin Approver Groups page, which
displays the added Approver Group, as shown in the sample below:
Figure 5.13: AdminApprover Groups Page
5.5.3 Online Report – People by Approver Group
1. Click on the No. of Members assigned to the Approver Group (as specified in the above
figure).
This displays the Report of People by Approver Group as shown in the sample below:
Figure 5.14: Online Report (People by Approver Group)
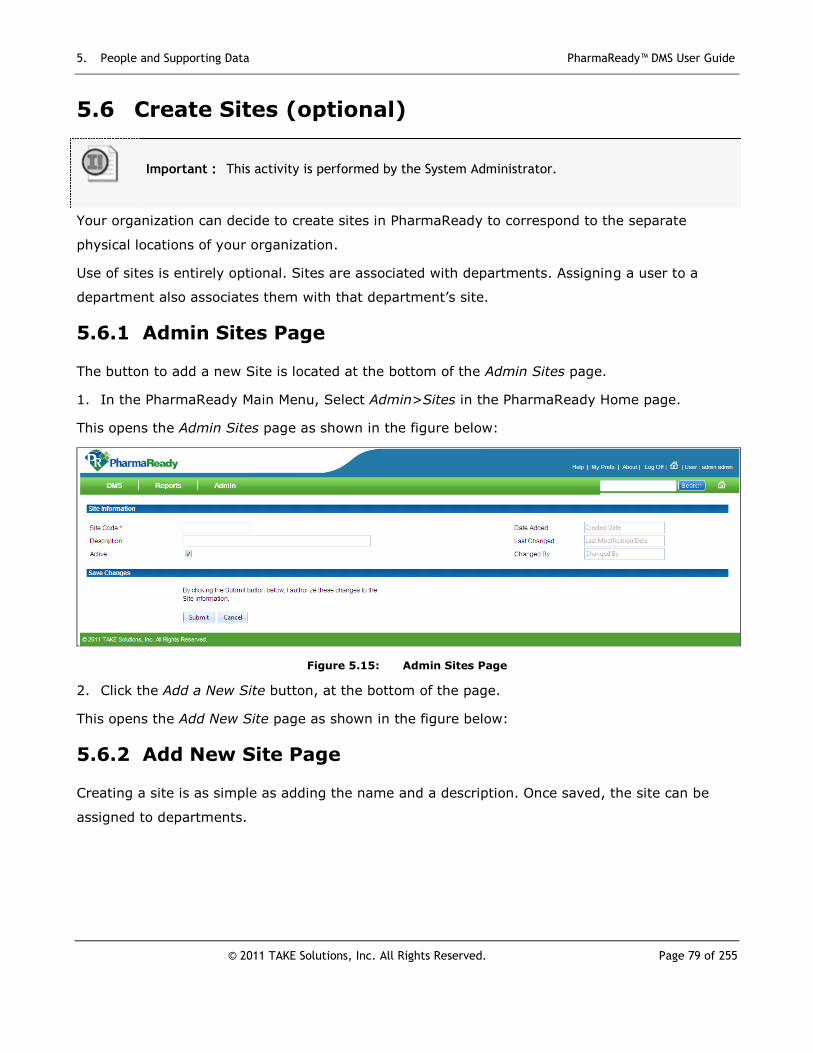
5. People and Supporting Data PharmaReady™ DMS User Guide
© 2011 TAKE Solutions, Inc. All Rights Reserved. Page 79 of 255
5.6 Create Sites (optional)
Important : This activity is performed by the System Administrator.
Your organization can decide to create sites in PharmaReady to correspond to the separate
physical locations of your organization.
Use of sites is entirely optional. Sites are associated with departments. Assigning a user to a
department also associates them with that department’s site.
5.6.1 Admin Sites Page
The button to add a new Site is located at the bottom of the Admin Sites page.
1. In the PharmaReady Main Menu, Select Admin>Sites in the PharmaReady Home page.
This opens the Admin Sites page as shown in the figure below:
Figure 5.15: Admin Sites Page
2. Click the Add a New Site button, at the bottom of the page.
This opens the Add New Site page as shown in the figure below:
5.6.2 Add New Site Page
Creating a site is as simple as adding the name and a description. Once saved, the site can be
assigned to departments.

5. People and Supporting Data PharmaReady™ DMS User Guide
© 2011 TAKE Solutions, Inc. All Rights Reserved. Page 80 of 255
Figure 5.16: Add New Site Page
The Add New Site page details are described in the table below:
Table 5.4: Add New Site Page – Sections
Section Instruction
Site Information Enter the Site Code and Description as shown in the sample below:
Save Changes After entering Site Details, click the Submit button in the Add New Site
page, to save the Site to PharmaReady.
Once when the details are submitted, you are returned to Admin Sites page, which displays the
added Site, as shown in the sample below:
Figure 5.17: Admin Sites Page

5. People and Supporting Data PharmaReady™ DMS User Guide
© 2011 TAKE Solutions, Inc. All Rights Reserved. Page 81 of 255
5.7 Create Department
Important : This activity is performed by the System Administrator.
While optional from a system perspective, most companies set up departments in PharmaReady
that mirror the divisions of their organization. After the initial setup, departments are assigned on
a user’s account.
Two methods exist to create departments in PharmaReady:
Manually
Automatically through importing people from Active Directory (if your Active Directory
incorporates the Department field)
One of the main advantages of using departments was discussed earlier: departments define a
document audience, meaning you can assign department-level read access to a document.
When creating departments from your Active Directory, you do not use the Department pages of
the Admin menu. Instead, departments are created automatically when importing your users.
5.7.1 Admin Departments Page
The button to add a new department is located at the bottom of the Admin Departments page.
1. In the PharmaReady Main menu, select Admin>Departments in the PharmaReady Home page.
This opens the Admin Departments page as shown in the figure below:
Figure 5.18: Admin Departments Page
2. Click the Add a New Department button, at the bottom of the page.
This opens the Add New Department page as shown in the figure below:

5. People and Supporting Data PharmaReady™ DMS User Guide
© 2011 TAKE Solutions, Inc. All Rights Reserved. Page 82 of 255
5.7.2 Add New Department Page
Note : During initial system set up, it is likely that department managers won’t be users in the
system at the time you create their departments.
Creating a department manually is as simple as adding the department code and a description.
Once saved, the department can be assigned to any user in the system.
Figure 5.19: Add New Department Page
The Add New Department page details are described in the table below:
Table 5.5: Add New Department Page – Sections
Section Instruction
Department
Information
3. Enter the Department Code and Description as shown in the
sample below:
Note : If your organization uses sites, you may assign a site at
this time.
Save Changes 4. After entering Department Details, click the Submit button in the

5. People and Supporting Data PharmaReady™ DMS User Guide
© 2011 TAKE Solutions, Inc. All Rights Reserved. Page 83 of 255
Add New Department page, to save the Department to
PharmaReady.
Once when the details are submitted, you are returned to Admin Departments page, which
displays the added Department, as shown in the sample below:
Figure 5.20: Admin Departments Page
5.8 Create Project (optional)
Important : This activity is performed by the System Administrator.
While optional, you can set up projects in PharmaReady that mirror the projects taking place at
your organization. After their initial set up, the projects a user is working on are assigned on the
user’s account.
One of the main advantages of using projects was discussed earlier: projects define a document
audience, meaning you can assign project-level read access to a document. Documents are
assigned to projects at the document level.
5.8.1 Admin Projects Page
The button to add a new Project is located at the bottom of the Admin Projects page.
1. In the PharmaReady Main menu, select Admin>Projects in the PharmaReady Home page.
This opens the Admin Projects page as shown in the figure below:

5. People and Supporting Data PharmaReady™ DMS User Guide
© 2011 TAKE Solutions, Inc. All Rights Reserved. Page 84 of 255
Figure 5.21: Admin Projects Page
2. Click the Add New Project button, at the bottom of the page.
This opens the Add New Project page as shown in the figure below:
5.8.2 Add New Project Page
Note : The department reflects the primary department responsible for the project’s
management and does not assign the department’s users to the project
Project setup can include assigning a project number, a department, and people.
You can also choose to include start and stop dates to the project; these dates are informational
only and do not affect your ability to assign documents to a project. A project will remain active in
PharmaReady as long as the Active checkbox is marked.
A document can be assigned to multiple projects. Assignment occurs at the document level.

5. People and Supporting Data PharmaReady™ DMS User Guide
© 2011 TAKE Solutions, Inc. All Rights Reserved. Page 85 of 255
Figure 5.22: Add New Project Page
The Add New Project page details are described in the table below:
Table 5.6: Add New Project Page – Sections
Section Instruction
Project
Information
1. Enter the Project Name, Description, and Project Number.
2. Select the Department from the drop-down menu to which this project is
assigned to.
3. Select the Start Date and Stop Date of the Project.
These details are entered as shown in the sample below:
Assigned
People
Any user can be assigned to the project here; you also have the option of
assigning a user to a project via the People page.

5. People and Supporting Data PharmaReady™ DMS User Guide
© 2011 TAKE Solutions, Inc. All Rights Reserved. Page 86 of 255
Only those users who appear in the Assigned List box are available in the Project
Manager and Project Executive drop-down lists.
4. To add a new person to the project, click the magnifying glass ( ) and
select the user.
5. Then click the Add Person button. This displays the selected user in the
Assigned People Box as shown in the sample below:
Save
Changes
6. After entering Project Details, click the Submit button in the Add New Project
page, to save the Project toPharmaReady.
Once when the details are submitted, you are returned to the Admin Projects page, which
displays the added Project, as shown in the sample below:
Figure 5.23: Admin Projects Page

5. People and Supporting Data PharmaReady™ DMS User Guide
© 2011 TAKE Solutions, Inc. All Rights Reserved. Page 87 of 255
5.9 Understand Standard Access Roles
Note : The information presented here is from a set up and administration perspective.
Apart from the System Administrator role, ten standard access roles are delivered with the
PharmaReady DMS. These roles cannot be modified or deleted.
People Administrator is the one General role; it allows you to maintain people, departments, and
sites.
The remaining nine delivered roles determine functional access to documents and facilitate
document workflow. These are specified in the table below:
Table 5.7: Roles and Access Rights
Role Access Rights
Reader View documents.
Document Creator Create documents one-by-one; establish initial document properties.
Document Owner Edit document properties; update activity mode for any document for
which they are an assigned owner.
Author View documents and document properties; check out, edit, and check in
documents
NOTE: For unpublished documents, the Author role sees only documents
to which they are assigned.
Reviewer View documents and document properties, review documents.
Approver View documents and document properties, approve documents.
Publisher View documents and document properties, publish documents.
Distributor View documents and document properties, distribute documents.
Library Admin View documents, numbers, templates, and document properties; edit
document properties; upload documents; change document activity
mode; view audit log; maintain libraries, categories, reader groups,
numbers, and templates; upload and export documents in batch.

5. People and Supporting Data PharmaReady™ DMS User Guide
© 2011 TAKE Solutions, Inc. All Rights Reserved. Page 88 of 255
5.10 Cloning to Create New Functional Access Roles
Important : This activity is performed by the System Administrator.
While the general and document management roles delivered with the DMS meet the needs of
most organizations, you may find you want to create a few additional roles.
Note : To create a new role, you can either select all values manually or you can clone an
existing role. Cloning is highly recommended, as it requires only additions to an existing
role to meet your needs.
Examples of new roles you might create include:
Document Creator with Author Rights (An author who has the right to edit document
properties).
Document rights to a specified library (applicable for Owners, Creators, Authors,
Approvers, Distributors, & Publishers).
Help Desk/User Support (Department-specific general admin rights).
5.10.1 An important note about creating roles from scratch
Important : It is important to understand that the delivered roles in PharmaReady each have the
minimum rights necessary to perform associated tasks. In addition, the functional
access of each role is determined not just by marking checkboxes, but also by code
behind the scenes in PharmaReady.
For these reasons it is best not to create roles from scratch, as you may not be
granting users in these roles all the rights they need.

5. People and Supporting Data PharmaReady™ DMS User Guide
© 2011 TAKE Solutions, Inc. All Rights Reserved. Page 89 of 255
5.10.2 Admin Roles Page
1. In the PharmaReady DMS menu, select Admin > Roles.
This opens the Admin Roles page which contains a minimum of two tabs that logically group the
roles by purpose.
Note : You can filter by library. Keep in mind that the delivered roles will always have access
to documents in all libraries.
Figure 5.24: Admin Roles Page (DMS Tab)
Note : PharmaReady main Admin menu contains roles that are administrative in nature while
the PharmaReady DMS Admin menu contains those related to library and document
management. Each role contains the minimum library, document, and/or administrative
rights unique to the standard role.
2. Click on the name of the role you want to clone (copy) {e.g. Author}, which opens the
Maintain Role page displaying the Document Rights of this role, as shown in the below figure:
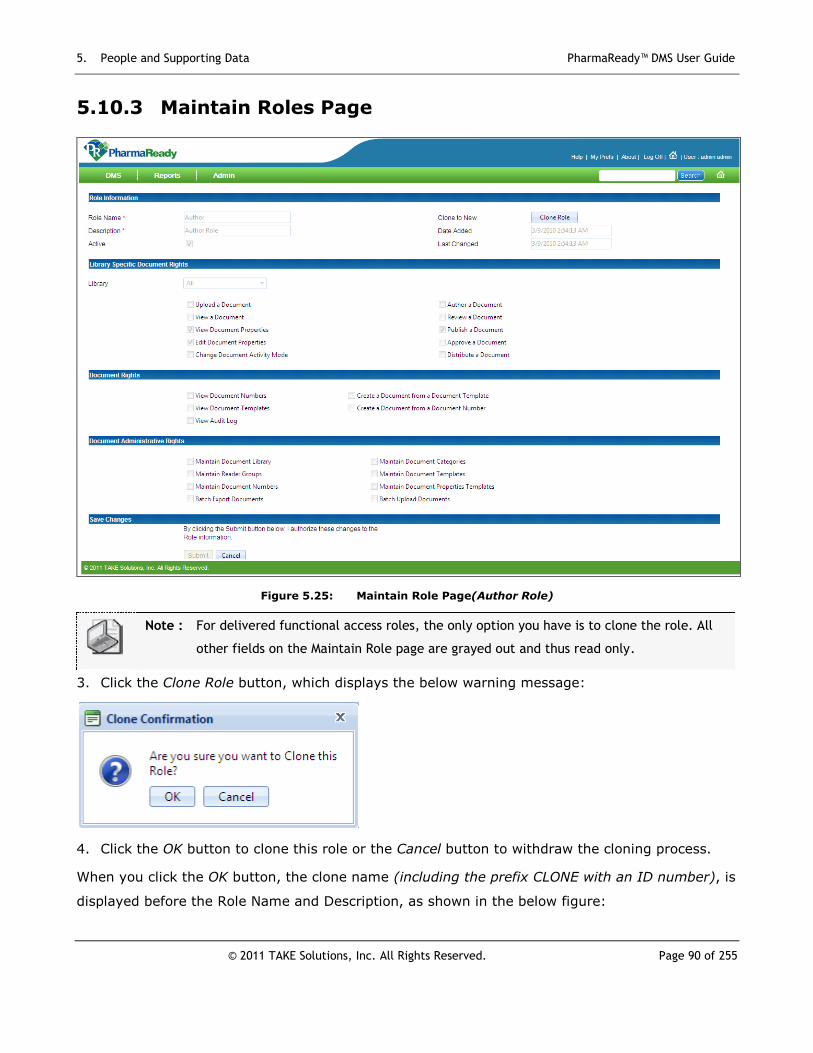
5. People and Supporting Data PharmaReady™ DMS User Guide
© 2011 TAKE Solutions, Inc. All Rights Reserved. Page 90 of 255
5.10.3 Maintain Roles Page
Figure 5.25: Maintain Role Page(Author Role)
Note : For delivered functional access roles, the only option you have is to clone the role. All
other fields on the Maintain Role page are grayed out and thus read only.
3. Click the Clone Role button, which displays the below warning message:
4. Click the OK button to clone this role or the Cancel button to withdraw the cloning process.
When you click the OK button, the clone name (including the prefix CLONE with an ID number), is
displayed before the Role Name and Description, as shown in the below figure:

5. People and Supporting Data PharmaReady™ DMS User Guide
© 2011 TAKE Solutions, Inc. All Rights Reserved. Page 91 of 255
Figure 5.26: Maintain Role Page(Edit Clone Name)
Caution : After cloning the role, you need to modify the required fields from the original role
before submitting the new role to PharmaReady.
5. Edit the Role Name and Description to ensure the purpose of the role is clear, as shown in the
below example:
6. Modify the Document Rights, as shown in the below example:

5. People and Supporting Data PharmaReady™ DMS User Guide
© 2011 TAKE Solutions, Inc. All Rights Reserved. Page 92 of 255
7. Click the Submit button, which creates the new Role(e.g. eCTD Sequence Administrator with
Approve Rights) and gets displayed in the eCTD Role list, as shown in the below figure:
Figure 5.27: Admin Roles Page (Cloned Role displayed)
5.11 Creating and Editing People
Important : This activity is performed by the System Administrator.
As stated earlier, users cannot share PharmaReady accounts. Instead, each user has a unique
Logon ID that includes personal information and defines their roles(s) in the building and lifecycle
of applications and sequences.
You can create users in PharmaReady manually, or you can import them from your organization’s
Active Directory (AD) if you have established the necessary system integration.

5. People and Supporting Data PharmaReady™ DMS User Guide
© 2011 TAKE Solutions, Inc. All Rights Reserved. Page 93 of 255
5.11.1 Admin People Page
1. Select Admin > People in the PharmaReady Home page.
This opens the Admin People page as shown in the figure below:
Figure 5.28: AdminPeople Page
Note : By default, the Admin People page displays the user list in a tabular format, based on
the last view during your PharmaReady session.
For example, if you click the letter “G” to view all active users whose last name starts
with that letter that view will remain when you return to the page.
Column headings displayed Admin People page, are explained below:
Table 5.8: Admin People Page (Column Headings & Description)
# Column
Heading Description
1 Active This checkbox indicates the presence of the User in the system (whether it
is currently active or not).
2 Name People Names are listed.
Click on the Name to view the details of the User.
3 Logon ID Logon ID specified for the user is displayed.
4 Department Department Name to which the user is associated is displayed.
5 Last Changed Date and Time the User details was last modified is displayed.

5. People and Supporting Data PharmaReady™ DMS User Guide
© 2011 TAKE Solutions, Inc. All Rights Reserved. Page 94 of 255
6 Last Logon The Last Date and Time the User has logged into the System is displayed.
Note : “Currently Active” is displayed if the Person (User) is currently
logged into the system.
7 Active Only Redisplays page with Active users(only if checked).
Tip : Click any of the column headings to sort the table by that column’s data.
Note : Before adding a user (person), you need to verify that the person does not already have
an account.
5.11.2 Add New People Page
2. Click the Add a New Person button located at the bottom of the Admin People page.
This displays the Add New People page as shown in the below figure.

5. People and Supporting Data PharmaReady™ DMS User Guide
© 2011 TAKE Solutions, Inc. All Rights Reserved. Page 95 of 255
Figure 5.29: Add New People Page
This page is where you assign a user to a department, define their role(s) in the system, and set
them as members of one or more document audiences.

5. People and Supporting Data PharmaReady™ DMS User Guide
© 2011 TAKE Solutions, Inc. All Rights Reserved. Page 96 of 255
The fields present in the Add New Peoplepage are explained in the below table:
Table 5.9: Add New People Page - Fields & Description
# Fields Description / Instruction
1 People
Information
Logon ID Enter the User ID.
First Name Enter the First Name of the User.
Last Name Enter the Last Name of the User.
Unit Enter the Unit Name (e.g. Data Management, Reg. Affairs,
etc.)
Active Active box is selected by default.
Uncheck this box, to make the User inactive.
Last Logon The Last Date and Time the User has logged into the System is
displayed when you open the Maintain People page.
Email Enter the Email ID of the User.
Phone 1 Enter the primary phone number.
Phone 2 Enter the secondary phone number.
AD
Authenticate
Check the AD Authenticate box, if your Organization is
using Active Directory (AD); otherwise, enter the User
Password Section.
AD Domain Enter the AD Domain, if you are using Active Directory.
In-place
Editing
If this person is an author and needs the ability to edit
documents checked out documents online, mark the In-
place Editing checkbox.
Keep in mind that additional setup is required on the client
workstation to fully support this functionality
Department Departments configured under Admin > Departments are
displayed in the list.
Click the drop-down menu and select the Department Name
to which the User belongs to.

5. People and Supporting Data PharmaReady™ DMS User Guide
© 2011 TAKE Solutions, Inc. All Rights Reserved. Page 97 of 255
Supervisor All the Users of the System are displayed.
Click the search lens icon which opens a page
displaying all the People in the System.
Select the appropriate Supervisor.
Default Printer Printers configured under Admin > System Printers are
displayed in the list.
Click the drop-down menu and select a Default Printer for
the User to print documents and reports.
2 Roles Each User must be assigned a Role.
Click the Add a New Role button, which displays a table as shown below:
Type
Click the drop-down menu, which displays all the pre-defined Role Types as
shown below:
Select the appropriate Role Type of the User.
Library
You cannot edit this field.
Department
You cannot edit this field.

5. People and Supporting Data PharmaReady™ DMS User Guide
© 2011 TAKE Solutions, Inc. All Rights Reserved. Page 98 of 255
Role Name
Click the drop-down menu, which displays the roles associated with the
selected Role Type (for e.g. if you select DMS under Role Type, then all the
DMS Roles are listed under Role Name):
Note : To add multiple roles, click the Add a New Role button and select
the Type and Role Name as explained above.
To delete an added role, click the Delete button, against the role.
Reader Groups Newly created Reader Groups and Imported Active Directory
Groups are displayed in the Reader Groups list.
Note: Imported Active Directory Groups is explained
under the Topic - Import People from Active
Directory.
Creation of Reader Groups and the steps to
assign a Reader Group for a person are already
explained.
Select the appropriate Reader Group displayed under
Available list.
o To assign the Reader Group from the Available list,
click the “<” directional arrow icon, to move it to the
Assigned list.
o To remove the assigned Reader Group, select the
Reader Group in the Assigned list and use the “>”
directional arrow icon to move it to the Available list.
Projects Select the appropriate Project displayed under Available
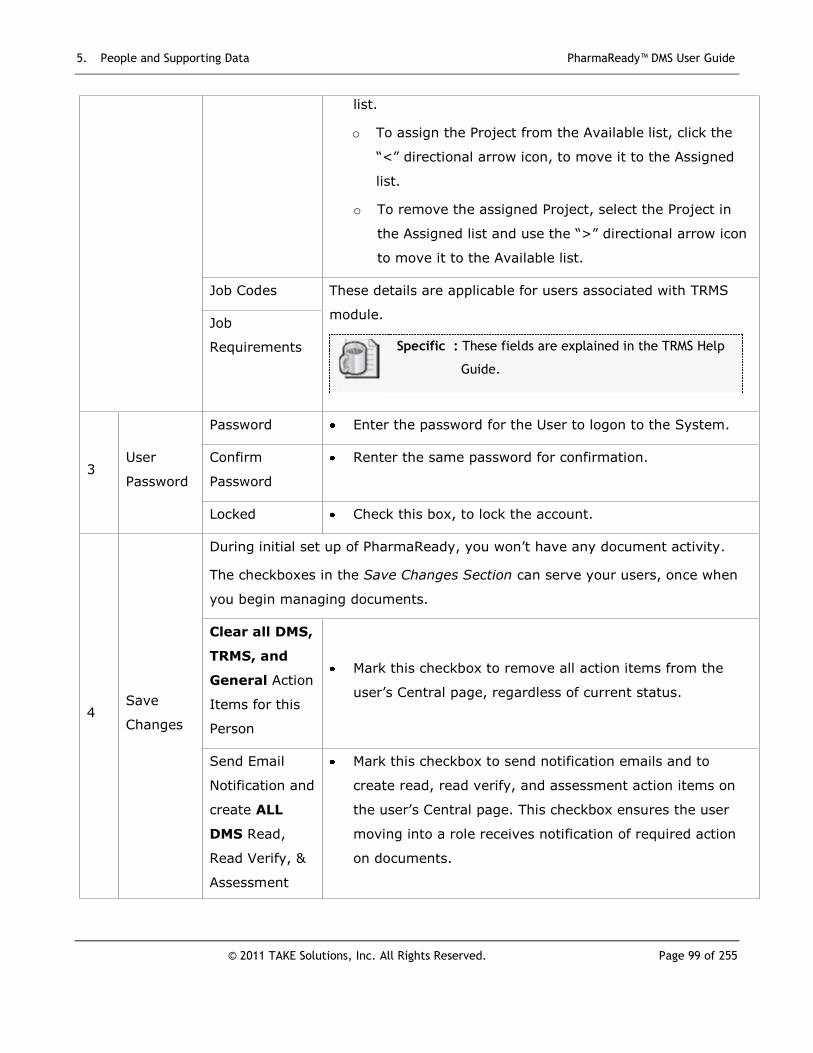
5. People and Supporting Data PharmaReady™ DMS User Guide
© 2011 TAKE Solutions, Inc. All Rights Reserved. Page 99 of 255
list.
o To assign the Project from the Available list, click the
“<” directional arrow icon, to move it to the Assigned
list.
o To remove the assigned Project, select the Project in
the Assigned list and use the “>” directional arrow icon
to move it to the Available list.
Job Codes These details are applicable for users associated with TRMS
module.
Specific : These fields are explained in the TRMS Help
Guide.
Job
Requirements
3 User
Password
Password Enter the password for the User to logon to the System.
Confirm
Password
Renter the same password for confirmation.
Locked Check this box, to lock the account.
4 Save
Changes
During initial set up of PharmaReady, you won’t have any document activity.
The checkboxes in the Save Changes Section can serve your users, once when
you begin managing documents.
Clear all DMS,
TRMS, and
General Action
Items for this
Person
Mark this checkbox to remove all action items from the
user’s Central page, regardless of current status.
Send Email
Notification and
create ALL
DMS Read,
Read Verify, &
Assessment
Mark this checkbox to send notification emails and to
create read, read verify, and assessment action items on
the user’s Central page. This checkbox ensures the user
moving into a role receives notification of required action
on documents.

5. People and Supporting Data PharmaReady™ DMS User Guide
© 2011 TAKE Solutions, Inc. All Rights Reserved. Page 100 of 255
Action Items
for this Person.
Send Email
Notification and
create ALL
TRMS Action
Items
This checkbox field is applicable for users associated with
TRMS Module.
Specific : This field is explained in the TRMS Help
Guide.
Submit Click the Submit button to save the specified information
or the Cancel button to end the function, which will not
save the changes you have entered.
When you click the Submit button, the added person gets displayed in the Admin People page as
shown in the figure below:
Figure 5.30: Admin People Page (New User added)
5.11.3 Import People from Active Directory
As stated earlier, you can create users in PharmaReady manually, or you can import them from
your organization’s Active Directory (AD) if you have established the necessary system
integration.
The steps to import people from active directory are explained below:

5. People and Supporting Data PharmaReady™ DMS User Guide
© 2011 TAKE Solutions, Inc. All Rights Reserved. Page 101 of 255
1. In the PharmaReady menu, select Admin > People which opens the Admin People page.
2. Click the Import People from Active Directory button.
This displays the Import People from Active Directory page as shown in the below figure:
Figure 5.31: Import People from Active Directory Page

5. People and Supporting Data PharmaReady™ DMS User Guide
© 2011 TAKE Solutions, Inc. All Rights Reserved. Page 102 of 255
The fields present in the Import People from Active Directorypage are explained in the below
table:
Table 5.10: Import People Page - Fields & Description
Fields Description / Instruction
1. Import People from Active Directory
a. Active Directory
Domain
The Default Domain, User Name and Password configured in
Admin > System Settings are displayed here.
b. Active Directory Logon
ID
c. Active Directory
Password
d. Groups – AD Filter This field is used to filter the Active Directory based on Groups.
e. People – AD Filter This field is used to filter the Active Directory based on People.
f. Get Available AD
Groups / People
Click the Get Available AD Groups / People button.
PharmaReady searches the Active Directory Groups and People
based on the System Integration established by your
Organization and display the Active Directory Groups and People
in the respective list box.
2. Groups and People to Import
You can import People from Active Directory in 3 different ways:
i. Import Active Directory Groups
ii. Import Active Directory People
iii. Import People from Selected Groups
i. Import Active Directory Groups
This imports the selected Active Directory Groups alone into the PharmaReady System as
Reader Groups.
g. Active Directory Groups All the Active Directory Groups are displayed in the Available list.
Select the required Active Directory Group and click the

5. People and Supporting Data PharmaReady™ DMS User Guide
© 2011 TAKE Solutions, Inc. All Rights Reserved. Page 103 of 255
“<”button to move the group into the Selected list.
To remove a group, select the group in the Selected list and
then click the“>” button to move the group to the Available
list.
ii. Import Active Directory People
This imports the selected Active Directory People alone into the PharmaReady System.
h. Active Directory People All the Active Directory People are displayed in the Available list.
Select the required Active Directory Person(s) and click the
“<” button to move the Person(s) into the Selected list.
To remove a Person, select the Person(s) in the Selected list
and then click the “>” button which moves the Person(s) to
the Available list.
iii. Import People from Selected Groups
This imports the People(s) from the selected Group(s) into the PharmaReady System.
i. Select People from
Selected Groups
To import people from a selected Group(s), select an Active
Directory Group(s) in the Selected List.
Click the Select People from Selected Groups button, which
automatically displays all the Active Directory People
associated with the Selected Group under Selected list.
3. Save Changes
j. Create a New
Department
Check this box if you want create a New Department, if one
is associated with a Selected Person and the Department
does not exists in PharmaReady.
k. Set all Newly Imported
Users
Check this box, if you want to set all Newly Imported users to
Authenticate against Active Directory.
l. Submit Click the Submit button, to import the Groups / People
displayed under the selected list.

5. People and Supporting Data PharmaReady™ DMS User Guide
© 2011 TAKE Solutions, Inc. All Rights Reserved. Page 104 of 255
5.11.4 Edit Person Details
1. In the PharmaReady menu, select Admin > People, which opens the Admin People page.
2. Click on a specific Person, which you need to edit.
This opens the Maintain People page, as shown in the figure below:
Figure 5.32: Maintain People Page (Edit People Information)

5. People and Supporting Data PharmaReady™ DMS User Guide
© 2011 TAKE Solutions, Inc. All Rights Reserved. Page 105 of 255
After submitting a new user to PharmaReady, additional buttons appear on the Maintain People
page.
Note : The Maintain People page allows access to reports like Access Rights Report, Activity
Report and Training Report.
Access Rights Rpt: Displays the personal information as well as the functional access
rights and document audiences of the current user.
Activity Report: Displays all document, system, and/or user activity for the current user.
Specific : Training Report is applicable for TRMS Module and is explained in TRMS Help Guide.
3. Edit the People Information fields and the Role Details as required.
4. Click the Submit button which saves the modified details and reverts to the Admin People
page.
5.11.5 Clone a Person
To create a new person, you have to select all the values manually. Cloning is recommended, as
it requires only small additions to an existing role to meet your needs.
The steps to perform a cloning process are explained below:
1. In the PharmaReady menu, select Admin > People, which opens the Admin People page.
2. Click on the name of the Person you want to clone which opens the Maintain People page.
3. Click the Clone Person button, which displays the below warning message:
4. Click the OK button to clone this Person or the Cancel button to withdraw the cloning process.
5. When you click the OK button, the clone name (including the prefix CLONE with an ID
number), is displayed before the LogonID, as shown in the below figure:

5. People and Supporting Data PharmaReady™ DMS User Guide
© 2011 TAKE Solutions, Inc. All Rights Reserved. Page 106 of 255
Figure 5.33: Maintain People Page(Edit Cloned Person)

5. People and Supporting Data PharmaReady™ DMS User Guide
© 2011 TAKE Solutions, Inc. All Rights Reserved. Page 107 of 255
Caution : After cloning the Person, you need to modify the required fields from the original Person
before submitting the new Person.
6. Edit the Logon ID, the other fields of the People Information and also the Role Details as
required.
7. Click the Submit button, which creates the new Person and gets displayed in the People list,
as shown in the below figure:
Figure 5.34: Admin People Page (Cloned Person displayed)

PharmaReady™ DMS User Guide
© 2008 TAKE Solutions, Inc. All Rights Reserved. Page 108 of 255
CHAPTER 6
6. System Maintenance and
Monitoring
About this Chapter
As an administrator in PharmaReady, understanding global and
module-specific settings and how those settings affect the rest
of the system is important. You may also need to monitor user,
system, and document activity. In this lesson, administrators
gain the knowledge required to maintain system settings and
monitor system activity.
This chapter includes the following sections:
Contents
Topic Page
Explain global and DMS-specific system settings 111
Set up system printers (optional) 120
Explain reminders (optional) 122
Monitor system activity with the Audit Log Viewer 126
6. System Maintenance & Monitoring PharmaReady™ DMS User Guide
© 2008 TAKE Solutions, Inc. All Rights Reserved. Page 109 of 255
6.1 System Settings
Important : This activity is performed by a Library or System Administrator.
It is important to understand how the global and DMS values on the System Settings page affect
PharmaReady, although it is unlikely you will modify most of these values after implementation.
6.1.1 Understand System Settings Page (General)
1. Select Admin > System Settings from the PharmaReady menu.
This opens the System Settings page as shown in the figure below:

6. System Maintenance & Monitoring PharmaReady™ DMS User Guide
© 2011 TAKE Solutions, Inc. All Rights Reserved. Page 110 of 255
Figure 6.1: System Settings Page(General Settings)

6. System Maintenance & Monitoring PharmaReady™ DMS User Guide
© 2011 TAKE Solutions, Inc. All Rights Reserved. Page 111 of 255
Column headings displayed in the System Settings page are explained below:
Table 6.1: System Settings – General (Fields & Description)
Fields Description / Instruction
1. Text Fields The first three fields on the General tab allow your organization to
create custom messages that appear on the Logon and Central pages of
PharmaReady.
a. Central
Welcome Text
You can create a custom message as Welcome Text, which will be
displayed in the PharmaReady home page
An example is provided below:
b. Central Help
Text
You can create a custom message as Central Help Text, which will
be displayed in the PharmaReady home page under Where to go for
Help Text
An example is provided below:
c. Logon Text You can create a custom message as Logon Text, which will be
displayed in the PharmaReady home page
An example is provided below:

6. System Maintenance & Monitoring PharmaReady™ DMS User Guide
© 2011 TAKE Solutions, Inc. All Rights Reserved. Page 112 of 255
2. Global Settings The fields in the Global Settings section determine functioning for many
areas of PharmaReady.
Note : If your organization is using Active Directory,
authentication is not handled by PharmaReady. The
Password and Number of Attempts fields are not
applicable.
The Default Printer and Action Item Validation Interval
Fields are not used during an e-CTD only implementation.
a. Password
Change
Select the number of days from the drop-down list, to set the
frequency of password changes.
b. Theme Select the required Theme from the drop-down list, for the
appearance of the application.
c. Email Alias
These 3 fields set the email account that sends and receives emails
from PharmaReady.
Specify the Email Alias, Notification and Blind CC Email.
d. Notification
e. Blind CC Email
f. Number of
Attempts
This field allows you to specify the number of times a person can be
allowed to try and log into the system with an incorrect password before
the user account is locked.
Select the number of attempts from the drop-down list(0, 3, 4, 5,
or6), to set the number of incorrect logon attempts before system
lockout.
Note : If you select 0, then you are allowed to make unlimited
attempts.

6. System Maintenance & Monitoring PharmaReady™ DMS User Guide
© 2011 TAKE Solutions, Inc. All Rights Reserved. Page 113 of 255
g. Invalid Logon
Notify
Enter the Invalid Logon Notify email address, to alert this person
when a PharmaReady user account is locked in the system.
Note : The person will receive an email indicating the user
account is locked. An Administrator must unlock the user
account before the person gains access to the application
even with the valid password.
h. Default Printer Establishes the default printer for all Document Direct-Print icons.
Printers pre-defied (added) under Admin > System Printers are
displayed here.
Select a Default Printer from the drop-down list, for printing your
documents and reports.
Caution : If you have not selected a specific printer from My
Preferences page, then this printer will be used by
default for all the users in PharmaReady.
i. Default
Domain
These credentials are provided for Active Directory (AD) integration and
automatic resynchronization interval.
Enter the Default Domain Name, Default User Name, Default
Password and number of the days in the People Auto Update
Interval and Action items Validation Interval fields(Sets number of
days PharmaReady regenerates a user’s action item list).
j. Default User
Name
k. Default
Password
l. People Auto
Update
Interval
m. Action Items
Validation
Interval
n. Default Date
Format
Select the Default Date Format and Time format, to display
throughout the application.

6. System Maintenance & Monitoring PharmaReady™ DMS User Guide
© 2011 TAKE Solutions, Inc. All Rights Reserved. Page 114 of 255
o. Default Time
Format
p. Local Save
Directory
Specify the location where you need the documents to get saved.
q. Remote Save
Directory
Specify the server name and share name.
3. General E-
Signature
Settings
As an additional level of security, your organization can require users to
apply an electronic signature (e-signature) when setting up and
modifying regulatory identifiers. The meanings or reasons for the
addition or change to the regulatory identifier are added here as well.
Note : Electronic signatures can be required for specific Actions.
Check which Actions will require E-Signatures and Meaning
texts that will be presented for the specific Action.
a. Regulatory
Identifiers
This has been explained in the eCTD Module Help Guide.
The last five fields on the General tab are typically used during system setup and upgrades
only. The Send Test Email To field allows you to verify the integration with your email server by
sending a test email to any working email address. If you are using less than all four
PharmaReady modules, the Update [Module] License Key fields will activate additional modules
of PharmaReady when a valid license key is entered.
4. Test
PharmaReady
System Email
Functionality
This field is used to send the test mail for the mentioned email id in the
text box.
Enter the Test Email ID and Click the Send Test Email button to
send a Test Mail.
5. Update PR
License Key
This is used to update the PR License Number.
Enter the PR License Key and click the Update PR Key button to
update the specified license key.

6. System Maintenance & Monitoring PharmaReady™ DMS User Guide
© 2011 TAKE Solutions, Inc. All Rights Reserved. Page 115 of 255
6. Update DMS
License Key
This is used to update the DMS License Number.
Enter the DMS License Key and click the Update DMS Key button to
update the specified license key.
7. Update TRMS
License Key
Specific : These fields are meant for electronic Common
Technical Document and Training Management System
respectively (explained under eCTD Module - Help
Guide and TRMS Module – Help Guide).
8. Update eCTD
License Key
9. Update SPL
License Key
Specific : This field is meant for Structured Product Label
(explained under SPLModule - Help Guide).
10. Save Changes Click the Submit button to save the specified information or the
Cancel button to end the function, which will not save the changes
you have entered.
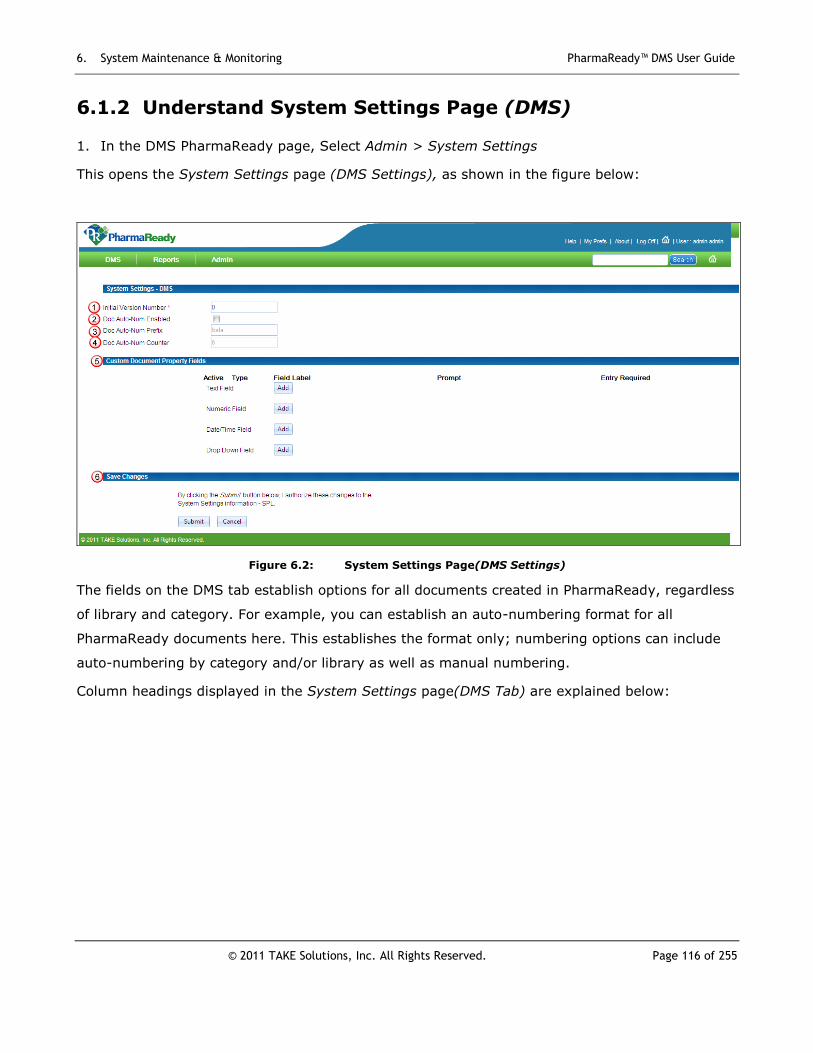
6. System Maintenance & Monitoring PharmaReady™ DMS User Guide
© 2011 TAKE Solutions, Inc. All Rights Reserved. Page 116 of 255
6.1.2 Understand System Settings Page (DMS)
1. In the DMS PharmaReady page, Select Admin > System Settings
This opens the System Settings page (DMS Settings), as shown in the figure below:
Figure 6.2: System Settings Page(DMS Settings)
The fields on the DMS tab establish options for all documents created in PharmaReady, regardless
of library and category. For example, you can establish an auto-numbering format for all
PharmaReady documents here. This establishes the format only; numbering options can include
auto-numbering by category and/or library as well as manual numbering.
Column headings displayed in the System Settings page(DMS Tab) are explained below:

6. System Maintenance & Monitoring PharmaReady™ DMS User Guide
© 2011 TAKE Solutions, Inc. All Rights Reserved. Page 117 of 255
Table 6.2: System Settings – DMS(Column Heading & Description)
Fields Description / Instruction
1. Initial
Version
Number
Enter the Initial Version Number.
2. Doc Auto-
Num
Enabled
Only if Doc Auto Num Enabled checkbox is selected, you can enter a prefix
in the Doc Auto Num Prefix field and also specify the required number in the
Doc-Auto-Num Counter field.
3. Doc Auto-
Num Prefix
4. Doc Auto-
Num
Counter
5. Custom
Document
Property
Fields
You can also create custom fields here that will appear on the properties page
of all documents, allowing you to record standard information on every
document in PharmaReady.
Click the Add button and enter the Field Label.
Enter the prompt message in the Prompt Text box field.
Click the Delete button, to delete the specified Meaning.
Mark the Entry Required checkbox to prevent users from saving the
document properties until a value is entered in a particular custom field
An example is shown below for Text Field:
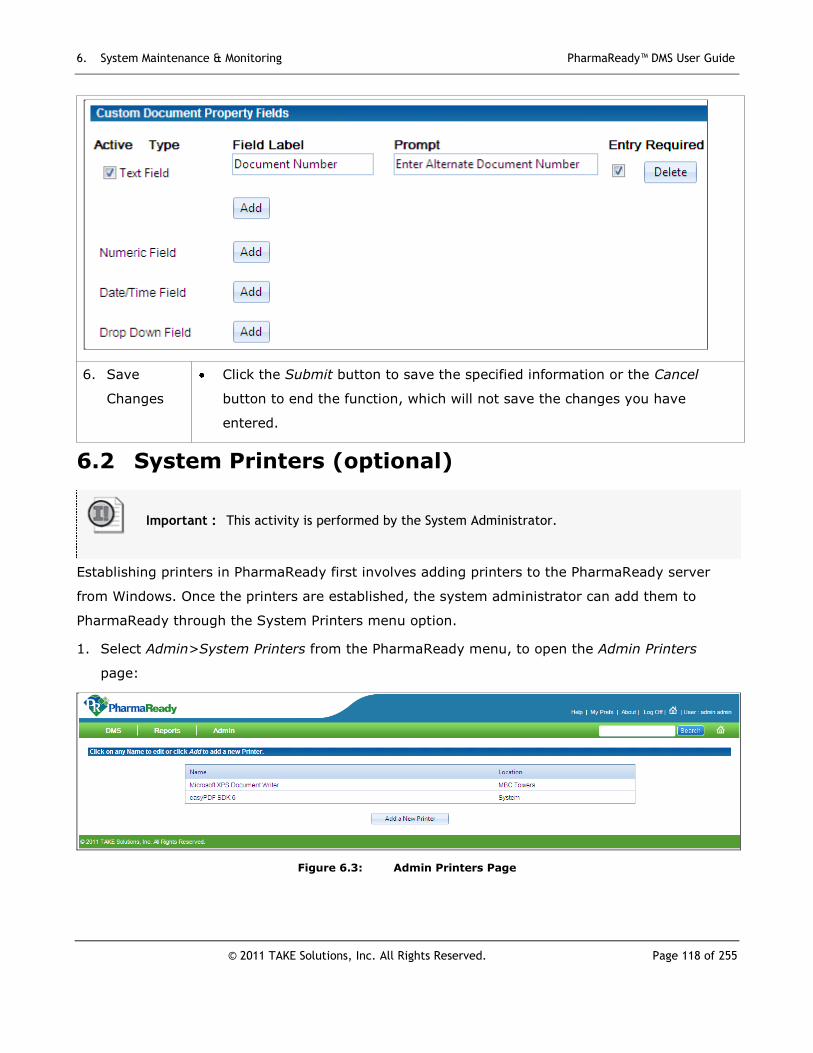
6. System Maintenance & Monitoring PharmaReady™ DMS User Guide
© 2011 TAKE Solutions, Inc. All Rights Reserved. Page 118 of 255
6. Save
Changes
Click the Submit button to save the specified information or the Cancel
button to end the function, which will not save the changes you have
entered.
6.2 System Printers (optional)
Important : This activity is performed by the System Administrator.
Establishing printers in PharmaReady first involves adding printers to the PharmaReady server
from Windows. Once the printers are established, the system administrator can add them to
PharmaReady through the System Printers menu option.
1. Select Admin>System Printers from the PharmaReady menu, to open the Admin Printers
page:
Figure 6.3: Admin Printers Page

6. System Maintenance & Monitoring PharmaReady™ DMS User Guide
© 2011 TAKE Solutions, Inc. All Rights Reserved. Page 119 of 255
6.2.1 Add New Printer Page
2. Click the Add a New Printer button located at the bottom of the Admin Printer page.
This displays the Add New Printer page as shown in the below figure.
Figure 6.4: Add New Printer Page
Printers added here appear as valid values in the Default Printer drop-down list on the System
Settings, People, and My Preferences pages.
Note : Only the user defined in the Default User Name field on the System Settings page can
add printers to the PharmaReady sever.
The fields present in the Add New Printer page are explained in the below table:
Table 6.3: Add New Printer Page - Fields & Description
Fields Description / Instruction
1. Printer Information
a. Printer Name Select a printer from the list of printers defined on the
PharmaReady Server, which cannot be changed from within
PharmaReady.
b. Printer Location Enter the physical location of the printer
This is shown in the sample below:

6. System Maintenance & Monitoring PharmaReady™ DMS User Guide
© 2011 TAKE Solutions, Inc. All Rights Reserved. Page 120 of 255
2. Save Changes Click the Submit button to save the specified information or
the Cancel button to end the function, which will not save the
changes you have entered.
The added printer gets displayed in the Admin Printers page.
6.3 Reminders (optional)
Important : This activity is performed by the System Administrator.
Your organization can choose to send reminder emails to users to encourage them to take a
particular action on a document. These reminders are in addition to standard email notifications
that are triggered as part of the normal document lifecycle.
Reminders can be set at the system level, or they can be specific to documents in a library or
department.
1. In the PharmaReady DMS Home page, Select Admin >Reminders:
This opens the Admin Reminders page as shown in the figure below:
Figure 6.5: Admin RemindersPage
6.3.1 Add New Reminder Page
For each delivered reminder type, the email is sent (triggered) based on key dates defined on the
document’s properties and sent to one or more recipients based on each user’s relationship to the
document.

6. System Maintenance & Monitoring PharmaReady™ DMS User Guide
© 2011 TAKE Solutions, Inc. All Rights Reserved. Page 121 of 255
Set up of an email reminder includes selecting the Reminder Type, setting either the number of
days out or interval for the reminder, and writing the email subject line and message
2. Click the Add a New Reminder button located at the bottom of the Admin Reminder page.
This displays the Add New Reminder page as shown in the below figure.
Figure 6.6: Add New Reminder Page
Important : Any reminder can be sent at set intervals or a set number of days before or after a
key date. Whether the reminder is sent before or after the date that triggers it is
based on the reminder type.
A reminder can send emails at intervals or according to a set number of days before
or after a key date, but not both. A “-1” in either the Days Out to Send Reminder or
Reminder Interval Days field turns off this day/date option.
The fields present in the Add New Reminder page are explained in the below table:

6. System Maintenance & Monitoring PharmaReady™ DMS User Guide
© 2011 TAKE Solutions, Inc. All Rights Reserved. Page 122 of 255
Table 6.4: Add New Reminder Page - Fields & Description
Fields Description / Instruction
1. Reminder Information
a. Reminder
Name Enter the name of the reminder
b. Description Enter a brief description about the reminder.
c. Active Active box is selected by default.
Uncheck this box, to make the reminder inactive.
d. CC Supervisor Check this box, to mark a CC to the Supervisor
e. Reminder
Type
As outlined in the table below, every reminder has set recipients and triggers.
Caution : If all of a document’s key dates needed for a particular reminder
are blank, no email will be sent.
Key dates are often date ranges defined by start and stop dates.
Reminders may be triggered before a start date or before a stop
date
When referring to the table, it is important to understand the following:
Table 6.5: Reminder Type and Trigger
Reminder Type Recipients Trigger
Approval of
Working Document
Reminder
Approvers Set number of days before the
Approval Stop Date
Document Read
Reminder
Readers Set number of days before the
Training Stop Date, else the
Effective Stop Date
Document Read
Verify Reminder
Readers Set number of days before the
Training Stop Date, else the
Effective Stop Date
Document Authors, Set number of days before

6. System Maintenance & Monitoring PharmaReady™ DMS User Guide
© 2011 TAKE Solutions, Inc. All Rights Reserved. Page 123 of 255
Checked-Out
Reminder
Reviewers,
Approvers
Create Stop Date, else Review
Start Date, else Approve Start
Date, else Effective Start Date,
else today’s date
Review of
Published
Document
Reminder
Authors Set number of days before the
Date Due Review date
Review of Working
Document
Reminder
Reviewers Set number of days before the
Review Stop date
Select the appropriate Reminder Type from the drop-down menu.
f. :Library Select the appropriate Library from the drop-down menu.
g. Department Select the appropriate Department from the drop-down menu.
h. Days out to
Send
Reminder
Specify the number of days out to send reminder.
i. Reminder
Interval Days
Specify the number of reminder interval days.
j. Reminder
Email Subject
The selected Reminder Type is automatically displayed here as the subject.
Edit the Subject of the Reminder Email, if required.
k. Reminder
Message
Enter the Message (content) of the Reminder Email.
These details are entered as shown in the sample below:

6. System Maintenance & Monitoring PharmaReady™ DMS User Guide
© 2011 TAKE Solutions, Inc. All Rights Reserved. Page 124 of 255
2. Save
Changes
Click the Submit button to save the specified information or the Cancel
button to end the function, which will not save the changes you have
entered.
The added Reminder gets displayed in the Admin Reminderspage.
6.4 Monitoring Activity with the Audit Log Viewer
Important : This activity is performed by the System Administrator.
6.4.1 Audit Log Viewer Page
The Audit Log Viewer page gives you a static online view of system, user, and/or document
activity in PharmaReady.
1. Select Admin > Audit Log Viewer in the DMS PharmaReady Home page.
This opens the Audit Log Viewer page as shown in the figure below:
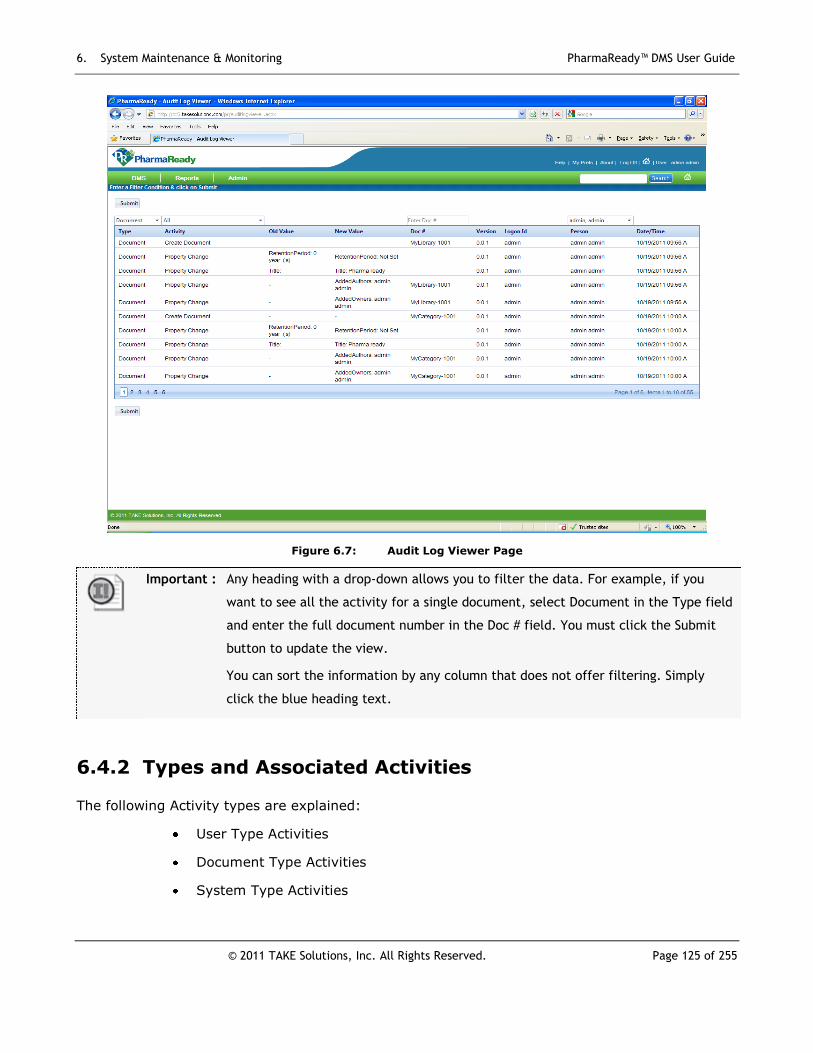
6. System Maintenance & Monitoring PharmaReady™ DMS User Guide
© 2011 TAKE Solutions, Inc. All Rights Reserved. Page 125 of 255
Figure 6.7: Audit Log Viewer Page
Important : Any heading with a drop-down allows you to filter the data. For example, if you
want to see all the activity for a single document, select Document in the Type field
and enter the full document number in the Doc # field. You must click the Submit
button to update the view.
You can sort the information by any column that does not offer filtering. Simply
click the blue heading text.
6.4.2 Types and Associated Activities
The following Activity types are explained:
User Type Activities
Document Type Activities
System Type Activities

6. System Maintenance & Monitoring PharmaReady™ DMS User Guide
© 2011 TAKE Solutions, Inc. All Rights Reserved. Page 126 of 255
6.4.2.1 User Type Activities
The user activity visible in the Audit Log is specified in the below table:
Table 6.6: User Activities (Value and Description)
Activity Value Description
Logon Attempt Unsuccessful log on by user.
Logon Successful log on by user.
Logoff User logged off of PharmaReady manually or automatically.
Create New user created in PharmaReady.
Property Change User’s account modified, such as a password change.
Note : The Audit Log Viewer can also be launched from the Maintain People page
Click the Activity Report’s View Report button, and the Audit Log Viewer appears
filtered with user activity information for the person whose page you came from.
6.4.2.2 Document Type Activities
The document activity visible in the Audit Log is specified in the below table:
Table 6.7: Document Type Activities (Value and Description)
Activity Value Description
Create Document New document created or new version of an existing document
created
Check-In Document checked back in to PharmaReady
Check-Out Document checked out of PharmaReady
Undo Checkout Document checked out erroneously
Review Document reviewed
Approve Document approved; can include e-signature meanings

6. System Maintenance & Monitoring PharmaReady™ DMS User Guide
© 2011 TAKE Solutions, Inc. All Rights Reserved. Page 127 of 255
Not Approved Document not approved; can include e-signature meanings
Publish Document published; can include e-signature meanings
Print Document sent to printer
Distribute Document distributed
Property Change Document properties updated, such as removing reviewers or
changing the document title; can include e-signature meanings
View Document opened online
Verified Read Readers acknowledge reading document
Archive Document saved to alternate location, no longer accessible in
PharmaReady
6.4.2.3 System Type Activities
The system activity visible in the Audit Log is specified in the below table:
Table 6.8: System Activities (Value and Description)
Activity Value Description
Property Change System data changed, such as a change to an e-signature in
library or the addition of a reader group.
Active Directory Import Users added or updated through import from Active Directory.
Create Setup data created, such as reader groups and roles.

PharmaReady™ DMS User Guide
© 2008 TAKE Solutions, Inc. All Rights Reserved. Page 128 of 255
CHAPTER 7
7. Create Documents
About this Chapter
Document creation is the first step in the document lifecycle and
kicks off the document management workflow in the
PharmaReady DMS.
This chapter includes the following sections:
Contents
Topic Page
Understand roles and workflow 131
Create a new document 133
Create a new document using a template 151
Upload documents in batch 154

7. Create Documents PharmaReady™ DMS User Guide
© 2008 TAKE Solutions, Inc. All Rights Reserved. Page 129 of 255
7.1 Roles and Workflow
Since document workflow is fundamental to the DMS, let’s first discuss how PharmaReady roles
and workflow support the document lifecycle. Assuming all steps occur for a document—creation,
editing, review, approval, publishing, distribution, and reading—the full document lifecycle is as
follows:
Figure 7.1: DMS Life Cycle
7.1.1 DMS Roles
Each phase of the lifecycle is performed by a person in a specific role with distinct access to and
responsibility for a document. It is important to understand these roles and what each can do in
the system.
Note : Each of these roles is predefined and delivered with your installation of PharmaReady.
Your organization may create additional roles.
Table 7.1: DMS Roles and Access Rights
Role Access Rights
Document Creator Start new documents, including uploading the initial version (or
template) to PharmaReady and selecting authors, reviewers,
approvers, readers, and key dates.
Document Owner Edit document properties to facilitate workflow; publish and distribute
documents.
Author Check out, edit, and check in documents.

7. Create Documents PharmaReady™ DMS User Guide
© 2011 TAKE Solutions, Inc. All Rights Reserved. Page 130 of 255
Reviewer Review documents.
Approver Approve documents.
Publisher Publish documents.
Distributor Distribute documents.
Reader View documents.
Library Admin Create, edit, approve, review, publish, and distribute documents for all
libraries or for a single library; create, edit, and delete libraries,
categories, document numbers, templates, and reader groups.
7.1.2 DMS Workflow
The DMS workflow merges the document lifecycle with the DMS functional access roles.
Figure 7.2: DMS Workflow

7. Create Documents PharmaReady™ DMS User Guide
© 2011 TAKE Solutions, Inc. All Rights Reserved. Page 131 of 255
7.2 Creating New Documents
Important : This activity is performed by a Document Creator.
The PharmaReady DMS offers two different methods to create a new document in the DMS: 1)
one at a time or 2) in a batch. This section follows the procedure of creating a single new
document.
The method of document creation available to you is determined by your DMS role: Document
Creators can create single documents while Library Administrators can create singles as well as
upload multiple documents in a batch.
It is important to note that, while both the PharmaReady application and this chapter make
reference to documents, any file can technically be a document in the DMS.
1. In the PharmaReady DMS Page, Select DMS>Create Documents
This opens the Create Document page as shown in the figure below:
7.2.1 Create Document Page
Figure 7.3: Create Document

7. Create Documents PharmaReady™ DMS User Guide
© 2011 TAKE Solutions, Inc. All Rights Reserved. Page 132 of 255
The Create Document page details are described in the table below:
Table 7.2: Create Document Page – Sections
Section Instruction
New
Document
Information
2. Select the following values from the drop-down menu, to start a new
document in the DMS.
Library
Category
Document Number
Doc Prop Template
Initial Owner
Initial Author
3. Tick the Virtual Document checkbox, if the document is uploaded from
outside of PharmaReady.
Note : When selecting a value in the Document Number field, you will see
all available auto-numbering options: system, library, and category
level as well as combinations thereof. If your organization uses
manual document numbering, all currently available numbers for
the selected category will also appear in the Document Number
drop-down list.
Note : Document templates, document properties templates, and manual
document numbers are discussed in the last lesson, Additional
Document Functionality.
Document
Source
4. Choose the template if the file is based on a template stored in the system.
5. Click the Browse button and select the appropriate file that needs to be
uploaded(added to the DMS).
These details are entered as shown in the sample below:

7. Create Documents PharmaReady™ DMS User Guide
© 2011 TAKE Solutions, Inc. All Rights Reserved. Page 133 of 255
Add
Document
6. Click the Submit button to save the specified information or the Cancel
button to end the function, which will not save the changes you have
entered.
Once when the details are submitted, the Document Properties page displays as shown in the
figure below:
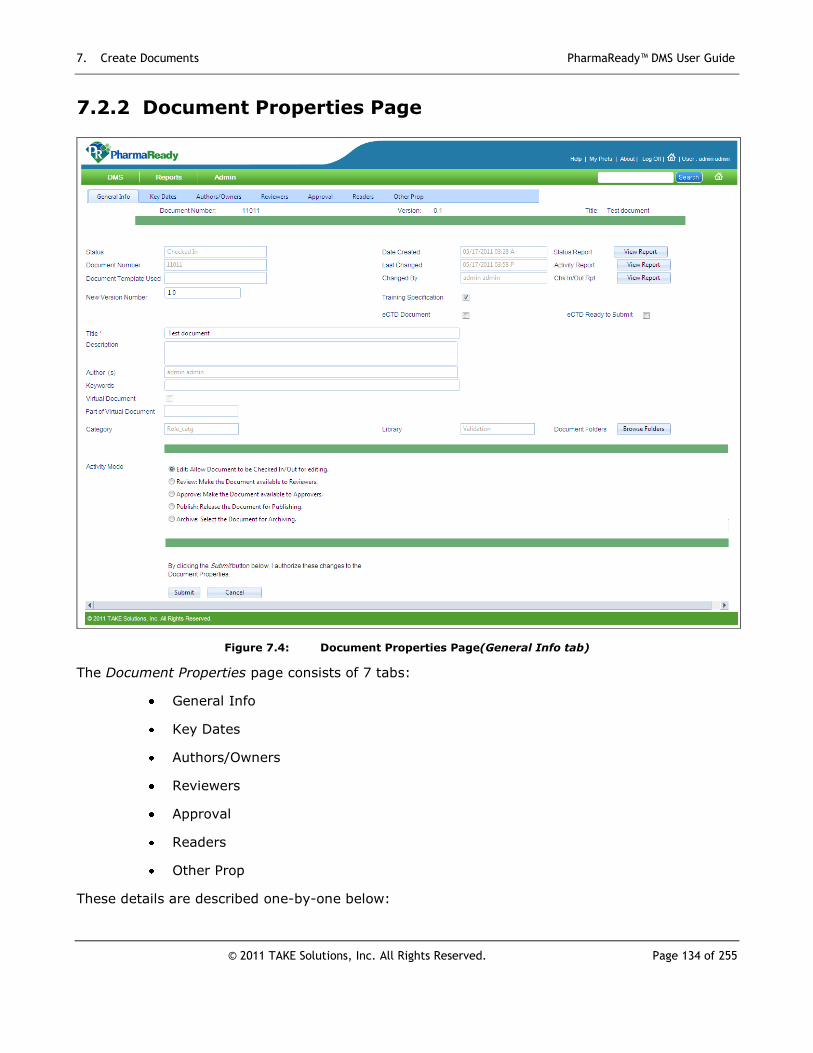
7. Create Documents PharmaReady™ DMS User Guide
© 2011 TAKE Solutions, Inc. All Rights Reserved. Page 134 of 255
7.2.2 Document Properties Page
Figure 7.4: Document Properties Page(General Info tab)
The Document Properties page consists of 7 tabs:
General Info
Key Dates
Authors/Owners
Reviewers
Approval
Readers
Other Prop
These details are described one-by-one below:

7. Create Documents PharmaReady™ DMS User Guide
© 2011 TAKE Solutions, Inc. All Rights Reserved. Page 135 of 255
7.2.2.1 General Info tab
The details displayed in the General Information tab and the instructions are described below:
Table 7.3: Document Properties Page - General Info Tab
Fields Description / Instruction
Status The current status (checked-in) of the documents displayed here.
Document Number This field is read-only; automatically displayed based on the values
selected on the Create Document page.
Document Template
Used
If the document is created using a template then the 7 for this
document is displayed in this field. A sample is shown below:
New Version Number Enter the New Version Number in this field.
Date Created The document created date is displayed here.
Last Changed The date the document underwent changes recently is displayed
here.
Changed By The role which changed the document is displayed here.
Status Report Click this button to view the Document Status.
Activity Report Click this button to open the Audit Log Viewer page where you
can view the Document Activities.
Chk In/Out Rpt Click this button to view the check-in and check-out reports.
New Version Number Enter the New Version Number in this field.
Training Specification
Specific : This field is applicable for user associated with TRMS
Module and explained in the TRMS Help Guide.
eCTD Document

7. Create Documents PharmaReady™ DMS User Guide
© 2011 TAKE Solutions, Inc. All Rights Reserved. Page 136 of 255
eCTD Ready to Submit
Specific : These fields are applicable for user associated with
eCTD Module and explained in the eCTD Help Guide.
Title The document title and description is pulled from the file name of the
uploaded document.
You can edit these fields as desired. Description
Author(s) This field is read-only; automatically displayed based on the values
selected on the Create Document page.
Keywords Represents the key words used in the PharmaReady Search.
Virtual Document This field is read-only; automatically displayed based on the value
selected on the Create Document page. A tick mark represents that
the document is a virtual document.
Part of Virtual
Document
This flag represents that the document is part of Virtual Document.
Documents added under the Virtual document will be denoted as a
part of the created Virtual document as shown in the sample below:
Category This field is read-only; automatically displayed based on the value
selected on the Create Document page.
Library This field is read-only; automatically displayed based on the value
selected on the Create Document page.
Document Folders It is likely that you want the document to reside in one or more
folders below the root library level.
Click the Browse Folders button to access the folders in this
library.
In the Folder Browser window, expand the folders and select one
or more folders in which the document should reside (as shown in
the below sample):
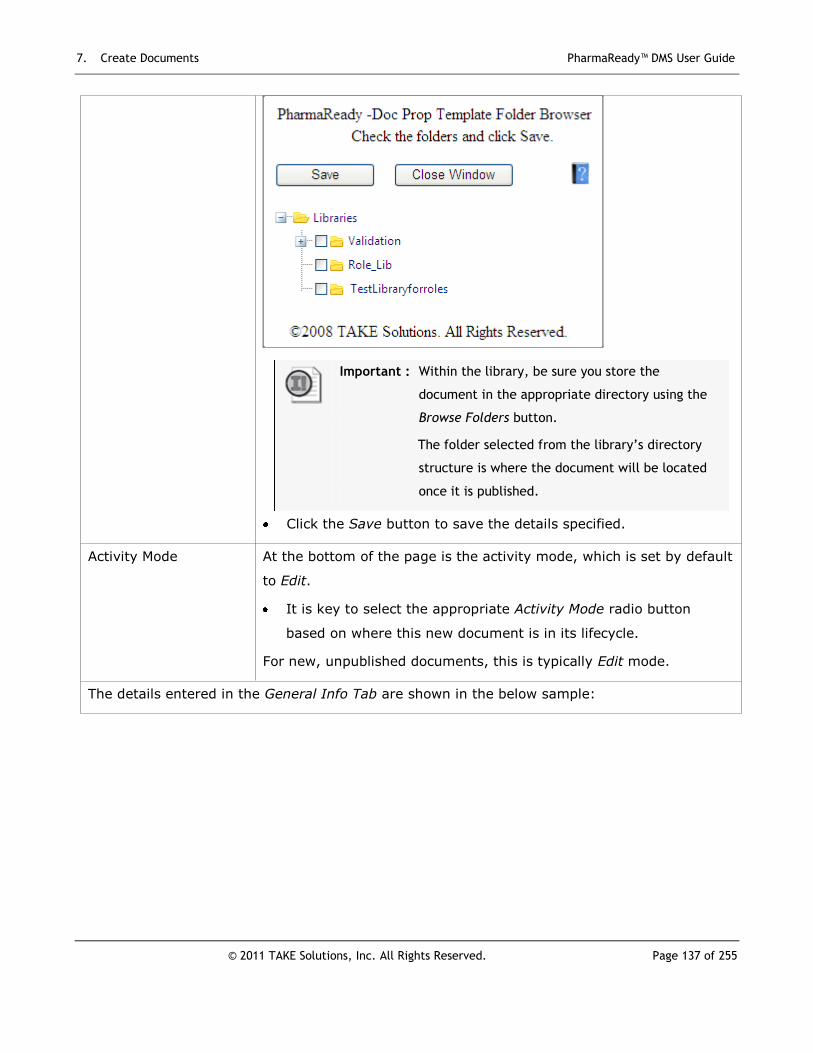
7. Create Documents PharmaReady™ DMS User Guide
© 2011 TAKE Solutions, Inc. All Rights Reserved. Page 137 of 255
Important : Within the library, be sure you store the
document in the appropriate directory using the
Browse Folders button.
The folder selected from the library’s directory
structure is where the document will be located
once it is published.
Click the Save button to save the details specified.
Activity Mode At the bottom of the page is the activity mode, which is set by default
to Edit.
It is key to select the appropriate Activity Mode radio button
based on where this new document is in its lifecycle.
For new, unpublished documents, this is typically Edit mode.
The details entered in the General Info Tab are shown in the below sample:

7. Create Documents PharmaReady™ DMS User Guide
© 2011 TAKE Solutions, Inc. All Rights Reserved. Page 138 of 255
Save Changes Click the Submit button to save the specified information or the
Cancel button to end the function, which will not save the changes
you have entered.
Important : Electronic signatures (e-signatures) can be required by library for specific actions
to a document. Updating document properties is an action that can require an e-
signature and the selection of a predefined meaning behind the action.

7. Create Documents PharmaReady™ DMS User Guide
© 2011 TAKE Solutions, Inc. All Rights Reserved. Page 139 of 255
7.2.2.2 Key Dates Tab
Figure 7.5: Document Properties Page (Key Dates Tab)
When creating a new document, you can record the key dates of its lifecycle.
Note : Most of the dates on this tab are informational, although an effective date range must be
set before the document is published.
Important : Approve End Date should not be less than Review Stop Date.
Approve Start Date should not be less than Review Start Date.
The details displayed in the Key Dates tab and the instructions are described below:
Table 7.4: Document Properties Page – Key Dates Tab
Fields Description
Create Start/Stop
Date
Tentative date range for creating/editing a document.

7. Create Documents PharmaReady™ DMS User Guide
© 2011 TAKE Solutions, Inc. All Rights Reserved. Page 140 of 255
Review Start/Stop
Date
Tentative date range for reviewing a document. The Stop Date appears on
the Pending Doc Action report and on the Central page in the My Action
Items list.
Approve
Start/Stop Date
Tentative date range for approving a document. The Stop Date appears on
the Pending Doc Action report and on the Central page in the My Action
Items list.
Publish Date Tentative date for publishing a document. Appears on the Pending Doc
Action report.
Training Start/Stop
Date
Date range when the published document is accessible to readers for
training. These dates appear on the Published Doc Listing report.
Effective
Start/Stop Date
Date range when the published document is accessible (viewable) in the
DMS. These dates appear on the Published Doc Listing report.
Distributed Tentative date to start document distribution.
Date Due Review Future date the document should be reviewed for updates. Appears on the
Date Due Review report.
Retention
Period/End of
Retention
How long the document must be retained in the system before it may be
archived. Both values appear on the Retention Date report.
Assign the applicable dates on the Key Dates tab as mentioned above.
Note : No Dates are required to save a new document in Edit mode.

7. Create Documents PharmaReady™ DMS User Guide
© 2011 TAKE Solutions, Inc. All Rights Reserved. Page 141 of 255
7.2.2.3 Authors / Owners tab
Figure 7.6: Document Properties Page (Authors / Owners Tab)
The initial owner and author assigned when creating the document appears on this tab by default.
If others should be allowed to check out, edit, and check in the document, move their name
to the Document Authors Assigned list.
Important : Keep in mind that all users assigned as Document Owners will receive email
notifications at each phase of the document lifecycle until the document is
published.
Caution : The initial author and owner selected when the document was created appear in the
Assigned list boxes of the Document Authors and Document Owners fields. Be sure to add authors
and owners as appropriate.
Note : The full list of email notifications by role is covered in the Chapter – ‘Edit, Review, &
Approve Documents’.
Reviewers, approvers, and readers as well as additional authors and owners can be assigned
at the time a new document is created. If not assigned initially, a person with rights to edit
document properties can assign users to these tasks after the document is saved.

7. Create Documents PharmaReady™ DMS User Guide
© 2011 TAKE Solutions, Inc. All Rights Reserved. Page 142 of 255
7.2.2.4 Reviewers tab
On the Reviewers tab, you will add all persons assigned as reviewers. Once review activity takes
place, the event is listed in the Review Activity grid. If a reviewer has attached a file with
comments, all users who can view the document properties can open the attachment.
Figure 7.7: Document Properties Page (Reviewers Tab)
There are two options involved in Basic Cycle. Select “Sequential” for the review to take
place sequentially one after the other or Select “Parallel”, for the review to take place in any
order.
Select the Reviewers name in the Available list and click the ‘>’ icon to move the selected
reviewers name to the Assigned list box.
Select the required Document Reviewers Group in the Available list and click the ‘>’ icon to
move the selected reviewers group name to the Assigned list box.

7. Create Documents PharmaReady™ DMS User Guide
© 2011 TAKE Solutions, Inc. All Rights Reserved. Page 143 of 255
There are three options involved in the Extended Cycle. Select “None” to use only the Basic
Review Cycle or select “Sequential” for the review to take place in sequentially, one after the
other or select “Parallel” for the review to take place in any order.
The Reviewer Activity is displayed in the grid.
7.2.2.5 Approval tab
The Approval tab includes all persons assigned to approve the document before it is published.
Approvers can be assigned in sequential order or all approvers can approve the document in
parallel. If a second round of approvals exists, you will see additional list boxes in the Extended
Cycle section with assigned and available approvers.
Figure 7.8: Document Properties Page (Approval Tab)
There are two options involved in Basic Cycle. Select “Sequential” for the approval to take
place sequentially one after the other or Select “Parallel”, for the approval to take place in
any order.

7. Create Documents PharmaReady™ DMS User Guide
© 2011 TAKE Solutions, Inc. All Rights Reserved. Page 144 of 255
Select the Basic Approvers name in the Available list and click the ‘>’ icon to move the
selected Approvers name to the Assigned list box.
Select the required Basic Approvers Group Name in the Available list and click the ‘>’ icon to
move the selected Approvers Group name to the Assigned list box.
There are three options involved in the Extended Cycle. Select “None” to use only the Basic
Approval Cycle or select “Sequential” for the approval to take place in sequentially, one after
the other or select “Parallel” for the approval to take place in any order.
The Approval Activity is displayed in the grid.
7.2.2.6 Readers tab
Document audiences can be assigned during document creation and at any future time during the
document lifecycle, both before and after the document is published.
Figure 7.9: Document Properties Page (Readers Tab)
Click the Add a New Reader button, to specify the details of the Readers.
Note : While marked by default, the Assessment Required checkbox will trigger an action item
only if a) your organization has implemented PharmaReady TRMS and b) the document is
associated with an online test (an assessment).
By default, all read and verify checkboxes are marked for each set of readers. These checkboxes
trigger action items to appear for each person in the associated document audience.
For example, the Verify Read Required checkbox will send an action item to a single user after
they have read the document. After the user has signed off that they have indeed read the
document, the action becomes part of the document’s audit trail.

7. Create Documents PharmaReady™ DMS User Guide
© 2011 TAKE Solutions, Inc. All Rights Reserved. Page 145 of 255
Select the Reader Type and the Reader Name from the drop-down menu.
7.2.2.7 Other Prop tab
Figure 7.10: Document Properties Page (Other Prop(erties) Tab)

7. Create Documents PharmaReady™ DMS User Guide
© 2011 TAKE Solutions, Inc. All Rights Reserved. Page 146 of 255
Use of the Other Prop(erties) tab is at the discretion of your organization. Beyond the delivered
fields, your organization may create custom fields to hold information specific to your documents,
your industry, and so on.
The Other Prop tab includes a large selection of fields that your organization can decide to use as
part of defining a document in the DMS.
None of the standard PharmaReady fields on this tab are required to create a new document;
however, your organization may require values in one or more custom fields prior to saving.
Note : Required custom fields must contain a value before the document can be published.
The details displayed in the Other Prop(erties) tab and the instructions are described below:
Table 7.5: Document Properties Page – Other Prop Tab
Fields Description / Instruction
Document Number,
Version and Title
The user defined fields defined in the System Settings are displayed
here.
Assessment Select the Assessment exam associated with this document.
Projects Highlight additional Projects and click the < or > buttons to add or
delete.
Product
Select the Product Name, Sponsor, Regulatory Body, and
Investigator Site from the drop-down menu.
Sponsor
Regulatory Body
Investigator Site
Subject Enter the Subject in this field.
Lot Number Enter the Lot Number.
Cabinet & Drawer Enter the Filing cabinet and drawer.
Shelf & Bin Enter the Shelf & Bin.
Disk & Filename Enter the Disk and File Name.

7. Create Documents PharmaReady™ DMS User Guide
© 2011 TAKE Solutions, Inc. All Rights Reserved. Page 147 of 255
Reel & Frames Enter the Microfilm Reel and start and stop frame.
Image ID Specify the Imaging System unique identifier
Site Site where the document is stored.
Save Changes When the data entry is complete, Click the Submit button to save the
specified information or the Cancel button to end the function, which
will not save the changes you have entered.
Note : The file itself is housed in a SharePoint database.
Submitting the new document also triggers
PharmaReady to send email notifications to all
document owners and authors.
7.2.3 Work with Documents Page
Once when you submit the document, PharmaReady displays the Work with Documents page.
Except for readers, all roles can now see the new document here.
Figure 7.11: Work with Documents Page

7. Create Documents PharmaReady™ DMS User Guide
© 2011 TAKE Solutions, Inc. All Rights Reserved. Page 148 of 255
7.2.3.1 A few key items on the Work with Documents Page:
Filtering options is available to select a Library and Folder, where in the user can select a
specific Library and choose Browse folder to view the documents in the selected Library and
Folder. This is shown in the sample below:
Figure 7.12: Work with Documents Page (using filtering options)
Also filtering options is available under the Document List to view the documents based on the
Statuses under different categories.
The document title is an active hyperlink that will open the document online without checking
it out.
To add the document to the Quick View section of your Central page, mark the QV checkbox.
The users can perform only those activities for which they are assigned access. For example,
the users who are assigned as “Readers” can only read the document and they cannot
approve unless they are provided access.
The documents for which the user had been assigned any kind of access will only get
displayed in the Document List.

7. Create Documents PharmaReady™ DMS User Guide
© 2011 TAKE Solutions, Inc. All Rights Reserved. Page 149 of 255
7.3 Creating a New Document using a Template
(optional)
Important : This activity is performed by a Document Creator.
If your organization uses standard templates to provide consistent formatting and structure to
your documents, those templates can be housed in PharmaReady.
When it comes time to create a new document in the DMS, you have the option of selecting one
of the templates previously loaded by an administrator. As a document creator, you create the
new document as you would any other document, but rather than pulling an external file into the
DMS, you select the pre-loaded template from a list.
Note : Except selecting a template, the remaining steps of creating a document using a
template are the same as the previous procedure, Creating a New Document.
1. Select DMS> Create Documents from the DMS PharmaReady Home Page. The Create
Documents page displays.
2. Select the library and category for the document.
3. Select a numbering format for the document.
4. Select the Initial Owner and Author of the document.
5. Select from the Template drop-down list to attach the predefined template.
This is shown in the sample below:

7. Create Documents PharmaReady™ DMS User Guide
© 2011 TAKE Solutions, Inc. All Rights Reserved. Page 150 of 255
Figure 7.13: Create Document Page
6. Click the Submit button to save the document to PharmaReady. The Document Properties
page displays:

7. Create Documents PharmaReady™ DMS User Guide
© 2011 TAKE Solutions, Inc. All Rights Reserved. Page 151 of 255
Figure 7.14: Document Properties Page
7. Update the Document Title, if desired, and add a Description and Key Words.
8. Using the Browse Folders button, select the appropriate folder.
9. Update the Activity Mode, if appropriate.
10. On the Key Dates tab, assign applicable dates.
11. On the Authors/Owners, Reviewers, and Approvers tabs, assign people according to their
respective role and relationship to this document.
12. On the Readers tab, click the Add a New Reader button. Select each applicable document
audience and unmark any unnecessary action checkboxes.
13. On the Other Prop tab, add document data according to your organization’s needs.
14. Click the Submit button to save the document properties to PharmaReady.

7. Create Documents PharmaReady™ DMS User Guide
© 2011 TAKE Solutions, Inc. All Rights Reserved. Page 152 of 255
7.4 Upload Documents in a Batch
Important : This activity is performed by a Library Administrator.
Library administrators can upload multiple documents to the DMS in a single batch. This method
of rapid creation (or publishing) works well when you have documents that share common
information. For all documents uploaded in a batch, the documents must have the following in
common:
Library
Category
Auto-numbering format
Initial Author and Owner
Activity Mode, either Edit (for new documents) or Publish
Root Network Directory (but not necessarily subfolders)
Custom field values (if required)
Published documents uploaded in a batch should also have the following in common:
Readers
Published Version Number
Publish Format (same PDF options or original document format)
Effective Dates
Note : To reduce data entry errors and save time, consider using a document properties
template when uploading published documents in a batch. Document properties
templates are covered in detail in the Additional Document Functionality chapter.

7. Create Documents PharmaReady™ DMS User Guide
© 2011 TAKE Solutions, Inc. All Rights Reserved. Page 153 of 255
7.4.1 Batch Upload Page
All the steps required to upload a set of new or published documents in a batch are performed on
the Batch Upload page.
1. Select DMS> Batch Upload from the PharmaReady DMS Page.
This displays the Batch Upload page as shown in the figure below:
Figure 7.15: Batch Upload Page
The page is divided into functional sections:
i. Batch Upload Document Information
ii. Source Documents
iii. Set Mode
iv. Publish Options (for published documents only)
v. Upload Options

7. Create Documents PharmaReady™ DMS User Guide
© 2011 TAKE Solutions, Inc. All Rights Reserved. Page 154 of 255
These details are explained in the table below:
Table 7.6: Batch Upload Page Details
Fields Description / Instruction
1. Batch Upload Document Information
Information in this section populates much of the General Information tab of the Document
Properties for each uploaded document. Note that each upload has a unique batch number and
that you must provide a Batch Description. All documents will have the same person as the
initial author; additional authors can be added later.
Batch Number This field is automatically displayed. However you can edit the
Batch Number.
Batch Description Enter a valid and a brief description about the batch.
Library Select the appropriate Library and Category for the documents,
from the drop-down menu. Category
Auto Document
Number
Select an auto-numbering format for the documents, from the
drop-down menu.
The option Manual Number is included in the Document Number
field. The User can upload the Batch with Manual Numbers, if the
Manual Number option is selected.
Doc Prop Template Choose the appropriate Document Property Template from the
drop-down menu.
Initial Owner Select the Initial Owner and Author from the drop-down menu, for
all the documents. Initial Author
Create Virtual
Document
Tick this checkbox, if you wish to create a virtual document
(outside of PharmaReady).
Create Selected Folders
for Selected Files
Tick this checkbox, if you wish to create Selected Folders for
Selected Files.

7. Create Documents PharmaReady™ DMS User Guide
© 2011 TAKE Solutions, Inc. All Rights Reserved. Page 155 of 255
These details are specified as shown in the sample below:
2. Source Documents
The directory you enter in this section must have an established connection with PharmaReady.
This connection is typically established during implementation.
In the Enter Starting Directory field, enter the server name and the network path where
the documents are located.
Note : If documents live in separate folders below a certain level, enter the highest level
directory.
Click the Show Files button to display the folder structure of the path you entered.
Expand folders and check the appropriate files, from different paths for upload.
This is shown in the sample below:
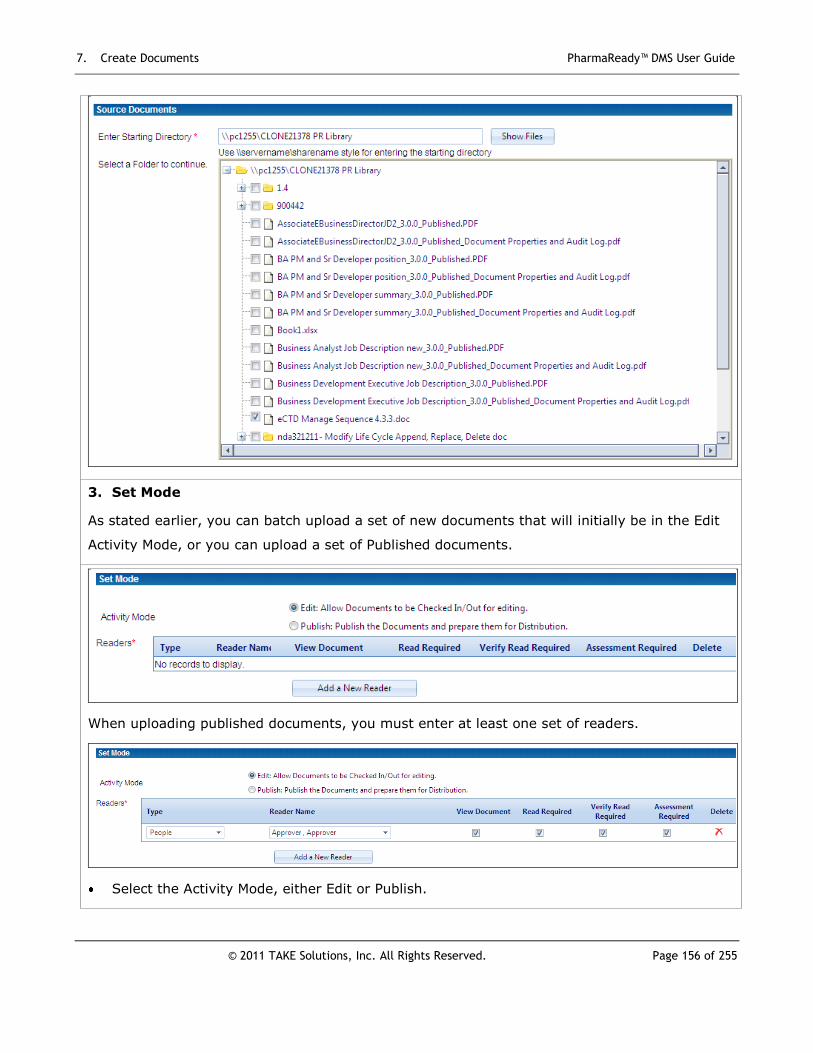
7. Create Documents PharmaReady™ DMS User Guide
© 2011 TAKE Solutions, Inc. All Rights Reserved. Page 156 of 255
3. Set Mode
As stated earlier, you can batch upload a set of new documents that will initially be in the Edit
Activity Mode, or you can upload a set of Published documents.
When uploading published documents, you must enter at least one set of readers.
Select the Activity Mode, either Edit or Publish.
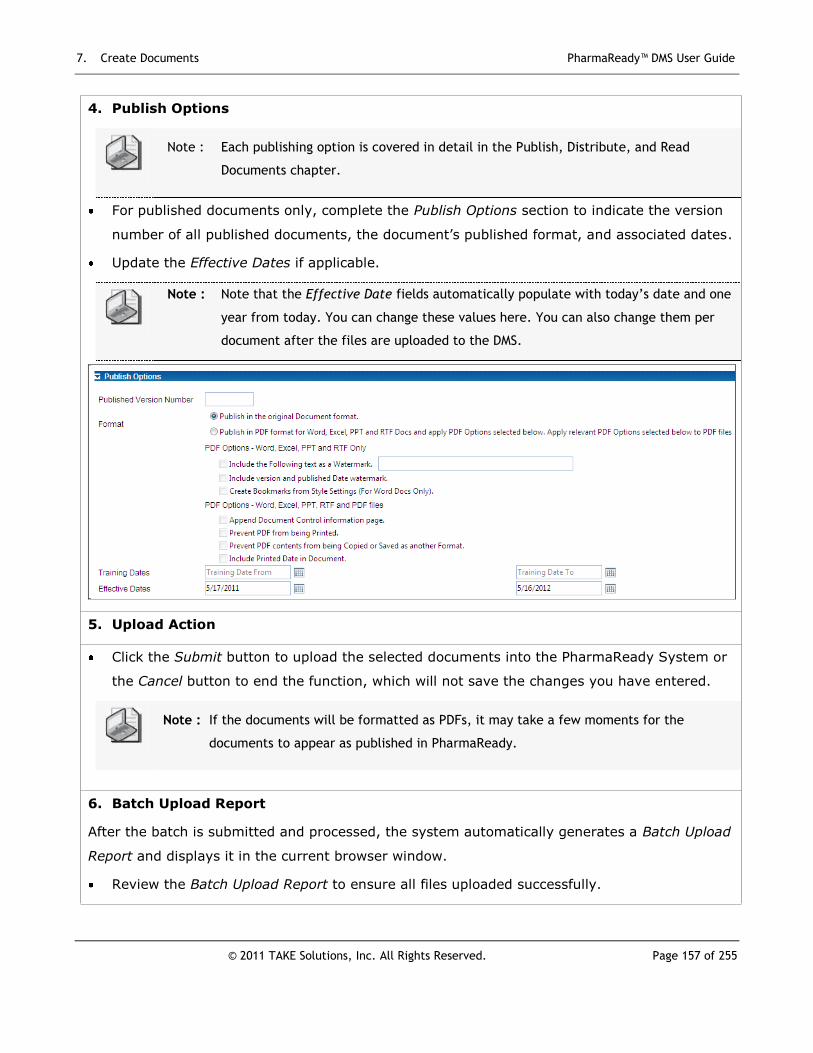
7. Create Documents PharmaReady™ DMS User Guide
© 2011 TAKE Solutions, Inc. All Rights Reserved. Page 157 of 255
4. Publish Options
Note : Each publishing option is covered in detail in the Publish, Distribute, and Read
Documents chapter.
For published documents only, complete the Publish Options section to indicate the version
number of all published documents, the document’s published format, and associated dates.
Update the Effective Dates if applicable.
Note : Note that the Effective Date fields automatically populate with today’s date and one
year from today. You can change these values here. You can also change them per
document after the files are uploaded to the DMS.
5. Upload Action
Click the Submit button to upload the selected documents into the PharmaReady System or
the Cancel button to end the function, which will not save the changes you have entered.
Note : If the documents will be formatted as PDFs, it may take a few moments for the
documents to appear as published in PharmaReady.
6. Batch Upload Report
After the batch is submitted and processed, the system automatically generates a Batch Upload
Report and displays it in the current browser window.
Review the Batch Upload Report to ensure all files uploaded successfully.

7. Create Documents PharmaReady™ DMS User Guide
© 2011 TAKE Solutions, Inc. All Rights Reserved. Page 158 of 255
Figure 7.16: Reports Page

PharmaReady™ DMS User Guide
© 2008 TAKE Solutions, Inc. All Rights Reserved. Page 159 of 255
CHAPTER 8
8. Edit, Review & Approve
Documents
About this Chapter
The key lifecycle stages of unpublished documents include
authoring, review, and approval. In this chapter, we will take a
document through the pre-publishing steps of its lifecycle.
This chapter is important for persons in the Author, Reviewer,
Approver, and Document Owner roles, as it discusses when they
become involved in the workflow of a document and the related
procedural steps.
This chapter includes the following sections:
Contents
Topic Page
Understand document statuses 162
Understand Workflow Navigation 163
Email Notifications and Workflow 165
Check out a document 166
Check in a document 171
Update a document’s activity mode 175
Review a document 178
Approve a document 184

8. Edit, Review and Approve Documents PharmaReady™ DMS User Guide
© 2008 TAKE Solutions, Inc. All Rights Reserved. Page 160 of 255
8.1 Document Statuses
When a document is first created in the DMS, it is in a Checked-In status. As it moves through its
lifecycle, a document can have many statuses; these are defined in the table below.
Notice that, for any given role, functional access to a document is according to its status.
Table 8.1: Functional access to a document
Status Role Definition
Checked In Authors The document is available for checkout and editing by an
Author. It could also mean the document is ready for review
but not yet moved to the next status (* Refer the note below).
Checked Out Authors The document is currently checked out by an Author.
Reviewing Reviewers The document is in the review process. It could be awaiting
review or being reviewed.
Reviewed Reviewers The document is reviewed but not yet moved to the next status
(* Refer the note below).
Approving Approvers The document is in the approval process. It could be awaiting
approvals, or not approved
Approved Approvers The document is approved but not yet moved to the next
status(* Refer the note below).
Pending Publishers The document is available to be published or is in the process
of being published and converted to PDF.
Published Distributors
Readers
The document is now published and visible to all document
audiences with view rights.
* Note :Document Owners are responsible for updating the activity mode of a document. Doing so
updates the document’s status and makes it accessible to the next role.
Note : Note that “distributed” is not a status. A document can be distributed many times, but it
remains in a Published status.

8. Edit, Review and Approve Documents PharmaReady™ DMS User Guide
© 2011 TAKE Solutions, Inc. All Rights Reserved. Page 161 of 255
8.1.1 Document Status, Roles, & the DMS Workflow
The DMS Workflow is once again displayed below:
Figure 8.1: Document Status, Roles, & the DMS Workflow
8.2 Workflow Navigation
Both the Work with Documents page and the Central page offer functional access to pages where
you complete required actions according to your role.
8.2.1 Work with Documents Page
On the Work with Documents page, the following icons appear for documents depending on your
role and pending action.
Table 8.2: Work with Documents Page icons and functions
Icon Visible to Indicates Function
Authors Available for
check out
Click to access the Check Out a Document page.
Authors Checked out Click to access the Check In a Document page.

8. Edit, Review and Approve Documents PharmaReady™ DMS User Guide
© 2011 TAKE Solutions, Inc. All Rights Reserved. Page 162 of 255
Reviewers Ready for
review
Click to open the document in a new browser
window. The current window displays the Review a
Document page.
Approvers Ready for
approval
Click to open the document in a new browser
window. The current window displays the Approve a
Document page.
Publishers Ready for
publishing
Click to access the Publish a Document page.
Distributors Ready for
distribution
Click to access the Distribute a Document page.
8.2.2 DMS Central Page
On the DMS Central page, two separate sections offer functional access to workflow items.
First, the My DMS Quick View List includes the same icons as the Work with Documents page.
Keep in mind that you must add documents to the Quick View before they appear on the Central
page.
The other section of the DMS Central page is the DMS Action Items tab. This section displays all
action items triggered by system and user events. For example, when a document moves into a
new activity mode, the update triggers PharmaReady to send the appropriate user(s) an action
item.
Note : If you are set up to receive email notifications, you will receive an email indicating when
an action is required of you. The email will include a hyperlink that launches the
appropriate page for the required action.

8. Edit, Review and Approve Documents PharmaReady™ DMS User Guide
© 2011 TAKE Solutions, Inc. All Rights Reserved. Page 163 of 255
Figure 8.2: Central Page
8.3 Email Notifications and Workflow
At the beginning and end of each phase of the document lifecycle, an email goes out to the
appropriate party notifying them of required or completed actions.
Below are the types of emails users receive according to their role and assignment to a
document. This is shown in the table below:
Table 8.3: Role and Email Notification
Role Email Notification
Authors New Document Notification
Document Returned to Edit Mode Notification
Document Owners New Document Notification

8. Edit, Review and Approve Documents PharmaReady™ DMS User Guide
© 2011 TAKE Solutions, Inc. All Rights Reserved. Page 164 of 255
Document Reviews Completed Notification (can include Review
Summary report)
Document Approval Completed Notification (can include Document
Approval History report)
Document Not Approved Notification (can include Document
Approval History report)
Reviewers Document Review Notification (can include CheckIn/Out Summary
report)
Approvers Document Approval Notification
Readers Document Distribution Notification
Important : It is important to note that three roles do not receive email notifications:
Document Creators, Publishers, and Distributors.
If your organization uses the Publisher and Distributor role, they should be
contacted by the Document Owner when the document is ready to publish and
distribute.
8.4 Checking out Documents
Important : This activity is performed by the Author.
When a new document is created with you as the author, you will receive a “New Document
Notification” email. From this point, you are able to check out the document (or template) and
work in the file. Depending on your implementation of PharmaReady, you may work online or
save the file to a directory prior to beginning your work.
It is a good idea to check the QV (Quick View) checkbox for documents you work with frequently.
Marking this checkbox adds the document to your Central page as a Quick View list item.
A document must be in the Edit Activity Mode to be available to an author for check out.
In this procedure, we begin by navigating to the Work with Documents page and locating the
document. While the “New Document Notification” email does contain a hyperlink to the
document, the link launches the file without actually checking it out for editing.

8. Edit, Review and Approve Documents PharmaReady™ DMS User Guide
© 2011 TAKE Solutions, Inc. All Rights Reserved. Page 165 of 255
Note : Checking out a document changes the Status on the Document Properties page to
Checked Out.
8.4.1 Work with Documents Page
For authors, the default settings on the Work with Documents page display all the unpublished
documents you are currently working on. You can filter the view by library, library folders,
category, and status.
1. Select DMS>Work with Docs from the PharmaReady DMS page.
The Work with Documents page displays as shown below:
Figure 8.3: Work with Documents Page
2. Locate the document you want to check out and click the Check Out ( ) icon.
Note : While a document can have multiple authors, only one author at a time can check out a
document.
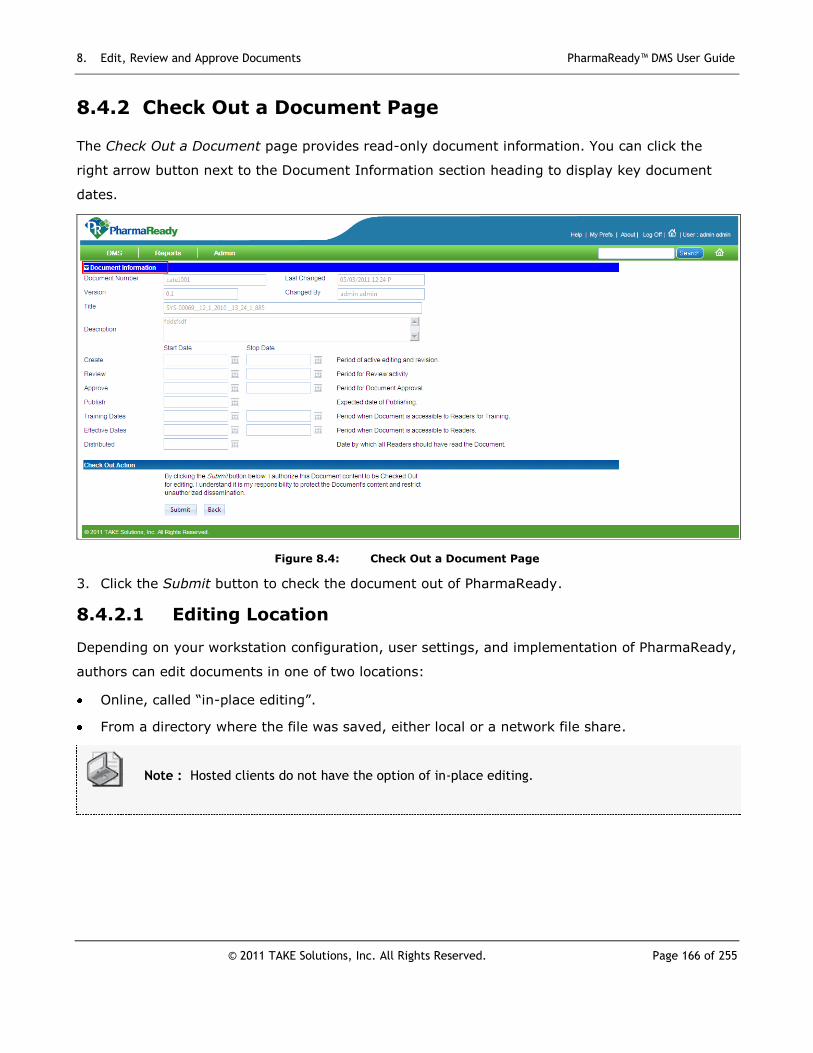
8. Edit, Review and Approve Documents PharmaReady™ DMS User Guide
© 2011 TAKE Solutions, Inc. All Rights Reserved. Page 166 of 255
8.4.2 Check Out a Document Page
The Check Out a Document page provides read-only document information. You can click the
right arrow button next to the Document Information section heading to display key document
dates.
Figure 8.4: Check Out a Document Page
3. Click the Submit button to check the document out of PharmaReady.
8.4.2.1 Editing Location
Depending on your workstation configuration, user settings, and implementation of PharmaReady,
authors can edit documents in one of two locations:
Online, called “in-place editing”.
From a directory where the file was saved, either local or a network file share.
Note : Hosted clients do not have the option of in-place editing.
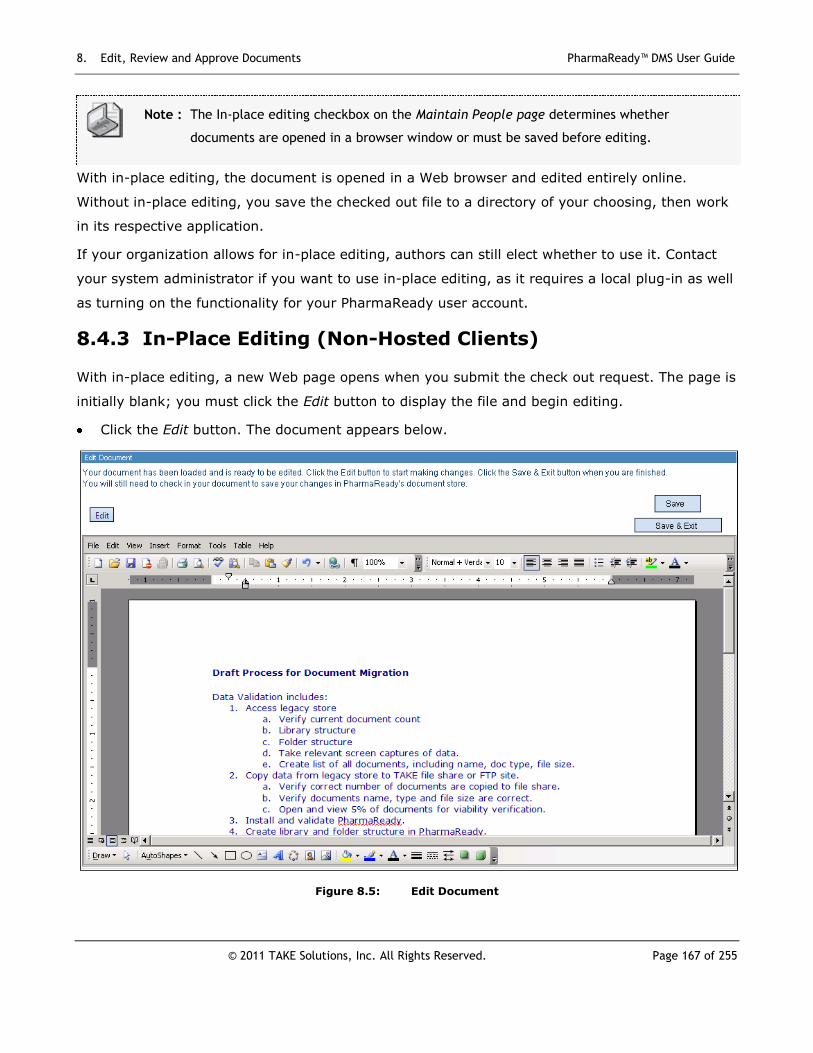
8. Edit, Review and Approve Documents PharmaReady™ DMS User Guide
© 2011 TAKE Solutions, Inc. All Rights Reserved. Page 167 of 255
Note : The In-place editing checkbox on the Maintain People page determines whether
documents are opened in a browser window or must be saved before editing.
With in-place editing, the document is opened in a Web browser and edited entirely online.
Without in-place editing, you save the checked out file to a directory of your choosing, then work
in its respective application.
If your organization allows for in-place editing, authors can still elect whether to use it. Contact
your system administrator if you want to use in-place editing, as it requires a local plug-in as well
as turning on the functionality for your PharmaReady user account.
8.4.3 In-Place Editing (Non-Hosted Clients)
With in-place editing, a new Web page opens when you submit the check out request. The page is
initially blank; you must click the Edit button to display the file and begin editing.
Click the Edit button. The document appears below.
Figure 8.5: Edit Document

8. Edit, Review and Approve Documents PharmaReady™ DMS User Guide
© 2011 TAKE Solutions, Inc. All Rights Reserved. Page 168 of 255
When you have finished editing, click the Save & Exit button.
Caution : Don’t forget to save to your work frequently.
8.4.3.1 A few words about in-place editing:
Important :
Do not use the Open or Save menu options from the File menu.
Once you have checked out the document, no other author can access or edit the file until
you check it back in.
You should save frequently. If your PharmaReady session times out, the work since the last
save is lost.
You do not need to check the document back in each time you end your PharmaReady
session. To access a document you have checked out at any time, click the file name on the
Work with Documents page.
8.4.4 Saving the Document
Without in-place editing, after clicking Submit you will be asked whether you want to open the file
or save it. You should save the file to a directory. Once saved, you can open and edit the file
using its respective application.
Important : If nothing happens after clicking Submit, it is likely that your browser is blocking
pop-ups. You must change your browser settings to allow pop-ups from the
PharmaReady URL.
Figure 8.6: File Download

8. Edit, Review and Approve Documents PharmaReady™ DMS User Guide
© 2011 TAKE Solutions, Inc. All Rights Reserved. Page 169 of 255
Click the Save button.
Figure 8.7: Check Out a Document Page
The File name automatically appears in the following format:
[DocNumber]__[DateStamp]__[TimeStamp].[extension].
Select the desired directory and save your file. You can now open and work in the file using its
respective application.
8.5 Checking in Documents
Important : This activity is performed by the Author.
When you have completed your desired edits to a document, the next step is to check the
document back in to the DMS.
Electronic signatures (e-signatures) can be required by library for specific actions to a document.
It is likely that checking in a document is an action that requires an e-signature and the selection
of a predefined meaning behind the action.
System Administrators can check in documents at any time.
In this procedure, we begin on the Work with Documents page.
Note : Checking in a document changes the Status on the Document Properties page to Checked
In.

8. Edit, Review and Approve Documents PharmaReady™ DMS User Guide
© 2011 TAKE Solutions, Inc. All Rights Reserved. Page 170 of 255
8.5.1 Work with Documents Page
For authors, the default settings on the Work with Documents page display all the unpublished
documents you are currently working on. You can filter the view by library, library folder,
category, and status.
1. Select DMS>Work with Docs from the PharmaReady DMS Home Page.
The Work with Documents page displays.
From the Work with Documents page, all authors assigned to the document can see who has it
checked out. Hold your cursor over the Checked Out text in the Status column to display the
hover text.
This is displayed in the figure below:
Figure 8.8: Work with Documents Page
2. Locate the document you want to check-in, Click the Check In ( ) icon.
This displays Check In a Document page as shown below:

8. Edit, Review and Approve Documents PharmaReady™ DMS User Guide
© 2011 TAKE Solutions, Inc. All Rights Reserved. Page 171 of 255
Figure 8.9: Check In a Document Page
8.5.2 Check In a Document Page
The Check In a Document page allows you to:
i. Select and upload the edited file (for authors not using in-place editing)
ii. Check in the editing file (for authors using in-place editing)
iii. Upload a different file (regardless of an author’s editing functionality)
iv. Abandon changes and release the original file to the DMS
To upload a different file, click the Add button and navigate to the file to be checked in.
This page may also include e-signature fields. For documents requiring a check-in e-signature,
select a Meaning and enter your Password.
You also have the option of making comments in the Change Summary text box regarding this
round of editing.
This is shown in the figure below:

8. Edit, Review and Approve Documents PharmaReady™ DMS User Guide
© 2011 TAKE Solutions, Inc. All Rights Reserved. Page 172 of 255
Figure 8.10: Check In a Document Page(Change Summary entered)
When a document is ready for the next stage in its lifecycle, a document author must contact the
Document Owner and request the change in activity mode.
Note : If you accidentally checked out the document and are not uploading an edited file, use
the Abandon Changes button.
3. After updating the details, click the Submit button.
You will return to the Work with Documents Page.
8.5.3 Work with Documents Page
When edits are made to a file, the previous versions are visible on the Work with Documents
page. Each time a document is checked out, edited, and checked back in, the version number is
increased by one.
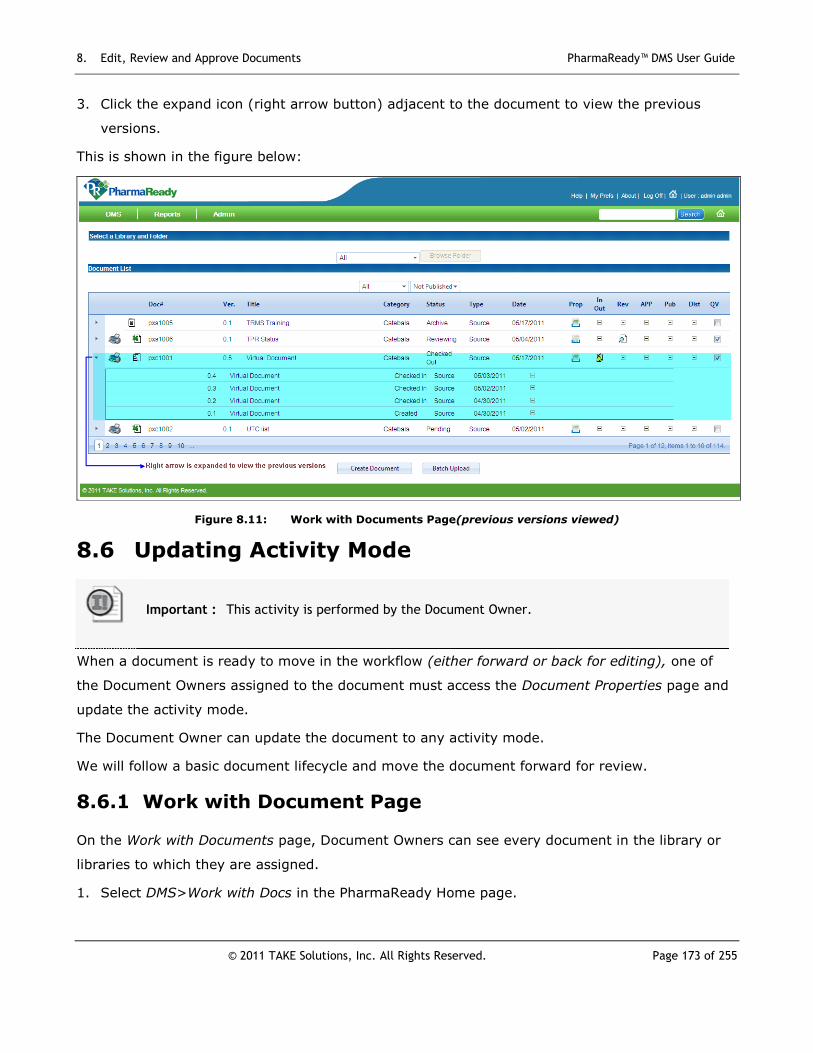
8. Edit, Review and Approve Documents PharmaReady™ DMS User Guide
© 2011 TAKE Solutions, Inc. All Rights Reserved. Page 173 of 255
3. Click the expand icon (right arrow button) adjacent to the document to view the previous
versions.
This is shown in the figure below:
Figure 8.11: Work with Documents Page(previous versions viewed)
8.6 Updating Activity Mode
Important : This activity is performed by the Document Owner.
When a document is ready to move in the workflow (either forward or back for editing), one of
the Document Owners assigned to the document must access the Document Properties page and
update the activity mode.
The Document Owner can update the document to any activity mode.
We will follow a basic document lifecycle and move the document forward for review.
8.6.1 Work with Document Page
On the Work with Documents page, Document Owners can see every document in the library or
libraries to which they are assigned.
1. Select DMS>Work with Docs in the PharmaReady Home page.

8. Edit, Review and Approve Documents PharmaReady™ DMS User Guide
© 2011 TAKE Solutions, Inc. All Rights Reserved. Page 174 of 255
Note : The Author must alert the Document Owner when the document is ready to move to
review mode.
Tip : To quickly locate a document, select its library, folder (using the Browse Folders button),
and category.
Figure 8.12: Work with Documents Page
2. Locate the document you want to update and click the View Properties icon.
This displays the Document Properties page.

8. Edit, Review and Approve Documents PharmaReady™ DMS User Guide
© 2011 TAKE Solutions, Inc. All Rights Reserved. Page 175 of 255
8.6.2 Document Properties Page
Figure 8.13: Document Properties Page
3. Select the appropriate Activity Mode radio button appearing at the bottom of the General Info
tab of the Document Properties page.
For example, if you want make the document available to Reviewers, select the Review radio
button as shown in the sample below:

8. Edit, Review and Approve Documents PharmaReady™ DMS User Guide
© 2011 TAKE Solutions, Inc. All Rights Reserved. Page 176 of 255
Additional information may be required at the time you update the activity mode. For example,
you will need to provide a new version number value if the document creator did not do so.
4. Click the Submit button, in the Document
This displays the Work with Documents page.
8.6.2.1 About Updating the Activity Mode
Here are a few items to keep in mind when updating activity mode:
As the PharmaReady DMS is delivered, Document Owners, Library Administrators, and
System Administrators can update a document’s properties.
The Description, New Version Number, and Effective Dates fields all become required fields
as the document moves through its lifecycle. If this data is not added at the time a
document is created, you will be prompted to add required values as part of updating the
activity mode.
You can make multiple changes to the Document Properties page during the same session.
For example, you can add a Reviewer to the document properties, then move it to Review
mode. Once in review mode, however, you cannot add people as Reviewers.
8.7 Reviewing Documents
Important : Performed by one or more Reviewers. May also be performed by a delegated
Reviewer as established on the My Preferences page.
Once a document is ready for review and placed in the Review activity mode by a Document
Owner, the assigned Reviewers receive an email notification and an action item.
As a Reviewer, you can open the document in a browser window and review it online or you
can print a hard copy. You cannot, however, make any edits to the source document. Instead,
you are able to attach an edited copy of the document (or any other attachment) to your
review.

8. Edit, Review and Approve Documents PharmaReady™ DMS User Guide
© 2011 TAKE Solutions, Inc. All Rights Reserved. Page 177 of 255
You can see the comments of any previous reviews, and if the review has an attachment, you
can open and add to it.
After all reviews are in, all Document Owners receive a “Document Reviews Completed
Notification” email. If any of the reviews require that changes to the file, the document must
be returned to the Edit activity mode.
8.7.1 DMS Central Page
Note : You can access documents awaiting your review from the Work with Documents page;
each will be marked with a Review icon.
The best way to conduct a review is to use both active hyperlinks for the review item on the
Central page.
o First, you’ll access the file from the Title hyperlink, either saving a copy or opening it
online.
o After reviewing it, you’ll return to the Central page and click the Review hyperlink.
1. Select DMS>Central from the PharmaReady DMS page.
The DMS Central page displays:
Figure 8.14: Central Page
2. Click the document name in the Title column.
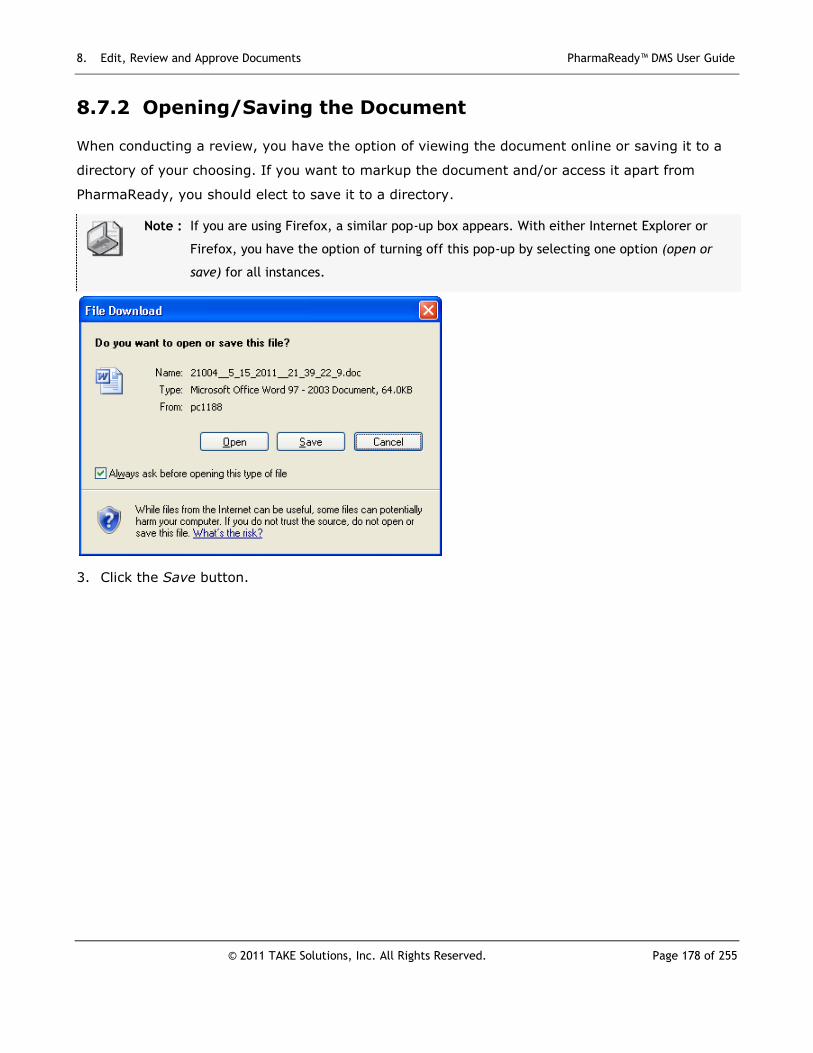
8. Edit, Review and Approve Documents PharmaReady™ DMS User Guide
© 2011 TAKE Solutions, Inc. All Rights Reserved. Page 178 of 255
8.7.2 Opening/Saving the Document
When conducting a review, you have the option of viewing the document online or saving it to a
directory of your choosing. If you want to markup the document and/or access it apart from
PharmaReady, you should elect to save it to a directory.
Note : If you are using Firefox, a similar pop-up box appears. With either Internet Explorer or
Firefox, you have the option of turning off this pop-up by selecting one option (open or
save) for all instances.
3. Click the Save button.
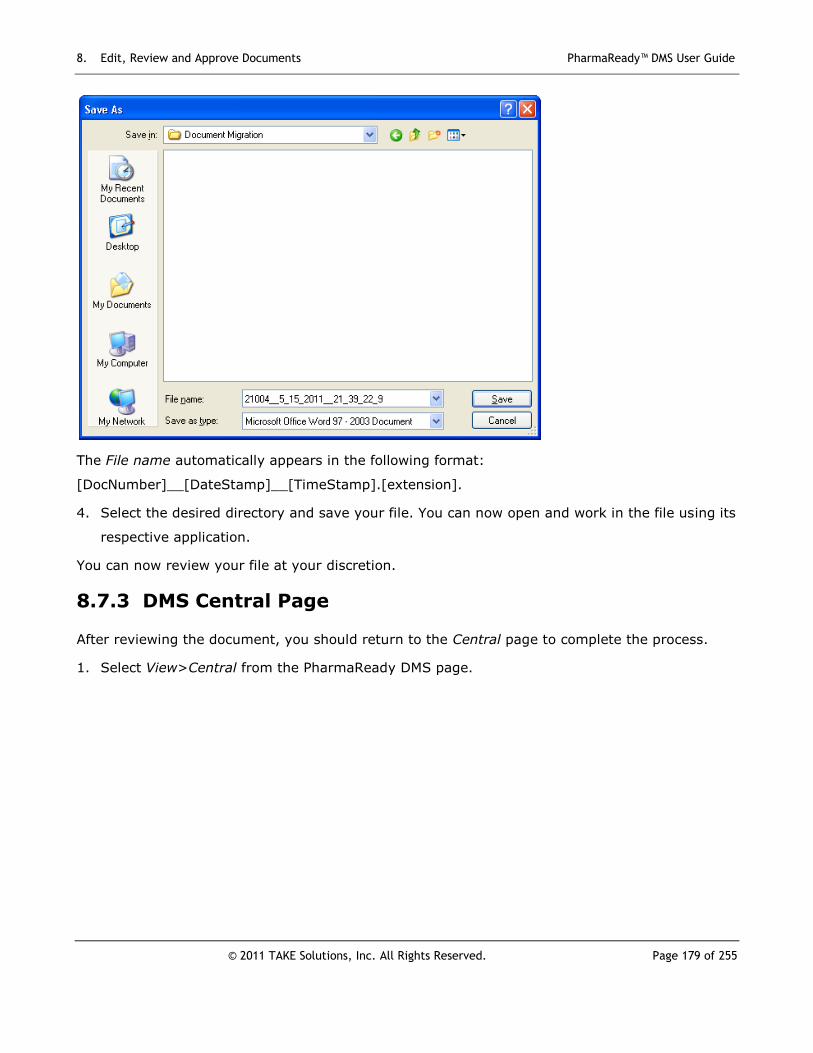
8. Edit, Review and Approve Documents PharmaReady™ DMS User Guide
© 2011 TAKE Solutions, Inc. All Rights Reserved. Page 179 of 255
The File name automatically appears in the following format:
[DocNumber]__[DateStamp]__[TimeStamp].[extension].
4. Select the desired directory and save your file. You can now open and work in the file using its
respective application.
You can now review your file at your discretion.
8.7.3 DMS Central Page
After reviewing the document, you should return to the Central page to complete the process.
1. Select View>Central from the PharmaReady DMS page.

8. Edit, Review and Approve Documents PharmaReady™ DMS User Guide
© 2011 TAKE Solutions, Inc. All Rights Reserved. Page 180 of 255
Figure 8.15: Central Page
2. Click the Review hyperlink in the Action column. The File Download window appears again, as
shown in the below sample:
3. Click the Cancel button. The Review a Document page will appear.

8. Edit, Review and Approve Documents PharmaReady™ DMS User Guide
© 2011 TAKE Solutions, Inc. All Rights Reserved. Page 181 of 255
8.7.4 Review a Document Page
Figure 8.16: Review a Document Page
The Review a Document page allows you to enter a small number of comments as well as attach
a file. The file you attach is visible to all of the document’s Reviewers as well as the Document
Owner(s).
4. Enter your review comments and attach a file (if desired).
The details are entered as shown in the sample below:

8. Edit, Review and Approve Documents PharmaReady™ DMS User Guide
© 2011 TAKE Solutions, Inc. All Rights Reserved. Page 182 of 255
Note : For documents requiring an e-signature, select a meaning and enter your password on the
Review a Document page.
5. Click the Submit button.
You will return to the DMS Central page.
8.8 Approving Documents
Important : Performed by one or more Approvers. May also be performed by a delegated
Approver as established on the My Preferences page.
Note : Before updating the activity mode, direct the class to the Reviewers tab and point out the
comments and attached files (if any). Then return them to the General Info tab and
update the activity mode to Approve before proceeding.
Once all reviews are in and a Document Owner has updated the activity mode of the document to
Approve, assigned Approvers receive an email notification and action item. If the approvals are
set as sequential, only the first Approver will receive notification. After their approval, the next
Approver in line will receive their notification and action item.
Electronic signatures (e-signatures) can be required by library for specific actions to a document.
It is likely that approving a document is an action that will require an e-signature and the
selection of a predefined meaning behind the action.

8. Edit, Review and Approve Documents PharmaReady™ DMS User Guide
© 2011 TAKE Solutions, Inc. All Rights Reserved. Page 183 of 255
8.8.1 DMS Central Page
The best way to conduct a review is to use both active hyperlinks for the approve item on the
DMS Central page.
First, you’ll access the file from the Title hyperlink, either saving a copy or opening it
online.
After reviewing it, you’ll return to the DMS Central page and click the Approve hyperlink.
Note : You can access documents awaiting your approval from the Work with Documents page;
each will be marked with an Approve icon.
1. Select View>Central in the PharmaReady Home page.
This displays the DMS Central page:
Figure 8.17: Central Page
2. Click the document name in the Title column.

8. Edit, Review and Approve Documents PharmaReady™ DMS User Guide
© 2011 TAKE Solutions, Inc. All Rights Reserved. Page 184 of 255
8.8.2 Opening/Saving the Document
When approving a document, you have the option of viewing the document online or saving it to
a directory of your choosing.
Note : If you are using Firefox, a similar pop-up box appears. With either Internet Explorer or
Firefox, you have the option of turning off this pop-up by selecting one option (open or
save) for all instances.
3. Click the Save button.
The File name automatically appears in the following format:
[DocNumber]__[DateStamp]__[TimeStamp].[extension].
4. Select the desired directory and save your file. You can now open and read the file outside of
the browser.

8. Edit, Review and Approve Documents PharmaReady™ DMS User Guide
© 2011 TAKE Solutions, Inc. All Rights Reserved. Page 185 of 255
8.8.3 Central Page
After reviewing the document, you should return to the DMS Central page to complete the
process.
1. Select DMS>Central in the PharmaReady Home page.
Figure 8.18: Central Page
2. Click the Approve hyperlink in the Action column.
The Approve a Document page will appear.
8.8.4 Approve a Document Page

8. Edit, Review and Approve Documents PharmaReady™ DMS User Guide
© 2011 TAKE Solutions, Inc. All Rights Reserved. Page 186 of 255
Figure 8.19: Approve a Document Page
The Approve a Document page allows you to approve or not approve the file.
Note : The fields on this page can also generate an e-signature by requiring a meaning and your
password to approve (or not approve) the document. The meaning you select should
correspond to whether you approve or do not approve.
6. Enter your approval comments(if desired) as shown in the sample below:
Note : If you are not approving the document, click the Not Approved button.
7. Click the Approved button.
You will return to the DMS Central page.
Note : Once all approvals are completed, the author receives a “Document Approval Completed
Notification” email to announce that the document is ready for publishing.

PharmaReady™ DMS User Guide
© 2008 TAKE Solutions, Inc. All Rights Reserved. Page 187 of 255
CHAPTER 9
9. Publish, Distribute & Read
Documents
About this Chapter
The final steps in the document’s lifecycle include the publishing
of documents, the distribution of documents and associated
reader notification(s), and the actions required of the readers
themselves.
This chapter includes the following sections:
Contents
Topic Page
Publish a document 190
Distribute a document 196
Read a document 198
Verify reading a document 200
Locate documents at every lifecycle stage 201

9. Publishing Documents PharmaReady™ DMS User Guide
© 2008 TAKE Solutions, Inc. All Rights Reserved. Page 188 of 255
9.1 Publishing Documents
Important : Performed by a Publisher or Document Owner assigned to the individual
document.
Once the activity mode of a document is set to Publish, the document is ready to become live in
the DMS. Publishing a document changes who can view the document.
For example, readers can see published documents in the DMS that are in effect and to which
they have read rights.
9.1.1 Work with Documents Page
Documents in the Publish activity mode that have yet to be published show a status of Pending on
the Work with Documents page.
Caution : All documents waiting to be published are in a Pending status; this includes documents
that are added to the DMS in the Publish Activity Mode initially. In other words, a
publisher must perform this step on all documents in the DMS. Documents that are
published as part of a batch upload are the exception.
1. Select DMS>Work with Docs in the DMS Home page.
Figure 9.1: Work with Documents Page
2. Locate the document you want to publish, and click the Publish ( ) icon.

9. Publishing Documents PharmaReady™ DMS User Guide
© 2011 TAKE Solutions, Inc. All Rights Reserved. Page 189 of 255
9.1.2 Publish a Document Page
Figure 9.2: Publish a Document Page
The Publish a Document page is divided into sections:
i. Document Information
ii. Approval Activity
iii. Publish Options
iv. Save Changes
The Publish a Document page details are described in the table below:

9. Publishing Documents PharmaReady™ DMS User Guide
© 2011 TAKE Solutions, Inc. All Rights Reserved. Page 190 of 255
Table 9.1: Publish a Document Page – Sections
Fields - Description &Instruction
1 & 2. Document Information& Approval Activity
The first two sections of the Publish a Document page provide read-only information related to the
document, key dates (if you expand the Document Information section heading), and approvals.
Caution : If a document is assigned to a library that requires approvals prior to publishing, the
Submit button will not appear on the Publish a Document page until all approvals are
complete. A warning will also appear at the top of the page. Remember that the
document must be returned to the Approval Activity Mode to complete this step of the
workflow.

9. Publishing Documents PharmaReady™ DMS User Guide
© 2011 TAKE Solutions, Inc. All Rights Reserved. Page 191 of 255
3. Publish Options
a. Format In the Publish Options section, you should select the format and, if publishing in PDF
format, the specific settings for the published document.
Three formats exist for publishing a document:
In original format—will not PDF the file and no formatting or security settings will
be applied.
In original PDF format and apply PDF options— use when the original file is a PDF
and you want to add formatting and/or establish security.
In PDF format and apply PDF options—use to convert a file to a PDF and add
formatting and/or establish security.
Note : PharmaReady can convert the following file types to PDF: .doc,
.docx, .ppt, .pptx, .xls, .xlsx, .rtf, .rtfx.
b. PDF
Options
The table below details the formatting applied by each PDF format checkbox.
Table 9.2: Publish a Document Page (PDF Options)
Checkbox Description
Include the
Following text as a
Watermark
Applies the text entered in the adjacent field as a
watermark on each page of the published document.
Include version
and published
Date watermark
Applies the version number and date the document was
published as a watermark on each page of the published
document.
Create Bookmarks
from Style Settings
(for Word Docs)
Creates hyperlinks in the PDF file based on predefined
styles from Microsoft Word.
Append Document
Control
information page
Adds a final page to the published document providing
Document Control data (doc #, version, library, author,
key dates, and reader rights).
Prevent PDF from Allows readers to view the document, but disables printing
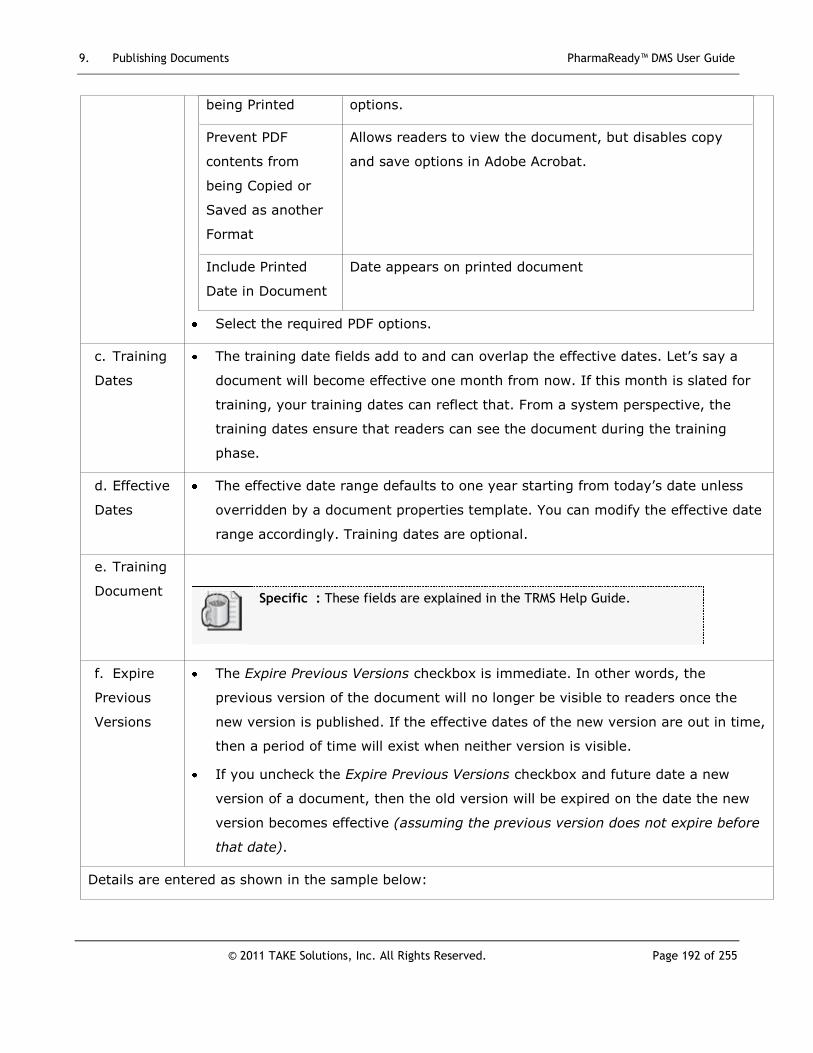
9. Publishing Documents PharmaReady™ DMS User Guide
© 2011 TAKE Solutions, Inc. All Rights Reserved. Page 192 of 255
being Printed options.
Prevent PDF
contents from
being Copied or
Saved as another
Format
Allows readers to view the document, but disables copy
and save options in Adobe Acrobat.
Include Printed
Date in Document
Date appears on printed document
Select the required PDF options.
c. Training
Dates
The training date fields add to and can overlap the effective dates. Let’s say a
document will become effective one month from now. If this month is slated for
training, your training dates can reflect that. From a system perspective, the
training dates ensure that readers can see the document during the training
phase.
d. Effective
Dates
The effective date range defaults to one year starting from today’s date unless
overridden by a document properties template. You can modify the effective date
range accordingly. Training dates are optional.
e. Training
Document
Specific : These fields are explained in the TRMS Help Guide.
f. Expire
Previous
Versions
The Expire Previous Versions checkbox is immediate. In other words, the
previous version of the document will no longer be visible to readers once the
new version is published. If the effective dates of the new version are out in time,
then a period of time will exist when neither version is visible.
If you uncheck the Expire Previous Versions checkbox and future date a new
version of a document, then the old version will be expired on the date the new
version becomes effective (assuming the previous version does not expire before
that date).
Details are entered as shown in the sample below:
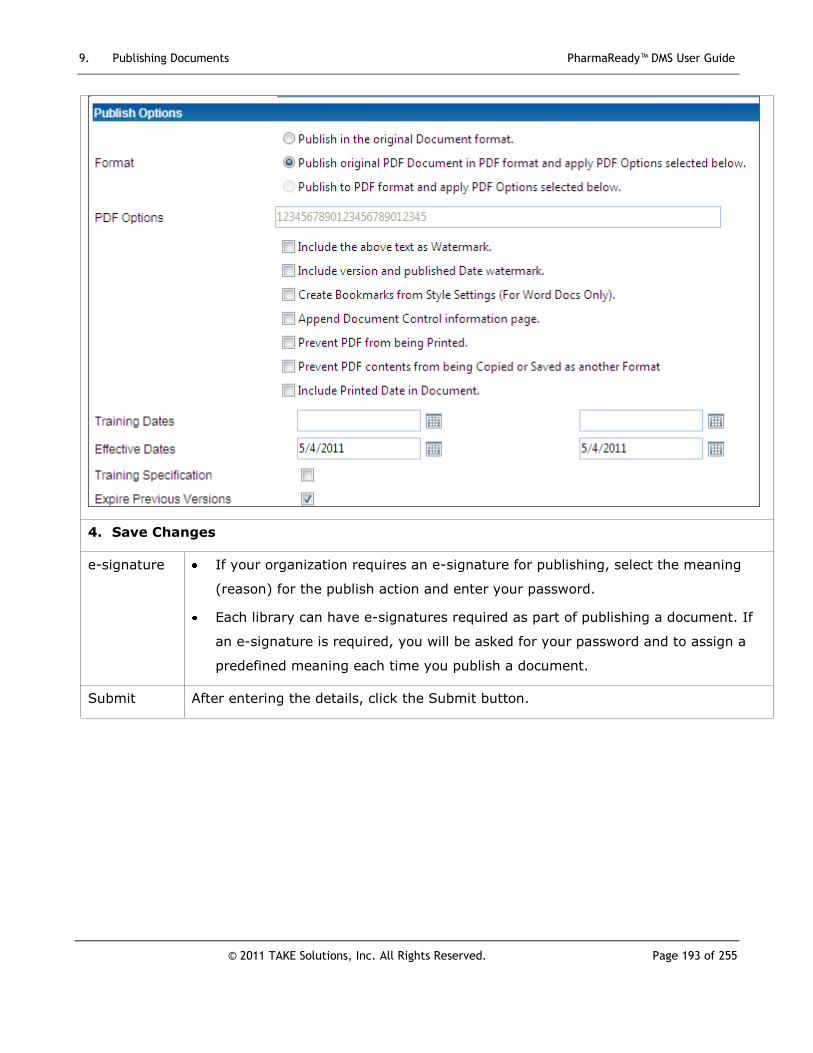
9. Publishing Documents PharmaReady™ DMS User Guide
© 2011 TAKE Solutions, Inc. All Rights Reserved. Page 193 of 255
4. Save Changes
e-signature If your organization requires an e-signature for publishing, select the meaning
(reason) for the publish action and enter your password.
Each library can have e-signatures required as part of publishing a document. If
an e-signature is required, you will be asked for your password and to assign a
predefined meaning each time you publish a document.
Submit After entering the details, click the Submit button.

9. Publishing Documents PharmaReady™ DMS User Guide
© 2011 TAKE Solutions, Inc. All Rights Reserved. Page 194 of 255
9.2 Distributing Documents
Important : Performed by a Distributor or Document Owner assigned to the individual
document.
Once a document is published, readers must be notified that the document is now available.
Distributing a document triggers action items and email notifications, so this step is vital in terms
of communication and assigning the appropriate reader actions.
As stated earlier, the final status of an effective document is Published. Distributed is not a
status. A document can be distributed many times, but its status will not change until it expires,
is expired, or is archived.
9.2.1 Work with Documents Page
On the Work with Documents page, Distributors and Document Owners will see all published
documents in the libraries to which they have rights. Keep in mind you may need to update the
Status filter on the page to Published.
1. Select DMS>Work with Docs from the DMS Home Page.
Figure 9.3: Work with Documents Page
2. Locate the document you want to distribute and click the Distribute ( ) icon.
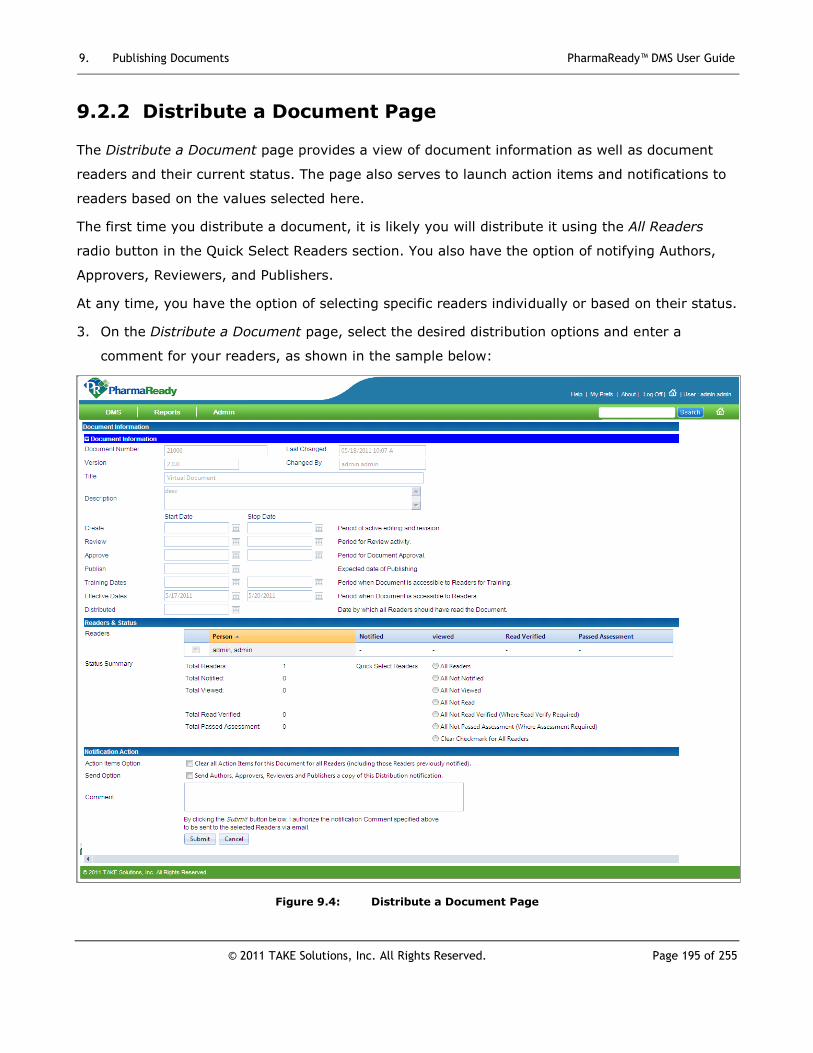
9. Publishing Documents PharmaReady™ DMS User Guide
© 2011 TAKE Solutions, Inc. All Rights Reserved. Page 195 of 255
9.2.2 Distribute a Document Page
The Distribute a Document page provides a view of document information as well as document
readers and their current status. The page also serves to launch action items and notifications to
readers based on the values selected here.
The first time you distribute a document, it is likely you will distribute it using the All Readers
radio button in the Quick Select Readers section. You also have the option of notifying Authors,
Approvers, Reviewers, and Publishers.
At any time, you have the option of selecting specific readers individually or based on their status.
3. On the Distribute a Document page, select the desired distribution options and enter a
comment for your readers, as shown in the sample below:
Figure 9.4: Distribute a Document Page

9. Publishing Documents PharmaReady™ DMS User Guide
© 2011 TAKE Solutions, Inc. All Rights Reserved. Page 196 of 255
4. After specifying the required details, click the submit button.
You will return to the Central page.
9.3 Reading Required Documents
Note : As soon as a document is published, readers can see it on the Browse Documents page.
The events that occur for readers upon distribution of a document are determined by two pages in
PharmaReady. Who receives a distribution notification is determined by the settings on the
Distribute a Document page. Whether the reader has required actions associated with a document
is determined by checkboxes on the Readers tab of the Document Properties page.
When a document is distributed, every reader that has elected to receive email notifications from
PharmaReady receives a “Document Distribution Notification” email.
A distribution notification lets you know that the document is available for you to read. If you are
required to read the document, you will receive a Read action item on your Central page when
the document is distributed or when an administrator sends DMS action items to you by updating
your Maintain People page.
9.3.1 Central Page
1. Select DMS>Central in the DMS Home page.
Note : The Due Date for each read action is the Effective Stop Date from the Document
Properties’ Key Dates tab.

9. Publishing Documents PharmaReady™ DMS User Guide
© 2011 TAKE Solutions, Inc. All Rights Reserved. Page 197 of 255
Figure 9.5: DMS Central Page (Action – Read)
2. Click the Read hyperlink in the Action column.
Note : If nothing happens after clicking the hyperlink, it is likely that your browser is blocking
pop-ups. You must change your browser settings to allow pop-ups from the PharmaReady
URL.
9.3.2 Reading a Document
When you click either the Read hyperlink on the Action Item or the hyperlink from the notification
email, the document opens in a browser window. Closing the browser window indicates to
PharmaReady that you have read the document and clears the Read action item from the Central
page.
3. After reading the document, close the browser window.

9. Publishing Documents PharmaReady™ DMS User Guide
© 2011 TAKE Solutions, Inc. All Rights Reserved. Page 198 of 255
9.4 Verifying Reading a Document
If you are required to verify that you have read a document, this is a separate action from
reading the document. As such, readers receive a separate action item that appears after opening
the document or clicking the Read hyperlink.
The Verify Read action does not have a corresponding email notification since the action item
appears immediately after reading the document.
9.4.1 Central Page
Closing the document’s browser window triggers PharmaReady to create the Verify Read action
item.
1. Select DMS >Central in the DMS Home page.
Figure 9.6: Central Page (Action – Verify Read)
2. Click the Verify Read hyperlink in the Action column.
This displays the Verify Read page.
9.4.2 Verify Read Page
The Verify Read page is a second level of assurance that a reader has indeed read a document.
Depending on library settings, this step can also include use of e-signatures. In this case, readers
are asked for their password and to assign a meaning to the action before they can submit the
page.

9. Publishing Documents PharmaReady™ DMS User Guide
© 2011 TAKE Solutions, Inc. All Rights Reserved. Page 199 of 255
3. If an e-signature is required, select a meaning and enter your password in the Verify Read
Action section.
Figure 9.7: Verify Read Page
4. Click the Submit button.
You will return to the Central page.
9.5 Locating Documents
As PharmaReady DMS users, you should now be familiar with locating documents using the
PharmaReady menu and filtering views by fields such as Library, Category, and Status.
Beyond the menu, the DMS offers two other means of locating documents:
o The Browse Documents page
o The Search page
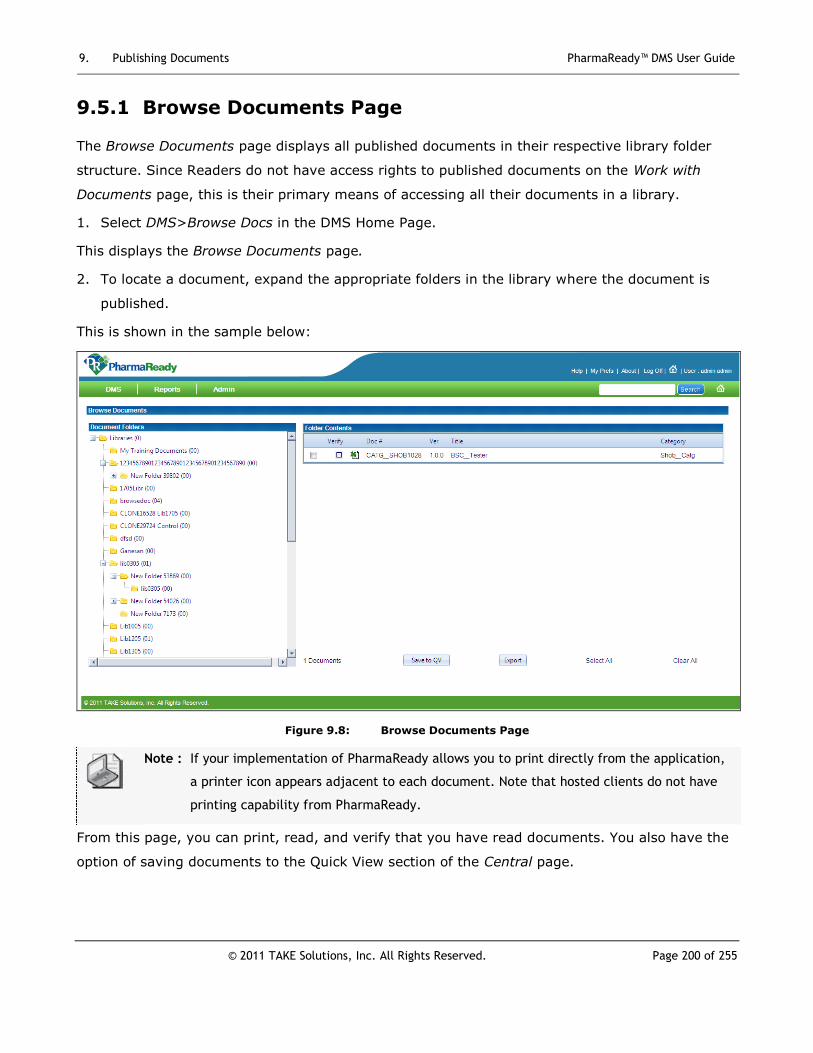
9. Publishing Documents PharmaReady™ DMS User Guide
© 2011 TAKE Solutions, Inc. All Rights Reserved. Page 200 of 255
9.5.1 Browse Documents Page
The Browse Documents page displays all published documents in their respective library folder
structure. Since Readers do not have access rights to published documents on the Work with
Documents page, this is their primary means of accessing all their documents in a library.
1. Select DMS>Browse Docs in the DMS Home Page.
This displays the Browse Documents page.
2. To locate a document, expand the appropriate folders in the library where the document is
published.
This is shown in the sample below:
Figure 9.8: Browse Documents Page
Note : If your implementation of PharmaReady allows you to print directly from the application,
a printer icon appears adjacent to each document. Note that hosted clients do not have
printing capability from PharmaReady.
From this page, you can print, read, and verify that you have read documents. You also have the
option of saving documents to the Quick View section of the Central page.

9. Publishing Documents PharmaReady™ DMS User Guide
© 2011 TAKE Solutions, Inc. All Rights Reserved. Page 201 of 255
9.5.2 The Search Page
For DMS users, the Search page provides a robust tool for locating any document to which the
user has rights.
1. Click Srch from the set of common page buttons to access the Search page.
This displays the Search page as shown below:
Figure 9.9: Search Page
The Search page is divided into two tabs: Criteria and Results.
The Search instructions are explained below:

9. Publishing Documents PharmaReady™ DMS User Guide
© 2011 TAKE Solutions, Inc. All Rights Reserved. Page 202 of 255
9.5.2.1 Criteria Tab
Note : Readers will not see documents that are not in effect.
Table 9.3: Search Page
Fields - Description &Instruction
1. Criteria Tab
This tab includes all available search fields.
Create New To create a new search, enter a name in the field adjacent to the Create New
button, then click Create New.
Saved Searches To use a saved search, select it from the drop-down list and click the Load
button.
Text Contains You can perform a Text Contains search from any page using the Srch field.
Enter the text you want to search by and click the Srch button adjacent to the
field.
The Results tab of the Search page will automatically display all current
documents containing that text.
Quick Meta
Search
You can search key fields including; Title, Doc Number, Keywords and the
Custom Properties fields displayed below.
Library
Select the Library, Category, Status, Project, Department, Job Requirement
and Assessment from the drop-down list.
Category
Status
Project
Department
Job Requirement
Assessment
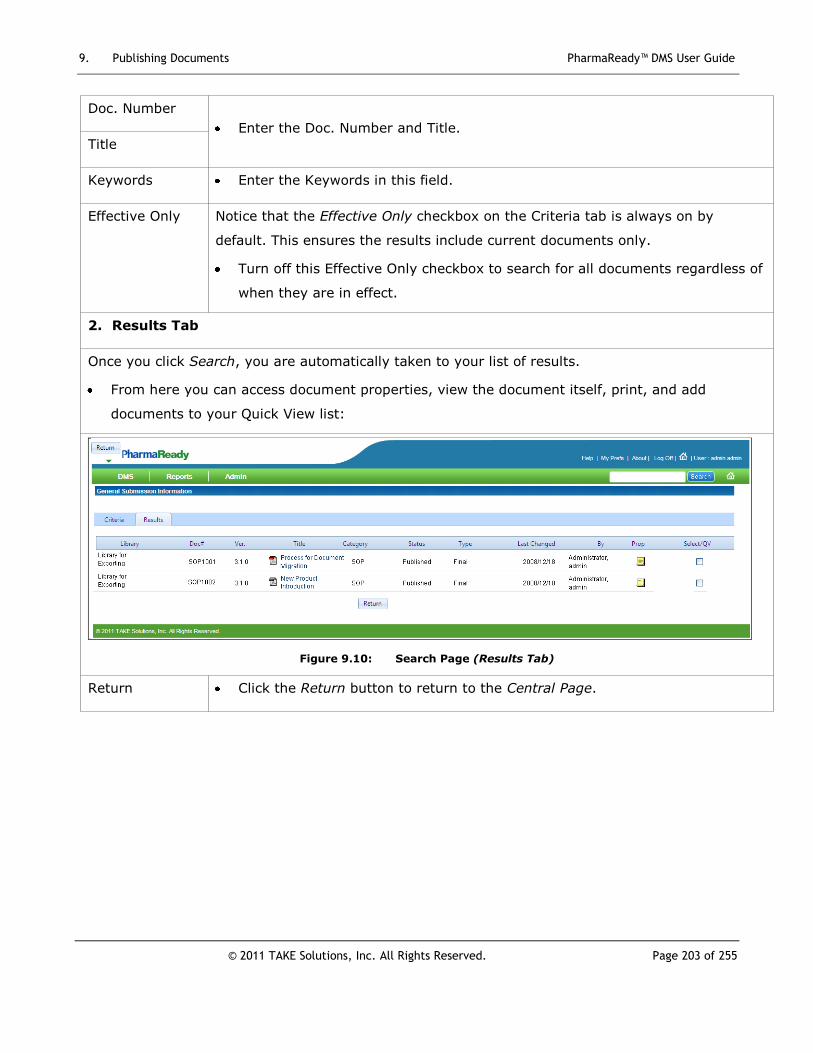
9. Publishing Documents PharmaReady™ DMS User Guide
© 2011 TAKE Solutions, Inc. All Rights Reserved. Page 203 of 255
Doc. Number
Enter the Doc. Number and Title.
Title
Keywords Enter the Keywords in this field.
Effective Only Notice that the Effective Only checkbox on the Criteria tab is always on by
default. This ensures the results include current documents only.
Turn off this Effective Only checkbox to search for all documents regardless of
when they are in effect.
2. Results Tab
Once you click Search, you are automatically taken to your list of results.
From here you can access document properties, view the document itself, print, and add
documents to your Quick View list:
Figure 9.10: Search Page (Results Tab)
Return Click the Return button to return to the Central Page.

PharmaReady™ DMS User Guide
© 2008 TAKE Solutions, Inc. All Rights Reserved. Page 204 of 255
CHAPTER 10
10. Different Types of Reports
All delivered reports pertaining to documents, people, and
monitoring system activity are accessed from the Reports
menu. This chapter includes the following sections:
Contents
Topic Page
Archive Report 207
Batch Export Report 208
Batch Upload Report 209
Date Due Review 210
Delegated Approvals 211
Doc Approve History 212
Doc Chk InOut Sum 213
Doc Folder List 214
Doc Review History 215
Doc Workflow Assign 216
Pending Doc Action 217
People Wrkflw Assign 218
Pub Doc by Readers 219
Published Doc List 220
Read Verify Summary 221
Access Report 223
Delegation Report 224
Read Verify Activity 224
Reader Summary 225
Required Reading 227
Retention Date 228
Audit Log Listing 229
Access Rights 230
Data Summary 231
People by Department 232
People by Project 233
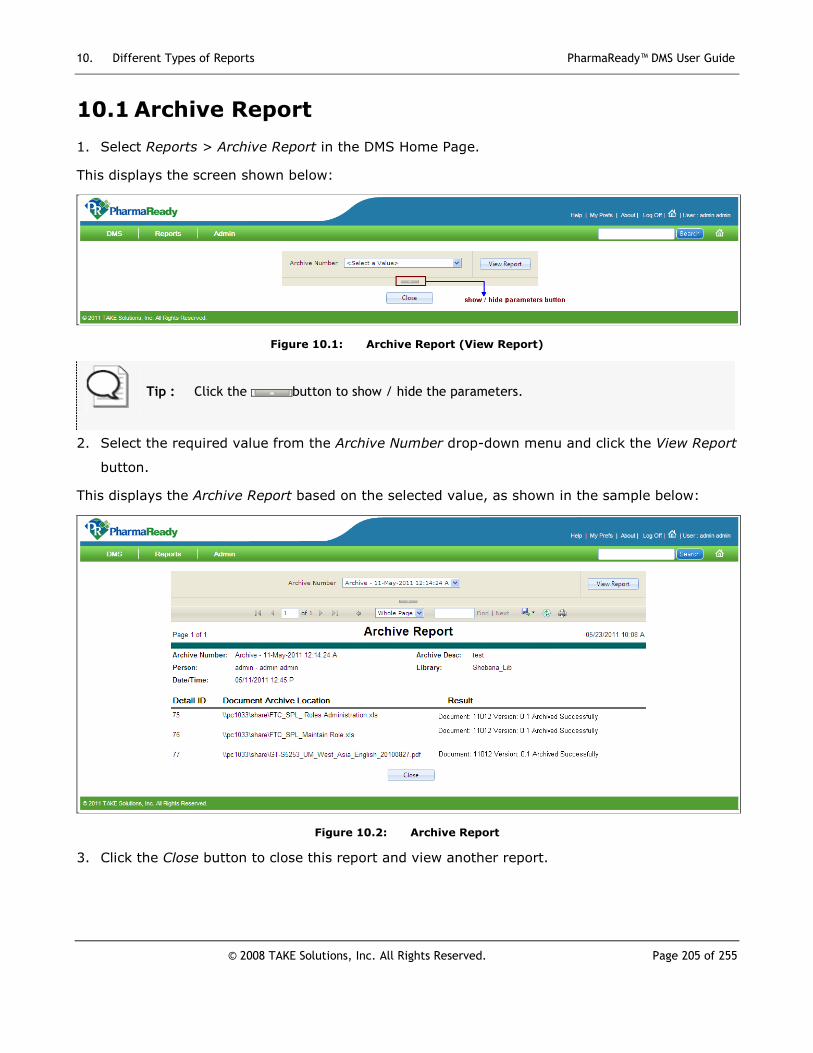
10. Different Types of Reports PharmaReady™ DMS User Guide
© 2008 TAKE Solutions, Inc. All Rights Reserved. Page 205 of 255
10.1 Archive Report
1. Select Reports > Archive Report in the DMS Home Page.
This displays the screen shown below:
Figure 10.1: Archive Report (View Report)
Tip : Click the button to show / hide the parameters.
2. Select the required value from the Archive Number drop-down menu and click the View Report
button.
This displays the Archive Report based on the selected value, as shown in the sample below:
Figure 10.2: Archive Report
3. Click the Close button to close this report and view another report.

10. Different Types of Reports PharmaReady™ DMS User Guide
© 2011 TAKE Solutions, Inc. All Rights Reserved. Page 206 of 255
10.2 Batch Export Report
1. Select Reports >Batch Export Report in the DMS Home Page.
This displays the screen shown below:
Figure 10.3: Batch Export Report (View Report)
2. Select the required value from the Batch Number drop-down menu and click the View Report
button.
This displays the Batch Export Report based on the selected value, as shown in the sample below:
Figure 10.4: Batch Export Report
3. Click the Close button to close this report and view another report.

10. Different Types of Reports PharmaReady™ DMS User Guide
© 2011 TAKE Solutions, Inc. All Rights Reserved. Page 207 of 255
10.3 Batch Upload Report
1. Select Reports > Batch Upload Report in the DMS Home Page.
This displays the screen shown below:
Figure 10.5: Batch Upload Report (View Report)
2. Select the required value from the Batch Number drop-down menu and click the View Report
button.
This displays the Batch Upload Report based on the selected value, as shown in the sample
below:
Figure 10.6: Batch Export Report
3. Click the Close button to close this report and view another report.

10. Different Types of Reports PharmaReady™ DMS User Guide
© 2011 TAKE Solutions, Inc. All Rights Reserved. Page 208 of 255
10.4 Date Due Review Report
1. Select Reports >Date Due Review Report in the DMS Home Page.
This displays the screen shown below:
Figure 10.7: Date Due Review Report (View Report)
2. Enter the due Review Begin Date
3. Enter the Due Review end Date.
4. Select the required Library from the drop-down menu.
5. Enter the Training or Effective On Date and click the View Report button.
This displays the Date Due Review Report based on the selected value, as shown in the sample
below:
Figure 10.8: Date Due Review Report
6. Click the Close button to close this report and view another report.

10. Different Types of Reports PharmaReady™ DMS User Guide
© 2011 TAKE Solutions, Inc. All Rights Reserved. Page 209 of 255
10.5 Delegated Approvals Report
1. Select Reports >Delegated Approvals Report in the DMS Home Page.
This displays the screen shown below:
Figure 10.9: Delegated Approvals Report (View Report)
2. Select the Document Number, Delegated By (role), and Delegate To (role) from the drop-
down menu.
3. Select the Approved On Begin Date and End Date from the date-picker icon and click the View
Report button.
Note: The Approved On Begin Date & End Dates are only if NULL option is deselected.
This displays the Delegated Approvals Report based on the selected value, as shown in the
sample below:
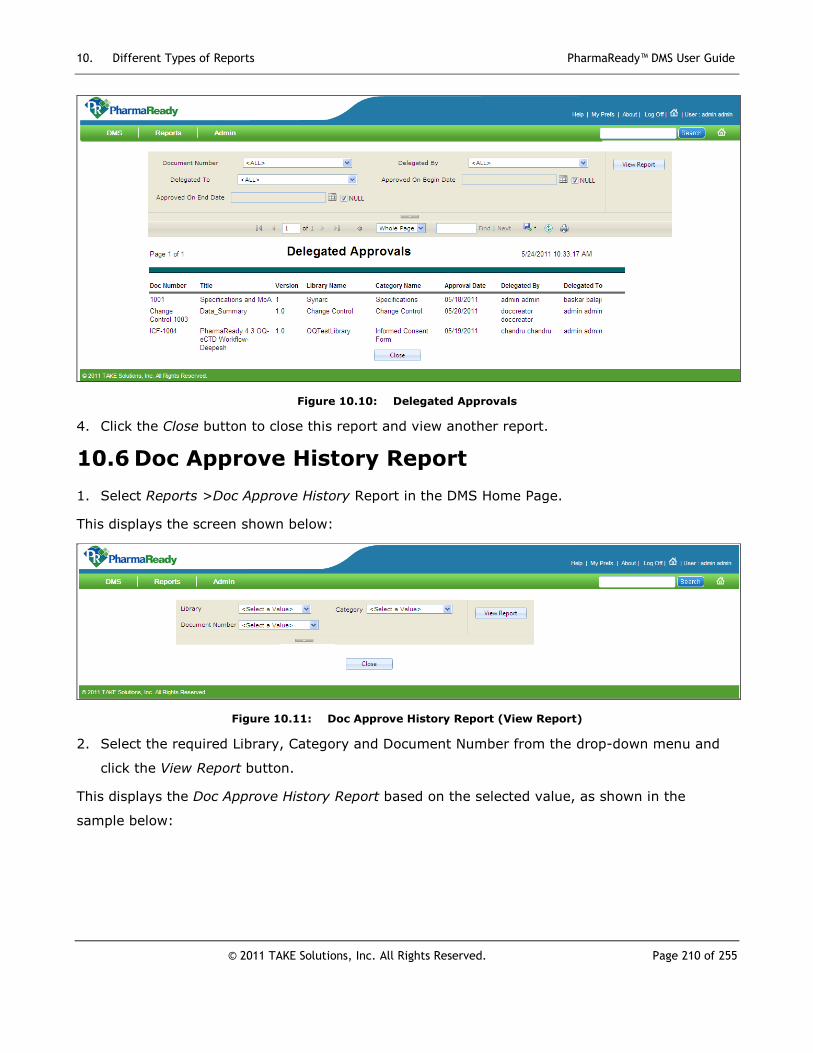
10. Different Types of Reports PharmaReady™ DMS User Guide
© 2011 TAKE Solutions, Inc. All Rights Reserved. Page 210 of 255
Figure 10.10: Delegated Approvals
4. Click the Close button to close this report and view another report.
10.6 Doc Approve History Report
1. Select Reports >Doc Approve History Report in the DMS Home Page.
This displays the screen shown below:
Figure 10.11: Doc Approve History Report (View Report)
2. Select the required Library, Category and Document Number from the drop-down menu and
click the View Report button.
This displays the Doc Approve History Report based on the selected value, as shown in the
sample below:

10. Different Types of Reports PharmaReady™ DMS User Guide
© 2011 TAKE Solutions, Inc. All Rights Reserved. Page 211 of 255
Figure 10.12: Doc Approval History
3. Click the Close button to close this report and view another report.
10.7 Doc Check In Out Sum
1. Select Reports >Doc Check In Out Sum Report in the DMS Home Page.
This displays the screen shown below:
Figure 10.13: Doc Check In Out Sum (View Report)
2. Select the required value from the Document Number drop-down menu and click the View
Report button.
This displays the Doc Check In Out Sum Report based on the selected value, as shown in the
sample below:

10. Different Types of Reports PharmaReady™ DMS User Guide
© 2011 TAKE Solutions, Inc. All Rights Reserved. Page 212 of 255
Figure 10.14: Doc Check In Out Sum
3. Click the Close button to close this report and view another report.
10.8 Doc Folder List Report
1. Select Reports >Doc Folder List Report in the DMS Home Page..
This displays the screen shown below:
Figure 10.15: Doc Folder List Report (View Report)
2. Select the required Library and Category from the drop-down menu and click the View Report
button.
This displays the Doc Folder List Report based on the selected value, as shown in the sample
below:
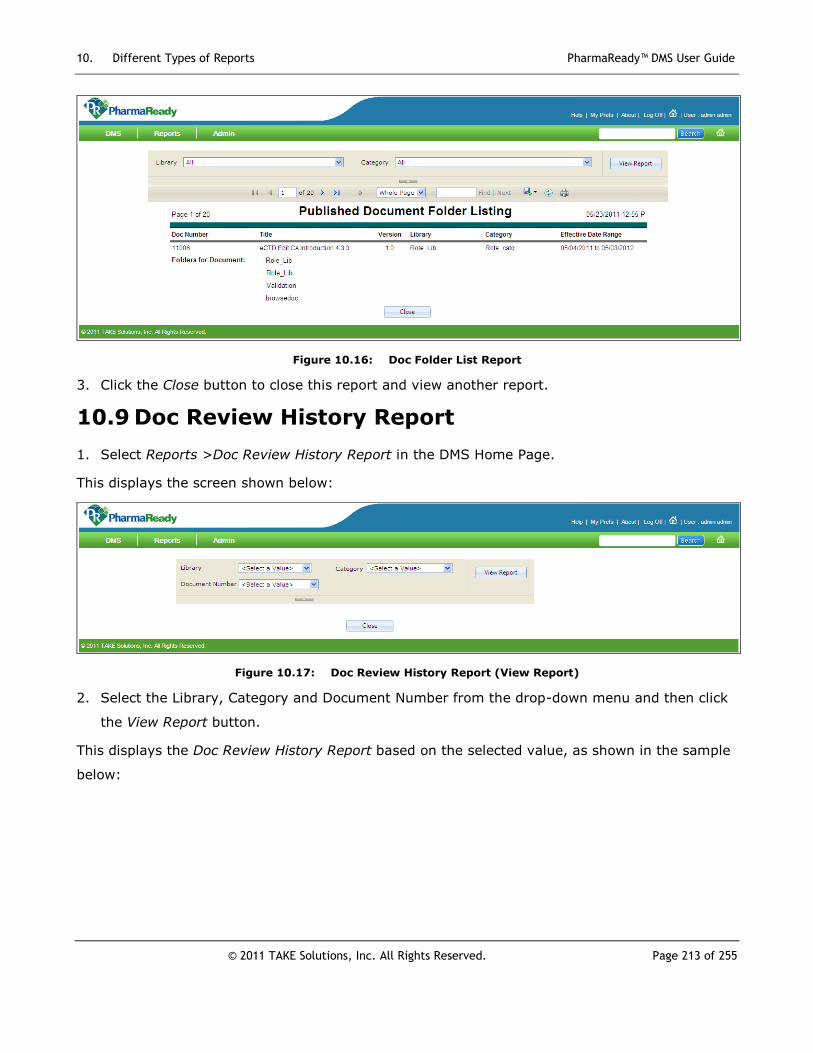
10. Different Types of Reports PharmaReady™ DMS User Guide
© 2011 TAKE Solutions, Inc. All Rights Reserved. Page 213 of 255
Figure 10.16: Doc Folder List Report
3. Click the Close button to close this report and view another report.
10.9 Doc Review History Report
1. Select Reports >Doc Review History Report in the DMS Home Page.
This displays the screen shown below:
Figure 10.17: Doc Review History Report (View Report)
2. Select the Library, Category and Document Number from the drop-down menu and then click
the View Report button.
This displays the Doc Review History Report based on the selected value, as shown in the sample
below:

10. Different Types of Reports PharmaReady™ DMS User Guide
© 2011 TAKE Solutions, Inc. All Rights Reserved. Page 214 of 255
Figure 10.18: Doc Review History Report
3. Click the Close button to close this report and view another report.
10.10 Doc Workflow Assign
1. Select Reports > Doc Workflow Assign Report in the DMS Home Page.
This displays the screen shown below:
Figure 10.19: Doc Workflow Assign Report (View Report)
2. Select the required Library, Document Number from the drop-down menu and click the View
Report button.
This displays the Doc Workflow Assign Report based on the selected value, as shown in the
sample below:

10. Different Types of Reports PharmaReady™ DMS User Guide
© 2011 TAKE Solutions, Inc. All Rights Reserved. Page 215 of 255
Figure 10.20: Doc Workflow Assign Report
3. Click the Close button to close this report and view another report.
10.11 Pending Doc Action
1. Select Reports >Pending Doc Action Report in the DMS Home Page.
This displays the screen shown below:
Figure 10.21: Pending Doc Action (View Report)
2. Select the Library and Limit Report By from the drop-down menu.
3. Enter the Begin Date and End Date and then click the View Report button.
This displays the Pending Doc Action Report based on the selected value, as shown in the sample
below:

10. Different Types of Reports PharmaReady™ DMS User Guide
© 2011 TAKE Solutions, Inc. All Rights Reserved. Page 216 of 255
Figure 10.22: Pending Document Action Report
4. Click the Close button to close this report and view another report.
10.12 People Workflow Assign
1. Select Reports >People Workflow Assign Report in the DMS Home Page.
This displays the screen shown below:
Figure 10.23: People Workflow Assign Report (View Report)
2. Select the required Library and Person from the drop-down menu and click the View Report
button.
This displays the People Workflow Assign Report based on the selected value, as shown in the
sample below:

10. Different Types of Reports PharmaReady™ DMS User Guide
© 2011 TAKE Solutions, Inc. All Rights Reserved. Page 217 of 255
Figure 10.24: People Workflow Assign Report
3. Click the Close button to close this report and view another report.
10.13 Pub Doc by Readers
1. Select Reports >Pub Doc by Readers Report in the DMS Home Page.
This displays the screen shown below:
Figure 10.25: Pub Doc by Readers (View Report)
2. Select the Library, Category, Person, Reader Group, Department, Project, and Job Code from
the drop-down menu.
3. Enter the Training or Effective On Date and then click the View Report button

10. Different Types of Reports PharmaReady™ DMS User Guide
© 2011 TAKE Solutions, Inc. All Rights Reserved. Page 218 of 255
This displays the Pub Doc by Readers Report based on the selected value, as shown in the sample
below:
Figure 10.26: Published Document Listing by Readers (View Report)
4. Click the Close button to close this report and view another report.
10.14 Published Doc List
1. Select Reports >Published Doc List Report in the DMS Home Page.
This displays the screen shown below:
Figure 10.27: Published Doc List (View Report)
2. Select the Library, Category from the drop-down menu

10. Different Types of Reports PharmaReady™ DMS User Guide
© 2011 TAKE Solutions, Inc. All Rights Reserved. Page 219 of 255
3. Enter the Training or Effective on date and then click the View Report button.
This displays the Published Doc List Report based on the selected value, as shown in the sample
below:
Figure 10.28: Published Document Listing Report
4. Click the Close button to close this report and view another report.
10.15 Read Verify Summary
1. Select Reports >Read Verify Summary Report in the DMS Home Page.
This displays the screen shown below:
Figure 10.29: Read Verify Summary (View Report)
2. Enter the Date Format, Time Format.

10. Different Types of Reports PharmaReady™ DMS User Guide
© 2011 TAKE Solutions, Inc. All Rights Reserved. Page 220 of 255
3. Select the Person, Library, Category, Reader Group, Project, Department, Supervisor, and
Show Only Docs Not Verify Read from the drop-down menu and then click the View Report
button.
This displays the Read Verify Summary Report based on the selected value, as shown in the
sample below:
Figure 10.30: Read Verify Summary
4. Click the Close button to close this report and view another report.

10. Different Types of Reports PharmaReady™ DMS User Guide
© 2011 TAKE Solutions, Inc. All Rights Reserved. Page 221 of 255
10.16 Access Report
1. Select Reports >Access Report in the DMS Home Page.
This displays the screen shown below:
Figure 10.31: Access Report(View Report)
2. Select the Role and Library from the drop-down menu and click the View Report button.
This displays the Access Report based on the selected value, as shown in the sample below:
Figure 10.32: Access Report
3. Click the Close button to close this report and view another report.

10. Different Types of Reports PharmaReady™ DMS User Guide
© 2011 TAKE Solutions, Inc. All Rights Reserved. Page 222 of 255
10.17 Delegation Report
1. Select Reports >Delegation Report in the DMS Home Page.
This displays the screen shown below:
Figure 10.33: Delegation Report (View Report)
2. Select the Delegate Type from the drop-down menu and click the View Report button.
This displays the Delegation Report based on the selected value, as shown in the sample below:
Figure 10.34: Delegation Report
3. Click the Close button to close this report and view another report.
10.18 Read Verify Activity
1. Select Reports >Read Verify Activity Report in the DMS Home Page..
This displays the screen shown below:

10. Different Types of Reports PharmaReady™ DMS User Guide
© 2011 TAKE Solutions, Inc. All Rights Reserved. Page 223 of 255
Figure 10.35: Read Verify Activity (View Report)
2. Select the Library, Category, and Person from the drop-down menu.
3. Enter the Document Number in the Doc # field and then click the View Report button.
This displays the Read Verify Activity Report based on the selected value, as shown in the sample
below:
Figure 10.36: Read Verify Activity Report
4. Click the Close button to close this report and view another report.
10.19 Reader Summary
1. Select Reports >Reader Summary Report in the DMS Home Page.
This displays the screen shown below:

10. Different Types of Reports PharmaReady™ DMS User Guide
© 2011 TAKE Solutions, Inc. All Rights Reserved. Page 224 of 255
Figure 10.37: Reader Summary (View Report)
2. Select the Department and Supervisor from the drop-down menu and click the View Report
button.
This displays the Reader Summary Report based on the selected value, as shown in the sample
below:
Figure 10.38: Read Summary Report
3. Click the Close button to close this report and view another report.

10. Different Types of Reports PharmaReady™ DMS User Guide
© 2011 TAKE Solutions, Inc. All Rights Reserved. Page 225 of 255
10.20 Required Reading Report
1. Select Reports >Required Reading Report in the DMS Home Page.
This displays the screen shown below:
Figure 10.39: Required Reading Report (View Report)
2. Select the required Person from the drop-down menu and click the View Report button.
This displays the Required Reading Report based on the selected value, as shown in the sample
below:
Figure 10.40: Required Reading Report
3. Click the Close button to close this report and view another report.
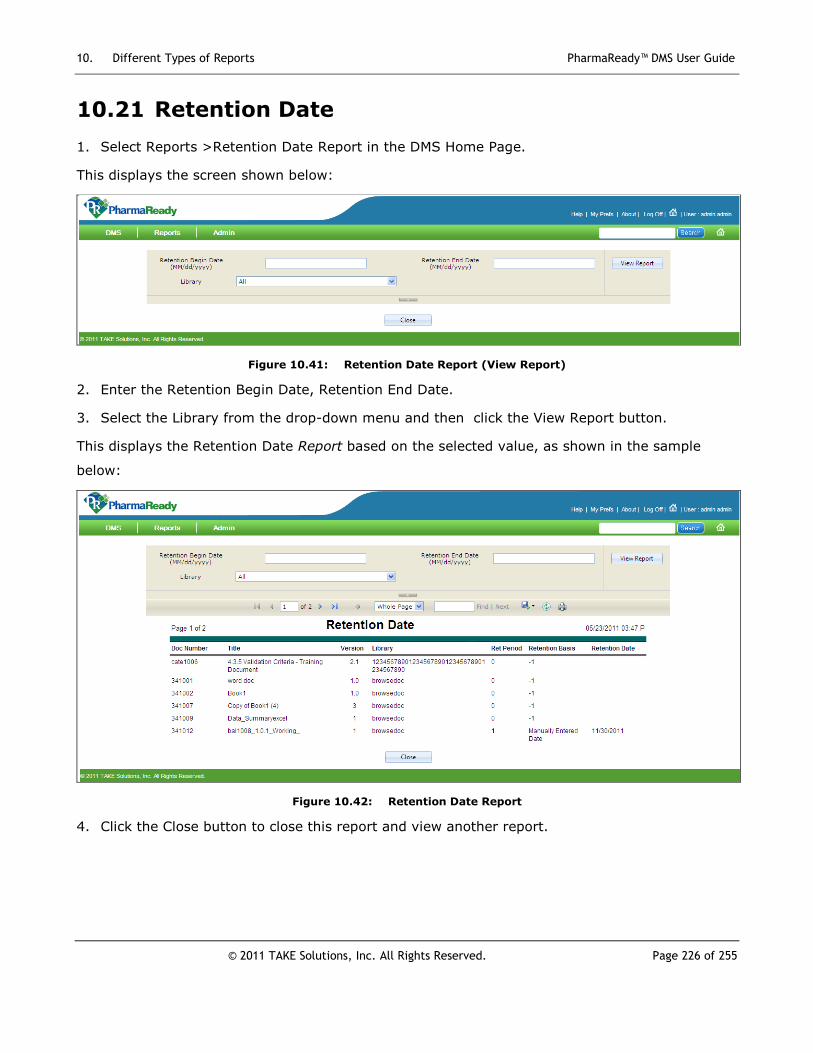
10. Different Types of Reports PharmaReady™ DMS User Guide
© 2011 TAKE Solutions, Inc. All Rights Reserved. Page 226 of 255
10.21 Retention Date
1. Select Reports >Retention Date Report in the DMS Home Page.
This displays the screen shown below:
Figure 10.41: Retention Date Report (View Report)
2. Enter the Retention Begin Date, Retention End Date.
3. Select the Library from the drop-down menu and then click the View Report button.
This displays the Retention Date Report based on the selected value, as shown in the sample
below:
Figure 10.42: Retention Date Report
4. Click the Close button to close this report and view another report.

10. Different Types of Reports PharmaReady™ DMS User Guide
© 2011 TAKE Solutions, Inc. All Rights Reserved. Page 227 of 255
10.22 Audit Log Listing
1. Select Reports >Audit Log Listing Report in the DMS Home Page.
This displays the screen shown below:
Figure 10.43: Audit Log Listing (View Report)
2. Enter the Begin Date, End Date.
3. Select the Person, Document Number, Activity, Sort Order and Report Type from the drop-
down menu.
This displays the Audit Log Listing Report based on the selected value, as shown in the sample
below:
Figure 10.44: Audit Log Listing Report
4. Click the Close button to close this report and view another report.

10. Different Types of Reports PharmaReady™ DMS User Guide
© 2011 TAKE Solutions, Inc. All Rights Reserved. Page 228 of 255
10.23 Access Rights Report
1. Select Reports >Access Rights in the DMS Home Page.
This displays the screen shown below:
Figure 10.45: Access Rights Report (View Report)
2. Select the Person from the drop-down menu
3. Select the appropriate option (True or False) in the Show Detail and then click the View Report
button.
This displays the Access Rights Report based on the selected value, as shown in the sample
below:
Figure 10.46: Access Rights Report
4. Click the Close button to close this report and view another report.

10. Different Types of Reports PharmaReady™ DMS User Guide
© 2011 TAKE Solutions, Inc. All Rights Reserved. Page 229 of 255
10.24 Data Summary Report
1. Select Reports >Data Summary Report in the DMS Home Page.
This displays the PharmaReady Data Summary Report shown below:
Figure 10.47: Data Summary Report (View Report)
2. Click the Close button to close this report and view another report.

10. Different Types of Reports PharmaReady™ DMS User Guide
© 2011 TAKE Solutions, Inc. All Rights Reserved. Page 230 of 255
10.25 People by Department
1. Select Reports >People by Department Report in the DMS Home Page.
This displays the screen shown below:
Figure 10.48: People by Department (View Report)
2. Select the Department and Supervisor from the drop-down menu and click the View Report
button.
This displays the People by Department Report based on the selected value, as shown in the
sample below:
Figure 10.49: People by Department
3. Click the Close button to close this report and view another report.

10. Different Types of Reports PharmaReady™ DMS User Guide
© 2011 TAKE Solutions, Inc. All Rights Reserved. Page 231 of 255
10.26 People by Project
1. Select Reports >People by Project Report in the DMS Home Page.
This displays the screen shown below:
Figure 10.50: People by Project (View Report)
2. Select the Project, Department, and Supervisor from the drop-down menu.
3. Enter the Project Effective on Date and then click the View Report button.
This displays the People by Project Report based on the selected value, as shown in the sample
below:
Figure 10.51: People by Project
4. Click the Close button to close this report and view another report.
PharmaReady™ DMS User Guide
© 2008 TAKE Solutions, Inc. All Rights Reserved. Page 232 of 255
CHAPTER 11
11. Additional Document
Functionality
About this Chapter
Additional document functionality exists in the PharmaReady
DMS system that can speed document creation and ensure
consistency across documents. This functionality includes the
ability to predefine both document templates and sets of
document properties as well as to create document numbers
manually. Use of this functionality is at the discretion of your
organization.
This chapter includes the following sections:
Contents
Topic Page
Archive Documents 235
Create document numbers manually 237
Create document templates 241
Create document properties templates 245

11. Additional Document Functionality PharmaReady™ DMS User Guide
© 2008 TAKE Solutions, Inc. All Rights Reserved. Page 233 of 255
11.1 Archive Documents
1. Select DMS > Archive Docs in the PharmaReady DMS Home Page.
This displays the figure shown below:
Figure 11.1: Archive Documents
2. Select the Archive Number
3. Enter the Archive Description
4. Select the appropriate Library from the drop-down menu
5. Select the Activity Mode from the drop-down menu
6. Click the Browse button and select the appropriate directory where the documents need to be
archived.
This displays the list of documents shown in the sample below:
7. Select the required documents from the list and then click the Submit button
This displays the Archive Report, as shown in the sample below:

11. Additional Document Functionality PharmaReady™ DMS User Guide
© 2011 TAKE Solutions, Inc. All Rights Reserved. Page 234 of 255
Figure 11.2: Archive Report
11.2 Creating Document Numbers Manually
Important : This activity is performed by the Library Administrator.
Every document in the DMS must have a unique document number. How you number your
documents is up to your organization.
PharmaReady offers the document numbering options as shown in the table below:
Table 11.1: Document Numbering Options
Automatic
Numbering
Document numbers are created by the system during document creation.
The Document Creator selects a predefined format and the system
automatically assigns the next available number based on the selected
format. Automatic numbering can be set at the system, library, and
category level.
Manual
Number
Creation
Document numbers are created before and are initially separate from the
documents themselves. Library Administrators create these custom
numbers in any format your organization desires. Document Creators can
see these manually created numbers on the Doc Number Manager page.

11. Additional Document Functionality PharmaReady™ DMS User Guide
© 2011 TAKE Solutions, Inc. All Rights Reserved. Page 235 of 255
If your organization wants to use legacy numbers or another document numbering format apart
from the delivered automatic numbering functionality of PharmaReady, then the Library Admin
must create these document numbers.
A few key points to remember when creating document numbers manually:
The PharmaReady DMS does not require you to choose one numbering system at the
exclusion of the other.
Manual numbers can be category specific.
Manual numbers are created one at a time.
You cannot use manually created numbers when uploading documents in a batch.
Manual numbers can only be created by a Library or System Administrator.
11.2.1 Doc Number Manager Page
Whether created manually or generated by the system, every document number in the DMS can
be seen on the Doc Number Manager page. For Library Administrators, this page displays a
button allowing you to create new document numbers manually.
1. Select DMS>Doc Numbers in the DMS PharmaReady Home page.
Figure 11.3: Doc Number Manager Page

11. Additional Document Functionality PharmaReady™ DMS User Guide
© 2011 TAKE Solutions, Inc. All Rights Reserved. Page 236 of 255
2. Click the Add a New Doc Number button. This displays Add a New Doc Number page:
11.2.2 Add a New Document Number Page
Figure 11.4: Add a New Doc Number Page
The fields displayed in Add a New Doc Number page are explained in the table below:
All entry required to create a new document number occurs on this page.
Table 11.2: Add a New Doc Number Page – Fields
Section Instruction
Category Select the required Category from the drop-down menu, which is optional.
Number Enter the Document number in this field.
Note : Use your Organization’s Document Number Format.
Title Enter a Title for the Document Number.
Owner Enter an Owner for the Document Number.
Status When creating new document numbers, you select the status of the number as
Issued or Reserved.
Issued -These document numbers are immediately available for use.
Reserved - These document numbers are on hold and cannot be assigned. A

11. Additional Document Functionality PharmaReady™ DMS User Guide
© 2011 TAKE Solutions, Inc. All Rights Reserved. Page 237 of 255
Library Administrator must update the number’s status before it can be used
to create a new document.
Super ceded
by
Enter the Document Numbers that super cede this Document Number.
The details entered in the Add a New Doc Number page are shown in the sample below:
Save
Changes
Click the Submit button to save the new document number to PharmaReady.
Once when the details are submitted, you are returned to Doc Number Manager page, which
displays the added Document Number, as shown in the sample below:

11. Additional Document Functionality PharmaReady™ DMS User Guide
© 2011 TAKE Solutions, Inc. All Rights Reserved. Page 238 of 255
Figure 11.5: Doc Number Manager Page
11.3 Creating Document Templates
Important : This activity is performed by the Library Administrator.
Your organization most likely uses templates to ensure consistent formatting, graphics, sections,
and the like, in files of the same type. You can easily add these templates to PharmaReady.
For example, all of your Standard Operating Procedures have the same title page, headers,
footers, fonts, etc., and this information is stored in a template. You have the option in
PharmaReady to load your SOP template into the system so that when it’s time to create a new
SOP, your organization’s custom template serves as the basis for starting a new document.
When a document is created in the DMS using a template, the author will check out and fill in the
template as part of the editing activity of the document lifecycle.
A few key things about document templates in the DMS:
Any type of file can be uploaded as a document template, not just application-specific
template files (such as a .dot file).
Document templates are not version controlled.
Document templates can be library specific.

11. Additional Document Functionality PharmaReady™ DMS User Guide
© 2011 TAKE Solutions, Inc. All Rights Reserved. Page 239 of 255
11.3.1 Doc Template Manager Page
The button to add a new document template is located at the bottom of the Doc Template
Manager page.
1. Select DMS>Doc Templates in the DMS PharmaReady Home page.
Figure 11.6: Doc Template Manager Page
Note : Select All in the Library field to make the template accessible when creating documents
in any library.
2. Click the Add a New Document Template button.
This displays the Add a New Doc Template page:
11.3.2 Add a New Document Template Page
Figure 11.7: Add a New Doc Template Page

11. Additional Document Functionality PharmaReady™ DMS User Guide
© 2011 TAKE Solutions, Inc. All Rights Reserved. Page 240 of 255
Creating a new document template in PharmaReady involves associating the template with one or
all libraries, giving the template a title that allows it to be easily recognized in the DMS, and
uploading the template file itself.
The fields displayed in Add a New Doc Template page are explained in the table below:
Table 11.3: Add a New Doc Template Page – Fields
Section Instruction
Active This checkbox is enabled by default to represent the Doc Template is
currently active.
You can uncheck this box, if you want to make the Doc Template
inactive.
Library Select a Library, enter a Title,
Note : Selecting All in the Library field makes the template
available in every library.
Title
The name of the template file will populate the Title field when a
document is created from a template. The Document Creator can edit
this value before submitting the new document to the DMS
Classification Enter the Classification of the Template.
Uploaded File Check the Overwrite box if you want to overwrite any existing uploaded
template file. Overwrite
Template File Click the Browse button and upload the desired template file from your
workstation or network.
The details entered in the Add a New Doc Template page are shown in the sample below:

11. Additional Document Functionality PharmaReady™ DMS User Guide
© 2011 TAKE Solutions, Inc. All Rights Reserved. Page 241 of 255
Save
Changes
Click the Submit button to save the new document template to the
PharmaReady.
Once when the details are submitted, you are returned to Doc Template Manager page, which
displays the added Document Template, as shown in the sample below:
Figure 11.8: Doc Template Manager Page (added template displayed)

11. Additional Document Functionality PharmaReady™ DMS User Guide
© 2011 TAKE Solutions, Inc. All Rights Reserved. Page 242 of 255
11.4 Creating Document Properties Templates
Important : This activity is performed by the Library Administrator.
It is likely that your organization will have documents that share common document properties.
For example, you may have a department that develops and follows a set of SOPs. The reviewers,
approvers, and readers of those SOPs are the same, and the length of retention before a required
review is part of your company policy. Creating a template for these common properties can
speed entry of your SOPs in the DMS.
When uploading documents in a batch, using a document properties template will save you from
having to enter information for multiple documents manually.
11.4.1 Admin Doc Prop Templates Page
The Admin Doc Prop Templates page includes a button for creating new document properties
templates.
1. Select Admin>Doc Prop Templates in the DMS Home page.
This displays the Admin Doc Prop Templates page as shown below:
Figure 11.9: Admin Doc Prop Templates Page
2. Click the Add New Document Properties Template button.

11. Additional Document Functionality PharmaReady™ DMS User Guide
© 2011 TAKE Solutions, Inc. All Rights Reserved. Page 243 of 255
11.4.2 Add New Doc Prop Template Page
Figure 11.10: Add New Doc Prop Template Page
The tabs and fields on the Add New Doc Prop Template page mirror the fields on the Document
Properties page.
The Add New Document Properties Template page consists of 7 tabs:
General Info
Key Dates
Authors/Owners
Reviewers
Approval
Readers
Other Prop
These details are described one-by-one below:

11. Additional Document Functionality PharmaReady™ DMS User Guide
© 2011 TAKE Solutions, Inc. All Rights Reserved. Page 244 of 255
11.4.2.1 General Info tab
The details displayed in the General Information tab and the instructions are described below:
Table 11.4: Add New Document Prop Template Page - General Info Tab
Fields Description / Instruction
Enter the default values that you want to appear as document properties when creating new
documents based on this properties template.
Template Name Enter the Template Name in this field.
Important : The Template Name entered on this tab should
be descriptive enough that Document Creators
understand which type of document these
properties should populate.
Category Select the appropriate Category of this Template.
Select the appropriate Library of this Template.
Active By default this field is checked.
Uncheck this box, if you want to make this Doc Prop Template
inactive.
New Version Number Enter the New Version Number in this field.
Training Specification
Specific : This field is applicable for user associated with TRMS
Module and explained in the TRMS Help Guide.
eCTD Document
Specific : These fields are applicable for user associated with eCTD
Module and explained in the eCTD Help Guide.
eCTD Ready to Submit
Title Enter the Title and Description in the respective fields.
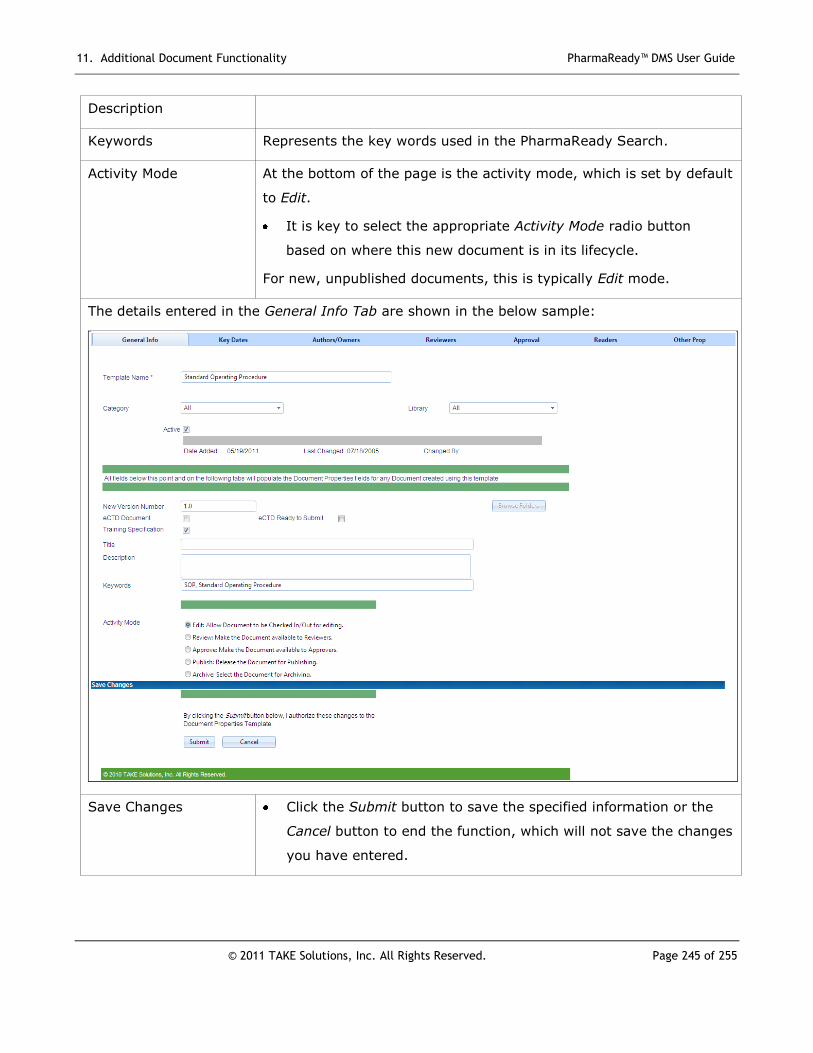
11. Additional Document Functionality PharmaReady™ DMS User Guide
© 2011 TAKE Solutions, Inc. All Rights Reserved. Page 245 of 255
Description
Keywords Represents the key words used in the PharmaReady Search.
Activity Mode At the bottom of the page is the activity mode, which is set by default
to Edit.
It is key to select the appropriate Activity Mode radio button
based on where this new document is in its lifecycle.
For new, unpublished documents, this is typically Edit mode.
The details entered in the General Info Tab are shown in the below sample:
Save Changes Click the Submit button to save the specified information or the
Cancel button to end the function, which will not save the changes
you have entered.

11. Additional Document Functionality PharmaReady™ DMS User Guide
© 2011 TAKE Solutions, Inc. All Rights Reserved. Page 246 of 255
11.4.2.1.1 About the Activity Mode:
Important : Remember that the Activity Mode determines where a document is in its
lifecycle and which role has access to it.
For new documents, the default of Edit is the likely choice.
For legacy documents published elsewhere that you are bringing into the DMS, however,
you may change the Activity Mode to Publish.
11.4.2.2 Key Dates tab
Note : The dates on this tab are discussed in detail in Chapter 5 – Create Documents > Creating
New Documents >Document Properties page, which is a prerequisite for this chapter.
You have the option of setting numeric values in key date fields that are then used to
calculate the respective date when the properties template is applied.
For example, let’s say a new document should be edited and ready for review in 60 days. You
would set the Create Start Date value to 0 days (reflects the date the template was applied)
and the Create Stop Date value to 60 days.
All the fields on this tab are optional when setting up a document properties template. To not
apply a date, enter or leave “-999” in the field.

11. Additional Document Functionality PharmaReady™ DMS User Guide
© 2011 TAKE Solutions, Inc. All Rights Reserved. Page 247 of 255
Figure 11.11: Add New Doc Prop Template Page(Key Dates Tab)
11.4.2.3 Authors / Owners tab
Select the Document Author(s) from the available list and move it to the Assigned list.
Select the Document Owner(s) from the available list and move it to the Assigned list.
Figure 11.12: Add New Doc Prop Template Page(Authors / Owners Tab)

11. Additional Document Functionality PharmaReady™ DMS User Guide
© 2011 TAKE Solutions, Inc. All Rights Reserved. Page 248 of 255
11.4.2.4 Reviewers tab
Select the Document Reviewer(s) from the available list and move it to the Assigned list.
Figure 11.13: Add New Doc Prop Template Page (Reviewers Tab)
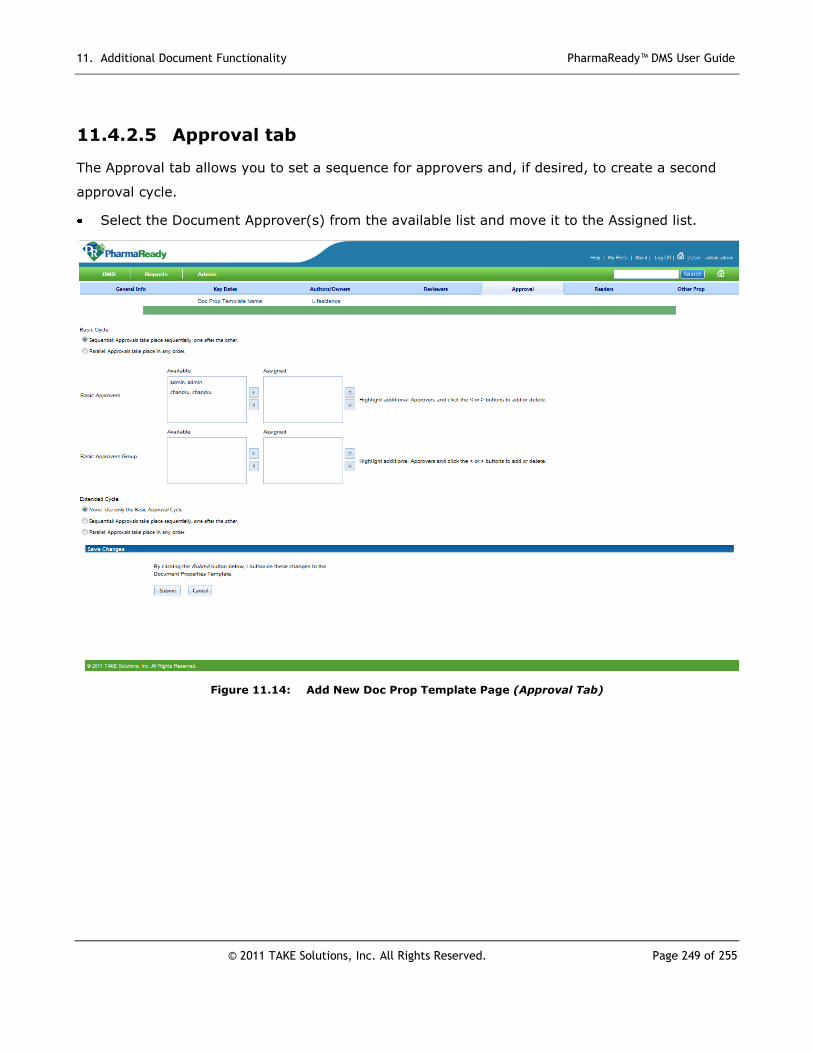
11. Additional Document Functionality PharmaReady™ DMS User Guide
© 2011 TAKE Solutions, Inc. All Rights Reserved. Page 249 of 255
11.4.2.5 Approval tab
The Approval tab allows you to set a sequence for approvers and, if desired, to create a second
approval cycle.
Select the Document Approver(s) from the available list and move it to the Assigned list.
Figure 11.14: Add New Doc Prop Template Page (Approval Tab)

11. Additional Document Functionality PharmaReady™ DMS User Guide
© 2011 TAKE Solutions, Inc. All Rights Reserved. Page 250 of 255
11.4.2.6 Readers tab
The Readers tab allows you to set the default document audience(s) for published documents
based on this document properties template. You can select one or more reader groups,
departments, projects, or people on this tab and which actions are required of each audience.
Select the Reader Type and the Reader Name from the drop-down list as shown in the sample
below:
Figure 11.15: Add New Doc Prop Template Page (Readers Tab)
Note : Once saved to the DMS, you have the option of cloning Document Properties Template.

11. Additional Document Functionality PharmaReady™ DMS User Guide
© 2011 TAKE Solutions, Inc. All Rights Reserved. Page 251 of 255
11.4.2.7 Other Prop tab
Finally, the Other Prop(erties) tab includes fields such as Project that can be common to multiple
documents. Also, if your organization has defined custom fields at the system or library level,
adding the values here saves data entry time when the template is applied.
Figure 11.16: Add New Doc Prop Template Page (Other Prop Tab)
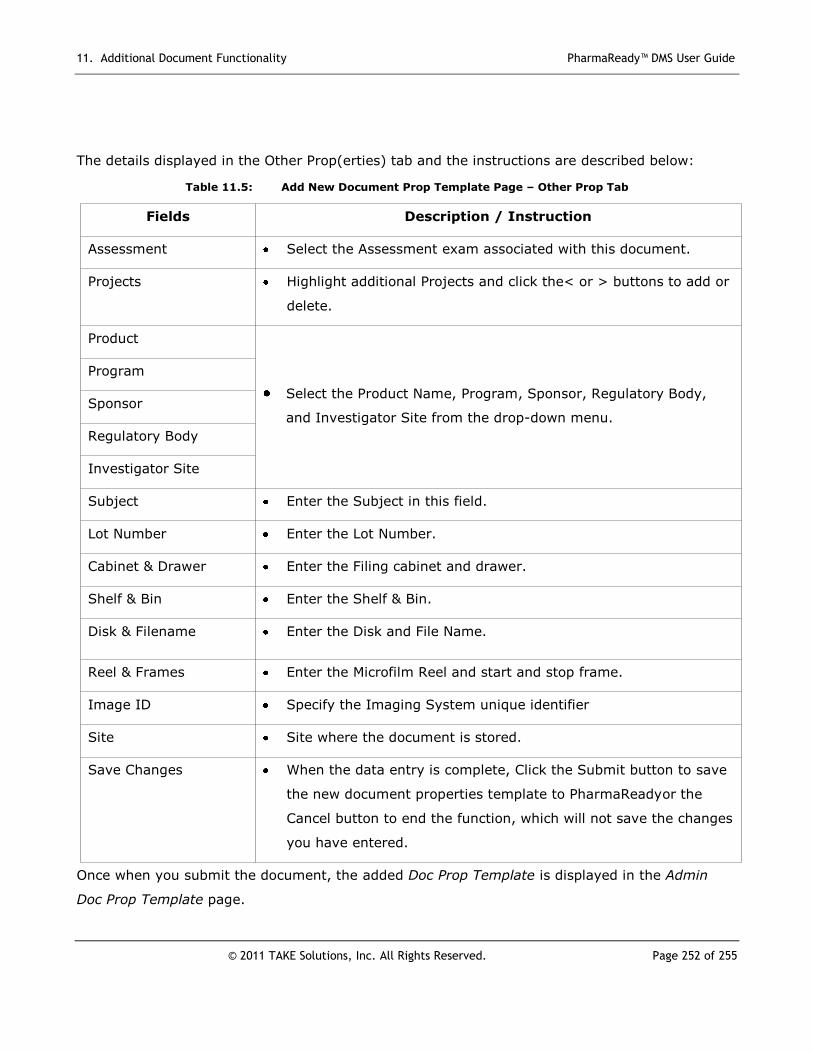
11. Additional Document Functionality PharmaReady™ DMS User Guide
© 2011 TAKE Solutions, Inc. All Rights Reserved. Page 252 of 255
The details displayed in the Other Prop(erties) tab and the instructions are described below:
Table 11.5: Add New Document Prop Template Page – Other Prop Tab
Fields Description / Instruction
Assessment Select the Assessment exam associated with this document.
Projects Highlight additional Projects and click the< or > buttons to add or
delete.
Product
Select the Product Name, Program, Sponsor, Regulatory Body,
and Investigator Site from the drop-down menu.
Program
Sponsor
Regulatory Body
Investigator Site
Subject Enter the Subject in this field.
Lot Number Enter the Lot Number.
Cabinet & Drawer Enter the Filing cabinet and drawer.
Shelf & Bin Enter the Shelf & Bin.
Disk & Filename Enter the Disk and File Name.
Reel & Frames Enter the Microfilm Reel and start and stop frame.
Image ID Specify the Imaging System unique identifier
Site Site where the document is stored.
Save Changes When the data entry is complete, Click the Submit button to save
the new document properties template to PharmaReadyor the
Cancel button to end the function, which will not save the changes
you have entered.
Once when you submit the document, the added Doc Prop Template is displayed in the Admin
Doc Prop Template page.
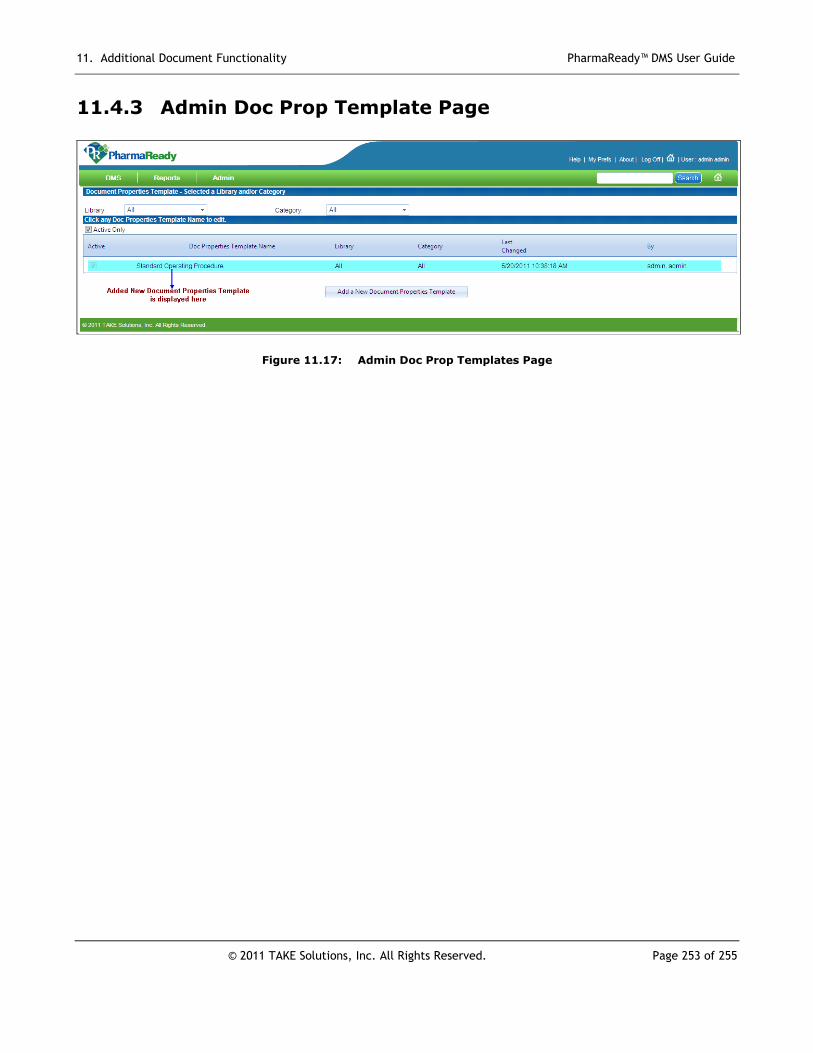
11. Additional Document Functionality PharmaReady™ DMS User Guide
© 2011 TAKE Solutions, Inc. All Rights Reserved. Page 253 of 255
11.4.3 Admin Doc Prop Template Page
Figure 11.17: Admin Doc Prop Templates Page
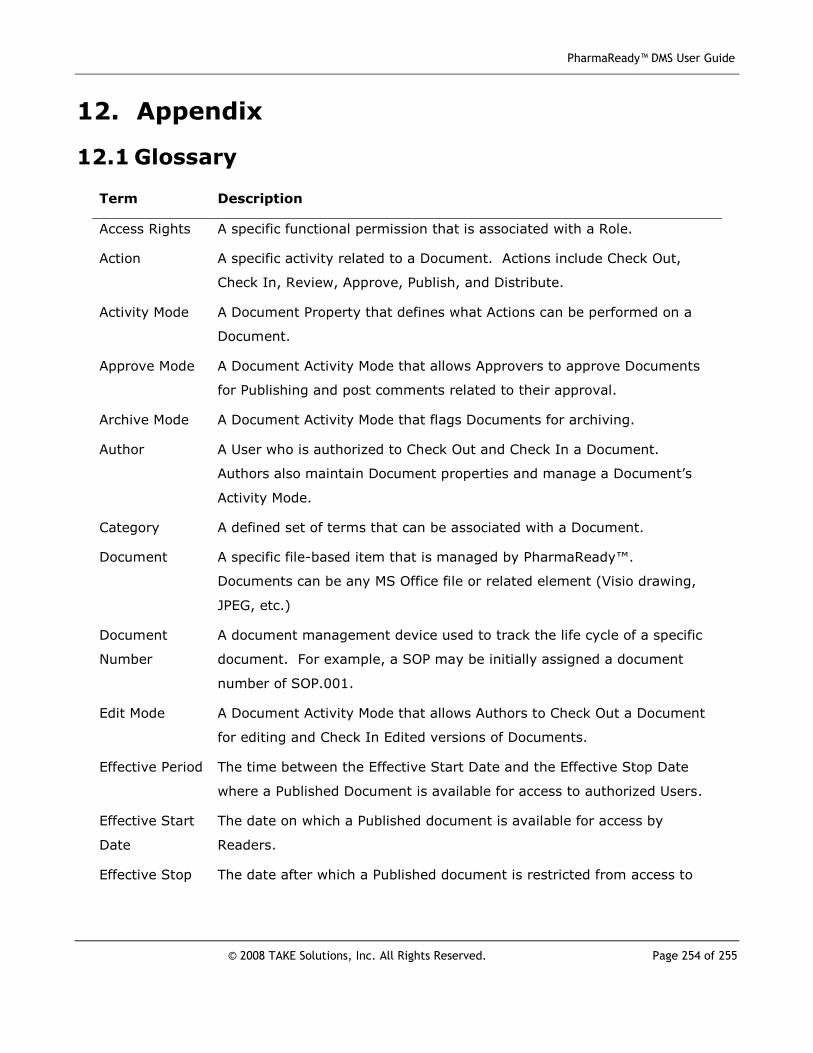
PharmaReady™ DMS User Guide
© 2008 TAKE Solutions, Inc. All Rights Reserved. Page 254 of 255
12. Appendix
12.1 Glossary
Term Description
Access Rights A specific functional permission that is associated with a Role.
Action A specific activity related to a Document. Actions include Check Out,
Check In, Review, Approve, Publish, and Distribute.
Activity Mode A Document Property that defines what Actions can be performed on a
Document.
Approve Mode A Document Activity Mode that allows Approvers to approve Documents
for Publishing and post comments related to their approval.
Archive Mode A Document Activity Mode that flags Documents for archiving.
Author A User who is authorized to Check Out and Check In a Document.
Authors also maintain Document properties and manage a Document’s
Activity Mode.
Category A defined set of terms that can be associated with a Document.
Document A specific file-based item that is managed by PharmaReady™.
Documents can be any MS Office file or related element (Visio drawing,
JPEG, etc.)
Document
Number
A document management device used to track the life cycle of a specific
document. For example, a SOP may be initially assigned a document
number of SOP.001.
Edit Mode A Document Activity Mode that allows Authors to Check Out a Document
for editing and Check In Edited versions of Documents.
Effective Period The time between the Effective Start Date and the Effective Stop Date
where a Published Document is available for access to authorized Users.
Effective Start
Date
The date on which a Published document is available for access by
Readers.
Effective Stop The date after which a Published document is restricted from access to

12. Appendix PharmaReady™ DMS User Guide
© 2011 TAKE Solutions, Inc. All Rights Reserved. Page 255 of 255
Date Readers.
Folder A hierarchical structure for storing Documents. A Folder is associated
with only one Library. Within Libraries, Documents can be associated
with one or more Folders.
Library A defined grouping of related Documents. A Document can reside in only
one Library.
Owner A person responsible for the contents of any Document published using a
Document Number.
PDF Adobe’s Portable Document Format standard for creating read-only
versions of Documents.
Publish Mode A Document Activity Mode that allows Publishers to perform publishing
actions on a Document.
Review Mode A Document Activity Mode that allows Reviewers to access read-only
versions of Documents and post comments to the Author about those
versions.
Role A defined set of functional access rights that be assigned to a User.
Version A snapshot of a document that is retained in PharmaReady™. Point
versions (i.e. 2.1, 2.2) are produced while a document is in an edit cycle,
are discarded after the document is published.
User A person who has been authorized to use the PharmaReady™ system and
been given personal logon credentials.