
Chapter 35
Cost Cap Exception and Assistive Technology
Request Forms
Table of Contents
Introduction .................................................................................................................................... 1
Accessing the Forms ....................................................................................................................... 2
Accessing Existing Request Forms .................................................................................................. 4
Cost Cap Exception – New Form ..................................................................................................... 5
Cost Cap Exception – Completed Form .......................................................................................... 6
Cost Cap Exception Process ............................................................................................................ 7
Assistive Technology – New Form .................................................................................................. 9
Assistive Technology – Completed Form ...................................................................................... 10
Assistive Technology Process ........................................................................................................ 11
Assistive Technology Process – Adding Items .............................................................................. 14
Assistive Technology Process – Completing the Request ............................................................. 16
Additional Notes – Adding a New Note ........................................................................................ 18
Additional Notes – Reading .......................................................................................................... 19
File Upload – Attaching File .......................................................................................................... 20
File Upload – Viewing File ............................................................................................................. 23
File Upload – Deleting File ............................................................................................................ 25
Approved / Denied Status of Request .......................................................................................... 26
Closing a Request Form ................................................................................................................ 28
Important The required fields referenced in this chapter refer to system-required fields.
These fields are required in order for the form to be saved in submit for approved status. The information that is required due to policy may be different from those that are system required.


35-1
Introduction
Purpose The process of submitting the Cost Cap Exception and Assistive Technology
Request forms online within KAMIS will replace the current process of the Case Manager faxing to KDOA several documents, including the completed request form for review and approval.
IMPORTANT The case manager’s e-mail address must be added to the e-mail field in the Organization Member’s page in order for the case manager’s name to display in the TCM Name field of the request form.
E-Mail Notifications
An automated e-mail notification will be sent to the case manager’s e-mail address on record in the Organization Member’s page when one of the following actions occur:
Approval of the Request
Denial of the Request
Additional or Corrected Information is needed for a determination
A new or corrected document is needed to be uploaded for a determination
No HIPPA information will be included in this e-mail. The customer’s KAMIS ID and the request form date is the only identifying information that will be referenced.
Responding to the E-Mail Notifications
When an automated e-mail notification is received requesting action the following steps should be taken:
1. Sign-in to KDOA Web Applications / KAMIS 2. Search for the appropriate customer (the e-mail will list the
customers KAMIS ID). 3. Access the current UAI/POC that contains the request form needing
action. 4. Enter the requested additional/corrected information in the
Additional Notes region or upload the requested/corrected document(s).
Customer Case Log
When the KDOA Program Manager takes one of the above actions that generates an automated e-mail, the message of the e-mail is also added to the customer case log for future reference and documentation.

35-2
Accessing the Forms
Introduction There are two options in accessing the Cost Cap Exception Request and
Assistive Technology Request forms.
Through the UAI Assessment or
Through the Plan of Care. Once a form has been created, regardless through which access point the form was created, the form will be available through either the UAI or Plan of Care.
How To Follow the steps in the table below to access the Cost Cap Exception Request
and Assistive Technology Request forms.
Step Action Result
1. Perform a Person Search to locate the customer.
2. Access either the UAI Assessment form or the Plan of Care.
UAI Assessment or the Plan of Care displays.
3. The form link is located on the following tabs:
UAI – Customer - Main Tab
POC – Customer Information
Continued on next page

35-3
Accessing the Forms (continued)
How To continued
Step Action Result
4. Click on the Create a new CCER or Create a new ASTEX Req. link to open the referenced form.
Form will open in a separate window.

35-4
Accessing Existing Request Forms
Introduction Once a form has been created, it can be viewed through either the UAI
Assessment or the Plan of Care. How To Follow the steps in the table below to access an existing the Cost Cap
Exception Request and Assistive Technology Request form.
Step Action Result
1. Perform a Person Search to locate the customer.
2. Access the UAI Assessment form or the Plan of Care.
UAI Assessment or the Plan of Care displays.
3. A table will be displayed listing all request forms by date under the appropriate heading.
4. Click on the request link to open the existing referenced form.
Form will open in a separate window.

35-5
Cost Cap Exception – New Form
Initial Form Window
The below screen print is the form prior to any information being entered or created.
User Information Request Information Request Date defaults to the current date. Can be changed. KDOA Review KDOA access only. Upload File Adjustable Frame
To adjust the size of the lower frame, please the curser on the line, left mouse click and drag the line to the desired size.

35-6
Cost Cap Exception – Completed Form
Completed Form Window
The below screen print is the form after information has been entered and the form has been submitted for approval.
User Information Request Information KDOA Review KDOA access only. Indicates form status. Additional Notes Region Notes can be added at any time regardless of form status
Upload File Adjustable Frame

35-7
Cost Cap Exception Process
How To Create the Form
Follow the steps in the table below to create the Cost Cap Exception Request form. Once created two additional regions, Additional Notes and File Upload will display.
Note The changes in services or units should be entered on the Plan of Care in
KAMIS and referred to the assigned KDOA Approver.
Step Action Result
1. Access the form as previously instructed.
New form is displayed.
2. Complete all fields on the form. All fields are required.
3. Click on the Create button. Form will be saved with a status of Work in Progress. The Additional Notes and the Upload File regions are displayed and available.
4. Enter any additional comments in the Additional Notes area. Detailed Instructions on Page 18.
The notes will remain on all Cost Cap Exception Request forms associated with the UAI/POC.
5. Upload the required documents of the paper Plan of Care and the Customer Service Worksheet. Detailed Instructions on Page 20.
The uploaded document will remain only on this version of the Cost Cap Exception Request form.
6. Once all information is entered. Using the drop down selection field, change the Form Status to Submit for Approval.
Continued on next page

35-8
Cost Cap Exception Process (continued)
How To continued
Step Action Result
7. Click on the Apply Changes button.
Form fields are disabled and the form is submitted to KDOA for review.
Note When the request form is saved with the status of Submit for Approval the
form will be placed on the Cost Cap Exception worklist for KDOA action.

35-9
Assistive Technology – New Form
Initial Form Window
The below screen print is the form prior to any information being entered or created.
User Information Request Information Request Date defaults to the current date. Can be changed. KDOA Review KDOA access only. Upload File Adjustable Frame
To adjust the size of the lower frame, please the curser on the line, left mouse click and drag the line to the desired size.

35-10
Assistive Technology – Completed Form
Completed Form Window
The below screen print is the form after information has been entered and the form has been submitted for approval.
User Information Request Information KDOA Review KDOA access only. Additional Notes Region Upload File Adjustable Frame
Standard Sources Checked
Items Requested on this form

35-11
Assistive Technology Process
How To Create the Form
Follow the steps in the table below to create the Assistive Technology Request form. Once created four additional regions will display.
Note The Assistive Technology line item(s) should NOT be entered on the Plan of
Care in KAMIS until the item(s) have been approved by KDOA.
Step Action Result
1. Access the form as previously instructed.
New form is displayed.
2. Enter the Date of the Form (default is the current date)
3. Select the TCM from the drop down field.
All fields are required.
4. Enter the explanation of the item requested in the Explanation field.
Optional
5. Enter any additional comments in the Comment field
Optional
6. Click on the Create button. Form will be saved with a status of Work in Progress.
Continued on next page

35-12
Assistive Technology Process (continued)
How To continued
Step Action Result
7. The following regions are displayed and available. A. Sources Denying Request B. AT Items/Costs. The Modify
AT Items/Cost tab is displayed.
C. Additional Notes D. Upload File
Regions are marked with the corresponding letter in the graphic below.
8. Complete the Sources Denying Request region. (A)
Continued on next page

35-13
Assistive Technology Process (continued)
How To continued
Step Action Result
9. Enter the Reason Denied for each of the 10 sources listed.
10. Click on the Apply Changes
button. Information is saved.
11. Continue to the next section to add the requested items to the form.

35-14
Assistive Technology Process – Adding Items
How To Once the Assistive Technology Request page has had several of the regions
completed, follow the steps in the table below to add the item(s) to the request.
Step Action Result
1. To add items to the request, click on the Modify AT Items/Costs button (B) under the AT Items/Costs region.
Will forward to the Modify AT Items/Cost page.
2. Click on Add Row button. Blank Row will be displayed
3. Select the Item Category from then drop down listing.
4. S Enter an additional Description if needed.
5. Enter the Provider of the item.
Continued on next page

35-15
Assistive Technology Process – Adding Items (continued)
How To continued
Step Action Result
6. Enter the total Item Cost.
7. Enter the medicare portion of the amount in the Medicare Cost field.
8. If additional items are being requested, click on the Add Row button. Repeat steps 2-7 until all items are entered.
9. If an item needs to be deleted, click on the check box at the left side of the table (selects the item) and click on the Delete button.
Item is removed from the list.
10. Click on Submit button which will complete the item entry.
Will be returned back to the Assistive Technology Page. A table will display will all item(s) listed under the AT Items/Costs region.

35-16
Assistive Technology Process – Completing the Request
How To Once the Assistive Technology Request page is displayed, follow the steps in
the table below to complete the rest of the information on the request.
Step Action Result
1. Enter any additional comments in the Additional Notes region. (C) Detailed Instructions on Page 18.
The notes will remain on all Assistive Technology Request forms associated with the UAI/POC.
2. Upload the required documents of any bids and home modification proposals. (D) Detailed Instructions on Page 20.
The uploaded document(s) will remain only on this version of the Assistive Technology Request form.
3. Once all information is entered. Change the Form Status to Submit for Approval.
Continued on next page

35-17
Assistive Technology Process – Completing the Request (continued)
How To continued
Step Action Result
4. Click on the Apply Changes button.
Form fields are disabled and the form is submitted to KDOA for review and approval.
Note When the request form is saved with the status of Submit for Approval the
form will be placed on the Assistive Technology worklist for KDOA action.

35-18
Additional Notes – Adding a New Note
Introduction The Additional Notes region is a secured communication tool to post notes
or comments on the specific form. The region will only displays after the form has been created.
How to The following are the steps to add a note to the form.
Step Action Results
1. At the bottom of the top frame is the Additional Notes Region.
All notes are displayed as the default.
2. To add a new note, click on the Post Additional Information button.
A note comment box will display.
3. Type the note.
4. Click on the Post New Entry button.
Note is posted to the Additional Notes listing.
Note: The Users name, CME, date and time posted will automatically be added when the note is posted.

35-19
Additional Notes – Reading
Introduction Once the note is posted, the text of the note will display in different font
types and colors, depending upon the status of the note.
Large Blue Letters - indicates that a note was posted by another person
but you have not read the note.
Large Red Letters - indicates that you entered a note however the note
has not been read. Regular size, black letters - indicates that the note has been read by you or another person.
How to The following are the steps to indicate that you have read a note.
Step Action Results
1. At the bottom of the top frame is the Additional Notes Region.
All notes are displayed as the default.
2. Select the filter option of what type of notes to display.
Yes – Displays all the Unread Notes
No – Displays all Notes (Default Setting)
Notes are listed in date order with the most current at the top.
3. Click on the blue text of a note to mark the note as read.
Note format is changed to regular text marking the note as read.

35-20
File Upload – Attaching File
Introduction For approval determination, the following types of documents are required
to be uploaded into KAMIS.
Cost Cap Exception Request:
Clock Draw Page of the UAI Assessment (Page 4)
Paper version Plan of Care
Customer Service Worksheet
Assistive Technology Request:
Bids
Home Modification Proposals The Upload File frame only displays after the form has been created.
How to Follow the steps below to attach a file to a specific request form.
Step Action Result
1. The Upload file application will display in the bottom adjustable frame of the form.
2. Click on the Browse button Choose File to Upload dialog box displays.
Continued on next page

35-21
File Upload – Attaching File (continued)
How to continued
Step Action Result
3. Browse to the saved document to be attached. Documents must be saved first.
For best results attach only the following type of documents:
Document Type
Action
Word Convert documents to pdf before attaching **
Excel Convert documents to pdf before attaching **
PDF (Acrobat) Attach with no additional steps needed
Graphics Attach JPG or GIF type graphics – do not attach TIF (Electronic FAX) files
**Office 2007 and 2010 has a save as option to save files to a pdf format. There are freeware products available to convert files to a pdf format. However, caution should be used when installing and using freeware products.
4. On the Choose File to Upload dialog box, click on Open button
File is selected and entered into the Upload File field.
5. Enter a Name in the File Name field.
Use an identifying name of the file. i.e. – CSW; POC; ABC Services Bid Proposal, etc.
Continued on next page

35-22
File Upload – Attaching File (continued)
How to continued
Step Action Result
6. Click on the Post/Delete File button
Completes the upload. Table of the attached file(s) is displayed.
Note: If the single file is too large (1 mg or 1,000 kb) a warning notice will be displayed that the file was too large and was deleted.
7. Repeat until all required documents are attached to the form.

35-23
File Upload – Viewing File
Introduction All attached files can be viewed once uploaded to the form.
How to Follow the steps below to view an attached file.
Step Action Result
1. Select the form from the listing.
The form will open in a separate window. In the bottom frame, the table will display all the attached files.
2. Click on the file name "Customer Service Worksheet – J Jetson" in the above example.
Continued on next page

35-24
File Upload – Viewing File (continued)
How to continued
Step Action Result
3. The document will open in a separate window.
4. To return to the Application, click on the "X" to close the separate browser window.
35-25
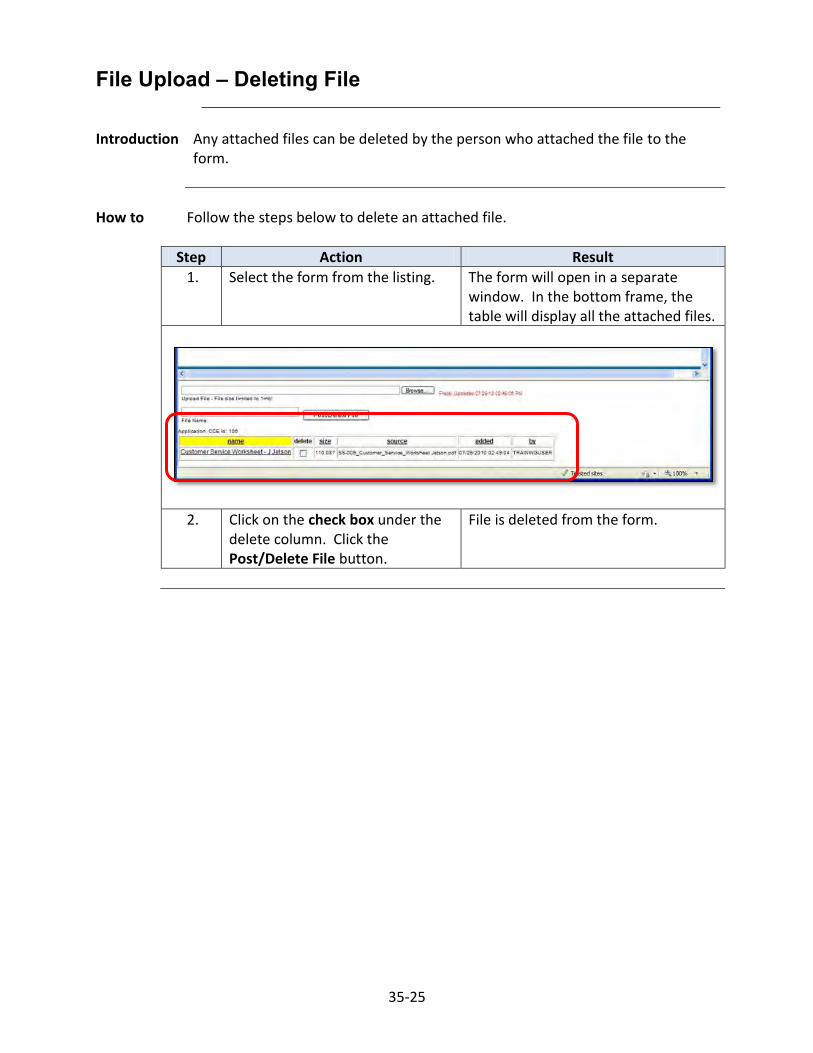
File Upload – Deleting File
Introduction Any attached files can be deleted by the person who attached the file to the
form.
How to Follow the steps below to delete an attached file.
Step Action Result
1. Select the form from the listing. The form will open in a separate window. In the bottom frame, the table will display all the attached files.
2. Click on the check box under the delete column. Click the Post/Delete File button.
File is deleted from the form.

35-26
Approved / Denied Status of Request
Introduction Once KDOA either approves or denies the request, an automated e-mail will be
sent to the Case Manager. Also, the request form will indicate the status as well as a notation in the Customers Case Log.
How to Follow the steps below to view the status of a request form.
Step Action Result
1. Select the form from the listing.
The form will open in a separate window.
2. The status will display in the KDOA Review region.
Below is a graphic of the Approved status and the automated e-mail notification.
Continued on next page

35-27
Approved / Denied Status of Request (continued)
How to continued
Step Action Result
Below is a graphic of the Denied status and the automated e-mail notification.

35-28
Closing a Request Form
Introduction The Request forms are launched in a separate window. Therefore, KAMIS is still
available in the background.
How to Follow the steps below to close the request form.
Step Action Result
1. To close the request form, simply click on the “X” of the form browser window.
Window will close.


![Assistive Planning in Complex, Dynamic Environments: a ... · of use cases: assistive wheelchair technology [12], assistive au-tomobile driving, and assistive manufacturing vehicle](https://cdn.vdocuments.net/doc/165x107/6055985ff7e719060567e863/assistive-planning-in-complex-dynamic-environments-a-of-use-cases-assistive.jpg)


