dvdav receiver avh-p4900dvd - pioneer usa, car …€¦ · · 2011-10-18jury or damage.! to avoid...
TRANSCRIPT

Operation Manual
DVD AV Receiver
AVH-P4900DVD
English

Thank you for buying this Pioneer product.Please read through these operating instructions so you will know how to operateyour model properly. After you have finished reading the instructions, keep this man-ual in a safe place for future reference.
Be sure to read this
! Playable discs 5! DVD video disc region numbers 6! When an operation is prohibited 10
PrecautionsIMPORTANT SAFEGUARDS 3To ensure safe driving 3To avoid battery exhaustion 4
Before You StartInformation to User 5For Canadian model 5About this unit 5About this manual 6After-sales service for Pioneer products 6Visit our website 7Features 7About WMA 8About the SAT RADIO READY mark 9To protect the LCD screen 9For viewing LCD comfortably 9What the marks on DVDs indicate 9Protecting your unit from theft 10Resetting the microprocessor 10
Operating this unitWhat’s What 12Basic Operations 13Tuner 18Built-in DVD player 20Audio Adjustments 30Setting up the DVD player 35Initial Settings 38Other Functions 41
Available accessoriesXM tuner 45SIRIUS Satellite Radio tuner 47Playing songs on iPod 49Multi-CD Player 51DVD Player 54TV tuner 56Digital Signal Processor 58
Additional InformationTroubleshooting 70Error messages 72Understanding auto TA and EQ error
messages 72Understanding messages 73Handling guideline of discs and player 74DVD discs 74CD-R/CD-RW discs 74Dual Discs 75Compressed audio files on the disc 75Using the display correctly 76Language code chart for DVD 78Terms 79Specifications 82
Index 84
Contents
En2

IMPORTANT SAFEGUARDSPlease read all of these instructions regardingyour display and retain them for future refer-ence.1 Read this manual fully and carefully be-
fore operating your display.2 Keep this manual handy as a reference for
operating procedures and safety informa-tion.
3 Pay close attention to all warnings in thismanual and follow the instructions care-fully.
4 Do not allow other persons to use this sys-tem until they have read and understoodthe operating instructions.
5 Do not install the display where it may (i)obstruct the driver’s vision, (ii) impair theperformance of any of the vehicle’s oper-ating systems or safety features, includ-ing air bags, hazard lamp buttons or (iii)impair the driver’s ability to safely oper-ate the vehicle.
6 Do not operate this display if doing so inany way will divert your attention fromthe safe operation of your vehicle. Alwaysobserve safe driving rules and follow allexisting traffic regulations. If you experi-ence difficulty in operating the system orreading the display, park your vehicle in asafe location and make necessary adjust-ments.
7 Please remember to wear your seat belt atall times while operating your vehicle. Ifyou are ever in an accident, your injuriescan be considerably more severe if yourseat belt is not properly buckled.
8 Never use headphones while driving.9 To promote safety, certain functions are
disabled unless the parking brake is on,and the vehicle is not in motion.
10 Never set the volume of your display sohigh that you cannot hear outside trafficand emergency vehicles.
WARNING! Do not attempt to install or service your
display by yourself. Installation or servi-cing of the display by persons withouttraining and experience in electronicequipment and automotive accessoriesmay be dangerous and could expose youto the risk of electric shock or otherhazards.
To ensure safe driving
WARNING! LIGHT GREEN LEAD AT POWER CON-
NECTOR IS DESIGNED TO DETECTPARKED STATUS ANDMUST BE CON-NECTED TO THE POWER SUPPLY SIDEOF THE PARKING BRAKE SWITCH. IM-PROPER CONNECTION OR USE OFTHIS LEAD MAY VIOLATE APPLICABLELAW ANDMAY RESULT IN SERIOUS IN-JURY OR DAMAGE.
! To avoid the risk of damage and injury and thepotential violation of applicable laws, this unitis not for use with a video screen that is visibleto the driver.
! To avoid the risk of accident and the potentialviolation of applicable laws, the front DVD orTV (sold separately) feature should never beused while the vehicle is being driven. Also,rear displays should not be in a locationwhere it is a visible distraction to the driver.
! In some countries or states the viewing ofimages on a display inside a vehicle even bypersons other than the driver may be illegal.Where such regulations apply, they must beobeyed and this unit’s DVD features shouldnot be used.
Precautions
En 3
Section
01Pre
cautio
ns

When you attempt to watch a DVD, Video CDor TV while driving, the warning VIDEO VIEW-ING IS NOTAVAILABLE WHILE DRIVING willappear on the front display.To watch a DVD, Video CD or TV on the frontdisplay, park your vehicle in a safe place andapply the parking brake.
Parking brake interlockCertain functions (DVD/TV viewing and certaintouch panel keys) offered by this unit could bedangerous and/or unlawful if used while driv-ing. To prevent such functions from beingused while the vehicle is in motion, there is aninterlock system that senses when the parkingbrake is set. If you attempt to use the functionsdescribed above while driving, they will be-come disabled until you stop the vehicle in asafe place, and (1) apply the parking brake, (2)release the parking brake, and then (3) applythe parking brake again. Please keep thebrake pedal pushed down before releasing theparking brake.
To avoid battery exhaustionBe sure to run the vehicle engine while usingthis unit. Using this unit without running theengine can result in battery drainage.! When no power is supplied to this unit be-
cause of a replacement of the vehicle bat-tery or for some similar reason, themicrocomputer of this unit is returned toits initial condition except audio settings.Although audio adjustment information isstored in this unit for several hours, we re-commend that you transcribe the data.
WARNINGDo not use with vehicles that do not feature anACC position.
Precautions
En4
Section
01

Information to User
Alteration or modifications carried out withoutappropriate authorization may invalidate theuser’s right to operate the equipment.
For Canadian model
This Class B digital apparatus complies withCanadian ICES-003.
About this unitThe tuner frequencies on this unit are allo-cated for use in North America. Use in otherareas may result in poor reception.
WARNINGHandling the cord on this product or cords asso-ciated with accessories sold with the productmay expose you to chemicals listed on proposi-tion 65 known to the State of California and othergovernmental entities to cause cancer and birthdefects or other reproductive harm.Wash handsafter handling.
This product contains mercury. Disposal of thismaterial may be regulated due to environmentalconsiderations. For disposal or recycling informa-tion, please contact your local authorities or theElectronics Industries Alliance: www.eiae.org.
CAUTION:USE OF CONTROL OR ADJUSTMENT ORPERFORMANCE OF PROCEDURESOTHER THAN THOSE SPECIFIED HEREINMAY RESULT IN HAZARDOUS RADIATIONEXPOSURE.
CAUTION:THE USE OF OPTICAL INSTRUMENTSWITH THIS PRODUCT WILL INCREASEEYE HAZARD.
CAUTION! Do not allow this unit to come into contact
with liquids. Electrical shock could result.Also, this unit damage, smoke, and overheatcould result from contact with liquids.
! Keep this manual handy as a reference for op-erating procedures and precautions.
! Always keep the volume low enough so thatyou can hear sounds from outside the vehicle.
! Protect this unit from moisture.! If the battery is disconnected or discharged,
the preset memory will be erased and must bereprogrammed.
Important (Serial number)
The serial number is located on the bottom ofthis unit. For your own security and convenience,be sure to record this number on the enclosedwarranty card.
Playable discsDVD, Video CD and CD discs that display thelogos shown below can be played back on thisplayer.
Before You Start
En 5
Section
02Befo
reYouSta
rt

DVD video
Video CD
CD
Notes
! is a trademark of DVD Format/LogoLicensing Corporation.
! This player can only play back discs bearingthe marks shown above.
DVD video disc region numbersDVD video discs that have incompatible regionnumbers cannot be played on this player. Theregion number of the player can be found onthe bottom of this unit.
The illustration below shows the regions andcorresponding region numbers.
About this manualThis unit features a number of sophisticatedfunctions ensuring superior reception and op-eration. All the functions have been designedfor the easiest possible use, but many are notself-explanatory. This operation manual willhelp you benefit fully from this unit’s potentialand to maximize your listening enjoyment.We recommend that you familiarize yourselfwith the functions and their operation by read-ing through the manual before you beginusing this unit. It is especially important thatyou read and observeWARNINGs and CAU-TIONs in this manual.
After-sales service forPioneer productsPlease contact the dealer or distributor fromwhere you purchased this unit for after-salesservice (including warranty conditions) or anyother information. In case the necessary infor-mation is not available, please contact thecompanies listed below:Please do not ship your unit to the companiesat the addresses listed below for repair withoutadvance contact.
Before You Start
En6
Section
02

U.S.A.Pioneer Electronics (USA) Inc.CUSTOMER SUPPORT DIVISIONP.O. Box 1760Long Beach, CA 90801-1760800-421-1404
CANADAPioneer Electronics of Canada, Inc.CUSTOMER SATISFACTION DEPARTMENT300 Allstate ParkwayMarkham, Ontario L3R OP21-877-283-5901
For warranty information please see the Lim-ited Warranty sheet included with this unit.
Visit our websiteVisit us at the following site:
1 Register your product. We will keep the detailsof your purchase on file to help you refer tothis information in the event of an insuranceclaim such as loss or theft.
2 Receive updates on the latest products andtechnologies.
3 Download owner’s manuals, order productcatalogues, research new products, andmuch more.
FeaturesTouch panel key operationIt is possible to operate this unit by usingtouch panel key.
DVD video playbackIt is possible to play back DVD video and DVD-R/RW (video mode).Remember that use of this system for com-mercial or public viewing purposes may con-stitute an infringement on the author’s rightsprotected by the Copyright Law.
Video CDs featuring PBC compatibilityIt is possible to play back Video CDs featuringPBC (playback control).
CD playbackMusic CD/CD-R/RW playback is possible.
MP3 file playbackYou can play back MP3 files recorded on CD-ROM/CD-R/CD-RW (ISO9660 Level 1/Level 2standard recordings).! Supply of this product only conveys a li-
cense for private, non-commercial use anddoes not convey a license nor imply anyright to use this product in any commercial(i.e. revenue-generating) real time broad-casting (terrestrial, satellite, cable and/orany other media), broadcasting/streamingvia internet, intranets and/or other net-works or in other electronic content distri-bution systems, such as pay-audio oraudio-on-demand applications. An inde-pendent license for such use is required.For details, please visithttp://www.mp3licensing.com.
WMA file playbackYou can play back WMA files recorded on CD-ROM/CD-R/CD-RW (ISO9660 Level 1/Level 2standard recordings).
NTSC compatibilityThis unit is NTSC system compatible. Whenconnecting other components to this unit, besure components are compatible with thesame video system otherwise images will notbe correctly reproduced.
Before You Start
En 7
Section
02Befo
reYouSta
rt
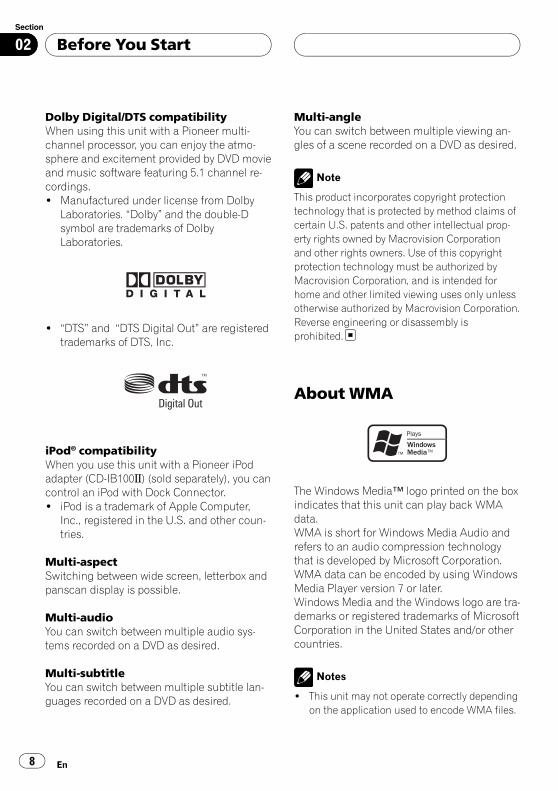
Dolby Digital/DTS compatibilityWhen using this unit with a Pioneer multi-channel processor, you can enjoy the atmo-sphere and excitement provided by DVD movieand music software featuring 5.1 channel re-cordings.! Manufactured under license from Dolby
Laboratories. “Dolby” and the double-Dsymbol are trademarks of DolbyLaboratories.
! “DTS” and “DTS Digital Out” are registeredtrademarks of DTS, Inc.
iPod® compatibilityWhen you use this unit with a Pioneer iPodadapter (CD-IB100B) (sold separately), you cancontrol an iPod with Dock Connector.! iPod is a trademark of Apple Computer,
Inc., registered in the U.S. and other coun-tries.
Multi-aspectSwitching between wide screen, letterbox andpanscan display is possible.
Multi-audioYou can switch between multiple audio sys-tems recorded on a DVD as desired.
Multi-subtitleYou can switch between multiple subtitle lan-guages recorded on a DVD as desired.
Multi-angleYou can switch between multiple viewing an-gles of a scene recorded on a DVD as desired.
Note
This product incorporates copyright protectiontechnology that is protected by method claims ofcertain U.S. patents and other intellectual prop-erty rights owned by Macrovision Corporationand other rights owners. Use of this copyrightprotection technology must be authorized byMacrovision Corporation, and is intended forhome and other limited viewing uses only unlessotherwise authorized by Macrovision Corporation.Reverse engineering or disassembly isprohibited.
About WMA
The Windows Media™ logo printed on the boxindicates that this unit can play back WMAdata.WMA is short for Windows Media Audio andrefers to an audio compression technologythat is developed by Microsoft Corporation.WMA data can be encoded by using WindowsMedia Player version 7 or later.Windows Media and the Windows logo are tra-demarks or registered trademarks of MicrosoftCorporation in the United States and/or othercountries.
Notes
! This unit may not operate correctly dependingon the application used to encode WMA files.
Before You Start
En8
Section
02

! Depending on the version of Windows MediaPlayer used to encode WMA files, albumnames and other text information may not becorrectly displayed.
About the SAT RADIOREADY mark
The SAT RADIO READY mark printed on thefront panel indicates that the Satellite RadioTuner for Pioneer (i.e., XM tuner and Sirius sa-tellite tuner which are sold separately) can becontrolled by this unit. Please inquire to yourdealer or nearest authorized Pioneer servicestation regarding the satellite radio tuner thatcan be connected to this unit. For satelliteradio tuner operation, please refer to the satel-lite radio tuner owner’s manual.
Notes
! The system will use direct satellite-to-receiverbroadcasting technology to provide listenersin their cars and at home with crystal-clearsound seamlessly from coast to coast. Satel-lite radio will create and package over 100channels of digital-quality music, news,sports, talk and children’s programming.
! “SAT Radio”, the SAT Radio logo and all re-lated marks are trademarks of Sirius SatelliteRadio inc., and XM Satellite Radio Inc.
To protect the LCD screen! Do not allow direct sunlight to fall on the
display when this unit is not being used.Extended exposure to direct sunlight can
result in LCD screen malfunction due tothe resulting high temperatures.
! When using a cellular phone, keep the an-tenna of the cellular phone away from thedisplay to prevent disruption of the video bythe appearance of spots, colored stripes,etc.
For viewing LCD comfortablyDue to its construction, the view angle of theLCD screen is limited. The viewing angle (verti-cal and horizontal) can be increased, however,by using BRIGHT to adjust the black density ofthe video. When using for the first time, adjustthe black density in accordance with the view-ing angle (vertical and horizontal) to adjust forclear viewing. DIMMER can also be used toadjust the brightness of the LCD screen itselfto suit your personal preference.
What the marks on DVDsindicateThe marks below may be found on DVD disclabels and packages. They indicate the type ofimages and audio recorded on the disc, andthe functions you can use.
Mark Meaning
2 Indicates the number of audio sys-tems.
2 Indicates the number of subtitle lan-guages.
3Indicates the number of viewing an-gles.
16 : 9 LB Indicates the picture size (aspect ratio:screen width-to-height ratio) type.
1
ALL
Indicates the number of the regionwhere playback is possible.
Before You Start
En 9
Section
02Befo
reYouSta
rt

When an operation is prohibitedWhen you are watching a DVD and attempt toperform an operation, it may not be performedbecause of the programming on the disc.When this happens, the icon appears onthe screen.! The icon may not appear with certain
discs.
Protecting your unit fromtheftThe front panel can be detached to deter theft.! If the front panel is not detached from the
head unit within five seconds of turning offthe ignition, a warning tone will sound.
! You can turn off the warning tone. SeeSwitching the warning tone on page 39.
Important
! Handle gently when removing or attachingthe front panel.
! Avoid subjecting the front panel to excessiveshocks.
! Keep the front panel out of direct sunlight andhigh temperatures.
! If removed, replace the front panel on the unitbefore starting up your vehicle.
Removing the front panel% Push the release button downward andrelease the front panel.Take care not to grip it too tightly or to dropthe front panel and protect it from contactwith water or other fluids to prevent perma-nent damage.
Release button
Attaching the front panel% Replace the front panel by holding itupright to the unit and clipping it securelyinto the mounting hook.
Resetting the microprocessorPressing RESET lets you reset the micropro-cessor to its initial settings.The microprocessor must be reset under thefollowing conditions:! Prior to using this unit for the first time
after installation! If the unit fails to operate properly! When strange or incorrect messages ap-
pear on the display
1 Turn the ignition switch OFF.
2 Press RESET with a pen tip or otherpointed instrument.
RESET button
Before You Start
En10
Section
02

Note
After completing connections or when you wantto erase all memorized settings or return the unitto its initial (factory) settings, switch your engineON or set the ignition switch to ACC ON beforepressing RESET.
Before You Start
En 11
Section
02Befo
reYouSta
rt

What’s WhatHead unit1 INFO button
Press to turn the information bar on/off.
2 PGM buttonPress to operate the preprogrammed func-tions for each source. (Refer to Using thePGM button on page 44.)
3 Ambient light sensorSenses ambient light. This system automati-cally adjusts the brightness of the display tocompensate for ambient light.
4 FLIP DOWN buttonPress to turn the LCD panel horizontal tem-porarily from upright position.
5 OPEN/CLOSE buttonPress to open or close the LCD panel.
6 ENTERTAINMENT (ENT) buttonPress to switch between the backgrounddisplays.
7 WIDE buttonPress to select a desired mode for enlarginga 4:3 picture to a 16:9 one.
8 V.ADJ buttonPress and hold to display the picture adjust-ment menu.
9 RESET buttonPress to return to the factory settings (initialsettings).
a a/b/c/d buttonsPress to do manual seek tuning, fast for-ward, reverse and track search controls.
b A.MENU buttonPress to display MENU.
78
bdefghij
l
a
9
c
1 2 5
6
43
k
Operating this unit
En12
Section
03

c BOOKMARK (BM) buttonPress to bookmark a scene that you want toresume playback.
d BAND/ESC buttonPress to select among three FM bands andone AM band and to cancel the controlmode of functions.
e EQ buttonPress to select various equalizer curves.
f BOOST buttonPress to boost the subwoofer level.When the separately sold multi-channel pro-cessor is connected to this unit and the sub-woofer is set to ON, press to display thespeaker level menu. When it is OFF, press todisplay the speaker setting menu.
g Release buttonPress downward to detach the front panel.
h ANGLE (+/–) buttonPress to change the LCD panel angle.
i SOURCE buttonThis unit is turned on by selecting a source.Press to cycle through all the availablesources.
j EJECT buttonPress to eject a disc from this unit.
k VOLUMEPress to increase or decrease the volume.
l Disc loading slotInsert a disc to play.
Optional remote controlThe remote control CD-R55 is sold separately.For details concerning operations, see the re-mote control manual.
Basic OperationsPower ON/OFFTurning the unit on
% Press SOURCE to turn the unit on.
Turning the unit off
% Press SOURCE and hold until the unitturns off.# When using the touch panel keys, touch thesource icon and then touch OFF.When the source icon is not displayed, you candisplay it by touching the screen.
Selecting a sourceYou can select a source you want to listen to.To switch to the DVD player, load a disc in theunit to switch to DVD.
% When using the touch panel keys,touch the source icon and then touch thedesired source name.The source names are displayed and select-able ones are highlighted.
! DVD – Built-in DVD player! S-DVD – DVD player/multi-DVD player! M-CD – Multi-CD player! TUNER – Tuner! TV – Television! iPod – iPod! EXT-1 – External unit 1! EXT-2 – External unit 2! AUX – AUX! AV – AV input! XM – XM tuner! SIRIUS – SIRIUS tuner! OFF – Turn the unit off
# When the source icon is not displayed, youcan display it by touching the screen.# To return to the playback display, touch ESC.
Operating this unit
En 13
Section
03Opera
tingth
isunit

% When using the buttons, press SOURCEto select a source.Press SOURCE repeatedly to switch betweenthe following sources:XM (XM tuner)—SIRIUS (SIRIUS tuner)—TUNER (tuner)—TV (television)—AV (AV)—DVD (built-in DVD player)—S-DVD (DVDplayer/multi-DVD player)—M-CD (multi-CDplayer)—iPod (iPod)—EXT-1 (external unit 1)—EXT-2 (external unit 2)—AUX (AUX)
Notes
! In the following cases, the sound source willnot change:— When there is no unit corresponding to the
selected source connected to this unit.— When there is no disc or magazine in the
player.— When the AUX (auxiliary input) is set to off
(refer to page 39).— When the AV (AV input) is not set to
VIDEO (refer to page 41).! External unit refers to a Pioneer product (such
as one available in the future) that, althoughincompatible as a source, enables control ofbasic functions by this unit. Two external unitscan be controlled by this unit. When two exter-nal units are connected, the allocation ofthem to external unit 1 or external unit 2 isautomatically set by this unit.
! When this unit’s blue/white lead is connectedto the vehicle’s auto-antenna relay controlterminal, the vehicle’s antenna extends whenthis unit’s source is turned on. To retract theantenna, turn the source off.
Adjusting the volume% Use VOLUME to adjust the sound level.Press VOLUME up/+ or down/– to increase ordecrease the source volume.
Touch panel key basic operationActivating the touch panel keys
1
1 Touch panel keysTouch to do various operations.
1 Touch the screen to activate the touchpanel keys corresponding to each source.The touch panel keys appear on the display.# To go to the next group of touch panel keys,touchd.
2 Touch ESC to hide the touch panel keys.
Note
If you do not use the touch panel keys within 30seconds, they will be hidden automatically.
Operating the menu
1 4 52 3
1 FUNCTION keyTouch to select functions for each source.
2 AUDIO keyTouch to select various sound quality controls.
3 SETUP key
Operating this unit
En14
Section
03

Touch to select various setup functions.4 BACK key
Touch to return to the previous display.5 ESC key
Touch to cancel the control mode of func-tions.
1 Press A.MENU button to display MENU.MENU appears on the display.
2 Touch the desired key to display thefunction names you want to operate.# To go to the next group of function names,touch NEXT.# To return to the previous group of functionnames, touch PREV.
3 Touch ESC to return to the display ofeach source.
Note
If you do not operate the function within about 30seconds, the display is automatically returned tothe playback display.
Opening and closing the LCD panelThe LCD panel will be opened or closed auto-matically with the turning of the ignitionswitch on or off. You can turn off the automaticclose/open function. (Refer to page 42.)! Do not close the LCD panel with hands by
force. That cause malfunction.! The automatic close/open function will op-
erate the display as follows.— When the ignition switch is turned OFF
while the LCD panel is opened, the LCDpanel will close after six seconds.
— When the ignition switch is turned ONagain (or turned to ACC), the LCD panelwill be opened automatically.
— Removing or attaching the front panelwill automatically close or open the LCDpanel. (Refer to page 10.)
! When the ignition switch is turned OFFafter the LCD panel has been closed, turn-ing the ignition switch ON again (or turningit to ACC) will not open the LCD panel. Inthis case, press OPEN/CLOSE to open theLCD panel.
! When closing the LCD panel, check tomake sure that it has closed completely. Ifthe LCD panel has stopped halfway, leavingit like this could result in damage.
CAUTIONKeep hands and fingers clear of the unit whenopening, closing, or adjusting the LCD panel. Beespecially cautious of children’s hands and fin-gers.
% Press OPEN/CLOSE to open the LCDpanel.# To close the LCD panel, press OPEN/CLOSEagain.
Adjusting the LCD panel angle
Important
! If you can hear the LCD panel knockingagainst your vehicle’s console or dashboard,press ANGLE (–) to move the LCD panel a lit-tle forward.
! When adjusting the LCD panel angle, be sureto press ANGLE (+/–). Forcibly adjusting theLCD panel by hand may damage it.
Operating this unit
En 15
Section
03Opera
tingth
isunit

% Press ANGLE (+/–) to adjust the LCDpanel to an easily viewable angle.The LCD panel angle continues changing aslong as you press ANGLE (+/–) and hold.
# The adjusted LCD panel angle will be memor-ized and automatically returned to the next timethe LCD panel is opened.
Turning the LCD panel horizontalWhen the LCD panel is upright and it hindersthe operation of the air conditioner, the panelcan be turned horizontal temporarily.
% Press FLIP DOWN to turn the LCD panelhorizontal.# To return to original position, pressFLIP DOWN again.# The LCD panel returns to the original positionautomatically with beeping sound 10 secondsafter operation.
Changing the wide screen modeYou can select a desired mode for enlarging a4:3 picture to a 16:9 one.
% Press WIDE to select the desired set-ting.PressWIDE repeatedly to switch between thefollowing settings:FULL (full)—JUST (just)—CINEMA (cinema)—ZOOM (zoom)—NORMAL (normal)
FULL (full)A 4:3 picture is enlarged in the horizontal direc-tion only, giving you a 4:3 TV picture (normal pic-ture) without any omissions.
JUST (just)The picture is enlarged slightly at the center andthe amount of enlargement increases horizontallyto the ends, enabling you to enjoy a 4:3 picturewithout sensing any disparity even on a widescreen.
CINEMA (cinema)The picture is enlarged by the same proportion asFULL or ZOOM in the horizontal direction and byan intermediate proportion between FULL andZOOM in the vertical direction; ideal for a cine-ma-sized picture (wide screen picture) where cap-tions lie outside.
ZOOM (zoom)A 4:3 picture is enlarged in the same proportionboth vertically and horizontally; ideal for a cine-ma-sized picture (wide screen picture).
NORMAL (normal)A 4:3 picture is displayed as it is, giving you nosense of disparity since its proportions are thesame as that of the normal picture.
Notes
! Different settings can be memorized for eachvideo source.
! When video is viewed in a wide screen modethat does not match its original aspect ratio, itmay appear different.
! Remember that using the wide mode featureof this system for commercial or public view-ing purposes may constitute an infringementon the author’s rights protected by the Copy-right Law.
! Video will appear grainy when viewed inCINEMA or ZOOMmode.
Operating this unit
En16
Section
03

Changing the picture adjustmentYou can adjust BRIGHT (brightness),CONTRAST (contrast), COLOR (color) andHUE (hue) for each source and rear view cam-era.! The adjustments of BRIGHT and
CONTRAST are stored separately for lightambient (daytime) and dark ambient (night-time). A sun or moon is displayed tothe left of BRIGHT and CONTRAST, respec-tively, as the ambient light sensor deter-mines brightness or darkness.
! You cannot adjust COLOR or HUE for theaudio source.
1 Press V.ADJ and hold to displayPICTURE ADJUST.Press V.ADJ until PICTURE ADJUST appearsin the display.
2 Touch any of the following touch panelkeys to select the function to be adjusted.The adjustment function names are displayedand adjustable ones are highlighted.
! BRIGHT – Adjust the black intensity! CONTRAST – Adjust the contrast! COLOR – Adjust the color saturation! HUE – Adjust the tone of color (red is em-
phasized or green is emphasized)! DIMMER – Adjust the brightness of display! BACK-CAMERA – Switch to the picture ad-
justment display for the rear view camera# You can adjust the picture adjustment for rearview camera only when B-CAM is turned on.(Refer to Setting for rear view camera (back upcamera) on page 41.)# With some rear view cameras, picture adjust-ment may not be possible.
3 Touch c or d to adjust the selecteditem.Each time you touch c or d it increases or de-creases the level of selected item. +24 to –24
is displayed as the level is increased or de-creased.
4 Touch ESC to hide the touch panel keys.
Adjusting the dimmerThe adjustment of DIMMER is stored sepa-rately for each ambient light; daytime, eveningand nighttime. The brightness of LCD screenwill be adjusted to optimum level automati-cally in accordance with the ambient lightbased on the setting values.
1 Press V.ADJ and hold to displayPICTURE ADJUST.Press V.ADJ until PICTURE ADJUST appearsin the display.
2 Touch DIMMER.The ambient light level used as the standardfor adjusting DIMMER appears above the levelbar.
! Red sun – Adjust the brightness forbright ambient light (daytime)
! White sun – Adjust the brightness for in-termediate brightness (evening)
! Blue moon – Adjust the brightness fordark ambient light (nighttime)
3 Touch c or d to adjust the brightness.Each time you touch c or d moves the key to-wards the left or the right.The level indicates the brightness of thescreen being adjusted. The farther the keymoves to the right, the brighter the screen.
4 Touch ESC to hide the touch panel keys.
Note
The icons indicating the current ambient bright-ness used for adjusting BRIGHT and CONTRASTmay differ from DIMMER slightly.
Operating this unit
En 17
Section
03Opera
tingth
isunit

TunerBasic Operations
1 2 43
67 5
1 Source icon2 Band indicator3 Preset number indicator4 Frequency indicator5 Preset list display6 LOCAL indicator
Shows when local seek tuning is on.7 STEREO indicator
Shows when the selected frequency is beingbroadcast in stereo.
1 Touch the source icon and then touchTUNER to select the tuner.
2 Touch the screen to display the touchpanel keys.
3 Touch BAND to select a band.Touch BAND until the desired band (FM1,FM2, FM3 for FM or AM) is displayed.
4 To select a preset channel, touch a pre-set channel on the list.The preset channel you selected is tuned in.# When the list of channels is not displayed,touch LIST.
5 To perform manual tuning, brieflytouch c or d.The frequencies move up or down step bystep.# You can also perform manual tuning by press-ing c or d button.
6 To perform seek tuning, keep touchingc or d for about one second and release.The tuner will scan the frequencies until abroadcast strong enough for good reception isfound.# You can cancel seek tuning by briefly touchingeitherc or d.# If you keep touchingc ord you can skip sta-tions. Seek tuning starts as soon as you releasethe key.# You can also perform seek tuning by pressingand holdingc or d button.
Note
If you do not use the touch panel keys within 30seconds, they will be hidden automatically.
Storing and recalling broadcastfrequenciesYou can easily store up to six broadcast fre-quencies for later recall.! Up to 18 FM stations, six for each of the
three FM bands, and six AM stations canbe stored in memory.
% When you find a frequency that youwant to store in memory keep touchingone of preset tuning keys P1 to P6 until thepreset number stops flashing.The number you have touched will flash in thepreset number indicator and then remain lit.The selected radio station frequency has beenstored in memory.
Operating this unit
En18
Section
03

The next time you touch the same preset tun-ing key the radio station frequency is recalledfrom memory.# When the touch panel keys are not displayed,you can display them by touching the screen.# When P1 to P6 are not displayed, you can dis-play them by touching LIST.# You can also use a and b buttons to recallradio station frequencies assigned to preset tun-ing keys P1 to P6.You can also use a and b buttons to recall radiostation frequencies assigned to preset tuningkeys P1 to P6.
Introduction of advanced tuneroperation1 Press A.MENU button to display MENU.MENU appears on the display.
2 Touch FUNCTION to display the func-tion names.The function names are displayed and oper-able ones are highlighted.# To return to the previous display, touch BACK.# To return to the frequency display, touch ESC.# If you do not operate the function within about30 seconds, the display is automatically returnedto the frequency display.
Storing the strongest broadcastfrequenciesBSM (best stations memory) lets you automa-tically store the six strongest broadcast fre-quencies under preset tuning keys P1 to P6and once stored there you can tune in to thosefrequencies with the touch of a key.! Storing broadcast frequencies with BSM
may replace broadcast frequencies youhave saved using P1 to P6.
% Touch BSM on the function menu toturn BSM on.BSM begins to flash. While BSM is flashingthe six strongest broadcast frequencies will bestored under preset tuning keys P1 to P6 inorder of their signal strength. When finished,BSM stops flashing.# To cancel the storage process, touch BSMagain.
Tuning in strong signalsLocal seek tuning lets you tune in only thoseradio stations with sufficiently strong signalsfor good reception.
1 Touch LOCAL on the function menu.
2 Touch a to turn local seek tuning on.# To turn local seek tuning off, touch b.
3 Touch c or d to set the sensitivity.There are four levels of sensitivity for FM andtwo levels for AM:FM: 1—2—3—4AM: 1—2The 4 setting allows reception of only thestrongest stations, while lower settings let youreceive progressively weaker stations.
Operating this unit
En 19
Section
03Opera
tingth
isunit
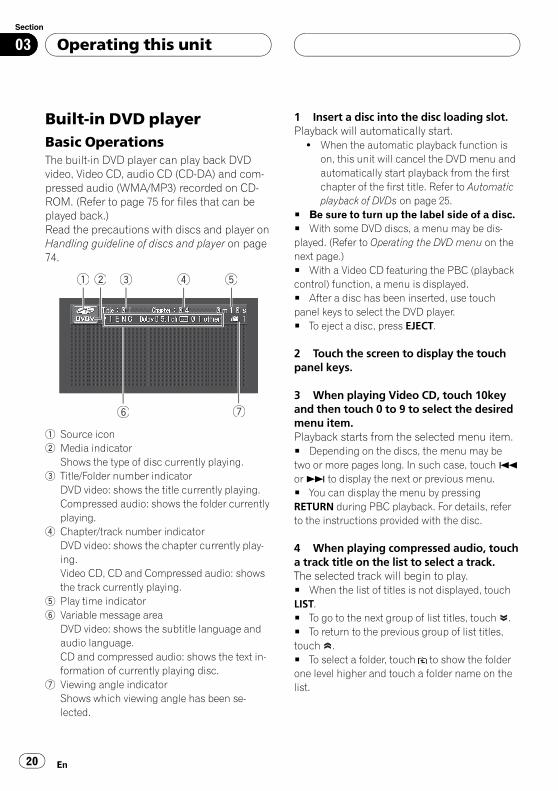
Built-in DVD playerBasic OperationsThe built-in DVD player can play back DVDvideo, Video CD, audio CD (CD-DA) and com-pressed audio (WMA/MP3) recorded on CD-ROM. (Refer to page 75 for files that can beplayed back.)Read the precautions with discs and player onHandling guideline of discs and player on page74.
3 4 52
76
1
1 Source icon2 Media indicator
Shows the type of disc currently playing.3 Title/Folder number indicator
DVD video: shows the title currently playing.Compressed audio: shows the folder currentlyplaying.
4 Chapter/track number indicatorDVD video: shows the chapter currently play-ing.Video CD, CD and Compressed audio: showsthe track currently playing.
5 Play time indicator6 Variable message area
DVD video: shows the subtitle language andaudio language.CD and compressed audio: shows the text in-formation of currently playing disc.
7 Viewing angle indicatorShows which viewing angle has been se-lected.
1 Insert a disc into the disc loading slot.Playback will automatically start.
! When the automatic playback function ison, this unit will cancel the DVD menu andautomatically start playback from the firstchapter of the first title. Refer to Automaticplayback of DVDs on page 25.
# Be sure to turn up the label side of a disc.# With some DVD discs, a menu may be dis-played. (Refer to Operating the DVD menu on thenext page.)# With a Video CD featuring the PBC (playbackcontrol) function, a menu is displayed.# After a disc has been inserted, use touchpanel keys to select the DVD player.# To eject a disc, press EJECT.
2 Touch the screen to display the touchpanel keys.
3 When playing Video CD, touch 10keyand then touch 0 to 9 to select the desiredmenu item.Playback starts from the selected menu item.# Depending on the discs, the menu may betwo or more pages long. In such case, toucho
orp to display the next or previous menu.# You can display the menu by pressingRETURN during PBC playback. For details, referto the instructions provided with the disc.
4 When playing compressed audio, toucha track title on the list to select a track.The selected track will begin to play.# When the list of titles is not displayed, touchLIST.# To go to the next group of list titles, touch .# To return to the previous group of list titles,touch .# To select a folder, touch to show the folderone level higher and touch a folder name on thelist.
Operating this unit
En20
Section
03

# To return to folder 001 (ROOT), press and holdBAND/ESC. However, if folder 001 (ROOT) con-tains no files, playback commences with folder002.# You can also select a folder by pressinga orb button.
5 To skip back or forward to anotherchapter/track, briefly touch o orp.
6 To perform fast forward or reverse,keep touching o or p.When DVD video or Video CD is playing, if youkeep touchingo or p for five seconds,the icon m or n is highlighted. When thishappens, fast reverse/fast forward continueseven if you release o or p. To resumeplayback at a desired point, touch f.# When playing DVD video or Video CD, fast for-ward/fast reverse may not be possible at certainlocations on some discs. If this happens, normalplayback automatically resumes.# When playing compressed audio, there is nosound on fast forward or reverse.
Notes
! If you do not use the touch panel keys within30 seconds, they will be hidden automatically.
! The DVD player plays one, standard, 12-cm or8-cm (single) disc at a time. Do not use anadapter when playing 8-cm discs.
! Do not insert anything other than a disc intothe disc loading slot. Discs which can beplayed back are listed on Playable discs onpage 5.
! If you cannot insert a disc completely or ifafter you insert a disc the disc does not play,check that the label side of the disc is up.Press EJECT to eject the disc, and check thedisc for damage before inserting it again.
! If an error message such as ERROR-02 is dis-played, refer to Error messages on page 72.
! If bookmark function is on, DVD playback re-sumes from the selected point. For more de-
tails, refer to Resume playback (Bookmark) onpage 28.
! When playing discs with compressed audioand audio data (CD-DA) such as CD-EXTRAand MIXED-MODE CDs, both types can beplayed only by switching mode between com-pressed audio and CD-DA by touchingMEDIA or pressing BAND/ESC. This functioncan be operated only when the disc is playing.
! If you have switched between compressedaudio and CD-DA, playback starts at the firsttrack on the disc.
! There is sometimes a delay between startingup disc playback and the sound being issued.When being read, FORMAT READ is dis-played.
! When playing back files recorded as VBR(variable bit rate) files, the play time will not becorrectly displayed if fast forward or reverseoperations are used.
! When playing a compressed audio disc con-taining more than 192 tracks, READY ap-pears on the information bar for the tracktitles of 193rd and later.
Operating the DVD menuSome DVDs allow you to select from the disccontents using a menu.! This function is available for DVD.! You can display the menu by touching
MENU or TOP.M while a disc is playing.Touching either of these keys again lets youstart playback from the location selectedfrom the menu. For details, refer to the in-structions provided with the disc.
1 Touch � �� to display touch panel keysto operate the DVD menu.# When the touch panel keys are not displayed,you can display them by touching the screen.
2 Touch a, b, c or d to select the desiredmenu item.
Operating this unit
En 21
Section
03Opera
tingth
isunit

3 Touch ENTER.Playback starts from the selected menu item.# You cannot operate the DVD menu from a/b/c/d buttons on the head unit.# The way to display the menu differs dependingon the disc.
Operating the DVD menu with 10 keySome DVDs allow you to select from the disccontents using 10key.
1 Touchd until 10key appears in the dis-play.
2 Touch 10key.
3 Touch 0 to 9 corresponding to a menunumber and then touch ENTER to startplayback.
! To select 3, touch 3.! To select 10, touch 1 and 0 in that order.! To select 23, touch 2 and 3 in that order.
Skipping back or forward toanother title! This function is available for DVD.
% To skip back or forward to another title,touch a or b.Touching a skips to the start of the next title.Touching b skips to the start of the previoustitle.Title numbers are displayed for eight seconds.
Searching for a desired scene,starting playback from aspecified timeYou can use the search function to search fora desired scene by specifying a title, chapter,track and the time search function to specifythe time on a disc at which play starts.
! This function is available for DVD andVideo CD.
! Chapter search and time search are notpossible when disc playback has beenstopped.
! During playback of Video CDs featuringPBC (playback control), this function can-not be operated.
1 Touch SEARCH.
2 Touch TITLE (title), CHAP. (chapter),TRACK (track) or TIME (time).
3 Touch 0 to 9 to input the desired num-ber.For titles, chapters and tracks
! To select 3, touch 3.! To select 10, touch 1 and 0 in that order.! To select 23, touch 2 and 3 in that order.
For time (time search)! To select 21 minutes 43 seconds, touch 2, 1,
4 and 3 in that order.! To select 1 hour 11 minutes, convert the
time into 71 minutes 00 seconds and touch7, 1, 0 and 0 in that order.
# To cancel the inputted numbers, touch C.
4 While the inputted number is dis-played, touch ENTER.This starts playback from the selected scene.
Notes
! With DVD discs featuring a menu, you canalso touch MENU or TOP.M and then makeselections from the displayed menu.
! With some discs, the icon may be dis-played, indicating that titles, chapters andtime cannot be specified.
Specifying titleYou can use the direct search function tosearch for a desired scene by specifying a title.
Operating this unit
En22
Section
03

1 Touchd until 10key appears in the dis-play.
2 Touch 10key.
3 Touch 0 to 9 corresponding to a desiredtitle number when the disc is stopped.Title number is displayed for eight secondsand playback starts from the selected title.
! To select 3, touch 3.! To select 10, touch 1 and 0 in that order.! To select 23, touch 2 and 3 in that order.
Changing audio languageduring playback (Multi-audio)DVDs can provide audio playback with differ-ent languages and different systems (Dolby Di-gital, DTS etc.). With DVDs featuring multi-audio recordings, you can switch between lan-guages/audio systems during playback.! This function is available for DVD.
1 Touchd until AUDIO appears in thedisplay.
2 Touch AUDIO during playback.Each time you touch AUDIO it switches be-tween audio systems.
Notes
! The number in the 2 mark on a DVD’spackage indicates the number of recordedlanguages/audio systems.
! With some DVDs, switching between lan-guages/audio systems may only be possibleusing a menu display.
! You can also switch between languages/audiosystems using DVD SETUP. For details, referto Setting the audio language on page 35.
! Only digital output of DTS audio is possible. Ifthis unit’s optical digital outputs are not con-
nected, DTS audio will not be output, so selectan audio setting other than DTS.
! Display indications such as Dolby D and5.1ch indicate the audio system recorded onthe DVD. Depending on the setting, playbackmay not be with the same audio system asthat indicated.
! Touching AUDIO during fast forward/fast re-verse, pause or slow motion playback returnsyou to normal playback.
Changing the subtitle languageduring playback (Multi-subtitle)With DVDs featuring multi-subtitle recordings,you can switch between subtitle languagesduring playback.! This function is available for DVD.
1 Touchd until SUB.T appears in the dis-play.
2 Touch SUB.T during playback.Each time you touch SUB.T it switches be-tween subtitle languages.
Notes
! The number in the 2 mark on a DVD’s pack-age indicates the number of recorded subtitlelanguages.
! With some DVDs, switching between subtitlelanguages may only be possible using a menudisplay.
! You can also switch between subtitle lan-guages using DVD SETUP. For details, refer toSetting the subtitle language on page 35.
! Touching SUB.T during fast forward/fast re-verse, pause or slow motion playback returnsyou to normal playback.
Operating this unit
En 23
Section
03Opera
tingth
isunit

Changing the viewing angleduring playback (Multi-angle)With DVDs featuring multi-angle (scenes shotfrom multiple angles) recordings, you canswitch among viewing angles during play-back.! This function is available for DVD.! During playback of a scene shot from mul-
tiple angles, the angle icon is dis-played. Turn angle icon display on or offusing DVD SETUP. For details, refer to Set-ting the angle icon display on page 36.
1 Touchd until ANGLE appears in thedisplay.
2 Touch ANGLE during playback of ascene shot from multiple angles.Each time you touch ANGLE it switches be-tween angles.
Notes
! The 3 mark on a DVD’s package indicates itfeatures multi-angle scenes. The number inthe 3 mark indicates the number of anglesfrom which scenes were shot.
! Touching ANGLE during fast forward/fast re-verse, pause or slow motion playback returnsyou to normal playback.
Stopping playback% Touch g.# When you stop disc playback by touchingg,that location on the disc is memorized, enablingplayback from that point when you play the discagain.# To play back the disc again, touchf.
Pausing disc playbackPause lets you temporarily stop disc playback.
% Touchf during playback.The icon e is displayed and playback ispaused, letting you view a still image.# To resume playback at the same point that youturned pause on, touchf again.
Note
Depending on the disc and the playback locationon the disc, the icon may be displayed, indicat-ing that still playback is not possible.
Frame-by-frame playbackThis lets you move ahead one frame at a timeduring playback.! This function is available for DVD and
Video CD.
% Touchr during playback.Each time you touch r, you move ahead oneframe.# To return to normal playback, touchf.
Notes
! Depending on the disc and the playback loca-tion on the disc, the icon may be displayed,indicating that frame-by-frame playback is notpossible.
! With some discs, images may be unclear dur-ing frame-by-frame playback.
Operating this unit
En24
Section
03

Slow motion playbackThis lets you slow down playback speed.! This function is available for DVD and
Video CD.
1 Keep touching r until � is displayedduring playback.The icon � is displayed, forward slow mo-tion playback begins.# To return to normal playback, touchf.
2 Touchq orr to adjust playbackspeed during slow motion playback.Each time you touch q or r it changes thespeed in four steps in the following order:1/16—1/8—1/4—1/2
Notes
! There is no sound during slow motion play-back.
! Depending on the disc and the playback loca-tion on the disc, the icon may be displayed,indicating that slow motion playback is notpossible.
! With some discs, images may be unclear dur-ing slow motion playback.
! Reverse slow motion playback is not possible.
Return to the specified sceneYou can return to the specified scene wherethe DVD you are currently playing has beenpreprogrammed to return.! This function is available for DVD.
1 Touchd until RETURN appears in thedisplay.
2 Touch RETURN to return to the speci-fied scene.
Note
If a specified scene has not been preprogrammedin DVD disc, this function is not possible.
Automatic playback of DVDsWhen a DVD disc with DVD menu is inserted,this unit will cancel the DVD menu automati-cally and start playback from the first chapterof the first title.! This function is available for DVD.! Some DVDs may not operate properly. If
this function is not fully operated, turn thisfunction off and start playback.
1 Touchd until A.PLAY appears in thedisplay.
2 Touch A.PLAY to turn automatic play-back on.# To turn automatic playback off, touch A.PLAYagain.# When the automatic playback is on, you can-not operate repeating play of DVD disc (refer toRepeating play on page 27).
PBC playbackDuring playback of Video CDs featuring PBC(Playback Control), PBC ON is displayed. Youcan operate PBC menu with 10key.! This function is available for Video CD.
1 Touchd until 10key appears in the dis-play and then touch 10key.
2 Touch 0 to 9 corresponding to a menunumber and then touch ENTER to startplayback.
! To select 3, touch 3.! To select 10, touch 1 and 0 in that order.! To select 23, touch 2 and 3 in that order.
Operating this unit
En 25
Section
03Opera
tingth
isunit

# Depending on the discs, the menu may betwo or more pages long. In such case, toucho
orp to display the next or previous menu.# You can display the menu by touchingRETURN during PBC playback. For details, referto the instructions provided with the disc.
Notes
! PBC playback of Video-CD cannot be can-celled.
! During playback of Video CDs featuring PBC(Playback Control), PBC ON, search and timesearch functions cannot be used nor can youselect the range for repeat play.
Text informationText information recorded on CD TEXT andcompressed audio disc can be displayed. Textinformation is displayed on variable messagearea.
Displaying text information
% Touch DISP.Touch DISP repeatedly to switch between thefollowing settings:For CD TEXT discsD.Title (disc title)—D.Artist (disc artist name)—T.Title (track title)—T.Artist (track artistname)For compressed audio discsFolder (folder name)—File (file name)—T.Title (track title)—Artist (artist name)—Album (album title)—Comment (comment)—Bit Rate (bit rate)
Notes
! Some discs have certain information encodedon the disc during manufacture. These discsmay contain such information as the CD title,track title, artist’s name and playback timeand are called CD TEXT discs.
! If specific information has not been recordedon a CD TEXT disc, NO XXXX will be dis-played (e.g., NO T.ARTIST NAME).
! When playing back WMA files, album title andcomment are not displayed.
! When a list of folders/files is displayed by thetouch of LIST, Current (currently playingfolder) is displayed instead of Folder.
! When playing back MP3 files recorded as VBR(variable bit rate) files, the bit rate value is notdisplayed even after switching to bit rate.(VBR will be displayed.)
! If specific information has not been recordedon a compressed audio disc, NO XXXX willbe displayed (e.g., NO ARTIST NAME).
Scrolling text information in the displayThis unit can display the first 19 letters. Whenthe recorded information is longer than 19 let-ters, you can scroll the text to the left so thatthe rest of the title can be seen.
% Keep touching DISP until the title be-gins to scroll to the left.The rest of the title will appear in the display.
Displaying information oncompressed audioInformation recorded on a compressed audiodisc can be displayed.
% Touch to display information onthe compressed audio file you are currentlyplaying.
! ALBUM (album title)! TRACK (track title)! FOLDER (folder name)! FILE (file name)! ARTIST (artist name)! GENRE (genre)! YEAR (year)
# When playing back WMA files, lists of albumtitle, genre and year appear in blank.
Operating this unit
En26
Section
03

# If specific information has not been recordedon a compressed audio file, the list appears inblank.# Depending on the version of ID3 tag orWindows Media Player, the information may notbe displayed correctly.
Introduction of advancedoperations
1
1 Function displayShows the function names.
1 Press A.MENU button to display MENU.MENU appears on the display.
2 Touch FUNCTION to display the func-tion names.The function names are displayed and oper-able ones are highlighted.# To return to the previous display, touch BACK.# To return to the playback display, touch ESC.
Note
If you do not operate the function within about 30seconds, the display is automatically returned tothe playback display.
Repeating playRepeat play plays the same play range repeat-edly. Play range varies depending on themedia.
For DVD, play range can be selected fromTITLE (title repeat) and CHPTR (chapter re-peat).For Video CD and CD, play range can be se-lected from DISC (disc repeat) and TRACK(track repeat).For compressed audio, play range can be se-lected from DISC (disc repeat), FOLDER (folderrepeat) and TRACK (track repeat).
% Touch REPEAT on the function menu toselect the repeat range.
! TITLE – Repeat just the current title! CHPTR – Repeat just the current chapter! TRACK – Repeat just the current track! FOLDER – Repeat the current folder! DISC – Play through the current disc
Notes
! If you perform chapter search or fast forward/reverse, the repeat play range changes toDISC.
! If you select another folder during repeat play,the repeat play range changes to DISC.
! During compressed audio playback, if you per-form track search or fast forward/reverse dur-ing TRACK, the repeat play range changes toFOLDER.
! When FOLDER is selected, it is not possible toplay back a subfolder of that folder.
! When playing discs with compressed audioand audio data (CD-DA), repeat play performswithin the currently playing data type even ifDISC is selected.
Playing tracks in random orderRandom play plays tracks in a random orderwithin the selected repeat range.! This function is available for CD and com-
pressed audio disc.
Operating this unit
En 27
Section
03Opera
tingth
isunit

1 Select the repeat range.Refer to Repeating play on the previous page.
2 Touch RANDOM on the function menuto turn random play on.Tracks will play in a random order within thepreviously selected repeat range.# To turn random play off, touch RANDOMagain.
Scanning tracks of a CDScan play lets you hear the first 10 seconds ofeach track on the CD.When playing the compressed audio disc, thefirst 10 seconds of each track of the currentfolder (or the first track of each folder) isplayed.! This function is available for CD and com-
pressed audio disc.
1 Select the repeat range.Refer to Repeating play on the previous page.
2 Touch SCAN on the function menu toturn scan play on.The first 10 seconds of each track is played.
3 When you find the desired track (orfolder) touch SCAN again.
Note
After track or folder scanning is finished, normalplayback of the tracks will begin again.
Selecting audio outputYou can switch between stereo and monauralaudio output.! This function is available for DVD and
Video CD.! This function is not possible when disc
playback has been stopped.
1 Press A.MENU button to display MENU.
2 Touch FUNCTION to display the func-tion names.
3 Touch L/R SELECT to select the audiooutput.
! L+R – left and right! LEFT – left! RIGHT – right
Note
Depending on the disc and the playback locationon the disc, the function may not be selectable,indicating that operating this function is not pos-sible.
Resume playback (Bookmark)The Bookmark function lets you resume play-back from a selected scene the next time thedisc is loaded.! This function is available for DVD.
% During playback, pressBOOKMARK (BM) button at the point youwant to resume playback next time.The selected scene will be bookmarked so thatplayback resumes from that point next time.You can bookmark up to five discs. After that,the oldest bookmark is replaced by the newone.# To clear the bookmark on a disc, press andhold BOOKMARK (BM) button during playback.# You can also bookmark a disc by pressing andholding EJECT at the point you want to bookmark.Next time you load the disc, playback will resumefrom the bookmarked point. Note that you canonly bookmark one disc using this method. Toclear the bookmark on a disc, press EJECT.
Operating this unit
En28
Section
03

Entering disc titlesYou can input CD titles and display the title.The next time you insert a CD for which youhave entered a title, the title of that CD will bedisplayed.Use the disc title input feature to store up to48 CD titles in the unit. Each title can be up to10 characters long.! This function is available for CD.! When playing a CD TEXT disc, you cannot
switch to T. EDIT. The disc title will have al-ready been recorded on a CD TEXT disc.
! If no title has been entered for the currentlyplaying disc, NO DISC TITLE is displayed.
1 Play the CD that you want to enter atitle for.
2 Touch T. EDIT on the function menu.
3 Touch ABC to select the desired charac-ter type.Touch ABC repeatedly to switch between thefollowing character types:Alphabet (upper case), numbers and symbols—alphabet (lower case)—European letters,such as those with accents (e.g., á, à, ä, ç)# You can select to input numbers and symbolsby touching 123.
4 Touch a or b to select a letter of the al-phabet.Each time you touch a it will display alphabet,numbers or symbols in ascending order (A BC ...). Each time you touch b it will display aletter in descending order.
5 Touch d to move the cursor to the nextcharacter position.When the desired letter is displayed, touch d
to move the cursor to the next position andthen select the next letter. Touch c to movebackwards in the display.
6 Touch OK to store the entered title inmemory.
7 Touch ESC to return to the playback dis-play.
Notes
! Titles remain in memory, even after the dischas been removed from the unit, and are re-called when the disc is reinserted.
! After data for 48 discs has been stored inmemory, data for a new disc will overwrite theoldest one.
Selecting tracks from the tracktitle listTrack title list lets you see the list of track titleson a CD TEXT disc and select one of them toplay back.! This function is available for CD.
1 Touch T.LIST on the function menu.
2 Touch or to switch between thelists of titles.
3 Touch your favorite track title.That selection will begin to play.
Operating this unit
En 29
Section
03Opera
tingth
isunit

Audio AdjustmentsIntroduction of audio adjustments
1
1 Audio displayShows the audio adjustment status.
Important
If the multi-channel processor (DEQ-P8000) isconnected to this unit, the audio function will bechanged to the multi-channel processor’s audiomenu. For details, refer to Introduction of DSP ad-justments on page 58.
1 Press A.MENU button to display MENU.MENU appears on the display.
2 Touch AUDIO to display the audio func-tion names.The audio function names are displayed andoperable ones are highlighted.# To go to the next group of function names,touch NEXT.# To return to the previous group of functionnames, touch PREV.# If EQ-EX function has been selected and onlywhen EQ-EX is turned on and CUSTOM is se-lected as the equalizer curve, you can switch toBASS and TREBLE.# Only when the subwoofer controller setting isFULL, NON FADING will be displayed instead ofSUB WOOFER. (Refer to Setting the rear outputand subwoofer controller on page 39.)# When selecting the FM tuner as the source,you cannot switch to SLA.
# To return to the previous display, touch BACK.# To return to the display of each source, touchESC.
Note
If you do not operate the audio function withinabout 30 seconds, the display is automatically re-turned to the source display.
Using balance adjustmentYou can change the fader/balance setting sothat it can provide you an ideal listening envir-onment in all occupied seats.
1 Touch FAD/BAL on the audio functionmenu.# When the rear output setting is SUB. W, BALwill be displayed instead of FAD/BAL. Refer toSetting the rear output and subwoofer controlleron page 39.
2 Touch a or b to adjust front/rearspeaker balance.Each time you touch a or b it moves thefront/rear speaker balance towards the front orthe rear.FRONT:15 to REAR:15 is displayed as thefront/rear speaker balance moves from front torear.# FR:00 is the proper setting when only twospeakers are used.# When the rear output setting is SUB. W, youcannot adjust front/rear speaker balance. Refer toSetting the rear output and subwoofer controlleron page 39.
3 Touch c or d to adjust left/right speak-er balance.Each time you touch c or d it moves the left/right speaker balance towards the left or theright.LEFT:09 to RIGHT:09 is displayed as the left/right speaker balance moves from left to right.
Operating this unit
En30
Section
03

Using the equalizerThe equalizer lets you adjust the equalizationto match car interior acoustic characteristicsas desired.
Recalling equalizer curvesThere are six stored equalizer curves whichyou can easily recall at any time. Here is a listof the equalizer curves:
Display Equalizer curve
POWERFUL Powerful
NATURAL Natural
VOCAL Vocal
CUSTOM Custom
FLAT Flat
SUPER BASS Super bass
! CUSTOM is an adjusted equalizer curvethat you create.
! A separate CUSTOM curve can be createdfor each source. If you make adjustments,the equalizer curve settings will be memor-ized in CUSTOM.
! When FLAT is selected no supplement orcorrection is made to the sound. This isuseful to check the effect of the equalizercurves by switching alternatively betweenFLAT and a set equalizer curve.
% Press EQ to select the equalizer.Press EQ repeatedly to switch between the fol-lowing equalizers:POWERFUL—NATURAL—VOCAL—CUSTOM—FLAT—SUPER BASS
Adjusting equalizer curvesYou can adjust the currently selected equalizercurve setting as desired. Adjusted equalizercurve settings are memorized in CUSTOM.
! You can adjust the center frequency andthe Q factor (curve characteristics) of eachcurrently selected curve band (LOW/MID/HIGH).
Level (dB)
Center frequency
Q=2NQ=2W
Frequency (Hz)
1 Touch EQ MENU on the audio functionmenu.
2 Touch a or b to select the desired item.Each time you touch a or b selects the itemin the following order:BAND (bands)—LEVEL (equalizer level)—FREQUENCY (center frequency)—Q. FACTOR(Q factor)
3 Touch c or d to select the equalizerband to adjust.Each time you touch c or d selects equalizerbands in the following order:LOW (low)—MID (mid)—HIGH (high)
4 Touch b and then touch c or d to ad-just the level of the equalizer band.Each time you touch c or d increases or de-creases the level of the equalization band.+6 to –6 is displayed as the level is increasedor decreased.
5 Touch b and then touch c or d to se-lect the desired frequency.Touch c or d until the desired frequency ap-pears in the display.Low: 40Hz—80Hz—100Hz—160HzMid: 200Hz—500Hz—1kHz—2kHzHigh: 3.15kHz—8kHz—10kHz—12.5kHz
Operating this unit
En 31
Section
03Opera
tingth
isunit

6 Touch b and then touch c or d to se-lect the desired Q factor.Touch c or d until the desired Q factor ap-pears in the display.2W—1W—1N—2N
Note
If you make adjustments, CUSTOM curve is up-dated.
Adjusting bass and trebleYou can adjust bass and treble settings.! If EQ-EX function has been selected and
only when EQ-EX is turned on andCUSTOM is selected as the equalizercurve, you can adjust bass and treble set-tings. (Refer to Compensating for equalizercurves (EQ-EX) on page 34.)
Adjusting bassYou can adjust the cut-off frequency and thebass level.
1 Touch BASS on the audio functionmenu.
2 Touch a or b to adjust the bass level.Each time you touch a or b increases or de-creases the bass level. +6 to –6 is displayed asthe level is increased or decreased.
3 Touch c or d to select the desired fre-quency.Touch c or d until the desired frequency ap-pears in the display.40Hz—63Hz—100Hz—160Hz
Adjusting trebleYou can adjust the cut-off frequency and thetreble level.
1 Touch TREBLE on the audio functionmenu.
2 Touch a or b to adjust the treble level.Each time you touch a or b increases or de-creases the treble level. +6 to –6 is displayedas the level is increased or decreased.
3 Touch c or d to select the desired fre-quency.Touch c or d until the desired frequency ap-pears in the display.2.5kHz—4kHz—6.3kHz—10kHz
Adjusting loudnessLoudness compensates for deficiencies in thelow- and high-sound ranges at low volume.
1 Touch LOUDNESS (LOUD) on the audiofunction menu.
2 Touch a to turn loudness on.# To turn loudness off, touch b.
3 Touch c or d to select a desired level.Each time you touch c or d selects level inthe following order:LOW (low)—MID (mid)—HIGH (high)
Using subwoofer outputThis unit is equipped with a subwoofer outputwhich can be turned on or off.! When the subwoofer output is on, you can
adjust the cut-off frequency and the outputlevel of the subwoofer.
1 Touch SUB WOOFER on the audio func-tion menu.# When the subwoofer controller setting isFULL, you cannot select SUB WOOFER.
Operating this unit
En32
Section
03

2 Touch c to turn subwoofer output on.# To turn subwoofer output off, touch d.
3 Touch b and then touch c or d to se-lect the phase of subwoofer output.Touch d to select normal phase andNORMAL appears in the display. Touch c toselect reverse phase and REVERSE appears inthe display.
4 Touch b and then touch c or d to ad-just the output level of the subwoofer.Each time you touch c or d increases or de-creases the level of the subwoofer. +6 to –6 isdisplayed as the level is increased or de-creased.
5 Touch b and then touch c or d to se-lect cut-off frequency.Each time you touch c or d selects cut-off fre-quencies in the following order:50Hz—80Hz—125HzOnly frequencies lower than those in the se-lected range are outputted from the subwoo-fer.
Boosting the subwoofer levelYou can easily boost the subwoofer bass levelby repeatedly pressing BOOST button. If thesubwoofer is set to OFF, pressing BOOST but-ton automatically sets the subwoofer to ON.
% Press BOOST button to increase thesubwoofer level.The subwoofer level 0 to +6 is shown in thedisplay.# To decrease the level, press BOOST buttonand hold. The subwoofer level is reset to 0 andthen you can start again.
Note
You can also select the subwoofer level in theaudio menu. Refer to Using subwoofer output onthe previous page.
Using nonfading outputWhen the nonfading output setting is on, theaudio signal does not pass through this unit’slow pass filter (for the subwoofer), but is out-putted through the RCA output.
1 Touch NON FADING on the audio func-tion menu.# When the subwoofer controller setting is onlyFULL, you can select NON FADING. (Refer topage 39.)
2 Touch a to turn non fading output on.# To turn non fading output off, touch b.
3 Touch c or d to adjust the output levelof the non fading.Each time you touch c or d increases or de-creases the level of the non fading. +6 to –6 isdisplayed as the level is increased or de-creased.
Using the high pass filterWhen you do not want low sounds from thesubwoofer output frequency range to playfrom the front or rear speakers, turn on theHPF (high pass filter). Only frequencies higherthan those in the selected range are outputtedfrom the front or rear speakers.
1 Touch NEXT on the audio functionmenu.
2 Touch HPF.
Operating this unit
En 33
Section
03Opera
tingth
isunit
3 Touch a to turn high pass filter on.# To turn high pass filter off, touch b.
4 Touch c or d to select cut-off fre-quency.Each time you touch c or d selects cut-off fre-quencies in the following order:50Hz—80Hz—125Hz
Adjusting source levelsSLA (source level adjustment) lets you adjustthe volume level of each source to prevent ra-dical changes in volume when switching be-tween sources.! Settings are based on the FM tuner volume
level, which remains unchanged.
1 Compare the FM tuner volume levelwith the level of the source you wish to ad-just.
2 Touch NEXT on the audio functionmenu.
3 Touch SLA.
4 Pressa or b to adjust the source vo-lume.Each time you press a or b it increases or de-creases the source volume.+4 to –4 is displayed as the source volume isincreased or decreased.
Notes
! The AM tuner volume level can also be ad-justed with source level adjustments.
! Video CD, CD and compressed audio are setto the same source level adjustment volumeautomatically.
! DVD and the optional DVD player are set tothe same source level adjustment volumeautomatically.
! External unit 1 and external unit 2 are set tothe same source level adjustment volumeautomatically.
! AUX (auxiliary input) and AV (AV input) are setto the same source level adjustment volumeautomatically.
Compensating for equalizercurves (EQ-EX)The EQ-EX function accentuates the effects ofeach equalizer curve. Furthermore, you canadjust bass and treble for each source whenCUSTOM curve is selected.
1 Touch NEXT on the audio functionmenu.
2 Touch EQ-EX.
3 Touch a to turn EQ-EX on.# To turn EQ-EX off, touch b.
Operating this unit
En34
Section
03

Setting up the DVD playerIntroduction of DVD setupadjustmentsYou can use this menu to change audio, subti-tle, parental lock and other DVD settings.
1
1 DVD setup menu displayShows the DVD setup menu names.
1 Touch g.SETUP will be displayed instead ofMENU.
2 Touch SETUP when the disc is stopped.The DVD setup menu is displayed.
3 Touch any of LANGUAGE or VISUAL todisplay the DVD setup function names.The DVD setup function names in selectedmenu are displayed.# To return to the previous display, touch BACK.# To return to the playback display, touch ESC.
Note
If you do not operate the DVD setup functionwithin about 30 seconds, the display is automati-cally returned to the playback display.
Setting the subtitle languageYou can set a desired subtitle language. If theselected subtitle language is recorded on theDVD, subtitles are displayed in that language.
1 Touch SETUP and LANGUAGE and thentouch SUB. T LANG.Subtitle language menu is displayed and thecurrently selected language is highlighted.# To switch to the second language selectmenu, touch NEXT.# To return to the first language select menu,touch PREV.
2 Touch the desired language.A subtitle language is set.# If you have selected OTHERS, refer to Whenyou select OTHERS on this page.
Notes
! If the selected language is not recorded onthe disc, the language specified on the disc isdisplayed.
! You can also switch the subtitle language bytouching SUB.T during playback. (Refer toChanging the subtitle language during play-back (Multi-subtitle) on page 23.)
! Even if you use SUB.T during playback toswitch the subtitle language, this does not af-fect the settings here.
When you select OTHERSWhen you select OTHERS, a language codeinput display is shown. Refer to Language codechart for DVD on page 78 to input the four-digitcode of the desired language.
1 Touch 0 to 9 to input the languagecode.# To cancel the inputted numbers, touch C.
2 While the inputted number is dis-played, touch ENTER.
Setting the audio languageYou can set the preferred audio language.
Operating this unit
En 35
Section
03Opera
tingth
isunit

1 Touch SETUP and LANGUAGE and thentouch AUDIO LANG.Audio language menu is displayed and thecurrently selected language is highlighted.# To switch to the second language selectmenu, touch NEXT.# To return to the first language select menu,touch PREV.
2 Touch the desired language.The audio language is set.# If you have selected OTHERS, refer to Whenyou select OTHERS on the previous page.
Notes
! If the selected language is not recorded onthe disc, the language specified on the disc isoutputted.
! You can also switch the audio language bytouching AUDIO during playback. (Refer toChanging audio language during playback(Multi-audio) on page 23.)
! Even if you use AUDIO during playback toswitch the audio language, this does not af-fect the settings here.
Setting the menu languageYou can set the preferred language for dis-plays of menus recorded on a disc.
1 Touch SETUP and LANGUAGE and thentouch MENU LANG.A menu language menu is displayed and thecurrently set language is highlighted.# To switch to the second language selectmenu, touch NEXT.# To return to the first language select menu,touch PREV.
2 Touch the desired language.The menu language is set.# If you have selected OTHERS, refer to Whenyou select OTHERS on the previous page.
Note
If the selected language is not recorded on thedisc, the language specified on the disc is dis-played.
Switching the assist subtitle onor offIf assist subtitles are recorded on a DVD disc,you can display them by turning the assistsubtitle function on.You can turn assist subtitles on or off as de-sired.
1 Touch SETUP and LANGUAGE and thentouch NEXT.
2 Touch A SUB TITL to turn assist subtitleson.# To turn the assist subtitle off, touchA SUB TITL again.
Setting the angle icon displayYou can set it up so that the angle icon ap-pears on scenes where the angle can beswitched.
1 Touch SETUP and VISUAL to display theDVD visual set up menu.
2 Touch M. ANGLE to turn angle icon dis-play on.# To turn the angle icon display off, touchM. ANGLE again.
Setting the aspect ratioThere are two kinds of display. A wide screendisplay has a width-to-height ratio (TV aspect)of 16:9, while a regular display has a TV aspectof 4:3. Be sure to select the correct TV aspectfor the display connected to VIDEO OUTPUT.
Operating this unit
En36
Section
03

! When using a regular display, select eitherLETTER BOX or PANSCAN. Selecting 16 : 9may result in an unnatural picture.
! If you select the TV aspect, the unit’s dis-play changes to the same setting.
1 Touch SETUP and VISUAL and thentouch TVASPECT.
2 Touch any of the following touch panelkeys to select the TV aspect.
! 16 : 9 –Wide screen picture (16:9) is dis-played as it is (initial setting)
! LETTER BOX – The picture is the shape of aletterbox with black bands at the top andbottom of the screen
! PANSCAN – The picture is cut short at theright and left of the screen
Notes
! When playing discs that do not specifyPANSCAN, playback is with LETTER BOX evenif you select PANSCAN setting. Confirmwhether the disc package bears the 16 : 9 LB
mark. (See page 9.)! Some discs do not enable changing of the TV
aspect. For details, refer to the disc’s instruc-tions.
Setting the parental lockSome DVD video discs let you use parentallock to restrict children from viewing violentand adult-oriented scenes. You can set the par-ental lock to your desired level.! When you set a parental lock level and then
play a disc featuring parental lock, codenumber input indications may be dis-played. In this case, playback will beginwhen the correct code number is input.
Setting the code number and levelYou need to have registered a code number forplaying back discs with parantal lock.
1 Touch SETUP and VISUAL and thentouch PARENTAL.
2 Touch 0 to 9 to input a four digit codenumber.
3 While the inputted number is dis-played, touch ENTER.The code number is set, and you can now setthe level.
4 Touch any of 1 to 8 to select the desiredlevel.The parental lock level is set.
! LEVEL 8 – Playback of the entire disc is pos-sible (initial setting)
! LEVEL 7 to LEVEL 2 – Playback of discs forchildren and non-adult-oriented discs ispossible
! LEVEL 1 – Playback of discs for childrenonly is possible
Notes
! We recommend to keep a record of your codenumber in case you forget it.
! The parental lock level is recorded on the disc.Look for the level indication written at the discpackage, included literature or on the disc it-self. Parental lock of this unit is not possible ifa parental lock level is not recorded in thedisc.
! With some discs, the parental lock may be ac-tive only on the scenes with certain levels. Theplayback of those scenes will be skipped. Fordetails, refer to the instruction manual thatcame with the discs.
Changing the levelYou can change the set parental lock level.
Operating this unit
En 37
Section
03Opera
tingth
isunit

1 Touch SETUP and VISUAL and thentouch PARENTAL.
2 Touch 0 to 9 to input the registeredcode number.
3 Touch ENTER.This enters the code number, and you can nowchange the level.# If you input an incorrect code number, theicon is displayed. Touch C and input the cor-rect code number.# If you forget your code number, refer to If youforget your code number on this page.
4 Touch any of 1 to 8 to select the desiredlevel.The new parental lock level is set.
If you forget your code numberRefer to Changing the level on the previouspage, and touch C 10 times. The registeredcode number is canceled, letting you registera new one.
Initial SettingsAdjusting initial settingsUsing the initial settings, you can customizevarious system settings to achieve optimal per-formance from this unit.
1
1 Function displayShows the function names.
1 Touch the source icon and then touchOFF to turn this unit off.# When the source icon is not displayed, youcan display it by touching the screen.
2 Press A.MENU button and touch INIT todisplay the initial function names.The function names are displayed and oper-able ones are highlighted.# To go to the next group of function names,touch NEXT.# To return to the previous group of functionnames, touch PREV.# When the multi-channel processor (e.g., DEQ-P8000) is connected to this unit, you can operateD. ATT and RESET instead of REARSP.# To return to the previous display, touch BACK.# To return to the display of each source, touchESC.
Operating this unit
En38
Section
03

Switching the warning toneIf the front panel is not detached from thehead unit within five seconds of turning off theignition, a warning tone will sound. You canturn off the warning tone.
% Touch D. WARN on the initial menu toturn warning tone on.# To turn warning tone off, touch D. WARNagain.
Switching the auxiliary settingIt is possible to use auxiliary equipment withthis unit. Activate the auxiliary setting whenusing auxiliary equipment connected to thisunit.
% Touch AUX on the initial menu to turnauxiliary setting on.# To turn auxiliary setting off, touch AUX again.
Setting the rear output andsubwoofer controllerThis unit’s rear output (rear speaker leads out-put and RCA rear output) can be used for full-range speaker (FULL) or subwoofer (SUB. W)connection. If you switch the rear output set-ting to SUB. W, you can connect a rear speak-er lead directly to a subwoofer without usingan auxiliary amp.Initially, the unit is set for rear full-range speak-er connection (FULL). When rear output isconnected to full range speakers (when FULLis selected), you can connect the RCA sub-woofer output to a subwoofer. In this case, youcan select whether to use the subwoofer con-troller’s (low pass filter, phase) built-in SUB.Wor the auxiliary FULL.! When the multi-channel processor (e.g.,
DEQ-P8000) is connected to this unit, youcannot operate this function.
1 Touch NEXT on the initial menu.
2 Touch REARSP.
3 Touch a or b to switch the rear outputsetting.Touch a to select full-range speaker and FULLappears in the display. Touch b to select sub-woofer and SUB. W appears in the display.# When no subwoofer is connected to the rearoutput, select FULL.# When a subwoofer is connected to the rearoutput, set for subwoofer SUB. W.# When the rear output setting is SUB. W, youcannot change the subwoofer controller.
4 Touch c or d to switch the subwooferoutput or non fading output.Touch c to select subwoofer output andSUB.W appears in the display. Touch d to se-lect non fading output and FULL appears inthe display.
Notes
! Even if you change this setting, there is nooutput unless you turn the nonfading output(refer to Using nonfading output on page 33)or subwoofer output (refer to Using subwooferoutput on page 32) in the audio menu on.
! If you change the subwoofer controller, sub-woofer output and nonfading output in theaudio menu return to the factory settings.
Correcting distorted soundYou can minimize distortion that may becaused by the equalizer curve settings.Setting an equalizer level high can cause dis-tortion. If high sound is crippled or distorted,try switching to LOW. Normally, leave the set-ting at HIGH to ensure quality sound.! Only when the multi-channel processor
(e.g., DEQ-P8000) is connected to this unit,you can operate this function.
Operating this unit
En 39
Section
03Opera
tingth
isunit

1 Touch NEXT on the initial menu.
2 Touch D. ATT to switch the digital at-tenuator setting.Touching D. ATT switches the digital attenua-tor settings in the following order:HIGH—LOW
Switching the soundmuting/attenuationSound from this system is muted or attenu-ated automatically when the signal from theequipment with mute function is received.
1 Touch NEXT on the initial menu.
2 Touch TEL to select any of the muting,attenuation, mixing or off.Touch TEL until the desired setting appears inthe display.
! MUTE –Muting! ATT 20 – Attenuation (ATT 20 has a stron-
ger effect than ATT 10)! ATT 10 – Attenuation! OFF – Turn the sound muting/attenuation
off
Notes
! The sound is muted or attenuated,MUTE orATT are displayed and no audio adjustment ispossible.
! Operation returns to normal when the phoneconnection or the voice guidance is ended.
Resetting the audio functionsYou can reset all audio functions except vo-lume.! Only when the multi-channel processor
(e.g., DEQ-P8000) is connected to this unit,you can operate this function.
1 Touch NEXT on the initial menu.
2 Touch RESET.
3 Touch RESET.
4 Touch RESET again to reset audio func-tions.# To cancel resetting the audio functions, touchCANCEL.
Setting the illumination switchYou can choose whether to have the illumina-tion of this unit switch on/off when the ignitionkey is turned to the ACC position or the power-off position.
% Touch ILM SW on the initial menu toturn the illumination switch on.Set the illumination switch ON to have the illu-mination of this unit remain on when the igni-tion key is turned to the ACC position. Set toOFF to have the illumination off when the igni-tion key is turned to the ACC position.# To turn the illumination switch off, touchILM SW again.
Note
Never set the illumination switch on if the vehicledoes not have the ACC position. It may cause bat-tery leakage.
Operating this unit
En40
Section
03

Other FunctionsIntroduction of setup adjustments
1
1 Setup menu displayShows the setup function names.
% Press A.MENU button and touch SETUPto display the setup function names.The setup function names are displayed andoperable ones are highlighted.# To return to the previous display, touch BACK.# To return to the display of each source, touchESC.
Note
If you do not operate the setup function withinabout 30 seconds, the display is automatically re-turned to the source display.
Setting the AV inputYou can switch the setting according to theconnected component.! Select VIDEO to watch video of a con-
nected component as AV source.! Select M-DVD to watch video of a con-
nected DVD player as S-DVD source.! Select EXT-V to watch video of a connected
video unit as EXT source.
% Touch AV IN on the setup menu to se-lect the AV input setting.Touch AV IN until the desired setting is se-lected.
! OFF – No video component is connected! VIDEO – External video component (such
as portable video player)! M-DVD –Multi-DVD player connected with
RCA cable! EXT-V – External video unit (such as
Pioneer products available in the future)# When a multi-DVD player is connected withan AV-BUS cable, do not selectM-DVD otherwiseno picture will be displayed even if you selectS-DVD.
Setting for rear view camera(back up camera)
CAUTIONPioneer recommends the use of a camerawhich outputs mirror reversed images, other-wise screen image may appear reversed.
This unit features a function that automaticallyswitches to the rear view camera video (REARVIEW CAMERA IN jack) when a rear viewcamera is installed on your vehicle. When thegear shift is in REVERSE (R) position, thevideo automatically switches to a rear viewcamera video. (For more details, consult yourdealer.)! After you set up the rear view camera set-
ting, move the gear shift in REVERSE (R)and confirm if a rear view camera videocan be shown on the display.
! If the display should be switched to a rearview camera video by error while you aredriving forward, change the rear view cam-era setting.
! To end watching a rear view camera videoand return to the source display, pressV.ADJ.
1 Touch B-CAM on the setup menu.
Operating this unit
En 41
Section
03Opera
tingth
isunit

2 Touch c to turn rear view camera set-ting on.# To turn rear view camera setting off, touch d.
3 Touch b and then touch c or d to se-lect an appropriate setting for polarity.Each time you touch c or d it switches be-tween the following polarity:
! BATTERY – When the polarity of the con-nected lead is positive while the gear shiftis in REVERSE (R) position
! GND – When the polarity of the connectedlead is negative while the gear shift is inREVERSE (R) position
Setting the automatic openfunctionTo prevent the display from hitting the shiftlever of an automatic vehicle when it is in P(park) position, or when you do not wish thedisplay to open/close automatically, you canset the automatic open function in the manualmode.Furthermore, to adjust the LCD panel slide po-sition, you can turn the set back on or off.
1 Touch FLP ST on the setup menu.
2 Touch a to turn the set back on and theLCD panel slides to the back.# Touchb to turn the set back off and the LCDpanel slides to the front.
3 Touch c or d to select the display toopen/close automatically or manually.Touch c to selectMANUAL, and you have topress OPEN/CLOSE to open/close the display.Touch d to select AUTO, and the display auto-matically opens/closes when power to thisunit is turned on.
Setting the clockUse these instructions to set the clock.
1 Touch CLOCK ADJUST on the setupmenu.
2 Touch OFF to turn the clock display on.ON will appear in the display instead of OFF.Clock display is now on.# To turn the clock display off, touch ON.
3 Touch c or d to select the segment ofthe clock display you wish to set.Each time you touch c or d it will select onesegment of the clock display:Hour—MinuteAs you select segments of the clock displaythe segment selected will be highlighted.
4 Touch a or b to set the clock.Each time you touch a it increases the se-lected hour or minute. Each time you touch b
it decreases the selected hour or minute.
Notes
! You can match the clock to a time signal bytouching JUST.— If the minute is 00 to 29, the minutes are
rounded down. (e.g., 10:18 becomes10:00.)
— If the minute is 30 to 59, the minutes arerounded up. (e.g., 10:36 becomes 11:00.)
! Even when the sources are off, the clock dis-play appears on the display.
Operating this unit
En42
Section
03

Using the AUX sourceAn IP-BUS-RCA Interconnector such as theCD-RB20/CD-RB10 (sold separately) lets youconnect this unit to auxiliary equipment fea-turing RCA output. For more details, refer tothe IP-BUS-RCA Interconnector owner’s man-ual.
Selecting AUX as the source
% Touch the source icon and then touchAUX to select AUX as the source.# When the source icon is not displayed, youcan display it by touching the screen.# If the auxiliary setting is not turned on, AUXcannot be selected. For more details, see Switch-ing the auxiliary setting on page 39.
Setting the AUX titleThe title displayed for the AUX source can bechanged.
1 After you have selected AUX as thesource, press A.MENU button and touchFUNCTION and then touch NAME EDIT.
2 Touch ABC to select the desired charac-ter type.Touch ABC repeatedly to switch between thefollowing character types:Alphabet (upper case), numbers and symbols—alphabet (lower case)—European letters,such as those with accents (e.g., á, à, ä, ç)# You can select to input numbers and symbolsby touching 123.
3 Touch a or b to select a letter of the al-phabet.Each time you touch a it will display alphabet,numbers or symbols in ascending order (A BC ...). Each time you touch b it will display aletter in descending order.
4 Touch d to move the cursor to the nextcharacter position.When the desired letter is displayed, touch d
to move the cursor to the next position andthen select the next letter. Touch c to movebackwards in the display.
5 Touch OK to store the entered title inmemory.
6 Touch ESC to return to the playback dis-play.
Selecting the background displayYou can switch background displays while lis-tening to each source.
% Press ENTERTAINMENT (ENT).Each time you press ENTERTAINMENT (ENT)the display changes in the following order:Audio sourceBackground still picture—BGV (backgroundvisual)—AV (AV input)Video sourceVideo of currently selected source—back-ground still picture—BGV (background visual)—AV (AV input)
Note
In the following cases, the background displaywill not change:! When a list is displayed.! When the AV (AV input) is not set to VIDEO
(refer to page 41).
Operating this unit
En 43
Section
03Opera
tingth
isunit

Using the PGM buttonYou can operate the preprogrammed functionsfor each source by using PGM.
% Press PGM to turn pause on when se-lecting the following sources:
! DVD – Built-in DVD player! S-DVD – DVD player/multi-DVD player! M-CD – Multi-CD player! iPod – iPod
# To turn pause off, press PGM again.
% Press PGM and hold to turn BSM onwhen selecting TUNER as the source.Press PGM and hold until the BSM turns on.# To cancel the storage process, press PGMagain.
% Press PGM and hold to turn BSSM onwhen selecting TV as the source.Press PGM and hold until the BSSM turns on.# To cancel the storage process, press PGMagain.
% Press PGM to select the desired channelselect setting when selecting XM or SIRIUSas the source.Press PGM repeatedly to switch between thefollowing channel select settings:CH NUMBER (channel number select setting)—CATEGORY (channel category selectsetting)
Operating this unit
En44
Section
03

XM tunerBasic OperationsYou can use this unit to control an XM satellitedigital tuner (GEX-P920XM), which is soldseparately.For details concerning operation, refer to theXM tuner’s operation manuals. This sectionprovides information on XM operations withthis unit which differs from that described inthe XM tuner’s operation manual.! This unit does not have the text scroll
function.! With this unit, you can operate one addi-
tional function: XM channel directselection.
1 2 43
7
65
1 Source icon2 XM band indicator3 XM channel name4 XM preset number indicator5 XM channel number indicator6 XM channel select setting indicator
Shows what channel select setting has beenselected. CH-Number is displayed whenCH NUMBER is selected, and Category is dis-played when CATEGORY is selected.
7 Preset list display
1 Touch the source icon and then touchXM to select the XM.
2 Touch the screen to display the touchpanel keys.
3 Touch BAND to select an XM band.Touch BAND repeatedly until the desired XMband is displayed, XM1, XM2 or XM3.
4 Touch c or d to select a desiredchannel.The channels move up or down step by step.Channels that cannot currently be selectedare skipped, and the next channel is selected.# If you touch and holdc or d, you can in-crease or decrease the channel number con-tinuously.# You can also perform tuning from a desiredchannel category. (Refer to Selecting a channel inthe channel category on the next page.)
Notes
! If you do not use the touch panel keys foreight seconds, they will be hidden auto-matically.
! You can go to the next group of touch panelkeys by touchingd.
Switching the XM display% Touch DISP to switch the XM display.Channel name—Artist name/feature—Song/program title—Channel category
Storing and recalling broadcaststationsYou can easily store up to six broadcast sta-tions for later recall.! Up to 18 stations, six for each of three XM
bands can be stored in memory.
% When you find a station that you wantto store in memory touch and hold a presettuning key P1 to P6 until the XM presetnumber stops flashing.The number you have touched will flash in theXM preset number indicator and then remainlit. The selected station has been stored inmemory.
Available accessories
En 45
Section
04Availab
leaccesso
ries

The next time you touch the same preset tun-ing key P1 to P6 the station is recalled frommemory.# You can also use a and b to recall stationsassigned to preset tuning keys P1 to P6.# When the touch panel keys are not displayed,you can display them by touching the screen.# When P1 to P6 are not displayed, you can dis-play them by touchingd.
Switching the XM channelselect modeYou have two methods for selecting a channel:by number and by category. When selectingby number, channels in any category can beselected. Select by category to narrow yoursearch down to only channels in a particularcategory.
% Touch MODE to select the desired chan-nel select mode.Touch MODE repeatedly to switch betweenthe following channel select modes:CH NUMBER (channel number select setting)—CATEGORY (channel category selectsetting)
Selecting a channel in the channelcategory
1 Touch MODE to select the channel cate-gory select mode.Touch MODE repeatedly to switch betweenthe following channel select modes:CH NUMBER (channel number select setting)—CATEGORY (channel category selectsetting)
2 Touch a or b to select the desired chan-nel category.
3 Touch c or d to select the desired chan-nel in the selected channel category.
Selecting an XM channel directlyYou can select an XM channel directly by en-tering the desired channel number.
1 Touch DIRECT.CHANNEL INPUT appears in the display.
2 Touch 0 to 9 to input the desired chan-nel number.# To cancel the input numbers, touch C.
3 While the input number is displayed,touch ENTER.The XM channel of entered number isselected.
Displaying the Radio IDChannel number select settingIf you select CH : 000, the ID code is displayed.
% Touch c or d to select CH : 000.
Channel category select settingRADIO ID is provided as a channel categoryfor displaying the ID code.
% Touch a or b to select RADIO ID fromchannel category.# If you select another channel, display of the IDcode is canceled.# Display of the ID code repeats displayingRADIO ID and the ID code one after the other.
Available accessories
En46
Section
04
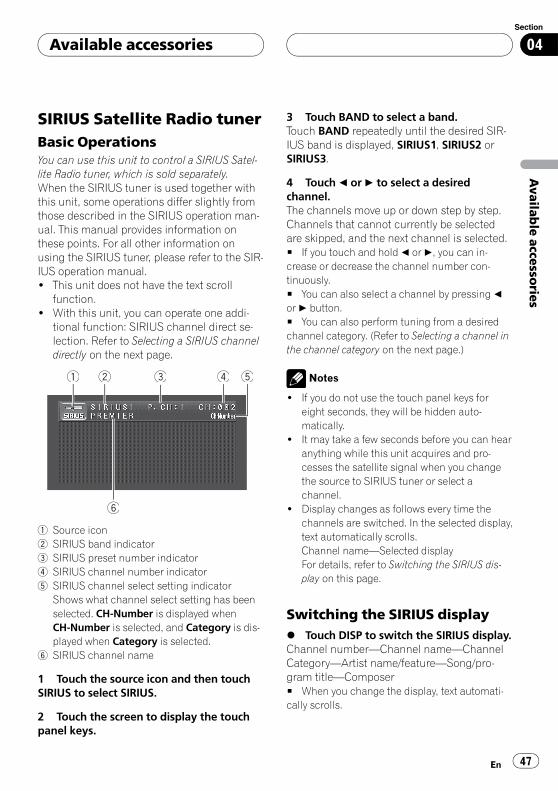
SIRIUS Satellite Radio tunerBasic OperationsYou can use this unit to control a SIRIUS Satel-lite Radio tuner, which is sold separately.When the SIRIUS tuner is used together withthis unit, some operations differ slightly fromthose described in the SIRIUS operation man-ual. This manual provides information onthese points. For all other information onusing the SIRIUS tuner, please refer to the SIR-IUS operation manual.! This unit does not have the text scroll
function.! With this unit, you can operate one addi-
tional function: SIRIUS channel direct se-lection. Refer to Selecting a SIRIUS channeldirectly on the next page.
1 2 43 5
6
1 Source icon2 SIRIUS band indicator3 SIRIUS preset number indicator4 SIRIUS channel number indicator5 SIRIUS channel select setting indicator
Shows what channel select setting has beenselected. CH-Number is displayed whenCH-Number is selected, and Category is dis-played when Category is selected.
6 SIRIUS channel name
1 Touch the source icon and then touchSIRIUS to select SIRIUS.
2 Touch the screen to display the touchpanel keys.
3 Touch BAND to select a band.Touch BAND repeatedly until the desired SIR-IUS band is displayed, SIRIUS1, SIRIUS2 orSIRIUS3.
4 Touch c or d to select a desiredchannel.The channels move up or down step by step.Channels that cannot currently be selectedare skipped, and the next channel is selected.# If you touch and holdc or d, you can in-crease or decrease the channel number con-tinuously.# You can also select a channel by pressingc
or d button.# You can also perform tuning from a desiredchannel category. (Refer to Selecting a channel inthe channel category on the next page.)
Notes
! If you do not use the touch panel keys foreight seconds, they will be hidden auto-matically.
! It may take a few seconds before you can hearanything while this unit acquires and pro-cesses the satellite signal when you changethe source to SIRIUS tuner or select achannel.
! Display changes as follows every time thechannels are switched. In the selected display,text automatically scrolls.Channel name—Selected displayFor details, refer to Switching the SIRIUS dis-play on this page.
Switching the SIRIUS display% Touch DISP to switch the SIRIUS display.Channel number—Channel name—ChannelCategory—Artist name/feature—Song/pro-gram title—Composer# When you change the display, text automati-cally scrolls.
Available accessories
En 47
Section
04Availab
leaccesso
ries

Storing and recalling broadcaststationsYou can easily store up to six broadcast sta-tions for later recall.! Up to 18 stations, six for each of three SIR-
IUS bands can be stored in memory.
% When you find a station that you wantto store in memory keep touching a presettuning key P1 to P6 until PCH SET is dis-played.The selected station has been stored in mem-ory.The next time you touch the same preset tun-ing key P1 to P6 the station is recalled frommemory.# When the touch panel keys are not displayed,you can display them by touching the screen.# When P1 to P6 are not displayed, you can dis-play them by touching LIST.
Selecting the SIRIUS channelselect modeYou have two methods for selecting a channel:by number and by category. When selectingby number, channels in any category can beselected. Select by category to narrow yoursearch down to only channels in a particularcategory.
% Touch MODE to select the desired chan-nel select mode.Touch MODE repeatedly to switch betweenthe following channel select modes:CH-Number (channel number select setting)—Category (channel category select setting)
Selecting a channel in the channelcategoryChannels are organized into various programcategories, e.g. Rock, Classic, Jazz. You canspecify channels by selecting the desiredcategory.
1 Touch MODE to select the channel cate-gory select mode.Touch MODE repeatedly to switch betweenthe following channel select modes:CH-Number (channel number select setting)—Category (channel category select setting)
2 Touch a or b to select the desired chan-nel category.
3 Touch c or d to select the desired chan-nel in the selected channel category.
Selecting a SIRIUS channel directlyYou can select a SIRIUS channel directly byentering the desired channel number.
1 Touch DIRECT.CHANNEL INPUT appears in the display.
2 Touch 0 to 9 to input the desired chan-nel number.# To cancel the input numbers, touch C.
3 While the input number is displayed,touch ENTER.The SIRIUS channel of entered number isselected.
Displaying the Radio IDIf you select CH:000, the ID code is displayed.
% Touch c or d to select CH : 000.# To select CH:000, set the channel select set-ting to CH-Number. About the channel select set-ting, refer to Selecting the SIRIUS channel selectmode on this page
Available accessories
En48
Section
04

Playing songs on iPodListening to songs on your iPodYou can use this unit to control an iPod adapter,which is sold separately.
1 32
46 5
1 Source icon2 Song number indicator3 Play time indicator4 Song title indicator5 Repeat indicator
Shows when repeat range is selected to cur-rent track.
6 RDM indicatorShows when random play is set to TRACK orALBUM.
1 Touch the source icon and then touchiPod to select the iPod.# You can also select the iPod source by press-ing SOURCE repeatedly.# When the iPod is not connected to this unit,you cannot select the iPod as a source.
2 Touch the screen to display the touchpanel keys.
3 To skip back or forward to anothersong, touch o or p.Touching p skips to the start of the nextsong. Touching o once skips to the start ofthe current song. Touching it again will skip tothe previous song.
4 To perform fast forward or reverse,keep touching o or p.
Note
If the playback is stopped for any reason, touchTOP and refine your seach for a song.
Browsing for a songThe operation of this unit to control an iPod isdesigned to be as close to the operation of theiPod as possible for easy operation and songsearch.
1 Touch TOP to display the top menu.
2 Touch one of the categories in whichyou want to search for a song.
! PLAYLISTS (playlists)! GENRES (genres)! ARTISTS (artists)! ALBUMS (albums)! SONGS (songs)
3 Touch a list title that you want to play.Repeat this operation until you find the de-sired song.# You can start a playback of all the songs in theselected list (GENRES, ARTISTS or ALBUMS). Todo this, keep touching the list title.# To go to the next group of list titles, touch .# To return to the previous group of list titles,touch .# To return to the previous menu, touch .# To go to the top menu of the list search, touchTOP.
Pausing a song% Touchf during playback.# To resume playback at the same point that youturned pause on, touchf again.
Available accessories
En 49
Section
04Availab
leaccesso
ries

Displaying text information oniPod% Touch DISP.Touch DISP repeatedly to switch between thefollowing settings:T. Title (song title)—Artist (artist name)—Album (album title)# If the characters recorded on the iPod are notcompatible with a head unit, those characterswill not be displayed.
Note
You can scroll the title to the left by keepingtouching DISP.
Repeating playFor playback of the songs on the iPod, thereare two repeat play ranges: TRACK (repeatone song) and ALL (repeat all songs in thelist).! While REPEAT is set to TRACK, you cannot
select the other songs.
1 Press A.MENU button and then touchFUNCTION to display the function names.
2 Touch REPEAT to select the repeatrange.Touch REPEAT repeatedly until the desired re-peat range appears in the display.
! TRACK – Repeat just the current song! ALL – Repeat all songs in the selected list
Playing songs in a randomorder (shuffle)For playback of the songs on the iPod, thereare two random play methods: TRACK (playback songs in a random order) and ALBUM(play back albums in a random order).
1 Press A.MENU button and then touchFUNCTION to display the function names.
2 Touch RANDOM to select the randomplay method.Touch RANDOM repeatedly until the desiredrandom play method appears in the display.
! TRACK – Play back songs in a randomorder within the selected list
! ALBUM – Select an album randomly, andthen play back all the songs in it in order
! OFF – Cancel the random play
Available accessories
En50
Section
04

Multi-CD PlayerBasic OperationsYou can use this unit to control a multi-CDplayer, which is sold separately.! Only those functions described in this man-
ual are supported by 50-disc multi-CDplayers.
! This unit is not designed to operate disc titlelist functions with a 50-disc multi-CD player.
1 3 42
5
1 Source icon2 Disc number indicator3 Track number indicator4 Play time indicator5 Disc list display
Shows the disc title list.
1 Touch the source icon and then touchM-CD to select the multi-CD player.
2 Touch the screen to display the touchpanel keys.
3 Touch a disc title on the list to playback.Operable disc titles are highlighted. If youwant to select a disc located at 7 to 12, touch
or to display 07 to 12.# When the disc titles of 01-06 or 07-12 are notdisplayed, you can display them by touchingLIST.# You can also sequentially select a disc bypressinga/b button.
4 To skip back or forward to anothertrack, touch c or d.Touching d skips to the start of the next track.Touching c once skips to the start of the cur-rent track. Touching again will skip to the pre-vious track.
5 To perform fast forward or reverse,keep touching c or d.
Notes
! When the multi-CD player performs the pre-paratory operations, READY is displayed.
! If an error message such as ERROR-02 is dis-played, refer to the multi-CD player owner’smanual.
! If there are no discs in the multi-CD player ma-gazine, NO DISC is displayed.
! If you do not use the touch panel keys within30 seconds, they will be hidden automatically.
Introduction of advancedoperationsYou can use these functions only with a multi-CD player that supports them.
1 Press A.MENU button to display MENU.MENU appears on the display.
2 Touch FUNCTION to display the func-tion names.The function names are displayed and oper-able ones are highlighted.# To go to the next group of function names,touch NEXT.# To return to the previous group of functionnames, touch PREV.# To return to the previous display, touch BACK.# To return to the playback display, touch ESC.
Available accessories
En 51
Section
04Availab
leaccesso
ries

Function and operationREPEAT, RANDOM, SCAN, PAUSE,Compression and T. EDIT operations are basi-cally the same as that of the built-in DVDplayer.
Function name Operation
REPEAT
Refer to Repeating play on page 27.But the repeat play ranges you canselect are different from that of thebuilt-in DVD player. The repeat playranges of the multi-CD player areas below:! M-CD – Repeat all discs in the
multi-CD player! TRACK – Repeat just the cur-
rent track! DISC – Repeat the current disc
RANDOMRefer to Playing tracks in randomorder on page 27.
SCANRefer to Scanning tracks of a CD onpage 28.
PAUSERefer to Pausing disc playback onpage 24.
CompressionRefer to Using compression andbass emphasis on page 54.
ITS PLAYRefer to Using ITS playlists on thispage.
ITS MEMORefer to Using ITS playlists on thispage.
T. EDITRefer to Entering disc titles on thenext page.
Notes
! If you do not operate the function within about30 seconds, the display is automatically re-turned to the playback display.
! If you select other discs during repeat play,the repeat play range changes toM-CD.
! If you perform track search or fast forward/re-verse during TRACK, the repeat play rangechanges to DISC.
! After track or disc scanning is finished, nor-mal playback of the tracks will begin again.
! When playing a CD TEXT disc on a CD TEXTcompatible multi-CD player, you cannotswitch to T. EDIT. The disc title has alreadybeen recorded on a CD TEXT disc.
Using ITS playlistsITS (instant track selection) lets you make aplaylist of favorite tracks from those in themulti-CD player magazine. After you haveadded your favorite tracks to the playlist youcan turn on ITS play and play just those selec-tions.
Creating a playlist with ITS programmingYou can use ITS to enter and play back up to99 tracks per disc from up to 100 discs (withthe disc titles). (With multi-CD players sold be-fore the CDX-P1250 and CDX-P650, up to 24tracks can be stored in the playlist.)
1 Play a CD that you want to program.Touch a or b to select the CD.
2 Touch NEXT on the function menu.
3 Touch ITS MEMO.
4 Touch c or d to select the desiredtrack.
5 Touch MEMORYa to store the currentlyplaying track in the playlist.MEMORY is displayed and the currently play-ing selection is added to your playlist. The dis-play then shows track number again.
Note
After data for 100 discs has been stored in mem-ory, data for a new disc will overwrite the oldestone.
Available accessories
En52
Section
04

Playback from your ITS playlistITS play lets you listen to the tracks that youhave entered into your ITS playlist. When youturn on ITS play, tracks from your ITS playlistin the multi-CD player will begin to play.
1 Select the repeat range.Refer to Playing tracks in random order onpage 27.
2 Touch NEXT on the function menu.
3 Touch ITS PLAY to turn ITS play on.Playback begins of those tracks from yourplaylist within the previously selectedM-CD orDISC ranges.# If no tracks in the current range are pro-grammed for ITS play, then ITS EMPTY is dis-played.# To turn ITS play off, touch ITS PLAY again.
Erasing a track from your ITS playlistYou can delete a track from your ITS playlist ifITS play is on.If ITS play is already on, skip to step 2.
1 Play the CD with the track you want todelete from your ITS playlist, and turn ITSplay on.Refer to Playback from your ITS playlist on thispage.
2 Touch NEXT on the function menu.
3 Touch ITS MEMO.
4 Touch c or d to select the desiredtrack.
5 Touch CLEARb to erase the track fromyour ITS playlist.The currently playing selection is erased fromyour ITS playlist and playback of the next trackfrom your ITS playlist begins.
# If there are no tracks from your playlist in thecurrent range, ITS EMPTY is displayed and nor-mal play resumes.
Erasing a CD from your ITS playlistYou can delete all tracks of a CD from your ITSplaylist if ITS play is off.
1 Play the CD that you want to delete.Touch a or b to select the CD.
2 Touch NEXT on the function menu.
3 Touch ITS MEMO.
4 Touch CLEARb to erase all tracks on thecurrently playing CD from your ITS playlist.ITS CLEAR is displayed and all tracks on thecurrently playing CD are erased from yourplaylist.
Entering disc titlesUse the disc title input feature to store up to100 CD titles (with ITS playlist) into the multi-CD player. Each title can be up to 10 charac-ters long.The operation is the same as that of the built-in DVD player.Refer to Entering disc titles on page 29.! When playing a CD TEXT disc on a CD TEXT
compatible multi-CD player, you cannotswitch to T. EDIT. The disc title has alreadybeen recorded on a CD TEXT disc.
Notes
! Titles remain in memory, even after the dischas been removed from the magazine, andare recalled when the disc is reinserted.
! After data for 100 discs has been stored inmemory, data for a new disc will overwrite theoldest one.
Available accessories
En 53
Section
04Availab
leaccesso
ries

Displaying disc titles% Touch DISP.Touch DISP repeatedly to switch between thefollowing settings:DISC LIST (disc list)—D.Title (disc title)When you select D.Title, the title of the cur-rently playing disc is shown in the display.# If no title has been entered for the currentlyplaying disc, NO DISC TITLE is displayed.
Using CD TEXT functionsYou can use these functions only with a CDTEXT compatible multi-CD player.The operation is the same as that of the built-in DVD player.Refer to Text information on page 26.
Selecting tracks from the tracktitle listYou can use these functions only with a CDTEXT compatible multi-CD player.The operation is the same as that of the built-in DVD player.Refer to Selecting tracks from the track title liston page 29.
Using compression and bassemphasisUsing COMP (compression) and DBE (dy-namic bass emphasis) functions lets you ad-just the sound playback quality of the multi-CD player.
% Touch COMP on the function menu toselect your favorite setting.COMP OFF—COMP 1—COMP 2—COMP OFF—DBE 1—DBE 2# If the multi-CD player does not supportCOMP/DBE, NOCOMP is displayed when you at-tempt to select it.
DVD PlayerBasic OperationsYou can use this unit to control a DVD player ormulti-DVD player, which is sold separately.For details concerning operation, refer to theDVD player’s or multi-DVD player’s operationmanual. This section provides information onDVD operations with this unit which differsfrom that described in the DVD player’s ormulti-DVD player’s operation manual.! Multi-DVD player that has ITS functions
and disc title functions can also be con-nected to this unit. In this case, ITSPLAY,ITS MEMO and disc title input can be con-trolled.
1 3 5 62 4
7
1 Source icon2 Media indicator3 Disc number indicator
Shows the disc number currently playingwhen using a multi-DVD player.
4 Title/Folder number indicator5 Chapter/track number indicator6 Play time indicator7 Disc list display
Shows the disc title list.
1 Touch the source icon and then touchS-DVD to select the DVD player.# When the source icon is not displayed, youcan display it by touching the screen.
Available accessories
En54
Section
04

2 Touch the screen to display the touchpanel keys.
3 To skip back or forward to anotherchapter/track, briefly touch c or d.
4 To perform fast forward or reverse,keep touching c or d.
Note
If you do not use the touch panel keys within 30seconds, they will be hidden automatically.
Selecting a disc! You can operate this function only when a
multi-DVD player is connected to this unit.
% Touch a disc title on the list to playback.Operable disc titles are highlighted.# You can also select a disc by touchinga or b.# You can also select a disc by pressing andholdinga or b button.# When the list of titles is not displayed, touchLIST.
Selecting a folder! You can operate this function only when a
DVD player which is corresponding to com-pressed audio playback is connected tothis unit.
% Touch a or b to select a folder.
Introduction of advancedoperations1 Press A.MENU button to display MENU.MENU appears on the display.
2 Touch FUNCTION to display the func-tion names.The function names are displayed and oper-able ones are highlighted.# To return to the previous display, touch BACK.# To return to the playback display, touch ESC.
Function and operationPlay mode, Random mode, Scan mode,Pause and T. EDIT operations are basically thesame as that of the built-in DVD player.Also, ITSPLAY and ITS MEMO operations arebasically the same as that the multi-CD player.
Function name Operation
Play mode
Refer to Repeating play on page 27.But the repeat play range that youcan select is vary depending onthe type of disc or system. The re-peat play ranges of the DVDplayer/multi-DVD player are asbelow:During PBC playback of VideoCDs, this function cannot be oper-ated.! DISC – Repeat the current disc! FOLDER – Repeat the current
folder! TITLE – Repeat just the current
title! CHAPTER – Repeat just the
current chapter! TRACK – Repeat just the cur-
rent track
Random modeRefer to Playing tracks in randomorder on page 27.
Scan modeRefer to Scanning tracks of a CD onpage 28.
PauseRefer to Pausing disc playback onpage 24.
ITSPLAYRefer to Using ITS playlists onpage 52.
ITS MEMORefer to Using ITS playlists onpage 52.
T. EDITRefer to Entering disc titles onpage 53.
Available accessories
En 55
Section
04Availab
leaccesso
ries

Notes
! If you select other discs during repeat play,the repeat play range changes to DISC.
! During video CD or CD playback, if you per-form track search or fast forward/reverse dur-ing TRACK, the repeat play range changes toDISC.
! During compressed audio playback, if you se-lect another folder during repeat play, the re-peat play range changes to DISC.
! During compressed audio playback, if you per-form track search or fast forward/reverse dur-ing TRACK, the repeat play range changes toFOLDER.
! The ITS function of a DVD player differsslightly from ITS playback with a multi-CDplayer. With multi-DVD player, ITS playback ap-plies only to the CD playing. For details, referto Using ITS playlists on page 52.
TV tunerBasic OperationsYou can use this unit to control a TV tuner (e.g.GEX-P5700TV), which is sold separately.For details concerning operation, refer to theTV tuner’s operation manual. This section pro-vides information on TV operations with thisunit which differs from that described in theTV tuner’s operation manual.
1 3 42
5
1 Source icon2 Band indicator3 Preset number indicator4 Channel indicator5 Preset list display
Shows the preset list.
1 Touch the source icon and then touchTV to select the TV.# When the source icon is not displayed, youcan display it by touching the screen.
2 Touch the screen to display the touchpanel keys.
3 Touch BAND to select a band.Touch BAND repeatedly until the desired bandis displayed, TV1 or TV2.
4 To select a preset channel, touch a pre-set channel on the list.The preset channel you selected is tuned in.
Available accessories
En56
Section
04

# When the list of channels is not displayed,touch LIST.
5 To perform manual tuning, brieflytouch c or d.The channels move up or down step by step.
6 To perform seek tuning, keep touchingc or d for about one second and release.The tuner will scan the channels until a broad-cast strong enough for good reception isfound.# You can cancel seek tuning by briefly touchingeitherc or d.# If you keep touchingc ord you can skipbroadcasting channels. Seek tuning starts assoon as you release the keys.
Note
If you do not use the touch panel keys within 30seconds, they will be hidden automatically.
Storing and recalling broadcaststationsIf you touch any of the preset tuning keys P01to P12 you can easily store up to 12 broadcaststations for later recall with the touch of a key.
% When you find a station that you wantto store in memory, keep touching one ofpreset tuning keys P01 to P12 until the pre-set number stops flashing.The number you have touched will flash in thepreset number indicator and then remain lit.The selected station has been stored in mem-ory.The next time you touch the same preset tun-ing key the station is recalled from memory.# To switch between P01 to P06 and P07 to P12,touch or .# When the touch panel keys are not displayed,you can display them by touching the screen.
# When P01 to P06 and P07 to P12 are not dis-played, you can display them by touching LIST.
Notes
! Up to 24 stations, 12 for each of two TV bands,can be stored in memory.
! You can also use a and b to recall stationsassigned to preset tuning keys P01 to P12.
Introduction of advancedoperations1 Press A.MENU button to display MENU.MENU appears on the display.
2 Touch FUNCTION to display the func-tion names.The function names are displayed and oper-able ones are highlighted.# To return to the previous display, touch BACK.# To return to the TV picture, touch ESC.
Note
If you do not operate the function within about 30seconds, the display is automatically returned tothe TV picture.
Storing the strongest broadcaststations sequentially% Touch BSSM on the function menu toturn BSSM on.BSSM begins to flash. While BSSM is flashingthe 12 strongest broadcast stations will bestored in order from the lowest channel up.When finished, BSSM disappears.# To cancel the storage process, touch BSSMagain.
Available accessories
En 57
Section
04Availab
leaccesso
ries
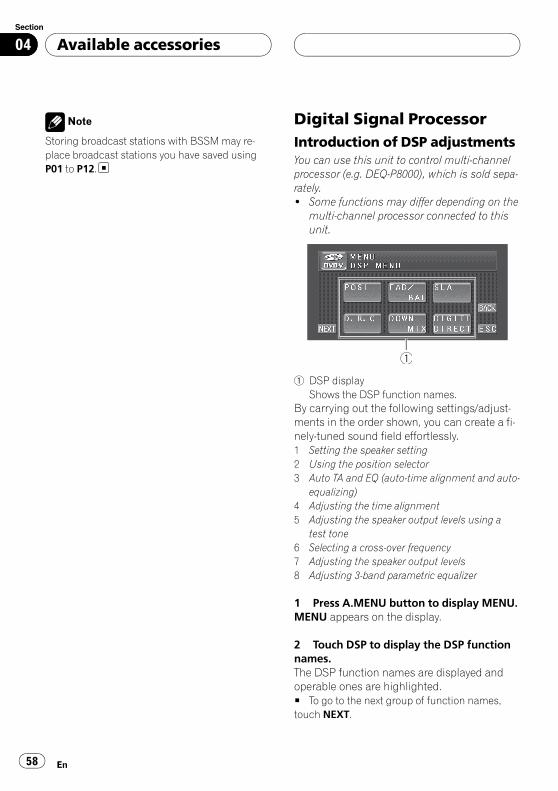
Note
Storing broadcast stations with BSSM may re-place broadcast stations you have saved usingP01 to P12.
Digital Signal ProcessorIntroduction of DSP adjustmentsYou can use this unit to control multi-channelprocessor (e.g. DEQ-P8000), which is sold sepa-rately.! Some functions may differ depending on the
multi-channel processor connected to thisunit.
1
1 DSP displayShows the DSP function names.
By carrying out the following settings/adjust-ments in the order shown, you can create a fi-nely-tuned sound field effortlessly.1 Setting the speaker setting2 Using the position selector3 Auto TA and EQ (auto-time alignment and auto-
equalizing)4 Adjusting the time alignment5 Adjusting the speaker output levels using a
test tone6 Selecting a cross-over frequency7 Adjusting the speaker output levels8 Adjusting 3-band parametric equalizer
1 Press A.MENU button to display MENU.MENU appears on the display.
2 Touch DSP to display the DSP functionnames.The DSP function names are displayed andoperable ones are highlighted.# To go to the next group of function names,touch NEXT.
Available accessories
En58
Section
04

# To return to the previous group of functionnames, touch PREV.# When playing discs recorded with more than96 kHz sampling frequency, you cannot use audiofunctions. Also, equalizer curve setting,POSITION, AUTO EQ and AUTOTA will be can-celled.# When playing discs recorded with more than96 kHz sampling frequency, audio is outputtedfrom front speakers only.# When selecting the FM tuner as the source,you cannot switch to SLA.# When playing other than the DVD disc, youcannot switch to D.R.C.# When neither FRONT-L nor FRONT-R is se-lected in POSITION, you cannot switch toTIME ALIGN.# When both the center speaker and the rearspeaker are set to OFF in the speaker setting, youcannot switch to DOLBY PL II.# To return to the previous display, touch BACK.# To return to the display of each source, touchESC.
Note
If you do not operate the DSP function withinabout 30 seconds, the display is automatically re-turned to the source display.
Using the sound field controlThe SFC function creates the sensation of alive performance.! The acoustics of different performance en-
vironments are not the same and dependon the extent and contour of space throughwhich sound waves move and on howsounds bounce off the stage, walls, floorsand ceilings. At a live performance youhear music in three stages: direct sound,early reflections, and late reflections, or re-verberations. Those factors are programedinto the SFC circuitry to recreate the acous-tics of various performance settings.
1 Press EQ button and hold to switch toSFC function.Press EQ and hold until SFC appears in thedisplay.# To switch to equalizer function, press EQ andhold again.
2 Press EQ to select the desired SFCmode.Press EQ repeatedly to switch between the fol-lowing mode:MUSICAL (musical)—DRAMA (drama)—ACTION (action)—JAZZ (jazz)—HALL (hall)—CLUB (club)—OFF (off)
Note
If the source is a 2-channel LPCM audio or a 2-channel Dolby Digital audio and you select SFCeffects that are most applicable for 5.1-channelaudio (i.e.,MUSICAL, DRAMA or ACTION), werecommend turning Dolby Pro Logic II on. On theother hand, when selecting SFC effects that areintended for use with 2-channel audio (i.e., JAZZ,HALL or CLUB), we recommend turning DolbyPro Logic II off.
Using the position selectorOne way to assure a more natural sound is toaccurately position the stereo image, puttingyou right in the center of the sound field. Theposition selector function lets you automati-cally adjust the speaker output levels and in-serts a delay time to match the number andposition of occupied seats. When used in con-junction with the SFC, the feature will makethe sound image more natural and offer a pa-noramic sound that envelops you.
1 Touch POSITION on the DSP functionmenu.
Available accessories
En 59
Section
04Availab
leaccesso
ries

2 Touch c/d/a/b to select a listening po-sition.Touch one of these, c/d/a/b, to select a lis-tening position as listed in the table.
Key Display Position
c FRONT-L Front seat left
d FRONT-R Front seat right
a FRONT Front seats
b ALL All seats
# To cancel the selected listening position,touch the same key again.
Note
When you make adjustments to the listening po-sition, the speaker outputs are automatically setfor appropriate levels. You can tailor the levelsmore precisely referring to Adjusting the speakeroutput levels using a test tone or Adjusting thespeaker output levels.
Using balance adjustmentYou can change the fader/balance setting sothat it can provide you an ideal listening envir-onment in all occupied seats.
1 Touch FAD/BAL on the DSP functionmenu.
2 Touch a or b to adjust front/rearspeaker balance.Each time you touch a or b it moves thefront/rear speaker balance towards the front orthe rear.FRONT:25 to REAR:25 is displayed as thefront/rear speaker balance moves from front torear.# FR:00 is the proper setting when only twospeakers are used.
3 Touch c or d to adjust left/right speak-er balance.Each time you touch c or d it moves the left/right speaker balance towards the left or theright.LEFT:25 to RIGHT:25 is displayed as the left/right speaker balance moves from left to right.
Adjusting source levelsSLA (source level adjustment) lets you adjustthe volume level of each source to prevent ra-dical changes in volume when switching be-tween sources.! Settings are based on the FM tuner volume
level, which remains unchanged.
1 Compare the FM tuner volume levelwith the level of the source you wish to ad-just.
2 Touch SLA on the DSP function menu.
3 Pressa or b to adjust the source vo-lume.Each time you press a or b it increases or de-creases the source volume.+4 to –4 is displayed as the source volume isincreased or decreased.
Notes
! The AM tuner volume level can also be ad-justed with source level adjustments.
! Video CD, CD and compressed audio are setto the same source level adjustment volumeautomatically.
! DVD and the optional DVD player are set tothe same source level adjustment volumeautomatically.
! External unit 1 and external unit 2 are set tothe same source level adjustment volumeautomatically.
Available accessories
En60
Section
04

! AUX (auxiliary input) and AV (AV input) are setto the same source level adjustment volumeautomatically.
Using the dynamic range controlThe dynamic range refers to the difference be-tween the largest and softest sounds. The dy-namic range control compresses thisdifference so that you can clearly hear soundseven at low volume levels.! The dynamic range control is effective only
on Dolby Digital sounds.! When playing other than the DVD disc, you
cannot switch to D.R.C.
1 Touch D.R.C on the DSP function menu.# When playing other than the DVD disc, youcannot switch this mode.
2 Touch a to turn the dynamic range con-trol on.# To turn dynamic range control off, touch b.
Using the down-mix functionThe down-mix function allows you to play backmulti-channel audio in 2 channels.
1 Touch DOWN MIX on the DSP functionmenu.
2 Touch c or d to select the desired level.Touch c to select Lo/Ro. Touch d to selectLt/Rt.
! Lo/Ro – Stereo mix the original audio thatdo not contain channel modes such as sur-round components.
! Lt/Rt – Down mix so that the surroundcomponents can be restored (decoded).
Using the direct controlYou can override audio settings to check for ef-fectiveness of your audio settings.! All audio functions are locked out when the
direct control is on except VOLUME.
1 Touch DIGITL DIRECT on the DSP func-tion menu.
2 Touch a to turn the direct control on.# To turn direct control off, touch b.
Using the Dolby Pro Logic IIDolby Pro Logic II creates five full-bandwidthoutput channels from two-channel sources toachieve high-purity matrix surround.! Dolby Pro Logic II supports up to 48kHz
sampling rate stereo source and has no ef-fect on other types of source.
1 Touch NEXT on the DSP function menu.
2 Touch DOLBY PL II.
3 Touch any of the following touch panelkeys to select the desired mode.
! MOVIE – The Movie mode suitable formovie playback
! MUSIC – The Music mode suitable formusic playback
! MATRIX – The Matrix mode for when FMradio reception is weak
! OFF – Turn Dolby Pro Logic II off! ADJUST – Adjust the Music mode
# You can operate ADJUST only whenMUSIChas been selected.
Adjusting the Music modeYou can adjust the Music mode with the fol-lowing three controls.
Available accessories
En 61
Section
04Availab
leaccesso
ries

! Panorama (PANORAMA) extends the frontstereo image to include the surroundspeakers for an exciting “wraparound” ef-fect.
! Dimension (DIMENSION) allows you togradually adjust the sound field either to-wards the front or the rear.
! Center Width Control (CENTER WDT) al-lows center-channel sounds to be posi-tioned between the center speaker and theleft/right speakers. It improves the left-cen-ter-right stage presentation for both the dri-ver and the front passenger.
1 Touch NEXT on the DSP function menu.
2 Touch DOLBY PL II.
3 Touch MUSIC and then touch ADJUST.# You can operate ADJUST only whenMUSIChas been selected.
4 Touch a or b to select PANORAMA (pa-norama).Each time you touch a or b selects the itemin the following order:PANORAMA (panorama)—DIMENSION (di-mension)—CENTER WDT (center width)
5 Touch c to turn the panorama controlon.# To turn the panorama control off, touch d.
6 Touch b to select DIMENSION and thentouch c or d to adjust front/surroundspeaker balance.Each time you touch c or d it moves thesound towards the front or the surrounds.+3 to –3 is displayed as the front/surroundspeaker balance moves from front to sur-rounds.
7 Touch b to select CENTER WDT andthen touch c or d to adjust the centerimage.Each time you touch c or d it graduallyspreads the center channel sound into thefront left and right speakers over a range 0 to7.3 is the default and it’s recommended formost recordings. 0 places all center sound inthe center speaker. 7 places all center soundequally in the left/right speakers.
Setting the speaker settingYou need to make with/without (or yes/no) andsize (bass reproducing capacity) selection/ad-justments depending on the installed speak-ers. The size needs to be set to LARGE (large)if the speaker is capable of reproducingsounds of about 100 Hz or below. Otherwiseselect SMALL (small).! Low frequency range is not output if the
subwoofer is set to OFF and the front andrear speakers set to SMALL or OFF.
! It is imperative that non-installed speakersbe set to OFF.
! Set the front or rear speaker to LARGE ifthe speaker is capable of reproducing basscontent, or if no subwoofer is installed.
1 Touch NEXT on the DSP function menu.
2 Touch SP SET.
3 Touch a or b to select the speaker tobe adjusted.Each time you touch a or b selects the speak-er in the following order:FRONT (front speakers)—CENTER (centerspeaker)—REAR (rear speakers)—SUB WOOFER (subwoofer)—PHASE (subwoo-fer setting)# You can switch to PHASE only when the sub-woofer has been set to ON.
Available accessories
En62
Section
04

4 Touch c or d to select the correct sizefor the selected speaker.Each time you touch c or d selects the size inthe following order:OFF (off)—SMALL (small)—LARGE (large)# You cannot select OFF, when FRONT (frontspeakers) have been selected.# You can select ON or OFF, whenSUB WOOFER (subwoofer) has been selected.# You can switch REVERSE (reverse phase) orNORMAL (normal phase), when PHASE (subwoo-fer setting) has been selected.
Correcting the subwoofer’s phaseIf trying to boost the bass output of the sub-woofer doesn’t do much or rather makes youfeel that the bass gets more murky, this mayindicate that the subwoofer’s output and basscontent you hear over other speakers canceleach other out. To remove this problem, trychanging the phase setting for the subwoofer.
1 Touch NEXT on the DSP function menu.
2 Touch SP SET.
3 Touch a or b to select SUB WOOFER(subwoofer).Each time you touch a or b selects the speak-er in the following order:FRONT (front speakers)—CENTER (centerspeaker)—REAR (rear speakers)—SUB WOOFER (subwoofer)—PHASE (subwoo-fer setting)
4 Touch c to turn subwoofer output on.# To turn subwoofer output off, touch d.
5 Touch b and then touch c or d to se-lect the phase of subwoofer output.Touch d to select normal phase andNORMAL appears in the display. Touch c toselect reverse phase and REVERSE appears inthe display.
Note
When playing a 2-channel mono source with ProLogic turned on, there may be occasions whenthe following will occur:! No audio is outputted if the center speaker
setting is SMALL or LARGE and no centerspeaker is installed.
! Audio is heard only over the center speaker ifinstalled and the center speaker setting isSMALL or LARGE.
Selecting a cross-over frequencyYou can select a frequency, under whichsounds are reproduced through the subwoo-fer. If the installed speakers include one whosesize has been set to SMALL, you can select afrequency, under which sounds are repro-duced through a LARGE speaker or subwoo-fer.
1 Touch NEXT on the DSP function menu.
2 Touch CROSS OVER.
3 Touch a or b to select the speaker tobe adjusted.Each time you touch a or b selects the speak-er in the following order:FRONT (front speakers)—CENTER (centerspeaker)—REAR (rear speakers)—SUB WOOFER (subwoofer)
4 Touch c or d to select cross-over fre-quency.Each time you touch c or d selects cross-overfrequencies in the following order:63—80—100—125—160—200 (Hz)
Available accessories
En 63
Section
04Availab
leaccesso
ries

Note
Selecting a cross-over frequency is to set a cross-over frequency of the subwoofer’s L.P.F. (low-passfilter) and that of the SMALL speaker H.P.F. (high-pass filter). The cross-over frequency setting hasno effect if the subwoofer is set to OFF and otherspeakers are set to LARGE or OFF.
Adjusting the speaker outputlevelsYou can readjust the speaker output levelsusing a test tone while listening to music.
1 Touch NEXT on the DSP function menu.
2 Touch SP LEVEL.
3 Touch a or b to select the speaker tobe adjusted.Each time you touch a or b selects the speak-er in the following order:FRONT-L (front speaker left)—CENTER (centerspeaker)—FRONT-R (front speaker right)—REAR-R (rear speaker right)—REAR-L (rearspeaker left)—SUB WOOFER (subwoofer)# You cannot select speakers whose size is setat OFF.
4 Touch c or d to adjust the speaker out-put level.Each time you touch c or d increases or de-creases the speaker output level. +10 to –10 isdisplayed as the level is increased or de-creased.
Notes
! You can also display the speaker setting menuby pressing BOOST button.
! To adjust the speaker output levels in thismode is the same as making the speaker out-put levels at TEST TONE. Both provide thesame results.
Adjusting the speaker outputlevels using a test toneThis function allows you to easily get the over-all balance right among the speakers.
1 Touch NEXT on the DSP function menu.
2 Touch TEST TONE.
3 Touch START to start the test tone out-put.The test tone is outputted. It rotates fromspeaker to speaker in the following sequenceat intervals of about two seconds. The currentsettings for the speaker over which you hearthe test tone are shown in the display.FRONT-L (front speaker left)—CENTER (centerspeaker)—FRONT-R (front speaker right)—REAR-R (rear speaker right)—REAR-L (rearspeaker left)—SUB WOOFER (subwoofer)Check each speaker output level. If no adjust-ments are needed, perform step 5 to stop thetest tone.# The settings do not appear for speakerswhose size is set OFF.
4 Touch c or d to adjust the speaker out-put level.Each time you touch c or d increases or de-creases the speaker output level. +10 to –10 isdisplayed as the level is increased or de-creased.# The test tone rotates to the next speaker afterabout two seconds from the last operation.
5 Touch STOP to stop the test tone out-put.
Notes
! You can also display the speaker output levelmenu by pressing BOOST button.
Available accessories
En64
Section
04

! If needed, select speakers and adjust their ‘ab-solute’ output levels. (Refer to Adjusting thespeaker output levels on the previous page.)
! To adjust the speaker output levels in thismode is the same as making the speaker out-put levels at SP LEVEL. Both provide the sameresults.
Using the time alignmentThe time alignment lets you adjust the dis-tance between each speaker and the listeningposition.
1 Touch NEXT on the DSP function menu.
2 Touch TIME ALIGN.
3 Touch any of the following touch panelkeys to select the time alignment.
! INIT – Initial time alignment (factory set-ting)
! AUTOTA – Time alignment created by autoTA and EQ. (Refer to Auto TA and EQ (auto-time alignment and auto-equalizing) onpage 67.)
! CUSTOM – Adjusted time alignment thatyou can create for yourself
! OFF – Turn the time alignment off! ADJUST – Adjust the time alignment as de-
sired# You cannot select AUTOTA if auto TA and EQhas not been carried out.# You cannot select ADJUST when neitherFRONT-L nor FRONT-R is selected in POSITION.
Adjusting the time alignmentYou can adjust the distance between eachspeaker and the selected position.! An adjusted time alignment is memorized
in CUSTOM.
1 Touch NEXT on the DSP function menu.
2 Touch TIME ALIGN and then touchADJUST.# You cannot select ADJUST when neitherFRONT-L nor FRONT-R is selected in POSITION.
3 Touch a or b to select the speaker tobe adjusted.Each time you touch a or b selects the speak-er in the following order:FRONT-L (front speaker left)—CENTER (centerspeaker)—FRONT-R (front speaker right)—REAR-R (rear speaker right)—REAR-L (rearspeaker left)—SUB WOOFER (subwoofer)# You cannot select speakers whose size is setat OFF.
4 Touch c or d to adjust the distance be-tween the selected speaker and the listen-ing position.Each time you touch c or d increases or de-creases the distance. 0.0 to 200.0in. is dis-played as the distance is increased ordecreased.
5 Touch ESC to return to the playback dis-play.
Using the equalizerThe equalizer lets you adjust the equalizationto match car interior acoustic characteristicsas desired.
Recalling equalizer curvesThere are seven stored equalizer curves whichyou can easily recall at any time. Here is a listof the equalizer curves:
Display Equalizer curve
POWERFUL Powerful
NATURAL Natural
VOCAL Vocal
FLAT Flat
Available accessories
En 65
Section
04Availab
leaccesso
ries

Display Equalizer curve
CUSTOM1 Custom 1
CUSTOM2 Custom 2
SUPER BASS Super bass
! CUSTOM1 and CUSTOM2 are adjustedequalizer curves.
! When FLAT is selected no supplement orcorrection is made to the sound. This isuseful to check the effect of the equalizercurves by switching alternatively betweenFLAT and a set equalizer curve.
1 Press EQ and hold to switch to equali-zer function.Press EQ and hold until an equalizer curvename appears in the display.# To switch to SFC function, press EQ and holdagain.
2 Press EQ to select the equalizer.Press EQ repeatedly to switch between the fol-lowing equalizers:POWERFUL—NATURAL—VOCAL—FLAT—CUSTOM1—CUSTOM2—SUPER BASS
Adjusting 3-band parametric equalizerFor CUSTOM1 and CUSTOM2 equalizercurves, you can adjust the front, rear and cen-ter equalizer curves separately by selecting acenter frequency, an equalizer level and a Qfactor for each band.! A separate CUSTOM1 curve can be cre-
ated for each source.! A CUSTOM2 curve can be created com-
mon to all sources.! The center speaker largely determines the
sound image and getting the balance rightisn’t easy. We recommend reproducing a 2-ch. audio (a CD for example) and gettingthe balance right among the speakers ex-cept for the center, and then reproducing a5.1-ch. audio (Dolby Digital or DTS) and ad-
justing the center speaker output to thebalance you have already got among theother speakers.
1 Touch NEXT twice on the DSP functionmenu.
2 Touch PARA EQ.
3 Touch a or b to select the desired item.Each time you touch a or b selects the itemin the following order:SP-SEL (speakers)—BAND (bands)—FREQUENCY (center frequency)—LEVEL(equalizer level)—Q. FACTOR (Q factor)
4 Touch c or d to select the speaker tobe adjusted.Touch c or d until the desired speaker ap-pears in the display.REAR (rear speakers)—CENTER (center speak-er)—FRONT (front speakers)# You cannot select speakers whose size is setat OFF.
5 Touch b and then touch c or d to se-lect the equalizer band to be adjusted.Each time you touch c or d selects equalizerbands in the following order:LOW (low)—MID (mid)—HIGH (high)
6 Touch b and then touch c or d to se-lect the center frequency of selected band.Touch c or d until the desired frequency ap-pears in the display.40Hz—50Hz—63Hz—80Hz—100Hz—125Hz—160Hz—200Hz—250Hz—315Hz—400Hz—500Hz—630Hz—800Hz—1kHz—1.25kHz—1.6kHz—2kHz—2.5kHz—3.15kHz—4kHz—5kHz—6.3kHz—8kHz—10kHz—12.5kHz
Available accessories
En66
Section
04

7 Touch b and then touch c or d to ad-just the equalizer level.Each time you touch c or d increases or de-creases the equalizer level. +06 to –06 is dis-played as the level is increased or decreased.
8 Touch b and then touch c or d to se-lect the desired Q factor.Each time you touch c or d switches betweenthe following Q factor:NARROW (narrow)—WIDE (wide)# You can adjust parameters for each band ofthe other speakers in the same way.
Note
You can select a center frequency for each band.You can change the center frequency in 1/3-oc-tave steps, but you cannot select frequencies thathave intervals shorter than 1 octave among thecenter frequencies of the three bands.
Using the auto-equalizerThe auto-equalizer is the equalizer curve cre-ated by auto TA and EQ (refer to Auto TA andEQ (auto-time alignment and auto-equalizing)on this page).You can turn the auto-equalizer on or off.
1 Touch NEXT twice on the DSP functionmenu.
2 Touch AUTO EQ.# You cannot use this function if auto TA andEQ has not been carried out.
3 Touch a to turn the auto-equalizer on.# To turn auto-equalizer off, touch b.
Auto TA and EQ (auto-timealignment and auto-equalizing)The auto-time alignment is automatically ad-justed for the distance between each speakerand the listening position.The auto-equalizer automatically measuresthe car interior acoustic characteristics, andthen creates the auto-equalizer curve basedon that information.
WARNINGTo prevent accidents, never carry out auto TA andEQ while driving. When this function measuresthe car interior acoustic characteristics to createan auto-equalizer curve, a loud measurementtone (noise) may be outputted from the speakers.
CAUTION! Carrying out auto TA and EQ under the follow-
ing conditions may damage the speakers. Besure to check the conditions thoroughly be-fore carrying out auto TA and EQ.— When speakers are incorrectly connected.
(e.g., When a rear speaker is connected toa subwoofer output.)
— When a speaker is connected to a poweramp delivering output higher than thespeaker’s maximum input power capabil-ity.
! If the microphone is placed in an unsuitableposition the measurement tone may becomeloud and measurement may take a long time,resulting in a drain on battery power. Be sureto place the microphone in the specified loca-tion.
Available accessories
En 67
Section
04Availab
leaccesso
ries

Before operating the auto TA and EQfunction! Carry out auto TA and EQ in as quiet a
place as possible, with the car engine andair conditioning switched off. Also cutpower to car phones or portable telephonesin the car, or remove them from the car be-fore carrying out auto TA and EQ. Soundsother than the measurement tone (sur-rounding sounds, engine sound, tele-phones ringing etc.) may prevent correctmeasurement of the car interior acousticcharacteristics.
! Be sure to carry out auto TA and EQ usingthe supplied microphone. Using anothermicrophone may prevent measurement, orresult in incorrect measurement of the carinterior acoustic characteristics.
! When front speaker is not connected, autoTA and EQ cannot be carried out.
! When this unit is connected to a poweramp with input level control, auto TA andEQ may not be possible if you lower poweramp input level. Set the power amp’s inputlevel to the standard position.
! When this unit is connected to a poweramp with an LPF, turn off the LPF on thepower amp before carrying out auto TA andEQ. In addition, the cut-off frequency forbuilt-in LPF of an active subwoofer shouldbe set to the highest frequency.
! The time alignment value calculated byauto TA and EQ may differ from the actualdistance in the following circumstances.However, the distance has been calculatedby computer to be the optimum delay togive accurate results for the circum-stances, so please continue to use thisvalue.— When the reflected sound within a vehi-
cle is strong and delays occur.— When delays occur for low sounds due
to the influence of the LPF on activesubwoofers or external amps.
! Auto TA and EQ changes the audio settingsas below:— The fader/balance settings return to the
center position. (Refer to page 60.)— The equalizer curve switches to FLAT.
(Refer to page 65.)— It will be adjusted automatically to high
pass filter setting for front, center andrear speaker.
! If you carry out auto TA and EQ when a pre-vious setting of this already exists, the set-ting will be replaced.
Carrying out auto TA and EQ
1 Stop the car in a place that is as quietas possible, close all doors, windows andthe sun roof, and then turn the engine off.If the engine is left running, engine noise mayprevent correct auto TA and EQ.
2 Fix the supplied microphone in the cen-ter of the headrest of the driver’s seat, fa-cing forward, using the belt (soldseparately).The auto TA and EQ may differ depending onwhere you place the microphone. If desired,place the microphone on the front passengerseat to carry out auto TA and EQ.
3 Turn the ignition switch to ON or ACC.If the car’s air conditioner or heater is turnedon, turn it off. Noise from the fan in the airconditioner or heater may prevent correct autoTA and EQ.
Available accessories
En68
Section
04
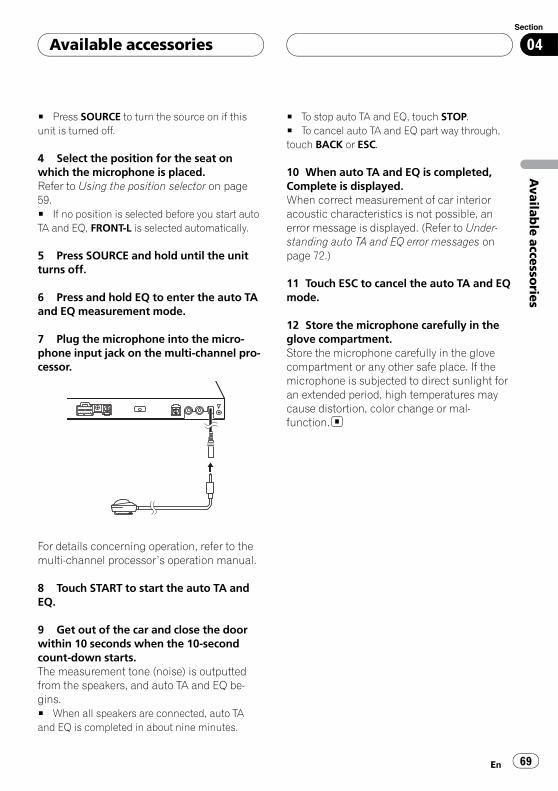
# Press SOURCE to turn the source on if thisunit is turned off.
4 Select the position for the seat onwhich the microphone is placed.Refer to Using the position selector on page59.# If no position is selected before you start autoTA and EQ, FRONT-L is selected automatically.
5 Press SOURCE and hold until the unitturns off.
6 Press and hold EQ to enter the auto TAand EQ measurement mode.
7 Plug the microphone into the micro-phone input jack on the multi-channel pro-cessor.
For details concerning operation, refer to themulti-channel processor’s operation manual.
8 Touch START to start the auto TA andEQ.
9 Get out of the car and close the doorwithin 10 seconds when the 10-secondcount-down starts.The measurement tone (noise) is outputtedfrom the speakers, and auto TA and EQ be-gins.# When all speakers are connected, auto TAand EQ is completed in about nine minutes.
# To stop auto TA and EQ, touch STOP.# To cancel auto TA and EQ part way through,touch BACK or ESC.
10 When auto TA and EQ is completed,Complete is displayed.When correct measurement of car interioracoustic characteristics is not possible, anerror message is displayed. (Refer to Under-standing auto TA and EQ error messages onpage 72.)
11 Touch ESC to cancel the auto TA and EQmode.
12 Store the microphone carefully in theglove compartment.Store the microphone carefully in the glovecompartment or any other safe place. If themicrophone is subjected to direct sunlight foran extended period, high temperatures maycause distortion, color change or mal-function.
Available accessories
En 69
Section
04Availab
leaccesso
ries

TroubleshootingCommon
Symptom Cause Action (See)
Power doesn’t turn on.The unit doesn’t operate.
Leads and connectors are incor-rectly connected.
Confirm once more that all connections arecorrect.
The fuse is blown. Rectify the reason for the fuse blowing, thenreplace the fuse. Be very sure to install thecorrect fuse with the same rating.
Noise and other factors are causingthe built-in microprocessor to oper-ate incorrectly.
Press RESET. (Page 10)
Playback is not possible. The disc is dirty. Clean disc. (Page 74)
The loaded disc is a type this unitcannot play.
Check what type the disc is.
Non compatible video system discis loaded.
Change to a disc compatible to your videosystem.
No sounds are heard.The volume level will not rise.
Cables are not connected correctly. Connect the cables correctly.
The unit is performing still, slow mo-tion or frame-by-frame playback.
There is no sound during still, slow motion orframe-by-frame playback.
There is no picture. The parking brake cord is not con-nected.
Connect a parking brake cord, and apply theparking brake.
The parking brake is not applied. Connect a parking brake cord, and apply theparking brake.
The icon is displayed, and op-eration is not possible.
The operation is prohibited for thedisc.
This operation is not possible.
The operation is not compatiblewith the disc’s organization.
This operation is not possible.
The picture stops (pauses) andthe unit cannot be operated.
Reading of data has become impos-sible during playback.
After pressing g once, start playback oncemore.
There is no sound.Volume level is low.
The volume level is low. Adjust the volume level.
The attenuator is on. Turn the attenuator off.
There is audio and video skip-ping.
The unit is not firmly secured. Secure the unit firmly.
The picture is stretched, the as-pect is incorrect.
The aspect setting is incorrect forthe display.
Select the appropriate setting for your display.(Page 36)
When the ignition switch isturned ON (or turned to ACC),the motor sounds.
The unit is confirming whether adisc is loaded or not.
This is a normal operation.
Nothing is displayed.The touch panel keys cannot beused.
The rear view camera is not con-nected.B-CAM is at incorrect setting.
Connect a rear view camera.Press V.ADJ to return to the source displayand then select the correct setting for B-CAM. (Page 41)
Additional Information
En70
Appendix

Problems during DVD playback
Symptom Cause Action (See)
Playback is not possible. The loaded disc has a different re-gion number from this unit.
Replace the disc with one featuring the sameregion number as this unit. (Page 6, Page 81)
A parental lock message is dis-played and playback is not pos-sible.
Parental lock is on. Turn parental lock off or change the level.(Page 37)
Parental lock cannot be can-celed.
The code number is incorrect. Input the correct code number. (Page 37)
You have forgotten your code num-ber.
Press CLEAR 10 times to cancel the codenumber. (Page 38)
Dialog language (and subtitlelanguage) cannot be switched.
The DVD playing does not featuremultiple language recordings.
You cannot switch among multiple languagesif they are not recorded on the disc.
You can only switch between itemsindicated in the disc menu.
Switch using the disc menu.
No subtitles are displayed. The DVD playing does not featuresubtitles.
Subtitles are not displayed if they are not re-corded on the disc.
You can only switch between itemsindicated in the disc menu.
Switch using the disc menu.
Playback is not with the audiolanguage and subtitle languagesettings selected in DVD SETUP.
The DVD playing does not featuredialog or subtitles in the languageselected in DVD SETUP.
Switching to a selected language is not possi-ble if the language selected in DVD SETUP isnot recorded on the disc.
Switching the viewing angle isnot possible.
The DVD playing does not featurescenes shot from multiple angles.
You cannot switch between multiple angles ifthe DVD does not feature scenes recordedfrom multiple angles.
You are trying to switch to multipleangle viewing of a scene that is notrecorded from multiple angles.
Switch between multiple angles when watch-ing scenes recorded from multiple angles.
The picture is extremely unclear/distorted and dark during play-back.
The disc features a signal to prohibitcopying. (Some discs may havethis.)
Since this unit is compatible with the copyguard analog copy protect system, when play-ing a disc that has a signal prohibiting copy-ing, the picture may suffer from horizontalstripes or other imperfections when viewedon some displays. This does not mean thisunit is malfunctioning.
Problems during Video CD playback
Symptom Cause Action (See)
The PBC (playback control)menu display cannot be calledup.
The Video CD playing does not fea-ture PBC.
This operation is not possible with Video CDsnot featuring PBC.
Repeat play and track/timesearch are not possible.
The Video CD playing features PBC. This operation is not possible with Video CDsfeaturing PBC.
Additional Information
En 71
AppendixAdditio
nalIn
form
atio
n
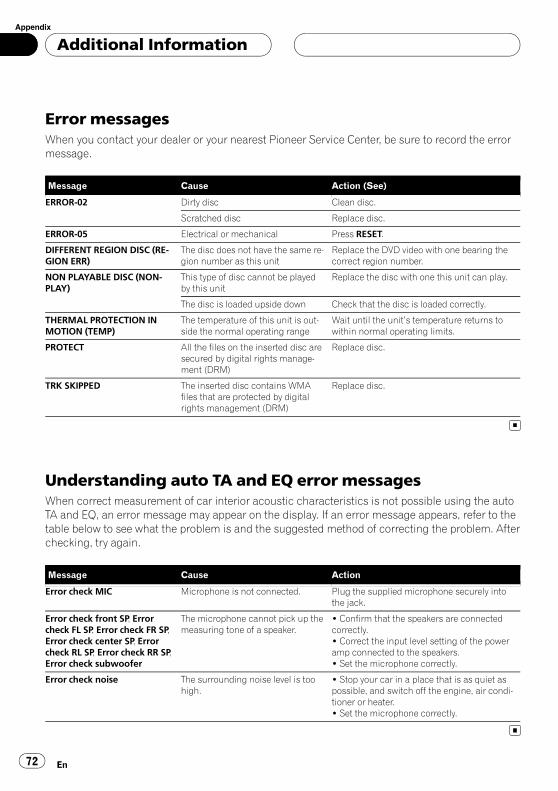
Error messagesWhen you contact your dealer or your nearest Pioneer Service Center, be sure to record the errormessage.
Message Cause Action (See)
ERROR-02 Dirty disc Clean disc.
Scratched disc Replace disc.
ERROR-05 Electrical or mechanical Press RESET.
DIFFERENT REGION DISC (RE-GION ERR)
The disc does not have the same re-gion number as this unit
Replace the DVD video with one bearing thecorrect region number.
NON PLAYABLE DISC (NON-PLAY)
This type of disc cannot be playedby this unit
Replace the disc with one this unit can play.
The disc is loaded upside down Check that the disc is loaded correctly.
THERMAL PROTECTION INMOTION (TEMP)
The temperature of this unit is out-side the normal operating range
Wait until the unit’s temperature returns towithin normal operating limits.
PROTECT All the files on the inserted disc aresecured by digital rights manage-ment (DRM)
Replace disc.
TRK SKIPPED The inserted disc contains WMAfiles that are protected by digitalrights management (DRM)
Replace disc.
Understanding auto TA and EQ error messagesWhen correct measurement of car interior acoustic characteristics is not possible using the autoTA and EQ, an error message may appear on the display. If an error message appears, refer to thetable below to see what the problem is and the suggested method of correcting the problem. Afterchecking, try again.
Message Cause Action
Error check MIC Microphone is not connected. Plug the supplied microphone securely intothe jack.
Error check front SP, Errorcheck FL SP, Error check FR SP,Error check center SP, Errorcheck RL SP, Error check RR SP,Error check subwoofer
The microphone cannot pick up themeasuring tone of a speaker.
! Confirm that the speakers are connectedcorrectly.! Correct the input level setting of the poweramp connected to the speakers.! Set the microphone correctly.
Error check noise The surrounding noise level is toohigh.
! Stop your car in a place that is as quiet aspossible, and switch off the engine, air condi-tioner or heater.! Set the microphone correctly.
Additional Information
En72
Appendix

Understanding messages
Messages Translation
VIDEO VIEWING IS NOTAVAILABLEWHILE DRIVING
Video viewing is not available when driving.
YOU CANNOT USE THIS FUNCTIONWHILE DRIVING
You cannot use this function while driving.
Please source unit off Hold EQ button 2sec, Set Auto EQ&TA
Please source unit off. Hold EQ button two seconds. Set AutoEQ&TA.
Can`t adjust Time Alignment. Set PositionFL or FR
Can’t adjust Time Alignment. Set Position FL or FR.
Press track list to play and title will ap-pear
Press track list to play and title will appear.
Additional Information
En 73
AppendixAdditio
nalIn
form
atio
n

Handling guideline of discsand player! Use only conventional, fully circular discs.
Do not use shaped discs.
! Do not use cracked, chipped, warped, orotherwise damaged discs as they may da-mage the player.
! Do not touch the recorded surface of thediscs.
! Store discs in their cases when not in use.! Avoid leaving discs in excessively hot envir-
onments including under direct sunlight.! Do not attach labels, write on or apply che-
micals to the surface of the discs.! To clean a disc, wipe the disc with a soft
cloth outward from the center.! Condensation may temporarily impair the
player’s performance. Leave it to adjust tothe warmer temperature for about onehour. Also, wipe any dump discs with a softcloth.
! Road shocks may interrupt disc playback.! Read the precautions with discs before
using them.
DVD discs! With some DVD video discs, it may not be
possible to use certain functions.! It may not be possible to play back some
DVD video discs.! When DVD-R/DVD-RW discs are used,
playback is possible only for discs whichhave been finalized.
! When DVD-R/DVD-RW discs are used,playback is possible only for discs whichhave been recorded with the Video format
(video mode). It is not possible to play backDVD-RW discs which have been recordedwith the Video Recording format (VRmode).
! It may not be possible to play back DVD-R/DVD-RW discs which have been recordedwith the Video format (video mode), be-cause of disc characteristics, scratches ordirt on the disc, or dirt, condensation, etc.on the lens of this unit.
! It is not possible to play back DVD-ROM/DVD-RAM discs.
! Playback of discs may not be possible be-cause of disc characteristics, disc format,recorded application, playback environ-ment, storage conditions and so on.
CD-R/CD-RW discs! When CD-R/CD-RW discs are used, play-
back is possible only for discs which havebeen finalized.
! It may not be possible to play back CD-R/CD-RW discs recorded on a music CD re-corder or a personal computer because ofdisc characteristics, scratches or dirt onthe disc, or dirt, condensation, etc., on thelens of this unit.
! Playback of discs recorded on a personalcomputer may not be possible, dependingon the application settings and the environ-ment. Please record with the correct for-mat. (For details, contact the manufacturerof the application.)
! Playback of CD-R/CD-RW discs may be-come impossible in case of direct exposureto sunlight, high temperatures, or the sto-rage conditions in the vehicle.
! Titles and other text information recordedon a CD-R/CD-RW disc may not be dis-played by this unit (in the case of audiodata (CD-DA)).
Additional Information
En74
Appendix

! This unit conforms to the track skip func-tion of the CD-R/CD-RW disc. The trackscontaining the track skip information areskipped automatically (in case of audiodata (CD-DA)).
! If you insert a CD-RW disc into this unit,time to playback will be longer than whenyou insert a conventional CD or CD-R disc.
! Read the precautions with CD-R/CD-RWdiscs before using them.
Dual Discs! Dual Discs are two-sided discs that have a
recordable CD for audio on one side and arecordable DVD for video on the other.
! Playback of the DVD side is possible withthis unit. However, since the CD side ofDual Discs is not physically compatiblewith the general CD standard, it may not bepossible to play the CD side with this unit.
! Frequent loading and ejecting of a DualDisc may result in scratches on the disc.Serious scratches can lead to playback pro-blems on this unit. In some cases, a DualDisc may become stuck in the disc loadingslot and will not eject. To prevent this, werecommend you refrain from using DualDisc with this unit.
! Please refer to the information from thedisc manufacturer for more detailed infor-mation about Dual Discs.
Compressed audio files onthe disc! Depending on the version of Windows
Media Player used to encode WMA files,album names and other text informationmay not be correctly displayed.
! There may be a slight delay when startingplayback of audio files encoded with imagedata.
! ISO 9660 Level 1 and 2 compliant. Romeoand Joliet file systems are both compatiblewith this player.
! Multi-session playback is possible.! Compressed audio files are not compatible
with packet write data transfer.! Only 64 characters from the beginning can
be displayed as a file name (including theextension such as .wma or .mp3) or a foldername.
! Folder selection sequence or other opera-tion may be altered depending on the en-coding or writing software.
! Regardless of the length of blank sectionbetween the songs of original recording,compressed audio discs will play with ashort pause between songs.
! File extensions such as .wma or .mp3 mustbe used properly.
Additional Information
En 75
AppendixAdditio
nalIn
form
atio
n

Example of a hierarchy: Folder: Compressed audio file
1
2
3
45
6
Level 1 Level 2 Level 3 Level 4
! This unit assigns folder numbers. The usercannot assign folder numbers.
! Folder hierarchy is allowed up to eight tiers.However, practical hierarchy of folder isless than two tiers.
! It is possible to play back up to 253 itemsfrom folders on one disc.
Compressed audio compatibilityWMA! Compatible format: WMA encoded by
Windows Media Player Ver. 7, 7.1, 8, 9 or 10! Bit rate: 48 kbps to 320 kbps (CBR)! VBR: No! Sampling frequency: 32 kHz to 48 kHz! Windows Media Audio 9 Professional, Loss-
less, Voice: No
MP3! Bit rate: 8 kbps to 320 kbps! Sampling frequency: 16 kHz to 48 kHz (32,
44.1, 48 kHz for emphasis)! Compatible ID3 tag version: 1.0, 1.1, 2.2,
2.3, 2.4 (ID3 tag Version 2.x is given prioritythan Version 1.x.)
! M3u playlist: No! MP3i (MP3 interactive), mp3 PRO: No
Using the display correctly
CAUTION! If liquid or foreign matter should get inside
this unit, turn off the power immediately andconsult your dealer or the nearest authorizedPIONEER Service Station. Do not use the unitin this condition because doing so may resultin a fire, electric shock, or other failure.
! If you notice smoke, a strange noise or smell,or any other abnormal signs from the display,turn off the power immediately and consultyour dealer or the nearest authorizedPIONEER Service Station. Using this unit inthis condition may result in permanent da-mage to the system.
! Do not disassemble or modify this unit, asthere are high-voltage components insidewhich may cause an electric shock. Be sureto consult your dealer or the nearest author-ized PIONEER Service Station for internal in-spection, adjustments or repairs.
Handling the display! When the display is subjected to direct sun-
light for a long period of time, it will be-come very hot resulting in possibledamage to the LCD screen. When notusing this unit, close the display and avoidexposing it to direct sunlight.
! The display should be used within the tem-perature ranges shown below.Storage temperature range: -4 °F to 176 °FAt temperatures higher or lower than theoperating temperature range the displaymay not operate normally.
! The LCD screen of this unit is exposed inorder to increase its visibility within the ve-hicle. Please do not press strongly on it asthis may damage it.
Additional Information
En76
Appendix

! Do not place anything on the display whenit is opened. Also, do not attempt to carryout angle adjustment, or open/close thedisplay by hand. Applying strong force tothe display may damage it.
! Do not push the LCD screen with muchforce as this may scratch it.
! Be careful not to place anything betweenthe display and the main body when thedisplay is opening or closing. If an objectgets between the display and main body,the display may stop working.
! Be careful of fingers, long hair, and loosearticles of clothing which could possiblyget caught between the display and themain body and cause serious injury.
Liquid crystal display (LCD) screen! If the display is near the vent of an air con-
ditioner when it is opened, make sure thatair from the air conditioner is not blowingon it. Heat from the heater may damagethe LCD screen, and cool air from the cool-er may cause moisture to form inside thedisplay resulting in possible damage. Also,if the display is cooled down by the cooler,the screen may become dark, or the lifespan of the small fluorescent tube used in-side the display may be shortened.
! Small black dots or white dots (bright dots)may appear on the LCD screen. These aredue to the characteristics of the LCDscreen and do not indicate a problem withthe display.
! At low temperatures, the LCD screen maybe dark for a while after the power is turnedon.
! The LCD screen will be difficult to see if it isexposed to direct sunlight.
! When using a portable phone, keep the an-tenna of the portable phone away from thedisplay to prevent disruption of the video by
the appearance of spots, colored stripes,etc.
Keeping the display in goodcondition! When wiping the screen, take care not to
scratch the surface. Do not use harsh orabrasive chemical cleaners.
Small fluorescent tube! A small fluorescent tube is used inside the
display to illuminate the LCD screen.— The fluorescent tube should last for ap-
proximately 10 000 hours, depending onoperating conditions. (Using the displayat low temperatures reduces the servicelife of the fluorescent tube.)
— When the fluorescent tube reaches theend of its useful life, the screen will bedark and the image will no longer beprojected. If this happens, consult yourdealer or the nearest authorizedPIONEER Service Station.
Additional Information
En 77
AppendixAdditio
nalIn
form
atio
n

Language code chart for DVDLanguage (code), input code Language (code), input code Language (code), input codeJapanese (ja), 1001 Guarani (gn), 0714 Pashto, Pushto (ps), 1619English (en), 0514 Gujarati (gu), 0721 Quechua (qu), 1721French (fr), 0618 Hausa (ha), 0801 Rhaeto-Romance (rm), 1813Spanish (es), 0519 Hindi (hi), 0809 Kirundi (rn), 1814German (de), 0405 Croatian (hr), 0818 Romanian (ro), 1815Italian (it), 0920 Hungarian (hu), 0821 Kinyarwanda (rw), 1823Chinese (zh), 2608 Armenian (hy), 0825 Sanskrit (sa), 1901Dutch (nl), 1412 Interlingua (ia), 0901 Sindhi (sd), 1904Portuguese (pt), 1620 Interlingue (ie), 0905 Sangho (sg), 1907Swedish (sv), 1922 Inupiak (ik), 0911 Serbo-Croatian (sh), 1908Russian (ru), 1821 Indonesian (in), 0914 Sinhalese (si), 1909Korean (ko), 1115 Icelandic (is), 0919 Slovak (sk), 1911Greek (el), 0512 Hebrew (iw), 0923 Slovenian (sl), 1912Afar (aa), 0101 Yiddish (ji), 1009 Samoan (sm), 1913Abkhazian (ab), 0102 Javanese (jw), 1023 Shona (sn), 1914Afrikaans (af), 0106 Georgian (ka), 1101 Somali (so), 1915Amharic (am), 0113 Kazakh (kk), 1111 Albanian (sq), 1917Arabic (ar), 0118 Greenlandic (kl), 1112 Serbian (sr), 1918Assamese (as), 0119 Cambodian (km), 1113 Siswati (ss), 1919Aymara (ay), 0125 Kannada (kn), 1114 Sesotho (st), 1920Azerbaijani (az), 0126 Kashmiri (ks), 1119 Sundanese (su), 1921Bashkir (ba), 0201 Kurdish (ku), 1121 Swahili (sw), 1923Byelorussian (be), 0205 Kirghiz (ky), 1125 Tamil (ta), 2001Bulgarian (bg), 0207 Latin (la), 1201 Telugu (te), 2005Bihari (bh), 0208 Lingala (ln), 1214 Tajik (tg), 2007Bislama (bi), 0209 Laothian (lo), 1215 Thai (th), 2008Bengali (bn), 0214 Lithuanian (lt), 1220 Tigrinya (ti), 2009Tibetan (bo), 0215 Latvian (lv), 1222 Turkmen (tk), 2011Breton (br), 0218 Malagasy (mg), 1307 Tagalog (tl), 2012Catalan (ca), 0301 Maori (mi), 1309 Setswana (tn), 2014Corsican (co), 0315 Macedonian (mk), 1311 Tonga (to), 2015Czech (cs), 0319 Malayalam (ml), 1312 Turkish (tr), 2018Welsh (cy), 0325 Mongolian (mn), 1314 Tsonga (ts), 2019Danish (da), 0401 Moldavian (mo), 1315 Tatar (tt), 2020Bhutani (dz), 0426 Marathi (mr), 1318 Twi (tw), 2023Esperanto (eo), 0515 Malay (ms), 1319 Ukrainian (uk), 2111Estonian (et), 0520 Maltese (mt), 1320 Urdu (ur), 2118Basque (eu), 0521 Burmese (my), 1325 Uzbek (uz), 2126Persian (fa), 0601 Nauru (na), 1401 Vietnamese (vi), 2209Finnish (fi), 0609 Nepali (ne), 1405 Volapük (vo), 2215Fiji (fj), 0610 Norwegian (no), 1415 Wolof (wo), 2315Faroese (fo), 0615 Occitan (oc), 1503 Xhosa (xh), 2408Frisian (fy), 0625 Oromo (om), 1513 Yoruba (yo), 2515Irish (ga), 0701 Oriya (or), 1518 Zulu (zu), 2621Scots-Gaelic (gd), 0704 Panjabi (pa), 1601Galician (gl), 0712 Polish (pl), 1612
Additional Information
En78
Appendix

TermsAspect ratioThis is the width-to-height ratio of a TV screen.A regular display has an aspect ratio of 4:3.Wide screen displays have an aspect ratio of16:9, providing a bigger picture for exceptionalpresence and atmosphere.
Bit rateThis expresses data volume per second, or bps(bits per second) units. The higher the rate,the more information is available to reproducethe sound. Using the same encoding method(such as MP3), the higher the rate, the betterthe sound.
ChapterDVD titles are in turn divided into chapterswhich are numbered in the same way as thechapters of a book. With DVD video discs fea-turing chapters, you can quickly find a desiredscene with chapter search.
Dolby DigitalDolby Digital provides multi-channel audiofrom up to 5.1 independent channels. This isthe same as the Dolby Digital surround soundsystem used in theaters.
Dolby Pro Logic IIDolby Pro Logic II can create five full-band-width output channels from two-channelsources. This new technology enables a dis-crete 5-channel playback with 2 front chan-nels, 1 center channel, and 2 rear channels. Amusic mode is also available for 2-channelsources in addition to the movie mode.
DTSThis stands for Digital Theater Systems. DTS isa surround system delivering multi-channelaudio from up to 6 independent channels.
ID3 tagThis is a method of embedding track-relatedinformation in an MP3 file. This embedded in-formation can include the track title, the ar-tist’s name, the album title, the music genre,the year of production, comments and otherdata. The contents can be freely edited usingsoftware with ID3 Tag editing functions.Although the tags are restricted as to the num-ber of characters, the information can beviewed when the track is played back.
ISO9660 formatThis is the international standard for the for-mat logic of CD-ROM folders and files. For theISO9660 format, there are regulations for thefollowing two levels.Level 1:The file name is in 8.3 format (the name con-sists of up to 8 characters, half-byte Englishcapital letters and half-byte numerals and the“_” sign, with a file-extension of three charac-ters).Level 2:The file name can have up to 31 characters (in-cluding the separation mark “.” and a file ex-tension). Each folder contains less than 8hierarchies.Extended formatsJoliet:File names can have up to 64 characters.Romeo:File names can have up to 128 characters.
Additional Information
En 79
AppendixAdditio
nalIn
form
atio
n

Linear PCM (LPCM)/Pulse codemodulationThis stands for linear pulse code modulation,which is the signal recording system used formusic CDs and DVDs. Generally, DVDs are re-corded with higher sampling frequency andbit rate than CDs. Therefore, DVDs can providehigher sound quality.
m3uPlaylists created using the “WINAMP” soft-ware have a playlist file extension (.m3u).
MP3MP3 is short for MPEG Audio Layer 3. It is anaudio compression standard set by a workinggroup (MPEG) of the ISO (International Stan-dards Organization). MP3 is able to compressaudio data to about 1/10th the level of a con-ventional disc.
MPEGThis stands for Moving Pictures ExpertsGroup, and is an international video imagecompression standard. Some DVDs feature di-gital audio compressed and recorded usingthis system.
Multi-angleWith regular TV programs, although multiplecameras are used to simultaneously shootscenes, only images from one camera at atime are transmitted to your TV. Some DVDsfeature scenes shot from multiple angles, let-ting you choose your viewing angle as desired.
Multi-audio (Multilingual dialog)Some DVDs feature dialog recorded in multi-ple languages. Dialog in up to 8 languagescan be recorded on a single disc, letting youchoose as desired.
Multi-sessionMulti-session is a recording method that al-lows additional data to be recorded later.
When recording data on a CD-ROM, CD-R orCD-RW, etc., all data from beginning to end istreated as a single unit or session. Multi-ses-sion is a method of recording more than 2 ses-sions on one disc.
Multi-subtitleSubtitles in up to 32 languages can be re-corded on a single DVD, letting you choose asdesired.
Optical digital output/inputBy transmitting and receiving audio signals ina digital signal format, the chance of sonicquality deteriorating in the course of transmis-sion is minimized. An optical digital output/input is designed to transmit and receive digi-tal signals optically.
Packet writeThis is a general term for a method of writingon CD-R, etc., at the time required for a file,just as is done with files on floppy or harddiscs.
Parental lockSome DVD video discs with violent or adult-or-iented scenes feature parental lock which pre-vents children from viewing such scenes. Withthis kind of disc, if you set the unit’s parentallock level, playback of scenes inappropriate forchildren will be disabled, or these scenes willbe skipped.
Playback control (PBC)This is a playback control signal recorded onVideo CDs (Version 2.0). Using menu displaysprovided by Video CDs with PBC lets you enjoyplayback of simple interactive software andsoftware with search functions. You can alsoenjoy viewing high- and standard-resolutionstill images.
Additional Information
En80
Appendix

Region numberDVD players and DVD discs feature regionnumbers indicating the area in which theywere purchased. Playback of a DVD is not pos-sible unless it features the same region num-ber as the DVD player. This unit’s regionnumber is displayed on the bottom of the unit.
TitleDVD video discs have high data capacity, en-abling recording of multiple movies on a sin-gle disc. If, for example, one disc containsthree separate movies, they are divided intotitle 1, title 2 and title 3. This lets you enjoy theconvenience of title search and other func-tions.
VBRVBR is short for variable bit rate. Generallyspeaking CBR (constant bit rate) is morewidely used. But by flexibly adjusting the bitrate according to the needs of audio compres-sion, it is possible to achieve compression-priority sound quality.
WMAWMA is short for Windows Media™ Audioand refers to an audio compression technol-ogy that is developed by MicrosoftCorporation. WMA data can be encoded byusing Windows Media Player version 7 orlater.Windows Media and the Windows logo are tra-demarks or registered trademarks of MicrosoftCorporation in the United States and/or othercountries.
Additional Information
En 81
AppendixAdditio
nalIn
form
atio
n

SpecificationsGeneralPower source ............................. 14.4 V DC (10.8 V to 15.1 V
allowable)Grounding system ................... Negative typeMax. current consumption
..................................................... 10.0 ADimensions (W × H × D):
DINChassis ............................... 178 × 50 × 160 mm
(7 × 2 × 6/1/4 in.)Nose ..................................... 188 × 58 × 30 mm
(7-3/8 × 2-1/4 × 1-1/8 in.)DChassis ............................... 178 × 50 × 165 mm
(7 × 2 × 6-1/2 in.)Nose ..................................... 170 × 46 × 25 mm
(6-3/4 × 1-3/4 × 1 in.)Weight .......................................... 2.3 kg (5.1 lbs)
DisplayScreen size/aspect ratio ....... 6.5 inch wide/16:9
(effective display area: 144× 77 mm)
Pixels ............................................. 336 960 (1 440 × 234)Type ................................................ TFT active matrix, transmis-
sive typeColor system .............................. NTSC compatibleStorage temperature range
..................................................... -4 °F to 176 °FAngle adjustment .................... 50° to 110°
(initial settings: 110°)
AudioMaximum power output ....... 50 W × 4
50 W × 2/4 W + 70 W × 1/2W (for subwoofer)
Continuous power output ... 22 W × 4 (50 Hz to 15 000Hz, 5% THD, 4 W load, bothchannels driven)
Load impedance ...................... 4 W to 8 W × 44 W to 8 W × 2 + 2 W × 1
Preout max output level/output impedance..................................................... 2.2 V/1kW
Equalizer (3-Band Parametric Equalizer):Low
Frequency ................ 40/80/100/160 HzQ Factor .................... 0.35/0.59/0.95/1.15 (+6 dB
when boosted)Gain ............................±12 dB
MidFrequency ................ 200/500/1k/2k HzQ Factor .................... 0.35/0.59/0.95/1.15 (+6 dB
when boosted)Gain ............................±12 dB
HighFrequency ................ 3.15k/8k/10k/12.5k HzQ Factor .................... 0.35/0.59/0.95/1.15 (+6 dB
when boosted)Gain ............................±12 dB
Loudness contour:Low .......................................+3.5 dB (100 Hz), +3 dB (10
kHz)Mid .......................................+10 dB (100 Hz), +6.5 dB
(10 kHz)High .....................................+11 dB (100 Hz), +11 dB
(10 kHz)(volume: –30 dB)
Tone controls:Bass
Frequency ................ 40/63/100/160 HzGain ............................±12 dB
TrebleFrequency ................ 2.5k/4k/6.3k/10k HzGain ............................±12 dB
HPF:Frequency .......................... 50/80/125 HzSlope .................................... –12 dB/oct
Subwoofer:Frequency .......................... 50/80/125 HzSlope .................................... –18 dB/octGain ......................................±12 dBPhase .................................. Normal/Reverse
DVD PlayerSystem .......................................... DVD video, Video CD, Com-
pact disc audio systemUsable discs .............................. DVD video, Video CD, CD,
CD-ROM (WMA, MP3)Region number ........................ 1Signal format:
Sampling frequency ..... 44.1/48/96 kHzNumber of quantization bits
........................................... 16/20/24; linearFrequency response ............... 5 Hz to 44 000 Hz (with DVD,
at sampling frequency 96kHz)
Signal-to-noise ratio ............... 97 dB (1 kHz) (IHF-A net-work)(CD: 96 dB (1 kHz) (IHF-Anetwork))
Additional Information
En82
Appendix

Dynamic range ......................... 95 dB (1 kHz)(CD: 94 dB (1 kHz))
Distortion ..................................... 0.008 % (1 kHz)Output level:
Video .................................... 1.0 Vp-p/75 W (±0.2 V)Audio ................................... 1.0 V (1 kHz, 0 dB)
Number of channels .............. 2 (stereo)MP3 decoding format ...........MPEG-1 & 2 Audio Layer 3WMA decoding format ......... Ver. 7 & 8
FM tunerFrequency range ...................... 87.9 MHz to 107.9 MHzUsable sensitivity ..................... 8 dBf (0.7 µV/75 W, mono,
S/N: 30 dB)Signal-to-noise ratio ............... 75 dB (IHF-A network)Distortion ..................................... 0.3 % (at 65 dBf, 1 kHz,
stereo)0.1 % (at 65 dBf, 1 kHz,mono)
Frequency response ............... 30 Hz to 15 000 Hz (±3 dB)Stereo separation .................... 45 dB (at 65 dBf, 1 kHz)
AM tunerFrequency range ...................... 530 kHz to 1 710 kHz (10
kHz)Usable sensitivity ..................... 18 µV (S/N: 20 dB)Signal-to-noise ratio ............... 65 dB (IHF-A network)
Note
Specifications and the design are subject to pos-sible modifications without notice due to im-provements.
Additional Information
En 83
AppendixAdditio
nalIn
form
atio
n

A
Angle icon ..................................................24,.36Aspect ratio ...............................................36,.79Audio language .........................................23,.35
BBookmark .........................................................28Brightness ........................................................17
C
Chapter .............................................................79Code number ...................................................37Color .................................................................17Contrast ............................................................17
D
Direct search ...................................................22DTS ...............................................................8,.79
H
Hue ...................................................................17
L
Language code chart .....................................78Linear PCM (LPCM) ........................................80
M
Menu language ...............................................36MPEG ................................................................80Multi-angle .................................................24,.80Multi-audio .................................................23,.80Multi-subtitle ..............................................23,.80
O
Optical digital output/input ...........................80
PParental lock ..............................................37,.80PBC (playback control) ..................................20Playback control (PBC) ..................................80
R
Region number ...........................................6,.81
S
Subtitle language ......................................23,.35
TTitle ...................................................................81TV aspect ..........................................................36
V
Video CD ............................................................6
WWide screen mode ..........................................16
Index
En84

PIONEER CORPORATION4-1, MEGURO 1-CHOME, MEGURO-KUTOKYO 153-8654, JAPAN
PIONEER ELECTRONICS (USA) INC.P.O. Box 1540, Long Beach, California 90801-1540, U.S.A.TEL: (800) 421-1404
PIONEER EUROPE NVHaven 1087, Keetberglaan 1, B-9120 Melsele, BelgiumTEL: (0) 3/570.05.11
PIONEER ELECTRONICS ASIACENTRE PTE. LTD.253 Alexandra Road, #04-01, Singapore 159936TEL: 65-6472-7555
PIONEER ELECTRONICS AUSTRALIA PTY. LTD.178-184 Boundary Road, Braeside, Victoria 3195, AustraliaTEL: (03) 9586-6300
PIONEER ELECTRONICS OF CANADA, INC.300 Allstate Parkway, Markham, Ontario L3R OP2, CanadaTEL: 1-877-283-5901
PIONEER ELECTRONICS DE MEXICO, S.A. de C.V.Blvd.Manuel Avila Camacho 138 10 pisoCol.Lomas de Chapultepec, Mexico, D.F. 11000TEL: 55-9178-4270
先鋒股份有限公司總公司 : 台北市中山北路二段44號13樓電話 : (02) 2521-3588
先鋒電子(香港)有限公司香港九龍尖沙咀海港城世界商業中心9樓901-6室電話 : (0852) 2848-6488
Published by Pioneer Corporation.Copyright © 2007 by Pioneer Corporation.All rights reserved.
Printed in Japan
<CRB2343-A> UC<KSNZF> <07A00000>