edited and published by gary evens, training with a legend
TRANSCRIPT
Training With A Legend
Random Shots
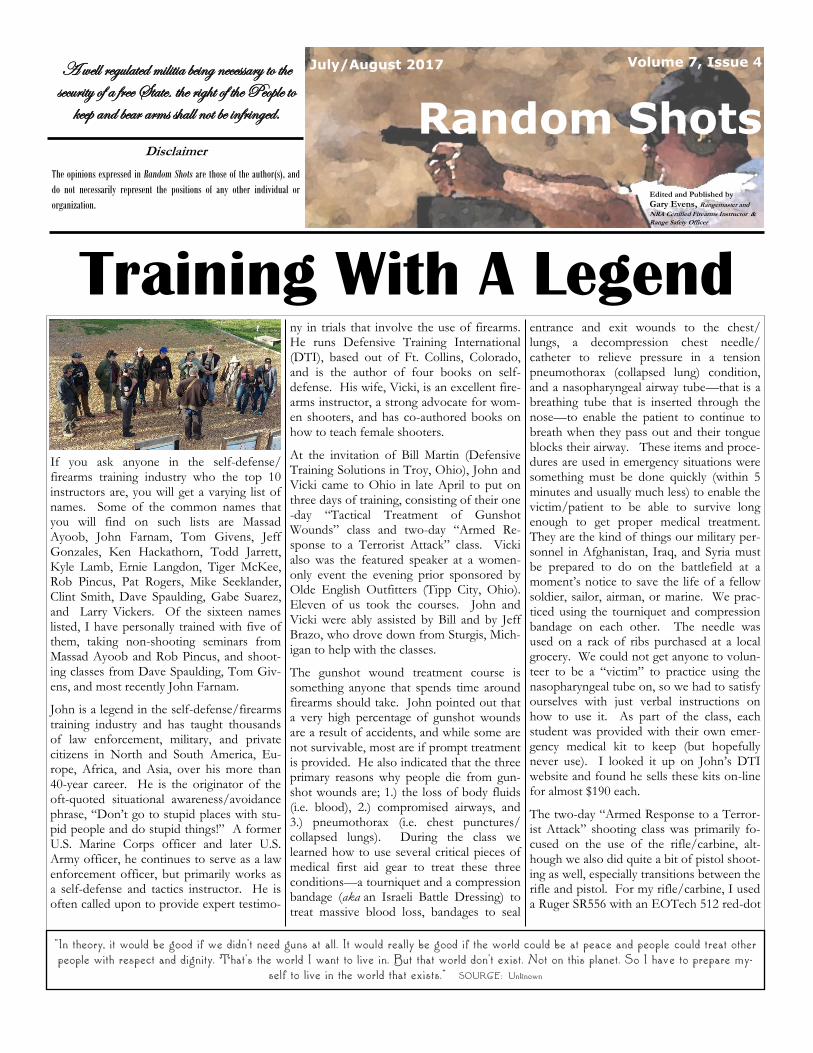
If you ask anyone in the self-defense/firearms training industry who the top 10 instructors are, you will get a varying list of names. Some of the common names that you will find on such lists are Massad Ayoob, John Farnam, Tom Givens, Jeff Gonzales, Ken Hackathorn, Todd Jarrett, Kyle Lamb, Ernie Langdon, Tiger McKee, Rob Pincus, Pat Rogers, Mike Seeklander, Clint Smith, Dave Spaulding, Gabe Suarez, and Larry Vickers. Of the sixteen names listed, I have personally trained with five of them, taking non-shooting seminars from Massad Ayoob and Rob Pincus, and shoot-ing classes from Dave Spaulding, Tom Giv-ens, and most recently John Farnam.
John is a legend in the self-defense/firearms training industry and has taught thousands of law enforcement, military, and private citizens in North and South America, Eu-rope, Africa, and Asia, over his more than 40-year career. He is the originator of the oft-quoted situational awareness/avoidance phrase, “Don’t go to stupid places with stu-pid people and do stupid things!” A former U.S. Marine Corps officer and later U.S. Army officer, he continues to serve as a law enforcement officer, but primarily works as a self-defense and tactics instructor. He is often called upon to provide expert testimo-
ny in trials that involve the use of firearms. He runs Defensive Training International (DTI), based out of Ft. Collins, Colorado, and is the author of four books on self-defense. His wife, Vicki, is an excellent fire-arms instructor, a strong advocate for wom-en shooters, and has co-authored books on how to teach female shooters.
At the invitation of Bill Martin (Defensive Training Solutions in Troy, Ohio), John and Vicki came to Ohio in late April to put on three days of training, consisting of their one-day “Tactical Treatment of Gunshot Wounds” class and two-day “Armed Re-sponse to a Terrorist Attack” class. Vicki also was the featured speaker at a women-only event the evening prior sponsored by Olde English Outfitters (Tipp City, Ohio). Eleven of us took the courses. John and Vicki were ably assisted by Bill and by Jeff Brazo, who drove down from Sturgis, Mich-igan to help with the classes.
The gunshot wound treatment course is something anyone that spends time around firearms should take. John pointed out that a very high percentage of gunshot wounds are a result of accidents, and while some are not survivable, most are if prompt treatment is provided. He also indicated that the three primary reasons why people die from gun-shot wounds are; 1.) the loss of body fluids (i.e. blood), 2.) compromised airways, and 3.) pneumothorax (i.e. chest punctures/collapsed lungs). During the class we learned how to use several critical pieces of medical first aid gear to treat these three conditions—a tourniquet and a compression bandage (aka an Israeli Battle Dressing) to treat massive blood loss, bandages to seal
entrance and exit wounds to the chest/lungs, a decompression chest needle/catheter to relieve pressure in a tension pneumothorax (collapsed lung) condition, and a nasopharyngeal airway tube—that is a breathing tube that is inserted through the nose—to enable the patient to continue to breath when they pass out and their tongue blocks their airway. These items and proce-dures are used in emergency situations were something must be done quickly (within 5 minutes and usually much less) to enable the victim/patient to be able to survive long enough to get proper medical treatment. They are the kind of things our military per-sonnel in Afghanistan, Iraq, and Syria must be prepared to do on the battlefield at a moment’s notice to save the life of a fellow soldier, sailor, airman, or marine. We prac-ticed using the tourniquet and compression bandage on each other. The needle was used on a rack of ribs purchased at a local grocery. We could not get anyone to volun-teer to be a “victim” to practice using the nasopharyngeal tube on, so we had to satisfy ourselves with just verbal instructions on how to use it. As part of the class, each student was provided with their own emer-gency medical kit to keep (but hopefully never use). I looked it up on John’s DTI website and found he sells these kits on-line for almost $190 each.
The two-day “Armed Response to a Terror-ist Attack” shooting class was primarily fo-cused on the use of the rifle/carbine, alt-hough we also did quite a bit of pistol shoot-ing as well, especially transitions between the rifle and pistol. For my rifle/carbine, I used a Ruger SR556 with an EOTech 512 red-dot
July/August 2017 Volume 7, Issue 4
Edited and Published by
Gary Evens, Rangemaster and
NRA Certified Firearms Instructor &
Range Safety Officer
A well regulated militia being necessary to the security of a free State, the right of the People to
keep and bear arms shall not be infringed.
Disclaimer
The opinions expressed in Random Shots are those of the author(s), and
do not necessarily represent the positions of any other individual or
organization.
"In theory, it would be good if we didn't need guns at all. It would really be good if the world could be at peace and people could treat other people with respect and dignity. That's the world I want to live in. But that world don't exist. Not on this planet. So I have to prepare my-
self to live in the world that exists." SOURCE: Unknown
optic, chambered in 5.56mm NATO/.223 Remington. My handgun choice for the weekend was a 9mm Glock Model 19 with Ameriglo I-Dot sights and a Zev Technolo-gies Fulcrum trigger. Both guns performed flawlessly for the entire weekend with no jams or other malfunctions. Since I had no problems with them, I did not need my back-up guns—a 5.56mm/.223 caliber Ruger Mini-14 carbine with a Leupold 1.5-4X vari-able power scope and a Hogue over-molded stock, and a 9mm Glock Model 26 pistol, although we did use the Mini-14 for one drill. I lost count of how many rounds I actually fired, but we were required to bring at least 400 rounds for our rifles and 200 rounds for our pistols to the class.
John takes a very different approach to training than any of the other firearms in-structor that I have received training from. He recognizes that “risk attaches to having a gun” and thus anything involving the use of a gun cannot be 100% risk free. He runs a “hot” range where guns are expected to be loaded and carried at all times (even when we went inside Bill’s house for lunch). This included carrying our rifles on a sling around our necks virtually all the time. We were responsible for topping off our magazines as needed. He told us that we were not al-lowed to leave the firing line with an empty gun. (During one drill, I fired all 45 rounds of the ammunition I had on me for my pis-tol. John would not allow me to leave the line until I borrowed one round of 9mm ammunition and loaded it into my pistol so I would not violate his rule. After this hap-pened, other students in the class started carrying their own “Barney Fife bullet” in their shirt pockets.) John explained the im-portance of doing this in dangerous environ-ments by relating a recent incident where over 140 Afghan soldiers were killed as they were leaving a mosque when the Taliban attacked their base. The Afghan soldiers were all unarmed at the time of the attack. Defenseless, they were slaughtered like sheep by the attackers.
One of his early statements during the class was, “We don’t learn anything from our successes, we only learn from our failures.” Thus, he stated his role in the class was to provide us all with opportunities to fail. He said his instructions would be vague but the objective we were to achieve would be clear-ly defined. He left it up to each of us how to accomplish the objective(s) of each drill. He said, “Find a way to win, don’t look for an excuse to lose!” Vicki emphasized the
WIN concept—do what’s important now, at this very instant, to achieve success.
The first day of the shooting class was spent practicing fundamentals and getting use to manipulating our rifles. One drill consisted of firing three full magazines (about 90 rounds) rapidly through our rifles to demon-strate they would keep working once they got hot. We also did the traditional shooting from different positions—standing, and several variations of kneeling and prone—using both our strong-side and weak-side/support-side to shoot from. Shooting left-handed with a rifle is a challenge because, unless we are naturally left-handed we just don’t practice doing this. We also had to show that we could fire the rifle using each of the fingers, including the thumb, with both our strong hand and our weak hand. We had to demonstrate we could shoot our rifles using only one hand with no external support to hold up the barrel. Oh, did I mention we were expected to keep 80% of our shots in a scoring area that was roughly 3½-inches wide by 24-inches long on a human-size silhouette target placed about 25 yards down-range?
John used accuracy as his standard measure throughout the weekend. None of the exer-cises we did were timed—again a difference from what every other instructor I’ve had has done. Other instructors use time to introduce stress during their drills. John uses accuracy, somewhat longer shooting distances, and complex scenarios to provide the stress. John did expect us to accomplish the required tasks as quickly as possible while still making accurate shots, but there were no stop watches or shot timers in use.
I did manage to keep all of my hits within the human silhouette target, but I was una-ble to keep 80% within the narrow area within the silhouette that was the “scoring zone”. I found that my Ruger SR556, while 100% reliable, was too muzzle heavy to ena-ble me to hold steady and maintain those kind of accuracy standards. Indeed, config-ured as I had it, it weighs about 9-9.5 pounds when fully loaded with 30 rounds of ammunition. It was easily the heaviest rifle being used during the class. I’m going to have to work on getting a lighter weight upper assembly for my rifle.
As part of our transition drills, we put an empty magazine in our rifles with one round
loaded in the chamber. We were then to engage our designated target and when our rifle stopped working—as it did after firing just one round—we had to transition to our handgun to continue firing at our target—still that narrow strip 25 yards away and still maintaining that 80% accuracy standard. A variation of this drill started the same, but after firing a few rounds with our pistol we were to transition back to our rifle, reload it with a fresh magazine, and continue shoot-ing at our target. We were also expected to move whenever we were reloading, clearing a malfunction, and after taking 3-4 shots.
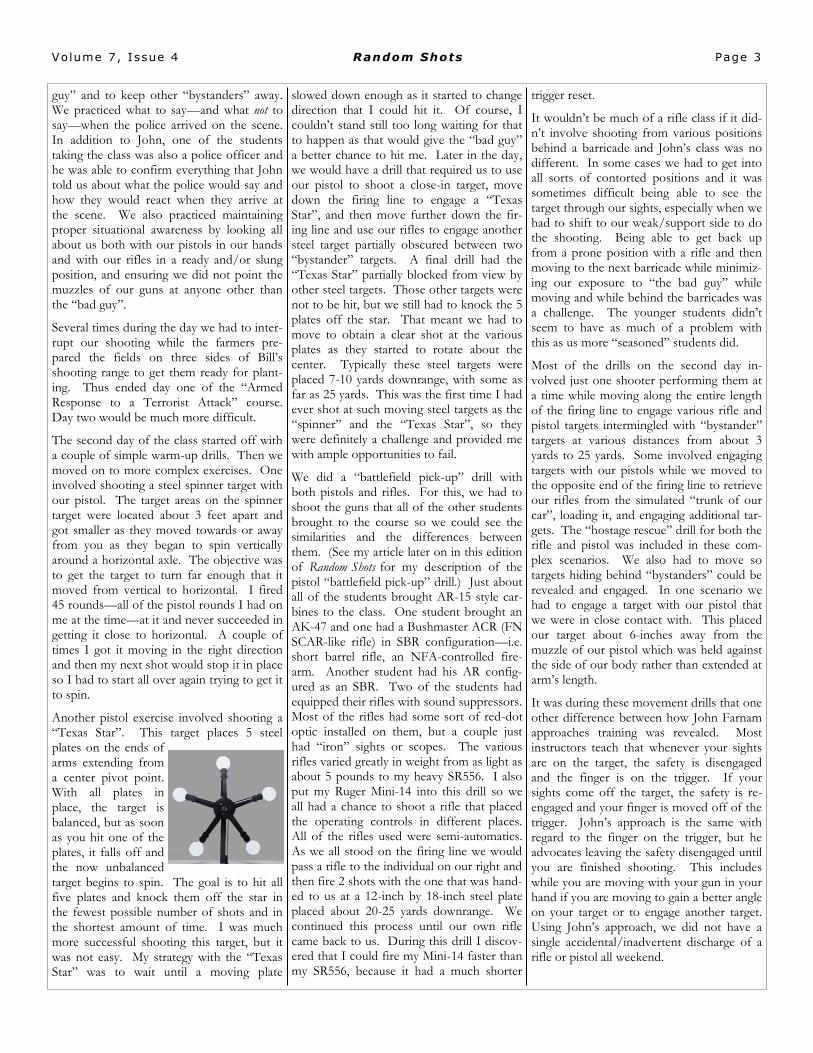
Finally, we did a hostage rescue drill with both our rifle and our handgun. The “hostage” silhouette was placed in front of the “bad guy” target and we had to shoot the “bad guy” in the head—a very small 1-inch wide by 2½-inch tall area where the nose is located—multiple times without hitting the “hostage”. Distances for this drill were 3 yards with the pistol and 7 yards with the rifle. The challenge with this drill with the rifle was remembering to account for the mechanical off-set created by the height of the sights over the bore of the barrel. For AR-style rifles this is about 2½ inches. As you can see from the accompa-nying photo, I managed to get the majority of my shots into the required zone on the target and I avoided hitting my “mother-in-law” who was being held hostage by a “terrorist”. I got very similar results with my pistol. Luckily “mom” held very still while I was shooting. My point of aim for my rifle was the middle of the “terrorist’s” forehead—something I forgot when we did the drill again the following day, resulting in me giving the “terrorist” a new mouth.
Several of the drills required us to use verbal challenges to get the attention of the “bad
Page 2 Random Shots Volume 7, I ssue 4
guy” and to keep other “bystanders” away. We practiced what to say—and what not to say—when the police arrived on the scene. In addition to John, one of the students taking the class was also a police officer and he was able to confirm everything that John told us about what the police would say and how they would react when they arrive at the scene. We also practiced maintaining proper situational awareness by looking all about us both with our pistols in our hands and with our rifles in a ready and/or slung position, and ensuring we did not point the muzzles of our guns at anyone other than the “bad guy”.
Several times during the day we had to inter-rupt our shooting while the farmers pre-pared the fields on three sides of Bill’s shooting range to get them ready for plant-ing. Thus ended day one of the “Armed Response to a Terrorist Attack” course. Day two would be much more difficult.
The second day of the class started off with a couple of simple warm-up drills. Then we moved on to more complex exercises. One involved shooting a steel spinner target with our pistol. The target areas on the spinner target were located about 3 feet apart and got smaller as they moved towards or away from you as they began to spin vertically around a horizontal axle. The objective was to get the target to turn far enough that it moved from vertical to horizontal. I fired 45 rounds—all of the pistol rounds I had on me at the time—at it and never succeeded in getting it close to horizontal. A couple of times I got it moving in the right direction and then my next shot would stop it in place so I had to start all over again trying to get it to spin.
Another pistol exercise involved shooting a “Texas Star”. This target places 5 steel plates on the ends of arms extending from a center pivot point. With all plates in place, the target is balanced, but as soon as you hit one of the plates, it falls off and the now unbalanced target begins to spin. The goal is to hit all five plates and knock them off the star in the fewest possible number of shots and in the shortest amount of time. I was much more successful shooting this target, but it was not easy. My strategy with the “Texas Star” was to wait until a moving plate
slowed down enough as it started to change direction that I could hit it. Of course, I couldn’t stand still too long waiting for that to happen as that would give the “bad guy” a better chance to hit me. Later in the day, we would have a drill that required us to use our pistol to shoot a close-in target, move down the firing line to engage a “Texas Star”, and then move further down the fir-ing line and use our rifles to engage another steel target partially obscured between two “bystander” targets. A final drill had the “Texas Star” partially blocked from view by other steel targets. Those other targets were not to be hit, but we still had to knock the 5 plates off the star. That meant we had to move to obtain a clear shot at the various plates as they started to rotate about the center. Typically these steel targets were placed 7-10 yards downrange, with some as far as 25 yards. This was the first time I had ever shot at such moving steel targets as the “spinner” and the “Texas Star”, so they were definitely a challenge and provided me with ample opportunities to fail.
We did a “battlefield pick-up” drill with both pistols and rifles. For this, we had to shoot the guns that all of the other students brought to the course so we could see the similarities and the differences between them. (See my article later on in this edition of Random Shots for my description of the pistol “battlefield pick-up” drill.) Just about all of the students brought AR-15 style car-bines to the class. One student brought an AK-47 and one had a Bushmaster ACR (FN SCAR-like rifle) in SBR configuration—i.e. short barrel rifle, an NFA-controlled fire-arm. Another student had his AR config-ured as an SBR. Two of the students had equipped their rifles with sound suppressors. Most of the rifles had some sort of red-dot optic installed on them, but a couple just had “iron” sights or scopes. The various rifles varied greatly in weight from as light as about 5 pounds to my heavy SR556. I also put my Ruger Mini-14 into this drill so we all had a chance to shoot a rifle that placed the operating controls in different places. All of the rifles used were semi-automatics. As we all stood on the firing line we would pass a rifle to the individual on our right and then fire 2 shots with the one that was hand-ed to us at a 12-inch by 18-inch steel plate placed about 20-25 yards downrange. We continued this process until our own rifle came back to us. During this drill I discov-ered that I could fire my Mini-14 faster than my SR556, because it had a much shorter
trigger reset.
It wouldn’t be much of a rifle class if it did-n’t involve shooting from various positions behind a barricade and John’s class was no different. In some cases we had to get into all sorts of contorted positions and it was sometimes difficult being able to see the target through our sights, especially when we had to shift to our weak/support side to do the shooting. Being able to get back up from a prone position with a rifle and then moving to the next barricade while minimiz-ing our exposure to “the bad guy” while moving and while behind the barricades was a challenge. The younger students didn’t seem to have as much of a problem with this as us more “seasoned” students did.
Most of the drills on the second day in-volved just one shooter performing them at a time while moving along the entire length of the firing line to engage various rifle and pistol targets intermingled with “bystander” targets at various distances from about 3 yards to 25 yards. Some involved engaging targets with our pistols while we moved to the opposite end of the firing line to retrieve our rifles from the simulated “trunk of our car”, loading it, and engaging additional tar-gets. The “hostage rescue” drill for both the rifle and pistol was included in these com-plex scenarios. We also had to move so targets hiding behind “bystanders” could be revealed and engaged. In one scenario we had to engage a target with our pistol that we were in close contact with. This placed our target about 6-inches away from the muzzle of our pistol which was held against the side of our body rather than extended at arm’s length.
It was during these movement drills that one other difference between how John Farnam approaches training was revealed. Most instructors teach that whenever your sights are on the target, the safety is disengaged and the finger is on the trigger. If your sights come off the target, the safety is re-engaged and your finger is moved off of the trigger. John’s approach is the same with regard to the finger on the trigger, but he advocates leaving the safety disengaged until you are finished shooting. This includes while you are moving with your gun in your hand if you are moving to gain a better angle on your target or to engage another target. Using John’s approach, we did not have a single accidental/inadvertent discharge of a rifle or pistol all weekend.
Page 3 Random Shots Volume 7, I ssue 4

I learned a lot during the weekend. One of those lessons was that I do not like the Safa-riland retention holster that moves the re-lease button from the side (as on the Black-hawk SERPA holster) to the back edge of the holster behind the trigger guard area. Something about the design of this holster made it seem to take longer to draw the pistol from it. I think this may relate to the suede-like material that is used to line the inside of the holster to prevent scratching the pistol. The method used by Safariland to attach the holster to the belt also enabled my holster to move rather than stay in one place so it was difficult to re-holster the pistol without first looking to see where it was at. (I had another Safariland holster that I had intended to use for the class. This one only uses friction to retain the pistol, but I was not able to get the retention ad-justment properly configured. I may have a defective holster because the retention screw is completely loose and there is still too much friction to enable a smooth draw of the pistol.)
With the modifications that I have made to it, my Glock 19 performed very well for me. I especially liked the easy-to-see front sight that was quick to pick-up and get on target. I just need to find a better holster to go with it. I’ll probably use it much more often when I take shooting classes in the future.
Another lesson learned was that I need to get a lighter weight rifle. I’ll work on that by trying to find a lighter upper assembly to install on my Ruger lower assembly. I will probably also change to a different red-dot optic rather than continuing to use the EOTech. I do like the EOTech reticle—a dot in a circle—but the reticle begins to fade out in bright sunlight and I cannot adjust it to be bright enough to continue to clearly see it. At one point during the afternoon of the second day, I had to deploy my back-up iron sights. John noticed and asked me why I had done it. Once I told him that my red dot was fading he said that was a very good reason for going to the back-up sights.
Another lesson that I learned was that I need to practice a lot more with my rifle. I’ll probably revert to my S&W M&P 15-22 for most of this practice as the ammunition—.22 Long Rifle—is much cheaper.
I also learned that carrying all of the gear recommended for everyday carry (EDC) is difficult to do. In addition to your gun, you should carry spare ammunition, a knife, a
flashlight, and a trauma first aid kit. The trauma kit is way too bulky to carry as I go about my daily routine, and it will be for just about anyone that does not wear cargo pants as part of their daily attire. I do carry a trauma kit in my car all the time and in my range bag when I go to the shooting range, but they may be too far away when I need them. I may have to settle and just carry a tourniquet instead of the full kit. Something you need to consider is that the primary reason for carrying the trauma kit is to be able to treat yourself should you be wound-ed, not someone else.
You can expect that I will introduce some of the drills John uses into some of my ad-vanced courses that I teach. I do have a carbine/rifle lesson plan in the works so that I can begin offering it. I now have some good material to include in it.
At the conclusion of the class, John encour-aged us all to take the lessons we had learned and use them to improve our own performance and to teach our students. Most of us taking the class were instructors and John pointed out that it was up to us to carry on teaching the lessons that his gener-ation of instructors had to learn the hard way. He said we cannot expect this to be done by the military or law enforcement because they are too risk adverse in how they approach firearms training. Instead it will be up to those of us in the civilian sec-tor to carry on the tradition.
Vicki pointed out that the “Armed Re-sponse to a Terrorist Attack” was not really a shooting class, but rather a thinking class. She once again emphasized the importance
of WIN—What’s Important Now! at this instant to accomplish the objective.
I’m relatively sure Bill Martin will invite John and Vicki to come back to Ohio again next year. (This was the second year he’s done it.) If you get the opportunity you should try to attend. It will be an expensive class, but well worth it. It is not something for the novice so if you are not that profi-cient with a handgun and rifle, get additional training before you take on the challenges that John and Vicki will present you with during one of their classes.
- G.R. Evens
Terror Attacks in London
& Stockholm
Editor’s Note: These attacks happened in late March and early April. Normally I would have included this article in the May-June edition of Ran-dom Shots, but I already had all of the articles for that edition written so this is the first opportunity to publish it.
Once again terrorists have struck in Europe. On the anniversary of the attack in Brussels, a lone terrorist ran down about two dozen pedestrians on a bridge over the Thames River then drove his vehicle into a security fence surrounding the British Parliament building. There he got out of his vehicle and attacked a police officer with a knife, killing him.
This attack was very reminiscent of the at-tack in late 2016 at Ohio State University. The terrorist used a vehicle as their primary “weapon” to produce mass casualties and then a knife to continue their attack. The terrorist was killed by the police just as was the case at OSU. Another three individuals that were struck by the vehicle were also killed and approximately 20 others were injured in the London attack.
Then just a couple of weeks later, in early April, another suspected terrorist drove a
Page 4 Random Shots Volume 7, I ssue 4
truck into a crowd of shoppers on a city street in Stockholm, Sweden, before contin-uing on into a nearby department store. In this attack, four people were killed and an-other fifteen were injured. The terrorist managed to escape from the scene, but was captured and arrested by police a couple of days later.
Increasingly the terrorists have been using vehicles to rundown pedestrians as their main method of creating panic and terror in the Western countries of Europe and North America. This method of attack is very difficult to prevent in urban areas where vehicles and pedestrians share the streets and adjacent walkways to move about the city. In the Middle East and Africa, the bomb tends to be the preferred weapon to create mass casualties.
- G.R. Evens
My Journey to Becoming
a Rifleman
Part 12: The Kneeling Position
With the prone position being the most stable and the standing position being the least stable, the kneeling, sitting, and squat-ting shooting positions fall in between on the stability spectrum. The general “rule” is that the closer to the ground you are and the more of your body that is in contact with the ground, the more stable your shooting position will be. In this article, I’ll explore the kneeling position, which is the most complicated one to get into properly.
Of the three “intermediate stability” shoot-ing positions mentioned above—kneeling, sitting, and squatting—kneeling is probably the in the middle between squatting and sitting with regard to stability, but it has the advantage of being the quickest of the three positions to get into and fire an accurate shot from. (The squatting position can be gotten into just as quickly as the kneeling
position, but since it is less steady, it takes longer to line up and fire an accurate shot from that position.)
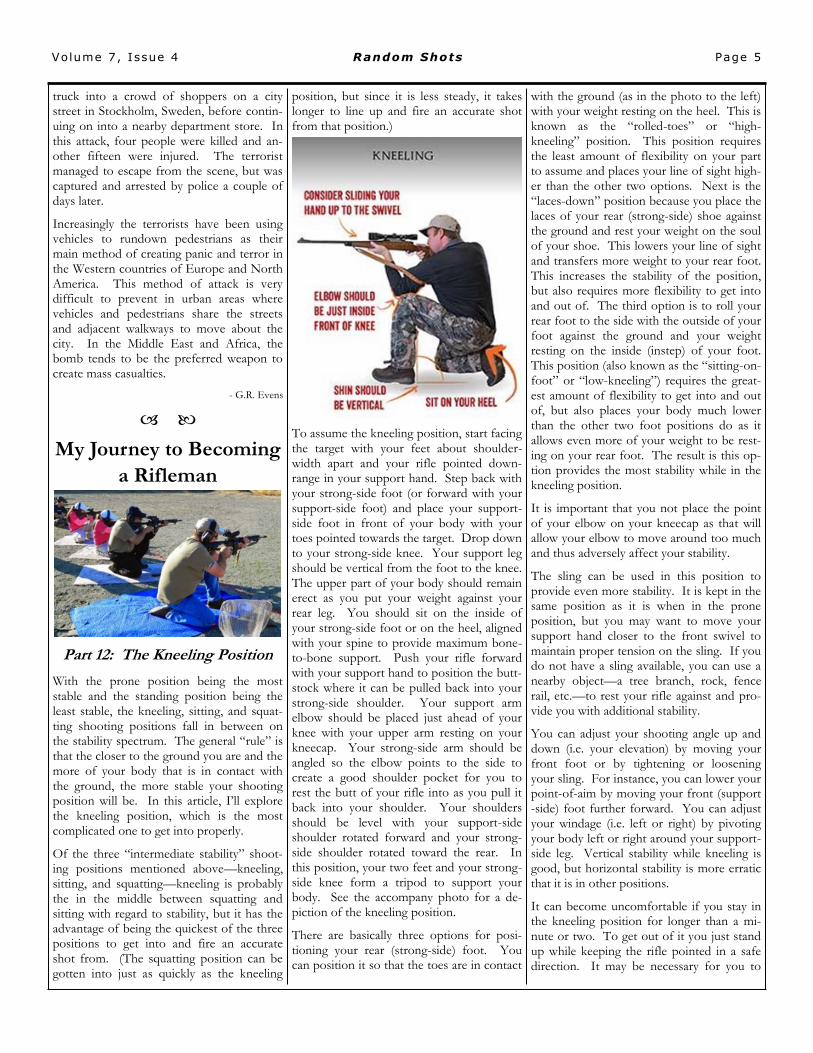
To assume the kneeling position, start facing the target with your feet about shoulder-width apart and your rifle pointed down-range in your support hand. Step back with your strong-side foot (or forward with your support-side foot) and place your support-side foot in front of your body with your toes pointed towards the target. Drop down to your strong-side knee. Your support leg should be vertical from the foot to the knee. The upper part of your body should remain erect as you put your weight against your rear leg. You should sit on the inside of your strong-side foot or on the heel, aligned with your spine to provide maximum bone-to-bone support. Push your rifle forward with your support hand to position the butt-stock where it can be pulled back into your strong-side shoulder. Your support arm elbow should be placed just ahead of your knee with your upper arm resting on your kneecap. Your strong-side arm should be angled so the elbow points to the side to create a good shoulder pocket for you to rest the butt of your rifle into as you pull it back into your shoulder. Your shoulders should be level with your support-side shoulder rotated forward and your strong-side shoulder rotated toward the rear. In this position, your two feet and your strong-side knee form a tripod to support your body. See the accompany photo for a de-piction of the kneeling position.
There are basically three options for posi-tioning your rear (strong-side) foot. You can position it so that the toes are in contact
with the ground (as in the photo to the left) with your weight resting on the heel. This is known as the “rolled-toes” or “high-kneeling” position. This position requires the least amount of flexibility on your part to assume and places your line of sight high-er than the other two options. Next is the “laces-down” position because you place the laces of your rear (strong-side) shoe against the ground and rest your weight on the soul of your shoe. This lowers your line of sight and transfers more weight to your rear foot. This increases the stability of the position, but also requires more flexibility to get into and out of. The third option is to roll your rear foot to the side with the outside of your foot against the ground and your weight resting on the inside (instep) of your foot. This position (also known as the “sitting-on-foot” or “low-kneeling”) requires the great-est amount of flexibility to get into and out of, but also places your body much lower than the other two foot positions do as it allows even more of your weight to be rest-ing on your rear foot. The result is this op-tion provides the most stability while in the kneeling position.
It is important that you not place the point of your elbow on your kneecap as that will allow your elbow to move around too much and thus adversely affect your stability.
The sling can be used in this position to provide even more stability. It is kept in the same position as it is when in the prone position, but you may want to move your support hand closer to the front swivel to maintain proper tension on the sling. If you do not have a sling available, you can use a nearby object—a tree branch, rock, fence rail, etc.—to rest your rifle against and pro-vide you with additional stability.
You can adjust your shooting angle up and down (i.e. your elevation) by moving your front foot or by tightening or loosening your sling. For instance, you can lower your point-of-aim by moving your front (support-side) foot further forward. You can adjust your windage (i.e. left or right) by pivoting your body left or right around your support-side leg. Vertical stability while kneeling is good, but horizontal stability is more erratic that it is in other positions.
It can become uncomfortable if you stay in the kneeling position for longer than a mi-nute or two. To get out of it you just stand up while keeping the rifle pointed in a safe direction. It may be necessary for you to
Page 5 Random Shots Volume 7, I ssue 4

use your strong-side hand to grab ahold of something to support you while you rise to the standing position, while using your sup-port hand to securely hold onto the rifle.
The kneeling position is useful in hunting and combat situations where the shooter wants to reduce the size of their profile so it is more difficult to be seen yet maintain the ability to quickly move if needed. It is less stable than the prone position because fewer parts of your body are in contact with the ground, specifically your strong-side elbow. It is one of the traditional positional shoot-ing positions used in competition—in addi-tion to prone and standing—and is often considered an option to the sitting position. Kneeling is often required in the field when the surrounding vegetation and terrain fea-tures do not allow you to see the target from the prone position yet you need more stabil-ity than is achievable from the standing po-sition.
- G.R. Evens
Proper stance is fundamental to being able to shoot a handgun. However, there are various stances, and each have their advo-cates. For the standing position, these in-clude the Weaver, Isosceles, and Chapman (modified Isosceles) or tactical stances. How you arrange your feet and your arms are the main differences between them. All are designed to provide you with the most stable platform possible for you to shoot from and all of them involve using a two-handed grip to hold your gun while you shoot it.
The Weaver stance is a staple of Colonel
Jeff Cooper and the modern technique of the pistol. It is taught at Gunsite and other shooting schools, where thousands of shooters have been taught this method. The basics of the technique involve your body being more “bladed” toward the target with your feet about shoulder-width apart. With your shooting hand you push the gun for-ward and with your support hand you pull the gun backwards, creating isometric ten-sion on the gun. Your shooting hand arm is positioned with the elbow pointed towards the ground, while your support hand arm has the elbow pointing out towards the side.
With the Isosceles Stance, you stand “square” to the target with your feet about shoulder-width (or more) apart, your arms are extended to the front and they form a triangle with your chest being the base of that triangle. The pistol is raised to the level of your eyes. The elbows of your arms point out towards the side.
With the Chapman/Modified Isosceles (Tactical) Stance, your position is more crouched, you are leaning forward, and your strong side foot is slightly to the rear of your other foot.
The problem with the Weaver Stance is that research has shown that when engaged in an actual gunfight, participants tend to adopt a natural fighting stance that more closely resembles the Isosceles stance than anything else, despite spending hundreds or thou-sands of hours practicing with the Weaver stance. Because of this Gunsite and other shooting schools are now paying less atten-tion to the particular stance that is used. Some instructors have come to realize that, while stance is important in teaching the fundamentals of marksmanship, you may not have time to get into a particular stance when you are confronted with a violent en-counter. Instead you will have to fight from whatever position you find yourself in and that may not be standing, let alone placing your feet and arms in any particular posi-tion. However, other instructors insist that you use their technique, which is typically the one they learned when they began shooting.
Once moving beyond the fundamentals of marksmanship, the emphasis needs to be on your ability to aim and control the trigger, no matter what position you happen to be in. You need to accurately place your shots on the target and that means having the most stable shooting platform possible.
Ideally your feet will be about shoulder-width apart and positioned to give you good balance. You will also use a firm two-handed grip on your pistol if possible, but you’ll need to know how to shoot with just one hand. You need to realize that “ideal” seldom exists in the real world and you need to have the skills necessary to perform the “essential skills”—those necessary to keep your gun running and that enable you to survive the conflict.
Having said that, you should adopt the stance that feels the most comfortable and stable to you, but you need to realize that you probably won’t be in your ideal stance if you ever become involved in a violent en-counter. In a real gunfight, you will need to be moving and not standing still is some text-book shooting stance. Ideally you will be ducking down behind any available cover (or concealment) to make yourself as small of a target to your assailant as possible if you aren’t moving. This will probably mean you are in a kneeling or prone shooting position rather than in a standing position.
-- G.R. Evens
Self-Defense Handgun Comparison
Part II: Glock vs. Glock
While the Glock 19 is clearly an excellent firearm, Glock produces many other models that have advantages and disadvantages, depending on your preferences and desires. One thing that is common across the entire Glock line is the similar fire control system that they all share and the basic configura-tions of the guns. There are three general categories of Glock pistols—full-size, com-pact, and sub-compact. In some cases Glocks with longer slides are also available. They are also divided into calibers—.380 ACP, 9mm Luger, .357 SIG, .40 S&W, 10mm, .45 GAP, and .45 ACP. The Glock 19 is their 9mm compact model. The Glock 17 is their larger full-size version, and the Glock 26 is their sub-compact version. In this article I will focus on comparing the Glock 19 with the smaller Glock 26.
The main differences between the 19 and the 26 is that the latter has a shorter slide/barrel/grip length and less ammunition ca-pacity. As such, it may be preferable for concealed carry than the larger Glock 19 is.
Page 6 Random Shots Volume 7, I ssue 4
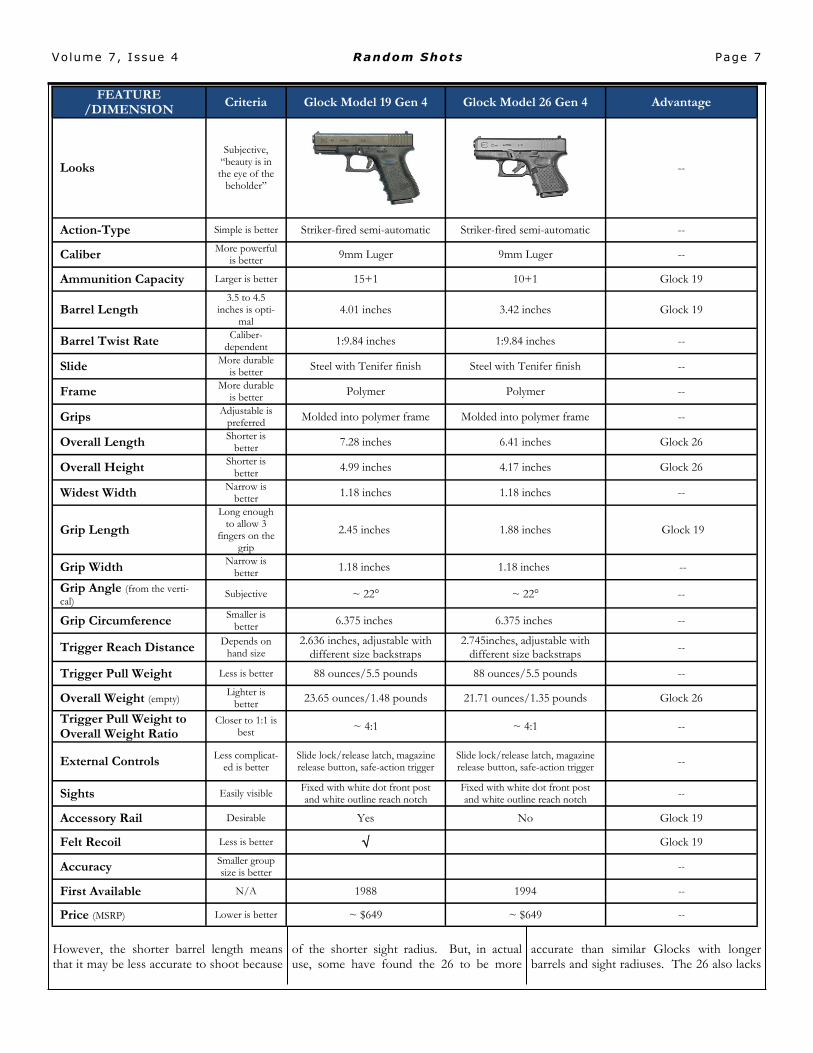
However, the shorter barrel length means that it may be less accurate to shoot because
of the shorter sight radius. But, in actual use, some have found the 26 to be more
accurate than similar Glocks with longer barrels and sight radiuses. The 26 also lacks
Page 7 Random Shots Volume 7, I ssue 4
FEATURE /DIMENSION
Criteria Glock Model 19 Gen 4 Glock Model 26 Gen 4 Advantage
Looks
Subjective, “beauty is in the eye of the
beholder”
--
Action-Type Simple is better Striker-fired semi-automatic Striker-fired semi-automatic --
Caliber More powerful
is better 9mm Luger 9mm Luger --
Ammunition Capacity Larger is better 15+1 10+1 Glock 19
Barrel Length 3.5 to 4.5
inches is opti-mal
4.01 inches 3.42 inches Glock 19
Barrel Twist Rate Caliber-
dependent 1:9.84 inches 1:9.84 inches --
Slide More durable
is better Steel with Tenifer finish Steel with Tenifer finish --
Frame More durable
is better Polymer Polymer --
Grips Adjustable is
preferred Molded into polymer frame Molded into polymer frame --
Overall Length Shorter is
better 7.28 inches 6.41 inches Glock 26
Overall Height Shorter is
better 4.99 inches 4.17 inches Glock 26
Widest Width Narrow is
better 1.18 inches 1.18 inches --
Grip Length
Long enough to allow 3
fingers on the grip
2.45 inches 1.88 inches Glock 19
Grip Width Narrow is
better 1.18 inches 1.18 inches --
Grip Angle (from the verti-
cal) Subjective ~ 22° ~ 22° --
Grip Circumference Smaller is
better 6.375 inches 6.375 inches --
Trigger Reach Distance Depends on
hand size 2.636 inches, adjustable with
different size backstraps 2.745inches, adjustable with
different size backstraps --
Trigger Pull Weight Less is better 88 ounces/5.5 pounds 88 ounces/5.5 pounds --
Overall Weight (empty) Lighter is
better 23.65 ounces/1.48 pounds 21.71 ounces/1.35 pounds Glock 26
Trigger Pull Weight to Overall Weight Ratio
Closer to 1:1 is best ~ 4:1 ~ 4:1 --
External Controls Less complicat-
ed is better Slide lock/release latch, magazine release button, safe-action trigger
Slide lock/release latch, magazine release button, safe-action trigger --
Sights Easily visible Fixed with white dot front post and white outline reach notch
Fixed with white dot front post and white outline reach notch --
Accessory Rail Desirable Yes No Glock 19
Felt Recoil Less is better Glock 19
Accuracy Smaller group size is better --
First Available N/A 1988 1994 --
Price (MSRP) Lower is better ~ $649 ~ $649 --
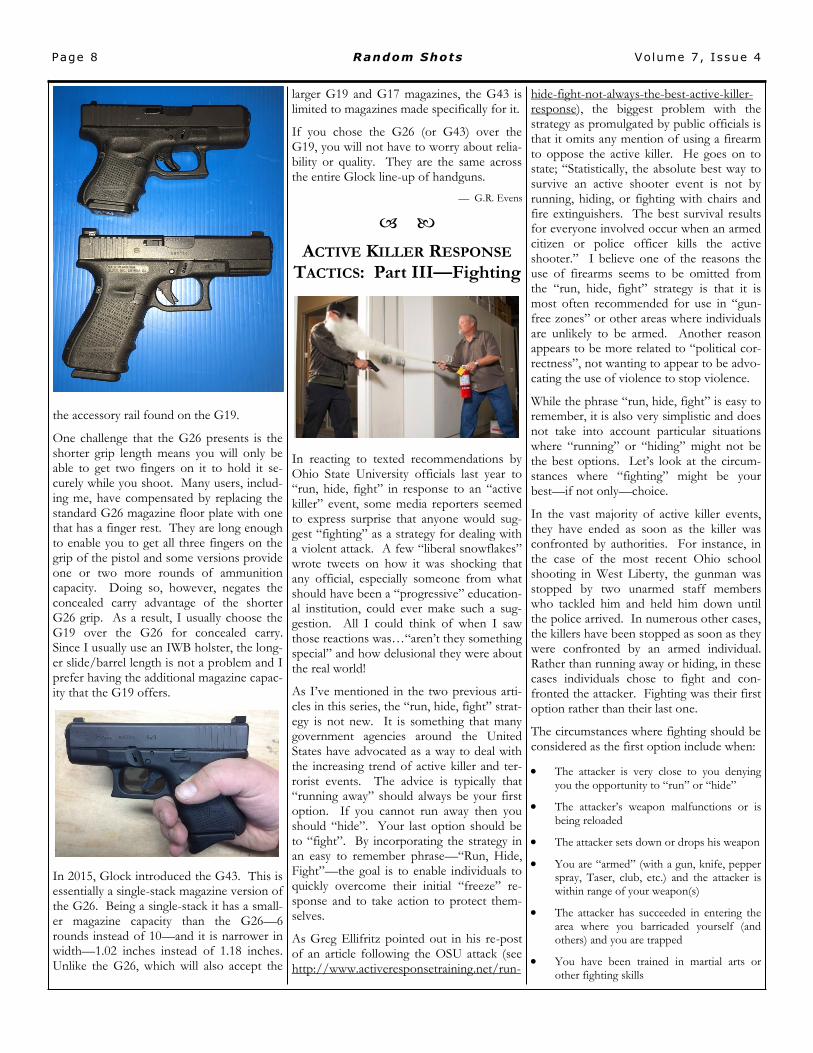
the accessory rail found on the G19.
One challenge that the G26 presents is the shorter grip length means you will only be able to get two fingers on it to hold it se-curely while you shoot. Many users, includ-ing me, have compensated by replacing the standard G26 magazine floor plate with one that has a finger rest. They are long enough to enable you to get all three fingers on the grip of the pistol and some versions provide one or two more rounds of ammunition capacity. Doing so, however, negates the concealed carry advantage of the shorter G26 grip. As a result, I usually choose the G19 over the G26 for concealed carry. Since I usually use an IWB holster, the long-er slide/barrel length is not a problem and I prefer having the additional magazine capac-ity that the G19 offers.
In 2015, Glock introduced the G43. This is essentially a single-stack magazine version of the G26. Being a single-stack it has a small-er magazine capacity than the G26—6 rounds instead of 10—and it is narrower in width—1.02 inches instead of 1.18 inches. Unlike the G26, which will also accept the
larger G19 and G17 magazines, the G43 is limited to magazines made specifically for it.
If you chose the G26 (or G43) over the G19, you will not have to worry about relia-bility or quality. They are the same across the entire Glock line-up of handguns.
— G.R. Evens
ACTIVE KILLER RESPONSE TACTICS: Part III—Fighting
In reacting to texted recommendations by Ohio State University officials last year to “run, hide, fight” in response to an “active killer” event, some media reporters seemed to express surprise that anyone would sug-gest “fighting” as a strategy for dealing with a violent attack. A few “liberal snowflakes” wrote tweets on how it was shocking that any official, especially someone from what should have been a “progressive” education-al institution, could ever make such a sug-gestion. All I could think of when I saw those reactions was…“aren’t they something special” and how delusional they were about the real world!
As I’ve mentioned in the two previous arti-cles in this series, the “run, hide, fight” strat-egy is not new. It is something that many government agencies around the United States have advocated as a way to deal with the increasing trend of active killer and ter-rorist events. The advice is typically that “running away” should always be your first option. If you cannot run away then you should “hide”. Your last option should be to “fight”. By incorporating the strategy in an easy to remember phrase—“Run, Hide, Fight”—the goal is to enable individuals to quickly overcome their initial “freeze” re-sponse and to take action to protect them-selves.
As Greg Ellifritz pointed out in his re-post of an article following the OSU attack (see http://www.activeresponsetraining.net/run-
hide-fight-not-always-the-best-active-killer-response), the biggest problem with the strategy as promulgated by public officials is that it omits any mention of using a firearm to oppose the active killer. He goes on to state; “Statistically, the absolute best way to survive an active shooter event is not by running, hiding, or fighting with chairs and fire extinguishers. The best survival results for everyone involved occur when an armed citizen or police officer kills the active shooter.” I believe one of the reasons the use of firearms seems to be omitted from the “run, hide, fight” strategy is that it is most often recommended for use in “gun-free zones” or other areas where individuals are unlikely to be armed. Another reason appears to be more related to “political cor-rectness”, not wanting to appear to be advo-cating the use of violence to stop violence.
While the phrase “run, hide, fight” is easy to remember, it is also very simplistic and does not take into account particular situations where “running” or “hiding” might not be the best options. Let’s look at the circum-stances where “fighting” might be your best—if not only—choice.
In the vast majority of active killer events, they have ended as soon as the killer was confronted by authorities. For instance, in the case of the most recent Ohio school shooting in West Liberty, the gunman was stopped by two unarmed staff members who tackled him and held him down until the police arrived. In numerous other cases, the killers have been stopped as soon as they were confronted by an armed individual. Rather than running away or hiding, in these cases individuals chose to fight and con-fronted the attacker. Fighting was their first option rather than their last one.
The circumstances where fighting should be considered as the first option include when:
• The attacker is very close to you denying
you the opportunity to “run” or “hide”
• The attacker’s weapon malfunctions or is
being reloaded
• The attacker sets down or drops his weapon
• You are “armed” (with a gun, knife, pepper spray, Taser, club, etc.) and the attacker is within range of your weapon(s)
• The attacker has succeeded in entering the area where you barricaded yourself (and others) and you are trapped
• You have been trained in martial arts or other fighting skills
Page 8 Random Shots Volume 7, I ssue 4

• You are with a large group of people that are willing to act together to confront the attacker
• You are in a position to ambush the attacker
Your success in making a counter-attack will depend on your willingness to take action and on the attacker being temporarily dis-tracted so they do not see your attack com-ing. Indeed, they are not expecting re-sistance. In most cases they chose the loca-tion for their attack because there was little likelihood of being confronted. The reality is that an active killer will continue their actions as long as there are victims to be killed and there is no resistance to stop them. Unless you have been able to escape by running away, your need to “fight” will increase the longer it takes the police to respond to the scene.
Other respected self-defense experts had thoughts on the “run, hide, fight” strategy as a result of last fall’s attack at OSU, and I’ll address some of them in the next article in this series. Until then, be safe.
-- G.R. Evens
First Impressions This one is going to be a little different than my usual handgun review articles. Instead of just one or two guns that I fire five rounds though, this time I’ll be briefly dis-cussing over a dozen different handguns and I only fired two rounds through each of them. During John and Vicki Farnam’s class (described earlier in this edition of Random Shots) one of the shooting exercises was a “battlefield pick-up” drill. Such drills are commonly used during advanced fire-arms courses and typically require the stu-dent to pick up a pre-positioned gun that is different from the one they carry. They are required to get the gun into operation and engage a target with it. In this case, John had all of the students place their handguns on a table. Each of us then moved down the length of the table, picking up each handgun, and firing two shots at a steel tar-get placed about 20 yards downrange.
All but one of the handguns were cham-bered in 9mm Luger—that one exception was chambered in .45 ACP. Four of the guns were Glocks—two G19s, a G17, and a G41. Three guns were of the 1911 design—a single-stack Kimber, a single-stack S&W, and a double-stack Rock Island. There were
two SIGs—a P226 and a P320. There was only one S&W M&P—a new 2.0 version. The other guns were an H&K VP9, an FN FNS-9, a Springfield XDS, and a Canik TP9SF. I had previous experience shooting Glock G19s, single-stack 1911s, S&W M&Ps, and SIG P226s. For the rest of the guns, this was my first experience shooting any of them.
I did not like the Springfield XDS at all. (It was Vicki Farnam’s personal carry pistol.) This is a very compact, single-stack 9mm pistol designed to compete with the S&W M&P Shield and Glock 43. I found the grip to be too thin and short for my hand. The front red fiber optic sight was very bright to the point of being distracting.
I was also disappointed in the S&W M&P 2.0 pistol (Bill Martin’s latest acquisition). The trigger felt “soft” to me, and the sights were not that crisp and clear. The new grip texturing was okay, but I’m not sure the changes to the M&P are enough to want me to trade my first generation M&P for a 2.0 version.
I’m familiar with SIG pistols, owning three myself. The double-action/single-action trigger on the P226 takes some getting used to but I had no problem getting my hits on target with it. The P226 was the only pistol on the table that required a double-action trigger pull for the first shot and it was the only one that had a decocker that had to be activated after firing the last shot. I was a little disappointed in the P320, SIG’s striker-fired polymer pistol designed to compete directly with Glock and that was recently selected to replace the Beretta M9 as the standard U.S. military handgun. I felt the trigger was a little “mushy”—I like crisp triggers—and the sights didn’t stand out as much as I like them to. In typical SIG fash-ion, the P320 does not have any safety de-vice like those incorporated into Glock and S&W M&P triggers. (Because of this, the military version of the P320 will include a manual thumb safety).
The Glocks all shot like Glocks—point them at the target and pull the trigger. Somewhat surprisingly, I was unable to tell the difference in terms of recoil between the 9mm Glocks and the one that was cham-bered in .45 ACP. That one, a G41, had a longer barrel (5.31-inches) and slide than the G17 (4.48-inch barrel) and G19 (4.01-inch barrel). That extra length and weight un-doubtedly compensated for the slightly
greater recoil produced by the .45 ACP car-tridge.
I’m quite familiar shooting 1911s so they were not a challenge for me. They were the only pistols on the table that had manual thumb safeties that had to be manipulated to shoot them. I did have my only handgun malfunction of the weekend shooting the Kimber though, a failure to extract. I was able to clear it and take my second shot without too much trouble. The double-stack design of the Rock Island model made the grip much thicker but other than that, it shot like a 1911 always does. Triggers don’t get any better than those that come on 1911 pistols.
The H&K VP9 is supposed to have the most ergonomic grip of just about any pistol on the market. To me it felt okay, but not good enough that I want to rush out and buy one. In all other aspects, this pistol is just like a Glock—except for the design of the magazine release button.
I was really surprised by t h e C a n i k (shown here) and the FN pistol. (The Canik was John Farnam’s personal pistol that he was doing a long-term evaluation on. So far he’s been very impressed with it.) Both pistols felt really good in my hand and had crisp trig-gers. Both were striker-fired models. This was the first time I had seen the Canik other than in magazine articles. I had seen the FN in some gun stores, but it always looked a little “boxy” to me and I had never bothered to handle one. I’m sorry that I didn’t. I would seriously consider adding one of ei-ther of these guns to my collection.
As far as accuracy goes, everyone was able to hit the 20 yard steel target (about 18-inches wide by 24-inches tall) consistently. I managed to hit it about 85% of the time, with one of my misses coming from the second shot with my own G19! I suspect it was because I didn’t use proper follow-thru as I had already started thinking about shooting the next gun before I was finished shooting the one that was in my hand.
Successfully operating these different hand-guns was not a problem for me, but might take some getting used to for a novice shooter. They were all adequate for self-defense, although some were better than
Page 9 Random Shots Volume 7, I ssue 4

others. The Rock Island 1911 was set-up to be more of a competition pistol, so had some features that do not make it an ideal self-defense handgun. These included an ambidextrous manual thumb safety and a magazine well extension. John feels that the only place controls for a gun should be lo-cated is on the “inside” of the gun—i.e. next to the body when the gun is holstered. This prevents the controls from being inadvert-ently activated when moving the arm close to the gun. The flared magazine well exten-sions cause problems if they are not used in conjunction with magazines that have ex-tended base pads. Used with regular maga-zines, the extension prevents you from be-ing able to ensure you seat the magazine completely into the magazine well—something that actually occurred to the shooter that was using this gun during the course.
A couple of the guns had lights mounted on them. The lights didn’t pose any problems when it came to shooting them. The only problem I’ve ever found with pistol-mounted lights is finding holsters that will enable you to keep the light installed on the pistol all the time.
The slide length on the Glock 41 might cause you to think it is not appropriate for concealed carry, but I know of several prominent firearms instructors that do carry the long slide Glocks in various calibers. They accommodate the extra slide length by carrying their pistols in inside-the-waistband (IWB) holsters.
For me, this exercise proved once again the importance of the “fit” of the handgun. Some of the guns just fit into my hand bet-ter than others did. The other things that I look for is a short, crisp trigger press and clear, sharp sights. Fortunately, you can change the sights on most handguns. That is exactly what I have done on my G19—I installed a set of Ameriglo I-Dot sights on mine a couple of years ago—and will proba-bly now do the same on my G26.
The other thing the exercise showed was to not discount handguns that are not widely available or that may not meet your aesthetic styling.
-- G.R. Evens
The Aging Shooter: Part 4
In previous articles in this series I addressed
what happens as we get older and our vision and strength begins to diminish. As we get older, criminals tend to view us as “easier targets” because they think we have less ability to protect ourselves during an attack. There is little we can do to prevent the ef-fects of aging, but there are some things we can do to compensate for them, thus mini-mizing their impacts, especially if a criminal decides we are “easy pickings”. This com-pensation may involve changing the way we perform some of the tasks associated with handling and shooting a handgun. It may even require changing the type/model of handgun that we use for self-defense. It is likely that you will need to go to the shoot-ing range more often to keep your skills sharp and you will probably need to spend more time at the gym to make sure you maximize your muscle conditioning to the extent possible.
As a result of the changes in our vision, many of us will end up wearing bi-focal or tri-focal glasses to compensate. As shoot-ers, this is challenging because we must move our head to change the lenses we are looking through to see the target (long dis-tance) and our sights (near distance). This movement of the head is not conducive to accurate shooting, but then again, how accu-rate do we need to be in a self-defense situa-tion?
We don’t need pin-point accuracy, instead we need “combat” accuracy. Essentially that is any shot that hits the threat and that significantly diminishes their ability to con-tinue to present a lethal threat. At normal violent encounter distances—usually ten feet or less—we just need to be able to place bullets into the threat’s high center chest area. This happens to be the largest target on the human body and is where we have the best chance of causing massive trauma and shock—unless of course the threat is
wearing a bullet-proof vest or some other type of body armor, but that is not some-thing that common criminals often equip themselves with. All of your hits do not need to be in the same hole—if that was true, then all we would need is one shot to stop the threat. Instead they should be “spread around” to facilitate a greater loss of blood pressure. When blood pressure di-minishes beyond a certain point, the individ-ual will lose consciousness.
While making a headshot will often result in shutting down your attacker’s central nerv-ous system, the area of the head you must hit is much smaller than the high center chest area and requires more precision in our shooting abilities. Also, during move-ment the head will move around a lot more than the chest area will, also making it more difficult to hit.
Given these conditions, what the aging shooter needs to be practicing at the shoot-ing range is to obtain combat accurate hits. At normal self-defense distances, you do not need to use the sights on your gun to be successful in getting combat accurate hits. Instead of relying on seeing the front sight clearly, we can use “point shooting” to get the necessary hits on the target. You will not need to tilt your head back to clearly see your front sight as long as the threat is with-in 10-15 feet of you. Instead you just need to look at the point on your target that you wish to hit then rapidly point the gun in the direction of the threat and press the trigger. At distances of seven yards (21 feet) or less, you can use the silhouette of your guns slide (in the case of a semi-automatic pistol, the cylinder in the case of a revolver) and place it over the area on the target that you which to hit. With practice, you should be able to get all of your hits on the target at these kinds of distances. You should even be able to close your eyes and still get combat effec-tive hits. If the threat is further away, more precision is needed so you will have to slow down your rate of fire and take the time to see your front sight and place it on the tar-get where you need to get your hits.
While you can practice many of the funda-mentals of shooting with dry fire, as you get older you will need to depend more on live fire practice. The major thing that dry fire does not provide is practice in managing the recoil from your gun. As our strength di-minishes, especially in our hands, recoil con-trol becomes more difficult to manage. Indeed, we may have to switch to a handgun
Page 10 Random Shots Volume 7, I ssue 4
that fires a less powerful cartridge to com-pensate for this loss in recoil management ability.
Changing to a handgun that shoots a less powerful cartridge has several advantages for those with diminished hand strength. There is less recoil to deal with, but it also means the springs that keep the slide closed do not need to be as strong. Thus racking the slide may be easier. You may also need to switch from using a semi-auto pistol with a double-action trigger to one with a single-action trigger. It will require less force to press the trigger and fire the gun. With a double-action revolver, we may have to change our shooting technique to cock the hammer manually prior to taking each shot. This gives us a lighter single-action trigger press, but it takes additional time at the practice range to get use to doing this quick-ly.
You may want to consider using a body index to shoot from rather than fully ex-tending your arms and gun toward the tar-get. By holding the gun close to your chest in a high-ready position and pinning your elbows to your sides, you can twist your body to the left or right to provide windage adjustments to your point of aim.
Having a handgun that fits our hands better becomes more important the less strength we have in our hands. If it fits your hand well, it should be easier to point. You may also want to consider adding a laser sight to your handgun. It will be easier to place the “dot” on the target where you want to hit it and then just press the trigger. Red “dots” are best for low light conditions, but green “dots” are more visible in daylight. The brighter the lighting conditions are, the shorter the distance at which you will be able to see the laser dot on your target.
In addition to less strength in our hands and arms, we may also have less flexibility in our bodies in general. This makes it more diffi-cult to move quickly or to get into shooting positions other than standing. This can put you at an extreme disadvantage in any self-defense encounter. To compensate you may need to start a physical fitness program that focuses on flexibility.
Getting old sucks, especially when we can no longer do those things that we could in our 20’s and 30’s. However, we don’t need to let our personal protection suffer. We can make compensations to offset the changes that take place in our physical bod-
ies. Good luck in your efforts to stay as young as possible for as long as possible—and I’ll see you at the shooting range and the gym.
-- G.R. Evens
Gear Selection
The Blackhawk! Serpa® Holster
A Dissenting Opinion
In a previous article in the January/February 2017 edition of Random Shots, I wrote about Blackhawk’s SERPA retention holster. This holster is widely used by uniformed law enforcement agencies and by the military. The primary feature that it has is the ability to mechanically retain the handgun in the holster until the user wants to draw it. A deliberate action is required—depressing a button—to release the “lock” that holds the handgun securely in the holster. However, there have been several inadvertent dis-charges of handguns that involve the use of this holster, especially in situations where the user is trying to rapidly draw or holster their pistol. Because of this, several firearms instructors and shooting schools have banned the use of the SERPA holster or place restrictions on its use that are not im-posed on other brands of holsters.
In my previous article I wrote that I have used SERPA holsters extensively and that I prefer them as “range holsters” when I am teaching a class because of the security they provide to my handguns. I also attributed the majority of problems that have been encountered with this holster design to the improper activation of the latch by the user. I still believe this to be the case. However, recently I watched a video showing another problem with the SERPA holster—and I suspect with any other retention holster that uses some sort of mechanical locking mech-anism to keep the gun from being removed
from the holster without the user taking action to deactivate the lock.
In this video, the user was involved in a close-quarters battle (CQB) class that in-volved rolling around on the ground to sim-ulate being knocked down by an opponent at close range. Dirt got into the SERPA holster’s latch mechanism—something that is highly likely to occur if you are knocked down on a dirt-covered surface and a strug-gle ensues to maintain control of your gun. No amount of effort could get the latch to unlock and allow the gun to be removed, even after the student and instructors pulled so hard on the gun that the holster broke off where it attaches to the user’s belt. While locking up would prevent the “assailant” from gaining control of your gun, it also prevents you from using it to stop your “assailant” from attacking you.
Another thing that appears to be a potential from the video is that if an assailant is able to get their hands around the SERPA hol-ster and cover the latch, they can prevent you from being able to draw your handgun because you could not get your finger to activate the latch.
Neither of these situations are good and could have serious consequences if you are ever involved in a life and death struggle with an assailant.
The author of the article accompanying this video asks the question, if there are so many good holsters on the market, why do so many people continue to buy poorly de-signed holsters like the Blackhawk SERPA? I think the answer is simple—marketing. You can walk into just about any gun store and see display racks full of Blackhawk hol-sters, including the SERPA—along with most of the other brands of holsters the author of the article says are poor choices. The high quality holsters that he mentions in the article are just not found in stores. Some manufacturers are starting to recog-nize this. BladeTech has been getting their products into retail stores and CompTac is making an effort to do so. However, the BladeTech holsters that I’ve seen in retail outlets tend to be their low-cost entry mod-els and I am not convinced they are better-made than some of the ones the author claims are poorly designed or low quality ones. Better ones are available to be or-dered over the Internet, but I suspect most handgun owners are reluctant to order an expensive holster just based on a picture on
Page 11 Random Shots Volume 7, I ssue 4
some website. I know I like to handle a product before I commit to buying it.
Besides availability, there is one other issue that a user needs to consider. If you are not going to use a holster that provides some form of mechanical retention, are you pre-pared to run the risk of an assailant taking your gun away from you during a struggle or are you willing to risk it falling out of your holster should you take a hard fall? While many holster—especially the Kydex ones—provide friction retention that can often be adjusted, if you adjust it so the gun won’t come out if you fall you probably will have great difficulty drawing it from the holster when you want to. You should also serious-ly consider getting hand-to-hand combatives training on handgun retention techniques if you chose to wear a non-retention holster of some sort!
— G.R. Evens
Random Shots Reading List
The next book on the reading list is similar to the first one—Massad Ayoob’s Deadly Force—as it focuses on the law. This time it is The Law of Self Defense: The Indispensable Guide for the Armed Citizen, by Andrew F. Branca.
Andrew Branca is an attorney and an expert on self-defense law. He regularly provides legal advice and training to police, firearms instructors, and to civilians. He also serves as an expert witness during trials and con-tributes to media outlets such as the Wall Street Journal and National Public Radio. He is featured on this season of Michael Bane’s The Best Defense television series on the Out-door Channel. In addition to his legal work, Andrew is a competitive handgun shooter and NRA-certified firearms instructor.
Andrew’s Law of Self Defense is now in its third edition. The em-phasis of his book is on the two fights you will be involved with if you ever have to defend yourself or someone else—first, the fight for your (or their) life, and second, the fight to keep your liberty after the first fight has
ended. As he states in the introductory chapter:
IN A SINGLE INSTANT YOU CAN CHOOSE TO TAKE THE LIFE OF ANOTHER HUMAN BEING, WITH NO NEED FOR PRIOR AUTHORIZATION OR DUE PROCESS OF LAW. SO LONG AS YOU CAN SHOW THAT WHAT YOU DID WAS JUSTIFIED SELF DEFENSE YOU CAN WALK AWAY, FREE OF CRIMINAL SANCTION.
The challenging is proving that what you did was “justified self defense”. As he points out, “self defense law has nuances that don’t exist in other types of criminal law.”
In addition to covering the legal require-ments that you must prove if you claim self-defense, he writes about the specifics of the laws as interpreted by each state. This in-cludes discussions on the standards of proof and who has the burden of proof in various situations. He also addresses the principals of innocence, imminence, proportionality, avoidance, and reasonableness—principals that you must adhere to in order to avoid spending many years in prison.
Key legal principals from all fifty states are covered in tables at the end of the chapters. Differences in laws between the states can be critical. For instance, when discussing the standards of proof he notes that in 49 states the prosecutor must disprove self defense beyond a reasonable doubt, but in Ohio the defendant must prove that he acted in self defense by a preponderance of the evidence. He also points out that Ohio is one of two states (South Carolina is the other state) that applies the “alter ego” rule. In these states, if the person that you chose to defend did not have the right to claim self defense for themselves, you cannot claim to have acted in self defense on their behalf. Because of these two nuances, self defense is one of the most difficult to prove in these two states.
Because he does go into such detail about individual state laws, his book is far more detailed than Ayoob’s book is. He uses case studies as examples of the points he tries to emphasize.
The law is continually being refined and updated and Andrew keeps up with these changes on his website (www. Lawofself-defense.com) that individuals can access.
Reading List:
1. Deadly Force: Understanding Your Right to Self Defense, by Massad Ayoob, ISBN-13: 978-1-4402-4061-2, ©2014
2. The Law of Self Defense: The Indis-pensable Guide for the Armed Citi-
zen, 3rd Ed., by Andrew Branca, ISBN-13: 978-1943809141, ©2016
— G.R. Evens
Upcoming Classes
The schedule for Ohio Concealed Carry classes provided by LongMeadows Shooting School for 2017 is:
January 28
February 18
April 15 CANCELLED
May 13
June 17
July 22
September 23
November 11
December 16
Contact Dave at the phone number be-low ahead of time to register for the class and make arrangements to get your read-ahead material.
The schedule for our Advanced Concealed Carry I classes this year is as follows:
May 6
August 12
October 7
We have modified this course with a new course of fire to include the OPOTA hand-gun qualification.
We will also be offering our Defensive Shotgun class on:
June 3 RESCHEDULED to July 8
See our Facebook page for announcements of classes.
Page 12 Random Shots Volume 7, I ssue 4
LongMeadows Shooting School
4910 State Route 201 Tipp City, Ohio 45371
(937) 478-8201
www.facebook.com/LongMeadows-
Shooting-School