eec eforms
TRANSCRIPT
User Guide to the Kentucky Ag Water
Quality Planning Tool
EEC eForms

2
Contents
Getting Started .................................................................................................. 4
Initial Login ............................................................................................ 5
Direct Login ............................................................................................ 7
Navigation within EEC eForms ........................................................................ 7
EEC eForms Dashboard .................................................................................... 8
Create a Plan ..................................................................................................... 9
Saving Progress ...................................................................................... 21
Completing a Plan................................................................................... 22
Conclusion ........................................................................................................ 23

3
Welcome to the new online tool for creating a Kentucky Agricultural Water Quality Plan
(AWQP). The goal of this tool is to simplify the flow of creating an AWQP. After a plan is
complete, you can elect to download a .pdf file copy, thus eliminating the need to keep a paper,
hard copy on hand. This electronic file can be kept on a smartphone, computer, or printed if
preferred. The tool also allows users to retrieve a copy of a completed plan for future use or
revision. Note: The recommended internet browser is Google Chrome. If using a different or
older browser, some formatting and/or functions may not be visible.
This tool is designed to be intuitive and user friendly. Every online system has its quirks and
caveats of use, and this tool is no exception. Please use this User Guide to navigate the tool. If
you need assistance with developing your plan, you may reach out to your local conservation
district or the KDOC field representative in your area. For technical support, you will find
information on the following pages for that type of assistance.
The AWQP tool is an Energy and Environment Cabinet eForm found within the Kentucky
Online Gateway (KOG) portal. If you do other business with the Commonwealth of Kentucky,
you may already have an account within this KOG platform. If this is the case, you may use your
existing account for the AWQP that you currently use for other applications. The front page of
the KOG appears as follows:

4
Getting Started
Please use the following link to access the home page of KOG (photo above):
https://kog.chfs.ky.gov/home/ .
You will prompted to sign in (if you already have an account), or you may create an account
from this page from the button in the bottom right corner of the screen.
o For a more direct option to sign directly into the EEC eForms section, please scroll
to the end of this section to find the Direct Login instructions on page 7.
After selecting the “create an account” option, the following screen will appear. This is
similar to any other account creation online. Complete the required information, including
your email address and a password of your choosing. Save this information, as it will be used
to log in to your account in the future.
After completing the above information, you will receive a confirmation email and an
activation link. Once you have confirmed your email address with the activation link, you
will be ready to log in to your new account.

5
Initial Login
Following your initial log in, you will see the following page:
This page lists all potential agencies/uses of the platform ordered alphabetically. Simply
scroll down until you see EEC eForms, or you may just click the letter “E” at the top of the
page and it will show all of the selections under that letter as shown below:

6
Simply click “Enroll” at the bottom of the EEC eForms box, and you will be in the correct
section.
o From this point forward, if you log into the system through this front door site, then
only the agencies that you have selected will appear automatically if the tab “My
Apps” is selected at the top of the screen:
Click “launch”, and you will be in the EEC eForms section.
The above instructions are for the “front door” entry into KOG, for those that have used this
platform for different types of business with the Commonwealth previously.

7
Direct Login
For a more direct pathway into the EEC eForms section, you may use the following link:
https://dep.gateway.ky.gov/eForms/Account/Home.aspx .
o This will take you directly to the home page of the EEC eForms, and you may click
the icon in the upper right hand corner to either sign in, or create an account (it will
follow the same steps as above).
This is simply a more direct path to the proper location within the platform. If this tool is all
that you will be using KOG for, it is likely the preferred method.
Navigation within EEC eForms
You will see five tabs at the top of the EEC eForms page.
o The first, the “Home” icon , is simply the page viewed above.
o The “Contact Us” icon has contact information for the Cabinet, and the
ability to send a message if there is a question about the forms in use.
o The “Help Center” icon has a Frequently Asked Questions section, and links
to agencies and user help topics.
o The “Dashboard” icon and the “Forms” icon will be the primary two
tabs that are used to complete your AWQP.
The “Dashboard” section organizes a user’s completed or in-progress
eForms. This section is covered further in the EEC eForms Dashboard section
on page 8.
Navigation of the “Forms” section to complete a plan is covered in the Create
a Plan section on page 9.

8
EEC eForms Dashboard
After you have saved your AWQP, you may want to return to access the plan you created.
You may need to do another new plan for another farm, or in the future, the current one may
need revision.
From your home page, select the Dashboard icon at the top of the page.
After you have selected Dashboard, you will see the following page:
o The Blue Box contains messages from the system. You will receive a message
for each completed plan that you submit/complete.
o The Green Box is a list (as shown in above example) of the “incomplete
eForms”. With regards to our tool, these are the plans that you “save” but have not
completed. So, if you do not complete a plan, and need to return to the system to
retrieve it or continue working on it, it is found in this section.
o The Orange Box is not utilized within our AWQP tool, thus serves no purpose
for our workflow.
o The Red Box is a list of the completed/submitted plans. After you click on the
option to finalize your completed plan on the form, and the system has had time to
process that request, then it should appear in the list under this box. You will go here
to retrieve your completed plan whenever you enter the system. If you only use this
system for AWQPs, after the system has processed the plans, the number of messages
(blue box) should be the same as the number of completed plans (red box).
9
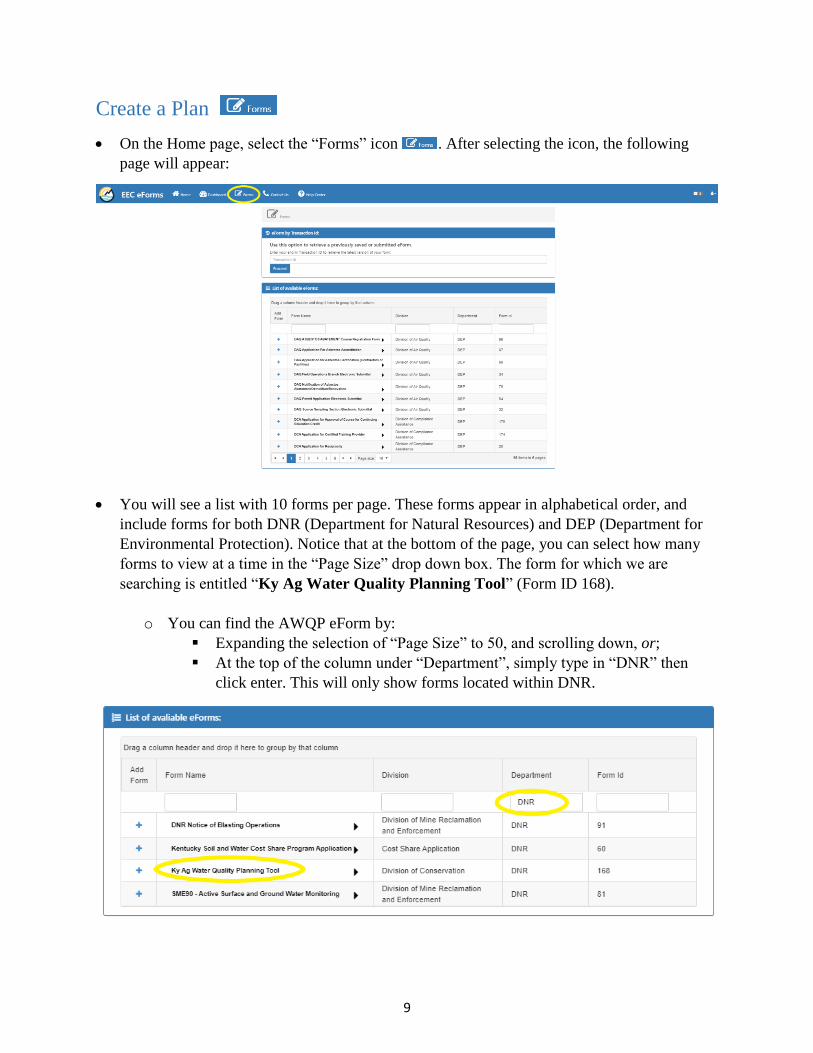
Create a Plan
On the Home page, select the “Forms” icon . After selecting the icon, the following
page will appear:
You will see a list with 10 forms per page. These forms appear in alphabetical order, and
include forms for both DNR (Department for Natural Resources) and DEP (Department for
Environmental Protection). Notice that at the bottom of the page, you can select how many
forms to view at a time in the “Page Size” drop down box. The form for which we are
searching is entitled “Ky Ag Water Quality Planning Tool” (Form ID 168).
o You can find the AWQP eForm by:
Expanding the selection of “Page Size” to 50, and scrolling down, or;
At the top of the column under “Department”, simply type in “DNR” then
click enter. This will only show forms located within DNR.

10
To start a new form from this location, you will click on the “+” symbol in front of the
name, under the column entitled “Add Form”.
This will open a new, blank form, and a six-digit ID number will be automatically assigned
to that form at this point for future tracking.
You will see the following page:

11
Upon opening this page, you will then begin to fill out the required fields.
Any field marked with an asterisk (*) is required, thus if these fields are not completed, you
will get an error message upon attempting to save/complete.
Hovering over a “?” box provides more information about that input category.
This page includes the following sections as described below:
Farm Information
o The Farm Name is a name that is user-assigned to track which farm/operation this plan
represents. This may be a nickname, a descriptive name, etc. that allows the user to easily
distinguish from other farm locations or operations.
o The Approximate Farm Acreage is how many acres are on the farm that this plan
covers. You may obtain your exact farm acreage from FSA, or a good approximation will
also suffice for this entry.
o Connection to Farm is a drop down box in which you will indicate your relationship
with the farm. Please select one of the three choices: Land Owner, Operator, or
Owner/Operator.
o Farm Number/FSA Number is the identifying farm number assigned by the Farm
Services Agency.
Farm Address
o Please enter the location information for the physical location of the farm, including all
address boxes, and the county from the drop down box (if the farm lies in more than one
county, select the largest acreage of farm). Please include contact phone number in the
space provided. Note: The following section is the farm mailing address; if these two are

12
the same, please check the box provided in the section break and the information is
automatically populated into the following section.
o Please enter a GPS coordinate for your operation. It is important to enter an accurate GPS
coordinate. If the farm is large, simply select a point somewhere near the center.
Coordinates shall be in decimal format to six digits after decimal point. Please do not
forget the “-“(negative sign) in front of the longitude value. To determine your GPS
coordinate:
Beneath the Latitude and Longitude entry boxes in this section, you will see a box
entitled “Display Map”. Click this box, and an interactive map will appear
below it. There are three functions on the map that will assist you in finding your
specific location.
1. In the upper left corner of the map, you will see two small boxes stacked
on top of one another. The top contains a plus sign “+”, and the bottom a
minus sign “-“. The + zooms closer to the location, the minus zooms out,
or away from the location.
2. In the upper right corner of the map, you will see a box that has a symbol
of layered documents. If you click in this box, it will provide different
map base imagery that may assist in finding your property. The map opens
in a layer entitled ESRI Topo. ESRI Imagery will show a satellite imagery
map in which you may zoom in and identify features such as buildings,
field borders, etc. National Geographic is an enhanced topo layer with
place and road names. USA Topo represents traditional USGS topographic
maps. Open Street Map is simply a map of only roads, cities, towns, etc.
ESRI Transportation Imagery is similar to the ESRI Topo, but with road
and place names emphasized.
3. Located under the layer box above, you will see a box with a magnifying
glass. Select this box, and you may type in a place name, street
address, etc. and the map will be zoomed directly to that location.

13
Use one or a combination of these tools to locate your property. Once you have
located your location, simply click it on the map. The latitude and longitude
coordinates will automatically appear in the corresponding boxes, and you may
now move onto the next section. If you click on a point and want to change it,
simply click on another point and the coordinates will automatically update to the
new coordinate. The following example is a location determined by zooming into
the location on the ESRI Imagery layer:
The GPS coordinates may also be determined by using an app on your cellular
device, or by using Google Maps or similar websites. If you have not used Google
Maps to retrieve a GPS coordinate: Simply zoom in to your operation as far as the
zoom function will allow. Pick a point within your property and left click. A box
will appear near the point, and it will contain the six-digit GPS decimal degree
coordinate for that point. Google Maps also allows the user to toggle between a
street map and an imagery map layer. An example is shown below:

14
Farm Mailing Address
o Please enter the mailing address of the farm, including all address boxes, and the county
from the drop down box. This mailing address may be utilized for any potential
correspondence.
Land Owner Information
o Organization Name is not a required field. If your operation is part of an incorporation,
limited liability company, etc. that name should be entered in this field. If you are a
family owned farm, this field may be left blank.
o The remaining fields document the name and address of the landowner of the property.
Land User (tenant, manager, etc.) Information
o If the landowner is the same as the land user, then the box in the section break may be
checked, and this information will be auto populated. If the land user is different, i.e. a
tenant, manager, etc., then the remaining fields should be completed with the required
information. As in the previous section, the Organization Name should only be
completed if applicable.
At this point, the first page is complete, and you may select the NEXT button to
advance the following page.
Reminder: Be sure to periodically save your document by selecting to prevent timing
out or losing information (see Saving Progress on page 21 for details). When returning to the
document after saving, you will return to the first page of the plan. The information you
previously input is still there, but you will need to navigate through tabs to return to where you
left off.

15
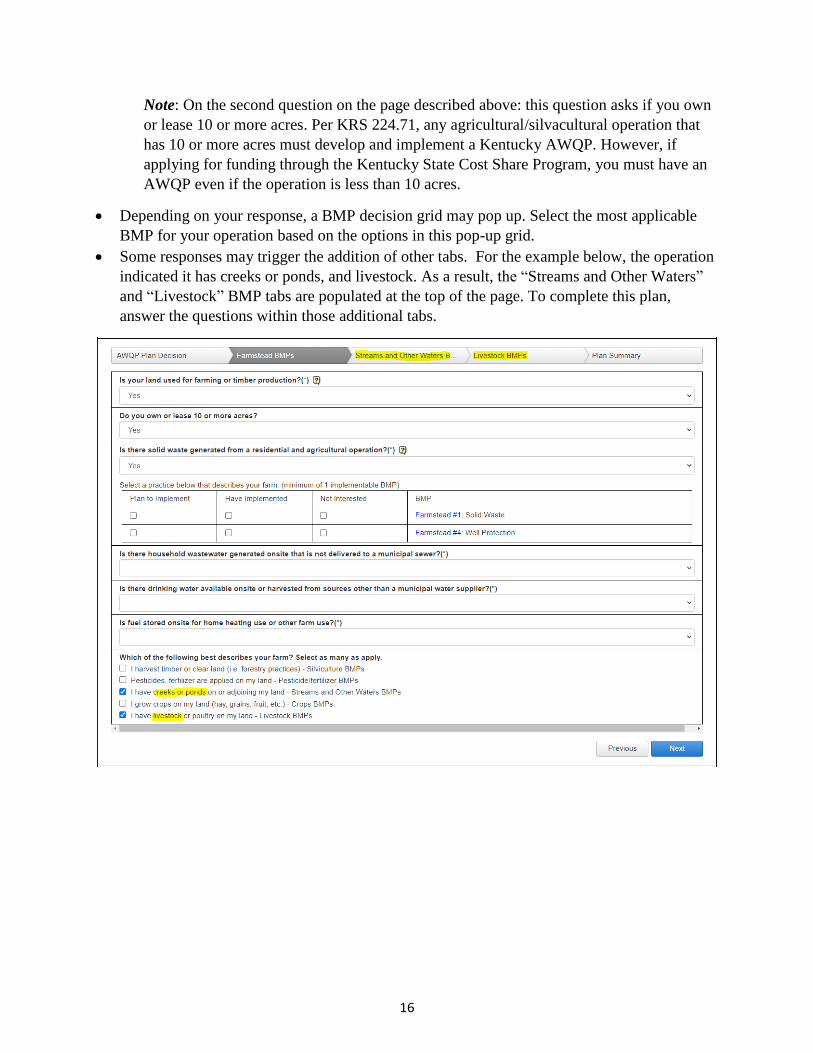
After completing the first page, click the button and you will enter the second page of
the plan. At this point, you will be asked a series of questions about your operation so that the
system may guide the user to the correct sections and Best Management Practices (BMPs).
You will notice that initially, the page is short with only one question. As you answer the
questions sequentially, more questions will populate depending on your operation type. The
tabs at the top of the section provide a visual progress tracker of your plan. In this case, the
Farmstead BMPs section is highlighted. All plans will have these three tabs at a minimum.
As you answer subsequent questions on operation type, you will see sections added to these
tabs to reflect your operation type(s). The final question on this page will prompt new
sections and questions such as Livestock BMPs, Cropland BMPs, etc.
16
Note: On the second question on the page described above: this question asks if you own
or lease 10 or more acres. Per KRS 224.71, any agricultural/silvacultural operation that
has 10 or more acres must develop and implement a Kentucky AWQP. However, if
applying for funding through the Kentucky State Cost Share Program, you must have an
AWQP even if the operation is less than 10 acres.
Depending on your response, a BMP decision grid may pop up. Select the most applicable
BMP for your operation based on the options in this pop-up grid.
Some responses may trigger the addition of other tabs. For the example below, the operation
indicated it has creeks or ponds, and livestock. As a result, the “Streams and Other Waters”
and “Livestock” BMP tabs are populated at the top of the page. To complete this plan,
answer the questions within those additional tabs.

17
From the above page, the BMP grid for the solid waste question appears after answering
“yes” to the third question. BMP options are listed in the far right column of the grid. The
blue text is a clickable link to a 1-page description of the BMP, with additional information
to help users make a decision. This information is also available on the Kentucky Division of
Conversation website at: https://eec.ky.gov/Natural-Resources/Conservation/Pages/Best-
Management-Practices.aspx
By clicking the link to the “Farmstead #1” BMP, users are provided with the following
explanation and visual depiction of that BMP based on the AWQA statewide plan:
The BMP grid gives users three options to implement that particular BMP. The choices are:
Plan to Implement, Have Implemented, or Not Interested. You MUST make a choice of one
of the three options for each BMP option within the plan:
o Plan to Implement indicates that the BMP is something that interests you or plan to
do in the future, but have not implemented;
o Have Implemented is a BMP that you have already utilized and;
o Not Interested is a BMP that may not be applicable or practical for your operation.

18
Following the example above, the next BMP tab is “Streams and Other Waters BMP”:
Notice that BMP Streams #3 is an option in both BMP grids for the first and last questions.
The user selections for each BMP carries forward from one question to the next on the same
tab. In this case, “Not Interested” is selected for the Streams #3 BMP, and this selection is
auto populated in the next question where that specific BMP appears.
Note: Simply navigating this plan and checking “Not Interested” for each and every
BMP throughout the plan does not satisfy the requirements of KRS 224.71.
Reminder: Be sure to periodically save your document by selecting to prevent timing out
or losing information (see Saving Progress on page 21 for details). When returning to the
document after saving, you will return to the first page of the plan. The information you
previously input is still there, but you will need to navigate through tabs to return to where you
left off.

19
An example of the completed Livestock BMP page is provided below exhibiting the same
rules as previous tabs:

20
After all of the BMP tabs at the top of the page are completed, you will progress to the Plan
Summary tab:
This summary tab includes a comprehensive list of all of the BMP selections made in the
plan, a list of entitlements for the plan preparer, and a signature section.
o Please enter your first name in the correct box, and your last name in the
corresponding box.
o The Signature box you will enter your full name.
o In the Signature Date box, please enter the date that the plan is completed/submitted
into the system.
The following is an example of this page:

21
Saving Progress
It is important to remember, as with any document that you may work with online, that you
should periodically save the progress that is made. It is suggested to do this at no more than
ten-minute intervals. Within this application, at the bottom of each page, you will see the
following options:
Select the first (left) option, Click to Save, to save the progress that you have made to that
point.
Select the second option, Click to Finalize, when you are ready to finalize your plan and
receive a copy for your records. If you attempt to click Finalize before all required fields are
complete, you will get an error message stating that you have not completed all necessary
fields, and those fields should have notations in red text.
When you click to save your current progress, your selections will be saved, and you will exit
the AWQP eForm. You will be directed to the “Form Details” page which appears as
follows:
This “Form Details” page summarizes the status of your current AWQP and provides a few
options to the user.
o If you are simply saving progress and would like to return to your plan, click
Continue with this eForm , and you will return to your plan in progress.
o You will also notice other information provided here. The useful entries are: eForm
Submittal ID - this identification number is the number that the system uses to
identify your unique document. If you, or your conservation district, need to retrieve
this plan from the system at a later date, this number will allow you to easily find and
open it. The Date is simply the date saved. Submitted to EEC? indicates if you have
completed and submitted to the system. In this example, since this document has
simply been saved, but not completed, it will indicate “no”. Form Info is two
identifying factors to help find this document if the submittal ID is not available. This

22
will be the farm name that you assign, and the farm number. The final option in this
section is light blue box at the bottom .
Select this option to create an entirely new form, with the same information that was
entered into the original plan; i.e. the plan will be copied into a new form with a
different ID number. Users of the AWQP Tool do not utilize the subsequent sections
on this page.
Completing a Plan
If you have completed work on your Kentucky AWQP and filled out the “Plan Summary”
tab, click the button at the bottom of the screen labeled “Click to Finalize”. The system will
now process the completed plan, and you should see the following page appear:
Notice that the top section of this page looks very similar to the page that is seen when the
document is simply “saved”, however the Submitted to EEC? question states “Yes”, and
there is no option to “continue with this plan”.
The second section (located below the first) allows the user to retrieve the plan. It may take
several minutes for the system to process the plan, but after processing, you have the ability
to download the completed plan. In the Document(s) section, you will see the first file
entitled “KyWQP_Printable.pdf”. Go to the far right column, and click the download
symbol to download a copy of the Plan Summary.

23
The final Plan Summary will appear as follows:
This document is a summary of the AWQP that you created in the online portal, and serves
as documentation of completion. On the second page, you will notice that there is a link to
the BMP descriptions so that you will not have to reenter the portal to view these documents.
Conclusion
This concludes the User Guide for the Kentucky Ag Water Quality Planning Tool. You are now
be ready to start your first plan in accordance with Kentucky Ag Water Quality Act
requirements. After you complete and submit your plan, you will receive a message to the email
address used for your account that the submittal has been made and completed. There will also
be a link back to the system where you can download your plan as outlined previously in this
document. Please keep in mind that the system will take several minutes to process the plan, so if
you do not receive the email immediately, simply check back at a later time.
If you need further assistance on using this tool, please contact your local conservation district.
For login or website technical issues, utilize the help tab found on the website in the EEC eForms
header as shown below: