eft server v6.5 installation guide
TRANSCRIPT

INSTALLATION GUIDE EFT SERVER™ V6.5

GlobalSCAPE, Inc. (GSB)
Address: 4500 Lockhill-Selma Road, Suite 150 San Antonio, TX (USA) 78249
Sales: (210) 308-8267
Sales (Toll Free): (800) 290-5054
Technical Support: (210) 366-3993
Web Support: http://www.globalscape.com/support/
© 2004-2013 GlobalSCAPE, Inc. All Rights Reserved
Last updated: February 4, 2013
ii

Table of Contents Introduction ................................................................................................................................................. 5
EFT Server Deployment Scenarios ........................................................................................................... 5
System Requirements ................................................................................................................................ 7
EFT Server Requirements ...................................................................................................................... 7
EFT Server Administration Interface Requirements ............................................................................... 7 Auditing and Reporting Module (ARM) Requirements ........................................................................... 8
AS2 Module Requirements ..................................................................................................................... 8
DMZ Gateway Requirements ................................................................................................................. 8
Secure Ad Hoc Transfer (SAT) Module .................................................................................................. 8
Web Transfer Client (WTC) Requirements ............................................................................................ 9 EFT Server Specifications .......................................................................................................................... 9
Maximum Capacity for EFT Server ...................................................................................................... 10 Configuration and Security Best Practices ............................................................................................ 11
Development Lab Environment ............................................................................................................ 11
Configuration Checklist ......................................................................................................................... 11
Security Best Practices Checklist ......................................................................................................... 13
Prescriptive Guidance for Maintenance ............................................................................................... 16 Procedure for Cold Standby Setup ....................................................................................................... 17
Installing EFT Server, Administration Interface, and Modules ............................................................. 18
Installing the Administration Interface Remotely .................................................................................. 31
Installing or Upgrading EFT Server in a Cluster .................................................................................... 40
Installing EFT Server in a Cluster Configuration .................................................................................. 40 Upgrading EFT Server in an Existing Cluster ....................................................................................... 41
Upgrading the Software ............................................................................................................................ 42
File Locations ............................................................................................................................................ 49
Activating the Software (Server and Add-On Modules) ........................................................................ 49
Activating DMZ Gateway .......................................................................................................................... 52
DMZ Gateway and EFT Server Trial and Activation Interaction .......................................................... 52 Release Notes/Version History ................................................................................................................ 52
Modifying or Repairing the Installation .................................................................................................. 53
Uninstalling the Software ......................................................................................................................... 54
Windows Account for the EFT Server Service ....................................................................................... 56
Creating a Windows User Account for EFT Server .............................................................................. 56
Set Windows NT Permissions for EFT Server ..................................................................................... 56 Assigning the Service to a Windows User Account .............................................................................. 57
iii

Registry Settings ....................................................................................................................................... 58
Running EFT Server and Microsoft IIS on the Same Computer ........................................................... 59
"Unexpected Error 0x8ffe2740 Occurred" Message When You Try to Start EFT Server .................... 59 Running a Microsoft .NET Web Application in 32-bit Mode in IIS 6.0 on a 64-bit Server .................. 60
Error in ASP.NET Registration ................................................................................................................ 60
Extending the Trial .................................................................................................................................... 61
Silent Command-Line Installation ........................................................................................................... 62
Command-Line Parameters ................................................................................................................. 64 Installation Logging .................................................................................................................................. 66
Debug Logging ..................................................................................................................................... 66 Licenses, and Copyrights ........................................................................................................................ 67
Server License Information ................................................................................................................... 67
GlobalSCAPE Copyright Information.................................................................................................... 67 EFT Server Modules .................................................................................................................................. 67
Secure Ad Hoc Transfer Module (SAT) ................................................................................................ 67 Advanced Workflow Engine (AWE) 8 ................................................................................................... 67
DMZ Gateway Module (DMZ), v3 ......................................................................................................... 67
Mail Express Module ............................................................................................................................ 67
Secure Mobile Access Module ............................................................................................................. 68
COM API Reference ............................................................................................................................. 68 Index ........................................................................................................................................................... 69
iv

Introduction This Installation Guide provides information regarding installing and activating EFT Server, and configuring EFT Server on your network. Before you run the installer, review the Deployment Scenarios, System Requirements, EFT Server Specifications, and Configuration and Best Practices.
Refer to the complete EFT Server User Guide by clicking Help after you install the application or online at any time at http://help.globalscape.com/help/eft6-5.
EFT Server Deployment Scenarios You have several options for how you configure EFT Server in your network architecture. Some common deployment scenarios are described below. If none of these scenarios exactly meets your needs, Globalscape's Professional Services team can work with you to design a custom architecture, assist with installation and initial configuration, and help you create custom scripting, Event Rules, Commands, and external user databases.
EFT Server in the Demilitarized Zone (DMZ)
In the most basic deployment scenario, both end users and business partners (clients) communicate with EFT Server as it resides in your organization's demilitarized zone (DMZ). All authentication directory service quests and data storage occur inside the DMZ.
EFT Server can be configured to forward all received data to the back-end network to mitigate the risks associated with storing it in the DMZ. This architecture, commonly known as store and forward, means that data only resides in the DMZ temporarily before it is offloaded to a back-end system for processing or storage. This store-and-forward architecture requires a hole to be punched through the firewall in west-to-east fashion, a deviation from security best practices. This architecture is the one most commonly employed by competitors to Globalscape’s server solution.
EFT Server and DMZ Gateway Deployment
The ideal security solution is to implement a two-tier architecture comprised of EFT Server deployed behind the corporate firewall and the DMZ Gateway deployed inside the demilitarized zone. This setup is known as a streaming or pass-through configuration.
5

EFT Server Installation Guide
Hybrid Configuration 1: Server-to-Server Deployment
Various hybrid approaches exist consisting of multiple servers in a variety of configurations for different business use cases. Take for example a scenario in which the majority of traffic is outbound push with occasional in-bound pull, initiated by an automated script or batch process. In this scenario, data is generated behind the corporate firewall, then forwarded from one EFT Server to another EFT Server that resides in the DMZ for client pick-up, or directly from the back-end server to a destination server residing at the partner’s location.
The business need for placing EFT Server in the DMZ often stems from the need to pre- or post-process data as it moves through the DMZ, such as performing an anti-virus scan or an encryption procedure.
Hybrid Configuration 2: Two EFT Servers and a DMZ Gateway
In this hybrid deployment scenario, a client-initiated push and/or pull transaction is brokered through DMZ Gateway, and outbound push transactions are initiated by EFT Server, either from within the corporate firewall or from a Server residing in the DMZ. In this example, the partner is equipped with a file transfer server to service outbound push operations initiated by EFT Server.
6

System Requirements
Two EFT Servers and Two DMZ Gateways in a Server Cluster
In the architecture illustrated below, 2 EFT Servers and 2 DMZ Gateway Servers in a server cluster meet business continuity requirements requiring the duplication of servers to provide a fail-over cluster.
System Requirements The Globalscape Quality Assurance (QA) team tested EFT Server and EFT Server Enterprise with a variety of operating systems, software, and hardware. It is possible for EFT Server to function with other software and hardware than those listed below, but Globalscape only offers support for EFT Server with the software/hardware listed below.
EFT Server Requirements • Operating systems: Windows Server 2003 R2, Windows Server 2008 R2 (Standard, Enterprise,
and Datacenter editions), Windows Server 2012
• 2 GB free RAM (More RAM could be required for large file transfers over the AS2 protocol. AS2 transfers can use up to 40% of the Server's RAM.)
• Microsoft .NET Framework 4.0 (all components, including AWE and AS2)
• Microsoft Windows Installer 4.5
• If accessing or monitoring Samba network shares, version 3.0.25 or later of Samba
• The EFT Server service must have full administrative rights to the folder in which you install EFT Server.
EFT Server Administration Interface Requirements The administration interface must be installed on the same computer as EFT Server, but also can be installed on other computers for remote administration. (Refer to the ARM, AWE, and AS2 requirements below if you plan to use those modules remotely.)
• Windows 7, Windows 8, Windows Server 2003 R2, Windows Server 2008 R2 (Standard, Enterprise, and Datacenter editions), and Windows 2012
• 1 GB of free RAM
• 1024x768 resolution or higher display
• Microsoft Windows Installer 4.5
• Microsoft .NET Framework 4.0
7

EFT Server Installation Guide
Auditing and Reporting Module (ARM) Requirements • Microsoft® ActiveX Data Objects (ADO)
• Microsoft SQL Server 2008 R2 Native Client is installed automatically, regardless of whether SQL Server will be used (so that ADO will work with IPv6).
• 3GB minimum hard drive space for the initial database size. Space requirements for transactions depend on estimated EFT Server Event Rule activity, number of connections, and types of transactions. A general estimate is 3MB to 5 MB per 1000 files uploaded.
• PDF-viewing software (such as Adobe Reader) to view PDF reports.
• Access to a SQL Server or an Oracle database.
• The installer includes SQL Server 2008 R2 Express for both 32- and 64-bit operating systems (intended for evaluation purposes only). For SQL Server system requirements, refer to http://www.microsoft.com/sqlserver/en/us/learning-center/resources.aspx. EFT Server is supported with the following SQL Server versions:
• SQL Server 2008 R2 Express
• SQL Server 2008 R2
• SQL Server 2012
• Oracle requires EFT Server Enterprise; refer to Oracle's documentation regarding Oracle system requirements. Be sure to reboot after you install the Oracle Data Access Components (ODAC). You need to use the 32-bit ODAC, even if EFT Server Enterprise is installed on a 64-bit operating system. EFT Server Enterprise is supported with the following Oracle versions:
• Oracle Database 11g Release 1: 11.1.0.6–11.1.0.7 (patchset as of September 2008)
• Oracle Database 11g Release 2: 11.2.0.1–11.2.0.3 (patchset as of September 2011)
• A good database maintenance plan is important to keeping space requirements to a minimum (aging/archiving/warehousing/truncating old data).
• For better database performance, follow the standard SQL/Oracle tuning guidelines in their user documentation.
• If you are using SQL Server 2008 Developer and Enterprise editions for your EFT Server database, refer to the MSDN article Creating Compressed Tables and Indexes.
• For ARM upgrades, Microsoft .NET Framework 4.0
AS2 Module Requirements • More RAM could be required for large, non-EDI file transfers. AS2 transfers can use up to 40% of
the Server's RAM for file transfers.
DMZ Gateway Requirements Refer to the System Requirements in the DMZ Gateway documentation.
Secure Ad Hoc Transfer (SAT) Module Refer to the System Requirements in the Secure Ad Hoc Transfer module documentation.
8

EFT Server Specifications
Web Transfer Client (WTC) Requirements For information regarding system requirements for the Web Transfer Client, refer to System Requirements for Web Transfer Client.
EFT Server Specifications This topic is intended as a quick reference of EFT Server specifications. The information is provided in detail in the applicable procedures.
Item Description Server's Windows user account
To run EFT Server as a service with permissions to the network and mapped drives, you must create an NT account for EFT Server, assign the Globalscape EFT Server service to the account, and log EFT Server on as a service.
Protocols allowed FTP/S (SSL/TLS), SFTP (SSH2), HTTP/S, and AS2 (Certain protocols require optional modules and/or EFT Server Enterprise.)
Authentication types Globalscape, AD/NTLM, LDAP, ODBC
Log formats W3C, Microsoft IIS, and NCSA
SSL Certificate Key lengths supported
Key lengths supported: 1024, 2048, 3072, and 4096 bits
Server-created SSL certificates
x.509 base-64 standard DER encoded
Allowed OpenSSL ciphers for inbound transfers (HTTPS and FTPS)
Refer to Using Ciphers for Inbound SSL Connections for details.
Allowed SSL versions TLS 1.0, SSL 2.0, or SSL 3.0 • EFT Server version 6.5 uses OpenSSL 0.9.8t; FIPS SSL is based on
OpenSSL 0.9.8m
SFTP hashing algorithms supported
MD2, MD4, MD5, Haval, RIPE-MD, SHA-1, SHA-Double, Tiger
OpenPGP version OpenPGP is a standard and has no version. EFT Server adheres to the OpenPGP standard and is RFC 2440 compliant.
FIPS EFT Server supports public key lengths for RSA in FIPS SSL from 1024 to 4096 bits. The FIPS library used by EFT Server is certified with DSA (1024 bits only) or RSA (1024, 2048, and 4096) keys.
PCI DSS EFT Server facilitates compliance with PCI DSS 2.0.
SFTP EFT Server supports SFTP versions 2, 3, 4, and 6. The outbound client defaults to version 4, and it is not configurable through the GUI, but can be configured in the registry. The EFT Server outbound client negotiates the SFTP version with the receiving server during session establishment. That is, if the receiving server only supports version 2, EFT Server will negotiate down and operate at version 2.
AS2 module EFT Server uses /n software's IP*Works EDI Engine, in compliance with RFC4130
9

EFT Server Installation Guide
Maximum Capacity for EFT Server Listed below are several EFT Server object types and the maximum number of each type (both theoretical maximum and tested maximum) that can be defined in EFT Server. Keep in mind that an excessive number of total objects displayed in the administration interface can affect the responsiveness of the interface.
EFT Server Object Theoretical Maximum Tested Maximum Maximum number of Server Groups 32768 maximum not tested
Maximum number of Servers 32768 10
Maximum number of Sites 2147483647 40
Maximum number of Settings Templates
2147483647 maximum not tested
Maximum number of users per Server 2147483647 maximum is set per Site
Maximum number of users per Site 2147483647 150,000
Maximum number of users per Settings Template
2147483647 maximum is set per Site
Maximum number of users per Group 2147483647 maximum is set per Site
Maximum number of administration accounts
2147483647 1,000
Maximum number of Permissions (on VFS tab)
2147483647 maximum not tested
Maximum number of VFS entries 2147483647 150,000
Maximum number of Groups 2147483647 maximum not tested
Maximum number of Folders 2147483647 See VFS entries maximum
Maximum number of Event Rules 65536 4,000 Folder Monitor Event Rules
Maximum number of Commands 65536 maximum not tested
Maximum number of AWE tasks 65536 maximum not tested
Maximum number of Custom Reports 65536 maximum not tested
Maximum number of pages in a report 2500 2000
Maximum number of simultaneous connections
65536 1,000
Note: Object type distribution for baseline and testing purposes was roughly 80% users, 10% Folder Monitor Event Rules, 5% other Event Rules, 2.5% AWE tasks, 2.5% other.
10

Configuration and Security Best Practices Below is a collection of suggestions and guidelines for installing, configuring, and deploying EFT Server in a production environment, including best practices for security.
Development Lab Environment As with any mission-critical software or hardware, it is recommended that a testing, validation, development, or usability lab be established to provide a "sandbox" into which EFT Server and DMZ Gateway Server software can be deployed. This initial deployment allows for validation of the interoperability with other dependent components as well the validation of expected usage scenarios.
The lab environment should emulate (if not duplicate) the production environment at a network topography and application level. To do this, a clear vision of the production network and the proposed deployment of EFT Server and DMZ Gateway must exist. Typical deployments of EFT Server and DMZ Gateway consist of many other components from the enterprise, including Active Directory Server, SQL Server, SMTP Server, and a storage system such as a SAN. For DMZ Gateway, a firewall such as Microsoft ISA might be applicable. Finally, some deployments also include Clustering, in which case various components are replicated to provide clustered resources.
For increased business continuity and risk mitigation, you should use the development lab environment as the starting point for any configuration changes in the system. That is, make the change in development and validate it prior to making the change in production.
A good testing tool is CuteFTP.
Configuration Checklist The installation and configuration of EFT Server in either a lab or a production environment should be validated by EFT Server administrators/operators to ensure that the functions are working as expected. Use the checklist below to validate key items for a Server and DMZ Gateway deployment. Also refer to the section below this table for Security Best Practices.
Configuration Checklist Service
Make sure that the Globalscape Server service is started on the computer.
Make sure that the service is listening on the expected IP:PORT socket addresses on EFT Server. (To view the listening sockets, use "netstat -ona" from a command line or an application such as PrcView or TcpView.)
Check the Event Viewer log to ensure that there are no errors in the Application log related to EFT Server or DMZ Gateway Server.
Confirm that the administration interface shows the status of the system when it is launched and connected to EFT Server.
Server User Management
For each Site on EFT Server, ensure that the expected user accounts exist.
To ensure that authentication is working as expected, attempt to log in to EFT Server as a user account on the system (using any protocol).
To confirm that permissions for the user account are working as expected, attempt a file transfer.
11

EFT Server Installation Guide
Configuration Checklist Protocol/Network
For each protocol enabled on EFT Server, attempt a connection directly to EFT Server using a client that supports that protocol.
For each protocol enabled through DMZ Gateway, attempt a connection to the appropriate DMZ Gateway IP:PORT and confirm that this route works as expected.
Auditing/Logging
View the audit traces generated by the validation steps above.
Confirm that the Auditing and Reporting module database has been populated with appropriate data (using either EFT Server Reporting interface or direct access to the SQL Server being used).
Confirm that the text log files generated by EFT Server have been populated with the appropriate data.
Event Rules/Workflow Each customer has a unique set of Event Rule/workflow requirements, but these are the general validation steps. Confirm the following are working as expected:
E-mail notifications. Test e-mail notifications by triggering an Event Rule that has an e-mail notification Action to confirm that Event Rules fire and that the SMTP configuration is correct.
PGP operations. Confirm that OpenPGP keys are configured properly.
Move/Copy/Download actions. Initiate Event Rules that perform remote file uploads/copies/download so that connectivity originating from EFT Server to a remote system is properly configured. In this step, also confirm that a log file is generated that audits outbound connection information (a "cl*.log" file in the designated Server Log File location).
Custom Commands. EFT Server is responsible for triggering those external commands, so that is what should be validated with respect to EFT Server. Any actions carried out by those external tools should be validated independently. Confirm that a "CMDOUT.LOG" file is generated as the result of an invoked Custom Command.
Folder Monitor Rules. Ensure that the Event Rules are properly enabled and responsive to files added to the folder being monitored. Cluster/Failover Testing
For cluster deployments, the failover and failback operations of the cluster should be confirmed. After a failover/failback, confirm that the newly active server behaves properly; that is, the failover is transparent and the configuration/operation is as expected. This can be summarized by the prior set of tests operating against the newly active node in the cluster.
Load Testing
If you expect high volumes of traffic or back-end processing within EFT Server, you should verify that the resource utilization levels on the Server are within acceptable tolerances. There are numerous load-testing tools available, ranging from simple batch files running command-line FTP to highly complex synthetic transaction generators. Globalscape's Quality Assurance team performs load testing of our servers as part of our standard validation process for releasing software.
12

Configuration and Security Best Practices
Security Best Practices Checklist The following settings are recommended for increased security.
Security Best Practices Checklist
Administration Security
Create a specific AD account on which EFT Server’s service is to run with the minimum necessary permissions.
Create an Event Rule to back up the entire Server configuration to a separate drive at least daily.
Do not use any default administrator names (e.g., "admin").
Do not use the default administration port (1100).
Only turn on remote administration if necessary. If remote administration is needed, then ban all IPs except those trusted IPs necessary to access the server for administration.
Turn on SSL if using remote administration.
Create sub-administrator accounts with the least amount of privileges necessary for help desk or operational administrators.
Do not give sub-administrators access to COM or the ARM (report) module unless absolutely necessary
If giving ARM (report) access to a sub-administrator, use the ReportsConnectionString registry override to define an alternate (least privileged) database connection string for database queries.
Set administrator passwords to expire every 90 days (or according to internal best practices/policies).
Set a complex security scheme for administrator passwords.
Lockout administrators for an extended period after multiple failed login attempts.
Run a PCI DSS report to detect any lax security configuration settings (either manually or on a schedule with an Event Rule).
Periodically check the Globalscape support site for the latest version and upgrade accordingly. One more high priority bug fixes or fixes for security vulnerabilities are often included.
User/Password Security
Expire accounts that are non-active for a specified period.
Set user passwords to expire every 60 or 90 days.
Define complex password security scheme for users.
Prohibit password reuse/history.
13

EFT Server Installation Guide
Security Best Practices Checklist
When using HTTP/S and/or SFTP protocols, require that the user reset their password upon initial use (requires KIA support by the SFTP client. FTP/S protocol does not support password reset upon initial login).
Briefly lockout users after repeated failed logins.
Automatically ban IP addresses with repeated failed username attempts.
E-mail user login credentials separately or only send username and communicate password via phone or other means (i.e., out-of-band delivery).
File System Security
Segregate user’s folders. (Do not share folders/resources across users when possible.)
Restrict users to their home folders and set the home folder as ROOT for that user.
Use Settings Templates to inherit user permissions rather than modifying them for each user.
Use Groups to simplify control over user access to resources.
Limit resource permissions to the minimum necessary.
Specify a maximum disk space (quota) for each user (or Settings Template).
Auditing Security
Enable verbose logging (Log Type).
Rotate logs daily and encrypt+sign using an Event Rule.
Always use extended auditing (ARM).
Examine audit logs at least weekly for anomalous behavior
Data Security
Encrypt data at rest using EFS encryption, PGP, or 3rd-party encryption.
Keep data separate (DAS/SAN/NAS).
Define data recovery procedures in case of data corruption/loss/theft.
Scan uploaded files for viruses (3rd-party tool required).
14

Configuration and Security Best Practices
Security Best Practices Checklist
Never store data in the DMZ, even temporarily. (Use DMZ Gateway instead.)
Create a legacy data clean-up rule according to your company policy.
Enable data wiping for sanitizing deleted data.
Add a banned file type rule and disallow all extensions except those required by the business.
Protocols Security
Be extremely selective when choosing which IPv4 or IPv6 addresses to bind to for a specific Site (listener). Only bind to IPv6 addresses if your organization is aware of and mitigating against IPv6-specific attacks at the edge of your network.
If possible, allow only secure protocols (SSL, SSH, HTTPS, AS2).
Disable all unused services or features that may adversely affect security, including Web Services, any unused protocol listeners, and using username and password credentials for use in Event Rule context variables, if not needed by any Event Rule.
Always choose the strongest ciphers, hashes, and key lengths; however to mitigate the BEAST exploit, move RC4 (a lesser strength but non-CBC cipher) to the top of the SSL cipher priority list, followed by AES 256, then AES128, etc.
Allow only TLS 1.0 if possible, SSL 3 only if necessary, for Server-wide SSL Security settings. Do not enable Clear Command Channel (CCC) nor unprotected data channel (PROT C).
Disallow site-to-site (FXP) support for FTP/S protocol listeners, and block client anti-timeout attempts.
Have your server’s SSL certificate signed by Certificate Authority (CA).
If possible, require that the connecting clients provide a certificate proving their identify in addition to their authentication credentials.
Mask the server's identity by using generic banner messages.
Specify a maximum limit for connections and transfers for each user/template.
Enable EFT Server’s Denial of service settings, disconnecting and banning users that issue an excessive numbers of invalid commands (weighted over a given period) and permanently banning IP addresses that exceed the server's Flood/hammer value. Non HTTP/S setups should set the Flood/hammer slider to Very High, vs. the default Medium setting.
Specify allowed IP address ranges for user/partner connections when possible, denying connections from all other IP addresses.
15

Prescriptive Guidance for Maintenance The following are guidelines for maintaining the good health of a Server and DMZ Gateway deployment, and reducing long-term costs of maintenance and operation.
• Configuration Backup - For disaster recovery and business continuity, it is important to keep backups of the Server and DMZ Gateway configuration. Backing up the configuration can be accomplished with a variety of tools such as Symantec Backup Exec, Ghost / VMWare to make images of the system, Globalscape Continuous Data Protection (CDP), or even a simple script file.
• Database Backup and Truncation - If you are using the Auditing and Reporting module (ARM), the database to which the audit records are stored should include EFT Server ARM tables as part of the typical database maintenance plan. This includes proper monitoring of the tables and transaction logs, backing up the data and having a retention policy to archive (or purge) old data.
• Data Archival and Retention - You should put into place and enforce a policy by which old data is periodically archived and/or purged, because no disk is limitless and performance can degenerate as more files are added to EFT Server. Therefore, a storage management policy should include regular inspection of available hard disk space and health (error count, fragmentation, etc.) as well as archiving and/or purging user data and Server Log Files (CMDOUT.log found in the application folder, and all other logs found in the Log folder specified on the Server).
• Restarting Services - Given the facility of the Microsoft Cluster in failing over and failing back while providing high resource availability, it is recommended that you design a maintenance schedule in which the EFT Server service is cycled at least once per quarter to once per month. Failing over to the backup node, restarting the service, then failing back and restarting the other node would suffice in re-establishing a baseline state of the EFT Server service to ensure optimal health.
• Event Log Alerting - EFT Server will log error conditions to the standard Windows Event Viewer. It is recommended that the operations team for an enterprise include EFT Server error checks in their monitoring techniques, looking for an ERROR event generated with a source of "EFT Server" or "Globalscape Gateway" service.
16

Configuration and Security Best Practices
Procedure for Cold Standby Setup Below are few recommendations for achieving a backup server image that is ready to be turned on quickly and accept "real" traffic.
In all situations, if you are copying a configuration file from one system to another, care must be taken with hardware-specific resources, such as IP addresses, physical paths/partitions, and so on. If possible, it is recommended that the EFT Server configuration use the generic "All Incoming" IP Address for incoming socket connections so that differences in computer IP addresses do not prevent proper operation of the system if the Cold Standby comes online. Furthermore, you must take care with the connections and IP-access restriction lists between EFT Server and DMZ Gateway. If DMZ Gateway is configured to allow only one EFT Server IP address to connect to it, then the Cold Standby server must have the same IP address to connect; alternately, the DMZ Gateway IP access list must include all possible IP addresses (possibly a Class C subnet) so that multiple servers from the approved network segment may connect.
• Virtualization Software - A great solution from a cost- and resource-saving standpoint, virtualization software is also quite easy to manage due to the "software" nature of the solution. The approach would be to create an image within a virtual system (using a tool such as VMWare or Microsoft Virtual PC) by installing and activating the EFT Server or DMZ Gateway software. Once this is done, the steps required to bring the system online include first copying the configuration files (which were backed up using a process described above), then bringing the virtual image online and starting the service.
• System Backup Software - Another quick and easy option is to create a disk or system image of a configured EFT Server or DMZ Gateway (using a product such as Norton Ghost); when a Cold standby needs to be "stood up" and made hot, the image can be installed on a computer, backup configuration copied, and the service started.
• Periodic Backup to Cold Standby Machine - If resources permit, the quickest way to get a "Cold" computer to become "Hot" is to have a computer dedicated to this function. It should have EFT Server and/or DMZ Gateway installed and activated, but the service should be stopped. A process to copy the configuration periodically from the "Hot" server to the "Cold" server would keep the two in synch, and if the "Hot" system goes down, the "Cold" system can simply start the service.
17

Installing EFT Server, Administration Interface, and Modules The EFT Server installer is used to install EFT Server and its modules: Auditing and Reporting Module (ARM), Advanced Workflow Engine, AS2 module, High Security module, OpenPGP module, Secure Mobile Access Module module, and the Web Transfer Client, and each is available during the 30-day trial.
Important Pre-Installation Information: • Before installing the software, refer to System Requirements, and read the entire
installation procedure below.
• If you are upgrading from a previous version of EFT Server, refer to Upgrading the Software.
• Install EFT Server before installing the Secure Ad Hoc Transfer (SAT) module. The SAT module setup references the EFT Server name/IP address, port, and username/password. EFT Server must have remote administration enabled if the SAT module is installed on a separate computer.
• After you have installed the system on a test computer and are now ready to move it to a production environment, refer to Backing Up or Restoring Server Configuration (Enterprise) or Copying Server Configuration to Several Computers if you want to keep the test environment's Server, Site, and user configuration settings. Otherwise, install as usual on the production system.
• If you are installing in a cluster configuration, refer to Installing or Upgrading the Server in a Cluster.
• If you are connecting to an existing database, ensure the database is installed and configured before starting the EFT Server installer. The installer will attempt to connect to the database. Or you can skip ARM installation and rerun the installer later in Modify mode. If you are using an Oracle database, ensure the ODAC client suitable for your database version is installed. For details of installing SQL Server 2008 R2, refer to the SQL Server Install pages on technet.microsoft.com.
• The installer does not support Unicode characters. Refer to "Unicode Exceptions" in the EFT Server User Guide for details.
• The EFT Server installer includes the ARM database installation/upgrade. If you want to install/upgrade the database later, refer to "Installing and Configuring the Auditing and Reporting Module," "Upgrading the EFT Server Database," "Upgrading Large Databases," and "EFT Server Database Utility" in the ARM section of the EFT Server User Guide.
The EFT Server has four different installers; each of them installs as a 32-bit application, even on a 64-bit OS. Silent installation is also available.
• eftserver.exe—EFT Server SMB with a SQL Express installer bundled
• eftserver-nodb.exe—EFT Server SMB without bundled database installer
• eftserver-ent.exe—EFT Server Enterprise with a SQL Express installer bundled
• eftserver-ent-nodb.exe—EFT Server Enterprise without bundled database installer
The installer verifies that the following items before continuing:
• OS compatibility
• Is the user an admin?
• DMZ Gateway is not installed?
• .NET 4.0 Full installed?
• MSI 4.5 installed
18

To install EFT Server, administration interface, and all modules except Mail Express, DMZ Gateway and Secure Ad Hoc Transfer
1. Close all unnecessary applications so that the installer can update system files without rebooting the computer.
2. Start the installer, and then click Next. The Choose an installer page appears. (Illustrations below show EFT Server Enterprise installation; the procedure is the same for EFT Server (SMB) edition.)
3. Click the list and then, depending on which edition of EFT Server you downloaded, click
Globalscape EFT Server or Globalscape EFT Server Enterprise.
4. Click Next. The installer will verify the prerequisites.
• If the prerequisites are not installed, you are asked to cancel so that you can install the prerequisites. For example, if you are missing the correct version of .NET Framework and have Internet access, you are redirected to the .NET download page after you click Cancel.
5. Click Next. After installation components are loaded, the Welcome page appears.
19

EFT Server Installation Guide
6. Read the Welcome page, and then click Next. The License Agreement page appears.
7. Read the license agreement, and then click I agree to accept it. The license agreement is also
saved in the EFT Server installation folder as "license.txt" if you want to read or print it later. Clicking Cancel aborts the installation.
o If you are upgrading or reinstalling, the version detected page appears. Refer to Upgrading the Software for the procedure.
The Choose Components page appears.
20

COM API Reference
When you install EFT Server, the EFT Admin Interface check box must also be selected. After you have installed EFT Server and the administration interface on one computer, you can install the administration interface on other computers for remote administration. (To install the administration interface on a remote computer, refer to Installing the Administration Interface Remotely.)
8. Click Next. The Installation type page appears.
9. Specify the installation type, and then click Next.
• Single server is the default installation type.
• To install EFT Server as part of a cluster, review the cluster documentation, and then click Part of a cluster. A message appears cautioning that it is important to read and understand the cluster documentation if you are installing EFT Server in a cluster. Refer to Installing or Upgrading the Server in a Cluster for the procedure for installing EFT Server in a cluster setup.
The Choose Install Location page appears.
21

EFT Server Installation Guide
10. The default installation location appears in the Destination Folder box. Leave the default or click
Browse to specify a different folder, and then click Next. The Configuration File Location page appears. (The installer does not support Unicode characters in the path.)
11. Specify where you want to save EFT Server's configuration settings. For example, if you are
installing in a cluster, you should specify a shared resource drive to synchronize settings across nodes. The EFT Server service must have permission to access the specified path. The default location is %systemroot%\ProgramData. (The installer does not support Unicode characters in the path.)
12. Click Next. The Choose Start Menu Folder page appears.
22

COM API Reference
13. Keep the default shortcuts, specify an existing folder, or type a name for a new folder.
14. Click Next. The Administrator Account Configuration page appears.
15. Create a user name and password for the administrator account for connecting to EFT Server
from the administration interface. Both the username and password are case sensitive. The installer does not support Unicode characters in the username or password.
The administrator account password cannot be blank, can be up to 99 characters, and cannot be any of the following keywords: password, admin, administrator, sa, or sysadmin. The administrator account password must also comply with the computer's Windows account password policy (local or domain policy) "Minimum password length" and "Password must meet complexity" items. To view the policy, click Start > Run, then type secpol.msc. The Local Security Policy snap in appears. Under Security Settings, expand Account Policies, and then click Password Policy. Right click the policy, and then click Properties to view the details and to enable, edit, or disable the policy.
23

EFT Server Installation Guide
16. Click Next. The ARM selection page appears.
• If you want to configure auditing and reporting, click Next.
• If you do not want to configure auditing and reporting, click Skip auditing and reporting configuration, and then click Next to skip the database configuration pages. You can still configure the database later, if you want. (Skip to step 18.)
• If you want to manually create the database later, click Skip auditing and reporting configuration, and then refer to the Auditing and Reporting Module instructions when you're ready to create the database. (Skip to step 18.)
17. Specify the type of database to which EFT Server is to connect.
• If you click Use existing SQL Server, the upgrade or create new page appears.
24

COM API Reference
a. Click Create a new EFT Server ARM database. The configuration page
appears.
b. Specify Windows or SQL Authentication. (Windows mode allows you to connect through a Microsoft Windows NT or Windows 2000 user account. SQL allows you to connect using either Windows Authentication or SQL Server Authentication.)
c. Specify the host address or instance name.
d. Specify the database server SA or privileged user account name.
e. Specify the database server SA or privileged user account password
f. (Optional) Click Next or Test to test the connection to the database. If the test fails, click Yes to verify database connection details or No to continue without configuring the database.
25

EFT Server Installation Guide
• If you click Use existing Oracle database (available in EFT Server Enterprise), the upgrade or create new page appears.
a. Click Create a new schema. The configuration page appears.
b. Specify the database host address and the EFT Server-specific schema name
and database administrator credentials, and then click Test or Next to test the connection to the database. (If you have installed Oracle Database Express Edition (XE) for testing/demo purposes, the instance name is XE and the User Name is SYSTEM.)
• If the test fails, click Back to verify the configuration or click Next and then Next again to open the Oracle Technology Network download page and download "Oracle Data Access Components for Windows" driver, if necessary.
c. After the test is successful, click Next. The ARM schema owner credentials page appears.
26

COM API Reference
d. Specify/create the ARM schema owner credentials, then click Next.
• Click Install SQL Server 2008 R2 Express if you are installing on a test/demo system. When you click Next, a message appears explaining that the EFT Server administrator account will be used as the SQL Server "sa" account. You will use these credentials for database diagnostics and maintenance. These credentials are required if you use the trial database with the Mail Express module. After you click OK, the database is installed.
18. After you've defined the database, the installer installs the options that you've selected, then the Installation Complete page appears.
19. Click Next. A page appears allowing you to start EFT Server, create a shortcut to the
administration interface on the desktop, open the administration interface, and/or view the EFT Server version history.
27

EFT Server Installation Guide
• Start the administration interface - If you do not want to open the interface, clear the
check box. You can also open the interface from the Start menu.
• Create a desktop shortcut - An administration interface shortcut is created on the desktop by default. If you do not want to create a shortcut, clear the check box.
• Show version history - If you want to read the release notes, select the Show Version History check box. If you want to read it later, the file, notes.txt, is stored in the EFT Server installation directory.
• Show installation log - If you want to review the installation log now, select the check box. If you want to review it later, it is stored in a temporary folder, C:\Program Files\GlobalSCAPE\EFT Server Enterprise (or EFT Server)\Installer.log.
• Start the EFT Server Enterprise Service - Clear the check box if you do not want to start the Service yet. Select the check box if you want to start the service when you click Finish. The service is configured to start automatically when the computer starts. If you do not want the service to start automatically, you will have to configure it in Windows to start manually. The EFT Server service Log On Account is set to "Local System account."
20. Click Finish. If the administration interface check box was selected and the EFT Server service was started, the Login Wizard appears.
28

COM API Reference
21. With This computer selected, click Next. (You must create a local connection first. Then later
you can create remote connections, if you want.) The EFT Server Administrator Login page appears.
29

EFT Server Installation Guide
22. Click in the Authentication box and specify the type of authentication to use for this login. Future
connections will default to the authentication type that you specify during this initial login, but you can choose a different type. Authentication types include:
• EFT Server Authentication - Choose this option to log in with an EFT Server-specified administrator account, such as the one you created during installation.
• Integrated Windows Authentication - Choose this option to log in with an Active Directory or local Windows account.
• Windows NET logon - Choose this option to log in with a local Windows account.
23. In the Username and Password boxes, provide the login credentials that you created during installation, and then click Connect. The Welcome page appears. Since you have not yet activated the software, the "Free Trial" reminders appear. After you activate, you will not see the reminder prompt.
Next Steps:
• If you are evaluating the software or just do not want to activate yet, click Start Trial, then follow the prompts to configure EFT Server. (Refer to the EFT Server User Guide for instructions.)
• If you want to restore EFT Server configuration from a backup, refer to "Backing Up or Restoring Server Configuration" in the EFT Server User Guide.
• If you want to install the Secure Ad Hoc Transfer (SAT) module, in the EFT Server administration interface, you should configure the Server, define at least one Site, and enable remote administration before installing the SAT module.
• If you have purchased a license, click Activate Now, then follow the procedures for activating the software.
30

COM API Reference
DMZ Gateway, Mail Express, and the Secure Ad Hoc Transfer module are installed separately and also have a 30-day trial period. Refer to their documentation for details.
• Set Windows System Services (You do not have to activate the software before you do this. All features and modules are available during the 30-day trial.)
The EFT Server service runs under a user account, which must have full administrative rights to the folder in which you install EFT Server. With administrative rights, the EFT Server service can save all of your settings. If the service does not have administrative rights, you will lose settings and user accounts whenever you restart the EFT Server service and you will need to reset permissions on the computer on which the EFT Server service is running.
If you are using Microsoft IIS on the same computer as EFT Server, refer to Running EFT Server and Microsoft IIS on the Same Computer.
Installing the Administration Interface Remotely When you install EFT Server, you also install the administration interface. After you have installed EFT Server and the administration interface on one computer, you can also install the administration interface on remote desktops. You do not need a separate license for each installation of the administration interface.
• The necessary DLL files are also installed and registered when you install the interface remotely, in case you plan to use the COM API remotely. Refer to Can you remotely administer EFT Server without the administration interface? for details.
• If you do NOT want to install the administration interface, but want to use the COM API remotely, refer to Can you remotely administer EFT Server without the administration interface? for details.
This procedure is for installing only the administration interface on a computer that is remote from EFT Server. To install EFT Server and the administration interface on the same computer, refer to Installing the Server, Interface, and Modules. To install the administration interface remotely
1. Close all unnecessary applications so that the installer can update system files without rebooting the computer.
2. Start the installer, and then click Next. If this is a fresh installation, the Choose an installer page appears. (Illustrations below show EFT Server Enterprise installation; the procedure is the same for EFT Server SMB.)
31

EFT Server Installation Guide
3. Click the list and then click EFT Server or EFT Server Enterprise.
4. Click Next. After installation components are loaded, the Welcome page appears.
5. Read the Welcome page, and then click Next. The License Agreement page appears.
32
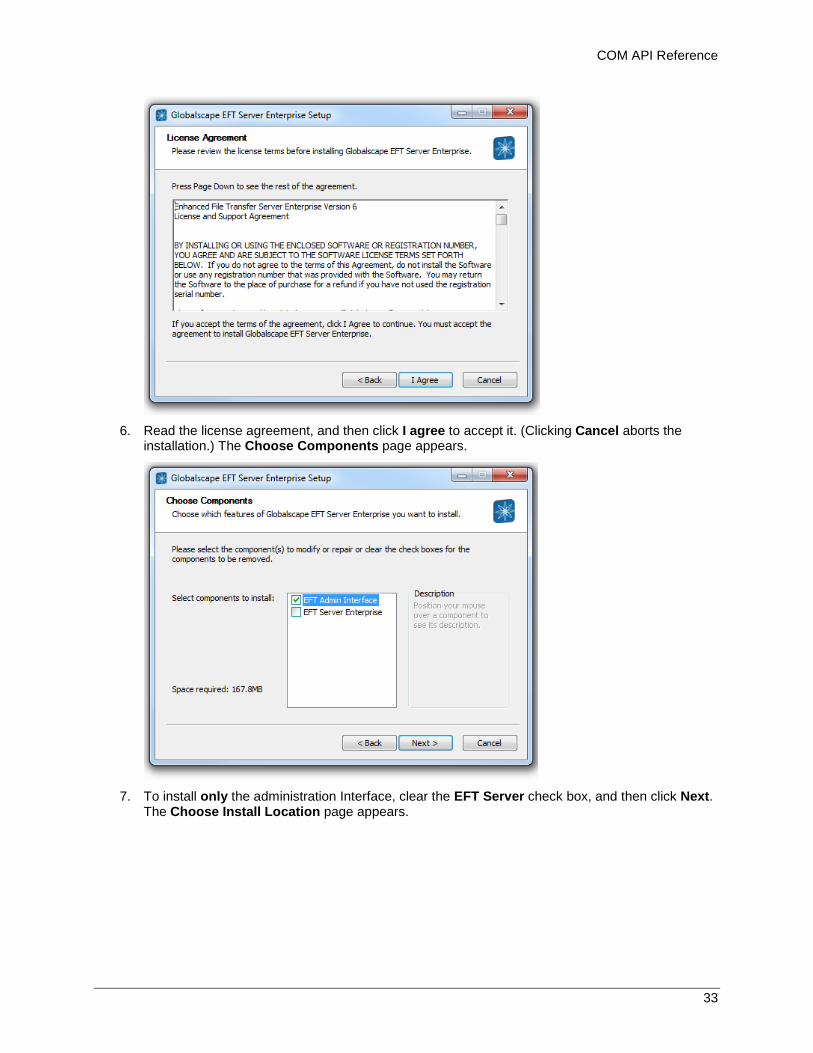
COM API Reference
6. Read the license agreement, and then click I agree to accept it. (Clicking Cancel aborts the
installation.) The Choose Components page appears.
7. To install only the administration Interface, clear the EFT Server check box, and then click Next.
The Choose Install Location page appears.
33

EFT Server Installation Guide
8. The default installation location appears in the Destination Folder box. Leave the default or click
Browse to specify a different folder, and then click Next. The Configuration data path page appears.
9. Leave the default or click Browse to specify a different folder, and then click Next. The Choose
Start Menu Folder page appears.
34

COM API Reference
10. Keep the default shortcuts, specify an existing folder, or type a name for a new folder, and then
click Next. The administration interface installs.
11. When installation is complete, click Next.
35

EFT Server Installation Guide
• Leave the Start the administration interface check box selected so that you can
configure a connection to the remote EFT Server next.
• If you want to create a desktop shortcut for the administration interface leave the Create a desktop shortcut check box selected.
• If you want to review the version history in your default text editor, select the Show version history check box.
• If you want to display the installation log, select the Show installation log check box.
12. Click Finish. The administration interface appears and the EFT Server Administrator Login wizard appears.
36

COM API Reference
13. Click A remote computer, then ensure the remote EFT Server's IP address appears in the drop-
down list. If the remote EFT Server's IP address does not appear in the list, ensure you can connect to it from this computer and that remote administration is allowed on EFT Server. Otherwise, click New and configure the remote connection.
37

EFT Server Installation Guide
• In the Label box, provide a name for the EFT Server to which you want to connect. You
can call it anything you want; it has nothing to do with EFT Server's computer name. This name will appear in logs and reports.
• In the Host address box, type the IP address of EFT Server computer.
• In the Port box, type the port number used by EFT Server for remote connections.
14. Click Next. The EFT Server Administrator Login page appears.
38

COM API Reference
15. Click the Authentication box and specify the type of authentication to use for this login. Future
connections will default to the authentication type that you specify during this initial login, but you can choose a different type. Authentication types include:
• EFT Server Authentication - Choose this option to log in with an EFT Server-specified administrator account.
• Integrated Windows Authentication - Choose this option to log in with an Active Directory or local Windows account.
• Windows NET logon - Choose this option to log in with a local Windows account.
16. In the Username and Password boxes, provide the login credentials that you created during installation, and then click Connect. The Welcome page appears.
• If connection was not successful, verify the IP address and port on which EFT Server listens for connections, that remote administration is enabled on the server, and that SSL is properly configured, if used, on EFT Server.
• If connection was successful, the remote Server appears in the tree.
39

EFT Server Installation Guide
Installing or Upgrading EFT Server in a Cluster EFT Server can be installed in an active-passive cluster to achieve high availability through failover clustering. Separate instructions are provided below for installing and upgrading EFT Server in a cluster. (TIP: Print this topic and check off the steps as they are completed.)
Installing EFT Server in a Cluster Configuration
Before you add EFT Server to your cluster, you must setup your cluster manager. Please consult your cluster manager vendor’s documentation for details. Globalscape's Server Support team can provide assistance with basic configuration questions, and Globalscape Professional Services group provide assistance with installing and configuring a cluster.
To install an EFT Server version 6 or later in a cluster configuration:
Step Owner
1. Setup Microsoft Failover Clustering, Symantec’s Veritas Cluster Server, or other third-party cluster manager according to your cluster manager vendor’s documentation.
2. Make sure the node that you are installing on has access to the shared resource disk (i.e., the clustered disk or clustered storage pool or Cluster Shared Volume (CSV), as appropriate to your cluster environment.
3. Run the EFT Server installer on the node that has access to the clustered (shared resource) disk. Follow the prompts and refer to Installing the Server, Interface, and Modules, if necessary.
4. On the Choose install type page, click Part of a cluster, then click Next. When the confirmation prompt appears, click Yes to confirm that you have read the cluster documentation.
5. A prompt appears asking "Is this the first node in the cluster?" Do one of the following: • Click Yes if this is the first node in the cluster. • Click No if you already installed EFT Server on the first node and you are now
installing EFT Server on the second node.
6. On the Choose Install Location page, specify the installation location on your local physical drive, and then click Next.
7. On the Choose EFT Server Enterprise configuration data location page, specify the shared resource disk, and then click Next. Note: If you cannot browse to the shared resource disk, then the clustered disk is offline or assigned to the other node. CANCEL the installation and verify that the clustered disk can be accessed on the node you are installing on, and then restart the installation process.
8. Follow the prompts in the wizard to continue the installation (create the EFT Server administrator account, configure ARM, etc.).
Note: You must specify a remote SQL or Oracle server for the ARM database. Do not use a local database, such as SQL Server Express.
9. On the final page of the installer, ensure that the Start the EFT Server Enterprise service check box is NOT selected, and then click Finish.
10. Use the third party's cluster administrator tool to move (assign) the clustered disk resource to the second node.
11. Repeat steps 3 – 9 on the second node. (Be sure to click No in step 5.)
12. On the second node, use the third-party's cluster administrator tool to create a new clustered role: generic service > EFT Server Enterprise, linked to the desired shared resource drive (described in step 2), optionally replicating the following registry settings in HKLM\SOFTWARE\Wow6432Node\GlobalSCAPE Inc.
40

COM API Reference
Step Owner
13. Once the role is created, the EFT Server service on the second node will be started by the cluster. Launch the EFT Server administration interface, connect to the EFT Server on the second node, configure EFT Server, and license the product and any add-on modules.
Note: Make sure you specify a Site root folder on the shared resource drive when creating your first Site. (For example: Site Root = H:\Data.)
14. Once you have configured EFT Server to your liking, make the first node in the cluster the group owner, then license EFT Server and any add-on modules in that node. (Notice that EFT Server on the first (primary) node picks up all configuration done to the second node, because the nodes share the configuration files.)
Upgrading EFT Server in an Existing Cluster To upgrade an EFT Server version 6.4 or later that is already installed in a cluster configuration:
Step Owner
1. Gather your credentials: EFT Server administrator and SQL or Oracle database owner (unless using Windows authentication).
2. Perform rollback and disaster recovery (DR) operations: a. Run EFT Server's Backup Server Configuration tool (available in Enterprise only) b. Backup your entire EFT Server configuration folder located on the shared resource
drive c. Backup your database (performing purging, if necessary) d. (Optional) Route traffic to your DR site to avoid downtime.
3. Open the third-party cluster administrator tool and take the cluster offline. Also take the EFT Server Enterprise clustered role (formerly called "clustered applications and services") offline.
Note: Microsoft’s failover cluster will bring down the disk resource when the role is stopped. You may need to detach the clustered disk from the role and bring the clustered disk resource back online so that the installer can write files to the clustered (shared resource) disk.
4. Run the EFT Server installer on the node that has access to the clustered (shared resource) disk.
5. On the Prior version detected page, click Upgrade cluster, and then click Next. When the confirmation prompt appears, click Yes to confirm that you have read the cluster documentation.
6. A prompt appears asking "Is this the first node in the cluster?" Do one of the following: • Click Yes if you are upgrading the first node in the cluster. • Click No if you already upgraded the first node and are now going through the steps
again for the second or Nth node.
7. On the Choose Install Location page, verify that the Destination Folder matches the current program install directory, typically C:\Program Files\Globalscape\EFT Server Enterprise, and then click Next.
8. On the Auditing and Reporting database configuration page, click Configure Auditing and Reporting (most likely) or skip if auditing is not being used (rare). Click Next.
9. Click Use existing SQL Server or Use existing Oracle database, as appropriate, and then click Next.
10. Click Upgrade an existing EFT Server ARM Database, and then click Next.
11. Provide your database credentials if using SQL or Oracle authentication, otherwise click
41

EFT Server Installation Guide
Step Owner Windows authentication. Click Test to verify your database connection. After the database credentials have been verified, click Next.
Note: Do not proceed with the installation if you are unable to validate your database connection. Contact Globalscape support or your database administrator for further assistance.
12. On the Confirm Database Upgrade page, verify that all upgrade requirements have passed. Once verified, select the check box to confirm your understanding of the upgrade process, and then click Install.
13. On the final page of the installer, ensure that the Start the EFT Server Enterprise service check box is NOT selected, and then click Finish.
14. Use the third-party cluster administrator’s tool to move (assign) the clustered disk resource to the second node.
15. Repeat step 4-14 above on the second node, making sure to click No in step 6 when the prompt asks "Is this the first node in the cluster?" You will not be prompted to upgrade the database for the second node.
16. Once the second node has been upgraded, use the third-party cluster administrator to reattach the clustered disk resource to the EFT Server resource role, then subsequently bring the role and cluster back online.
17. If applicable you can start routing traffic back from the DR site to the primary. Repeat the cluster upgrade procedure on the DR site once you feel confident with the new version.
Upgrading the Software Please read the following information before upgrading. Several of the caveats below could adversely affect the success of your upgrade if not heeded.
• EFT Server's installer detects and prevents upgrades of more than two versions prior to the current version:
o Upgrading is supported from EFT Server Enterprise v6.3.x or v6.4.x to EFT Server Enterprise v6.5.x
o Upgrading is supported from EFT Server SMB 6.3.x or 6.4.x to EFT Server SMB 6.5.x
o Upgrading is supported from EFT Server SMB v6.5 to EFT Server Enterprise v6.5 (requires purchase of Enterprise license)
• If you are upgrading from EFT Server SMB edition to EFT Server Enterprise, you may have to update the path to the .aud file in the Authentication Options dialog box for each Site. Refer to Globalscape Authentication or Changing and Testing LDAP Authentication Options for instructions, depending on the authentication type. When the EFT Server service starts, it looks for a .cfg file. If the .cfg file is not found, corrupted, or not compatible, EFT Server creates a new .cfg file in the default location. If the .cfg file is corrupted or the wrong version, the bad .cfg file is backed up and an error is written to the Event log. The .cfg file points to the Sites' .aud files. EFT Server searches for the .aud file near the ftp.cfg file if the path to the .aud file appears to be incorrect. You cannot edit the .cfg file. (If you have installed the previous version for the sole purpose of upgrading, you must create at least a Server object in the administration interface to create a .cfg file before you can upgrade.)
• If you are adding any modules, you may receive a new activation serial number. If so, then it may be necessary to activate the software when you start it for the first time.
42

COM API Reference
• Contact the Sales team to obtain a new registration serial number or to determine your eligibility for an upgrade. If you are moving a Server from one computer to another, contact the Globalscape customer service team or your account manager so that we can adjust your account on our activation and registration server. Activation on the new computer will not be possible until the adjustment is made. If you want to test or verify an update prior to introduction into your production environment, do not use your production serial number for testing purposes.
• If you are upgrading a cluster, refer to Installing or Upgrading EFT Server in a Cluster.
• DMZ Gateway: If you are also upgrading DMZ Gateway, upgrade DMZ Gateway first, then upgrade EFT Server.
• ARM:
o If you will be upgrading the ARM database, refer to Upgrading the EFT Server Database, Upgrading Large Databases, and ARM Database Schema Change Tracking for important information. A new process is used to upgrade the ARM database. Refer to Upgrading the EFT Server Database for details.
o When upgrading from versions prior to EFT Server v6.4, if you upgrade the SQL Server ARM database with the installer, the default schema name is changed to dbo.
• COM API:
o COM API resources including SFTPCOMInterface.DLL and associated files are saved in C:\Program Files\Common Files\Globalscape\SFTPCOMInterface so that they can be shared with other Globalscape applications, such as the Secure Ad Hoc Transfer module and Mail Express, ensuring that each application is using the same DLL.
o Any scripts that use the v6.2 COM API for Timer Events must be updated to the new API.
o The IP Access/IP Ban has increased functionality, and the COM interface has been modified to match the new functionality.
• WTC:
o When upgrading the WTC, workstations might receive a Java error, but then the WTC will load and be functional. Refer to KB article#10654 for details.
o When upgrading, the \web\custom\ and \web\public\ folders are backed up and renamed with the date and time (e.g., \customBackup_9-28-2010_16-18\ and \publicBackup_9-28-2010_16-18\). The new versions of the files may have some updated content, so rather than overwriting the new files with your old files, you should manually copy your customizations to the new files after upgrading. This applies to any edits for the per-Site and per-Server login pages, Web Transfer Client (WTC) interface, Plain-Text Client (PTC), Account Management interface, and AS2 Management interface.
o New functionality has been added to the Web Transfer Client (WTC) and the Plain Text Client (PTC). End users will need to clear their browser cache: refer to KB http://kb.globalscape.com/KnowledgebaseArticle10654.aspx for more information.
• Event Rules:
o The Folder Monitor Event Rule trigger was improved to provide better reliability for the handling of file events. The current Folder Monitor algorithm uses more resources (threads) than the v6.2 algorithm. EFT Servers with more than 250 Folder Monitor Rules should use the v6.2 algorithm, which uses fewer resources. The 6.2 Folder Monitor algorithm can be selected via a registry key.
o The Event Rule file Copy/Move wizard provides control for overwrite options. The overwrite options were set in earlier versions using registry keys. Any associated registry keys will now be ignored and you should update your Event Rule Actions with the desired overwrite option.
43

EFT Server Installation Guide
o EFT Server supports PORT mode when using the SOCKS protocol to the outbound gateway/proxy. Event Rules that were configured for SOCKS PORT mode in v6.2, will switch from acting as a PASV mode connection to a PORT mode connection in later versions.
o During the upgrade, if a non file-trigger rule contains an %FS.FILE_NAME% variable, it will be converted to %SOURCE.FILE_NAME% and a WARNING will record the change in the EFT.log. Refer to Variables (List) for more information about the %SOURCE.FILE_NAME% variable.
• In cases where ASCII strings with >127 characters were used for RADIUS in the prior version, there is some risk of loss of fidelity when converting to UTF-8 (depending on the code page) for v6.5. You may need to re-enter values, disable and then re-enable RADIUS, or restart the Site to refresh the values.
• If a Site uses the LDAP Authentication Manager, and if the users are allowed to change their passwords, LDAP calls are used to make the password changes. In v6.2, Active Directory calls were used to make the password changes. With the switch to LDAP in v6.3 and later, LDAP over SSL should be used to protect the password changes. LDAP over SSL can be difficult to configure, so the registry setting in http://kb.globalscape.com/KnowledgebaseArticle10659.aspx allows you to continue using the Active Directory API for the password changes, which also provides security for the communication path.
• If NTLM v2 proxy authentication support is needed, the default HTTP client must be changed from the Apache HTTP client to the Java JSE HTTP client. The JSE HTTP client does not properly set the Content-Length for files > 2GB, so a custom X-Header is used to communicate the file size. Any HTTP proxy that is in the path between the browser and EFT Server must properly pass the custom X-Header. Refer to Accessing EFT Server Through a Proxy for details.
• FTP requires UPLOAD permission in addition to APPEND to resume a partial file transfer.
• It is a good idea to read the Release Notes before you begin.
To upgrade the software
1. Document the administrator user name and password for the existing product. If you are also upgrading the database files, you will need the ARM database name, username, and password.
2. Close the administration interface and stop the EFT Server service.
3. As a precaution, back up the existing installation directories and any other files you may have installed elsewhere. If you are upgrading EFT Server Enterprise, run a backup and save that backup file in an easily accessed location or removable media.
4. Launch the installer. The Choose an installer page appears.
5. Click EFT Server or EFT Server Enterprise. The installer loads the required components, then the Welcome page appears.
6. Click Next. The license agreement appears.
7. Scroll or page down to review the agreement, then click I Agree to continue. The license agreement is also saved in the EFT Server installation folder as "license.txt" if you want to read or print it later.
The installer will detect the existing installation of EFT Server.
44

COM API Reference
8. Click Upgrade to upgrade the existing configuration and copy your existing Sites, users, etc. to
the new installation. (If you are upgrading a cluster, refer to Installing EFT Server in a Cluster. If this is a new installation, refer to Installing the Server, Administrator, and Modules.)
9. Click Next. If a message appears stating that the SFTPCOMInterface.dll will be upgraded, click OK to dismiss the message.
10. Click Next. The Choose Components page appears.
11. To upgrade EFT Server and the Admin Interface, leave both check boxes selected. (To upgrade
only the administration interface (for remote management of the server), clear the EFT Server check box and refer to Installing the Administration Interface Remotely.)
12. Click Next. The Choose Install Location page appears.
45

EFT Server Installation Guide
13. Keep the default location or click Browse to specify an alternate location.
14. Click Next. The Configuration data path page appears.
15. Keep the default location or click Browse to specify an alternate location.
16. Click Next. The Choose Start Menu Folder page appears.
46

COM API Reference
17. Keep the default location, click an alternate location, or type a name to create a new folder, then
click Next.
o If the Secure Ad Hoc Transfer module is installed on the same computer, a message appears stating that IIS needs to be stopped during the upgrade. Click Yes to continue.
The database configuration page appears.
47

EFT Server Installation Guide
18. Click one of the following options:
o If you do not want to configure auditing and reporting, click Skip auditing and reporting configuration, and then click Next and the selected components will be updated. Go to step 24.
o If you want to configure auditing and reporting, click Configure auditing and reporting, and then click Next.
19. If you are using a local SQL Server Express database, the wizard will find the database and prompt you to upgrade it. When using a SQL Server or Oracle database, a page appears in which you can provide the database connection information and credentials. The installer will test the database connection, if configured, then the Confirm Database Upgrade page appears.
20. Review the information in the dialog box, or click View to review the information in a text editor.
21. If there are any errors to repair, you can repair them on the database now, and then click Reanalyze to retest.
22. After all requirements for upgrade have passed, click Install.
23. The wizard will upgrade the database and the specified EFT Server components. On the final page of the wizard, select the check boxes as needed:
o Start the administration interface - If you do not want to open the interface, clear the check box. You can also open the interface from the Start menu.
o Create a desktop shortcut - An administration interface shortcut is created on the desktop by default. If you do not want to create a shortcut, clear the check box.
o Show version history - If you want to read the release notes, select the Show Version History check box. If you want to read it later, the release notes file, notes.txt, is installed in the EFT Server installation directory.
o Show installation log - If you want to review the installation log now, select the check box. If you want to review it later, it is saved in a temporary folder, C:\Program Files\GlobalSCAPE\EFT Server Enterprise (or EFT Server)\Installer.log.
48

COM API Reference
o Start the EFT Server Enterprise Service - Clear the check box if you do not want to start the service yet. Select the check box if you want to start the service when you click Finish. The service is configured to start automatically when the computer starts. If you do not want the service to start automatically, you will have to configure it in Windows to start manually.
The EFT Server service Log On as account will be set to Local System account by default. If necessary, you can edit this in the service's Properties dialog box, on the Log on tab. (Start > Run > services.msc.)
File Locations EFT Server stores its ftp.cfg in a hidden folder named %systemroot%\ProgramData. (To show it in Windows Explorer, click Tools > Folder Options > View tab, click Show hidden files and folders, and then click Apply.)
• Main program files are installed on:
o C:\Program Files\Globalscape\EFT Server
or
o C:\Program Files\Globalscape\EFT Server Enterprise
• Application data is stored in:
o C:\Documents and Settings\All Users\Application Data\Globalscape\EFT Server
or
o C:\Documents and Settings\All Users\Application Data\Globalscape\EFT Server Enterprise.
• EFT Server web files are stored in the following locations:
o Resource files used to create the Web pages are stored in \contrib\EFTClient
o Everything necessary for the Web site that is not contained in the resource folder is stored in \public\EFTClient
o Files used by Web Services are stored in \public\EFTClient\WebServices.
o When upgrading, previous files are backed up to web/backup/EFTClient
o Custom files are stored in \custom\EFTClient (empty by default). The EFTClient folder in this directory contains customizations that apply to all Sites on a server. To customize files for the Site, create a directory structure in the form [SiteName]/EFTClient/ in this folder. The Site folder should hold just those files that contain customizations for that Site. The best practice is to have only customized files in this folder and to leave the original files as they were when installed in the \web\public\EFTClient folder. WTC and PTC files can be modified independently.
Activating the Software (Server and Add-On Modules) When the trial period has expired, all remote connections are disallowed. The Continue Trial button changes to Developer Mode and remains in this state until EFT Server is activated or uninstalled. To allow you to continue evaluating EFT Server functionality after trial expiration, EFT Server blocks all incoming client IP addresses other than the localhost from connecting to EFT Server, either as an administrator or as a client (using FTP/S, SFTP, or HTTP/S protocols). All outgoing (offload/download) requests from EFT Server's Event Rules are also blocked to any IP address other than localhost. Therefore, when the trial period is over, no external IP addresses can connect to EFT Server, nor can EFT Server connect to any external IP addresses.
49

EFT Server Installation Guide
You must activate the software with a serial number. Each module is available during the EFT Server trial and must be activated separately.
When the trial period ends for modules for which you did not purchase a license, an information error appears in the Windows Event Log to indicate the module has expired. If the 30-day trial is not sufficient, you may be eligible to extend your trial. Contact your Globalscape account representative for more information.
To activate online, you must be connected to the Internet, and activation must be performed through the administration interface on the EFT Server computer. You cannot activate through a remote installation of the administration interface.
You can also e-mail the manual activation information to Globalscape Technical Support. Globalscape will confirm your activation and send you a .reg file. You can send the e-mail from any computer with Internet access, and then transfer the .reg file to the computer on which you are installing the software.
• If you are moving a Server from one computer to another, contact the Globalscape customer service team or your account manager so that we can adjust your account on our activation server. Activation on the new computer will not be possible until the adjustment is made.
• If you are upgrading EFT Server residing in a clustered environment, refer to Installing EFT Server in a Cluster and contact Globalscape technical support for assistance, if necessary.
• If EFT Server is installed on Windows 2003, log in to EFT Server as a user with an account having administrator privileges instead of "Local System" privileges to write the .reg file to the registry.
To activate EFT Server and/or add-on modules via the Internet
1. Start the administration interface and provide your EFT Server administrator credentials (created at installation). The Welcome message appears.
2. Click Enter Serial Number. The Registration Wizard appears.
3. On the main menu, click Help, and then click the product you want to activate:
• Activate EFT Server (or EFT Server Enterprise)
• Activate Web Transfer Client
• Activate HTTP/S Module (Necessary in EFT Server SMB only)
• Activate High Security Module
• Activate AWE Module (Available in EFT Server Enterprise only)
• Activate Auditing & Reporting Module
• Activate SFTP Module (Necessary in EFT Server SMB only)
• Activate OpenPGP Module
• Activate AS2 Module (Available in EFT Server Enterprise only)
• Activate DMZ Gateway Module (For information regarding DMZ Gateway activation, refer to Activating DMZ Gateway.)
After you activate a product, the "Activate" text for that product on the Help menu is dimmed/unavailable, with the exception of the Web Transfer Client (WTC). Leaving Activate Web Transfer Client available allows you to enter a new serial number if you first activate the WTC with a 5-seat license, then later purchase a license for more seats.
4. The Registration Wizard appears. (A portion of the wizard for EFT Server Enterprise is shown below, but the process is the same for each of the modules.)
50

COM API Reference
5. In the Serial Number box, provide your serial number, and then click Next. The Personal details
page appears.
6. In the Name box, provide your name and/or your company name, and then click Next. Only the
Name box of personal details is required; all others are optional. Your information is used for account verification for support, upgrades, and so on, so the more information you provide here, the easier it is to locate your account.
If a firewall or a proxy server is in use, your network administrator should ensure that outbound port 80 is open during the registration process.
7. You should receive a message confirming online activation. Click OK. Activation is complete. (If registration fails, try entering your serial number again or you might need to configure an HTTP proxy.)
If you have problems with online registration, visit Globalscape Customer Support, at http://www.globalscape.com/support/customerservice.aspx.
51

EFT Server Installation Guide
Activating DMZ Gateway After the 30-day trial has expired, you must activate DMZ Gateway by activating the serial number in EFT Server.
To activate online, you must be connected to the Internet, and registration must be performed through the EFT Server administration interface on the EFT Server computer. You cannot activate through a remote installation. Refer to Activating EFT Server and Modules for details.
DMZ Gateway and EFT Server Trial and Activation Interaction • When both EFT Server and DMZ Gateway are in trial mode, all DMZ Gateway features are
enabled. • If the EFT Server trial period expires (has not been activated) and the DMZ Gateway module has
not been activated, EFT Server will: o Halt all outbound Peer Notification Channel (PNC) communication to the DMZ Gateway. o Disable all controls on EFT Server's DMZ Gateway configuration pages. o Disable the “use DMZ Gateway as proxy” control in the Event Rule offload/download
proxy configuration dialog box, which will cause any Event Rule to fail that uses DMZ Gateway as an outbound proxy.
o Hide the Perimeter Network Security page of the Site Setup wizard in EFT Server. o Write a warning to the Windows Event Log: “EFT Server’s DMZ Gateway module
evaluation period has expired.” • If EFT Server is activated, but DMZ Gateway is in trial mode, the DMZ Gateway is fully functional
until the DMZ Gateway trial expires. Once DMZ Gateway expires, all functionality and controls in EFT Server are disabled (unless you activate DMZ Gateway).
• If DMZ Gateway is activated using a single site serial number: o EFT Server allows only one DMZ Gateway site to be enabled. o If more than one DMZ Gateway node was enabled prior to activation, all but one node will
be disabled, the PNC of each of the disabled sites is disconnected, and an error is written to the Windows Event Log: "EFT Server – One or more DMZ Gateway connections were disabled due to licensing restrictions. Make sure your DMZ Gateway module license matches the number of DMZ Gateway ‘Sites’ enabled. Contact your Globalscape account representative for further assistance.”
o EFT Server's COM engine will return an error if you attempt to start a DMZ Gateway when one is already enabled.
• If DMZ Gateway is activated using a multiple site serial number: o EFT Server allows up to 15 DMZ Gateways to be enabled (one per EFT Server Site).
Release Notes/Version History Release notes/version history for EFT Server are available in the installation directory (by default, C:\Program Files\Globalscape\EFT Server\notes.txt).
• Version history for EFT Server is available online at http://www.globalscape.com/eft/history.aspx. (The notes.txt file is available in the installation directory.)
• Version history for Secure FTP Server is available online at http://www.globalscape.com/gsftps/history.aspx.
Please visit our Knowledge Base for updates and self-help support: http://kb.globalscape.com.
52

COM API Reference
Modifying or Repairing the Installation After you have installed EFT Server, you might later want to install other features, such as the administration interface or the Auditing and Reporting module. Or, if you accidentally deleted or edited necessary program files, you can repair the installation.
To modify or repair the software
1. Launch the installer. The installer will detect an existing installation.
2. Do one of the following:
• To upgrade the existing installation, click Repair. (Repair overwrites changed files and reinstalls missing files.)
• To install or uninstall specific components, click Modify. (Modify installs selected components; removes unselected components.)
• To install a fresh installation, including a new configuration file, click New Install.
3. Click Next and follow the instructions in the wizard. Refer to Installing EFT Server, Administrator, and Modules, if necessary.
4. If you chose Modify in step 2, on the Components page, select the check boxes of components you want to install and clear the check boxes of components you want to remove. If you clear the check box of an installed component, it will be uninstalled!
53

EFT Server Installation Guide
5. When the wizard is finished, restart the Server services. The EFT Server service Log On as
account will be set to Local System account by default. You can edit this in the service's Properties dialog box, on the Log on tab. (Start > Run > services.msc.)
Repair/modify activities are logged in the installer log file (e.g., C:\Program Files\GlobalSCAPE\EFT Server Enterprise). If you need additional information or help, visit Globalscape's Support Center at http://www.globalscape.com/support.
Uninstalling the Software Uninstalling EFT Server removes everything installed in the Program Files/Globalscape folder (but does not remove the folder). It does not uninstall configuration files, Oracle or SQL Server tables, Reports, or Backup files in C:\Documents and Settings\All Users\Application Data\Globalscape\EFT Server Enterprise.
To remove EFT Server
1. Click Start > Programs > Globalscape > EFT Server (or EFT Server Enterprise) > Uninstall EFT Server (or EFT Server Enterprise). The Uninstall wizard appears.
54

COM API Reference
2. Click Uninstall. The uninstalling progress page appears.
3. After the program files are removed, the Uninstallation Complete page appears. Your license
information remains in the Windows Registry, in case you decide to reinstall. Click Close.
55

EFT Server Installation Guide
Windows Account for the EFT Server Service The EFT Server service must have full administrative rights to the folder in which you install EFT Server and to the location in which the users' home folders are stored. The EFT Server service must also have administrative rights to map a virtual folder to a network drive. With administrative rights, the service can save all of your settings. If the service does not have administrative rights, you will lose settings and user accounts whenever you restart the EFT Server service, and you will need to reset permissions on the computer on which the EFT Server service is running. After it is installed, EFT Server has access to local folders and files. To run EFT Server as a service with permissions to the network and mapped drives, you must create an NT account for EFT Server, assign the Globalscape EFT Server service to the account, and log EFT Server on as a service. Security policies should allow user accounts to log in locally.
After you have installed EFT Server, created a Windows account for EFT Server, and assigned permissions to the account, you should edit the service itself so that it will not run as a "System Account" (the default account choice). Running the service as System Account poses the potential hazard of giving users complete access to your system.
Creating a Windows User Account for EFT Server To create a user account in Windows
1. After you install EFT Server, open the Computer Management console. 2. Expand the Local users and Groups node, right-click Users, then click New User. The New
User dialog box appears. 3. Create a user account for EFT Server (e.g., EFTUser), clear the User must change password
at next logon check box, and then click Create, and then click Close. 4. Close the Computer Management console. 5. In Administrative Tools, click Local Security Policy. The Local Security Policy dialog box
appears. 6. Expand the Local Policies node, and then click User Rights Assignment. 7. In the right pane, in the Policy column, double-click Act as part of the operating system. The
Properties dialog box appears. 8. Click Add user or Group. The Select Users or Groups dialog box appears. 9. Select the new user you just added (e.g., EFTServer), click Add, then click OK. 10. If necessary, assign permissions for this user account in Windows. 11. Assign EFT Server to the new user account and log EFT Server on as a service.
Set Windows NT Permissions for EFT Server After you have created a new Windows user account for EFT Server, use Windows' permissions to set the permissions for folders, files, or drives for the account. Permissions should be as restrictive as possible while still allowing EFT Server enough permission to run.
Using Windows NT’s permissions, set the permissions for files or drives of this user to be as restrictive as possible, while still allowing EFT Server to run. After carefully determining which files and network folders your users will need to access, gradually increase the permissions.
Make sure that full permissions are granted to the EFT Server service domain user account for the following locations:
• Installation folder • Application data folder • Windows Temp folder • Any shared drive paths required by EFT Server • Any output directories that EFT Server may need to read/write files to
56

COM API Reference
If you run into permissions issues, run Process Monitor or similar tools and isolate non-success results caused by cftpsai.exe, cftpstes.exe, gsawe.exe, and any other EFT Server-related processes.
Using NT Authentication, user permissions override EFT Server's permissions. For example, if EFT Server has read-only access to folder1, but user John Doe has read and write permission to folder1, John Doe has the same permission when he accesses folder1 through EFT Server.
Windows NT permissions can be edited through the Security tab in the Properties of a file or folder. On the Security tab, select Permissions to display and edit the permissions for the object. The appearance of this dialog box is slightly different for files and directories, but in both cases, the following permissions can be granted to users or groups:
• R (Read) • W (Write) • D (Delete) • P (Edit permissions) • O (Take ownership)
Keep in mind that you have the option to grant or withhold read and write permissions. Read-only permissions are the most secure, because they allow users to access a file, but not to change it. For example, most users will need limited read access to the Windows folders (C, WinNT); however, most FTP Servers will not need any access to these directories at all.
In addition to the individual permissions, Windows NT permissions also provide access levels that are simply pre-built sets of the existing permissions. Typically, you assign an access level to a user rather than granting individual permissions. One such access level is called "No Access," which does not contain any permissions.
To view and edit the permissions for a folder or file
1. In Windows Explorer, right-click the file or folder, then click Properties.
2. On the Security tab, click Permissions. The appearance of this dialog box is slightly different for files and directories and for different versions of Windows (W2K, XP, etc.).
For more information about setting permissions to folders and files, refer to the Windows Help documentation for your specific operating system. (e.g., click Start > Help and Support, then search on keyword permission.)
Assigning the Service to a Windows User Account To assign the service to a Windows user account
1. Click Start > Run, type services.msc, then press ENTER.
2. Right-click EFT Server or EFT Server Enterprise, and then click Properties.
3. Follow the Windows Operating System procedures for selecting an account under which the service will run.
57

EFT Server Installation Guide
Registry Settings EFT Server stores some of its configuration information in the Windows Registry. EFT Server modifies the system registry as needed, and continually references this information during operation.
Refer to the following topics in this user guide for details of these commonly configured registry settings:
• Upgrading the Software—If a Site uses the LDAP Authentication Manager, and if the users are allowed to change their passwords, LDAP calls are used to make the password changes. In v6.2, Active Directory calls were used to make the password changes. With the switch to LDAP in v6.3 and later, LDAP over SSL should be used to protect the password changes. LDAP over SSL can be difficult to configure, so setting the ChangePassByAD DWORD value to 1 allows you to continue using the Active Directory API for the password changes, which also provides security for the communication path.
• Allowing Multipart Transfers (COMB Command)—Enable client offload/download multipart transfers over FTP/FTPS with the DWORDs MultipartValue and EnableMultipart.
• Changing the Number of Concurrent Threads Used by Event Rules: o Override the initial worker thread count in Folder Monitor rules with the DWORD
FolderMonitorWorkerThreadCount. o Specify the global maximum number of connections for EFT Server's transfer engine (the
default is 100) with the DWORD MaxNumberConnections. • Accessing EFT Server Through a Proxy—The default HTTP client for the WTC is based on the
Apache library, but if the proxy you are trying to connect through requires NTLM v2 authentication, the WTC will need to use an alternate HTTP client based on the JSE 6 application library. You can force the WTC to use the JSE HTTP client by configuring the DWORD use_JSE_HTTP_Client. For CAC-enabled Sites the JSE client is automatically used regardless of the registry setting.
• AD Password Expiration—On NTAD/LDAP Sites, you can configure EFT Server to send an e-mail notifying users that their password is about to expire in <n> days by setting the DWORD PasswordChg_EmailInterval.
• Changing an AD Password via the WTC—The WTC NTAD/LDAP change password capability can be turned on/off through the DWORD PasswordChg_NTADLDAP. On AD/LDAP Sites, if you have enabled the "User must change password at next logon" feature in AD, you must enable (set to "on") the registry setting. If you have enabled the "User cannot change password" feature in AD, users will not be able to change their passwords.
• Allow Server to Accept ODBC Database Passwords that are MD5 Hashed—When you create user accounts within EFT Server, the ODBC database is populated with the username and a SHA-256 hash of the account password. The DWORD UseMD5PasswordHash will cause ODBC to use MD5 instead.
• Session Timeout—The DWORD WTCTimeout specifies the number of minutes that you want the WTC session to be active, but idle, before the session is released.
• Specifying the Value Returned by the FTP SYST Command—If your server requires a particular response, EFT Server provides a registry setting with which you can specify the value returned by the FTP SYST command (DWORD FTPSYSTResponse).
• Integrated Windows Authentication for Single Sign On (SSO)—Enabled for AD users using Internet Explorer with DWORD use_registry and enable_iwa.
• The Client Log (Event Rule Logging)—A tenth column can be added to the CL log by defining a registry entry, DWORD Enable10ColumnInClientLog.
• The EFT.log File—EFT Server can be instructed to log specific or all HTTP request headers when DWORD log_request is set to 1.
58

COM API Reference
• EFT Server Web Services—The Web Services timeout is set to 60 seconds. You can change the timeout value in DWORD WebServiceTimeout.
To view other registry settings, please visit the Globalscape Knowledge Base at http://kb.globalscape.com/article.aspx?id=10411.
Running EFT Server and Microsoft IIS on the Same Computer By default, the FTP server in Microsoft IIS binds to port 21 on all IP addresses. If you are running IIS FTP server and EFT Server on the same computer, you must disable socket pooling for the IIS FTP server.
To disable socket pooling in IIS FTP server
In Microsoft IIS, stop the FTP site as described below:
1. Open a command prompt.
2. Change directory to C:\InetPub\Adminscripts: cd C:\InetPub\Adminscripts
3. Type: CSCRIPT ADSUTIL.VBS SET MSFTPSVC/DisableSocketPooling TRUE
4. Then press ENTER. You should get the following response: disablesocketpooling : (BOOLEAN) True
5. Exit the command prompt and restart the FTP site. This should prevent IIS from binding to all IP addresses on port 21, freeing up an IP address on port 21 (the default FTP port).
For more information on Microsoft IIS socket pooling, refer to the following articles:
http://support.microsoft.com/default.aspx?scid=kb;en-us;259349
http://support.microsoft.com/default.aspx?scid=kb;EN-US;238131
The articles linked above discuss the IIS Web server, but the same information applies to the IIS FTP server.
"Unexpected Error 0x8ffe2740 Occurred" Message When You Try to Start EFT Server Microsoft IIS uses port 80 for HTTP communication. If you are running the IIS FTP server and EFT Server on the same computer, you can do either of the following:
• In IIS Manager, change the port bindings for the website to a port other than port 80.
• Stop the application that is using port 80, and then start the website from IIS Manager.
For more information, refer to the Microsoft Knowledge Base article #816944.
http://support.microsoft.com/kb/816944/en-us
59

EFT Server Installation Guide
Running a Microsoft .NET Web Application in 32-bit Mode in IIS 6.0 on a 64-bit Server First, you need to configure IIS to run 32-bit Web applications on 64-bit Windows, then you need to register the ASP.NET application, then restart the Web publishing service.
1. Enable IIS 6.0 to run 32-bit Web applications on 64-bit Windows a. Open a command prompt and navigate to the \Inetpub\AdminScripts directory. b. Type the following:
cscript.exe adsutil.vbs set W3SVC/AppPools/Enable32BitAppOnWin64 "true"
c. Press ENTER. 2. Register the ASP.NET application
a. Open a command prompt and navigate to the directory that contains the ASP.NET executable. For example, type
cd WINDOWS\Microsoft.NET\Framework\v2.0.50727
b. Type the following, then press ENTER: aspnet_regiis.exe -i
For more information about the ASP.NET IIS Registration Tool (aspnet_regiis.exe), refer to http://msdn2.microsoft.com/en-us/library/k6h9cz8h(VS.80).aspx
3. Start the World Wide Web Publishing Service a. Click Start > Run, type services.msc, then press ENTER. b. In the list of services, right-click World Wide Web Publishing Service, and then click
Start (or Restart).
Error in ASP.NET Registration Microsoft .NET Framework 2.0 or greater is required for the AS2 module, Advanced Workflows Engine, and for the Secure Ad Hoc Transfer (SAT) module version 1.7.2 and earlier. SAT version 1.7.3 and later requires .NET Framework version 3.5.
• If you do NOT have the .NET framework installed on your system, you can download and install it from the Microsoft Developer Network.
• If you have the framework installed, but IIS still does not show any .NET-related information (such as the ASP.NET tab), run the ASP.NET IIS Registration Tool, found in the .NET installation folder (e.g., C:\WINDOWS\Microsoft.NET\Framework\v2.0.50727 ). The file is called aspnet_regiis.exe and you must pass in a "-i" parameter.
• To run the ASP.NET Registration Tool
1. At a command prompt, change to the directory that contains the executable. For example, type
cd WINDOWS\Microsoft.NET\Framework\v2.0.50727
2. Type the following, then press ENTER: aspnet_regiis.exe -i
ASP.NET is installed and registered.
For more information about the ASP.NET IIS Registration Tool (aspnet_regiis.exe), refer to http://msdn2.microsoft.com/en-us/library/k6h9cz8h(VS.80).aspx.
60

COM API Reference
Extending the Trial After the 30-day trial has expired, EFT Server switches to "Developer Mode" during which you can continue evaluating EFT Server functionality. After trial expiration, EFT Server blocks all incoming client IP addresses other than the localhost from connecting to EFT Server, either as an administrator or as a client (using FTP/S, SFTP, or HTTP/S protocols). All outgoing (offload/download) requests from EFT Server's Event Rules are also blocked to any IP address other than localhost. Therefore, when the trial period is over, no external IP addresses can connect to EFT Server, nor can EFT Server connect to any external IP addresses.
EFT Server and EFT Server Enterprise have many complex features that you will want to take time to evaluate thoroughly. Therefore, 30 days might not be enough time for busy IT professionals to make a buying decision. For this reason, you can request a trial extension that, if approved, provides an additional 30 days of full functionality, including add-on modules.
To request a trial extension
1. Open the administration interface.
2. On the main menu, click Help > Request Trial Extension. The Trial Extension Request dialog box appears.
3. Provide your Name, Company, Email address, and Phone. This information is used to find your
account in our database.
a. If you would like to review the request before sending it, click Preview Request. The Trial Extension Request Details dialog box appears.
b. Click Close to close the dialog box and return to the request.
4. Click Send. Your request is sent to the Globalscape server, which will forward your request to an account executive. If your computer does not have access to the Internet, copy the trial extension request to a computer that has internet access and e-mail the request to your account representative, or if you don’t have one, use the Contact Sales form online at http://www.globalscape.com/support/sales.aspx. After your request is processed, an account executive will send you an e-mail with a response string.
• If you do not have Internet access, an error message appears. You can copy the contents of the Trial Extension Request to the clipboard and then e-mail to Globalscape Sales using the form at http://www.globalscape.com/support/sales.aspx.
61

EFT Server Installation Guide
To provide the Trial Extension Response
1. Log in to the administration interface. (You must be logged in to EFT Server on the computer from which the trial request originated.)
2. On the main menu, click Help > Enter Trial Extension Response. The Trial Extension Response dialog box appears.
3. Copy the string from the e-mail and then paste it into the Trial Extension Response dialog box.
• If the string is not valid, an error message appears. Verify this is the same computer from which the trial extension request originated and that you have copied the exact response from the approval message.
• If the string is validated, click OK.
4. If the string is accepted, the trial is extended.
Silent Command-Line Installation Let's suppose you have several computers around the world on which you want to install EFT Server. You can provide to each of the remote sites an installation file with a batch file, then ask a local administrator to execute the batch file, which will install EFT Server. The script silently installs/upgrades EFT Server without any interaction on the part of the administrator. The installer logging functionality can be used to verify the outcome and diagnose potential issues.
An example of the batch file is described below. Your installation path and the application data folder location may be different than the default, in which case you would have to specify that in the batch file. (If you are installing at the default path, you do not have to specify a path.) Refer to Command-Line Parameters below for details of the parameters.
Command line usage: installer.exe /S /USERNAME= /PASSWORD= [/APPDATA=] [/D=]
/S = silent installation /USERNAME = administrator user name /PASSWORD = administrator password
Optional parameters examples: /APPDATA = appdata path
(default = C:\Documents and Settings\All Users\Application Data\Globalscape\EFT Server Enterprise) /INSTALL_SQLEXPR =(y/n, Y/N) /NOAUTOSTART = If present, service will not automatically start when installation is complete /D = installation folder
(default = C:\Program Files\Globalscape\EFT Server Enterprise)
62

COM API Reference
New install – No Sample Database
This path will instruct the installer to install the EFT Server.
• Required Parameters o /S o /USERNAME=<username> o /PASSWORD=<password>
• Optional Parameters o /D=<path> o /debug o /aionly o /CLUSTERNODE=<option> o /APPDATA=<DATA_PATH> o /NOAUTOSTART
Administration interface-only install
This path will instruct the installer to install the administration interface without installing EFT Server. This is useful if you want to do remote administration of EFT Server. (This path is only applicable when the Server is not installed.)
• Required Parameters o /S o /aionly
• Optional Parameters o /D=<path> -- If used, this must be the last parameter used in the command line and must
not contain any quotes, even if the path contains spaces. Only absolute paths are supported.
o /debug
Batch File Examples:
• If you are installing EFT Server Enterprise without a database at the default path: eftserver-ent-nodb.exe /S /USERNAME=test /PASSWORD=test
• If you are installing EFT Enterprise at the default path with SQL Express: eftserver-ent.exe /S /USERNAME=test /PASSWORD=test /INSTALL_SQLEXPR=y
More Examples: eftserver-ent-nodb.exe /S /USERNAME=admin /PASSWORD=password eftserver-ent.exe /S /USERNAME=admin /PASSWORD=alaska /INSTALL_SQLEXPR=y /NOAUTOSTART eftserver-ent.exe /S /USERNAME=admin /PASSWORD=alaska /aionly /debug eftserver-ent.exe /S /USERNAME=admin /PASSWORD=alaska /APPDATA=c:\eft data dir /D=c:\eft inst dir
63

EFT Server Installation Guide
Command-Line Parameters The installer supports specification of the following command line parameters. When running the installer in silent mode, using the /S switch, these parameters are used to specify both the required and optional values as detailed below.
Parameter Definitions
• /S o Description: Initiates a silent installation. o Default: The installer defaults to graphical user interface mode. o Example: /S
• /D=<path> o Description: The installation directory. o Default:
Enterprise - C:\Program Files\Globalscape\EFT Server Enterprise Base - C:\Program Files\Globalscape\EFT Server
o Example: /InstallDirectory=D:\Applications\EFT Server • /debug
o Description: Enables logging to the Windows system debug log. This log may be viewed in real time using tools such as DebugView that is part of the SysInternals Suite from Microsoft.
o Default: Disabled by default o Example: /debug
• /aionly o Description: Do not install the full server. Install only the files needed for the
administration interface. o Default: The installer deploys both the administration interface and EFT Server by default o Example: /aionly
• /CLUSTERNODE=<option> o Description: This install will be part of a clustered install o Options:
1 - This is the primary 2 - This is not the primary
o Default: Default installations are non-clustered o Example: /CLUSTERNODE=1
• /APPDATA=<DATA_PATH> o Description: Use an alternate location for EFT Server application data o Default: EFT Server usually writes application data to the OS standard location
Enterprise Win2k8: C:\ProgramData\Globalscape\EFT Server Enterprise Win2k3: C:\Documents and Settings\All Users\Application
Data\Globalscape\EFT Server Enterprise Base
Win2k8: C:\ProgramData\Globalscape\EFT Server Win2k3: C:\Documents and Settings\All Users\Application
Data\Globalscape\EFT Server o Example: /APPDATA=C:\EFTData
64

COM API Reference
• /USERNAME=<username> o Description: The username to use for the initial administration account. o Default: None o Example: /USERNAME=EFTAdmin
• /PASSWORD=<password> o Requirements: Must be used in conjunction with the /USERNAME switch o Description: The password to use for the initial administration account. o Default: None o Example: /PASSWORD=wkBG2YxgzBpR
• /NOAUTOSTART o Description: Skips launching of the EFT Server Windows service that typically occurs at
the end of installation, reinstallation, upgrade, or database settings modification. o Default: Service automatically starts on new installs o Example: /NOAUTOSTART
• /INSTALL_SQLEXPR=<option> o Description: Whether to install the bundled MSSQL Express Installer o Options:
Y - Install the bundled MSSQL Express N - Do not install the bundled MSSQL Express
o Prerequisites: Can only be used with EFT Server installs that contain a bundled MSSQL Express installer.
o Example: /INSTALL_SQLEXPR=Y • /NOREQS
o Description: If specified, the installer will skip checking of the common prerequisites that occurs during initial installer launch. This setting is mainly used for debugging purposes or when the checks have errors that are preventing a valid install in the field.
Check #1 - Check for Minimum OS Check #2 - Check if user currently has admin privs Check #3 - Check if DMZ is installed Check #4 - As of EFT 6.5 Unicode DotNet 4.0 FULL is a requirement Check #5 - EFT is of two prior versions
o Default: The common prerequisites will be checked by default o Example: /NOREQS
• /logfile=<file> o Description: Log installation messages to the specified file (this is in addition to the
internal log that is always created by the installer). o Default: None o Example: /logfile=C:\Temp\EFTInstall.log
65

EFT Server Installation Guide
Installation Logging The installation log file is intended for debugging purposes and contains messages that may help resolve issues that arise during installation.
• During installation and maintenance, the installer creates an Installer.log file in the %TEMP%\<Product Name> directory. For example:
o C:\Users\Administrator\AppData\Local\Temp\EFT Server\Installer.log
o C:\Users\Administrator\AppData\Local\Temp\EFT Server Enterprise\Installer.log
• At the completion of the installation, either due to success or failure, the installer copies the final log to the <InstallDir>\logs directory, if it exists. If the installer fails during an initial clean installation, the <InstallDir>\logs directory may not exist. In this case, the final log file remains in the %TEMP%\<Product Name> directory.
• The installer attempts to append to the existing log file on subsequent runs of the installer (e.g., if the user performs a Reinstall). It does this by copying any existing Installer.log file from the installation directory into the Temp directory, writing to it during installation, and then copying it back to the <InstallDir>\logs directory when the installation is finished.
• You can write out the same log messages to another log file of your choosing using the /logfile=<Log file> command line switch to the installer. (Refer to Command Line Parameters.)
Debug Logging The installer is capable of writing the same messages that go to the Main Installer Log using the Windows debug logging infrastructure. These messages may be viewed using a utility such as SysInternal’s DebugView application. To enable this logging, the installer must be run from the command line with the /debug switch. (Refer to Command Line Parameters.)
66

COM API Reference
Licenses, and Copyrights When you installed the product, the End-User License Agreement (EULA) appeared, and you had to click I Agree before the installation could continue. If you want to view the EULA again, it is available in the installation folder.
Server License Information When you contact Globalscape Customer Support for assistance, you might be asked to provide your license Information. EFT Server License Information is displayed in the About dialog box. To avoid errors, you can copy and paste the license information into the e-mail that you send to Support. (You have to be logged in to the server to view or copy the license information.)
To copy the license information to the clipboard
1. On the main menu, click Help > About Globalscape EFT Server. The About dialog box appears.
2. Click anywhere within the Server License Information box, and then click Copy. A message appears, stating that the registration information was copied to the clipboard.
3. Click OK. You can then paste that information into a text document or e-mail to send to support.
GlobalSCAPE Copyright Information This help file is copyrighted confidential property of GlobalSCAPE, Inc. Copying, use or disclosure without the express written consent of Globalscape, Inc. is prohibited.
• EFT Server Copyright © 2004-2013 GlobalSCAPE, Inc. All rights reserved.
EFT Server Modules
Secure Ad Hoc Transfer Module (SAT) The Secure Ad Hoc Transfer™ (SAT) module allows your internal users to send and receive large e-mail file attachments to recipients outside of your organization quickly, reliably, and securely, all without having to manually create or maintain FTP accounts on EFT Server.
Advanced Workflow Engine (AWE) 8 (Available in EFT Server Enterprise) With EFT Server's Event Rules, you can configure EFT Server to perform an Action automatically when a specific Event occurs. You can use Automated Workflows to design scripts, batch files, macros, or any other code-intensive process using an easy drag-and-drop interface, and add the Workflow to Event Rules. AWE Workflow Task names can appear in reports and logs.
DMZ Gateway Module (DMZ), v3 The DMZ Gateway® module version 3 is designed to reside in the demilitarized zone and provide secure communication with EFT Server behind intranet firewalls without requiring any inbound firewall holes between the internal network and the DMZ.
Mail Express Module Mail Express™ allows you to send large email file attachments to recipients inside or outside of your organization quickly, reliably, and securely, while reducing the load on your mail server. Mail Express also allows your recipients to send large email file attachments to you through a Web portal. You can send files using a Microsoft Outlook Add-In, a Web portal, or both, using secure authentication and auditing capabilities. The Mail Express system will offload file attachments to an independent server and can notify recipients that the files are available for pickup.
67

EFT Server Installation Guide
Secure Mobile Access Module The Secure Mobile Access (SMA) module for EFT Server™ managed file transfer allows you to access EFT Server-managed files on your mobile devices.
COM API Reference You can interact directly with EFT Server from your own custom applications using any COM-enabled programming language such as Visual Basic (VB), Java, or C++. You can create a script with the development IDE of your choice. To create a new script file, you must be familiar with programming concepts and should have experience with COM-enabled programming languages.
68

Index About ................................................................ 67 About dialog ..................................................... 67 About Globalscape EFT Server ....................... 67 Activating .................................................... 49, 52
ARM .............................................................. 49 AS2 Module .................................................. 49 AWE Module ................................................. 49 DMZ Gateway ......................................... 49, 52 EFT Server ................................................... 49 High Security Module ................................... 49 HTTP ............................................................ 49 OpenPGP Module ........................................ 49 SFTP Module ................................................ 49 Software........................................................ 49 Web Transfer Client ...................................... 49
Activating the Software .................................... 49 Advanced Workflow ......................................... 67 Advanced Workflow Engine ............................. 67 Allowing the EFT Server Service Administrative
Rights ............................................................ 56 APPDATA......................................................... 62 Application Data ......................................... 49, 62 ASP.NET .......................................................... 60 aspnet_regiis.exe ............................................. 60 Automated Workflows ...................................... 67 AWE ................................................................. 67 AWE Workflow ................................................. 67 Backup Server Configuration tool .................... 40 Best Practices for Configuration and Validation
...................................................................... 11 ChangePassByAD ..................................... 42, 58 Cluster Configuration ....................................... 40 COM ................................................................. 68 Configuration Checklist .................................... 11 Configuration Data Location............................. 40 Continue Trial button ........................................ 49 Copyright Information ....................................... 67 creating ............................................................. 56
Windows User Account ................................ 56 Data Security .................................................... 11 debug logging ................................................... 66 Developer Mode ......................................... 49, 61 DMZ .................................................................. 67 DMZ Gateway ............................................ 52, 67
Activating ...................................................... 52 EFT Server ................................................. 54, 56
Set Windows NT Permissions ...................... 56 Uninstalling ................................................... 54
EFT Server Deployment Scenarios ................... 5 EFT Server License Information ...................... 67 EFT Server Service Administrative Rights ....... 56 EFT Server Specifications .................................. 9 EFT Server's COM API .................................... 68
EFTServer ........................................................ 56 eftserver-ent.exe .............................................. 62 eftserver-ent-nodb.exe ..................................... 62 EFTUser ........................................................... 56 Enable
32BitAppOnWin64 ........................................ 60 Multipart ........................................................ 58
enable_iwa ....................................................... 58 Enable10ColumnInClientLog ........................... 58 Enable32BitAppOnWin64 ................................ 60 Enter Trial Extension Response ...................... 61 Error in ASP.NET Registration ........................ 60 evaluating ................................................... 49, 61 Event Rules ...................................................... 67 Extending the Trial ........................................... 61 File Location Changes ..................................... 49 Firewall ............................................................. 67 Folder Options ................................................. 49 FolderMonitorWorkerThreadCount .................. 58 FTPSYSTResponse......................................... 58 Globalscape Customer Support ....................... 67 Hybrid Configuration .......................................... 5 IIS ..................................................................... 59 IIS 6.0 ............................................................... 60 INSTALL_SQLEXPR ....................................... 62 Installation ........................................................ 18 Installation Logging .......................................... 66 Installer.log ....................................................... 66 Installing EFT Server Administrator and Modules
...................................................................... 18 Installing the Administration Interface Remotely
...................................................................... 31 Licenses ........................................................... 67 Locations .......................................................... 49 log .................................................................... 66 log_request ...................................................... 58 Logfile .............................................................. 66 Logging ............................................................ 66 Mail Express .................................................... 67 MaxNumberConnections ................................. 58 Modifying or Repairing the Software................ 53 MultipartValue .................................................. 58 NET IIS Registration Tool ................................ 60 NET Registration Tool ..................................... 60 NET Web Application ....................................... 60 NOAUTOSTART .............................................. 62 PasswordChg_EmailInterval ............................ 58 PasswordChg_NTADLDAP ............................. 58 passwords ........................................................ 58 Peer Notification Channel ................................ 52 Perimeter Network Security ............................. 52 PNC ................................................................. 52 Program Files ................................................... 49
69

EFT Server Installation Guide
ProgramData .................................................... 49 register ............................................................. 60
ASP ............................................................... 60 Registration Wizard .......................................... 49 Registrations .................................................... 67 Registrations Licenses End-User Agreement .. 67 Registry Settings .............................................. 58 Release Notes .................................................. 52 Remote Administration ..................................... 31 Repairing .......................................................... 53
Installation..................................................... 53 Reporting Module ............................................. 49 Running a Microsoft .NET Web Application in
32-bit Mode in IIS 6.0 on a 64-bit Server ...... 60 Running EFT Server and Microsoft IIS on the
Same Computer ........................................... 59 SAT .................................................................. 67 Secure Ad Hoc Transfer ................................... 67 Secure Ad Hoc Transfer Module ...................... 67 Secure Mobile Access ...................................... 68 Secure Mobile Access Module ......................... 68 Security Best Practices Checklist .................... 11 Serial Number .................................................. 49 Server Cluster .................................................... 5 Server License Information .............................. 67 Server Specifications ......................................... 9 Server-to-Server Deployment ............................ 5 Set Windows NT Permissions .......................... 56 SFTP ................................................................ 49 Silent Installation .............................................. 62 SMA .................................................................. 68 Software ........................................................... 54
Activating ...................................................... 49
Uninstalling ................................................... 54 specifications ..................................................... 9 System Account ............................................... 56 System Requirements ....................................... 7 System Requirements for EFT Server ............... 7 systemroot ....................................................... 49 Trial .................................................................. 61 Trial Extension Request ................................... 61 Trial Extension Request Details ....................... 61 Trial Extension Response ................................ 61 Two DMZ Gateways .......................................... 5 Unexpected error 0x8ffe2740 occurred ........... 59 Uninstall EFT Server ........................................ 54 Uninstalling ...................................................... 54 Uninstalling the Software ................................. 54 upgrading ................................................... 42, 49
ARM ............................................................. 42 DMZ Gateway .............................................. 42 EFT Server ............................................. 42, 49 EFT Server Enterprise ................................. 42
Upgrading EFT Server in a Cluster .................. 40 Upgrading the Software ................................... 42 use_registry ..................................................... 58 User Rights Assignment .................................. 56 Using NT Authentication .................................. 56 Version History ................................................. 52 Web Services ................................................... 58 WebServiceTimeout......................................... 58 Windows Event Log ......................................... 52 Windows Registry ............................................ 58 Workflows ........................................................ 67 WTCTimeout .................................................... 58
70