egfr surveillance user guide & it information pack and outcomes of patients who have chronic...
TRANSCRIPT

ASSIST-CKD
A programme to spread eGFR graph surveillance for the early identification, support and treatment of people with progressive chronic kidney disease
eGFR SURVEILLANCE USER GUIDE &
IT INFORMATION PACK (v4)
https://assist-ckd.org
Key Contacts: Lesley Woolnough - Project Manager Email: [email protected] Tel: 07765 838 071 Rowena Sampson - Project Administrator Email: [email protected] Support & Development Email: [email protected]
www.kidneyresearchuk.org | Registered Charity No. 252892 Scottish Charity No. SC039245
Page � of �1 41
Introduction 3
Pre-Setup: Getting Ready 4 System Requirements 4Database 4Notes on Upgrading from v2 to v4 5Notes on Upgrading from v4.x.x to v4.y.y 5
Setup: Installing and Launching 6 Accessing the Installation and Configuration Directories 7
Setup: Database Connection 9 MSSQL Server 10MySQL 11SQLite 12
Setup: Email Server (SMTP) 13
Usage: Application Dashboard 14
Usage: Load Data 15 Upload GFR Data 16Upload Bulk Location Code Mapping Data 17Upload Diabetic/Renal Data and Upload Other Tests Data [Legacy] 18
Usage: Analyse Data 18 Filtering 19Viewing Graphs 20Generating Reports 21Guidelines on Interpreting the Cumulative eGFR Results 22
Usage: Statistics 23
Usage: Settings 24 App Settings 24Database Settings 25Email Server Settings (SMTP) 25Location Code Mappings 25Location Email Mappings 25Report Template Settings 25Query Settings (Advanced) 25
Detail: Report Templates 26 Sample Report and Customisation Example 28
Detail: Location Code Mappings 29
Detail: Database Table Schemas 30 ckd_loccode_mappings 31ckd_tests and ckd_diabetic_renal 31
Guidance on Data Upload Formatting 31
FAQ’s 32
Standard Operating Procedure (SOP) for eGFR Graph Reporting System 37
Page � of �2 41
Introduction ASSIST-CKD is a UK wide collaborative quality improvement project led by Kidney Research UK and funded by the Health Foundation. The aim is to improve the treatment and outcomes of patients who have chronic kidney disease (CKD). The project focuses on those patients who have declining kidney function and may ultimately require dialysis or a kidney transplant and involves the reporting of kidney function (eGFR) graphs to local GPs.
The ASSIST-CKD software system was developed at the Heart of England Foundation Trust (HEFT) in Birmingham with a grant from the Health Foundation and has been operating for patients with diabetes since 2004 and in all patients since 2012. During this time, UK Renal Registry (UKRR) data has shown that HEFT have the lowest percentage of patients presenting late to a nephrologist (defined as less than 90 days before commencing Renal Replacement Therapy (RRT) at 5.2% to an average of 17% across England, Wales and Northern Ireland. Late presentation is strongly associated with increased mortality and morbidity and is a key cause of avoidable harm and increased healthcare costs.
The package includes a SQL database into which biochemical data from the laboratory system (or reporting service) is uploaded together with software that interrogates the database to produces graphs of kidney function over time. The intervention has since been rolled across the West Midlands in a project funded by NHS England via the West Midlands Strategic Clinical Network and Clinical Senate. In 2016/17 the software was upgraded to version 4 and this has been extensively tested and fully validated against the original HEFT software. ASSIST-CKD does not involve the collection or analysis of new biochemical data. Rather it re-uses, stores and transmits data already available on laboratory systems and highlight trends over time graphically to the General Practitioners who have requested the biochemical tests.
The ASSIST-CKD project involves up to 20 main renal units, pathology laboratories and their surrounding GP practices, covering an estimated population of 11-12 million people. We are delighted that your Trust are supporting this exciting initiative which we believe will help to provide care that is more timely and safer and make better use of scarce NHS resources.
If you have any questions please contact us at [email protected] and we will direct your query to the appropriate team member. For technical and software support queries please email [email protected].
Acknowledgement
The ASSIST-CKD team would like to thank Dr Hugh Rayner, Dr David Kennedy, Jessie Raju, Cecily Hollingsworth and version 2 developers Ali Bahron and Cathy Sanders, whose work at HEFT has been such an inspiration to this project and the development of version 4. We would also like to thank them for allowing us to use much of their materials which have been adapted for this project. A special thanks must also go out to Dr Darren Powell, Principal Clinical Scientist at St Helens and Knowsley NHS Trust, who helped v4 developers test, improve and audit new software versions.
Page � of �3 41
Pre-Setup: Getting Ready
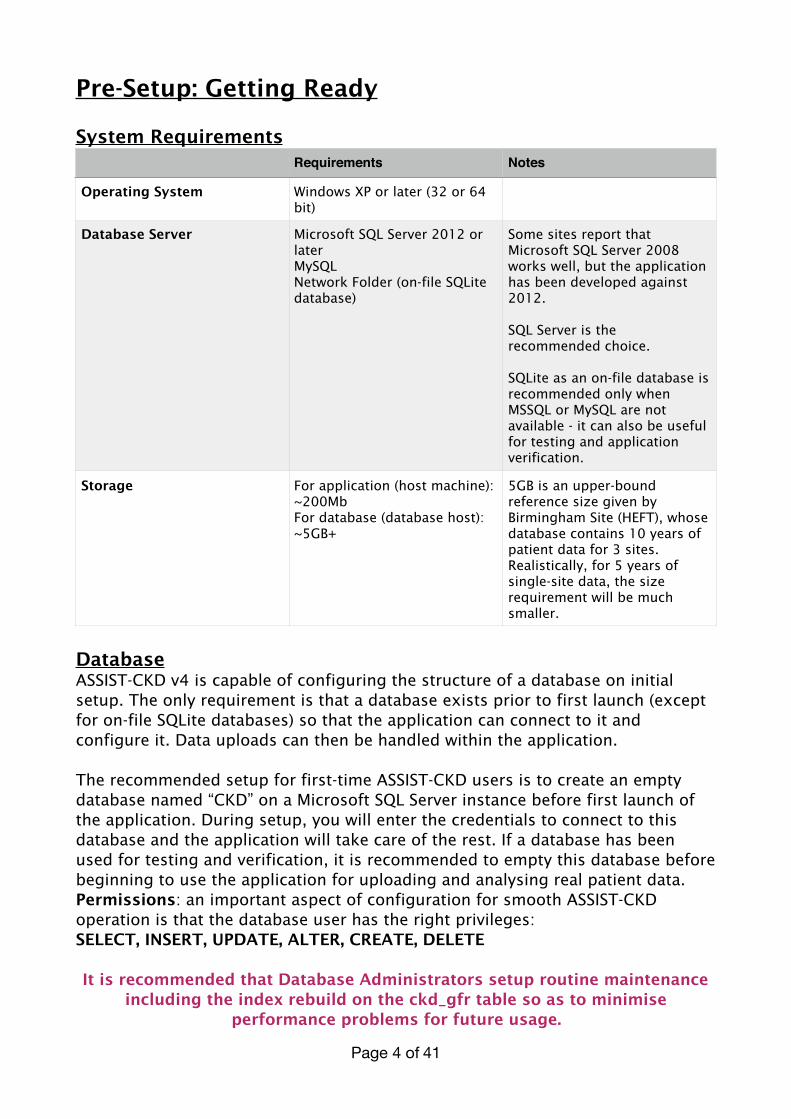
System Requirements
Database ASSIST-CKD v4 is capable of configuring the structure of a database on initial setup. The only requirement is that a database exists prior to first launch (except for on-file SQLite databases) so that the application can connect to it and configure it. Data uploads can then be handled within the application.
The recommended setup for first-time ASSIST-CKD users is to create an empty database named “CKD” on a Microsoft SQL Server instance before first launch of the application. During setup, you will enter the credentials to connect to this database and the application will take care of the rest. If a database has been used for testing and verification, it is recommended to empty this database before beginning to use the application for uploading and analysing real patient data. Permissions: an important aspect of configuration for smooth ASSIST-CKD operation is that the database user has the right privileges: SELECT, INSERT, UPDATE, ALTER, CREATE, DELETE
It is recommended that Database Administrators setup routine maintenance
including the index rebuild on the ckd_gfr table so as to minimise performance problems for future usage.
Requirements Notes
Operating System Windows XP or later (32 or 64 bit)
Database Server Microsoft SQL Server 2012 or later MySQL Network Folder (on-file SQLite database)
Some sites report that Microsoft SQL Server 2008 works well, but the application has been developed against 2012.
SQL Server is the recommended choice.
SQLite as an on-file database is recommended only when MSSQL or MySQL are not available - it can also be useful for testing and application verification.
Storage For application (host machine): ~200Mb For database (database host): ~5GB+
5GB is an upper-bound reference size given by Birmingham Site (HEFT), whose database contains 10 years of patient data for 3 sites. Realistically, for 5 years of single-site data, the size requirement will be much smaller.
Page � of �4 41
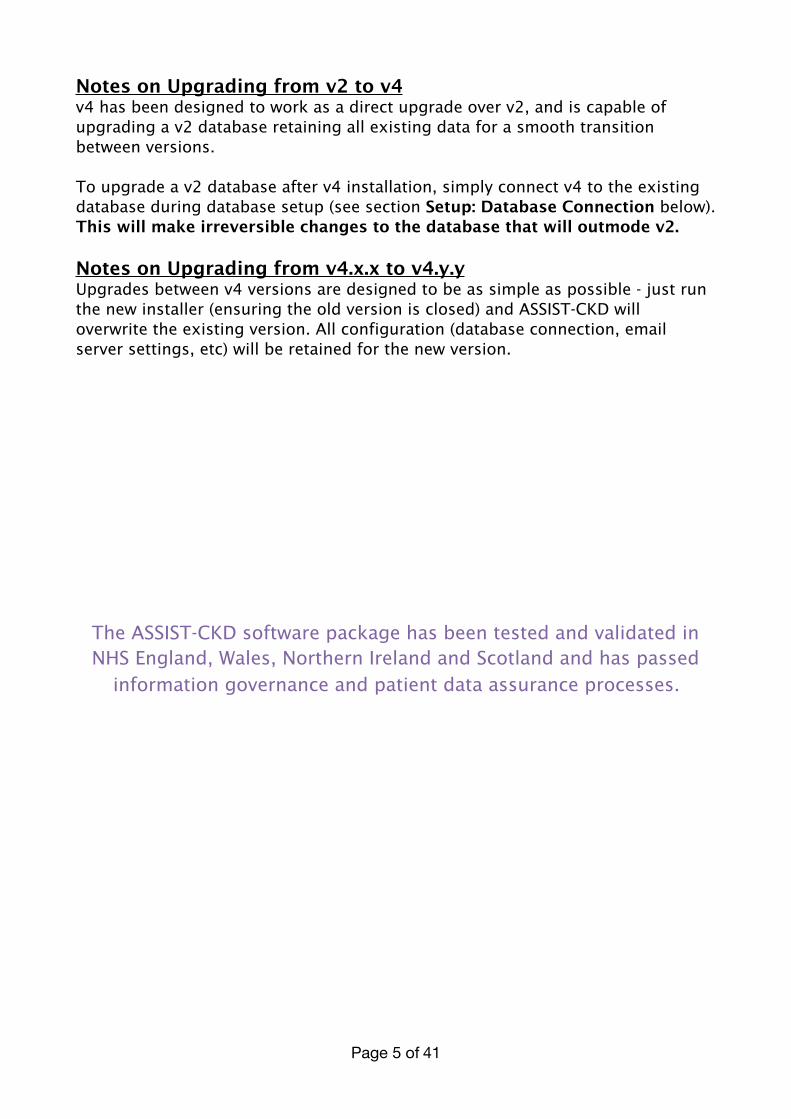
Notes on Upgrading from v2 to v4 v4 has been designed to work as a direct upgrade over v2, and is capable of upgrading a v2 database retaining all existing data for a smooth transition between versions.
To upgrade a v2 database after v4 installation, simply connect v4 to the existing database during database setup (see section Setup: Database Connection below). This will make irreversible changes to the database that will outmode v2.
Notes on Upgrading from v4.x.x to v4.y.y Upgrades between v4 versions are designed to be as simple as possible - just run the new installer (ensuring the old version is closed) and ASSIST-CKD will overwrite the existing version. All configuration (database connection, email server settings, etc) will be retained for the new version.
The ASSIST-CKD software package has been tested and validated in NHS England, Wales, Northern Ireland and Scotland and has passed
information governance and patient data assurance processes.
Page � of �5 41

Setup: Installing and Launching ASSIST-CKD v4’s installer is distributed as a Windows executable (.exe), facilitating a click-to-run installation procedure which sets up the software on your PC. V4 works on a per machine / user basis, to install on multiple machines you would need to repeat the process.
The latest version can be obtained by emailing [email protected] or by visiting the website at https://assist-ckd.org and logging in.
If upgrading between v4 versions (for example, from v4.4.X to v4.4.Y), ensure that the existing version is closed before running the new installer. As mentioned above, the new version will overwrite the old version and all configuration will be retained.
Installation: 1. Download the .zip 2. Extract the .zip to get the installer (.exe) inside. 3. Double click the installer, and wait for the splash screen to disappear 4. The application will launch automatically on completion, and a shortcut
should be written to your desktop
The application installs to the following location: C:\Users\{your-username}\AppData\Local\AssistCKD\
With the launcher executable being named AssistCKD.exe. If no shortcut was created during installation, it is recommended that you do so manually by right clicking the file and clicking Send To -> Desktop.
Application configuration details as well as its error log are stored in the following location: C:\Users\{your-username}\AppData\Roaming\AssistCKD\
Page � of �6 41

Accessing the Installation and Configuration Directories As mentioned, the installation and configuration directories are within the AppData user directory. This directory is hidden by default. To gain access, follow these instructions:
1. Open the start menu and search for “File Explorer Options” 2. Within the Options panel, navigate to the “View” tab 3. Find “Show hidden files and folders” in the list and tick the option 4. Click “OK” or “Apply” to save the changes (this may require administrator
privileges)
Page � of �7 41

Alternatively, to navigate straight to the folders without changing settings: Installation Directory [AppData\Local]:
1. Open the start menu and search for “Run” 2. In the Run dialog, type %LOCALAPPDATA% 3. Press Enter or click Run - Explorer should open at AppData\Local
Configuration / Log Directory [AppData\Roaming]: 1. Open the start menu and search for “Run” 2. In the Run dialog, type %APPDATA% 3. Press Enter or click Run - Explorer should open at
AppData\Roaming
From there, navigate to the folders named AssistCKD.
Page � of �8 41
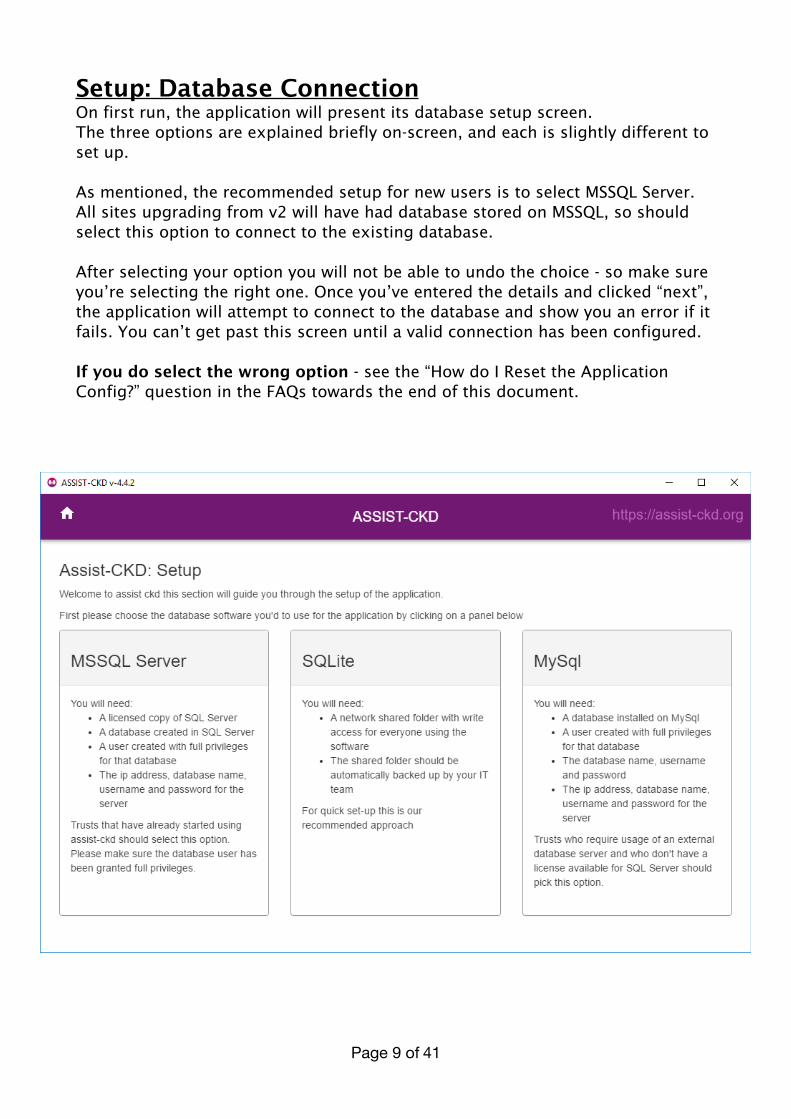
Setup: Database Connection On first run, the application will present its database setup screen. The three options are explained briefly on-screen, and each is slightly different to set up.
As mentioned, the recommended setup for new users is to select MSSQL Server. All sites upgrading from v2 will have had database stored on MSSQL, so should select this option to connect to the existing database.
After selecting your option you will not be able to undo the choice - so make sure you’re selecting the right one. Once you’ve entered the details and clicked “next”, the application will attempt to connect to the database and show you an error if it fails. You can’t get past this screen until a valid connection has been configured. If you do select the wrong option - see the “How do I Reset the Application Config?” question in the FAQs towards the end of this document.
Page � of �9 41

MSSQL Server
If upgrading from a functional v2 installation, you can glean the above information from that installation’s configuration file (found at C:\Program Files (x86)\Heart of England\CKD_SQL\ckd.txt). Within this file will be a line labelled “Connection”, which will contain the relevant information. An example of how to carry across these credentials is given below.
Detail Meaning
Server IP Address / Hostname Network identifier for the server hosting the MSSQL instance
Instance Name (optional) Optional. If the target database isn’t on the default MSSQL instance, you must enter the instance name here.
Database Name The name of the database. This is likely to be “CKD”.
Database Username The username with the database permissions mentioned earlier.
Database Password The password for the database user
Use Encryption Only necessary if using the Azure/Encrypted version of SQL Server. Ask your IT Team if in doubt.
Page � of �10 41

MySQL An unlicensed (non-proprietary) alternative to MSSQL which functions in a similar manner (ie; it exists on a server and requires login credentials to work with specific named databases), you may find that your IT team uses this as an alternative to MSSQL. The setup requirements for MySQL are therefore very similar to MSSQL.
Detail Meaning
Server IP Address / Hostname Network identifier for the server hosting the MSSQL instance
Instance Name (optional) Optional. If the target database isn’t on the default MySQL instance, you must enter the instance name here.
Database Name The name of the database. This is likely to be “CKD”.
Database Username The username with the database permissions mentioned earlier.
Database Password The password for the database user
Page � of �11 41
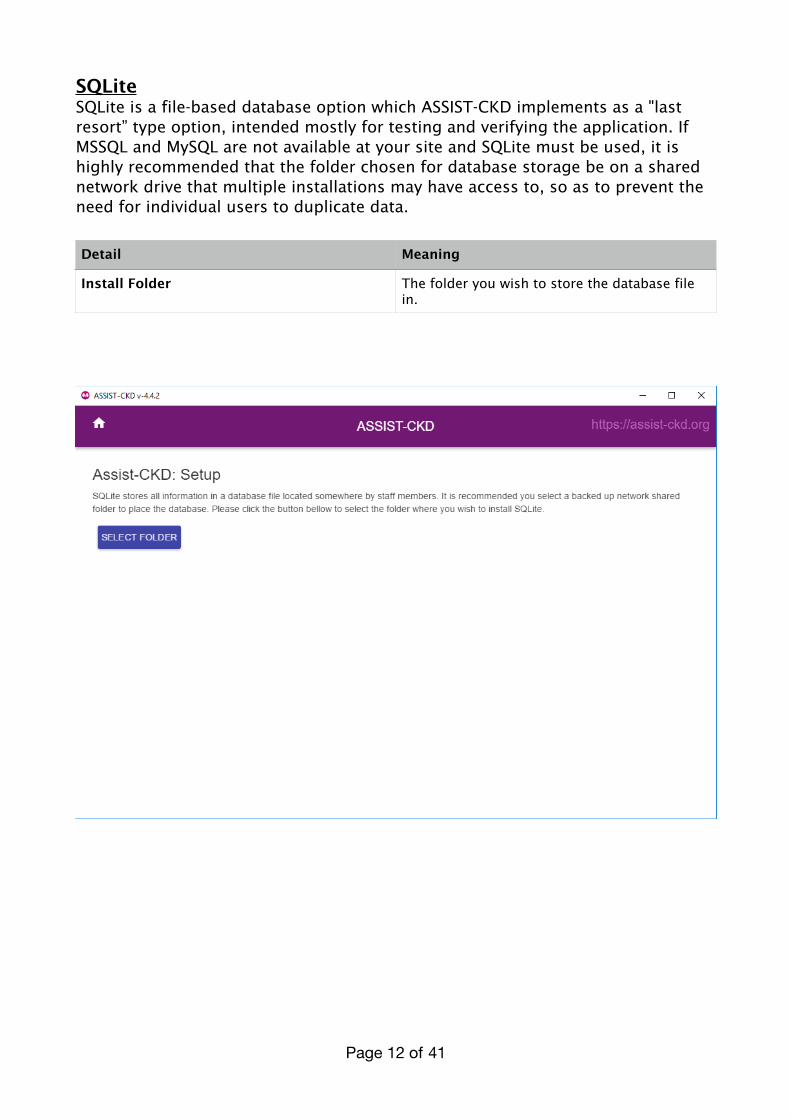
SQLite SQLite is a file-based database option which ASSIST-CKD implements as a "last resort” type option, intended mostly for testing and verifying the application. If MSSQL and MySQL are not available at your site and SQLite must be used, it is highly recommended that the folder chosen for database storage be on a shared network drive that multiple installations may have access to, so as to prevent the need for individual users to duplicate data.
Detail Meaning
Install Folder The folder you wish to store the database file in.
Page � of �12 41

Setup: Email Server (SMTP) After setting up the database, you will have the option to set up the mail server on first launch. This is optional at this stage, but recommended if you know the details or can find them, as it will be necessary for sending emails from within the application.
Some details are required to set up the mail server:
This can be configured later, so if you wish to skip this stage then just click “next” without entering any details.
Once this stage is complete, the application will configure the database if necessary (this may take a little while), and move to the Dashboard.
Detail Meaning
SMTP IP Address / Hostname Network identifier for the SMTP server used to send mail
Port The SMTP port used by the server
Email From The email address to send emails from
Username (optional) If necessary, the username for the SMTP server
Password (optional) If necessary, the password for the SMTP server
Page � of �13 41

Usage: Application Dashboard After the mail setup screen, the database configuration may take a little while to complete. Once it does, you'll land on the Application Dashboard - and every subsequent launch of the application will come here too.
From here, you can access all of the application’s features - Upload, Analyse (including the graphing function), Statistics and Settings.
From any screen in the application, you can press the “Home” button (top-left) to return to the Dashboard.
Page � of �14 41

Usage: Load Data To upload data to the database, navigate to the “Load Data” screen from the Application Dashboard. For all uploads shown below, there is a standard interface: a file selector, a field-by-field validation indicator, and an upload button which only shows if the selected file appears valid.
When selecting a file for upload, the first row is scanned. The interpreted data is shown in a table denoting the required fields for this file and the values found on the file row. A green background indicates that the field is valid; a red background indicates that it is not. The upload button won’t appear unless all fields are green. For red fields, an error will show describing what is wrong.
To ensure that ASSIST-CKD can understand your laboratory data outputs correctly, it may require some preparation or adjustment using MS Excel (or an equivalent text editor) prior to saving data as a .csv file and importing it into the application. The requirement to prepare data will depend on data export capabilities and configuration of your specific LIMS system, but examples may include adding the eGFR units or removing page headers from an output file.
During upload, you will see a progress bar denoting how many rows have been processed.
The application processes files in batches of 900 rows, validating some fields against required formats/expected values. It will skip any rows which don’t pass this validation check, and inform you about skipped rows at the end (with extra detail given in the file;
C:\Users\{your-username}\AppData\Roaming\AssistCKD\errors.csv)
Below are some details and examples of all data uploads.
Page � of �15 41

Upload GFR Data This is the “main upload”, where you will upload data denoting patients’ eGFR results. Choose a file with the “Browse” button and ensure that all fields match what you’d expect before uploading.
Further details on the expected layout of provided data is given in the “Database Table Schemas” section below.
Page � of �16 41

Upload Bulk Location Code Mapping Data This upload ties to the application’s Location Code Mapping feature, and allows you to upload Mappings in bulk rather than entering them one-by-one on the settings screen. For more information on this, see the detail section on the subject below.
ASSIST-CKD requires that the eGFR patient data match the formatting criteria and order as specified on the Database specification (page 30), and it is critical that all eGFR from GP requests are correctly identified as Location Type set as 'X' to ensure that graphs are prepared on these patients alone. This can be achieved by setting the Location Code attribute as 'X' in the uploaded file, or alternatively using the Location Code mapping table (described on page 29) to automatically convert your own local code for GP results to the required 'X' code during the import process.
Page � of �17 41
Upload Diabetic/Renal Data and Upload Other Tests Data [Legacy] These uploads are legacy carry-overs from ASSIST-CKD v2 and are largely irrelevant and not recommended for use as they do not add to the focus of the application. You can find details on the fields required for upload by opening the “Legacy Uploads” section on the Upload screen and selecting either of these options.
If present, data uploaded to either of these sections are displayed on reports generated for each patient.
Usage: Analyse Data
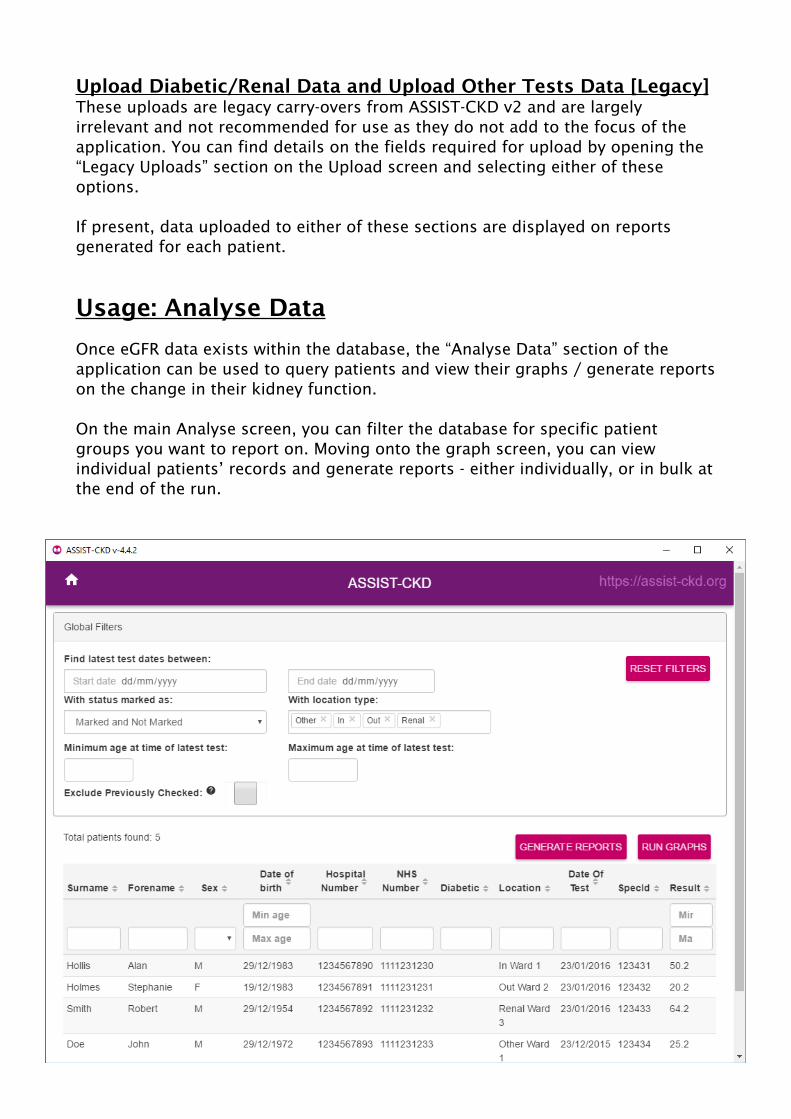
Once eGFR data exists within the database, the “Analyse Data” section of the application can be used to query patients and view their graphs / generate reports on the change in their kidney function.
On the main Analyse screen, you can filter the database for specific patient groups you want to report on. Moving onto the graph screen, you can view individual patients’ records and generate reports - either individually, or in bulk at the end of the run.
Page � of �18 41
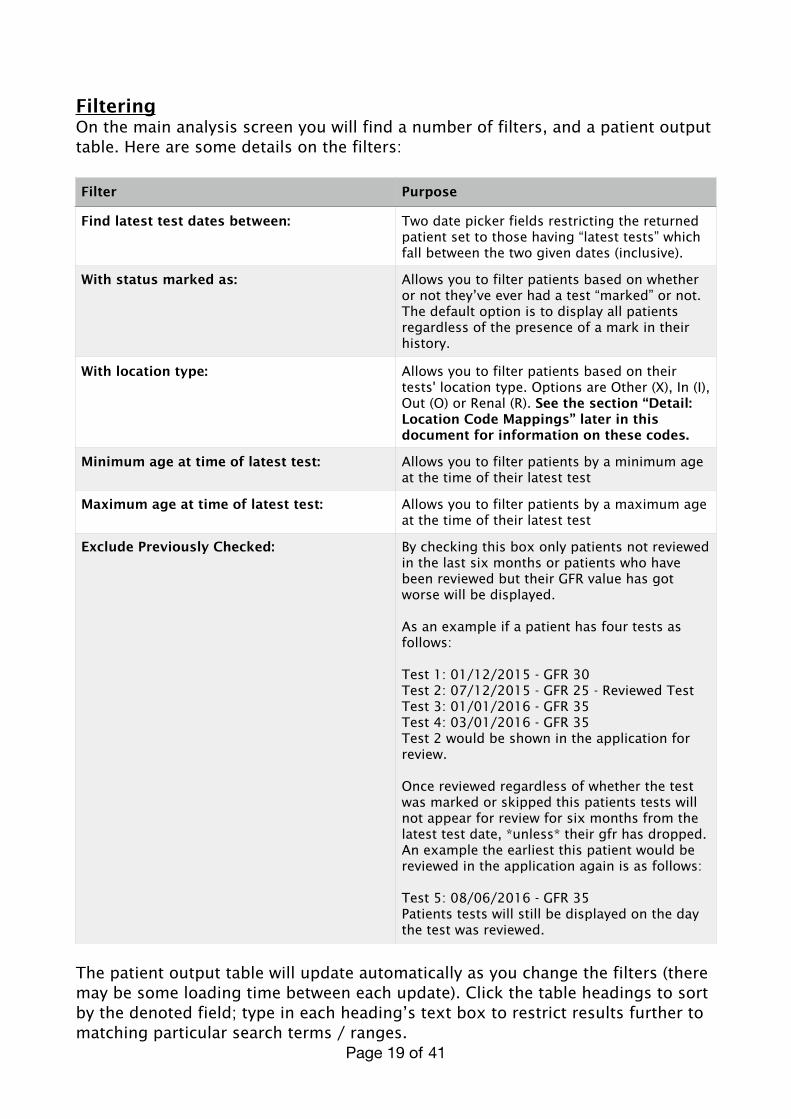
Filtering On the main analysis screen you will find a number of filters, and a patient output table. Here are some details on the filters:
The patient output table will update automatically as you change the filters (there may be some loading time between each update). Click the table headings to sort by the denoted field; type in each heading’s text box to restrict results further to matching particular search terms / ranges.
Filter Purpose
Find latest test dates between: Two date picker fields restricting the returned patient set to those having “latest tests” which fall between the two given dates (inclusive).
With status marked as: Allows you to filter patients based on whether or not they’ve ever had a test “marked” or not. The default option is to display all patients regardless of the presence of a mark in their history.
With location type: Allows you to filter patients based on their tests' location type. Options are Other (X), In (I), Out (O) or Renal (R). See the section “Detail: Location Code Mappings” later in this document for information on these codes.
Minimum age at time of latest test: Allows you to filter patients by a minimum age at the time of their latest test
Maximum age at time of latest test: Allows you to filter patients by a maximum age at the time of their latest test
Exclude Previously Checked: By checking this box only patients not reviewed in the last six months or patients who have been reviewed but their GFR value has got worse will be displayed.
As an example if a patient has four tests as follows:
Test 1: 01/12/2015 - GFR 30 Test 2: 07/12/2015 - GFR 25 - Reviewed Test Test 3: 01/01/2016 - GFR 35 Test 4: 03/01/2016 - GFR 35 Test 2 would be shown in the application for review.
Once reviewed regardless of whether the test was marked or skipped this patients tests will not appear for review for six months from the latest test date, *unless* their gfr has dropped. An example the earliest this patient would be reviewed in the application again is as follows:
Test 5: 08/06/2016 - GFR 35 Patients tests will still be displayed on the day the test was reviewed.
Page � of �19 41

Note that large returned patient sets may cause the application to operate slowly. It is recommended that filters be used to produce a small number of returned patients per reporting run to increase overall efficiency. A useful way to achieve this consistently is to split reporting runs into two groups - “Older” and “Younger” patients (age >65 and age <=65, respectively).
Viewing Graphs When you’ve filtered the patients to retrieve the set you want to report on, click “Run Graphs” to move to the graphing screen.
Graphs are plotted as eGFR value (y axis) against time (x axis). The date range shown per patient will be bi-quarterly, with consistent gaps between dates. The range will begin with the nearest date after the patient’s first recorded test. Two series are shown on the graph - one for the given eGFR values, and one, labelled “eGFR if Afro-Caribbean”, with eGFR values multiplied by a correction factor so as to account for expected differences in muscle mass.
Page � of �20 41
At the top of the screen, the patient’s details are shown in a table. On the right of the graph, two or three options are shown, allowing you to save or email an individual report for just this patient, and (if you have Graph Zoom enabled in the application settings) reset the zoom of the graph. If zoom is enabled, you can use the mouse wheel on the graph to zoom in and out.
Below the graph you will find controls for navigating to the next and previous patient, and the “Mark” button. Clicking “Mark” adds a red line at the current date to the patient’s graph which will persist through all future reporting runs for this patient. It is used to denote a flag, at which time the patient was reported to the requesting clinician. The application will use the mark to determine whether or not a report should be generated for a patient at the end of a reporting run.
Graphs may already contain these red-line marks, denoting the dates upon which the patient was previously marked and reported to the clinician. Each of the patient’s recorded tests will create a small dot at the right date on their graph. Hovering over these dots with the mouse will give the exact date and result of the test. At the bottom of the screen will be a table giving full details of each recorded test for this patient.
If a patient has only a single test, then a graph cannot be constructed. The patient will come up in the run, but the graph will be replaced with a message explaining this. See the setting “Skip if Single Test Found” (detail below) to skip these patients automatically.
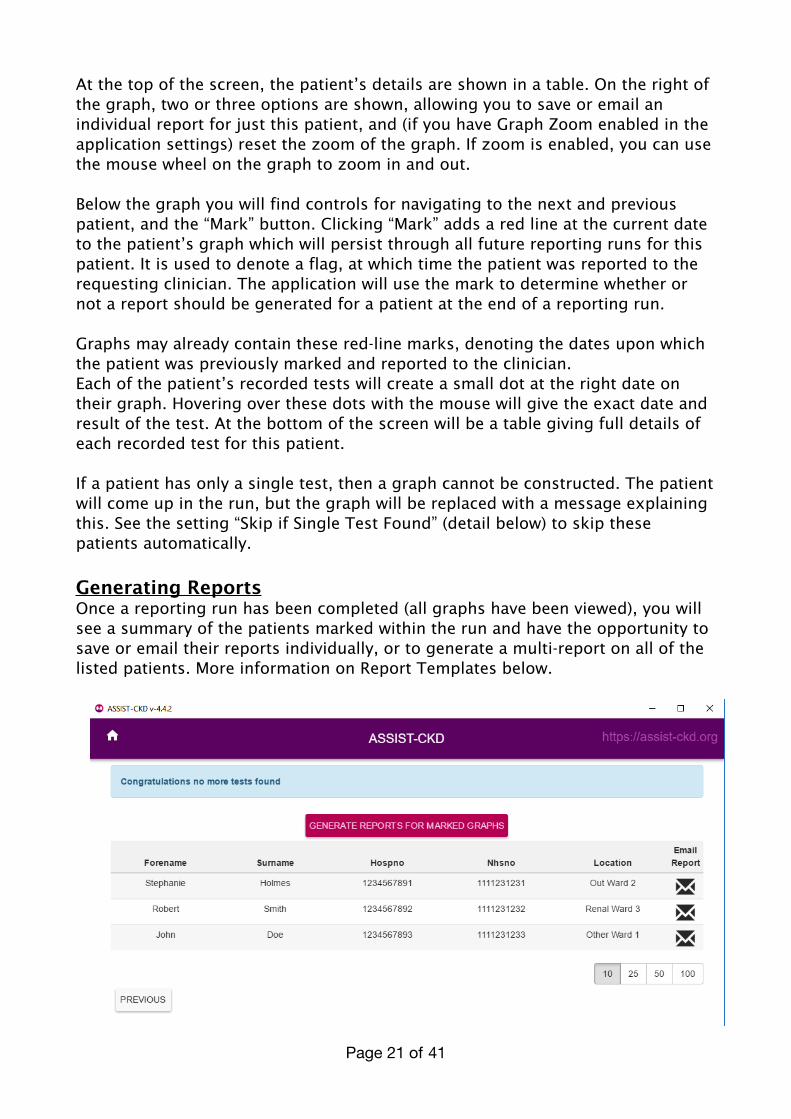
Generating Reports Once a reporting run has been completed (all graphs have been viewed), you will see a summary of the patients marked within the run and have the opportunity to save or email their reports individually, or to generate a multi-report on all of the listed patients. More information on Report Templates below.
Page � of �21 41
Guidelines on Interpreting the Cumulative eGFR Results
Note: this is a screening system and is necessarily subjective. The aim is to use clinical judgement to maximise detection of patients with undiagnosed and significant deteriorating kidney function whilst minimising the number of ‘false positive’ reports that do not require clinical action. The following are guidelines based on experience.
Patients to be highlighted
• Patients with a very steep eGFR graph suggest rapidly changing renal function. This may be consistent with either acute kidney injury (AKI) or rapidly progressive chronic kidney disease. Although the screening system is designed for monitoring chronic kidney disease (and your Trust is likely to have a separate system of AKI alerts) these patients should as a default be marked.
• Patients whose cumulative eGFR results are deteriorating steadily at a significant rate (for example ≥5ml/min/1.73m2/year) and especially those with the latest eGFR below 30 ml/min. Please note that 5/ml/min/1.73m2/year is only a guide – lesser declines may also be important where the trend over time is clearly progressive or the kidney function is lower. The age of the patient may also be taken into consideration. In very elderly patients a slow steady decline in eGFR may be less significant than for younger patients as the former are more likely to die of other causes before their deteriorating kidney function becomes clinically significant.
• Patients with relatively stable eGFR results in previous years but where the decline has accelerated within the last few months.
• A patient with a previous history of declining eGFR which initially improved and then a second decline has started. Consider these as high risk and review in the second stage.
Page � of �22 41

Usage: Statistics On first navigation to the Statistics screen, you will need to enter your ODS number (an auto-suggestion dropdown helps as you begin to type your number or organisation name) so that statistics are reported against the right organisation.
Once you’ve done this, the statistics screen will allow you to filter by month and will display a number of usage statistics per week for the selected month. Of note is the “export” button which will export the displayed statistics to a file, for transmission to the Renal Registry.
As detailed in the Standard Operating Procedure (at the end of this document), statistics should be exported and sent to the Renal Registry once a month.
The list should be sent at the end of each calendar month from an nhs.net account to ensure secure transfer to UKRR dedicated email address
Page � of �23 41
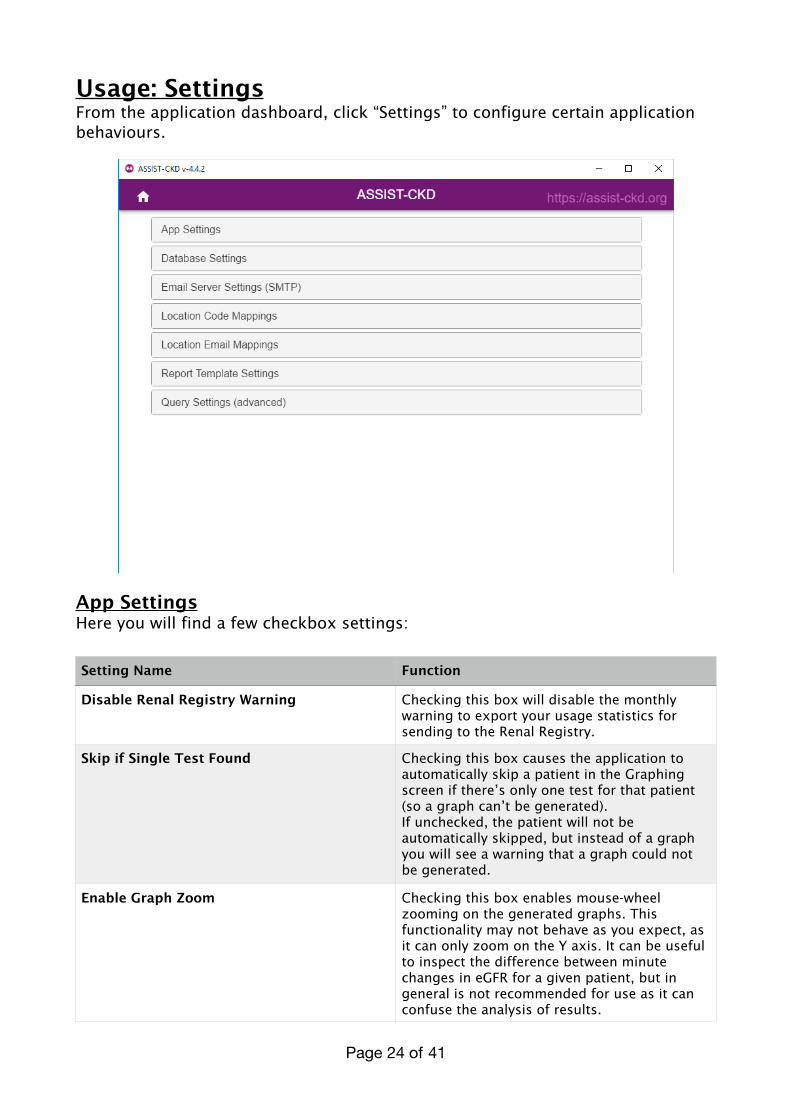
Usage: Settings From the application dashboard, click “Settings” to configure certain application behaviours.
App Settings Here you will find a few checkbox settings:
Setting Name Function
Disable Renal Registry Warning Checking this box will disable the monthly warning to export your usage statistics for sending to the Renal Registry.
Skip if Single Test Found Checking this box causes the application to automatically skip a patient in the Graphing screen if there’s only one test for that patient (so a graph can’t be generated). If unchecked, the patient will not be automatically skipped, but instead of a graph you will see a warning that a graph could not be generated.
Enable Graph Zoom Checking this box enables mouse-wheel zooming on the generated graphs. This functionality may not behave as you expect, as it can only zoom on the Y axis. It can be useful to inspect the difference between minute changes in eGFR for a given patient, but in general is not recommended for use as it can confuse the analysis of results.
Page � of �24 41

Database Settings Database connection settings cannot be changed within the application, but here you will find direction to the main configuration file within which you can change those settings. For reference, the expected location of the configuration file is:
C:\Users\{your-username}\AppData\Roaming\AssistCKD\assist-ckd-config.json
If you wish to make changes to this file, ensure that the application is closed first.
Email Server Settings (SMTP) Here you will find the same settings as provided on the Email Server setup stage screen - facilitating alteration of the credentials initially provided, or initial setup if you skipped the stage during first launch.
Location Code Mappings Here you can view existing Location Code Mappings and add or remove them one by one. For more information on Location Code Mappings, see the detail section on the subject below.
Location Email Mappings This section allows you to associate email addresses with particular locations. When using the “email reports” feature, patients with locations matching stored mappings can automatically be sent to the mapped email addresses.
Report Template Settings Here you will find two buttons for opening the two report templates the application uses to generate patient reports. For more information on Report Templates, see the detail section on the subject below.
Query Settings (Advanced) Here you can change the ckd_gfr fields by which patients will be matched during search. Changing this setting may alter the patients that are returned by particular filters, and may impact overall application performance. The default fields to match against are NHS No and Date of Birth; these may require changing if your data has inconsistent usage of those fields. In general, this field set should include fields which all patients will have, and which are very likely to be unique between patients (taken as a set, the match fields should be able to uniquely identify patients to a reasonable degree).
Page � of �25 41
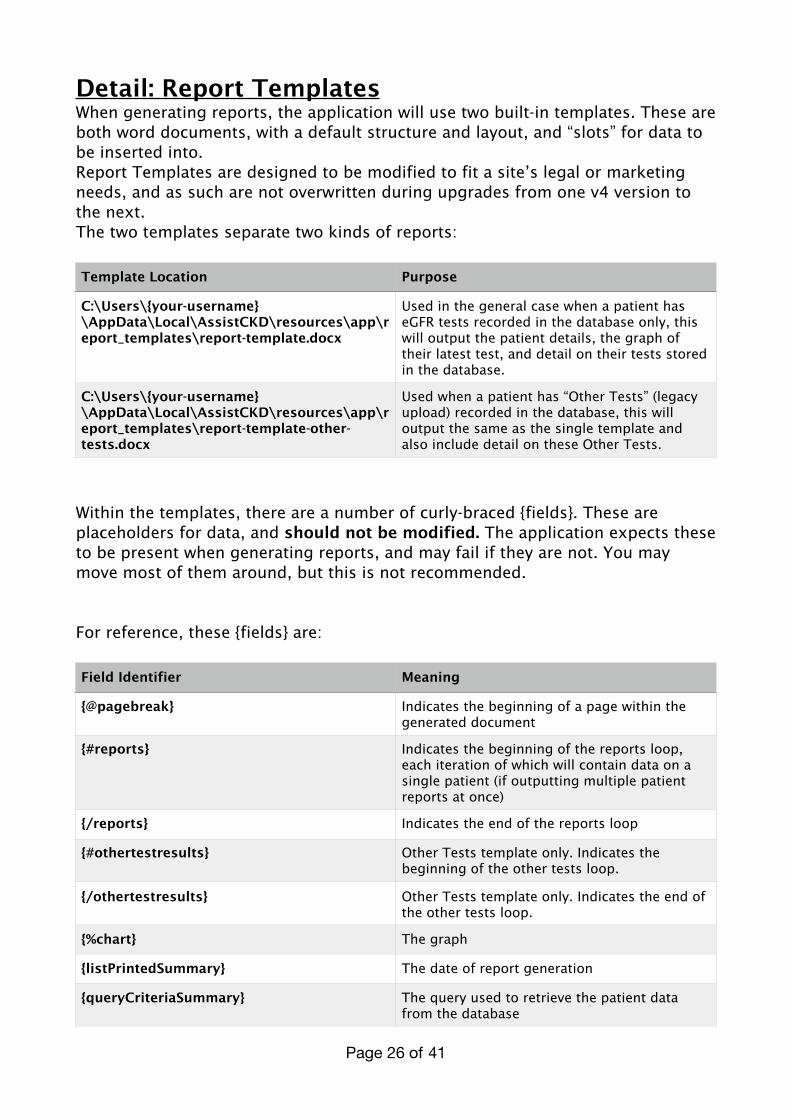
Detail: Report Templates When generating reports, the application will use two built-in templates. These are both word documents, with a default structure and layout, and “slots” for data to be inserted into. Report Templates are designed to be modified to fit a site’s legal or marketing needs, and as such are not overwritten during upgrades from one v4 version to the next. The two templates separate two kinds of reports:
Within the templates, there are a number of curly-braced {fields}. These are placeholders for data, and should not be modified. The application expects these to be present when generating reports, and may fail if they are not. You may move most of them around, but this is not recommended.
For reference, these {fields} are:
Template Location Purpose
C:\Users\{your-username}\AppData\Local\AssistCKD\resources\app\report_templates\report-template.docx
Used in the general case when a patient has eGFR tests recorded in the database only, this will output the patient details, the graph of their latest test, and detail on their tests stored in the database.
C:\Users\{your-username}\AppData\Local\AssistCKD\resources\app\report_templates\report-template-other-tests.docx
Used when a patient has “Other Tests” (legacy upload) recorded in the database, this will output the same as the single template and also include detail on these Other Tests.
Field Identifier Meaning
{@pagebreak} Indicates the beginning of a page within the generated document
{#reports} Indicates the beginning of the reports loop, each iteration of which will contain data on a single patient (if outputting multiple patient reports at once)
{/reports} Indicates the end of the reports loop
{#othertestresults} Other Tests template only. Indicates the beginning of the other tests loop.
{/othertestresults} Other Tests template only. Indicates the end of the other tests loop.
{%chart} The graph
{listPrintedSummary} The date of report generation
{queryCriteriaSummary} The query used to retrieve the patient data from the database
Page � of �26 41
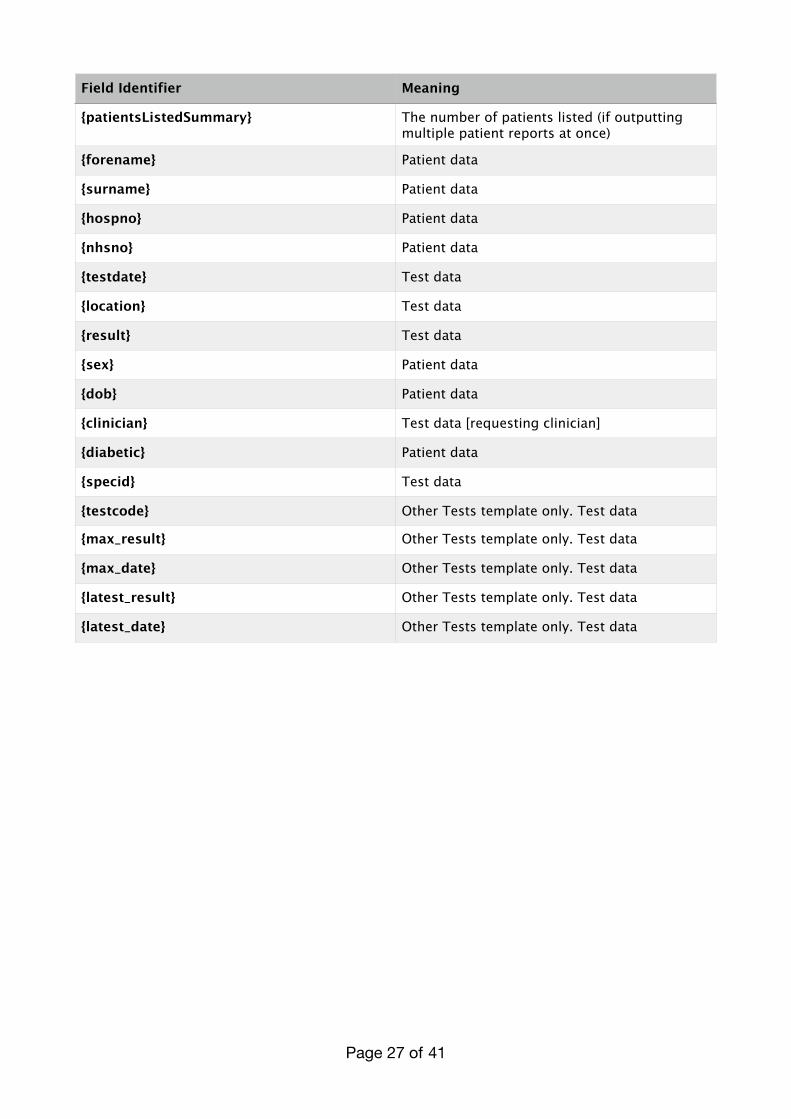
{patientsListedSummary} The number of patients listed (if outputting multiple patient reports at once)
{forename} Patient data
{surname} Patient data
{hospno} Patient data
{nhsno} Patient data
{testdate} Test data
{location} Test data
{result} Test data
{sex} Patient data
{dob} Patient data
{clinician} Test data [requesting clinician]
{diabetic} Patient data
{specid} Test data
{testcode} Other Tests template only. Test data
{max_result} Other Tests template only. Test data
{max_date} Other Tests template only. Test data
{latest_result} Other Tests template only. Test data
{latest_date} Other Tests template only. Test data
Field Identifier Meaning
Page � of �27 41

Sample Report and Customisation Example
The text in the “Information and Guidance" section is most important to modify to suit your environment. Especially, any example email addresses given should be replaced with the addresses of relevant personnel at your site. Line 3 should contain the name of a local consultant clinical/medical scientist or renal nurse.
Page � of �28 41
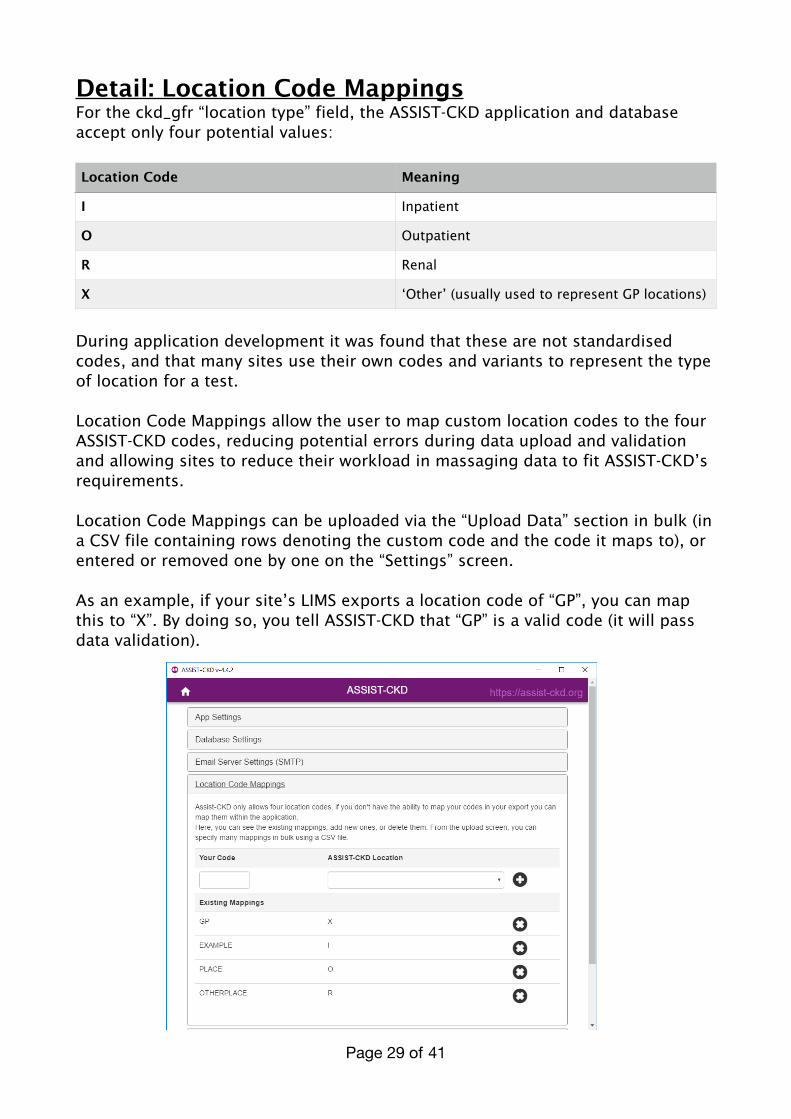
Detail: Location Code Mappings For the ckd_gfr “location type” field, the ASSIST-CKD application and database accept only four potential values:
During application development it was found that these are not standardised codes, and that many sites use their own codes and variants to represent the type of location for a test.
Location Code Mappings allow the user to map custom location codes to the four ASSIST-CKD codes, reducing potential errors during data upload and validation and allowing sites to reduce their workload in massaging data to fit ASSIST-CKD’s requirements.
Location Code Mappings can be uploaded via the “Upload Data” section in bulk (in a CSV file containing rows denoting the custom code and the code it maps to), or entered or removed one by one on the “Settings” screen.
As an example, if your site’s LIMS exports a location code of “GP”, you can map this to “X”. By doing so, you tell ASSIST-CKD that “GP” is a valid code (it will pass data validation).
Location Code Meaning
I Inpatient
O Outpatient
R Renal
X ‘Other’ (usually used to represent GP locations)
Page � of �29 41

Detail: Database Table Schemas
Below are details on each table’s structure and fields, denoting the required layout for data to be uploaded. This is the target table of the “GFR Data Upload”.
Column Data Type Notes Example
SURNAME text Apostrophes allowed, as long as the field is wrapped in “quotes"
Smith
FORENAME text Apostrophes allowed, as long as the field is wrapped in “quotes”
John
SEX character Only allows values are “M”, “F” and “U”
M
DATE OF BIRTH date Formats allowed: dd/mm/yyyy, dd-mm-yyyy or dd.mm.yyyy
29/06/1967
HOSPITAL NUMBER text - 1234567890
NHS NUMBER text Must be 10 characters/digits in length
0987654321
LOCATION text The location of the test
In Ward 1
LOCATION TYPE character Only allowed values are “I”, “O”, “R” or “X” - or any codes mapped to one of these using the Location Code Mapping feature
I
CLINICIAN text Name of the clinician ordering the test
Example Doctor
SPECIMEN IDENTIFICATION
text - 1234567890
TEST DATE date As above; date formats allowed: dd/mm/yyyy or dd-mm-yyyy
15/02/2016
RESULT number Decimal values allowed. GFR codes will be ignored. “>60” and “>90” are valid
55
UNITS text The units of the test result
mL/min/1.73m2
Page � of �30 41
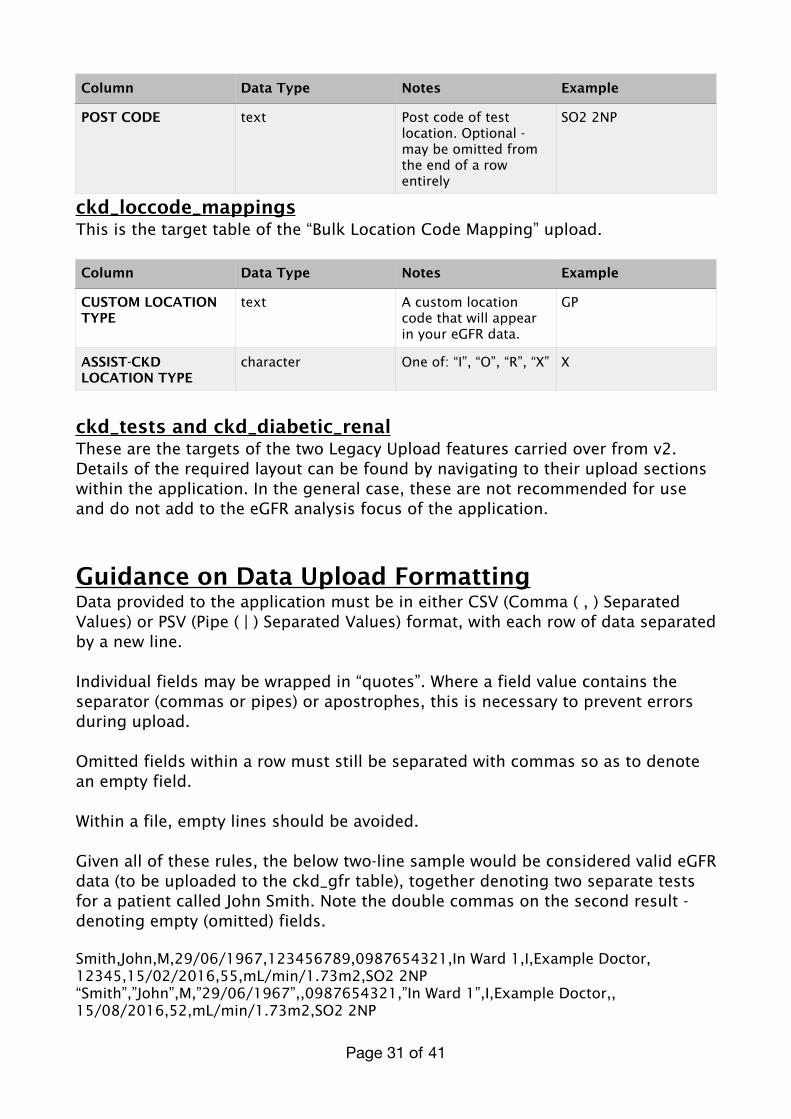
ckd_loccode_mappings This is the target table of the “Bulk Location Code Mapping” upload.
ckd_tests and ckd_diabetic_renal These are the targets of the two Legacy Upload features carried over from v2. Details of the required layout can be found by navigating to their upload sections within the application. In the general case, these are not recommended for use and do not add to the eGFR analysis focus of the application.
Guidance on Data Upload Formatting Data provided to the application must be in either CSV (Comma ( , ) Separated Values) or PSV (Pipe ( | ) Separated Values) format, with each row of data separated by a new line.
Individual fields may be wrapped in “quotes”. Where a field value contains the separator (commas or pipes) or apostrophes, this is necessary to prevent errors during upload.
Omitted fields within a row must still be separated with commas so as to denote an empty field.
Within a file, empty lines should be avoided.
Given all of these rules, the below two-line sample would be considered valid eGFR data (to be uploaded to the ckd_gfr table), together denoting two separate tests for a patient called John Smith. Note the double commas on the second result - denoting empty (omitted) fields.
Smith,John,M,29/06/1967,123456789,0987654321,In Ward 1,I,Example Doctor,12345,15/02/2016,55,mL/min/1.73m2,SO2 2NP “Smith”,”John”,M,”29/06/1967”,,0987654321,”In Ward 1”,I,Example Doctor,,15/08/2016,52,mL/min/1.73m2,SO2 2NP
POST CODE text Post code of test location. Optional - may be omitted from the end of a row entirely
SO2 2NP
Column Data Type Notes Example
Column Data Type Notes Example
CUSTOM LOCATION TYPE
text A custom location code that will appear in your eGFR data.
GP
ASSIST-CKD LOCATION TYPE
character One of: “I”, “O”, “R”, “X” X
Page � of �31 41

FAQ’s
What is ASSIST-CKD?ASSIST-CKD is an intervention to improve the care of people with kidney disease. It is based around a piece of software which enables laboratory staff (or other trained members of the healthcare team) to review patients eGFR test results in graphical form. This helps to assess trends in kidney function. When viewing each graph the reviewer decides whether the patient should be "marked". Marking a patient means that a report is sent to their GP highlighting the fact that their kidney function has deteriorated over time.
What will I need from my Trust IT department? 1) Establishing a database and installing the ‘ASSIST-CKD’ application.
A database is required to store the patient eGFR data. It's up to the individual trusts to determine which database server technology is most appropriate for your installation. The options are SQLite, Mysql or SQLServer 2008+. The application will need to be installed onto each pc that will be used for the graph analysis, thus your IT department will be required to install the application on pc if a user doesn't have permission to install the application themselves.
2) Extracting/Importing data from the LIMS systems
There are two ways by which to import data into the ASSIST-CKD software. Either through the application’s “LOAD DATA” section with LIMS-exported CSV data (the standard method), or directly into the database (a secondary, not-recommended method which may be possible / useful in some locations).
It's down to the individual trusts to decide on the preferred method for data transfer. ASSIST-CKD software supports the upload of .CSV files however we are aware of trusts who have automated this upload process. For example Kettering;
"We use our integration engine (Rhapsody) to pick up files from our Pathology
system, which filters out the relevant Biochemistry results and feeds them into a new "CKD" route within Rhapsody. This new route picks out any results
with an eGFR and then from those, picks out the useful information (e.g. report data and demographics), as well as bringing in any useful supporting
information (e.g. practice details) from our patient master index, before
using all this gathered data and writing that to the CKD tables (which bits it uses depends on whether it's inserting or updating tables).”
As an external body, the support team are unable to advise on how to configure your LIMS system to automate this process. This is something you would need to request and resolve internally. We can put you in touch with other labs using the same LIMS (where available) if useful.
Page � of �32 41
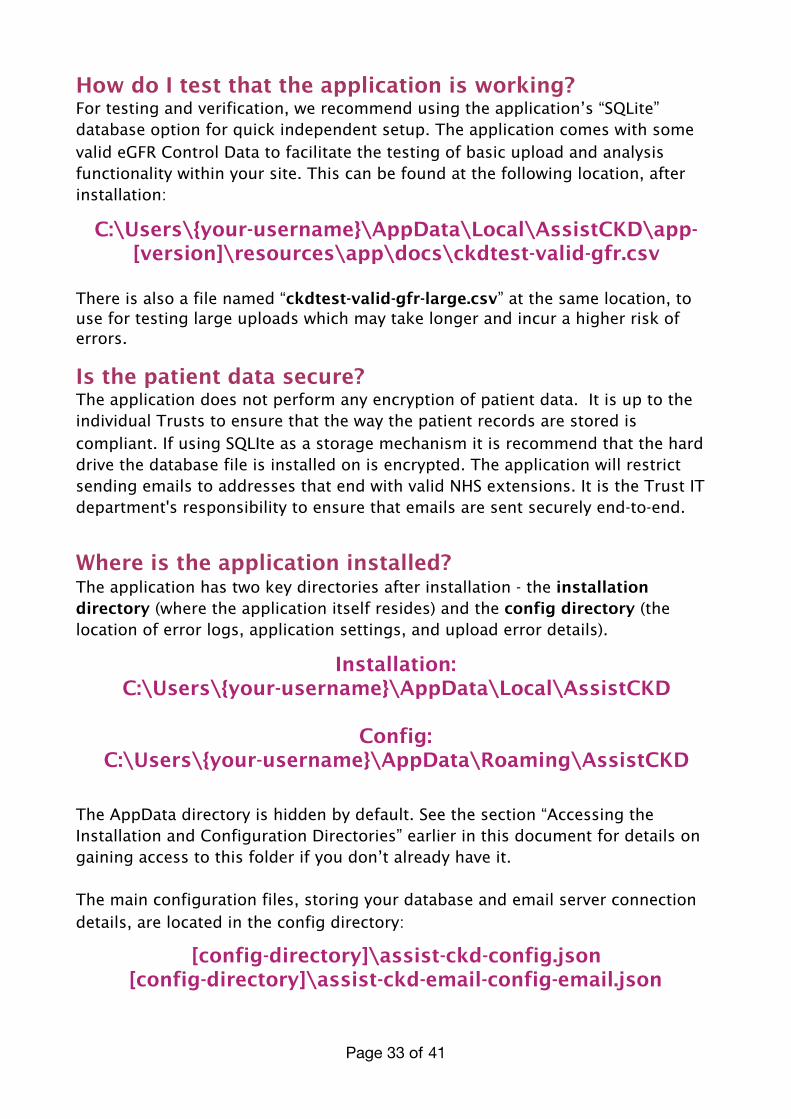
How do I test that the application is working? For testing and verification, we recommend using the application’s “SQLite” database option for quick independent setup. The application comes with some valid eGFR Control Data to facilitate the testing of basic upload and analysis functionality within your site. This can be found at the following location, after installation:
C:\Users\{your-username}\AppData\Local\AssistCKD\app-[version]\resources\app\docs\ckdtest-valid-gfr.csv
There is also a file named “ckdtest-valid-gfr-large.csv” at the same location, to use for testing large uploads which may take longer and incur a higher risk of errors.
Is the patient data secure? The application does not perform any encryption of patient data. It is up to the individual Trusts to ensure that the way the patient records are stored is compliant. If using SQLIte as a storage mechanism it is recommend that the hard drive the database file is installed on is encrypted. The application will restrict sending emails to addresses that end with valid NHS extensions. It is the Trust IT department's responsibility to ensure that emails are sent securely end-to-end.
Where is the application installed?The application has two key directories after installation - the installation directory (where the application itself resides) and the config directory (the location of error logs, application settings, and upload error details).
Installation: C:\Users\{your-username}\AppData\Local\AssistCKD
Config: C:\Users\{your-username}\AppData\Roaming\AssistCKD
The AppData directory is hidden by default. See the section “Accessing the Installation and Configuration Directories” earlier in this document for details on gaining access to this folder if you don’t already have it. The main configuration files, storing your database and email server connection details, are located in the config directory:
[config-directory]\assist-ckd-config.json [config-directory]\assist-ckd-email-config-email.json
Page � of �33 41

How do I Reset the Application Config?In some circumstances it can be useful to reset the application to “factory settings”, effectively undoing any configuration including application settings, database connection details and email server details.
To reset the config, simply delete the contents of the Config Directory (see above).
Note that the Config Directory also contains the application’s activity/error logs - you may wish to retain these specific files across a config reset by
making backups of them.
Note that if you selected the wrong database type on initial setup, or you need to change your database connection details for any reason, a config reset will be necessary.
What do I do if I get an error message? The application creates a log of all its activities at the following location:
C:\Users\{your-username}\AppData\Roaming\AssistCKD\log.log
If you encounter a critical error (application freezes, error message box pops up, or other unexpected / blocking behaviour), most commonly the log will contain information about what went wrong. It is recommended to either open a support ticket at https://assist-ckd.org/support or email [email protected] with your log file attached, as well as a description of the problem you encountered and any screenshots you can gather surrounding it.
Please note: the log file will contain copies of all data you upload to the database, which will include confidential patient data. It is vital that you modify the file to remove this data before sending it to the support team.
As mentioned in the “Load Data” section earlier in the document, sometimes the application will need to skip some data within a given file due to one or more fields being invalid. If this occurs, you will receive a non-blocking error once upload has completed, detailing how many rows were skipped.
Information about these skipped rows can be found by clicking the link to the file provided; situated here:
C:\Users\{your-username}\AppData\Roaming\AssistCKD\errors.csv
In these cases, data must be modified to fit the schema of the target table and re-uploaded, if you don’t want to skip the rows and leave them out.
Page � of �34 41

Common error messages / issues:
1. Application Failed to InstallThis can occur either during installation (while the “Installing” progress splash is shown on-screen), or during application setup. Usually, this is down to directory and user permissions and/or anti-virus or firewall installations.To resolve this error it is recommended to speak to your IT Team and/or local administrator; running the installer .exe as administrator often solves the issue.
2. Slow Operation on Analyse or Graph Screens When there is a lot of data in the database, the application can slow down significantly on the Analyse or Graph screens. After some time, a pop-up will show explaining some possible reasons for this, including a link back to the Application Dashboard in case you want to stop the load.The best resolution to this would be to use the filters on the Analyse screen - especially the date fields - to reduce the number of patients returned by the query.If the problem persists despite small patient sets or limited data in the database, you can ask your IT Team about rebuilding the indexes on the ckd_gfr table. This has worked to solve many performance problems during initial deployment and development. It is recommended that Database Administrators setup routine maintenance including the index rebuild on the ckd_gfr table so as to minimise this problem for future usage.Occasionally, this problem can be caused by slow or congested networks; in which case trying again later may improve overall performance.If all solutions have been attempted and the problem persists, try leaving the application on the slow load warning for up to an hour. If the load does not complete, get in touch with the support team with details about what you were trying to do when the slow load occurred.
3. Error: “Failed to Connect to Database” (during application startup)During application startup (either first-time setup or any subsequent launch), this error is likely to indicate that the stored database credentials are incorrect in some way.Talk to your IT Team about ensuring you have the right server / port / login credentials, and consider resetting the application config (see above) if you find you have the wrong details.
4. Error: “Problem Occurred During Upload”If your data upload halts and you’re presented with an error along these lines, it means the database rejected some of your data. The application processes data in batches of
Page � of �35 41
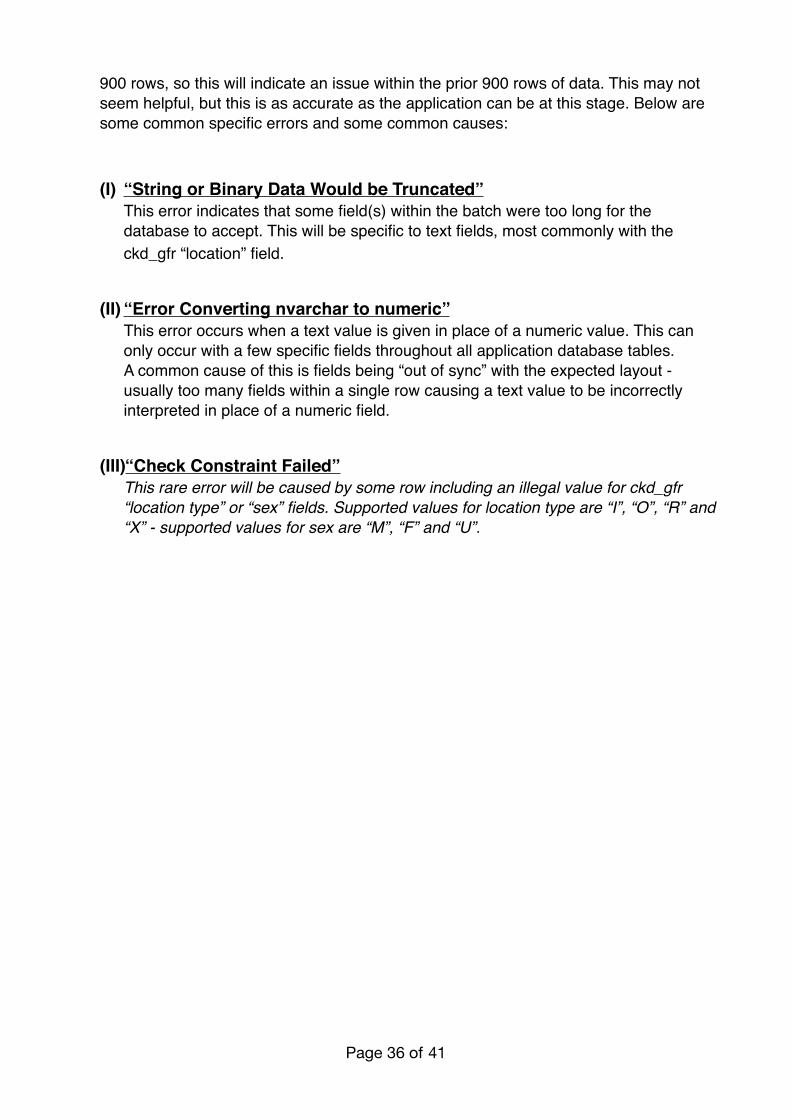
900 rows, so this will indicate an issue within the prior 900 rows of data. This may not seem helpful, but this is as accurate as the application can be at this stage. Below are some common specific errors and some common causes:
(I) “String or Binary Data Would be Truncated”This error indicates that some field(s) within the batch were too long for the database to accept. This will be specific to text fields, most commonly with the ckd_gfr “location” field.
(II) “Error Converting nvarchar to numeric”This error occurs when a text value is given in place of a numeric value. This can only occur with a few specific fields throughout all application database tables.A common cause of this is fields being “out of sync” with the expected layout - usually too many fields within a single row causing a text value to be incorrectly interpreted in place of a numeric field.
(III)“Check Constraint Failed”This rare error will be caused by some row including an illegal value for ckd_gfr “location type” or “sex” fields. Supported values for location type are “I”, “O”, “R” and “X” - supported values for sex are “M”, “F” and “U”.
Page � of �36 41
Standard Operating Procedure (SOP) for eGFR Graph Reporting System
1. Role description and procedure for performing the weekly review and report generation of the cumulative eGFR reporting system
Step 1 At the project start an initial upload of historical eGFR data (5 years is ideal) is performed. An enquiry is run against the Laboratory Information Management System (LIMS) (e.g Telepath, Winpath, Pathnet, Masterlab, Trak) to extract the patient data items specified in the CKD Specification into a file (typically a .CSV file). For some sites this facility may be automated (from a data warehouse for example); for others this enquiry will have to be run manually on a weekly basis.
Depending on the output functionality of certain LIMs, some sites use Excel to prepare their exported data prior to import into ASSIST-CKD. Examples can be provided if required.
Step 2 This file is then uploaded into an SQL database that has been previously setup either locally or on a central Trust IT server. For those sites that do not have SQL Server software (or no spare licensing capacity) freeware MySQL and SQLite have been made available. The Graphing Software has been distributed free of charge; there is no licensing fee for the use of this software.
Step 3 The graphing software is run in the lab on a weekly basis. This is described in detail in the User Guide pages. This step generates the graphs for review.
Step 4 An appropriately skilled and clinically trained, accredited member of staff reviews the graphs to decide what action is required.
Step 5 For those patients highlighted as high risk (the “Inform Clinician/mark” group from the User Guide), the graph is disseminated to the GP who requested the test. The software produces hard copy paper reports which are sent to the requesting clinician. These can also be emailed.
Page � of �37 41

2. Resources Required
• Computer with the database installed. • Printer for sending out graphs. Ideally colour because of the adjusted eGFR for
African-Caribbean people, but will still work with monotone.
3. Skills and Experience
• An understanding of CKD and the patterns and implications of eGFR. • Computer literate. • The model used at the Heart of England Foundation Trust (HEFT) is for graphs
to be reviewed by a Band 7 Clinical Scientist on the HCPC register. Review by a CKD specialist renal nurse may be possible in some locations. Oversight and supervision is provided by a consultant Clinical (or Medical) Scientist. For sites where other models are proposed, these will be examined on a case-by-case basis by the project team; in all cases a period of formal training and directly observed working followed by sign-off by the local consultant Clinical (or Medical) Scientist lead will be required.
• This is not classed as a research project. We would therefore expect that graph review is carried out by service rather than research staff.
4. Time Commitment
• This will be dependent upon population size and the activities included within the laboratory. As an example at HEFT (800,000 population), the Band 7 clinical scientist commitment is approximately 4 hours per week, with an additional 1 hour per week consultant clinical scientist supervision, 1 hour per week band 3 administration, and 0.25 hours per week ICT support.
Page � of �38 41

• Please note, these are the maximum figures used to calculate the ASSIST-CKD contract value, but in reality and depending on the experience, familiarity of the system and seniority of the person, weekly reporting has proven to be accomplished in less than half this time.
5. Process for Quality Assurance & Accreditation
After the completion of local training in the use of the system, staff who are to conduct weekly reporting will be sent a batch of 30 anonymous graphs (together with a guide to interpreting eGFR graphs) and be required to report for each whether no further action is required or whether the patient is considered high risk and they would inform the requesting GP. Successful completion of this initial competency assessment is deemed mandatory before commencing live reporting. It is also best practice for sites to have at least two members of staff who are trained in reporting to cover for periods of holidays or sickness.
6. Task List for Individual Running Graphing Software and Reviewing Graphs
These tasks should be performed on a weekly basis
1. Run the enquiry to produce the weekly eGFR data extract from the laboratory
LIMS. This step will not be necessary for those sites where this process is automated.
2. Log into the Graphing Software system.
3. Load data into SQL database as described in the User Guide.
4. Select the date from which to review the patient data – usually one week back from today’s date.
5. Select your location type and then set an age range, one of which is for 65 and under with an eGFR cut-off of 50; the second is for over 65s with an eGFR of
40. It is possible to also select 'outpatients'; however we recommend that this option is not used, as it will result in GPs being informed about tests that they did not request (and may not have a record of).
6. Once the list is generated, sort by location so all the GP practices are grouped
together and then generate the graphs for review.
7. While reviewing the graphs, select ‘MARK’ for those patients whose eGFR is declining.
8. The system records those patients who have already been flagged with their
clinician. The results since that referral will inform the decision whether or not to inform the clinician again.
Page � of �39 41
9. Repeat steps 5-8 for over 65s.
10.Once all the graphs have been reviewed, re-filter the graphs according to those that have been selected under ‘Inform Clinician/mark’.
11.Print a list of those to be flagged with the clinician and file this list (paper and electronically) securely.
12.Distribute the graphs of the flagged patients to the referring clinician by your sites chosen method e.g via secure email, or by saving a copy of the graphs to the desktop and printing hard copies and posting.
7. Data for Evaluation
As part of the evaluation we are measuring the impact of the intervention on outcome measures. For this we require certain data to be recorded on an ongoing basis within the lab. It is vital that you collect these data, otherwise we won’t know whether the intervention has been effective. The data items required are specified in the contract between the lab and the Kidney Research UK. They need to be collected weekly on a prospective basis. The requirements are listed below:
a. The total number of graphs generated per week. b.The number of graphs flagged as ‘inform clinician/mark’ per week. c. The above list should be sent at the end of each calendar month from an
nhs.net account to ensure secure transfer to UKRR dedicated email address:- [email protected]. We need you to have a specific title in the subject of the e-mail to include your site name/ODS lab code.
Page � of �40 41

Need help or further information? Please visit;
https://assist-ckd.org
===============
Document Code: ASSIST-CKD Lab & IT Info Pack v4 Version number: 4.4.2 - Date of Issue: 24.11.2017 - Author: TidyDesign.com
Page � of �41 41