emc smarts version 9.3 installation guide for sam, ip, … · emc smarts installation guide for...
TRANSCRIPT

EMC® Smarts®
Version 9.3
Installation Guide for SAM, IP, ESM, MPLS, VoIP, and NPM ManagersP/N 302-001-042REV 01

EMC Smarts Installation Guide for SAM, IP, ESM, MPLS, VoIP, and NPM Managers2
Copyright © 1996 - 2014 EMC Corporation. All rights reserved. Published in the USA.
Published June, 2014
EMC believes the information in this publication is accurate as of its publication date. The information is subject to change without notice.
The information in this publication is provided as is. EMC Corporation makes no representations or warranties of any kind with respect to the information in this publication, and specifically disclaims implied warranties of merchantability or fitness for a particular purpose. Use, copying, and distribution of any EMC software described in this publication requires an applicable software license.
EMC2, EMC, and the EMC logo are registered trademarks or trademarks of EMC Corporation in the United States and other countries. All other trademarks used herein are the property of their respective owners.
For the most up-to-date regulatory document for your product line, go to EMC Online Support (https://support.emc.com).

CONTENTS
Preface
Chapter 1 Overview
Product contents......................................................................................... 14Installation directory structure .............................................................. 16
Product and version compatibility ............................................................... 18 Installation tasks overview.......................................................................... 18 Upgrade tasks overview .............................................................................. 19 Migration tasks overview............................................................................. 20 Uninstallation tasks overview...................................................................... 21
Chapter 2 Performing an Installation
Installation overview ................................................................................... 24 Installation prerequisites ............................................................................ 25 Install the 9.3 product................................................................................. 26
Install using Wizard mode ..................................................................... 26Install using CLI mode ........................................................................... 31Install using Unattended mode ............................................................. 32Additional Service Assurance Manager installation tasks ...................... 34Installing the Service Assurance Manager Console, or the Smarts NOTIF Editor, or both ....................................................................................... 35
Add additional features to a new installation............................................... 37 Support for FIPS 140-2 for 9.3 products ...................................................... 38
Enabling FIPS 140 mode on a new installation ...................................... 38Disabling FIPS 140 mode ...................................................................... 41
Next steps................................................................................................... 42
Chapter 3 NAS Installation and Startup
Overview..................................................................................................... 44 Installing and starting the HTTPS Adapter service ........................................ 44
Running HTTPs adapter in FIPS mode .................................................... 46
Chapter 4 Performing an Upgrade
Upgrade installation overview ..................................................................... 50Installer tasks ....................................................................................... 52Installer-called utilities.......................................................................... 52
Upgrade installation prerequisites .............................................................. 53 Upgrade the 9.3 product ............................................................................. 53 Add additional features to an upgrade installation ...................................... 57 Upgrading 9.3 products in FIPS mode.......................................................... 57 Next steps................................................................................................... 58
Registering 9.0 domain managers manually with the broker.................. 59
Chapter 5 Performing a Migration
Migration overview...................................................................................... 62
EMC Smarts Installation Guide for SAM, IP, ESM, MPLS, VoIP, and NPM Managers 3

Contents
Install and migrate on the same host........................................................... 63Migration procedure for the same host.................................................. 64
Install and migrate on a different host ......................................................... 66Migration procedure for a different host ................................................ 67
Server Manager specific migration task ....................................................... 69Migration of Application Process templates and host configuration (Server Manager only) ....................................................................................... 69
Review license file migration ....................................................................... 70Migrate permanent license and set up FLEXnet license server................ 71Access to FLEXnet license server using SM_LICENSE.............................. 74Configuring license server behind the firewall ....................................... 74
Post-migration tasks ................................................................................... 75Rename the repository file..................................................................... 75Registering 8.1.x domain managers manually with the broker ............... 75Ensure that the Broker host:port is updated in the runcmd_env.sh files 76Remove the old out-of-date service entries............................................ 76Change the secret phrase to match rest of deployment ......................... 77Uninstall the old software ..................................................................... 77
Chapter 6 Migration Utilities
Customization migration utility overview ..................................................... 80sm_migrate modes of operation............................................................ 80
sm_migrate function ................................................................................... 82 Customization migration procedures........................................................... 85
Migrating customizations on the same host .......................................... 85Migrating customizations to a different host.......................................... 86Restoring customizations after an upgrade installation ......................... 89
Perform a rollback....................................................................................... 90 Custom file migration use cases.................................................................. 91
Migration of security configuration files................................................. 94Migration of dynamic model files .......................................................... 94
Three-way merge utility ............................................................................... 95Use cases for content block comparison ............................................... 95Configuration migration process logs .................................................... 97
Automatically migrate topology using RPS utility ......................................... 97Functions of RPS migration utility .......................................................... 97Running RPS migration utility ................................................................ 98Precautions........................................................................................... 98
Deployment utility overview ........................................................................ 99Running the Deployment utility ........................................................... 100sm_deploy modes of operation ........................................................... 100To create a deployment package ......................................................... 100Manage RPS file settings across multiple installations ........................ 101To deploy the package ........................................................................ 101To Rollback ......................................................................................... 102
Chapter 7 Verifying the Installation
Check the version number......................................................................... 104 Obtain and install a temporary license file................................................. 105
Events and attributes for license expired alert ..................................... 106 Start services ............................................................................................ 107
Starting services on UNIX .................................................................... 107Starting services on Windows.............................................................. 108
4 EMC Smarts Installation Guide for SAM, IP, ESM, MPLS, VoIP, and NPM Managers

Contents
Start programs .......................................................................................... 108 Service and program startup options......................................................... 109 Start Smarts NOTIF .................................................................................... 110 Verify the product status ........................................................................... 112 Verify the FIPS 140 mode status ................................................................ 113 Collect system information........................................................................ 114
sm_getinfo files .................................................................................. 114sm_getinfo command-line syntax........................................................ 115sm_getinfo invocation examples ......................................................... 117sm_getinfo data collection .................................................................. 117
Configuration Scanner Tool ....................................................................... 118Running the Configuration Scanner tool from the sm_getinfo utility..... 119
Chapter 8 Performing an Uninstallation
Before uninstallation................................................................................. 122Remove manually installed services.................................................... 122Determine order for removing products (UNIX only) ............................. 122Uninstall when same product software is installed twice (Windows only) ... 123Detect and stop programs ................................................................... 123Uninstall the FLEXnet License Server ................................................... 126
Uninstall Smarts 9.3 products................................................................... 127Uninstall using Wizard mode............................................................... 127Uninstall using CLI mode..................................................................... 128Uninstall using Unattended mode ....................................................... 129
Appendix A The sm_edit utility
sm_edit .................................................................................................... 132 sm_edit example ...................................................................................... 132
Appendix B Manually Installing Services
Overview................................................................................................... 134Selection of bootstrap files when installing services............................ 134
Broker Services for the 9.3 product ........................................................... 134 Services for the IP Manager ....................................................................... 135
IP Availability Manager-only server ...................................................... 135IP Performance Manager-only Server ................................................... 136IP Availability and Performance Manager Server .................................. 136IP Configuration Manager .................................................................... 137
Services for the Service Assurance Manager.............................................. 137EMC Smarts Broker.............................................................................. 137Service Assurance Manager (Presentation SAM server)........................ 138Service Assurance Manager (Global Manager)..................................... 138Business Impact Manager server......................................................... 139Adapter Platform ................................................................................. 139Business Dashboard ........................................................................... 139Syslog Adapter.................................................................................... 140SNMP Trap Adapter ............................................................................. 140Notif trap Adapter................................................................................ 141Notif syslog adapter ............................................................................ 141EMC Smarts Data Web Applications (Tomcat) ...................................... 142EMC Smarts Notification Exchange (Rabbit MQ)................................... 142EMC Smarts Notification Cache (ElasticSearch) ................................... 142
EMC Smarts Installation Guide for SAM, IP, ESM, MPLS, VoIP, and NPM Managers 5

Contents
Services for the MPLS Manager ................................................................. 143MPLS Topology Server ......................................................................... 143MPLS Monitoring Server ...................................................................... 143MPLS Analysis Server .......................................................................... 144MPLS VPN-Tagging Server.................................................................... 144
Services for the Server Manager ................................................................ 145Server Manager ................................................................................... 145
Services for the Network Protocol Manager installation ............................. 145Network Protocol Manager for BGP ...................................................... 145Network Protocol Manager for EIGRP ................................................... 146Network Protocol Manager for IS-IS ..................................................... 147Network Protocol Manager for OSPF .................................................... 148
Services for the VoIP Availability Manager ................................................. 148VoIP Availability Manager.................................................................... 149VoIP Notification Trap Adapter............................................................. 149
Appendix C Procedures for CD/DVD-ROMs
Mounting a CD/DVD-ROM on UNIX systems ............................................... 152 Loading a CD/DVD-ROM on Windows ........................................................ 153
Appendix D Using the MPLS server_config Utility
Use the server_config.pl script to change domain names .......................... 156Purpose .............................................................................................. 156Run the script...................................................................................... 156Script options ..................................................................................... 157
Appendix E Configuration Scanner tool Sample Output
Files created by Configuration Scanner tool ............................................... 162 Sample outputs ........................................................................................ 162
Running Configuration Scanner tool with server name ......................... 162Report when server is specified........................................................... 163Running Configuration Scanner tool without server name.................... 168Report when server is not specified ..................................................... 168
6 EMC Smarts Installation Guide for SAM, IP, ESM, MPLS, VoIP, and NPM Managers
PREFACE
As part of an effort to improve its product lines, EMC periodically releases revisions of its software and hardware. Therefore, some functions described in this document might not be supported by all versions of the software or hardware currently in use. The product release notes provide the most up-to-date information on product features.
Contact your EMC technical support professional if a product does not function properly or does not function as described in this document.
This document was accurate at publication time. Go to EMC Online Support (https://support.emc.com) to ensure that you are using the latest version of this document.
PurposeThis document describes how to install, migrate, and uninstall the following EMC Smarts products:
◆ Service Assurance Manager
◆ IP Manager
◆ MPLS Manager
◆ Server Manager
◆ Network Protocol Manager
◆ VoIP Availability Manager
AudienceThis document is intended for administrators and integrators who are responsible for installing the Service Assurance Manager, IP Manager, MPLS Manager, Server Manager, Network Protocol Manager, and VoIP Availability Manager.
Product installation directoryIn this document, the term BASEDIR represents the location where EMC Smarts software is installed:
◆ For UNIX, this location is /opt/InCharge/<product>.
◆ For Windows, this location is C:\InCharge\<product>.
By default,
◆ Service Assurance Manager is installed to: /opt/InCharge/SAM/smarts for UNIX and to C:\InCharge\SAM\smarts for Windows.
◆ IP Availability Manager is installed to /opt/InCharge/IP/smarts for UNIX and to C:\InCharge\IP\smarts for Windows.
◆ MPLS Manager is installed to /opt/InCharge/MPLS/smarts for UNIX and to C:\InCharge\MPLS\smarts for Windows.
Preface 7

Preface
◆ Server Manager is installed to /opt/InCharge/ESM for UNIX and to C:\InCharge\ESM for Windows.
◆ Network Protocol Manager is installed to /opt/InCharge/NPM/smarts for UNIX and to C:\InCharge\NPM\smarts for Windows.
◆ VoIP Availability Manager is installed to /opt/InCharge/VoIP/smarts for UNIX and to C:\InCharge\VoIP\smarts for Windows.
This location is referred to as BASEDIR/smarts.
Optionally, you can specify the root of BASEDIR to be something different, but you cannot change the <product> location under the root directory. The EMC Smarts System Administration Guide provides detailed information about the directory structure for EMC Smarts software.
Product contentThe EMC Smarts Service Assurance Manager includes the following products:
◆ Service Assurance Manager (Global Manager), includes Business Impact Manager (BIM), and Smarts Notification Module (NOTIF)
◆ Global Console
◆ Business Dashboard
◆ Smarts EMC Data Access API (Smarts EDAA)
◆ Alert EMC Data Access API (Alert EDAA)
◆ SAM Native Adapters:
• Service Assurance Manager Notification Adapters (E-Mail Notifier Adapter, Script Notifier Adapter, SNMP Trap Notifier Adapter, Log File Notifier Adapter)
• Adapter Platform (Adapter Platform server, Syslog Adapter, SNMP Trap Adapter, sm_ems command-line interface)
• XML Adapter
◆ EMC M&R— EMC M&R is distributed with Service Assurance Manager. You must install the SolutionPack for EMC Smarts in order to view notifications from Smarts Domain Managers in the EMC M&R user interface.
The EMC Smarts IP Manager includes the following products:
◆ EMC Smarts IP Availability Manager
◆ EMC Smarts IP Performance Manager
◆ EMC Smarts IP Availability Manager Extension for NAS
The EMC Smarts MPLS Manager includes the following products:
◆ EMC Smarts MPLS Manager is composed of three servers:
• MPLS Topology Server
• MPLS Monitoring Server
• MPLS Analysis Server
◆ EMC Smarts MPLS VPN-Tagging Server
8 EMC Smarts Installation Guide for SAM, IP, ESM, MPLS, VoIP, and NPM Managers

Preface
The EMC Smarts Server Manager includes the Server Manager software.
The EMC Smarts Network Protocol Manager includes the following products:
◆ EMC Smarts Network Protocol Manager for BGP
◆ EMC Smarts Network Protocol Manager for EIGRP
◆ EMC Smarts Network Protocol Manager for IS-IS
◆ EMC Smarts Network Protocol Manager for OSPF
The EMC Smarts VoIP Availability Manager includes the following products:
◆ EMC Smarts VoIP Availability Manager
◆ EMC Smarts VoIP Enablement Pack for Avaya
◆ EMC Smarts VoIP Enablement Pack for Cisco
◆ EMC Enablement Pack for ACME
◆ EMC Smarts VoIP Integration Pack for VoIP Performance Manager
Product documentationThe following documents are relevant to users of the Service Assurance Manager:
◆ EMC Smarts Release Notes for SAM, IP, ESM, MPLS, VoIP, and NPM Managers
◆ EMC Smarts Service Assurance Manager Introduction
◆ EMC Smarts Installation Guide for SAM, IP, ESM, MPLS, VoIP, and NPM Managers
◆ EMC Smarts Service Assurance Manager Deployment Guide
◆ EMC Smarts Service Assurance Manager Configuration Guide
◆ EMC Smarts Service Assurance Manager Operator Guide
◆ EMC Smarts Service Assurance Manager Dashboard Configuration Guide
◆ EMC Smarts Business Impact Manager User Guide
◆ EMC Smarts Service Assurance Manager Notification Adapters User Guide
◆ EMC Smarts Service Assurance Manager Adapter Platform User Guide
◆ EMC Smarts XML Adapter User Guide
◆ EMC Smarts Notification Module User Guide
◆ EMC Smarts Service Assurance Manager Troubleshooting Guide
◆ EMC Smarts Service Assurance Manager Documentation Portfolio
◆ EMC Smarts Open Source License and Copyright Information
The following EMC Smarts documents are relevant to users of the IP Manager product:
◆ EMC Smarts Release Notes for SAM, IP, ESM, MPLS, VoIP, and NPM Managers
◆ EMC Smarts Open Source License and Copyright Information
◆ EMC Smarts Installation Guide for SAM, IP, ESM, MPLS, VoIP, and NPM Managers
◆ EMC Smarts IP Manager Deployment Guide
9

Preface
◆ EMC Smarts IP Manager Concepts Guide
◆ EMC Smarts IP Manager User Guide
◆ EMC Smarts IP Manager Reference Guide
◆ EMC Smarts IP Manager Troubleshooting Guide
◆ EMC Smarts IP Manager Certification Matrix
◆ EMC Smarts IP Manager Documentation Portfolio
The following documents are relevant to users of the MPLS Manager:
◆ EMC Smarts Release Notes for SAM, IP, ESM, MPLS, VoIP, and NPM Managers
◆ EMC Smarts Installation Guide for SAM, IP, ESM, MPLS, VoIP, and NPM Managers
◆ EMC Smarts MPLS Manager Configuration Guide
◆ EMC Smarts MPLS Manager Discovery Guide
◆ EMC Smarts MPLS Manager User Guide
◆ EMC Smarts MPLS Certification Matrix for Version 9.3
◆ EMC Smarts MPLS Manager Documentation Portfolio
The following EMC Smarts documents are relevant to users of the EMC Smarts Server Manager:
◆ EMC Smarts Release Notes for SAM, IP, ESM, MPLS, VoIP, and NPM Managers
◆ EMC Smarts Installation Guide for SAM, IP, ESM, MPLS, VoIP, and NPM Managers
◆ EMC Smarts Server Manager User and Configuration Guide
◆ EMC Smarts Open Source License and Copyright Information
◆ EMC Smarts Server Manager Documentation Portfolio
The following documents are relevant to users of the Network Protocol Manager:
◆ EMC Smarts Release Notes for SAM, IP, ESM, MPLS, VoIP, and NPM Managers
◆ EMC Smarts Installation Guide for SAM, IP, ESM, MPLS, VoIP, and NPM Managers
◆ EMC Smarts Open Source License and Copyright Information
◆ EMC Smarts Network Protocol Manager Configuration Guide
◆ EMC Smarts Network Protocol Manager Discovery Guide
◆ EMC Smarts Network Protocol Manager for BGP User Guide
◆ EMC Smarts Network Protocol Manager for EIGRP User Guide
◆ EMC Smarts Network Protocol Manager for IS-IS User Guide
◆ EMC Smarts Network Protocol Manager for OSPF User Guide
◆ EMC Smarts Network Protocol Manager Certification Matrix
◆ EMC Smarts Network Protocol Manager Documentation Portfolio
The following documents are relevant to users of the EMC Smarts VoIP Availability Manager:
10 EMC Smarts Installation Guide for SAM, IP, ESM, MPLS, VoIP, and NPM Managers

Preface
◆ EMC Smarts Release Notes for SAM, IP, ESM, MPLS, VoIP, and NPM Managers
◆ EMC Smarts Installation Guide for SAM, IP, ESM, MPLS, VoIP, and NPM Managers
◆ EMC Smarts Open Source License and Copyright Information
◆ EMC Smarts VoIP Manager Overview and Integration Guide
◆ EMC Smarts VoIP Availability Manager Configuration Guide
◆ EMC Smarts VoIP Availability Manager Discovery Guide
◆ EMC Smarts VoIP Availability Manager User Guide
◆ EMC Smarts VoIP Enablement Pack for Avaya User Guide
◆ EMC Smarts VoIP Enablement Pack for Cisco User Guide
◆ EMC Smarts VoIP Availability Manager Certification Matrix
◆ EMC Smarts VoIP Availability Manager Documentation Portfolio
These documents are updated periodically. Electronic versions of the updated manuals are available on the EMC online support website.
Related documentationThe following EMC publications provide additional information:
◆ EMC Smarts System Administration Guide
◆ EMC Smarts Common Information Model (ICIM) 1.11 Reference for Non-Service Assurance Manager Products
◆ EMC Smarts Common Information Model (ICIM) Reference for Service Assurance Manager
◆ EMC Smarts ASL Reference Guide
◆ EMC Smarts Perl Reference Guide
◆ EMC Smarts MODEL Reference Guide
◆ EMC Smarts Dynamic Modeling Tutorial
◆ FlexNet Publisher 11.9 License Administration Guide
◆ Smarts Foundation EMC Data Access API (EDAA) Programmer Guide
◆ Alert EMC Data Access API (EDAA) Programmer Guide
◆ These documents are updated periodically. Electronic versions of the updated manuals are available on the EMC online support website.
Conventions used in this documentEMC uses the following conventions for special notices:
NOTICE is used to address practices not related to personal injury.
11
Preface
Typographical conventions
EMC uses the following type style conventions in this document:
Where to get helpEMC support, product, and licensing information can be obtained as follows:
Product information — For documentation, release notes, software updates, or information about EMC products, go to EMC Online Support at:
https://support.emc.com
Technical support — Go to EMC Online Support and click Service Center. You will see several options for contacting EMC Technical Support. Note that to open a service request, you must have a valid support agreement. Contact your EMC sales representative for details about obtaining a valid support agreement or with questions about your account.
Your commentsYour suggestions will help us continue to improve the accuracy, organization, and overall quality of the user publications. Send your opinions of this document to:
Bold Use for names of interface elements, such as names of windows, dialog boxes, buttons, fields, tab names, key names, and menu paths (what the user specifically selects or clicks)
Italic Use for full titles of publications referenced in text
Monospace Use for:• System output, such as an error message or script• System code• Pathnames, filenames, prompts, and syntax• Commands and options
Monospace italic Use for variables.
Monospace bold Use for user input.
[ ] Square brackets enclose optional values
| Vertical bar indicates alternate selections — the bar means “or”
{ } Braces enclose content that the user must specify, such as x or y or z
... Ellipses indicate nonessential information omitted from the example
12 EMC Smarts Installation Guide for SAM, IP, ESM, MPLS, VoIP, and NPM Managers

CHAPTER 1Overview
This chapter describes the EMC Smarts Service Assurance Manager, EMC Smarts IP Manager, EMC Smarts MPLS Manager, EMC Smarts Server Manager, EMC Smarts Network Protocol Manager, and EMC Smarts VoIP Availability Manager, their compatibility with other EMC Smarts products, and installation tasks. It consists of the following topics:
◆ Product contents..................................................................................................... 14◆ Product and version compatibility ........................................................................... 18◆ Installation tasks overview...................................................................................... 18◆ Upgrade tasks overview .......................................................................................... 19◆ Migration tasks overview......................................................................................... 20◆ Uninstallation tasks overview.................................................................................. 21
Overview 13

Overview
Product contentsThis document provides installation, upgrade, migration, and uninstallation procedures for:
◆ EMC Smarts Service Assurance Manager
◆ EMC Smarts IP Manager
◆ EMC Smarts MPLS Manager
◆ EMC Smarts Server Manager
◆ EMC Smarts Network Protocol Manager
◆ EMC Smarts VoIP Availability Manager
The EMC Smarts Service Assurance Manager includes the following products:
◆ Service Assurance Manager
The EMC Smarts Service Assurance Manager product includes the following components:
• Global Manager
• EMC Smarts Broker
• EMC Smarts MBIM — Maintenance and Business Impact Manager Server
• Generic notification adapters such as Log File, SNMP Trap, Script, and email
• EMC Data Access API
– Smarts Foundation EMC Data Access API (Smarts EDAA)
– Alert EMC Data Access API (EDAA)
– EMC Smarts Data Web Applications (Tomcat)
– EMC Smarts Notification Exchange (Rabbit MQ)
– EMC Smarts Notification Cache (ElasticSearch)
Some components, such as Business Impact Manager, require licensing.
◆ EMC M&R — EMC M&R 6.4 is distributed with Service Assurance Manager. The SolutionPack for EMC Smarts installation and configuration article provides instructions on configuring Service Assurance Manager to work with EMC M&R.
◆ Global Console
The Global Console product is the graphical interface for all EMC Smarts products.
Global Console functionality can also be deployed as a Web Console or a Business Dashboard.
14 EMC Smarts Installation Guide for SAM, IP, ESM, MPLS, VoIP, and NPM Managers

Overview
◆ Adapter Platform
The SAM Adapter Platform product provides functionality to import and normalize topology and events from outside the EMC Smarts domain.
◆ Syslog Adapter
The Syslog Adapter product reads and processes system log (Syslog) messages. It requires the SAM Adapter Platform.
◆ Smarts Notification Module
The Smarts Notification Module (NOTIF) augments EMC Smarts solutions with event management features that are configured through a graphical user interface (the Smarts NOTIF Editor). Smarts NOTIF enables the user to easily optimize the flow of events and notifications sent through any EMC Smarts system. Smarts NOTIF can be installed on either the SAM server or Adapter Platform server, or both. The internal event and notification processing features of the standard SAM Adapter Platform are replaced by Smarts NOTIF.
Smarts NOTIF functionality and architecture is discussed in the EMC Smarts Notification Module User Guide.
◆ Smarts Notification Module Cisco Syslog Processing Adapter
The Smarts Notification Module Cisco Syslog Processing Adapter (referred to as the Smarts NOTIF Cisco Syslog Adapter) replaces the log file processing features of the standard Syslog Adapter. The Smarts NOTIF Cisco Syslog Adapter processes the log file information into useful notifications with or without the use of ASL scripts. Adapter for NetIQ
The EMC Smarts Notification Module Cisco Syslog Processing Adapter Installation and User Guide provides additional information on this adapter.
◆ SNMP Trap Adapter
The SNMP Trap Adapter product reads SNMP traps and forwards traps to any EMC Smarts application. It requires the SAM Adapter Platform.
◆ XML Adapter
The XML Adapter product imports and exports topology from any EMC Smarts application.
The EMC Smarts IP Manager includes the following products:
◆ IP Availability Manager
◆ IP Performance Manager
◆ IP Server Performance Manager
◆ IP Availability Manager Extension for NAS
The EMC Smarts MPLS Manager includes the following products:
Product contents 15

Overview
◆ EMC Smarts MPLS Manager is composed of three servers:
• MPLS Topology Server
• MPLS Monitoring Server
• MPLS Analysis Server
◆ MPLS VPN-Tagging Server
The EMC Smarts Network Protocol Manager includes the following products:
◆ EMC Smarts Network Protocol Manager for BGP
◆ EMC Smarts Network Protocol Manager for EIGRP
◆ EMC Smarts Network Protocol Manager for IS-IS
◆ EMC Smarts Network Protocol Manager for OSPF
The EMC Smarts Server Manager includes the Server Manager software.
The VoIP Availability Manager includes the following products:
◆ EMC Smarts VoIP Availability Manager
• EMC Smarts VoIP Enablement Pack for Avaya
• EMC Smarts VoIP Enablement Pack for Cisco
• EMC Enablement Pack for ACME
• EMC Smarts VoIP Integration Pack for VoIP Performance Manager
Installation directory structure
The installation directory structure is shown in Figure 1 on page 17. All EMC Smarts products use the same basic installation directory structure.
In Figure 1 on page 17, notice that:
◆ BASEDIR, which is not an environment variable, is used in documentation to represent the top-level directory structure of an EMC Smarts product software installation.
BASEDIR represents:
• For MPLS Manager —<installation_root_directory>/MPLS
• For IP Manager — <installation_root_directory>/IP
• For Service Assurance Manager — <installation_root_directory>/SAM
• For Server Manager — <installation_root_directory>/ESM
• For Network Protocol Manager — <installation_root_directory>/NPM
• For VoIP Availability Manager — <installation_root_directory>/VoIP
◆ The EMC Smarts sm_edit utility ensures that modified files are always saved to the appropriate local area and that base (original) copies of the files remain unchanged. Appendix A, “The sm_edit utility,” provides additional information.
The EMC Smarts System Administration Guide provides detailed information about the directory structure for EMC Smarts software and the sm_edit utility.
16 EMC Smarts Installation Guide for SAM, IP, ESM, MPLS, VoIP, and NPM Managers

Overview
Figure 1 Installation directory structure
_jvm (dir)
_uninst (dir)
smarts (dir)
sm_edit utilitylocal (dir)
actions (dir)
bin (dir)
classes (dir)
conf (dir)
actions (dir)
bin (dir)
classes (dir)
conf (dir)
Installation root directory
Product suite directoryBASEDIR
Location ofbase files
Location ofcustomized files
Product contents 17

Overview
Product and version compatibilityThe EMC Smarts Support Matrix for SAM, IP, ESM, MPLS, VoIP, and NPM Managers provides information about the 9.3 products and the compatible versions of the EMC Smarts products.
Installation tasks overviewTo install EMC Smarts Service Assurance Manager, IP Manager, MPLS Manager, Server Manager, or the Network Protocol Manager you need to meet the requirements or perform the tasks that are listed in Table 1 on page 18.
To install additional components to an existing installation, you can perform an installation or an upgrade.
Table 1 Installation requirements and tasks (page 1 of 2)
Before you install
The Broker and FLEXnet license host should be installed, configured, and operating.
EMC Smarts System Administration Guide
The Global Console, Global Manager, and Service Assurance products should be installed, configured, and licensed.
EMC Smarts Installation Guide for SAM, IP, ESM, MPLS, VoIP, and NPM Managers
EMC M&R product should be installed, configured, and licensed.
• EMC M&R (Watch4net) Installation and Configuration Guide
• SolutionPack for EMC Smarts Summary Sheet article
IP Manager should be installed, configured, and licensed. After IP Manager is installed, you can install or upgrade other Smarts products.
EMC Smarts Installation Guide for SAM, IP, ESM, MPLS, VoIP, and NPM Managers
Review the important release issues for the product. Release notes for the product being installed
Obtain an evaluation or permanent license for the product.
“Obtain and install a temporary license file” on page 105
Determine if the products are supported on your platform.
EMC Smarts Support Matrix for SAM, IP, ESM, MPLS, VoIP, and NPM Managers
Review the patch requirements for your operating system. EMC Smarts Support Matrix for SAM, IP, ESM, MPLS, VoIP, and NPM Managers
Determine if your system meets the hardware requirements.
EMC Smarts Support Matrix for SAM, IP, ESM, MPLS, VoIP, and NPM Managers
Installation method
Install the product. Select one of the following installation methods:• “Install using Wizard mode” on page 26• “Install using CLI mode” on page 31• “Install using Unattended mode” on page 32
18 EMC Smarts Installation Guide for SAM, IP, ESM, MPLS, VoIP, and NPM Managers
Overview
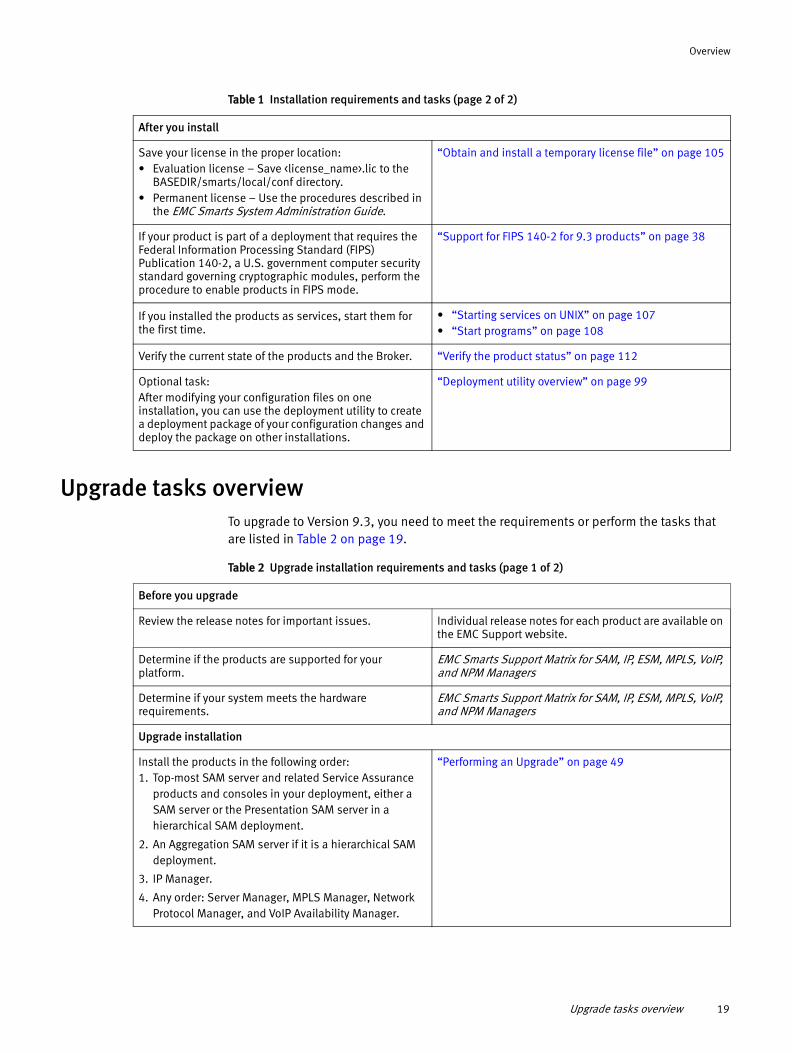
Upgrade tasks overviewTo upgrade to Version 9.3, you need to meet the requirements or perform the tasks that are listed in Table 2 on page 19.
After you install
Save your license in the proper location:• Evaluation license – Save <license_name>.lic to the
BASEDIR/smarts/local/conf directory.• Permanent license – Use the procedures described in
the EMC Smarts System Administration Guide.
“Obtain and install a temporary license file” on page 105
If your product is part of a deployment that requires the Federal Information Processing Standard (FIPS) Publication 140-2, a U.S. government computer security standard governing cryptographic modules, perform the procedure to enable products in FIPS mode.
“Support for FIPS 140-2 for 9.3 products” on page 38
If you installed the products as services, start them for the first time.
• “Starting services on UNIX” on page 107• “Start programs” on page 108
Verify the current state of the products and the Broker. “Verify the product status” on page 112
Optional task:After modifying your configuration files on one installation, you can use the deployment utility to create a deployment package of your configuration changes and deploy the package on other installations.
“Deployment utility overview” on page 99
Table 1 Installation requirements and tasks (page 2 of 2)
Table 2 Upgrade installation requirements and tasks (page 1 of 2)
Before you upgrade
Review the release notes for important issues. Individual release notes for each product are available on the EMC Support website.
Determine if the products are supported for your platform.
EMC Smarts Support Matrix for SAM, IP, ESM, MPLS, VoIP, and NPM Managers
Determine if your system meets the hardware requirements.
EMC Smarts Support Matrix for SAM, IP, ESM, MPLS, VoIP, and NPM Managers
Upgrade installation
Install the products in the following order:1. Top-most SAM server and related Service Assurance
products and consoles in your deployment, either a SAM server or the Presentation SAM server in a hierarchical SAM deployment.
2. An Aggregation SAM server if it is a hierarchical SAM deployment.
3. IP Manager.
4. Any order: Server Manager, MPLS Manager, Network Protocol Manager, and VoIP Availability Manager.
“Performing an Upgrade” on page 49
Upgrade tasks overview 19

Overview
Migration tasks overviewTo migrate to Version 9.3, you need to meet the requirements or perform the tasks that are listed in Table 3 on page 20.
After you install
Evaluate your custom code and review the tools for restoring user customization.
“Custom file migration use cases” on page 91
(Optional) Update your license, if you installed additional products and they are not licensed features.Otherwise, existing licenses are supported for 9.3 products. No user action is required.
“Obtain and install a temporary license file” on page 105
If your product is part of a deployment that requires the Federal Information Processing Standard (FIPS) Publication 140-2, a U.S. government computer security standard governing cryptographic modules, perform the procedure to upgrade products in FIPS mode.
“Upgrading 9.3 products in FIPS mode” on page 57
If you installed the products as services, start them for the first time.
• “Starting services on UNIX” on page 107• “Start programs” on page 108
Verify the current state of the products and the Broker. “Verify the product status” on page 112
(Optional) After performing an upgrade and modifying your configuration files on one installation, you can use the deployment utility to create a deployment package of your configuration changes and deploy the package on other installations. After deploying the package on other installations, you do not have to run the migrate utility to merge your customizations.
“Deployment utility overview” on page 99
Table 2 Upgrade installation requirements and tasks (page 2 of 2)
Table 3 Migration requirements and tasks (page 1 of 2)
Before you migrate
Review the release notes for important issues. • EMC Smarts Release Notes for SAM, IP, ESM, MPLS, VoIP, and NPM Managers
Determine if the products are supported for your platform.
EMC Smarts Support Matrix for SAM, IP, ESM, MPLS, VoIP, and NPM Managers
Determine if your system meets the hardware requirements.
EMC Smarts Support Matrix for SAM, IP, ESM, MPLS, VoIP, and NPM Managers
Installation and migration
Install the products in the following order:1. Top-most SAM server and related Service Assurance
products and consoles in your deployment, either a SAM server or the Presentation SAM server in a hierarchical SAM deployment.
2. An Aggregation SAM server if it is a hierarchical SAM deployment.
3. IP Manager.
4. Any order: Server Manager, MPLS Manager, Network Protocol Manager, and VoIP Availability Manager.
“Performing a Migration” on page 61
20 EMC Smarts Installation Guide for SAM, IP, ESM, MPLS, VoIP, and NPM Managers

Overview
Uninstallation tasks overviewTo uninstall the product, you need to meet the requirements or perform the tasks that are listed in Table 4 on page 21.
After you install
Evaluate your custom code and review the tools for restoring user customization.
“Custom file migration use cases” on page 91
If you installed the products as services, start them for the first time.
• “Starting services on UNIX” on page 107• “Start programs” on page 108
Save your license in the proper location:• Evaluation license – Save <license_name>.lic to the
BASEDIR/smarts/local/conf directory.• Permanent license – Use the procedures described in
the EMC Smarts System Administration Guide.(Optional) Update your license, if you installed additional products and they are not licensed features.Otherwise, existing licenses are supported for 9.3 products. No user action is required.
“Obtain and install a temporary license file” on page 105
Verify the current state of the products and the Broker. “Verify the product status” on page 112
(Optional) After performing a migration and modifying your configuration files on one installation, you can use the deployment utility to create a deployment package of your configuration changes and deploy the package on other installations. After deploying the package on other installations, you do not have to run the migrate utility to merge your customizations.
“Deployment utility overview” on page 99
Table 3 Migration requirements and tasks (page 2 of 2)
Table 4 Uninstallation requirements and tasks
Before you uninstall
Review uninstall prerequisites. “Performing an Uninstallation” on page 121
Uninstallation
Uninstall the product. • “Uninstall using Wizard mode” on page 127• UNIX only, “Uninstall using CLI mode” on page 128• “Uninstall using Unattended mode” on page 129
Uninstallation tasks overview 21

Overview
22 EMC Smarts Installation Guide for SAM, IP, ESM, MPLS, VoIP, and NPM Managers

CHAPTER 2Performing an Installation
This chapter describes how to install a new installation of the EMC Smarts Service Assurance Manager, EMC Smarts IP Manager, EMC Smarts MPLS Manager, EMC Smarts Server Manager, EMC Smarts Network Protocol Manager, and EMC Smarts VoIP Availability Manager. It consists of the following topics:
◆ Installation overview ............................................................................................... 24◆ Installation prerequisites ........................................................................................ 25◆ Install the 9.3 product............................................................................................. 26◆ Add additional features to a new installation........................................................... 37◆ Support for FIPS 140-2 for 9.3 products .................................................................. 38◆ Next steps............................................................................................................... 42
Performing an Installation 23

Performing an Installation
Installation overviewThe installation flow is shown in Figure 2 on page 24. A new installation installs a new version of a product on a host system that either has no software installed or has a previous version of the software installed. Chapter 4, “Performing an Upgrade,” provides instructions to install an upgrade installation.
Figure 2 New installation flowchart
* Found by installation program
Install new installation
Suitealready installed
on host *?
Yes
Install products to a new directory
Installation Directory Selection
Welcome
License Agreement
Installation Complete
Choose ProductsCustom
Complete
Services Selection
Broker Specification
Installation Criteria
Installing . . .
Upgrade or Install
Install products to a new directory Upgrade existing installationAdd additional features
Installation Type
CompleteCustom
No
24 EMC Smarts Installation Guide for SAM, IP, ESM, MPLS, VoIP, and NPM Managers

Performing an Installation
Installation prerequisitesFulfill the following prerequisites before starting the installation:
◆ Ensure that you have superuser (User ID 0) or administrative privileges on the target host. The installation program will halt if you do not have the appropriate privileges.
◆ Ensure that the required operating system patches have been installed. Clicking More Information during the installation process will launch the System Information window and the Pass/Fail status of the operating system patches. The EMC Smarts Support Matrix for SAM, IP, ESM, MPLS, VoIP, and NPM Managers document provides information on operating system patches.
◆ Determine the location of the EMC Smarts Broker.
You must specify the location of the Broker during a new installation of EMC Smarts software. Typically, this location is chosen during the design of the EMC Smarts software deployment and before any installation begins. Consult with your deployment planner or check the build guide that documents your deployment to determine the name of the host where the Broker was installed and the port that the Broker uses.
If the location is the same host where you are installing this product, the installation program will automatically install the Broker if it is not already on the host.
◆ (Service Assurance Manager only) Decide whether your operators will use the Service Assurance Manager Notification Console (classic SAM functionality) or the SolutionPack for EMC Smarts (in EMC M&R) to view and acknowledge notifications. If you plan to use the SolutionPack for EMC Smarts, you must install additional features and services when you install Service Assurance Manager.
Installation prerequisites 25

Performing an Installation
Install the 9.3 productYou acquire the software for the EMC Smarts Service Assurance Manager, EMC Smarts IP Manager, EMC Smarts MPLS Manager, EMC Smarts Server Manager, EMC Smarts Network Protocol Manager, and EMC Smarts VoIP Availability Manager in one of two ways:
◆ From the installation CD/DVD-ROM.
Insert the CD/DVD-ROM into the optical drive of the host system. Appendix C, “Procedures for CD/DVD-ROMs,” describes how to access the optical drive for various operating systems.
When you insert the installation CD/DVD, several minutes might pass between the InstallShield preparation screen and the EMC Smarts splash screen/installation dialog boxes. Be patient. Do not eject/reinsert the CD/DVD to start a second install process.
The Service Assurance Manager is distributed on the following CD/DVD-ROMs:
• Service Assurance Manager Server
The following products can be installed as services: EMC Smarts Broker, EMC Smarts Service Assurance Manager Server, EMC Smarts Business Impact Manager, EMC Smarts Service Assurance Manager Adapter Platform Server, EMC Smarts SNMP Trap Adapter, EMC Smarts Syslog Adapter, EMC Smarts Notification Module, EMC Data Access API (Smarts EDAA), Alert EMC Data Access API (Alert EDAA).
• Service Assurance Manager Console
The following products can be installed as services: EMC Smarts Servlet Engine, Smarts NOTIF Editor.
◆ From the EMC online support website.
Go to the EMC online support website and download the installation file that is specific to your platform.
You install each product in one of three ways: Wizard mode, CLI mode, or Unattended mode.
Install using Wizard mode
Wizard mode provides a graphical user interface to the installation program for UNIX and Windows platforms.
On UNIX systems, Wizard mode uses the X Window System to display the installation wizard. The host on which you install the EMC Smarts software and the host where you log in must be configured to run the X Window System. Before starting the installation program using the Wizard mode, verify that the X Window System is running.
At the start of the installation, the installation program detects and stops all services, scheduled jobs, and processes that use programs or libraries that are running from the previous installation. It also stops the service daemon, sm_serviced, if it is running.
26 EMC Smarts Installation Guide for SAM, IP, ESM, MPLS, VoIP, and NPM Managers

Performing an Installation
Be aware that In some cases, on Windows, services cannot be stopped by the installation program because multiple threads are locking the services. In those cases, use the Windows Control Panel to stop the services manually.
For instructions on installing the Service Assurance Manager Server in wizard mode, complete the steps in the following section. To install other Service Assurance Manager products after Server install, refer to “Installing the Service Assurance Manager Console, or the Smarts NOTIF Editor, or both” on page 35, and “Add additional features to a new installation” on page 37.
Running Wizard mode1. Run the setup command that is appropriate for the operating system as shown in
Table 5 on page 27.
Table 5 Server setup command syntax for Wizard mode
Product Operating system Setup command
Service Assurance Manager Server
Notice: For setup command syntax for other Service Assurance Manager products, refer to “Installing the Service Assurance Manager Console, or the Smarts NOTIF Editor, or both” on page 35.
Linux ./setup-SAM-9_3_0_0-linux64.bin
Windows setup-SAM-9_3_0_0-win64.exe
IP Manager Linux ./setup-IP-9_3_0_0-linux64.bin
Windows setup-IP-9_3_0_0-win64.exe
MPLS Manager Linux ./setup-MPLS-9_3_0_0-linux64.bin
Windows setup-MPLS-9_3_0_0-win64.exe
Server Manager Linux ./setup-ESM-9_3_0_0-linux64.bin
Windows setup-ESM-9_3_0_0-win64.exe
Network Protocol Manager Linux ./setup-NPM-9_3_0_0-linux64.bin
Windows setup-NPM-9_2_2_0-win64.exe
VoIP Availability Manager Linux ./setup-VOIP-9_3_0_0-linux64.bin
Windows setup-VOIP-9_3_0_0-win64.exe
Install the 9.3 product 27
Performing an Installation
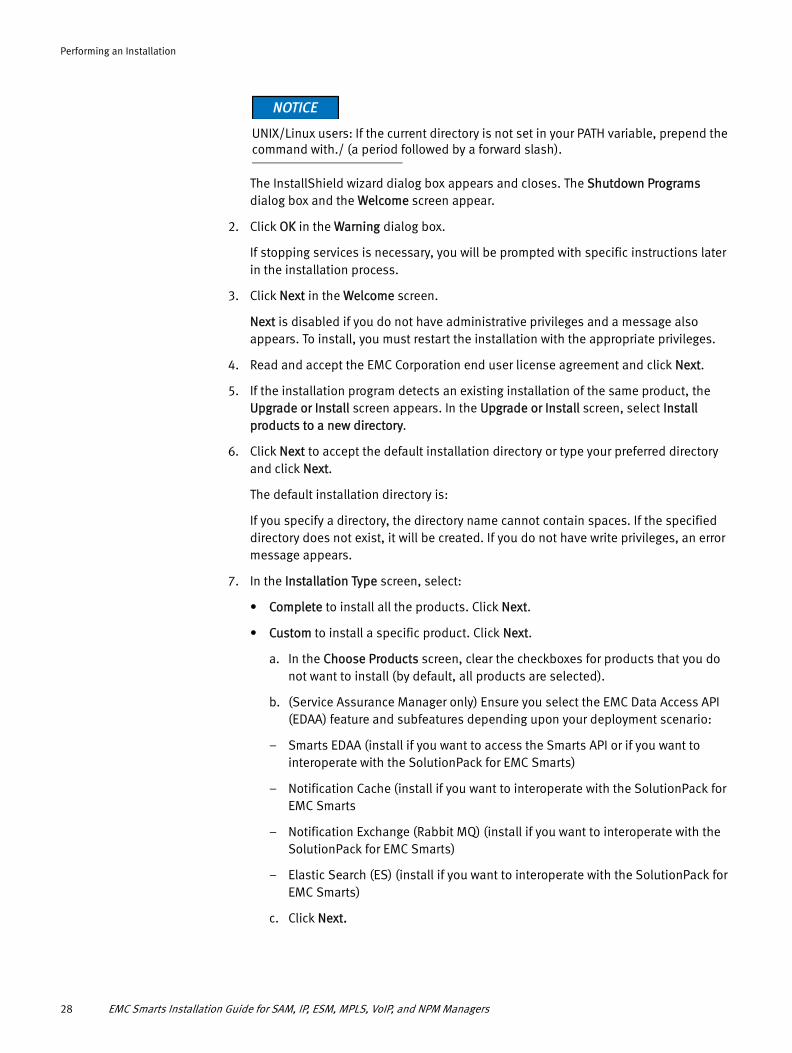
UNIX/Linux users: If the current directory is not set in your PATH variable, prepend the command with./ (a period followed by a forward slash).
The InstallShield wizard dialog box appears and closes. The Shutdown Programs dialog box and the Welcome screen appear.
2. Click OK in the Warning dialog box.
If stopping services is necessary, you will be prompted with specific instructions later in the installation process.
3. Click Next in the Welcome screen.
Next is disabled if you do not have administrative privileges and a message also appears. To install, you must restart the installation with the appropriate privileges.
4. Read and accept the EMC Corporation end user license agreement and click Next.
5. If the installation program detects an existing installation of the same product, the Upgrade or Install screen appears. In the Upgrade or Install screen, select Install products to a new directory.
6. Click Next to accept the default installation directory or type your preferred directory and click Next.
The default installation directory is:
If you specify a directory, the directory name cannot contain spaces. If the specified directory does not exist, it will be created. If you do not have write privileges, an error message appears.
7. In the Installation Type screen, select:
• Complete to install all the products. Click Next.
• Custom to install a specific product. Click Next.
a. In the Choose Products screen, clear the checkboxes for products that you do not want to install (by default, all products are selected).
b. (Service Assurance Manager only) Ensure you select the EMC Data Access API (EDAA) feature and subfeatures depending upon your deployment scenario:
– Smarts EDAA (install if you want to access the Smarts API or if you want to interoperate with the SolutionPack for EMC Smarts)
– Notification Cache (install if you want to interoperate with the SolutionPack for EMC Smarts
– Notification Exchange (Rabbit MQ) (install if you want to interoperate with the SolutionPack for EMC Smarts)
– Elastic Search (ES) (install if you want to interoperate with the SolutionPack for EMC Smarts)
c. Click Next.
28 EMC Smarts Installation Guide for SAM, IP, ESM, MPLS, VoIP, and NPM Managers

Performing an Installation
8. In the Services Selection screen, select the products that you want to install as services and click Next. If you do not install services at this point, you will need to install them manually later.
When installed as services, the products start automatically whenever the host starts up. EMC Corporation recommends that EMC Smarts products be installed as services whenever possible.
If you are migrating from a previous version to 9.3 on the same host, you need to decide whether to install services during the 9.3 installation or to install them manually after the installation. Installing services during the installation will override the services for the previous version of installed products.
For the same-host migration scenario, and assuming that you want to continue to run the previous version of installed products, you have two choices:
• Install services during the 9.3 installation and then, after the installation, manually install services with unique names for the previous version of installed products.
• Do not install services during the 9.3 installation and then, after the installation, manually install services with unique names for the 9.3 products.
Appendix B, “Manually Installing Services,” describes how to install services manually.
9. (Service Assurance Manager only) If you installed the EMC Data Access API, ensure you select the service for EMC Smarts Service Assurance Manager Server (with notification cache publishing). Within that selection, you must start services for both EMC Smarts Data Web Applications (Tomcat) and EMC Smarts Notification Exchange (Rabbit MQ).
10. (MPLS Manager only) The Domain Group Naming screen is displayed. Either accept the default (INCHARGE-MPLS) or enter a new name.
The domain group name is the name given to the MPLS Manager that is made up of MPLS Topology Server, MPLS Monitoring Server, and MPLS Analysis Server. If you change the name of the MPLS Manager, the names of the three servers are changed accordingly.
You may want to define Domain Groups by geographical coverage. You could create a Domain Group for corporate headquarters and change INCHARGE-MPLS to HQ-MPLS, and later, a group for South America as SA-MPLS. The only requirement at this time is that you must install all services for any Domain Group on the same host. Even if you know that you are going to change the name of the Domain Group, you can perform the renaming step later, either through the Global Console or through a script from the command line. Appendix D, “Using the MPLS server_config Utility,” provides more information.
Install the 9.3 product 29

Performing an Installation
11. In the Broker Specification screen, specify the EMC Smarts Broker.
• If you are installing the Broker as a service, specify the port. The hostname defaults to localhost, where localhost is a literal name.
• If the Broker is already running on this host, keep the default values.
• If the Broker is running on another host, specify the hostname of that system and the port that the Broker uses.
Click Next to continue.
12. The Installation Criteria screen appears. Review the list of products that will be installed and the target installation directory. At the bottom of the list, the total amount of disk space that is required for the selected products is provided so that you can verify that adequate disk space is available. To install the products, click Next and the Installation Progress screen appears.
13. Upon completion, the Installation Summary shows informational messages such as successful confirmations, error messages, and warnings. Investigate any errors or warnings.
If Next appears, your system needs to be rebooted because one or both of the following tasks are pending on the system:
• A system-protected file was replaced during the installation and requires a restart.
• A pending restart was triggered by another application or by an operating system patch installation.
Click Next and then reboot your system. Otherwise, click Finish to exit the installation.
The installation program writes an install log file to the BASEDIR/smarts/setup/logs directory, unless the installation fails at the very start, in which case the installation program writes the log file to the /tmp directory. The log file is a text file with the naming convention Install.<product>.<productversionNumber>.log.
14. If your product is part of a deployment that requires the Federal Information Processing Standard (FIPS) Publication 140-2, a U.S. government computer security standard governing cryptographic modules, follow the instructions in “Support for FIPS 140-2 for 9.3 products” on page 38.
15. “Next steps” on page 42 provides post-installation tasks.
For instructions on installing the Service Assurance Manager Server in CLI mode, complete the steps in the following section. To install other Service Assurance Manager products after Server install, refer to “Installing the Service Assurance Manager Console, or the Smarts NOTIF Editor, or both” on page 35.
30 EMC Smarts Installation Guide for SAM, IP, ESM, MPLS, VoIP, and NPM Managers

Performing an Installation
Install using CLI mode
CLI mode provides a text-based method for invoking the installation program. This mode is intended for UNIX platforms with non-graphics consoles. The CLI mode follows the same process flow as the Wizard mode but uses text rather than graphics.
Running CLI modeTo start the CLI mode, invoke the setup command with the -console command-line option.
User selections and navigation in CLI modeDuring the installation and uninstallation processes, you are prompted with a series of steps and menus:
◆ For prompts, accept the default value or select another choice. The default values are indicated in brackets. To accept the default value, press Enter. To reply “yes,” enter y or Y; to reply “no,” enter n or N. Do not press Delete because doing so will cause the process to terminate with an error message.
Table 6 Setup command syntax for CLI mode
Product Operating system Executable
Service Assurance Manager Server
Linux ./setup-SAM-9_3_0_0-linux64.bin -console
Windows setup-SAM-9_3_0_0-win64.exe -console
Service Assurance Manager Console
Linux ./setup-CONSOLE-9_3_0_0-linux.bin -console
Windows setup-CONSOLE-9_3_0_0-win.exe -console
IP Manager Linux ./setup-IP-9_3_0_0-linux64.bin -console
Windows setup-IP-9_3_0_0-win64.exe -console
MPLS Manager Linux ./setup-MPLS-9_3_0_0-linux64.bin -console
Windows setup-MPLS-9_3_0_0-win64.exe -console
Server Manager Linux ./setup-ESM-9_3_0_0-linux64.bin -console
Windows setup-ESM-9_3_0_0-win64.exe -console
Network Protocol Manager Linux ./setup-NPM-9_3_0_0-linux64.bin -console
Windows setup-NPM-9_2_2_0-win64.exe -console
VoIP Availability Manager Linux ./setup-VOIP-9_3_0_0-linux64.bin -console
Windows setup-VOIP-9_3_0_0-win64.exe -console
Install the 9.3 product 31

Performing an Installation
◆ For selections in menus, accept the default selections or type the number of the item and press Enter. The default values are indicated in brackets or as pre-defined selections in menus. An X is used to indicate the selected item. When you are finished making selections, type zero (0) and press Enter.
If you incorrectly type an entry, press 5 to repeat the prompt and select the correct value. Arrow keys and the Backspace key are not supported.
To navigate between each step, use the keys described in Table 7 on page 32.
If your product is part of a deployment that requires the Federal Information Processing Standard (FIPS) Publication 140-2, a U.S. government computer security standard governing cryptographic modules, follow the instructions in “Support for FIPS 140-2 for 9.3 products” on page 38.
“Next steps” on page 42 provides post-installation tasks.
Install using Unattended mode
Unattended mode is supported for all operating systems, but separate response files are needed for UNIX and Windows systems. Unattended mode reads the selections and settings for the installation from a user-modifiable response file, which enables you to easily duplicate the installation on many computer systems. Manual intervention is not necessary after you execute the setup command.
The response file, named <product>-response.txt, is located on the CD/DVD-ROM in the /utils directory. The file provides instructions and examples of command line options that are passed to the installation program in Unattended mode. The command line options are organized by process flow, which is almost identical to that of Wizard mode or CLI mode.
For instructions on installing the Service Assurance Manager Server in Unattended mode, complete the steps in the following section. To install other Service Assurance Manager products after Server install, refer to “Installing the Service Assurance Manager Console, or the Smarts NOTIF Editor, or both” on page 35.
Modifying the response fileTo modify the response file:
1. Copy the response file from the CD/DVD’s /utils directory to a directory on your host, for example, to the /tmp directory.
Table 7 Navigation keys
Key Operation
1 Next, continue to the next step
2 Previous, go back to the previous step
3 Cancel, terminate the program
5 Redisplay, repeat the step
0 Accept the marked ([X]) menu choice
32 EMC Smarts Installation Guide for SAM, IP, ESM, MPLS, VoIP, and NPM Managers

Performing an Installation
2. Using a text editor, modify the values for the command line options in the response file:
a. Specify the target directory.
b. Select a directory for the process log file.
c. Select the products to install. Ensure that the property value for the product is set to true.
d. Select the products to start as services. Ensure that the property value for the product is set to true.
e. Specify the location of the Broker. By default, the location is set to localhost at port 426.
3. Save the file.
Running Unattended modeTo start the Unattended mode, invoke the setup command with the -options command-line option, followed by the full path to the response file.
Table 8 Setup command syntax for Unattended mode (page 1 of 2)
Product Operating system Executable
Service Assurance Manager Server
Linux ./setup-SAM-9_3_0_0-linux64.bin -options<path>/<product>-response.txt
Windows setup-SAM-9_3_0_0-win64.exe -options <path>\<product>-response.txt
Service Assurance Manager Console
Linux ./setup-CONSOLE-9_3_0_0-linux.bin -options<path>/<product>-response.txt
Windows setup-CONSOLE-9_3_0_0-win.exe -options<path>\<product>-response.txt
IP Manager Linux ./setup-IP-9_3_0_0-linux64.bin -options<path>/<product>-response.txt
Windows setup-IP-9_3_0_0-win64.exe -options<path>\<product>-response.txt
MPLS Manager Linux ./setup-MPLS-9_3_0_0-linux64.bin -options<path>/<product>-response.txt
Windows setup-MPLS-9_3_0_0-win64.exe -options<path>\<product>-response.txt
Server Manager Linux ./setup-ESM-9_3_0_0-linux64.bin -options<path>/<product>-response.txt
Windows setup-ESM-9_3_0_0-win64.exe -options<path>\<product>-response.txt
Network Protocol Manager Linux ./setup-NPM-9_3_0_0-linux64.bin -options<path>/<product>-response.txt
Windows setup-NPM-9_2_2_0-win64.exe -options<path>\<product>-response.txt
Install the 9.3 product 33

Performing an Installation
For example, to start the Unattended mode of installation on Linux when the response file is located in /opt/home, enter:
MPLS Manager
./setup-MPLS-9_3_0_0-linux64.bin -options /opt/home/MPLS_SUITE-response.txt
If your product is part of a deployment that requires the Federal Information Processing Standard (FIPS) Publication 140-2, a U.S. government computer security standard governing cryptographic modules, follow the instructions in “Support for FIPS 140-2 for 9.3 products” on page 38.
“Next steps” on page 42 provides post-installation tasks.
Additional Service Assurance Manager installation tasks
If you are installing other Service Assurance Manager components such as the:
◆ Service Assurance Manager Console ◆ Smarts NOTIF Editor◆ Both the Service Assurance Manager Console and the Smarts NOTIF Editor
follow one of the installation procedures for each component included in, “Installing the Service Assurance Manager Console, or the Smarts NOTIF Editor, or both” on page 35.
You can view and acknowledge notifications in the Notification Console in Service Assurance Manager or you can manage notifications from the EMC M&R user interface by installing the SolutionPack for EMC Smarts. The SolutionPack for EMC Smarts article on installation and configuration provides information.
VoIP Availability Manager Linux ./setup-VOIP-9_3_0_0-linux64.bin -options<path>/<product>-response.txt
Windows setup-VOIP-9_3_0_0-win64.exe -options<path>\<product>-response.txt
where <path> is the fully qualified path to the response file and <product> is the product name, for example, IP_NETWORK_SUITE, MPLS_SUITE, or SAM_SUITE.
Table 8 Setup command syntax for Unattended mode (page 2 of 2)
Product Operating system Executable
34 EMC Smarts Installation Guide for SAM, IP, ESM, MPLS, VoIP, and NPM Managers

Performing an Installation
Installing the Service Assurance Manager Console, or the Smarts NOTIF Editor, or both
This section describes the steps for installing the Service Assurance Manager Console, or the Smarts NOTIF Editor, or both the Service Assurance Manager Console and the Smarts NOTIF Editor. Make sure you install the Service Assurance Manager Server first.
Install Service Assurance Manager Console, or the Smarts NOTIF Editor, or both using Wizard modeTo install the Service Assurance Manager Console:
1. Run the Setup command appropriate for the operating system listed in Table 9 on page 35.
The InstallShield wizard dialog box appears and closes. The Shutdown EMC Smarts Programs dialog box and the Welcome screen appear.
2. Click OK in the Warning dialog box.
If stopping services is necessary, specific instructions prompts appear later in the installation process.
3. Click Next in the Welcome screen.
Next is disabled if you do not have administrative privileges and a message also appears. To install, you must restart the installation with appropriate privileges.
4. Read and accept the EMC Corporation end user license agreement and click Next.
5. If the installation program detects an existing installation of the same product, the Installation Type screen appears.
Select Install the product to a new directory.
This screen does not display if you are installing the product for the first time on the system.
6. Click Next to accept the default installation directory or type your preferred directory and click Next.
The default installation directory is:
If you specify a directory, the directory name cannot contain spaces. If the specified directory does not exist, it will be created. If you do not have write privileges, an error message appears.
7. In the Setup screen, select one of the following:
• Complete to install all Service Assurance Manager Console components. Click Next.
Table 9 Console setup command syntax for Wizard mode
Operating system Setup command
Linux ./setup-CONSOLE-9_3_0_0-linux.bin
Windows setup-CONSOLE-9_3_0_0-win.exe
Install the 9.3 product 35
Performing an Installation
• Custom to install a specific product. Click Next.
a. Clear products that you do not want to install (by default, all products are selected). From this screen, you may choose to install either the Global Console or the Smarts NOTIF Editor.
b. Click Next.
8. In the type of Global Console installation screen, select:
• Global Console, Web Console, and Business Dashboard. Click Next.
• Global Console. Click Next.
9. The Services Selection screen appears. Select the products that you want to install as services and click Next. If you do not install services at this point, you must install them manually later.
If you have an older version of a service running on the host, you must stop that service before installing a new version of the service.
When installed as services, EMC Smarts products start automatically when the system starts up. If the system is stopped and restarted, the EMC Smarts products restart automatically. EMC Corporation recommends that EMC Smarts products be installed as services whenever possible. If any of the products that are being installed can be started as services, these products are displayed in the services selection screen.
10. Specify the EMC Smarts Broker:
• If the Broker is already running on this host, keep the hostname default value and change the Broker port accordingly if it is not running on port 426.
• If the Broker is running on another host, specify the hostname of that system and the port the Broker uses.
Click Next to continue.
11. Review the list of products that will be installed and the target installation directory. At the bottom of the list, the total amount of disk space required for the selected products is provided so that you can verify that adequate disk space is available. To install the products, click Next and the Installation Progress screen appears.
12. Upon completion, the Installation Summary displays informational messages such as successful confirmations, error messages, and warnings. Click Finish to exit the installation. It is not necessary to restart the system after installation.
Investigate any errors or warnings. The log file is a text file with the naming convention Install.<product>.<productversionNumber>.log. It is located in the BASEDIR/smarts/setup/logs directory. If the installation process fails, the log files are located in the /tmp directory.
13. “Next steps” on page 42 provides information on post-installation tasks.
Install Service Assurance Manager Console, or the Smarts NOTIF Editor, or both using CLI mode“Install using CLI mode” on page 31 provides information on installing Service Assurance Manager Console, or the Smarts NOTIF Editor, or both using CLI mode.
36 EMC Smarts Installation Guide for SAM, IP, ESM, MPLS, VoIP, and NPM Managers

Performing an Installation
Install Service Assurance Manager Console, or the Smarts NOTIF Editor, or both using unattended mode
“Install using Unattended mode” on page 32 provides information on installing Service Assurance Manager Console, or the Smarts NOTIF Editor, or both using unattended mode.
Add additional features to a new installationIf after installing a new installation you want to add products to the new installation, run the installation again, select the Add additional features option in the Upgrade or install screen, and select all products that are already installed plus any other products that you would like to install in the new installation. Then proceed to “Next steps” on page 42.
Add additional features to a new installation 37

Performing an Installation
Support for FIPS 140-2 for 9.3 productsThe Federal Information Processing Standard (FIPS) Publication 140-2 is a U.S. government computer security standard governing cryptographic modules. FIPS 140 is required for any software purchased by the U.S government and U.S military. This release specifically addresses U.S Government accounts which require FIPS 140 compliance.
A configuration parameter, SM_FIPS140, has been introduced for FIPS 140 in the runcmd_env.sh file. The SAM or EMC Smarts administrator can enable or disable this parameter as required. The default value of this parameter is FALSE.
FIPS 140 mode allows you to use SNMP V1, SNMPV2C, SNMP V3, with SHA and AES 128 protocols. FIPS 140 does not support the DES privacy protocol or the MD5 authentication protocol. When you discover an SNMPv3 device, you need to select the option “V3” in the “Add Agent” window. The “Authentication Protocol” option lists only SHA and not MD5, and the “Privacy Protocol” option lists only AES and not DES. This is because MD5 and DES are not supported in FIPS 140 mode. When you discover SNMPv3 devices with MD5 and DES protocol as seed, the devices go to the Pending List and display as “Invalid” or “Unsupported SNMP V3 protocol.”
FIPS 140 mode cannot be enabled or disabled after a server is started. FIPS 140-enabled Domain Managers such as MPLS Manager, IP Manager, Service Assurance Manager, and Server Manager can work only with the SAM Global Console 8.1.2 or later for FIPS 140-2 mode.
A non-FIPS 140 mode Broker will not be able to communicate with a FIPS 140-enabled Manager (IP server, SAM server, or Domain Manager). Trying to establish such a connection will result in the enabled Manager going into a DEAD state after couple of minutes. Communication should always happen between FIPS 140-enabled Brokers and Managers.
Inter-domain and FIPS 140 Broker communication happens only when the Broker, Managers, and the SAM Console are all in FIPS 140 mode, else the application will not be operational.
This section covers the following scenarios for FIPS 140:
◆ “Enabling FIPS 140 mode on a new installation” on page 38
◆ “Disabling FIPS 140 mode” on page 41
◆ “Verify the FIPS 140 mode status” on page 113
Enabling FIPS 140 mode on a new installation
When you install a 9.3 product, FIPS 140 is not enabled by default. You must enable FIPS 140 on a clean installation or an upgrade, before the servers are started, using the following procedure:
1. Back up the imk.dat, brokerConnect.conf, serverConnect.conf and clientConnect.conf files from the existing installation. These files are located in the BASEDIR/local/conf folder.
38 EMC Smarts Installation Guide for SAM, IP, ESM, MPLS, VoIP, and NPM Managers

Performing an Installation
The backup is necessary in case you need to disable FIPS 140 mode and remove FIPS 140-2 encryption.
2. Run the following command at the command line prompt:
Service Assurance Manager
sm_rebond --upgrade --basedir=/opt/InCharge/SAM/smarts
IP Manager
sm_rebond --upgrade --basedir=/opt/InCharge/IP/smarts
MPLS Manager
UNIX
sm_rebond --upgrade --basedir=/opt/InCharge/MPLS/smarts
Windows
sm_rebond --upgrade --basedir=C:\InCharge\MPLS\smarts
Server Manager
sm_rebond --upgrade --basedir=/opt/InCharge/ESM/smarts
Network Protocol Manager
UNIX
sm_rebond --upgrade --basedir=/opt/InCharge/NPM/smarts
Windows
sm_rebond --upgrade --basedir=C:\InCharge\NPM\smarts
The path must be set to the default install path. Regardless of the FIPS 140 state, the sm_rebond command must be invoked from the BASEDIR where the software is installed, not from any other product installation area which also has the sm_rebond utility.
3. When prompted, type a password to regenerate the imk.dat file. The default password is Not a secret.
Older versions of products (prior to 8.1) do not use a FIPS 140-2 approved encryption algorithm to protect the imk.dat file. Hence, while upgrading from older versions of the products to 9.3, the imk.dat file needs to be regenerated in order to run in the FIPS 140 mode.
4. Download and install the Unlimited Strength Jurisdiction Policy Files using the procedure described in “Preparing Java Runtime for FIPS mode” on page 41.
5. Set the value for the parameter SM_FIPS140 to TRUE in the runcmd_env.sh file. The file is located under the BASEDIR/smarts/local/conf directory.
Support for FIPS 140-2 for 9.3 products 39

Performing an Installation
Enabling FIPS 140 mode on SAM Web Console1. Perform steps 1 - 4 as described in the section, “Enabling FIPS 140 mode on a new
installation” on page 38.
2. Go to the <BASEDIR>/smarts/jre/lib/security folder, and in the java.security file, change:
“sun.security.rsa.SunRsaSign” to “com.rsa.jsafe.provider.JsafeJCE” and “com.sun.net.ssl.internal.ssl.Provider” to “com.rsa.jsse.JsseProvider.”
3. Set the value for the parameter SM_FIPS140 to TRUE in the runcmd_env.sh file. This file is located under the <BASEDIR>/CONSOLE/smarts/local/conf folder of your Global Console installation. or Use "-Dcom.smarts.fips_mode=true" as a command line parameter for the sm_guicommand.
Enabling FIPS 140 mode on SAM Dashboard1. Perform steps 1 - 4 as described in the section, “Enabling FIPS 140 mode on a new
installation” on page 38.
2. Set the value for the com.smarts.fips_mode to TRUE in the corresponding webconsole.properties file (located under <BASEDIR>/InCharge/CONSOLE/smarts/tomcat/webapps/webconsole folder) or dashboard.properties file (located under <BASEDIR>/InCharge/CONSOLE/smarts/tomcat/webapps/templates).
3. Set the value for the parameter SM_FIPS140 to TRUE in the runcmd_env.sh file. This file is located under the <BASEDIR>/CONSOLE/smarts/local/conf folder of your Global Console installation. or Use "-Dcom.smarts.fips_mode=true" as a command line parameter for the sm_gui command.
Enabling FIPS 140 mode on SAM NOTIF1. Perform steps 1 - 4 as described in the section, “Enabling FIPS 140 mode on a new
installation” on page 38.
2. Go to the <BASEDIR>/CONSOLE/smarts/notif/editor/ or the <BASEDIR>/SAM/smarts/notif/editor folder, and edit the NotifGui.bat/NotifGui.sh file to replace the string, “com.netmg.notif.gui.NotifApplication” with “-Dcom.smarts.fips_mode=true com.netmg.notif.gui.NotifApplication.”
3. Set the value for the parameter SM_FIPS140 to TRUE in the runcmd_env.sh file. This file is located under the <BASEDIR>/CONSOLE/smarts/local/conf folder of your Global Console installation. or Use "-Dcom.smarts.fips_mode=true" as a command line parameter for the sm_gui command.
40 EMC Smarts Installation Guide for SAM, IP, ESM, MPLS, VoIP, and NPM Managers

Performing an Installation
If you install the servers as a service on Linux platforms, the services will start automatically after you issue the sm_rebond command. First stop the services, modify SM_FIPS140=TRUE in the runcmd_env.sh file, and then manually start the services.
After enabling FIPS 140 mode, when you start the broker and the SAM server, you may see the following message in the server log:
“CI-W-NOCGSS-No certificate loaded for INCHARGE-AM, generating self-signed certificate.”
This message is generated because FIPS 140 requires secure communication, which can be achieved using SSL. If this certificate is not available, the SAM Manager generates a self-signed certificate. This message is benign in nature and does not impact functionality.
Preparing Java Runtime for FIPS mode
Download and install the Unlimited Strength Jurisdiction Policy Files using the following steps:
1. Download the Java Cryptography Extension (JCE) Unlimited Strength Jurisdiction Policy Files 7 from the Oracle website.
When moving the Server from FIPS Disabled mode to Enabled mode, re-enter SOAP Credentials in the Polling and Thresholds window and reconfigure the Server. Failing to do so will result in failure of SOAP discovery and monitoring.
2. Extract the local_policy.jar and US_export_policy.jar files from the downloaded zip file.
3. Go to the BASEDIR/smarts/jre/lib/security directory, and then back up the existing policy files in this path.
4. Overwrite the local_policy.jar and US_export_policy.jar files to the BASEDIR/smarts/jre/lib/security directory.
Disabling FIPS 140 mode
To disable FIPS 140:
1. Replace the imk.dat, brokerConnect.conf, serverConnect.conf and clientConnect.conf files in the BASEDIR/local/conf folder, with the copies saved from prior to ““Enabling FIPS 140 mode on a new installation” on page 38”. If you do not have a copy of these files saved, contact Technical Support.
2. Set the value for the SM_FIPS140 parameter to FALSE in the runcmd_env.sh file. This file is located under BASEDIR/smarts/local/conf/runcmd_env.sh.
3. Restart all processes, such as the Broker, Domain Managers, SAM Global Manager, and Global Console.
Support for FIPS 140-2 for 9.3 products 41

Performing an Installation
RPS files started under FIPS mode cannot be re-used in non-FIPS mode. Domains will need to be started either from scratch or pre-FIPS RPS files can be used in cases where topologies have not changed. Restoring from older RPS files may not be productive as it will not contain any recent topology.
Do not remove the Unlimited Strength Jurisdiction Policy Files.
Next stepsPerform the following tasks:
◆ “Obtain and install a temporary license file” on page 105 describes tasks for obtaining and saving a new license file.
(For VoIP Availability Manager only) The VoIP core software, each enablement pack, and the integration pack require a separate license. In VoIP Availability Manager 9.3, because the license for the newly introduced ACME Enablement Pack has been added to the VoIP core license, you will not be charged for the use of the ACME Enablement Pack, but you still must acquire a new license file in order to use the ACME Enablement Pack.
◆ Chapter 5, “Performing a Migration,” describes additional tasks if you are migrating from a previous version of the product.
◆ Chapter 7, “Verifying the Installation,” describes tasks for verifying the proper installation of the software and starting services.
42 EMC Smarts Installation Guide for SAM, IP, ESM, MPLS, VoIP, and NPM Managers

CHAPTER 3NAS Installation and Startup
This chapter covers installation and startup issues for the EMC Smarts IP Availability Manager Extension for NAS. Topics in this chapter are:
◆ Overview................................................................................................................. 44◆ Installing and starting the HTTPS Adapter service .................................................... 44
NAS Installation and Startup 43

NAS Installation and Startup
OverviewThe NAS Extension is installed with the IP Availability Manager. After installation, the IP Availability Manager can discover NAS devices, and perform root cause and impact analysis on these devices.
Configuring the NAS Extension involves the tasks summarized in Table 10 on page 44.
Installing and starting the HTTPS Adapter serviceThe NAS Extension software includes an adapter process (the HTTPS Adapter), which probes the Celerra devices using the HTTPS/XML probe to obtain internal topology information. While the installation of this adapter is automatic, you must install the service and start it manually. Install the HTTPS Adapter as a service and start the service manually, as described next for UNIX and Windows.
Once started, the HTTPS Adapter registers with the Broker. The EMC Smarts System Administration Guide provides more information about starting services.
UNIX:
To install the HTTPS Adapter as a service on UNIX, issue the following command:
# sm_service install --force --unmanaged --startmode=manual \'--name=<service_name>' \'--description=<Smarts description>' \'BASEDIR/smarts/bin/sm_adapter_java' '--name=<HTTPS_Adapter_Name>' \'--output=<HTTPS_Adapter_Name>.log' \'-J' \'nas_probe.jar'
Table 10 Steps for configuring the NAS Extension
Procedure Reference
If necessary, configure the HTTPS Adapter to support access to the managed Celerra devices.
For information about this requirement, refer to the “Configuring Control Station usernames and passwords” chapter in the EMC Smarts IP Manager User Guide.
If necessary, configure external Control Station and Data Mover IP addresses.
For information about this requirement, refer to the “Configuring Control Station and Data Mover IP addresses” chapter in the EMC Smarts IP Manager User Guide, which also refers you to the appropriate EMC documentation, if needed.
Install the HTTPS Adapter as a service and start the service.
“Installing and starting the HTTPS Adapter service” on page 44.
Start the Availability Manager. EMC Smarts Installation Guide for SAM, IP, ESM, MPLS, VoIP, and NPM Managers
Start the Global Manager. EMC Smarts Installation Guide for SAM, IP, ESM, MPLS, VoIP, and NPM Managers. For configuration information, refer to the EMC Smarts System Administration Guide.
Start the Global Console. EMC Smarts Installation Guide for SAM, IP, ESM, MPLS, VoIP, and NPM Managers.
44 EMC Smarts Installation Guide for SAM, IP, ESM, MPLS, VoIP, and NPM Managers

NAS Installation and Startup
where <service_name> is the name registered to the service daemon. You may choose any name you wish for this name; for example, ic-remote-nas. When you issue the sm_service show command, this name appears.
<Smarts description> is the description of the service. You may create any description you wish; for example, Smarts remote NAS adapter.
<HTTPS_Adapter_Name> is the name of the HTTPS Adapter, as registered with the Broker; for example, the default name is remote-nas.
You can also specify the Broker and Port, if the Availability Manager with NAS Extension is registered with a Broker and Port other than the default, localhost:426. To do this, add the following arguments to the end of the command:
--broker=<IP Address or Hostname>:<Port Number>
where <IP Address or Hostname> identifies the host on which the Broker is running, and <Port Number> identifies which port is used by the Broker. Please note that a colon separates the hostname from the port.
To start the service, type the following command:
# BASEDIR/smarts/bin/sm_service start <service_name>
To stop the service, issue the following command:
# BASEDIR/smarts/bin/sm_service stop <service_name>
Windows:
To install the HTTPS Adapter as a service on Windows, type the following command on one line:
▼ sm_service install --force --name=<service_name> --description=<Smarts description> --startmode=manual BASEDIR\smarts\bin\sm_adapter_java.exe "--name=<HTTPS_Adapter_Name>" "--output=<HTTPS_Adapter_Name>.log" "--jar=nas_probe.jar" ▲
where <service_name> is the name registered to the service registry; this name must be unique to the registry. You may choose any name you wish for this name so long as the name has no white spaces. The following is an example, ic-remote-nas. When you issue the sm_service show command, this name appears.
<Smarts description> is the description of the service. You may create any description you wish but it is easier to find the service if all EMC Smarts services are grouped together. An example service description is Smarts remote NAS adapter. Service names display alphabetically in the Name column of the Services window located at Control Panel/Administrative Tools, so the example description will follow Smarts Performance Manager and precede Smarts Service Assurance Manager.
<HTTPS_Adapter_Name> is the name of the HTTPS Adapter, as registered with the Broker; for example, the default name is remote-nas.
You can also specify the Broker and Port, if the Availability Manager with NAS Extension is registered with a Broker and Port other than the default, localhost:426. To do this, add the following arguments to the end of the command:
Installing and starting the HTTPS Adapter service 45

NAS Installation and Startup
--broker=<IP Address or Hostname>:<Port Number>
where <IP Address or Hostname> identifies the host on which the Broker is running, and <Port Number> identifies which port is used by the Broker. Please note that a colon separates the hostname from the port.
To start the service, go to the Services window and select the service name, or issue the following command at a command prompt:
# BASEDIR\smarts\bin\sm_service start <service_name>
To stop the service, go to the Services window and select the service name, or issue the following command:
# BASEDIR\smarts\bin\sm_service stop <service_name>
Running HTTPs adapter in FIPS mode
The NAS subsystem was changed to provide FIPS 140 support. Hence you need to download additional JAR (Java Archive) files, else errors are seen in the NAS log when you run NAS discovery.
Unlimited Strength Jurisdiction Policy JAR files are required for the FIPS140 mode for the console, webserver, and anything else using Java.
Example NAS Log Error Snippet:
MAIN_MSG-*-STDFD_OUT-stdout: javax.net.ssl.SSLException: java.security.InvalidKeyException: Illegal key size
[June 17, 2011 6:37:49 PM GMT+05:30 +227ms] t@1084229984 platformMAIN_MSG-*-STDFD_OUT-stdout:
at com.rsa.sslj.x.aJ.b(Unknown Source)at com.rsa.sslj.x.aJ.a(Unknown Source)at com.rsa.sslj.x.aJ.b(Unknown Source)at com.rsa.sslj.x.aU.d(Unknown Source)at com.rsa.sslj.x.aU.a(Unknown Source)at com.rsa.sslj.x.aU.h(Unknown Source)at com.rsa.sslj.x.cI.startHandshake(Unknown Source)at com.smarts.nas_probe.ControlStationInterface.getSSLSocket(ControlStationInterface.java:314)at com.smarts.nas_probe.ControlStationInterface.post(ControlStationInterface.java:75)at com.smarts.nas_probe.ControlStationInterface.getReply(ControlStationInterface.java:58)at com.smarts.nas_probe.XMP.NasXML(XMP.java:25)
Caused by: com.rsa.sslj.x.ax: java.security.InvalidKeyException: Illegal key sizeat com.rsa.sslj.x.aJ.b(Unknown Source)at com.rsa.sslj.x.cR.k(Unknown Source)at com.rsa.sslj.x.t.f(Unknown Source)at com.rsa.sslj.x.t$a.run(Unknown Source)at com.rsa.sslj.x.aJ$a$a.run(Unknown Source)at java.security.AccessController.doPrivileged(Native Method)at com.rsa.sslj.x.aJ$a.run(Unknown Source)... 7 more
[June 17, 2011 6:37:49 PM GMT+05:30 +229ms] t@1084229984 platform
46 EMC Smarts Installation Guide for SAM, IP, ESM, MPLS, VoIP, and NPM Managers
NAS Installation and Startup
MAIN_MSG-*-STDFD_OUT-stdout: eCaused by: java.security.InvalidKeyException: Illegal key size
at javax.crypto.Cipher.a(DashoA13*..)at javax.crypto.Cipher.init(DashoA13*..)at javax.crypto.Cipher.init(DashoA13*..)at com.rsa.sslj.x.Y.<init>(Unknown Source)......
With BSAFE SSL-J, some of the FIPS 140 cryptographic algorithms require Unlimited Strength Jurisdiction Policy Files.
Unlimited Strength Jurisdiction Policy JAR Files for NAS discoveryDownload and install the Unlimited Strength Jurisdiction Policy Files to run the NAS adapter in FIPS mode using the following steps:
1. Download the Java Cryptography Extension (JCE) Unlimited Strength Jurisdiction Policy Files 6 from the Oracle website.
2. Extract the local_policy.jar and US_export_policy.jar files from the downloaded zip file.
3. Go to the smarts/jre/lib/security directory and then back up the existing policy files in this path.
4. Overwrite the local_policy.jar and US_export_policy.jar files to the smarts/jre/lib/security directory.
If you want to switch back from FIPS mode to non-FIPS mode, reset SM_FIPS140 to FALSE. You do not need to remove the Unlimited Strength Jurisdiction Policy Files.
Installing and starting the HTTPS Adapter service 47

NAS Installation and Startup
48 EMC Smarts Installation Guide for SAM, IP, ESM, MPLS, VoIP, and NPM Managers

CHAPTER 4Performing an Upgrade
This chapter describes how to install an in-place upgrade installation for the EMC Smarts IP Manager, EMC Smarts MPLS Manager, EMC Smarts Server Manager, EMC Smarts Network Protocol Manager, and EMC Smarts VoIP Availability Manager. Upgrade topics include:
◆ Upgrade installation overview ................................................................................. 50◆ Upgrade installation prerequisites .......................................................................... 53◆ Upgrade the 9.3 product ......................................................................................... 53◆ Add additional features to an upgrade installation .................................................. 57◆ Upgrading 9.3 products in FIPS mode...................................................................... 57◆ Next steps............................................................................................................... 58
Performing an Upgrade 49

Performing an Upgrade
Upgrade installation overviewThis chapter describes how to perform an upgrade installation for the IP Manager, Service Assurance Manager, MPLS Manager, and Server Manager. An upgrade installation applies a new version of software to an existing version in the same directory on the same host. An “upgrade installation” is also known as an “in-place upgrade.” During an upgrade installation, new product services are not available to install, unless you select additional products during the upgrade procedure.
You can upgrade the versions of software listed in the EMC Smarts Support Matrix for SAM, IP, ESM, MPLS, VoIP, and NPM Managers to Version 9.3 using the in-place upgrade instructions provided in this chapter.
The upgrade installation flow is shown in Figure 3 on page 51.
When deciding which Global Manager or underlying Domain Manager to upgrade first, perform the upgrade in the following order:
1. Start with the top-most SAM server and related Service Assurance products and consoles in your deployment, either a SAM server or the Presentation SAM server in a hierarchical SAM deployment.
2. An Aggregation SAM server if it is a hierarchical SAM deployment.
3. IP Manager.
4. Any order: Server Manager, MPLS Manager, Network Protocol Manager, and VoIP Availability Manager.
50 EMC Smarts Installation Guide for SAM, IP, ESM, MPLS, VoIP, and NPM Managers

Performing an Upgrade
Figure 3 Upgrade installation flowchart
������������ ���� �����������
��������������� ���� ���
��� ����������� ������������� ��
�
���
�������
����������������
�
!�� ���� ����"���� �������� ���
!�� ���� ����#����� �
$��������%�� ������� ���� ���
&���� �!�� ���� ��������� ���
!�� ���� ����#����� �
#������������ �
���!�� �������'�'�'
(�� ����$����#�������� �����!�� ��� ����
$����������!�� ���
� !�� ���������� �� ������������� ���� $��������%�� ������� ���� ���� �������� ��������� ����
���)���������� ���
!�� ���� ����#�� ����
#������"���� ������� �����!&*+,"
'''
��������� ���� ���
Upgrade installation overview 51

Performing an Upgrade
Installer tasks
During an upgrade installation, the installation program performs the following tasks:
1. Detects and stops all services, scheduled jobs, and processes that use programs or libraries that are running from the existing installation. It also stops the service daemon, sm_serviced, if it is running.
Be aware that in some cases, on Windows, services cannot be stopped by the installation program because multiple threads are locking the services. In those cases, use the Windows Control Panel to stop the services manually.
If the broker is running on the host with a IP Manager, then it will have to be stopped during an upgrade. The broker has to be stopped to prevent the impact on all the other applications running on the system.
2. Creates a backup copy of your customizations in the <BASEDIR>/smarts/.migrate.bkp.<version> directory.
3. Removes the patch, if any, from the existing installation.
4. Installs the 9.3 software.
5. Prompts you to merge your customizations files in the BASEDIR>/smarts/.migrate.bkp.<version> directory to the BASEDIR/smarts/local directory.
Installer-called utilities
The installation program invokes the sm_migrate utility to backup the existing user-customized files and base files. It also presents the sm_migrate command to be run after the 9.3 installation to complete a three-way merge of the following sets of files:
◆ Existing user-customized files in the <BASEDIR>/smarts/.migrate.bkp.<version> directory.
◆ Existing base files in the <BASEDIR>/smarts/.migrate.bkp.<version> directory.
◆ 9.3 base files in the BASEDIR/smarts directory
The sm_migrate utility invokes another utility, the sm_merge utility, for each of the files that requires a three-way merge. Chapter 6, “Migration Utilities,” explains how the sm_migrate and sm_merge utilities work.
52 EMC Smarts Installation Guide for SAM, IP, ESM, MPLS, VoIP, and NPM Managers

Performing an Upgrade
Upgrade installation prerequisitesFulfill the following prerequisites before starting the upgrade installation:
◆ Ensure that you have superuser (User ID 0) or administrative privileges on the target host. The installation program will halt if you do not have the appropriate privileges.
◆ Ensure that the required operating system patches have been installed. Clicking More Information during the installation process will launch the System Information window and the Pass/Fail status of the operating system patches. The EMC Smarts Support Matrix for SAM, IP, ESM, MPLS, VoIP, and NPM Managers document provides information on operating system patches.
◆ Remove all the unused files in the /local directory. The unused files will also include RPS files and custom files created by you. The upgrade process uses the sm_migrate utility that creates a backup of all the files in the local directory and copies them back to local directory after the upgrade. RPS and custom files can be large, and may slow down the process.
◆ Disk space requirement—During an upgrade installation, the installer creates a backup of files in actions, conf, model, repos, rules, script directories. Ensure that you have disk space of twice the size of these directories available on the system. After the upgrade and verifying the installation, you can archive or remove the backup directories. This requirement is in addition to the minimum disc requirement outlined for each product in the EMC Smarts Support Matrix for SAM, IP, ESM, MPLS, VoIP, and NPM Managers document.
Before upgrading to 9.3 software, all the temporary test patches must be manually uninstalled. The installer detects the temporary test patches and prompts you to manually uninstall them. The installer will not proceed with the upgrade until all the temporary test patches are uninstalled.
Upgrade the 9.3 productYou upgrade each product in one of three ways: Wizard mode, CLI mode, or Unattended mode.
Perform the following tasks:
1. Review the important release issues found in your product-specific release notes.
2. On the host where the target existing installation resides, log in as superuser (User ID 0) or administrator.
3. Uninstall any temporary test patches (TTPs) in the existing installation.
4. Mount the CD/DVD-ROM. Appendix C, “Procedures for CD/DVD-ROMs,” provides more information.
5. Choose Wizard mode, CLI mode (UNIX only), or Unattended mode. The setup commands for invoking Wizard mode, CLI mode, and Unattended mode are listed in Table 5 on page 27, Table 6 on page 31, and Table 8 on page 33.
Upgrade installation prerequisites 53

Performing an Upgrade
• In Wizard mode or CLI mode, make the following additional selections:
– In the Upgrade or Install screen, select Upgrade existing suite and click Next or enter [1].
– In the Target Installation Selection screen (in which an existing product is selected unless the product was previously installed to more than one directory, in which case you will see multiple choices), select a target installation directory and click Next or enter [1].
– In the Choose Products screen, all of the existing products are selected to be upgraded. You can select additional products to add to the installation.
– Specify any additional local directories created using SM_SITEMOD. Click Next or enter [1].
– For Server Manager, in the Choose the Installation type screen, select Complete.
– For Server Manager, in the Export Process-Monitoring configuration screen, select Yes to export your existing applications and application process templates to the new installation. Click Next or enter [1].
– For Server Manager, type the name of the old 9.x Server Manager where the process monitoring configurations reside. Also, you can accept or revise the broker location and port number for the broker that is registered with the old Server Manager. Click Next or enter [1].
• In Unattended mode, specify the following additional options in the response file (<product>-response.txt). All previously installed products must have their product options set to “true” in the response file.
– Uncomment the -W INSTALL_TYPE.INSTALL_CHOICE=UPGRADE option.
– Uncomment the -W SITEMOD_BEAN.SITEMODS_VAR option, and provide one or more directory locations to perform an upgrade. You can provide the name of the directories, or the directory name with absolute path.
For example, on Linux:
-W SITEMOD_BEAN.SITEMODS_VAR=local-1:/opt/InCharge/SAM/smarts/Local-2 :local-3
on Windows:
-W SITEMOD_BEAN.SITEMODS_VAR=C:\InCharge\smarts\SAM\local3 ;C:\InCharge\SAM\smarts\local2
For specifying directory separators, use : on Linux and ; on Windows.
– Uncomment the -W MERGE_OPTION_UPGRADE.MERGE_CHOICE=MERGE option to perform the merge.
– Uncomment the -W MERGE_OPTION_UPGRADE.MERGE_CHOICE=NOMERGE option to not perform the merge.
54 EMC Smarts Installation Guide for SAM, IP, ESM, MPLS, VoIP, and NPM Managers

Performing an Upgrade
– Uncomment the -P <product>.installLocation option and set its property value to the installation directory of the target installation. The installation directory must end with /<product>.
– Ensure the property value is set to “true” for each product that is already installed plus any other product that you would like to add to the installation.
– For Server Manager, uncomment the -W PROCESS_MONITOR_BEAN.DUMP_CHOICE=DUMP option to export your existing applications and application process templates.
– For Server Manager, specify the name of the old 9.x Server Manager (INCHARGE-ESM, by default) where the process monitoring configurations reside for the -W ASLExecInputBeanESM.DOMIAN_VAR option.
– For Server Manager, specify the broker location and port number for the broker that is registered with the old Server Manager for the -W ASLExecInputBeanESM.BROKER_VER option.
6. The installation program displays the Directories created using SM_SITEMOD screen which allows you to back up local directories that were created with SM_SITEMOD. If you used SM_SITEMOD to create local directories, enter a list of local directories. Click Next or enter [1].
The installation program then runs the sm_migrate utility to create a backup file of the user-customized files and base files in the existing installation. The backup file, named .migrate.bkp.<version>, is saved to the BASEDIR/smarts directory.
On a Windows-based host, extracting the sm_migrate utility and performing a migration takes a considerable amount of time. Be patient. Do not stop the migration process.
7. The installation program removes the patch, if any, from the existing installation and installs the 9.3 software.
8. After the installation, the installation program shows the Restore User Configurations Instructions screen, which presents the sm_migrate command for restoring the old user-customizations in the .migrate.bkp.<version> backup file to the BASEDIR/smarts/local directory. The screen provides two options:
a. Yes, merge the files - Select this option if you want the utility to automatically merge the files modified by you.
b. No, I will merge them later - Select this option if you want to manually merge the files modified by you.
Click Next or enter [1] to view the Installation Summary.
For Service Assurance Manager, the upgrade process inserts the _edaa user entry into the security configuration file serverConnect.conf and the runcmd_env.sh file. The upgrade process does not modify the clientConnect.conf, brokerConnect.conf, and imk.dat files. The upgrade process does not insert the _edaa user entry into the files of Domain Managers.
Upgrade the 9.3 product 55

Performing an Upgrade
For Domain Managers, copying the security configuration files clientConnect.conf, serverConnect.conf, brokerConnect.conf, runcmd_env.sh, and imk.dat is not supported in an upgrade installation. You can manually copy the security configuration files using sm_migrate utility as described in “Restoring customizations after an upgrade installation” on page 89.
9. The Installation Summary shows informational messages such as successful confirmations, error messages, and warnings. Investigate any errors or warnings.
If Next appears, your system needs to be rebooted because one or both of the following tasks are pending on the system:
• A system-protected file was replaced during the installation and requires a restart.
• A pending restart was triggered by another application or by an operating system patch installation.
Click Next or enter [1] and then reboot your system. Otherwise, click Finish or enter [1] to exit the installation.
The installation program writes an install log file to the BASEDIR/smarts/setup/logs directory, unless the installation fails at the very start, in which case the installation program writes the log file to the /tmp directory. The log file is a text file with the naming convention Install.<product>.<productversionNumber>.log.
10. Evaluate your custom code. Review the “Custom file migration use cases” on page 91. The sm_migrate utility migrated all user-customized files from the existing installation to the BASEDIR/smarts/local directory in the 9.3 installation. Review the output of the sm_migrate utility and evaluate if you would like to keep the user-customized files in the new installation.
“Configuration migration process logs” on page 97 provides more information on the log files that are created after the migration of user-customized files.
11. If you plan to use the EMC M&R UI and the Service Assurance Manager in this upgrade is the Presentation SAM server for the EMC M&R UI, you need to use the sm_service command to install the ic-sam-server-pres service, and then remove the existing ic-sam-server service.
Appendix B, “Manually Installing Services,” provides the sm_service syntax for the ic-sam-server-pres service.
To remove the ic_sam_service service, type this command from the <BASEDIR>/smarts/bin directory:
sm_service remove --name=ic-sam-server
The EMC Smarts System Administration Guide provides more information about how to use the sm_service command.
12. For Server Manager, from the <BASEDIR>/smarts/bin directory, type:
sm_server -n <9.3_server_manager_name> -c esm --output --daemon --clean-topology --ignore-restore-errors
a. Then, shut down the sm_server.
56 EMC Smarts Installation Guide for SAM, IP, ESM, MPLS, VoIP, and NPM Managers

Performing an Upgrade
Use the --clean-topology option only once. After all of the settings are imported, do not use the option again. Instead, use the sm_service command to start your Domain Managers later in step 15 on page 57 .
13. If you installed additional products and they are not licensed features, obtain and save a new license file as outlined in “Obtain and install a temporary license file” on page 105.
Otherwise, existing permanent licenses are supported for 9.3 products. No user action is required.
14. If your product is part of a deployment that requires the Federal Information Processing Standard (FIPS) Publication 140-2, a U.S. government computer security standard governing cryptographic modules, follow the instructions in “Upgrading 9.3 products in FIPS mode” on page 57.
15. If you installed the products as services, start the services. “Starting services on UNIX” on page 107 or “Starting services on Windows” on page 108 provides more information.
16. Verify the current state of the products and Broker. “Verify the product status” on page 112 provides more information.
17. Initiate a discovery. Consult the discovery guide or user guide for your product for more information on this procedure.
Add additional features to an upgrade installationIf after installing an upgrade installation you want to add products to the upgrade installation, run the installation again, select the Add additional features option in the Upgrade or install screen, and select all products that are already installed plus any other products that you would like to install in the upgraded installation.
Upgrading 9.3 products in FIPS mode
Upgrading in FIPS mode is not available for Server Manager.
9.3 products do not use a Federal Information Processing Standard (FIPS 140-2) approved encryption algorithm to protect the imk.dat file. By default, the 9.3 imk.dat file uses MD5, which is not a FIPS-approved algorithm. Hence, while upgrading from previous versions of products to Version 9.3, the imk.dat file needs to be regenerated in order to run in the FIPS mode.
In order to convert an existing installation to FIPS, use the sm_rebond (in non-FIPS mode) first to get everything re-encoded in a FIPS compatible way. The steps are as follows:
Add additional features to an upgrade installation 57

Performing an Upgrade
During an upgrade installation, the installer replaces the local_policy.jar and US_export_policy.jar files. To continue FIPS mode in the new upgraded installation, perform the tasks as described in step 3 .
1. Run the following command at the command line prompt:
sm_rebond --upgrade --basedir=BASEDIR/smarts
The path must be set to the default install path. Regardless of the FIPS 140 state, you must run the sm_rebond command from the BASEDIR where the software is installed, not from any other product installation area which also has the sm_rebond utility.
MPLS Manager
UNIX
sm_rebond --upgrade --basedir=/opt/InCharge/MPLS/smarts
Windows
sm_rebond --upgrade --basedir=C:\InCharge\MPLS\smarts
IP Manager
sm_rebond --upgrade --basedir=/opt/InCharge/IP/smarts
2. When prompted, type a password to regenerate the imk.dat file. The default password is Not a secret.
3. Download and install the Unlimited Strength Jurisdiction Policy Files using the following steps:
a. Download the Java Cryptography Extension (JCE) Unlimited Strength Jurisdiction Policy Files 6 from the Oracle website.
b. Extract the local_policy.jar and US_export_policy.jar files from the downloaded zip file.
c. Go to the BASEDIR/smarts/jre/lib/security directory, and then back up the existing policy files.
d. Overwrite the local_policy.jar and US_export_policy.jar files to the BASEDIR/smarts/jre/lib/security directory.
4. Set the value for the environment variable, SM_FIPS140 to TRUE in the runcmd_env.sh file. This file is located in the BASEDIR/smarts/local/conf directory.
Next stepsChapter 7, “Verifying the Installation,” describes tasks for verifying the proper installation of the software and starting services.
The following section applies only to customers who have upgraded fro version 9.0 to version 9.3.
58 EMC Smarts Installation Guide for SAM, IP, ESM, MPLS, VoIP, and NPM Managers

Performing an Upgrade
Registering 9.0 domain managers manually with the broker
After performing an upgrade, the existing 9.0 domain managers register with the new broker on startup. If you are manually registering 9.0 domain managers to the new broker, you have to disable the Transport Layer Security (TLS) for older version domains only. The 9.0 domain managers do not support TLS and fail to communicate with the broker as the broker uses TLS by default. Perform these steps to disable the TLS:
1. <BASEDIR>/smarts/bin/brcontrol add_dm <name> <host> <port> <pid>
2. ./dmctl -s <broker_host>:<port>/dmbroker put domainManager::<domain_name>::usingTLS::FALSE
For example:./dmctl -s 10.241.172.73:426/dmbroker put domainManager::DOMAIN::usingTLS::FALSE
Next steps 59

Performing an Upgrade
60 EMC Smarts Installation Guide for SAM, IP, ESM, MPLS, VoIP, and NPM Managers

CHAPTER 5Performing a Migration
This chapter provides instructions for migrating previous versions of the EMC Smarts Service Assurance Manager, EMC Smarts IP Manager, EMC Smarts MPLS Manager, EMC Smarts Server Manager, EMC Smarts Network Protocol Manager, and EMC Smarts VoIP Availability Manager to a new version. It consists of the following topics:
◆ Migration overview.................................................................................................. 62◆ Install and migrate on the same host....................................................................... 63◆ Install and migrate on a different host ..................................................................... 66◆ Server Manager specific migration task ................................................................... 69◆ Review license file migration ................................................................................... 70◆ Post-migration tasks ............................................................................................... 75
Performing a Migration 61

Performing a Migration
Migration overviewConsult the EMC Smarts Support Matrix for SAM, IP, ESM, MPLS, VoIP, and NPM Managers for software versions that require a manual migration to Version 9.3.
Two methods are available:
◆ Install and migrate on the same host
◆ Install and migrate on a different host
After the installation, run the sm_migrate utility to backup the user-customized files in the previous version and migrate the files to the new version. Chapter 6, “Migration Utilities,” explains how the sm_migrate utility works.
Disk space requirement—During a migration, the sm_migrate creates a backup of files in actions, conf, model, repos, rules, script directories. Ensure that you have disk space of four times the size of these directories available on the system. After the migration and verifying the installation, you can archive or remove the backup directories. This requirement is in addition to the minimum disk requirement outlined for each product in the EMC Smarts Support Matrix for SAM, IP, ESM, MPLS, VoIP, and NPM Managers document.
Server name requirement for migration to Version 9.3—To preserve notification history and the original Source attributes of notifications in the Service Assurance Manager, the server names of underlying Domain Managers should remain the same. This way at the end of the migration of all EMC Smarts Domain Managers, the SAM server can correctly associate the pre-existing topology and notifications with the topology and events coming from migrated Domain Managers. For example, if the 9.2.2 Server Manager has a server name INCHARGE-ESM, do not change it to a different name for the 9.3 release.
Make sure that you read “Install and migrate on the same host” on page 63 and “Install and migrate on a different host” on page 66 in their entirety before proceeding.
Remove all the unused files in the /local directory. The unused files will also include RPS files and custom files created by you. The sm_migrate utility creates a backup of all the files in the local directory and copies them back to local directory after the upgrade. RPS and custom files can be large, and may slow down the process.
62 EMC Smarts Installation Guide for SAM, IP, ESM, MPLS, VoIP, and NPM Managers

Performing a Migration
Install and migrate on the same hostTo migrate from a previous version of a product to the new, current 9.3 version on the same host, you must:
1. Install the 9.3 product and specify an installation directory that is different from the one that is used for the previous installation.
2. Stop the old services for the previous version, if necessary.
For UNIX, keep the service daemon (the sm_serviced component) running. If sm_serviced is stopped, all EMC Smarts products will stop and will need to be restarted.
In some cases, on Windows, the installation program cannot stop the services, because multiple threads are locking the services. In those cases, use the Windows Control Panel to stop the services manually.
For most cases, the installation program detects and stops all services, scheduled jobs, and processes that use programs or libraries that are running from the existing installation.
It also stops the service daemon, sm_serviced, if it is running.
3. Migrate user-customized files from the previous installation to the new installation.
4. Reuse the customized Polling and Thresholds settings from the old repository.
Detailed instructions are described in “Migration procedure for the same host” on page 64.
For a test lab environment, since the two installations are on the same host, you can run both installations in parallel. For parallel installations, both installations connect to the same Broker and Global Manager, as long as the old and new product service and sm_server names are unique. In this case, you will need to rename the service and sm_server for the previous product version. Managers registered with the same Broker must have unique names.
For a production environment, EMC Corporation recommends that you decommission the previous version of product.
When deciding which Global Manager or underlying Domain Manager to migrate first, perform the migration in the following order:
1. Start with the top-most SAM server and related Service Assurance products and consoles in your deployment, either a SAM server or the Presentation SAM server in a hierarchical SAM deployment.
2. An Aggregation SAM server if it is a hierarchical SAM deployment.
3. IP Manager.
4. Any order: Server Manager, MPLS Manager, Network Protocol Manager, and VoIP Availability Manager.
Install and migrate on the same host 63
Performing a Migration
Migration procedure for the same host
To migrate the previous version of the product to the new version on the same host, perform the following tasks:
1. Review the important release issues for the 9.3 product, as described in the EMC Smarts Release Notes for SAM, IP, ESM, MPLS, VoIP, and NPM Managers.
2. Determine that the products that you are installing are supported for your platform. The EMC Smarts Support Matrix for SAM, IP, ESM, MPLS, VoIP, and NPM Managers document provides more information.
3. Determine if the host has enough disk space and memory to accommodate so both versions of the product can co-exist. The EMC Smarts Support Matrix for SAM, IP, ESM, MPLS, VoIP, and NPM Managers document provides more information.
4. Mount the CD/DVD-ROM on the host as described in Appendix C, “Procedures for CD/DVD-ROMs.”
5. Uninstall any temporary test patches (TTPs), if they exist, in your old installation.
If a TTP has been installed on a Service Pack, you must first uninstall the TTP. Otherwise, the TTP files will be treated as files modified by you and copied to the local directory in the new installation area.
6. Install the new version of the product on the same host as described in Chapter 2, “Performing an Installation.”
• Specify an installation directory that is different from the old installation directory so both versions of the product can co-exist.
• Install products as services. These services overwrite the old stopped services.
If you need to continue to run the previous versions of the products, manually install services for them with unique names and start them.
The installation program installs the 9.3 software.
7. Run the sm_migrate utility to copy user-customized files from the previous installation to the new 9.3 installation. “Migrating customizations on the same host” on page 85 provides instructions.
Run the sm_migrate utility immediately after the installation and before you start any services or modify any files in the new installation. The sm_migrate utility will not merge any files from the previous installation local directory, if the same files are present in the new installation BASEDIR/smarts/local directory.
8. Evaluate your security settings. “Migration of security configuration files” on page 94 provides more information.
9. Evaluate the environment variables in the old runcmd_env.sh file. “Migration of security configuration files” on page 94 provides more information.
64 EMC Smarts Installation Guide for SAM, IP, ESM, MPLS, VoIP, and NPM Managers

Performing a Migration
10. Evaluate your custom code. Review the “Custom file migration use cases” on page 91 to plan your post-migration steps. The sm_migrate utility migrated all user-customized files from the previous installation to the BASEDIR/smarts/local directory in the new installation. It also made a backup copy of the files under the BASEDIR/smarts/.migrate.bkp.x.x directory (for example, .migrate.bkp.2.0.0.0). Review the output of the sm_migrate utility and evaluate if you would like to keep the user-customized files in the new installation.
11. For Server Manager, migrate the application templates described in “Server Manager specific migration task” on page 69.
a. Then, shut down the sm_server.
Use the --clean-topology option only once. After all of the settings are imported, do not use the option again. Instead, use the sm_service command to start your Domain Managers later in step 15 on page 66 .
12. If you are migrating from 8.x to 9.3, for MPLS Manager and Network Protocol Manager, import the customized Polling and Threshold settings into the Topology server by starting the domain using the --clean-topology option. This option removes old topological information but allows use of customized Polling and Thresholds settings from the old repository file. Here is an example command:
bin/sm_server -n <mpls_manager_name> -c mpls-t --output --daemon --clean-topology --ignore-restore-errors
a. For MPLS Manager and Network Protocol Manager, use the sm_service show command to determine the sm_server syntax for each Domain Manager:
<BASEDIR>/smarts/bin/sm_service show --cmdline <service_name>
b. Copy the sm_server syntax, and append the --clean-topology option to it.
c. After the import, verify the Polling and Threshold settings are correct.
d. Then, shut down the sm_server.
For Service Assurance Manager, IP Manager, and VoIP Availability Manager, no user action is required for this step.
Use the --clean-topology option only once. After all of the settings are imported, do not use the option again. Instead, use the sm_service command to start your Domain Managers later in step 15 on page 66 .
13. Save your license in the proper location or (optional) update your license:
• Temporary license—copy the license file, smarts.lic, to the BASEDIR/smarts/local/conf directory on the system where the EMC Smarts software is installed. If you installed multiple EMC Smarts products on the same system, each product requires a separate copy of smarts.lic.
• Permanent license—use the procedures described in the EMC Smarts System Administration Guide.
Install and migrate on the same host 65

Performing a Migration
If you installed additional products and they are not licensed features, obtain and save a new license file as outlined in “Obtain and install a temporary license file” on page 105.
Otherwise, existing licenses are supported for 9.3 products. No user action is required.
14. Rename the repository file before reusing it.
a. Locate the existing repository file that was copied to the BASEDIR/smarts/local/repos/icf directory in the new 9.3 installation.
b. Rename the repository file by removing the version number extension. For example, the repository file INCHARGE-MPLS-ANALYSIS.rps.3.1.0.2 should be renamed to INCHARGE-MPLS-ANALYSIS.rps without the version number extension.
15. If you installed the products as services, start them for the first time. “Starting services on UNIX” on page 107 or “Starting services on Windows” on page 108 provide more information.
16. Verify the current state of the products and Broker. “Verify the product status” on page 112 provides more information.
17. Decommission the previous version of the products. For instructions, refer to the uninstallation chapter in the installation guide for the previous software version.
Install and migrate on a different hostIf you want to run the new version of the 9.3 product before decommissioning the previous version, you must:
1. Install the new version of the 9.3 product on a different host.
2. Migrate any customized configuration file changes to the new installation.
Detailed instructions are described in “Migration procedure for a different host” on page 67.
Since the two installations are on different hosts, you can run both installations in parallel. You have the option of:
◆ Having both installations connect to the same Global Manager and Broker.
Managers registered with the same Broker must have unique names. In this scenario, stop and rename the services for the previous version and, when you install the 9.3 product, the installation program will use the default server names.
◆ Having multiple instances of the Global Manager and Broker with each instance assigned to a different version of the product.
For a production environment, EMC Corporation recommends that you decommission the previous version of product.
When deciding which Global Manager or underlying Domain Manager to migrate first, perform the migration in the following order:
1. Start with the top-most SAM server and related Service Assurance products and consoles in your deployment, either a SAM server or the Presentation SAM server in a hierarchical SAM deployment.
66 EMC Smarts Installation Guide for SAM, IP, ESM, MPLS, VoIP, and NPM Managers

Performing a Migration
2. An Aggregation SAM server if it is a hierarchical SAM deployment.
3. IP Manager.
4. Any order: Server Manager, MPLS Manager, Network Protocol Manager, and VoIP Availability Manager.
Migration procedure for a different host
To migrate the previous version of the product to the new version on a different host, satisfy or perform the following tasks:
1. Review the important release issues for the 9.3 product, as described in the EMC Smarts Release Notes for SAM, IP, ESM, MPLS, VoIP, and NPM Managers.
2. Determine that the products that you are installing are supported for your platform. The EMC Smarts Support Matrix for SAM, IP, ESM, MPLS, VoIP, and NPM Managers document provides more information.
3. Determine if the host has enough disk space and memory to accommodate so both versions of the product can co-exist. The EMC Smarts Support Matrix for SAM, IP, ESM, MPLS, VoIP, and NPM Managers document provides more information.
4. Mount the CD/DVD-ROM on the host as described in Appendix C, “Procedures for CD/DVD-ROMs.”
5. Uninstall any temporary test patches (TTPs), if they exist, in your old installation.
If a TTP has been installed on a Service Pack, you must first uninstall the TTP. Otherwise, the TTP files will be treated as files modified by you and copied to the local directory in the new installation area.
6. Install the new version of the product on the different host as described in Chapter 2, “Performing an Installation.”
The installation program installs the 9.3 software.
7. Run the sm_migrate utility to copy user-customized files from the previous installation to the new 9.3 installation. “Migrating customizations to a different host” on page 86 provides instructions.
Run the sm_migrate utility immediately after the installation and before you start any services or modify any files in the new installation. The sm_migrate utility will not merge any files from the previous installation local directory, if the same files are present in the new installation BASEDIR/smarts/local directory.
8. Evaluate your security settings. “Migration of security configuration files” on page 94 provides more information.
9. Evaluate the environment variables in the old runcmd_env.sh file. “Migration of security configuration files” on page 94 provides more information.
10. Evaluate your custom code. Review the “Custom file migration use cases” on page 91 to plan your post-migration steps. The sm_migrate utility migrated all user-customized files from the previous installation to the BASEDIR/smarts/local directory in the new installation. It also made a backup copy of the files under the
Install and migrate on a different host 67

Performing a Migration
BASEDIR/smarts/.migrate.bkp.x.x directory (for example, .migrate.bkp.2.0.0.0). Review the output of the sm_migrate utility and evaluate if you would like to keep the user-customized files in the new installation.
11. For Server Manager, migrate the application templates described in “Server Manager specific migration task” on page 69.
a. Then, shut down the sm_server.
Use the --clean-topology option only once. After all of the settings are imported, do not use the option again. Instead, use the sm_service command to start your Domain Managers later in step 15 on page 69 .
12. If you are migrating from 8.x to 9.3, for MPLS Manager and Network Protocol Manager, import the customized Polling and Threshold settings into the Topology server by starting the domain using the --clean-topology option. This option removes old topological information but allows use of customized Polling and Thresholds settings from the old MPLS and Server Manager repository file. Here is an example command:
bin/sm_server -n <mpls_manager_name> -c mpls-t --output --daemon --clean-topology --ignore-restore-errors
a. For MPLS Manager and Network Protocol Manager, use the sm_service show command to determine the sm_server syntax for each Domain Manager:
<BASEDIR>/smarts/bin/sm_service show --cmdline <service_name>
b. Copy the sm_server syntax, and append the --clean-topology option to it.
c. After the import, verify the Polling and Threshold settings are correct.
d. Then, shut down the sm_server.
For Service Assurance Manager, IP Manager, and VoIP Availability Manager, no user action is required for this step.
Use the --clean-topology option only once. After all of the settings are imported, do not use the option again. Instead, use the sm_service command to start your Domain Managers later in step 15 on page 69 .
13. Save your license in the proper location or (optional) update your license:
• Temporary license—copy the license file, smarts.lic, to the BASEDIR/smarts/local/conf directory on the system where the EMC Smarts software is installed. If you installed multiple EMC Smarts products on the same system, each product requires a separate copy of smarts.lic.
• Permanent license—use the procedures described in the EMC Smarts System Administration Guide.
If you installed additional products and they are not licensed features, obtain and save a new license file as outlined in “Obtain and install a temporary license file” on page 105.
68 EMC Smarts Installation Guide for SAM, IP, ESM, MPLS, VoIP, and NPM Managers

Performing a Migration
Otherwise, existing licenses are supported for 9.3 products. No user action is required.
14. Rename the repository file before reusing it.
a. Locate the existing repository file that was copied to the BASEDIR/smarts/local/repos/icf directory in the new 9.3 installation.
b. Rename the repository file by removing the version number extension. For example, the repository file INCHARGE-MPLS-ANALYSIS.rps.3.1.0.2 should be renamed to INCHARGE-MPLS-ANALYSIS.rps without the version number extension.
15. If you installed the products as services, start them for the first time. “Starting services on UNIX” on page 107 or “Starting services on Windows” on page 108 provide more information.
16. Verify the current state of the products and Broker. “Verify the product status” on page 112 provides more information.
17. Decommission the previous version of the products. For instructions, refer to the uninstallation chapter in the installation guide for the previous software version.
Server Manager specific migration taskThe following section is applicable only for Server Manager.
Migration of Application Process templates and host configuration (Server Manager only)
ESM 9.3 offers a migration tool to support the migration from ESM 9.x to ESM 9.3 of application process templates and processes that were manually configured on hosts. This functionality enables you:
◆ To retrieve the application process templates from ESM 9.x, convert, and import the information as user-defined templates into a single .xml file.
◆ To retrieve processes or host applications that were manually configured on hosts from ESM 9.x and transfer the applications to a discovered host. The applications are not saved to an .xml file.
Use the adapter dump-process-monitoring-configuration-file.asl to perform the migration. To migrate from ESM 9.x to ESM 9.3:
1. Start the old ESM 9.x Domain Manager.
2. From the <BASEDIR>/smarts/bin directory of your 9.3 ESM installation, execute the adapter command as one line:
sm_adapter -b <broker:port> -s <old_esm_domain_manager> -Dfilename=<BASEDIR>/smarts/local/conf/esm/ProcessMonitoringConfig.txt <BASEDIR>/smarts/rules/sp/dump-process-monitoring-configuration-file.asl
Where:
• <broker:port> —Is the location of the broker where the old ESM Domain Manager is registered.
Server Manager specific migration task 69

Performing a Migration
• <old_esm_domain_manager> —Is the name of the old ESM Domain Manager.
• <BASEDIR> — Is the directory where ESM 9.3 is installed.
3. After the transfer has executed successfully, start the 9.3 Server Manager by specifying the --clean-topology and --ignore-restore-errors options. Type from the <BASEDIR>/smarts/bin directory:
sm_server -n <9.3_server_manager_name> -c esm --output --daemon --clean-topology --ignore-restore-errors
The contents of the adapter ProcessMonitoringConfig.txt file is automatically loaded and processed. Also, the --clean-topology option imports the customized Polling and Threshold settings from the old repository file into the topology.
The import of process monitoring configuration from the dump file is performed only for the first time when the 9.3 Server Manager is started.
4. Verify that the process templates and host configurations match the corresponding process templates and host configurations from ESM 9.x. To do so, open the 9.3 Domain Manager Administration Console and select the Application Templates tab for the attached Server Manager.
Review license file migrationThis section provides the procedure for migrating the license server. The EMC Smarts System Administration Guide provides complete information about EMC Smarts licensing, including how to obtain license files, deployment considerations, and troubleshooting.
Before you begin, you need to be aware of the following considerations:
◆ You can use your existing license file, provided that you have not: acquired more features, increased the number of licenses, or changed machines (host IDs).
If you have acquired more features, increased the number of licenses, or changed machines, then you must obtain a new license file. The EMC Smarts System Administration Guide provides instructions to obtain a permanent license file.
◆ You will need to use the FLEXnet 11.9.0.0 license server provided with EMC Smarts version 9.3 software. The setup instructions are described in the following subsection.
FLEXnet software is backward-compatible. For example, a newer license manager daemon (lmgrd) will work with older vendor daemons and older FLEXnet-licensed products. So a FLEXnet 11.9.0.0 license server provided with EMC Smarts version 9.3 software will work with FLEXlm 9.3 license files distributed for EMC Smarts version 7.2.0.x, 8.0.0.x, or 8.1.0.x software, but not the other way round.
This license migration procedure is similar to the procedure used to set up licensing for a new installation with the following differences:
◆ You can reuse your existing license file for step 3 .
◆ You stop the old license server in step 6 and uninstall it in step 8 .
70 EMC Smarts Installation Guide for SAM, IP, ESM, MPLS, VoIP, and NPM Managers

Performing a Migration
◆ If you set up the new FLEXnet license server on the same system as the old license server, you do not need to modify the SM_LICENSE variable for your other EMC Smarts software installations.
For the following procedure, you need administrative privileges for both the EMC Smarts software and the systems on which the software is running.
In this discussion, a temporary license file is referred to as <license_name>.lic and a permanent license file is referred to as <host_id>.<license_name>.lic. If you install a license server with the install_license script described later, you should be aware that the script changes the permanent license filename from <host_id>.<license_name>.lic to <license_name>.lic.
Migrate permanent license and set up FLEXnet license server
On the system where the EMC Smarts Broker resides, perform these steps to migrate the permanent license file and set up the new server:
1. If you have not already installed the 9.3 software, do so. Install the software on the same system in a different directory than the older software.
If you installed the software on a different system, you need a new license file.
2. If you previously used a temporary license (copied <license_name>.lic to the BASEDIR/smarts/local/conf directory), you need to delete it because it will cause the install_license script to fail later in step 5 .
3. Copy your existing permanent license file, <host_id>.<license_name>.lic, from the old installation directory to the new BASEDIR directory on the system where the license server will run.
Typically, this location should be the same host and BASEDIR as for the EMC Smarts Broker. By default, BASEDIR is /opt/InCharge/<product> for UNIX and C:\InCharge\<product> for Windows.
If you obtained a new permanent license file, save the attachment to a file named <host_id>.<license_name>.lic in your BASEDIR directory on the system where the license server will run.
Do not save the permanent license file (<host_id>.<license_name>.lic) to the BASEDIR/smarts/local/conf directory. The install_license script will fail if it finds a permanent license file in this directory. Also, do not save a permanent license file to the BASEDIR/smarts/script or BASEDIR/smarts/conf directory.
Later, as the result of step 5 , the install_license script installs the permanent license file into the BASEDIR/smarts/local/conf directory.
Review license file migration 71

Performing a Migration
4. If necessary, you may need to change the port for the FLEXnet license server (which will be installed in step 5 ). For example, if the default port, 1744, is used by another process, the FLEXnet license server can run on a different port. Do not make any changes to the permanent license file unless you need to change the port.
Use any text editor to open the <host_ID>.<license_name>.lic file. The first line of the permanent license file, labelled SERVER, contains the hostname, host ID, and port of the license server, as shown in the following example:
SERVER this_host 8323fcbf 1744
Change the port number from the default (“1744”) on the SERVER line and save the file.
The EMC Smarts System Administration Guide for instructions contains information on deploying the FLEXnet license server on the opposite side of a firewall from your other Smarts software installations.
5. Install the FLEXnet license server using the install_license script. By default, this file is located in the BASEDIR/smarts/script directory.
You must run the install_license script on the same system where the license server runs. This script requires superuser privileges (user ID 0) for UNIX, and administrator privileges for Windows. You must specify the full path to the permanent license file.
For example, the command on UNIX systems is:
▼#/opt/InCharge/SAM/smarts/script>install_license.sh install <path to license file>/<host_ID>.<license_name>.lic ▲
On Windows systems, for example, the command is:
▼ C:\InCharge\SAM\smarts\script>install_license.cmd install <path to license file>\<host_ID>.<license_name>.lic ▲
▼ ▲ indicates this command should be typed as one line.
In addition to installing the FLEXnet license server, the install_license script performs other functions such as configuring the license server to start when the system reboots. The EMC Smarts System Administration Guide provides additional information.
6. Stop the old license server. Use the same command in step 7 except substitute stop for start.
7. Start the FLEXnet license server. The FLEXnet license server runs as a daemon on UNIX and as a service on Windows and automatically starts the vendor daemon for EMC Smarts. Run the command appropriate for your platform.
Linux:
# /etc/init.d/SMARTS-License start
Windows:
To manually start the license server, follow these steps as an administrator:
1. Select Start > Settings > Control Panel > Administrative Tools.
72 EMC Smarts Installation Guide for SAM, IP, ESM, MPLS, VoIP, and NPM Managers

Performing a Migration
2. Select Services.
3. Select the FLEXlm License Manager service.
4. Right-click and select Start.
5. Verify that the new FLEXlm license server started by checking your EMC Smarts Manager log file. To do so, start your EMC Smarts Manager and view the EMC Smarts Manager log file for two messages that indicate success:
• ICF-N-LICENSEDFEATURE-Enabling
• ICF-N-RESTOREFINISH-PersistenceManager: restore finished
The log filename is based upon the EMC Smarts Manager’s name (for example, INCHARGE-SA.log) and the log file is located in the BASEDIR/smarts/local/logs directory.
The installation guide that accompanied your product includes instructions on starting your EMC Smarts Manager.
On the system where the FLEXnet license server and EMC Smarts Broker reside, for a permanent license file, you do not need to edit the SM_LICENSE variable in the runcmd_env.sh file for that product, because by default the install_license script adds the SM_LICENSE variable with the appropriate values. If other products were already deployed on the same system, you do not need to manually edit the SM_LICENSE variable in the runcmd_env.sh file for those products if the new FLEXnet license server is set up on the same system as the old license server. If the new FLEXnet license server is set up on a different system than the old license server or if you installed other 9.3 products on the same system, you need to manually edit the SM_LICENSE variable in the runcmd_env.sh file for those products. “Access to FLEXnet license server using SM_LICENSE” on page 74 provides additional information. For example, if the Service Assurance Manager and IP Manager reside on System1 and the install_license script is invoked from the /opt/InCharge/SAM/smarts/script directory, the script modifies the variable, but you will have to modify the variable for the 9.3 IP Manager.
8. Uninstall the old license server using the install_license script.
For example, command on UNIX systems is:
# /opt/InCharge/SAM/smarts/script>install_license.sh uninstall
Command on Windows systems is:
C:\InCharge\SAM\smarts\script>install_license.cmd uninstall
Review license file migration 73

Performing a Migration
Access to FLEXnet license server using SM_LICENSE
If you set up the new FLEXnet license server on the same system as the old license server, you do not need to modify the SM_LICENSE variable for other EMC Smarts software installations. You can skip this task.
When you install EMC Smarts software on more than one system, you must ensure that the EMC Smarts software on each system can connect to the FLEXnet license server in order to be able to check out licenses. For the system where you installed the FLEXnet license server, the SM_LICENSE variable is added automatically by the install_license script. For other EMC Smarts software installations, you need to modify the variable.
To set up licensing for other products or the Global Console, you need to set the SM_LICENSE variable to specify the <port>@<lic_host> of the FLEXnet license server.
Use the sm_edit utility to edit the SM_LICENSE variable in the runcmd_env.sh file. The runcmd_env.sh file resides in the BASEDIR/smarts/local/conf directory of the product.
Perform the following steps:
1. For UNIX, invoke sm_edit from the BASEDIR/smarts/bin directory:
% sm_edit conf/runcmd_env.sh
To open runcmd_env.sh on Windows, invoke sm_edit utility as follows:
C:\>sm_edit conf\runcmd_env.sh
For example on Windows, type:
C:\InCharge\SAM\smarts\bin>sm_edit conf\runcmd_env.sh
2. Set the SM_LICENSE variable to <port>@<lic_host> of the FLEXnet license server.
The runcmd_env.sh file should resemble the following:
SM_BROKER_DEFAULT=localhost:426SM_LICENSE=1744@SYSTEM1 SM_SNMP_BUG_COMPATIBLE=TRUESM_INCOMING_PROTOCOL=1,0SM_OUTGOING_PROTOCOL=1,0
3. Save the runcmd_env.sh file and close it.
Any EMC Smarts program within a product started after this point will use the applicable environment variables specified in the runcmd_env.sh file. EMC Smarts programs that are already running need to be restarted for any new environment variable to take effect. The installation guide that accompanied your product provides information on starting services.
Configuring license server behind the firewall
If the FLEXnet license server is deployed on the opposite side of a firewall from your IP installation, you need to perform the following changes in the permanent license file:
1. Open the permanent license file for editing in an appropriate editor.
74 EMC Smarts Installation Guide for SAM, IP, ESM, MPLS, VoIP, and NPM Managers

Performing a Migration
2. Type PORT=<port_number> after the line VENDOR sm_lmgrd92 /opt/InCharge/IP/smarts/bin/system/sm_lmgrd92
After making the changes, it must look similar to: VENDOR sm_lmgrd92 /opt/InCharge/IP/smarts/bin/system/sm_lmgrd92 PORT=<port_number>
3. Save and close the permanent license file.
Post-migration tasksPerform these tasks after the data migration steps are complete:
1. “Rename the repository file” on page 75
2. “Registering 8.1.x domain managers manually with the broker” on page 75
3. “Ensure that the Broker host:port is updated in the runcmd_env.sh files” on page 76
4. “Remove the old out-of-date service entries” on page 76
5. “Change the secret phrase to match rest of deployment” on page 77
6. “Uninstall the old software” on page 77
Rename the repository file
For a same host or different host migration, the old repository file is copied to the BASEDIR/smarts/local/repos/icf directory in the 9.3 installation. Because the repository file has a version number extension (for example, .2.0 extension), rename the repository file without the .2.0 extension before using it.
As further information, regardless of whether the old installation is on a Windows system or a UNIX system, sm_migrate saves the old repository file and all other customization files in DOS (Windows) format. If the new installation is on a UNIX system, sm_migrate automatically converts the repository file and all other customization files to UNIX format.
Registering 8.1.x domain managers manually with the broker
After performing a migration of the broker to 9.3, the existing 8.1.x domain managers register with the new broker on startup. If you are manually registering 8.1.x domain managers to the new broker, you have to disable the Transport Layer Security (TLS) for older version domains only. The 8.1.x domain managers do not support TLS and fail to communicate with the broker as the broker uses TLS by default. Perform these steps to disable the TLS:
1. <BASEDIR>/smarts/bin/brcontrol add_dm <name> <host> <port> <pid>
2. ./dmctl -s <broker_host>:<port>/dmbroker put domainManager::<domain_name>::usingTLS::FALSE
For example:./dmctl -s 10.241.172.73:426/dmbroker put domainManager::DOMAIN::usingTLS::FALSE
Post-migration tasks 75

Performing a Migration
Ensure that the Broker host:port is updated in the runcmd_env.sh files
If you are installing the 9.3 Broker during the installation to a location that is different from where the Broker for the previous installation resides, for each server that is registered with the Broker, you need to use the sm_edit utility to edit the SM_BROKER_DEFAULT variable in the runcmd_env.sh file in each of those server’s BASEDIR/smarts/local/conf directory with the hostname (and port) of the host system that is running the Broker:
If the Broker host is resolved using a DNS name, this step is not necessary. It is recommended not to use Name Server Caching Daemon (NSCD) to cache DNS lookups (the host’s database) in Linux.
1. Run BASEDIR/smarts/bin/sm_service show --cmdline (UNIX) or BASEDIR\smarts\bin\sm_service.exe show --cmdline (Windows) from your older product to get a listing of all installed services. Save the output. For example:
C:\InCharge\IP\smarts\bin\sm_service.exe show --cmdline
2. For each service that you have installed, you will see output similar to the following:
sm_service install --force --name=ic-broker --description=”EMC Broker” --env=SM_CLIENTCONNECT=brokerConnect.conf --startmode=runonce C:\InCharge\IP\smarts\bin\brstart.exe --port=426 --restore=C:\InCharge\IP\smarts/local/repos/broker/broker.rps --output
where ic-broker is the name of the service for which you are interested.
While performing a migration, if you select to retain the security configuration files, ensure to update the parameters SM_LICENSE, SM_FIXED, SM_JAVAHOME in the runcmd_env.sh file with the 9.3 installation path.
Remove the old out-of-date service entries
Use the following command to remove all old services that are going to be replaced by the 9.3 product:
<BASEDIR>/smarts/bin/sm_service remove <service name>
If you are installing under Windows operating systems, you must restart the server to remove all traces of the services that you uninstalled. However, do not restart the server before the 9.3 product configuration (renaming services, servers, editing settings, and so on) is completed.
For UNIX or Linux, you also need to point the product to the new 9.3 services that will be installed. Do this by making a copy of /etc/init.d/ic-serviced, change the SMHOME variable to point to the 9.3 services, and place it in the 9.3 /etc/init.d directory.
76 EMC Smarts Installation Guide for SAM, IP, ESM, MPLS, VoIP, and NPM Managers

Performing a Migration
Change the secret phrase to match rest of deployment
If the rest of the deployment uses a different site secret, and assuming that you want to employ secure communications between the component applications in the deployment, you need to change the site secret of this installation to match the rest of deployment. You do so by using the deployment’s site secret to recreate and encrypt the clientConnect.conf, serverConnect.conf, brokerConnect.conf, and .imk.dat files in the BASEDIR/smarts/local/conf directory of this installation.
Use the sm_rebond command to encrypt the files. For example, from the BASEDIR/smarts/bin directory, enter:
sm_rebond --basedir=/opt/InCharge/IP/smarts
The EMC Smarts System Administration Guide provides complete information about the security files and encryption.
Uninstall the old software
If the new version of the product is functioning properly, all data has been migrated to the new version, and all services are functioning properly, you should uninstall the previous version of the product.
For Windows only, if you use the Windows “Add/Remove Programs” capability at this point, you will be incorrectly uninstalling version 9.3 instead of the previous version. Therefore, you must uninstall the older product applications by using the uninstaller.exe from the older base directory.
Uninstalling the previous version of the product will prevent conflicts if the previous version is started by mistake while 9.3 is running. Chapter 8, “Performing an Uninstallation,” provides more information.
Uninstall will display errors if services were installed by the installation program when the old version was installed, but were removed manually in a later step. The uninstall process will display errors because it will not find the services when it tries to remove them.
Post-migration tasks 77

Performing a Migration
78 EMC Smarts Installation Guide for SAM, IP, ESM, MPLS, VoIP, and NPM Managers
CHAPTER 6Migration Utilities
This chapter describes the migration utilities and provides procedures for using them. The chapter consists of the following topics:
◆ Customization migration utility overview ................................................................. 80◆ sm_migrate function ............................................................................................... 82◆ Customization migration procedures....................................................................... 85◆ Perform a rollback................................................................................................... 90◆ Custom file migration use cases.............................................................................. 91◆ Three-way merge utility ........................................................................................... 95◆ Automatically migrate topology using RPS utility ..................................................... 97◆ Deployment utility overview .................................................................................... 99
Migration Utilities 79
Migration Utilities
Customization migration utility overviewThe sm_migrate utility is used to migrate user-customized files from an old installation to a new installation, where the old installation and the new installation are in different installation directories or, for an upgrade installation, in the same installation directory. User-customized files include user-modified files (using sm_edit), user-introduced files, and the repository file.
If TTPs (Temporary Test Patch) are installed on a previous installation of SAM, you must first uninstall the TTP and then run the utility. Else, TTP files will be treated as files modified by you and copied to the local directory in the new installation area.
When migrating a customized file from an old installation to a new installation, if a file with the same name exists in the local directory of the new installation, the Customization Migration Utility does not modify or overwrite it. The utility skips all such files being considered for merging. For files being considered to be copied-over, the utility migrates the files with the old version number appended to the file name.
sm_migrate modes of operation
The sm_migrate has seven command-line options:
◆ --old (or -o)
◆ --new (or -n)
◆ --archive (or -a)
◆ --upgrade (or -u)
◆ --rollback (or -r)
◆ --silent (or -s)
◆ --sitemod (or -l)
◆ --help (or -h)
These command-line options can be used in pairs in the command line to achieve eight different modes of operation described below.
SAME HOST MODEThis mode is used when the new installation and the old installation are on the same host, in two separate locations. In this mode, sm_migrate migrates all customizations (non-binary files that have been modified or introduced by you in the old installation) from the old installation to a new installation.
80 EMC Smarts Installation Guide for SAM, IP, ESM, MPLS, VoIP, and NPM Managers

Migration Utilities
All files that were modified or newly introduced in the old installation must be present only under the BASEDIR/smarts/ directory. When you use the --sitemod option, the migration utility will migrate all customized old files for all user created locals.
DIFFERENT HOST - OLD MODEThis mode is used when the new installation and the old installation are on different hosts. In this mode, sm_migrate backs up and creates tar or a zip archive (file) of the customizations in the old installation. The tar or zip file resides in the location specified by you while executing the utility.
To run the utility from an older version of a Smarts product that does not have the migration utility, you must copy the sm_migrate.pl script and certain Perl files (packaged in migratePerlPkg.zip file) and place them in the appropriate locations. The sm_migrate.pl must be placed in the bin directory and the Perl package must be placed under the BASEDIR/smarts/local folder and extracted there. When you use the --sitemod option, the migration utility will migrate all customized old files for all user created locals.
After running DIFF_HOST_OLD mode and before running DIFF_HOST_NEW mode, you must manually move the tar or zip archive from the old host to the new host, preferably under the smarts directory of your new installation.
DIFFERENT HOST - NEW MODEThis mode is also used when the new installation and the old installation are on different hosts. In this mode, sm_migrate migrates the customizations from the tar or zip archive that was created in the old installation to the local directory under the new installation and attempts to merge the files from your new installation with the files present in the backup archive wherever applicable, and places them in your new local directory.
UPGRADE MODEThis mode is used during an in-place upgrade, where the installer creates a backup of the files modified or newly introduced by you in the old installation into a .migrate.bkp.<old_version> backup directory and merges them into a new installation. This mode has been designed for the installer, but can be invoked by you too.
This mode must not be invoked by you if there are multiple .migrate.bkp.<version> directories under the <BASEDIR/smarts directory.
Customization migration utility overview 81

Migration Utilities
ROLLBACK MODEIn any execution of the migration utility, before the utility migrates your customizations from the backup directory to your new installation, it creates a backup of certain files in your current new local and stores it in a .rollback_<version_timestamp> directory. Also, it records the version and timestamp before any migration.
The rollback option allows you to reverse the changes made by the migration utility by restoring the local version in your new installations using files from the .rollback_<version_timestamp> directory. Rollback will contain only those locals which are part of migration.
In some scenarios, if a file is copied to the new installation with .<old_version> extension, then this file is not deleted when a rollback is performed.
The rollback action is restricted only to rollback points that were recorded in your current version. For example if you upgrade from 9.1.0.0 to 9.2.0.0, and then install a patch (for example, 9.2.0.1), the rollback utility will not allow you to rollback to your 9.2.0.0 local version. You have to manually uninstall the patch in order to rollback to 9.2.0.0.
You can use the rollback option only after an in-place upgrade or if you have previously run the migration utility either in the SAME_HOST, DIFFERENT_HOST or UPGRADE_NEW modes.
“Perform a rollback” on page 90 describes the procedure for carrying out a rollback.
sm_migrate functionThe customization migration utility is capable of four major functions, which include:
◆ Copying all non-binary files from the <BASEDIR>/smarts/local folder that have been modified or introduced by you in the previous version of the product into the appropriate backup directories under the <BASEDIR>/smarts directory of the new installation. Table 11 on page 82 provides details on the backup directories created by the utility during the migration and upgrade process.
Table 11 Details of backup folders created by sm_migrate utility
ScenarioName and location of backup folders under <BASEDIR>/smarts
Migration on same host .migrate.bkp.<old_version>, .rollback_<version_timestamp>
Migration on different host old mode user-defined tar or zip file name,
Migration on different host new mode .rollback_<version_timestamp>,.migrate.bkp.<old_version>
Upgrade .migrate.bkp.<old_version>, .rollback_<version_timestamp>
82 EMC Smarts Installation Guide for SAM, IP, ESM, MPLS, VoIP, and NPM Managers

Migration Utilities
For files that have been modified by you, the utility also creates a copy of the base files from the <BASEDIR>/smarts folder. These files are backed up into .migrate.bkp.<old_version> directory. The original and the local versions of the files from the old installation will be needed when the utility attempts to merge your changes with the new installation files.
Under the smarts/.migrate.bkp.<old_version> and backup.tar or backup.zip directory you can find files with the following extensions:
• .custom - files from the <BASEDIR>/smarts/local folder introduced by you and are not part of the default installation
• .local - files from the <BASEDIR>/smarts/local folder that are part of the default installation and have been modified from their original version, using sm_edit.
• .base - the <BASEDIR>/smarts version of these files with .local extension
“Custom file migration use cases” on page 91 provide details.
◆ Copying the cacert.sso certificate file from <BASEDIR>/smarts/jre/lib/security directory into the .migrate.bkp.<old_version>/jre/lib/security directory to retain the certificate file.
◆ Copying all files you have added into the <BASEDIR>/smarts/local folder of the new installation. This allows for an easy and automatic migration of all customer files to the new installation, so that no manual step is required for moving the files from the backup directory.
All files, customized or newly introduced in the existing installation, must be present under the <BASEDIR>/smarts/ folder only. The utility also copies the RPS files found in the old_local.
◆ Merging .asl, .import, .conf, .xml, .pl, .sh and .cmd files modified by you into the new installation. The utility first backs up the corresponding files from the old_base, and then migrates the files from .migrate.bkp.<old_version> backup directory to the new installation.
This is an optional function and you may skip it.
In order to merge the configurations from the existing installation into the new installation, the utility uses files from:
• Original base installation (previous installation with <file_name>.base extension)
• Local directory of the previous installation (files you have modified with a <file_name>.local extension)
• New installation (with <file_name> extension)
The files to be merged are put in the new_local after performing a three-way merge between the two files in the backup directory and the corresponding file in the new base.
sm_migrate function 83

Migration Utilities
◆ Rolling back changes made by the sm_migrate utility in your current installation. It creates a backup of the new_local, and allows you to rollback to multiple stages of backup, as long as the changes were carried out in your current version. The backup consists of all .conf, .import, .asl, .mdl, .xml, .template, .sh, .conflict, .automerge, .cmd, .dat, and .bat files found in the new_local.
Soft links created for product related files in the UNIX environment are not handled by sm_migrate utility.
84 EMC Smarts Installation Guide for SAM, IP, ESM, MPLS, VoIP, and NPM Managers

Migration Utilities
Customization migration proceduresRun the sm_migrate utility immediately after the installation and before you start any services or modify any files in the new installation. Back up the BASEDIR/smarts/local directory in the new installation before you run sm_migrate.
When you run the sm_migrate utility, ensure that you run only one instance of sm_migrate utility.
On a Windows host, be aware that performing a migration takes a considerable amount of time. Be patient. Do not stop the migration process.
Migrating customizations on the same host
Use the following steps to migrate customizations on the same host:
1. Go to the BASEDIR/smarts/bin directory of the new installation and type the following command on one line to invoke the sm_migrate utility:
sm_perl sm_migrate.pl --old=<BASEDIR>/smarts (old installation) --new=<BASEDIR>/smarts (new installation) --sitemod=<BASEDIR>/smarts/local;local1
For example:
IP Manager
c:\InCharge812\IP\smarts\bin>sm_perl sm_migrate.pl--old=c:\Incharge812\IP\smarts --new=c:\Incharge90\IP\smarts --sitemod=c:\Incharge90\IP\smarts\local1; c:\Incharge90\IP\smarts\local2
Service Assurance Manager
c:\InCharge\SAM\smarts\bin>sm_perl sm_migrate.pl--old=c:\Incharge\SAM\smarts --new=c:\Incharge\sam\smarts --sitemod=c:\Incharge90\SAM\smarts\local1; c:\Incharge90\SAM\smarts\local2
MPLS Manager
c:\InCharge40\MPLS\smarts\bin>sm_perl sm_migrate.pl--old=c:\Incharge40\MPLS\smarts --new=c:\Incharge90\MPLS\smarts --sitemod=c:\Incharge90\MPLS\smarts\local1; c:\Incharge90\MPLS\smarts\local2
Server Manager
c:\InCharge\ESM\smarts\bin>sm_perl sm_migrate.pl--old=c:\Incharge\ESM\smarts --new=c:\Incharge\ESM\smarts --sitemod=c:\Incharge90\ESM\smarts\local1; c:\Incharge90\ESM\smarts\local2
VoIP Availability Manager
c:\InCharge\VoIP\smarts\bin>sm_perl sm_migrate.pl--old=c:\Incharge\VoIP\smarts --new=c:\Incharge\VoIP\smarts --sitemod=c:\Incharge90\VoIP\smarts\local1; c:\Incharge90\VoIP\smarts\local2
Customization migration procedures 85

Migration Utilities
Network Protocol Manager
c:\InCharge\NPM\smarts\bin>sm_perl sm_migrate.pl--old=c:\Incharge\NPM\smarts --new=c:\Incharge\VoIP\smarts --sitemod=c:\Incharge90\NPM\smarts\local1; c:\Incharge90\NPM\smarts\local2
The utility carries out the following steps:
• Verifies the presence of the existing installations in the specified directories.
• Determines the files in the old installation that must be copied.
• Lists the files that were modified by you. The utility skips files that were introduced by the patch but not modified by you.
• Copies the user-modified files to a backup directory in the BASEDIR/smarts/.migrate.bkp.<old_version> directory in the new installation.
2. Press [y] or any other key to start the file merge utility (sm_merge), and then press [Enter]. The sm_merge utility is invoked individually for each of the files that may require a three-way merge. (“Three-way merge utility” on page 95 provides details.) Once the utility completes merging the files, a message is displayed that indicates successful completion of the process.
or
Press [n] to skip the invocation of the sm_merge utility.
3. Review the files (merged, auto-merged and .conflict) after the migration is over. Take appropriate actions as mentioned in the “User Action” column in “Custom file migration use cases” on page 91.
4. Press [y] or any other key to copy security configuration files, and then press [Enter]. This will copy the security configuration files from .migrate.bkp.<version>/conf to local/conf of the new installation.
or
Press [n] to skip the copying of security configuration files.
Migrating customizations to a different host
Use the following steps to migrate customizations on remote hosts:
1. Prepare to archive the customizations made in the old installation into a tar or zip archive by copying the following files:
• Perl packages: Copy migrateperlpkg.zip from the BASEDIR/smarts/perl directory in the new installation to the BASEDIR/smarts/local directory of the old installation. For Linux and CentOS, use the unzip migrateperlpkg.zip command, and on Windows use the WinZip software to extract the contents in the zipped file to the BASEDIR/smarts/local directory.
• sm_migrate.pl utility: Copy this file from the BASEDIR/smarts/bin directory of the new installation to the BASEDIR/smarts/bin directory of your old installation.
2. Go to the BASEDIR/smarts/bin directory of your old installation and enter the following command on one line to generate an archive of the customizations:
86 EMC Smarts Installation Guide for SAM, IP, ESM, MPLS, VoIP, and NPM Managers

Migration Utilities
sm_perl sm_migrate.pl --old=<BASEDIR>/smarts (old installation) --archive=<BASEDIR>/smarts/<tar or zip file to contain customizations> ----sitemod==<BASEDIR>\smarts\local1; =<BASEDIR>\smarts\local2
It is recommended to save the archive with .zip extension if you are installing the 9.3 product on a Windows platform and .tar extension if you are installing the 9.3 product on Linux and CentOS platforms.
For example:
IP Manager
c:\InCharge812\IP\smarts\bin>sm_perl sm_migrate.pl --old=c:\InCharge812\IP\smarts --archive=c:\InCharge812\IP\smarts\backup.zip --sitemod=c:\InCharge812\IP\smarts\local1;c:\InCharge812\IP\ smarts\local2
Service Assurance Manager
c:\InCharge\SAM\smarts\bin>sm_perl sm_migrate.pl --old=c:\InCharge\SAM\smarts --archive=c:\InCharge\SAM\smarts\backup.tar --sitemod=c:\InCharge\SAM\smarts\local1;c:\InCharge\SAM\ smarts\local2
MPLS Manager
c:\InCharge40\MPLS\smarts\bin>sm_perl sm_migrate.pl --old=c:\InCharge40\MPLS\smarts --archive=c:\InCharge40\MPLS\smarts\backup.zip --sitemod=c:\InCharge40\MPLS\smarts\local1;c:\InCharge40\MPLS\ smarts\local2
Server Manager
c:\InCharge\ESM\smarts\bin>sm_perl sm_migrate.pl --old=c:\InCharge\ESM\smarts --archive=c:\InCharge\ESM\smarts\backup.tar --sitemod=c:\InCharge\ESM\smarts\local1;c:\InCharge\ESM\smarts\ local2
VoIP Availability Manager
c:\InCharge\VoIP\smarts\bin>sm_perl sm_migrate.pl --old=c:\InCharge\VoIP\smarts --archive=c:\InCharge\VoIP\smarts\backup.tar --sitemod=c:\InCharge\VoIP\smarts\local1;c:\InCharge\VoIP\smarts\ local2
Network Protocol Manager
c:\InCharge\NPM\smarts\bin>sm_perl sm_migrate.pl --old=c:\InCharge\NPM\smarts --archive=c:\InCharge\NPM\smarts\backup.tar --sitemod=c:\InCharge\NPM\smarts\local1;c:\InCharge\NPM\ smarts\local2
The utility carries out the following functions:
• Verifies the presence of an existing installation in the specified directory.
Customization migration procedures 87

Migration Utilities
• Determines the files that must be copied.
• Lists the files that were modified by you. The utility skips files that were introduced by the patch but not modified by you.
• Archives the backup directory into the specified tar or zip archive.
3. Transfer the tar or zip archive that is created in step 2 to the BASEDIR/smarts directory on the host with the 9.3 installation.
4. Go to the BASEDIR/smarts/bin directory of your new installation and enter the following command on one line to migrate the customizations from the old installation to your new installation:
sm_perl sm_migrate.pl --new=<BASEDIR>/smarts (new installation) --archive=<BASEDIR>/smarts/<tar or zip file that contains customizations>
For example:
IP Manager
c:\InCharge90\IP\smarts\bin>sm_perl sm_migrate.pl --archive=c:\InCharge90\IP\smarts\backup.zip --new=c:\InCharge90\IP\smarts
Service Assurance Manager
c:\InCharge\SAM\smarts\bin>sm_perl sm_migrate.pl --archive=c:\InCharge\SAM\smarts\backup.tar --new=c:\InCharge\SAM\smarts
MPLS Manager
c:\InCharge90\MPLS\smarts\bin>sm_perl sm_migrate.pl --archive=c:\InCharge90\MPLS\smarts\backup.zip --new=c:\InCharge90\MPLS\smarts
Server Manager
c:\InCharge\ESM\smarts\bin>sm_perl sm_migrate.pl --archive=c:\InCharge\ESM\smarts\backup.tar --new=c:\InCharge\ESM\smarts
VoIP Availability Manager
c:\InCharge\VoIP\smarts\bin>sm_perl sm_migrate.pl --archive=c:\InCharge\VoIP\smarts\backup.tar --new=c:\InCharge\VoIP\smarts
Network Protocol Manager
c:\InCharge\NPM\smarts\bin>sm_perl sm_migrate.pl --archive=c:\InCharge\NPM\smarts\backup.tar --new=c:\InCharge\NPM\smarts
In a Windows environment, you may notice that it takes a longer time to extract the sm_migrate.pl utility and carry out a migration. This behavior is expected and hence do not stop the migration process.
88 EMC Smarts Installation Guide for SAM, IP, ESM, MPLS, VoIP, and NPM Managers
Migration Utilities
The utility completes the following steps:
• Verifies the presence of the new installation in the specified directory and the existence of the specified tar or zip archive.
• Reads the tar or zip archive and determines the files that must be copied.
• Copies the files from the tar or zip archive to a backup directory in BASEDIR/smarts/.migrate.bkp.<old_version>.
• Creates <BASEDIR>/smarts/.rollback_<version_timestamp> directory
• Lists the files that were modified by you.
5. Press [y] or any other key to start the file merge utility (sm_merge), and then press [Enter]. The sm_merge utility is invoked individually for each of the files that may require a three-way merge. (“Three-way merge utility” on page 95 provides details.) Once the utility completes merging the files, a message is displayed that indicates successful completion of the process.
or
Press [n] to skip the invocation of the sm_merge utility.
6. Review the files (merged, auto-merged and .conflict) after the migration is over. Take appropriate actions as mentioned in the “User Action” column in “Custom file migration use cases” on page 91.
7. Press [y] or any other key to copy security configuration files, and then press [Enter]. This will copy the security configuration files from .migrate.bkp.<version>/conf to local/conf of the new installation.
or
Press [n] to skip the copying of security configuration files.
Restoring customizations after an upgrade installation
During an upgrade, the installer creates a backup of your customizations and places them in the <BASEDIR>/smarts/.migrate.bkp.<version> directory.
If during the installation you choose to skip migrating the files back into your new local directory, you may either manually migrate or merge the files into your new local installation directory or run the sm_migrate utility in the UPGRADE mode to perform this action.
Use the following steps to run the sm_migrate utility:
1. Go to the <BASEDIR>/smarts/bin folder.
2. Type the following command to migrate the backup directory to the new installation:
./sm_perl sm_migrate.pl--new=<new installation location up to and including smarts> --upgrade --silent
It is optional to specify the --silent option in the command. Setting the --silent option does not print any messages to the screen. Using this option with sm_migrate utility will invoke the sm_merge utility automatically and does not prompt for your input.
Customization migration procedures 89

Migration Utilities
For example:
c:\InCharge\SAM\smarts\bin>sm_perl sm_migrate.pl--new=c:\InCharge\SAM\smarts --upgrade
The utility carries out the following functions:
• Identifies the <BASEDIR>/smarts/.migrate.bkp.<old_version> directory. The directory contains all files that were introduced by you in the previous version of the application. It also contains files that have been modified by you in the previous install under local and the version of those files from <BASEDIR>.
• Copies the files introduced by you back under <BASEDIR>/local.
• Prompts you to run the sm_merge utility and merges the files in your new installation with the files contained in the backup directory wherever applicable, and places the resultant files in your new local directory.
• Creates <BASEDIR>/smarts/.rollback_<version_timestamp> directory
• On completion, it lists the files which were introduced or modified by you and the merge status of the files.
3. Press [y] or any other key to start the file merge utility (sm_merge utility), and then press [Enter]. The utility is invoked individually for each of the files that may require a three-way merge. “Three-way merge utility” on page 95 provides details. Once the utility completes merging the files, a message is displayed indicating successful completion of the process.
or
Press [n] to skip the invocation of the file merge utility.
You may use an additional --silent option to avoid this prompt. In which case, by default, the utility will attempt the three-way merge.
4. Press [y] or any other key to copy security configuration files, and then press [Enter]. This will copy the security configuration files from .migrate.bkp.<version>/conf to local/conf of the new installation.
or
Press [n] to skip the copying of security configuration files.
5. Review the files (merged, auto-merged and .conflict) after the migration is over. Take appropriate actions as mentioned in the 'User Action' column in “Custom file migration use cases” on page 91.
Perform a rollbackUse the following steps to rollback changes made by the sm_migrate utility:
1. Go to the <BASEDIR>/smarts/bin folder of your new installation, and type the following command to rollback the changes made by sm_migrate utility to your new installation:
./sm_perl sm_migrate.pl --new=<new_installation location _upto_and including smarts> --rollback [--silent]
90 EMC Smarts Installation Guide for SAM, IP, ESM, MPLS, VoIP, and NPM Managers

Migration Utilities
It is optional to specify the [--silent] option in the command. The [--silent] option allows you to carry out the rollback without any prompts.
For example:
c:\InCharge\SAM\smarts\bin>sm_perl sm_migrate.pl--new=c:\InCharge\SAM\smarts --rollback
The utility carries out the following steps:
• Looks in the rollback record and displays the possible timestamps you can rollback to. If the utility finds more than one possible rollback timestamp, it allows you to choose a specific timestamp, and requests a confirmation for rollback. In the Silent mode, the utility chooses the latest timestamp by default, and proceeds with the rollback without an explicit request for confirmation.
• Cleans the current local directory - the utility traverses the current local directory and deletes all the .conf, .import, .asl, .mdl, .xml, .template, .sh, .bat and .cmd files, except the clientConnect.conf, serverConnect.conf, brokerConnect.conf and runcmd_env.sh files.
• Traverses the backup directory for rollback and copies back all the files into the current local directory.
Custom file migration use casesThe use cases for custom file migration and resulting backup and merge activities are described in Table 12 on page 92.
Custom file migration use cases 91

Migration Utilities
<file_name> with no extension represents a base file that is present under the BASEDIR/smarts directory of the new installation.
Table 12 Custom file migration use cases (page 1 of 3)
Use case Backup action Merge Action
User actionOld installation
New installation: BASEDIR/smarts/ .migrate.bkp.<version>
New_installation: BASEDIR/smarts/local
There is a local copy of a file, and changes were introduced by you. The file is also used in the new base installation.
Back up the base and the local copies of the file. The base copy is backed up with “base” extension, as<file_name>.base.
The local copy will be backed up with “local” extension, as<file_name>.local.Local name will be customized name of local.For example: <file_name>.local123.
Run sm_merge for:• <file_name>.base• <file_name>.local• <file_name>
Merge Outcome:• Changes made by you are
merged into the new file and placed in <New_installation>/smarts/local/<file_name>.conf
• If the changes made by you could not be merged without a conflict, a .conflict file is generated and placed in <New_installation>/smarts/local/<file_name>.conflict
• Because the three-way merge utility works at a string level and not at a code level for files such as .asl, .xml, .cmd, and .sh, the merge result of these files is appended with .automerge extension. Review the files, and if the changes are acceptable, save the file without .automerge extension.
• Files with .import and .conf extension are not appended with an automerge extension on successful merge.
• For conflict files, review the conflict file, manually resolve the conflict, and save the file without a .conflict extension.
There is a file in old base, old local and the same file exists in new base.
No backup action. No merge. No user action required.
There is a file in old base and the same file exists in new base.
No backup action. No merge. No user action required.
The local copy of the file that was introduced by a patch and later modified by you. The file exists in the new base, but does not exist in the old base.
Back up the local copy of the file. The local copy will be backed up with “local” extension, as <file_name>.local.Local name will be customized name of local.For example: <file_name>.local123.
sm_merge utility will compare <file_name>.local and <file_name>.
Merge Outcome:<file_name>.conflict
Review the conflict file, manually resolve the conflict and save the file without a .conflict extension.
92 EMC Smarts Installation Guide for SAM, IP, ESM, MPLS, VoIP, and NPM Managers

Migration Utilities
There is a local copy of the file, and changes were introduced by you, but the file is no longer used in the new release.
Backup the base and the local copies of the file. The base copy is backed up with “base” extension, as<file_name>.base.
The local copy will be backed up with “local” extension, as<file_name>.local.Local name will be customized name of local.For example: <file_name>.local123.
No merge The files remain in the backup directory. Determine if the customization is still relevant to the new installation.
The local copy of the file was introduced by a patch, and changes were made by you. The file does not exist in either the new or old base.
Backup the local copy of the file. The local copy will be backed up with “local” extension, as <file_name>.local.Local name will be customized name of local.For example: <file_name>.local123.
No merge Determine if the customization is still relevant to the new installation.
There is a local copy of the file, and changes were made by you. The file is also used in the new version, and there is already a local copy of the file in the new local.
Backup the local copy of the file. The local copy will be backed up with “local” extension, as <file_name>.local.Local name will be customized name of local.For example: <file_name>.local123.
No merge The sm_merge gives precedence to the files in new_local. No changes will be made to the files that are already under new_local.Key exceptions to the rule are covered in the “Migration of security configuration files” on page 94.
There is a local copy of the file, and custom code was introduced by you. This code does not exist in either the old or the new base.
Back up the local copy of the file. The local copy will be backed up with “custom” extension, as <file_name>.custom.
No merge.Copy the files (without the .custom extension) from New Installation: BASEDIR/smarts/.migrate.bkp. <version> to New installation: BASEDIR/smarts/local
Determine whether these custom files are still needed in your new installation.
There is a local copy of the file, and custom code was introduced by you. This file is also used in the new base.
Back up the local copy of the file. The local copy will be backed up with “custom” extension, as <file_name>.custom.
No merge.Copy the files (without the .custom extension) from New Installation: BASEDIR/smarts/.migrate.bkp. <version> to New installation: BASEDIR/smarts/localThe file is copied with .<old_version> extension.
Determine whether these custom files are still needed in your new installation.
Table 12 Custom file migration use cases (page 2 of 3)
Use case Backup action Merge Action
User actionOld installation
New installation: BASEDIR/smarts/ .migrate.bkp.<version>
New_installation: BASEDIR/smarts/local
Custom file migration use cases 93

Migration Utilities
Migration of security configuration files
The sm_migrate utility prompts you for copying the security configuration files serverConnect.conf, clientConnect.conf, brokerConnect.conf, runcmd_env.sh and imk.dat. You can either choose to copy these files into the local directory of the new installation or configure these files later, manually.
If you choose to copy and have changed the site secret in your previous installation, you need to run the sm_rebond command to encrypt the files. For example:
./sm_rebond --basedir=C:\InCharge\IP\smarts
After copying the files, the data in the old runcmd_env.sh file is appended to the new runcmd_env.sh file and the new 9.3 version data is commented.
Migration of security configuration files is not supported on cross platforms.
Migration of dynamic model files
The dynamic model files (files with .mdl and .ldm extension) are backed up in the .migrate.bkp.<version> directory. These files are not considered by sm_migrate utility for merging. Remove the .ldm file from the local directory of the new installation. Recompile the .mdl file before it is used in the new installation. A new .ldm file will be generated once you recompile the .mdl file.
There is a local copy of the file, and changes were made by you. The file is also used in the new version, and there is already a local copy of the file in the new local introduced by a patch.
Back up the base and the local copies of the file. The base copy is backed up with “base” extension, as <file_name>.base.The local copy will be backed up with “local” extension, as <file_name>.local.Local name will be customized name of local.For example: <file_name>.local123.
Run sm_merge for:• <file_name>.base• <file_name>.local• <file_name>
Merge Outcome:• Changes made by you are
merged into the new file and placed in <New_installation>/smarts/local/<file_name>.conf
• If the changes made by you could not be merged without a conflict, a .conflict file is generated and placed in <New_installation>/smarts/local/<file_name>.conflict
• Because the three-way merge utility works at a string level and not at a code level for files such as .asl, .xml, .cmd, and .sh, the merge result of these files is appended with .automerge extension. Review the files, and if the changes are acceptable, save the file without .automerge extension.
• Files with .import and .conf extension are not appended with an automerge extension on successful merge.
• For conflict files, review the conflict file, manually resolve the conflict, and save the file without a .conflict extension.
Table 12 Custom file migration use cases (page 3 of 3)
Use case Backup action Merge Action
User actionOld installation
New installation: BASEDIR/smarts/ .migrate.bkp.<version>
New_installation: BASEDIR/smarts/local
94 EMC Smarts Installation Guide for SAM, IP, ESM, MPLS, VoIP, and NPM Managers

Migration Utilities
The EMC Smarts Dynamic Modeling Tutorial explains the concepts and methods of dynamic modeling.
Three-way merge utilityThe three-way merge utility, sm_merge, helps incorporate configuration changes (made in the .conf, .import .asl, .xml, .pl, .sh, and .cmd files) from an old installation into a new installation of a product. The utility performs a three-way merge on each of the files that you have modified.
The utility uses <file_name>.base, <file_name>.local, and <file_name>, and finds the largest sequence of lines that is common to all three files (this sequence need not necessarily be continuous lines). This largest sequence of lines is called the Longest Common Subsequence (LCS). Then, for each of the three files, it finds groups of lines in between two consecutive lines in the LCS. These groups are referred to as “content blocks.” The utility compares these content blocks to decide on merge as given in Table 12 on page 92.
Use cases for content block comparison
The scenarios for comparison of content blocks during the three-way merge process are described in Table 13 on page 95. In this table, X, Y, and Z represent the content blocks, one from each of the three files.
Table 13 Content block comparison use cases (page 1 of 2)
Scenario Content block comparison Result
XYY• Content block in the
<file_name>.base looks like X
• Content block in <file_name>.local looks like Y
• Content block in the <file_name> looks like Y
The following content blocks are picked up:• Content block in <file_name>.base = X
AllowPrivateIPAsName FALSE
• Content block in <files_name>.local = YAllowPrivateIPAsName TRUE
• Content block in <file_name> = YAllowPrivateIPAsName TRUE
Result: Y Since the <file_name>.local version and the <file_name> version of the content blocks match, the Y version is picked.
XYX • Content block in the
<file_name>.base looks like X
• Content block in the <file_name>.local looks like Y
• Content block in <file_name> looks like X
The following content blocks are picked up:• Content block in <file_name>.base = X
ERXIfExcludeSysPattern router*
• Content block in <files_name>.local = YERXIfExcludeSysPattern *
• Content block in <file_name> = XERXIfExcludeSysPattern router*
Result : Y This is the case where the file modified by you (Y) is preserved and is written to new_local.
Three-way merge utility 95

Migration Utilities
During this process, modifications done on each of the files in the old installation are merged into the new installation. The utility identifies the files to be copied and copies them into a predefined new directory in the new installation with an appropriate suffix. Table 12 on page 92 provides details on the files which will be copied:
The utility performs the following functions:
◆ Automated analysis of the differences between any two files (for example, File A and File B), while also considering the parent file.
◆ Incorporates the changes done to the parent file in File A and File B, and automatically merges the two changes. This type of merge is used in revision control systems.
◆ It maintains a record of the conflicts encountered during the merge process in a .conflict file.
In case the utility is unable to merge the files due to some conflict, it creates a .conflict file for each file. The .conflict file provides details of the files which were not completely merged by the three-way utility. Each conflicting instance is recorded in the .conflict file. You can review the .conflict files to spot the conflicts, and manually resolve the differences.
X Y Z • Content block in the
<file_name>.base looks like X
• Content block in the <file_name>.local looks like Y
• Content block in the <file_name> looks like Z. This is the case where a .conflict file is created.
The following blocks sections are picked up:• Content block in <file_name>.base = X
#Enable/Disable discovery of VLANs PropagateVRIfAlias FALSE
• Content block in <files_name>.local = Y#Enable/Disable discovery of Router PropagateVRIfAlias TRUE
• Content block in <file_name> = Z#Enable/Disable discovery of Multicast # New install changesPropagateVRIfAlias FALSE
Result: Conflict All three content blocks will be written into a .conflict file.
Table 13 Content block comparison use cases (page 2 of 2)
Scenario Content block comparison Result
96 EMC Smarts Installation Guide for SAM, IP, ESM, MPLS, VoIP, and NPM Managers

Migration Utilities
Configuration migration process logs
Table 14 on page 97 lists the logs files that are created for the modified customization migration process. These files are available under the BASEDIR/smarts/setup/logs directory.
Automatically migrate topology using RPS utilityThe repository file (RPS) migration utility (sm_migraterps) automatically converts the RPS file created by the previous version of the software to an RPS file compatible with the newer version of the software. For example, the utility can be used to automatically convert the IP 7.0.3.28 RPS file into a compatible version of IP 8.1.2 or later. This tool allows the administrator to quickly migrate the product without going through a rediscovery of the entire topology.
The RPS migration utility supports migration from IP 7.0.3.x, 7.0.4.x, 8.1.1.x, and 8.1.2.x versions to IP 9.3.
This section covers the following:
◆ “Functions of RPS migration utility” on page 97
◆ “Running RPS migration utility” on page 98
◆ “Precautions” on page 98
Functions of RPS migration utility
The utility carries out the following functions:
◆ Creates a temporary and a backup copy of the RPS file to be migrated. On successful migration, the backup file is deleted. The tool then renames the temporary file as the new RPS and, the original RPS file as the backup file with a .v70 suffix.
◆ Checks for the existence of the source RPS file. Users must ensure that they are using a valid source RPS file.
Table 14 Log file and description
Log file name Description
Config_migration_copy.log Logs information about files that were modified during the previous installation, and those which were backed up in the new installation.
Config_migration_merge.log Logs information about the files on which three-way merge was performed. It also mentions whether the merge process was successful or if any conflicts arose during the process.
<file_name>.conf.MergeLog<file_name>.asl.MergeLog<file_name>.import.MergeLog<file_name>.xml.MergeLog<file_name>.sh.MergeLog<file_name>.cmd.MergeLog
For each type of file (.conf, .import .asl, .xml, .sh, and .cmd) merge logs are created. These logs record the lines which the three-way merge process copied from the previous installation, lines which were retained as-is, and those where conflicts were observed.
Automatically migrate topology using RPS utility 97

Migration Utilities
Running RPS migration utility
It is recommended to run the RPS migration utility only once. A second run will overwrite the older backup file.
To run the RPS migration utility:
1. Go to the <BASEDIR>/smarts/bin folder.
2. Copy the previous version of the RPS file to the <BASEDIR>/smarts/bin folder.
3. Type the following command:
sm_migraterps <rps_file> --trace > <logfilename>
It is optional to specify the --trace option in the command. The --trace option provides a line-by-line description with regard to the RPS migration processing.
The RPS file is converted and written to a temporary file. If no errors are detected during the conversion, then the original RPS file will be renamed with a '.v70' suffix, and the temporary file will be renamed to the original. If any errors are encountered during file conversion, the original RPS file remains unchanged.
4. Copy the migrated RPS file into the <BASEDIR>/smarts/local/repos/icf folder.
A full discovery is required for the new version features and changes to take effect.
Precautions
While starting the IP server with the migrated RPS, use the --ignore-restore-errors option in the command to start the new server. Else, the server may throw errors and may not start up with the migrated RPS.
RPS format error messages may be observed in the IP 9.3 server log file when RPS migration is performed from IP Manager version 7.0.x to version 9.3 using the sm_migraterps utility. These errors are benign in nature. There is no impact on the functionality and these error messages can be ignored.
98 EMC Smarts Installation Guide for SAM, IP, ESM, MPLS, VoIP, and NPM Managers

Migration Utilities
Deployment utility overviewThe Deployment Utility allows you to deploy customizations and configuration changes from an existing installation to another installation on the same version of a product. The deployment can be carried out on the same host or between two different hosts running the same operating system.
The utility is useful if you have to apply the same configurations on multiple installations of a product. Use the utility if you have:
◆ Multiple new installation running on the same or multiple hosts that will need to share the same configuration and customizations.
◆ Multiple installations on the same or multiple hosts that are upgraded and will share the same configuration and customizations.
In both cases, you will need to start with one installation where you make all your modifications to configuration files, <BASEDIR>/smarts/local files and, create and compile dynamic models. Then, run the sm_deploy utility to create a package that contains your modifications. Use the sm_deploy utility to apply the files collected from the first installation to the rest of your installations.
The Deployment Utility performs the following three functions:
◆ Create a package
◆ Deploy the package
◆ Rollback
Create a package
The utility enables you to create a deployment package which consists of all the customizations made to files in an installation. In SAM, by specifying a broker and server information when you run the utility, you can collect configuration settings from RPS into the package.
Deploy the package
The utility enables you to deploy a previously collected deployment package into other installations of the same product running on the same version and operating system as the original installation. If you have collected configuration settings from SAM RPS, the configurations will be available in the file, <SAM_server>.xml under local/conf/ics directory.
Rollback
Before deploying the package into an installation, the utility creates a rollback directory containing the backup copy of files from the current installation which will be used incase of a rollback action. You can rollback your configuration to that in your rollback directory, only if the version of your current installation is the same as the version of the installation when the rollback directory was created.
Soft links created for product related files in the UNIX environment are not handled by sm_deploy utility.
Deployment utility overview 99

Migration Utilities
Running the Deployment utility
To run the Deployment utility, go to <BASEDIR>/smarts/bin directory and type the following command:
./sm_perl sm_deploy.pl <options>
where, <options> refers to the options specified in the section,“sm_deploy modes of operation” on page 100.
sm_deploy modes of operation
The sm_deploy has the following command-line options:
◆ --install=<dir> – To install the utility.
◆ --create=<file> – To create the deployment package.
◆ --deploy=<file> – To deploy the package.
◆ --rollback – To rollback the configuration changes.
◆ --broker – The broker to which the SAM server is attached. Use this option to collect configuration settings from SAM RPS.
◆ --server – The SAM server whose configuration settings from RPS are to be collected.
◆ --clean – To clean the files in the local directory.
◆ --silent
◆ --sitemod – To specify customer specific local directories.
◆ --help
The deployment utility must be used with at least one of these options.
If you want to run this utility from older versions of Smarts products, you must copy the sm_migrate.pl script, sm_deploy.pl script and, the Perl files packaged in a .zip file from the 9.3 installation to the corresponding locations in the old installation.
To create a deployment package
1. Go to the <BASEDIR>/smarts/bin folder of your target installation, and type the following command:
./sm_perl sm_deploy.pl --install=<BASEDIR>/smarts --create=<archive-name.tar> --sitemod==<BASEDIR>/smarts/local
2. The utility identifies the files with customizations from the local directory under <BASEDIR>/smarts directory of the installation that need to be copied to the deployment package. Local directory can be local1, local2.
3. The utility copies the files from the local directory to the deployment backup directory .deploy.bkp<pdt>.<version> under <BASEDIR>/smarts, archives these files to a specified archive file and then deletes the backup directory.
100 EMC Smarts Installation Guide for SAM, IP, ESM, MPLS, VoIP, and NPM Managers

Migration Utilities
Manage RPS file settings across multiple installations
The method of extracting the configuration settings from an RPS file into the deployment package varies between SAM, IP, and VoIP Managers.
For SAM, use the deployment utility to extract the configuration settings from the RPS file.
Go to the <BASEDIR>/smarts/bin folder of your target installation, and type the following command:
./sm_perl sm_deploy.pl --install=<BASEDIR>/smarts --create=<archive-name.tar> --broker=<host:port> --server=<SAM_server>
If a server is specified, the utility collects the configurations into the file, <SAM_server>.xml under local/conf/ics directory.
This can be a convenient way to deploy the configurations of aggregate SAM domain since they often share the same configuration.
For IP, use the sm_settings.pl script of the IP-Configuration Manager tool to export the Polling and Threshold groups from an existing domain and import them into the IP-Configuration Manager to be deployed further on other domains.
For more information on loading settings into IP-Configuration Manager, refer to the IP Configuration Manager section of the EMC Smarts IP Manager Version 9.3 User Guide.
For VoIP Availability Manager, Network Protocol Manager, MPLS Manager, and Server Manager, the configuration settings from an RPS file must be manually configured in all other installations of these products.
To deploy the package
1. Go to the <BASEDIR>/smarts/bin folder of your target installation, and type the following command:
./sm_perl sm_deploy.pl --install=<TargetBASEDIR>/smarts --deploy=<archive-name.tar>
The utility extracts the archive into the backup directory .deploy.bkp<pdt>.<version> under <BASEDIR>/smarts.
2. Creates a rollback directory with the backup of files from the target installation which will be used incase of a rollback action. Rollback will contain local folders which are part of the deployment package.
3. Copies all the files from the deployment package to the local directory of the target installation.
4. Overwrites the files that are part of both, the deployment package and the local directory of the target installation.
5. If the --clean option is specified, the files in the local directory of the target installation that are not part of the deployment package are deleted.
Or
If --clean option is not specified, the files in the local directory of the target installation that are not part of the deployment package are retained.
Deployment utility overview 101

Migration Utilities
To deploy the SAM RPS settings,
◆ Manually import the <SAM_server>.xml file from local/conf/ics directory to the directory in the target installation by typing the following sm_config command:
./sm_config --server=<SAM_server> import --force <SAM_server>.xml
To Rollback
1. Go to the <BASEDIR>/smarts/bin folder of your target installation, and type the following command:
./sm_perl sm_deploy.pl --install=<TargetBASEDIR>/smarts --rollback
The utility displays all the rollback directory locations to which you can rollback.
2. Copies the files from the local directory of the installation whose rollback directory you choose to rollback to, into the corresponding location in your current installation.
If your current directory is a rollback directory location, it will not be displayed in the list of rollback directory locations to which you can rollback.
102 EMC Smarts Installation Guide for SAM, IP, ESM, MPLS, VoIP, and NPM Managers

CHAPTER 7Verifying the Installation
This chapter describes tasks for confirming proper installation of the IP Manager, Service Assurance Manager, MPLS Manager, Server Manager, Network Protocol Manager, and VoIP Availability Manager. It consists of the following topics:
◆ Check the version number..................................................................................... 104◆ Obtain and install a temporary license file............................................................. 105◆ Start services ........................................................................................................ 107◆ Start programs ...................................................................................................... 108◆ Service and program startup options..................................................................... 109◆ Start Smarts NOTIF ................................................................................................ 110◆ Verify the product status ....................................................................................... 112◆ Verify the FIPS 140 mode status ............................................................................ 113◆ Collect system information.................................................................................... 114◆ Configuration Scanner Tool ................................................................................... 118
Verifying the Installation 103

Verifying the Installation
Check the version numberWhen you run a utility to report the version number of the software, you will see both the version number for the product as well as the version number for the underlying foundation software. These two version numbers might differ.
To verify the version number, enter the following command from:
sm_server --version
UNIX/Linux users: If the current directory is not set in your PATH variable, prefix the command with ./ (a period followed by a forward slash).
This command should return the following information:
◆ Operating system (OS) name on which the product is running and the OS version identifier.
◆ Version number of the product.
◆ Version number of the foundation (DMT) code, foundation build number, the date and time that the build was made as well as whether you have installed a 64-bit version of the software. If you installed the 64-bit version, you will see a “/64” after the foundation and the product version number.
The “sm_server --version” output is the following:
Operating System <Identifier><product>: V<Number>(<InternalBuild>), <Date> Copyright 1995-2012, EMC Corporation - Build <Build>Foundation V<Number>(<InternalBuild>), <Date>Copyright 1995-2012, EMC - Build <Build>
For Service Assurance Manager, the output might look similar to:
linux_rhAS50-x86-64/206180000SAM_SUITE: V9.3.0(127725), 27-Sep-2013 10:20:53 Copyright 1995-2013,
EMC Corporation - Build 59Foundation V9.3.0(127413), 14-Sep-2013 10:02:10 Copyright 1995-2013,
EMC Corporation - Build 14
For IP Manager, the output might look similar to:
linux_rhAS50-x86-64/206180000IP_NETWORK_SUITE: V9.3.0(127825), 01-Oct-2013 14:19:59 Copyright
1995-2013, EMC Corporation - Build 83Foundation V9.3.0(127413), 14-Sep-2013 10:02:10 Copyright 1995-2013,
EMC Corporation - Build 14
For Server Manager, the output might look similar to:
linux_rhAS50-x86-64/206180000ESM_SUITE: V9.3.0(128041), 10-Oct-2013 14:10:19 Copyright 1995-2013,
EMC Corporation - Build 100Foundation V9.3.0(127413), 14-Sep-2013 10:02:10 Copyright 1995-2013,
EMC Corporation - Build 14
104 EMC Smarts Installation Guide for SAM, IP, ESM, MPLS, VoIP, and NPM Managers

Verifying the Installation
For MPLS Manager, the output might look similar to:
linux_rhAS50-x86-64/206180000MPLS_SUITE: V9.3.0(127730), 27-Sep-2013 15:26:58 Copyright 1995-2013,
EMC Corporation - Build 50Foundation V9.3.0(127413), 14-Sep-2013 10:02:10 Copyright 1995-2013,
EMC Corporation - Build 14
For Network Protocol Manager, the output might look similar to:
linux_rhAS50-x86-64/206180000NPM_SUITE: V9.3.0(127731), 27-Sep-2013 15:46:37 Copyright 1995-2013,
EMC Corporation - Build 34Foundation V9.3.0(127413), 14-Sep-2013 10:02:10 Copyright 1995-2013,
EMC Corporation - Build 14
For VoIP Availability Manager, the output might look similar to:
linux_rhAS50-x86-64/206180000VOIP_SUITE: V9.3.0(127725), 27-Sep-2013 09:46:27 Copyright 1995-2013,
EMC Corporation - Build 34Foundation V9.3.0(127413), 14-Sep-2013 10:02:10 Copyright 1995-2013,
EMC Corporation - Build 14
The product version number, for example, MPLS Manager 9.3.0 is displayed during the Wizard mode installation on the InstallShield screen.
Be aware that product versions vary and do not always match the software foundation version number. For example, if you select the About from the Help menu in the Global Console, you may see a different number.
Obtain and install a temporary license fileYour EMC account team will send you a temporary (evaluation) <license_name>.lic file through email. Copy the license file to the BASEDIR/smarts/local/conf directory on the host system where you have installed the EMC Smarts software.
◆ If multiple products run on the same host, copy the license file to the BASEDIR/smarts/local/conf directory for each product.
◆ If a product runs on multiple hosts, copy the license file to the BASEDIR/smarts/local/conf directory on each host where the software is installed.
Edit the SM_LICENSE variable in runcmd_env.sh on each host where EMC Smarts software is installed to specify the full path and file name of a single license file. When multiple products are installed on the same host, each product will include a runcmd_env.sh in its BASEDIR/smarts/local/conf directory.
If the temporary license file has a different extension, do not rename it. Instead, ensure that the name that is entered for the SM_LICENSE variable matches that of the license file.
Temporary licenses are time-limited. At the end of the trial period, the software will no longer start. The trial license has an expiration date. The system generates two events alerting users about the expiration of the trial license: LicenseExpirationWarning and LicenseExpired. Table 15 on page 106 provides details on the events associated with the license expiration alert generation process.For illustrative purposes, the following example is an excerpt of a ssmarts.lic file for EMC Smarts software version 9.3:
Obtain and install a temporary license file 105

Verifying the Installation
FEATURE DMC_CORR sm_lmgrd92 9.0 04-dec-2012 uncounted 123456789ABC \HOSTID=DEMO SN=DO315530889 START=4-nov-2008FEATURE AD_PEM sm_lmgrd92 9.0 04-dec-2012 uncounted 123456789ABC \HOSTID=DEMO SN=DO315530889 START=4-nov-2012FEATURE AP_ICSRV sm_lmgrd92 9.0 04-dec-2012 uncounted 123456789ABC \HOSTID=DEMO SN=DO315530889 START=4-nov-2012FEATURE DMC_DECS sm_lmgrd92 9.0 04-dec-2012 uncounted 123456789ABC \HOSTID=DEMO SN=DO315530889 START=4-nov-2012A temporary license file is not user-modifiable, and it consists of a list of applications or features; each line begins with the FEATURE keyword. Each FEATURE line includes the feature name, the vendor daemon name (sm_lmgrd92), the feature version, the expiration date, the number of concurrent licenses that is “uncounted” in this case, the authentication signature for the feature, the HOSTID=DEMO value that indicates that the feature is not bound to any particular host, the serial number (SN) to identify the FEATURE line, and a start date.
Events and attributes for license expired alert
Table 15 on page 106 and Table 16 on page 106 provides details on the event and attributes associated with the license expired alert generation process:
The EMC Smarts System Administration Guide provides information on licensing and instructions for obtaining and installing temporary and permanent licenses.
Table 15 Event for license expired alert generation
Event DescriptionSubscribed to bythe Global Manager
LicenseExpirationWarning Indicates that the system license expiration has reached the remaining days threshold limit. This is defined as follows: (Number of license remaining days <= License expiration warning threshold).An event will be generated if the remaining days is less than the LicenseExpirationWarningThreshold value. The event will be cleared if:• The license expires • A permanent license is obtainedor • The new trial license is valid for over 30 days
Yes - When the license expiration threshold is reached, a LicenseExpirationWarning notification is generated in the Service Assurance Manager server.
LicenseExpired This event is generated when the number of days remaining for the expiration of a license reaches 0, that is, when the value for the NumberOfLicenseRemainingDays attribute reaches 0.
Yes - When the NumberOfLicenseRemainingDays value reaches 0, a notification is generated in the Service Assurance Manager server.
Table 16 Attributes for license expired alert generation
Attribute Description Default value
LicenseExpirationWarningThreshold The number of days before license expiration for which the event will be generated. The default value is set to 30 days.
30
NumberOfLicenseRemainingDays The number of days for which the license is effective. This is auto-calculated from expiration date and current date.
NA
106 EMC Smarts Installation Guide for SAM, IP, ESM, MPLS, VoIP, and NPM Managers

Verifying the Installation
You will not be able to start new domain after a license expires. New devices can be added to the topology and discovery can be performed during the grace period, but new domains cannot be started using the same license. A fresh license is required to start new domain servers. You can extend the grace period on your license by a year. A special request asking for additional grace period on the AP_SYSTEM_VOLUME license feature has to be sent. Discovery and auto-discovery depends on this AP_SYSTEM_VOLUME license feature.
A new domain cannot be started even with this special license file. For example, if the license is expiring on 9/15/2011, and five domains are pointing towards the license server, then even after expiration, the five domains will continue to work till 9/15/2012. However, if we start a new domain server after 9/15/2011 and it is pointing towards the same license file, it will not work. You will need to a new license to start a new domain server. Also, if your temporary license expires and if you are within the grace period, you will not be able to either restart existing domain managers if they are stopped, or add any new device in the existing topology.
Start servicesEMC Corporation recommends installing EMC Smarts products as services. If you installed the products as services, you must start them for the first time. These services start automatically upon system reboot.
Starting services on UNIX
Verify the status of the service daemon before starting a service.
Verifying the status of the service daemonUse the ic-serviced command to check the status of the service daemon. The path to the ic-serviced command varies by operating system.
CentOS
On CentOS systems, enter the following command to verify the status of the service daemon:
/etc/init.d/ic-serviced status
If the sm_serviced process does not respond, the process is not running. Start the service by entering the command:
/etc/init.d/ic-serviced start
Linux
On Linux systems, enter the following command to verify the status of the service daemon:
/etc/init.d/ic-serviced status
If the sm_serviced process does not respond, the process is not running. Start the service by entering the command:
/etc/init.d/ic-serviced start
Start services 107

Verifying the Installation
Starting servicesTo start or stop an EMC Smarts service, use the sm_service utility. Type the command from the BASEDIR/smarts/bin directory:
sm_service start <service_name> [<service_name> ...]
where <service_name> is each service you need to start.
Starting services on Windows
To start an EMC Smarts service from the Windows desktop:
1. Select Start > Settings > Control Panel > Administrative Tools.
2. Select Services.
3. Right-click the EMC Smarts service.
4. Select Start.
Start the Broker service first if it is not running.
Start programsYou can start EMC Smarts programs from the terminal when the program is not intended to be long-running or to perform testing. EMC Corporation does not recommend using this method in a production environment.
The EMC Smarts System Administration Guide provides a complete description of the command syntax.
To start a program, type the command with the appropriate options on one line.
◆ For UNIX, invoke the command from the BASEDIR/smarts/bin directory. Prefix the command with ./ (a period followed by a forward slash).
◆ For Windows, invoke the command from the C:\BASEDIR\smarts\bin directory.
Starting the EMC Smarts Broker
./brstart --port=426 --output
Starting a Manager
▼ ./sm_server --name=<server_name>--config=<config_directory>--port=0--ignore-restore-errors--output ▲
▼▲ indicates the command must be typed on one line.
For UNIX, to run the program in the background, use the daemon option.
108 EMC Smarts Installation Guide for SAM, IP, ESM, MPLS, VoIP, and NPM Managers
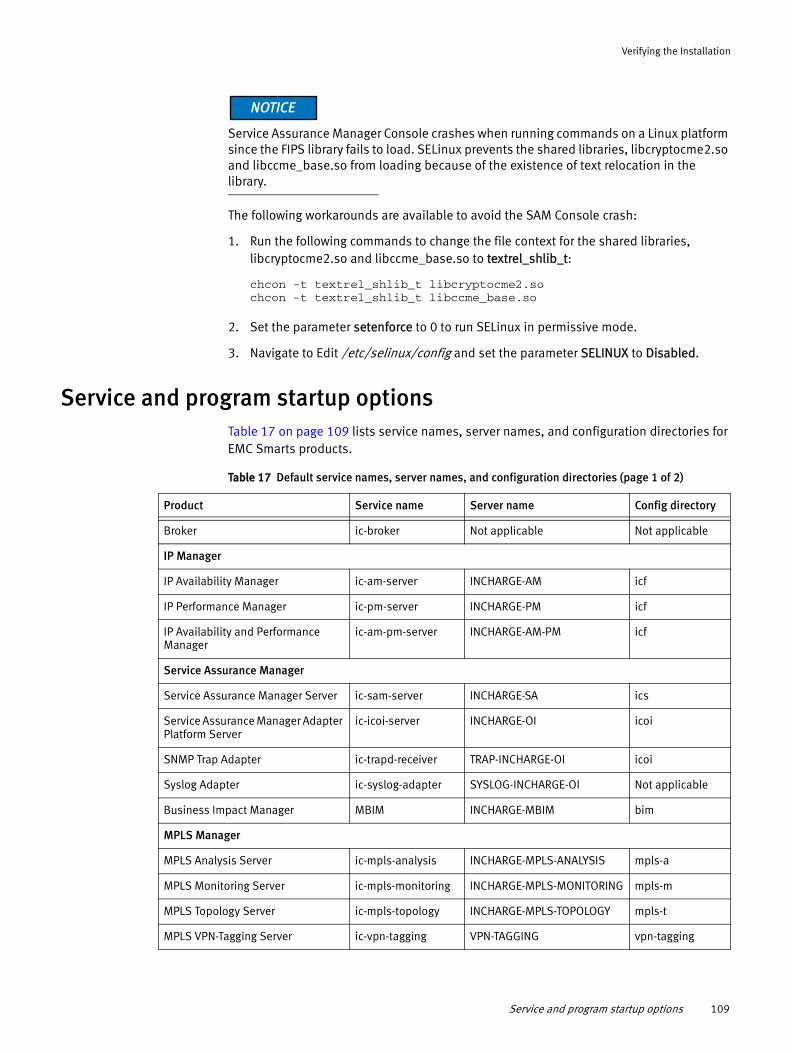
Verifying the Installation
Service Assurance Manager Console crashes when running commands on a Linux platform since the FIPS library fails to load. SELinux prevents the shared libraries, libcryptocme2.so and libccme_base.so from loading because of the existence of text relocation in the library.
The following workarounds are available to avoid the SAM Console crash:
1. Run the following commands to change the file context for the shared libraries, libcryptocme2.so and libccme_base.so to textrel_shlib_t:
chcon -t textrel_shlib_t libcryptocme2.sochcon -t textrel_shlib_t libccme_base.so
2. Set the parameter setenforce to 0 to run SELinux in permissive mode.
3. Navigate to Edit /etc/selinux/config and set the parameter SELINUX to Disabled.
Service and program startup optionsTable 17 on page 109 lists service names, server names, and configuration directories for EMC Smarts products.
Table 17 Default service names, server names, and configuration directories (page 1 of 2)
Product Service name Server name Config directory
Broker ic-broker Not applicable Not applicable
IP Manager
IP Availability Manager ic-am-server INCHARGE-AM icf
IP Performance Manager ic-pm-server INCHARGE-PM icf
IP Availability and Performance Manager
ic-am-pm-server INCHARGE-AM-PM icf
Service Assurance Manager
Service Assurance Manager Server ic-sam-server INCHARGE-SA ics
Service Assurance Manager Adapter Platform Server
ic-icoi-server INCHARGE-OI icoi
SNMP Trap Adapter ic-trapd-receiver TRAP-INCHARGE-OI icoi
Syslog Adapter ic-syslog-adapter SYSLOG-INCHARGE-OI Not applicable
Business Impact Manager MBIM INCHARGE-MBIM bim
MPLS Manager
MPLS Analysis Server ic-mpls-analysis INCHARGE-MPLS-ANALYSIS mpls-a
MPLS Monitoring Server ic-mpls-monitoring INCHARGE-MPLS-MONITORING mpls-m
MPLS Topology Server ic-mpls-topology INCHARGE-MPLS-TOPOLOGY mpls-t
MPLS VPN-Tagging Server ic-vpn-tagging VPN-TAGGING vpn-tagging
Service and program startup options 109

Verifying the Installation
◆ Appendix B, “Manually Installing Services,” provides the default service and program parameters that are used for the service install commands.
◆ The EMC Smarts System Administration Guide provides information in regard to the sm_server, sm_adapter, and sm_trapd programs.
Start Smarts NOTIFTo start Smarts NOTIF:
1. Set an environment variable in the BASEDIR directory path to ensure that Java can be successfully started for Smarts NOTIF. In BASEDIR/smarts/local/conf/runcmd_env.sh, add the following line:
SM_JAVA_ENABLED=YES
2. Configure the SNMP Trap Adapter to use the Notif-trap_mgr_parse.asl script instead of the default trap_mgr_parse.asl script so that Smarts NOTIF processes SNMP traps.
For example:
./sm_service install --force --unmanaged --startmode=runonce \'--name=ic-notif-trap' \'--description=Notif Trap Receiver' \'/opt/InCharge/SAM/smarts/bin/sm_trapd' \'--name=NOTIF-TRAP' \'--server=INCHARGE-OI' \'--output' \'--config=icoi' \'--port=1162' \'--model=sm_actions' \'--rules=icoi-trapd/Notif-trap_mgr_parse.asl'
Server Manager
Server Manager ic-esm-server INCHARGE-ESM esm
Network Protocol Manager products
Network Protocol Manager for BGP ic-npm-bgp-server INCHARGE-BGP conf/bgp
Network Protocol Manager for EIGRP ic-npm-eigrp-server INCHARGE-EIGRP conf/eigrp
Network Protocol Manager for IS-IS ic-npm-isis-server INCHARGE-ISIS conf/isis
Network Protocol Manager for OSPF ic-npm-ospf-server INCHARGE-OSPF conf/ospf
VoIP Availability Manager
VoIP Availability Manager ic-voip-server VoIP-AM conf/voip
VoIP Notification Trap Adapter ic-voip-notification- trapd-receiver
TRAP-INCHARGE-VOIP conf/voip
Table 17 Default service names, server names, and configuration directories (page 2 of 2)
Product Service name Server name Config directory
110 EMC Smarts Installation Guide for SAM, IP, ESM, MPLS, VoIP, and NPM Managers

Verifying the Installation
The --daemon option only works on UNIX systems, not Microsoft Windows systems. Any customizations made by the customer to the original trap_mgr_parse.asl file in the BASEDIR/smarts/rules/icoi-trapd directory must be incorporated into the Notif-trap_mgr_parse.asl file in the BASEDIR/smarts/rules/icoi-trapd directory.
3. Configure the Syslog Adapter to use the Notif-SysLog_mgr.asl script instead of the default SysLog_mgr.asl script in order for Smarts NOTIF to process Cisco system log files.
For example:
./sm_service install --force --unmanaged --startmode=runonce \'--name=ic-notif-syslog' \'--description=Notif Syslog Adapter' \'/opt/InCharge9/SAM/smarts/bin/sm_adapter' \'--name=NOTIF-SYSLOG' \'--server=INCHARGE-OI' \'--output' \'--config=icoi' \'--port=1162' \'--model=sm_actions' \'--model=sm_system'\'--rules=icoi-syslog/Notif-SysLog_mgr.asl'\'--tail=/opt/InCharge9/SAM/smarts/local/logs/sample.txt'
One or more adapters can feed a single Smarts NOTIF server.
4. Launch the Smarts NOTIF Editor by selecting Start > Programs > InCharge > Smarts NOTIF Editor.
You can also launch the editor by double-clicking the NotifGui.bat file (for Windows systems) or the NotifGui.sh file (for UNIX systems) in the BASEDIR/smarts/notif/editor directory.
5. Use the Smarts NOTIF Editor to connect to the running SAM server or Adapter Platform server. Select Remote > Edit a server's settings in the Smarts NOTIF Editor. The Connect to a Server dialog box appears, showing the list of available Adapter Platform and SAM server connections.
6. Choose a server from the list of available server connections in the Connect to a Server dialog box and click OK.
If server connections are not displayed, perform the following to populate the list of server connections:
a. Click More in the Connect to a Server dialog box. The Manage Connections dialog box appears where you can add server connections.
b. Click Add in the Manage Connections dialog box. The Input dialog box appears.
c. Enter a connection reference name (for example, “Remote Smarts NOTIF OI server”) in the Input dialog box and click OK.
Start Smarts NOTIF 111

Verifying the Installation
d. Fill in the new connection record in the right pane of the Manage Connections dialog box.
e. Click OK to save the connection setup.
The Remote Server Settings dialog box appears that shows the server's current settings.
7. Select the Activate Smarts NOTIF checkbox, and then click OK.
You can also change other server settings in the Remote Server Settings dialog box if necessary.
8. Restart your SAM server or Adapter Platform server.
Server setting changes made in the Smarts NOTIF Editor Remote Server Settings dialog box are persistent. When you change server settings in the Remote Server Settings dialog box and click OK, the changes are saved to the Notif_Settings.import file that is generated and saved to the BASEDIR/smarts/local/conf/<icoi or ics> directory in the Adapter Platform or SAM server where Smarts NOTIF is running. Server setting changes made in the Smarts NOTIF Editor are preserved even if the repository is deleted. For example, if the repository is erased because you used the --norestore option for server startup, the server uses the last saved settings from the Smarts NOTIF Editor saved in BASEDIR/smarts/local/conf/<icoi or ics>/Notif_Settings.import.
The EMC Smarts Notification Module User Guide includes information on how to use the Smarts NOTIF Editor.
Verify the product statusYou can determine the current state of the products that register with the Broker by typing the following command from the BASEDIR/smarts/bin directory:
./brcontrol
This command displays a list of EMC Smarts Managers and adapters that are registered with the Broker, their states (RUNNING, DEAD, UNKNOWN), process IDs, port numbers, and the last time that their states changed.
Also check any log files for the products. Typically, these log files are in BASEDIR/smarts/local/logs.
More than one log file may be generated due to changes in the foundation code that supports internationalization. The EMC Smarts System Administration Guide provides additional information on log files.
112 EMC Smarts Installation Guide for SAM, IP, ESM, MPLS, VoIP, and NPM Managers

Verifying the Installation
If only one log file per server is desired, use sm_edit to update the BASEDIR/smarts/local/conf/runcmd_env.sh file. To get a single log file, set the following environment variables:
export SM_LOCALE=en_US (or appropriate locale code)export SM_ENCODING_OUTPUT=UTF-8
Verify the FIPS 140 mode statusTo verify if the installation is running in FIPS-140 mode, run the following command in the dmctl mode:
get SM_System::SM-System::FIPS
The value for this parameter must be TRUE.
You can also check for the status of FIPS 140 in the log files in the BASEDIR/smarts/local/logs directory. When the Broker and server start in FIPS 140 mode, a message similar to the following one is written to the Broker and server log files:
RSA BSAFE: MES 3.2.4 26-May-2012/64(0), FIPS: RSA BSAFE Crypto-C Micro Edition FIPS 140-2 Module 3.0.0.0/64(0), May 31 2008 13:19:56
Common issues
Domain registers with the broker, but appears DEAD after a few minutes
The domain is in FIPS 140 mode but the broker is not.
Domain is not able to register with the broker
The Broker is in FIPS 140 mode but the domain is not.
Broker or Domain log entry
CI-N-EWHILE-While executing function "queue_work”CI-EFLOWID-For flow CI_FlowTCP_U [Flow in negotiations Accepted physical flow] PHYSICAL @0x0000000000a38db . *:v4:44445 KS N/A, KR N/A . Open fd=10, conn August 17, 2011 3:27:43 PM EDT, disc N/A, . 127.0.0.1:44445 -> 127.0.0.1:58347, tmo 0 00:00:15 N/S 1/0 CI-EWHILE-While executing function ""CI_FlowTLS_U::handshake”” CI-BSAFE-error:1407609C:SSLroutines:SSL23_GET_CLIENT_HELLO:http request: ; in file "s23_srvr.c" at line 746
The entry might also appear as: SSL routines:SSL23_GET_CLIENT_HELLO:unknown protocol.
This may be because the Domain (or Broker) is in FIPS 140 mode but the client is not. It may also be that the client is a non-Smarts client (for example a load balancer’s HTTP check). In that case, switch the load balancer to HTTPS check.
Client error
CI-E-EWHILE-While executing function ""CI_FlowTLS_U::handshake””CI-BSAFE-error:1408F10B:SSL routines:SSL3_GET_RECORD:wrong version number: ; in file "s3_pkt.c" at line 553CI-TLSPE-TLS protocol error
This may be because the Domain or Broker is not FIPS 140 capable but the client is operating in FIPS 140 mode.
Verify the FIPS 140 mode status 113

Verifying the Installation
Log errors
[July 11, 2011 5:09:41 PM EDT +385ms] t@31 PollingQueue #8CI-E-EDECRYPT-Cannot decrypt.CI-EDECRYPT-Cannot decrypt.[July 11, 2011 5:09:41 PM EDT +386ms] t@31 PollingQueue #8IA-E-ERROR_EXECUTING_ACTION-Error executing action MA-PerlScript-sihou513a.CI-EDECRYPT-Cannot decrypt.
This may be because the Imk.dat version or the password does not match between domains. Ensure that the password and the version matches across all installs that inter operate.
Error on startup of domain or other tools
[August 8, 2011 8:29:07 PM EDT +466ms] t@3916876800 <Primary Thread>CI-F-EBLACKSTRING_CONTEXT-While creating the contextCRPT-CRYPTO_MD5_INIT_FAILED-Failed to initialize the context for MD5 algorithm
This may be because you are trying to use a v1 imk.dat file in FIPS 140 mode. Ensure that you use v2.1 for FIPS 140 compatibility.
Collect system informationThe sm_getinfo utility is used to collect data for troubleshooting EMC Smarts Manager (server) problems. The utility backs up the current configuration for a server by creating a tar archive of all files and user customizations that are essential to troubleshooting the server. Customers then email the tar archive to EMC Customer Support for problem resolution.
sm_getinfo files
The sm_getinfo utility, which is supported on CentOS, Linux, and Windows, creates four types of files in the installation directory area from which it is invoked. The files are shown described in Table 18 on page 114.
Table 18 Files created by the sm_getinfo utility (page 1 of 2)
Filename Description
Files in BASEDIR/smarts/local/logs directory
sm_getinfo<date>.tar.gzExample: sm_getinfo26Mar2012-015952.tar.gz
A compressed tar archive in which the sm_getinfo utility stores a server ‘s log files, repository files, core files (CentOS, Linux) or dump files (Windows), user-modified files (using sm_edit), user-introduced files, and system environment information. The actual content of the tar archive depends on the user-specified options on the sm_getinfo invocation command line.The name of the tar archive includes the date when the tar archive was created.
MANIFEST A text file that lists all of the files that the sm_getinfo utility includes in the tar archive.
Files in BASEDIR/smarts/local/logs/smgetinfo_files directory
114 EMC Smarts Installation Guide for SAM, IP, ESM, MPLS, VoIP, and NPM Managers

Verifying the Installation
sm_getinfo command-line syntax
You run the sm_getinfo utility from the BASEDIR/smarts/bin directory. The options that you specify on the invocation command line determine which files are included in the sm_getinfo-created tar archive.
Here is the command line syntax for sm_getinfo:
sm_perl sm_getinfo.pl| --server <server name> --pid <server process ID>| --broker <location>| --log [<number of latest logs>]| --nolog| --repos [--latest]| --norps| --core| --all| --version| --help| --smmonitor “<sm_monitor options>”| --flush| --smconfigscan
where:
◆ <> Angle brackets are user-supplied parameter values (variables).
◆ [ ] Square brackets are optional entries.
◆ | Vertical bar symbols are alternate selections.
smgetinfo-versions.log.<date>Example: smgetinfo-versions.log.26Mar2012-020004
Example of other files in smgetinfo_files: TTP-Installed-versions.log.26Mar2012-020005
A log file in which the sm_getinfo utility writes information about a server’s log file or repository file that is larger than 700 megabytes (MB). The sm_getinfo utility does not include any log or repository file in a server’s tar archive that exceeds 700 MB.In addition, sm_getinfo writes system information to the log file.The name of the log file includes the date when the log file was created.
Final_sm_getinfo<timestamp>.tarExample: Final_sm_getinfo20Sep2012-005855.tar
The -k or --smconfigscan command invokes the Configuration Scanner tool, and generates the Final_getinfo-<timestamp>.tar, along with other Configuration Scanner tool-related files.
Notice: If the sm_getinfo utility is run without the -k or --smconfigscan command, a getinfo-<timestamp>.tar output file will be generated without Final_ appended to the output. This implies that you will be running the sm_getinfo tool as usual.
Table 18 Files created by the sm_getinfo utility (page 2 of 2)
Filename Description
Collect system information 115

Verifying the Installation
The command-line options are described in Table 19 on page 116.
Table 19 Command-line options for the sm_getinfo utility (page 1 of 2)
Option Description
--server <server name> --pid <server process ID> | -s <server name> -p <server process ID>
Specifies the EMC Smarts server name and PID against which the sm_getinfo utility will collect information. To dump a core file for a running server on CentOS or Linux, the pid option must be provided. Also, the server name is used to invoke the sm_monitor tool.
--broker <location> | -b <location> Specifies an alternate broker location as host:port.
--pid <pid> | -p <pid> PID of Domain Manager used to run gcore.Not applicable on Windows.
--log [<number of latest logs>] | -l [<number of latest logs>]
For each EMC Smarts server, collects and stores a user-specified number of latest logs or all generated log files that are in the BASEDIR/smarts/local/logs directory.Note that whenever collecting a log, the related .audit and .archive files should be collected as well.If a server name is specified, only the files that correspond to the server will be collected. To avoid generating a too-large tar archive (too large to email), any log file that is larger than 700 MB will be excluded and its information will be logged in smgetinfo-versions.log<date>.
--nolog | -g Excludes log files when collecting local files. This option and --log are mutually exclusive.
--repos [--latest] | -r [-t] For each EMC Smarts server, collects and stores the latest repository file or all repository files. If a server name is specified, only the file corresponding to the server will be collected. Any repository file that is larger than 700 MB will be excluded and its information will be logged in smgetinfo-versions.log<date>.
--norps | -n Excludes repository files when collecting local files. This option and --repos are mutually exclusive.
--core | -c Collects and stores the core files (CentOS, Linux) or dump files (Windows) that are generated by the EMC Smarts software, and the corresponding logs.
--all | -a All data and files in BASEDIR/smarts/local and BASEDIR/smarts/setup directories will be collected and stored. If --all option is specified, the other options will be ignored except --server and --pid.
--version | -v Print version information and exit.
--help | -h Print usage information and exit.
116 EMC Smarts Installation Guide for SAM, IP, ESM, MPLS, VoIP, and NPM Managers

Verifying the Installation
sm_getinfo invocation examples
To gather the five latest logs, enter:
sm_perl sm_getinfo.pl --logs 5
To gather the latest repository data and core files, enter:
sm_perl sm_getinfo.pl --repos --latest --core
To gather the entire BASEDIR/smarts/local directory, enter:
sm_perl sm_getinfo.pl --all
To invoke sm_monitor, enter:
On UNIX/Linux:
sm_perl sm_getinfo.pl -s <server name> -m “-m correlation -z”
On Windows:
sm_perl sm_getinfo.pl -s <server name> -m “-m mem”
sm_getinfo data collection
If no command-line option is specified, the sm_getinfo utility will store the following information in the tar archive:
◆ For each server, the latest server log file in BASEDIR/smarts/local/logs and the related .audit and .archive files in BASEDIR/smarts/local/logs. If a server name is specified, only the files that correspond to the server will be collected. To avoid generating a too-large tar archive (too large to email), any log file that is larger than 700 MB will be excluded and its information will be logged in smgetinfo-versions.log<date>.
◆ For each server, the latest repository file in BASEDIR/smarts/local/repos. If a server name is specified, only the repository file for the server will be archived. Any repository file that is larger than 700 MB will be excluded and its information will be logged in smgetinfo-versions.log<date>.
--smmonitor “<sm_monitor options>” | -m “<sm_monitor options>”
Specifies the options for running sm_monitor, which will override the default options “-m run-all -z.”Approximately two cycles are run to collect the required information. The collected information is output to the BASEDIR/smarts/local/logs/SM-Monitor-<server name> directory.
--flush | -f Force a flush. Needed when the sm_getinfo utility is invoked from a remote host.
--smconfigscan | -k
Notice: This option is available for IP Manager only.
Invokes the configuration scanner tool to provide a snapshot of all the customizations introduced by you in your current installation. “Configuration Scanner Tool” on page 118 provides more information on how to use the tool.
Table 19 Command-line options for the sm_getinfo utility (page 2 of 2)
Option Description
Collect system information 117

Verifying the Installation
◆ The local files that are not in the BASEDIR/smarts/local/logs and repos directories and changed since last temporary test patch (TTP) and patch.
◆ The new local files that are not in the BASEDIR/smarts/local/logs and repos directories and were added since the last TTP and patch.
◆ All local files except the files in logs and repos directories if no TTP or patch is installed.
◆ All files in the BASEDIR/smarts/setup/info and BASEDIR/smarts/setup/logs directories.
◆ Core files (UNIX, Linux) or dump files (Windows) that are generated by the EMC Smarts software, and the corresponding server log files. On UNIX or Linux, some library (lib) files that are related to the cores are also collected.
◆ EMC Smarts TTP or patch version information. Additionally, it verifies MD5 checksum for the installed TTP files and the files that are listed in manifest.md5 in the BASEDIR/smarts/setup/info directory.
◆ The data collected by sm_monitor. If a server name is specified, only the files that correspond to the server will be collected.
◆ The data generated by the EMC Smarts Health Monitor (SHM).
◆ System environment information.
Configuration Scanner Tool
This tool is available only for IP Manager.
The Configuration Scanner tool scans for configuration changes in your current installation. It scans for customizations with regard to the following:
◆ Polling and threshold settings: The tool presents the non-default values and settings. That is, the tool generates a list of polling settings and threshold parameters that have changed from their default values, along with details of all the groups they are associated with. The output also includes tagging settings. In case of CLI settings, the tool collects and displays the username and the associated matching criteria.
◆ Configuration files: The tool generates a list of files that have changed from the default installation. The tool scans the files in the SM_SITEMOD and base installation and does a two-way difference analysis to figure out what files have changed, and displays the list of files, flagged appropriately as modified or added. For discovery.conf, name-resolver.conf and tpmgr-param.conf files, the tool parses through the content and presents the difference at an attribute->value pair level.
The clientConnect.conf, serverConnect.conf, brokerConnect.conf, .imk.dat files and the l10n classes and Perl directories are excluded from the scan.
118 EMC Smarts Installation Guide for SAM, IP, ESM, MPLS, VoIP, and NPM Managers

Verifying the Installation
The tool ignores service pack and patch files that are not modified by you.
Running the Configuration Scanner tool from the sm_getinfo utility
To run the Configuration Scanner tool:
1. Go to the <BASEDIR>/smarts/bin folder.
In this document, the term BASEDIR represents the location where EMC Smarts software is installed. For example:
For UNIX, this location is: /opt/InCharge/<product>.
For Windows, this location is: C:\InCharge\<product>.
On UNIX operating systems, IP Availability Manager is, by default, installed to: /opt/InCharge/IP/smarts. On Windows operating systems, this product is, by default, installed to: C:\InCharge\IP\smarts. This location is referred to as BASEDIR\smarts. Optionally, you can specify the root of BASEDIR to be something different, but you cannot change the <product> location under the root directory.
2. Type the following command:
sm_perl sm_getinfo <options> -k (or --smconfigscan)
An example for the command is provided below:
sm_perl sm_getinfo --broker=localhost:5086 --server=INCHARGE-AM --smconfigscan
or
sm_perl sm_getinfo -b localhost:5086 -s pserver --smconfigscan
The tool has four command-line options: --broker and --server. You can use these options in various combinations and in any order. The details of the options are provided below:
◆ --broker= <location> or -b <location> is the name of the broker if you are using a broker other than your default broker. For example: localhost:400.
It is optional to specify a broker. If a broker is not specified, the tool picks up the broker in the runcmd_env.sh file as the default.
◆ --server=<name> or -s <name> is the name of the Smarts server. For example: --server=INCHARGE-AM.
Configuration Scanner Tool 119

Verifying the Installation
It is optional to specify a server. If a server is not specified, the tool skips the scan for polling and threshold settings, and does only a configuration file scan. However, if the server is running from a location other than the current working directory, the tool scans for polling and threshold settings, but skips the check for file differences and proceeds with packaging the output.
Once you run the command, the tool carries out the following steps:
• Connects to the IP server and scans for changes to the polling and threshold setting values, and writes the findings to an output file.
When prompted for domain login credentials, type the username and password for connecting to the domain.
• Maintains lists of files it has determined as modified or introduced by you and lists of files that were changed by TTPs, if any.
• For some special files, that is, discovery.conf, tpmgr-param.conf and name-resolver.conf), the tool invokes an adapter to parse the contents of the modified and base version of these files. It presents a detailed account of the changes you have made at an attribute->value pair level in the sm_configscan_report-<time_stamp>.txt report file.
As the tool starts the adapter and accesses your running server to gather information, you will be prompted for login credentials. Type the credentials you provided earlier for connecting to the domain.
• Creates a sm_configscan.<time_stamp>.tar file at <BASEDIR>/smarts/local/logs/sm_getinfo-<time_stamp>.tar, which contains the .configscan.<version_number> directory, report file and the logs.
• Cleans up your environment by removing any directories and files it had created, except for the tar file and the report file. It closes any servers or brokers it had started.
120 EMC Smarts Installation Guide for SAM, IP, ESM, MPLS, VoIP, and NPM Managers

CHAPTER 8Performing an Uninstallation
This chapter describes how to uninstall the EMC Smarts Service Assurance Manager, EMC Smarts IP Manager, EMC Smarts MPLS Manager, EMC Smarts Server Manager, EMC Smarts Network Protocol Manager, and EMC Smarts VoIP Availability Manager. It consists of the following topics:
◆ Before uninstallation............................................................................................. 122◆ Uninstall Smarts 9.3 products............................................................................... 127
Performing an Uninstallation 121

Performing an Uninstallation
Before uninstallationYou should complete the following tasks before uninstalling the product:
◆ “Remove manually installed services” on page 122
◆ “Determine order for removing products (UNIX only)” on page 122
◆ “Uninstall when same product software is installed twice (Windows only)” on page 123
◆ “Detect and stop programs” on page 123
◆ “Uninstall the FLEXnet License Server” on page 126
Remove manually installed services
Services that you manually installed with sm_service command are not removed by the uninstallation program. You must remove these services manually before uninstalling the product software.
To remove a service, invoke sm_service from the BASEDIR/smarts/bin directory:
1. Use sm_service to list installed services.
sm_service show
2. Remove the manually installed service.
sm_service remove ic-<service name>
where <service name> is the name of the service. For example, ic-am-server or ic-sam-server.
Determine order for removing products (UNIX only)
When uninstalling EMC Smarts products from the same server, the product that was installed first must be uninstalled last. During the installation of the first product, the EMC Smarts Service Database is created and the other products subsequently access it. Uninstalling the product installed first will also uninstall the Service Database that will disable the sm_service command for those products, prevent their proper operation and uninstallation.
You can determine what product software was installed first by performing this check:
1. Use a text editor to open the ic-serviced script.
• For CentOS, ic-serviced is located in the /etc/init.d directory
• For Linux, ic-serviced is located in the /etc/init.d directory
2. Find the value of the SMHOME variable.
The value of SMHOME indicates which product was installed first.
122 EMC Smarts Installation Guide for SAM, IP, ESM, MPLS, VoIP, and NPM Managers

Performing an Uninstallation
Uninstall when same product software is installed twice (Windows only)
If you installed the same product to different locations on the same host system, do not use Add/Remove Programs to uninstall. Uninstall the EMC Smarts product as follows:
1. Open a command-line prompt, go to the BASEDIR\_uninst directory of the target EMC Smarts product, and enter the following command to initiate a Wizard mode uninstallation:
uninstaller.exe
2. Complete the uninstallation beginning with step 2 as described in “Uninstall using Wizard mode” on page 127.
Detect and stop programs
Before upgrading or uninstalling your product, you must stop all EMC Smarts services, EMC Smarts scheduled jobs, and any other process that uses programs or libraries running from the EMC Smarts product.
Detecting programsThe sm_plist utility identifies all EMC Smarts programs that are running for any product on your machine. You can use the sm_plist utility whenever you need to identify EMC Smarts programs that are running (for example, before applying a service pack or patch and uninstalling the product software).
To use the utility, invoke it from the BASEDIR/smarts/script directory. The utility displays active programs in a window:
1. Go to the BASEDIR/smarts/script directory.
2. Start the sm_plist utility:
On UNIX, enter
./sm_plist.sh <BASEDIR2>
On Windows, enter
cscript sm_plist.vbs <BASEDIR2>
where BASEDIR is the directory where the sm_plist utility is installed and BASEDIR2 represents the location of any EMC Smarts product.
Stopping active programs (UNIX)To stop active EMC Smarts programs (UNIX):
1. Stop active EMC Smarts services using the sm_service utility from BASEDIR/smarts/bin:
./sm_service stop --all
sm_serviced waits 30 minutes after sending a shutdown request to a process. If the process is still running after 30 minutes, sm_serviced terminates it.
Before uninstallation 123
Performing an Uninstallation
2. Determine if any EMC Smarts services are still running by using the brcontrol utility from BASEDIR/smarts/bin:
./brcontrol -b <host>:<port>
Based on the location of the Broker, go to the appropriate step, as indicated in Table 20 on page 124.
3. Stop any EMC Smarts server that is still running. If the Broker is on the host, stop the local Broker:
• To stop any server that is still running, use the dmquit utility from BASEDIR/smarts/bin:
./dmquit --server=<server name> -b <host>:<port>
• To stop the local Broker from BASEDIR/smarts/bin:
./brquit --broker=localhost:<port>
4. Determine if any other EMC Smarts processes are still running and shut the processes down:
• Detect the processes using the following command:
ps -ef | grep “sm_”
If a list is displayed, note the process ID (pid) of these active EMC Smarts processes.
Do not stop or kill the service daemon process, sm_serviced.
• Shut down these EMC Smarts processes (except sm_serviced) using the following command:
kill <pid>
Table 20 Next steps for detecting and stopping programs
The Broker is on the . . . And this displays . . . Do this . . .
Same host “Error attaching to Broker” message
The Broker is not running. Go to step 4 .
List of servers registered with the Broker
• The Broker or service daemon did not shut down.
• If any servers are still running on the host, these did not shut down.
Go to step 3 .
Different host List of servers registered with the Broker
• If any servers are still running on the host where you will install the EMC Smarts software, these did not shut down. Go to step 3 .
124 EMC Smarts Installation Guide for SAM, IP, ESM, MPLS, VoIP, and NPM Managers

Performing an Uninstallation
Stopping active programs (Windows)To stop a service from the Windows desktop, use the Microsoft Management Console:
1. Select Settings > Control Panel.
2. At the Control Panel, select Administrative Tools.
3. At the Administrative Tools folder, select Services.
4. At the Services window, locate any running EMC Smarts services. These services start with the words “EMC Smarts,” “Smarts,” or “InCharge.” For each of these services, right-click the service and then select Stop.
Do not stop the Broker service.
5. Repeat step 4 until all EMC Smarts services are stopped.
6. Open a command prompt and determine if any Managers are running by using the brcontrol utility from BASEDIR\smarts\bin:
brcontrol -b <host>:<port>
7. Stop any EMC Smarts server that is still running using the dmquit utility from BASEDIR/smarts/bin:
./dmquit --server=<server name> -b <host>:<port>
8. If the Broker is installed on the same host, use the brquit utility from BASEDIR/smarts/bin to stop it:
brquit --broker=localhost:<port>
9. Press Ctrl+Alt+Delete. The Windows Security dialog box appears.
10. Click Task Manager. The Windows Task Manager appears.
11. Select the Processes tab.
Allow up to 30 minutes before performing the next step. EMC Smarts servers with large topologies can take considerable time to stop while saving the topology to the repository. Stopping processes prematurely may corrupt your repository file.
12. In the Processes tab, look in the column labeled Image Name for sm_server. Right-click each sm_server, and then select End Process.
13. In the Processes tab, look for other Image Names that start with sm_, for example, sm_notify, sm_adapter, sm_beacon, and so on. Right-click each instance, and then select End Process.
Do not shut down any sm_authority or sm_logger processes. The sm_authority and sm_logger processes are child processes of an EMC Smarts server. The child processes will stop when the parent process stops.
Before uninstallation 125

Performing an Uninstallation
Uninstall the FLEXnet License Server
When uninstalling all of your EMC Smarts products that use a specific FLEXnet License Server, you must also uninstall the FLEXnet License Server.
If any EMC Smarts products will remain in your network and use the FLEXnet License Server, do not uninstall either the license server or the EMC Smarts product where the permanent license file resides.
If you uninstall EMC Smarts products without uninstalling the FLEXnet License Server, a message displays that the FLEXnet (lmgrd) service is still running. Remember that an EMC Smarts application will not start if it is unable to contact the license server.
To stop and uninstall the FLEXnet License Server:
1. Stop the FLEXnet License Server.
CentOS
/etc/init.d/SMARTS-License stop
Linux
/etc/init.d/SMARTS-License stop
Windows
To manually stop the license server on Windows, do the following:
• Select Start > Settings > Control Panel > Administrative Tools.
• Select Services.
• Select the FLEXnet License Server service.
• Right-click and select Stop.
2. Run the install_license script, with the uninstall command, from BASEDIR/smarts/script.
On UNIX, enter:
install_license.sh uninstall
On Windows, enter:
install_license.cmd uninstall
126 EMC Smarts Installation Guide for SAM, IP, ESM, MPLS, VoIP, and NPM Managers

Performing an Uninstallation
Uninstall Smarts 9.3 productsEMC Smarts product software uses the InstallShield program to install and uninstall products. For UNIX, you invoke the uninstallation program from the system prompt. For Windows, you use the Add/Remove Programs, except when the same product is installed in multiple locations on the same host system. Failure to use the appropriate method will result in an unstable system and/or inconsistent product directories.
Do not manually delete the installed product directories.
Also, if you plan to reinstall the product, save all of the customized files that are in the BASEDIR/smarts/local directory before performing the uninstallation. The uninstallation program will remove all of the files and directories in the BASEDIR/smarts directory, and then remove the smarts directory.
Uninstall using Wizard mode
Wizard mode provides a graphical user interface to the uninstallation program for UNIX and Windows platforms.
On UNIX systems, Wizard mode uses the X Window System to display the installation wizard. The host on which you install the EMC Smarts software and the host where you log in must be configured to run the X Window System. Before starting the installation program, verify that the X Window System is running.
1. Invoke the uninstaller program:
• On UNIX, go to the BASEDIR/_uninst directory and enter:
uninstaller.bin
• On Windows, use Windows Control Panel:
a. Click Start > Settings > Control Panel.
b. Double-click Programs and Features.
c. From the Program and Features window, select the appropriate product.
d. Click Uninstall/Remove.
2. Click Next in the Welcome screen to continue.
3. In the Product Selection screen, click Next to uninstall the entire product (by default, all products are selected) or deselect products that should remain installed.
4. Review the list of products that will be uninstalled and the target installation directory. Once you click Next, you cannot cancel the uninstallation process.
If necessary, click Back to return to the Product Selection screen to revise your selections.
To uninstall the products, click Next; the Uninstallation Progress screen appears.
Uninstall Smarts 9.3 products 127

Performing an Uninstallation
5. Upon completion, the Uninstallation Summary shows informational messages such as successful confirmations, error messages, and warnings. Investigate any errors or warnings.
If Next appears, your system needs to be rebooted. Click Next and then reboot your system. Otherwise, click Finish to exit the uninstallation.
The uninstallation program will remove all of the files and directories in the BASEDIR/smarts directory, and then remove the smarts directory.
The uninstallation program will also write an uninstall log file to the BASEDIR directory, unless the uninstallation fails at the very start, in which case the installation program will write the log file to the /tmp directory. The log file is a text file with the naming convention Uninstall.<product>.<productversionNumber>.log.
Uninstall using CLI mode
To uninstall an EMC Smarts product or product:
1. Go to the BASEDIR/_uninst directory and enter the following command:
uninstaller.bin -console
During the uninstallation processes, you are prompted with a series of steps and menus. You can either accept the default value or select another choice. The default values are indicated in brackets or as predefined selections (checkmarks) in menus. To accept the default value, press Enter.
When replying to a prompt, you can either accept the default value or select another choice. To reply yes, enter Y To reply no, enter N. Do not press Delete; doing so will cause the process to terminate with an error message.
For selections in menus, you can accept default selections or type the number of the item and press Enter. An X appears next to the item. When you are finished making selections, type zero (0) and press Enter.
If you incorrectly type an entry, press 5 to repeat the prompt and select the correct value. Arrow keys and the backspace key are not supported.
Upon completion, the Uninstallation Summary displays informational messages such as successful confirmations, error messages, and warnings.
2. Press Enter to continue. If necessary, the installation program will prompt to restart your computer.
3. Press 1 to restart immediately or press 2 to restart later.
4. If you chose not to restart your computer, press 3 to finish.
5. Upon completion, the uninstallation program will remove all of the files and directories in the BASEDIR/smarts directory, and then remove the smarts directory.
The uninstallation program will also write an uninstall log file to the BASEDIR directory, unless the uninstallation fails at the very start, in which case the installation program will write the log file to the /tmp directory. The log file is a text file with the naming convention Uninstall.<product>.<productversionNumber>.log.
128 EMC Smarts Installation Guide for SAM, IP, ESM, MPLS, VoIP, and NPM Managers

Performing an Uninstallation
Uninstall using Unattended mode
The Unattended mode enables you to automate the removal of the EMC Smarts products.
1. Invoke the uninstallation program with appropriate options for the operating system:
• On UNIX systems, go to the BASEDIR/_uninst directory and enter the following command:
uninstaller.bin -silent
• On Windows system, go to the BASEDIR\_uninst directory and enter the following command:
uninstaller.exe -silent
2. Upon completion, the uninstallation program will remove all of the files and directories in the BASEDIR/smarts directory, and then remove the smarts directory.
The uninstallation program will also write an uninstall log file to the BASEDIR directory, unless the uninstallation fails at the very start, in which case the installation program will write the log file to the /tmp directory. A non-zero status indicates a failure. The log file is a text file with the naming convention Uninstall.<product>.<productversionNumber>.log.
Uninstall Smarts 9.3 products 129

Performing an Uninstallation
130 EMC Smarts Installation Guide for SAM, IP, ESM, MPLS, VoIP, and NPM Managers

APPENDIX AThe sm_edit utility
This appendix describes how to use the sm_edit utility. It consists of the following topics:
◆ sm_edit ................................................................................................................ 132◆ sm_edit example .................................................................................................. 132
The sm_edit utility 131

The sm_edit utility
sm_editAs part of the EMC Smarts deployment and configuration process, you need to modify certain files. User modifiable files include configuration files, rule set files, templates, and seed files that contain encrypted passwords. Original versions of these files are installed into appropriate subdirectories under the BASEDIR/smarts/ directory.
The original versions of files should not be altered. If a file must be modified, a new version should be created and then stored as a local copy of the file in BASEDIR/smarts/local or one of its subdirectories.
When EMC Smarts software requires one of these files, it is designed to first search for a modified file in BASEDIR/smarts/local or one of its subdirectories. If a modified version of a file is not found in the local area, EMC Smarts software then searches corresponding BASEDIR/smarts directories for the original version of the file.
To ease file editing and storage, EMC Corporation provides the sm_edit utility with the every EMC Smarts product. When invoked, sm_edit opens the specified file in a text editor. This utility ensures that modified files are always saved to the appropriate local area and that non-local copies of all files remain unchanged. If an appropriate subdirectory does not exist for the file you are modifying, sm_edit creates the appropriate subdirectory before saving the modified file to that location. For files with header information set for encryption, sm_edit encrypts certain fields in the file. In addition, sm_edit preserves the file permissions of modified files, which helps ensure that important configuration files are not altered by unauthorized users.
The EMC Smarts System Administration Guide provides instructions on how to configure the utility to use a specific editor.
sm_edit exampleTo use sm_edit from the command line, specify the file name and include the subdirectory under BASEDIR/smarts/local where the file resides. For example, to edit the trapd.conf, enter the following command from the BASEDIR/smarts/bin directory:
sm_edit conf/trapd/trapd.conf
In this example, sm_edit searches in the BASEDIR/smarts/local/conf/trapd directory for the trapd.conf file. If it finds the trapd.conf file, it opens the file in a text editor. If sm_edit does not find the trapd.conf file in the BASEDIR/smarts/local/conf/trapd directory, it creates a local copy of the trapd.conf file and writes it to the BASEDIR/smarts/local/conf/trapd directory.
The EMC Smarts System Administration Guide provides additional information about the sm_edit utility.
132 EMC Smarts Installation Guide for SAM, IP, ESM, MPLS, VoIP, and NPM Managers

APPENDIX BManually Installing Services
This appendix describes how to install services manually for the EMC Smarts Service Assurance Manager, EMC Smarts IP Manager, EMC Smarts MPLS Manager, EMC Smarts Server Manager, EMC Smarts Network Protocol Manager, and EMC Smarts VoIP Availability Manager. It consists of the following topics:
◆ Overview............................................................................................................... 134◆ Broker Services for the 9.3 product ....................................................................... 134◆ Services for the IP Manager ................................................................................... 135◆ Services for the Service Assurance Manager .......................................................... 137◆ Services for the MPLS Manager ............................................................................. 143◆ Services for the Server Manager ............................................................................ 145◆ Services for the Network Protocol Manager installation ......................................... 145◆ Services for the VoIP Availability Manager ............................................................. 148
Manually Installing Services 133

Manually Installing Services
OverviewIf you did not install services when you installed the EMC Smarts products, you may install services manually. Services are programs that, once started, are generally intended to run continuously. Components installed as services start automatically upon system reboot; those not installed as services (manual processes or disabled processes) require that you issue commands to start and stop them as necessary.
EMC Corporation recommends that EMC Smarts products be installed as services whenever possible. Typical reasons to install products as services include the following conditions:
◆ (IP Manager only) There is a need to install services for a single product instead of the combined IP Availability Manager and IP Performance Manager products (for example, IP Availability Manager alone or IP Performance Manager alone). “Selection of bootstrap files when installing services” on page 134 provides more information.
◆ During installation of the product software, you chose to start product components manually and now want to run the components as services.
◆ Multiple instances of a single product component running as a service are required. During installation, you can install only a single instance of a product component as a service.
To manually install a product as a service, use the sm_service install command with the appropriate set of options.
The EMC Smarts System Administration Guide provides a complete description of the command syntax.
Selection of bootstrap files when installing services
When you install IP 9.3 with all services selected, both IP Availability Manager and IP Performance Manager services are installed. The default configuration file, bootstrap.conf, is used by the IP 9.3 installer.
If your deployment supports only IP Availability Manager or IP Performance Manager, you must manually install these services for the IP Manager(s) using a bootstrap file different from bootstrap.conf.
Broker Services for the 9.3 productThis section provides the default UNIX and Windows commands that are used to install the service manually for the Broker. Type the command on one line.
UNIX ▼ BASEDIR/smarts/bin/sm_service install --force--name=ic-broker“--description= EMC Smarts Broker”--env=SM_CLIENTCONNECT=brokerConnect.conf--startmode=runonceBASEDIR/smarts/bin/brstart--port=426--output--restore=BASEDIR/smarts/local/repos/ broker/broker.rps ▲
134 EMC Smarts Installation Guide for SAM, IP, ESM, MPLS, VoIP, and NPM Managers

Manually Installing Services
Windows ▼ BASEDIR\smarts\bin\sm_service install --force --name=ic-broker “--description= EMC Smarts Broker”--env=SM_CLIENTCONNECT=brokerConnect.conf --startmode=runonce BASEDIR\smarts\bin\brstart.exe “--port=426” “--output” “--restore=BASEDIR\smarts\local\repos\ broker\broker.rps"▲
▼▲ indicates that this command must be typed as one line.
Services for the IP ManagerHere are the UNIX commands used to install services manually for the underlying servers in the IP Manager.
IP Availability Manager-only server
UNIX ▼ /opt/InCharge/IP/smarts/bin/sm_service install--force--name=ic-am-server“--description= EMC Smarts IP Availability Manager Server”--startmode=runonce/opt/InCharge/IP/smarts/bin/sm_server--name=INCHARGE-AM--config=icf--bootstrap=bootstrap-am.conf--port=0--subscribe=default--ignore-restore-errors--output▲
Windows ▼ C:\InCharge\IP\smarts\bin\sm_service install --force --name=ic-am-server“--description= EMC Smarts IP Availability Manager Server”--startmode=runonce C:\InCharge\IP\smarts\bin\sm_server.exe “--name=INCHARGE-AM” “--config=icf” “--bootstrap=bootstrap-am.conf” “--port=0” “--subscribe=default” “--ignore-restore-errors” “--output”▲
Services for the IP Manager 135

Manually Installing Services
IP Performance Manager-only Server
UNIX ▼ /opt/InCharge/IP/smarts/bin/sm_service install--force--name=ic-pm-server“--description= EMC Smarts IP Performance Manager Server”--startmode=runonce/opt/InCharge/IP/smarts/bin/sm_server--name=INCHARGE-PM--config=icf--bootstrap=bootstrap-pm.conf--port=0--subscribe=default--ignore-restore-errors--output▲
Windows ▼ C:\InCharge\IP\smarts\bin\sm_service install --force --name=ic-pm-server "--description= EMC Smarts IP Performance Manager Server" --startmode=runonce C:\InCharge\IP\smarts\bin\sm_server.exe "--name=INCHARGE-PM" "--config=icf" "--bootstrap=bootstrap-pm.conf" "--port=0" "--subscribe=default" "--ignore-restore-errors" "--output"▲
IP Availability and Performance Manager Server
UNIX ▼ /opt/InCharge/IP/smarts/bin/sm_service install --force --name=ic-am-pm-server“--description= EMC Smarts IP Availability Manager and Performance Manager Server” --startmode=runonce /opt/InCharge/IP/smarts/bin/sm_server --name=INCHARGE-AM-PM --config=icf--bootstrap=bootstrap-am-pm.conf --port=0 --subscribe=default --ignore-restore-errors --output▲
Windows ▼ C:\InCharge\IP\smarts\bin\sm_service install --force --name=ic-am-pm-server "--description= EMC Smarts IP Availability Manager and Performance Manager Server" --startmode=runonce C:\InCharge\IP\smarts\bin\sm_server.exe "--name=INCHARGE-AM-PM" "--config=icf" "--bootstrap=bootstrap-am-pm.conf" "--port=0" "--subscribe=default" "--ignore-restore-errors" "--output"▲
136 EMC Smarts Installation Guide for SAM, IP, ESM, MPLS, VoIP, and NPM Managers
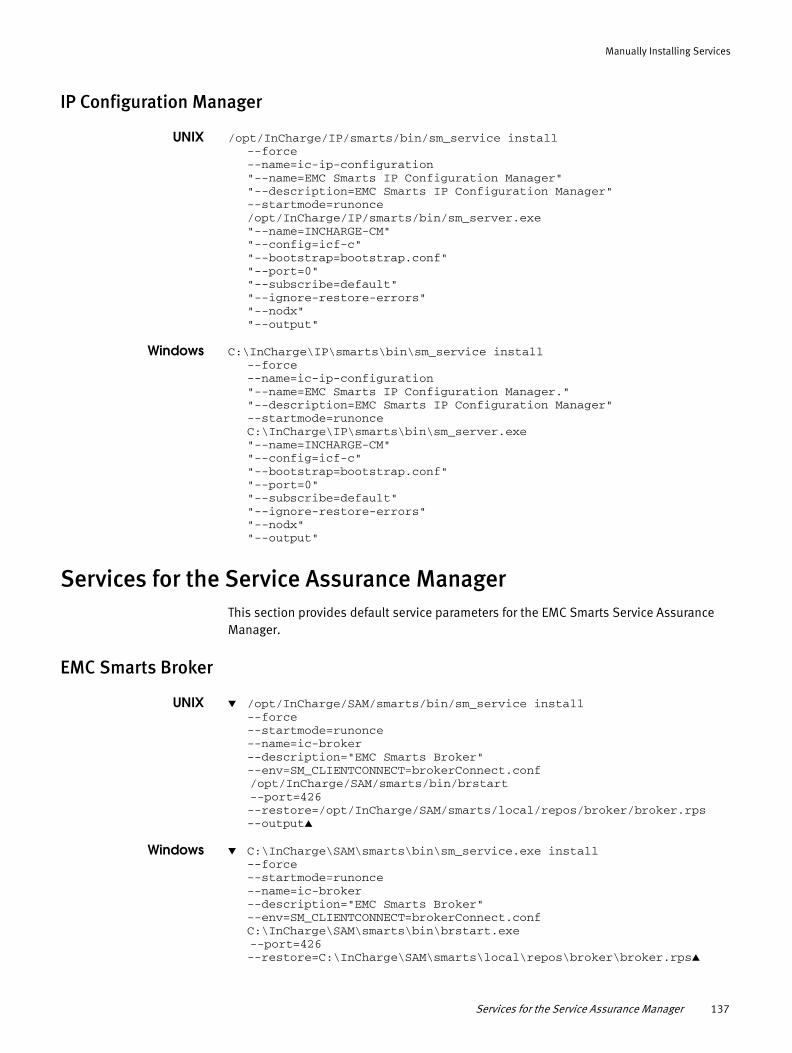
Manually Installing Services
IP Configuration Manager
UNIX /opt/InCharge/IP/smarts/bin/sm_service install --force --name=ic-ip-configuration "--name=EMC Smarts IP Configuration Manager" "--description=EMC Smarts IP Configuration Manager" --startmode=runonce /opt/InCharge/IP/smarts/bin/sm_server.exe "--name=INCHARGE-CM" "--config=icf-c" "--bootstrap=bootstrap.conf" "--port=0" "--subscribe=default" "--ignore-restore-errors" "--nodx" "--output"
Windows C:\InCharge\IP\smarts\bin\sm_service install --force --name=ic-ip-configuration "--name=EMC Smarts IP Configuration Manager." "--description=EMC Smarts IP Configuration Manager" --startmode=runonce C:\InCharge\IP\smarts\bin\sm_server.exe "--name=INCHARGE-CM" "--config=icf-c" "--bootstrap=bootstrap.conf" "--port=0" "--subscribe=default" "--ignore-restore-errors" "--nodx" "--output"
Services for the Service Assurance ManagerThis section provides default service parameters for the EMC Smarts Service Assurance Manager.
EMC Smarts Broker
UNIX ▼ /opt/InCharge/SAM/smarts/bin/sm_service install--force--startmode=runonce--name=ic-broker--description="EMC Smarts Broker"--env=SM_CLIENTCONNECT=brokerConnect.conf/opt/InCharge/SAM/smarts/bin/brstart--port=426--restore=/opt/InCharge/SAM/smarts/local/repos/broker/broker.rps--output▲
Windows ▼ C:\InCharge\SAM\smarts\bin\sm_service.exe install --force--startmode=runonce--name=ic-broker--description="EMC Smarts Broker"--env=SM_CLIENTCONNECT=brokerConnect.confC:\InCharge\SAM\smarts\bin\brstart.exe--port=426 --restore=C:\InCharge\SAM\smarts\local\repos\broker\broker.rps▲
Services for the Service Assurance Manager 137

Manually Installing Services
Service Assurance Manager (Presentation SAM server)
UNIX /opt/InCharge/SAM/smarts/bin/sm_service install --force --unmanaged --startmode=runonce --name=ic-sam-server-pres--description=”EMC Smarts Service Assurance Manager Server
(notification cache publishing)” /opt/InCharge/SAM/smarts/bin/sm_server -n INCHARGE-SA-PRES--config=ics--port=0--edaa=sam-presentation/2.0--bootstrap=bootstrap-amqp.conf--ignore-restore-errors--output
Windows C:\InCharge\SAM\smarts\bin\sm_service install --force --unmanaged --startmode=runonce
“--name=ic-sam-server-pres” “--description=EMC Smarts Service Assurance Manager Server
(notification cache publishing)” C:\InCharge\SAM\smarts\bin\sm_server“-n INCHARGE-SA-PRES” “--config=ics”“--port=0” “--edaa=sam-presentation\2.0” “--bootstrap=bootstrap-amqp.conf” “--ignore-restore-errors”“--output”
Service Assurance Manager (Global Manager)
UNIX ▼ /opt/InCharge/SAM/smarts/bin/sm_service install--force--unmanaged--name=ic-sam-server--startmode=runonce --description="EMC Smarts Service Assurance Manager
Server"/opt/InCharge/SAM/smarts/bin/sm_server--name=INCHARGE-SA--config=ics--port=0--ignore-restore-errors--output▲
Windows ▼ C:\InCharge\SAM\smarts\bin\sm_service.exe install--force--name=ic-sam-server--startmode=runonce --description="EMC Smarts Service Assurance Manager
Server"C:\InCharge\SAM\smarts\bin\sm_server.exe--name=INCHARGE-SA--config=ics--port=0--ignore-restore-errors--output▲
138 EMC Smarts Installation Guide for SAM, IP, ESM, MPLS, VoIP, and NPM Managers

Manually Installing Services
Business Impact Manager server
UNIX ▼/opt/InCharge/SAM/smarts/bin/sm_service install --startmode=runonce--name=MBIM--description=”EMC Smarts MBIM – Maintenance and Business Impact Manager Server”/opt/InCharge/SAM/smarts/bin/sm_server--name=INCHARGE-MBIM--config=bim--port=0--ignore-restore-errors--output▲
Windows ▼C:\InCharge\SAM\smarts\bin\sm_service.exe install --startmode=runonce--name=MBIM--description=”EMC Smarts MBIM – Maintenance and Business Impact Manager Server”C:\InCharge\SAM\smarts\bin\sm_server.exe--name=INCHARGE-MBIM--config=bim--port=0--ignore-restore-errors--output▲
Adapter Platform
UNIX ▼ /opt/InCharge/SAM/smarts/bin/sm_service install--force--unmanaged--name=ic-icoi-server--startmode=runonce --description="EMC Smarts SAM Adapter Platform Server"/opt/InCharge/SAM/smarts/bin/sm_server--name=INCHARGE-OI--config=icoi--port=0--ignore-restore-errors--output▲
Windows ▼ C:\InCharge\SAM\smarts\bin\sm_service.exe install--force--name=ic-icoi-server--startmode=runonce --description="EMC Smarts SAM Adapter Platform Server"C:\InCharge\SAM\smarts\bin\sm_server.exe--name=INCHARGE-OI--config=icoi--port=0--ignore-restore-errors--output▲
Business Dashboard
UNIX ▼ /opt/InCharge/CONSOLE/smarts/bin/sm_service install--force--unmanaged--name=ic-business-dashboard--startmode=runonce --description="EMC Smarts Servlet Engine"/opt/InCharge/CONSOLE/smarts/bin/sm_tomcat--output
Services for the Service Assurance Manager 139

Manually Installing Services
start▲
Windows ▼ C:\InCharge\CONSOLE\smarts\bin\sm_service.exe install--force--name=ic-business-dashboard--startmode=runonce --description="EMC Smarts Servlet Engine"C:\InCharge\CONSOLE\smarts\bin\sm_tomcat.exe--outputstart▲
Syslog Adapter
Before you configure the Syslog Adapter, identify the location of the SYSFILE you want the adapter to tail and parse and ensure that sm_service install command line for the ic-syslog-adapter identifies this location. The EMC Smarts Service Assurance Manager Adapter Platform User Guide provides more information on configuring the Syslog Adapter.
UNIX ▼ /opt/InCharge/SAM/smarts/bin/sm_service install --force--unmanaged--name=ic-syslog-adapter--startmode=runonce--description="EMC Smarts Syslog Adapter"/opt/InCharge/SAM/smarts/bin/sm_adapter--name=SYSLOG-INCHARGE-OI--rserver=INCHARGE-OI--tail=/var/log/syslog--model=sm_system--model=sm_actions--output icoi-syslog/syslog_mgr.asl▲
Windows ▼ C:\InCharge\SAM\smarts\bin\sm_service.exe install--force--name=ic-syslog-adapter--description="EMC Smarts Syslog Adapter"--startmode=runonceC:\InCharge\SAM\smarts\bin\sm_adapter.exe--name=SYSLOG-INCHARGE-OI--rserver=INCHARGE-OI--tail=/var/log/syslog--model=sm_system--model=sm_actions--output icoi-syslog/syslog_mgr.asl▲
SNMP Trap Adapter
UNIX ▼ /opt/InCharge/SAM/smarts/bin/sm_service install--force--unmanaged--name=ic-trapd-receiver--startmode=runonce --description="EMC Smarts SNMP Trap Adapter"/opt/InCharge/SAM/smarts/bin/sm_trapd--name=TRAP-INCHARGE-OI--server=INCHARGE-OI--config=icoi--port=162--seed=seedfile--model=sm_actions--output
140 EMC Smarts Installation Guide for SAM, IP, ESM, MPLS, VoIP, and NPM Managers

Manually Installing Services
--rules=icoi-trapd/trap_mgr_parse.asl▲
Windows ▼ C:\InCharge\SAM\smarts\bin\sm_service.exe install--force--name=ic-trapd-receiver--startmode=runonce --description="EMC Smarts SNMP Trap Adapter"C:\InCharge\SAM\smarts\bin\sm_trapd.exe--name=TRAP-INCHARGE-OI--server=INCHARGE-OI--config=icoi--port=162--seed=seedfile--model=sm_actions--output--rules=icoi-trapd/trap_mgr_parse.asl▲
Notif trap Adapter
UNIX ▼ /opt/InCharge/SAM/smarts/bin/sm_service install --force -unmanaged--startmode=runonce--name=ic-notif-trapd-receiver--description="EMC Smarts NOTIF SNMP Trap Adapter"/opt/InCharge/SAM/smarts/bin/sm_trapd--name=NOTIF-TRAP-INCHARGE-OI--server=INCHARGE-OI--config=icoi--port=162--model=sm_actions--rules=icoi-trapd/Notif-trap_mgr_parse.asl--seed=seedfile--output▲
Windows ▼ C:\InCharge\SAM\smarts\bin>sm_service install --force--name=ic-notif-trapd-receiver--description="EMC Smarts NOTIF SNMP Trap Adapter"C:\InCharge\SAM\smarts\bin\sm_trapd.exe--name=NOTIF-TRAP-INCHARGE-OI--server=INCHARGE-OI--config=icoi--port=162--model=sm_actions--rules=icoi-trapd/Notif-trap_mgr_parse.asl--seed=seedfile--output▲
Notif syslog adapter
UNIX ▼ /opt/InCharge/SAM/smarts/bin/sm_service install --force --unmanaged --startmode=runonce--name=ic-notif-syslog-adapter--description="EMC Smarts Syslog Adapter"/opt/InCharge/SAM/smarts/bin/sm_adapter--name=NOTIF-SYSLOG-INCHARGE-OI--rserver=INCHARGE-OI--tail=/var/log/syslog--model=sm_system--model=sm_actions--output icoi-syslog/Notif-SysLog_mgr.asl▲
Windows ▼ C:\InCharge\SAM\smarts\bin\sm_service install --force--name=ic-notif-syslog-adapter--description="EMC Smarts Syslog Adapter"
Services for the Service Assurance Manager 141

Manually Installing Services
C:\InCharge\SAM\smarts\bin\sm_adapter.exe--name=NOTIF-SYSLOG-INCHARGE-OI--rserver=INCHARGE-OI--tail=/var/log/syslog--model=sm_system--model=sm_actions--output icoi-syslog/Notif-SysLog_mgr.asl▲
EMC Smarts Data Web Applications (Tomcat)
UNIX /opt/InCharge/SAM/smarts/bin/sm_service install --force --unmanaged --startmode=runonce --name=smarts-tomcat' --description=”EMC Smarts Data Web Applications (Tomcat)”/opt/InCharge/SAM/smarts/bin/sm_tomcat --ignoreme
Windows C:\InCharge\SAM\smarts\bin\sm_service install --force --unmanaged --startmode=runonce “--name=smarts-tomcat” “--description=EMC Smarts Data Web Applications (Tomcat)” C:\InCharge\SAM\smarts\bin\sm_tomcat “--ignoreme”
EMC Smarts Notification Exchange (Rabbit MQ)
UNIX /opt/InCharge/SAM/smarts/bin/sm_service install --force --unmanaged --startmode=runonce--name=smarts-rabbitmq--description=”EMC Smarts Notification Exchange (Rabbit MQ)” /opt/InCharge/SAM/smarts/bin/sm_rabbitmq--ignoreme
Windows C:\InCharge\SAM\smarts\bin\sm_service install --force --unmanaged --startmode=runonce “--name=smarts-rabbitmq” “--description=EMC Smarts Notification Exchange (Rabbit MQ)”C:\InCharge\SAM\smarts\bin\sm_rabbitmq “--ignoreme”
EMC Smarts Notification Cache (ElasticSearch)
UNIX /opt/InCharge/SAM/smarts/bin/sm_service install --force --unmanaged --startmode=runonce --name=smarts-elasticsearch --description=”EMC Smarts Notification Cache (ElasticSearch)” /opt/InCharge/SAM/smarts/bin/sm_elasticsearch --ignoreme
Windows C:\InCharge\SAM\smarts\bin\sm_service install --force --unmanaged --startmode=runonce “--name=smarts-elasticsearch” “--description=EMC Smarts Notification Cache (ElasticSearch)” C:\InCharge\SAM/smarts\bin\sm_elasticsearch “--ignoreme”
142 EMC Smarts Installation Guide for SAM, IP, ESM, MPLS, VoIP, and NPM Managers
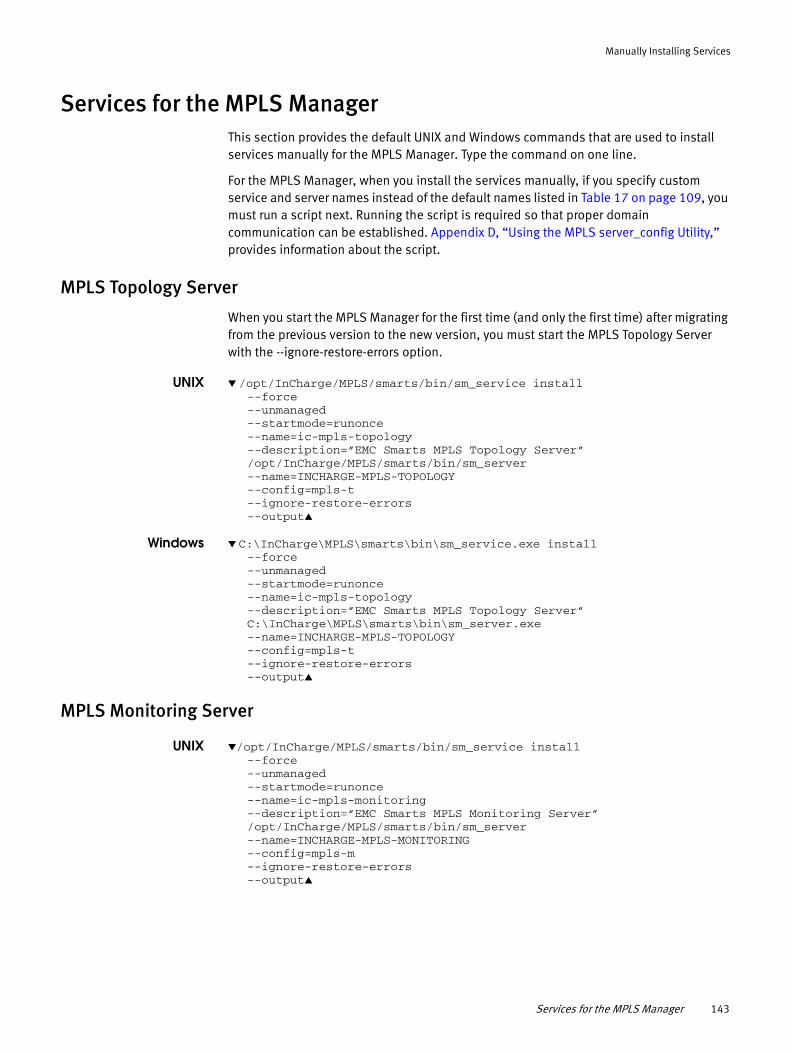
Manually Installing Services
Services for the MPLS ManagerThis section provides the default UNIX and Windows commands that are used to install services manually for the MPLS Manager. Type the command on one line.
For the MPLS Manager, when you install the services manually, if you specify custom service and server names instead of the default names listed in Table 17 on page 109, you must run a script next. Running the script is required so that proper domain communication can be established. Appendix D, “Using the MPLS server_config Utility,” provides information about the script.
MPLS Topology Server
When you start the MPLS Manager for the first time (and only the first time) after migrating from the previous version to the new version, you must start the MPLS Topology Server with the --ignore-restore-errors option.
UNIX ▼ /opt/InCharge/MPLS/smarts/bin/sm_service install --force --unmanaged --startmode=runonce --name=ic-mpls-topology --description=”EMC Smarts MPLS Topology Server” /opt/InCharge/MPLS/smarts/bin/sm_server --name=INCHARGE-MPLS-TOPOLOGY --config=mpls-t --ignore-restore-errors --output▲
Windows ▼ C:\InCharge\MPLS\smarts\bin\sm_service.exe install --force --unmanaged --startmode=runonce --name=ic-mpls-topology --description=”EMC Smarts MPLS Topology Server” C:\InCharge\MPLS\smarts\bin\sm_server.exe --name=INCHARGE-MPLS-TOPOLOGY --config=mpls-t --ignore-restore-errors --output▲
MPLS Monitoring Server
UNIX ▼/opt/InCharge/MPLS/smarts/bin/sm_service install --force --unmanaged --startmode=runonce --name=ic-mpls-monitoring --description=”EMC Smarts MPLS Monitoring Server” /opt/InCharge/MPLS/smarts/bin/sm_server --name=INCHARGE-MPLS-MONITORING --config=mpls-m --ignore-restore-errors --output▲
Services for the MPLS Manager 143

Manually Installing Services
Windows ▼ C:\InCharge\MPLS\smarts\bin\sm_service.exe install --force --unmanaged --startmode=runonce --name=ic-mpls-monitoring --description=”EMC Smarts MPLS Monitoring Server” C:\InCharge\MPLS\smarts\bin\sm_server.exe --name=INCHARGE-MPLS-MONITORING --config=mpls-m --ignore-restore-errors --output▲
MPLS Analysis Server
UNIX ▼ /opt/InCharge/MPLS/smarts/bin/sm_service install --force --unmanaged --startmode=runonce --name=ic-mpls-analysis --description=”EMC Smarts MPLS Analysis Server” /opt/InCharge/MPLS/smarts/bin/sm_server --name=INCHARGE-MPLS-ANALYSIS --config=mpls-a --ignore-restore-errors --output▲
Windows ▼ C:\InCharge\MPLS\smarts\bin\sm_service.exe install --force --unmanaged --startmode=runonce --name=ic-mpls-analysis --description=”EMC Smarts MPLS Analysis Server” C:\InCharge\MPLS\smarts\bin\sm_server.exe --name=INCHARGE-MPLS-ANALYSIS --config=mpls-a --ignore-restore-errors --output▲
MPLS VPN-Tagging Server
UNIX ▼ /opt/InCharge/MPLS/smarts/bin/sm_service install --force --unmanaged --startmode=runonce --name=ic-vpn-tagging --description=”EMC Smarts MPLS VPN-Tagging Server” /opt/InCharge/MPLS/smarts/bin/sm_server --name=VPN-TAGGING --config=vpn-tagging --ignore-restore-errors --output▲
Windows ▼ C:\InCharge\MPLS\smarts\bin\sm_service.exe install --force --unmanaged --startmode=runonce --name=ic-vpn-tagging --description=”EMC Smarts MPLS VPN-Tagging Server” C:\InCharge\MPLS\smarts\bin\sm_server.exe --name=VPN-TAGGING --config=vpn-tagging --ignore-restore-errors --output▲
144 EMC Smarts Installation Guide for SAM, IP, ESM, MPLS, VoIP, and NPM Managers

Manually Installing Services
Services for the Server ManagerThis section provides the default UNIX and Windows commands that are used to install the service manually for the EMC Smarts Server Manager. Type the command on one line.
Server Manager
UNIX ▼ opt/InCharge/ESM/smarts/bin/sm_service install --force --unmanaged--name=ic-esm-server --description=”EMC Smarts Server Manager (ESM)” --startmode=runonce opt/InCharge/ESM/smarts/bin/sm_server --name=INCHARGE-ESM --config=esm --subscribe=default --output --ignore-restore-errors▲
Windows ▼ sm_service.exe install--force--unmanaged--name=ic-esm-server--description=”EMC Smarts Server Manager (ESM)”--startmode=C:\InCharge\ESM\smarts\bin\sm_server.exe--name=INCHARGE-ESM--config=esm--subscribe=default--output --ignore-restore-errors▲
Services for the Network Protocol Manager installationThis section provides the default UNIX and Windows commands that are used to install services manually for the Network Protocol Manager. Type the command on one line.
Network Protocol Manager for BGP
UNIX (IPv6 and IPv4 mode)
/opt/InCharge/NPM/smarts/bin/sm_service install --force --startmode=runonce --name=ic-npm-bgp-server --description=”EMC Smarts NPM for BGP Server” /opt/InCharge/NPM/smarts/bin/sm_server --name=INCHARGE-BGP --config=bgp --port=0 --subscribe=default --output
Services for the Server Manager 145

Manually Installing Services
Windows (IPv6 and IPv4 mode)
C:\InCharge\NPM\smarts\bin\sm_service.exe install --force --startmode=runonce --name=ic-npm-bgp-server --description=”EMC Smarts NPM for BGP Server” C:\InCharge\NPM\smarts\bin\sm_server.exe --name=INCHARGE-BGP --config=bgp --port=0 --subscribe=default --output
UNIX (IPv4 mode only) /opt/InCharge/NPM/smarts/bin/sm_service install --force --startmode=runonce --name=ic-npm-bgp-server --description=”EMC Smarts NPM for BGP Server” /opt/InCharge/NPM/smarts/bin/sm_server --name=INCHARGE-BGP --config=bgp --port=0 --bootstrap=bootstrap-ipv4.conf --subscribe=default --output
Windows (IPv4 mode only)
C:\InCharge\NPM\smarts\bin\sm_service.exe install --force --startmode=runonce --name=ic-npm-bgp-server --description=”EMC Smarts NPM for BGP Server” C:\InCharge\NPM\smarts\bin\sm_server.exe --name=INCHARGE-BGP --config=bgp --bootstrap=bootstrap-ipv4.conf --port=0 --subscribe=default --output
Network Protocol Manager for EIGRP
UNIX /opt/InCharge/NPM/smarts/bin/sm_service install --force --startmode=runonce --name=ic-npm-eigrp-server --description=”EMC Smarts NPM for EIGRP Server” /opt/InCharge/NPM/smarts/bin/sm_server --name=INCHARGE-EIGRP --config=eigrp --port=0 --subscribe=default --ignore-restore-errors --output
146 EMC Smarts Installation Guide for SAM, IP, ESM, MPLS, VoIP, and NPM Managers

Manually Installing Services
Windows C:\InCharge\NPM\smarts\bin\sm_service.exe install --force --startmode=runonce --name=ic-npm-eigrp-server --description=”EMC Smarts NPM for EIGRP Server” C:\InCharge\NPM\smarts\bin\sm_server.exe --name=INCHARGE-EIGRP --config=eigrp --port=0 --subscribe=default --ignore-restore-errors --output
Network Protocol Manager for IS-IS
UNIX (IPv6 and IPv4 mode)
/opt/InCharge/NPM/smarts/bin/sm_service install --force --startmode=runonce --name=ic-npm-isis-server --description=”EMC Smarts NPM for ISIS Server” /opt/InCharge/NPM/smarts/bin/sm_server --name=INCHARGE-ISIS --config=isis --port=0 --subscribe=default --output
Windows (IPv6 and IPv4 mode)
C:\InCharge\NPM\smarts\bin\sm_service.exe install --force --startmode=runonce --name=ic-npm-isis-server --description=”EMC Smarts NPM for ISIS Server” C:\InCharge\NPM\smarts\bin\sm_server.exe --name=INCHARGE-ISIS --config=isis --port=0 --subscribe=default --output
UNIX (IPv4 mode only) /opt/InCharge/NPM/smarts/bin/sm_service install --force --startmode=runonce --name=ic-npm-isis-server --description=”EMC Smarts NPM for ISIS Server” /opt/InCharge/NPM/smarts/bin/sm_server --name=INCHARGE-ISIS --config=isis --port=0 --bootstrap=bootstrap-ipv4.conf --subscribe=default --output
Windows (IPv4 mode only)
C:\InCharge\NPM\smarts\bin\sm_service.exe install --force --startmode=runonce --name=ic-npm-isis-server --description=”EMC Smarts NPM for ISIS Server” --C:\InCharge\NPM\smarts\bin\sm_server.exe --name=INCHARGE-ISIS --config=isis --port=0 --bootstrap=bootstrap-ipv4.conf --subscribe=default --output
Services for the Network Protocol Manager installation 147
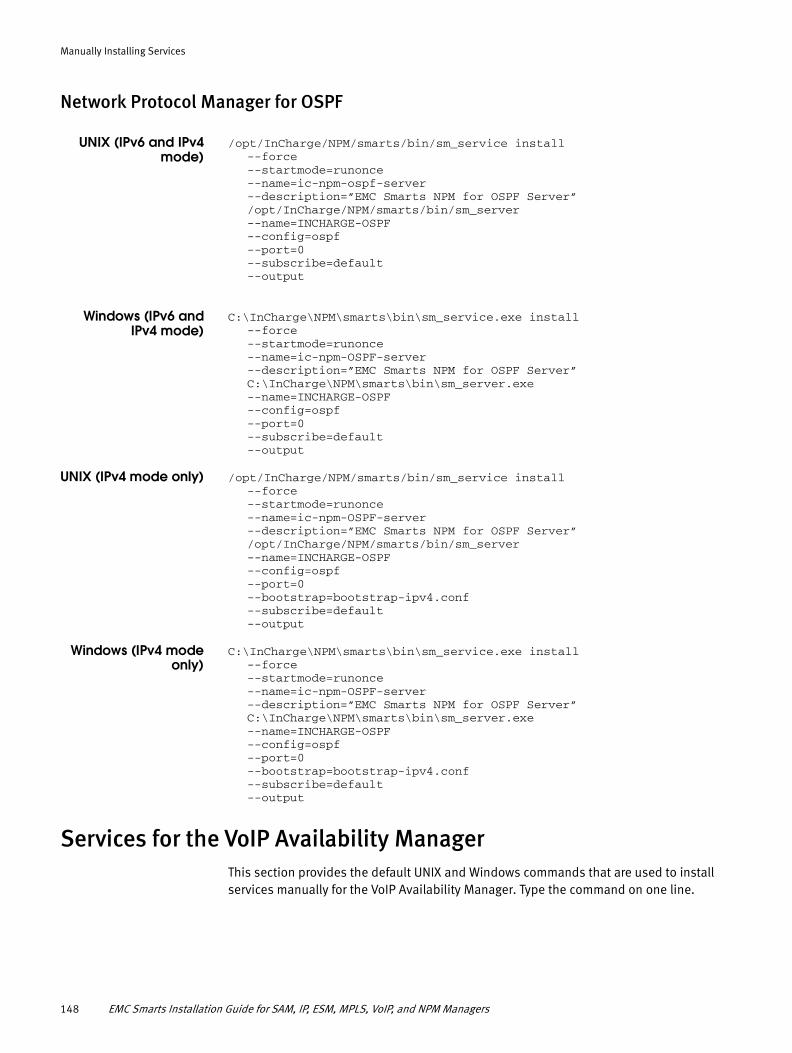
Manually Installing Services
Network Protocol Manager for OSPF
UNIX (IPv6 and IPv4 mode)
/opt/InCharge/NPM/smarts/bin/sm_service install --force --startmode=runonce --name=ic-npm-ospf-server --description=”EMC Smarts NPM for OSPF Server” /opt/InCharge/NPM/smarts/bin/sm_server --name=INCHARGE-OSPF --config=ospf --port=0 --subscribe=default --output
Windows (IPv6 and IPv4 mode)
C:\InCharge\NPM\smarts\bin\sm_service.exe install --force --startmode=runonce --name=ic-npm-OSPF-server --description=”EMC Smarts NPM for OSPF Server” C:\InCharge\NPM\smarts\bin\sm_server.exe --name=INCHARGE-OSPF --config=ospf --port=0 --subscribe=default --output
UNIX (IPv4 mode only) /opt/InCharge/NPM/smarts/bin/sm_service install --force --startmode=runonce --name=ic-npm-OSPF-server --description=”EMC Smarts NPM for OSPF Server” /opt/InCharge/NPM/smarts/bin/sm_server --name=INCHARGE-OSPF --config=ospf --port=0 --bootstrap=bootstrap-ipv4.conf --subscribe=default --output
Windows (IPv4 mode only)
C:\InCharge\NPM\smarts\bin\sm_service.exe install --force --startmode=runonce --name=ic-npm-OSPF-server --description=”EMC Smarts NPM for OSPF Server” C:\InCharge\NPM\smarts\bin\sm_server.exe --name=INCHARGE-OSPF --config=ospf --port=0 --bootstrap=bootstrap-ipv4.conf --subscribe=default --output
Services for the VoIP Availability ManagerThis section provides the default UNIX and Windows commands that are used to install services manually for the VoIP Availability Manager. Type the command on one line.
148 EMC Smarts Installation Guide for SAM, IP, ESM, MPLS, VoIP, and NPM Managers

Manually Installing Services
VoIP Availability Manager
UNIX /opt/InCharge/VoIP/smarts/bin/sm_service install --force --unmanaged --startmode=runonce --name=ic-voip-server --description=”EMC Smarts VoIP Availability Manager” --env=SM_JAVA_ENABLED=YES /opt/InCharge/VoIP/smarts/bin/sm_server --name=VoIP-AM --config=voip --port=0 --subscribe=default --ignore-restore-errors --output
Windows C:\InCharge\VoIP\smarts\bin\sm_service.exe install --force --unmanaged --startmode=runonce --name=ic-voip-server “--description=EMC Smarts VoIP Availability Manager” “--env=SM_JAVA_ENABLED=YES” C:\InCharge\VoIP\smarts\bin\sm_server.exe “--name=VoIP-AM” “--config=voip” “--port=0” “--subscribe=default” “--ignore-restore-errors” “--output”
VoIP Notification Trap Adapter
UNIX /opt/InCharge/VoIP/smarts/bin/sm_service install --force --unmanaged --startmode=runonce --name=ic-voip-notification-trapd-receiver --description=”EMC VoIP Notification Trap Adapter” /opt/InCharge/VoIP/smarts/bin/sm_trapd --name=TRAP-INCHARGE-VOIP --server=INCHARGE-OI --config=voip --port=9002 --model=sm_actions --rules=voip/voip_trap_mgr_parse.asl --output=TRAP-INCHARGE-VOIP
Windows C:\InCharge\VoIP\smarts\bin\sm_service.exe install --force --unmanaged --startmode=runonce --name=ic-voip-notification-trapd-receiver --description=”EMC VoIP Notification Trap Adapter” C:\InCharge\VoIP\smarts\bin\sm_trapd.exe --name=TRAP-INCHARGE-VOIP --server=INCHARGE-OI --config=voip --port=9002 --model=sm_actions --rules=voip\voip_trap_mgr_parse.asl --output=TRAP-INCHARGE-VOIP
Services for the VoIP Availability Manager 149

Manually Installing Services
150 EMC Smarts Installation Guide for SAM, IP, ESM, MPLS, VoIP, and NPM Managers

APPENDIX CProcedures for CD/DVD-ROMs
This appendix includes commands and examples for working with a CD/DVD-ROM to install or upgrade product software. It consists of the following topics:
◆ Mounting a CD/DVD-ROM on UNIX systems ........................................................... 152◆ Loading a CD/DVD-ROM on Windows .................................................................... 153
Procedures for CD/DVD-ROMs 151
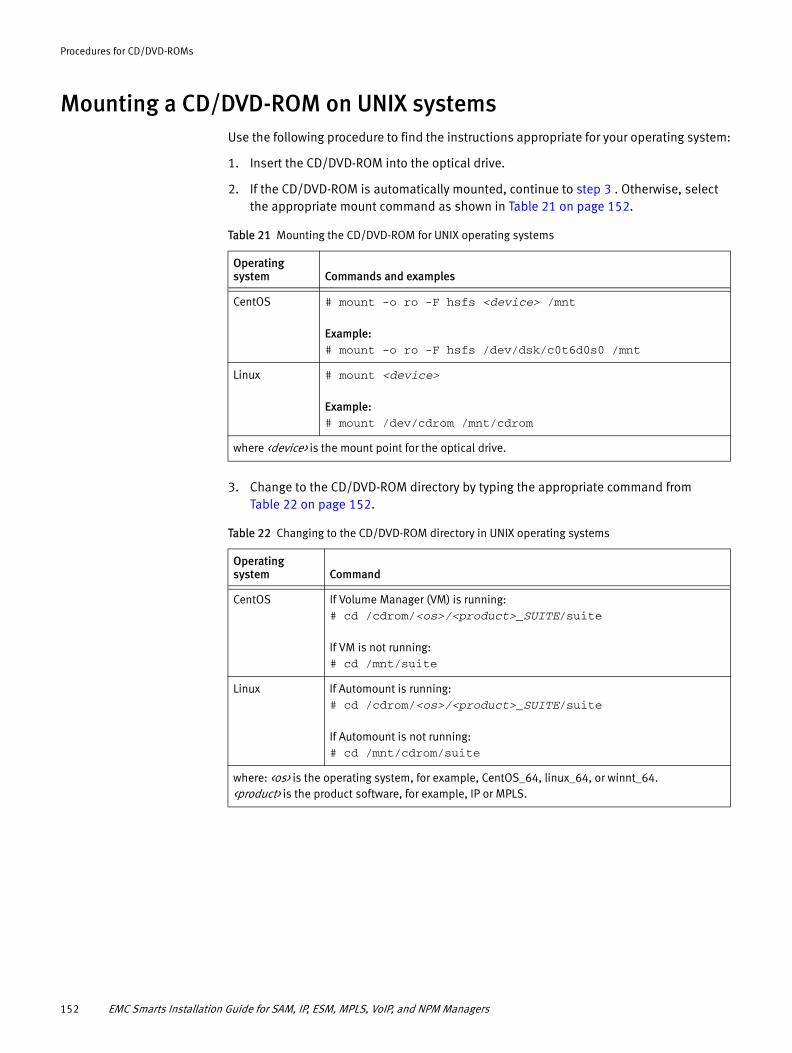
Procedures for CD/DVD-ROMs
Mounting a CD/DVD-ROM on UNIX systemsUse the following procedure to find the instructions appropriate for your operating system:
1. Insert the CD/DVD-ROM into the optical drive.
2. If the CD/DVD-ROM is automatically mounted, continue to step 3 . Otherwise, select the appropriate mount command as shown in Table 21 on page 152.
3. Change to the CD/DVD-ROM directory by typing the appropriate command from Table 22 on page 152.
Table 21 Mounting the CD/DVD-ROM for UNIX operating systems
Operating system Commands and examples
CentOS # mount -o ro -F hsfs <device> /mnt
Example:# mount -o ro -F hsfs /dev/dsk/c0t6d0s0 /mnt
Linux # mount <device>
Example:# mount /dev/cdrom /mnt/cdrom
where <device> is the mount point for the optical drive.
Table 22 Changing to the CD/DVD-ROM directory in UNIX operating systems
Operating system Command
CentOS If Volume Manager (VM) is running:# cd /cdrom/<os>/<product>_SUITE/suite
If VM is not running:# cd /mnt/suite
Linux If Automount is running:# cd /cdrom/<os>/<product>_SUITE/suite
If Automount is not running:# cd /mnt/cdrom/suite
where: <os> is the operating system, for example, CentOS_64, linux_64, or winnt_64.<product> is the product software, for example, IP or MPLS.
152 EMC Smarts Installation Guide for SAM, IP, ESM, MPLS, VoIP, and NPM Managers

Procedures for CD/DVD-ROMs
Loading a CD/DVD-ROM on WindowsThe installation program starts automatically on Windows systems when AutoPlay or AutoRun is enabled:
1. Insert the CD/DVD-ROM into the optical drive. If AutoPlay or AutoRun is enabled, the installation program starts automatically using the Wizard mode.
2. If the installation program does not start, use Windows Explorer to locate the top-level folder of the mounted CD/DVD-ROM.
3. Locate the \product directory on the CD/DVD-ROM and double-click the setup executable.
If you want to run CLI mode or Unattended mode on a Windows system, you need to disable the AutoPlay or AutoRun feature. To do so, press and hold the Shift key for approximately 10 seconds while inserting the CD/DVD-ROM into the optical drive.
Loading a CD/DVD-ROM on Windows 153

Procedures for CD/DVD-ROMs
154 EMC Smarts Installation Guide for SAM, IP, ESM, MPLS, VoIP, and NPM Managers

APPENDIX DUsing the MPLS server_config Utility
This appendix pertains to the MPLS Manager. It provides an overview of the split topology architecture, an overview of the server_config utility used to rename domain groups and domains, and instructions on how to run the script.
◆ Use the server_config.pl script to change domain names ...................................... 156
Using the MPLS server_config Utility 155
Using the MPLS server_config Utility
Use the server_config.pl script to change domain names
Purpose
When installed and unless the default domain name is changed during installation, MPLS Manager is configured with the default domain group name of INCHARGE-MPLS.
From this default domain group name, the three MPLS Manager server names are constructed by appending the function specific suffix to the default domain group name:
◆ INCHARGE-MPLS-TOPOLOGY
◆ INCHARGE-MPLS-MONITORING
◆ INCHARGE-MPLS-ANALYSIS
TOPOLOGY, MONITORING, and ANALYSIS are always appended to the Domain Group name to generate the three MPLS Manager domain managers.
A script (server_config.pl) is provided to make it easier to define server names, to update names, and populate the domain names changes to the default configurations files. Once updated, these new domain names are used by the TOPOLOGY, MONITORING and ANALYSIS servers.
Run the script
After the different servers have been installed with the default domain manager's names, you can use the server_config script to customize the domain managers’ names.
The MPLS Manager post installation script uses the sm_perl command from either the MPLS BASEDIR/smarts/bin directory or from the location where the server_config.pl post installation script is located.
From the Perl /bin directoryInvoke the post installation script from the directory where the MPLS Manager post installation script is located.
sm_perl server_config.pl -o <OldGroupName> -n <NewGroupName> -b <BASEDIR>
From the MPLS installation directoryInvoke the post installation script from the directory where Perl is installed.
./sm_perl <BASEDIR>/smarts/script/mpls-tma/server_config.pl -o <OldGroupName> -n<NewGroupName> -b <BASEDIR>
Invoke the command line script server_config.pl options from the BASEDIR/smarts/bin/ directory as follows:
◆ Install services with default name if they have not been installed previously (see Example ).
server_config.pl -i -o <OldGroupName> -n<NewGroupName> -b<BASEDIR>
◆ Rename services that have been installed previously (see Example ).
156 EMC Smarts Installation Guide for SAM, IP, ESM, MPLS, VoIP, and NPM Managers
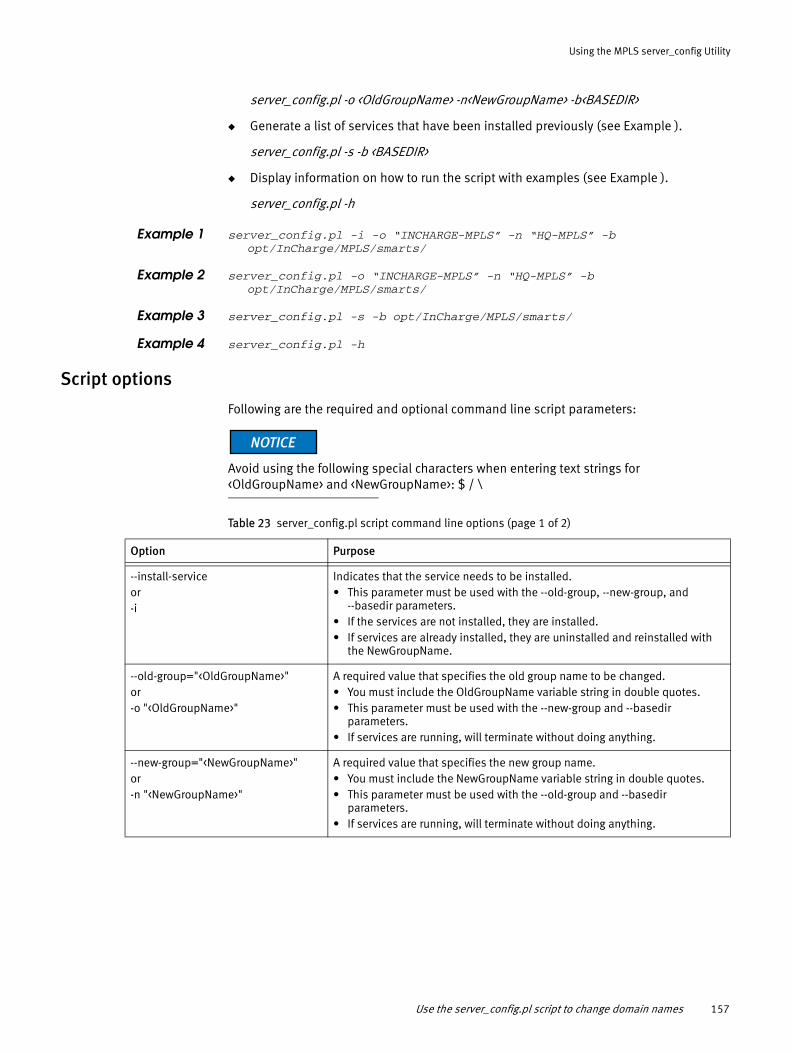
Using the MPLS server_config Utility
server_config.pl -o <OldGroupName> -n<NewGroupName> -b<BASEDIR>
◆ Generate a list of services that have been installed previously (see Example ).
server_config.pl -s -b <BASEDIR>
◆ Display information on how to run the script with examples (see Example ).
server_config.pl -h
Example 1 server_config.pl -i -o “INCHARGE-MPLS” -n “HQ-MPLS” -b opt/InCharge/MPLS/smarts/
Example 2 server_config.pl -o “INCHARGE-MPLS” -n “HQ-MPLS” -b opt/InCharge/MPLS/smarts/
Example 3 server_config.pl -s -b opt/InCharge/MPLS/smarts/
Example 4 server_config.pl -h
Script options
Following are the required and optional command line script parameters:
Avoid using the following special characters when entering text strings for <OldGroupName> and <NewGroupName>: $ / \
Table 23 server_config.pl script command line options (page 1 of 2)
Option Purpose
--install-serviceor-i
Indicates that the service needs to be installed. • This parameter must be used with the --old-group, --new-group, and
--basedir parameters.• If the services are not installed, they are installed.• If services are already installed, they are uninstalled and reinstalled with
the NewGroupName.
--old-group="<OldGroupName>" or-o "<OldGroupName>"
A required value that specifies the old group name to be changed. • You must include the OldGroupName variable string in double quotes.• This parameter must be used with the --new-group and --basedir
parameters.• If services are running, will terminate without doing anything.
--new-group="<NewGroupName>" or -n "<NewGroupName>"
A required value that specifies the new group name.• You must include the NewGroupName variable string in double quotes.• This parameter must be used with the --old-group and --basedir
parameters.• If services are running, will terminate without doing anything.
Use the server_config.pl script to change domain names 157

Using the MPLS server_config Utility
The order of the parameters is not important.
Always include the BASEDIR of the installed services in the command line. The only instances where you do not have to include it is when using the Help (-h) option.
Following are the steps that the script performs once invoked:
1. If the local directory BASEDIR/smarts/local/conf/mpls-tma does not already exist, it is created and a copy of the original mpls-tma.conf file from the BASEDIR/smarts/conf/mpls-tma directory is copied to it.
2. If a service corresponding to the <OldGroupName> is installed, the following process is initiated:
a. If the service is running and the user command line argument is not -s or --show, the script displays an error message and exits. You must stop the services before you can rename them.
b. If the service is not running and the Service Daemon is running, then the script uninstalls the service for the current <OldGroupName>, installs the service for the <NewGroupName>, then continues to step 4.
c. If the service is not running and the Service Daemon is not running, then the script displays a warning that there is potential for mismatch, uninstalls the service for the current <OldGroupName>, installs the service for the <NewGroupName>, then continues to step 4.
3. If a service corresponding to the <OldGroupName> is not installed, the following process is initiated:
a. If the installation option (--i or -install-service) is not specified, the scripts does not install the service.
--basedir=<BASEDIR> or -b <BASEDIR>
A required value which specifies the installation base directory. • This parameter must be used with the --old-group and --new-group
parameters.• If services are running, will terminate without doing anything.
--show or -s
Indicates that you want to see the current group names, services and Domain Manager names. • With this option, no changes are made to either the service or the
configuration file. • This parameter must be used with the --basedir parameter.
--help or -h
--help or -h shows command line parameters and examples.This parameter is used alone.
Table 23 server_config.pl script command line options (page 2 of 2)
Option Purpose
158 EMC Smarts Installation Guide for SAM, IP, ESM, MPLS, VoIP, and NPM Managers

Using the MPLS server_config Utility
b. If the installation option (--i or -install-service) is specified and if the Service Daemon is running, the script installs the service corresponding to the <NewGroupName>.
c. If the installation option (--i or -install-service) is specified and if the Service Daemon is not running, the script warns you that you must start it and exits without further action.
4. After step 2 or step 3 are performed, the script copies the previous local configuration file to a backup file named .<OldGroupName><.bak>
5. The script then replaces the <OldGroupName> with <NewGroupName> in BASEDIR/smarts/local/conf/mpls-tma/mpls-tma.conf and terminates.
Use the server_config.pl script to change domain names 159

Using the MPLS server_config Utility
160 EMC Smarts Installation Guide for SAM, IP, ESM, MPLS, VoIP, and NPM Managers

APPENDIX EConfiguration Scanner tool Sample Output
This appendix provides sample output for the Configuration Scanner tool. It consists of the following topics:
◆ Files created by Configuration Scanner tool ........................................................... 162◆ Sample outputs .................................................................................................... 162
Configuration Scanner tool Sample Output 161

Configuration Scanner tool Sample Output
Files created by Configuration Scanner toolThe following files are created by the tool:
◆ sm_configscan_report-<time_stamp>.txt: This is the report file created by the Configuration Scanner tool. This file contains:
• List of files installed by the TTP, if any
• List of files introduced by the user
• Modifications made to the discovery.conf, tpmgr-param.conf and name-resolver.conf files
• List of file differences for each modified file
• List of modifications found in the server
“Report when server is specified” on page 163 and “Report when server is not specified” on page 168 provides sample outputs.
◆ sm_configscan-<time_stamp>.tar: This tar file contains the following:
• A copy of the Configuration Scanner report file
• sm_configscanner.log
• A copy of runcmd_env.sh
• ConfigScanAdapter.log
• PnTallOutput.txt: lists all the settings found on the server
• A directory containing the DIFF files for each modified files
The output files for the configuration scanner tool is available under the<BASEDIR>/smarts/local/logs/Final_sm_getinfo<timesatamp>.tar file.
Sample outputsThis section provides sample outputs for the following:
◆ “Running Configuration Scanner tool with server name” on page 162
◆ “Report when server is specified” on page 163
◆ “Running Configuration Scanner tool without server name” on page 168
◆ “Report when server is not specified” on page 168
Running Configuration Scanner tool with server name
You can run the tool by specifying a running server in the command line. In this scenario, the tool scans for changes you have made in the values of both the polling and threshold settings and configuration files. A sample output is provided:
C:\InCharge\IP\smarts\bin>sm_perl sm_getinfo -s INCHARGE-AMPM -kExecuting sm_configscan ...===============================================================sm_moni
tor about to run!Please enter the correct credentials in clientConnect.confOr be prepared to enter the credentials below:
162 EMC Smarts Installation Guide for SAM, IP, ESM, MPLS, VoIP, and NPM Managers

Configuration Scanner tool Sample Output
===============================================================Getting hardware Info...
Getting AMPM show-dm-process info...MAIN-N-Closing this log file at August 28, 2012 4:02:24 AM EDT;
continuing inC:\InCharge\IP\smarts\local\logs\AMPM-show-dm-proc-28Aug2012-040223_en
_US_UTF-8.logGetting AMPM stacktrace info...Exiting eval via last at C:/InCharge/IP/smarts/bin//sm_monitor.pl line
180.Getting AMPM queues info...Getting AMPM subscriptions info...Getting AMPM threads info...Getting AMPM flows info...Getting AMPM clients info...Getting netstat info...Getting tasklist info...Getting log file...Getting rps files...Getting Monitor...Getting Accessor Ping...Getting Accessor Poll...Getting Problems...Getting instrumentation for IP...MAIN-N-Closing this log file at August 28, 2012 4:05:13 AM EDT;
continuing inC:\InCharge\IP\smarts\local\logs\AMPM-instrumentation-28Aug2012-040223
_en_US_UTF-8.logDeleting files:
C:\InCharge\IP\smarts\local\logs\smgetinfo_files\*smgetinfo-versions.log*
Getting the Smarts server version ...Getting the Executable versions ...Getting the Local lib versions ...Getting the lib versions ...Getting the list of installed TTPs ...No TTPs currently installedNo patches currently installed.Archiving the files...Writing to sm_getinfo28Aug2012-040132.tar.zip ...... Done writing to Final_sm_getinfo28Aug2012-040132.tar.zipPlease send the file:
C:\InCharge\IP\smarts\local\logs\Final_sm_getinfo28Aug2012-040132.tar.zip to EMC Support
Report when server is specified
The following is the sample of the report when the tool is run specifying a running server in the command line:
Version: IP.9.1.0.0These files have been modified in the installation:===================================================C:/InCharge/IP/smarts/local/conf/discovery/discovery.confC:/InCharge/IP/smarts/local/conf/discovery/name-resolver.confC:/InCharge/IP/smarts/local/conf/discovery/oid2type_Cisco.confC:/InCharge/IP/smarts/local/conf/discovery/oid2type_Misc.confC:/InCharge/IP/smarts/local/conf/discovery/tpmgr-param.confThese files have been introduced in the installation: =====================================================C:/InCharge/IP/smarts/local/repos/icf/INCHARGE-AMPM.rpsC:/InCharge/IP/smarts/local/repos/icf/INCHARGE-AMPM.rps.bakServer Name: INCHARGE-AMPMThe following Polling and Threshold settings were modified in the
installation:
Sample outputs 163
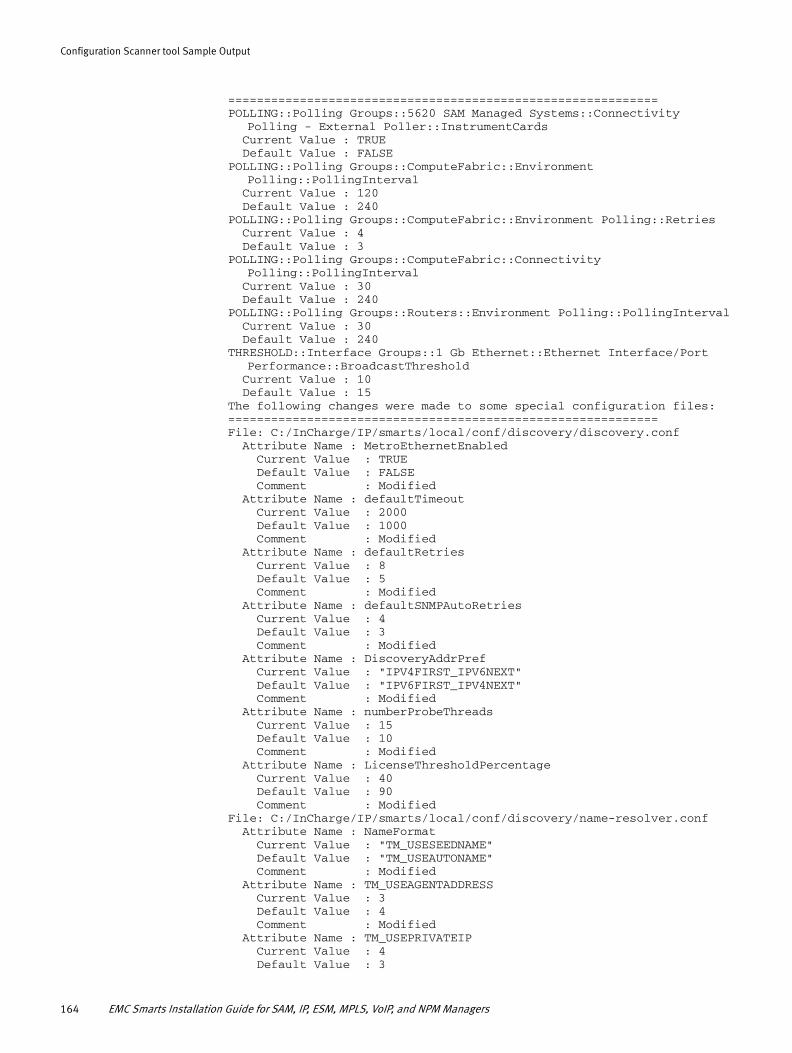
Configuration Scanner tool Sample Output
============================================================POLLING::Polling Groups::5620 SAM Managed Systems::Connectivity
Polling - External Poller::InstrumentCards Current Value : TRUE Default Value : FALSEPOLLING::Polling Groups::ComputeFabric::Environment
Polling::PollingInterval Current Value : 120 Default Value : 240POLLING::Polling Groups::ComputeFabric::Environment Polling::Retries Current Value : 4 Default Value : 3POLLING::Polling Groups::ComputeFabric::Connectivity
Polling::PollingInterval Current Value : 30 Default Value : 240POLLING::Polling Groups::Routers::Environment Polling::PollingInterval Current Value : 30 Default Value : 240THRESHOLD::Interface Groups::1 Gb Ethernet::Ethernet Interface/Port
Performance::BroadcastThreshold Current Value : 10 Default Value : 15The following changes were made to some special configuration files: ============================================================File: C:/InCharge/IP/smarts/local/conf/discovery/discovery.conf Attribute Name : MetroEthernetEnabled Current Value : TRUE Default Value : FALSE Comment : Modified Attribute Name : defaultTimeout Current Value : 2000 Default Value : 1000 Comment : Modified Attribute Name : defaultRetries Current Value : 8 Default Value : 5 Comment : Modified Attribute Name : defaultSNMPAutoRetries Current Value : 4 Default Value : 3 Comment : Modified Attribute Name : DiscoveryAddrPref Current Value : "IPV4FIRST_IPV6NEXT" Default Value : "IPV6FIRST_IPV4NEXT" Comment : Modified Attribute Name : numberProbeThreads Current Value : 15 Default Value : 10 Comment : Modified Attribute Name : LicenseThresholdPercentage Current Value : 40 Default Value : 90 Comment : ModifiedFile: C:/InCharge/IP/smarts/local/conf/discovery/name-resolver.conf Attribute Name : NameFormat Current Value : "TM_USESEEDNAME" Default Value : "TM_USEAUTONAME" Comment : Modified Attribute Name : TM_USEAGENTADDRESS Current Value : 3 Default Value : 4 Comment : Modified Attribute Name : TM_USEPRIVATEIP Current Value : 4 Default Value : 3
164 EMC Smarts Installation Guide for SAM, IP, ESM, MPLS, VoIP, and NPM Managers

Configuration Scanner tool Sample Output
Comment : ModifiedFile: C:/InCharge/IP/smarts/local/conf/discovery/tpmgr-param.conf Attribute Name : maxOIDsPerPacketForASNMP Current Value : 15 Default Value : 19 Comment : Modified Attribute Name : GetBulkPattern-.1.3.6.1.4.1.1872.1.15 Current Value : TRUE Default Value : Comment : Newly added Attribute Name : GetBulkRetriesOverrideRatio-.1.3.6.1.4.1.1872.1.15 Current Value : 1.5 Default Value : Comment : Newly added Attribute Name : GetBulkTimeoutOverrideRatio-.1.3.6.1.4.1.1872.1.15 Current Value : 2.5 Default Value : Comment : Newly added Attribute Name : IFTypePatternIFExt.1.3.6.1.4.1.119.1.3.13.4 Current Value : Default Value : 39|53|1 Comment : Removed Attribute Name : IFTypePattern-SwitchPort.1.3.6.1.4.1.119.1.14.8 Current Value : Default Value : 37 Comment : RemovedThe following are two way text differences:===========================================<--- C:/InCharge/IP/smarts/conf/discovery/discovery.conf ---><============== Start Difference ==============>>>>>>>>>>>>>>> Base File Contents >>>>>>>>>>>>>> >>>>>>>>>>>>>> From line: 54 to 54 >>>>>>>>>>>>>>defaultRetries = 5 <<<<<<<<<<<<<< Local File Contents <<<<<<<<<<<<<< <<<<<<<<<<<<<< From line: 54 to 54 <<<<<<<<<<<<<<defaultRetries = 8 <=============== End Difference ===============><============== Start Difference ==============>>>>>>>>>>>>>>> Base File Contents >>>>>>>>>>>>>> >>>>>>>>>>>>>> From line: 61 to 61 >>>>>>>>>>>>>>defaultTimeout = 1000<<<<<<<<<<<<<< Local File Contents <<<<<<<<<<<<<< <<<<<<<<<<<<<< From line: 61 to 61 <<<<<<<<<<<<<<defaultTimeout = 2000<=============== End Difference ===============><============== Start Difference ==============>>>>>>>>>>>>>>> Base File Contents >>>>>>>>>>>>>> >>>>>>>>>>>>>> From line: 82 to 82 >>>>>>>>>>>>>>defaultSNMPAutoRetries = 3 <<<<<<<<<<<<<< Local File Contents <<<<<<<<<<<<<< <<<<<<<<<<<<<< From line: 82 to 82 <<<<<<<<<<<<<<defaultSNMPAutoRetries = 4 <=============== End Difference ===============><============== Start Difference ==============>>>>>>>>>>>>>>> Base File Contents >>>>>>>>>>>>>> >>>>>>>>>>>>>> From line: 97 to 97 >>>>>>>>>>>>>>numberProbeThreads = 10<<<<<<<<<<<<<< Local File Contents <<<<<<<<<<<<<< <<<<<<<<<<<<<< From line: 97 to 97 <<<<<<<<<<<<<<numberProbeThreads = 15<=============== End Difference ===============><============== Start Difference ==============>>>>>>>>>>>>>>> Base File Contents >>>>>>>>>>>>>> >>>>>>>>>>>>>> From line: 280 to 280 >>>>>>>>>>>>>>DiscoveryAddrPref = "IPV6FIRST_IPV4NEXT"<<<<<<<<<<<<<< Local File Contents <<<<<<<<<<<<<<
Sample outputs 165

Configuration Scanner tool Sample Output
<<<<<<<<<<<<<< From line: 280 to 280 <<<<<<<<<<<<<<DiscoveryAddrPref = "IPV4FIRST_IPV6NEXT"<=============== End Difference ===============><============== Start Difference ==============>>>>>>>>>>>>>>> Base File Contents >>>>>>>>>>>>>> >>>>>>>>>>>>>> From line: 287 to 287 >>>>>>>>>>>>>>MetroEthernetEnabled = FALSE<<<<<<<<<<<<<< Local File Contents <<<<<<<<<<<<<< <<<<<<<<<<<<<< From line: 287 to 287 <<<<<<<<<<<<<<MetroEthernetEnabled = TRUE<=============== End Difference ===============><============== Start Difference ==============>>>>>>>>>>>>>>> Base File Contents >>>>>>>>>>>>>> >>>>>>>>>>>>>> From line: 290 to 290 >>>>>>>>>>>>>>LicenseThresholdPercentage = 90 <<<<<<<<<<<<<< Local File Contents <<<<<<<<<<<<<< <<<<<<<<<<<<<< From line: 290 to 290 <<<<<<<<<<<<<<LicenseThresholdPercentage = 40 <=============== End Difference ===============><-----------------------------------------------><--- C:/InCharge/IP/smarts/conf/discovery/name-resolver.conf ---><============== Start Difference ==============>>>>>>>>>>>>>>> Base File Contents >>>>>>>>>>>>>> >>>>>>>>>>>>>> From line: 19 to 18 >>>>>>>>>>>>>>#NameFormat = "TM_USESEEDNAME"NameFormat = "TM_USEAUTONAME"<<<<<<<<<<<<<< Local File Contents <<<<<<<<<<<<<< <<<<<<<<<<<<<< From line: 18 to 19 <<<<<<<<<<<<<<NameFormat = "TM_USESEEDNAME"#NameFormat = "TM_USEAUTONAME"<=============== End Difference ===============><============== Start Difference ==============>>>>>>>>>>>>>>> Base File Contents >>>>>>>>>>>>>> >>>>>>>>>>>>>> From line: 30 to 29 >>>>>>>>>>>>>>AutoNameOrder 3 TM_USEPRIVATEIPAutoNameOrder 4 TM_USEAGENTADDRESS<<<<<<<<<<<<<< Local File Contents <<<<<<<<<<<<<< <<<<<<<<<<<<<< From line: 29 to 30 <<<<<<<<<<<<<<AutoNameOrder 3 TM_USEAGENTADDRESSAutoNameOrder 4 TM_USEPRIVATEIP<=============== End Difference ===============><-----------------------------------------------><--C:/InCharge/IP/smarts/conf/discovery/oid2type_Cisco.conf -><============== Start Difference ==============>>>>>>>>>>>>>>> Base File Contents >>>>>>>>>>>>>> >>>>>>>>>>>>>> From line: 12369 to 12370 >>>>>>>>>>>>>><<<<<<<<<<<<<< Local File Contents <<<<<<<<<<<<<< <<<<<<<<<<<<<< From line: 12370 to 12384 <<<<<<<<<<<<<<.1.3.6.1.4.1.9.1.916 {TYPE = FirewallVENDOR = CiscoMODEL = ciscoASA5580scCERTIFICATION = CERTIFIEDCONT = Cisco-EntityHEALTH = Cisco-EntityINSTRUMENTATION:CPU/Memory = CiscoRouter:DeviceIDInterface-Fault = MIB2Interface-Performance = MIB2}<=============== End Difference ===============><-----------------------------------------------><--C:/InCharge/IP/smarts/conf/discovery/oid2type_Misc.conf --><============== Start Difference ==============>>>>>>>>>>>>>>> Base File Contents >>>>>>>>>>>>>> >>>>>>>>>>>>>> From line: 8816 to 8806 >>>>>>>>>>>>>>
166 EMC Smarts Installation Guide for SAM, IP, ESM, MPLS, VoIP, and NPM Managers

Configuration Scanner tool Sample Output
.1.3.6.1.4.1.10734.1.3.8 {TYPE = FirewallVENDOR = TippingPointMODEL = TippingPointIPSCERTIFICATION = CERTIFIEDCONT = MIB2-IfStackINSTRUMENTATION:Interface-Fault = MIB2Interface-Performance = MIB2}<<<<<<<<<<<<<< Local File Contents <<<<<<<<<<<<<< <<<<<<<<<<<<<< From line: 8806 to 8816 <<<<<<<<<<<<<<#.1.3.6.1.4.1.10734.1.3.8 {# TYPE = Firewall# VENDOR = TippingPoint# MODEL = TippingPointIPS# CERTIFICATION = CERTIFIED# CONT = MIB2-IfStack##INSTRUMENTATION:# Interface-Fault = MIB2# Interface-Performance = MIB2#}<=============== End Difference ===============><-----------------------------------------------><--C:/InCharge/IP/smarts/conf/discovery/tpmgr-param.conf ---><============== Start Difference ==============>>>>>>>>>>>>>>> Base File Contents >>>>>>>>>>>>>> >>>>>>>>>>>>>> From line: 40 to 40 >>>>>>>>>>>>>>IFTypePatternIFExt.1.3.6.1.4.1.119.1.3.13.4 39|53|1<<<<<<<<<<<<<< Local File Contents <<<<<<<<<<<<<< <<<<<<<<<<<<<< From line: 40 to 40 <<<<<<<<<<<<<<#IFTypePatternIFExt.1.3.6.1.4.1.119.1.3.13.4 39|53|1<=============== End Difference ===============><============== Start Difference ==============>>>>>>>>>>>>>>> Base File Contents >>>>>>>>>>>>>> >>>>>>>>>>>>>> From line: 125 to 125 >>>>>>>>>>>>>>IFTypePattern-SwitchPort.1.3.6.1.4.1.119.1.14.8 37<<<<<<<<<<<<<< Local File Contents <<<<<<<<<<<<<< <<<<<<<<<<<<<< From line: 125 to 125 <<<<<<<<<<<<<<#IFTypePattern-SwitchPort.1.3.6.1.4.1.119.1.14.8 37<=============== End Difference ===============><============== Start Difference ==============>>>>>>>>>>>>>>> Base File Contents >>>>>>>>>>>>>> >>>>>>>>>>>>>> From line: 554 to 554 >>>>>>>>>>>>>>#GetBulkPattern-.1.3.6.1.4.1.1872.1.15 TRUE<<<<<<<<<<<<<< Local File Contents <<<<<<<<<<<<<< <<<<<<<<<<<<<< From line: 554 to 554 <<<<<<<<<<<<<<GetBulkPattern-.1.3.6.1.4.1.1872.1.15 TRUE<=============== End Difference ===============><============== Start Difference ==============>>>>>>>>>>>>>>> Base File Contents >>>>>>>>>>>>>> >>>>>>>>>>>>>> From line: 565 to 565 >>>>>>>>>>>>>>#GetBulkTimeoutOverrideRatio-.1.3.6.1.4.1.1872.1.15 2.5<<<<<<<<<<<<<< Local File Contents <<<<<<<<<<<<<< <<<<<<<<<<<<<< From line: 565 to 565 <<<<<<<<<<<<<<GetBulkTimeoutOverrideRatio-.1.3.6.1.4.1.1872.1.15 2.5<=============== End Difference ===============><============== Start Difference ==============>>>>>>>>>>>>>>> Base File Contents >>>>>>>>>>>>>> >>>>>>>>>>>>>> From line: 576 to 576 >>>>>>>>>>>>>>#GetBulkRetriesOverrideRatio-.1.3.6.1.4.1.1872.1.15 1.5<<<<<<<<<<<<<< Local File Contents <<<<<<<<<<<<<< <<<<<<<<<<<<<< From line: 576 to 576 <<<<<<<<<<<<<<GetBulkRetriesOverrideRatio-.1.3.6.1.4.1.1872.1.15 1.5<=============== End Difference ===============>
Sample outputs 167

Configuration Scanner tool Sample Output
<============== Start Difference ==============>>>>>>>>>>>>>>> Base File Contents >>>>>>>>>>>>>> >>>>>>>>>>>>>> From line: 582 to 582 >>>>>>>>>>>>>>maxOIDsPerPacketForASNMP 19<<<<<<<<<<<<<< Local File Contents <<<<<<<<<<<<<< <<<<<<<<<<<<<< From line: 582 to 582 <<<<<<<<<<<<<<maxOIDsPerPacketForASNMP 15<=============== End Difference ===============><----------------------------------------------->
Running Configuration Scanner tool without server name
You can run the tool without specifying a running server in the command line. In this scenario, the tool only scans for changes you made to the configuration files. A sample output is provided:
C:\InCharge\IP\smarts\bin>sm_perl sm_getinfo -kExecuting sm_configscan ...Deleting files:
C:\InCharge\IP\smarts\local\logs\smgetinfo_files\*smgetinfo-versions.log*
Getting the Smarts server version ...Getting the Executable versions ...Getting the Local lib versions ...Getting the lib versions ...Getting the list of installed TTPs ...No TTPs currently installedNo patches currently installed.Archiving the files...Writing to sm_getinfo28Aug2012-044639.tar.zip ...... Done writing to Final_sm_getinfo28Aug2012-044639.tar.zipPlease send the file:
C:\InCharge\IP\smarts\local\logs\Final_sm_getinfo28Aug2012-044639.tar.zip to EMC Support
Report when server is not specified
The following is the sample of the report when the tool is run without specifying a running server in the command line:
Version: IP.9.1.0.0These files have been modified in the installation: ===================================================C:/InCharge/IP/smarts/local/conf/discovery/discovery.confC:/InCharge/IP/smarts/local/conf/discovery/name-resolver.confC:/InCharge/IP/smarts/local/conf/discovery/oid2type_Cisco.confC:/InCharge/IP/smarts/local/conf/discovery/oid2type_Misc.confC:/InCharge/IP/smarts/local/conf/discovery/tpmgr-param.confThese files have been introduced in the installation: =====================================================C:/InCharge/IP/smarts/local/repos/icf/INCHARGE-AMPM.rpsC:/InCharge/IP/smarts/local/repos/icf/INCHARGE-AMPM.rps.bakThe following changes were made to some special configuration files: ===============================================================File: C:/InCharge/IP/smarts/local/conf/discovery/discovery.conf Attribute Name : MetroEthernetEnabled Current Value : TRUE Default Value : FALSE Comment : Modified Attribute Name : defaultTimeout Current Value : 2000 Default Value : 1000 Comment : Modified Attribute Name : defaultRetries
168 EMC Smarts Installation Guide for SAM, IP, ESM, MPLS, VoIP, and NPM Managers

Configuration Scanner tool Sample Output
Current Value : 8 Default Value : 5 Comment : Modified Attribute Name : defaultSNMPAutoRetries Current Value : 4 Default Value : 3 Comment : Modified Attribute Name : DiscoveryAddrPref Current Value : "IPV4FIRST_IPV6NEXT" Default Value : "IPV6FIRST_IPV4NEXT" Comment : Modified Attribute Name : numberProbeThreads Current Value : 15 Default Value : 10 Comment : Modified Attribute Name : LicenseThresholdPercentage Current Value : 40 Default Value : 90 Comment : ModifiedFile: C:/InCharge/IP/smarts/local/conf/discovery/name-resolver.conf Attribute Name : NameFormat Current Value : "TM_USESEEDNAME" Default Value : "TM_USEAUTONAME" Comment : Modified Attribute Name : TM_USEAGENTADDRESS Current Value : 3 Default Value : 4 Comment : Modified Attribute Name : TM_USEPRIVATEIP Current Value : 4 Default Value : 3 Comment : Modified
File: C:/InCharge/IP/smarts/local/conf/discovery/tpmgr-param.conf Attribute Name : maxOIDsPerPacketForASNMP Current Value : 15 Default Value : 19 Comment : Modified Attribute Name : GetBulkPattern-.1.3.6.1.4.1.1872.1.15 Current Value : TRUE Default Value : Comment : Newly added Attribute Name : GetBulkRetriesOverrideRatio-.1.3.6.1.4.1.1872.1.15 Current Value : 1.5 Default Value : Comment : Newly added Attribute Name : GetBulkTimeoutOverrideRatio-.1.3.6.1.4.1.1872.1.15 Current Value : 2.5 Default Value : Comment : Newly added Attribute Name : IFTypePatternIFExt.1.3.6.1.4.1.119.1.3.13.4 Current Value : Default Value : 39|53|1 Comment : Removed Attribute Name : IFTypePattern-SwitchPort.1.3.6.1.4.1.119.1.14.8 Current Value : Default Value : 37 Comment : RemovedThe following are two way text differences:===========================================<--- C:/InCharge/IP/smarts/conf/discovery/discovery.conf ---><============== Start Difference ==============>>>>>>>>>>>>>>> Base File Contents >>>>>>>>>>>>>> >>>>>>>>>>>>>> From line: 54 to 54 >>>>>>>>>>>>>>defaultRetries = 5 <<<<<<<<<<<<<< Local File Contents <<<<<<<<<<<<<<
Sample outputs 169

Configuration Scanner tool Sample Output
<<<<<<<<<<<<<< From line: 54 to 54 <<<<<<<<<<<<<<defaultRetries = 8 <=============== End Difference ===============><============== Start Difference ==============>>>>>>>>>>>>>>> Base File Contents >>>>>>>>>>>>>> >>>>>>>>>>>>>> From line: 61 to 61 >>>>>>>>>>>>>>defaultTimeout = 1000<<<<<<<<<<<<<< Local File Contents <<<<<<<<<<<<<< <<<<<<<<<<<<<< From line: 61 to 61 <<<<<<<<<<<<<<defaultTimeout = 2000<=============== End Difference ===============><============== Start Difference ==============>>>>>>>>>>>>>>> Base File Contents >>>>>>>>>>>>>> >>>>>>>>>>>>>> From line: 82 to 82 >>>>>>>>>>>>>>defaultSNMPAutoRetries = 3 <<<<<<<<<<<<<< Local File Contents <<<<<<<<<<<<<< <<<<<<<<<<<<<< From line: 82 to 82 <<<<<<<<<<<<<<defaultSNMPAutoRetries = 4 <=============== End Difference ===============><============== Start Difference ==============>>>>>>>>>>>>>>> Base File Contents >>>>>>>>>>>>>> >>>>>>>>>>>>>> From line: 97 to 97 >>>>>>>>>>>>>>numberProbeThreads = 10<<<<<<<<<<<<<< Local File Contents <<<<<<<<<<<<<< <<<<<<<<<<<<<< From line: 97 to 97 <<<<<<<<<<<<<<numberProbeThreads = 15<=============== End Difference ===============><============== Start Difference ==============>>>>>>>>>>>>>>> Base File Contents >>>>>>>>>>>>>> >>>>>>>>>>>>>> From line: 280 to 280 >>>>>>>>>>>>>>DiscoveryAddrPref = "IPV6FIRST_IPV4NEXT"<<<<<<<<<<<<<< Local File Contents <<<<<<<<<<<<<< <<<<<<<<<<<<<< From line: 280 to 280 <<<<<<<<<<<<<<DiscoveryAddrPref = "IPV4FIRST_IPV6NEXT"<=============== End Difference ===============><============== Start Difference ==============>>>>>>>>>>>>>>> Base File Contents >>>>>>>>>>>>>> >>>>>>>>>>>>>> From line: 287 to 287 >>>>>>>>>>>>>>MetroEthernetEnabled = FALSE<<<<<<<<<<<<<< Local File Contents <<<<<<<<<<<<<< <<<<<<<<<<<<<< From line: 287 to 287 <<<<<<<<<<<<<<MetroEthernetEnabled = TRUE<=============== End Difference ===============><============== Start Difference ==============>>>>>>>>>>>>>>> Base File Contents >>>>>>>>>>>>>> >>>>>>>>>>>>>> From line: 290 to 290 >>>>>>>>>>>>>>LicenseThresholdPercentage = 90 <<<<<<<<<<<<<< Local File Contents <<<<<<<<<<<<<< <<<<<<<<<<<<<< From line: 290 to 290 <<<<<<<<<<<<<<LicenseThresholdPercentage = 40 <=============== End Difference ===============><-----------------------------------------------><--C:/InCharge/IP/smarts/conf/discovery/name-resolver.conf --><============== Start Difference ==============>>>>>>>>>>>>>>> Base File Contents >>>>>>>>>>>>>> >>>>>>>>>>>>>> From line: 19 to 18 >>>>>>>>>>>>>>#NameFormat = "TM_USESEEDNAME"NameFormat = "TM_USEAUTONAME"<<<<<<<<<<<<<< Local File Contents <<<<<<<<<<<<<< <<<<<<<<<<<<<< From line: 18 to 19 <<<<<<<<<<<<<<NameFormat = "TM_USESEEDNAME"#NameFormat = "TM_USEAUTONAME"<=============== End Difference ===============><============== Start Difference ==============>>>>>>>>>>>>>>> Base File Contents >>>>>>>>>>>>>> >>>>>>>>>>>>>> From line: 30 to 29 >>>>>>>>>>>>>>
170 EMC Smarts Installation Guide for SAM, IP, ESM, MPLS, VoIP, and NPM Managers

Configuration Scanner tool Sample Output
AutoNameOrder 3 TM_USEPRIVATEIPAutoNameOrder 4 TM_USEAGENTADDRESS<<<<<<<<<<<<<< Local File Contents <<<<<<<<<<<<<< <<<<<<<<<<<<<< From line: 29 to 30 <<<<<<<<<<<<<<AutoNameOrder 3 TM_USEAGENTADDRESSAutoNameOrder 4 TM_USEPRIVATEIP<=============== End Difference ===============><----------------------------------------------->
<--C:/InCharge/IP/smarts/conf/discovery/oid2type_Cisco.conf--><============== Start Difference ==============>>>>>>>>>>>>>>> Base File Contents >>>>>>>>>>>>>> >>>>>>>>>>>>>> From line: 12369 to 12370 >>>>>>>>>>>>>><<<<<<<<<<<<<< Local File Contents <<<<<<<<<<<<<< <<<<<<<<<<<<<< From line: 12370 to 12384 <<<<<<<<<<<<<<
.1.3.6.1.4.1.9.1.916 {TYPE = FirewallVENDOR = CiscoMODEL = ciscoASA5580scCERTIFICATION = CERTIFIEDCONT = Cisco-EntityHEALTH = Cisco-Entity
INSTRUMENTATION:CPU/Memory = CiscoRouter:DeviceIDInterface-Fault = MIB2Interface-Performance = MIB2}<=============== End Difference ===============><-----------------------------------------------><--C:/InCharge/IP/smarts/conf/discovery/oid2type_Misc.conf --><============== Start Difference ==============>>>>>>>>>>>>>>> Base File Contents >>>>>>>>>>>>>> >>>>>>>>>>>>>> From line: 8816 to 8806 >>>>>>>>>>>>>>.1.3.6.1.4.1.10734.1.3.8 {TYPE = FirewallVENDOR = TippingPointMODEL = TippingPointIPSCERTIFICATION = CERTIFIEDCONT = MIB2-IfStack
INSTRUMENTATION:Interface-Fault = MIB2Interface-Performance = MIB2}<<<<<<<<<<<<<< Local File Contents <<<<<<<<<<<<<< <<<<<<<<<<<<<< From line: 8806 to 8816 <<<<<<<<<<<<<<#.1.3.6.1.4.1.10734.1.3.8 {# TYPE = Firewall# VENDOR = TippingPoint# MODEL = TippingPointIPS# CERTIFICATION = CERTIFIED# CONT = MIB2-IfStack##INSTRUMENTATION:# Interface-Fault = MIB2# Interface-Performance = MIB2#}<=============== End Difference ===============><----------------------------------------------->
<--C:/InCharge/IP/smarts/conf/discovery/tpmgr-param.conf ---><============== Start Difference ==============>>>>>>>>>>>>>>> Base File Contents >>>>>>>>>>>>>> >>>>>>>>>>>>>> From line: 40 to 40 >>>>>>>>>>>>>>
Sample outputs 171

Configuration Scanner tool Sample Output
IFTypePatternIFExt.1.3.6.1.4.1.119.1.3.13.4 39|53|1<<<<<<<<<<<<<< Local File Contents <<<<<<<<<<<<<< <<<<<<<<<<<<<< From line: 40 to 40 <<<<<<<<<<<<<<#IFTypePatternIFExt.1.3.6.1.4.1.119.1.3.13.4 39|53|1<=============== End Difference ===============><============== Start Difference ==============>>>>>>>>>>>>>>> Base File Contents >>>>>>>>>>>>>> >>>>>>>>>>>>>> From line: 125 to 125 >>>>>>>>>>>>>>IFTypePattern-SwitchPort.1.3.6.1.4.1.119.1.14.8 37<<<<<<<<<<<<<< Local File Contents <<<<<<<<<<<<<< <<<<<<<<<<<<<< From line: 125 to 125 <<<<<<<<<<<<<<#IFTypePattern-SwitchPort.1.3.6.1.4.1.119.1.14.8 37<=============== End Difference ===============><============== Start Difference ==============>>>>>>>>>>>>>>> Base File Contents >>>>>>>>>>>>>> >>>>>>>>>>>>>> From line: 554 to 554 >>>>>>>>>>>>>>#GetBulkPattern-.1.3.6.1.4.1.1872.1.15 TRUE<<<<<<<<<<<<<< Local File Contents <<<<<<<<<<<<<< <<<<<<<<<<<<<< From line: 554 to 554 <<<<<<<<<<<<<<GetBulkPattern-.1.3.6.1.4.1.1872.1.15 TRUE<=============== End Difference ===============><============== Start Difference ==============>>>>>>>>>>>>>>> Base File Contents >>>>>>>>>>>>>> >>>>>>>>>>>>>> From line: 565 to 565 >>>>>>>>>>>>>>#GetBulkTimeoutOverrideRatio-.1.3.6.1.4.1.1872.1.15 2.5<<<<<<<<<<<<<< Local File Contents <<<<<<<<<<<<<< <<<<<<<<<<<<<< From line: 565 to 565 <<<<<<<<<<<<<<GetBulkTimeoutOverrideRatio-.1.3.6.1.4.1.1872.1.15 2.5<=============== End Difference ===============><============== Start Difference ==============>>>>>>>>>>>>>>> Base File Contents >>>>>>>>>>>>>> >>>>>>>>>>>>>> From line: 576 to 576 >>>>>>>>>>>>>>#GetBulkRetriesOverrideRatio-.1.3.6.1.4.1.1872.1.15 1.5<<<<<<<<<<<<<< Local File Contents <<<<<<<<<<<<<< <<<<<<<<<<<<<< From line: 576 to 576 <<<<<<<<<<<<<<GetBulkRetriesOverrideRatio-.1.3.6.1.4.1.1872.1.15 1.5<=============== End Difference ===============><============== Start Difference ==============>>>>>>>>>>>>>>> Base File Contents >>>>>>>>>>>>>> >>>>>>>>>>>>>> From line: 582 to 582 >>>>>>>>>>>>>>maxOIDsPerPacketForASNMP 19<<<<<<<<<<<<<< Local File Contents <<<<<<<<<<<<<< <<<<<<<<<<<<<< From line: 582 to 582 <<<<<<<<<<<<<<maxOIDsPerPacketForASNMP 15<=============== End Difference ===============><----------------------------------------------->
172 EMC Smarts Installation Guide for SAM, IP, ESM, MPLS, VoIP, and NPM Managers