employee self-service (ess) – operation manual · pdf fileprepared by: andrew...
TRANSCRIPT

Prepared by:
Andrew Christensen
Human Resources
Status: Live Version: 6.1 Date: 17/11/2016
Employee Self-Service (ESS) – Operation Manual
Human Resources

CRICOS Provider No. 00103D Page i of 68
Table of Contents
Table of Contents ..................................................................................................................... 1
Logging into ESS ...................................................................................................................... 1
Changing Personal Details on ESS .......................................................................................... 3
Viewing Payslips & Payment Summaries ................................................................................. 7
Viewing Employment History .................................................................................................. 12
Changing Payment Instructions on ESS (Changing Bank Payment Details) .......................... 13
Leave Bookings ...................................................................................................................... 19
Uploading Attachments to a Leave Request - Sick Leave Example ....................................... 29
Submitting Timesheets – (Gippsland Casual and Sessional Employees only) ....................... 40
Manager Self-Service – (MSS) Operation Manual ................................................................. 47
Accessing MSS, Searching for Staff using Filters & Accessing Individual Staff Info .............. 48
Absence Chart ........................................................................................................................ 55
Displaying Leave Balances for Selected Staff ........................................................................ 57
Processing Staff Leave Requests ........................................................................................... 59
Processing Timesheet Requests – (Supervisor / Manager Approval) .................................... 64
CRICOS Provider No. 00103D Page 1 of 68
Logging into ESS
1. Open Internet Explorer
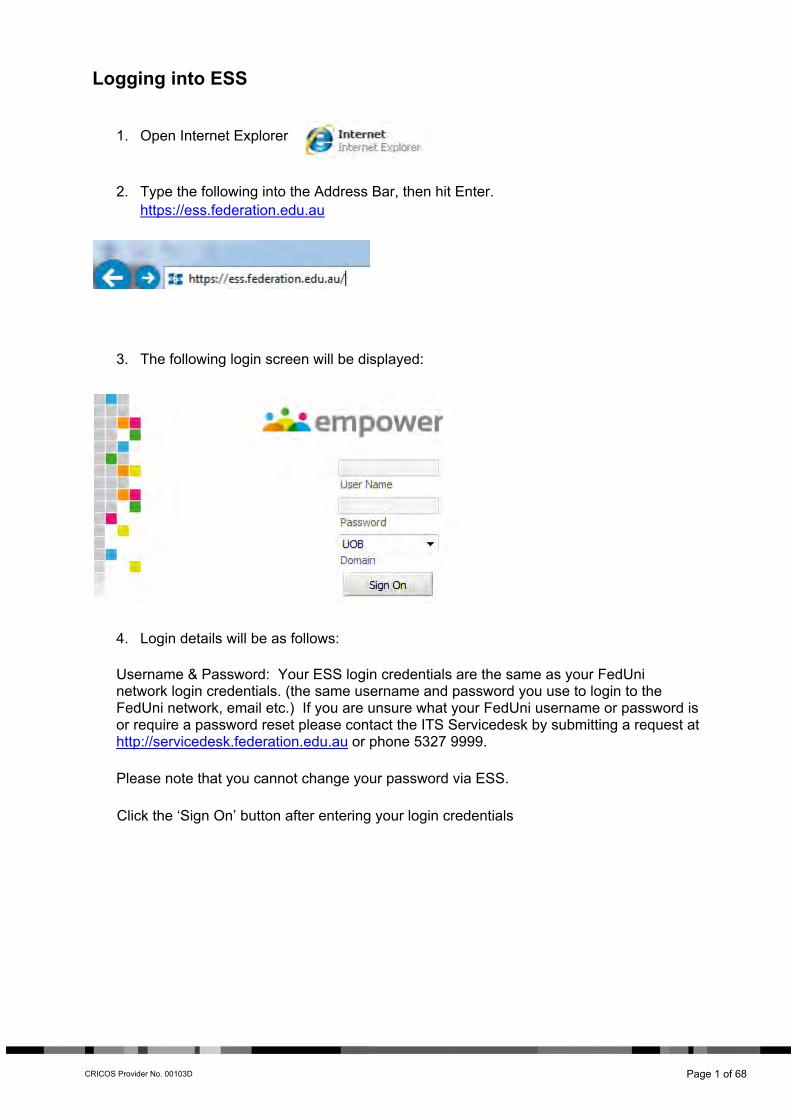
2. Type the following into the Address Bar, then hit Enter. https://ess.federation.edu.au
3. The following login screen will be displayed:
4. Login details will be as follows:
Username & Password: Your ESS login credentials are the same as your FedUni network login credentials. (the same username and password you use to login to the FedUni network, email etc.) If you are unsure what your FedUni username or password is or require a password reset please contact the ITS Servicedesk by submitting a request at http://servicedesk.federation.edu.au or phone 5327 9999.
Please note that you cannot change your password via ESS.
Click the ‘Sign On’ button after entering your login credentials

CRICOS Provider No. 00103D Page 2 of 68
5. If logon was successful the following screen will be displayed.

CRICOS Provider No. 00103D Page 3 of 68
Changing Personal Details on ESS
1. Click on the ‘Employee’ Tab as seen below:
2. Now click on the ‘Personal Details’ button

CRICOS Provider No. 00103D Page 4 of 68
3. Now you will see a row of new tabs which will allow you to make any necessary changes to your personal details then update them on the system. Available tabs are ‘General’ , ‘Addresses’, ‘Contact’, Emergency etc.
For example, by clicking on the ‘Addresses’ tab, you will be able to change your Private and Postal Address details.
- When you have amended any data, you must click on the ‘Update’ button to save the changes.

CRICOS Provider No. 00103D Page 5 of 68
You are able to change your contact details by clicking on the ‘Contact’ tab. After amending the data in the fields provided, click on the ‘Update’ button. It is important to have the Business email field populated with your Staff email address to ensure email notifications can be sent to you when requesting leave via ESS. Please also ensure all above phone/mobile details are correct as the University may need to contact you in the event of a disaster occurring. (For example, a code red ‘catastrophic’ fire day announcement).

CRICOS Provider No. 00103D Page 6 of 68
The ‘Emergency’ tab allows you to enter emergency contacts or ‘next of kin’ details in the ESS system. It is very important that these fields are kept up-to-date in the event of an injury or other emergency while at work. ESS allows up to 2 Emergency contacts to be entered.

CRICOS Provider No. 00103D Page 7 of 68
Viewing Payslips & Payment Summaries
ESS allows the user to easily access their Payslips and Payment Summaries. Not only can you access your current payslip, you can also access older payslips from previous pay days. 1. To access your payslip, click on the ‘Employee’ Tab as seen below:
2. Now you can access payslips in two ways. You can simply click on the ‘View Payslip’ button OR Click on the ‘Pay’ button then click on the ‘Payslip’ button which appears underneath.
CRICOS Provider No. 00103D Page 8 of 68
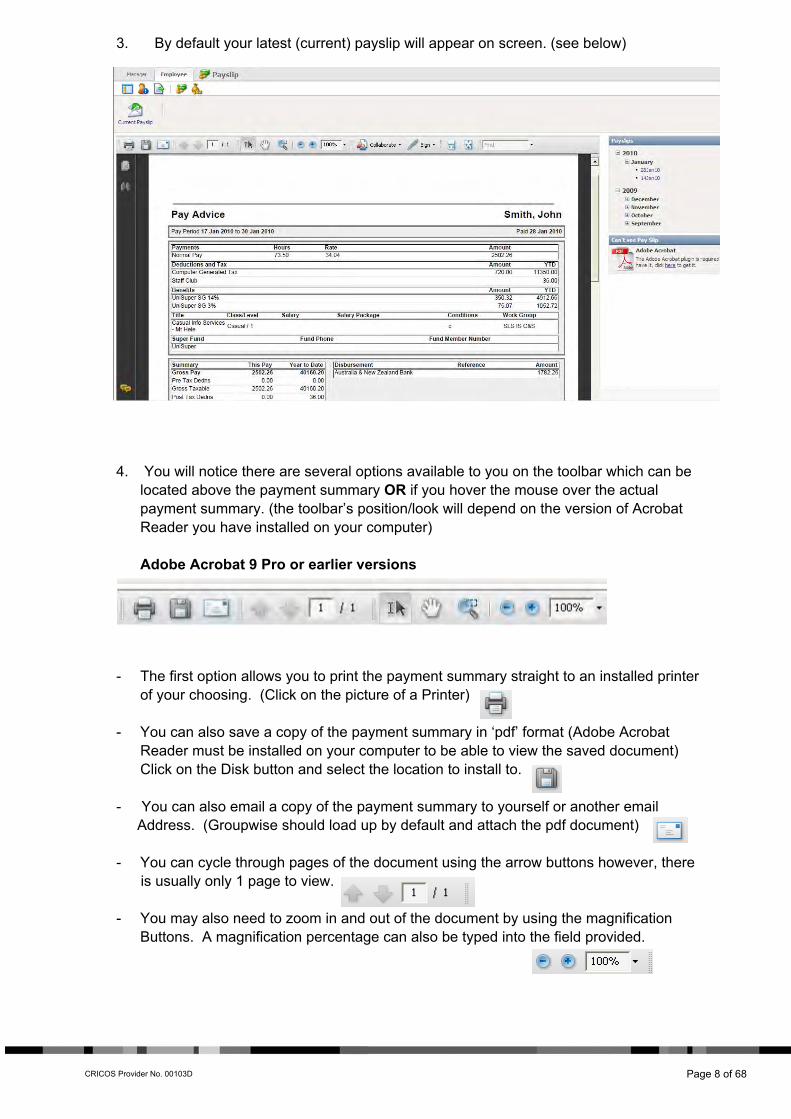
3. By default your latest (current) payslip will appear on screen. (see below)
4. You will notice there are several options available to you on the toolbar which can be located above the payment summary OR if you hover the mouse over the actual payment summary. (the toolbar’s position/look will depend on the version of Acrobat Reader you have installed on your computer) Adobe Acrobat 9 Pro or earlier versions
- The first option allows you to print the payment summary straight to an installed printer of your choosing. (Click on the picture of a Printer)
- You can also save a copy of the payment summary in ‘pdf’ format (Adobe Acrobat
Reader must be installed on your computer to be able to view the saved document) Click on the Disk button and select the location to install to.
- You can also email a copy of the payment summary to yourself or another email
Address. (Groupwise should load up by default and attach the pdf document)
- You can cycle through pages of the document using the arrow buttons however, there is usually only 1 page to view.
- You may also need to zoom in and out of the document by using the magnification
Buttons. A magnification percentage can also be typed into the field provided.

CRICOS Provider No. 00103D Page 9 of 68
Adobe Acrobat X Pro / Acrobat Reader DC If you have either of these versions of Adobe Acrobat installed you will need to hover the mouse cursor over the bottom of the payslip for the toolbar to appear. (it may not automatically appear until you do this)
From left to right of the toolbar, you have the ability to save a copy of the payment summary in pdf format, print the payment summary, cycle through the other pages (if any), and zoom in and out of the document using the – and + buttons.
5. The following appears to the right of the payslip window. This is where you can view past payslips by clicking on the Year, Month and Pay Date.
If you do not see a payslip appearing at all on screen it may be because you don’t have The Adobe Acrobat browser plugin installed. If necessary, click on the link provided to install it.

CRICOS Provider No. 00103D Page 10 of 68
Similar to accessing Payslips, staff can also access Payment Summaries via ESS. 6. To access Payment Summaries click on the ‘Employee’ Tab as seen below:
7. Now click on the ‘Pay’ button then click on the ‘Payment Summary’ button which appears underneath.
CRICOS Provider No. 00103D Page 11 of 68
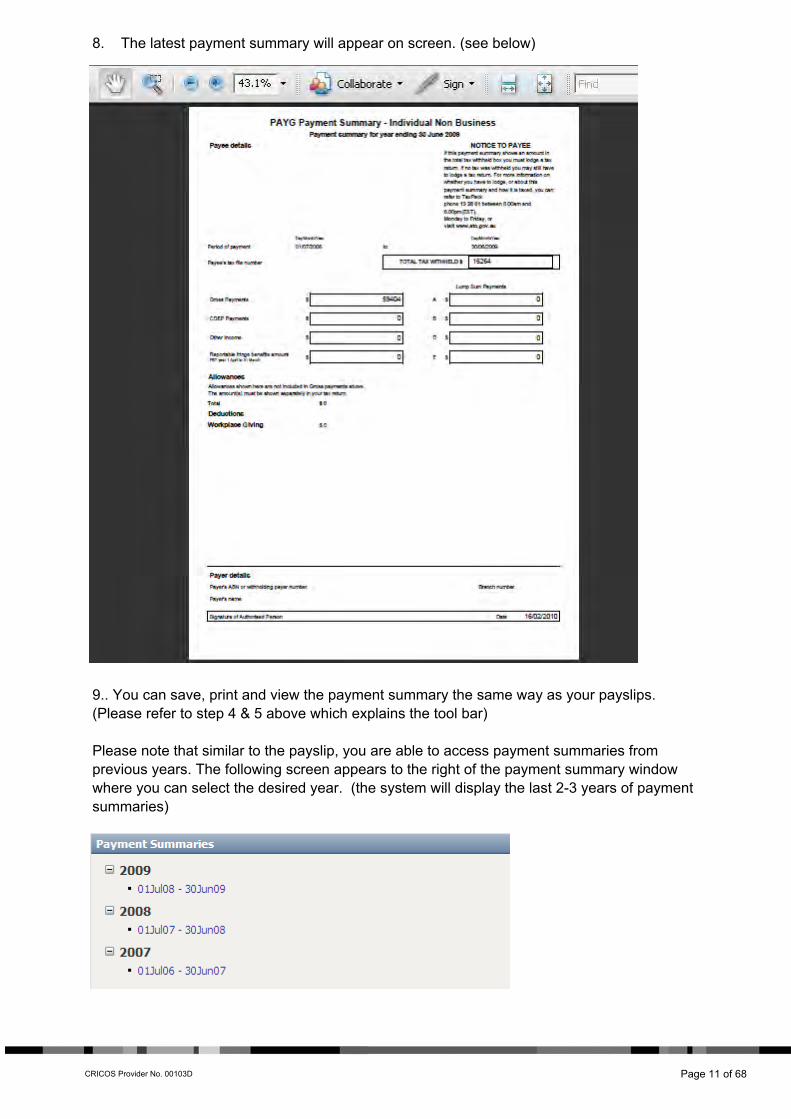
8. The latest payment summary will appear on screen. (see below) 9.. You can save, print and view the payment summary the same way as your payslips. (Please refer to step 4 & 5 above which explains the tool bar) Please note that similar to the payslip, you are able to access payment summaries from previous years. The following screen appears to the right of the payment summary window where you can select the desired year. (the system will display the last 2-3 years of payment summaries)

CRICOS Provider No. 00103D Page 12 of 68
Viewing Employment History
1. ESS is also very useful for displaying Employment history for staff within the University. To access your employment history at Fed Uni click on the Employee tab, click on the Employment button, then select ‘Employee History’
2. The following screen will appear which displays all positions held within Fed Uni, including salary classifications, pay increases, pay rates, increment changes, reasons for changes and start & end dates. This information is split into two sections ‘Salary History’ and ‘Position History’. This data cannot be changed by the user.

CRICOS Provider No. 00103D Page 13 of 68
Changing Payment Instructions on ESS (Changing Bank Payment Details)
1. ESS users also have the ability to change their banking details. To do this click on the Employee tab.
2. Now hover the mouse cursor over the New Request button, then click on the ‘Payment’ button.
3. The following screen will appear, listing your current payment instructions.

CRICOS Provider No. 00103D Page 14 of 68
4. Click on the ‘Change Instructions’ button to amend or add new payment instructions. (ESS allows you to add more than 1 payment instruction. For example, your pay can be distributed to more than 1 bank account) 5. You will be presented with the following screen. Please note that by default the ‘Not
Submitted’ and the ‘Current Instructions’ are the same payment instruction. The ‘Not Submitted’ instruction appears so you are able to Change your payment details without having to delete all details then start all over again.
6. To change/amend your current payment instruction please click on the ‘Change’ button located on the ‘Not Submitted’ record.

CRICOS Provider No. 00103D Page 15 of 68
7. The following screen will appear. Please ensure all details are correct and that every field has been entered. Once completed, click on the ‘Update’ button.
8. Now a message ‘Successfully updated instruction details’ will appear on screen and you will also notice that for the ‘Not Submitted’ record, your new payment instruction will be visible. Please note that your new payment instruction still has not changed on the system. There is two more steps you will need to complete before the changes you made will come into effect.

CRICOS Provider No. 00103D Page 16 of 68
9. You must now click on the ‘Submit Request’ button. 10. Now by clicking on the ‘Send To’ button on the screen below, the new bank details
will be sent to Payroll for approval. Once the Payroll team approve/confirm the new payment instructions you submitted, the new details will come into effect and an email will be sent to you once processed on the system.
11. You will notice that the ‘Not Submitted’ record will now read as a ‘Pending Request’ until the new payment instructions are approved by payroll.

CRICOS Provider No. 00103D Page 17 of 68
12. If you no longer want the pending request to be approved or processed you can click on the ‘Delete Request’ button. (assuming payroll haven’t already approved the requested payment instruction)
13. Click on the ‘Confirm’ button to confirm that you want to delete the request you made. Note that you can also type in a comment on the ‘Comments’ field explaining why you no longer want the changes to go ahead. (This is optional)
14. Another feature you may find useful is the ability to add more payment instructions and specify how much of your wage goes into a specific bank account. To do this please do the following:
Click on the ‘New Instruction’ button

CRICOS Provider No. 00103D Page 18 of 68
15. The following details are required including the amount you would like to be distributed from your pay into the specified account. After you have completed entering your details, click on the ‘Save’ button.
16. Now click on the ‘Submit Request’ button.
17. Now by clicking on the ‘Send To’ button on the screen below, the new bank instructions will be sent to Payroll for approval. Once the Payroll team approve/confirm the new payment instructions you submitted, the new details will come into effect and an email will be sent to you once processed on the system.

CRICOS Provider No. 00103D Page 19 of 68
Leave Bookings One of the major components built into ESS is the ability to book leave and access leave balances. Staff are able to make leave bookings for Sick Leave, Annual Leave, Compassionate Leave, Paternity Leave, Personal Leave, Special Leave (TAFE Teachers) and Fed Uni Business/Travel. Please note that for all other types of leave (Leave without Pay, Maternity Leave, Work Cover Leave and Long Service Leave) are all unavailable in Self-Service. Please continue using the existing paper-based forms for these types of leave.
In the example below an Annual Leave booking will be demonstrated. Please note that all types of leave are booked in the same way apart from selecting the different ‘type’ of leave from the dropdown menu. Booking Annual Leave Example 1. To make an Annual Leave booking click on the ‘Employee’ tab.
2. Now click on either the larger ‘Leave Details’ button or click on the ‘Leave’ button followed by the smaller ‘Leave Details’ button

CRICOS Provider No. 00103D Page 20 of 68
3. The following screen will appear displaying the current leave balances/entitlements, any current leave bookings you have, and any bookings still awaiting approval.
You will also notice a window displaying all of your leave history which you are able to filter by using the check-boxes. For example, you may only want to display all Sick Leave you have taken.

CRICOS Provider No. 00103D Page 21 of 68
4. In the above example, the employee has sufficient Annual Leave (118.31 hrs) to make a booking. They would be able to book a maximum of 16 days Annual Leave (provided their supervisor approves it) Therefore they are able to book leave by clicking on the ‘New Request’ button.
5. The following screen will be displayed.

CRICOS Provider No. 00103D Page 22 of 68
6. The user must first select their appropriate position. (They may have more than 1 position within the University. ie. A Casual position and also a full-time continuing position. As Casuals are not entitled to annual leave, the full-time continuing position needs to be selected. Click on the Position drop-down menu and select the appropriate position.
7. Now select the desired leave type you are making a booking for. (in this case, Annual Leave). Click on the ‘Leave Type’ dropdown menu arrow, then select from list.
Again, please note that for all other types of leave (Leave without Pay, Maternity Leave, Paternity Leave, Work Cover Leave and Long Service Leave) are all unavailable in Self-Service. Please continue using the existing paper-based forms for these types of leave.

CRICOS Provider No. 00103D Page 23 of 68
8. Now you must select the date(s) you would like to make a booking for. To do this click on the picture of the calendar icon to the right of the Start Date & End Date fields, then select the day on the calendar that appears. (This must be done for both the start date and end date fields)
For this example, the employee wants to make a booking for the 25th and 26th February. Therefore, they would select ‘25’ on the calendar for the Start Date, then select ‘26’ on the calendar for the End Date. You will notice that the ‘Calculated Amnt’ field is automatically populated. In this case, 14.7 hrs total the employee has booked. This is a full-time general staff member working 7.35 hrs a day. (2 X 7.35 = 14.7 Hrs)
9. The ‘Actual Amount’ field must also be populated by the user. This is to confirm that the Calculated Amount is correct. Please enter the same value as the Calculated Amount.
10.The ‘Explanation’ field is an optional field for staff that wish to give more detail to why they are booking the leave.
11. After you have completed filling out the leave request form click on the ‘Save’ button

CRICOS Provider No. 00103D Page 24 of 68
12. The next step in the leave booking process is for you to send the leave request to your Supervisor / Manager for approval. Please select the Supervisor / Manager you directly report to from the drop-down menu. If your supervisor is away you can send it to another supervisor/manager within your department who has the authority to approve your leave request. You may also want to add a small comment in the ‘Comments’ field if you need your supervisor to know something further about the request. Now click on the ‘Send To’ button. An email will be sent to your Supervisor / Manager explaining to them that you have a leave request for them to action.
13. If another screen appears after you have clicked on the ‘Send To’ button it will be asking you if you would like to book any further leave for any other positions you may hold. (which position you are using the leave up for). In the below example, the employee held a Casual position also, therefore the ‘Not Required’ button should be clicked. In most cases, the ‘Not Required’ button can be selected.

CRICOS Provider No. 00103D Page 25 of 68
14. Now you will notice the leave you just requested will appear under the ‘Pending Requests’ heading. If you have made an error in your leave request, you can delete it by clicking on the red and white ‘cross’ button or you can amend the existing request by clicking on the ‘Change’ button.
15. You will need to click on the ‘Confirm’ button if you want to delete your leave request.

CRICOS Provider No. 00103D Page 26 of 68
16. When you amend/change a current leave request the following screen appears. After you make the changes, you must click on the ‘Update’ button.
17. Please note that if you have made a change to your leave request, you will need to send it again to the Supervisor / Manager for approval. Again, click on your
supervisor on the drop-down list to send the request/email to then click on the ‘Send To’ button.

CRICOS Provider No. 00103D Page 27 of 68
18. Now if you go back to the Home Page in ESS (click on the ’Employee’ tab), you will
notice a new window appearing to the right of screen which confirms that you have a pending leave request and also specifies the type of leave you requested, the dates you have requested and also the progress of your request. Users may find the progress update very useful where it will tell them who the request is currently with. Ie. The request will either be with your supervisor/manager for approval or it will be at the second stage of the request process, which is with payroll for approval.
If you click on the blue ‘Leave Request’ link, you will be brought back to the main ‘Leave Details’ screen.
19. Once your supervisor / manager has approved your leave, you will receive an email which is sent to your University (Business email) Outlook email address. The email will look like the example below:
This means that your supervisor is ok for the leave booking to go ahead and it has now been forwarded to Payroll for final approval. If required, you can click on the link included on the email and it will direct you to the ESS login screen.

CRICOS Provider No. 00103D Page 28 of 68
20. Finally, when Payroll check over your leave request, they will approve it and the booking will be officially added to the system. Another message will be sent to your University email address confirming that your leave has been approved.
21. In ESS on the leave details screen, the leave booking will now appear under the ‘Current Bookings’ heading (assuming it is for a future booking). There is no further action required and your leave request is complete.

CRICOS Provider No. 00103D Page 29 of 68
Uploading Attachments to a Leave Request - Sick Leave Example
Self-Service users now have the ability to attach documents to a new leave request on the system. This is particularly useful for sick leave bookings where the user can now attach a scanned, electronic copy of the medical certificate to a leave booking. This means that the employee submitting the leave booking, the Manager approving the booking and the Payroll team finalising the booking will all be able to view the attached Medical Certificate. This will now speed up the approval process as the Payroll team will not need to wait for a hard copy or emailed copy of the medical certificate to be forwarded to them before making the final approval. (The payroll team must sight the Medical Certificate before actioning the request and the employee submitting the request still must specify that they have a medical certificate.)
1. To make a Sick Leave booking click on the ‘Employee’ tab.
2. Now click on either the larger ‘Leave Details’ button or click on the ‘Leave’ button followed by the smaller ‘Leave Details’ button

CRICOS Provider No. 00103D Page 30 of 68
3. The following screen will appear displaying the current leave balances/entitlements, any current leave bookings you have, and any bookings still awaiting approval.
4. Click on the ‘New Request’ button.
5. Now select Sick Leave from the ‘Leave Type’ dropdown menu.

CRICOS Provider No. 00103D Page 31 of 68
6. Once Sick Leave is selected, a warning message will appear explaining that you must select a certificate type before submitting the request. Click the OK button.
7. Now you must select the date(s) you would like to make a booking for. To do this click on the picture of the calendar icon to the right of the Start Date & End Date fields, then select the day on the calendar that appears. (This must be done for both the start date and end date fields)

CRICOS Provider No. 00103D Page 32 of 68
8. For this example, the employee wants to make a sick leave booking for a single day,
4th June. Therefore, they would select ‘4’ on the calendar for the Start Date, and also select ‘4’ on the calendar for the End Date. 9. You will notice that the ‘Calculated Amnt’ field is automatically populated. In this case, 7.35 hrs total the employee has booked. This is a full-time general staff member working 7.35 hrs a day. (1 X 7.35 = 7.35 Hrs) 10. It is very important that the Certificate type is selected as this identifies whether the approvers need to look for an attachment for this specific request. For this example the user has selected ‘Medical Certificate’ as the Certificate type. 11. The ‘Actual Amount’ field must also be populated by the user. This is to confirm that the Calculated Amount is correct. Please enter the same value as the Calculated Amount. 12. The ‘Explanation’ field is an optional field for staff that wish to give more detail to why they are booking the leave.

CRICOS Provider No. 00103D Page 33 of 68
13. Now the user has entered all of the details for the sick leave request, all they must do now is attach a copy of the medical certificate. To add an attachment click on the blue paperclip button with the heading ‘Attachments’. 14. The following screen will now appear. To attach the medical certificate click on the ‘Browse’ button to navigate through your drives, files and folders.
15. Select the appropriate file for upload by double clicking on it or by selecting the file and clicking the ‘Open’ button.

CRICOS Provider No. 00103D Page 34 of 68
16 After selecting the file for upload you must also type in a ‘Title’ and ‘Description’ for the attachment. This should be something meaningful so that you will be able to find and review the file at a later time. 17 Now click on the ‘Confirm’ button which will attach the file to your leave booking.

CRICOS Provider No. 00103D Page 35 of 68
18. If you want to double check that the file is attached to the booking you can now click on the Attachments button again and you will see the attachment along with the title and description you entered. Further to this you are also able to attach additional files if required by clicking on the ‘Browse’ button again. 19 After the booking details have been completed and the file is attached click on the ‘Save’ button.

CRICOS Provider No. 00103D Page 36 of 68
20. The final step in the leave booking process is for you to send the leave request to your Supervisor / Manager for approval. Please select the Supervisor / Manager you directly report to from the drop-down menu. If your supervisor is away you can send it to another supervisor/manager within your department who has the authority to approve your leave request. You may also want to add a small comment in the ‘Comments’ field if you need your supervisor to know something further about the request. Now click on the ‘Send To’ button. An email will be sent to your Supervisor / Manager explaining to them that you have a leave request for them to action.

CRICOS Provider No. 00103D Page 37 of 68
Retrieving files previously attached to Leave Bookings
1. You may notice that there is a ‘Files’ button which appears on the Home page of self-service. This allows users to retrieve files that they may have attached to a leave booking in the past.
2. Users have the ability to open all historical attachments by simply clicking on the File name(s) listed on the following screen. (The file name is highlighted in blue text)

CRICOS Provider No. 00103D Page 38 of 68
Viewing Leave Balances for Future Dates 1. If you are wanting to know what your leave balance will be at a specific date, you can
do so by clicking on the Employee Tab, Selecting the ‘Leave’ button, then by selecting the ‘Leave Balance’ button.
2. The following screen will display

CRICOS Provider No. 00103D Page 39 of 68
3. For the system to calculate future leave entitlements you can click on the calendar
icon to the right of the ‘Balance Date’ field and specify a date. After you have selected the date, click on the ‘Calculate’ button. (you can also choose whether to include LSL balances by using the ‘Include LSL’ check-box)
4. The Leave balances will be shown as at the specified date you selected. Eg. 30 June 2010

CRICOS Provider No. 00103D Page 40 of 68
Submitting Timesheets – (Gippsland Casual and Sessional Employees only) Gippsland Casual and Sessional employees will need to submit Timesheets using the Employee Self-Service system. This is a two step approval workflow process, which works the same way as leave bookings on the system. The user fills out an electronic form (timesheet), submits it to their Supervisor and the Supervisor then checks and approves the timesheet. The timesheet then goes to Payroll for final approval. The timesheet is given ‘awaiting payment’ status and is paid to the employee in-line with Federation University’s fortnightly pay cycle.
1. To submit a Timesheet click on the ‘Employee’ tab.
2. Hover the mouse cursor over the ‘New Request’ button then click on the ‘Timesheets’ button.

CRICOS Provider No. 00103D Page 41 of 68
3. The following screen will appear which displays any timesheets awaiting payment (already approved by the Supervisor and Payroll), any pending timesheet requests sitting with the Supervisor or Payroll (awaiting approval) and also displays the history of timesheet submissions. To submit a new timesheet, click on the ‘New Request’ button.
4. The user is now presented with a form where they will need to enter all of the relevant timesheet information.
CRICOS Provider No. 00103D Page 42 of 68
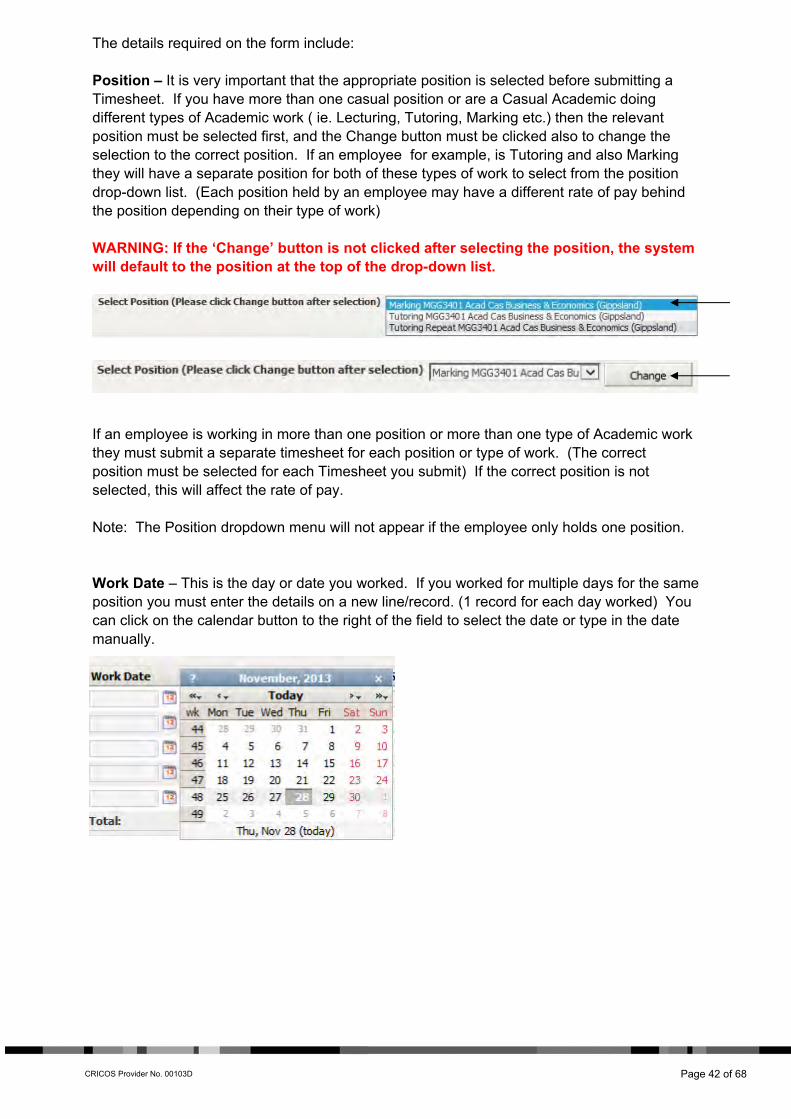
The details required on the form include: Position – It is very important that the appropriate position is selected before submitting a Timesheet. If you have more than one casual position or are a Casual Academic doing different types of Academic work ( ie. Lecturing, Tutoring, Marking etc.) then the relevant position must be selected first, and the Change button must be clicked also to change the selection to the correct position. If an employee for example, is Tutoring and also Marking they will have a separate position for both of these types of work to select from the position drop-down list. (Each position held by an employee may have a different rate of pay behind the position depending on their type of work) WARNING: If the ‘Change’ button is not clicked after selecting the position, the system will default to the position at the top of the drop-down list. If an employee is working in more than one position or more than one type of Academic work they must submit a separate timesheet for each position or type of work. (The correct position must be selected for each Timesheet you submit) If the correct position is not selected, this will affect the rate of pay. Note: The Position dropdown menu will not appear if the employee only holds one position. Work Date – This is the day or date you worked. If you worked for multiple days for the same position you must enter the details on a new line/record. (1 record for each day worked) You can click on the calendar button to the right of the field to select the date or type in the date manually.

CRICOS Provider No. 00103D Page 43 of 68
Payment Type – Please enter the appropriate Payment Type by selecting it from the drop-down list. If you are a Casual Academic and hold a position which is Lecturing, you must select ‘Casual Academic Lecture’ from the drop-down list. For all other Academic work types you must select ‘Casual Academic Non Lecturing’. Ie. Tutoring & Marking. Shift – There is no selection possible for this field. (The system does not record ‘shifts’ so please ignore this field) Start Time – This is the time you started work for the day. The time must be entered in 24 hour time. For example, if you started work at 9:00am you must type 0900 into the field. If you started at 1:00pm you must type 1300 into the field. End Time – This is the time you finished work for the day. The time must be entered in 24 hour time. For example, if you finished work at 3:00pm you must type 1500 into the field. If you finished at 5:00pm you would type in 1700. NOTE: Professional Casual staff must work only between the stipulated span of hours ie. 8.00am to 6.00 pm and must not exceed 7.35 hours in any one day. Break – If a break was taken during the day you must also enter the duration of the break into this field. For example, if you took a lunch break for 30 minutes you would enter 0.5 into the field. (Must be entered in Hours/Decimal figure) NOTE: A meal break of at least 30 minutes must be taken after 5 hours of work.

CRICOS Provider No. 00103D Page 44 of 68
Hours – The ‘Hours’ field is calculated automatically and does not require any input by the user. It calculates the duration of work (hours worked) for the day then deducts the break duration. Contract Number – The Contract Number must also be entered onto the Timesheet submission. This can be found on the employee’s Casual contract. It is required so that the Manager and Payroll team actioning the request can verify that the timesheet is for a legitimate contract held by the casual employee. NOTE: You may notice that there is no ‘Amount’ field on the timesheet. This is because the amount is calculated behind the scenes and requires no user data input. (The hourly rate is attached to the employee’s position and is calculated automatically)
5. After you have completed filling out the timesheet you must then click on the ‘Save’ button. A blue message will appear confirming the save. After you have clicked on the Save button, you can now click on the ‘Close’ button (red button with the white cross) which will close this screen. PLEASE NOTE: The timesheet at this point has not been submitted to your Supervisor. Please continue to the next step.

CRICOS Provider No. 00103D Page 45 of 68
6. After saving the timesheet details and closing the previous screen you will be presented with the following screen again. You will notice that the timesheet you saved now appears in the ‘Saved – Not Submitted’ category on screen.
You now have two options available for your timesheet. You can click on the Change button if you need to make further changes to it or click on the Submit Request button to send the timesheet to your Supervisor for approval.
Change button Submit Request button You must make a separate timesheet submission for each individual work day as all days position you may have worked in. (you must click on the submit request butt button for each position you are submitting a Timesheet for)
7. After clicking on the ‘Submit Request’ button the following screen will appear. Click on the drop-down list and select the appropriate Supervisor who will be approving your Timesheet. NOTE: If you have more than one position which both need a timesheet submission, you may need to send them to different Supervisors for approval. After selection you must click on the ‘Send To’ button.

CRICOS Provider No. 00103D Page 46 of 68
8. When the timesheet has been submitted you will see another blue message appear. ‘Your Timesheet has been successfully submitted’
Another way to confirm your timesheet has gone through correctly is by looking at the ‘Pending Requests’ category. You will see in the example below that the timesheet falls under the ‘Pending Requests’ category and the Status has been set to ‘Submitted’ Once your Supervisor has approved the Timesheet, it will then be forwarded to Payroll for final approval, and payment will be made on the appropriate pay day.

Prepared by:
Andrew Christensen
Human Resources
Status: Live Version: 6.1 Date: 17/11/2016
Manager Self-Service – (MSS) Operation Manual The Manager Self-Service component is available to Managers/Supervisors which enables them to approve/reject leave requests for staff, view future leave bookings for individual staff members, access a ‘Leave Absence Chart’ which displays all staff that report to them and the days they will be on leave. Managers/Supervisors can also run leave balance enquiries for all team members.
Human Resources

CRICOS Provider No. 00103D Page 48 of 63
Accessing MSS, Searching for Staff using Filters & Accessing Individual Staff Info
1. Managers and Supervisors will notice they have an extra tab at the top of the screen called ‘Manager’. This is the MSS component of the Self-Service System. Simply click on this tab to view available options.
2. Now click on the larger ‘Staff Management’ Button OR the ‘Staff’ button under the ‘Applications’ heading, then the Staff Button underneath.

CRICOS Provider No. 00103D Page 49 of 68
3. The following screen will appear. This is where the Supervisor/Manager can select the desired team members for review.
You can select staff you would like to view information about by using the ‘Search Filter’ You can find a staff member by typing their name in the ‘Name’ field or select by ‘Position’ title or select Staff by Section or Location. After each search it is important to click on the ‘Reset Search’ button, otherwise there will be conflicting filters and you may find that not all staff members are selected. Searching Staff by Name For example, John Smith who is the Manager and logged into MSS wants to find out leave balances for just one of his staff members, James Parker. John can begin typing in ‘Parker’ into the ‘Name:’ field and James’ record will appear automatically.

CRICOS Provider No. 00103D Page 50 of 68
Searching Staff by Position If you would like to select staff members by their position title you can simply click on the desired position title from the ‘Position’ list. If you would like to select multiple staff by position title hold down the ‘Shift’ key on the keyboard then click once on the desired positions. Searching Staff by Section If the Manager/Supervisor has staff reporting to them from more than one section, they can select the Section of their choosing. (in this example there is only one section to choose from)
Hold down the Shift key to select & deselect Staff Positions

CRICOS Provider No. 00103D Page 51 of 68
Searching Staff by Location Staff can also be filtered by Campus Location. For example, Mt. Helen Campus. (in this example there is only one campus to choose from)
4. Once you have selected the desired staff, you can now lookup individual staff info,
employment details, employee history details, view leave details and leave booking attachments (Uploaded Files). To do this hover the mouse cursor over the folder icon with a blue exclamation mark which appears to the right of each employee record you selected earlier.
When you hover over the folder icon, a new menu appears where you can then select what information you would like to view:

CRICOS Provider No. 00103D Page 52 of 68
Staff Info The Staff Info Screen will display Personal Information for the employee such as Address, Phone No, Mobile No, Work Phone No., Work Email address and Emergency Contact Information. Employment The ‘Employment’ screen will display the current Employment information such as Commencement Dates, Pay information, Position No, Location, Cost Centre Code, ‘Reports To’ relationship and other useful information.

CRICOS Provider No. 00103D Page 53 of 68
History > Employee History Managers/Supervisor’s are able to view staff Salary & Position History on this screen. You can identify salary increments, position start and end dates, hourly rates, classifications and also classification levels.
CRICOS Provider No. 00103D Page 54 of 68
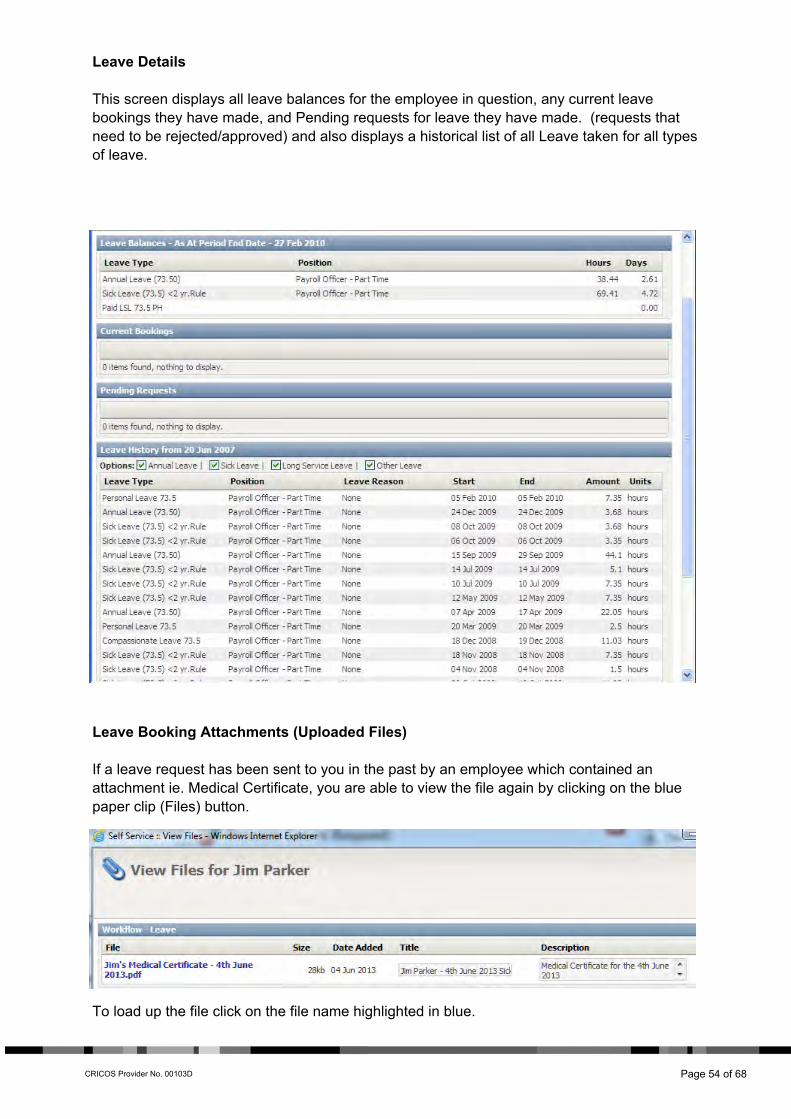
Leave Details This screen displays all leave balances for the employee in question, any current leave bookings they have made, and Pending requests for leave they have made. (requests that need to be rejected/approved) and also displays a historical list of all Leave taken for all types of leave. Leave Booking Attachments (Uploaded Files) If a leave request has been sent to you in the past by an employee which contained an attachment ie. Medical Certificate, you are able to view the file again by clicking on the blue paper clip (Files) button. To load up the file click on the file name highlighted in blue.

CRICOS Provider No. 00103D Page 55 of 68
Absence Chart
1. After selecting staff using the Search Filter (as discussed earlier) you can view
Pending/Current leave bookings. This information is displayed on a Gannt Chart which is very useful for finding out the availability of staff in busy work periods and the Chart has a colour coded Key which makes it easier to identify different types of leave. Click on the ‘Absence Chart’ button to display the Absence Chart.
2. The following screen will display. As you can see for the month of February there are several leave bookings. In this example, James booked an Annual Leave day, both Sarah and Cathy booked ‘Other’ types of leave and both James and Anne had some sick days.

CRICOS Provider No. 00103D Page 56 of 68
3. If you require further information regarding staff booked leave, you can hover the mouse cursor over the coloured boxes. In the example below, by hovering over the green box, a pop-up window appears explaining it is Annual Leave booked and specifies the Start and End Date for the Leave booked. You can filter the report to only display a particular type of leave by clicking on the checkboxes above the chart.
Please note that you can also use the scroll bar to view future month leave bookings.

CRICOS Provider No. 00103D Page 57 of 68
Displaying Leave Balances for Selected Staff
1. To access leave balances for all selected staff (see ‘Searching for staff using Filters’ as mentioned earlier) click on the ‘Leave Balances’ button.
2. The following screen will appear. Managers/Supervisors have the ability to view leave balances for their staff including Annual Leave, Long Service Leave, Sick Leave and Other types of leave (Compassionate leave and Personal Leave). You can switch between the types of leave by clicking on the tabs. For the Balance column the system will display the balance in days followed by the balance in hours.
Days Hours

CRICOS Provider No. 00103D Page 58 of 68
3. Another useful feature is the ‘highlighting’ of leave balances. This feature allows you to specify how many days of leave accrued by a staff member until it is considered ‘excessive’. You can enter the amount of days until considered excessive into the fields provided and once this is done you must click on the refresh button. All staff in excess of the value entered will be highlighted in blue.
For example, the Manager/Supervisor would like to know which staff members have Annual leave days exceeding 20 days. They would need to type ‘20’ into the ‘Annual Leave Excess’ field then click on the refresh button. As seen below, Sarah and John both have an annual leave balance greater than 20 days therefore they have been highlighted in blue.

CRICOS Provider No. 00103D Page 59 of 68
Processing Staff Leave Requests
1. When a staff member requests leave the request is sent to their Supervisor/Manager for approval. An email is sent to the Supervisor/Manager’s Federation University Outlook Email address and the email’s Subject will read ‘Leave Request’ and the Sender will read ‘EmpowerHR’ (please see below)
2. When opening the email, it should look like the following:
The email will notify the Supervisor/Manager which staff member has requested the leave, what type of leave and for what period. For this example James has requested Annual Leave for 1 day being the 18th March 2010.
3. Now the Supervisor/Manager can action the request by either logging into the Self- Service system by clicking on the link on the email or by accessing the site from their Browser’s Favourites list. The Self-Service link is also available via the Fed Uni website. 4. Now ensure that once logged into the Self-Service system that you are in the
‘Manager’ section (MSS) by clicking on the ‘Manager’ tab as it may default to Employee Self-Service (ESS).
You will notice that once logged in there is a new option on the MSS Home Page called ‘Actions To Do’. This appears when a member of your staff has requested leave.

CRICOS Provider No. 00103D Page 60 of 68
5. To action any outstanding leave requests click on the ‘Leave Request’ link.
6. You will now be presented with the following screen. (Please note that Leave Requests records will appear on the same row. The example below has been split into two rows)
As expected, James’ leave request has appeared for processing. You will also notice that on the end of the leave request record there are five options/buttons to choose from.

CRICOS Provider No. 00103D Page 61 of 68
These options are as follows: Edit button When clicking on the Edit button the following screen will appear.
This option allows you to view the request in more detail and also view any other leave bookings the staff member may have booked earlier. (via the Absense Chart) Once the Supervisor/Manager has looked over the request in more detail, they can Accept the request, Redirect it to a different Manager for approval, Reject the leave, or Return the request back to the employee with a message advising them to make some amendments to the request.
Accept button This button should be clicked if you are happy for the leave request to be approved. Once ‘Accepted’ an email will be sent to the staff member who made the request acknowledging that you have approved it and it has been passed on. (The request is passed onto the Payroll team for final approval). Once payroll approves the leave request it will become a current booking.

CRICOS Provider No. 00103D Page 62 of 68
Redirect button After clicking on the Re-direct button the following screen appears: If the leave request was sent to you incorrectly or you believe another manager would be better suited to approve the leave, then you can redirect it to another manager. Simply click on the drop-down menu, select the person you would like to re-direct the request to then click on the ‘Send To’ button. An email will be sent to you confirming you have redirected the leave and an email will also be sent to the Manager you have re-directed the request to. Reject button If you would like to reject the leave request for whatever reason, simply click on the Reject Button. Another screen will appear where you are able to add a comment to why you may have rejected the leave request. You must click on the ‘Confirm’ button to Reject the leave request. An email will be sent to the staff member who requested the leave explaining that it has been rejected.

CRICOS Provider No. 00103D Page 63 of 68
Return button Managers also have the ability to Return the leave request back to the sender. There may be a number of reasons why they would do this for example, there is an error on the leave request (wrong date, conflict etc), the request was sent to the wrong manager, or any other details the sender may need to adjust before approval. A comment/reason to why the request is being sent back can be entered into the ‘Comments’ field. The ‘Confirm’ button must also be clicked on for the request to be sent back and an email will be sent to the staff member to notify them that the requested leave has been returned to them. Attachments button If the leave request sent to you has an attachment ie. Medical Certificate, you are able to view the file by clicking on the blue paper clip (Attachments) button. To load up the attached file click on the file name highlighted in blue.
CRICOS Provider No. 00103D Page 64 of 68
Processing Timesheet Requests – (Supervisor / Manager Approval) Processing Staff Timesheets works the same way as approving leave requests. The Timesheet request becomes an official pending payment on the system when both the Supervisor / Manager and Payroll approve the request. PLEASE NOTE: The Timesheet must first be approved by the Supervisor / Manager and then Payroll before the request is given ‘Awaiting Payment’ status. An employee will not be paid if these conditions are not met.
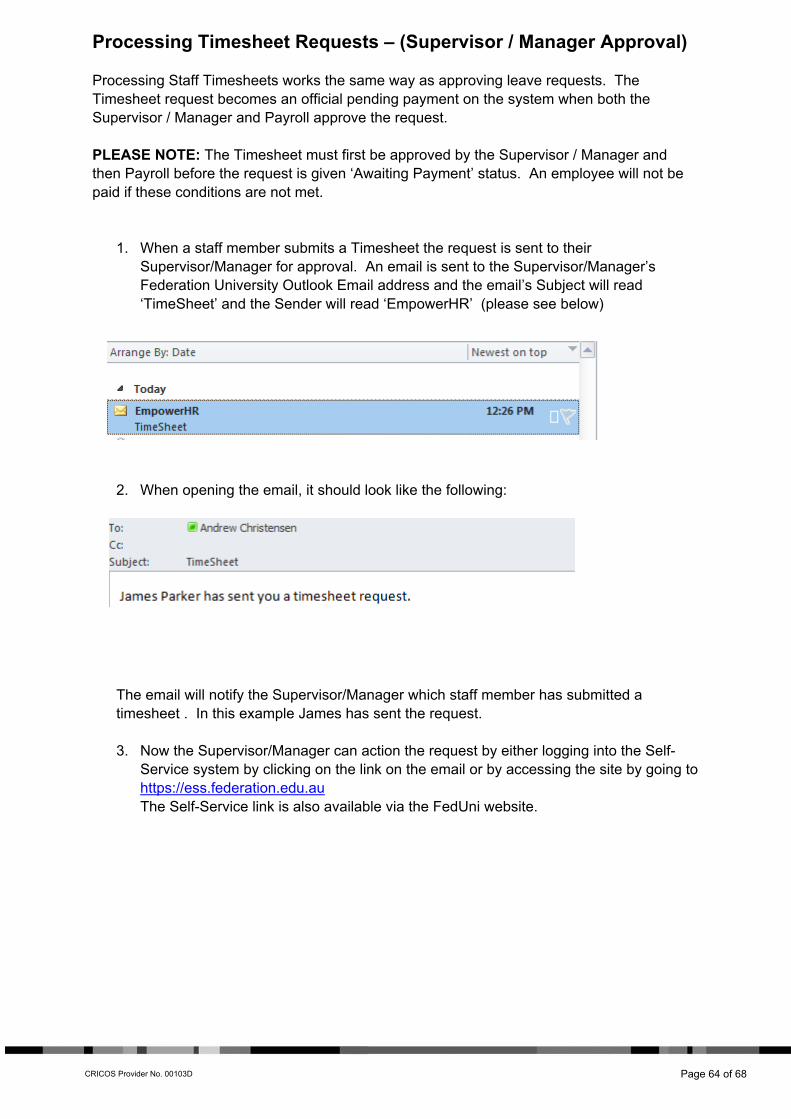
1. When a staff member submits a Timesheet the request is sent to their Supervisor/Manager for approval. An email is sent to the Supervisor/Manager’s Federation University Outlook Email address and the email’s Subject will read ‘TimeSheet’ and the Sender will read ‘EmpowerHR’ (please see below)
2. When opening the email, it should look like the following:
The email will notify the Supervisor/Manager which staff member has submitted a timesheet . In this example James has sent the request.
3. Now the Supervisor/Manager can action the request by either logging into the Self-
Service system by clicking on the link on the email or by accessing the site by going to https://ess.federation.edu.au The Self-Service link is also available via the FedUni website.

CRICOS Provider No. 00103D Page 65 of 68
4. Now ensure that once logged into the Self-Service system that you are in the ‘Manager’ section (MSS) by clicking on the ‘Manager’ tab as it may default to Employee Self-Service (ESS).
You will notice that once logged in there is a new option on the MSS Home Page called ‘Actions To Do’. This appears when a member of your staff has submitted a Timesheet
5. To action any outstanding Timesheet requests click on the ’Timesheet’ link.

CRICOS Provider No. 00103D Page 66 of 68
6. You will now be presented with the following screen.
As expected, James’ Timesheet request has appeared for processing. You will also notice that on the start and end of the leave request record there are six options/buttons to choose from. These options are as follows: View button
The view button gives a summary of any Timesheets already awaiting payment for the employee and also lists any Pending requests awaiting approval. This feature is useful for verifying Contract Numbers associated with the submission and also ensuring the Timesheet matches up with the Contract Number stated on the Casual Contract(s).
Edit button When clicking on the Edit button the following screen will appear.
This option allows you to view the request in more detail and make any changes if necessary. Once the Supervisor/Manager has looked over the request in more detail, they can Accept the request, Redirect it to a different Manager for approval, Reject the request, or Return the request back to the employee with a message advising them to make some amendments to the request.

CRICOS Provider No. 00103D Page 67 of 68
Accept button This button should be clicked if you are happy for the request to be approved. Once ‘Accepted’ an email will be sent to the staff member who made the request acknowledging that you have approved it and it has been passed on. (The request is passed onto the Payroll team for final approval). Once payroll approves the request it will become an official payment to be made. Redirect button After clicking on the Re-direct button the following screen appears: If the Timesheet request was sent to you incorrectly or you believe another manager would be better suited to approve the Timesheet, then you can redirect it to another manager. Simply click on the drop-down menu, select the person you would like to re- direct the request to then click on the ‘Send To’ button. An email will be sent to you confirming you have redirected the timesheet and an email will also be sent to the Manager you have re-directed the request to. Reject button If you would like to reject the timesheet request for whatever reason, simply click on the Reject Button. Another screen will appear where you are able to add a comment to why you may have rejected the timesheet request. You must click on the ‘Confirm’ button to Reject the request. An email will be sent to the staff member who submitted the request explaining that it has been rejected.
CRICOS Provider No. 00103D Page 68 of 68
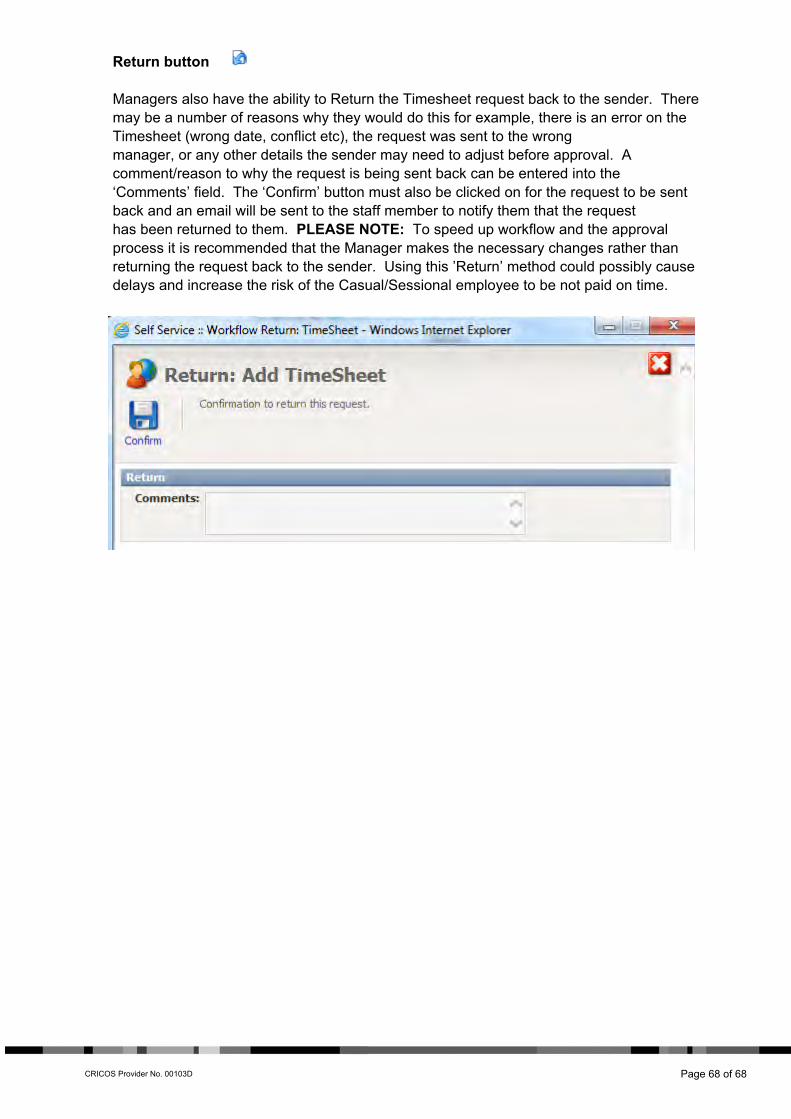
Return button Managers also have the ability to Return the Timesheet request back to the sender. There may be a number of reasons why they would do this for example, there is an error on the Timesheet (wrong date, conflict etc), the request was sent to the wrong manager, or any other details the sender may need to adjust before approval. A comment/reason to why the request is being sent back can be entered into the ‘Comments’ field. The ‘Confirm’ button must also be clicked on for the request to be sent back and an email will be sent to the staff member to notify them that the request has been returned to them. PLEASE NOTE: To speed up workflow and the approval process it is recommended that the Manager makes the necessary changes rather than returning the request back to the sender. Using this ’Return’ method could possibly cause delays and increase the risk of the Casual/Sessional employee to be not paid on time.