en translation from original ewpe smart - aermec.com
TRANSCRIPT
w w w . a e r m e c . c o m
T r a n s l a t i o n f r o m o r i g i n a l
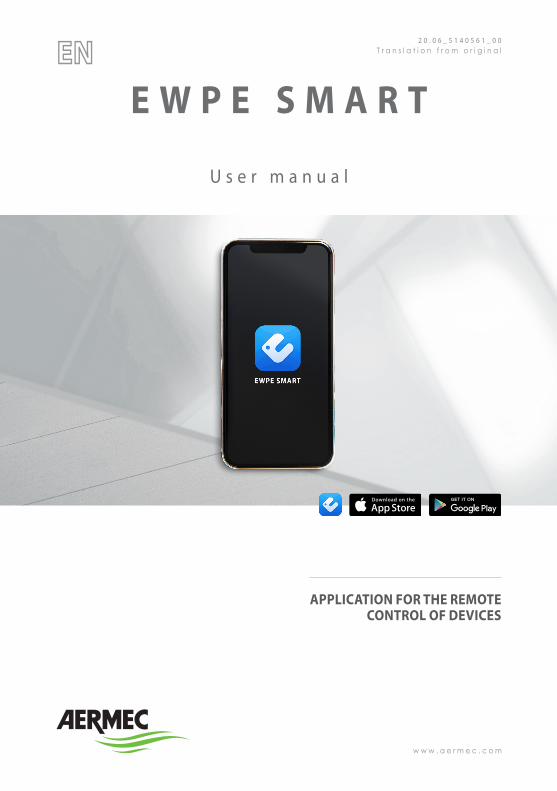
U s e r m a n u a l
ENE W P E S M A R T
2 0 . 0 6 _ 5 1 4 0 5 6 1 _ 0 0
APPLICATION FOR THE REMOTE CONTROL OF DEVICES

All specifications are subject to change without prior notice. Although every effort has been made to ensure accuracy, Aermec shall not be held liable for any errors or omissions.
Dear customer,Thank you for choosing an AERMEC product. It is the fruit of many years of experience and special design studies and has been made of the highest grade materials and with cutting edge technology.
The data may undergo modifications considered necessary for the improvement of the product, at any time and without the obligation for any notice thereof.
Thank you once again.AERMEC S.p.A
INFORMATION FOR USERThis software is universal.
By pressing a key for a function that is not available, the unit will not change the operating status.
Carefully read the manual before using the software.
PRODUCT PRESENTATION ..................................................................................................................................................................................................5
DOWNLOADING AND INSTALLING THE “EWPE SMART” APP VIA A SMARTPHONE OR TABLET .............................................................6
STARTING THE “EWPE SMART” APP AND ACCOUNT REGISTRATION .................................................................................................................7
NAVIGATING THE APP ...........................................................................................................................................................................................................9
ADDING A SPLIT UNIT .......................................................................................................................................................................................................10
ADDING A HEAT PUMP ......................................................................................................................................................................................................18
CUSTOMISING THE SPLIT UNIT ......................................................................................................................................................................................24
SPLIT UNIT FUNCTIONS ....................................................................................................................................................................................................25
CUSTOMISING THE HEAT PUMP ....................................................................................................................................................................................32
HEAT PUMP FUNCTIONS ..................................................................................................................................................................................................33
UNIT ERRORS .........................................................................................................................................................................................................................37
CONTROLLING HOUSEHOLD APPLIANCES ..............................................................................................................................................................38
APP OPTIONS ........................................................................................................................................................................................................................40
CONTENTS
COMPANY CERTIFICATIONS
CONTENT CLASSIFICATION

5
Using the special app for iOS and Android devices (available free on Apple Store and Google Play), you can control the entire system from a distance, directly from your smartphone or tablet.
This manual was creating using version:1.7.5.5 Android operating systems.1.7.5 iOS operating systems.
WARNINGThe application can only be used if the indoor unit has a WiFi device. Otherwise, the WiFi antenna must be purchased as an accessory.
Make sure that the device (smartphone or tablet) that is used have a standard Android (version 4.4 or later) and iOS (iOS 7.O or later) version as the operating system. Refer to the App for more details.
GENERAL INFORMATION
• The units can be connected and controlled only via WiFi or the Hotspot function.
• The application interface is universal for all products and many functions may not apply to all units. It can vary depending on the operating system used or the current update. Refer to the current version.
WARNINGWiFi 5GHz is not supported! Use only WiFi 2.4 GHz
PRODUCT PRESENTATION
6
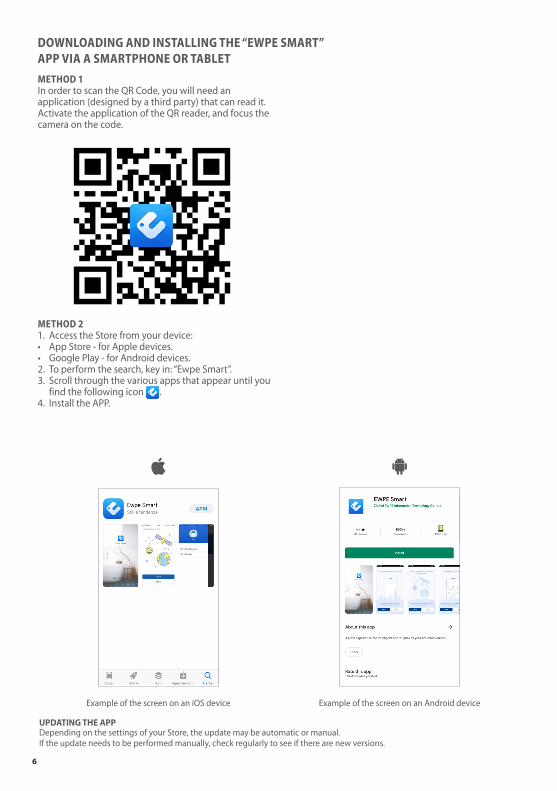
METHOD 1In order to scan the QR Code, you will need an application (designed by a third party) that can read it.Activate the application of the QR reader, and focus the camera on the code.
METHOD 21. Access the Store from your device:• App Store - for Apple devices.• Google Play - for Android devices.2. To perform the search, key in: “Ewpe Smart”.3. Scroll through the various apps that appear until you
find the following icon .4. Install the APP.
Example of the screen on an iOS device Example of the screen on an Android device
UPDATING THE APPDepending on the settings of your Store, the update may be automatic or manual.If the update needs to be performed manually, check regularly to see if there are new versions.
DOWNLOADING AND INSTALLING THE “EWPE SMART” APP VIA A SMARTPHONE OR TABLET
7
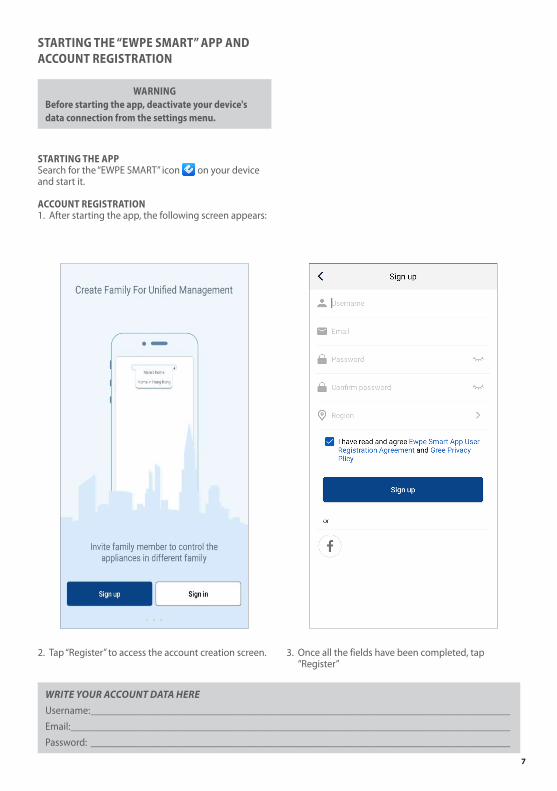
WRITE YOUR ACCOUNT DATA HEREUsername: ___________________________________________________________________________________Email: _______________________________________________________________________________________Password: ___________________________________________________________________________________
STARTING THE “EWPE SMART” APP AND ACCOUNT REGISTRATION
2. Tap “Register” to access the account creation screen. 3. Once all the fields have been completed, tap “Register”
WARNINGBefore starting the app, deactivate your device's data connection from the settings menu.
STARTING THE APPSearch for the “EWPE SMART” icon on your device and start it.
ACCOUNT REGISTRATION1. After starting the app, the following screen appears:

8
MULTIPLE CONNECTION POSSIBILITIESThanks to this application, you can control various types of machines when not at home, customising operation based on your needs.
ACCESSING YOUR ACCOUNTIf you already have an account, it can be accessed from the home page by tapping “Sign in”.
WARNINGThe screen in point 1 appears only the first time the App is started after installing it on your device.
If the home screen is open, tap the profile icon to the top left to exit and enter your own credentials.
9
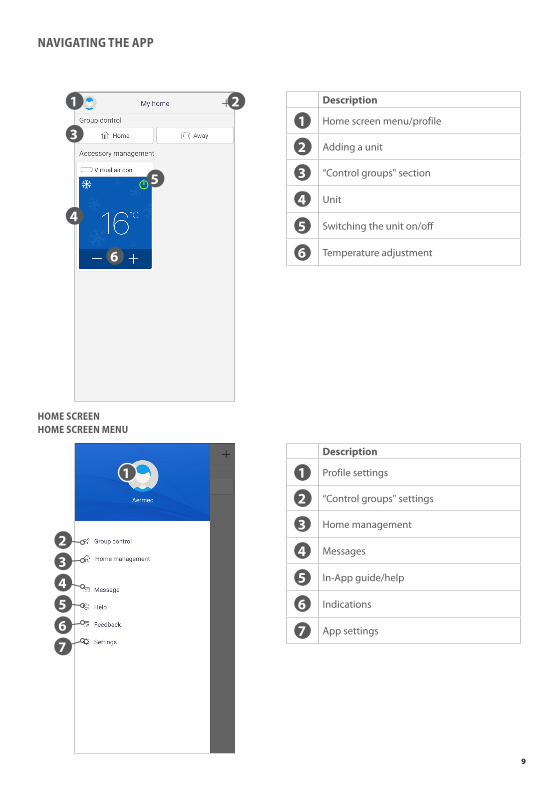
NAVIGATING THE APP
Description
1 Home screen menu/profile
2 Adding a unit
3 “Control groups" section
4 Unit
5 Switching the unit on/off
6 Temperature adjustment
Description
1 Profile settings
2 “Control groups" settings
3 Home management
4 Messages
5 In-App guide/help
6 Indications
7 App settings
1
1
2
2
3
3
4
4
6
67
5
5
HOME SCREENHOME SCREEN MENU

10
ADDING A SPLIT UNIT
AUTOMATIC PAIRING PROCEDURE
1. Select the device you want to select, in our case tap "Air conditioning”.
WARNINGThe automatic registration procedure must be completed within 2 minutes of resetting the unit's WiFi module. Restart it again if pairing is not performed correctly.
2. Select the type of command used to normally command the unit by tapping it.
Reset the wifi module prior to pairing:To reset the unit's WiFi module, refer to the specific procedure indicated in the user manual for the unit's remote control/wired panel provided together with the package.
11
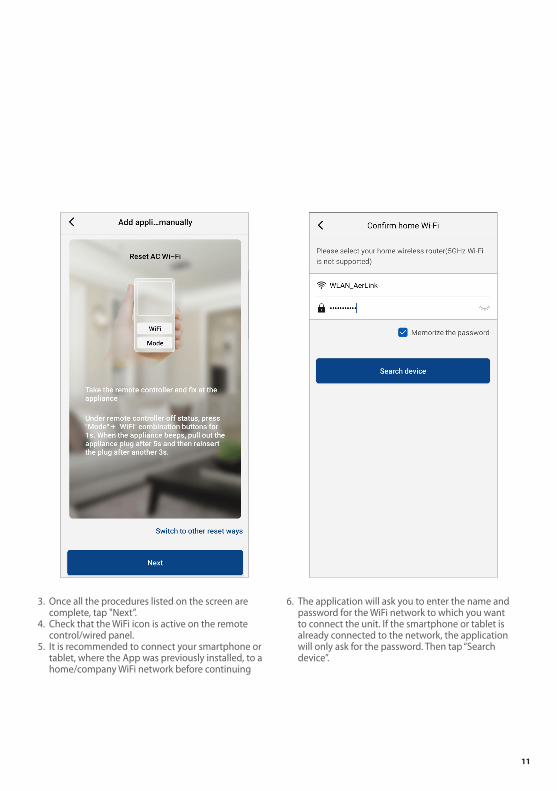
3. Once all the procedures listed on the screen are complete, tap "Next”.
4. Check that the WiFi icon is active on the remote control/wired panel.
5. It is recommended to connect your smartphone or tablet, where the App was previously installed, to a home/company WiFi network before continuing
6. The application will ask you to enter the name and password for the WiFi network to which you want to connect the unit. If the smartphone or tablet is already connected to the network, the application will only ask for the password. Then tap “Search device”.

12
7. The search for the device will start. Once it is found, it will be automatically added to the list and will appear on the App home screen.
8. When the configuration is complete, a notice will appear as shown above. Press OK to continue and return to the home screen.

13
9. If this notice appears, this means that the procedure was not successful. To solve the problem:
• Follow the instructions that appear on the screen and tap “Try again”.
• Perform manual pairing by tapping "Try to add manually”.

14
MANUAL PAIRING PROCEDURE
1. Select the device you want to select, in our case tap "Air conditioning”.
2. Select the type of command used to normally command the unit by tapping it. Then tap the top right corner to start the manual pairing procedure.

15
3. Once all the procedures listed on the screen are complete, tap "Next”.
4. The application will show the hotspot signal generated by the device. Tap “Next”.
16
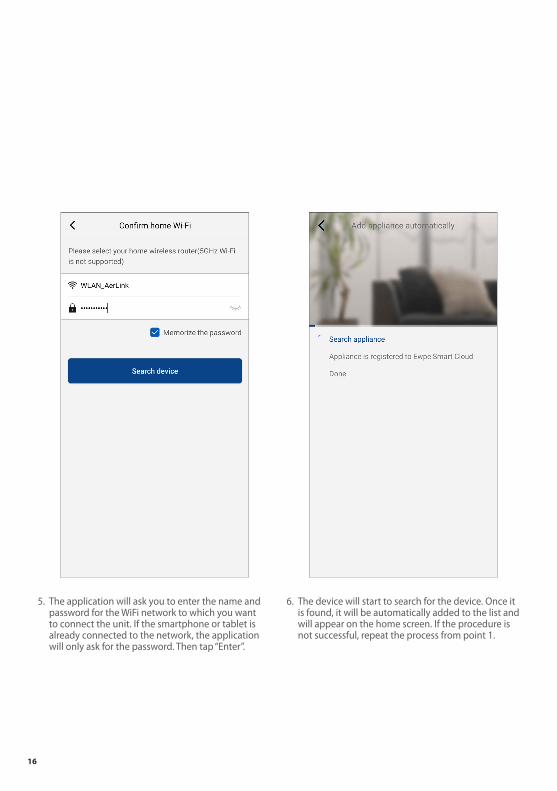
5. The application will ask you to enter the name and password for the WiFi network to which you want to connect the unit. If the smartphone or tablet is already connected to the network, the application will only ask for the password. Then tap “Enter”.
6. The device will start to search for the device. Once it is found, it will be automatically added to the list and will appear on the home screen. If the procedure is not successful, repeat the process from point 1.

17
7. When the configuration is complete, the following message appears. Press OK to continue and return to the home screen.
18
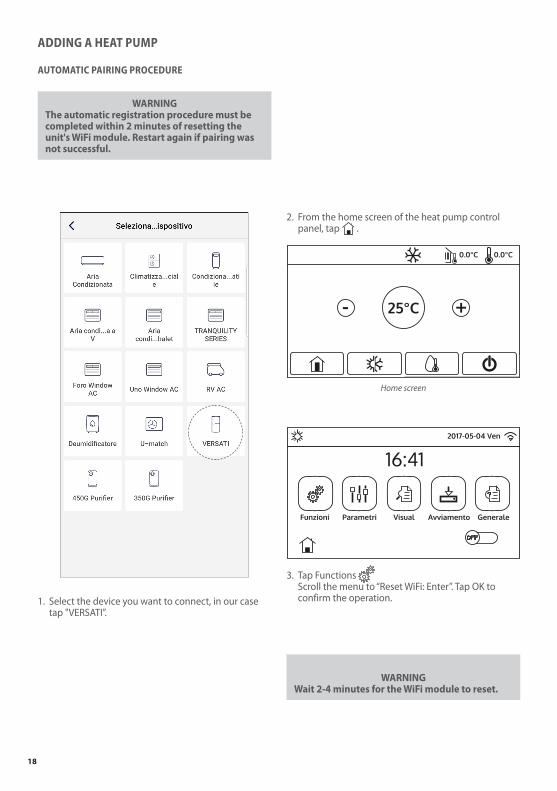
ADDING A HEAT PUMP
AUTOMATIC PAIRING PROCEDURE
1. Select the device you want to connect, in our case tap "VERSATI”.
WARNINGThe automatic registration procedure must be completed within 2 minutes of resetting the unit's WiFi module. Restart again if pairing was not successful.
3. Tap Functions Scroll the menu to “Reset WiFi: Enter”. Tap OK to
confirm the operation.
2. From the home screen of the heat pump control panel, tap .
16:412017-05-04 Ven
Funzioni Parametri Visual Avviamento Generale
2020-02-20 08:52 0.0°C 0.0°C
+- 25°C
Home screen
WARNINGWait 2-4 minutes for the WiFi module to reset.

19
4. Once the unit's WiFi device has reset, return to the EWPE APP and tap "Next" to continue.
5. The application will ask you to enter the name and password for the WiFi network to which you want to connect the unit. If the smartphone or tablet is already connected to the network, the application will only ask for the password. Then tap “Search device”.

20
6. Then a search will start for the unit's WiFi module. Once it is found, it will be automatically added to the list and will appear on the home screen.
7. If this notice appears, this means that the procedure was not successful. To solve the problem:
• Follow the instructions that appear on the screen and tap “Try again”.
• Perform manual pairing by tapping "Try to add manually”.

21
1. Select the device you want to select, in our case tap "VERSATI”.
WARNINGThe automatic registration procedure must be completed within 2 minutes of resetting the unit's WiFi module. Restart again if pairing was not successful.
3. Tap Functions Scroll the menu to “Reset WiFi: Enter”. Tap OK to
confirm the operation.
2. From the home screen of the heat pump control panel, tap .
16:412017-05-04 Ven
Funzioni Parametri Visual Avviamento Generale
2020-02-20 08:52 0.0°C 0.0°C
+- 25°C
Main screen (Home)
WARNINGWait 2-4 minutes for the WiFi module to reset.
MANUAL PAIRING PROCEDURE

22
5 The application will show the hotspot signal generated by the device. Tap “Next”.
4. Once the unit's WiFi device has reset, return to the EWPE APP and tap the text to the top right, then on the following screen tap "Next".
WARNINGThe password for pairing the detected WiFi device is 12345678

23
6. The application will ask you to enter the name and password for the WiFi network to which you want to connect the unit. If the smartphone or tablet is already connected to the network, the application will only ask for the password. Then tap “Enter”.
7. The device will start to search for the device. Once it is found, it will be automatically added to the list and will appear on the home screen. If the procedure is not successful, repeat the process from point 1.

24
To access the unit settings, tap “Settings” to the side of the name from its operating screen.
The screen that appears next will also show the Firmware version of the WiFi module.
RENAMING THE UNITTap the current name of the unit on the “Settings” screen (e.g.: AC5bcf ). Then enter the new name you selected and confirm.Once the changes are complete, tap "Save" to the top right to confirm the unit settings.
CUSTOMISING THE SPLIT UNIT

25
SPLIT UNIT FUNCTIONS
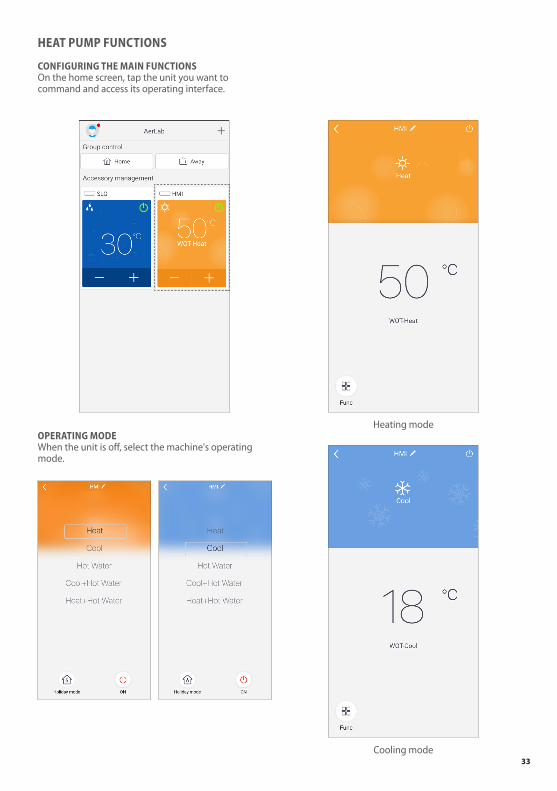
CONFIGURING THE MAIN FUNCTIONSOn the home screen, tap the unit you want to command and access its operating interface:
Quick unit functions Selecting the temperature
Selecting the ventilation speed Customising the unit
26
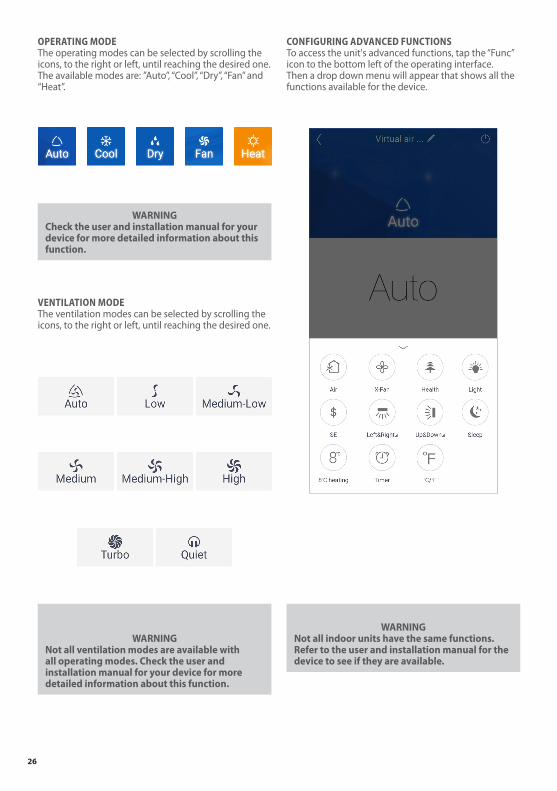
CONFIGURING ADVANCED FUNCTIONSTo access the unit's advanced functions, tap the “Func” icon to the bottom left of the operating interface. Then a drop down menu will appear that shows all the functions available for the device.
OPERATING MODEThe operating modes can be selected by scrolling the icons, to the right or left, until reaching the desired one.The available modes are: ”Auto”, “Cool”, “Dry”, “Fan” and “Heat”.
VENTILATION MODEThe ventilation modes can be selected by scrolling the icons, to the right or left, until reaching the desired one.
WARNINGNot all indoor units have the same functions. Refer to the user and installation manual for the device to see if they are available.
WARNINGNot all ventilation modes are available with all operating modes. Check the user and installation manual for your device for more detailed information about this function.
WARNINGCheck the user and installation manual for your device for more detailed information about this function.

27
AIR FUNCTIONFunction not available.
HEALTH FUNCTIONThe Health function is available when the unit is equipped with an anion generator. When the Health function is active, the anion generator starts, absorbing dust and eliminating bacteria in the room. To activate it tap the icon.
X-FAN FUNCTIONWhen the unit is off, this function is used to dry the heat exchanger by continuing to ventilate after shut-off. To activate it, tap the icon.
LIGHT FUNCTIONThis function turns the display of the indoor unit on and off. To activate it, tap the icon and the display turns on. Tap it again to turn the display off.
Display OFF Display ON

28
ES FUNCTIONThe energy savings function automatically regulates the fan speed and the power of the compressor to optimise consumption, in both “Cooling” and “Heating” mode. The fan and compressor reduce their performance when the room reaches the preset temperature. To activate it, tap the icon.
SLEEP FUNCTIONThe “sleep” function automatically regulates the room temperature without disturbing sleep. It also lowers unit consumption during the night-time hours. To activate it, tap the icon.
°C/°F FUNCTIONTapping the “°C/°F" changes the unit of measure from degrees Celsius to degrees Fahrenheit and vice versa.
ANTIFREEZE FUNCTIONThis function ensures that the room temperature never drops below 8°C/46°F when no one is home. It only functions in “Heating” mode. To activate it, tap the icon.
29
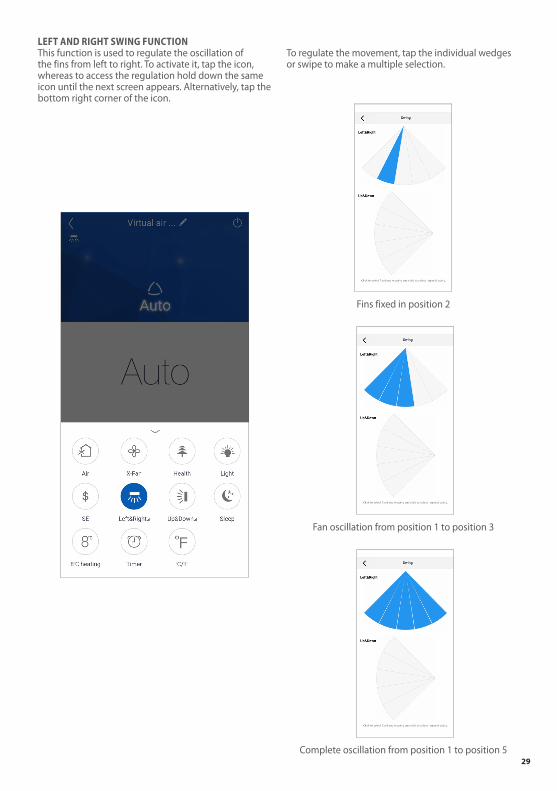
LEFT AND RIGHT SWING FUNCTIONThis function is used to regulate the oscillation of the fins from left to right. To activate it, tap the icon, whereas to access the regulation hold down the same icon until the next screen appears. Alternatively, tap the bottom right corner of the icon.
To regulate the movement, tap the individual wedges or swipe to make a multiple selection.
Fins fixed in position 2
Complete oscillation from position 1 to position 5
Fan oscillation from position 1 to position 3

30
SWING UP AND DOWN FUNCTIONThis function is used to regulate fin up and down oscillation. To activate it, tap the icon, whereas to access the regulation hold down the same icon until the next screen appears. Alternatively, tap the bottom right corner of the icon.
To regulate the movement, tap the individual wedges or swipe to make a multiple selection.
Fins fixed in position 4
Complete oscillation from position 1 to position 5
Fan oscillation from position 3 to position 5
31
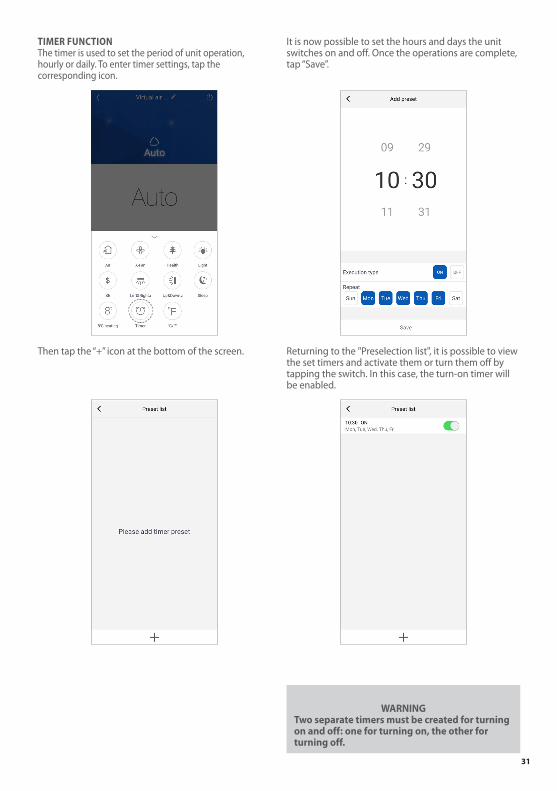
TIMER FUNCTIONThe timer is used to set the period of unit operation, hourly or daily. To enter timer settings, tap the corresponding icon.
Then tap the “+” icon at the bottom of the screen. Returning to the "Preselection list", it is possible to view the set timers and activate them or turn them off by tapping the switch. In this case, the turn-on timer will be enabled.
It is now possible to set the hours and days the unit switches on and off. Once the operations are complete, tap “Save”.
WARNINGTwo separate timers must be created for turning on and off: one for turning on, the other for turning off.
32
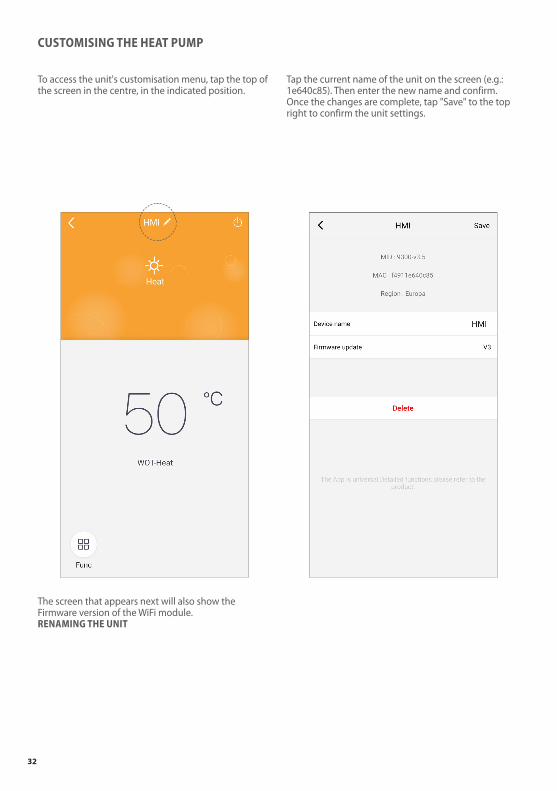
To access the unit's customisation menu, tap the top of the screen in the centre, in the indicated position.
The screen that appears next will also show the Firmware version of the WiFi module.RENAMING THE UNIT
Tap the current name of the unit on the screen (e.g.: 1e640c85). Then enter the new name and confirm.Once the changes are complete, tap "Save" to the top right to confirm the unit settings.
CUSTOMISING THE HEAT PUMP
33
HEAT PUMP FUNCTIONS
CONFIGURING THE MAIN FUNCTIONSOn the home screen, tap the unit you want to command and access its operating interface.
Heating modeOPERATING MODEWhen the unit is off, select the machine's operating mode.
Cooling mode

34
WARNINGNot all heat pumps have the same functions. Refer to the user and installation manual for the device to see if they are available.
CONFIGURING ADVANCED FUNCTIONSTo access the unit's advanced functions, tap the “Func” icon to the bottom left of the operating interface. Then a drop down menu will appear that shows all the functions available for the device.
QUIET FUNCTIONThis mode makes it possible to operate the machine in silent mode. To activate it, tap the icon.
DISINFECT FUNCTIONFunction not available.

35
W-DEPEND FUNCTIONThis mode regulates the unit based on the set temperature to reduce consumption. To activate it, tap the icon.
FAST DHW FUNCTIONFunction not available.
HOLIDAY MODE FUNCTIONThis function can be activated only when the unit is off. It makes sure that the water delivery temperature never goes down below 30°C / 86°F during winter if no one is home. To activate it, tap the icon.
PRIORITY FUNCTIONFunction not available.
36
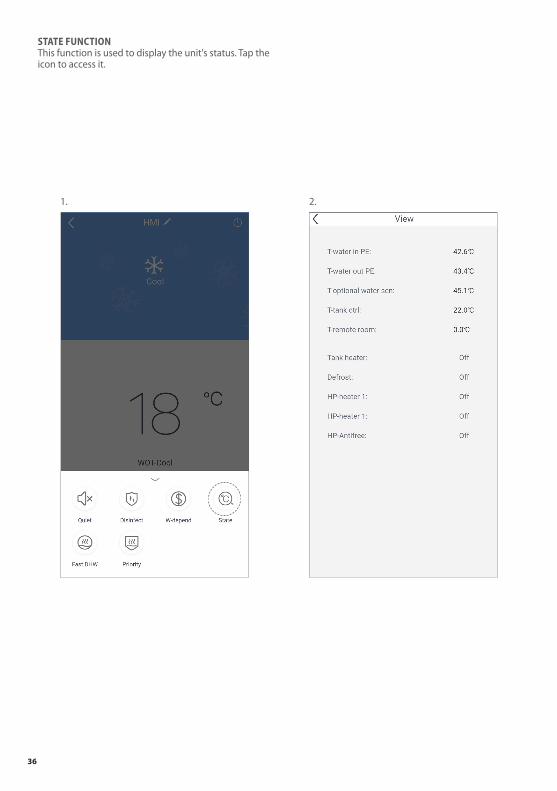
STATE FUNCTIONThis function is used to display the unit's status. Tap the icon to access it.
1. 2.

37
“CONTROL NOT-IN-LINE” ERRORThis error is mainly related to unit communication problems. To solve it, check:
1. The connection to the device power supply;2. Connection to the WiFi network;3. If the region of the profile is coherent with the region
of the device.
Once these controls have been performed, tap “OK”.If the application does not reconnect to the units, reset the WiFi module and repeat the pairing procedure.
UNIT ERRORS
"ERROR" ERRORIf this error appears, immediately check the unit's status. It is mainly related to its malfunctions.
WARNINGThe application may lose communication after a disconnection of the mains supply or the unit's power supply for a prolonged period of time.

38
CONTROLLING HOUSEHOLD APPLIANCES
After creating your ecosystem, other members can be added (e.g. family members, colleagues, etc.)
giving them the possibility to control the various units paired with the group.
1. Tap “Control household appliances.
2. Tap the group you created.
3. Tap "Invite member”.
4. Confirm the dialogue window by tapping “OK”.

39
5. Enter the user name or email. Then tap “Invite member" to complete the procedure.
6. The system will automatically add the new users to your group after matching the account or the email entered.

40

41

42
SETTINGS
Here it is possible to regulate the app settings, such as activating vibration when pressed. It is also possible to see the version by tapping “About” and checking if there are new updates.

43

SCARICA L’ULTIMA VERSIONE: DOWNLOAD THE LATEST VERSION: TÉLÉCHARGER LA DERNIÈRE VERSION:
BITTE LADEN SIE DIE LETZTE VERSION HERUNTER: DESCARGUE LA ÚLTIMA VERSIÓN:
A E R M E C S . p . A .
V i a R o m a , 9 9 6 - 3 7 0 4 0 B e v i l a c q u a ( V R ) - I t a l y
T e l . + 3 9 0 4 4 2 6 3 3 1 1 1 - F a x + 3 9 0 4 4 2 9 3 5 7 7
s a l e s @ a e r m e c . c o m - w w w . a e r m e c . c o m
SCARICA L’ULTIMA VERSIONE: DOWNLOAD THE LATEST VERSION: TÉLÉCHARGER LA DERNIÈRE VERSION:
http://www.aermec.com/qrcode.asp?q=15587 http://www.aermec.com/qrcode.asp?q=15588 http://www.aermec.com/qrcode.asp?q=15589
BITTE LADEN SIE DIE LETZTE VERSION HERUNTER: DESCARGUE LA ÚLTIMA VERSIÓN:
http://www.aermec.com/qrcode.asp?q=15590 http://www.aermec.com/qrcode.asp?q=15591