envi porcelain fabrication guide
TRANSCRIPT

PORCELAIN SURFACES | EnviSurfaces.com
EnviSurfaces.com
PORCELAIN SLABS FABRICATION GUIDE
Rev. 4

SLAB HANDLING PORCELAIN SURFACES | EnviSurfaces.com
EnviSurfaces.com | 1FABRICATION GUIDE
HANDLING WITH MECHANICAL CLAMP
To prevent the risk of breakage or chipping, slabs must be handled with the greatest care and attention, in full compliance with safety regulations and with their edges protected at all times. For all types of handling and storage, always check the payload of the loading, unloading and handling systems and ensure that the slabs are always perfectly balanced.
• Mechanical clamps are able to handle up to 2 slabs at a time. • This solution comprises a hydraulic system complete with a gantry crane, carrying a double clamp which grips the slabs in two points to prevent them from bending and breaking. • Before lifting, clean the slab contact points to ensure that they do not slip out of the clamp. Rubber fittings should also be placed in these points, so that the steel clamps do not touch the slabs.
• If a double clamp is not available, a single one can be used, enlarging its contact point by inserting a piece of wood measuring 1”x8”x10’. This is necessary to prevent rotation or twisting of the slab, which could cause it to break.

SLAB HANDLING PORCELAIN SURFACES | EnviSurfaces.com
EnviSurfaces.com | 2FABRICATION GUIDE
HANDLING WITH SLINGS
The ideal equipment for handling several slabs at a time is a gantry crane with slings, which must always be made of canvas and never metal, since the latter type might damage the slabs.

SLAB HANDLING PORCELAIN SURFACES | EnviSurfaces.com
EnviSurfaces.com | 3FABRICATION GUIDE
MANUAL HANDLING
One slab at a time can be transported by hand. This must be done with the aid of a frame with a sufficient payload to support the weight of the slab, with adjustable suction cups which hold the slab in place so that it cannot bend. At least 2 people are required to handle a slab less than 12 mm thick. At least 4 people are required for a slab 12 mm thick.

SLAB SHAPING
PERIMETER CUT
> = 3/4”> = 3/4”
PORCELAIN SURFACES | EnviSurfaces.com
EnviSurfaces.com | 4
Before any kind of shaping, slabs must be thoroughly cleaned and inspected to ensure they are free from marks, cracks, chipping or other manufacturing defects. After this, they should be destressed by making cuts around the perimeter of the slabs using a bridge saw, removing at least 3/4” from each edge. To properly destress the slabs, it’s important to cut along both long sides first, followed by both short sides. The cutting speed should be reduced to 8” to 10”/min during the first and last 8” to 10” of each cut.
Please note that all speeds, feeds, RPMs etc. suggested in this document are illustrative guidelines, and the optimal settings for your equipment may vary. Please consult your tooling manufacturer or distributor for specific guidance on the settings that are appropriate for your equipment, tooling and work processes.
FABRICATION GUIDE

Cutting speed (m/min)Thickness Straight Cut Inclined Cut Saw Blade Ø (mm) RPM 12” 2300 - 26006mm - 12mm 47” - 63” 27” - 35” 14” 2000 - 2200 16” 1700 - 2150 18” 1400 - 1800
CUTTING PARAMETERS
BRIDGE SAW CUTTING
PORCELAIN SURFACES | EnviSurfaces.com
EnviSurfaces.com | 5
SLAB SHAPING
• Use a diamond saw blade suitable for cutting porcelain stoneware.• Use a supporting surface large enough to hold the slab straight and flat.• To make cutouts for a sink or other items, drill holes in all the inside corners with a drill bit and then cut to join up the holes. For 12mm slabs, use a bit at least 5/8” in diameter to create a minimum 5/16“ radius. For slabs under 12 mm, use a bit at least 1/2” in diameter to create a minimum 1/4“ radius. Cut the long edges first, then the short edges. All openings must be at a minimum distance of 2” from the edge of the slab.• Make the straight cuts needed to create a countertop of the correct size.• The saw blade must rotate in the cutting direction. • Cool the saw blade with a constant jet of water at the highest possible flow rate, directed at the cutting zone.• Reduce the cutting speed to 8” to 10”/min during the first and last 8” to 10” of each cut.• Cut at least 1/8” more than the thickness of the slab to obtain a clean cut. • Cut at the minimum speed, and in automatic mode, if the saw blade falls straight onto the slab. Never create right-angled (90°) internal corners, L-shaped kitchen worktops with straight edges, straight-edge sink holes, or straight internal edges.• When cutting small pieces such as strips and backsplashes, it is recommended to secure the material to prevent the cutting disc from twisting when entering and exiting the material.• For slabs less than 12 mm thick, before creating holes and recesses a layer of high density rubber about 12 mm thick should be applied to the back.• Note that the parameters provided are approximate and may vary based on the machine and type of blade used; follow the machine and tooling suppliers’ specific instructions.• Because every machine and blade combination may respond differently to various materials, ENVI recommends testing these parameters on sample material before cutting your first production job. Please contact your ENVI territory manager to discuss.
FABRICATION GUIDE

WATERJET CUTTING
CUTTING PARAMETERS
PORCELAIN SURFACES | EnviSurfaces.com
EnviSurfaces.com | 6
SLAB SHAPING
Thickness Cutting speed (m/min) Pressure (psi) Abrasive Rate (lbs/min)6 mm - 12 mm 31” - 70” 55k - 60k 0.77 - 1.40
• It’s preferable to first rough out panels with a bridge saw, before water jet cutting, when possible.• Use a supporting surface large enough to hold the slab straight and flat.• Keep the water level about 1/8” above the slab.• Reduced cutting speed improves finish quality. Adjust cutting speed accordingly.• I f not a l ready done, make the destressing cuts, taking care that each cut starts and ends outside the slab.• Reduce the pressure at the start of each pierce (use entry pressures of 17k - 19k psi).• When making subsequent cuts, make sure that corners have a radius of at least 5/16” in 12mm thick slabs. Make sure corners have a radius of at least 1/4” in slabs under 12 mm thick.• Wherever possible, we suggest avoiding interrupted cuts and beginning to cut starting from the outside of the slab perimeter. To make openings or holes, carry out the “piercing” inside the opening, connecting to the edge of the intended opening using a slightly curved cutting path.• Start the cut for all cutouts as close to the interior of the panel (away from the panel’s edge) as possible.• The opening must be at a minimum distance of 2” from the edge of the slab. For openings greater than 24”x20”, we recommend first cutting multiple smaller holes or openings inside the intended cut-out in order to avoid excessive load near the point where the cut will join the final piece being removed.• For slabs less than 12 mm thick, before creating holes and recesses a layer of high density rubber about 12 mm thick should be applied to the back.
FABRICATION GUIDE

NUMERICALLY CONTROLLED CUTTING
CUTTING PARAMETERS
PORCELAIN SURFACES | EnviSurfaces.com
EnviSurfaces.com | 7
SLAB SHAPING
• Use tools suitable for cutting porcelain stoneware, constantly cooled with water.• Position an adequate number and arrangement of suction cups in order to provide the best possible resting surface for the countertop, ensuring the cut pieces will be prevented from falling.• Make the destressing cuts.• When making subsequent cuts, make sure that corners have a radius of at least 5/16” in 12mm thick slabs. Make sure corners have a radius of at least 1/4” in slabs under 12 mm thick.• When creating cutouts, start to cut at a point inside the cutout and proceed out toward the perimeter of the cut, using a slightly curved cutting motion.• Start the cut for all cutouts as close to the interior of the panel (away from the panel’s edge) as possible.• For slabs less than 12 mm thick, before creating holes and recesses a layer of high density rubber about 12 mm thick should be applied to the back.
STEP 1CORING BIT
• Make an initial hole for the recess with a coring bit, with minimal descent speed, especially at the start and end of the drilling process.• Raise the core bit slightly before completing the hole to reduce the pressure inside it.• Never remove more than 0.02” in the first two passes, or more than 0.08” in all subsequent passes.
STEP 2CUTTER TOOLS
• Approach the cutting tool to the line of the cut with a curved trajectory, avoiding a perpendicular position as this may lead to chipping or crazing.• When making subsequent cuts, make sure that corners have a radius of at least 1/4”.• Halve the speed in the final part of the cut which completes the recess.• Never lower the cutting tool straight onto the surface of the slab. • Never use the oscillation function with cutting tools, as this may create chipping.
STEP 3DIAMOND GRINDING WHEELS
• When grinding inside edges, always start from a hole already made earlier.
Tool Thickness RPM Speed (in/min)Coring Bit 6 - 12 mm 4,500 - 5,500 0.40Cutting Tool 6 - 12 mm 4,500 - 5,500 5.90Diamond Grinding Wheels 6 - 12 mm 8,000 - 10,000 9.80
FABRICATION GUIDE

• Leave at least 2” between holes and the edges of the destressed slab and between the edge of the sink hole and the tap hole.• Never leave 90° corners, and create a radius of at least 1/4” for the corners of holes in slabs less than 12 mm thick, and a radius of at least 5/16” in slabs of 12 mm thickness.• For undermount sinks, it’s recommended to bevel or round the inside edges of the cutout at least 1/16” to help minimize the possibility of chipping.• With a drop-in sink, no special considerations are necessary, as the edges of the cutout are completely covered by the sink frame.
COUNTERTOP SHAPING
SINK AND/OR TAP HOLES
FLUSH-MOUNTED SINKS / SINKS AND HOBS
2 in
2 in
2 in
<12 mm: R ≥ 1/4” 12 mm: R ≥ 5/16”
0.347”12 mm
PORCELAIN SURFACES | EnviSurfaces.com
EnviSurfaces.com | 8
• For all types of sinks, the basic wooden structure should be built first, ready for waterproofing and then covering with the slabs.• Holes for flush-mounted sinks and hobs must only be created in 12 mm slabs, cutting to a depth of no more than 1/8” in the mounting zone.
FABRICATION GUIDE

COUNTERTOP MANUFACTURING
Pc 1 Pc 2
PORCELAIN SURFACES | EnviSurfaces.com
EnviSurfaces.com | 9
COUNTERTOP SHAPING
• To create L-shaped tops, combine two rectangular pieces; do not create diagonal joints and avoid weight imbalances between the two parts of the countertop.
• 12 mm slabs can be installed directly over cabinet bases if slab is supported every 24” and support is level & planar.• If working on existing stone or solid surface countertops, the slab can be applied directly to the surface.• Once completed, countertops must be handled with the aid of specially created wooden cross-bars and crates, to ensure the maximum stability.
• Overhanging countertops must be created using slabs of 12 mm thickness, and the overhang must be no more than 6 inches wide.• Cutouts close to the edge will affect weight-bearing ability, and must be evaluated by the fabricator and installer on a case-by-case basis.
• Install support bars under the sink, attached to the sink base, to support the weight of the sink. This avoids stresses to the countertop.• Add additional strip of plywood around sink & underneath the slab. This provides additional support for the sink, and also ensures the slab is adequately supported.
FABRICATION GUIDE
EDGE FINISHING
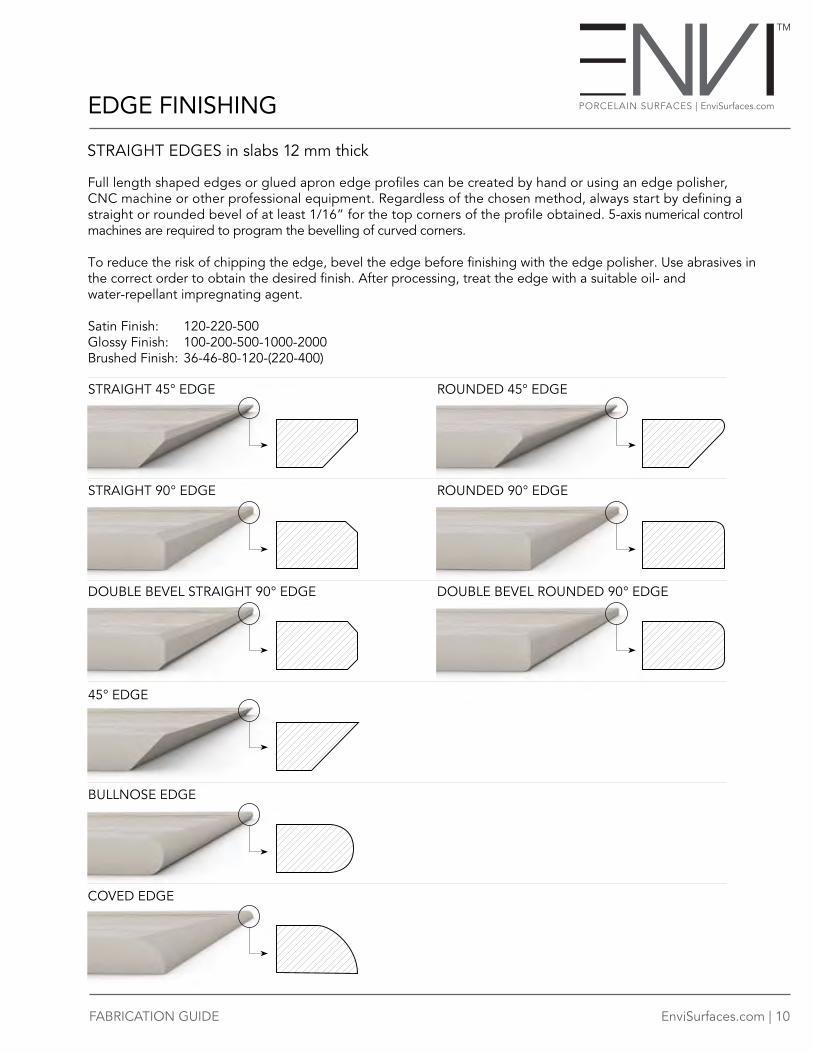
STRAIGHT EDGES in slabs 12 mm thick
ROUNDED 45° EDGESTRAIGHT 45° EDGE
ROUNDED 90° EDGESTRAIGHT 90° EDGE
DOUBLE BEVEL STRAIGHT 90° EDGE
COVED EDGE
DOUBLE BEVEL ROUNDED 90° EDGE
BULLNOSE EDGE
PORCELAIN SURFACES | EnviSurfaces.com
EnviSurfaces.com | 10
Full length shaped edges or glued apron edge profiles can be created by hand or using an edge polisher, CNC machine or other professional equipment. Regardless of the chosen method, always start by defining a straight or rounded bevel of at least 1/16” for the top corners of the profile obtained. 5-axis numerical control machines are required to program the bevelling of curved corners.
To reduce the risk of chipping the edge, bevel the edge before finishing with the edge polisher. Use abrasives in the correct order to obtain the desired finish. After processing, treat the edge with a suitable oil- and water-repellant impregnating agent.
Satin Finish: 120-220-500Glossy Finish: 100-200-500-1000-2000Brushed Finish: 36-46-80-120-(220-400)
FABRICATION GUIDE
45° EDGE
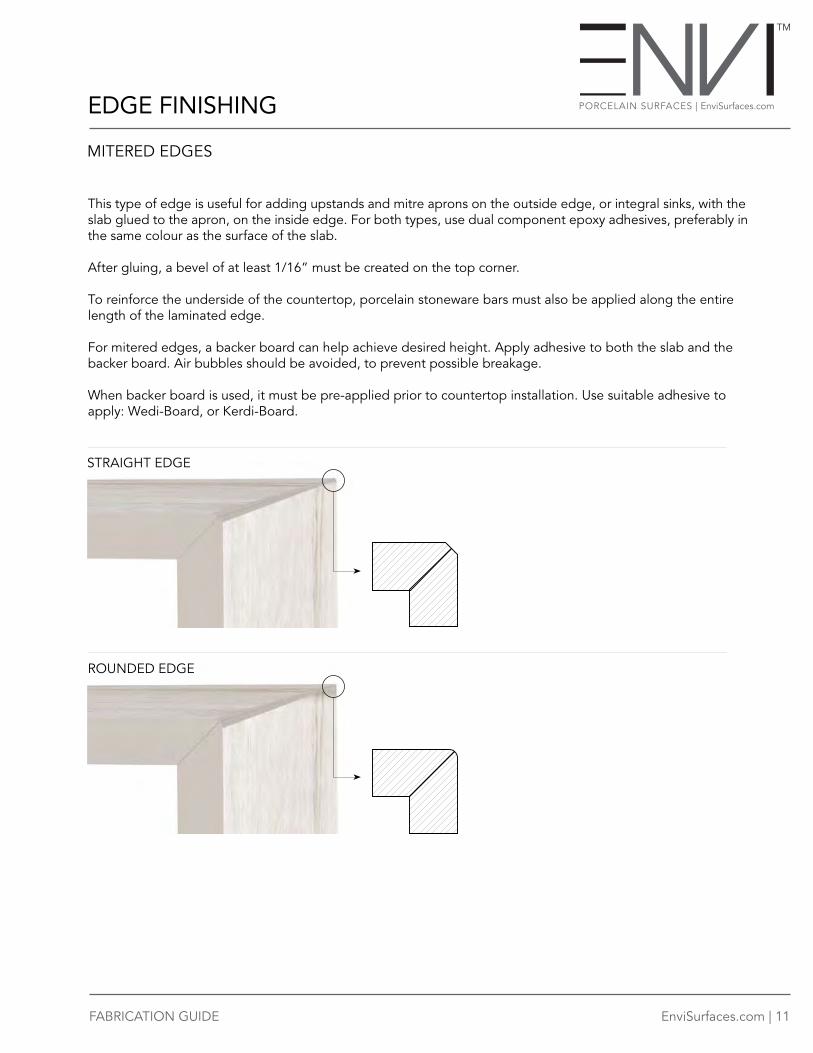
MITERED EDGES
PORCELAIN SURFACES | EnviSurfaces.com
EnviSurfaces.com | 11
EDGE FINISHING
This type of edge is useful for adding upstands and mitre aprons on the outside edge, or integral sinks, with the slab glued to the apron, on the inside edge. For both types, use dual component epoxy adhesives, preferably in the same colour as the surface of the slab.
After gluing, a bevel of at least 1/16” must be created on the top corner.
To reinforce the underside of the countertop, porcelain stoneware bars must also be applied along the entire length of the laminated edge.
For mitered edges, a backer board can help achieve desired height. Apply adhesive to both the slab and the backer board. Air bubbles should be avoided, to prevent possible breakage.
When backer board is used, it must be pre-applied prior to countertop installation. Use suitable adhesive to apply: Wedi-Board, or Kerdi-Board.
FABRICATION GUIDE
ROUNDED EDGE
STRAIGHT EDGE
HEAT
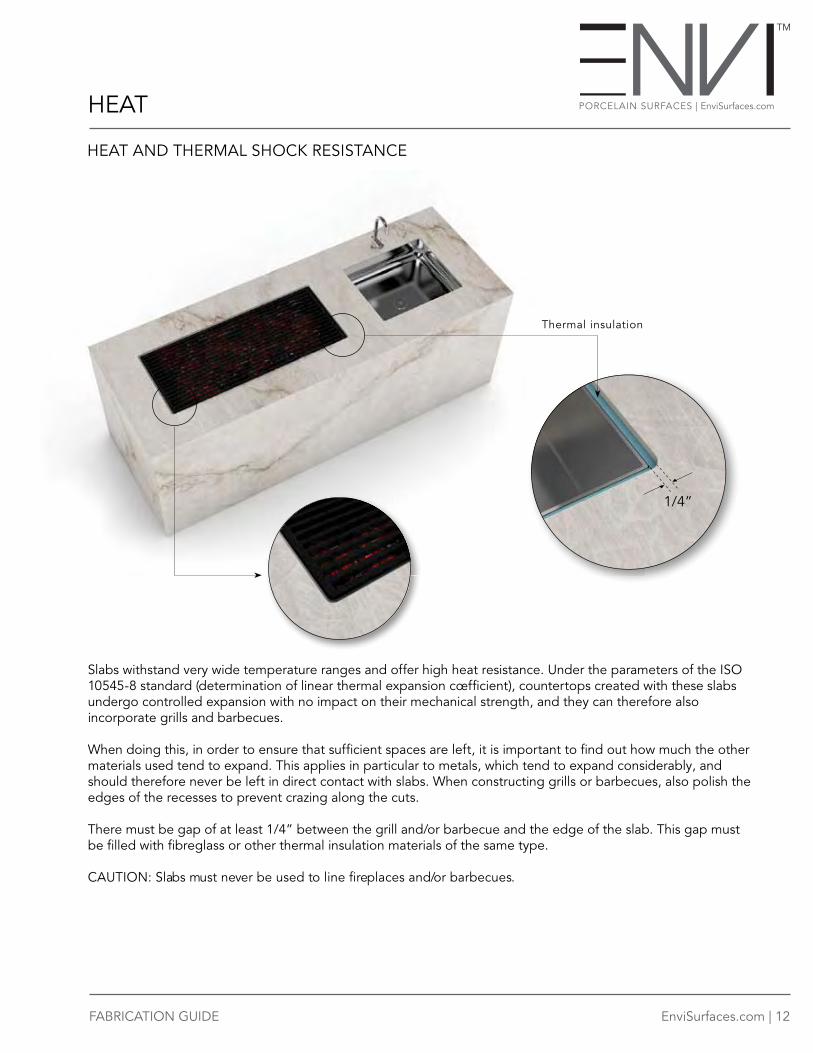
1/4”
Thermal insulation
HEAT AND THERMAL SHOCK RESISTANCE
PORCELAIN SURFACES | EnviSurfaces.com
EnviSurfaces.com | 12
Slabs withstand very wide temperature ranges and offer high heat resistance. Under the parameters of the ISO 10545-8 standard (determination of linear thermal expansion cœfficient), countertops created with these slabs undergo controlled expansion with no impact on their mechanical strength, and they can therefore also incorporate grills and barbecues.
When doing this, in order to ensure that sufficient spaces are left, it is important to find out how much the other materials used tend to expand. This applies in particular to metals, which tend to expand considerably, and should therefore never be left in direct contact with slabs. When constructing grills or barbecues, also polish the edges of the recesses to prevent crazing along the cuts.
There must be gap of at least 1/4” between the grill and/or barbecue and the edge of the slab. This gap must be filled with fibreglass or other thermal insulation materials of the same type.
CAUTION: Slabs must never be used to line fireplaces and/or barbecues.
FABRICATION GUIDE

PORCELAIN SURFACES | EnviSurfaces.com
EnviSurfaces.com | 13
HEAT
Slabs may also be used to cover the outsides, fronts and sides of normal and ethanol fireplaces. Refractory internal walls must always be constructed to separate the slabs from the heat.
CAUTION: Slabs must never be used to line fireplaces and/or barbecues.
FIREPLACE COVERINGS
FABRICATION GUIDE

COUNTERTOP INSTALLATION PORCELAIN SURFACES | EnviSurfaces.com
EnviSurfaces.com | 14FABRICATION GUIDE
GENERAL INSTRUCTIONS
When handling the countertop on site, hold the countertop vertically, never flat, keeping any openings toward the top. Do not lay flat until installing on cabinet bases.
Position the countertop on the base and level it perfectly by adjusting the supporting feet, being careful not to leave any gaps. In the presence of excess weight, even minimal gaps can cause the countertop to break.
Immediately after installation, the weight of furnishings and fittings, heat and moisture can affect the levelling. It is recommended to recheck it a few months after installation.
To anchor the countertop in place, apply a continuous bead of silicone around the perimeter of each cabinet base.
To anchor backsplashes in place, apply a bi-component resin over the entire perimeter. Always anchor backsplashes to the wall, never to the countertop. Apply a thin bead of silicone between the backsplash and countertop.

INSTALLATION – SHOWER WALLS PORCELAIN SURFACES | EnviSurfaces.com
EnviSurfaces.com | 15FABRICATION GUIDE
Ensure the substrate is crack-free, totally clean and flat. Maximum deviation of prepared surface from flatness of 1/8” per 10 feet, and 1/16” per 2 feet. Remediation of substrates not meeting this flatness requirement should be performed beforehand.
Use a waterproofing membrane such as Mapei Aquadefense.
Apply adhesive to the back of the slab with a 3mm tile trowel, spreading in one direction only. Use Mapei Ultralite S2 or similar thin-set for large-format tiles. Spread adhesive onto substrate, using a 15mm u-notch or a 10mm v-notch trowel. Apply in the same direction as on the back of the slab.
Using the appropriate suction frame, position slab on the adhesive bed. Maintain at least 1/8” gap between slabs using spacers.
De-air by tapping the slab with a rubber trowel from the center out.
Use leveling wedges at each linear meter of slab as necessary.
Grout with Mapei Ultracolor Plus or similar product.