eprism admin guide - edgewave · the following flowchart breaks down the way an incoming email...
TRANSCRIPT

ePrism Adminstrator’s Guide
M 5 0 0

Copyright and Trademark Acknowledgments: Copyright © 2004-2005 by St. Bernard Software, Inc. All Rights Reserved Worldwide. St. Bernard Software reserves the right to revise this publication without notice. ePrism® is a registered trademark and St. Bernard Software and the St. Bernard Software logo are trademarks of St. Bernard Software, Inc. Microsoft and Windows are registered trademarks of Microsoft Corporation. All other trademarks and registered trademarks are hereby acknowledged. Export Control Classification Number (ECCN) 5A992. Rev. June 28, 2005
iii
Table of Contents ePrism .....................................................................................................................................................1
Welcome to ePrism............................................................................................................................1 How ePrism helps ..............................................................................................................................1
Email threats.......................................................................................................................................1 Filtering email................................................................................................................................1
Spam ...............................................................................................................................................1
Viruses............................................................................................................................................2 Malformed messages .....................................................................................................................2
Inappropriate content.....................................................................................................................2 How ePrism works.............................................................................................................................3
Incoming information flow ...........................................................................................................3 Outgoing information flow ...........................................................................................................4
Methods of filtering.......................................................................................................................5 Setup and administration .......................................................................................................................8
Setup and administration ...................................................................................................................8 Opening the System Administration Tool........................................................................................8
Modifying system settings ..............................................................................................................10 Modifying system settings ..........................................................................................................10
Registering ePrism.......................................................................................................................10
Date and password settings .........................................................................................................12 Update network settings..............................................................................................................14
Update backup and restore settings ............................................................................................16 Modifying access control ................................................................................................................18
Access control..............................................................................................................................18 Setting authentication ..................................................................................................................18
Mail (SMTP) ................................................................................................................................20 Web HTTP ...................................................................................................................................23
Setting advanced options.................................................................................................................24 Administration settings........................................................................................................................25
Administration settings....................................................................................................................25 Setting global values........................................................................................................................26
Setting global whitelists/blacklists .................................................................................................28
Setting policies.................................................................................................................................30 Identifying special addresses...........................................................................................................33
Filename extensions.........................................................................................................................34

ePrism Administrator's Guide
iv
Setting up users ................................................................................................................................35
Setting up users with NTLM enabled.............................................................................................38 Held messages..................................................................................................................................41
Reports..............................................................................................................................................42 Utilization report..........................................................................................................................42
Message tracking report ..............................................................................................................43 Address mapping report ..............................................................................................................45
Diagnostics ...........................................................................................................................................46 What are diagnostics?......................................................................................................................46
Vitals.................................................................................................................................................47 Advanced..........................................................................................................................................48
Email.................................................................................................................................................49 NTLM Authentication .....................................................................................................................50
Update server ...................................................................................................................................51
Tools .................................................................................................................................................52 Tunnel ...............................................................................................................................................53
HotFix Manager ...................................................................................................................................54 Accessing the HotFix Manager.......................................................................................................54
HotFix management.........................................................................................................................55 Client help ............................................................................................................................................57
ePrism users .....................................................................................................................................57 Blacklists and whitelists ..................................................................................................................58
Change password .............................................................................................................................60 Glossary ................................................................................................................................................61
Index .....................................................................................................................................................63
1
ePrism
Welcome to ePrism ePrism 500 is an email gateway solution that is designed to filter messages and optionally provide virus protection. ePrism is an appliance that is easy to install and manage, and filters email with a high degree of accuracy, increasing that accuracy over time by learning what you and your users classify as unwanted email.
How ePrism helps ePrism helps you and your organization protect against unsolicited commercial email (see Spam), viruses, malformed messages, and inappropriate content. As soon as you plug the ePrism appliance in to your system and do some basic configuration, you will start seeing results.
Email threats
Filtering email There are several threats to email that can cause organizations a great deal in lost time and productivity. They are:
• Spam
• Viruses • Malformed messages
• Inappropriate content
Spam Spam is generally classified as unsolicited commercial email. It is estimated that 60% of all email is spam, and that rate is expected to increase dramatically over the next few years.
ePrism is a "tag and pass" system. This means that generally all emails are delivered, though they may be tagged as possibly spam. When messages are tagged, the subject line of the email indicates it is potential spam. The exceptions are when emails are received and have a score at or above your spam threshold, or when attachments come through with restricted attachment types. When one of these situations occurs, the email administrator decides what to push through and what to reject.
ePrism makes use of whitelists, which identify senders who are known to comply with acceptable email protocol and pose no threat. Those emails are passed along, regardless of scoring and their spam probability, with no tagging.
You can set up rules in your email software that automatically moves tagged spam messages to a specific folder for review. An example is: "Apply this rule after the message arrives with [SPAM] in the subject move it to the Spam folder."

ePrism Administrator's Guide
2
Viruses The threat of a virus is always present. It is estimated that 80% of all viruses are spread through email. To keep viruses from entering your system, ePrism scans inbound and outbound traffic at the email gateway. The scanning separates email into its constituent parts and scans each part for potential viruses. ePrism has a virus protection module that is included with the ePrism maintenance subscription.
Malformed messages Malforming messages is a technique used by spammers to confuse filters. A malformed message is an email that has been created in a way that violates the MIME or other Internet mailing standards. Malformed messages do not happen very often, but when they do they cause serious problems. Spammers often use malformed messages to cause email hosts to fail and/or crash, causing Denial of Service attacks.
If a malformed message is detected, it affects the messages spam score. Tagging and rejecting of email messages are performed at the administrator's defined threshold. See Spam and Setting policies.
Inappropriate content There are several types of content you might consider to be inappropriate for your company's systems, including certain types of images, speech, and text. It is a good idea to develop an Acceptable Use Policy (AUP) and design your filters and policies around the AUP. Inappropriate content checks are done through scoring email messages based on common spam practices. If a message has a high spam probability score, it will be tagged as spam. See Spam and Setting policies.

ePrism
3
How ePrism works
Incoming information flow The following flowchart breaks down the way an incoming email message travels through the ePrism system.
* The following rules are applied to blacklists and whitelists:
• Global blacklists are final. A user whitelist cannot override an entry in the global blacklist.
• End users can blacklist anything, even if it is on the global whitelist. • With end user and global whitelists and blacklists, an exact match takes precedence over
a domain wildcard match.
ePrism Administrator's Guide
4
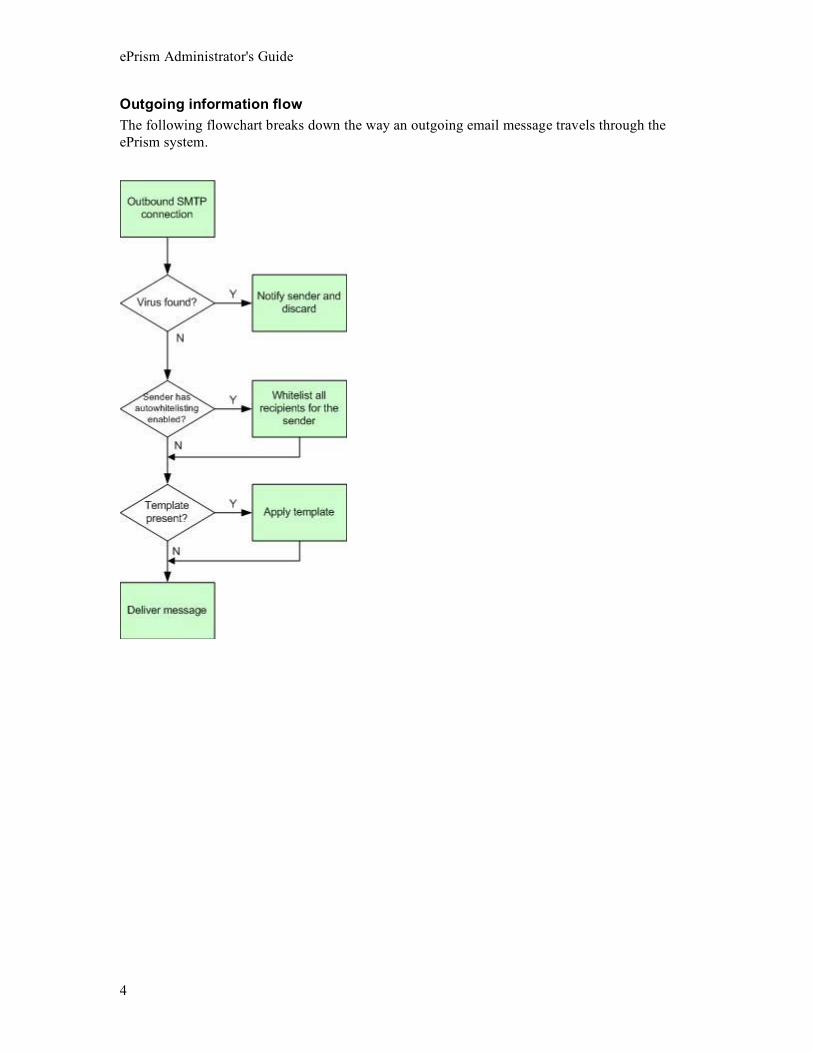
Outgoing information flow The following flowchart breaks down the way an outgoing email message travels through the ePrism system.

ePrism
5
Methods of filtering
Methods of filtering
There are several methods for filtering email that ePrism uses: • Outbound filtering
• DNS based blackhole list (DNSBL) • Distributed checksum clearinghouse (DCC)
• Attachment controls • Greylisting
• Heuristics • Sender policy framework (SPF)
Anti-virus protection (Kaspersky Labs)
Detection
Anti-virus software is included in the ePrism maintenance subscription. ePrism uses Kaspersky Labs for virus protection.
Kaspersky Labs detects nearly 100% of malicious programs without false positives. The comprehensive virus database supports accurate identification. Kaspersky Labs also protects all network components and equipment which can serve as entry points for malicious programs: workstations, file servers, mail systems, and Internet gateways.
Prevention
There are several methods for preventing viruses from entering your system. They are: setting email so that certain types of files and/or scripts cannot be opened, stripping all HTML and filtering out all attachments, running antivirus programs on the client and/or on the host, and running antivirus on the gateway/firewall. The most effective of these methods, and the one ePrism uses, consists of stripping all HTML, filtering all attachments, and running antivirus on the gateway/firewall. ePrism scans for viruses on both inbound and outbound mail.
Blacklists/whitelists
Blacklists are lists of senders (specific email addresses or by domain) that you do not want to ever receive messages from. Whitelists are lists of senders (specific email addresses or by domain) that you approve of, despite any message scoring by ePrism.
Auto whitelist
Auto whitelisting is a method where any address of an email sent outbound is automatically added to the individual users whitelist. An account that was added by the auto whitelising can be easily removed by the end user’s account.

ePrism Administrator's Guide
6
eGuard engine
eGuard is a large group of editors who are trained to identify the characteristics of spammers within various parts of email. They not only look at the title of the message, but the text, the IP address, the domain name, the HTML source, and especially the call to action of the email. Once the profile has been verified as spam, all variations of the same trick are caught by eGuard.
Heuristics
ePrism uses a spam test based on heuristics. Heuristics is a set of patterns and behavior checks developed over time to detect spam. The St. Bernard heuristics update mechanism enables St. Bernard to update the checks and stay on the forefront of spam detection.
Sender policy framework (SPF)
SPF attempts to verify that email is really coming from the sender it says it is coming from. It is designed to filter spammers who misrepresent who the email is from in the header of the email.
Discretionary greylisting
Greylisting is a method of blocking spam at the mailserver level, without using statistical analysis. Greylisting relies on the fact that most spam does not behave in the same way as normal email. The term Greylisting describes a general method of blocking spam based on the behavior of the sending server, rather than the content of the messages. Greylisting works by not accepting email the first time a sender/recipient pair is seen. The receiving server sends the sending server a temporary fail message. The sending server will typically resend the message in about 15 minutes. At that time, the receiving server will accept the message, since it is not the first time it has seen the sender/recipient pair. Greylisting helps with spam because spammers generally randomize the from addresses and usually do not re-send messages.
Discretionary distributed checksum clearinghouse (DCC)
Mail users and ISPs all over the world submit checksums of all messages received. The database records how many of each message is submitted. If requested, the DCC server can return a count of how many instances of a message have been received. ePrism uses this count to determine the disposition of a message, i.e., to detect and reject or filter spam or unsolicited bulk email. The logic behind DCC is that if email recipients could compare the email they receive, they could recognize unsolicited bulk email. Since simple checksums of spam would not be effective, the main DCC checksums ignore certain pieces of messages. The checksums change as spam evolves.

ePrism
7
Discretionary DNS based blackhole list (DNSBL)
A DNSBL is an Internet site that reports lists of IP addresses that can be queried by other machines on the Internet. Generally, these sites list known spammers, along with their IP address. You can then use this list to reject all incoming messages from the known spammer/IP addresses.
Outbound filtering
Outbound filtering scans all email being sent from your company to prevent viruses from being sent out and to check for boilerplate additions. Outbound email is automatically treated as acceptable (assuming no virus was found). Outbound email addresses are automatically added to a user’s whitelist.

8
Setup and administration
Setup and administration You can use the setup wizard to automatically change system settings, or use the ePrism System Administration tool to manually change your system. This section explains how to manually update your system settings using the System Administration tool. You can access the System Administration tool from the St. Bernard Appliance Manager. This section explains how to:
• Open the ePrism System Administration tool • Modify system settings
• Modify authentication and access to email and the Internet. • Enable antivirus software and Distributed Checksum Clearinghouse (DCC) for
unsolicited bulk email detection.
Opening the System Administration Tool Access the System Administration tool from the St. Bernard Appliance Manager.
1. Open the St. Bernard Appliance Manager.
Setup and administration
9
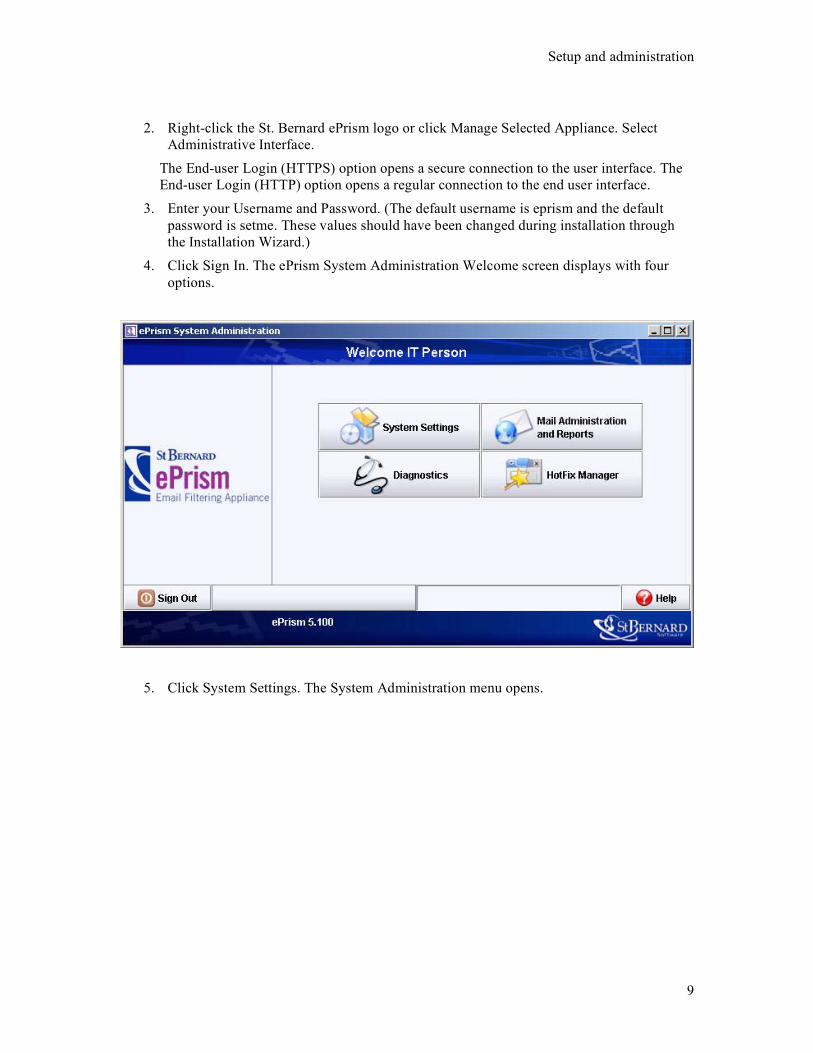
2. Right-click the St. Bernard ePrism logo or click Manage Selected Appliance. Select Administrative Interface.
The End-user Login (HTTPS) option opens a secure connection to the user interface. The End-user Login (HTTP) option opens a regular connection to the end user interface.
3. Enter your Username and Password. (The default username is eprism and the default password is setme. These values should have been changed during installation through the Installation Wizard.)
4. Click Sign In. The ePrism System Administration Welcome screen displays with four options.
5. Click System Settings. The System Administration menu opens.

ePrism Administrator's Guide
10
Modifying system settings
Modifying system settings System settings include the Registration, Settings, Network, and Backup tools to modify specific system settings.
This section explains how to: • Register ePrism
• Update the date and password settings • Update network settings
Registering ePrism
License Management
Before you can use ePrism as an evaluation or licensed user, you need to register the software. Registration occurs in the Installation Wizard but is provided as an option here for subscription renewals.
Setup and administration
11
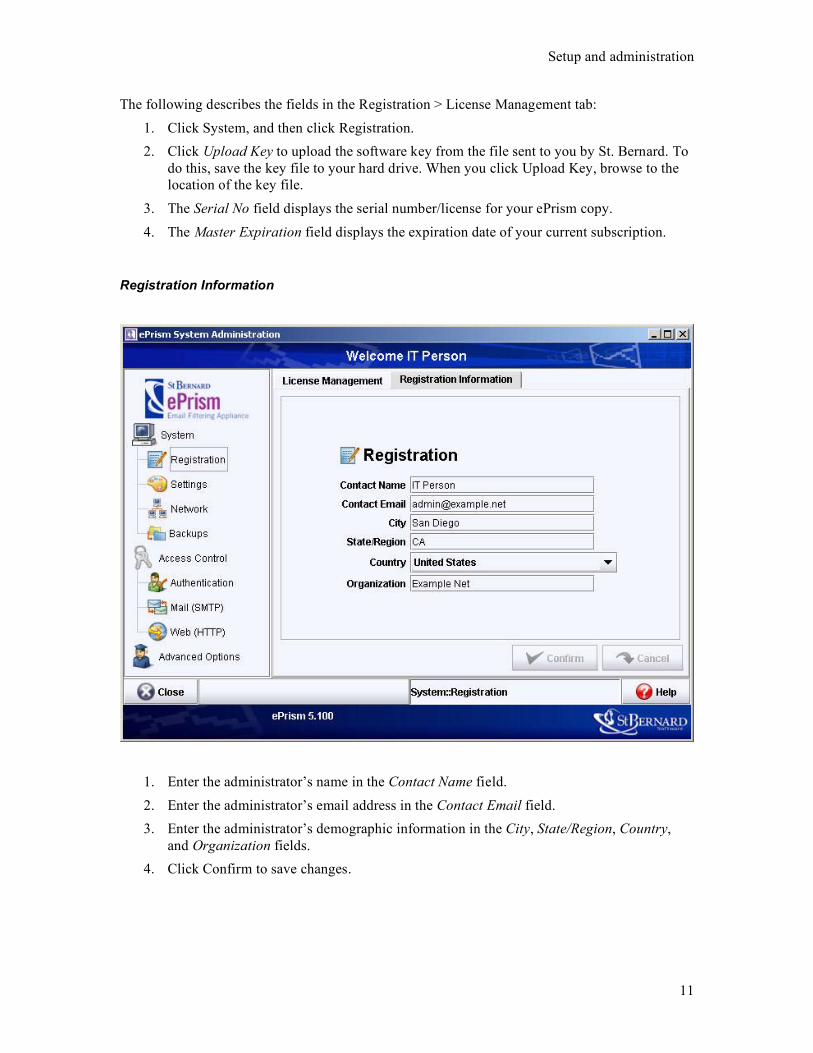
The following describes the fields in the Registration > License Management tab:
1. Click System, and then click Registration. 2. Click Upload Key to upload the software key from the file sent to you by St. Bernard. To
do this, save the key file to your hard drive. When you click Upload Key, browse to the location of the key file.
3. The Serial No field displays the serial number/license for your ePrism copy.
4. The Master Expiration field displays the expiration date of your current subscription.
Registration Information
1. Enter the administrator’s name in the Contact Name field.
2. Enter the administrator’s email address in the Contact Email field. 3. Enter the administrator’s demographic information in the City, State/Region, Country,
and Organization fields. 4. Click Confirm to save changes.

ePrism Administrator's Guide
12
Date and password settings
Updating the date and password settings
Occasionally, you may find it is necessary to update the ePrism date/time and update the administrator’s password.
Adjust the Date and Time Change the Administrator Password
Adjusting the date and time
Use the Adjust Date & Time dialog box to change the ePrism time zone and time settings. You can set the time manually, or synchronize the time on the network using Network Time Protocol (NTP).
1. Click System and then click Settings.
2. Select a time zone from the Timezone drop-down menu. 3. Choose one of the following:
• Select Time, and then select a date and time. Click Set Now when you are finished. • Select Use NTP, and then enter the IP address of the server in the Server field to
synchronize ePrism with your servers.
4. Click Confirm to save changes.
Setup and administration
13
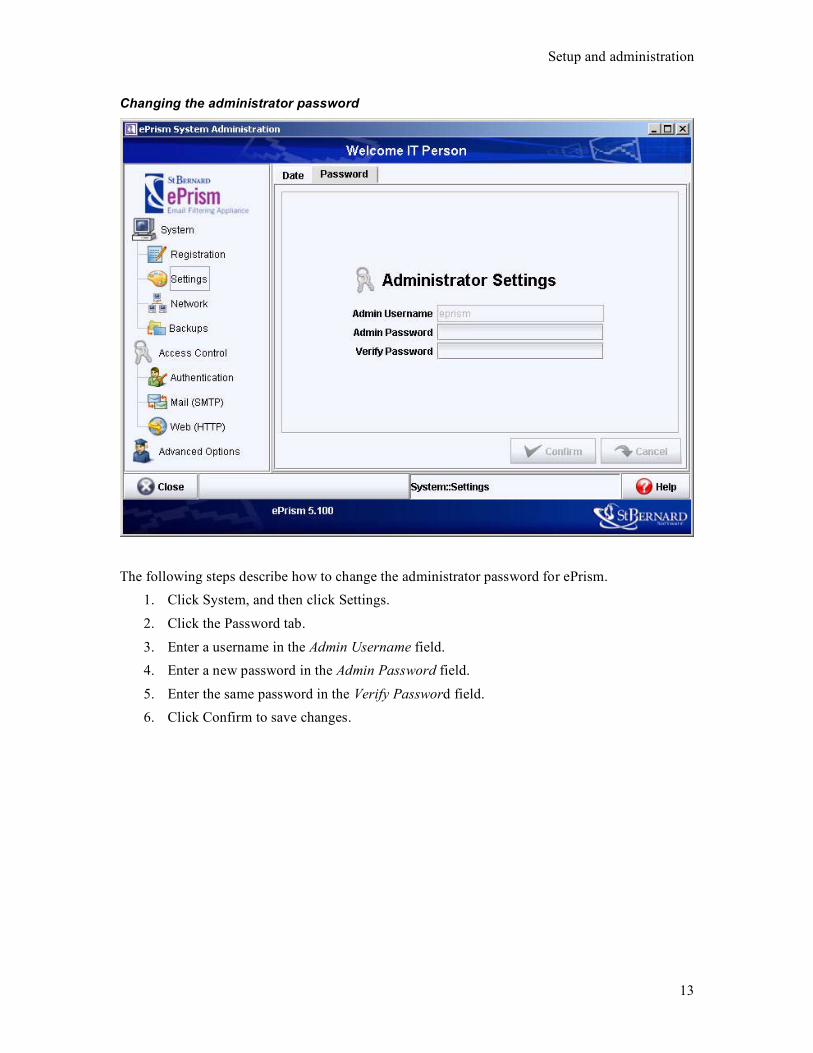
Changing the administrator password
The following steps describe how to change the administrator password for ePrism. 1. Click System, and then click Settings.
2. Click the Password tab.
3. Enter a username in the Admin Username field. 4. Enter a new password in the Admin Password field.
5. Enter the same password in the Verify Password field. 6. Click Confirm to save changes.

ePrism Administrator's Guide
14
Update network settings
Set network settings
Set/update your host name, nameserver, mode, IP address, netmask, and default network route on the Network tab.
1. Enter the host name in the ePrism Hostname field. The host name is the logical name assigned to the ePrism hardware.
2. Enter the nameserver in the Nameserver field. The nameserver is the IP address for the Domain Name Server (DNS).
3. In the Mode field, select one of the options from the drop-down menu that defines your network. The options are:
• Auto – Uses an automated detection process to determine what type of network you have. This is the recommended setting (see note below for more information).
• 10BaseT/UTP/full duplex – 10Mbps network where data is transmitted and received over the same channel simultaneously.
• 10BaseT/UTP – 10Mbps network where data is transmitted in both directions, but only one direction at a time.

Setup and administration
15
• 100BaseT/UTP/full duplex – 100Mbps network where data is transmitted and received over the same channel simultaneously.
• 100BaseT/UTP – 100Mbps network where data is transmitted in both directions, but only one direction at a time.
4. Enter the IP address in the IP Address field.
5. Enter the network mask in the Netmask field. The network mask is a binary pattern that is stored in the client machine, server, or router and is matched with the IP address.
6. Enter the default route in the Default Route field. The default route is the IP address of the device (usually a router) that lies between the logical network (subnet) and the Internet. This address should be on the same logical network as ePrism. The route specifies the location on the network where all non-local traffic should be sent.
7. Click Confirm to save changes.
Network routes
Since ePrism is a network appliance, it needs to know how to exchange packets of information within your network and outside of your network over the Internet. ePrism monitors workstations and servers that are attached to the same IP network. However, if you want ePrism to communicate with workstations on other IP networks, you must define "static routes" to these networks so ePrism can access them.
Use the Routes tab to add or delete network routes.

ePrism Administrator's Guide
16
1. Select the Routes tab. 2. Add or delete a route:
• To add a route, click Add Route. Enter the route IP Address, and click OK. • To delete a route, select the network route that you want to remove from the list
and click Delete Selected. 3. (Optional) Select Listen to RIP to detect and notify changes in the routing table via
Routing Information Protocol (RIP) if your routers use this protocol. When ePrism listens to RIP, changes to local network configurations automatically propagate to ePrism. If using RIP is not an option, you need to create static routes for ePrism to communicate with workstations on a different IP network.
4. Click Confirm to save changes.
Update backup and restore settings
Backups configuration
In the Backups tab, you start a configuration backup, which backs up all of your settings to a local file. This backup can be used to quickly bring new hardware back to the settings recorded at the time of the backup (in the event that a replacement ePrism is necessary). It should be noted that bulky, transient data, such as in transit email messages, are not backed up. They are likely to have passed through ePrism by the time a restoration is attempted and as such are not candidates for archiving/restoring.

Setup and administration
17
1. Click Start Backup. 2. Select a location for the backup file to be saved to.
3. Click OK.
Restore
Use the Restore tab to restore configuration settings you have previously backed up. Note: You can only do a restore of a backed up configuration. A restore is typically used in the case of a hardware failure. Restoring to an already configured ePrism removes the current configuration and replaces it with the settings from the restore file.
1. Click the Start Restore button.
2. Browse to the location of the backup file and select it. 3. Click OK.

ePrism Administrator's Guide
18
Modifying access control
Access control In the Access Control windows, you can require and set authentication, and set up regular mail and web mail servers, addresses, and protocols.
• Access Authentication • Mail (SMTP)
• SMTP inbound • SMTP relayers
• SMTP outbound • Web (HTTP)
• Web HTTP • Web SSL
Setting authentication The Windows® NT LAN Manager (NTLM) authentication feature lets ePrism access NT users directly from Windows domain controllers. This enables ePrism to seamlessly authenticate NT users and obtain NT group assignments.
In the NTLM tab you can set up authentication as an ePrism requirement, and specify the NT domains, accounts, login names, and login passwords for authentication.
Setup and administration
19
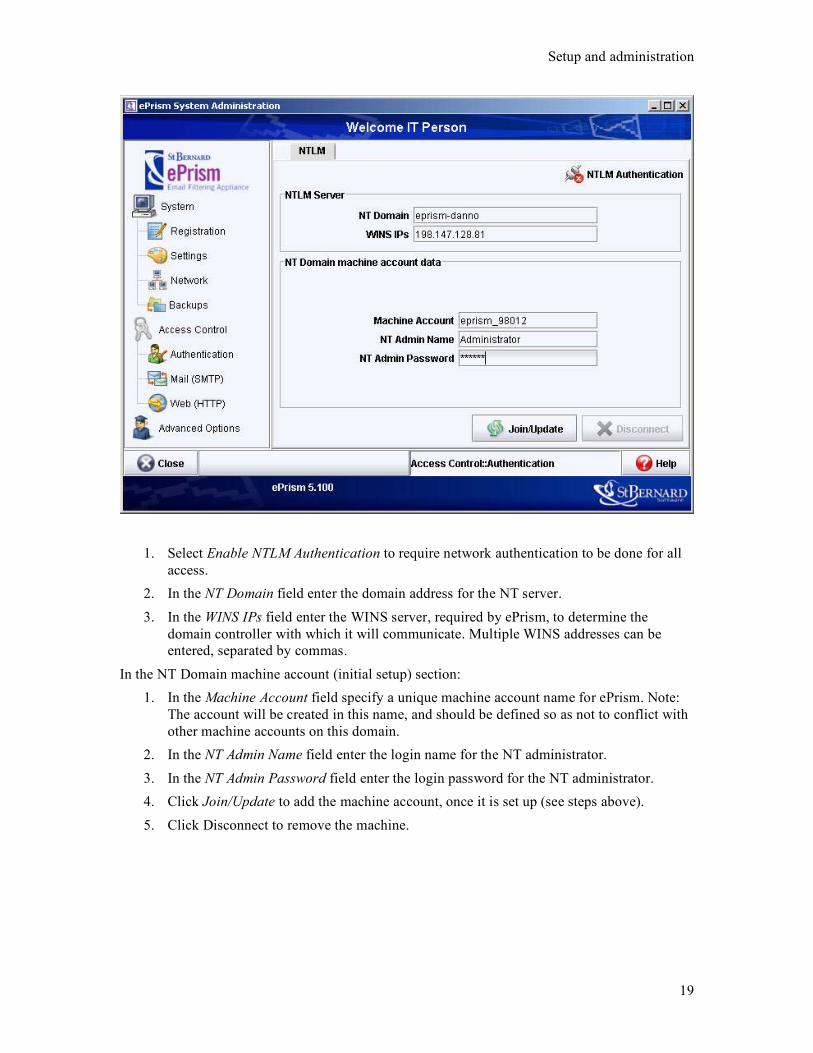
1. Select Enable NTLM Authentication to require network authentication to be done for all access.
2. In the NT Domain field enter the domain address for the NT server.
3. In the WINS IPs field enter the WINS server, required by ePrism, to determine the domain controller with which it will communicate. Multiple WINS addresses can be entered, separated by commas.
In the NT Domain machine account (initial setup) section: 1. In the Machine Account field specify a unique machine account name for ePrism. Note:
The account will be created in this name, and should be defined so as not to conflict with other machine accounts on this domain.
2. In the NT Admin Name field enter the login name for the NT administrator.
3. In the NT Admin Password field enter the login password for the NT administrator. 4. Click Join/Update to add the machine account, once it is set up (see steps above).
5. Click Disconnect to remove the machine.

ePrism Administrator's Guide
20
Mail (SMTP)
SMTP overview
Simple Mail Transfer Protocol (SMTP) is a reliable and efficient text-based (plain text and binary files) email protocol where recipients are identified (and verified) and then the message is delivered. An SMTP process can transfer mail over the same network, or to another network through a relay or gateway.
Setting SMTP mail inbound
Inbound email is email from the Internet to the organization (ePrism does not see local email or email to/from people within the organization). You need to set the domains ePrism accepts email for, and the location to send the messages for each domain (internal email server). When you target an internal server, the mxlookup and mode fields control how the mail gets to the server.
1. Click Add to enter a domain map. Enter the email domain and email server IP address. Leave the mxlookup and mode fields at their default values of false (f) and SMTP.Click Delete to delete a domain map.
2. Click Confirm to save changes.
Setup and administration
21
Setting SMTP mail relayers
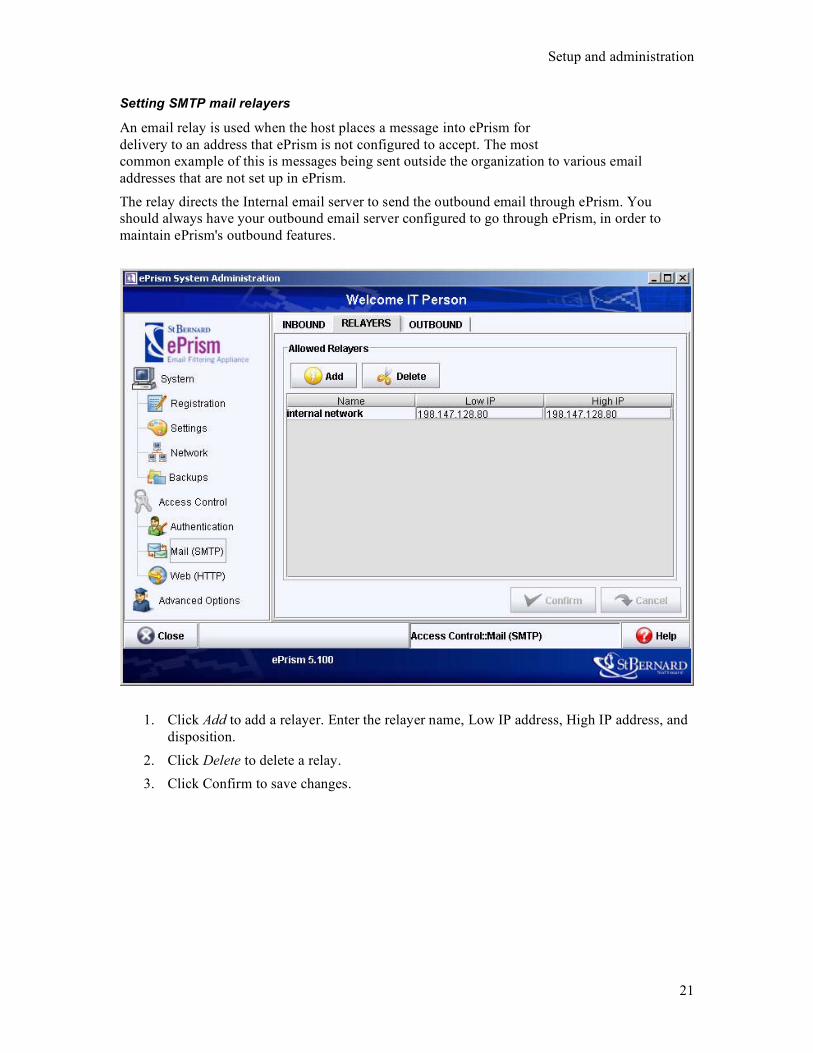
An email relay is used when the host places a message into ePrism for delivery to an address that ePrism is not configured to accept. The most common example of this is messages being sent outside the organization to various email addresses that are not set up in ePrism.
The relay directs the Internal email server to send the outbound email through ePrism. You should always have your outbound email server configured to go through ePrism, in order to maintain ePrism's outbound features.
1. Click Add to add a relayer. Enter the relayer name, Low IP address, High IP address, and disposition.
2. Click Delete to delete a relay. 3. Click Confirm to save changes.

ePrism Administrator's Guide
22
Setting SMTP mail outbound
Outbound email is email from the organization to the Internet (ePrism does not see local email, or email to/from people within the organization). In this window, you set the internal IP addresses so that ePrism can recognize that it is outbound email based on the IP address it is coming from.
1. Click Add to add the local IP address ranges. Enter the name of the group, the Low IP address, and the High IP Address.
2. Click Delete to delete a group.
3. Click Confirm to save changes.

Setup and administration
23
Web HTTP HyperText Transfer Protocol (HTTP) is the primary method for transferring information over the Internet. An HTTP client initiates a request using a TCP/IP port connection on a remote host. When the request is received, the server responds. End users can log in to ePrism to maintain whitelists and blacklists. The IP addresses defined here control the IP addresses allowed to access ePrism via the web. The Installation Wizard collects internal IP addresses and copies them here. Also, the outbound SMTP email control creates a list and copies it here. In this window, you can configure the addresses allowed in through the web separately from the internal addresses.
1. Click Add to add eligible web access addresses. Enter a name for the group, the Low IP address, and the High IP address.
2. Click Delete to remove web access from selected IP addresses.
3. Click Confirm to save changes.

ePrism Administrator's Guide
24
Setting advanced options In the Advanced Options window, you can enable/disable antivirus protection and the Distributed Checksum Clearinghouse (DCC).
1. Select Enable DCC to have messages scanned by the DCC prior to delivering them. See Distributed Checksum Clearinghouse.
2. Select Enable Antivirus Scan to use the ePrism antivirus program (Kaspersky Labs is included with the ePrism maintenance subscription) to scan all messages for viruses before receiving/sending. Or, to disable it, deselect it. Note: If you do not have a Kaspersky licence key or your license key is expired, this area is greyed out and you cannot enable antivirus scans.
3. Click Confirm to save changes.

25
Administration settings
Administration settings In the administration settings windows, you set up your users and their addresses, as well as identify what you consider spam and how you want to handle it. You can:
• Set global settings • Set global whitelists and blacklists
• Set policy settings • Define acceptable filename extensions
• Set up users • Identify special addresses
• Run reports
To access the administration settings:
1. Log in to the Appliance Manager. 2. Select Mail Administration and Reports.

ePrism Administrator's Guide
26
Setting global values In the Global Settings section, you set rules that apply to all incoming email in your organization.

Administration settings
27
1. Click Administration.
Note: DNSBL is a spam identifying technique by which DNS is used to detect the presence of a host in a blacklist database. When ePrism receives a message, it can query one or more blacklists to determine if they consider the sending host to be blacklisted. If they do, ePrism tags the message as spam. ePrism is most effective at detecting the true originating host when ePrism understands which hosts in your domain's email routing should be ignored (like your ISP or other mail exchangers for your domain).
2. In the Secondary MX machines which will relay to ePrism field, enter the IP address of the secondary MX host that queues email if the primary host is down. If there is more than one secondary MX host, separate the addresses by a comma. They relay the queued email back to the primary host when the primary MX host comes back on line. DNSBL and SPF effectiveness is maximized when ePrism is provided with a list of your secondary (or backup) mail exchangers. Not doing so could open a mail routing path in which the DNSBL lookup is not provided with the true sending host, resulting in a missed opportunity to tag a message as spam.
3. Enter a value for Consider hosts found on these DNSBLs to be spammers. This value is the hostname of the DNSBL server(s). This field can take one or more values. If there is more than one DNSBL, separate them by a comma. Leaving this field empty disables DNSBL checks. When ePrism receives an inbound email, ePrism queries the DNSBL server(s) against the sender's IP address. If the DNSBL server says the sender is a spammer, ePrism automatically marks the email as spam, regardless of the spam score.
Note: Network based checks such as DNSBL and SPF rely upon services outside of ePrism. Message latency through ePrism can be impacted by enabling such checks. The amount of delay can vary and is normally not noticed by recipients. However, if a network service is slow or fails to respond and a user at your organization is waiting for a message to be delivered, the network checks may not be desirable.
4. In the Enable Greylisting field, select an option from the pull-down menu:
• Per-Recipient—performs greylisting per the recipient of the message. • No—greylisting will not be used.
Greylisting is used as an anti-spam measure. Per-recipient greylisting tracks sender/recipient pairs. The first time an inbound sender/recipient pair is seen, a one-time "try again later" message is sent. This effects spammers who randomize from address and only make one delivery attempt. New delivery attempts will have a slight delivery delay with greylisting enabled (usually about 15 minutes), however, further delivery attempts will be processed normally.
5. In the Track sender/recipient when greylisting is disabled field, select Yes to track the sender/recipient or select No to not track this data. Turning tracking on for several weeks prior to enabling greylisting can help build sender/recipient pairs, potentially avoiding delivery delays with greylisting.
6. In the Enable Sender Policy Framework (SPF) checks field, select yes or no. Selecting yes enables SPF checks, which verifies that a message is truly coming from the domain name indicated in the From field. Selecting no means SPF verification will not take place.

ePrism Administrator's Guide
28
7. In the Send Welcome Messages to unknown addresses field, select Yes to send welcome messages when an email address is encountered for the first time, or select No to not send welcome messages. Sending welcome messages helps the end user create mappings between their login account and their mailbox addresses. Each address ePrism encounters receives a unique welcome message containing a link to associate the target address with their login account.
8. In the Email address to notify of held messages field, enter the email address notifications should be sent to when messages are being held. Summary reports of the messages being held (inbound messages containing restricted file extension attachments) are sent nightly.
9. Click Submit Changes.
Setting global whitelists/blacklists Addresses can be added to global whitelists and blacklists (see Blacklists/Whitelists for more information about what whitelists and blacklists are). The following rules are applied to blacklists and whitelists:
• Global blacklists are final. A user whitelist cannot override an entry in the global blacklist.
• End users can blacklist anything, even if it is on the global whitelist.
• With end user and global whitelists and blacklists, an exact match takes precedence over a domain wildcard match.
ePrism also has an auto-whitelisting feature. Auto-whitelisting occurs when an internal sender sends an email to an external address. That external address is associated with the internal account, and the pair is automatically whitelisted. Auto-whitelisting occurs even if addresses are not mapped to specific accounts. In addition, auto-whitelists entries that are still mapped to the default "eprism" account are moved to the personal whitelist when the address is associated with a specific account.

Administration settings
29

ePrism Administrator's Guide
30
To add an address or domain to your global whitelist:
1. The Whitelist section displays addresses/domains already in your whitelist. Enter an email address ([email protected]) or a domain (@acme.com) that you want to receive all messages from.
2. Click the Add button.
To delete a whitelist address or domain:
1. Select the address and/or domains in the Whitelist section. 2. Click Delete Selected.
To add an address or domain to your global blacklist:
1. The Blacklist section displays addresses/domains already in your blacklist. Enter an email address ([email protected]) or a domain (@acme.com) that you do not want to receive messages from.
2. Click the Add button. To delete a blacklist address or domain:
1. Select the address and/or domains in the Blacklist section. 2. Click Delete Selected.
Setting policies In the Policy Settings section, you identify the values you want to associate with spam, and how you want spam to be handled. You can keep the default values set up by St. Bernard.
All incoming messages are assigned a spam value by ePrism. This value is derived by using an algorithm that compares several aspects of an email message, including header, sender, and content information with values that are known to be spam. The higher the score, the more likely the message is spam. A score near five usually indicates spam. You can adjust your values to be more aggressive (entering a lower number, so more messages get tagged as spam) or less aggressive (by entering a higher number, fewer messages get tagged as spam).

Administration settings
31

ePrism Administrator's Guide
32
1. Click Administration. 2. Enter a value between 5 and 2000 in the Reject messages whose spam score is greater
than this value field. If a message comes in with a value higher than the one set, the message will be rejected outright. A safe reject threshold is usually in the 20–30 range.
3. Enter a value between 1 and 100 in the Tag the subject of messages whose spam score is greater than this value field. When a message comes in with a value higher than the one set, the message will be delivered, but it will be identified as spam. A score near five usually indicates spam.
Note: The tag threshold cannot be larger than the reject threshold. If the tag and reject thresholds are the same, no tagging occurs. Emails scoring below the threshold are delivered, and emails scoring equal to or greater than the threshold are rejected.
4. If you want to tag messages identified as spam by adding text and the spam score to the subject line, enter the text you want to add in the String to put in tagged subjects field. An example would be SPAM:%* %?. The special characters are defined as follows:
• %*—replaced with a string of asterisks, where the length of the string is equal to the integer of the spam score.
• %?—replaced with the reason the message was tagged, such as Spam-Score or HoldSender, etc.
• %d—replaced with the actual spam score as a decimal number (for example, 13.6).
• %h—replaced with the actual spam score as an integer (for example, 0013). • %%—replaced with a % sign.
5. In the Footer text to attach to outbound plain-text messages field, enter any plain text you want appended to outgoing messages. An example would be company confidential statements.
6. In the Footer text to attach to outbound HTML messages field, enter text (in valid HTML code) you want appended to all HTML email messages for the stream. If you enter text in the plain-text box, but leave the HTML box empty, ePrism uses the plain-text data, surrounded by <pre> and </pre> tags, for HTML messages.

Administration settings
33
Identifying special addresses When ePrism encounters an internal address it has not seen before, it sends the address a welcome message with instructions about how to access ePrism and customize settings. If there are addresses you do not want to send this message to (mailing lists, problem tracking systems, etc.), enter the address in this window. The welcome message will then be sent to the mail administrator instead.
1. Click Special Addresses. 2. Enter the email address in the field next to the Add button.
3. Enter a description of the address in the Description field. The description should contain information about what the address is (for example, Mailing List).
4. Click Add. 5. To delete an address that you have already set up, select the address in the top portion of
the window, then click Delete Selected.
6. To modify an address, select the address and then click Modify Selected. Make any changes you want to make to the address.

ePrism Administrator's Guide
34
Filename extensions In the Filename Extensions screen, define different types of file extensions and what action ePrism should take when defined extensions come through your email system. Extensions that are not listed are not restricted.
1. Enter an extension in the field next to the Add button.
2. Select Hold to hold emails with that type of attachment. Select Reject to reject emails with that type of attachment.
3. To delete an extension type, select the extension and click Delete Selected.

Administration settings
35
Setting up users User accounts on ePrism (whether authenticated from locally defined names and passwords or from a Windows domain via NTLM) are simply a place to whitelist/blacklist settings in order to apply email addresses that are mapped to the account. The User Accounts section of the Mail Administrator is where you set up ePrism accounts and users.
Note: The "eprism" account cannot be deleted, and represents the place that all unmapped addresses are found. It is the "default" account.
View an account
1. Click User Accounts. A list of users set up in ePrism displays. 2. In the View by drop-down menu, select how the accounts should display:
• Account— Displays the account by the account name. • Address— Displays accounts by email addresses.

ePrism Administrator's Guide
36
3. Select an address, and then click Delete selected to delete the selected email address associated with the account. Accounts can have multiple email addresses associated with them.
4. Click Add to add an account.
Create an account If you have NTLM enabled, see Setting up users (NTLM enabled).
1. Click Add. 2. In the Name field, enter a unique, single word user name..
3. Enter a password for the user in the Enter field. 4. Re-enter the user password in the Verify field. The password must exactly match the one
you typed in the Password field. 5. Click Create Account. The new user appears in the User Accounts window.
6. Click Cancel to cancel the account creation.
7. To add or delete an account, select the account, and then click Add or Delete respectively.

Administration settings
37
Adjust account settings If you have NTLM enabled, see Setting up users (NTLM enabled). Once an account has been created, you can click on the account to adjust the account settings.
1. Click the account you want to edit. 2. Select Block all messages addressed to this account to not let any emails through. This
can be useful if an employee leaves the organization but you don't want to delete their account.
3. Select Check messages addressed to this account for spam to run a spam check on all messages addressed to the selected account. This can also be used to create accounts that do not get checked for spam (to opt-out). You can create a single opt-out account and associate any addresses that should not get spam checked with that account. Note: Virus checking still occurs, even on email going to an opt-out account.
4. Using the Enter and Verify fields, change the password associated with this account. Enter the password in the Enter field, and then re-enter it in the Verify field.
5. In the Add email field, enter other email addresses to link to/associate with this account.

ePrism Administrator's Guide
38
Setting up users with NTLM enabled With NTLM enabled, you can choose to create ePrism locally defined name/password accounts (local accounts), or you can identify a Windows account name (used for authentication via NTLM). Note: If NTLM is in use, then NTLM user accounts are created automatically, and a welcome message is sent to each user. The User Accounts section of the Mail Administrator is where you set up ePrism accounts and users. All name and password information comes from the Windows domain. ePrism associates mail filter settings (whitelists and blacklists, for example) with the Windows account. Note: The "eprism" account is a special local account (the default mapping for email addresses) and cannot be deleted. You can identify NTLM accounts by the backslash in the account name. Local accounts never have a backslash.
View an account

Administration settings
39
1. Click User Accounts. A list of users set up in ePrism displays.
2. In the View by drop-down menu, select how the accounts should display: • Account— Displays the account by the account name.
• Address— Displays accounts by email addresses. 3. Click Delete selected to delete the selected email address associated with the account.
Accounts can have multiple email addresses associated with them. Delete only deletes ePrism settings, not information on the Windows domain.
4. Click Add to add an account.
Create an account (NTLM)
1. Click Add. 2. In the Name field, enter a unique, single word user name.
3. Select Associate with an NTLM account in domain and select the associated domain to associate the account with an already existing account on the network. Or, select Create an ePrism local account, with password to create an account specifically on ePrism for the user.
4. If you are creating a local ePrism account, enter a password for the user in the Enter field.

ePrism Administrator's Guide
40
5. If you are creating a local ePrism account, re-enter the user password in the Verify field. The password must exactly match the one you typed in the Password field.
6. Click Create Account. The new user appears in the User Accounts window.
7. Click Cancel to cancel the account creation. 8. To add or delete an account, select the account, and then click Add or Delete respectively.
Delete only deletes ePrism settings, not information on the Windows domain.
Adjust account settings (NTLM)
1. Click the account you want to edit. 2. Select Block all messages addressed to this account to not let any emails through. This
can be useful if an employee leaves the organization but you don't want to delete their account.

Administration settings
41
3. Select Check messages addressed to this account for spam to run a spam check on all messages addressed to the selected account. This can also be used to create accounts that do not get checked for spam (to opt-out). You can create a single opt-out account and associate any addresses that should not get spam checked with that account. Note: Virus checking still occurs, even on email going to an opt-out account.
4. Click Submit Changes to save the changes and return to the User Accounts window.
5. In the Add email field, enter other email addresses to link to/associate with this account. 6. Click Delete selected to delete a specific email address (from ePrism, not from the
Windows network) associated with the account.
Held messages The Held Messages section displays a list of all messages that are queued as pending. These messages require the mail administrator to determine their disposition.
Click on the subject of the message to open the message.
To change the disposition of held messages, in the Status and Action column: • Select/keep the question mark column to keep the message in pending (hold) status.
• Select the check mark column to approve the message for delivery • Select the x column to reject the message
Click Submit Changes to change the disposition of the messages.
Click Reject All to reject (not deliver) all of the held messages.

ePrism Administrator's Guide
42
Reports
Utilization report The utilization report displays the inbound and outbound message counts processed through ePrism. The report includes email size information as well as totals. You can select different amounts of time to report on.
Use the Report on activity over past drop-down menu to select the amount of time you want to report on. The options are:
• Today—shows results for the current day, starting at midnight through the current time.
• Yesterday—shows the results for the previous day. • Previous 7 days—shows results for the previous week.
• Previous month—shows results for the previous month. • Previous year—shows results for the previous year.
The Size column shows the minimum, maximum, and average size, along with percent of total (the total percentage of messages in the category compared to all messages in all categories). The Message column shows the actual email count and percentage of total for each category.
Click Email this Page to send the report through email.

Administration settings
43
Message tracking report The message tracking report enables you to search all emails that have passed through ePrism based on parameters, such as sender, recipient, and/or subject.
1. Select Sender if you want to search emails by sender.
2. Select Recipient if you want to search emails by recipient. 3. Select Subject if you want to search emails by subject.
4. Enter Keywords if you want to search based on specific words. 5. Select Filter by Status to filter the report based on the selected message status.
6. Enter Starting and Ending time periods* to search a time range. The date range fields accept several different types of entries. Some examples are: Dates: Notes:
1972-09-24 ISO 8601
72-9-24 Assume 19xx for 69 - 99 Assume 20xx for 00 - 68
72-09-24 Leading zeroes are ignored
9/24/72 Common U.S. writing
24 September 1972
24 Sept 72 September special abbreviation
24 Sep 72 Three letter abbreviations

ePrism Administrator's Guide
44
allowed
Sep 24, 1972
24-sep-72
24sep72
Time of Day:
20:02:00.000000
20:02
8:02pm
20:02-0500` In U.S. Eastern Standard Time (EST)
Days of the Week:
Monday Spelled out
Mon Three letter abbreviation
Last Thu Subtract one week from Thursday
Next Fri Add one week to Friday
Third Mon Adds three weeks to Monday
Relative Items:
1 week ago 7 days prior
2 days ago
now
today
Combinations:
7:00pm last Tue
* For more information regarding date formats, please go to: http://www.gnu.org/software/tar/manual/html_chapter/tar_7.html
7. Click Search Messages to begin your search. The results appear under Search Results. 8. Click Email this Page to send the report through email.
Administration settings
45
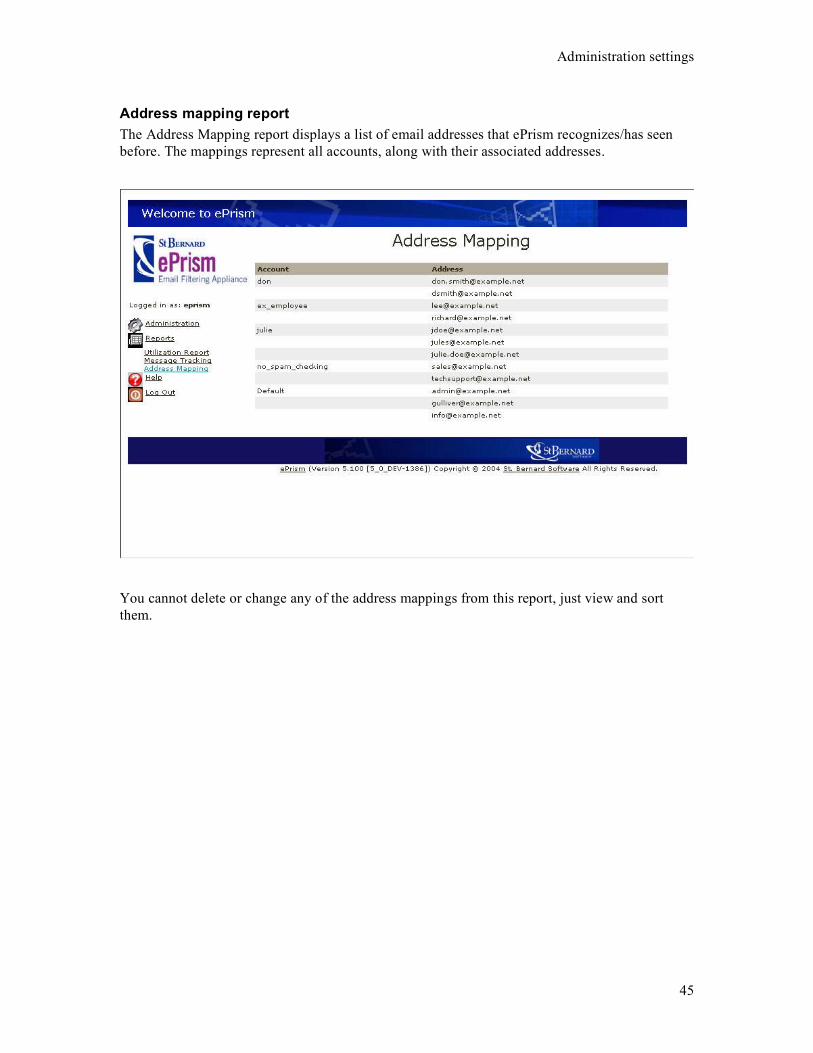
Address mapping report The Address Mapping report displays a list of email addresses that ePrism recognizes/has seen before. The mappings represent all accounts, along with their associated addresses.
You cannot delete or change any of the address mappings from this report, just view and sort them.

46
Diagnostics
What are diagnostics? The diagnostics area in ePrism is where you can run system tests and get system help to resolve any problems you might be having. The specific areas involved in the diagnostics are:
• Vitals (system tests for problem diagnoses) • Advanced vitals (additional detailed system test information)
• Email (test emails) • Authentication (check ePrism user authentication if using NTLM)
• Update server (check ePrism connectivity to the St. Bernard update server) • Tools (diagnose connectivity and configuration issues)
• Tunnels (used in conjunction with St. Bernard Technical Support to establish a secure link)
To access the administration settings: 1. Log in to the Appliance Manager.
2. Select Diagnostics.

Diagnostics
47
Vitals Use the Vitals option in the Diagnostics menu to run system tests to help diagnose problems you might have in ePrism.
1. Click Run/Refresh to run system defined tests to help diagnose problems.
2. The Results section displays the results of the system tests. If you have any areas of conflict, you can make changes to your setup, and then click Run/Refresh again to make sure the conflict is resolved.
3. Click Save Results to save the results of the system test. 4. Click Send to Technical Support to send the results of the system test to St. Bernard
Technical Support for assistance.
ePrism Administrator's Guide
48
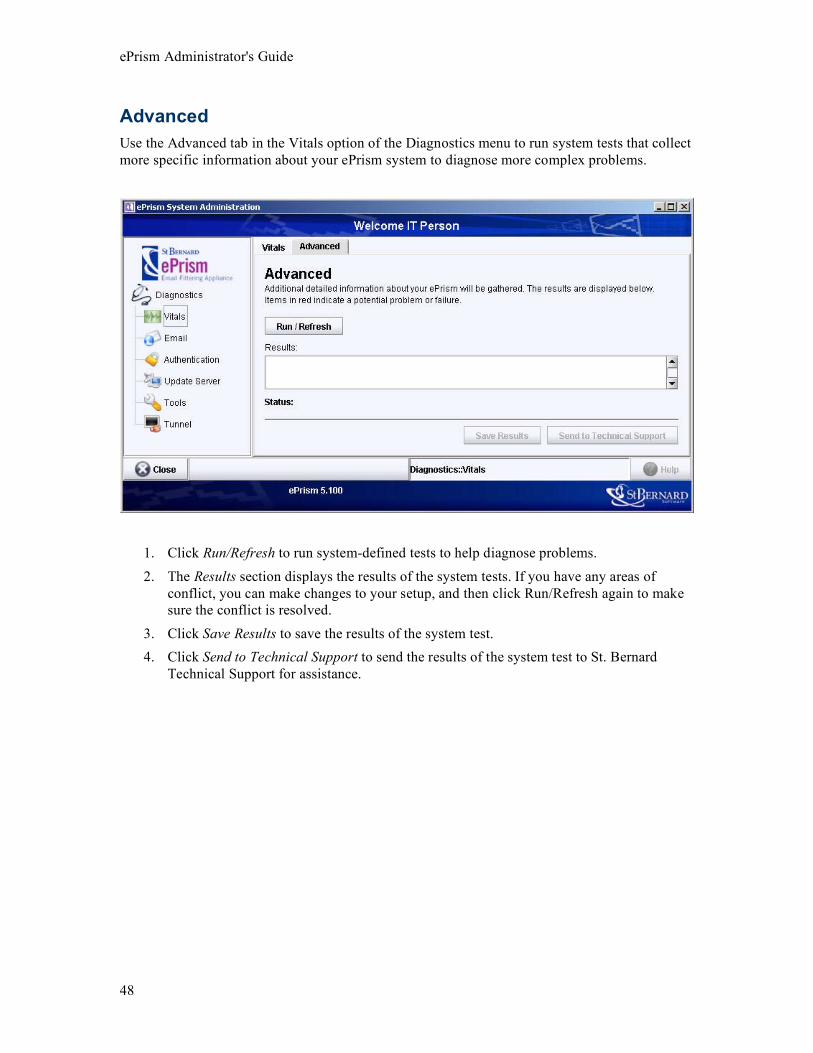
Advanced Use the Advanced tab in the Vitals option of the Diagnostics menu to run system tests that collect more specific information about your ePrism system to diagnose more complex problems.
1. Click Run/Refresh to run system-defined tests to help diagnose problems.
2. The Results section displays the results of the system tests. If you have any areas of conflict, you can make changes to your setup, and then click Run/Refresh again to make sure the conflict is resolved.
3. Click Save Results to save the results of the system test. 4. Click Send to Technical Support to send the results of the system test to St. Bernard
Technical Support for assistance.

Diagnostics
49
Email Use the Email option in the Diagnostics menu to send a test email through ePrism to a specific recipient.
1. In the Email Address field, enter the email address of the intended recipient.
2. Click Send Test Email to send a test email to the recipient. 3. The Results section displays the email processes and any errors that occur.
4. Click Save Results to save the test email results.
5. Click Send to Technical Support to send the results of the test email to St. Bernard Technical Support for further assistance.

ePrism Administrator's Guide
50
NTLM Authentication NTLM authentication allows a user to log in to ePrism using credentials not maintained on ePrism. The authentication source is queried when validating the username and password. ePrism only supports the use of Windows NTLM authentication. The administrator must configure ePrism to exchange information with the Windows environment (Access Control > Authentication)
Use the Authentication option in the Diagnostics menu to ensure users can authenticate, check the list of trusted domains, and view the key created when ePrism was added to the network.
1. In the Username field enter the administrator user name. 2. In the Password field enter the administrator password.
3. The Domain drop-down menu is used with the "Attempt Authentication" option. The administrator can perform the same steps as a user, with the results appearing in the Results section.
4. Click Refresh Domains to query the Windows server to determine what domains are supported or "trusted."
5. Click Attempt Authentication to attempt an authentication using the username, password, and domain entries.
6. Click Check Secret to verify that ePrism and the Windows servers still have a secure exchange of information, and can pass security data back and forth.
7. Click Save Results to save the results of the authentication check.
8. Click Send Results to Technical Support to send the results of the authentication check to St. Bernard Technical Support for further assistance.

Diagnostics
51
Update server Use the Update Server option in the Diagnostics menu to check the ePrism connectivity to the St. Bernard update server (IUS).
1. Click Ping IUS Server to verify ePrism can find the St. Bernard update server (IUS) over the Internet.
2. Click Attempt Connection to connect to the St. Bernard update server (IUS) and check for updates, patches, new filters, etc.
3. The Results section shows the results of the attempted ping or connection and whether or not it was successful.
4. Click Save Results to save the results of the ping and/or connection.
5. Click Send to Technical Support to send the results of the ping/connection to St. Bernard Technical Support for further assistance.

ePrism Administrator's Guide
52
Tools Use the Tools option in the Diagnostics menu to assist with connectivity and configuration problems.
1. In the Host field enter the hostname to use when querying for information. This is usually an email domain, such as acme.com.
2. In the Name Server field enter the nameserver IP address to use when querying for information about the host. You can leave the default value in this field.
3. Click Ping to ping the host. 4. Click Trace to trace the host.
5. Click Name Lookup to resolve a hostname. ePrism uses the nameserver entry to resolve the name.
6. Click MX Lookup to resolve an MX name. ePrism uses the hostname entry to resolve the name.
7. The Results section displays the results of ping, trace, or other action taken.
8. Click Save Results to save the results of the tools actions.
9. Click Send to Technical Support to send the tools results to St. Bernard Technical Support for further assistance.
Diagnostics
53
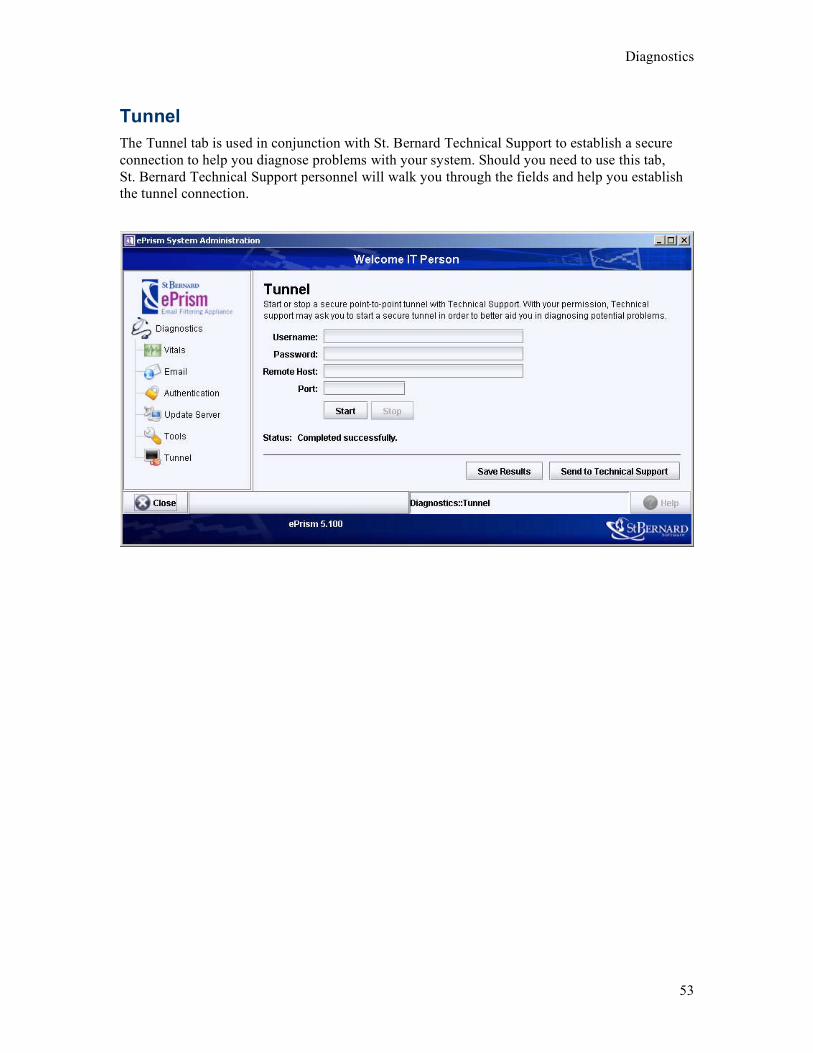
Tunnel The Tunnel tab is used in conjunction with St. Bernard Technical Support to establish a secure connection to help you diagnose problems with your system. Should you need to use this tab, St. Bernard Technical Support personnel will walk you through the fields and help you establish the tunnel connection.

54
HotFix Manager
Accessing the HotFix Manager The HotFix Manager provides an interface for tracking ePrism updates and patches (hotfixes). Using the HotFix Manager, you can check for new updates, view available updates, view which updates are already installed, and manually install/uninstall hotfixes.
To access the administration settings:
1. Log in to the Appliance Manager. 2. Select HotFix Manager.

HotFix Manager
55
HotFix management
Keep up to date:
The Keep up to date section is where you can check for new hotfixes, and reboot your system to activate hotfixes you have just installed.
1. Click Check for new HotFixes to query the St. Bernard update server (IUS) to check for new hotfixes.
2. Click Reboot the system to reboot your machine after installing new hotfixes.

ePrism Administrator's Guide
56
Available HotFixes:
The Available Hotfixes section displays a list of hotfixes available for ePrism. This list comes from the last time you queried the St. Bernard update server (IUS). If you select a hotfix to install, and the hotfix is dependent upon earlier hotfixes, all required hotfixes will be installed.
1. Select a hotfix and click Install to install a hotfix. 2. Select a hotfix and click Details to see the details of the hotfix. This is helpful before you
install, so that you know exactly what the hotfix is.
The Details screen displays the following: • HotFix ID—the official version number of the hotfix.
• Priority—the importance of the hotfix; critical, optional, or private. • Critical—resolves known issues and protects ePrism security. These should
always be installed. • Optional—enhancements that are usually non-vital.
• Private—must be manually installed. They are specific to your ePrism and are intended to solve specific problems you are having.
• Extra Arguments—information regarding extra arguments you can add to the hotfix to customize it, and what the arguments impact is.
• Description—describes the purpose of the hotfix.
Installed HotFixes:
The Installed HotFixes section shows a list of the hotfixes you have previously installed. 1. To uninstall a hotfix, select the hotfix and then click Uninstall. If you select to uninstall a
hotfix, and the hotfix is dependent upon earlier hotfixes, all required hotfixes will be uninstalled.
2. To edit a hotfix, select the hotfix and click Edit Args. You can now change the hotfix arguments. See Details for more information.
3. Select a hotfix and click Details to see the details of the hotfix. See Details for more information.
Manually Install HotFix:
The Manually Install HotFix section enables you to add hotfix arguments prior to installing them, and then you can install them manually so that your changes are in effect.
1. In the HotFix ID field, enter the ID number of the hotfix. 2. In the Extra Arguments field, enter the extra arguments you would like to add to the
hotfix. See Details for more information. 3. Click Manual Install to install the hotfix with the extra arguments.

57
Client help
ePrism users The welcome screen shows address mappings for the logged in user.
From this window you can also access and set up your blacklists (senders you do not want to ever receive messages from) and whitelists (senders you approve, despite any message scoring by ePrism). Simply click Blacklists/Whitelists, change your password, and log out of ePrism.

ePrism Administrator's Guide
58
Blacklists and whitelists Blacklists are lists of senders (specific email addresses or by domain) that you do not want to ever receive messages from. If you have received spam in the past from a sender, and know that they only send spam, it might be a good idea to enter them in your blacklist. Use caution when entering an address in the blacklist however, because all email from that sender/domain will be rejected.
Whitelists are lists of senders (specific email addresses or by domain) that you approve of, despite any message scoring by ePrism.

Client help
59
To add an address or domain to your whitelist:
1. Click Blacklists/Whitelists. The Whitelist section displays addresses/domains already in your whitelist.
2. Enter an email address ([email protected]) or a domain (@acme.com) that you want to receive all messages from.
3. Click the Add button.
To delete a whitelist address or domain: 1. Select the address and/or domains in the Whitelist section.
2. Click Delete Selected. Click Hide Autowhitelisted Senders to hide addresses that you did not add manually (ePrism added them automatically after verifying them). Click Disable Autowhitelisting if you do not want ePrism to add addresses to your whitelist.
To add an address or domain to your blacklist:
1. Click Blacklists/Whitelists. The Blacklist section displays addresses/domains already in your blacklist.
2. Enter an email address ([email protected]) or a domain (@acme.com) that you do not want to receive messages from.
3. Click the Add button. To delete a blacklist address or domain:
1. Select the address and/or domains in the Blacklist section. 2. Click Delete Selected.
ePrism Administrator's Guide
60
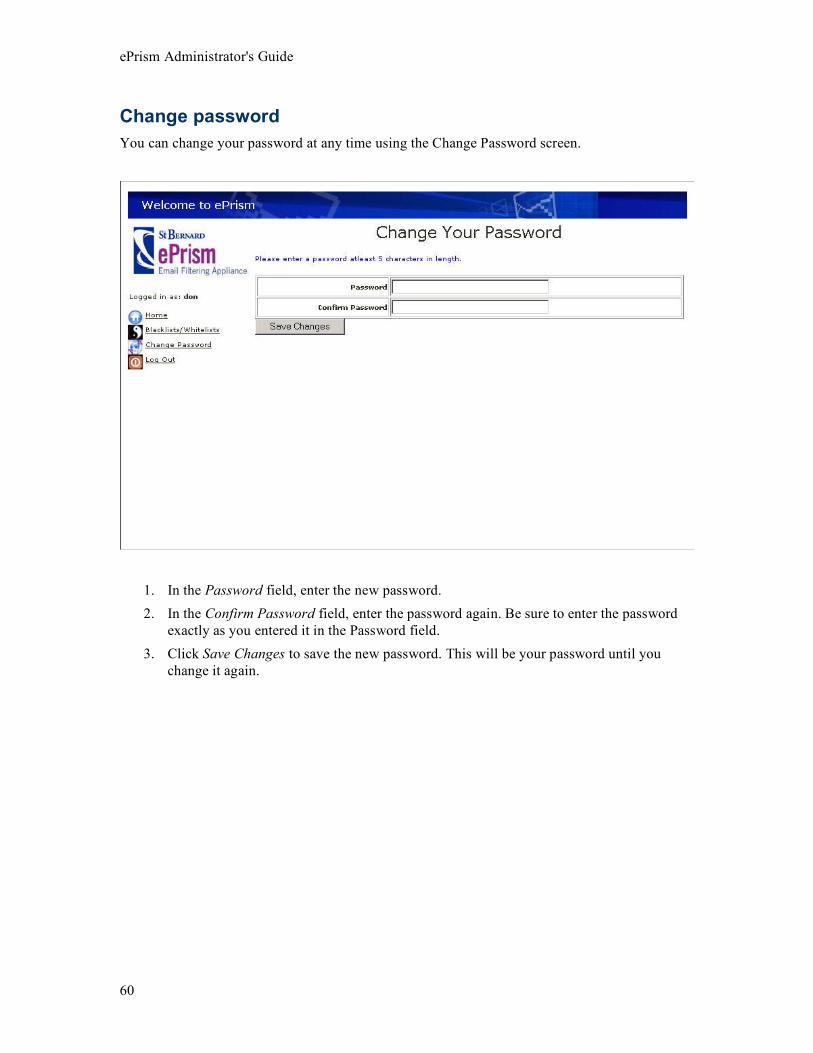
Change password You can change your password at any time using the Change Password screen.
1. In the Password field, enter the new password. 2. In the Confirm Password field, enter the password again. Be sure to enter the password
exactly as you entered it in the Password field. 3. Click Save Changes to save the new password. This will be your password until you
change it again.

61
Glossary
D DCC: The Distributed Checksum Clearinghouse (DCC) is a system of thousands of clients and
servers collecting and counting checksums related to email messages. The counts can be used by SMTP servers and mail user agents to detect and reject or filter spam or unsolicited bulk email. DCC servers exchange common checksums.The logic behind DCC is that if email recipients could compare the email they receive, they could recognize unsolicited bulk email. Since simple checksums of spam would not be effective, the main DCC checksums are fuzzy and ignore certain pieces of messages. The fuzzy checksums change as spam evolves.
DNSBL: A DNS-based Blackhole List (DNSBL) is an internet site that reports lists of IP addresses that can be queried by other machines on the internet. Generally, these sites list known spammers, along with their IP address. You can then use this list to tag all incoming messages from the known spammer/IP address.
G Gateway: Gateways are routers or switches that lie between the local network (subnet) and the
internet. There can be multiple gateways. See the ePrism Installation Guide for more information.
H Host name: The logical name assigned to a computer. For example, www.acme.com. If a site has
several hosts, there might be multiple host names, such as sales.acme.com and dev.acme.com, where sales and dev are the host names.
HTTP: HyperText Transfer Protocol (HTTP) is the primary method for transferring information over the internet. An HTTP client initiates a request using a TCP/IP port connection on a remote host. When the request is received, the server responds. This technology works well over the internet because once a request is completed, the connection is terminated.
M MIME: Multipurpose Internet Mail Extensions (MIME) is the most common method for
transmitting non-text files through email. MIME encodes and decodes files during sending and receiving. A header is added to the email which includes the type of data contained and the encoding method used.
MX record: The MX record is data specifying how email from the internet should be routed. When an email is sent, the sending server requests the MX information for the recipient's domain (the portion of the e-mail address following the "@"). The sending server then attempts to establish a connection, based on the results of the MX query, and delivers the message to the first server it can connect to. Using MX records, you can run multiple mail servers for a single domain. This helps deliver email successfully and helps distribute incoming mail across multiple servers.

ePrism Administrator's Guide
62
N Nameserver: A nameserver is software that runs on a server and implements a name service. The
name service is a directory of the machines on the network and their assigned names. The software can convert a name to a physical IP address.
Netmask: A netmask defines how much of an IP address identifies the subnetwork the host is on and how much identifies the host. Netmasks are usually represented as four numbers from zero to 255 separated by periods.
NTLM: NT Lan Manager (NTLM) is an authentication protocol. NTLM works with other software to allow for a single sign in. An example is a user entering their network logins/credentials to access network information over the internet.
R Relayer: A relayer is an internal system that is allowed to use ePrism to send email to other
domains. The context for relaying is the outbound direction, and is usually set to the address of the internal mail server.
S SMTP: Simple Mail Transfer Protocol (SMTP) is a reliable and efficient text-based (plain text
and binary files) email protocol where recipients are identified (and verified) and then the message is delivered. An SMTP process can transfer mail over the same network, or to another network through a relay or gateway.
SPF: Sender Policy Framework (SPF) attempts to verify that email is really coming from the sender it says it is coming from. It is designed to filter spammers who misrepresent who the email is from in the header of the email.
Static routes: Static routes are used to communicate with workstations on other IP networks. They are also used if the network uses local DNS servers that are not accessible through the default gateway. See the ePrism Installation Guide for more information.

63
Index
A
address maps ...............................................47 administration..............................................27
administrator password...............................14
advanced diagnostics ..................................51 advanced options.........................................25
antivirus filtering.........................................25 authentication ..............................................19
authentication diagnostics ..........................53 auto-whitelist ...............................................32
B backup asap .................................................18
backup configuration ..................................17 backups ........................................................17
blacklists ..................................................7, 62 blacklists and whitelists ..............................62
C
change user password .................................64 changing administrator password...............14
D date adjustment............................................13
defining address maps.................................47 defining users ..............................................37
diagnostics advanced ..................................................51
authentication ..........................................53 email ........................................................52
tools..........................................................55 tunnel .......................................................56
update server ...........................................54
vitals.........................................................50 distributed checksum clearinghouse ............6
distributed checksum clearinghouse/setting..................................................................25
E
email diagnostics .........................................52 email threats
inappropriate content ................................2
malformed messages .................................2 spam ...........................................................1
viruses ........................................................2 email threats...................................................1
end user help ................................................61 extensions.....................................................36
F filename extensions .....................................36
filtering email ................................................1 G
gloabl values ................................................28 global settings..............................................28
greylisting ......................................................6
H heuristics ........................................................6
hotfix manager.............................................58 how ePrism helps...........................................1
http................................................................24 I identifying special addresses ......................35 inbound mail ................................................21
information flow............................................3 installing hotfixes ........................................58
M mail administrator........................................27
mail statistics ...............................................61
managing hotfixes .......................................58 message tracking report ..............................45
methods of filtering DCC ...........................................................6

ePrism Administrator's Guide
64
distributed checksum clearinghouse ........6
greylisting..................................................6 heuristics....................................................6
outbound filtering .....................................7 real-time blacklists....................................7
sender policy framework ..........................6 SPF.............................................................6
methods of filtering.......................................5 N
network authentication................................19 network routes .............................................16
network settings ..........................................15 non-spam .....................................................61
NTLM ..........................................................19
O one-shot .......................................................61
outbound filtering..........................................7 outbound information flow...........................4
outbound mail..............................................23 overview ........................................................1
P password change .........................................64
pending ........................................................61 policies.........................................................32
policy setting ...............................................32 R
real-time blacklists ........................................7
register .........................................................11 registering ePrism .......................................11
relayers.........................................................22 report
message tracking .....................................45
utilization .................................................44 S
sender policy framework...............................6 setting policies .............................................32
setting up blacklists and whitelists .............62 setting up users ............................................37
smtp inbound ....................................................21
outbound ..................................................23 relayers .....................................................22
spam .............................................................61 special addresses..........................................35
SPF .................................................................6
T time adjustment ...........................................13
tools diagnostics ..........................................55 tunnel diagnostics ........................................56
U update server diagnostics ............................54
user password change..................................64 users..............................................................37
utilization report ..........................................44 V
virus detection................................................5 virus protection..............................................5
vitals diagnostics .........................................50
W web
http............................................................24 whitelists ......................................................62

CORPORATE ADDRESS15015 Avenue of ScienceSan Diego, CA 92128 USAToll Free: 800-782-3762Telephone: 858-676-2277Fax: 858-676-2299Email: [email protected]: www.stbernard.com
EUROPEAN ADDRESSUnit 4, Riverside WayWatchmoor Park, Camberley,Surrey GU15 3YQ, United KingdomTelephone: +44 (0) 1276-401640Support Telephone: +44 (0) 1276-401642Fax: +44 (0) 1276-684479Email: [email protected]
EPAdminGuide0605© 2004-2005 St. Bernard Software Inc. All rights reserved. The St. Bernard Software logo is a trademark of St. Bernard Software Inc. ePrism is a registered trademark of St. Bernard Software Inc.All other trademarks and registered trademarks are hereby acknowledged.
Protecting Your Network InvestmentProtecting Your Network Investment
WWW.STBERNARD.COM • 1-800-782-3762
ePrism Adminstrator’s Guide
M 5 0 0