eprism user guide - edgewave · eprism user guide m1000, m2000, m3000. 1 preface 5 chapter 1 eprism...
TRANSCRIPT

ePrism User Guide
M 1 0 0 0 , M 2 0 0 0 , M 3 0 0 0


Preface 5
CHAPTER 1 ePrism Overview 7What’s New in ePrism 5.0 8ePrism Overview 10ePrism Deployment 17How Messages are Processed by ePrism 19
CHAPTER 2 Administering ePrism 23Connecting to ePrism 24Configuring the Admin User 28Web Server Options 31Customizing the ePrism Interface 32
CHAPTER 3 Configuring Mail Delivery Settings 33Network Settings 34Static Routes 38Mail Routing 39Mail Delivery Settings 41Mail Aliases 46Mail Mappings 48Virtual Mappings 50
CHAPTER 4 Directory Services 53Directory Service Overview 54Directory Servers 56Directory Groups 58Directory Users 61LDAP Aliases 65LDAP Mappings 67LDAP Recipients 69LDAP Relay 71LDAP Routing 74
CHAPTER 5 Configuring Email Security 77SMTP Mail Access 78Anti-Virus 80
1
2
Malformed Messages 83Attachment Control 85SPF (Sender Policy Framework) 88Encryption and Certificates 90
CHAPTER 6 Anti-Spam Features 97Anti-Spam Feature Overview 98Email Spam Processing 99ePrism Anti-Spam Controls 102Specific Access Patterns 104Pattern Based Message Filtering 107Objectionable Content Filtering 115RBL (Real-time Blackhole List) 117DCC (Distributed Checksum Clearinghouse) 119STA (Statistical Token Analysis) 123Trusted Senders 133Spam Quarantine 136Spam Options 141
CHAPTER 7 User Accounts and Remote Authentication 143POP3 and IMAP Access 144Local User Mailboxes 145Mirror Accounts 147Strong Authentication 148Remote Accounts and Directory Authentication 150Relocated Users 153Vacation Notification 154Tiered Administration 157
CHAPTER 8 Secure WebMail and ePrism Mail Client 159Secure WebMail 160ePrism Mail Client 164
CHAPTER 9 Policy Management 167Policy Overview 168Creating Policies 171
CHAPTER 10 System Management 177System Status and Utilities 178Mail Queue Management 181Quarantine Management 182License Management 184Software Updates 186Security Connection 187Reboot and Shutdown 188Backup and Restore 189Centralized Management 197Problem Reporting 202
CHAPTER 11 HALO (High Availability and Load Optimization) 203HALO Overview 204Configuring Clustering 206Cluster Management 212Configuring the F5 Load Balancer 216Queue Replication 217
CHAPTER 12 Reporting 221Viewing and Generating Reports 222Viewing the Mail History Database 231Viewing the System History Database 234Report Configuration 237
CHAPTER 13 Monitoring System Activity 239Activity Screen 240System Log Files 242SNMP (Simple Network Management Protocol) 245Alarms 248
CHAPTER 14 Troubleshooting Mail Delivery 251Troubleshooting Mail Delivery 252Troubleshooting Tools 253Examining Log Files 254Network and Mail Diagnostics 258Troubleshooting Content Issues 263
3
4
APPENDIX A Using the ePrism System Console 265
APPENDIX B Restoring ePrism to Factory Default Settings 269
APPENDIX C Message Processing Order 271
APPENDIX D Customizing Notification and Annotation Messages 273
APPENDIX E Performance Tuning 275Setting Default Performance Settings 276Advanced Settings 277
APPENDIX F SNMP MIBS 283MIB Files Summary 283MIB OID Values 287
APPENDIX G Third Party Copyrights and Licenses 291

Preface
Preface
This ePrism User Guide provides detailed information on how to configure and manage your ePrism Email Security Appliance, and contains the following topics:
• Chapter 1 — “ePrism Overview” on page 7• Chapter 2 — “Administering ePrism” on page 23• Chapter 3 — “Configuring Mail Delivery Settings” on page 33• Chapter 4 — “Directory Services” on page 53• Chapter 5 — “Configuring Email Security” on page 77• Chapter 6 — “Anti-Spam Features” on page 97• Chapter 7 — “User Accounts and Remote Authentication” on page 143• Chapter 8 — “Secure WebMail and ePrism Mail Client” on page 159• Chapter 9 — “Policy Management” on page 167• Chapter 10 — “System Management” on page 177• Chapter 11 — “HALO (High Availability and Load Optimization)” on page 203• Chapter 12— “Reporting” on page 221• Chapter 13 — “Monitoring System Activity” on page 239• Chapter 14 — “Troubleshooting Mail Delivery” on page 251
The following Appendices contain supplemental information for ePrism:
• Appendix A — “Using the ePrism System Console” on page 265• Appendix B — “Restoring ePrism to Factory Default Settings” on page 269• Appendix C — “Message Processing Order” on page 271• Appendix D — “Customizing Notification and Annotation Messages” on page 273• Appendix E — “Performance Tuning” on page 275• Appendix F — “SNMP MIBS” on page 283• Appendix G — “Third Party Copyrights and Licenses” on page 291
Related Documentation
If release notes are included with your product package, please read them for the latest information on installing and managing your ePrism.
The following documents are included as part of the ePrism documentation set:
• Release Notes — Provides up to date information on the product, including any known issues. If instructions in the release notes differ from the Installation Guide or User Guide, use the instructions in the Release Notes.
5

6
• ePrism Installation Guide — Provides instructions on how to install and provide the initial configuration for the ePrism Email Security Appliance.
• ePrism User Guide — Provides detailed information on how to configure and administer the ePrism Email Security Appliance.
Contacting Technical Support
St. Bernard Software telephone support is available Monday-Friday 07:00am to 4:00pm (Pacific Standard Time) 08:30 to 17:30 (UTC) North America, South America, Pacific Rim (PST)
15015 Avenue of Science San Diego, CA 92128 Main: 858.676.2277 FAX: 858.676.2299 Technical Support: 858.676.5050 Technical Support Email: [email protected]
Europe, Asia, Africa (UTC) Unit 4, Riverside Way Watchmoor Park, Camberley Surrey, UK GU15 3YQ
Main: 44.1276.401.640 FAX: 44.1276.684.479 Technical Support: 44.1276.401.642 Technical Support Email: [email protected]
Copyright Information
© 2003-2005 St. Bernard Software, Inc. All rights reserved.
St. Bernard Software is trademark of St. Bernard Software Inc. All other trademarks or registered trademarks are hereby acknowledged.
Information in this document is subject to change without notice.

CHAPTER 1 ePrism Overview
This chapter provides an overview of the architecture and features of the ePrism Email Security Appliance, and contains the following topics:
• “What’s New in ePrism 5.0” on page 8• “ePrism Overview” on page 10• “ePrism Deployment” on page 17• “How Messages are Processed by ePrism” on page 19
7
ePrism Overview
8
What’s New in ePrism 5.0
The ePrism Email Security Appliance 5.0 release contains the following new features and improvements:
New User Interface
The ePrism user interface has been redesigned for easier navigation and more efficient administration of ePrism’s powerful features.
Improved Performance
ePrism 5.0 improves its current performance with a 30% or greater improvement in mail processing. ePrism's security and spam filtering techniques have been improved to provide greater mail processing efficiency.
Directory Services Improvements
ePrism 5.0 adds significant improvements to its Directory Services integration, enhancing support for OpenLDAP, iPlanet, and Active Directory LDAP implementations. The following new features have been added:
• LDAP Recipients — This feature is used in conjunction with the Reject on Unknown Recipient Anti-Spam feature. LDAP Recipients performs real-time direct LDAP lookups to verify the existence of recipients.
• LDAP Domain Routing — This feature is used to perform an LDAP search to find the mail route host for a domain. This is a preferred method for mail routing for organizations with a large amount of domains.
• LDAP SMTP Relay Authentication — This feature is used in conjunction with the SMTP Relay Authentication to allow clients to be authenticated via LDAP for SMTP relay purposes.
Select Basic Config -> Directory Services on the menu to configure all LDAP directory features.
OCF (Objectionable Content Filter)
The Objectionable Content Filter defines a list of key words that will cause a message to be blocked if any of those words appear in the message. This feature is useful for organizations that need to manage their email in accordance with regulatory requirements. The Objectionable Content Filter provides enhanced content filtering functionality and flexibility, allowing users to restrict content of any form including objectionable words or phrases, offensive content and/or confidential information.
The OCF list can be updated and customized to meet the specific needs of any organization. Rules can also be applied to both inbound and outbound messages preventing unwanted content
What’s New in ePrism 5.0
from entering an organization and prohibiting the release of sensitive information. OCF can be configured via Mail Delivery -> Anti-Spam -> OCF.
Large MTU Support
In Basic Config -> Network, in the Network Interface section, you can enable the Large MTU (Maximum Transfer Unit) parameter which sets the MTU of the interface to 1500. This may improve performance connecting to servers on a local network. The default MTU is 576.
Configurable Content Reject Message (SMTP)
In Mail Delivery -> Delivery Settings -> Advanced, there is a new option to configure the content rejection message that appears in the SMTP 552 error message.
9

ePrism Overview
10
ePrism Overview
ePrism is a dedicated Mail Firewall designed for deployment between internal mail servers and the Internet. ePrism supports the standard mail protocols for processing email messages, while offering a secure method for their processing and delivery. ePrism has been designed specifically to resist operating system attacks and protect your mail servers from direct SMTP and HTTP connections.
Firewall-Level Network and System Security
ePrism delivers the most complete security available for email systems. ePrism runs on S-Core, St. Bernard’s customized and hardened Unix operating system. S-Core is field tested for over 10 years as the operating system for the St. Bernard Firewall Server. S-Core does not allow uncontrolled access to the system. There is no command line access and the system runs as a "closed" system, preventing accidental or deliberate misconfiguration by administrators, which is a common cause of security vulnerabilities.
ePrism has been awarded Common Criteria EAL 4+ certification. EAL 4+ indicates that ePrism has passed all of the requirements needed to gain Evaluation Assurance Level 4 (EAL 4) and has passed some additional modules that elevate the certification above the standard EAL4 to include EAL5 vulnerability testing.

ePrism Overview
ePrism Deployment
ePrism is generally configured to accept all mail for a domain or sub-domain, store and process mail according to specified policies, and deliver the mail to one or more internal mail servers for collection by users.
ePrism is ideally suited for deployment in parallel with an existing firewall, on a DMZ, or on an internal network.
See “ePrism Deployment” on page 17 for more detailed information on deploying ePrism.
Mail Delivery Security
ePrism has a sophisticated mail delivery system with several security features and benefits to ensure that the identifying information about your company's email infrastructure remains private.
• For a company with multiple domain names, ePrism can accept, process and deliver mail to private email servers.
• For a company with multiple private email servers, the ePrism can route mail based on the domain or subdomain to separate groups of email users.
• Security features such as mail mappings and address masquerading allow the ability to hide references to internal host names.
Content Filtering
ePrism implements attachment controls and content filtering based on pattern and text matching. These controls prevent the following issues:
• Breaches of confidentiality• Legal liability from offensive content• Personal abuse of company resources
Attachment controls are based on the following characteristics:
• File Extension Suffix — The suffix of the file is checked to determine the attachment type, such as .exe, or .jpg.
• MIME Content Type — MIME (Multipurpose Internet Mail Extensions) can be used to identify the content type of the message.
• Content Analysis — The file is analyzed from the beginning to look for characteristics that can identify the file type. This analysis ensures that the attachment controls are not circumvented by simply renaming a file.
11

ePrism Overview
12
Virus Scanning
The ePrism Email Security Appliance features optional virus scanning based on Kaspersky Anti-Virus. Messages in both inbound and outbound directions can be scanned for viruses and malicious programs. ePrism’s high performance virus scanning provides a vital layer of protection against viruses for your entire organization. Automatic pattern file updates ensure that the latest viruses are detected.
Malformed Message Protection
Similar to malformed data packets used to subvert networks, malformed messages allow viruses to avoid detection, crash systems, and lock up mail servers. ePrism ensures that only correctly formatted messages are allowed into your mail systems. Message integrity checking protects your mail servers and clients, and improves the effectiveness of existing virus scanning implementations.
Anti-Spam Features
The ePrism Email Security Appliance provides a complete and robust set of anti-spam features specifically designed to protect against the full spectrum of current and evolving spam threats.
ePrism’s anti-spam features are based on the following features:
ePrism’s Anti-Spam Features
• Realtime Blackhole Lists (RBL) to reject known spam sources• Distributed Checksum Clearinghouse (DCC) to control bulk mail• Statistical Token Analysis (STA) for advanced statistical analysis
Trusted Senders List
This feature, accessed via WebMail/ePrism Mail Client, allows users to create their own personal Trusted Senders List based on a sender’s email address. These email addresses will be exempt from ePrism’s spam controls.
Spam Quarantine
The Spam Quarantine is used to redirect spam mail into a local storage area for each individual user. Users will be able to connect to ePrism to view and manage their own quarantined spam. Messages can be deleted, or moved to the user's local mail folders. Automatic notification emails can be sent to end users notifying them of the existence of messages in their personal quarantine area.

ePrism Overview
Secure WebMail
ePrism’s Secure WebMail provides remote access support for internal mail servers. With Secure WebMail, users can access their mailboxes using email web clients such as Outlook® Web Access, Lotus iNotes, or ePrism’s own web mail client, ePrism Mail Client.
ePrism addresses the security issues currently preventing deployment of web mail services by providing the following protection:
• Strong authentication (including integration with Active Directory)• Encrypted sessions• Advanced session control to prevent information leaks on workstations
Authentication
ePrism supports the following authentication methods for administrators, WebMail users, Trusted Senders List, and Spam Quarantine purposes:
• User ID and Password • RADIUS and LDAP
• RSA SecurID® tokens• SafeWord tokens• CRYPTOCard tokens
Encryption
All mail delivered to and from ePrism can be encrypted using TLS (Transport Layer Security). This includes connections to remote systems, local internal mail systems, or internal mail clients. Encrypted messages are delivered with complete confidentiality both locally and remotely.
Encryption can be used for the following:
• Secure mail delivery on the Internet to prevent anyone from viewing your email while in transit.• Secure mail delivery across your LAN to prevent malicious users from viewing email other than
their own.• Create policies for secure mail delivery to branch offices, remote users and business partners.
ePrism supports TLS/SSL encryption for all user and administrative sessions. TLS/SSL may also be used to encrypt SMTP sessions, effectively preventing eavesdropping and interception.
13

ePrism Overview
14
HALO (High Availability and Load Optimization)
All systems can be clustered together to increase additional capacity, throughput, or provide load balancing and optional high availability.
ePrism is the first email firewall to provide enterprises with a carrier-grade failsafe clustering architecture for high availability. HALO ensures email is never lost due to individual system failure through its unique security, cluster management, load balancing and optimization, and "stateful failover" queue replication capabilities.
Cluster Management
The cluster management feature allows administrators to manage ePrism clusters and to synchronize configuration settings across all systems in the cluster. Combined reports and email database searches may be derived from clustered systems. Specific features include:
• Configuration Cloning — This function allows systems to be added to clusters and to assume the configuration of a defined "master" Cluster Console system.
• Cluster Synchronization — Systems within a cluster can be synchronized to the defined "master" system. Any changes to the configuration of the Cluster Console master are reflected in the configuration of all systems in the cluster.
• Cluster Reporting — ePrism reports can be generated for a single system or for all systems in a cluster. The email database can be searched by system or by cluster. The history and status of any message can be instantly retrieved regardless of which system processed the message.
Load Balancing and Optimization
A basic requirement of high availability is to have an automated or semi-automated mechanism for switching the mail stream between available systems in the cluster, depending on their individual availability or health.
Utilizing DNS round-robin techniques, or dedicated load balancing hardware, email can be directed to ePrism systems in a cluster depending on their availability and current load.
Queue Replication
To prevent the loss of email messages during a system failure, ePrism has created a unique solution to this problem with "stateful failover" queue replication technology that replicates queues and intelligently synchronizes messages to a defined mirror system within a cluster. If a system in a cluster should fail, and there exists undelivered mail in its queue, a mirror system can take ownership of that queue’s messages and successfully process and deliver them.

ePrism Overview
Policy Controls
Policy-based controls allow settings for annotations, anti-spam, anti-virus, and attachment control to be customized and applied based on the group or domain membership of the recipient. User groups can be imported from an LDAP-based directory, and then policies can be created to apply customized settings to these groups.
For example, you can set up an Attachment Control Policy to allow your Development group to accept and send executable files (.exe), while configuring your attachment control settings for all your other departments to block this file type to prevent the spread of viruses among the general users.
LDAP Directory Service Support
ePrism integrates with LDAP (Lightweight Directory Access Protocol) directory services such as Active Directory, OpenLDAP, and iPlanet, allowing you to perform the following:
• LDAP lookup prior to internal delivery — You can configure ePrism to check for the existence of an internal user via LDAP before delivering a message. This feature allows you to reject mail to unknown addresses in relay domains, reducing the number of attempted deliveries of spam messages for unknown local addresses.
• Group/User Imports — An LDAP lookup will determine the group membership of a user when applying policy-based controls. LDAP users can also be imported and mirrored on ePrism to be used for services such as the Spam Quarantine.
• Authentication — LDAP can be used for authenticating IMAP access, user mailbox, and WebMail logins.
• SMTP Relay Authentication — LDAP can be used for authenticating clients for SMTP Relay.• Mail Routing — LDAP can be used to lookup Mail Routes for a domain to deliver mail to its
destination server.
Local User Mailboxes
ePrism can host user mailboxes and act as a fully functioning mail server for small offices. ePrism fully supports POP3 and IMAP (including their secure versions) and SMTP protocols for retrieving and sending mail.
Manageability
ePrism provides a complete range of monitoring and diagnostics tools to monitor the system and troubleshoot mail delivery issues. Admin sessions can also be encrypted for additional security, and comprehensive logs record all mail activity.
• Web Browser-based Management — The web browser management interface displays a live view of system activity and traffic flows. The management interface can be configured to
15

ePrism Overview
16
display this information for one or many systems, either systems in a local cluster or systems that are being centrally managed.
• Reporting and Auditing — The reporting and audit features deliver a comprehensive set of statistics that may be generated at any time or scheduled for automatic delivery. ePrism includes a wide range of predefined reports, including information on system health, mail processing, spam, virus filtering statistics, and user mail volumes. Administrators can easily create customized reports.
• Enterprise integration with SNMP — Using SNMP (Simple Network Management Protocol), ePrism can generate both information and traps to be used by tools like HP OpenView, Tivoli, BMC Patrol and CA Unicenter. This extends the administrator’s view of ePrism and allows an instant view of significant system events, including traffic flows and system failures.
• Alarms — ePrism can generate system alarms that can automatically notify the administrator via email and console alerts of a system condition that requires attention.
Security Connection
Unique to St. Bernard, the Security Connection provides an automated software update service. By enabling the Security Connection, you are automatically notified of any new patches and updates. St. Bernard continuously monitors for new vulnerabilities and issues new updates to defend against them, ensuring that you have them as soon as they are available.
Internationalization
ePrism supports internationalization for annotations, notification messages, and mail database views.

ePrism Deployment
ePrism DeploymentePrism is designed to be situated between your mail servers and the Internet so that there are no direct SMTP (Simple Mail Transport Protocol) connections between external and internal servers.
ePrism is typically installed in one of three locations:
• In parallel with the firewall• On your DMZ (Demilitarized Zone)• Behind the existing firewall on the Internal network
SMTP port 25 traffic is redirected from either the external interface of the firewall, or from the external router to ePrism. When the mail is accepted and processed, ePrism initiates an SMTP connection to the internal mail server to deliver the mail.
ePrism in Parallel with the Firewall
The preferred deployment strategy for ePrism is to be situated in parallel with an existing network Firewall. ePrism's inherent firewall security architecture eliminates the risk associated with deploying an appliance on the perimeter of your network. This parallel deployment eliminates any mail traffic on the firewall and decreases its overall load.
17
ePrism Overview
18
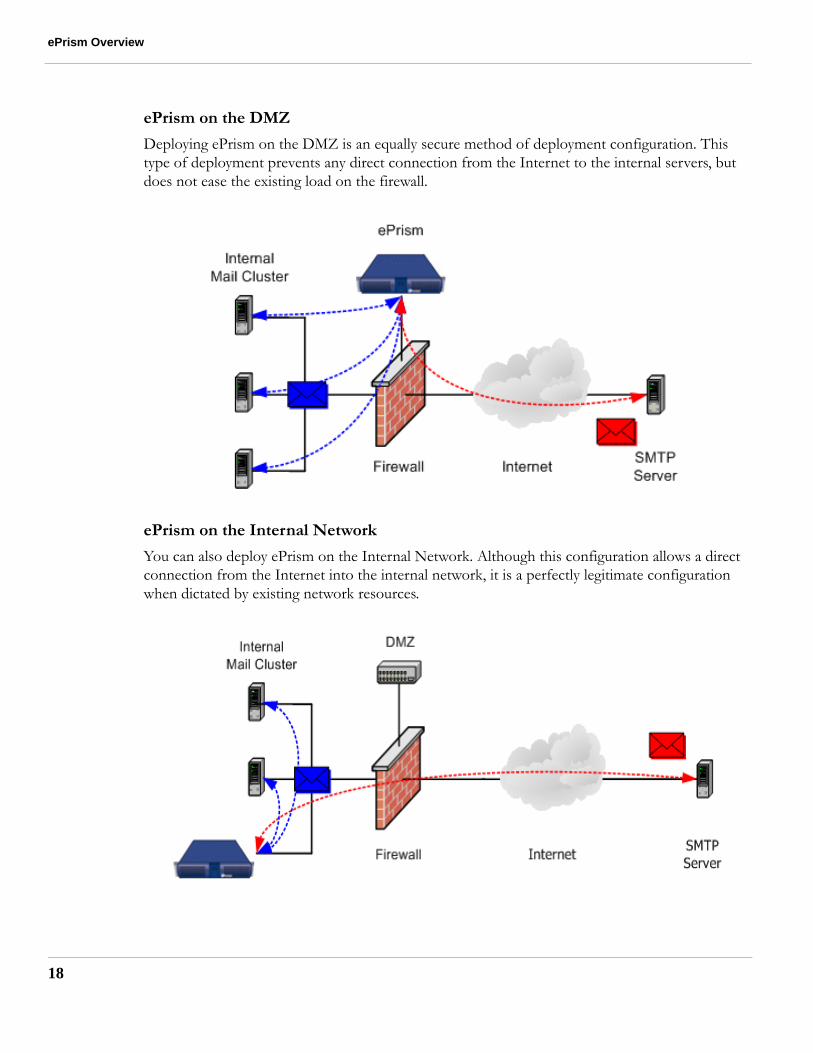
ePrism on the DMZ
Deploying ePrism on the DMZ is an equally secure method of deployment configuration. This type of deployment prevents any direct connection from the Internet to the internal servers, but does not ease the existing load on the firewall.
ePrism on the Internal Network
You can also deploy ePrism on the Internal Network. Although this configuration allows a direct connection from the Internet into the internal network, it is a perfectly legitimate configuration when dictated by existing network resources.

How Messages are Processed by ePrism
How Messages are Processed by ePrismThe following sections describe the sequence in which the various ePrism security features are applied to any inbound mail messages and how these settings affect their delivery.
SMTP Connection
An SMTP connection request is made from another system. ePrism accepts the connection request unless one of the following checks (if enabled) is triggered:
• Reject on unauthorized SMTP pipelining — Rejects mail when the client sends SMTP commands ahead of time without knowing that the mail server actually supports SMTP command pipelining. This stops messages from bulk mail software that use SMTP command pipelining improperly to speed up deliveries.
• Reject on unknown sender domain — Rejects mail when the sender mail address has no DNS A or MX record.
• Reject on missing reverse DNS — Rejects mail from hosts where the host IP address has no PTR (address to name) record in the DNS, or when the PTR record does not have a matching A (name to address) record. This setting is rarely used because many servers on the Internet do not have valid reverse DNS records, and enabling it may result in rejecting mail from legitimate sources.
• Reject on non-FQDN sender — Rejects mail when the address in the client MAIL FROM command is not in fully-qualified domain form (FQDN).
• Reject on Unknown Recipient — Rejects mail if the specified recipient does not exist. The system will perform an LDAP lookup on the recipient's address to ensure they exist before delivering the message.
• Specific Access Pattern (Reject) — The server address or other envelope field matches a Specific Access Pattern that is set to reject the message.
Mail Header and Message Properties
The connection is now accepted. The message will be accepted for processing unless one of the following occurs:
• Reject on missing addresses — Rejects mail when no recipients in the To: field, or no senders in the From: field were specified in the message headers.
• Maximum number of recipients — Rejects mail if the number of recipients exceeds the specified maximum (default = 1000).
• Maximum message size — Rejects mail if the message size exceeds the maximum.
19

ePrism Overview
20
Malformed Content, Virus Checking, and Attachment Control
Messages are scanned for malformed messages, viruses, and specific attachments. If there is a problem, ePrism can be configured with a variety of actions, such as sending the message to a Quarantine folder.
OCF (Objectionable Content Filter)
Messages are scanned for objectionable content and a configurable action is taken.
Pattern Based Message Filters and Specific Access Patterns
The messages are scanned to see if they match any existing Pattern Based Message Filters (PBMF), or Specific Access Patterns (SAP) set to Trust or Allow Relaying. Senders in the Trusted Sender list are excluded from processing (for low priority PBMFs only.)
SPF (Sender Policy Framework)
If enabled, the message is checked to see if it passes an SPF DNS lookup.
Anti-Spam Processing
If the message arrives from an "untrusted" source, it will be processed for spam as follows:
• If RBL is enabled, rejects mail if the server address is in an RBL. This can be overridden with a Pattern Based Message Filter.
• If DCC is enabled, the message will be examined for identification as "bulk" mail.• If STA is enabled, the message will be examined for identification as "spam" mail.
Mail Mappings
The message is now accepted for processing, and the following occurs:
• If the recipient address is not for a domain or sub-domain for which ePrism is configured to accept mail (either as an inbound mail route or a virtual domain) then the message is rejected.
• If the recipient address is mapped in the Mail Mappings table, then the "To" field in the message header will be modified as required.
Virtual Mappings
The message is now examined for a match in the Virtual Mapping table. If such a mapping is found, the envelope-header recipient field will be modified as required. LDAP virtual mappings will then be processed.
Virtual mappings are useful for the following:

How Messages are Processed by ePrism
• Acting as a wildcard mail mapping, such as everything for example.com goes to exchange.example.com. You can create exceptions to this rule in the mail mappings for particular users.
• ISPs who need to accept mail for several domains and the envelope-header recipient field needs to be rewritten for further delivery.
• To deliver to internal servers, use Mail Delivery -> Mail Routing.
Note: In all cases, mappings rely on successful DNS lookups for an MX record.
Relocated Users
When mail is sent to an address that is listed in the relocated user table, the message is bounced back with a message informing the sender of the relocated user's new contact information.
Mail Aliases
When mail needs to be delivered locally, the local delivery agent runs each local recipient name through the aliases database. An alias results in the creation of a new mail message to be created for the named address or addresses. This mail message is then entered back into the system to be mapped, routed, and so on. This process also occurs with local user accounts for whom a "forwarder address" has been configured. Local user accounts will be treated like aliases in this case.
Local aliases are typically used to implement distribution lists or to direct mail for standard aliases such as mail to the "postmaster" account.
LDAP aliases are then processed. LDAP functionality can be used to search for mail aliases on directory services such as Active Directory.
Mail Routing
During the mail routing process, there is no modification made to the mail header or the envelope.
A mail route specifies two things:
• Which domains ePrism will accept mail for (other than itself).• Which hosts the mail should be delivered to.
The message is now delivered to its destination.
See “Message Processing Order” on page 271 for a summary of the message processing order.
21

ePrism Overview
22

CHAPTER 2 Administering ePrism
This chapter describes how to administer and configure basic settings for the ePrism Email Security Appliance, and contains the following topics:
• “Connecting to ePrism” on page 24• “Configuring the Admin User” on page 28• “Web Server Options” on page 31• “Customizing the ePrism Interface” on page 32
23

Administering ePrism
24
Connecting to ePrism
Web Browser Administrative Interface
To administer ePrism using the web browser administrative interface, launch a web browser on your computer and enter the IP address or hostname for ePrism as the URL in the location bar. Your system must be listed in your DNS server to be able to connect via the hostname.
Supported web browsers:
• Microsoft Internet Explorer 6 and greater• Firefox 1.0 and greater• Mozilla 1.0 and greater• Netscape 6.0 and greater• Safari 1.0 and greater
The login screen will then appear. Enter your admin ID and password.
When logged in, the main ePrism Email Security Appliance Activity screen and main menu will appear.

Connecting to ePrism
Navigating the Main Menu
The main menu consists of the following main categories:
Activity — The Activity screen provides you with a variety of information on mail processing activity, such as the number of messages in the mail queue, the number of different types of messages received and sent, and current message activity. If you are running a HALO cluster, you will also have a Cluster Activity option that will show you the activity statistics for the entire cluster.
Basic Config — The Basic Config menu allows you to configure some of the basic settings for ePrism including:
• Admin Account• Alarms• Customization• Directory Services (LDAP)• Network settings• Performance settings• Static Routes• SNMP Configuration• Web Server Configuration
Mail Delivery — The Mail Delivery menu allows you to configure the features that affect mail delivery, including all mail security and anti-spam settings. It includes the following features:
• Anti-Spam
25
Administering ePrism
26
• Anti-Virus• Attachment Control• Delivery Settings• Mail Access Filtering• Mail Aliases• Mail Mapping• Mail Routing• Malformed Mail• Policy Settings• Relocated Users• SMTP Security• SPF• Vacation Notifications• Virtual Mappings
User Accounts — The User Account menu allows you to create local accounts on the ePrism and enable POP and IMAP access. Management of mirrored user accounts created by LDAP, Remote Authentication, and Secure WebMail/ePrism Mail Client are also configured here. It includes the following features:
• Local Accounts• Mirrored Accounts (Only displayed if mirrored accounts exist)• Remote Authentication• POP3 and IMAP• Secure WebMail• SecureID Configuration
HALO — The HALO (High Availability and Load Optimization) screen is used to configure and manage clustered ePrism systems, and includes the following features:
• Cluster Administration• Queue Replication• F5 Integration
Status/Reporting — The Status/Reporting menu allows you to view the current status of system services, and manage your mail queue and the quarantine area. The Reporting and logging features of ePrism are also configured here. The menu includes the following features:
• Status & Utility• Mail Queue• Quarantine

Connecting to ePrism
• Reporting• System Logs
Management — The Management menu contains options for various ePrism system administration tasks such as backup and restore, license management, and software updates. The menu includes the following features:
• Backup & Restore• Centralized Management• Daily Backup• License Management• Problem Reporting• Reboot & Shutdown• Software Updates• Security Connection• SSL Certificates
ePrism System Console
You can access the ePrism system console by connecting a monitor and keyboard to ePrism. The system console provides a limited subset of administrative tasks, and is only recommended for use during initial installation and network troubleshooting. Routine administration should be performed via the web browser administration interface. When accessing the system console, you will be prompted for the UserID and Password for the administrative user.
See “Using the ePrism System Console” on page 265 for more detailed information on using the system console.
27

Administering ePrism
28
Configuring the Admin User
The primary admin account is created during the ePrism installation. Select Basic Config -> Admin Account from the menu to modify the password or strong authentication methods for the admin user.
Note: It is recommended that you create additional admin users and use those accounts to manage ePrism instead of the primary admin account. The primary admin account password should then be written down and stored in a safe and secure place.
Strong Authentication
You can also configure strong authentication for the admin user. These methods of authentication require a hardware token that provides a response to the login challenge.
You can choose between the following types of secure authentication tokens:
• CRYPTOCard
• SafeWord
• SecurID
Once selected, a configuration wizard will guide you through the steps to configure the token for the specified authentication method.
See “Strong Authentication” on page 148 for more information on strong authentication methods.

Configuring the Admin User
Adding Additional Administrative Users
There is only one primary admin user account, but you can add additional administrative users via Tiered Administration. This allows you to configure another user with Full Admin rights, or with granular permissions that only give admin rights to certain ePrism options. For example, you may want to add a user who can administer reports or vacation notifications, but not have any other admin access.
Granting full or partial admin access to one or more user accounts allows actions taken by administrators to be logged because they have an identifiable UserID that can be tracked by the system.
Note: A user with Full Admin privileges cannot modify the profile of the Admin user. They can, however, edit others users with Full Admin privileges.
Add an administrative user as follows:
1. From the Basic Config -> Admin Account screen, click the Add Admin User button.
2. Enter a UserID, an optional email address to forward mail to, and a password. You can also set strong authentication methods, if required.
3. At the bottom of the Add a New User screen is a section for Administrator Privileges.
29
Administering ePrism
30
4. Select the required administrative access for the user:• Full Admin — The user has administrative privileges equivalent to the admin user.• Administer Aliases — The user can add, edit, remove, upload and download aliases (not
including LDAP aliases.)• Administer Filter Patterns — The user can add, edit, remove, upload and download
Pattern Based Message Filters and Specific Access Patterns.• Administer Mail Queue — The user can administer mail queues.• Administer Quarantine — The user can view, delete, and send quarantined files.• Administer Reports — The user can view, configure and generate reports, and view system
activity.• Administer Users — The user can add, edit, and relocate user mailboxes (except the Full
Admin users), including uploading and downloading user lists. User vacation notifications can also be configured.
• Administer Vacations — The user can edit local user’s vacation notification settings and other global vacation parameters.
• View Activity — The user can view the Activity page and start and stop mail services. Individual emails can only be viewed if View Email Database is also enabled.
• View Email Database — The user can view the email database history.• View System Logs — The user can view all system logs files.
See “Tiered Administration” on page 157 for more information on configuring admin access.
Note: WebMail access must be enabled on the network interface that will be used by tiered administration users. This is set in the Basic Config -> Network screen.

Web Server Options
Web Server OptionsThe ePrism Web Server Options screen defines the settings used for connecting to ePrism via the web browser administrative interface. By default, ePrism’s web server uses port 80 for HTTP request and port 443 for HTTPS requests. For secure WebMail and administration sessions, it is recommended that you leave the default SSL encryption enabled to force a connecting web browser to use HTTPS.
Select Basic Config -> Web Server on the menu to configure your web server settings.
• Admin HTTP Port — The default port for HTTP requests. The default port 80 can be changed via the system console.
• Admin HTTPS Port — The default port for HTTPS requests. The default port 443 can be changed via the system console.
• Require SSL encryption — Requires SSL encryption for all user and administrator web sessions.
• Allow low-grade encryption — Allow the use of low-grade encryption, such as DES ciphers with a key length of 64 bits, for encrypted user and administrator web sessions.
• Enable SSL version 2 — Enables SSL version 2 protocol. Note that SSL version 2 contains known security issues.
• Enable SSL version 3 — Enable SSL version 3 protocol. This is the default setting.• Enable TLS version 1 — Enable TLS version 1 protocol. This is the default setting.• Character set encoding — Select the type of character encoding used for HTML data.
31

Administering ePrism
32
Customizing the ePrism Interface
The ePrism interface logos can be easily customized by uploading your own company’s custom logos to replace the ePrism logo on the main login screen, the administration screen logo, and the ePrism Mail Client logo.
Customize a logo as follows:
1. Select Basic Config -> Customization on the menu to customize the ePrism logos.2. Click Browse to choose a file, and then click Next to upload the file.
You can always revert to the ePrism graphic by selecting the Default Logo button.
Most graphic formats are supported, but it is recommended that you use graphics suitable for web page viewing, such as GIF and JPEG. The maximum file size is 32k.
TABLE 1. Recommended Image Sizes
Logo Type Size in Pixels
Main Screen Logo 285 x 85 pixels
Admin Screen Small Logo 191 x 57 pixels
ePrism Mail Client Logo 94 x 28 pixels

CHAPTER 3 Configuring Mail Delivery Settings
This chapter describes how to configure network and mail delivery settings for the ePrism Email Security Appliance, and contains the following topics:
• “Network Settings” on page 34• “Static Routes” on page 38• “Mail Routing” on page 39• “Mail Delivery Settings” on page 41• “Mail Aliases” on page 46• “Mail Mappings” on page 48• “Virtual Mappings” on page 50
33

Configuring Mail Delivery Settings
34
Network Settings
The basic networking information to get ePrism up and running on the network is configured during installation time. To perform more advanced network configuration and to configure other network interfaces, you must use the Basic Config -> Network settings screen.
From the network settings screen you can modify the following items:
• Hostname and Domain information• Default Gateway• Syslog Host• DNS and NTP servers• Network Interface IP Address and feature access settings• Clustering and Queue Replication interface configuration• Support Access settings
Note: If you make any modifications to your network settings, you must reboot ePrism. The system will prompt you to restart after clicking the Apply button.
Configuring Network Settings
Select Basic Config -> Network on the menu to configure ePrism's network settings.
• Hostname — Enter the hostname (not the full domain name) of the ePrism Email Security Appliance, such as mail in the domain name mail.example.com.
• Domain — Enter the domain name, such as example.com.

Network Settings
• Gateway — Enter the IP address of the default route for ePrism. This is typically the external router connected to the Internet.
• Syslog Host — ePrism can log to a specific syslog host. A syslog host collects and stores log files from many sources. Enter the IP address of the syslog server that will receive all logs from ePrism.
• Name Server — At least one DNS name server must be configured for hostname resolution, and it is recommended that secondary name servers be specified in the event the primary DNS server is unavailable.
• NTP Server — NTP is critical for accurate timekeeping for the ePrism Email Security Appliance. Entering a valid NTP server will ensure that the server time is synchronized. It is recommended that secondary NTP servers be specified in the event the primary NTP server is unavailable.
Network Interfaces
Enter the required settings for each network interface. You can enter information for up to four interfaces.
• IP Address — Enter an IP address for this interface, such as 192.168.1.104.• Netmask — Enter the netmask for this interface, such as 255.255.255.0.• Media — Select the type of network card. Use Auto select for automatic configuration.• Large MTU — Sets the MTU (Maximum Transfer Unit) to 1500 bytes. This may improve
performance connecting to servers on the local network. The default is 576 bytes.
35

Configuring Mail Delivery Settings
36
• Respond to Ping — Allows ICMP ping requests to this interface. This will allow you to perform network connectivity tests to this interface, but will cause this interface to be more susceptible to denial of service ping attacks.
• Trusted Subnet — If selected, all hosts on this subnet are considered trusted for relaying and anti-spam processing.
• Admin Login — Allows access to this interface for administrative purposes.• WebMail — Allows access to WebMail via this interface.• IMAPS Server — Allows secure access to ePrism’s internal IMAP server via this interface.• IMAP Server — Allows access to ePrism’s internal IMAP server via this interface.• POP3S Server — Allows secure access to ePrism’s internal POP3 server via this interface.• POP3 Server — Allows access to ePrism’s internal POP3 server via this interface.
Note: POP and IMAP settings are only displayed if enabled in User Accounts -> POP3 and IMAP.
• SNMP Agent — Allows access to the SNMP agent via this interface.
Advanced Parameters
The following advanced networking parameters are TCP extensions that improve the performance and reliability of communications.
• Enable RFC 1323 — Enable TCP extensions to improve performance and to provide reliable operations of high-speed paths. This is enabled by default, and should only be disabled if you experiencing networking problems with certain hosts.
• Enable RFC 1644 — Enable an experimental TCP extension for efficient transaction oriented (request/response) service.
Clustering
The Clustering section is used to enable clustering on a specific network interface. See “HALO (High Availability and Load Optimization)” on page 203 for more information on configuring clustering.
• Enable Clustering — Select the check box to enable clustering on this ePrism system.• Cluster Interface — Select the interface to enable clustering on.

Network Settings
Support Access
Enable Support Access, if required, which allows St. Bernard Technical Support to connect to this system from the specified IP address. This setting does not need to be enabled during normal usage, and should only be enabled if requested by St. Bernard Technical Support.
Note: This option only appears if you have installed the Support Access patch in Management -> Software Updates.
For security reasons, Support Access communications use SSH (Secure Shell) to establish a secure connection via PKI (Public Key Infrastructure) encryption on a non-standard network port. Support Access will only allow a connection to be made from the St. Bernard network.
37

Configuring Mail Delivery Settings
38
Static Routes
Static routes are required if the mail servers to which mail must be relayed are located on another network, such as behind an internal firewall or accessed via a VPN.
Select Basic Config -> Static Routes to configure your static routes.
To add a new static route, enter the network address, netmask and gateway for the route, and then click New Route.

Mail Routing
Mail RoutingePrism, by default, accepts mail addressed directly to it and delivers it to local ePrism mailboxes. You can configure additional domains for ePrism to accept and route mail for using the Mail Routing menu.
Select Mail Delivery -> Mail Routing from the menu to set up mail routes.
• Sub — Select this check box to accept and relay mail for subdomains of the specified domain.• Domain — Enter the domain for which mail is to be accepted, such as example.com.• Route-to — Enter the address for the server to which mail will be delivered. • MX — (Optional) Select the MX check box if you need to look up the mail routes in DNS
before delivery. If this is not enabled, MX records will be ignored. Generally, you do not need to select this item unless you are using multiple mail server DNS entries for load balancing/failover purposes. By checking the MX record, DNS will be able to send the request to the next mail server in the list.
• KeepOpen — (Optional) Select the KeepOpen check box to ensure that each mail message to the domain will not be removed from the active queue until delivery is attempted, even if the preceding mail failed or was deferred. This setting ensures that local mail servers receive high priority. Note: The KeepOpen option should only be used for domains that are usually very reliable. If the domain is unavailable, it may cause system performance problems due to excessive error conditions and deferred mail.
A list of domains can also be uploaded in one text file. The file must contain comma or tab separated entries in the form:
[domain],[route],[port],[ignore_mx],[subdomains_too],[keep_open]
For example:
example.com,10.10.1.1,25,on,off,off
The file (domains.csv) should be created in csv file format using Excel, Notepad or other Windows text editor. It is recommended that you download the domain file first by clicking Download File, editing it as required, and uploading it using the Upload File button.
39
Configuring Mail Delivery Settings
40
LDAP Routing
Click the LDAP Routing button to define mail routes using an LDAP directory server. This is the preferred method for mail routing for organizations with a large amount of domains.
See “LDAP Routing” on page 74 for more detailed information on using LDAP for mail routing.

Mail Delivery Settings
Mail Delivery SettingsThe Mail Delivery settings screen allows you to configure parameters related to accepting, relaying and delivery mail messages.
Select Mail Delivery -> Delivery Settings on the menu to configure the following parameters.
Delivery Settings
• Maximum time in mail queue — Enter the number of days for a message to stay in the queue before being returned to the sender as "undeliverable".
• Time before delay warning — Number of hours before issuing the sender a notification that mail is delayed.
• Time to retain undelivered MAILER-DAEMON mail — The number of hours to keep undelivered mail addressed to MAILER-DAEMON.
Gateway Features
• Masquerade Addresses — Masquerades internal hostnames by rewriting headers to only include the address of the ePrism.
• Strip Received Headers — Strip all Received headers from outgoing messages.
41
Configuring Mail Delivery Settings
42
Default Mail Relay
• Relay To — (Optional) Enter an optional hostname or IP address of a mail server (not this ePrism system) to relay mail to for all email with unspecified destinations. A recipient’s email domain will be checked against the Mail Routing table, and if the destination is not specified the email will be sent to the Default Mail Relay server for delivery. This option is usually used when the ePrism cannot deliver email directly to remote mail servers. If you are setting up this mail server as a dedicated ePrism Mail Client system, and all mail originating from this system should be forwarded to another mail server for delivery, then specify the destination mail server here. Do NOT enter the name of your ePrism system.
• Ignore MX record — Enable this option to prevent an MX record lookup for this host to force relay settings.
• Enable Client Authentication — Enable client SMTP authentication for relaying mail to another mail server. This option is only used in conjunction with the default mail relay feature. This allows ePrism to authenticate to a server that it is using to relay mail. With this configuration, connections to the default mail relay are authenticated, while connections to other mail routes are not.
• User ID — Enter a User ID to login to the relay mail server.• Password — Enter and confirm a password for the specified User ID.
BCC All Mail
ePrism offers an archiving feature for organizations that require storage of all email that passes through their corporate mail servers. This option sends a blind carbon copy (BCC) of each message that passes through ePrism to the specified address. This address can be local or on any other system. Once copied, the mail can be effectively managed and archived from this account. You must also specify an address that will receive error messages if there are problems delivering the BCC mail.

Mail Delivery Settings
Annotations and Delivery Warnings
In the Annotations section, you can enable Annotations that are appended to all emails, and customize Delivery Failure and Delivery Delay warning messages.
Note: Separate annotations can be enabled for different groups and domains of users using LDAP and policies. See “Policy Management” on page 167 for information on creating policies and configuring separate group and domain annotations.
The variables in the messages, such as %PROGRAM% and %HOSTNAME%, are local system settings that are automatically substituted at the time the message is sent. See “Customizing Notification and Annotation Messages” on page 273 for a full list of variables that can be included.
Note: Some mail clients will display notifications and annotations as attachments to a message rather than in the message body.
43

Configuring Mail Delivery Settings
44
Advanced Delivery Options
Click the Advanced button on the Mail Delivery -> Delivery Settings screen to reveal advanced options for Advanced SMTP Settings, SMTP notifications, and actions for Very Malformed Mail messages.
Advanced SMTP Settings
The following settings are used to disable advanced SMTP delivery functions.
• SMTP Pipelining — Select the check box to disable SMTP Pipelining when delivering mail. Some mail servers may experience problems with SMTP command pipelining, and you may have to disable this feature if required.
• ESMTP — Select the check box to disable ESMTP (Extended SMTP) when delivery mail. Some mail servers may not support ESMTP, and you may have to disable this option if experiencing problems. Disabling ESMTP will disable TLS encryption on outgoing connections.
• HELO required — Enable this option to require clients to initiate their SMTP session with a standard HELO/EHLO sequence. It is recommended that you leave this feature enabled. It should only be disabled when experiencing problems with sending hosts that do not use a standard HELO message.
• Content Reject Message — This is the text part of the SMTP 552 error message reported to clients when message content is rejected.
Mail Delivery Settings
SMTP Notification
In this section, you can select the type of notifications that are sent to the postmaster account. Serious problems such as Resource or Software issues are selected by default for notification.
• Resource — Mail not delivered due to resource problems, such as queue file write errors.• Software — Mail not delivered due to software problems.• Bounce — Send postmaster copies of undeliverable mail. If mail is undeliverable, a single
bounce message is sent to the postmaster with a copy of the message that was not delivered. For privacy reasons, the postmaster copy is truncated after the original message headers. If a single bounce message is undeliverable, the postmaster receives a double bounce message with a copy of the entire single bounce message.
• Delay — Inform the postmaster of delayed mail. In this case, the postmaster receives message headers only.
• Policy — Inform the postmaster of client requests that were rejected because of (UCE) policy restrictions. The postmaster will receive a transcript of the entire SMTP session.
• Protocol — Inform the postmaster of protocol errors (client or server), or attempts by a client to execute unimplemented commands. The postmaster will receive a transcript of the entire SMTP session.
• Double Bounce — Send double bounces to the postmaster.
Very Malformed Mail
Specify the action to be performed when a very malformed message is detected by the system. A very malformed message may cause scanning engine latency.
Possible actions:
• Just log — Log the event and take no further action.• Quarantine mail — The message is placed into quarantine.• Temporarily Reject Mail — Returns an error to the sending server and doesn't accept the
mail. The mail delivery can be attempted again after a period of time. • Reject mail — The message is rejected with notification to the sending system.• Discard mail — The message is discarded without notification to the sending system.
Select the Notify check box to allow notifications using the malformed notification settings when the action specified above is triggered (except for Just log.)
Caution: Mail that is very malformed has not been virus scanned, or filtered for attachments and spam.
45
Configuring Mail Delivery Settings
46
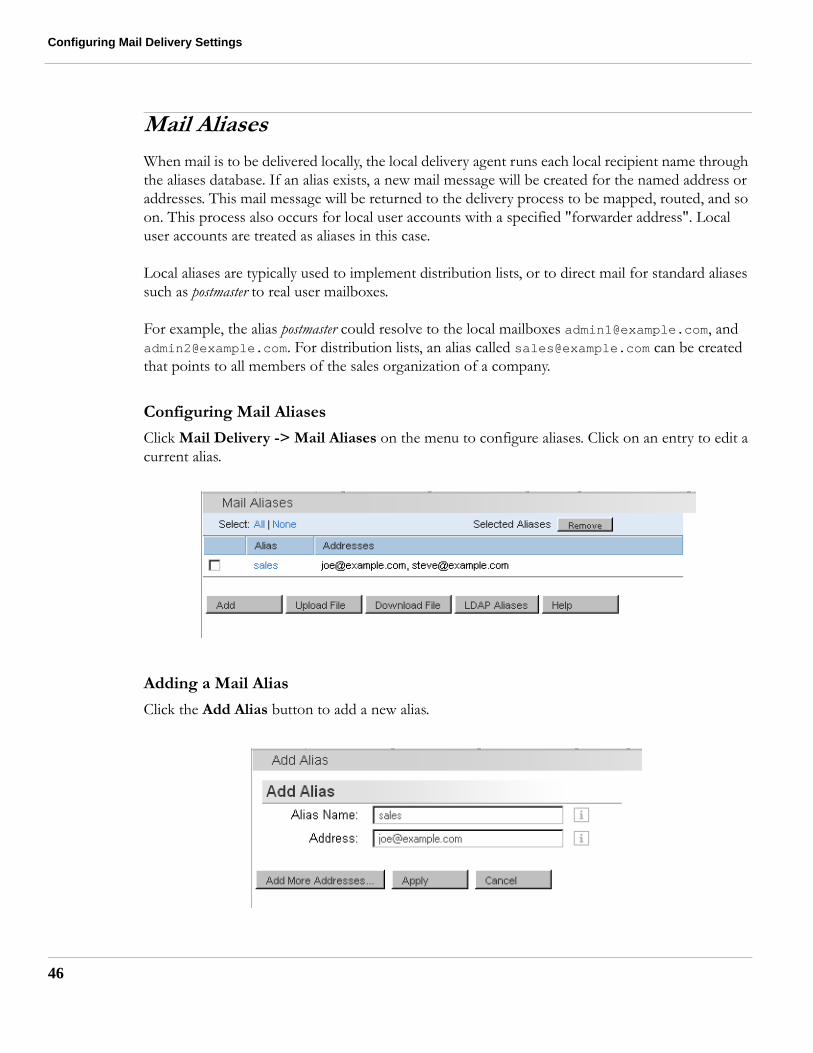
Mail Aliases
When mail is to be delivered locally, the local delivery agent runs each local recipient name through the aliases database. If an alias exists, a new mail message will be created for the named address or addresses. This mail message will be returned to the delivery process to be mapped, routed, and so on. This process also occurs for local user accounts with a specified "forwarder address". Local user accounts are treated as aliases in this case.
Local aliases are typically used to implement distribution lists, or to direct mail for standard aliases such as postmaster to real user mailboxes.
For example, the alias postmaster could resolve to the local mailboxes [email protected], and [email protected]. For distribution lists, an alias called [email protected] can be created that points to all members of the sales organization of a company.
Configuring Mail Aliases
Click Mail Delivery -> Mail Aliases on the menu to configure aliases. Click on an entry to edit a current alias.
Adding a Mail Alias
Click the Add Alias button to add a new alias.

Mail Aliases
The specified alias name must be a valid local mailbox on this ePrism system. Enter the corresponding mail address for the alias. Click the Add More Addresses button to enter multiple addresses for this alias.
Uploading Alias Lists
A list of aliases can also be uploaded in one text file. The file must contain comma or tab separated entries in the form:
[alias],[mail_address]
For example:
sales,[email protected]
info,[email protected]
The file (alias.csv) should be created in csv file format using Excel, Notepad or other Windows text editor. It is recommended that you download the mail alias file first by clicking Download File, editing it as required, and uploading it using the Upload File button.
LDAP Aliases
Click the LDAP Aliases button to configure and search for aliases using LDAP. This allows you to search LDAP-enabled directories such as Active Directory for mail aliases.
See See “LDAP Aliases” on page 65 for more information on LDAP Aliases.
47
Configuring Mail Delivery Settings
48
Mail Mappings
Mail Mappings are used to map an external address to a different internal address and vice versa. This is useful for hiding internal mail server addresses from external users. For mail originating externally, the mail mapping translates the address in the To: and CC: mail header field into a corresponding internal address to be delivered to a specific internal mailbox.
For example, mail addressed to [email protected] can be redirected to the internal mail address [email protected]. This enables the message to be delivered to the user’s preferred mailbox.
Similarly, mail originating internally will have the address in the From:, Reply-To:, and Sender: header modified by a mail mapping so it appears to have come from the preferred external form of the mail address, [email protected].
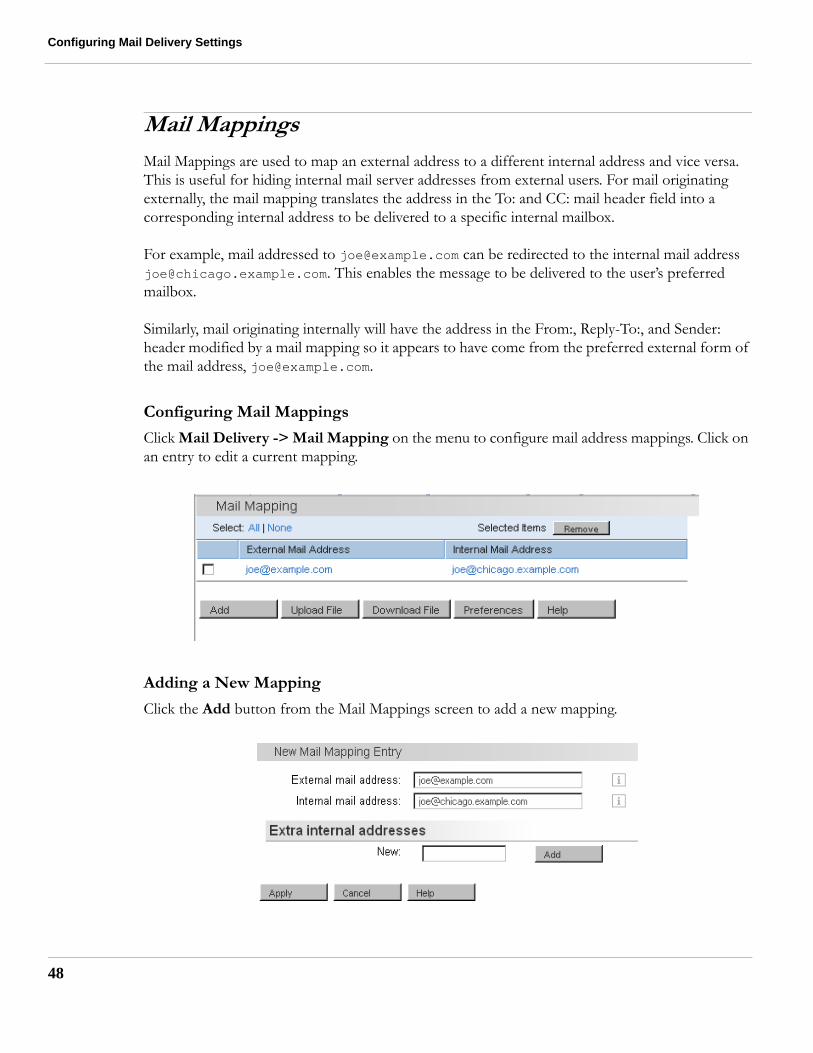
Configuring Mail Mappings
Click Mail Delivery -> Mail Mapping on the menu to configure mail address mappings. Click on an entry to edit a current mapping.
Adding a New Mapping
Click the Add button from the Mail Mappings screen to add a new mapping.
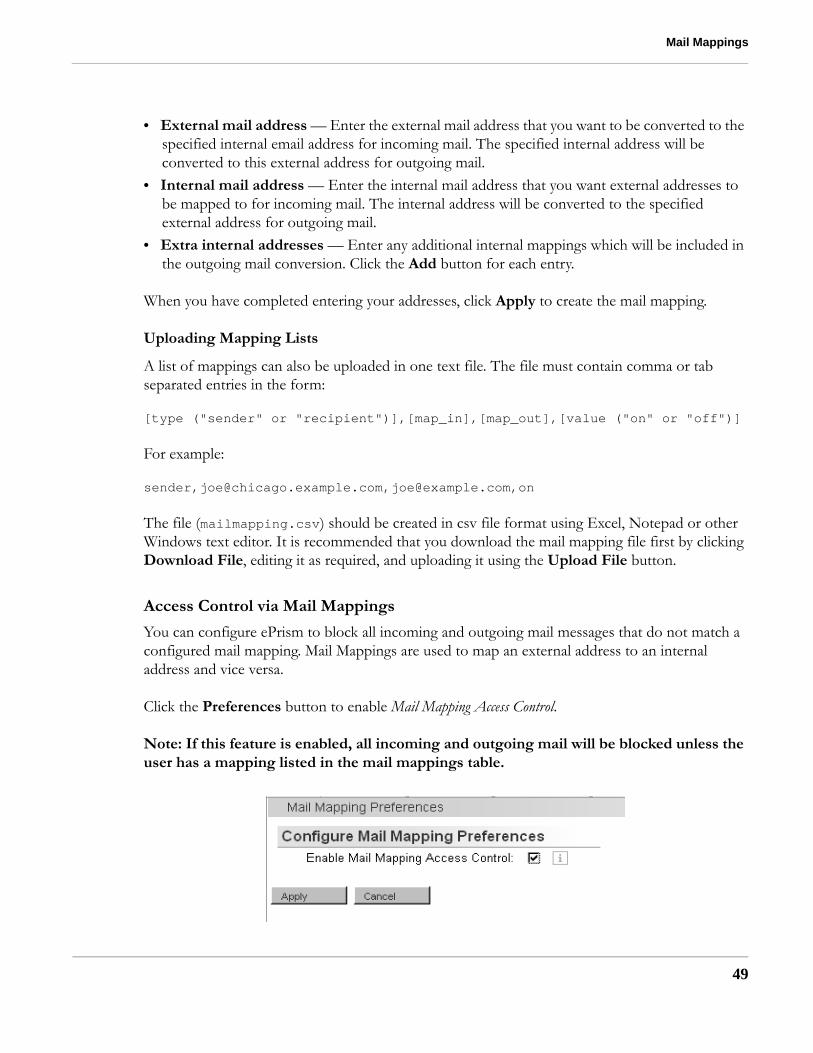
Mail Mappings
• External mail address — Enter the external mail address that you want to be converted to the specified internal email address for incoming mail. The specified internal address will be converted to this external address for outgoing mail.
• Internal mail address — Enter the internal mail address that you want external addresses to be mapped to for incoming mail. The internal address will be converted to the specified external address for outgoing mail.
• Extra internal addresses — Enter any additional internal mappings which will be included in the outgoing mail conversion. Click the Add button for each entry.
When you have completed entering your addresses, click Apply to create the mail mapping.
Uploading Mapping Lists
A list of mappings can also be uploaded in one text file. The file must contain comma or tab separated entries in the form:
[type ("sender" or "recipient")],[map_in],[map_out],[value ("on" or "off")]
For example:
sender,[email protected],[email protected],on
The file (mailmapping.csv) should be created in csv file format using Excel, Notepad or other Windows text editor. It is recommended that you download the mail mapping file first by clicking Download File, editing it as required, and uploading it using the Upload File button.
Access Control via Mail Mappings
You can configure ePrism to block all incoming and outgoing mail messages that do not match a configured mail mapping. Mail Mappings are used to map an external address to an internal address and vice versa.
Click the Preferences button to enable Mail Mapping Access Control.
Note: If this feature is enabled, all incoming and outgoing mail will be blocked unless the user has a mapping listed in the mail mappings table.
49

Configuring Mail Delivery Settings
50
Virtual Mappings
Virtual Mappings are used to redirect mail addressed for one domain to a different domain. This process is performed without modifying the To: and From: headers in the mail, as virtual mappings modify the envelope-recipient address.
For example, ePrism can be configured to accept mail for the domain @example.com and deliver it to @sales.example.com. This allows ePrism to distribute mail to multiple internal servers based on the Recipient: address of the incoming mail.
Virtual Mappings are useful for acting as a wildcard mail mapping, such as mail for example.com is sent to exchange.example.com. You can create exceptions to this rule in the Mail Mappings for particular users. Virtual mappings are also useful for ISPs who need to accept mail for several domains, and situations where the envelope-recipient header needs to be rewritten for further delivery.
Note: You should review the use of Mail Routes before setting anything in Virtual Mappings, as they may be more appropriate for delivering mail to internal mail servers.
Configuring Virtual Mappings
Click on Mail Delivery -> Virtual Mapping on the menu to configure mappings. Click on an entry to edit a current mapping.

Virtual Mappings
Adding a Virtual Mapping
Click the Add Virtual Mapping button from the Virtual Mappings screen to add a new mapping.
First, enter the domain or address to which incoming mail is directed in the Input box, such as @example.com. Then enter the domain or address to which mail should be redirected to, such as @sales.example.com in the Output box.
Uploading Virtual Mapping Lists
A list of virtual mappings can also be uploaded in one text file. The file must contain comma or tab separated entries in the form:
[map_in],[map_out]
For example:
[email protected],user [email protected],[email protected] @example.com,@sales.example.com
The file (virtmap.csv) should be created in csv file format using Excel, Notepad or other Windows text editor. It is recommended that you download the virtual mapping file first by clicking Download File, editing it as required, and uploading it using the Upload File button.
Note: The domain being virtually mapped or redirected must be defined via an "internal" DNS MX record to connect to this ePrism Email Security Appliance.
LDAP Virtual Mappings
Click the LDAP Virtual Mappings button to configure and search for virtual mappings using LDAP. This allows you to search LDAP-enabled directories such as Active Directory for virtual mappings. See “LDAP Mappings” on page 67 for more information on configuring LDAP virtual mappings.
51

Configuring Mail Delivery Settings
52

CHAPTER 4 Directory Services
This chapter describes how to integrate your existing directory services such as LDAP with ePrism, and contains the following topics:
• “Directory Service Overview” on page 54• “Directory Servers” on page 56• “Directory Groups” on page 58• “Directory Users” on page 61• “LDAP Aliases” on page 65• “LDAP Mappings” on page 67• “LDAP Recipients” on page 69• “LDAP Relay” on page 71• “LDAP Routing” on page 74
53

Directory Services
54
Directory Service Overview
ePrism can utilize LDAP (Lightweight Directory Access Protocol) services for accessing directories (such as Active Directory, OpenLDAP, and iPlanet) for user and group information. LDAP can be used with ePrism for mail routing, group lookups for policies, user lookups for mail delivery, alias and virtual mappings, and the Spam Quarantine.
LDAP was designed to provide a standard for efficient access to directory services using simple data queries. Most major directory services such as Active Directory support LDAP, but each differs in their interpretation and naming convention syntax. Other types of supported LDAP services include OpenLDAP and iPlanet.
Naming Conventions
The method for which data is arranged in the directory service hierarchy is a unique Distinguished Name. The following is an example of a Distinguished Name in Active Directory:
In this example, "cn" represents the Common Name, and "dc" is the Domain Component. The user, jsmith, is in the users container. The domain component is analogous to the FQDN domain name, in this case, example.com.
Note: For all LDAP Directory features, you must ensure you enter values specific to your LDAP environment and schema.

Directory Service Overview
Active Directory LDAP Results Limit
Active Directory has a default limit of 1000 entries that can be returned from an LDAP query. With large queries, the results may be truncated. It is recommended that you modify the default maximum page size to ensure that LDAP Group and User imports will work successfully.
Use the following procedure to modify the default maximum page size limit in Active Directory:
1. Login to the Active Directory system as an administrator.2. Open a command prompt, and enter the following commands (in bold):
c:\>ntdsutil.exe ntdsutil: ldap policies ldap policy: connections server connections: Connect to server [Servername] Binding to [Servername] ... Connected to [Servername] using credentials of locally logged on user server connections: q ldap policy: Show Values
Policy Current(New)
MaxPoolThreads 8 MaxDatagramRecv 1024 MaxReceiveBuffer 10485760 InitRecvTimeout 120 MaxConnections 5000 MaxConnIdleTime 900 MaxActiveQueries 20 MaxPageSize 1000 MaxQueryDuration 120 MaxTempTableSize 10000 MaxResultSetSize 262144 MaxNotificationPerConn 5
ldap policy: set Maxpagesize to 50000 ldap policy: commit Changes ldap policy: q ntdsutil: q Disconnecting from [Servername]
55

Directory Services
56
Directory Servers
The first step in configuring Directory Services on ePrism is to define and configure your Directory Servers.
Select Basic Config -> Directory Services -> Directory Servers on the menu to configure your LDAP servers that will be used for ePrism’s LDAP functions such as user and group membership lookups, authentication, routing, and so on.
Click Add to configure a new LDAP server, or click Edit to modify an existing server:
• Server URI — Enter the server URI (Uniform Resource Identifier) address, such as ldaps://10.10.4.84.
• Label — An optional label or alias for the LDAP server.

Directory Servers
• Type — Select the type of LDAP server, such as Active Directory, or choose Others for OpenLDAP or iPlanet.
• Bind — Select this check box to bind to the LDAP server with the Bind DN and password below.
• Bind DN — Enter the DN (Distinguished Name) for the user to bind to the LDAP server, such as cn=Admin,cn=users,dc=example,dc=com.
• Bind Password — Enter the bind password for the LDAP server.• Search Base — Specify a default starting point for lookups, such as dc=example,dc=com.• Timeout — The maximum interval, in seconds, to wait for the search to complete.• Chase Referrals — Specifies how alias dereferencing is performed during a search:
Never: Aliases are never dereferenced.Searching: Aliases are dereferenced in subordinates of the base object, but not in locating the base object of the search.Finding: Aliases are only derferenced when locating the base object of the search.Always: Aliases are dereferenced when searching and locating the base object of the search.
Click the Test button to test your LDAP settings and send a test query to the LDAP server.
When finished, click the Apply button to add the LDAP server.
57
Directory Services
58
Directory Groups
When you have a Directory server configured, you can import group membership information from the server to ePrism. Importing user’s group membership information is used for determining membership for group policies. See “Policy Management” on page 167 for more information on configuring Policies.
Note: Policies must be enabled before Groups can be imported. LDAP Groups has been tested only with Active Directory. Examples used are for Active Directory implementations.
Configuring Directory Groups
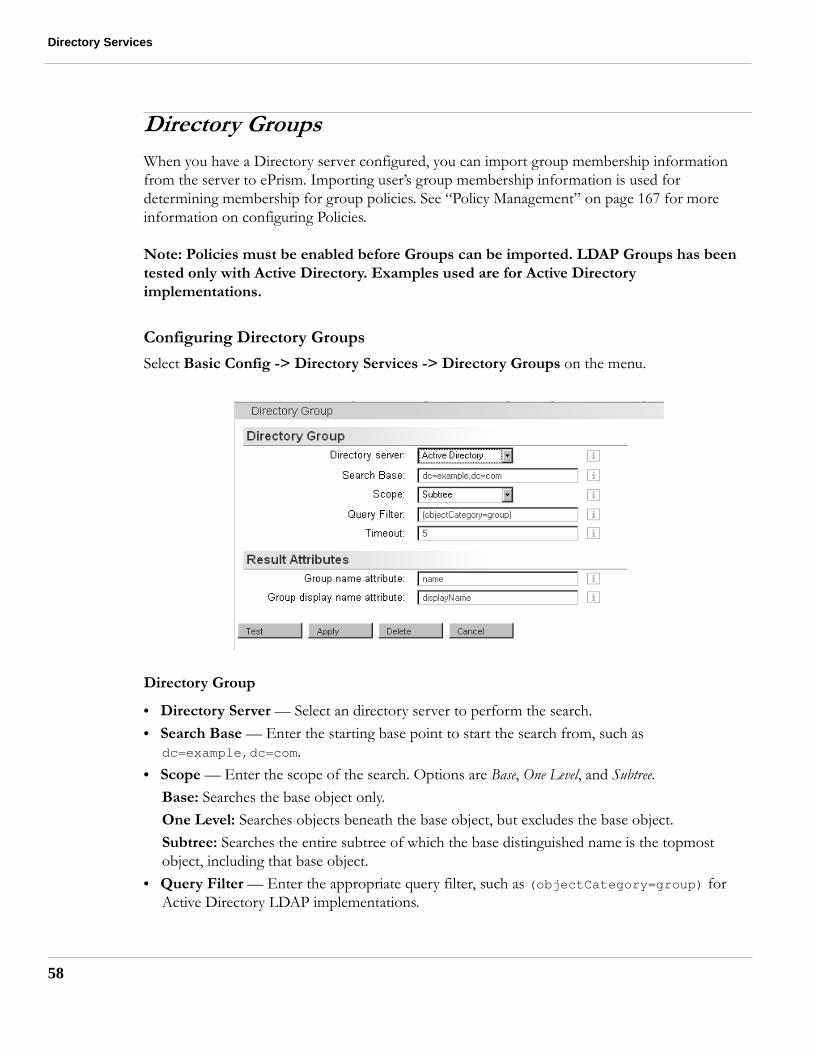
Select Basic Config -> Directory Services -> Directory Groups on the menu.
Directory Group
• Directory Server — Select an directory server to perform the search.• Search Base — Enter the starting base point to start the search from, such as
dc=example,dc=com.• Scope — Enter the scope of the search. Options are Base, One Level, and Subtree.
Base: Searches the base object only. One Level: Searches objects beneath the base object, but excludes the base object. Subtree: Searches the entire subtree of which the base distinguished name is the topmost object, including that base object.
• Query Filter — Enter the appropriate query filter, such as (objectCategory=group) for Active Directory LDAP implementations.

Directory Groups
To specify one specific group, use (&(objectCategory=group)(name=groupname)), inserting the group you are using for "groupname".
• Timeout — The maximum interval, in seconds, to wait for the search to complete.
Result Attributes
This section specifies the fields to return during the LDAP query. LDAP queries can return a lot of information that is not required, and the Result Attributes are used to filter only the data needed.
• Group name attribute — Enter the appropriate group name attribute, such as name for Active Directory LDAP implementations, that identifies the group name.
• Group display name attribute — Enter the appropriate group display name attribute, such as displayName for Active Directory implementations.
Click the Test button to test your directory server group settings. Click Apply when finished.
Import Settings
You can configure ePrism to automatically import LDAP group data on a scheduled basis. This allows you to stay synchronized with the LDAP directory.
To import LDAP groups:
Click the Import Settings button in the Basic Config -> Directory Services -> Directory Groups screen.
• Import Group Data — Select the check box to enable automatic import of LDAP group data. Enabling automatic import ensures that your imported LDAP data remains current with the information on the LDAP directory server.
• Frequency — Select the frequency of LDAP imports. You can choose between Hourly, Every 3 Hours, Daily, Weekly, and Monthly.
59

Directory Services
60
• Start Time — Specify the start time for the import in the format hh:mm, such as 23:00 to schedule an import at 11pm for the period specified in the Frequency field.
Click Apply to save the settings. Click Import Now to immediately begin the import of LDAP groups.
View the progress of LDAP imports via Status/Reporting -> System Logs -> Messages
Directory Users
Directory UsersThe Directory Users screen is used to import user account data from LDAP-based directory servers. This information is used provide LDAP lookups for valid email addresses for the Reject on Unknown Recipient anti-spam option.
Local mirror accounts can also be created to allow directory-based users to log in locally to ePrism to view quarantined mail for the Spam Quarantine feature.
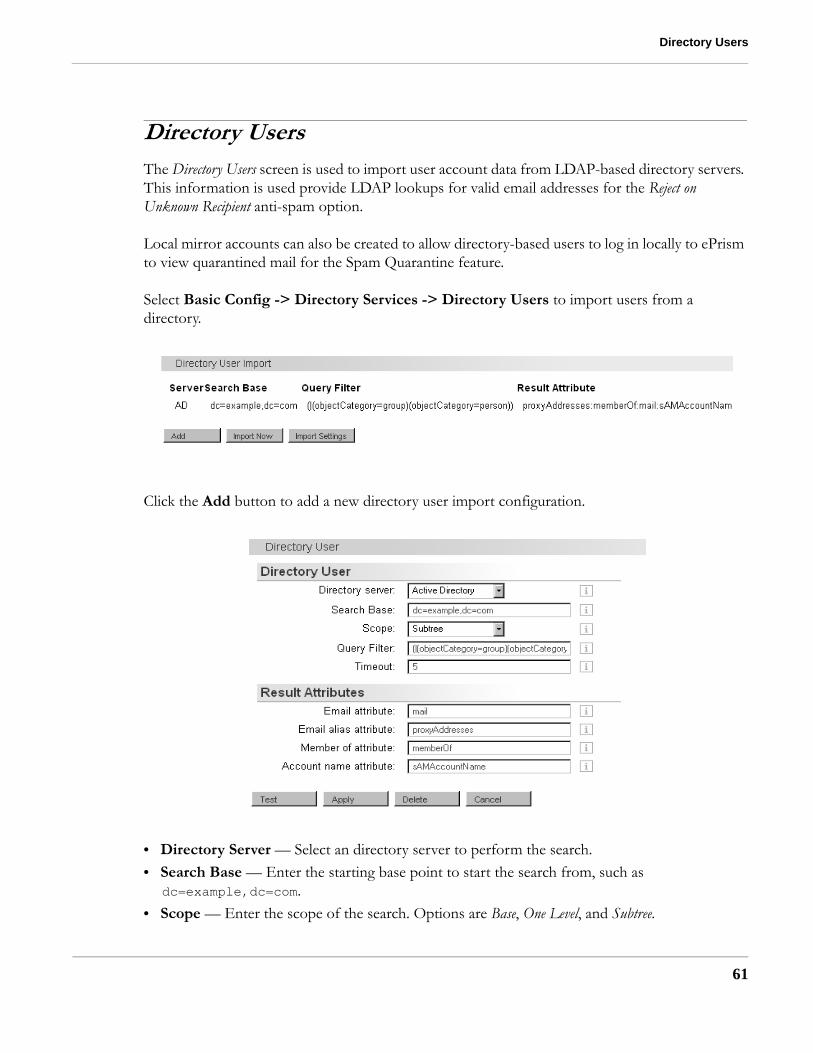
Select Basic Config -> Directory Services -> Directory Users to import users from a directory.
Click the Add button to add a new directory user import configuration.
• Directory Server — Select an directory server to perform the search.• Search Base — Enter the starting base point to start the search from, such as
dc=example,dc=com.• Scope — Enter the scope of the search. Options are Base, One Level, and Subtree.
61

Directory Services
62
Base: Searches the base object only. One Level: Searches objects beneath the base object, but excludes the base object. Subtree: Searches the entire subtree of which the base distinguished name is the topmost object, including that base object.
• Query Filter — Enter the appropriate query filter, such as (|(objectCategory=group)(objectCategory=person)) for Active Directory LDAP implementations.If you use Exchange public folders for email, include the following to your query filter: (objectCategory=publicFolder)
For example,(|(|(objectCategory=group)(objectCategory=person))(objectCategory=publicFolder))
For iPlanet and OpenLDAP, use: (objectClass=person).
• Timeout — The maximum interval, in seconds, to wait for the search to complete.
Result Attributes
This section specifies the fields to return during the LDAP query. LDAP queries can return a lot of information that is not required, and the Result Attributes are used to filter only the data needed.
• Email attribute — The name of the attribute that identifies the user’s email address. For Active Directory, iPlanet, and OpenLDAP, use mail.
• Email alias attribute — The name of the attribute that identifies the user’s alternate email addresses. In Active Directory, the default is proxyAddresses. For iPlanet, use Email. For OpenLDAP, leave this attribute blank.
• Member of attribute — The name of the attribute that identifies the group(s) that the user belongs to. This information is used for Policy controls. In Active Directory, the default is memberOf. For iPlanet, use Member. For OpenLDAP, leave this blank.
• Account Name attribute — This is the name of the attribute that identifies a user’s account name for login. In Active Directory, the default is sAMAccountName. For iPlanet, use uid. For OpenLDAP, use cn.
Click the Test button to test your LDAP settings. Click Apply when finished.

Directory Users
Import Settings
You can configure ePrism to automatically import LDAP user data on a scheduled basis. This allows you to stay synchronized with the LDAP directory.
To import LDAP users:
Click the Import Settings button in the Basic Config -> Directory Services -> Directory Users screen.
• Import User Data — Select the check box to enable automatic import of LDAP user data. Enabling automatic import ensures that your imported LDAP data remains current with the information on the LDAP directory server.
• Frequency — Select the frequency of LDAP imports. You can choose between Hourly, Every 3 Hours, Daily, Weekly, and Monthly.
• Start Time — Specify the start time for the import in the format hh:mm, such as 23:00 to schedule an import at 11pm for the period specified in the Frequency field.
Click Apply to save the settings. Click Import Now to immediately begin the import of users.
View the progress of LDAP imports via Status/Reporting -> System Logs -> Messages
63
Directory Services
64
Mirror LDAP Accounts as Local Users
To provide local account access for the Spam Quarantine feature, you can mirror the LDAP accounts which creates a local account on ePrism for each user imported. This provides a simple method for allowing directory-based users to log in to the ePrism to view quarantined messages if you have enabled the Spam Quarantine feature.
Note: These local mirror accounts cannot be used as local mail accounts. They can only be used for the Spam Quarantine.
See “Spam Quarantine” on page 136 for more information on configuring the user-based Spam Quarantine.
To create mirrored LDAP users:
1. Select the Mirror accounts option.2. Choose an Expiry period for the mirrored accounts. If the user no longer exists in the LDAP
directory for the specified period of time, the local mirrored account will be deleted. Note that this only applies to a local mirrored account, not accounts used for the Reject on Unknown Recipients feature.
Click Apply to save the settings. Click Import Now to immediately begin the import of users and create mirrored accounts.
View the progress of LDAP imports via Status/Reporting -> System Logs -> Messages.
Mirrored accounts can be viewed via User Accounts -> Mirrored Accounts on the menu.

LDAP Aliases
LDAP AliasesLDAP Aliases are used to search LDAP-enabled directories for mail aliases of a user. If an alias exists, a new mail message will be created for the named address or addresses. This mail message will be returned to the delivery process to be mapped, routed, and so on.
Note: LDAP Aliases have been tested with Active Directory only, and the examples shown are for Active Directory LDAP implementations.
See “Mail Aliases” on page 46 for more information on Mail Aliases.
Select Basic Config -> Directory Services -> LDAP Aliases to configure LDAP Aliases.
Click the Add button to add a new LDAP alias search.
• Directory Server — Select an directory server to perform the search.• Search Base — Enter the starting base point to start the search from, such as
cn=users,dc=example,dc=com.• Scope — Enter the scope of the search. Options are Base, One Level, and Subtree.
65

Directory Services
66
Base: Searches the base object only. One Level: Searches objects beneath the base object, but excludes the base object. Subtree: Searches the entire subtree of which the base distinguished name is the topmost object, including that base object.
• Alias Attribute — Enter the Alias Attribute that defines the alias mail addresses for a user, such as (proxyAddresses=smtp:%s@*) for Active Directory implementations.
• EMail — Enter the attribute that returns the user’s email address, such as mail for Active Directory implementations.
• Timeout — The maximum interval, in seconds, to wait for the search to complete.
Use the Test button to perform a test of the LDAP alias configuration. Click Apply to save the settings.

LDAP Mappings
LDAP MappingsLDAP mappings are used to search LDAP-enabled directories for virtual mappings for a user.
Virtual Mappings are used to redirect mail addressed for one domain to a different domain. This process is performed without modifying the To: and From: headers in the mail, as virtual mappings modify the envelope-recipient address.
Note: LDAP Virtual Mappings have been tested with Active Directory only, and the examples shown are for Active Directory LDAP implementations.
See “Virtual Mappings” on page 50 for more information on Virtual Mappings.
Select Basic Config -> Directory Services -> LDAP Mappings to configure LDAP Virtual Mappings.
Click the Add button to add a new LDAP Virtual Mapping search.
• Directory Server — Select an directory server to perform the search.
67

Directory Services
68
• Search Base — Enter the starting base point to start the search from, such as cn=users,dc=example,dc=com.
• Scope — Enter the scope of the search. Options are Base, One Level, and Subtree.Base: Searches the base object only. One Level: Searches objects beneath the base object, but excludes the base object. Subtree: Searches the entire subtree of which the base distinguished name is the topmost object, including that base object.
• Alias Attribute — Enter the Incoming Address attribute that defines the virtual mapping for a user, such as (proxyAddresses=smtp:%s) for Active Directory implementations.
• EMail — Enter the attribute that returns the user’s email address, such as mail for Active Directory implementations.
• Timeout — The maximum interval, in seconds, to wait for the search to complete.
Use the Test button to perform a test of the LDAP virtual mapping configuration. Click Apply to save the settings.

LDAP Recipients
LDAP RecipientsThe LDAP Recipients feature is used in conjunction with the Reject on Unknown Recipient feature configured in Mail Delivery -> Anti-Spam. You must have Reject on Unknown Recipient enabled for this feature to work.
When a mail message is received by ePrism, this feature searches an LDAP directory for the existence of a recipient’s email address. If that user address does not exist in the LDAP directory, the mail is rejected.
This feature differs from the LDAP Users lookup option which searches for a user using the imported locally-cached LDAP users database. The LDAP recipients feature performs a direct lookup on a configured LDAP directory server for each address.
If both LDAP Users and LDAP Recipients are enabled with Reject on Unknown Recipient, the system will lookup the local and mirrored LDAP Users first, and then use the direct query to an LDAP server.
Select Basic Config -> Directory Services -> LDAP Recipients on the menu to configure your LDAP recipient lookups.
Click Add to add a new LDAP Recipients search.
69

Directory Services
70
• Directory Server — Select an directory server to perform the search.• Search Base — Enter the starting base point to start the search from, such as
cn=users,dc=example,dc=com.• Scope — Enter the scope of the search. Options are Base, One Level, and Subtree.
Base: Searches the base object only. One Level: Searches objects beneath the base object, but excludes the base object. Subtree: Searches the entire subtree of which the base distinguished name is the topmost object, including that base object.
• Query Filter — Enter the Query Filter for the LDAP Recipients lookup, such as (&(objectClass=person)(mail=%s)) for Active Directory implementations.For OpenLDAP and iPlanet, use (&(objectClass=person)(uid=%s)).
• Result Attribute — Enter the attribute that returns the user’s email address, such as mail for Active Directory implementations. For OpenLDAP, and iPlanet, you can also use mail.
• Timeout — The maximum interval, in seconds, to wait for the search to complete.
Use the Test button to perform a test of the LDAP recipients configuration. Click Apply to save the settings.
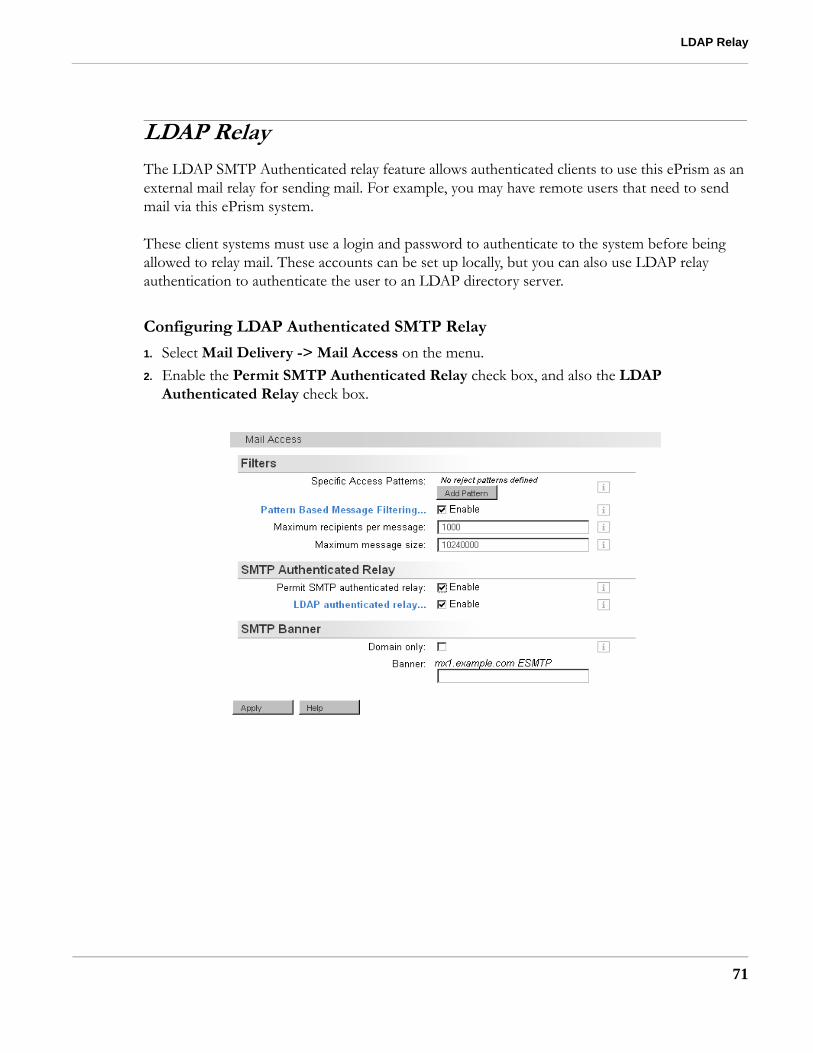
LDAP Relay
LDAP RelayThe LDAP SMTP Authenticated relay feature allows authenticated clients to use this ePrism as an external mail relay for sending mail. For example, you may have remote users that need to send mail via this ePrism system.
These client systems must use a login and password to authenticate to the system before being allowed to relay mail. These accounts can be set up locally, but you can also use LDAP relay authentication to authenticate the user to an LDAP directory server.
Configuring LDAP Authenticated SMTP Relay
1. Select Mail Delivery -> Mail Access on the menu.2. Enable the Permit SMTP Authenticated Relay check box, and also the LDAP
Authenticated Relay check box.
71

Directory Services
72
3. Select Basic Config -> Directory Services -> LDAP Relay on the menu.
There are two different ways to provide LDAP support for SMTP authentication, using Bind, or querying the LDAP server directly.
Note: The Bind method will only work with Active Directory and iPlanet implementations. The Query Direct method will only work with OpenLDAP.
• Bind — The Bind method will use the User ID and password to authenticate on a successful bind. The Query Filter must specify the User ID with a %s variable, such as (sAMAccountName=%s) for Active Directory. The Result Attribute must be a User ID such as sAMAccountName. Enter corresponding values specific to your LDAP environment.For iPlanet, use uid=%s for Query Filter, and mail for Result Attribute.
• Query Directly — The Query Direct method will query the LDAP server directly to authenticate a user ID and password. The Query Filter must specify the user ID, and the Result Attribute must specify the password.For OpenLDAP, use uid=%s for Query Filter, and userPassword for Result Attribute.
For either method, the relay will be refused if the LDAP server direct query or bind attempt fails for any reason, such as an invalid user name or password, bad query, or if the LDAP server is not responding.
Select a method, and then click Add to add an entry.
Note: You can only use one method, Bind or Query Direct, for all defined LDAP servers. You cannot use both at the same time.

LDAP Relay
• Directory Server — Select an directory server to perform the search.• Search Base — The Search Base is derived from the Search Base setting in Basic Config ->
Directory Services -> Directory Servers. You must ensure that you complete the Search Base string with information specific to your LDAP hierarchy, such as cn=users,dc=example,dc=com.
• Scope — Enter the scope of the search. Options are Base, One Level, and Subtree.Base: Searches the base object only. One Level: Searches objects beneath the base object, but excludes the base object. Subtree: Searches the entire subtree of which the base distinguished name is the topmost object, including that base object.
• Query Filter — Enter the Query Filter for the LDAP lookup, such as (sAMAccountName=%s) for Active Directory implementations.
• Result Attribute — Enter the attribute that returns the user’s account, such as sAMAccountName for Active Directory implementations.
• Timeout — The maximum interval, in seconds, to wait for the search to complete.
Use the Test button to perform a test of the LDAP relay configuration. Click Apply to save the settings.
73
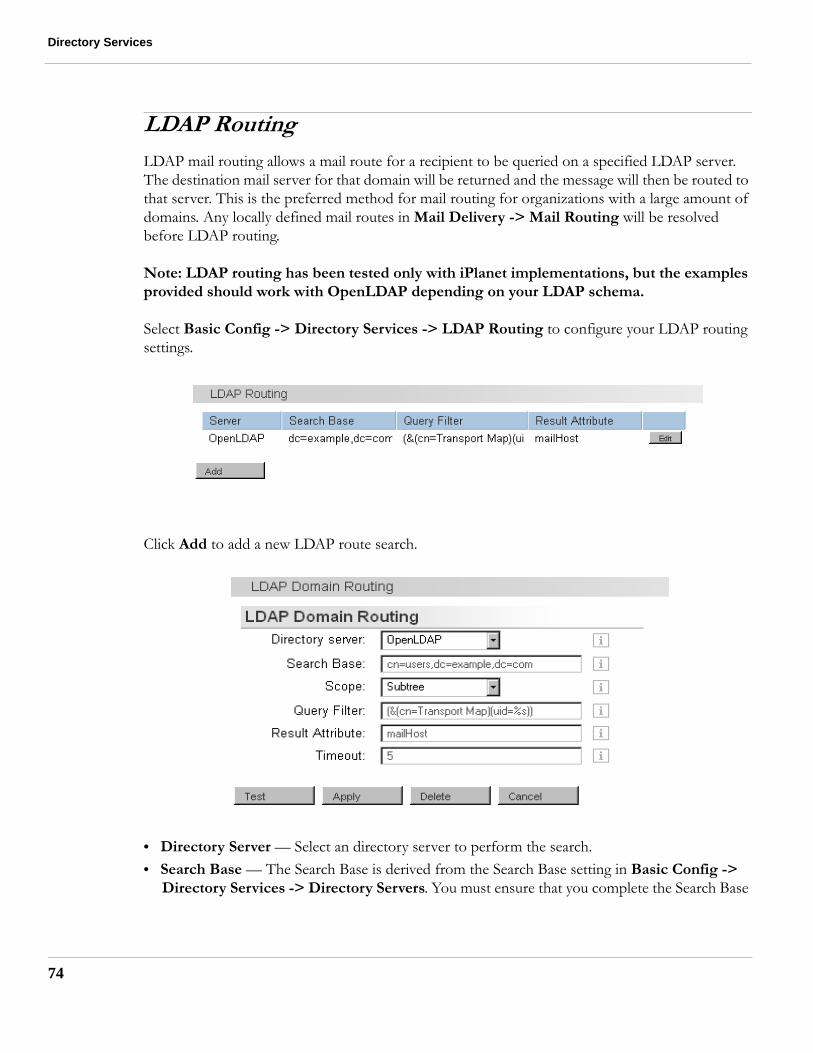
Directory Services
74
LDAP Routing
LDAP mail routing allows a mail route for a recipient to be queried on a specified LDAP server. The destination mail server for that domain will be returned and the message will then be routed to that server. This is the preferred method for mail routing for organizations with a large amount of domains. Any locally defined mail routes in Mail Delivery -> Mail Routing will be resolved before LDAP routing.
Note: LDAP routing has been tested only with iPlanet implementations, but the examples provided should work with OpenLDAP depending on your LDAP schema.
Select Basic Config -> Directory Services -> LDAP Routing to configure your LDAP routing settings.
Click Add to add a new LDAP route search.
• Directory Server — Select an directory server to perform the search.• Search Base — The Search Base is derived from the Search Base setting in Basic Config ->
Directory Services -> Directory Servers. You must ensure that you complete the Search Base
LDAP Routing
string with information specific to your LDAP hierarchy, such as cn=users,dc=example,dc=com.
• Scope — Enter the scope of the search. Options are Base, One Level, and Subtree.Base: Searches the base object only. One Level: Searches objects beneath the base object, but excludes the base object. Subtree: Searches the entire subtree of which the base distinguished name is the topmost object, including that base object.
• Query Filter — Enter the Query Filter that will search for the Mail Domain of a recipient, such as (&(cn=Transport Map)(uid=%s)) for OpenLDAP implementations.
• Result Attribute — Enter the attribute that returns the domain’s mail host, such as mailHost for OpenLDAP implementations.
• Timeout — The maximum interval, in seconds, to wait for the search to complete.
Use the Test button to perform a test of the LDAP routing configuration. Click Apply to save the settings.
75

Directory Services
76

CHAPTER 5 Configuring Email Security
This chapter describes how to configure the mail security features of your ePrism Email Security Appliance, and contains the following topics:
• “SMTP Mail Access” on page 78• “Anti-Virus” on page 80• “Malformed Messages” on page 83• “Attachment Control” on page 85• “SPF (Sender Policy Framework)” on page 88• “Encryption and Certificates” on page 90
77
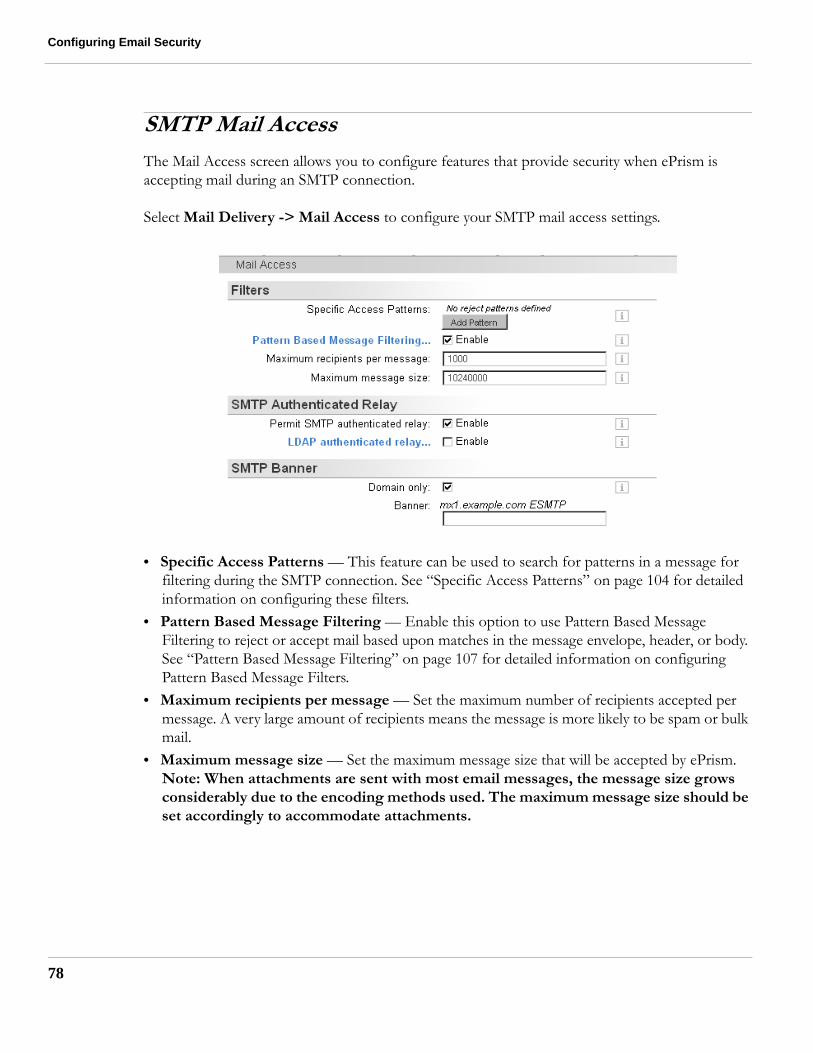
Configuring Email Security
78
SMTP Mail Access
The Mail Access screen allows you to configure features that provide security when ePrism is accepting mail during an SMTP connection.
Select Mail Delivery -> Mail Access to configure your SMTP mail access settings.
• Specific Access Patterns — This feature can be used to search for patterns in a message for filtering during the SMTP connection. See “Specific Access Patterns” on page 104 for detailed information on configuring these filters.
• Pattern Based Message Filtering — Enable this option to use Pattern Based Message Filtering to reject or accept mail based upon matches in the message envelope, header, or body. See “Pattern Based Message Filtering” on page 107 for detailed information on configuring Pattern Based Message Filters.
• Maximum recipients per message — Set the maximum number of recipients accepted per message. A very large amount of recipients means the message is more likely to be spam or bulk mail.
• Maximum message size — Set the maximum message size that will be accepted by ePrism. Note: When attachments are sent with most email messages, the message size grows considerably due to the encoding methods used. The maximum message size should be set accordingly to accommodate attachments.

SMTP Mail Access
SMTP Authenticated Relay
This feature allows authenticated clients to use ePrism as an external mail relay for sending mail. For example, you may have remote users that need to send mail via this ePrism system. Client systems must use a login and password to authenticate to the system before being allowed to relay mail. These accounts can be local or they can be authenticated via LDAP.
Select Mail Delivery -> Mail Access on the menu to enable SMTP Authenticated Relay.
LDAP SMTP Authentication
SMTP authentication can also be performed via an LDAP directory server. Select the check box to enable LDAP Authenticated Relay, and select the link to configure. This feature can also be configured via Basic Config -> Directory Services -> LDAP Relay.
See “LDAP Relay” on page 71 for detailed information on configuring LDAP Authenticated Relay.
SMTP Banner
The SMTP banner is exchanged during the HELO session of an SMTP connection. This banner contains identifying information for your mail server which can be used as information to launch attacks against the server. This option allows you to customize the SMTP banner, and also remove ePrism’s hostname by using the Domain only option.
79
Configuring Email Security
80
Anti-Virus
ePrism provides an optional virus scanning service. When enabled, all messages (inbound and outbound) passing through the ePrism Email Security Appliance can be scanned for viruses. ePrism integrates the Kaspersky Anti-Virus engine, which is one of the highest rated virus scanning technologies in the world. Virus scanning is tightly integrated with the mailer for maximum efficiency.
Viruses can be selectively blocked depending on whether they are found in inbound or outbound messages, and attachments are recursively disassembled to ensure that viruses cannot be concealed. When a virus-infected message is received, it can be deleted, quarantined, or the event can be simply logged. Quarantined messages may be viewed, forwarded, downloaded, or deleted. Quarantined messages can also be automatically deleted based on age.
By default, any email attachments that cannot be opened and examined by the mail scanner because of password-protection are quarantined. This feature prevents password-protected zip files that contain viruses or worms from being passed through the system.
Virus pattern files are automatically downloaded at regular intervals to ensure that they are always up to date. Notification messages can be sent to the sender, recipient, and mail administrator when an infected message is received.
Licensing Anti-Virus
To enable virus scanning after the 30-day evaluation period, you must purchase and install a license for each system. See “License Management” on page 184 for more information on adding licenses.

Anti-Virus
Configuring Anti-Virus Scanning
Select Mail Delivery -> Anti-Virus from the menu to configure virus scanning.
• Enable Kaspersky virus scanning — Enable or disable virus scanning by selecting the check box.
• Quarantine unopenable attachments — This option is enabled by default to quarantine attachments that are password-protected and flag them in the logs as "suspicious". This feature prevents password-protected zip files that contain viruses or worms from being passed through the system. It is recommended that customers use Attachment Control for similar protection against encrypted files, such as S/MIME, and PGP. For example, for S/MIME encrypted attachments you should add the "application/x-pkcs7-mime" MIME type to the list of attachment types and set the action to Quarantine mail. See “Attachment Control” on page 85 for more detailed information.Note: This option will only take effect if the Anti-Virus action is set to Quarantine mail.
• Action — Configure the action to take for both inbound and outbound mail. Possible actions include:Just log: Log the event and take no further action.Quarantine mail: The message is placed into quarantine.Reject mail: The message is rejected with notification to the sending system.Discard mail: The message is discarded without notification to the sending system.
• Notification — A notification email can be sent to the recipients and sender of an email, and also the mail system administrator. Select the required check box for both inbound and
81
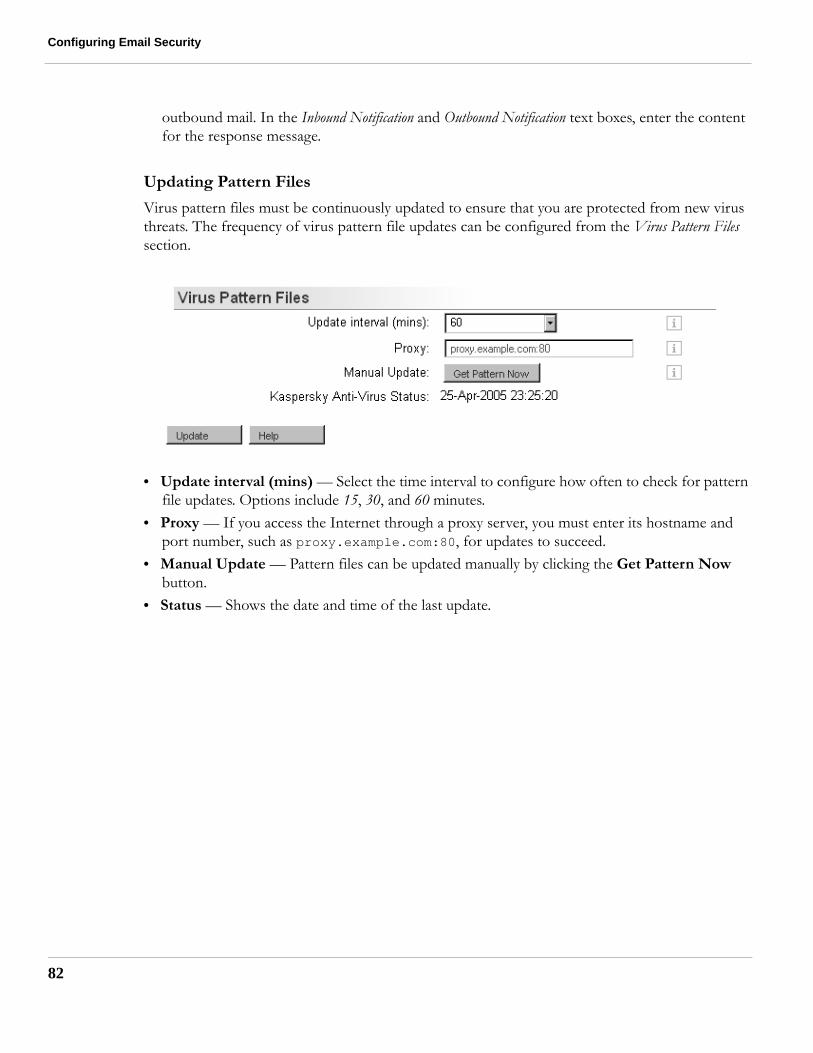
Configuring Email Security
82
outbound mail. In the Inbound Notification and Outbound Notification text boxes, enter the content for the response message.
Updating Pattern Files
Virus pattern files must be continuously updated to ensure that you are protected from new virus threats. The frequency of virus pattern file updates can be configured from the Virus Pattern Files section.
• Update interval (mins) — Select the time interval to configure how often to check for pattern file updates. Options include 15, 30, and 60 minutes.
• Proxy — If you access the Internet through a proxy server, you must enter its hostname and port number, such as proxy.example.com:80, for updates to succeed.
• Manual Update — Pattern files can be updated manually by clicking the Get Pattern Now button.
• Status — Shows the date and time of the last update.
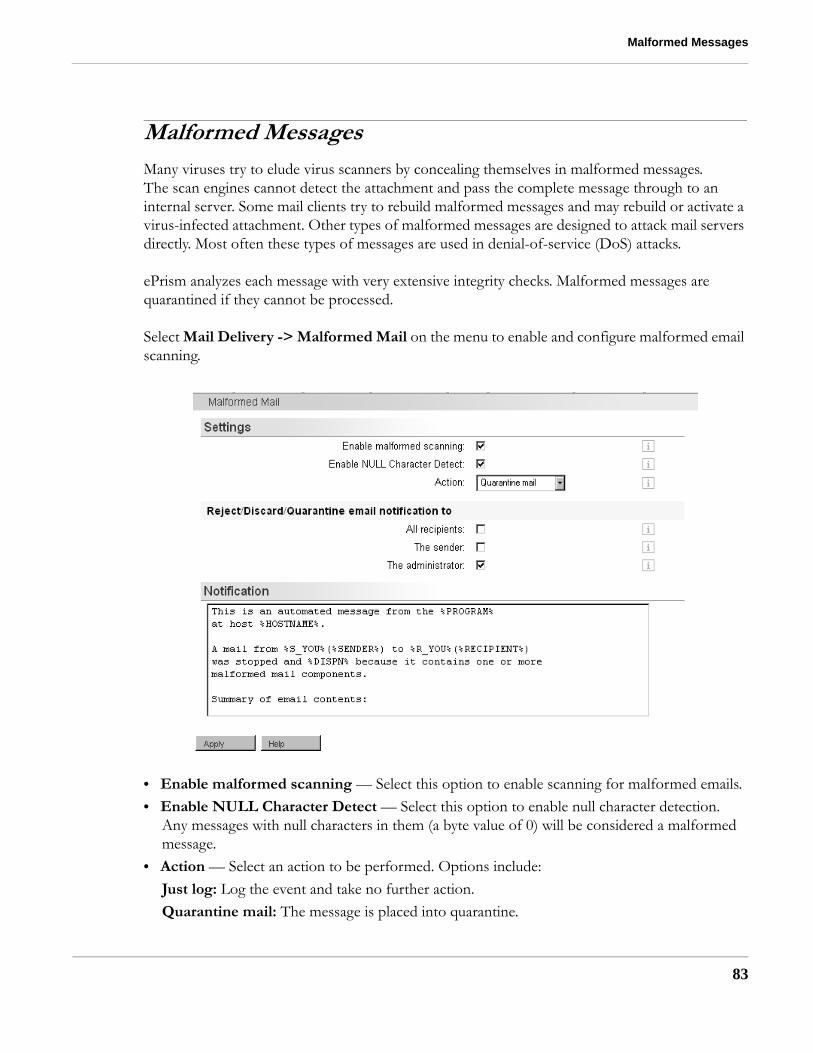
Malformed Messages
Malformed MessagesMany viruses try to elude virus scanners by concealing themselves in malformed messages. The scan engines cannot detect the attachment and pass the complete message through to an internal server. Some mail clients try to rebuild malformed messages and may rebuild or activate a virus-infected attachment. Other types of malformed messages are designed to attack mail servers directly. Most often these types of messages are used in denial-of-service (DoS) attacks.
ePrism analyzes each message with very extensive integrity checks. Malformed messages are quarantined if they cannot be processed.
Select Mail Delivery -> Malformed Mail on the menu to enable and configure malformed email scanning.
• Enable malformed scanning — Select this option to enable scanning for malformed emails.• Enable NULL Character Detect — Select this option to enable null character detection.
Any messages with null characters in them (a byte value of 0) will be considered a malformed message.
• Action — Select an action to be performed. Options include:Just log: Log the event and take no further action.Quarantine mail: The message is placed into quarantine.
83

Configuring Email Security
84
Reject mail: The message is rejected with notification to the sending system.Discard mail: The message is discarded without notification to the sending system.
• Notifications — Notifications for inbound and outbound messages can be enabled for all recipients, the sender, and the administrator. Enter the content for the notification message.
See “Customizing Notification and Annotation Messages” on page 273 for information on variables such as %SENDER% and %RECIPIENT%.
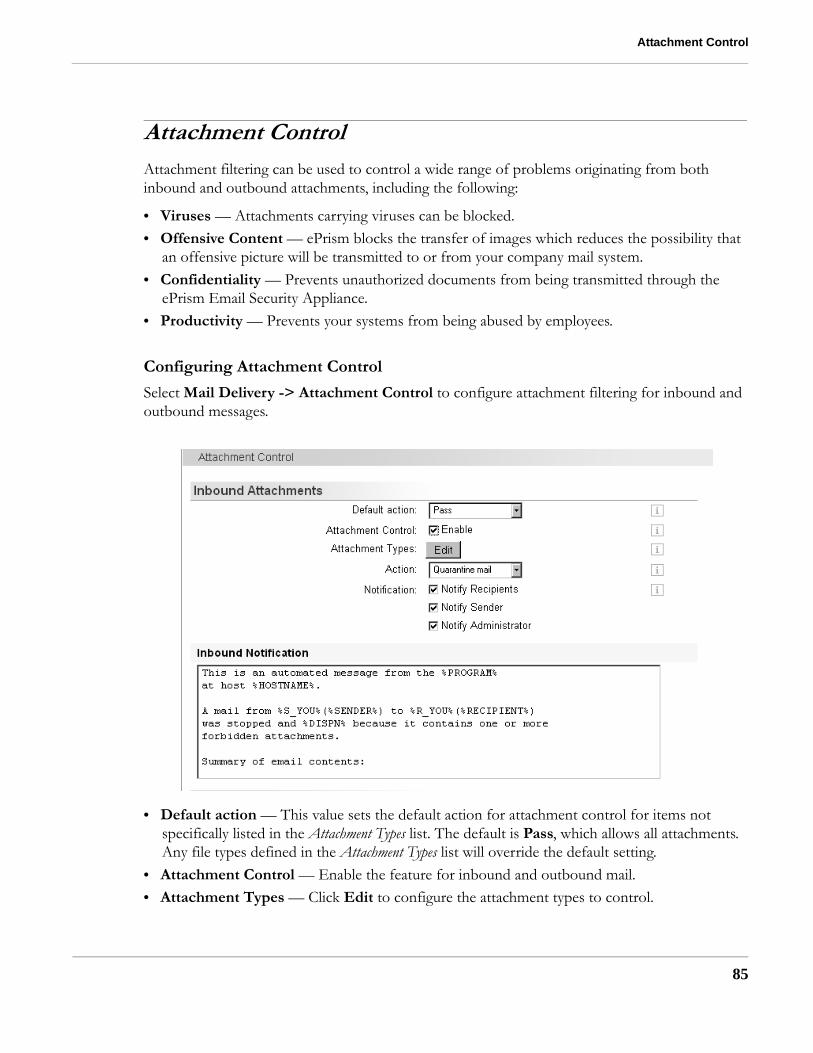
Attachment Control
Attachment ControlAttachment filtering can be used to control a wide range of problems originating from both inbound and outbound attachments, including the following:
• Viruses — Attachments carrying viruses can be blocked.• Offensive Content — ePrism blocks the transfer of images which reduces the possibility that
an offensive picture will be transmitted to or from your company mail system.• Confidentiality — Prevents unauthorized documents from being transmitted through the
ePrism Email Security Appliance.• Productivity — Prevents your systems from being abused by employees.
Configuring Attachment Control
Select Mail Delivery -> Attachment Control to configure attachment filtering for inbound and outbound messages.
• Default action — This value sets the default action for attachment control for items not specifically listed in the Attachment Types list. The default is Pass, which allows all attachments. Any file types defined in the Attachment Types list will override the default setting.
• Attachment Control — Enable the feature for inbound and outbound mail.• Attachment Types — Click Edit to configure the attachment types to control.
85

Configuring Email Security
86
• Action — Select an action to be performed. Options include:Just log: Log the event and take no further action.Quarantine mail: The message is placed into quarantine.Reject mail: The message is rejected with notification to the sending system.Discard mail: The message is discarded without notification to the sending system.
• Notifications — Notifications for inbound and outbound messages can be enabled for all recipients, the sender, and the administrator. Enter the content for the Inbound and Outbound notification.
Editing Attachment Types
Click the Edit button to edit your attachment types. You can add file extensions (.mp3), or MIME content types (image/png). For each attachment type, choose whether you want to "BLOCK" or "Pass" the attachment.
Select the DS (Disable Content Scan) check box if you want to disable content scanning for attachments with the specified extension. The attachment will still be checked for viruses if the Disable Content Scan option is selected.
Click the Add Extension button to add a file extension or MIME type to the list.

Attachment Control
• Extension — Enter a specific attachment type extension or MIME type, such as "image/png".
• Disable Content Scan — Select this option if you want to disable content scanning for attachments with the specified extension. The attachment will still be checked for viruses if the Disable Content Scan option is selected.
Note: If an archive file, such as .zip, contains a file type that is blocked, the archive file will be blocked, even if it is set to "Pass". Set the Disable Content Scan (DS) option if you do not want to scan the content of the archive file.
87

Configuring Email Security
88
SPF (Sender Policy Framework)
ePrism’s SPF support prevents spammers from spoofing mail headers and impersonating a legitimate email user or domain. Unsuspecting users may reply to these seemingly legitimate addresses with personal and confidential information.
Sender Policy Framework (SPF) provides a means for authenticating the source of an email by querying the sending domain’s DNS records. The SPF protocol allows server administrators to describe their email servers in their DNS records. By comparing the headers of the email with the SPF value, the receiving host can verify that the email is originating from the legitimate mail server for that domain. This prevents spammers from sending forged emails.
ePrism’s SPF actions only apply to incoming mail messages that have failed an SPF check, which means that the email message does not match the corresponding published SPF record. If a specific mail server does not have an existing SPF record then the message is processed normally. It is possible, however, that administrators may misconfigure their DNS SPF records, resulting in false positives and legitimate hosts being blocked from sending you mail.
SPF is an emerging anti-fraud and anti-phishing technology that is designed primarily as a mechanism to prevent forged emails rather than an anti-spam measure. It is dependent on network administrators publishing their legitimate email servers in their DNS records and ensuring these records are properly configured. St. Bernard encourages customers that use SPF in their DNS infrastructure to review their own SPF records to ensure they are accurate.
Note: St. Bernard recommends that if you enable SPF, you should set the action to modify the subject header rather than reject the message to ensure that false positives due to sending system misconfiguration are not completely rejected.
Select Mail Delivery -> SPF on the menu to configure Sender Policy Framework settings:
• Enable SPF — Select the check box to enable SPF verification. The SPF action will only apply to messages that fail an SPF check.

SPF (Sender Policy Framework)
• Strip incoming SPF headers — This option removes any "Received-SPF" header from incoming messages. Spammers may attach their own forged SPF headers to create the impression that the email is from a legitimate source
• Add outgoing SPF header — This option adds an SPF header to the outgoing message. • Action — Specify one of the following actions:
Just log: An entry is made in the log, and no other action is taken.Modify Subject Header: The text specified in Action Data will be inserted into the message subject line.Add header: An "X" mail header will be added as specified in the Action Data.Redirect to: The message will be delivered to the mail address specified in Action Data.Reject mail: The mail will not be accepted, and the connecting mail server is forced to return it.BCC: The message will be copied to the mail address specified in Action Data.
• Action data — Depending on the specified action:Modify Subject Header: The specified text will be inserted into the subject line, such as [SPF].Add header: A message header will be added with the specified text, such as [SPF].Redirect to: Send the message to a mailbox such as [email protected]. You can also specify a domain such as spam.example.com.
89

Configuring Email Security
90
Encryption and Certificates
ePrism uses SSL (Secure Socket Layer) and TLS (Transport Layer Security) encryption to protect browser sessions and mail delivery. This encryption is enabled by default.
There are two categories of browser sessions:
• Administration sessions — Access to the browser administrative interface. • ePrism Mail Client and Secure WebMail — Access to WebMail.
Configuring Web Server Encryption
Select Basic Config -> Web Server from the menu to configure encryption. The default settings are recommended.
• Admin HTTP Port — The default port for HTTP requests. The default port 80 can be changed via the system console.
• Admin HTTPS Port — The default port for HTTPS requests. The default port 443 can be changed via the system console.
• Secure SSL encryption — Requires SSL encryption for all user and administrator web sessions.
• Allow low-grade encryption — Allow the use of low-grade encryption, such as DES ciphers with a key length of 64 bits, for encrypted user and administrator web sessions.
• Enable SSL version 2 — Enables SSL version 2 protocol. Note that SSL version 2 contains known security issues.
• Enable SSL version 3 — Enable SSL version 3 protocol. This is the default setting.

Encryption and Certificates
• Enable TLS version 1 — Enable TLS version 1 protocol. This is the default setting.• Character set encoding — Select the type of character encoding used for HTML data.
Encrypted Mail Delivery
ePrism offers a simple mechanism for encrypting mail delivery via SSL/TLS support. A flexible policy can be implemented to allow other servers and clients to establish encrypted sessions with ePrism to send and receive mail.
The following types of traffic can be encrypted:
• Server to Server — Used to create an email VPN (Virtual Private Network) and protect company email over the Internet.
• Client to Server — Many email clients, such as Outlook, support TLS for sending and receiving mail. This allows email messages to be sent with complete confidentiality from desktop to desktop, but without the difficulties of implementing other encryption schemes.
Encryption can be enforced between particular systems, such as setting up an email VPN between two ePrism Email Security Appliances at remote sites. Encryption can also be set as optional so that users who are concerned about the confidentiality of their messages on the internal network can specify encryption in their mail client when it communicates with ePrism.
ePrism supports the use of certificates to initiate the negotiation of encryption keys. ePrism can generate its own site certificates, and can also import Certificate Authority (CA) signed certificates.
91

Configuring Email Security
92
Select Mail Delivery -> SMTP Security from the menu to enable email encryption.
Incoming TLS Mail
• Accept TLS — Enable this option to accept SSL/TLS for incoming mail connections.• Require TLS for SMTP AUTH — This value is used to require SSL/TLS when accepting
mail for authenticated relay. See “SMTP Authenticated Relay” on page 79 for more detailed information.
Default TLS Policy
• Offer TLS — Enable this option to offer remote mail servers the option of using SSL/TLS when sending mail.
• Enforce TLS — Enabling this option will require the validation of a CA-signed certificate when delivering mail to a remote mail server. Failure to do so will result in mail delivery failure.
Specific Site Policy
This option supports the specification of exceptions to the default settings for TLS/SSL. For example, you may need to exempt a mail server from using TLS/SSL because of lack of TLS support.
To exempt a system, specify the IP Address or FQDN (Fully Qualified Domain Name) of the remote mail server in the Add/Update Site field. Select Don't Use TLS from the dropdown box and click the Update button. The exempted mail server will be listed under the Specific Site Policy.

Encryption and Certificates
TLS options include the following:
• Don't Use TLS — TLS Mail Delivery is never used with the specified system.• May Use TLS — Use TLS if the specified system supports it.• Enforce TLS — Deliver to the specified system only if a TLS connection with a valid CA-
signed certificate can be established. • Loose TLS — Similar to Enforce TLS but will accept a mismatch between the specified server
name and the Common Name in the certificate.
SSL Certificates
A valid SSL certificate is required to support the encryption services available on ePrism. The SSL encrypted channel from the server to the web browser (such as when using a URL that begins with https), requires a valid digital certificate. You can use self-signed certificates generated by ePrism, or import certificates purchased from commercial vendors such as Verisign.
A certificate binds a domain name to an IP address by means of the cryptographic signature of a trusted party. The web browser can warn you of invalid certificates that undermine secure, encrypted communications with a server.
The disadvantage of self-signed certificates is that web browsers will display warnings that the "company" (in this case, the ePrism Email Security Appliance) issuing the certificate is untrusted. When you purchase a commercial certificate, the browser will recognize the company that signed the certificate and will not generate the warning messages.
A web server digital certificate can only contain one domain name, such as server.example.com, and a limitation in the SSL protocol only allows one certificate per IP address. Some web browsers will display a warning message when trying to connect to any domain on the server that has a different domain name than the server specified in the single certificate. Digital certificates eventually expire and are no longer valid after a certain period of time, and need to be renewed before the expiry date.
93

Configuring Email Security
94
Install a commercial certificate on the ePrism Email Security Appliance as follows:
1. Select Management -> SSL Certificates on the menu.2. Create a new certificate using the Generate a 'self-signed' certificate button.
3. Click Apply to reboot the system to install the new certificate.4. After the reboot, the current certificate and certificate request that was signed by the on-board
Certificate Authority will be displayed. To obtain a commercial certificate, send this certificate request information to the commercial Certificate Authority (CA) of your choice (such as Verisign, Entrust, and so on) for signing. Note: Ensure that the certificate is an Apache type of certificate for a mail server.
5. When received from the CA, install the commercial certificate using the Load site certificate button.
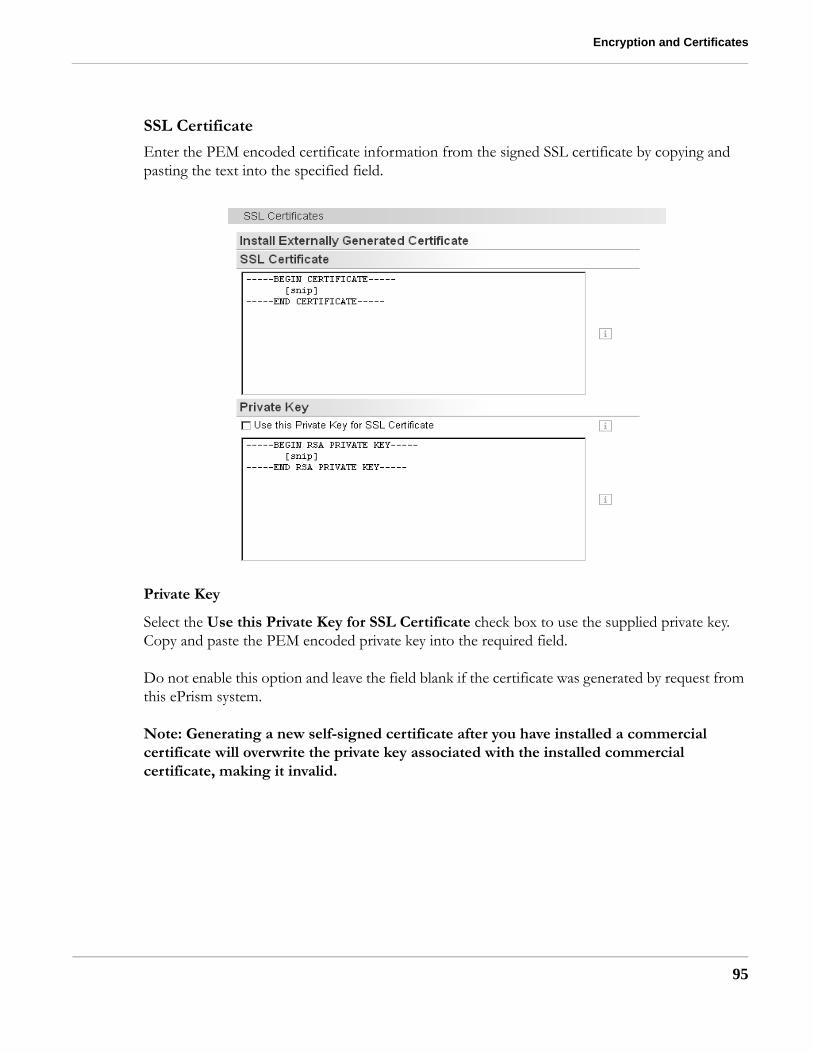
Encryption and Certificates
SSL Certificate
Enter the PEM encoded certificate information from the signed SSL certificate by copying and pasting the text into the specified field.
Private Key
Select the Use this Private Key for SSL Certificate check box to use the supplied private key. Copy and paste the PEM encoded private key into the required field.
Do not enable this option and leave the field blank if the certificate was generated by request from this ePrism system.
Note: Generating a new self-signed certificate after you have installed a commercial certificate will overwrite the private key associated with the installed commercial certificate, making it invalid.
95

Configuring Email Security
96
Intermediate Certificate
Some commercial certificates require you to upload an intermediate certificate in addition to the commercial certificate and the private key. Enter this information into the Intermediate Certificate section.
CHAPTER 6 Anti-Spam Features
This chapter describes how to configure the anti-spam features of your ePrism Email Security Appliance, and contains the following topics:
• “Anti-Spam Feature Overview” on page 98• “Email Spam Processing” on page 99• “ePrism Anti-Spam Controls” on page 102• “Specific Access Patterns” on page 104• “Pattern Based Message Filtering” on page 107• “Objectionable Content Filtering” on page 115• “RBL (Real-time Blackhole List)” on page 117• “DCC (Distributed Checksum Clearinghouse)” on page 119• “STA (Statistical Token Analysis)” on page 123• “Trusted Senders” on page 133• “Spam Quarantine” on page 136• “Spam Options” on page 141
97

Anti-Spam Features
98
Anti-Spam Feature Overview
The following sections provide an overview of ePrism’s Anti-Spam features.
ePrism’s Anti-Spam Tools
ePrism contains built-in spam controls that have been developed to take advantage of its extensive mail control features. ePrism provides flexible tools for creating local exceptions, managing whitelists and blacklists, and controlling undesirable content.
ePrism’s anti-spam controls include the following features:
• RBL (Realtime Blackhole Lists) to reject known spam sources.• DCC (Distributed Checksum Clearinghouse) to control bulk mail.• STA (Statistical Token Analysis) for advanced statistical analysis.
ePrism works by applying increasing levels of filtering as follows:
1. Filter message based on the server sending the initial connection request.2. Filter message based on message envelope contents.3. Look up the source server in the RBL lists.4. Determine if the message is bulk-mail via DCC.5. Apply sophisticated analysis to the content via STA.
Flexible dispositions enable the filtered mail to be quarantined, rejected, or classified in the subject header to be captured by the mail client.
See “ePrism Anti-Spam Controls” on page 102 for detailed information on configuring ePrism’s built-in anti-spam features.

Email Spam Processing
Email Spam ProcessingePrism applies a series of filters to messages beginning with the simplest and proceeding to the most complex. The sequence is as follows:
1. Various SMTP connection checks are performed for items such as unauthorized pipelining commands, non-FQDN senders, unknown sender domains, and so on.
2. The source of the message is compared against a locally specified Specific Access Pattern. If found, it may be "rejected" or "accepted" for immediate delivery or relay.
3. ePrism will apply locally specified attachment, malformation, and virus checks on the contents of the message.
4. The message is passed through the OCF (Objectionable Content Filter) which searches for objectionable text within a message.
5. The message is passed through Pattern Based Message Filters that look for a text or pattern match against a specified part of the message. If a filter rule is triggered, an associated action is executed such as "reject" or "accept" for immediate delivery. Any defined Trusted Senders will allow mail to bypass the rest of the spam controls.
6. Mail is processed for spam only if it arrives from an "untrusted" source. This is defined as any system not on the local network or not specifically "trusted" by the administrator.
7. The source of the message is checked to see it is listed on an RBL (Real-time Blackhole List), if enabled. The message may be rejected, quarantined, or tagged and delivered as required.
8. The message is checked by DCC, if enabled, which reports if the message is "bulk" or has been reported on the Internet a certain number of times to be classified as "bulk". If this value exceeds the local threshold, the message may be rejected, quarantined, or tagged and delivered as required.
9. The message is checked by STA, if enabled, to see if its contents exceed a locally specified threshold for spam. If so, the message may be rejected, quarantined, or tagged and delivered as required.
10. Prior to delivery, ePrism will check to see if this message was relayed.
See “Message Processing Order” on page 271 for a summary of the message processing order.
99

Anti-Spam Features
100
Anti-Spam Strategy
To use ePrism’s spam controls to their fullest extent, consider the following:
• Identify which systems will be "trusted". If these systems are on different internal networks, ePrism must know that they can be trusted. Also note any external systems that may need to relay via ePrism.
• Plan to enable RBL lists, DCC and STA. These tools require little configuration and maintenance once they are setup and will provide your main defense against spam. You can selectively enable or disable any one of these tools, however, if you plan to use STA, you almost certainly should use DCC as well.
• Learn how to whitelist or blacklist sources and types of mail. This is essential for obtaining a good result with few false positives. Use whitelists to exempt mail that is wrongly classified as bulk such as valid mailing lists. Use blacklists to catch any spam that eludes the other defenses.
• Educate your local user community on these tools. Users need to know why messages are being classified as they are and how to provide feedback on how well the system is performing. Appropriate feedback can help identify the thresholds in DCC and STA, as well as provide input for building the whitelists and blacklists.
Trusted and Untrusted Mail Sources
You must ensure that ePrism is properly configured for interaction with local and remote mail servers. ePrism only processes mail through the spam filters when a message originates from an "untrusted" source. Trusted sources bypass the spam controls.
There are two ways to control how sources of mail are identified:
1. The network interface the mail arrives on2. A specified IP address (or address block), or server or domain name

Email Spam Processing
Mail that arrives on a particular network interface from the same subnet is "trusted". To change this setting, perform the following steps:
1. Select Basic Config -> Network on the menu.2. For the specified interface, uncheck Trusted Subnet.
To add a system to the filters and mark it as "Trusted", perform the following steps:
1. Select Mail Delivery -> Anti-Spam -> PBMF on the menu.2. Click Add.3. Select Client IP or Client Host in the From field.4. Select Contains.5. Enter the IP address or hostname of the system depending on your selection in step 3.6. Under Action, select Trust, and then click Apply to add the rule.
101
Anti-Spam Features
102
ePrism Anti-Spam Controls
ePrism contains built-in anti-spam controls that have been developed to take advantage of its extensive mail control features. ePrism provides a flexible tool for creating local exceptions, managing whitelists and blacklists, and controlling undesirable content.
ePrism provides the following tools for controlling spam:
Locally Specified Filters
These filters can be used to define exceptions, overrides, whitelists, and blacklists. These tools avoid the problems that result from over-reliance on automated methods. It is inevitable that some spam will not be caught by these tools. It is also inevitable that some legitimate mail will be classified as spam, such as mailing lists marked as "bulk".
Locally-specified filters include:
• Specific Access Patterns• Pattern Based Message Filtering
Rules-based Tools
These tools provide automated protection. Used properly, these tools will handle the majority of spam. These tools include:
• RBL (Realtime Blackhole Lists)• DCC (Distributed Checksum Clearinghouse)• STA (Statistical Token Analysis)
User-Based Options
Other anti-spam options can be enabled on a user level to allow them to create Trusted Senders Lists to whitelist known senders, and manage their own spam quarantine area:
• Trusted Senders List• Spam Quarantine

ePrism Anti-Spam Controls
Anti-Spam Strategy
The recommended anti-spam strategy is as follows:
• Plan to implement RBL, DCC, and STA. • Use the least aggressive settings for DCC and STA, such as simply marking the mail as "spam"
so that users can see the mail and apply filters on their mail clients.• Ensure that your user community is aware of these tools and how it will impact their mail.• Prepare for exceptions and understand how to apply filters that can effectively whitelist and
blacklist messages.
Configuring Spam Controls
Select Mail Delivery -> Anti-Spam to enable and configure ePrism’s built-in spam controls.
To enable any one or more of the Spam Filters, select the Enable check box, select the spam feature to review the default settings, and then click the Update button.
103

Anti-Spam Features
104
Specific Access Patterns
Specific Access Patterns (SAP) can be used to either accept or reject mail. These rules overrule all others, allowing them to be used for special cases to allow email where it would be otherwise blocked, or to block email when it would otherwise be allowed. Specific access patterns allow an administrator to respond to local filtering requirements such as the following:
• Allowing other systems to relay mail through ePrism• Rejecting all messages from specific systems • Allowing all messages from specific systems (effectively whitelisting the mail)
It is recommended that you use Pattern Based Message Filtering for anti-spam control and white/black listing. See “Pattern Based Message Filtering” on page 107 for more detailed information.
Configuring Specific Access Patterns
Select Mail Delivery -> Anti-Spam -> SAP on the menu to configure specific access patterns.
• Pattern Based Message Filtering — Enable this option to use Pattern Based Message Filtering to reject or accept mail based upon matches in the message envelope, header, or body. This type of filtering is explained in more detail in the next section.
• Maximum recipients per message — Set the maximum number of recipients accepted per message. A large amount of recipients can indicate a spam or bulk message.

Specific Access Patterns
• Maximum message size — Set the maximum message size that will be accepted by ePrism. Ensure that the specified size can accommodate email attachments.
To configure Specific Access Patterns, click the Add Pattern button.
• Pattern — Enter a mail address, host or domain name.• Client Access — Specify a domain, server name, or IP address. This item is reliable and may
be used to block spam as well as whitelist.Note: Only the Client Access parameter can be relied upon, since spammers can easily forge all other message properties. These parameters, however, are useful for whitelisting.
• HELO Access — Specify either a domain or server name. It is not reliable as spammers can fake this property.
• Envelope-From Access — Specify a valid email address. It is not reliable as spammers can fake this property.
• Envelope-To Access — Specify a valid email address. It is not reliable as spammers can fake this property.
• If Pattern Matches:
Reject: The connection will be droppedAllow relaying: Messages from this address will be relayed and processed for spamTrust: Messages from this address will be relayed and not processed for spam
105

Anti-Spam Features
106
Matching Rules
SAP rules are slightly different from those used in the Pattern Based Message Filtering. When you specify a rule in this section, it can take the following forms:
• IP Address — ePrism will match the IP address such as, 192.168.1.10, or you can use a more general address form such as 192.168 that will match anything in that address space.
• Domain Name — ePrism will match the supplied domain name, such as example.com, with any subdomain such as mail.example.com, sales.mail.example.com and so on.
• Address — ePrism will match an exact email address, such as [email protected], or a more general rule such as @example.com.
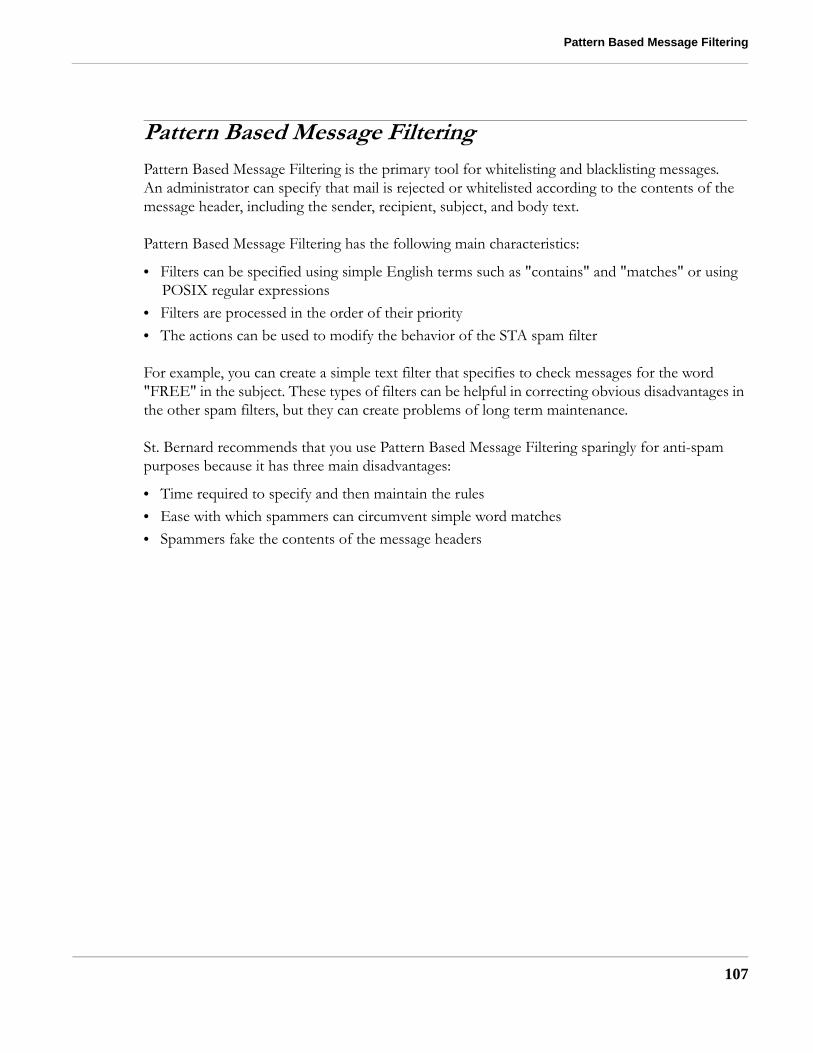
Pattern Based Message Filtering
Pattern Based Message FilteringPattern Based Message Filtering is the primary tool for whitelisting and blacklisting messages. An administrator can specify that mail is rejected or whitelisted according to the contents of the message header, including the sender, recipient, subject, and body text.
Pattern Based Message Filtering has the following main characteristics:
• Filters can be specified using simple English terms such as "contains" and "matches" or using POSIX regular expressions
• Filters are processed in the order of their priority• The actions can be used to modify the behavior of the STA spam filter
For example, you can create a simple text filter that specifies to check messages for the word "FREE" in the subject. These types of filters can be helpful in correcting obvious disadvantages in the other spam filters, but they can create problems of long term maintenance.
St. Bernard recommends that you use Pattern Based Message Filtering sparingly for anti-spam purposes because it has three main disadvantages:
• Time required to specify and then maintain the rules• Ease with which spammers can circumvent simple word matches• Spammers fake the contents of the message headers
107

Anti-Spam Features
108
Email Message Structure
The following is an example of a typical mail message:
Message Envelope
The information in the message envelope, such as HELO, MAIL FROM, and RCPT TO, are parameters not visible to the user. They are the "handshake" part of the SMTP protocol. You will need to look for these in the transport logs or have other knowledge of them.
Message Header
The message header includes the following fields:
• Received from — Indicates the final path that the message followed to get to its destination. It arrived from "mail.example.com", which delivered it to "server.example.com" to be put in the mailbox of "[email protected]."
• Received by — This indicates a previous "hop" that the message followed. In this case, the message came via "mail.example.com" which accepted the message addressed to "[email protected]".
• Delivered-To — The user to be delivered to, in this case "[email protected]".

Pattern Based Message Filtering
• Received from — This marks the origin of the message. Note that it is not necessarily the same as the actual system that originated the message.
• Subject — This is a free form field and displayed by a typical mail client.• To — This is a free form field and displayed by a typical mail client. It does not need to be
accurate and may be different from the destination address in the Received headers or from the actual recipient.
• From — This is a free form field and is displayed by a typical mail client. It does not need to be accurate and may be different from the From address in the Received headers. It is typically faked by spammers.
• Message-ID — This is added by the mail server and is often faked by spammers.
Other header fields include Reply-to, Sender and so on. These fields can be forged by spammers because they do not affect how the mail is delivered.
Message Body
Following the header is the text or content of the message. This content can be formatted or encoded in many different ways, but in this example, it is displayed as plain text.
Configuring Pattern Based Message Filtering
Select Mail Delivery -> Anti-Spam, and select Pattern Based Message Filtering on the menu.
Click the Add button to add a new pattern to the filter list.
109

Anti-Spam Features
110
Select the Message Part you want to filter on. ePrism allows you to filter on the following parameters:
Message Envelope Parameters
These parameters will not be visible to the user. They are the "handshake" part of the SMTP protocol. You will need to look for these in the transport logs or have other knowledge of them.
• <<Mail Envelope>> — This parameter allows for a match on any part of the message envelope which includes the HELO, Client IP and Client Host.
• HELO — This field is easily faked, and is not recommended for use in spam control. It may be useful in whitelisting a source of mail. Example: mail.example.com.
• Client IP — This field will be accurately reported and may be reliably used for both blacklisting and whitelisting. It is the IP address of the system initiating the SMTP connection. Example: 192.168.1.200.
• Client Host — This field will be accurately reported and may be reliably used for both blacklisting and whitelisting. Example: mail.example.com.
The following envelope parameters (Envelope Addr, Envelope To and Envelope From) may be visible if your client supports reading the message source, such as with ePrism Mail Client. They can also be found in the transport logs. Other header fields may be visible as supported by the mail client.
• Envelope Addr — This matches on either the Envelope To or Envelope From. These fields are easily faked, and are not recommended for use in spam control. They may be useful in whitelisting a source of mail. Example: [email protected].
• Envelope To — This field is easily faked, and is not recommended for use in spam control. It may be useful in whitelisting a source of mail. Example: [email protected].
• Envelope From — This field is easily faked, and is not recommended for use in spam control. It may be useful in whitelisting a source of mail. Example: [email protected].
Message Header Parameters
Spammers will typically enter false information into these fields and, except for the Subject field, they are usually not useful in controlling spam. These fields may be useful in whitelisting certain users or legitimate source of email.
• <<Mail Header>> — This parameter allows for a match on any part of the message header.• <<Recipient>> — This parameter matches the To: or CC: fields.• CC:
• From:
• Message-ID:
• Received:
• Reply-to:
• Sender:
• Subject:

Pattern Based Message Filtering
• To:
There are other header fields that are commonly used, such as List-ID, as well as those added by local mail systems and clients. You must use Regular Expressions (described below) to specify these.
Message Body Parameters
• <<Raw Mail Body>> — This parameter allows for a match on any part of the encoded message body. This encoded content includes Base64, MIME, and HTML. Since messages are not decoded, a simple text match may not work. Use <<Mail Content>> for text matching on the decoded content.
• <<Mail Content>> — This parameter allows for a match on the visible decoded message body.
STA Token
STA tokens can also be selected for pattern based message filters. This allows you to match patterns for common spam words that could be hidden or disguised with fake or invisible HTML text comments, which would not be caught by a normal pattern filter. For example, STA extracts the token "viagra" from the text "vi<spam>ag<spam>ra" and "v.i.a.g.r.a.".
Match Option
Matching looks for the specified text in each line. You can specify one of the following:
• Contains — Looks for the text to be contained in a line or field. This allows for spaces or other characters that may make an exact match fail.
• Ends with — Looks for the text at the end of the line or field (no characters, spaces and so on, between the text and the non-printed end-of-line character.)
• Matches — The entire line or field must match the text.• Starts with — Looks for the text at the start of the line or field (no characters between the text
and the start of line.)
Pattern
Enter the pattern you wish to search for. You may also use Regular Expressions which allow you to specify match rules in a more flexible and granular way. They are based on the standard POSIX specification for Regular Expressions.
For example, to search for a "blank" message field, use the following:
^subject:[[:blank:]]*$
111

Anti-Spam Features
112
Note: Although the Regular Expression feature is supported, St. Bernard cannot help with devising or debugging Regular Expressions because they have an infinite variety and can be very complex. Using Regular Expressions is not recommended unless you have advanced knowledge of their use.
Priority
Select a priority for the filter (High, Medium, Low). The entire message is read before making the decision. If a message matches multiple filters, the filter with the highest priority will be used. If more than one matched filter has the highest priority, the filter with the strongest action will be used, in order, from highest priority to lowest (Spam, Reject, Trust, Relay, Valid, Accept). If more than one matched rule has the highest priority and highest action, then the filter with the highest rule number will be used.
Action
When a rule has been triggered, the specified action is carried out:
• Reject — Mail is received, then rejected before the close of an SMTP session.• Spam — Mail is received, then trained as spam for STA, and then rejected.• Accept — Mail is delivered normally and not trained by STA, or marked as spam or bulk.
Attempted relays are rejected.• Valid — Mail is delivered normally and trained as valid by STA. Attempted relays are rejected.• Relay — Relay is enabled for this mail. Mail is not trained by STA.• Trust — Relay is enabled for this mail. Mail is trained as valid by STA.• Do Not Train — Do not use the message for STA training purposes.• BCC — Send a blind carbon copy mail to the mail address specified in Action Data. This option
only appears if you have a BCC Email Address set up in the Preferences section.• Just Log — Take no action, but log the occurrence. Just Log can be used to override other lower
priority PBMFs to test the effect of PBMFs without an action taking place.
Note: The "Relay" or "Trust" action can only be used with an Envelope message part because attempted relays must be rejected immediately after the envelope transaction.
Upload and Download of PBMF Rules
You can create a list of PBMF rules and upload them together in one file. The file must contain comma or tab separated entries in the form:
[Section],[type],[pattern],[action],[priority(sequence)],[rulenumber]
For example:
to:,contains,[email protected],reject,medium,1
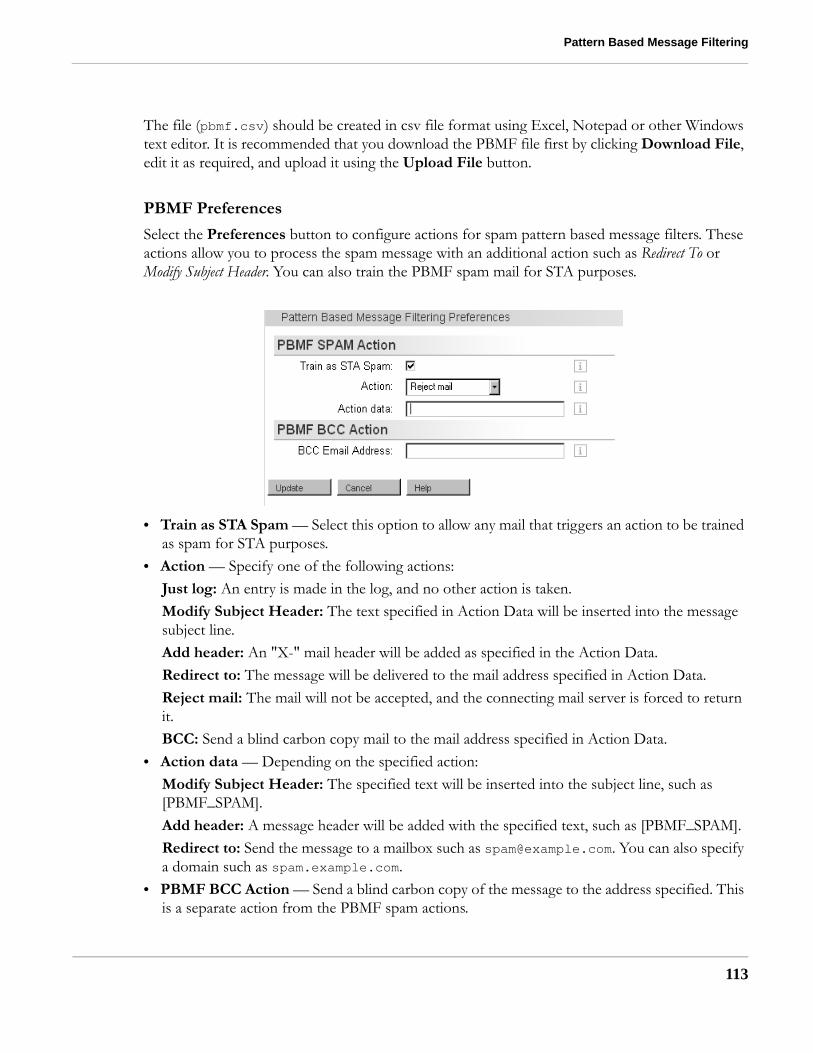
Pattern Based Message Filtering
The file (pbmf.csv) should be created in csv file format using Excel, Notepad or other Windows text editor. It is recommended that you download the PBMF file first by clicking Download File, edit it as required, and upload it using the Upload File button.
PBMF Preferences
Select the Preferences button to configure actions for spam pattern based message filters. These actions allow you to process the spam message with an additional action such as Redirect To or Modify Subject Header. You can also train the PBMF spam mail for STA purposes.
• Train as STA Spam — Select this option to allow any mail that triggers an action to be trained as spam for STA purposes.
• Action — Specify one of the following actions:Just log: An entry is made in the log, and no other action is taken.Modify Subject Header: The text specified in Action Data will be inserted into the message subject line.Add header: An "X-" mail header will be added as specified in the Action Data.Redirect to: The message will be delivered to the mail address specified in Action Data.Reject mail: The mail will not be accepted, and the connecting mail server is forced to return it.BCC: Send a blind carbon copy mail to the mail address specified in Action Data.
• Action data — Depending on the specified action:Modify Subject Header: The specified text will be inserted into the subject line, such as [PBMF_SPAM].Add header: A message header will be added with the specified text, such as [PBMF_SPAM].Redirect to: Send the message to a mailbox such as [email protected]. You can also specify a domain such as spam.example.com.
• PBMF BCC Action — Send a blind carbon copy of the message to the address specified. This is a separate action from the PBMF spam actions.
113

Anti-Spam Features
114

Objectionable Content Filtering
Objectionable Content FilteringThe Objectionable Content Filter defines a list of key words that will cause a message to be blocked if any of those words appear in the message.
The Objectionable Content Filter provides enhanced content filtering functionality and flexibility, allowing users to restrict content of any form including objectionable words or phrases, offensive content and/or confidential information.
This list is end user manageable, and can be updated and customized to meet the specific needs of any organization. Rules can also be applied to both inbound and outbound messages preventing unwanted content from entering an organization and prohibiting the release of sensitive information.
OCF words can be extracted from messages that disguise the words with certain techniques. For example, OCF will detect the word "spam", even if it is disguised as "sp@m" or "s_p_a_m".
Select Mail Delivery -> Anti-Spam -> OCF to configure the objectionable content filter.
Actions
You can set actions for both inbound and outbound messages. The following actions can be set:
• Just log — Log the event and take no further action.
115
Anti-Spam Features
116
• Reject mail — The message is rejected with notification to the sending system.• Quarantine mail — The message is placed into quarantine.• Discard mail — The message is discarded without notification to the sending system.
Notifications
Notifications for inbound and outbound messages can be enabled for all recipients, the sender, and the administrator. The content for the Inbound and Outbound notification can be customized.
See “Customizing Notification and Annotation Messages” on page 273 for a full list of system variables that can be used in the notification.
Upload and Download Filter List
A predefined list of objectionable words is included with the ePrism Email Security Appliance. To customize the list and to add or remove words, click Download File to download the list to a local system.
Use a text editor to edit the file using one word or phrase per line. When finished, upload the file by clicking the Upload File button.

RBL (Real-time Blackhole List)
RBL (Real-time Blackhole List)RBLs contain the addresses of known sources of spam and are maintained by both commercial and non-commercial organizations. The RBL mechanism is based on DNS. Every server that attempts to connect to ePrism will be looked up on the specified RBL servers using DNS. If the server is blacklisted, then a configurable action can be taken, such as rejecting the mail, or flagging the message in its header or subject.
Note the following considerations when using RBL:
• If the RBL server is not available, the DNS request times out. This may affect performance and requires monitoring for timed-out connections. Remove any servers which you do not use to prevent time-outs.
• If a message that you want to receive is blocked by an RBL, add an item to the Pattern Based Message Filtering list to "Trust" (to train for STA) or "Accept" (not train for STA) this message.
• Choose your RBLs carefully. St. Bernard provides a default server, but we recommend you review RBL providers (both commercial and free) as some servers are more reliable than others, while some may not exist after a certain period of time. It is recommended for stability and accuracy that a commercial RBL service be used.Caution: The default RBL server in ePrism (rbl-plus.mail-abuse.org) is a commercial RBL provider. To work properly, you must purchase a subscription to this service.
Configuring RBLs
Select Mail Delivery -> Anti-Spam from the menu. Click Realtime Blackhole List (RBL) to configure RBLs.
117
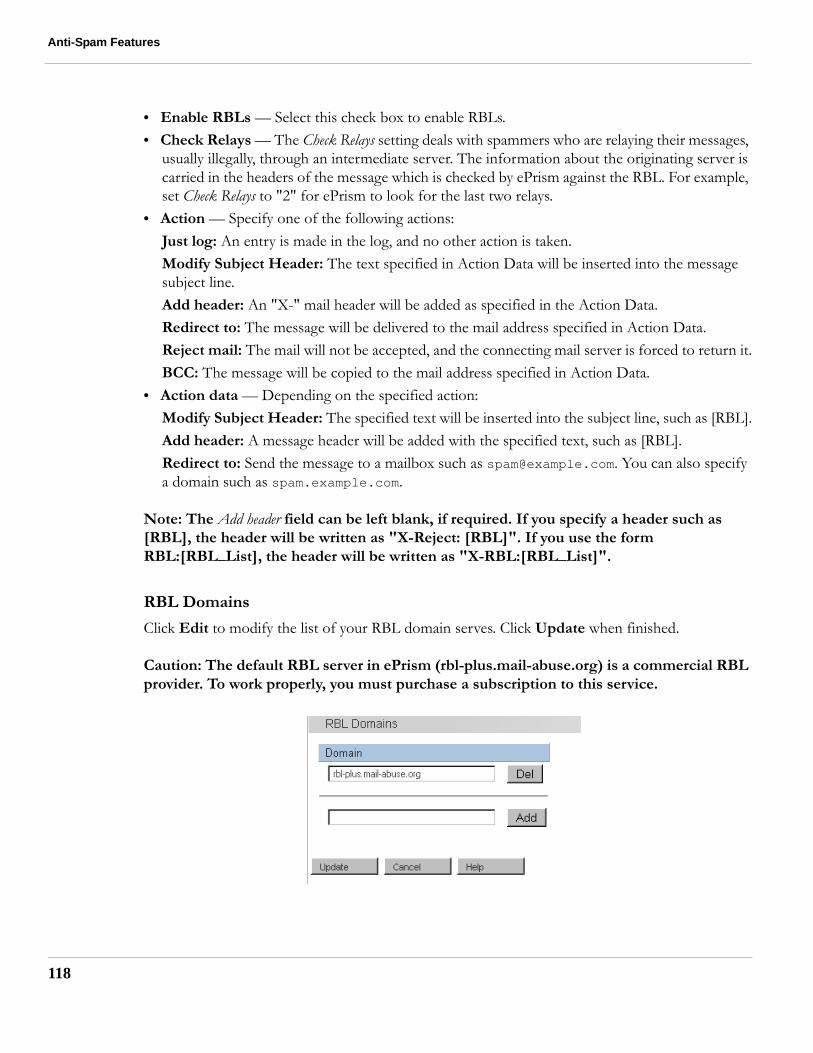
Anti-Spam Features
118
• Enable RBLs — Select this check box to enable RBLs.• Check Relays — The Check Relays setting deals with spammers who are relaying their messages,
usually illegally, through an intermediate server. The information about the originating server is carried in the headers of the message which is checked by ePrism against the RBL. For example, set Check Relays to "2" for ePrism to look for the last two relays.
• Action — Specify one of the following actions:Just log: An entry is made in the log, and no other action is taken.Modify Subject Header: The text specified in Action Data will be inserted into the message subject line.Add header: An "X-" mail header will be added as specified in the Action Data.Redirect to: The message will be delivered to the mail address specified in Action Data.Reject mail: The mail will not be accepted, and the connecting mail server is forced to return it.BCC: The message will be copied to the mail address specified in Action Data.
• Action data — Depending on the specified action:Modify Subject Header: The specified text will be inserted into the subject line, such as [RBL].Add header: A message header will be added with the specified text, such as [RBL].Redirect to: Send the message to a mailbox such as [email protected]. You can also specify a domain such as spam.example.com.
Note: The Add header field can be left blank, if required. If you specify a header such as [RBL], the header will be written as "X-Reject: [RBL]". If you use the form RBL:[RBL_List], the header will be written as "X-RBL:[RBL_List]".
RBL Domains
Click Edit to modify the list of your RBL domain serves. Click Update when finished.
Caution: The default RBL server in ePrism (rbl-plus.mail-abuse.org) is a commercial RBL provider. To work properly, you must purchase a subscription to this service.

DCC (Distributed Checksum Clearinghouse)
DCC (Distributed Checksum Clearinghouse)DCC is based on a number of servers that maintain databases of message checksums derived from numeric values that uniquely identify a message. DCC provides a simple but very effective way to successfully identify spam and control its disposition while updating its database with new spam message types.
Mail users and ISPs all over the world submit checksums of all messages received. The database records how many of each message is submitted. If requested, the DCC server can return a count of how many instances of a message have been received. ePrism uses this count to determine the disposition of a message.
A DCC server receives no mail, address, headers, or any similar information, but only the cryptographically secure checksums of such information. A DCC server cannot determine the text or other information that corresponds to the checksums it receives. It only acts as a clearinghouse of counts of checksums computed by clients.
DCC interacts with ePrism’s other spam controls as follows:
• Mail is checked by DCC after it has been filtered by Specific Access Patterns and Pattern Based Message Filters. Messages that trigger an "accept" rule will not be processed by DCC.
• All messages classified as "bulk" by DCC (those that exceed the locally set threshold) are passed to the STA engine for analysis as spam unless the specified action is "reject".
Note: You must allow a connection on UDP port 6277 on your firewall or router to allow communications with a DCC server. If this port is not available, DCC server calls will fail and slow down mail delivery.
DCC Considerations
When implementing DCC, consider the following:
• Educate your user community about this tool and request them to submit mailing lists and other bulk mail sources that need to be whitelisted. This step is crucial if DCC and STA are to work properly.
• Configure your initial disposition for bulk mail to be Modify Subject Header. Users will see all the bulk mail and will quickly identify any sources of mail they want to whitelist. Users can also create local filter rules in their mail clients to put all tagged mail into a folder.
119
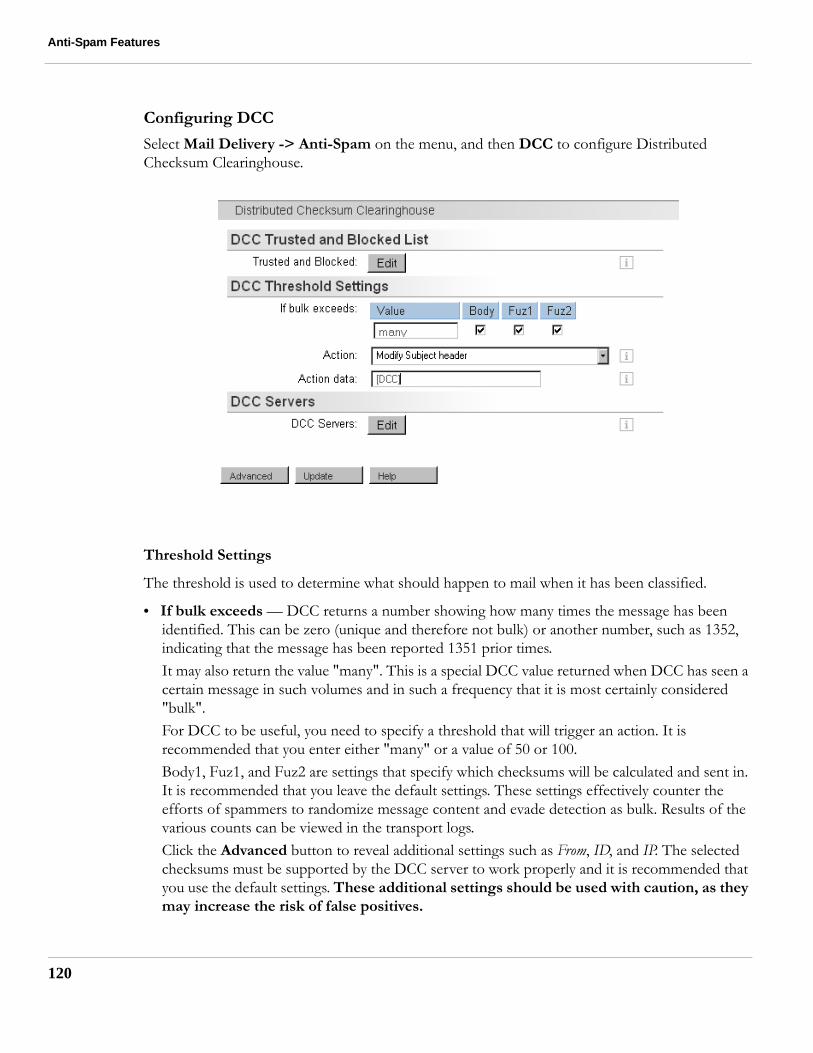
Anti-Spam Features
120
Configuring DCC
Select Mail Delivery -> Anti-Spam on the menu, and then DCC to configure Distributed Checksum Clearinghouse.
Threshold Settings
The threshold is used to determine what should happen to mail when it has been classified.
• If bulk exceeds — DCC returns a number showing how many times the message has been identified. This can be zero (unique and therefore not bulk) or another number, such as 1352, indicating that the message has been reported 1351 prior times.It may also return the value "many". This is a special DCC value returned when DCC has seen a certain message in such volumes and in such a frequency that it is most certainly considered "bulk".For DCC to be useful, you need to specify a threshold that will trigger an action. It is recommended that you enter either "many" or a value of 50 or 100.Body1, Fuz1, and Fuz2 are settings that specify which checksums will be calculated and sent in. It is recommended that you leave the default settings. These settings effectively counter the efforts of spammers to randomize message content and evade detection as bulk. Results of the various counts can be viewed in the transport logs.Click the Advanced button to reveal additional settings such as From, ID, and IP. The selected checksums must be supported by the DCC server to work properly and it is recommended that you use the default settings. These additional settings should be used with caution, as they may increase the risk of false positives.

DCC (Distributed Checksum Clearinghouse)
• Action — The action can be one of the following:Just log: An entry is made in the log, and no other action is taken.Modify Subject Header: The text specified in Action Data will be inserted into the message subject line.Add header: An "X-" mail header will be added as specified in the Action Data.Redirect to: The message will be delivered to the mail address specified in Action Data.Reject mail: The mail will not be accepted, and the connecting mail server is forced to return it.BCC: The message will be copied to the mail address specified in Action Data.
• Action data — Depending on the specified action:Modify Subject Header: The specified text will be inserted into the subject line, such as [DCC_BULK].Add header: A message header will be added with the specified text, such as [DCC_BULK].Redirect to: Send the message to a mailbox such as [email protected]. You can also specify a domain such as spam.example.com.
Note: The Add header field can be left blank, if required. If you specify a header such as [DCC_BULK], the header will be written as "X-Reject: [DCC_BULK]". If you use the form DCC_REJECT:[BULK], the header will be written as "X-DCC_REJECT:[BULK]".
DCC Trusted and Blocked List
You can create exceptions to DCC’s bulk classifications by using the Trusted and Blocked List. In many cases, it may be easier to specify such exceptions using Pattern Based Message Filters, in which case the mail bypasses both DCC and STA.
Note: In most cases, use the Pattern Based Message Filter menu for creating exceptions. The DCC trusted and blocked list feature is useful for removing legitimate bulk mail, such as mailing lists, from consideration as bulk while letting it be scanned by STA for spam characteristics.
Click Edit to add entries to the Trusted and Block lists.
121

Anti-Spam Features
122
DCC Servers
The default DCC servers supplied will cover most cases and should not be changed without careful consideration.
Click Edit in the DCC Servers section to configure your DCC server settings, if required.
Note: You must allow a connection on UDP port 6277 on your firewall or router to allow communications with a DCC server. If this port is not available, DCC server calls will fail and slow down mail delivery.

STA (Statistical Token Analysis)
STA (Statistical Token Analysis)STA is a sophisticated method of identifying spam based on statistical analysis of mail content. Simple text matches can lead to false positives because a word or phrase can have many meanings depending on the context. STA provides a way to accurately measure how likely any particular message is to be spam without having to specify every word and phrase.
STA achieves this by deriving a measure of a word or phrase contributing to the likelihood of a message being spam. This is based on the relative frequency of words and phrases in a large number of spam messages. From this analysis, it creates a table of "discriminators" (words associated with spam) and associated measures of how likely a message is spam.
When a new incoming message is received, STA analyzes the message, extracts the discriminators (words and phrases), finds their measures from the table, and aggregates these measures to produce a spam metric for the message.
STA uses three sources of data to build its run-time database:
• The initial tables supplied by St. Bernard based on analysis of known spam. • Tables derived from an analysis of local legitimate mail. This is referred to as "local learning" or
"training".• Mail identified as "bulk" by DCC is also analyzed to provide an example of local spam.
How STA Works
Consider the following simple message:
---------------------------------------------------------------
Subject: Get rich quick!!!!
Click on http://getrichquick.com to earn millions!!!!!
----------------------------------------------------------------
STA will break the message down into the following tokens:
Get rich quick!!! Click on
http://getrichquick.com to
123
Anti-Spam Features
124
earn millions!!!!!
Each token is looked up in the database and a metric is retrieved. The token "Click" has a high measure of 91, whereas the word "to" is neutral (indicating neither spam nor legitimate.) These measures are aggregated using statistical methods to give the overall score for the message of 98. Based on the resulting cumulative score, the message can then be rejected, quarantined, annotated, or forwarded according to how the local threshold is set.
STA Considerations
Several factors can affect the accuracy of STA:
• Is STA seeing all local mail? — The more local or outbound mail that STA sees, the more accurate it will be. It is recommended that ePrism should process all inbound and outbound mail.
• "Trusted" and "Untrusted" mail must be properly identified — If STA treats a local source of mail as "untrusted", it will not be used for training. Treating an external unknown source of mail as "trusted" will exempt this mail from spam processing. Similarly, using "untrusted" mail for training may insert spam into the STA database.
• Add your own definitions of "valid" or "spam" mail — Instead of simply creating a Pattern Based Message Filtering rule that rejects mail, you can label it as "spam" which sends the message to STA for training before rejecting it. Trusted external sources of mail can be labeled as "trusted" which sends the message to STA for training before delivery. STA’s advanced features allow you to upload your own lists of neutral words, spam, and legitimate mail.

STA (Statistical Token Analysis)
Configuring STA
Select Mail Delivery -> Anti-Spam on the menu, and then select STA to configure Statistical Token Analysis.
STA can be enabled to filter spam immediately after installation. It is recommended that you start STA by running in "Training Only" mode to gather an initial sample of legitimate mail and spam.
When enabled, STA will always run in training mode and analyze all local mail. Local mail is assumed to be not spam and the frequency of the words found in this mail may therefore be used to modify the values supplied by St. Bernard’s master list. For example, a mortgage company may use the word "refinance" quite frequently in its regular mail. The likelihood of this word suggesting spam would therefore be reduced.
• Training Only — STA will analyze local mail but will NOT classify incoming mail.• Scanning and Training — STA will analyze local mail AND will classify incoming mail.
When a sufficient number of local messages have been analyzed (minimum of 48 hours, 4-5 days recommended), switch to Scanning and Training to start classifying incoming mail.
125

Anti-Spam Features
126
Setting Thresholds
STA measures the likelihood of spam for each message it processes. This likelihood is represented by a number between 0 and 100. The closer to 100, the more likely the message is to be spam. You can set both an Upper and Lower Threshold. Leave the field blank to disable the action.
It is recommended that you initially set the Upper Threshold to a high value, such as 95, and then slowly lower it as the training improves. Then set the Lower Threshold, if required.
Messages typically fall into three groups:
• Over 90 — Almost certainly spam.• Between 55 and 90 — Possibly spam.• Less than 55 — Almost certainly legitimate mail.
ePrism provides an upper and lower threshold to manage the mail that has been classified. For each threshold, the range of available actions is as follows:
• Action — The action can be one of the following:Just log: An entry is made in the log, and no other action is taken.Modify Subject Header: The text specified in Action Data will be inserted into the message subject line.Add header: An "X-" mail header will be added as specified in the Action Data.Redirect to: The message will be delivered to the mail address specified in Action Data.Reject mail: The mail will not be accepted, and the connecting mail server is forced to return it.BCC: The message will be copied to the mail address specified in Action Data.
• Action data — Depending on the specified action:Modify Subject Header: The specified text will be inserted into the subject line, such as [STA_SPAM].Add header: A message header will be added with the specified text, such as [STA_SPAM].Redirect to: Send the message to a mailbox such as [email protected]. You can also specify a domain such as spam.example.com.
Note: The header field can be left blank, if required. If you specify a header such as [STA_SPAM], the header will be written as "X-Reject: [STA_SPAM]". If you use the form STA_REJECT:[SPAM], the header will be written as "X-STA_REJECT:[SPAM]".
Rebuild STA
Click the Rebuild STA button to rebuild the STA database. The STA run-time engine is built and rebuilt at 12 hour intervals using several sources such as the supplied spam data, the DCC spam (if

STA (Statistical Token Analysis)
enabled), and local training. Since the database is not built for the first time until 12 hours after installation, you can use this option to immediately rebuild the STA database.
Delete Training
Click the Delete Training button to remove all training material. You should delete all training material if your ePrism system has been misconfigured and starts to treat "trusted" mail as "untrusted" or vice versa.
STA Advanced Options
Click the Advanced button to reveal additional STA options. These options are for advanced STA configuration only, and it is highly recommended that the default values be used. Modifications to the default values may decrease STA accuracy and should be used with care.
Neutral Words
Neutral words are words that may or may not indicate spam. For example, a mortgage company may want to build a neutral word list that includes "refinance" or "mortgage" because these words show up quite frequently in spam mail. By adding them to the neutral word list, the likelihood of this word suggesting spam would therefore be reduced to a neutral value.
• Default Neutral Words — Select the check box to enable the St. Bernard neutral words list. This list helps prevent pollution of the STA database. It is recommended that you leave this option enabled.
• Uploaded Neutral Words — Enables use of the uploaded neutral words list.
You must upload a file using the Upload Neutral Words button. The file must be in text format, and contain a list of neutral words with one word per line. Uploading a new list will replace the previous neutral words list.
127
Anti-Spam Features
128
Note: During the upload of a neutral words list, the system will automatically rebuild the STA database. This process may take some time to complete.
STA and Languages
The STA spam database is based on English language spam. As a result, it may not be initially responsive to spam created in other languages. STA’s ability to learn means that it can readily adapt to other languages. Ensure that DCC is enabled because all mail identified as "bulk" by DCC will be used by STA to train as spam. Assuming that some of these messages are in the local language, STA will build a database that reflects that language. STA will train on local legitimate mail from the moment the system is started. This will help properly characterize the local language use and prevent it from being classified as spam.
It is recommended that you use the "spam" action in Pattern Based Message Filters (PBMF), and select "Train as STA Spam" in the PBMF Preferences. Messages specified as "spam" will be forwarded to STA and will increase its database of local language words.
• Japanese Language — STA can process Japanese language messages to ensure they are not automatically classified as spam.Default — All Japanese content is processed by STA. If you receive legitimate Japanese mail, this may result in false positives.No STA Scan — STA scanning will be turned off for all messages containing Japanese characters.Lenient STA Scan — STA scanning will be turned off for only the parts of the message containing Japanese characters. The rest of the message will be processed normally. If there are 20 or fewer non-Japanese tokens in the message, the STA scan will be skipped for that message.
Diagnostics
• Enable X-STA Headers — This setting inserts X-STA headers into all messages. These are not visible to the user (although they can be filtered in most mail clients), but can be used to gather information on why mail is processed in a particular way.The following headers will be inserted:X-STA-Metric — The "score" assigned by STA, such as 95, which would indicate a spam message.X-STA-NotSpam — Indicates the words with the highest non-spam value found in the message.X-STA-Spam — Indicates the words with the highest spam value found in the message.
• Enable Monitoring — Select the check box to enable the monitoring of messages received by the specified email address.
• Monitor email for — Enter an email address that you would like to monitor.• Copy to — Copy messages and the STA diagnostic to this email address.

STA (Statistical Token Analysis)
STA Training
The following sections allow you to define advanced parameters for STA training, such as legitimate and spam mail training settings.
Legitimate Mail Settings
The following settings are advanced options for the handling of legitimate mail:
• Local Training — Enable this option to train mail from local users (on the trusted network) as valid mail.
• Local Limit — Enter the maximum number of messages from local users that can be used for STA training. When the limit is reached, older training messages are deleted as new messages arrive.
• Local Threshold — Set the threshold for messages from local users to be used for training. If the STA classification for the message is greater than or equal to the specified number, the message will be used for training.
• Source Weighting % — For STA to be useful and efficient, the training must be based on well selected data. The initial database supplied by St. Bernard represents well selected data, and is therefore highly weighted, compared to uploaded legitimate mail, or legitimate mail from the trusted network.Default — Enter a percentage for the weight of the default maintained STA database of valid mail.
129

Anti-Spam Features
130
Uploaded — Enter the weight of locally uploaded valid mail. Legitimate mail can be uploaded by clicking the Upload Legitimate Mail button. The mail must be in plain-text Unix mbox format. A minimum of ten messages should be uploaded to be effective.Trusted-net — Enter the weight of mail from trusted networks that are automatically trained as valid mail.
Note: When uploading mail, it is recommended that you set the weighting to 60% for Default, 20% for Upload, and 20% for Trusted. Significant changes to the source weighting may decrease STA accuracy.
Spam Settings
The following settings are advanced options for the handling of spam mail:
• DCC Training — Select the check box to enable the training of mail marked as "bulk" by DCC as spam.
• Spam Limit — Enter the maximum number of spam messages used for training. • Spam Training Threshold — Set the threshold for spam messages to be used for training.
If the STA classification for the message is less than or equal to the specified number, the message will be used for training.
• Source Weighting — For STA to be useful and efficient, the training must be based on well selected data. The initial database supplied by St. Bernard represents well selected data, and is therefore highly weighted, compared to uploaded spam mail, or bulk mail from DCC.Default — Enter a percentage for the weight of the default maintained STA database of spam mail.Uploaded — Enter the weight of locally uploaded spam mail. Spam mail can be uploaded by clicking the Upload Spam Mail button. The mail must be in plain-text Unix mbox format. A minimum of ten messages should be uploaded to be effective.DCC Bulk — Enter the weight of mail marked as "bulk" by DCC that is automatically trained as spam.
Note: When uploading mail, it is recommended to set the weighting to 60% for Default, 20% for Upload, and 20% for DCC Bulk. Significant changes to the source weighting may decrease STA accuracy.
STA (Statistical Token Analysis)
Dictionary Spam Count
Recent changes to the way that spammers compose their messages have reduced the effectiveness of the basic Bayesian filter. By introducing large numbers of normal words into their spam messages, they can hide their content because the normal words outweigh the spam words and result in a low spam count. More aggressive settings may result in more false positives.
ePrism counters this in two ways:
1. All words in the ePrism dictionary are now assigned a base level of how likely they are to be spam. In a normal message, this increased level will not result in a false positive, since the overall count is low. In a spam message, the result is different; the normal words will not counteract the spam content, and the message is correctly identified as spam.
2. Training on local mail now works to reduce this base level closer to zero. This further reduces the likelihood of a false positive.
The Dictionary Count is set to one "1" by default. This should be sufficient for most situations. It is recommended that you only change the default value if the following conditions occur:
• If there are too many false positives and this is not alleviated by training, then the Dictionary Count should be set to zero "0", disabling this feature.
• If too much spam is passing, then the Dictionary Count can be increased. Try increasing the value to ten "10". If this results in too many false positives, reduce it to five "5".
Note: This setting should only be considered for modification if other measures (training, threshold changes, uploading spam and/or legitimate mail) have been tried and have not provided the desired result.
STA Mail Transport Log Entries
STA log entries which indicate the metric for each message can be viewed in the Transport logs. Select Status/Reporting -> System Logs, and then select Mail Transport to view the Transport logs.
For example:
Apr 4 17:58:50 mail postfix/qmgr[64521]: BAFB2D2DDD: from=<[email protected]>, size=3401, nrcpt=1 (queue active)
Apr 4 17:58:50 mail postfix/smtpd[76468]: disconnect from mx2.freebsd.org[216.136.204.119] Apr 4 17:58:50 mail postfix/qmgr[64521]: BAFB2D2DDD: STA: spam_metric=12
131

Anti-Spam Features
132
Troubleshooting STA
STA is a very effective anti-spam tool which provides the mail administrator with a variety of options to finely tune STA for their particular environment. With these advanced controls, there is a greater chance of creating a configuration that may result in excessive false positives (mail marked as spam when they are legitimate) or false negatives (mail not marked as spam when they are spam.)
The following are some considerations when troubleshooting issues with STA:
• For excessive false positives— Ensure that the system has gone through a cycle of training.— Ensure that any mailing lists that the organization sends out are whitelisted (via PBMF) as "accept".— Check for STA tokens that may be words used by the organization for their regular business. For example, a financing company would want the words "mortgage" or "refinance" to be allowed as legitimate tokens.
• For excessive false negatives— If DCC is enabled, ensure that it is working properly and it is using STA for training.— Check that any mailing lists received by the users are whitelisted (via PBMF) as "accept". If the action is set to "valid", any spam in the mailing lists can alter the STA values.

Trusted Senders
Trusted SendersThe Trusted Senders List allows users to create their own lists of users who they want to receive mail from to prevent them from being blocked by ePrism’s spam filters. Users can utilize the WebMail/ePrism Mail Client interface to create their own Trusted Sender’s List based on a sender’s email address.
The Trusted Senders List only applies to actions related to RBL, STA, DCC, and PBMF spam (Low priority) messages. If the message is rejected for other reasons, such as viruses or attachment controls, the Trusted Senders List will have no effect.
The Trusted Senders List overrides the following actions:
• Modify Subject Header• Add Header• Redirect
The following rules also apply for the Trusted Senders List:
• A Reject action will reject the message regardless of the settings in the Trusted Senders List. • If the action is set to Just Log or BCC, the trusted message will pass through, but will still be
logged or BCC’d by ePrism. • PBMF spam actions set to Medium or High priority cannot be whitelisted, allowing
administrators to ensure that a strong security policy is enforced.
Enabling Trusted Senders
The Trusted Senders List must be enabled globally by the administrator to allow users to configure their own trusted senders.
Enable the Trusted Senders List globally as follows:
1. Select Mail Delivery -> Anti-Spam -> Trusted Senders.2. Select the Permit Trusted Senders List check box to enable the feature globally for all users. 3. Configure the domain part of the email address appended to local user names.
133
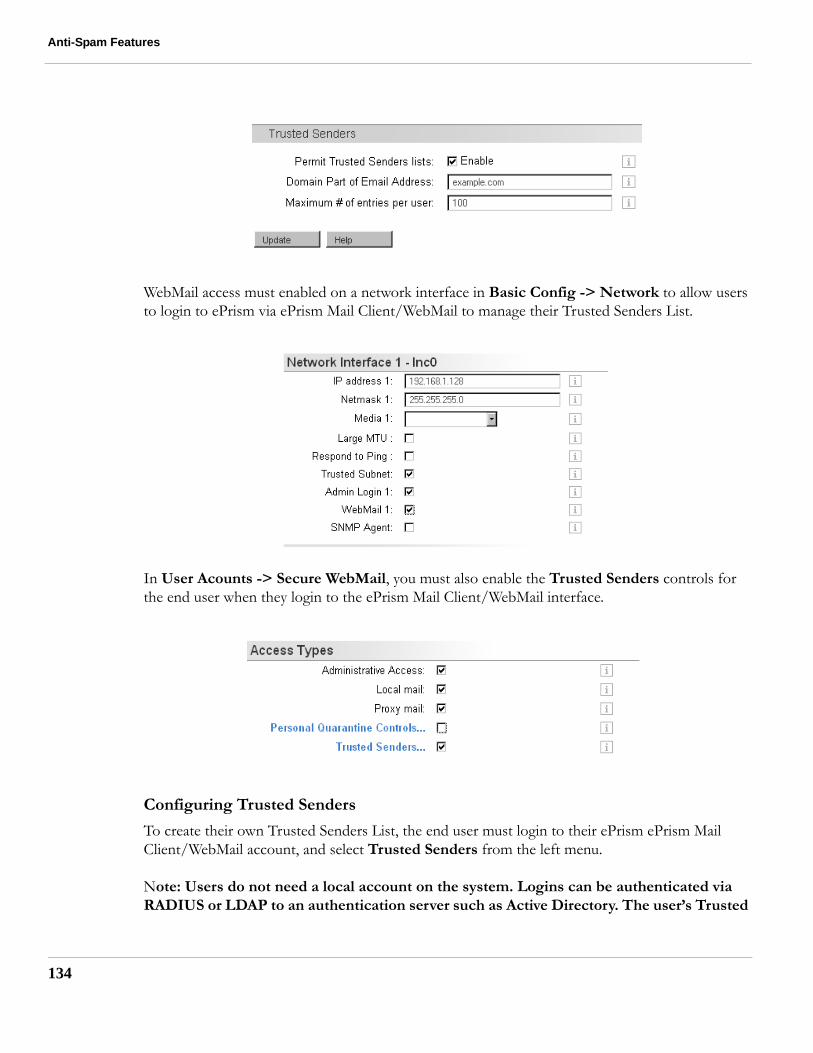
Anti-Spam Features
134
WebMail access must enabled on a network interface in Basic Config -> Network to allow users to login to ePrism via ePrism Mail Client/WebMail to manage their Trusted Senders List.
In User Acounts -> Secure WebMail, you must also enable the Trusted Senders controls for the end user when they login to the ePrism Mail Client/WebMail interface.
Configuring Trusted Senders
To create their own Trusted Senders List, the end user must login to their ePrism ePrism Mail Client/WebMail account, and select Trusted Senders from the left menu.
Note: Users do not need a local account on the system. Logins can be authenticated via RADIUS or LDAP to an authentication server such as Active Directory. The user’s Trusted

Trusted Senders
Senders List is saved locally on the system. See “Remote Accounts and Directory Authentication” on page 150 for more detailed information on setting up user authentication.
The Trusted Senders List is based on a sender’s email address. Enter an email address and click the Add button.
135
Anti-Spam Features
136
Spam Quarantine
The Spam Quarantine is used to redirect spam mail into a local storage area for each individual user or to a single user. This allows users to view and manage their own quarantined spam by giving them the ability to view, release the message to their inbox, or delete the message.
Spam Quarantine summary notifications can be sent to users notifying them of existing mail in their quarantine. The email notification itself can contain links to take action on messages without having to login to the quarantine.
To quarantine mail in each anti-spam feature, such as STA and DCC, select Redirect To as an action, and set the action data to the FQDN (Fully qualified domain name) of the ePrism system (to host the quarantine on the current system) or another ePrism running the spam quarantine feature.
Note: The Spam Quarantine must be enabled on the destination system if you choose to quarantine mail on a separate ePrism.
Local Spam Quarantine Account
To access quarantined mail, a local account must exist for each user. This account can be created locally, or you can use the LDAP Mirrored Users feature to import user accounts from an LDAP compatible directory (such as Active Directory) and mirror them on the local system. See “Directory Users” on page 61 for more information on importing and mirroring LDAP user accounts.

Spam Quarantine
Configuring the Spam Quarantine
Select Mail Delivery -> Anti-Spam on the menu, and then select Spam Quarantine.
• Enable Spam Quarantine — Select the check box to enable the spam quarantine.• Expiry Period — Select an expiry period for mail in each quarantine folder. Any mail
quarantined for longer than the specified value will be deleted.• Folder Size Limit — Set a value, in megabytes, to limit the amount of stored quarantined mail
in each quarantine folder.• Enable Summary Email — Select the check box to enable a summary email notification that
alerts users to mail that has been placed in their quarantine folder.Note: Notifications can only be sent to accounts the ePrism is aware of, such as local accounts or LDAP mirrored user accounts.
• Limit # of message headers sent — Specify the maximum number of headers to be sent in the notification message. Set to "0" for all messages.
• Notification Domain — Enter the domain for which notifications are sent to. This is typically the Fully Qualified Domain Name of the email server. Note: The Spam Quarantine only supports one domain.
• Notification Days — Select the specific days to send the summary. • Notification Times — Select the time of day to send the summary notifications.• Spam Folder — Indicate the Spam Folder name. This must be an RFC821 compliant mail box
name. This folder will appear in a user’s mailbox when they have received quarantined spam.• Mail Subject — Enter a subject for the notification email.
137

Anti-Spam Features
138
• Allow releasing of email — Inserts a link in the notification summary to allow the user to release it to their inbox.
• Allow white listing — Inserts a link in the notification summary to allow the user to add the sender to their Trusted Senders List.
• Allow reading of message — Inserts a link in the notification summary to allow the user to read the original message.
Note: Notifications for the Spam Quarantine can only be sent to local or LDAP mirrored user accounts.
Setting Spam Options
In each anti-spam feature with which you want to quarantine spam mail to the Spam Quarantine, you must set the action to Redirect to and set the action data to the FQDN of the spam quarantine server.
For example, to set DCC to send quarantine mail to the spam quarantine, use the following procedure:
1. Go to Mail Delivery -> Anti-Spam -> DCC from the menu.2. Set the Action to Redirect to.3. Set the Action data to the FQDN of the spam quarantine (either this ePrism, or another ePrism
system running the quarantine) such as spam.example.com.

Spam Quarantine
Accessing Quarantined Spam
The quarantined spam folder can be viewed using the ePrism Mail Client/WebMail interface. Users can log in to their local or mirrored account on ePrism and view their own quarantine folder.
If you do not require or do not want the end users to log in locally to ePrism to retrieve these messages, they can simply use the linked actions contained in the spam quarantine summary notification to manage quarantined messages.
Note: WebMail access must be enabled on a network interface in Basic Config -> Network to allow users to log into ePrism locally or use the linked actions in the spam quarantine summary notification.
Users can also use IMAP to access the quarantine folders. You must enable IMAP globally and on your trusted network interfaces as required. This allows users to connect to the system via IMAP and move spam messages out of the quarantine into their own folders.
Accessing the Quarantine Folder via IMAP
To enable access to the quarantine folder via IMAP:
1. Select User Accounts -> POP3 and IMAP to enable IMAP globally.2. Select Basic Config -> Network to enable IMAP on a specific network interface.3. Connect from a client using IMAP to view the "spam_quarantine" folder.
To retrieve false positives (messages that are not spam) from the quarantine, configure the client email application with two separate accounts, one for their normal account, and one for the spam quarantine. With this configuration you can drag and drop message from the quarantine to your mail account.
Enabling WebMail and Spam Quarantine Access
In Basic Config -> Network, enable the WebMail check box for a specific network interface to allow users to login to WebMail.
139
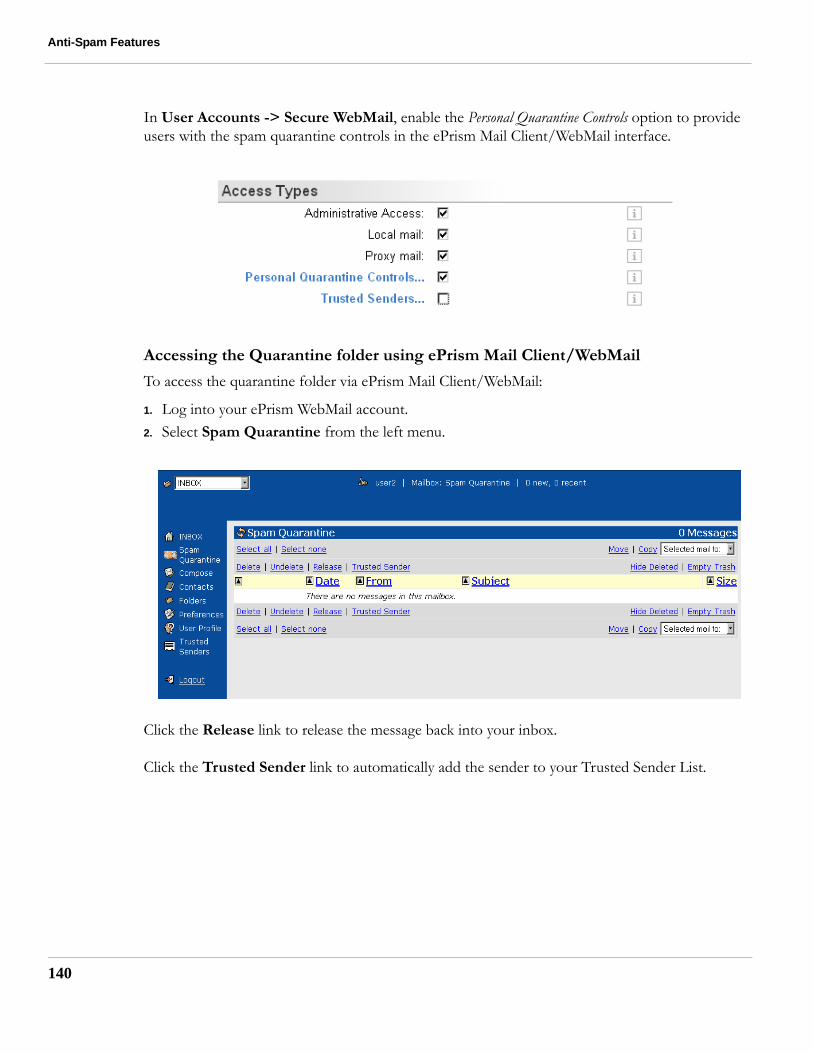
Anti-Spam Features
140
In User Accounts -> Secure WebMail, enable the Personal Quarantine Controls option to provide users with the spam quarantine controls in the ePrism Mail Client/WebMail interface.
Accessing the Quarantine folder using ePrism Mail Client/WebMail
To access the quarantine folder via ePrism Mail Client/WebMail:
1. Log into your ePrism WebMail account.2. Select Spam Quarantine from the left menu.
Click the Release link to release the message back into your inbox.
Click the Trusted Sender link to automatically add the sender to your Trusted Sender List.

Spam Options
Spam OptionsThe following options are other anti-spam settings that can be configured from the Mail Delivery -> Anti-Spam menu.
• Anti-Spam Header — Anti-spam headers are provided for diagnostic purposes and contain data on the spam processing applied to the message and its metrics. Enable this option to include the header.The header output is similar to the following: X-BTI-AntiSpam: sta:false/0/020,dcc:off,rbl:off,wlbl:none
Client Access Restrictions
The following client access restrictions are configured in this section:
• Reject on unknown recipient — This option rejects mail if the intended recipients do not exist in an LDAP directory. This option is used in conjunction with LDAP Users and the LDAP Recipients feature. ePrism will perform an LDAP lookup to see if the user exists, either in the local database of imported LDAP Users, or lookup a user on an LDAP user directory with the LDAP Recipients feature. Configure LDAP Users and LDAP Recipients in the Basic Config -> Directory Users menu. See “Directory Users” on page 61 for more information on importing LDAP users for user lookups and configuring the LDAP Recipients feature.Note: Override Reject on unknown recipient by using a Specific Access Pattern (Allow relaying and Trust), or a Pattern Based Message Filter based on the message Envelope.
• Reject on unknown sender domain — Rejects mail when the sender’s mail address does not appear in the DNS as an A or MX record. This option applies to "untrusted" mail only.
• Reject on non FQDN sender — Rejects mail when the client MAIL FROM command is not in the form of an FQDN (Fully Qualified Domain Name) such as mail.example.com. This option applies to "untrusted" mail only.
141

Anti-Spam Features
142
• Reject on unauth pipelining — Rejects mail when SMTP commands are sent ahead of the message even though the SMTP server supports pipelining.
Advanced Options
Click the Advanced button to configure advanced client restrictions. These options are for advanced users only because they can have adverse affects on your mail delivery if not used carefully.
• Reject on missing addresses — Reject mail when no recipients (To:) or sender (From:) were specified in the message headers. These fields are the optional To: and From: fields, not the corresponding Envelope fields.
• Reject on missing reverse DNS — Reject mail from a host when the host IP address has no PTR (address to name) record in the DNS, or when the PTR record does not have a matching A (name to address) record.
Caution: Many mail servers on the Internet do not have valid Reverse DNS records. Setting this option may result in rejecting mail from legitimate sources. Enabling this option is not recommended.

CHAPTER 7 User Accounts and Remote Authentication
This chapter describes how to setup and administer local and remote user accounts and POP/IMAP access on your ePrism Email Security Appliance, and contains the following topics:
• “POP3 and IMAP Access” on page 144• “Local User Mailboxes” on page 145• “Mirror Accounts” on page 147• “Strong Authentication” on page 148• “Remote Accounts and Directory Authentication” on page 150• “Relocated Users” on page 153• “Vacation Notification” on page 154• “Tiered Administration” on page 157
143

User Accounts and Remote Authentication
144
POP3 and IMAP Access
ePrism fully supports local user mailboxes. Mail is delivered to ePrism mailboxes after the same processing that applies to all other destinations. Users can use any POP or IMAP-based mail client (such as Outlook, Netscape, Eudora, and so on) to download their messages. Users can also be configured to access these mailboxes using St. Bernard’s webmail client.
Note: It is recommended that you use the secure versions of POP and IMAP to ensure passwords are not transmitted in clear text.
Select User Accounts -> POP3 and IMAP on the menu to enable or disable POP and/or IMAP mailboxes.
You must also enable POP3 and IMAP access (and their secure versions) on your network interfaces via the Basic Config -> Network menu.
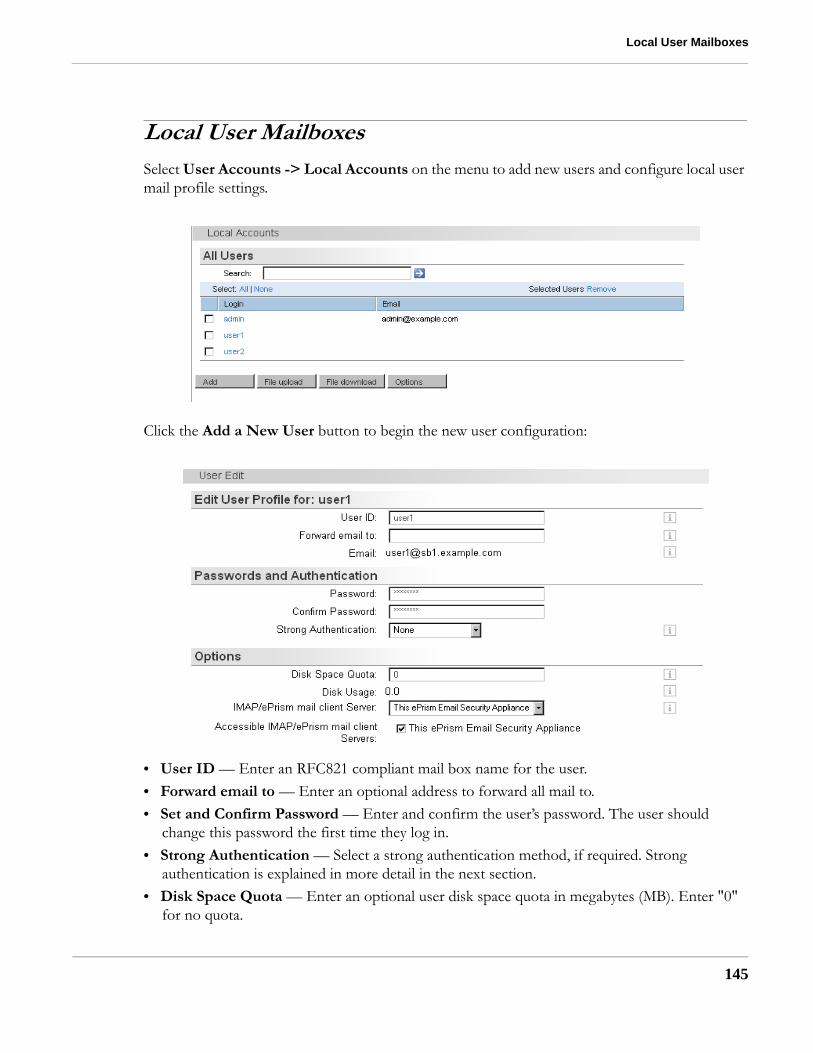
Local User Mailboxes
Local User MailboxesSelect User Accounts -> Local Accounts on the menu to add new users and configure local user mail profile settings.
Click the Add a New User button to begin the new user configuration:
• User ID — Enter an RFC821 compliant mail box name for the user. • Forward email to — Enter an optional address to forward all mail to.• Set and Confirm Password — Enter and confirm the user’s password. The user should
change this password the first time they log in.• Strong Authentication — Select a strong authentication method, if required. Strong
authentication is explained in more detail in the next section.• Disk Space Quota — Enter an optional user disk space quota in megabytes (MB). Enter "0"
for no quota.
145

User Accounts and Remote Authentication
146
• Accessible IMAP/WebMail Servers — Select the available IMAP and WebMail servers that this user can access.
Upload and Download User Lists
You can upload lists of users using comma or tab separated text files. You can specify the login ID, password, email address, and disk quota in megabytes. Use the following format:
[login],[password],[email address],[quota]
For example,
user1,ajg7rY,[email protected],0
The file (user.csv) should be created in csv file format using Excel, Notepad or other Windows text editor. It is recommended that you download the user list file first by clicking File Download, editing it as required, and then uploading it using the File Upload button.
Mailbox Options
Click the Options button to set the maximum mailbox size (in bytes) for all local mailboxes. Set this value to 0 to disable the limit.
Note: The value must not be smaller than the Maximum message size limit set in Mail Delivery -> Mail Access. If you set this value to 0, users will be able to send any size of message.

Mirror Accounts
Mirror AccountsLDAP user accounts can be imported from an LDAP directory server and mirrored on the local ePrism system. This allows you to create local accounts based on the LDAP account to allow these users to login locally for the Spam Quarantine feature.
Note: These mirror accounts are not local accounts that can accept mail, they are only used for the Spam Quarantine feature.
See “Directory Users” on page 61 for more detailed information on creating mirror accounts.
If you have imported LDAP user accounts via Basic Config -> Directory Services -> Directory Users, a new option will appear in the Local Accounts menu called Mirror Accounts that displays all mirrored user accounts.
You can remove selected user’s mirror accounts, or remove all of them by clicking the Remove All button.
Note: When using the Remove All button, users are removed as a background process and if you have many pages of users, it may take several minutes for the operation to complete.
147

User Accounts and Remote Authentication
148
Strong Authentication
By default, user authentication is based on UserID and password. ePrism also supports strong authentication methods such as CRYPTOCard, SafeWord, and RSA SecurID. These hardware token devices provide an additional authentication key that must be entered in addition to the UserID and password.
You can select a strong authentication type in the Strong Authentication drop-down menu of the user’s profile.
CRYPTOCard
The CRYPTOCard option is supported by a local authentication server and requires no external system for authentication. When CRYPTOCard is selected, you will be prompted to program the card at that time using the token configuration wizard.
Note: Only manually programmable CryptoCard RB-1 tokens are supported.
SafeWord
SafeWord Platinum and Gold tokens are supported by a local authentication server, and require no external system for authentication. When SafeWord is selected, you will be prompted to program the card at that time using the token configuration wizard.
Note: Only manually programmable SafeWord tokens are supported.

Strong Authentication
SecurID
To configure RSA SecurID, you must set up the system as a valid client on the ACE Server, and create an sdconf.rec (ACE Agent version 4.x) file and upload it to ePrism.
Note: The sdconf.rec file must be for version 4.x of the ACE Agent. Versions greater than 4.x generate a different format of this file.
Select User Accounts -> SecurID on the menu to configure SecurID.
Click the Browse button to find and load a sdconf.rec file. Click Upload when finished.
After enabled SecureID via User Accounts -> SecurID, it must also be enabled for a network interface in the Basic Config -> Network screen.
Note: Ensure that ePrism’s domain name is listed in your DNS server. SecurID authentication may not work properly if a DNS record does not exist.
149
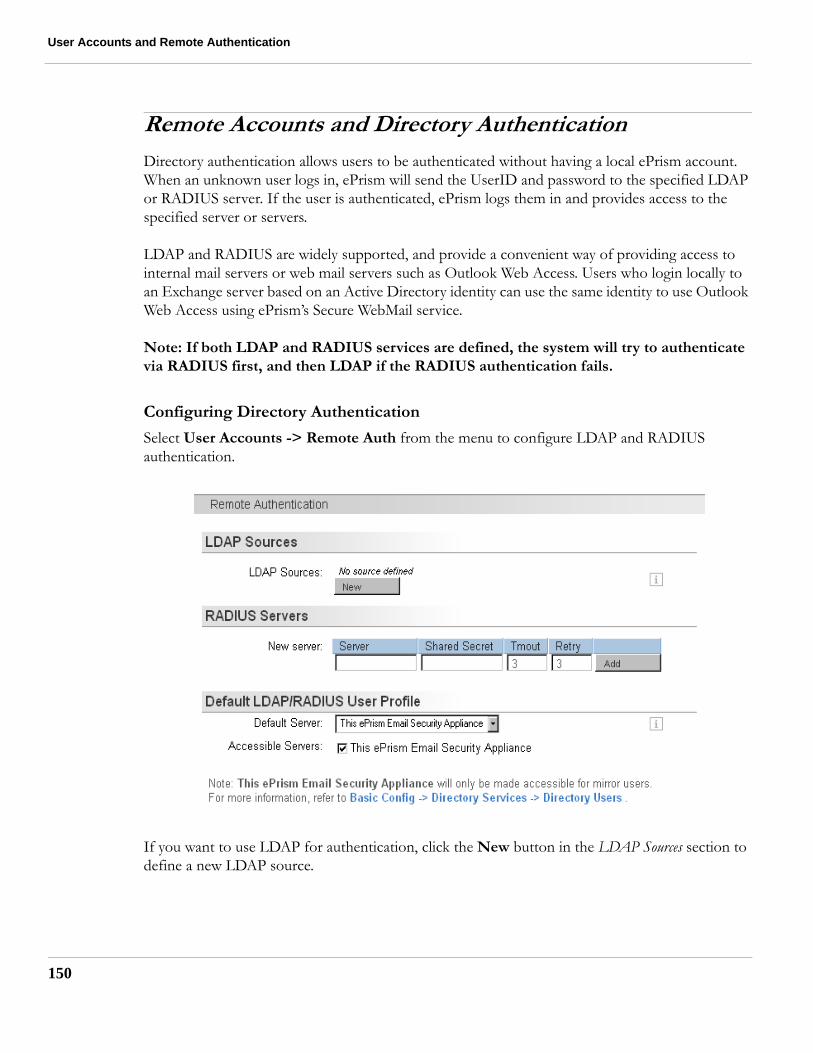
User Accounts and Remote Authentication
150
Remote Accounts and Directory Authentication
Directory authentication allows users to be authenticated without having a local ePrism account. When an unknown user logs in, ePrism will send the UserID and password to the specified LDAP or RADIUS server. If the user is authenticated, ePrism logs them in and provides access to the specified server or servers.
LDAP and RADIUS are widely supported, and provide a convenient way of providing access to internal mail servers or web mail servers such as Outlook Web Access. Users who login locally to an Exchange server based on an Active Directory identity can use the same identity to use Outlook Web Access using ePrism’s Secure WebMail service.
Note: If both LDAP and RADIUS services are defined, the system will try to authenticate via RADIUS first, and then LDAP if the RADIUS authentication fails.
Configuring Directory Authentication
Select User Accounts -> Remote Auth from the menu to configure LDAP and RADIUS authentication.
If you want to use LDAP for authentication, click the New button in the LDAP Sources section to define a new LDAP source.

Remote Accounts and Directory Authentication
• Directory Server — Select a configured LDAP directory server for authentication.• Search Base — Enter the starting base point to start the search from, such as
cn=users,dc=example,dc=com. • Scope — Enter the scope of the search such as Subtree, One Level, or Base.
Base: Searches the base object only. One Level: Searches objects beneath the base object, but excludes the base object.Subtree: Searches the entire subtree of which the base distinguished name is the topmost object, including that base object.
• Query Filter — Enter a specific query filter to search for a user in your LDAP directory hierarchy. For Active Directory implementations, use (ObjectClass=user).
• Timeout — The maximum interval, in seconds, to wait for the search to complete.• Account name attribute — Enter the account name result attribute that identifies a user’s
login or account name, such as sAMAccountName for Active Directory implementations.
Note: You will need to enter the appropriate Query Filter and Account name attribute for your particular LDAP infrastructure if you use another LDAP service such as OpenLDAP and iPlanet.
151

User Accounts and Remote Authentication
152
RADIUS
Complete the following fields to use a RADIUS server for authentication.
• Server — Enter the FQDN or IP address of the RADIUS server.• Shared Secret — Enter the shared secret for the RADIUS server. A shared secret is a text
string that acts as a password between a RADIUS server and client. Choose a secure shared secret of at least 8 characters in length, and include a mixture of upper and lowercase alphabetic characters, numbers, and special characters such as the "@" symbol.Note: When you add a RADIUS server, the administrator of the RADIUS server must also list this ePrism Email Security Appliance as a client using the same shared secret. All listed RADIUS servers must contain the same users and credentials.
• Timeout — Enter a timeout value to contact the RADIUS server.• Retry — Enter the retry interval to contact the RADIUS server.
The server "This ePrism Email Security Appliance" will only be made accessible for mirror users. See “Directory Users” on page 61 for more information on settings up mirrored accounts.
The other servers listed in the Accessible Servers option are configured via User Accounts -> Secure WebMail. See “Secure WebMail” on page 160 for more detailed information on configuring this feature.

Relocated Users
Relocated UsersUse the Relocated Users screen to return information to the sender of a message on how to reach users that no longer have an account on the ePrism system. A full domain can also be specified if the address has changed for a large number of users.
Select Mail Delivery -> Relocated Users on the menu to configure the relocation information.
Click the Add button to add a new relocated user.
Enter a user or domain name in the User field, such as user, [email protected], or @example.com to specify an entire domain.
In the "User has moved to…" field, enter any appropriate contact information for the relocated user, such as their new email address, street address, or phone number.
153

User Accounts and Remote Authentication
154
Vacation Notification
When a user will be out of the office, they can enable Vacation Notification which sends an automated email reply to incoming messages. The reply message is fully configurable, allowing a user to personalize the vacation notification message.
Note: Vacation Notifications are processed after mail aliases and mappings. You must create notifications for a specific end user and not for an alias or mapping.
The process for configuring Vacation Notification includes the following steps:
1. The administrator enables Vacation Notification globally.2. Individual settings can be configured as follows:
The administrator configures Vacation Notification for the user via User Accounts.The user configures Vacation Notification via WebMail.
Select Mail Delivery -> Vacations from the menu to enable Vacation Notification globally.
• Enable Vacation Notification — Enable or disable the service globally for all users. • Domain Part of Email Address — Enter the domain name to be appended to local user
names. This value will be used for all local users.• Interval Before Re-sending — The number of days after a previous notification was sent to
send another reply if a new email arrives from the original sender.

Vacation Notification
Default Vacation Notification Profile
Enter the subject and contents for the default notification message. Users will be able to change the subject and message from their own user profile.
Click the Edit Vacations button to see all Vacation Notification settings and to add arbitrary notifications for non-local users.
Click on an Email address to edit the user’s vacation notification settings.
From this screen, an administrator can configure the notification settings, including the address that incoming mail will receive a vacation response from.
155
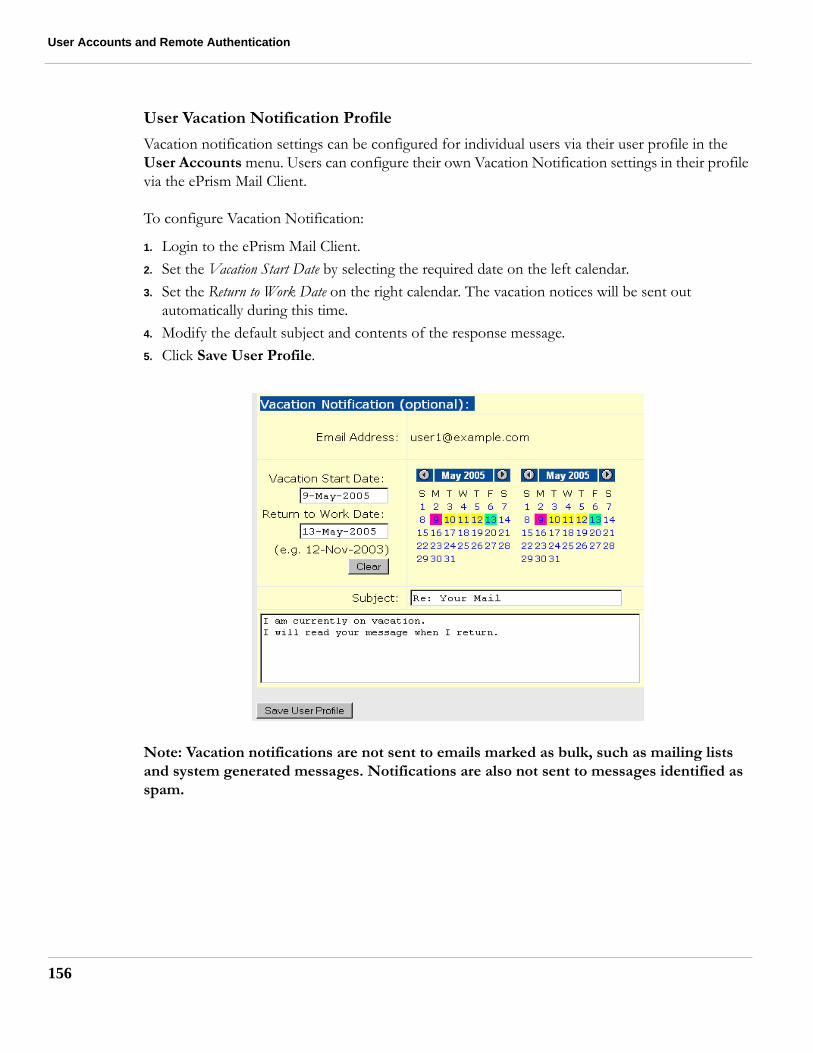
User Accounts and Remote Authentication
156
User Vacation Notification Profile
Vacation notification settings can be configured for individual users via their user profile in the User Accounts menu. Users can configure their own Vacation Notification settings in their profile via the ePrism Mail Client.
To configure Vacation Notification:
1. Login to the ePrism Mail Client.2. Set the Vacation Start Date by selecting the required date on the left calendar. 3. Set the Return to Work Date on the right calendar. The vacation notices will be sent out
automatically during this time.4. Modify the default subject and contents of the response message.5. Click Save User Profile.
Note: Vacation notifications are not sent to emails marked as bulk, such as mailing lists and system generated messages. Notifications are also not sent to messages identified as spam.

Tiered Administration
Tiered AdministrationTiered Administration allows an administrator to assign additional administrative access permissions on a per-user basis. For example, the administrator can designate another user as an alternate administrator by selecting the Full Admin option in their user profile.
To enable administrator permissions, select a user profile from the User Accounts -> Local Accounts menu. Enable each administrative option as required for that user by selecting the corresponding check box.
Note: WebMail access must be enabled on the network interface that will be used by tiered administration users. This is set in the Basic Config -> Network screen.
To distribute administrative functions, the administrator can configure more selective permissions to authorize a user only for certain tasks such as administering users and reports, configuring anti-spam filter patterns, or viewing the email database.
• Full Admin — The user has administrative privileges equivalent to the admin user.• Administer Aliases — The user can add, edit, remove, upload and download aliases (not
including LDAP aliases.)• Administer Filter Patterns — The user can add, edit, remove, upload and download Pattern
Based Message Filters and Specific Access Patterns.• Administer Mail Queue — The user can administer mail queues.• Administer Quarantine — The user can view, delete, and send quarantined files.• Administer Reports — The user can view, configure and generate reports, and view system
activity.• Administer Users — The user can add, edit, and relocate user mailboxes (except the Full
Admin users), including uploading and downloading user lists. User vacation notifications can also be configured.
• Administer Vacations — The user can edit local user’s vacation notification settings and other global vacation parameters.
• View Activity — The user can view the Activity page and start and stop mail services. Individual emails can only be viewed if View Email Database is also enabled.
157

User Accounts and Remote Authentication
158
• View Email Database — The user can view the email database.• View System Logs — The user can view all logs.
Granting full or partial admin access to one or more user accounts allows actions taken by administrators to be logged because they have an identifiable UserID that can be tracked by the system.
Note: A user with Full Admin privileges cannot modify the profile of the Admin user. They can, however, edit other users with Full Admin privileges.
Logging in with Tiered Admin Privileges
When tiered administrative privileges have been assigned to a user, they can access them via the ePrism mail client interface by logging in locally to ePrism.
Select the type of feature you want to administer via the top-left drop down menu.

CHAPTER 8 Secure WebMail and ePrism Mail Client
This chapter describes how to setup Secure WebMail and ePrism Mail Client on your ePrism Email Security Appliance, and contains the following topics:
• “Secure WebMail” on page 160• “ePrism Mail Client” on page 164
159
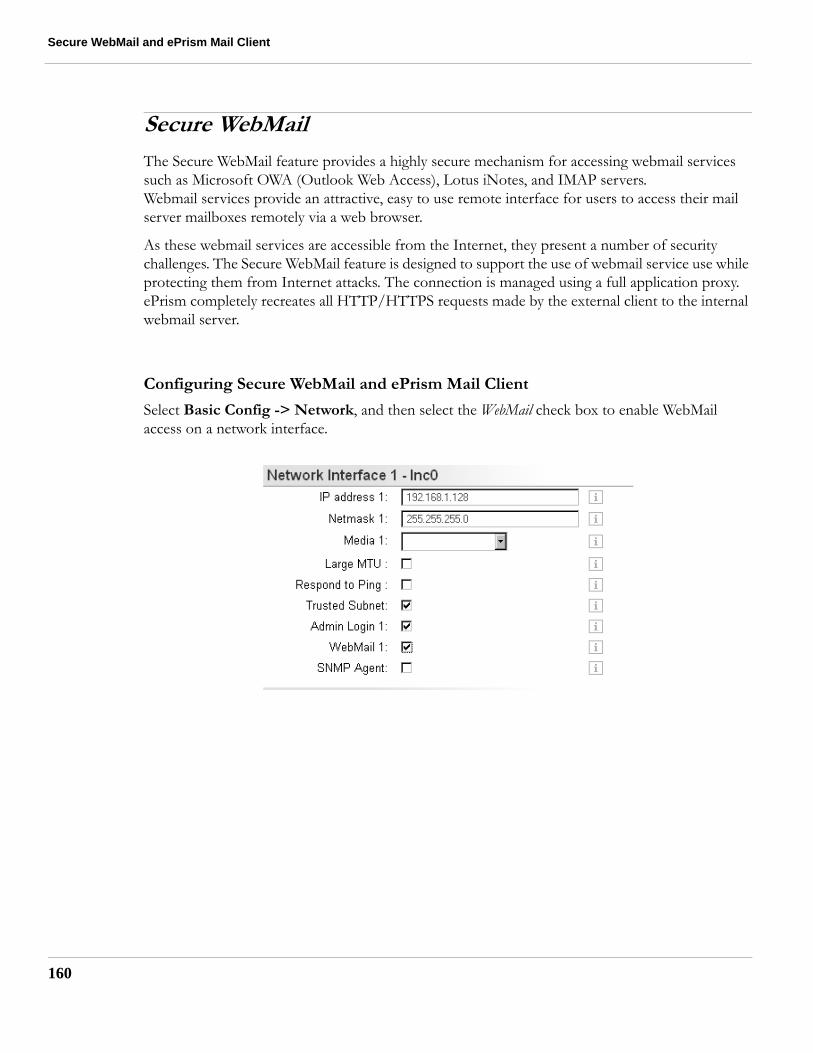
Secure WebMail and ePrism Mail Client
160
Secure WebMail
The Secure WebMail feature provides a highly secure mechanism for accessing webmail services such as Microsoft OWA (Outlook Web Access), Lotus iNotes, and IMAP servers. Webmail services provide an attractive, easy to use remote interface for users to access their mail server mailboxes remotely via a web browser.
As these webmail services are accessible from the Internet, they present a number of security challenges. The Secure WebMail feature is designed to support the use of webmail service use while protecting them from Internet attacks. The connection is managed using a full application proxy. ePrism completely recreates all HTTP/HTTPS requests made by the external client to the internal webmail server.
Configuring Secure WebMail and ePrism Mail Client
Select Basic Config -> Network, and then select the WebMail check box to enable WebMail access on a network interface.
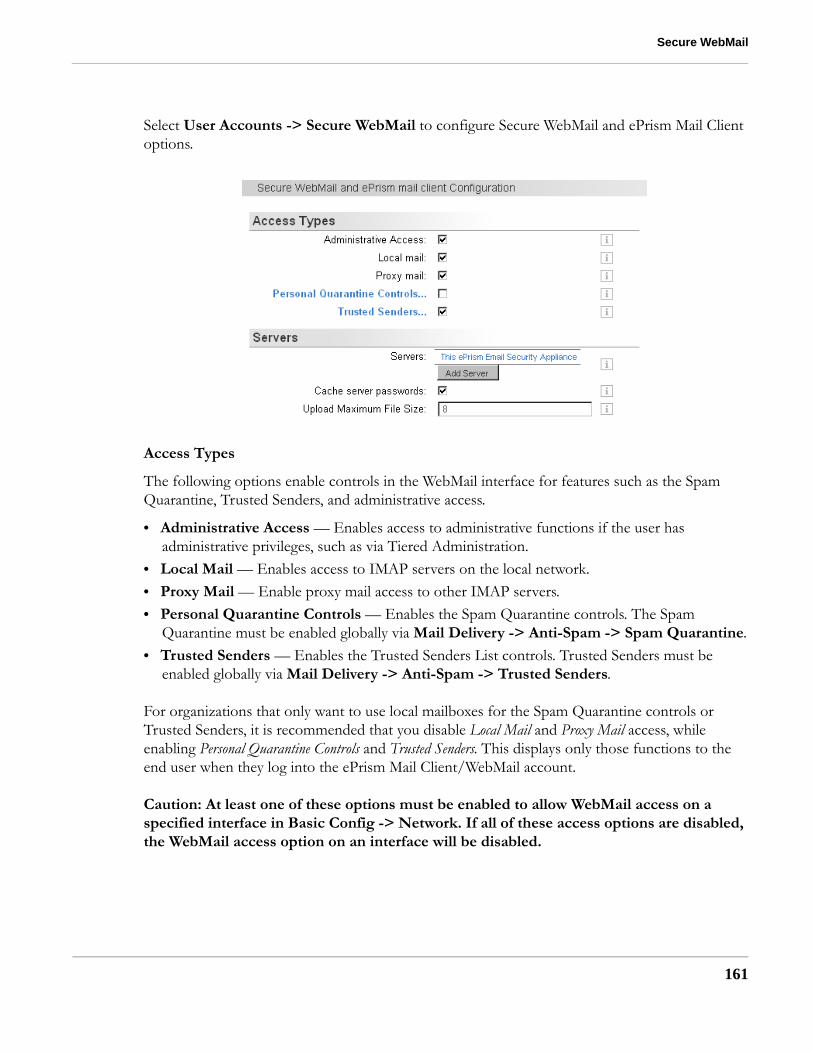
Secure WebMail
Select User Accounts -> Secure WebMail to configure Secure WebMail and ePrism Mail Client options.
Access Types
The following options enable controls in the WebMail interface for features such as the Spam Quarantine, Trusted Senders, and administrative access.
• Administrative Access — Enables access to administrative functions if the user has administrative privileges, such as via Tiered Administration.
• Local Mail — Enables access to IMAP servers on the local network.• Proxy Mail — Enable proxy mail access to other IMAP servers.• Personal Quarantine Controls — Enables the Spam Quarantine controls. The Spam
Quarantine must be enabled globally via Mail Delivery -> Anti-Spam -> Spam Quarantine.• Trusted Senders — Enables the Trusted Senders List controls. Trusted Senders must be
enabled globally via Mail Delivery -> Anti-Spam -> Trusted Senders.
For organizations that only want to use local mailboxes for the Spam Quarantine controls or Trusted Senders, it is recommended that you disable Local Mail and Proxy Mail access, while enabling Personal Quarantine Controls and Trusted Senders. This displays only those functions to the end user when they log into the ePrism Mail Client/WebMail account.
Caution: At least one of these options must be enabled to allow WebMail access on a specified interface in Basic Config -> Network. If all of these access options are disabled, the WebMail access option on an interface will be disabled.
161
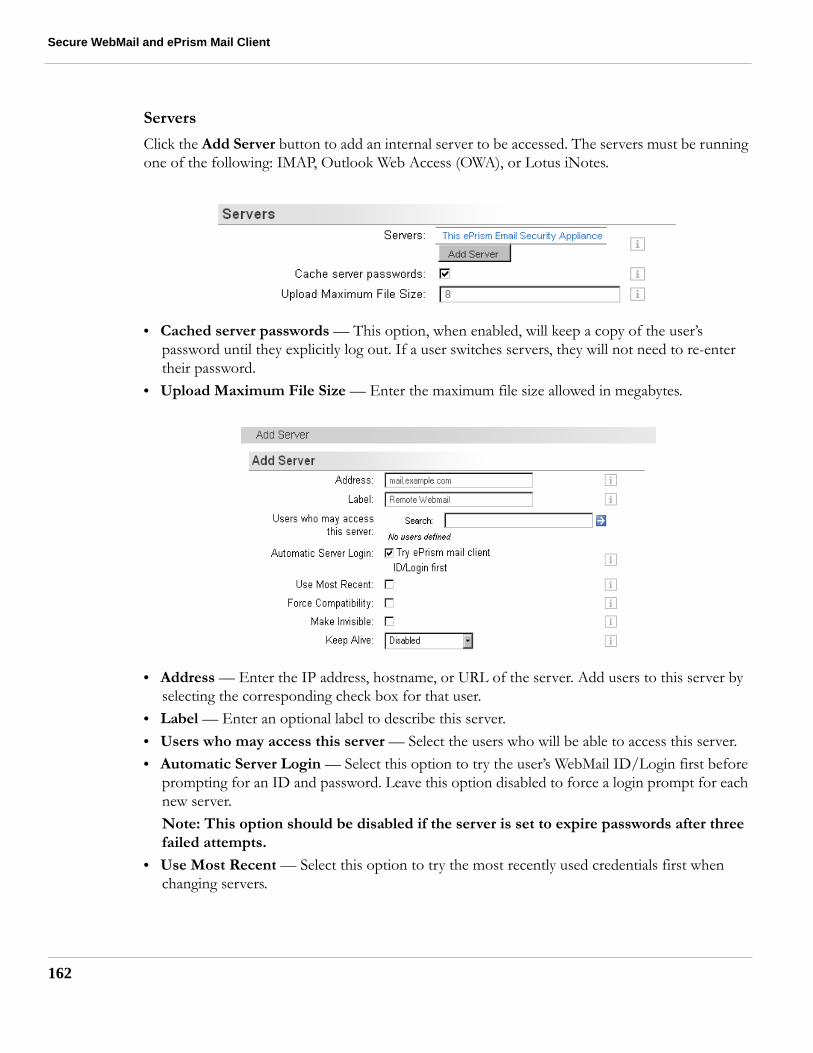
Secure WebMail and ePrism Mail Client
162
Servers
Click the Add Server button to add an internal server to be accessed. The servers must be running one of the following: IMAP, Outlook Web Access (OWA), or Lotus iNotes.
• Cached server passwords — This option, when enabled, will keep a copy of the user’s password until they explicitly log out. If a user switches servers, they will not need to re-enter their password.
• Upload Maximum File Size — Enter the maximum file size allowed in megabytes.
• Address — Enter the IP address, hostname, or URL of the server. Add users to this server by selecting the corresponding check box for that user.
• Label — Enter an optional label to describe this server.• Users who may access this server — Select the users who will be able to access this server.• Automatic Server Login — Select this option to try the user’s WebMail ID/Login first before
prompting for an ID and password. Leave this option disabled to force a login prompt for each new server. Note: This option should be disabled if the server is set to expire passwords after three failed attempts.
• Use Most Recent — Select this option to try the most recently used credentials first when changing servers.

Secure WebMail
• Force Compatibility — Select this option to ensure support for Outlook Web Access 2000 and limited support for OWA 2003.
• Make Invisible — Use this option to make the server invisible to users in the Secure WebMail server dropdown list.
• Keep Alive — The frequency of messages sent to the server to keep the connection alive.
163

Secure WebMail and ePrism Mail Client
164
ePrism Mail Client
ePrism Mail Client is the native webmail client for the ePrism Email Security Appliance. Using ePrism Mail Client, you can access local mailboxes, IMAP Servers, administrative access, the Spam Quarantine, and the Trusted Senders List.
From a web browser, enter the hostname or IP address of the ePrism system running ePrism Mail Client. Login with your local user ID and password. (The login may also be authenticated using LDAP or RADIUS.)
When successfully logged in, the ePrism Mail Client interface will be displayed.
Configuring ePrism Mail Client Options
In the User Accounts -> Secure Webmail -> ePrism Mail Client Options screen, you can configure popup options, the sent mailbox folder, and other ePrism Mail Client features.
Note: To see popup windows, your web browser must have popups enabled.
• New Mail Popup — Enable a popup window for new mail notifications.
ePrism Mail Client
• Minimize Popups — Minimize the use of new popup browser windows by using the main frame.
• Enable Inline HTML-mail Viewing — Enables the viewing of HTML mail. For security reasons, any scripts and fetches for external objects are filtered out.
• Save Sent Mail — Enables saving of sent mail in the user’s mailbox.• Sent Mail-box — The name of the sent mail folder if enabled.• Editable From — Enables a user to edit the From: field when composing mail.
165

Secure WebMail and ePrism Mail Client
166

CHAPTER 9 Policy Management
This chapter describes how to use and configure Policy controls for user groups and domains, and contains the following topics:
• “Policy Overview” on page 168• “Creating Policies” on page 171
167

Policy Management
168
Policy Overview
ePrism’s Policy controls allow settings for annotations, anti-spam, anti-virus, and attachment control to be customized and applied to different groups or domains of users. Domains can be added manually, while user groups and users can be imported from LDAP-compatible directories. Policies can then be applied to apply customized settings to these groups and domains.
Policies can be configured for the following items:
• Annotations• Anti-Virus• Inbound and Outbound Attachment Control• DCC• STA
Note: Anti-Virus scanning must be licensed to be able to use them with policy controls.
Policy Scenarios
The following describes some examples of how you can use policies to provide customized settings to different groups or domains of users in your organization.
• Annotations — You may want your Technical Support and Marketing departments to have different annotations appended to their outgoing messages. You can set up your group policy to provide an annotation emphasizing technical services for the Technical Support department, and a sales and promotional annotation for the Marketing department. Other users may only require a company-wide disclaimer to be appended to their emails.
• Attachment Control — You can set up group policies to allow your Development group to accept and send executable files (.exe) to each other, while configuring your attachment control settings for all your other departments to block this file type to prevent the spread of viruses among the general users. The Development group will be allowed to use these files because they may need to send compiled code to each other.
• Anti-Spam — When using the STA (Statistical Token Analysis) anti-spam tool, you may want to use or evaluate it with only one particular domain. Domain policies allow you to enable and configure STA for only certain domains, while disabling it for all other domains.
Global and Default Policies
You do not have to create separate policies for each and every user group or domain. Global and Default templates can be used to easily apply the same policy to several groups or domains. The Global Policy is the master policy that can be inherited by the Default or individual group or domain policies. You can enable or disable each feature globally, and then select the feature to configure it. For the Default Policy, you can choose to use the Global Policy value, or enable and

Policy Overview
customize each configuration item individually. For each individual user group or domain, you can use the Default Policy, or customize each group or domain individually.
Multiple Group Membership
In the event users are members of multiple groups, and different policies apply for these groups, the following rules apply. In general, the least restrictive policy is applied when multiple group membership policies apply.
Note: If a recipient or sender belongs to a group that does not have a policy defined, then the Default Policy is used. In the situation where multiple policies are in effect, the least restrictive policy will apply. If the Default Policy is the least restrictive, it will be the policy in effect. It is a recommended best practice to make the Default Policy more restrictive than the individual group policies.
Attachment Control
If a user is a member of more than one group when using attachment control, a setting of PASS for any of the group policies will result in the attachment being passed though.
• Group A: Attachment Control is set to PASS• Group B: Attachment Control is set to BLOCK
Result: The attachment will PASS.
Anti-Virus
• Group A: Anti-Virus ON• Group B: Anti-Virus OFF
Result: The messages for the user will not be scanned for viruses.
Anti-Spam Scenario 1
• Group A: STA/DCC ON• Group B: STA/DCC ON
Result: The message will always be flagged with an STA metric or DCC value for the mail transport logs, and the specified action (such as Modify Subject Header) will take place.
169

Policy Management
170
Anti-Spam Scenario 2
• Group A: STA/DCC ON• Group B: STA/DCC OFF
Result: The message will always be flagged with an STA metric or DCC value for the mail transport logs, but no action will be taken.
Annotations
• Group A: Configured with Annotation "A"• Group B: Configured with Annotation "B"
Result: The annotation that is applied is determined by the order in which the groups were imported in the system. If Group B was imported first, then annotation "B" will apply.

Creating Policies
Creating PoliciesTo configure group policies, you must follow these general steps:
1. Configure an LDAP server.2. Perform an initial import of LDAP users and groups, and then define domains manually if
required.3. Configure and customize the Default policy.4. Apply the Default policy to your imported groups or defined domains, or customize each
policy individually.5. Enable the required policy features in the Global settings.6. Enable Policy controls.
Step 1: Adding an LDAP Server
You must first ensure you have defined a valid LDAP server in the Basic Config -> Directory Services -> Directory Servers. See “Directory Servers” on page 56 for more information on adding LDAP servers.
Step 2: Import and Define Groups and Domains
Once you have an LDAP directory server defined, you can import your user and group membership information. Select Basic Config -> Directory Services -> Directory Users to import users from the LDAP directory. Select Basic Config -> Directory Services -> Directory Groups to import groups. See “Directory Groups” on page 58 for more information on importing LDAP users and groups.
When your group membership information has been imported from an LDAP directory, click the Add Group button on the Policy screen. For Domains, click the Add Domain button on the Policy screen.
171

Policy Management
172
Enter the domain name, such as example.com, and then for each feature, choose whether you want to use the Default Policy, or customize the feature for this domain.
Click Add when finished to add the Domain policy.
Step 3: Customize the Default Policy
Select Mail Delivery -> Policy on the main menu to enter the policy configuration screen.
Select the Default Policy to configure the default policy setting that will be applied to all groups and domains. When Policies are enabled, this policy will be applied to users that do not belong to any group.
You can use the Global value (current status shown in the Global column on the right side), or enable/disable each policy feature as required.

Creating Policies
Select a feature, such as Annotation, to customize its properties for the Default policy.
Step 4: Configure Individual Group and Domain Policies
Select the name of the Group or Domain to configure the Policy for each individual user group. For each group or domain, you can use the Default policy, or enable/disable and customize each policy feature as required.
Select a feature, such as Annotations, to configure its properties for the individual group or domain.
173

Policy Management
174
Step 5: Configure the Global Policy Settings
The Global settings define which policy features are enabled globally. Select Mail Delivery -> Policy on the main menu to enter the policy configuration screen.
Select Global to configure your global policy settings. This step enables or disables these features globally, and the current state will become immediately active.
You must configure your Default Policy and individual Group and Domain policies first before enabling these features globally.
Select the check box beside each feature you want to enable globally for policy controls.
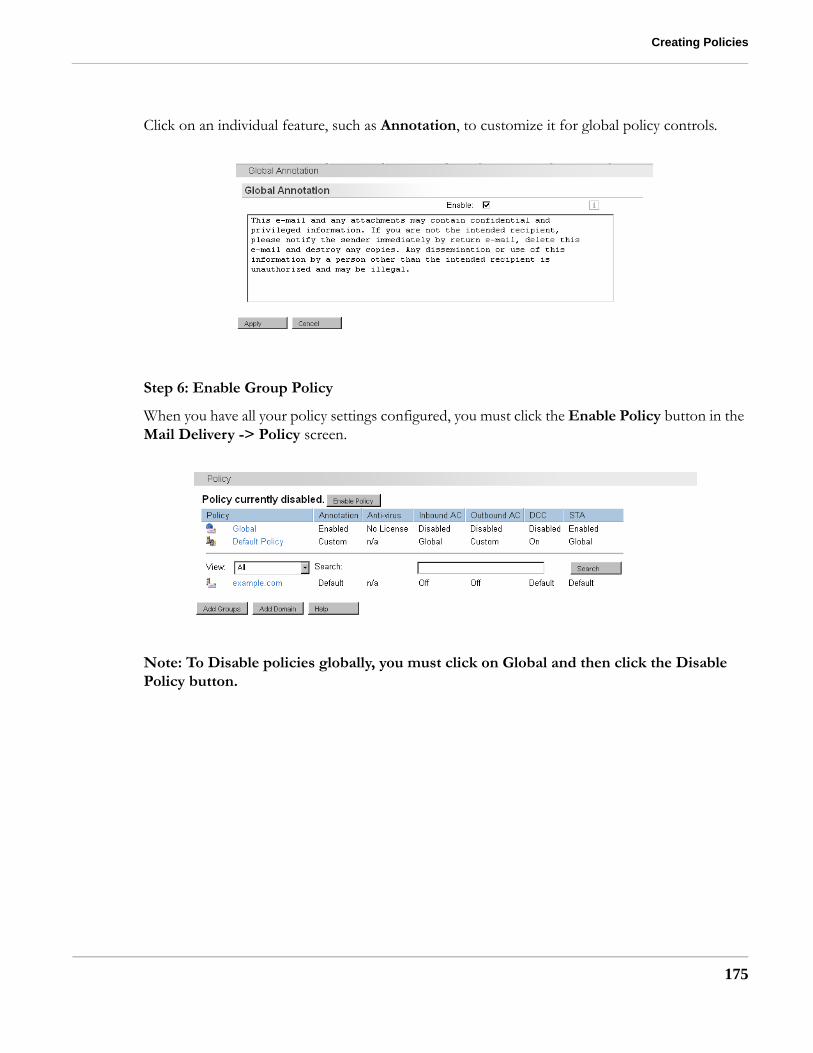
Creating Policies
Click on an individual feature, such as Annotation, to customize it for global policy controls.
Step 6: Enable Group Policy
When you have all your policy settings configured, you must click the Enable Policy button in the Mail Delivery -> Policy screen.
Note: To Disable policies globally, you must click on Global and then click the Disable Policy button.
175

Policy Management
176

CHAPTER 10 System Management
This chapter describes the tools used to administer the ePrism Email Security Appliance and contains the following topics:
• “System Status and Utilities” on page 178• “Mail Queue Management” on page 181• “Quarantine Management” on page 182• “License Management” on page 184• “Software Updates” on page 186• “Security Connection” on page 187• “Reboot and Shutdown” on page 188• “Backup and Restore” on page 189• “Centralized Management” on page 197• “Problem Reporting” on page 202
177
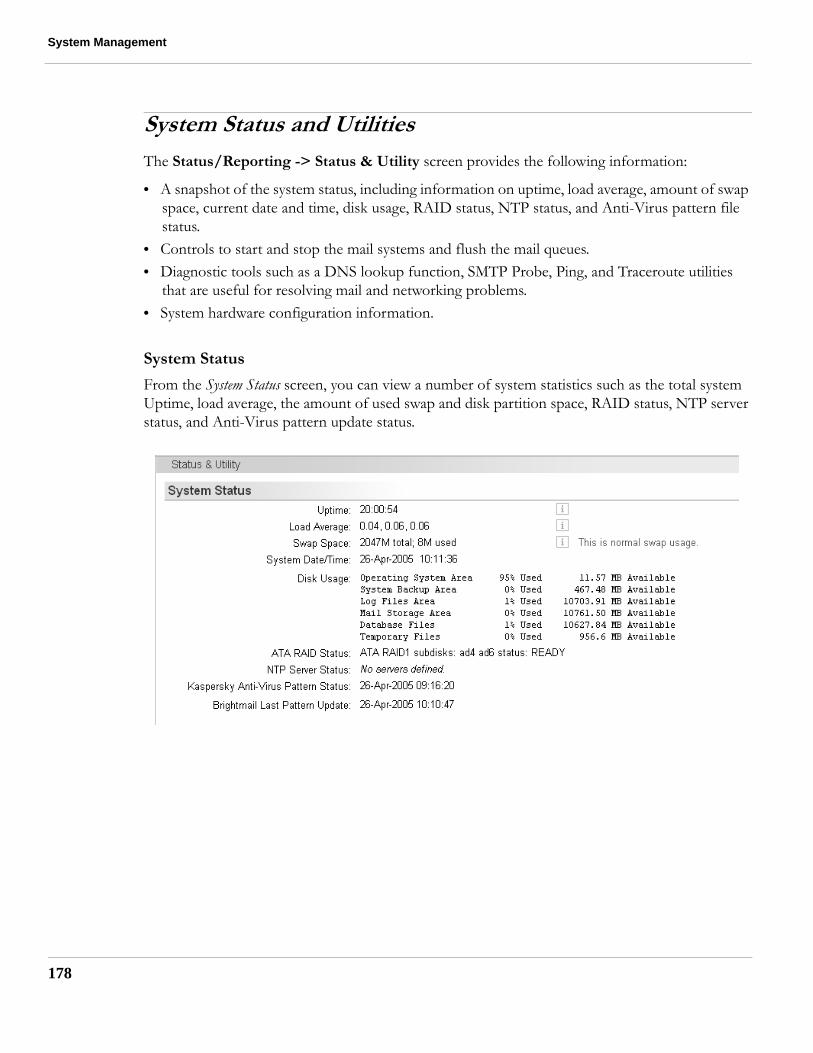
System Management
178
System Status and Utilities
The Status/Reporting -> Status & Utility screen provides the following information:
• A snapshot of the system status, including information on uptime, load average, amount of swap space, current date and time, disk usage, RAID status, NTP status, and Anti-Virus pattern file status.
• Controls to start and stop the mail systems and flush the mail queues.• Diagnostic tools such as a DNS lookup function, SMTP Probe, Ping, and Traceroute utilities
that are useful for resolving mail and networking problems.• System hardware configuration information.
System Status
From the System Status screen, you can view a number of system statistics such as the total system Uptime, load average, the amount of used swap and disk partition space, RAID status, NTP server status, and Anti-Virus pattern update status.
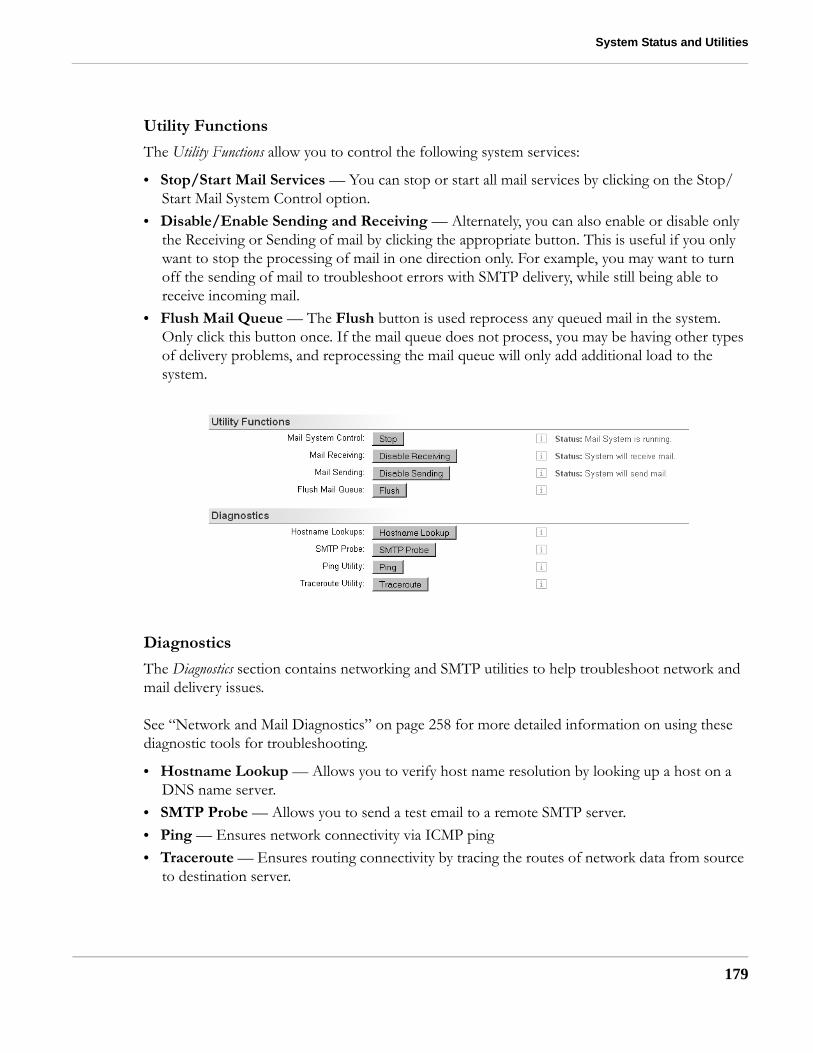
System Status and Utilities
Utility Functions
The Utility Functions allow you to control the following system services:
• Stop/Start Mail Services — You can stop or start all mail services by clicking on the Stop/Start Mail System Control option.
• Disable/Enable Sending and Receiving — Alternately, you can also enable or disable only the Receiving or Sending of mail by clicking the appropriate button. This is useful if you only want to stop the processing of mail in one direction only. For example, you may want to turn off the sending of mail to troubleshoot errors with SMTP delivery, while still being able to receive incoming mail.
• Flush Mail Queue — The Flush button is used reprocess any queued mail in the system. Only click this button once. If the mail queue does not process, you may be having other types of delivery problems, and reprocessing the mail queue will only add additional load to the system.
Diagnostics
The Diagnostics section contains networking and SMTP utilities to help troubleshoot network and mail delivery issues.
See “Network and Mail Diagnostics” on page 258 for more detailed information on using these diagnostic tools for troubleshooting.
• Hostname Lookup — Allows you to verify host name resolution by looking up a host on a DNS name server.
• SMTP Probe — Allows you to send a test email to a remote SMTP server.• Ping — Ensures network connectivity via ICMP ping • Traceroute — Ensures routing connectivity by tracing the routes of network data from source
to destination server.
179

System Management
180
Current Admin and WebMail Users
The Current Admin and WebMail Users section allows you to see who is logged in via the web admin interface or through a WebMail session.
Note: If you are using Clustering, an admin login may show up several times on the list because of additional RPC calls related to clustering communications. In these cases you will see the Remote IP address as the other ePrism systems.
Configuration Information
The Configuration Information section shows you important system information such as the current version of the system software, the time it was installed, and licensing and hardware information.

Mail Queue Management
Mail Queue ManagementThe Status/Reporting -> Mail Queue screen contains information on mail waiting to be delivered. You can search for a specific mail message using the search function. Messages that appear to be undeliverable can be removed by selecting them and then clicking the Remove link.
Any mail messages in the mail queue can also be reprocessed by clicking the Flush Mail Queue button. Only click this button once. If the mail queue does not process, you may be having other types of delivery problems and reprocessing the mail queue will only add additional load to the system.
Note: The Remove All button is used specifically with the search function. You must enter a search pattern to use with this button. To delete all mail messages in the queue, enter @ in the search field, and then click Remove All.
Display Options
The following options can be appended to the URL of the Mail Queue screen:
• ?limit=n — Sets the total number of items that will be listed to the specified number. The default is 2000.
• ?ipp=n — Sets the number of items per page.• ?order=asc — Sorts items by oldest date first to the most recent.
Note: If the query URL already contains a "?" argument, you must use the "&" instead to add options to the query.
To set the total number of items to be displayed to 100, use the following URL:
https://mx.example.com/ADMIN/mailqueue.spl?limit=100
Use the "&" symbol instead if an "?" option already exists:
https://mx.example.com/ADMIN/mailqueue.spl?action=submit&limit=100
181

System Management
182
Quarantine Management
Select Status/Reporting -> Quarantine to manage the Quarantine folder. This folder contains messages that have been blocked because of a virus, malformed message, or an illegal attachment. You can view the details of a message by clicking on its ID number, or delete the message from quarantine by clicking the Delete link.
Quarantined messages can also be released and delivered to their original destination by clicking the Release link.
Use the search field to look for specific messages within the quarantine. For example, you could search for the name of a specific virus so that any quarantined messages infected with that specific virus will be displayed.
Note: The Delete All and Release All buttons are used specifically with the search function. You must enter a specific search pattern before using these controls. It is recommended that you use the Expiry Options button to clear the quarantine area of all messages beyond a certain date.
Display Options
The following options can be appended to the URL of the Quarantined Mail screen:
• ?limit=n — Sets the total number of items that will be listed to the specified number. The default is 2000.
• ?ipp=n — Sets the number of items per page.• ?order=asc — Sorts items by oldest date first to the most recent.
Note: If the query URL already contains a "?" argument, you must use the "&" instead to add options to the query.
To set the total number of items to be displayed to 100, use the following URL:
https://mx.example.com/ADMIN/quarantine.spl?limit=100

Quarantine Management
Use the "&" symbol instead if an "?" option already exists:
https://mx.example.com/ADMIN/quarantine.spl?action=submit&limit=100
Set Quarantine Expiry
Click the Set Expiry button to configure the expiry settings. An expiry term can be set so that quarantined messages will be deleted after a certain period of time. You can use this feature to flush all messages from the quarantine area on a regular basis.
• Expire automatically — Enable this feature to expire messages automatically.• Days — Enter how many days to keep a quarantined message before deleting it.• Disk usage (percentage) — Enter a percentage of disk usage that can be used by the
quarantine area. If the quarantine area grows beyond this size, messages will be expired.Note: The disk partition used by the quarantine is the /var partition.
Click Update to enable the settings for new quarantined messages. Click Update and Expire Now to apply the settings to all messages in the quarantine area.
183
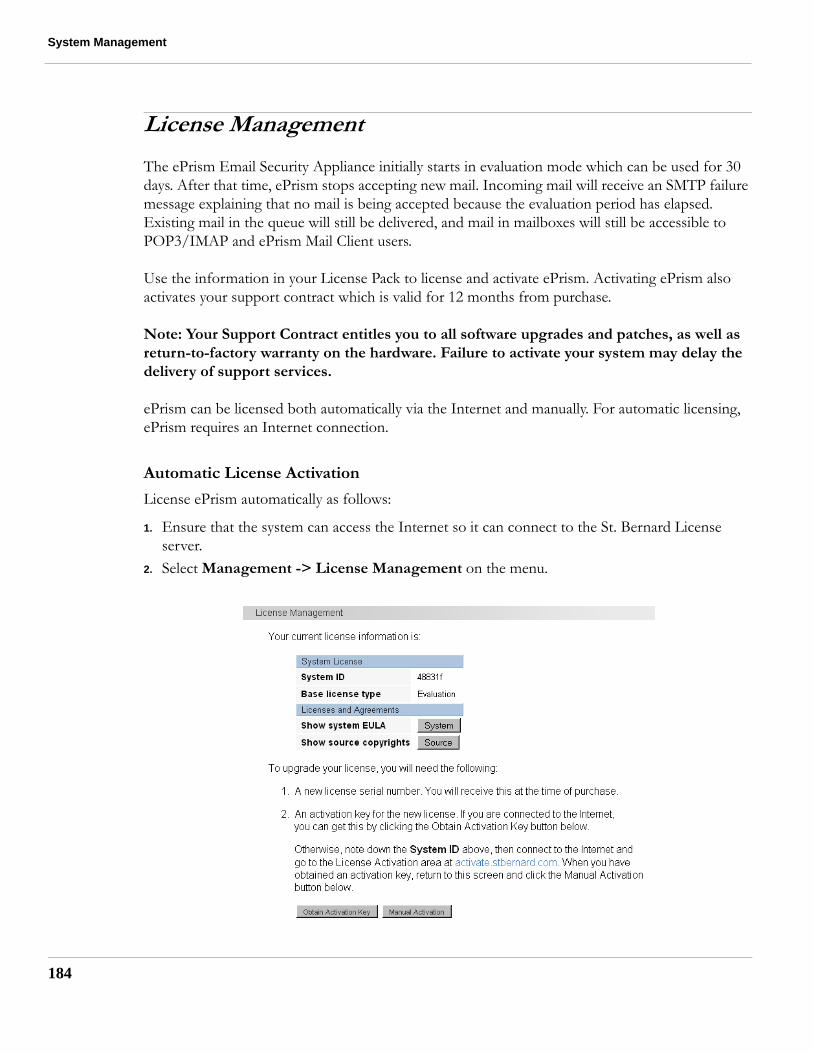
System Management
184
License Management
The ePrism Email Security Appliance initially starts in evaluation mode which can be used for 30 days. After that time, ePrism stops accepting new mail. Incoming mail will receive an SMTP failure message explaining that no mail is being accepted because the evaluation period has elapsed. Existing mail in the queue will still be delivered, and mail in mailboxes will still be accessible to POP3/IMAP and ePrism Mail Client users.
Use the information in your License Pack to license and activate ePrism. Activating ePrism also activates your support contract which is valid for 12 months from purchase.
Note: Your Support Contract entitles you to all software upgrades and patches, as well as return-to-factory warranty on the hardware. Failure to activate your system may delay the delivery of support services.
ePrism can be licensed both automatically via the Internet and manually. For automatic licensing, ePrism requires an Internet connection.
Automatic License Activation
License ePrism automatically as follows:
1. Ensure that the system can access the Internet so it can connect to the St. Bernard License server.
2. Select Management -> License Management on the menu.
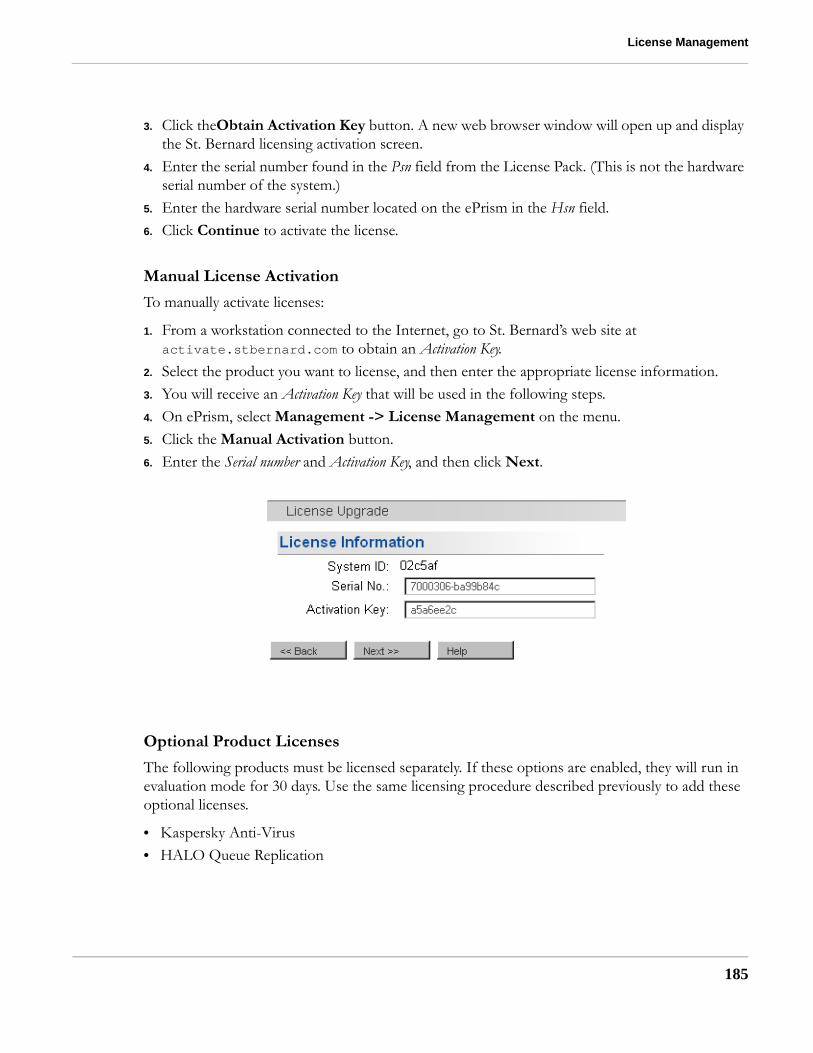
License Management
3. Click theObtain Activation Key button. A new web browser window will open up and display the St. Bernard licensing activation screen.
4. Enter the serial number found in the Psn field from the License Pack. (This is not the hardware serial number of the system.)
5. Enter the hardware serial number located on the ePrism in the Hsn field.6. Click Continue to activate the license.
Manual License Activation
To manually activate licenses:
1. From a workstation connected to the Internet, go to St. Bernard’s web site at activate.stbernard.com to obtain an Activation Key.
2. Select the product you want to license, and then enter the appropriate license information.3. You will receive an Activation Key that will be used in the following steps.4. On ePrism, select Management -> License Management on the menu.5. Click the Manual Activation button.6. Enter the Serial number and Activation Key, and then click Next.
Optional Product Licenses
The following products must be licensed separately. If these options are enabled, they will run in evaluation mode for 30 days. Use the same licensing procedure described previously to add these optional licenses.
• Kaspersky Anti-Virus• HALO Queue Replication
185

System Management
186
Software Updates
It is important to keep your ePrism software updated with the latest patches and upgrades. A key aspect of good security is responding quickly to new attacks and exposures by updating the system software when updates are available.
Updates are supplied in special files provided by St. Bernard. These updates can be delivered or retrieved using a variety of methods, including email, FTP, or from St. Bernard’s support servers. The Security Connection, if enabled, will download any patches automatically. Security Connection is discussed in more detail in the next section.
Note: St. Bernard recommends that you backup the current system before performing an update. See “Backup and Restore” on page 189 for detailed information on the backup and restore procedure.
Select Management -> Software Updates on the menu to load and apply software updates.
The Software Updates screen shows updates that are Available Updates (loaded onto ePrism, but not applied) and Installed Updates (applied and active.) You can install an available update, or uninstall a previously installed update.
When these software update files are downloaded to your local system, they can be installed by clicking Browse, navigating to the downloaded file, and then clicking Upload.
After applying any updates, you must restart the system.

Security Connection
Security ConnectionThe Security Connection is a service running on ePrism that polls St. Bernard’s support servers for new updates, security alerts, and other important information. When new information and updates are received, an email can be sent to the administrator. It is recommended that you enable this service.
Note: For security purposes, all Security Connection files are encrypted, and contain an MD5-based digital signature which is verified after decrypting the file.
• Enabled — Select to enable Security Connection.• Frequency — Specify how often to run the Security Connection service. Choices are daily,
weekly, and monthly.• Auto Download — Enable this option to allow software updates to be downloaded
automatically.• Display Alerts — Enable this option to display any alert messages on the system console.• Send Email — Enable this option to send an email to the address specified below.• Notification Mail Address — Specify an email address to receive messages from Security
Connection.• Support Contract — You must enter a valid Support Contract number. This information is
supplied with your license key at the time of purchase.
Click Update to save your Security Connection configuration.
Click the Connect Now button to run Security Connection immediately.
187

System Management
188
Reboot and Shutdown
The ePrism Email Security Appliance can be safely rebooted or shut down from this menu. Before shutting down, remove any media from the floppy and CDROM drives.
Click Reboot to shutdown the system and reboot.
Click Shutdown to shutdown the system completely.
See “Restoring ePrism to Factory Default Settings” on page 269 for detailed information on restarting ePrism and restoring it to factory default settings.

Backup and Restore
Backup and RestoreePrism can backup all data, including the database, quarantined items, mail queues, user mail directories, uploaded user lists, SSL certificates, reports, and system configuration data.
The ePrism Email Security Appliance supports three backup methods:
• Local tape drive (if available) • FTP server• Local disk (using browser download)
The restore feature can restore any of these items individually. The ePrism system should be backed up before performing any type of software upgrade or update.
Note: Restoring a clustered system requires a different procedure than outlined in the next section. See the Cluster Management section starting on page 197 for more information on backing up and restoring clustered systems.
Restore Considerations
The backup and restore function is primarily intended for product recovery after a re-installation or upgrade, and it is strongly recommended that all data be restored during a system recovery rather than individually. Since the size of the reporting database can be quite large, you may want to restore the reporting database separately after the restoration of the basic system.
Note: You must always restore the system data first before restoring the reporting database.
If the reporting history number limit parameter is set to a large value, the backup and restore process may take a long time to complete because of the size of the reporting database.
To reduce the backup and restore time, use the following procedure:
1. Several hours before you backup the system, select Status/Reporting -> Reporting -> Configure. Set the Email History Number Limit to the smallest value (50,000). You will lose any reporting data beyond the 50,000 item limit, but this will reduce the overall reporting database size.
2. Perform the backup, upgrade the system, and restore the data.3. Set the limit back to the original value.
189

System Management
190
Starting a Backup
You can perform backups on demand, or you can schedule a tape or FTP backup once per day via the Daily Backup option from the Management menu.
Select Management -> Backup & Restore on the menu to start a backup.
Select the required type of backup and click the Next >> button.
Local Disk (Direct Backup) Options
The following options are for backing up to the local disk:
• Encrypt backup — Select this option to store the backup file in encrypted form.• Backup system configuration — Select this option to backup all system configuration data,
including mailboxes, STA data, licenses and keys. This option must be enabled if you need to restore system functionality.
• Backup reporting data — Select this option to include reports, email history, and system event data in the backup.

Backup and Restore
Note: Backing up reporting data can drastically increase the size of the backup file, resulting in a much longer backup time. Use scheduled FTP backups to prevent your browser from timing out when this type of backup is taking place.
When you have set your options, click Next >> to continue.
Verify that your options are correct, and then click Create backup now to start the backup. The system will prompt you for a location to download the file (backup.gz). The backup file is saved in a Gzip compressed archive.
FTP Backup Options
The following options are for backing up to an FTP server:
• Encrypt backup — Select this option to store the backup file in encrypted form.
191

System Management
192
• Backup system configuration — Select this option to backup all system configuration data, including mailboxes, STA data, licenses and keys. This option must be enabled if you need to restore system functionality.
• Backup reporting data — Select this option to include reports, email history, and system event data in the backup. Note: Backing up reporting data can drastically increase the size of the backup file, resulting in a much longer backup time. Use scheduled FTP backups to prevent your browser from timing out when this type of backup is taking place.
• FTP server — Enter the host name or IP address of the destination FTP server.• Username — Enter the username for the FTP server.• Password — Enter the password for the FTP server.• Directory — Enter the directory on the FTP server for the backup files.• Use PASV mode — Sets FTP to use passive mode if you are having problems connecting.
When you have set your options, click Next >> to continue.
Verify that your options are correct, and then click Create backup now to start the backup. You can also click Create scheduled backup which will take you to the Daily Backup menu to create a scheduled FTP backup. The backup file is saved in a Gzip compressed archive.
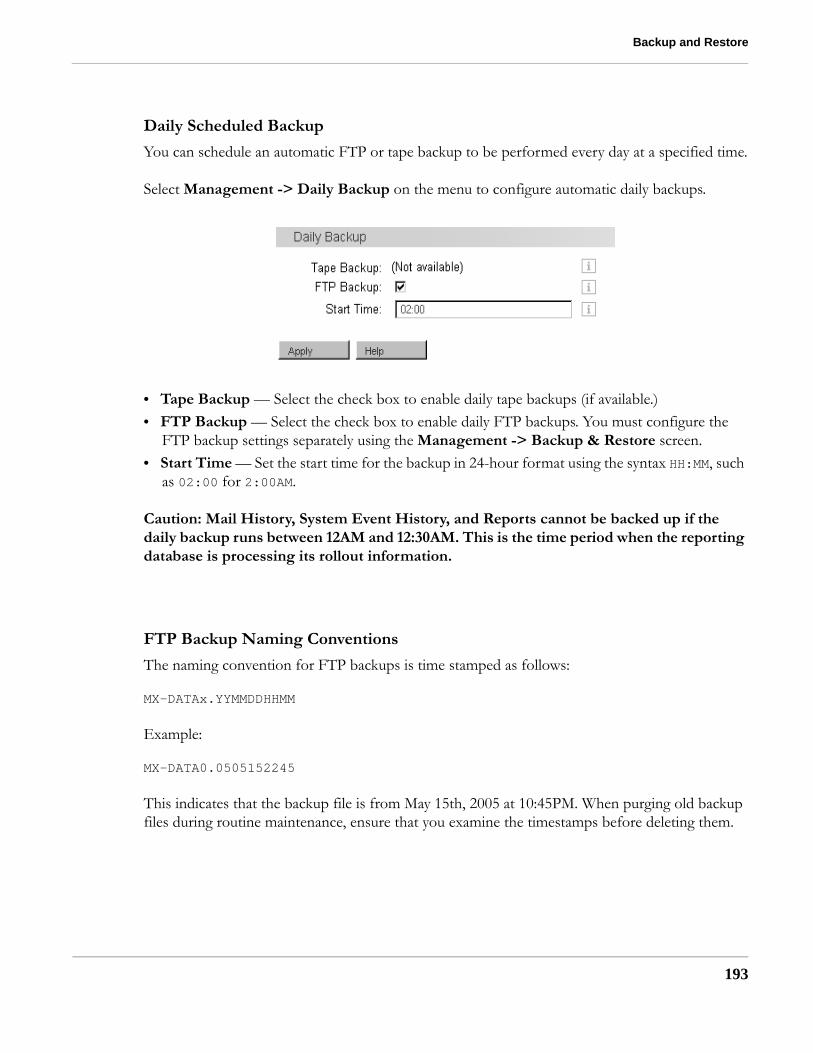
Backup and Restore
Daily Scheduled Backup
You can schedule an automatic FTP or tape backup to be performed every day at a specified time.
Select Management -> Daily Backup on the menu to configure automatic daily backups.
• Tape Backup — Select the check box to enable daily tape backups (if available.)• FTP Backup — Select the check box to enable daily FTP backups. You must configure the
FTP backup settings separately using the Management -> Backup & Restore screen.• Start Time — Set the start time for the backup in 24-hour format using the syntax HH:MM, such
as 02:00 for 2:00AM.
Caution: Mail History, System Event History, and Reports cannot be backed up if the daily backup runs between 12AM and 12:30AM. This is the time period when the reporting database is processing its rollout information.
FTP Backup Naming Conventions
The naming convention for FTP backups is time stamped as follows:
MX-DATAx.YYMMDDHHMM
Example:
MX-DATA0.0505152245
This indicates that the backup file is from May 15th, 2005 at 10:45PM. When purging old backup files during routine maintenance, ensure that you examine the timestamps before deleting them.
193
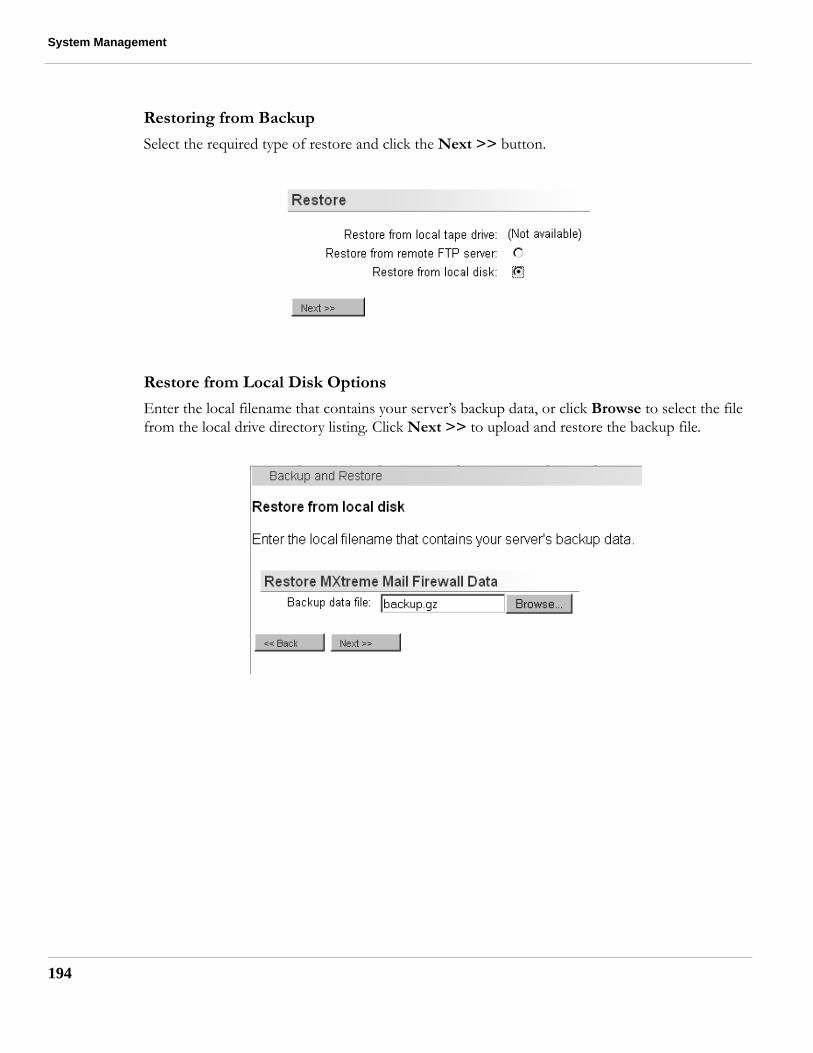
System Management
194
Restoring from Backup
Select the required type of restore and click the Next >> button.
Restore from Local Disk Options
Enter the local filename that contains your server’s backup data, or click Browse to select the file from the local drive directory listing. Click Next >> to upload and restore the backup file.

Backup and Restore
FTP Restore Options
• FTP server — Enter the host name or IP address of the FTP server where the backup file is stored.
• Username — Enter the username for the FTP server.• Password — Enter the password for the FTP server.• Directory — Enter the directory on the FTP server for the backup files.• Use PASV mode — Sets FTP to use passive mode if you are having problems connecting.
Click Next >> to connect with the FTP server and restore the backup file.
Restore Options
When the backup file has been successfully retrieved, you can choose which aspects of the system you want to restore. When finished selecting the restore items, click Restore Now.
Note: If you are restoring reporting data separately, it must be performed after the restoration of the main system information.
195
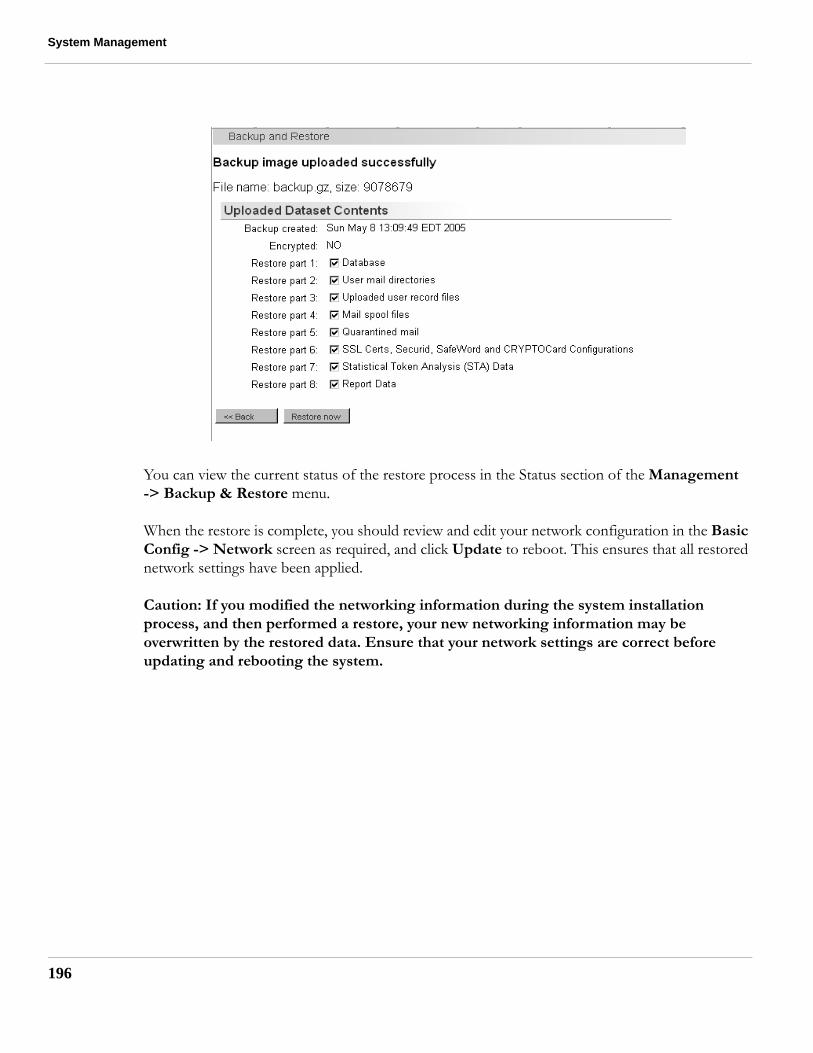
System Management
196
You can view the current status of the restore process in the Status section of the Management -> Backup & Restore menu.
When the restore is complete, you should review and edit your network configuration in the Basic Config -> Network screen as required, and click Update to reboot. This ensures that all restored network settings have been applied.
Caution: If you modified the networking information during the system installation process, and then performed a restore, your new networking information may be overwritten by the restored data. Ensure that your network settings are correct before updating and rebooting the system.

Centralized Management
Centralized ManagementThe Centralized Management feature allows you to administer multiple ePrism Email Security Appliances from a single management console. Centralized Management allows you to perform many routine administrative tasks across all ePrism systems configured in the same management group.
Centralized Management is used to monitor and administer multiple ePrism systems, including the ability to copy configuration items such as mail routes, aliases and mappings, RADIUS and LDAP settings, and so on, to other systems in the management group.
Note: All management group communications are authenticated and transmitted using HTTPS.
You can perform the following functions from the Centralized Management console:
• Start and Stop mail services• Monitor mail queues• View statistics of incoming and outgoing mail• Copy configuration settings to other ePrism systems• Perform backups
Centralized Management and Clustering
Centralized Management is very different from ePrism’s HALO Clustering features. Centralized Management is intended for managing multiple ePrism systems with different configurations, while Clustering is used to monitor and manage multiple systems with identical configurations for redundancy and load balancing purposes.
See “HALO (High Availability and Load Optimization)” on page 203 for more detailed information on cluster management.
197

System Management
198
Configuring Centralized Management
Use the following procedure to initialize and configure Centralized Management.
1. Select Basic Config -> Network from the menu.2. Ensure that Admin Login access is enabled for the specific network interface that will be
communicating with the management group.
3. Select Management -> Centralized Management to configure Centralized Management. The initialization screen will appear indicating that there are no management groups configured.
4. To create a management group, click Configure. You will need to enter the login and password of the admin user.
5. Add new members to the management group by clicking the Members button.

Centralized Management
6. Enter the group member’s hostname or IP address, an optional name, and the Admin user’s login and password. Click Add or Update Member. Once added, click the Close button.The group member will now appear in the main management console screen.
Note: If the address of a member server changes, the original entry must be removed before adding a new entry with the new address.
Changing the Centralized Management Console
To change the address of the console you are using, click Edit, enter your new settings, and then click Add or Update Member. You cannot delete the console you are using from the management group.
199
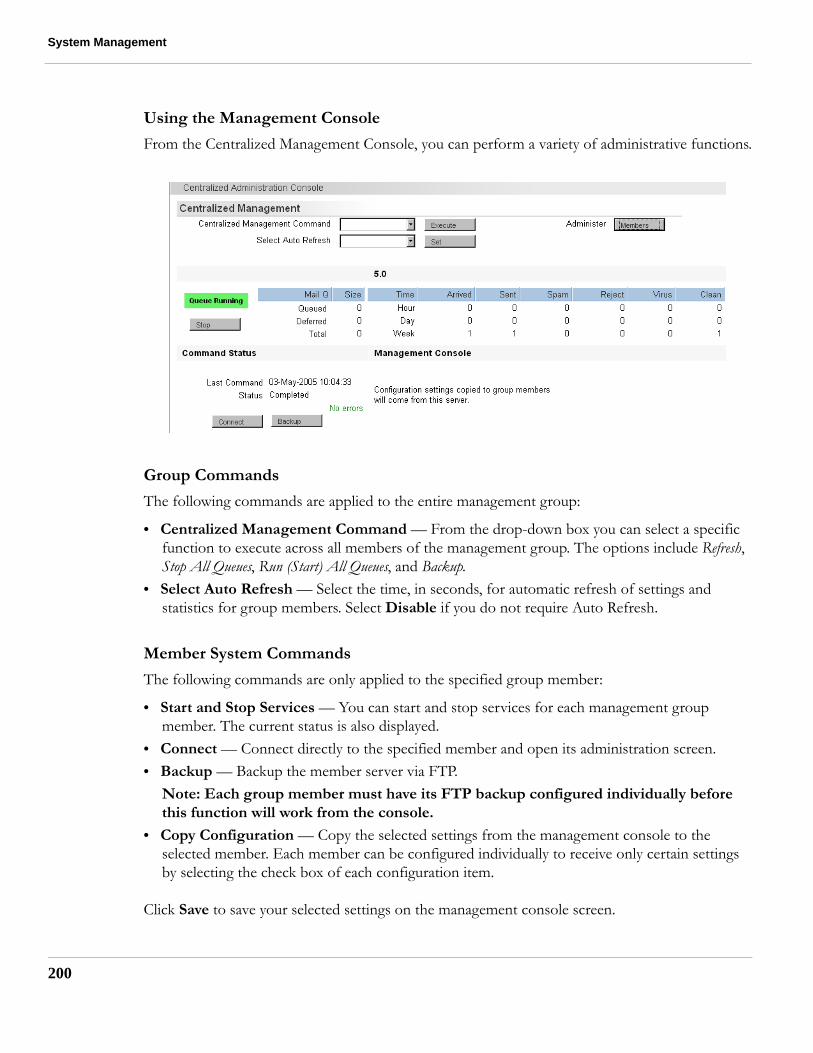
System Management
200
Using the Management Console
From the Centralized Management Console, you can perform a variety of administrative functions.
Group Commands
The following commands are applied to the entire management group:
• Centralized Management Command — From the drop-down box you can select a specific function to execute across all members of the management group. The options include Refresh, Stop All Queues, Run (Start) All Queues, and Backup.
• Select Auto Refresh — Select the time, in seconds, for automatic refresh of settings and statistics for group members. Select Disable if you do not require Auto Refresh.
Member System Commands
The following commands are only applied to the specified group member:
• Start and Stop Services — You can start and stop services for each management group member. The current status is also displayed.
• Connect — Connect directly to the specified member and open its administration screen.• Backup — Backup the member server via FTP.
Note: Each group member must have its FTP backup configured individually before this function will work from the console.
• Copy Configuration — Copy the selected settings from the management console to the selected member. Each member can be configured individually to receive only certain settings by selecting the check box of each configuration item.
Click Save to save your selected settings on the management console screen.

Centralized Management
Copy Configuration
To copy configuration items from the Centralized Management Console to the group members, select which items to copy, and then click the Copy button. Click Save to save your settings.
The following configuration settings can be replicated:
• Attachment Control — All items, including Attachment Types, are added to the selected group member.
• Mail Aliases — All mail aliases will be added to the selected group member.• Virtual Mappings — All virtual mappings will be added to the selected group member.• Mail Mapping — All mail mappings will be added to the selected group member.• Mail Routing — All mail routes will be added to the selected group member.• Mail Access/Filtering — Message size and patterns settings will be added to the selected
group member.• Relocated Users — The list of relocated users on a group member will be replaced by those
from the management console.• Pattern Based Filtering — All anti-spam Pattern Based Filtering settings except the default
settings will be added to the selected group member.• RADIUS/LDAP — All RADIUS and LDAP configuration settings will be added to the
selected group member.
Note: The email queue will be temporarily stopped during the replication process.
201

System Management
202
Problem Reporting
Problem reporting allows you to send important configuration and logging information to St. Bernard Technical Support for help with troubleshooting system issues. This feature should be used in conjunction with an existing support request with technical support.
Select Management -> Problem Reporting to configure your troubleshooting configuration information.
• Send To — Enter an email address to send the reports. The default is St. Bernard Technical Support, but you can also put in your own email address so that you can view them before sending them to St. Bernard.
• Mail Log — Sends the latest daily mail server log.• Mail Configuration — Sends your current mail configuration file.• Mail Queue Stats — Sends a snapshot of the latest current mail queue statistics.• System Log — Sends the latest daily system log file.
Click Update to save the information in the form, and click Send Now to send the information to the configured email address.
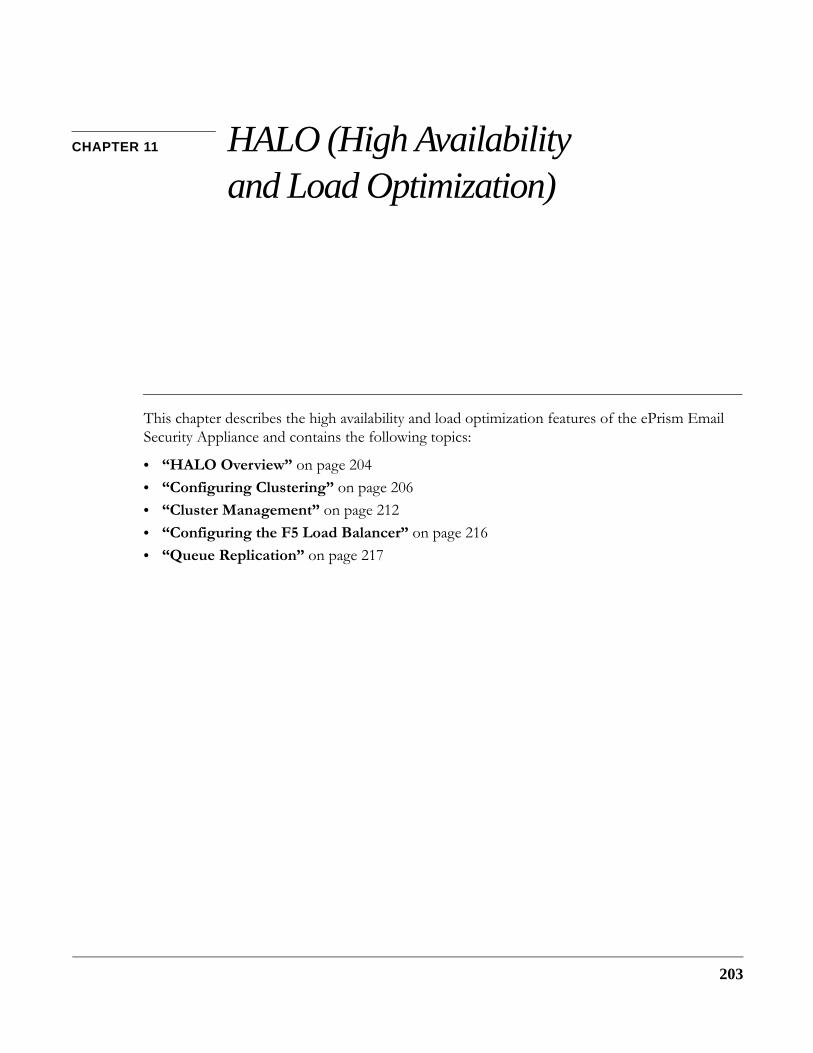
CHAPTER 11 HALO (High Availability and Load Optimization)
This chapter describes the high availability and load optimization features of the ePrism Email Security Appliance and contains the following topics:
• “HALO Overview” on page 204• “Configuring Clustering” on page 206• “Cluster Management” on page 212• “Configuring the F5 Load Balancer” on page 216• “Queue Replication” on page 217
203

HALO (High Availability and Load Optimization)
204
HALO Overview
HALO (High Availability Load Optimization), is the fail-safe clustering architecture for high availability for the ePrism Email Security Appliance. HALO enables two or more ePrism systems to act as a single logical unit for processing a mail stream while providing load balancing and high availability benefits.
HALO ensures that mail messages are never lost due to security vulnerabilities or individual system failures. The clustering architecture is illustrated in the following diagram.
Cluster Management
The ePrism systems participating in the cluster will be grouped together by connecting a network interface to a separate network called the Cluster Network. The ePrism systems will communicate clustering information with each other via this network. Systems can also be added or removed from clusters without interruption to mail services. It is recommended that all systems in the cluster should be running on the same platform (e.g., ePrism M3000), and that the cluster network beseparated from the main production network.
One system is configured to be the Cluster Console which is the "master" system where all cluster administration and configuration will be performed. When an ePrism system is added to the cluster, its configuration will automatically be synchronized with the Cluster Console. Any changes to the configuration on the Cluster Console will also be replicated to every cluster member.
The ePrism cluster will be treated as a logical unit for processing mail and system configuration.
Note: Clustered systems do not support ePrism Mail Client/WebMail, and Secure WebMail proxy.

HALO Overview
Load Balancing
Although the ePrism cluster will be treated as one system, email is processed independently by each cluster member, and requires the use of a load balancing system to distribute mail flow between the systems in the cluster.
Load Balancing via DNS
A DNS round-robin technique can be used to distribute incoming SMTP connections via DNS to the systems in the cluster, as shown in the following example MX records:
example.com IN MX 10 mail1.example.com
example.com IN MX 10 mail2.example.com
Priority can be given to specific servers by configuring different priority values, as follows:
example.com IN MX 5 mail1.example.com
example.com IN MX 10 mail2.example.com
Using a Load Balancer
You can also use a hardware load balancing device, such as the F5 BIG-IP, Cisco, or other similar load balancer. The load balancer is configured to send the mail stream to systems in a cluster. If one of the systems fails, the load balancer will automatically detect this event and distribute the load between the remaining systems.
The load balancer can be configured to distribute the mail stream connections intelligently across all systems in the cluster, using techniques such as round-robin, and distribution by system load and availability.
205
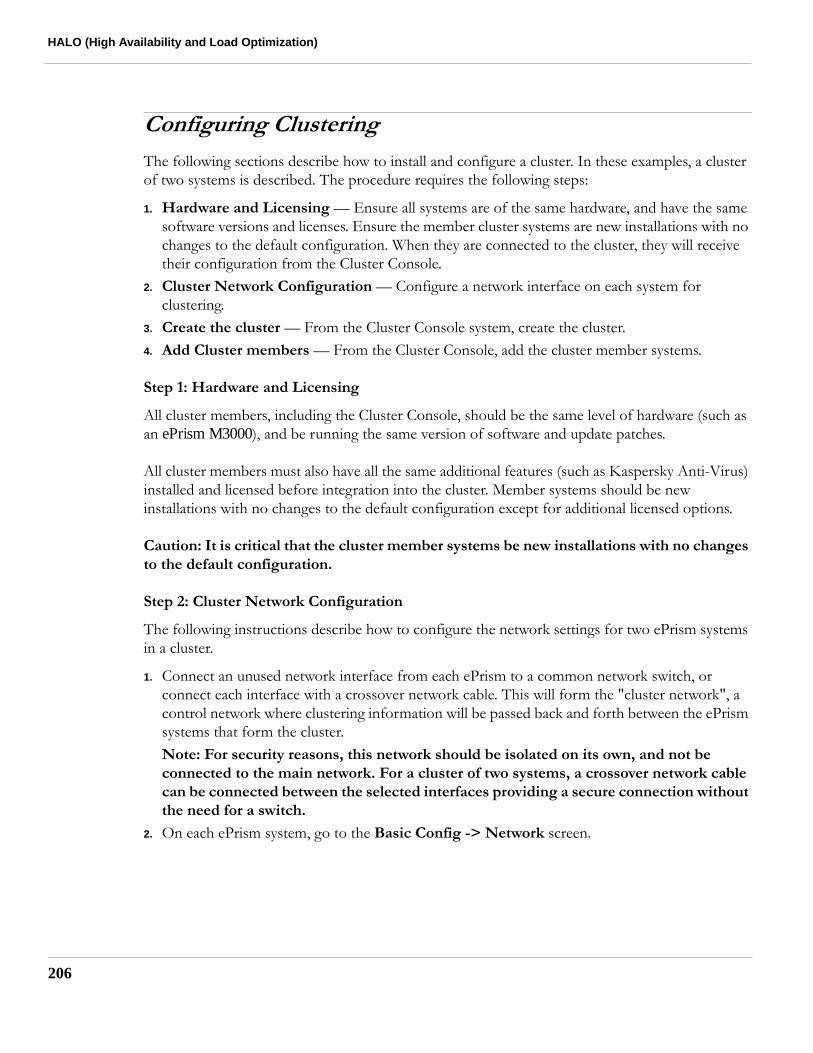
HALO (High Availability and Load Optimization)
206
Configuring Clustering
The following sections describe how to install and configure a cluster. In these examples, a cluster of two systems is described. The procedure requires the following steps:
1. Hardware and Licensing — Ensure all systems are of the same hardware, and have the same software versions and licenses. Ensure the member cluster systems are new installations with no changes to the default configuration. When they are connected to the cluster, they will receive their configuration from the Cluster Console.
2. Cluster Network Configuration — Configure a network interface on each system for clustering.
3. Create the cluster — From the Cluster Console system, create the cluster.4. Add Cluster members — From the Cluster Console, add the cluster member systems.
Step 1: Hardware and Licensing
All cluster members, including the Cluster Console, should be the same level of hardware (such as an ePrism M3000), and be running the same version of software and update patches.
All cluster members must also have all the same additional features (such as Kaspersky Anti-Virus) installed and licensed before integration into the cluster. Member systems should be new installations with no changes to the default configuration except for additional licensed options.
Caution: It is critical that the cluster member systems be new installations with no changes to the default configuration.
Step 2: Cluster Network Configuration
The following instructions describe how to configure the network settings for two ePrism systems in a cluster.
1. Connect an unused network interface from each ePrism to a common network switch, or connect each interface with a crossover network cable. This will form the "cluster network", a control network where clustering information will be passed back and forth between the ePrism systems that form the cluster. Note: For security reasons, this network should be isolated on its own, and not be connected to the main network. For a cluster of two systems, a crossover network cable can be connected between the selected interfaces providing a secure connection without the need for a switch.
2. On each ePrism system, go to the Basic Config -> Network screen.
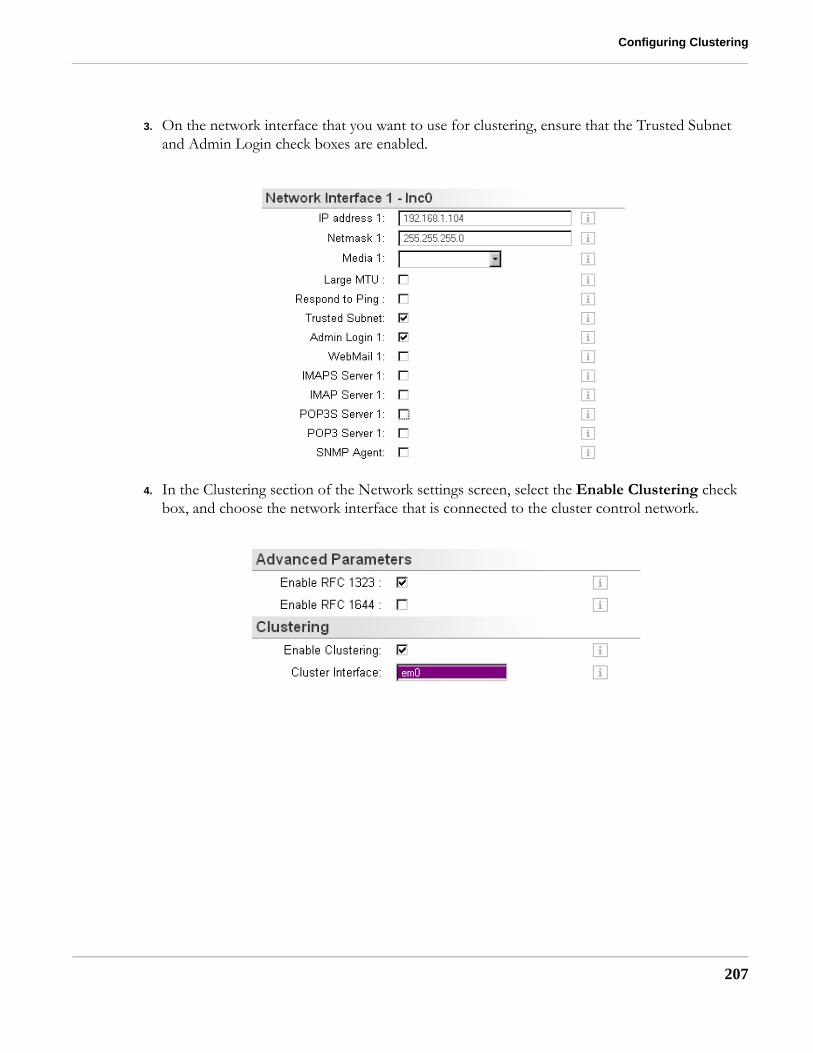
Configuring Clustering
3. On the network interface that you want to use for clustering, ensure that the Trusted Subnet and Admin Login check boxes are enabled.
4. In the Clustering section of the Network settings screen, select the Enable Clustering check box, and choose the network interface that is connected to the cluster control network.
207

HALO (High Availability and Load Optimization)
208
Step 3: Creating the Cluster
The following instructions describe how to create the cluster and initialize the Cluster Console system.
1. Select HALO -> Cluster Administration from the menu. Before continuing, ensure that this is the system that you want to be the Cluster Console system.
2. Click the Configure button to start the cluster configuration process.3. The system will prompt you for information on setting up the cluster. First, you must enter the
admin user and password for the system that will be configured as the Cluster Console.
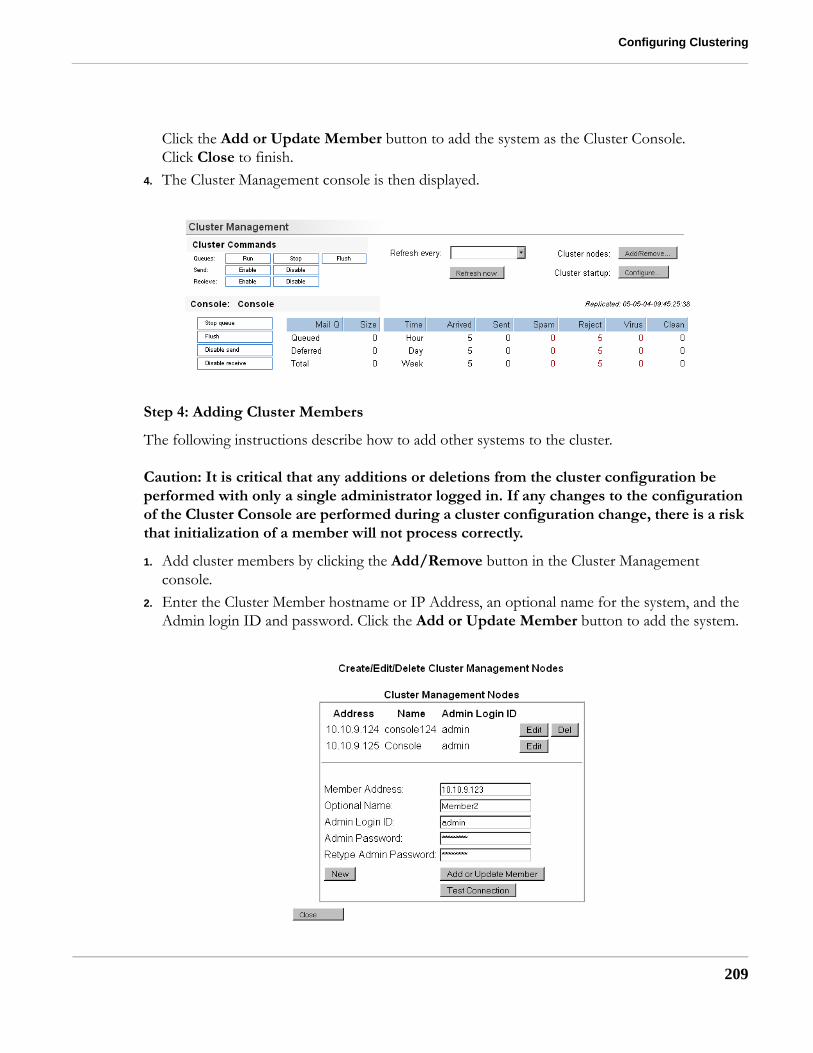
Configuring Clustering
Click the Add or Update Member button to add the system as the Cluster Console. Click Close to finish.
4. The Cluster Management console is then displayed.
Step 4: Adding Cluster Members
The following instructions describe how to add other systems to the cluster.
Caution: It is critical that any additions or deletions from the cluster configuration be performed with only a single administrator logged in. If any changes to the configuration of the Cluster Console are performed during a cluster configuration change, there is a risk that initialization of a member will not process correctly.
1. Add cluster members by clicking the Add/Remove button in the Cluster Management console.
2. Enter the Cluster Member hostname or IP Address, an optional name for the system, and the Admin login ID and password. Click the Add or Update Member button to add the system.
209

HALO (High Availability and Load Optimization)
210
3. When systems are added to a cluster, the configuration of the Cluster Console system is replicated automatically to the new cluster member. This process will take some time to complete, and the Cluster Management screen will indicate that the cluster member is initializing.
Caution: It is critical that no other configuration changes are made to the Cluster Member or Cluster Console while the member is initializing.
When a system is added to the cluster, the configuration of the Cluster Console is replicated to the new node with the following exceptions:
• Networking settings such as host name and IP address, and network interface specific settings• Local users and any WebMail related information• Any reporting related information• Centralized management information• STA databases• Vacation notification related information is only partially replicated
4. When the initialization of the member is complete, the Cluster Management console will appear, showing both the Cluster Console and the new cluster member.

Configuring Clustering
Troubleshooting Cluster Initialization
The following table describes common issues that occur when configuring a cluster.
TABLE 1. Troubleshooting Cluster Initialization
Issue Solution
Blank 'Address' field when setting up the cluster console.
The interface has not been correctly initialized.
Go to Basic Config -> Network and scroll down to the Clustering section. Select the Cluster Interface, click Update, and reboot.
Connection check fails The interface on the Console may not be configured correctly.
The target cluster member machine is not running or the interface on the target node is not configured correctly.
The hardware or software of the cluster sub-net may not be configured correctly.
Very slow to display the initialization screen in the console window for a new cluster member.
Check the cluster subnet between the Console and the target cluster member.
Try clicking the Refresh now button on the Console screen.
211

HALO (High Availability and Load Optimization)
212
Cluster Management
The Cluster Management screen, shown below, is accessed on the Cluster Console via HALO -> Cluster Administration, and shows mail processing statistics for each individual cluster member. All cluster management and configuration must be performed from the Cluster Console system. Any configuration changes made to the Cluster Console are automatically replicated to the cluster member servers.
Cluster Commands
The following commands can be performed for the entire cluster or for individual cluster member systems:
• Queues — Select the appropriate button to Run, Stop, and Flush the mail queues.• Send — You can Enable or Disable the sending of mail from the cluster or specified system.• Receive — You can Enable or Disable the receiving of mail for the cluster or specified system.
Activate/Deactivate Members
When member systems are added to a cluster, they are assigned an active state to process mail for the cluster. If you need to take this system out of the cluster for maintenance purposes, they can be temporarily deactivated from the cluster by using the Deactivate button. A deactivated cluster member is still monitored, and can process mail, but its configuration will not be synchronized with the Cluster Console. The state of the email queue is not changed when a cluster member is deactivated.

Cluster Management
The Cluster Console itself cannot be deactivated. To perform maintenance on the Cluster Console, you must deactivate all cluster members individually. This, in effect, deactivates the entire cluster. When your maintenance is completed, reactivate each cluster member.
To reactivate a disabled cluster member, click the Activate button. Activating a cluster member will synchronize its configuration information by comparing the last time of replication and update the system with the configuration from the Cluster Console. A complete resynchronization will be required if the replication times do not exactly match.
A cluster member will be deactivated automatically if the Cluster Console is unable to communicate with it, and an alarm will be issued when this occurs. Email processing is not affected by this deactivation.
Start-Up Configuration
Click the Configure button to select then an action to perform when a cluster member system restarts.
• Wait for Console — The cluster member, after a restart, will wait until it contacts the Cluster Console system and synchronizes before processing mail. The system will try to contact the console for five minutes before starting without synchronization.
• Start immediately — The cluster member will start immediately without contacting and synchronizing its configuration with the Cluster Console system.
213

HALO (High Availability and Load Optimization)
214
Cluster Activity
When a cluster is activated, a new Cluster Activity option appears on the Activity menu, and provides an activity screen displaying the combined activity of all cluster members. To see the activity for just the current system, use the Activity option from the menu.
Cluster Reporting
ePrism reports can be generated for a single system or for all systems in a cluster. The email database can also be searched on a single system or on the entire cluster. The history and status of any message can be instantly retrieved regardless of which system processed the message. See “Viewing and Generating Reports” on page 222 for more information on cluster reporting.
Configuring a New Cluster Console
If you need to assign the Cluster Console role to another system in the cluster, you must login to the cluster member you would like to use as the Cluster Console and reconfigure the cluster from the HALO -> Cluster Administration menu. This will essentially deactivate the entire cluster, and you must add the cluster members again to the cluster once the new Cluster Console is initialized.
Backup and Restore
You should configure the backup for a cluster member with a unique backup directory for each cluster system, including the Cluster Console. Separate backup directories are required to ensure that backups do not inadvertently overwrite the backup from another cluster system.
Restoring from a backup is primarily intended for product recovery after a re-installation or software upgrade. Restoring clustered systems can potentially cause problems with cluster configuration and communication, and it is recommended that you use the following procedures when restoring a member of a cluster system.
See “Backup and Restore” on page 189 for more detailed information on the backup and restore process.
Restoring a Cluster Member
Use the following procedure to perform a restore on a cluster member system (not the Cluster Console):
1. From the Cluster Console, remove the member system from the cluster.2. Disconnect the member system from the cluster network via the network cable.3. Perform the restore procedure, but only restore Quarantined mail, SSL Certificates, STA,
and Reporting Data (optional). The member will automatically synchronize the rest of its configuration with the Cluster Console when it is reintegrated with the cluster.

Cluster Management
4. When the system is restored, disable clustering on the cluster network interface in Basic Config -> Network. Click the Update button but do not reboot.
5. Re-enable clustering on the network interface. Ensure that the specified interface is the one connected to the cluster network. Click the Update button but do not reboot.
6. Connect the member system’s network cable to the cluster network.7. From the Cluster Console, add the system back into the cluster.
Restoring the Cluster Console
On each cluster member system, (not the Cluster Console) clear the cluster configuration as follows:
1. Disable clustering on the cluster network interface of each cluster member in Basic Config -> Network. Click the Update button but do not reboot. Re-enable clustering on the network interface. Ensure that the specified interface is the one connected to the cluster network. Click the Update button but do not reboot.
2. Disconnect the Cluster Console from the cluster network via the network cable.3. On the Cluster Console, perform a full restore of all configuration items.4. When the restore is complete, go to the cluster configuration screen in HALO -> Cluster
Administration, and remove all cluster members from the cluster.5. Reconnect the Cluster Console to the cluster network.6. Reconfigure the cluster and add the other systems as cluster members.
215

HALO (High Availability and Load Optimization)
216
Configuring the F5 Load Balancer
As part of ePrism’s clustering solution, you can use the BIG-IP F5 iControl load balancer to control traffic to your clustered systems. ePrism includes a configuration screen where you can configure the BIG-IP load balancer via the iControl administrative connection.
This integration allows you to configure and communicate the ePrism cluster system nodes directly to the BIG-IP device. Information on email content and traffic load can be communicated directly with the load balancer, resulting in intelligent failover decisions.
Note: See the BIG-IP documentation for more information on configuring the load balancer.
Select HALO -> F5 Integration from the menu to configure the BIG-IP load balancer.
Click the Config button to setup a new F5 configuration.
• BIG/IP Enabled — Select the check box to enable management of the BIG/IP load balancer with iControl.
• BIG/IP IP Address — Specify the IP address of the BIG/IP system used for iControl administrative access.
• Login — Enter the login ID used to configure the load balancer.• Password — Enter the password for the login ID above.• Pool — Specify the name of the load balancing pool used for mail flow for the ePrism cluster.
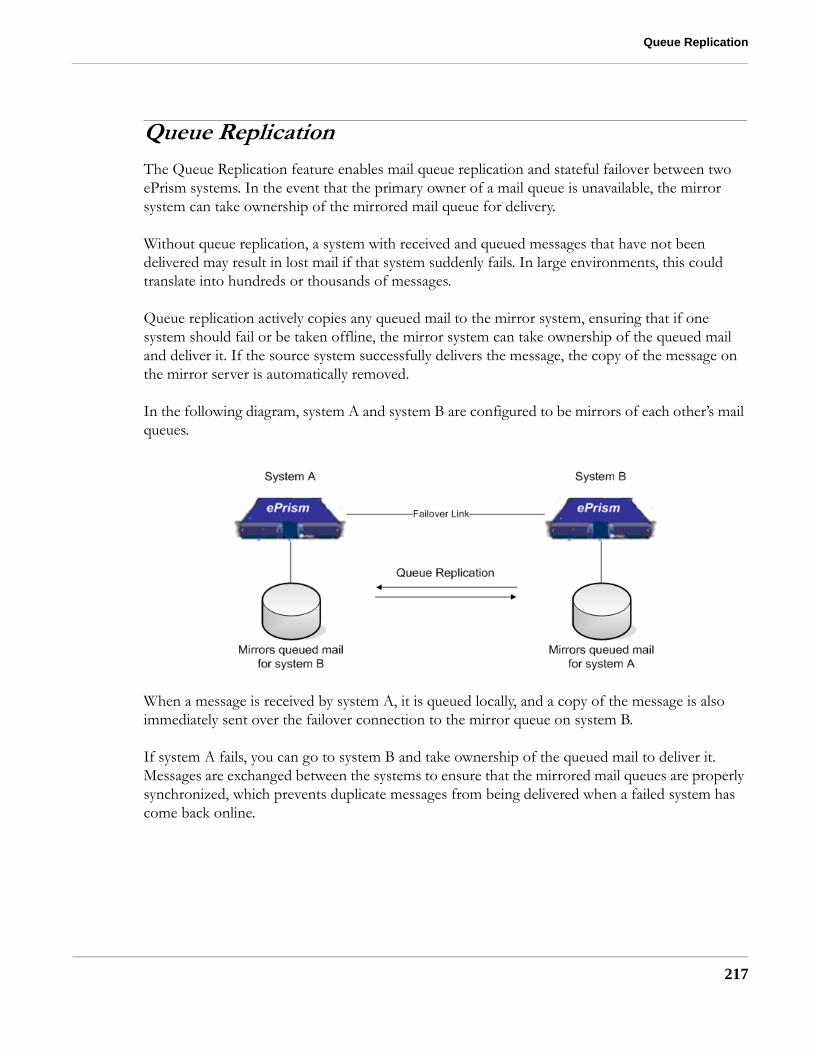
Queue Replication
Queue ReplicationThe Queue Replication feature enables mail queue replication and stateful failover between two ePrism systems. In the event that the primary owner of a mail queue is unavailable, the mirror system can take ownership of the mirrored mail queue for delivery.
Without queue replication, a system with received and queued messages that have not been delivered may result in lost mail if that system suddenly fails. In large environments, this could translate into hundreds or thousands of messages.
Queue replication actively copies any queued mail to the mirror system, ensuring that if one system should fail or be taken offline, the mirror system can take ownership of the queued mail and deliver it. If the source system successfully delivers the message, the copy of the message on the mirror server is automatically removed.
In the following diagram, system A and system B are configured to be mirrors of each other’s mail queues.
When a message is received by system A, it is queued locally, and a copy of the message is also immediately sent over the failover connection to the mirror queue on system B.
If system A fails, you can go to system B and take ownership of the queued mail to deliver it. Messages are exchanged between the systems to ensure that the mirrored mail queues are properly synchronized, which prevents duplicate messages from being delivered when a failed system has come back online.
217

HALO (High Availability and Load Optimization)
218
Licensing
HALO Queue Replication must be licensed to use it beyond the evaluation period. See “License Management” on page 184 for more information on licensing optional components.
Configuring Queue Replication
Select HALO -> Queue Replication from the menu to configure queue replication.
• Enable Queue Replication — Select the check box to enable queue replication on this system. Replication must be enabled on both the source and mirror hosts in the Basic Config -> Network screen.
• Replication Timeout —Specify the time, in seconds, to contact the host system before timing out.
• Replicate to Host — The mail queues are automatically updated when a message is first received, and the queues are also synchronized at regular intervals. Press this button to replicate the queue to the mirror host system immediately.
• Mirrored Messages — This value indicates the current amount of queued mail that is mirrored on this ePrism.
• Purge Mirrored Messages — Select this button to delete any mail messages in the local mirror queue. These are the files that we are mirroring for another host server.
• Deliver Mirrored Messages — Select this button to take ownership and process the mail that we are mirroring for another source system. If the server is still alive, importing and processing the mirror queue may result in duplicate messages being delivered.Caution: Do not press this button unless you are certain that the source system is unable to deliver mail.
• Review Mirrored Messages — Select this button to review any mail in the local mirror queue that we are mirroring for another source server.

Queue Replication
Queue Replication Interface
You must also enable queue replication on a network interface on both the host and client server.
Select Basic Config -> Network from the menu, and then scroll down to the Queue Replication section.
• Enable Replication — Select the check box to enable queue replication on this system.• Replication Host — Specify the IP address of the system that will be backing up mail for this
ePrism.• Replication Client — Specify the IP address of the system that will be backing up its mail
queue to this ePrism.• Replication I/F — Select the network interface to use for queue replication. This network
interface should be connected to a secure network. It is recommended that queue replication and clustering functions be run on their own dedicated subnet.Note: If you are backing up and restoring configuration information to a different system than the original, and queue replication is enabled, you will have to reconfigure Queue Replication to ensure that it will work properly.
219

HALO (High Availability and Load Optimization)
220
Importing and Processing Mirrored Messages
If you have two systems that are mirroring each other’s mail queues and one of those systems fails, you must go to the mirror server and import the mirrored mail to ensure that it is processing and delivered.
Import the mirrored messages as follows:
1. Ensure that the host server has failed. Before importing any mirrored mail, you must ensure that the host server is not working. If you import and process the mirrored mail on the mirror server, this may result in duplicate messages if the host server starts functioning again.
2. On the mirror server, select HALO -> Queue Replication from the menu.
3. You may wish to view the current mirrored my mail by clicking the Review button.4. Click the Deliver button. This ePrism will take ownership of any queued mail mirrored from
the source server, and process and deliver it.

CHAPTER 12 Reporting
This chapter describes the reporting features of the ePrism Email Security Appliance and contains the following topics:
• “Viewing and Generating Reports” on page 222• “Viewing the Mail History Database” on page 231• “Viewing the System History Database” on page 234• “Report Configuration” on page 237
221

Reporting
222
Viewing and Generating Reports
ePrism’s reporting functionality provides a comprehensive range of informative reports for the ePrism Email Security Appliance, including:
• Traffic Summary• System Health• Top Mailbox Disk Users• WebMail Usage• POP and IMAP Access• DCC and RBL Lookup Performance• Spam Statistics• Virus Reports
The reports are derived from information written to the various systems logs which is then stored in the database. Reports are stored on the system for online viewing, and can also be emailed automatically to specified users. Reports can be generated on demand and at scheduled times. Reports can also be filtered to provide reporting on only mail domains, user groups, or specific hosts.
Administrators can specify which data is to be included in each report, how it is to be displayed, the order of data, and the number of entries to report, such as "Top 10 Disk Space Users".
Reports can be generated in four different formats: HTML, PDF, CSV (comma separated output) and Postscript format.

Viewing and Generating Reports
Reporting Menu
To generate and view reports, select Status/Reporting -> Reporting.
To view a previously generated report, click on the report name. To configure a report, click on the Configure button beside the corresponding report name. Click Generate to immediately generate the specified report.
Viewing Reports
To view a report, click on the report name, such as Full Report.
223
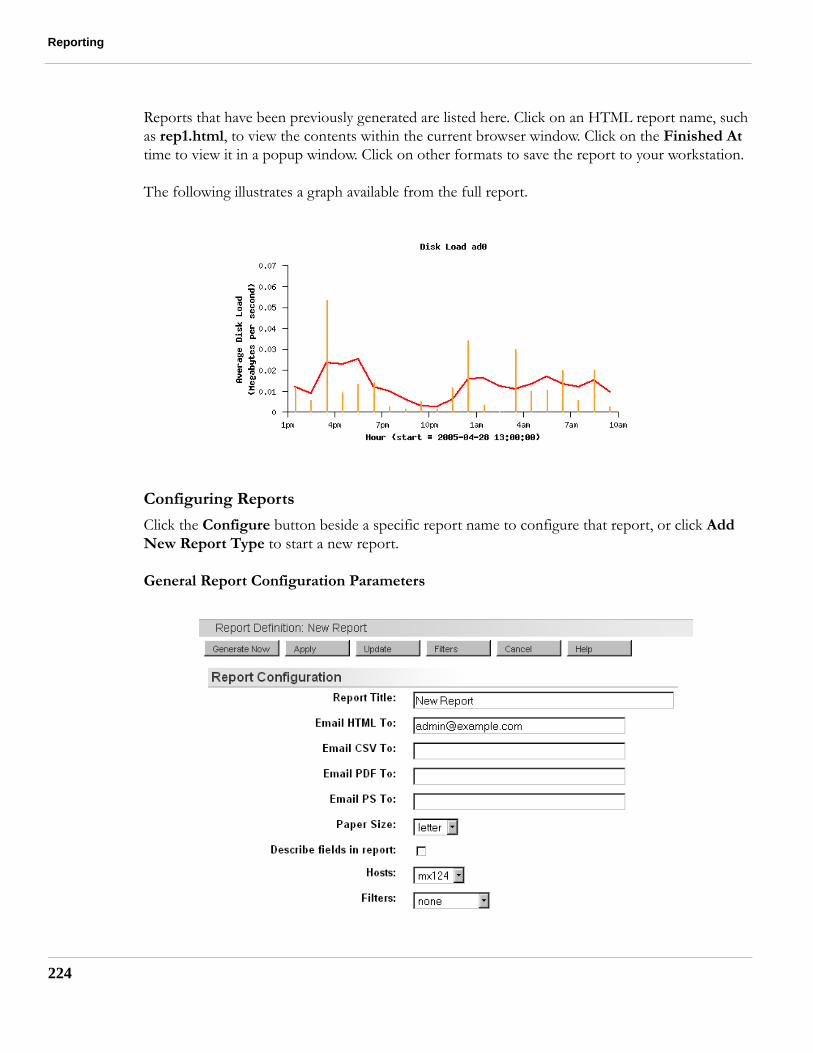
Reporting
224
Reports that have been previously generated are listed here. Click on an HTML report name, such as rep1.html, to view the contents within the current browser window. Click on the Finished At time to view it in a popup window. Click on other formats to save the report to your workstation.
The following illustrates a graph available from the full report.
Configuring Reports
Click the Configure button beside a specific report name to configure that report, or click Add New Report Type to start a new report.
General Report Configuration Parameters
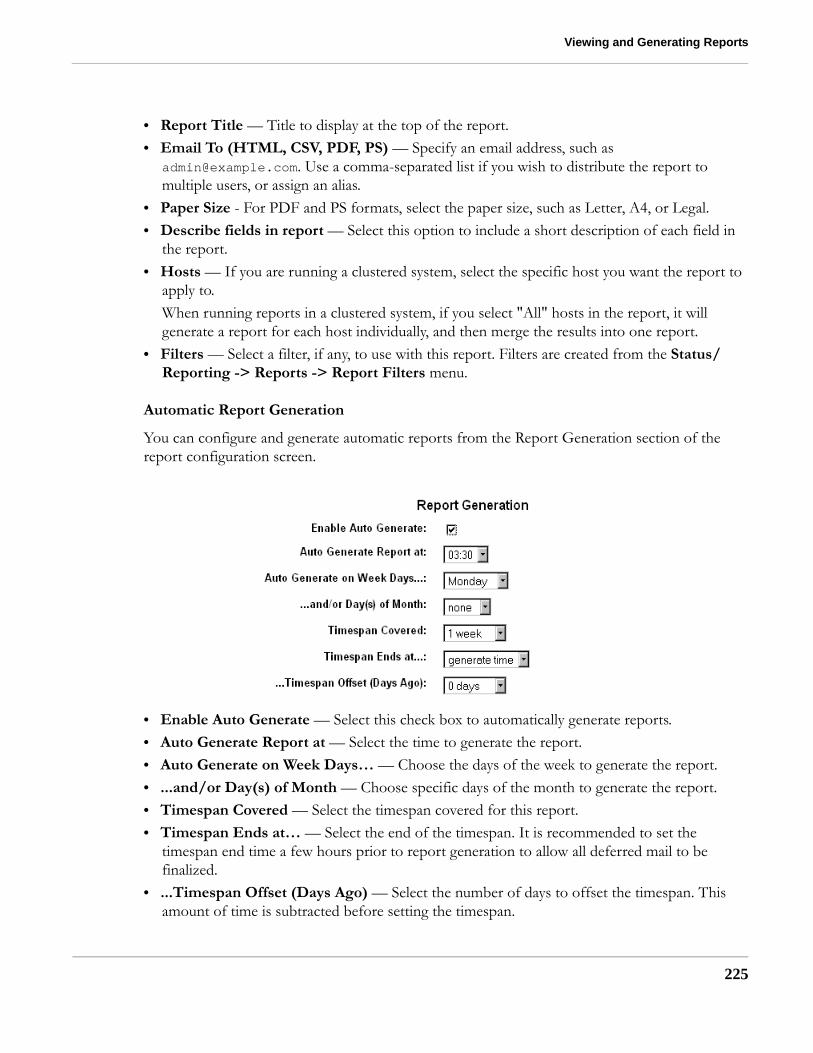
Viewing and Generating Reports
• Report Title — Title to display at the top of the report.• Email To (HTML, CSV, PDF, PS) — Specify an email address, such as
[email protected]. Use a comma-separated list if you wish to distribute the report to multiple users, or assign an alias.
• Paper Size - For PDF and PS formats, select the paper size, such as Letter, A4, or Legal.• Describe fields in report — Select this option to include a short description of each field in
the report.• Hosts — If you are running a clustered system, select the specific host you want the report to
apply to. When running reports in a clustered system, if you select "All" hosts in the report, it will generate a report for each host individually, and then merge the results into one report.
• Filters — Select a filter, if any, to use with this report. Filters are created from the Status/Reporting -> Reports -> Report Filters menu.
Automatic Report Generation
You can configure and generate automatic reports from the Report Generation section of the report configuration screen.
• Enable Auto Generate — Select this check box to automatically generate reports.• Auto Generate Report at — Select the time to generate the report.• Auto Generate on Week Days… — Choose the days of the week to generate the report.• ...and/or Day(s) of Month — Choose specific days of the month to generate the report.• Timespan Covered — Select the timespan covered for this report.• Timespan Ends at… — Select the end of the timespan. It is recommended to set the
timespan end time a few hours prior to report generation to allow all deferred mail to be finalized.
• ...Timespan Offset (Days Ago) — Select the number of days to offset the timespan. This amount of time is subtracted before setting the timespan.
225

Reporting
226
Click the Generate Now button to generate a report on demand using the specified settings. This will also automatically email the report to the specified address.
To generate a report daily at 2.00am for the previous day (up to 11:00pm):
Auto Generate Report at: 02:00 Auto Generate on Week Days: All Timespan covered: 1 day Timespan ends at: 23:00 Timespan offset: 0 days
To generate weekly reports on Sunday at 4:00am for the period ending Friday 11:00pm:
Auto Generate Report at: 04:00 Auto Generate on Week Days: Sunday Timespan covered: 1 week Timespan ends at: 23:00 Timespan offset: 1 day ago
Report Fields
The Fields section allows you to choose which fields or items of information you wish to include in the report. The fields provided are static, and the standard reports use fields pre-selected from this list to satisfy certain requirements. You can include or exclude fields to any one of the reports as required.
Columns
• Included — Select the check box to include a field.• Field ID — This is the ePrism name for this item.• Title in Report — Designate a title to appear in the report.• Order — The higher the value, the higher the field will appear in the report. Any number can be
chosen to position the fields as needed.

Viewing and Generating Reports
• Page Break — Choose between no, before, after, and both, to configure page breaks. This option only applies to PDF and PS format reports.
• Limit — Set a limit for the number of items in a field. For example, enter "10" in the top viruses field to create a "Top Ten Virus List".
Field Descriptions
The following table describes the fields that appear in the report. Brief descriptions of each field can be included in the report by configuring it in the general report parameters.
TABLE 1. Reporting Field Descriptions
Field Description
System name The system host name, such as mxtreme.example.com.
Date time Date and time of report generation.
Version ePrism software revision.
Timespan Period covered by report.
Uptime How long the ePrism system has been running since the last reboot.
Filter summary A summary of the filters applied to this report.
Head comment Freeform comment that you may enter.
Traffic blocking A table showing the number of messages caught by each method over the preceding hour, day, week, month, and report timespan.
Blocking pie chart A pie chart of the same data as the right hand column of Traffic Blocking (timespan).
Total traffic Received Graphs of the number of messages received per hour over the reporting period (timespan).
Total traffic sent Graphs of the number of messages sent per hour over the reporting period (timespan).
Total received message size Total message size of incoming messages per hour.
Total sent out message size Total message size of outgoing messages per hour.
Trust traffic A table showing the number of messages classified as "trusted" and "untrusted" and their disposition over the reporting period.
Processing time The average time a message waits between initial handshake and disposition, including RBL/DCC lookups if any. Messages that are deferred are not included.
Spam metrics Graph of the number of messages per STA assigned spam metric (0 - 100).
Top virus List of the top viruses found.
Recent virus list List of the most recent viruses found.
Top PBMFs List of the top pattern based message filters.
Top forbidden attachments List of the top forbidden attachments caught by attachment control.
227

Reporting
228
Recent forbidden attachments List of the most recent forbidden attachments caught by attachment control.
Disk usage Shows disk usage by partition.
Disk load Graph of average disk load (MB/s) over the reporting period.
CPU load Graph of average CPU load (number of waiting processes) over the reporting period.
NIC load Graph for each active network interface load (Bytes/hour) for the reporting period.
Swap usage Swap file usage.
Paging Paging usage.
Top mailbox sizes Lists the top users based on the size of their mailboxes in MB.
Webmail The number of WebMail logins and failed attempts per hour. This does not include "admin" logins.
POP Graph showing the number of POP logins and login failures per hour over the reporting period.
IMAP Graph showing the number of IMAP logins and login failures per hour over the reporting period.
Active mail queue Graph showing number of queued messages (as sampled every 5 minutes) over the reporting period.
Deferred mail queue Graph showing maximum number of messages (as sampled every 5 minutes) in the deferred queue over the reporting period.
Top senders The top sender (judged by envelope from, not header from) during the report timespan, sorted by number of messages. If the title contains one or more comma characters, the list will be restricted to those senders which include any string after the first comma. The limit parameter in the report configuration sets the maximum number listed.
Top sending hosts The top sending host names (in FQDN format) during the report timespan, sorted by number of messages. If the title contains one or more comma characters, the list will be restricted to those sender FQDNs which include any string after the first comma. The limit parameter in the report configuration sets the maximum number listed.
Top recipients The top recipients during the report timespan, sorted by number of messages. The sum of the message sizes is also listed. If the title contains one or more comma characters, the list will be restricted to those recipients which include any string after the first comma. The limit parameter in the report configuration sets the maximum number listed.
DCC Servers Graph showing the average round trip, in seconds, to the preferred DCC server over the reporting period.
TABLE 1. Reporting Field Descriptions
Field Description

Viewing and Generating Reports
Language support
Any text field in the report configuration can use Western (ISO-8859-1) text. For extended characters (such as accented letters), configure your browser for Western (ISO-8859-1) and set the character set encoding in Basic Config -> Web Server. You can then use your language specific keyboard or copy and paste ISO-8859 text into the report configuration fields.
RBL Servers Graph showing the round trip, in seconds, to the RBL servers over the reporting period. The value is averaged over all enabled RBL servers.
End comment Comment text.
Extra comment Extra comment text.
TABLE 1. Reporting Field Descriptions
Field Description
229

Reporting
230
Creating Report Filters
You can create custom filters to apply when generating reports. When a filter is selected in the report configuration editor, the applicable report fields are restricted to those values that include any string in the supplied list. You can filter by mail domain, user groups, and specific hosts. Filters for specific viruses, encryption, and attachments types can also be created.
Field values can be separated by a space or by starting a new line. Leave a field blank for no filtering. For domains and email addresses, wildcard characters can be used, such as:
*@example.com joe@*.example.com fred@*example*
Select Status/Reporting -> Reporting -> Report Filters to create and edit report filters.
You can filter on the following fields:
• Sender domain or email address • Recipient domain or email address• Sending host name or IP• Encryption from Sender• Encryption to Recipient

Viewing the Mail History Database
• Sender groups• Recipient groups• Virus• Forbidden Attachment
Viewing the Mail History DatabaseEvery message that passes through ePrism generates a database entry that records information about how it was processed, including a detailed journal identifying the results of the mail processing.
Select Status/Reporting -> Reporting -> Mail History to view the email database.
Columns
• QueueID — Identifies the message in the database.• Time Received — Time when the message was received by ePrism.• Subject — Contents of the message subject header field.• Prior — If a message is forwarded because of alias expansion, bounced, vacation notification,
and so on, a new message in the queue will be created. The QueueID number in the Prior column links to the original message.
• Journal — Shows how the message was processed, including its disposition.• Auth — Shows SMTP authentication information.
231

Reporting
232
Search
Search for specific message details using the following search fields:
• Search - Select the specific part of the message you want to search on, such as "sender" or "subject".
• For - Enter a search string. Use a blank field to match any string.
Advanced Search
Select the Advanced button to perform an advanced search of the email database.
• Search — Select the specific part of the message you want to search on, such as "sender" or "subject". Use the "and" fields to select an additional message part and search string.
• Date — You can select a time frame to search for received, disposed, or deferred mail.• Status — Select a message status to search for, such as "malformed", or "virus".• Hosts — In a clustered system, you can specify a specific host to perform the search on.• Max — Enter the maximum number of results (up to 10,000) returned in the search.• Regex — Select this option to define a search using a regular expression.
After performing a search, you can enter more criteria and use the Refine button to search only within the previous results.

Viewing the Mail History Database
Displaying Message Details
Click on a QueueID number to view the details of a message. Dispositions and deferrals, if any, are listed in the Message Disposition section.
233

Reporting
234
Viewing the System History Database
Select Status/Reporting -> Reporting -> System History to view the system database. The system database is a record of system events, such as login failures and disk space usage.
Search
Enter any text to search for an event. You can specify the type of message to narrow the search. Leave the text area blank to list by event type.
Columns
• Event# — Identifies the event in the database.• End Time — Time when the event is complete.• Type — The type of event.• Device, User — The device or user in the event.• Text — Associated text for the event.• #1, #2, #3 — Parameters of the event.

Viewing the System History Database
Event Types
The following table describes the event types that can appear in the system database.
TABLE 2. System Database Event Types
Event Type Abbreviation Description Parameters
Admin Actions adm Shows administrative functions that have been performed
AV Updates avup The time of the last update, its success or failure, and the name of the new pattern file
CPU Load cpuld The load average for the past 1, 5, and 15 minutes
Number of processes waiting for CPU. A very busy system may have 50 or more
DCC Preferred dccpref The round trip time to preferred DCC server
Name of preferred server
Disk I/O diskio MB per second transfer, KB per transfer, transfers per second for a disk
Disk Usage du Amount of used and total available disk space for each disk slice
IMAP I/O impio This shows each IMAP based transfer of email messages
IMAP Logins implin This shows each successful IMAP authentication. If the connection used SSL, the string "ssl" follows in a separate column. Note: IMAP transfers smaller than 50 bytes are not recorded
UserID and IP address
IMAP Failures impfail Shows the number of IMAP login failures.
UserID and IP address
Logins login A single web based login UserID and IP address
Logouts logout A single web based logout (not including timed-out sessions)
UserID and IP address
Login failures lifail Login failure UserID and IP address
Network I/O nic Amount of data in and out of network card
Paging page This shows the swap paging activity (pages in/out) over 5 seconds
POP I/O popio This shows each POP based transfer of email messages
Number of emails and bytes transferred in POP session
POP Logins poplin This shows each successful POP authentication. If the connection used SSL, the string "ssl" follows the IP address
UserID and IP address
235

Reporting
236
POP Failures popfail This shows each POP authentication failure. If the connection used SSL, the string "ssl" follows the IP address
UserID and IP address
Queue Sizes que Number of messages in active and deferred queues
Active queue size in bytes, deferred queue size in bytes
RBL Response rbldns Average round time to RBL server with minimum and maximum values
RBL server
Swap usage swap This shows the swap usage, and total swap space available
Used and available swap space in megabytes
TABLE 2. System Database Event Types
Event Type Abbreviation Description Parameters

Report Configuration
Report ConfigurationSelect Status/Reporting -> Reporting -> Configure to configure the maximum time email summaries, system event summaries, and reports are kept on the system, including the maximum number that are retained.
Email summaries, system events, and reports are included in backups. Each email summary is about 1,000 bytes in size. For performance reasons, such as backup/restores, searches, and so on, it is recommended to keep the email message limits no longer than is required, such as 100,000 messages for an ePrism M1000, 500,000 messages for an ePrism M3000 and so on.
The email message history is trimmed to the expiry date and number limit, whichever is smaller. System events occupy less than 2 MB per day, and a setting of 3 months is reasonable.
The system purges old data every day after 12:00am, and also within a few minutes of saving the settings in this menu. The data is rolled out depending on the date/time and number constraints, whichever is less.
Note: Reports will not be generated while the data is being purged.
237

Reporting
238
Disabling Reporting
The reporting database is populated with information that is obtained by interpreting the system log files. You have the option of disabling reporting, which results in no new information being saved in the reporting database. Note that all log files are still saved, but the reporting engine will not analyze and interpret them for reports.
Disabling reporting is not recommended, and should only be used if the system is extremely overloaded, or if you are testing performance levels.
Click the Advanced button on the Status/Reporting -> Reporting -> Configure screen to reveal an option for disabling the reporting function.
Note: Software upgrades or system restores will re-enable reporting, if disabled.
SQL Logging
For long term storage, you can save all reporting database changes and download the data in SQL format. Click the Enable SQL logging button to start a SQL log.
This log can be accessed via Status/Reporting -> System Logs -> Reporting SQL where they can be examined and downloaded, and then imported to SQL database.

CHAPTER 13 Monitoring System Activity
This chapter describes how to monitor ePrism’s system activity and message processing, and contains the following topics:
• “Activity Screen” on page 240• “System Log Files” on page 242• “SNMP (Simple Network Management Protocol)” on page 245• “Alarms” on page 248
239

Monitoring System Activity
240
Activity Screen
The Activity screen provides a variety of system information and utilities all on one screen, including:
• Mail service stop and start• Mail queue statistics• Queue Activity• System uptime and CPU load• Message details• Recent Mail Dispositions
The following describes the queue statistics columns:
• Arrived — The total number of messages processed by ePrism (messages accepted). These include messages that were spam, viruses, attachment control, and so on.
• Sent — The total number of messages sent by ePrism, including mailer daemon mail, quarantine notifications, mail delivery delay notifications, local mail, alarms, reports, and so on. If a message has multiple recipients, each delivered recipient will be added to the total.
• Spam — The total number of messages considered spam by STA, DCC, and PMBFs with a spam action.
• Reject — The total number of messages rejected because of client hostname/address restrictions, SAP rejects, RBLs, and PMBFs with reject action.

Activity Screen
• Virus — The total number of messages that contained a virus.• Clean — The total number of messages that were accepted for delivery inbound and outbound
by ePrism and passed all security and spam filters.
Show Dispositions
The Mail Received Recently section displays messages that were received by ePrism. Click the Show Dispositions button to show messages that were fully processed by ePrism and their final dispositions.
Cluster Activity
In a clustered system, an additional Cluster Activity screen is displayed that shows the combined activity for all clustered systems.
241

Monitoring System Activity
242
System Log Files
From the Status/Reporting -> System Logs screen you can access the system log files.
The Mail Transport log is the most important log to monitor because it contains a record of all mail processed by ePrism. See “Examining Log Files” on page 254 for more information on interpreting the Mail Transport logs.
Other logs include:
• Authentication — Contains messages from POP, IMAP, and WebMail logins.• Web Server Access — A log of access to the web server.• Web Server Errors — Contains error messages from the web server.• Web Server Encryption Engine — Contains messages for the web server encryption engine.• Web Server Encrypted Accesses — A log of SSL web server access.• Messages — Contains system messages, including file uploads.• Kernel — A log of kernel generated messages.
Note: It is possible that you may receive errors in the kernel logs regarding partition slices. If you your system is installed with a manufacturer’s diagnostics partition, this is the cause of the error and does not indicate a critical condition.
• Archive — This option allows you to view an amalgamation of all the logs.• Reporting SQL — This option appears when SQL logging is enabled in Status/Reporting ->
Reporting -> Configure. The logs can be downloaded in SQL format from this screen.

System Log Files
Viewing and Searching Log Files
Click on a specific log to view its entries. You can search for a particular search string by entering a value in the Search field and then clicking the Refresh/Search button.
The following features can be used to help refine log searches:
• For logical "and" and "or" searches, use the keywords "and", "or", and "not".• Use \and or \or to search for the actual words such as "and" and "or".• Use a preceding / to search using Unix-style regular expressions.
You can also download the log to a text file by using the Download button. You can then import this file into a log analysis application for offline processing.
Note: A maximum of 3MB of data is sent to the browser when viewing a log. If the specified search returns more than that amount, the list is truncated.
243

Monitoring System Activity
244
Configuring a Syslog Server
All of ePrism’s log files can be forwarded to a syslog server, which is a host which collects and stores log files from many sources.
The syslog files can then be analyzed by a separate logging and reporting program.
You can define a syslog host in the Basic Config -> Network screen.

SNMP (Simple Network Management Protocol)
SNMP (Simple Network Management Protocol)Simple Network Management Protocol (SNMP) is the standard protocol for network management. When enabled on ePrism, this feature allows standard SNMP monitoring tools, such as HP Openview, Tivoli, BMC Patrol and CA Unicenter, to connect to the SNMP agent running on ePrism and extract real-time system information.
The information available from the SNMP agent is organized into objects which are described by the MIB (Management Information Base) files. The information available includes disk, memory, and CPU statistics, mail queue information, and statistics on the number of spam or virus-infected emails. An SNMP trap can be sent when the system reboots.
See “SNMP MIBS” on page 283 for detailed information on the objects available in ePrism’s MIB files.
The SNMP agent service is installed and running by default, but it must be enabled specifically for each interface in the Basic Config -> Network screen. It is strongly advised that the agent only be configured for the internal (trusted) network.
245

Monitoring System Activity
246
Configuring SNMP
Select Basic Config -> SNMP Configuration on the menu to configure SNMP.
• Send Trap on Reboot — Enable the check box to send a trap message to your SNMP trap host whenever the system reboots.
• System Contact — (Required) Enter the email address of the contact person for this system.• System Location — (Required) Enter the location of the system.• Read-Only Community — By default, ePrism does not allow read/write access to the SNMP
agent. For read access, you must set up a read-only community string on both the agent, and your SNMP management application for authentication. It is recommended that you change the default community string "public" to a more secure value. Note: The community string is case sensitive.
Permitted Clients
To allow access to ePrism’s SNMP agent, you must specifically add the client system to the list of SNMP Permitted Clients. The clients can be specified using a host name, IP address, or network address (192.168.138.0/24). Typically, you will enter the address of your SNMP management station, such as an HP Openview system. Click Add to add the permitted client.

SNMP (Simple Network Management Protocol)
Trap Hosts
A trap host is an SNMP management station that will be receiving system traps from ePrism. ePrism will send an SNMP trap when the system is rebooted.
Enter a list of hosts that will receive trap messages. The hosts can be specified using a host name or IP address. Click Add to add the trap host.
MIB Files
The SMNP MIB files can be downloaded by clicking the Download MIBs button. These files must be imported into your SNMP management program. The MIB file contains a list of objects representing the information that can be extracted from the system’s SNMP agent.
See “SNMP MIBS” on page 283 for detailed information on the contents of the St. Bernard ePrism Email Security Appliance MIB files.
247

Monitoring System Activity
248
Alarms
ePrism implements a variety of system alarms to notify you of exceptional system conditions. Alarms are currently generated from the HALO, LDAP, and Backup subsystems. For example, you can receive an alarm notification if your daily FTP backup fails, or if you lose communications with a cluster member. Errors with LDAP user imports will also trigger an alarm.
You can select the type of alarm notifications to receive, such as Critical, Serious, and Warning events.
These notifications can be sent via:
• Email• Console Alert• Activity Screen Alert
The following example shows an alarm appearing on the Activity screen. You must click Acknowledge to remove the alarm notification.

Alarms
Configuring Alarms
Select Basic Config -> Alarms on the menu to configure your alarms and notifications.
• Send Escalation Mail — Select the types of alarms that will trigger an email to be sent to the Escalation Mail Address specified below.
• Send Alarm Mail — Select the types of alarms that will trigger an email to be sent to the Alarm Mail Address specified below.
Note: You must have a valid email specified in the Email Addresses section for the alarm email to be sent.
• Alert to Console — Select the types of alarms that will display an alert on the system console screen.
• Alert to Activity Page — Select the types of alarms that will display an alert on the main activity screen.
• Escalation Mail Address — Enter an email address to send escalation emails to.• Alarm Mail Address — Enter an email address to send alarm mails to.
249

Monitoring System Activity
250
System Alarms
The following table describes the current system alarms:
Note: It is recommended that you use SNMP for monitoring of system resources such as disk space and memory usage. See “SNMP (Simple Network Management Protocol)” on page 245 for more information.
TABLE 1. Description of Alarms
Severity Feature Description
Serious FTP Backup FTP Backup Failed [error message]
Serious Clustering Cluster Error connecting to host [member address]
Serious Clustering Cluster Error writing to host [member address]
Serious Clustering Cluster Error closing socket for host [member address]
Serious Clustering Cluster Error Connection to database
Serious Clustering Cluster Error query failed: [query error message]
Serious Clustering Cluster replication Error opening configuration file [file error]
Serious Clustering Error loading cluster configuration file
Serious Clustering Cluster Error loading command at [location in configuration file]
Serious LDAP Import LDAP import, Import of groups failed
Serious LDAP Import LDAP import, Import of users failed
Serious LDAP Import LDAP failed to download users, groups
Critical LDAP Lookup LDAP lookup failed during delivery
Critical LDAP Lookup LDAP lookup: Unable to bind to server [ldaps://xx.xx.xx.xx as cn=user1,cn=users,dc=example,dc=com]: 81 Can't contact LDAP server
Critical LDAP Lookup LDAP lookup: Search error 81: Can't contact LDAP server
Critical Queue Replication Cannot connect to mirror
CHAPTER 14 Troubleshooting Mail Delivery
This chapter describes procedures for troubleshooting mail delivery problems and contains the following topics:
• “Troubleshooting Mail Delivery” on page 252• “Troubleshooting Tools” on page 253• “Examining Log Files” on page 254• “Network and Mail Diagnostics” on page 258• “Troubleshooting Content Issues” on page 263
251
Troubleshooting Mail Delivery
252
Troubleshooting Mail Delivery
When experiencing mail delivery problems, the first step is to examine if the problem is affecting only incoming mail, outgoing, or both. For example, if you are receiving mail, but not sending outgoing mail, it is certain that your Internet connection is working properly, or you would not be receiving mail. In this scenario, you may have issues with the Firewall blocking your outbound SMTP connections, or some other problem preventing mail delivery.
Problems affecting both inbound and outbound delivery include the following scenarios:
• Network infrastructure and Communications — The most common scenario in which you are not receiving or sending mail is if your Internet connection is down. This can include upstream communications with your ISP, your connection to the Internet, or your external router. You should also check your internal network infrastructure to ensure you can contact ePrism from your router or firewall.
• DNS — If your DNS is not working or configured properly, mail will not be forwarded to your ePrism or you will not be able to lookup external mail sites. Check the DNS service itself to see if it is running, and check your DNS records for any misconfiguration for your mail services. Ensure that your MX records are setup properly to indicate the ePrism system.
• Firewall — If you are having issues with your Firewall or if it is misconfigured, it may inadvertently block mail access to and from ePrism. For example, SMTP port 25 must be opened between the Internet and ePrism and internally to allow inbound and outbound mail connections.
• Internal Mail Systems — You may be receiving incoming mail to the ePrism, but mail is not being forwarded to the appropriate internal mail servers. Also, outgoing mail from the internal servers may not be forwarded to ePrism for delivery. In these scenarios, examine your internal mail server to ensure it is working properly. Check communications between the two systems to ensure there are no network, DNS, or routing issues. Also check that your internal servers are configured to send outgoing mail to ePrism.
• External Mail Systems — If you have a large amount of mail to a particular destination, and that mail server is currently down, these messages will queue up in the deferred mail queue to be retried after a period of time. You can view the Mail Transport logs to see the relevant messages that may indicate why you cannot connect to that particular mail server. The server could be down, too busy, or not currently accepting connections.
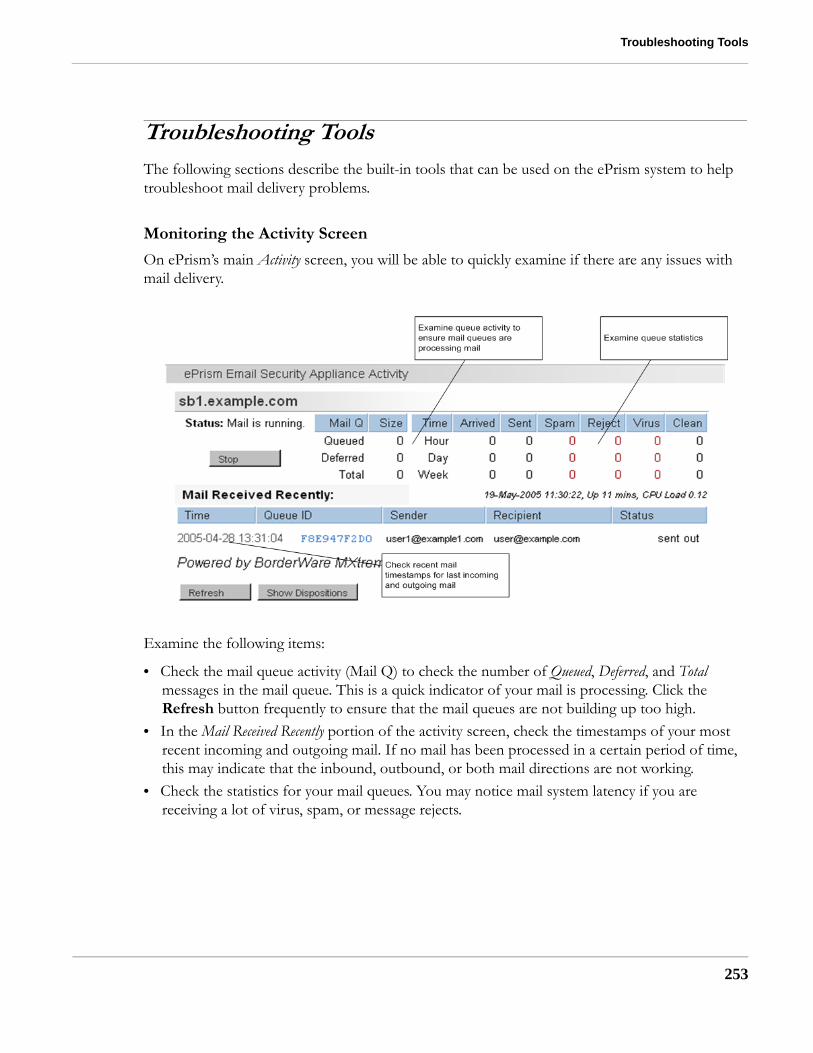
Troubleshooting Tools
Troubleshooting ToolsThe following sections describe the built-in tools that can be used on the ePrism system to help troubleshoot mail delivery problems.
Monitoring the Activity Screen
On ePrism’s main Activity screen, you will be able to quickly examine if there are any issues with mail delivery.
Examine the following items:
• Check the mail queue activity (Mail Q) to check the number of Queued, Deferred, and Total messages in the mail queue. This is a quick indicator of your mail is processing. Click the Refresh button frequently to ensure that the mail queues are not building up too high.
• In the Mail Received Recently portion of the activity screen, check the timestamps of your most recent incoming and outgoing mail. If no mail has been processed in a certain period of time, this may indicate that the inbound, outbound, or both mail directions are not working.
• Check the statistics for your mail queues. You may notice mail system latency if you are receiving a lot of virus, spam, or message rejects.
253

Troubleshooting Mail Delivery
254
Examining Log Files
Examine the system log files in the Status/Reporting -> System Logs screen. The Mail Transport log is the most important, as it provides a detailed description of each message that passes through the system.
The start of a single message log entry begins with a smtpd "connect" message, and ends with the "disconnect" message. To ensure that you are looking at the entries for a specific message, check the message ID, such as 9A51880D88 in the preceding example.
A summary of the actions for this message are included in the log.
Final action: None RBL: off SPF: off Anti-Virus: Kaspersky passed Malformed: no Attachments: passed Message Affirmation: off PBMF: no match DCC: off STA: metric=37, spam=yes, threshold=lower OCF: off
Interpreting Text Log Files
Log files can be downloaded as a text file to allow you to analyze the logs offline. When interpreting Mail Transport log files from the text version, the final message summary appears as a special analysis string. The analysis string contains a list of action codes that are created by the logging engine to create the message summary in the log.

Examining Log Files
For example, the following analysis string is interpreted as follows:
analysis=rSFFFFTUF099000FFFFFFTK000TFT000TF--50000000F1F-FF
Final action: Redirect, STA Upper RBL: off SPF: off Anti-Virus: Kaspersky passed Malformed: no Attachments: passed Message Affirmation: off PBMF: no match DCC: off STA: metric=99, spam=yes, threshold=upper OCF: off
The following table describes each character in the analysis string.
TABLE 1. Analysis Code Descriptions
Analysis Code Description Possible Values
r Final Action (Redirect) D - Reject A - Accept V - Valid S - Spam T - Trust R - Relay H - Modify Header h - Add Header Q - Quarantine d - Discard Mail L - Just Log B - Bounce Mail r - Redirect C - BCC z - Temporary Reject - None
S Final Action Code (S - STA Upper)
W - PBMF w - Trusted Senders List D - DCC S - STA Upper s - STA Lower V - Anti-virus C - Attachment Control M - Malformed R - RBL F - OCF X - Crash (insufficient data) O - Relay - None
F Notify Sender? (False) T - True, F - False
F Notify Recipient? (False) T - True, F - False
F Notify Admin? (False) T - True, F - False
F Notify Other? (False) T - True, F - False
255
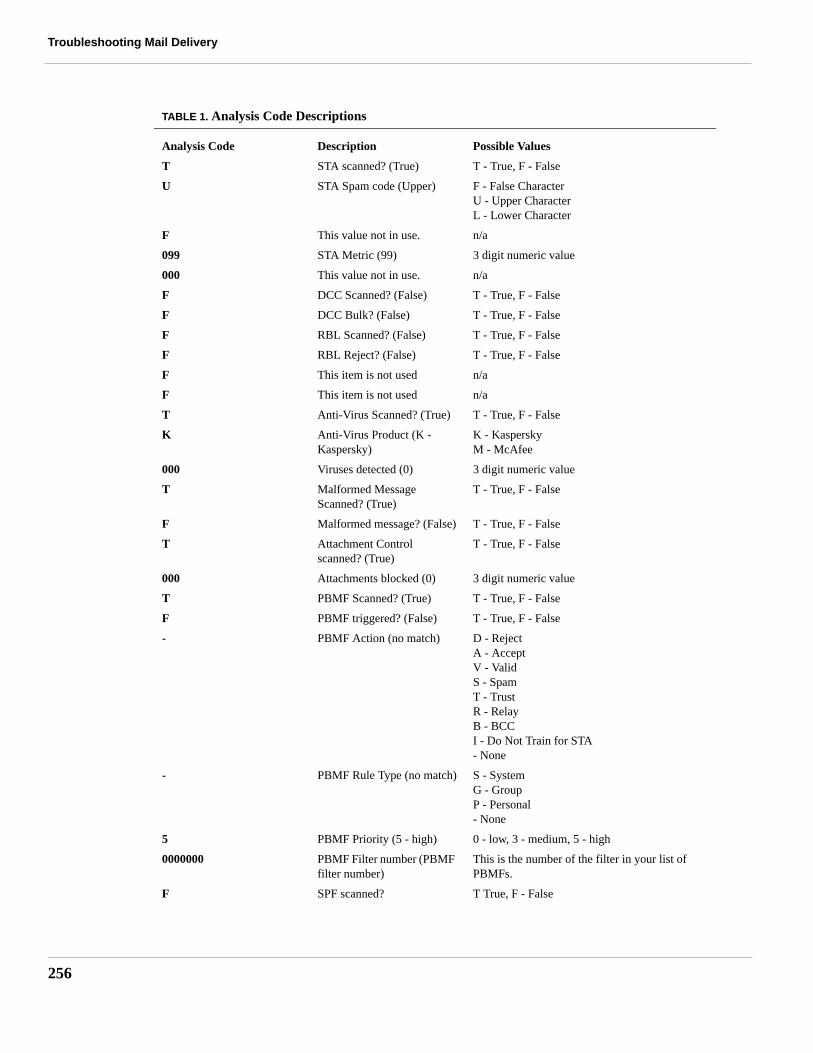
Troubleshooting Mail Delivery
256
T STA scanned? (True) T - True, F - False
U STA Spam code (Upper) F - False Character U - Upper Character L - Lower Character
F This value not in use. n/a
099 STA Metric (99) 3 digit numeric value
000 This value not in use. n/a
F DCC Scanned? (False) T - True, F - False
F DCC Bulk? (False) T - True, F - False
F RBL Scanned? (False) T - True, F - False
F RBL Reject? (False) T - True, F - False
F This item is not used n/a
F This item is not used n/a
T Anti-Virus Scanned? (True) T - True, F - False
K Anti-Virus Product (K - Kaspersky)
K - Kaspersky M - McAfee
000 Viruses detected (0) 3 digit numeric value
T Malformed Message Scanned? (True)
T - True, F - False
F Malformed message? (False) T - True, F - False
T Attachment Control scanned? (True)
T - True, F - False
000 Attachments blocked (0) 3 digit numeric value
T PBMF Scanned? (True) T - True, F - False
F PBMF triggered? (False) T - True, F - False
- PBMF Action (no match) D - Reject A - Accept V - Valid S - Spam T - Trust R - Relay B - BCC I - Do Not Train for STA - None
- PBMF Rule Type (no match) S - System G - Group P - Personal - None
5 PBMF Priority (5 - high) 0 - low, 3 - medium, 5 - high
0000000 PBMF Filter number (PBMF filter number)
This is the number of the filter in your list of PBMFs.
F SPF scanned? T True, F - False
TABLE 1. Analysis Code Descriptions
Analysis Code Description Possible Values
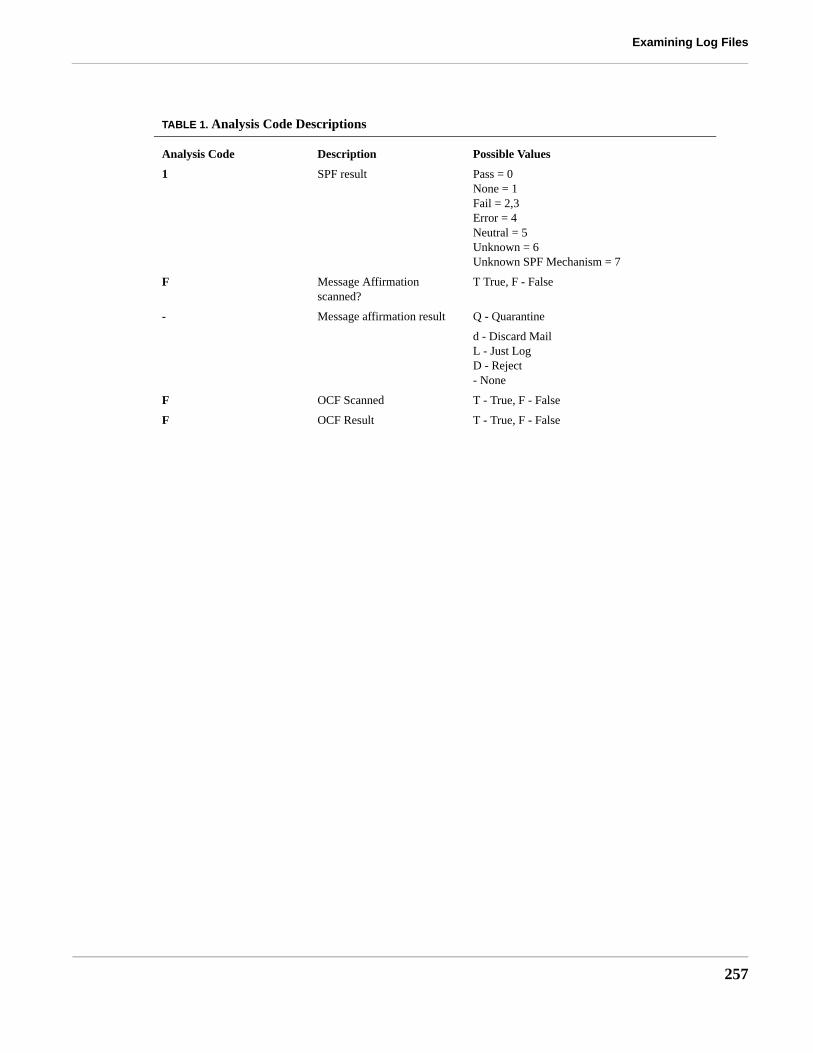
Examining Log Files
1 SPF result Pass = 0 None = 1 Fail = 2,3 Error = 4 Neutral = 5 Unknown = 6 Unknown SPF Mechanism = 7
F Message Affirmation scanned?
T True, F - False
- Message affirmation result Q - Quarantine
d - Discard Mail L - Just Log D - Reject - None
F OCF Scanned T - True, F - False
F OCF Result T - True, F - False
TABLE 1. Analysis Code Descriptions
Analysis Code Description Possible Values
257
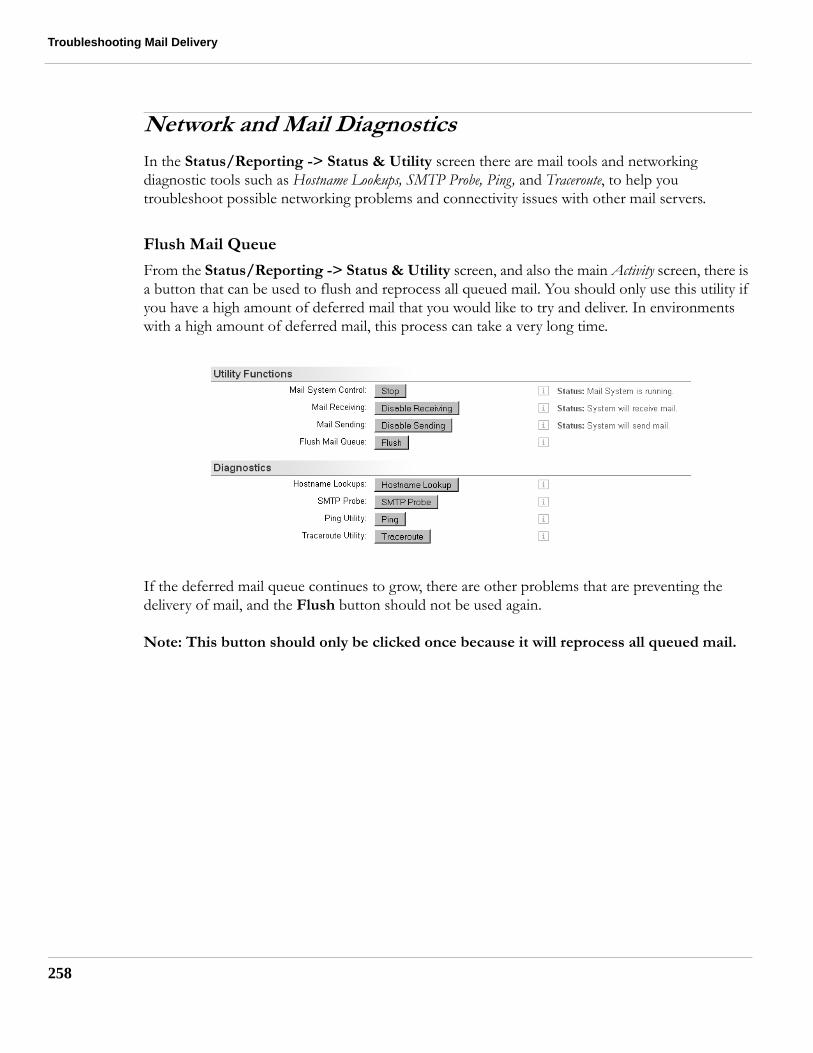
Troubleshooting Mail Delivery
258
Network and Mail Diagnostics
In the Status/Reporting -> Status & Utility screen there are mail tools and networking diagnostic tools such as Hostname Lookups, SMTP Probe, Ping, and Traceroute, to help you troubleshoot possible networking problems and connectivity issues with other mail servers.
Flush Mail Queue
From the Status/Reporting -> Status & Utility screen, and also the main Activity screen, there is a button that can be used to flush and reprocess all queued mail. You should only use this utility if you have a high amount of deferred mail that you would like to try and deliver. In environments with a high amount of deferred mail, this process can take a very long time.
If the deferred mail queue continues to grow, there are other problems that are preventing the delivery of mail, and the Flush button should not be used again.
Note: This button should only be clicked once because it will reprocess all queued mail.

Network and Mail Diagnostics
Hostname Lookup
The Hostname Lookup utility is used to perform DNS host lookups. This ensures that hostname are being properly resolved by the DNS server.
Enter the FQDN (Fully Qualified Domain Name) of the host you would like to lookup on a name server, such as mx.example.com. In the Query Type field, select the type of DNS record, such as a typical "A" name host record, or "MX" for a mail server lookup
Click the Lookup button when ready to test. The name server should provide you with the IP address for the name you entered. If the result displayed shows "Unknown host", then the name you entered is not listed in the DNS records.
If the name server cannot be contacted, check your DNS configuration in Basic Config -> Network. To ensure you have network connectivity use the ping and traceroute commands in the Status & Utility screen to ensure you have a connection to the network and to the DNS server.
259

Troubleshooting Mail Delivery
260
SMTP Probe
The SMTP (Simple Mail Transport Protocol) Probe is used to test email connectivity with a remote SMTP server. This allows you to verify that the SMTP server is responding to connection requests and returning a valid response.
In the SMTP Probe screen, you must enter the destination SMTP server, the envelope header fields for the sender and recipient (MAIL FROM and RCPT TO), the HELO identifier, and the message data.
Click the Send Message button to send the test message to the destination SMTP server. The server should come back with a response.
• SMTP Server — Enter the domain name of the destination SMTP server that you want to test.• Envelope-from (MAIL FROM) — The MAIL FROM part of the email message identifies the
sender. Enter an email address indicating the sender of the message.• Envelope-to (RCPT TO) — The RCPT TO part of the email message identifies the recipient
of the email. Enter an email address indicating the intended recipient of the message.• HELO — The HELO parameter is used to identify the SMTP Client to the SMTP Server. You
can enter any value here, but the sending domain name of the server is usually specified.• Message to Send (DATA Command) — This contains the actual test message data. You can
enter an optional subject to ensure a blank subject field is not sent.
The response field will show the result of the SMTP diagnostic probe, including the response for each SMTP command sent:
Sending mail...
<<< 220 ESMTP Postfix (2.1.0) HELO example.com <<< 250 mail.example.com

Network and Mail Diagnostics
MAIL FROM:[email protected] <<< 250 Ok RCPT TO:[email protected] <<< 250 Ok DATA <<< 354 End data with <CR><LF>.<CR><LF> sending /tmp/smtpdata . <<< 250 Ok: queued as F130F33EA6 QUIT <<< 221 Bye
Ping Utility
The ping utility sends ICMP packets to a host and the listens for a return packet. From ePrism, use ping to hosts both on the internal and external networks. You should also try to ping the firewall, DNS server, and external router. Try to ping ePrism from these locations to ensure you have connectivity.
For more detailed information on routing connectivity between the two hosts, use the traceroute utility
Click the Ping button on the Status & Utility screen to test connectivity.
Enter the IP address or hostname of the system you want to test connectivity to, and then click the Ping button.
261

Troubleshooting Mail Delivery
262
Traceroute Utility
Traceroute is used to see the routing steps between two hosts. If you are losing connectivity somewhere in between the two hosts, you can use traceroute to see where exactly the packet is losing its connection.
The traceroute utility will show each network "hop" as it passes through each router to its destination. If you are experiencing routing issues, you will be able to see in the trace where exactly the communication is failing.
Click the Traceroute button on the Status & Utility screen to trace the route to the specified host.
Enter the IP address or hostname of the system you want to trace the route to, and then click the Traceroute button. Use Reset to reset the display.

Troubleshooting Content Issues
Troubleshooting Content IssuesIf the mail has been delivered to ePrism successfully, it will undergo security processing before delivery to its final destination. Many of the security tools used by ePrism, such as anti-spam, content filtering, anti-virus scanning, attachment control, and so on, will cause the message to be rejected, discarded, and quarantined, without the message being delivered to the recipient's mail box.
These tools can often be misconfigured, allowing legitimate messages to be incorrectly rejected or quarantined. If you find that certain mail messages are being blocked when they should not be, check the following:
• Is there a Specific Access Pattern or Pattern Based Message Filter rule that applies to the message?
• Is the attachment type filtered via Attachment Control?• Are the spam controls (RBL, DCC, and STA) blocking the message?• Does a word from the OCF (Objectionable Content Filter) appear in the message?• Is the message over the maximum size limit?
Mail History Database
Every message that passes through ePrism generates a database entry that records information about how it was processed, filtered, quarantined, and so on. To see how the message was handled by ePrism, you can check the Email History Database to see the disposition of the message.
Using this information, you can find out which security processing is blocking the message, and then check the configuration and rules to ensure that they are set properly.
Select Status/Reporting -> Reports -> Mail History to view processed messages. Examine the Journal column for full information on how a message was processed and its final disposition.
263
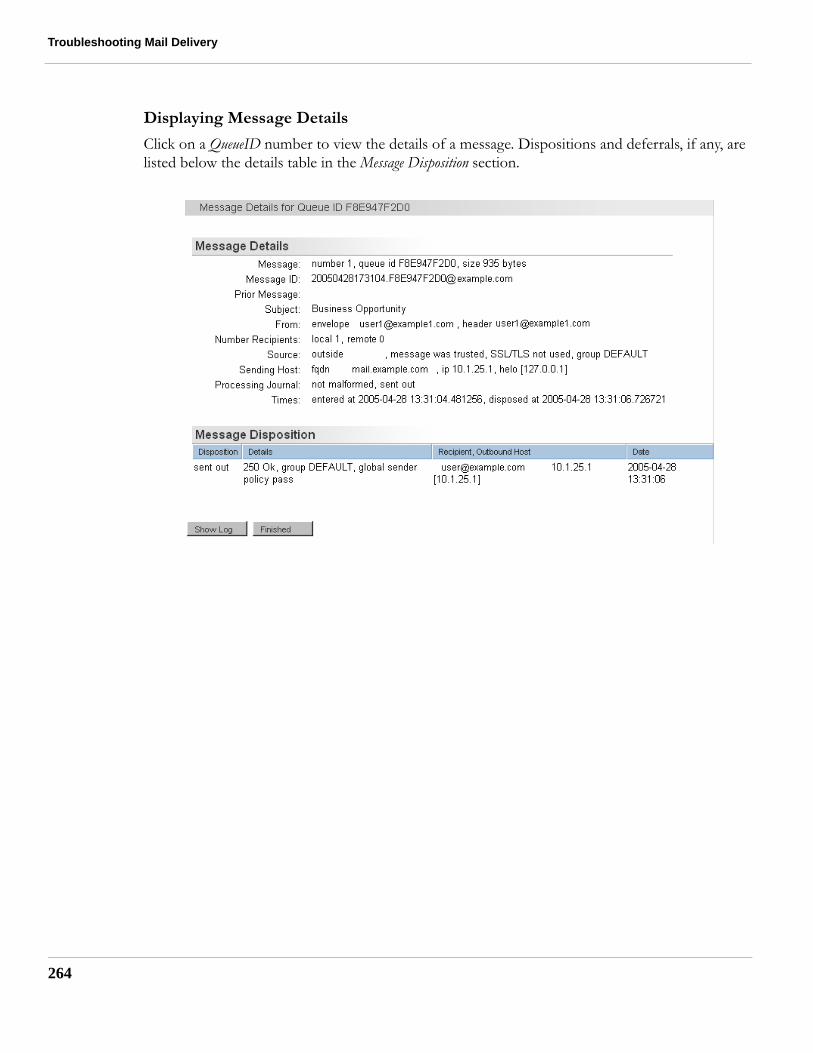
Troubleshooting Mail Delivery
264
Displaying Message Details
Click on a QueueID number to view the details of a message. Dispositions and deferrals, if any, are listed below the details table in the Message Disposition section.

APPENDIX A Using the ePrism System Console
The ePrism system console provides a limited subset of administrative tasks and is only recommended for use during initial installation and network troubleshooting. Routine administration should be performed via the web browser administration interface.
When accessing the system console, you will be prompted for the UserID and Password for the administrative user. When accessing the console for the first time after installation, the default settings are admin for the UserID, and admin for the Password. The password can be changed from the browser administration interface.
Activity Screen
The console Activity screen provides you with basic activity and statistics information for this ePrism system.
265

Using the ePrism System Console
266
Press any key to log into the console using the admin login.
Admin Menu
The Admin Menu contains the following functions:
• Exit — Exits the console.• Hardware Information — Displays the processor type, available memory, and network
interface information.• Configure Interfaces — Modify the host and domain name, IP address, Gateway, DNS and
NTP servers for all network interfaces.• Security Connection — Enables automatic updates from St. Bernard.• Shutdown — Shutdown ePrism.• Reboot — Shutdown and restart ePrism.• Switch to Text Mode — Switch from graphical mode to text mode.
Diagnostics Menu
The Diagnostics Menu contains the following functions:
• Activity Display — Displays CPU usage, network traffic and mail message activity.• Ping — Allows you to test network connectivity to other systems via the ping utility. An IP
address or host name can be used.• Traceroute — Displays the routing steps between your ePrism system and a destination host.• Reset Network Interface — Resets network interfaces. This function is useful for correcting
connection issues.• Display Disk Usage — Displays the amount of used and available disk space.• Display System Processes — Displays information on processes running on the system.
Repair Menu
The Repair Menu contains the following functions:
• Reset SSL Certificates — Sets certificate information back to the factory defaults. Any uploaded certificates or private keys will be lost.
• Delete Strong Authentication for Admin — Removes strong authentication for the admin user login to allow you to use the console password.
Misc Menu
The Miscellaneous Menu contains the following functions:
• Set Time and Date — Sets the time and date for the system.• Set Time Zone — Sets your local time zone settings.• Configure UPS — Configure the link to an Uninterruptible Power Supply (UPS) for automatic
shutdown in the event of a power failure.• Configure Web Admin — Modify the ports used to access the ePrism web browser
administration interface.• Configure Serial Console — Configure a serial port for using the console over a serial
connection. You must set your terminal program to the following values to use ePrism’s serial console:VT100 Emulation Baud Rate: 9600 Data Bits: 8 Parity: None Stop Bits: 1 Flow Control: Hardware
• Color Settings — Sets the colors for the console.
267

Using the ePrism System Console
268
APPENDIX B Restoring ePrism to Factory Default Settings
ePrism can be returned to its factory defaults at any time. You may need to re-initialize the system if unrecoverable disk errors are found, or if you wish to perform a full restore.
Caution! This procedure should only be used after consultation with St. Bernard technical support. You will lose ALL your configuration data and stored mail if you have not backed it up.
Re-initialize the system as follows:
1. Select Management -> Reboot and Shutdown on the menu.2. Click the Reboot button, and the system will reboot.3. When the system restarts, go to the system console and press F1 "Restore" to restore the
system to factory defaults. Note: Press "r" to reinstall if you upgraded to 5.0 from a previous version and are using an older boot menu.
4. Press Enter to select graphics mode when prompted.5. An informational screen will appear. Select OK to continue.6. Select a keyboard type.7. Select Auto (to auto partition you drives) or Custom and press Enter. Select OK to confirm.8. Select OK at the information screen: "You can install from CDROM…".9. Use the arrow keys to select Hard Drive from the options and press Enter.10. When the procedure is complete, an information message will appear: "St. Bernard’s software
has now been loaded….".11. Select OK and the system will restart.
269

Restoring ePrism to Factory Default Settings
270
The system will now be restarted with the factory default configuration. Proceed with the installation and configuration of the system. See the ePrism 5.0 Installation Guide for detailed information on the install procedure.

APPENDIX C Message Processing Order
The following list describes the full order in which incoming emails are processed by ePrism:
1. Reject on unauth pipelining (Reject)2. Reject on unknown sender domain (Reject, no other filter check)3. Reject on missing reverse DNS (Reject, no other filter check)4. Reject on non FQDN sender (Reject, no other filter check)5. Reject on Unknown Recipient (Reject)6. SAP (Specific Access Patterns - Reject)7. Reject on missing addresses8. Check if number of recipients exceeds maximum (Reject, no other filter check)9. Check if message size exceeds maximum (Reject, no other filter check)10. Very Malformed11. Anti-Virus12. Malformed13. Attachment Control14. OCF (Objectionable Content Filter)15. PBMF (Pattern Based Message Filter - High)16. PBMF (Pattern Based Message Filter - Medium)17. Trusted Senders List18. PBMF (Pattern Based Message Filter - Low)19. SAP (Specific Access Patterns - Trusted/Allow)20. Messages from the Trusted network21. SPF (Sender Policy Framework)22. RBL (Realtime Blackhole List)
271

Message Processing Order
272
23. DCC (Distributed Checksum Clearinghouse)24. STA (Statistical Token Analysis - High)25. STA (Statistical Token Analysis - Low)
APPENDIX D Customizing Notification and Annotation Messages
The following ePrism notifications and annotations can be customized with system variables:
• Message Annotation — Configured via Mail Delivery -> Delivery Settings screen.• Delivery Failure Notification — Configured via Mail Delivery -> Delivery Settings
screen. • Delivery Delay Warning — Configured via Mail Delivery -> Delivery Settings screen• Virus Detection Notification — Configured via Mail Delivery -> Anti-Virus screen.
Messages can be specified for inbound or outbound mail. • Attachment Control Notification — Configured via Mail Delivery -> Attachment
Control screen. Messages can be specified for inbound or outbound mail.• Malformed Mail Notification — Configured via Mail Delivery -> Malformed Mail
screen.• OCF Notification Messages — Configured via Mail Delivery -> Anti-Spam -> OCF
screen. Messages can be specified for inbound or outbound mail.• Spam Quarantine Notifications — Configured via Mail Delivery -> Anti-Spam -> Spam
Quarantine screen.• SMTP Banner — Configured via Mail Delivery -> Mail Access.
273

Customizing Notification and Annotation Messages
274
Message Variables
You can use variables to control the content of messages. ePrism will substitute your local settings for the variables at the time the message is sent. The following variables are available:
TABLE 1. ePrism System Variables
Variable Value Example
%PROGRAM% or %PRODUCT%
St. Bernard ePrism Email Security Appliance
%HOSTNAME% Hostname entered on the Network Settings screen
mail.example.com
%POSTMASTER_MAIL_ADDR%
Email address of the admin user [email protected]
%DELAY_WARN_TIME% In Delivery Settings - Time before Delay Warning
4 hours
%MAX_QUEUE_TIME% In Delivery Settings - Maximum Time in Mail Queue
5 days
%S_YOU% (%SENDER%) "you" Mail address of sender [email protected]
%R_YOU% (%RECIPIENT%) "you" Mail address of recipient [email protected]
%SPAM_FOLDER% The name of the spam folder for the user spam quarantine
spam_quarantine
%SPAM_EXPIRY% The number of days before quarantined spam is expired
30
%SPAM_MESSAGES% The information for a spam message (Date,From,Subject)
05/27/04, [email protected], File for you
%DISPN% Disposition or Action quarantined
%WEBMAIL_URL% The URL of the configured WebMail server
http://owa.example.com/exchange/

APPENDIX E Performance Tuning
There are several factors that can affect the performance of your ePrism system:
• Network bandwidth• Number of allowed SMTP connections• Usage of background processes such as Reporting and ePrism Mail Client• Internet unpredictability: Mail can often arrive in bursts of activity, with only a few messages
arriving one minute, and several hundred the next. In the event of a network outage, such as a failed router, the amount of queued mail that arrives after the router is back online can be very large.
• Internet performance: SMTP clients can be very slow at connecting, and the connection may be disconnected before it is complete.
• The time to process a message is also affected by the size of the email and its attachments. • Amount of system resources (Processing power, RAM, and disk space)
These factors must be carefully considered when tuning a system for optimal performance. If an ePrism system is optimized for throughput to handle high mail loads, other aspects of the system may suffer from increased latency issues, such as reporting, WebMail/ePrism Mail Client access, and the possibility of dropped connections by clients who cannot connect to a busy system. Similarly, allocating too many resources to resolve latency issues will affect mail throughput performance.
Caution! Modifying certain parameters may affect the performance of other aspects of the system, and it is recommended that you only change these settings to resolve specific performance issues with guidance from St. Bernard Technical Support. Do NOT experiment with these settings, as you may render your system unusable.
275

Performance Tuning
276
Setting Default Performance SettingsWhen ePrism is installed and initialized, you must select the default profile for your system, such as an "MX800 with mail scanning only", or an "MX800 with WebMail".
You may need to change your settings if you enable or disable the use of WebMail after your initial installation.
Select Basic Config -> Performance on the menu to configure your Performance tuning settings.
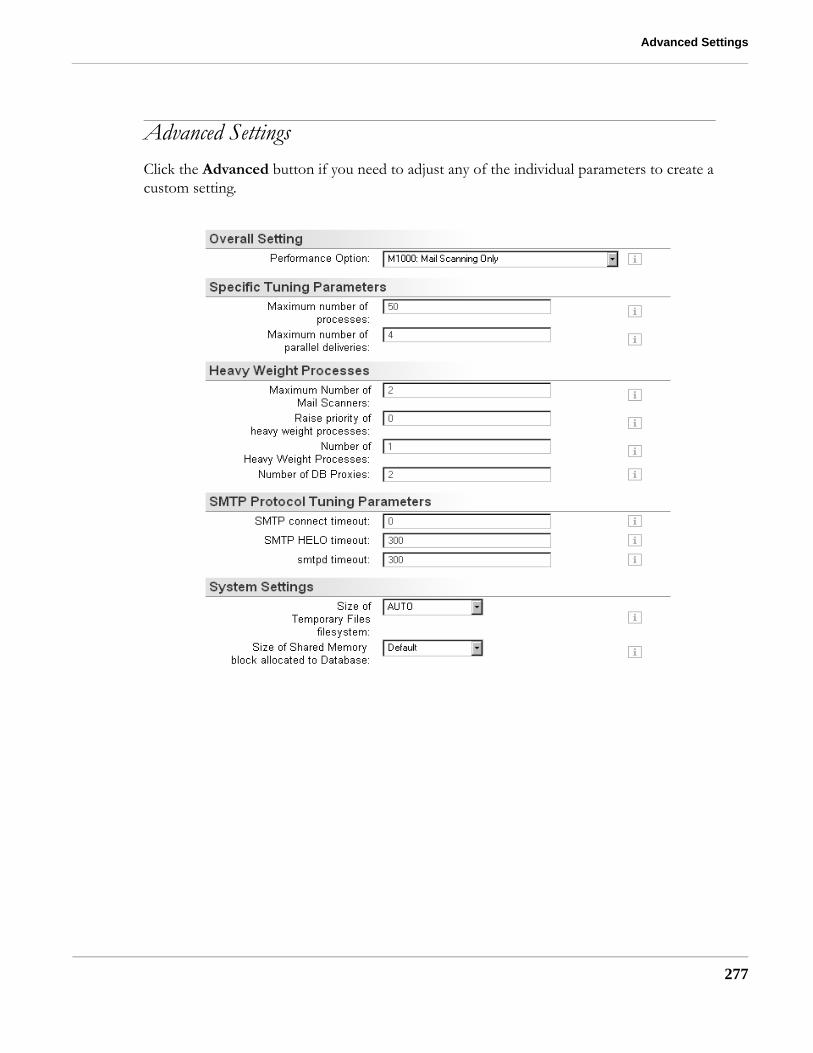
Advanced Settings
Advanced SettingsClick the Advanced button if you need to adjust any of the individual parameters to create a custom setting.
277

Performance Tuning
278
Maximum Number of Processes
This parameter specifies the maximum number of concurrent processes that implement Postfix services. This setting limits the number of connections accepted by smtpd, and the number of outgoing SMTP connections. If this number is set too large, you may run out of swap space.
Maximum Number of Parallel Deliveries
This parameter specifies the maximum number of outgoing SMTP connections to the same destination. This setting helps limit the number of outgoing connections. The value must be less than the maximum number of processes, or performance will be degraded.
TABLE 1. Maximum Number of Processes
System Recommended Value Description
M1000 25 (default) This is the default setting and should not be modi-fied.
M2000 50-100 Set this parameter to 50 for a site using ePrism Mail Client and medium mail traffic load. Select a value up to 100 for a high mail traffic load.
M3000 100-150 Set to 100 for a site using ePrism Mail Client and medium mail traffic load. Set up to 150 for a high mail traffic load.
M4000 200-250 Set to 200 for a site using ePrism Mail Client and medium mail traffic load. Set up to 250 for a high mail traffic load.
TABLE 2. Maximum Number of Parallel Deliveries
System Recommended Value Description
M1000 10 (default) This is the default setting and should not be modified.
M2000 10 You should only increase this value if you are having problems delivering enough mail to the internal server
M3000/4000 10
Advanced Settings
Maximum Number of Mail Scanners
This parameter specifies the maximum number of mail scanners that can run simultaneously. This setting limits the overall mail processing and memory footprint. Setting this value too high or too low may result in reduced performance. Valid settings are from 2 - 20.
Raise Priority of Heavy Weight Processes
Increasing the priority of heavyweight processes can increase performance and ePrism Mail Client response times, but it can reduce the processing resources for other mail processes if it is set too high. Valid settings are from a default priority of 0 to a maximum priority of 20.
Number of Heavy Weight Processes
This parameter specifies the maximum number of heavy weight mail scanning processes that can be run simultaneously.
Valid settings are from 1 (Default) - 6 (maximum processes).
Setting a value greater than 2 will not improve performance, and changing this value from the default setting is not recommended.
TABLE 3. Maximum Number of Mail Scanners
System Recommended Value Description
M1000 4 (default) This is the default setting and should not be modi-fied.
M2000 6 Increase this value to a maximum of 8 only if perfor-mance is an issue.
M3000/4000 6 Increase this value to a maximum of 10 only if per-formance is an issue.
TABLE 4. Raise Priority of Heavy Weight Processes
System Recommended Value Description
M1000 0 (default) This is the default setting and should not be modified.
M2000 5 Only change this from the default value if ePrism Mail Client is not being used, and you need to devote more resources to message handling.
M3000/4000 10 Set this value to 5 if using ePrism Mail Client and/or performance is not an issue.
279

Performance Tuning
280
Number of DB Proxies
This parameter specifies the maximum number of database proxies that can be used by the mail scanning processes. This value is relative to the Maximum Number of Processes setting, and should be increased in conjunction with increases in the number of maximum processes.
Valid settings are from 2 (Default) - 12 (maximum processes), however, setting this value above 8 will result in diminishing performance returns.
SMTP Connect Timeout
This SMTP parameter specifies the amount of time, in seconds, for an SMTP client to complete a TCP connection before we drop the connection. This value defines how long ePrism will wait for a response before timing out. The default is 0, but there is an overall system timeout of 5 minutes for SMTP connections. Increasing this value may help with sites which have a slow Internet connection.
SMTP HELO Timeout
This SMTP parameter specifies the amount of time, in seconds, for receiving the SMTP greeting banner before we drop the connection. The default is 300 seconds, which means that ePrism will wait 5 minutes to receive the initial SMTP HELO message before timing out. Using a lower timeout value may increase performance by freeing up more connections. Increasing this value may help with sites which have a slow Internet connection.
SMTPD Timeout
This SMTP parameter specifies the amount of time, in seconds, to send an SMTP server response and to receive an SMTP client request before dropping the connection. The default is 300 seconds. When ePrism connects to another mail server to deliver mail, it will drop the connection if it takes more than 5 minutes to receive a response. A lower value may increase performance by freeing up connections. Increasing this value may help with sites which have a slow Internet connection.
TABLE 5. Number of DB Proxies
System Recommended Value Description
M1000 4 (default) This is the default setting and should not be modified.
M2000 4 If increasing Maximum Number of Processes above 50, then set this value to 6.
M3000/4000 8 If increasing Maximum Number of Processes to 150, then set this value to 10.
Advanced Settings
Size of Temporary Files Filesystem
Specify the size of the /tmp filesystem at system startup. This setting affects the maximum size of attachments that may be scanned, and should only be used if you are having problems with scanning large files. If you increase this setting beyond the amount of physical RAM, system performance will be degraded due to excessive swapping. You must monitor your system performance if this setting is used.
Size of Shared Memory block allocated to Database
Specify the size of the shared memory block to make available to the database. Increasing this value increases the speed of database operations at the cost of having less memory available for other purposes. Increase this value if you are increasing the number of messages that will be stored in the email database.
Note: If you change the size of the temp file system or shared memory block, the system will need to be restarted before these settings takes effect.
281

Performance Tuning
282

APPENDIX F SNMP MIBS
The following sections describe the statistics available from ePrism’s SNMP MIBS. The MIB files can be downloaded from Basic Config -> SNMP Configuration and clicking the Download MIBS button.
Note: The MIB files are based on SNMP version 2, and are backwards compatible with version 1.
MIB Files SummaryThe following sections contain a summary of the MIB file entries.
Memory Usage and Reporting
TABLE 1. Memory Usage and Reporting
Object Description
memTotalSwap Total Swap Size configured for the host
memAvailSwap Available Swap Space on the host
memTotalReal Total Real/Physical Memory Size on the host
memAvailReal Available Real/Physical Memory Space on the host
memTotalSwapTXT Total virtual memory used by text
memAvailSwapTXT Active virtual memory used by text
memTotalRealTXT Total Real/Physical Memory Size used by text
memAvailRealTXT Active Real/Physical Memory Space used by text
283

SNMP MIBS
284
Disk Information
memTotalFree Total Available Memory on the host
memMinimumSwap Minimum amount of free swap required to be free
memShared Total Shared Memory
memBuffer Total Buffered Memory
memCached Total Cached Memory
memSwapError Error flag indicating very little swap space left
memSwapErrorMsg Error message describing the Error Flag condi-tion
TABLE 2. Disk Information
Object Description
dskIndex Integer reference number (row number) for the disk MIB.
dskPath Path where the disk is mounted.
dskDevice Path of the device for the partition
dskMinimum Minimum space required on the disk (in kBytes) before errors are triggered.
dskMinPercent Percentage of minimum space required on the disk before errors are triggered.
dskTotal Total size of the disk/partition (kBytes)
dskAvail Available space on the disk
dskUsed Used space on the disk
dskPercent Percentage of space used on disk
dskPercentNode Percentage of inodes used on disk
dskErrorFlag Error flag signaling that the disk or partition is under the minimum required space configured for it.
dskErrorMsg A text description providing a warning and the space left on the disk.
TABLE 1. Memory Usage and Reporting
Object Description

MIB Files Summary
System Statistics
The SNMP agent only implements the following statistics that are supported by the kernel. Not all of the following objects will be available.
TABLE 3. System Statistics
Object Description
ssIndex Reference Index for each observed system sta-tistic
ssErrorName The list of system statistic names being counted
ssSwapIn Amount of memory swapped in from disk (KB/s)
ssSwapOut Amount of memory swapped to disk (KB/s)
TABLE 4. System Statistics If Supported by Kernel
Object Description
ssCpuRawUser User CPU time
ssCpuRawNice Nice CPU time
ssCpuRawSystem System CPU time
ssCpuRawIdle Idle CPU time
ssCpuRawWait IOwait CPU time
ssCpuRawKernel Kernel CPU time
ssCpuRawInterrupt Interrupt level CPU time
ssIORawSent Number of requests sent to a block device
ssIORawReceived Number of interrupts processed
ssRawInterrupts Number of requests received from a block device
ssRawContexts Number of context switches
285

SNMP MIBS
286
Alarm Objects
Mail System Objects
Current Mail Data
Historical Mail Data
Traps
ePrism will send a SNMP trap on a system reboot
TABLE 5. Alarm Objects
Object Description
alTriggerAlarm The flag to trigger an alarm
alLastChange The time value when the alarm condition occurs
alName A textual string containing the name of the alarm
alRemoteIpAddr Source IP address
alDestPort Destination port number
alAlarm The alarm trap
TABLE 6. Current Mail Data
Object Description
queuedMessages The number of queued mail messages.
deferredMessages The number of deferred mail messages.
totalMessages The total number of mail messages.
TABLE 7. Historical Mail Data
Object Description
mailIndex The value of this object uniquely identifies each mail stats entry.
mailInterval Time interval pertaining to the data in this sequence.
mailRcvd Number of received messages for this interval.
mailSent Number of sent messages for this interval.
mailSpam Number of spam messages for this interval.
mailReject Number of rejected messages for this interval.
mailVirus Number of messages identified as containing a virus for this interval.
mailClean Number of clean messages for this interval.

MIB OID Values
MIB OID ValuesThe following describes the SNMP MIB OID values:
.1.3.6.1.4.1.8673 ->
.1.1.100.1.0 = bwProducts.bwFirewall.bwAlarm.alTriggerAlarm.0 = INTEGER: 0
.1.1.100.4.0 = bwProducts.bwFirewall.bwAlarm.alLastChange.0 = STRING: 0-1-1,0:0:0.0
.1.1.100.9.0 = bwProducts.bwFirewall.bwAlarm.alName.0 = STRING: None
.1.1.100.10.0 = bwProducts.bwFirewall.bwAlarm.alRemoteIpAddr.0 = IpAddress: 0.0.0.0
.1.1.100.15.0 = bwProducts.bwFirewall.bwAlarm.alDestPort.0 = INTEGER: 0
.1.11.10.1.1.1 = bwProducts.bwMailFirewall.mailTable.mailEntry.mailInterval.1 = STRING: Hour
.1.11.10.1.1.2 = bwProducts.bwMailFirewall.mailTable.mailEntry.mailInterval.2 = STRING: Day
.1.11.10.1.1.3 = bwProducts.bwMailFirewall.mailTable.mailEntry.mailInterval.3 = STRING: Week
.1.11.10.1.2.1 = bwProducts.bwMailFirewall.mailTable.mailEntry.mailRcvd.1 = Counter32: 5
.1.11.10.1.2.2 = bwProducts.bwMailFirewall.mailTable.mailEntry.mailRcvd.2 = Counter32: 12
.1.11.10.1.2.3 = bwProducts.bwMailFirewall.mailTable.mailEntry.mailRcvd.3 = Counter32: 42
.1.11.10.1.3.1 = bwProducts.bwMailFirewall.mailTable.mailEntry.mailSent.1 = Counter32: 7
.1.11.10.1.3.2 = bwProducts.bwMailFirewall.mailTable.mailEntry.mailSent.2 = Counter32: 19
.1.11.10.1.3.3 = bwProducts.bwMailFirewall.mailTable.mailEntry.mailSent.3 = Counter32: 50
.1.11.10.1.4.1 = bwProducts.bwMailFirewall.mailTable.mailEntry.mailSpam.1 = Counter32: 0
.1.11.10.1.4.2 = bwProducts.bwMailFirewall.mailTable.mailEntry.mailSpam.2 = Counter32: 0
.1.11.10.1.4.3 = bwProducts.bwMailFirewall.mailTable.mailEntry.mailSpam.3 = Counter32: 0
.1.11.10.1.5.1 = bwProducts.bwMailFirewall.mailTable.mailEntry.mailReject.1 = Counter32: 0
.1.11.10.1.5.2 = bwProducts.bwMailFirewall.mailTable.mailEntry.mailReject.2 = Counter32: 0
.1.11.10.1.5.3 = bwProducts.bwMailFirewall.mailTable.mailEntry.mailReject.3 = Counter32: 5
.1.11.10.1.6.1 = bwProducts.bwMailFirewall.mailTable.mailEntry.mailVirus.1 = Counter32: 0
.1.11.10.1.6.2 = bwProducts.bwMailFirewall.mailTable.mailEntry.mailVirus.2 = Counter32: 0
.1.11.10.1.6.3 = bwProducts.bwMailFirewall.mailTable.mailEntry.mailVirus.3 = Counter32: 0
.1.11.10.1.7.1 = bwProducts.bwMailFirewall.mailTable.mailEntry.mailClean.1 = Counter32: 0
.1.11.10.1.7.2 = bwProducts.bwMailFirewall.mailTable.mailEntry.mailClean.2 = Counter32: 3
.1.11.10.1.7.3 = bwProducts.bwMailFirewall.mailTable.mailEntry.mailClean.3 = Counter32: 4
.1.11.10.2.1 = bwProducts.bwMailFirewall.mailTable.mailStatus.queuedMessages = Counter32: 0
287

SNMP MIBS
288
.1.11.10.2.2 = bwProducts.bwMailFirewall.mailTable.mailStatus.deferredMessages = Counter32: 0
.1.11.10.2.3 = bwProducts.bwMailFirewall.mailTable.mailStatus.totalMessages = Counter32: 0
.4.1.0 = bwSysMemory.memIndex.0 = INTEGER: 0
.4.2.0 = bwSysMemory.memErrorName.0 = STRING: swap
.4.3.0 = bwSysMemory.memTotalSwap.0 = INTEGER: 262016
.4.4.0 = bwSysMemory.memAvailSwap.0 = INTEGER: 260928
.4.5.0 = bwSysMemory.memTotalReal.0 = INTEGER: 104264
.4.6.0 = bwSysMemory.memAvailReal.0 = INTEGER: 46684
.4.11.0 = bwSysMemory.memTotalFree.0 = INTEGER: 46696
.4.12.0 = bwSysMemory.memMinimumSwap.0 = INTEGER: 16000
.4.13.0 = bwSysMemory.memShared.0 = INTEGER: 29000
.4.14.0 = bwSysMemory.memBuffer.0 = INTEGER: 22640
.4.15.0 = bwSysMemory.memCached.0 = INTEGER: 12
.4.100.0 = bwSysMemory.memSwapError.0 = INTEGER: 0
.4.101.0 = bwSysMemory.memSwapErrorMsg.0 = STRING:
.9.1.1.1 = dskTable.dskEntry.dskIndex.1 = INTEGER: 1
.9.1.1.2 = dskTable.dskEntry.dskIndex.2 = INTEGER: 2
.9.1.1.3 = dskTable.dskEntry.dskIndex.3 = INTEGER: 3
.9.1.1.4 = dskTable.dskEntry.dskIndex.4 = INTEGER: 4
.9.1.2.1 = dskTable.dskEntry.dskPath.1 = STRING: /server/mail
.9.1.2.2 = dskTable.dskEntry.dskPath.2 = STRING: /server/ftp/log
.9.1.2.3 = dskTable.dskEntry.dskPath.3 = STRING: /var
.9.1.2.4 = dskTable.dskEntry.dskPath.4 = STRING: /backup
.9.1.3.1 = dskTable.dskEntry.dskDevice.1 = STRING: /dev/ad0s2e
.9.1.3.2 = dskTable.dskEntry.dskDevice.2 = STRING: /dev/ad0s2d
.9.1.3.3 = dskTable.dskEntry.dskDevice.3 = STRING: /dev/ad0s2f
.9.1.3.4 = dskTable.dskEntry.dskDevice.4 = STRING: /dev/ad0s2g
.9.1.4.1 = dskTable.dskEntry.dskMinimum.1 = INTEGER: -1
.9.1.4.2 = dskTable.dskEntry.dskMinimum.2 = INTEGER: -1
.9.1.4.3 = dskTable.dskEntry.dskMinimum.3 = INTEGER: -1
.9.1.4.4 = dskTable.dskEntry.dskMinimum.4 = INTEGER: -1

MIB OID Values
.9.1.5.1 = dskTable.dskEntry.dskMinPercent.1 = INTEGER: 10
.9.1.5.2 = dskTable.dskEntry.dskMinPercent.2 = INTEGER: 10
.9.1.5.3 = dskTable.dskEntry.dskMinPercent.3 = INTEGER: 10
.9.1.5.4 = dskTable.dskEntry.dskMinPercent.4 = INTEGER: 10
.9.1.6.1 = dskTable.dskEntry.dskTotal.1 = INTEGER: 2834414
.9.1.6.2 = dskTable.dskEntry.dskTotal.2 = INTEGER: 2834414
.9.1.6.3 = dskTable.dskEntry.dskTotal.3 = INTEGER: 2834414
.9.1.6.4 = dskTable.dskEntry.dskTotal.4 = INTEGER: 2834414
.9.1.7.1 = dskTable.dskEntry.dskAvail.1 = INTEGER: 2607590
.9.1.7.2 = dskTable.dskEntry.dskAvail.2 = INTEGER: 2576054
.9.1.7.3 = dskTable.dskEntry.dskAvail.3 = INTEGER: 2499830
.9.1.7.4 = dskTable.dskEntry.dskAvail.4 = INTEGER: 2607660
.9.1.8.1 = dskTable.dskEntry.dskUsed.1 = INTEGER: 72
.9.1.8.2 = dskTable.dskEntry.dskUsed.2 = INTEGER: 31608
.9.1.8.3 = dskTable.dskEntry.dskUsed.3 = INTEGER: 107832
.9.1.8.4 = dskTable.dskEntry.dskUsed.4 = INTEGER: 2
.9.1.9.1 = dskTable.dskEntry.dskPercent.1 = INTEGER: 0
.9.1.9.2 = dskTable.dskEntry.dskPercent.2 = INTEGER: 1
.9.1.9.3 = dskTable.dskEntry.dskPercent.3 = INTEGER: 4
.9.1.9.4 = dskTable.dskEntry.dskPercent.4 = INTEGER: 0
.9.1.100.1 = dskTable.dskEntry.dskErrorFlag.1 = INTEGER: 0
.9.1.100.2 = dskTable.dskEntry.dskErrorFlag.2 = INTEGER: 0
.9.1.100.3 = dskTable.dskEntry.dskErrorFlag.3 = INTEGER: 0
.9.1.100.4 = dskTable.dskEntry.dskErrorFlag.4 = INTEGER: 0
.9.1.101.1 = dskTable.dskEntry.dskErrorMsg.1 = STRING:
.9.1.101.2 = dskTable.dskEntry.dskErrorMsg.2 = STRING:
.9.1.101.3 = dskTable.dskEntry.dskErrorMsg.3 = STRING:
.9.1.101.4 = dskTable.dskEntry.dskErrorMsg.4 = STRING:
.11.1.0 = systemStats.ssIndex.0 = INTEGER: 1
.11.2.0 = systemStats.ssErrorName.0 = STRING: systemStats
.11.3.0 = systemStats.ssSwapIn.0 = INTEGER: 0
289

SNMP MIBS
290
.11.4.0 = systemStats.ssSwapOut.0 = INTEGER: 0
.11.7.0 = systemStats.ssSysInterrupts.0 = INTEGER: 233
.11.8.0 = systemStats.ssSysContext.0 = INTEGER: 49
.11.9.0 = systemStats.ssCpuUser.0 = INTEGER: 1
.11.10.0 = systemStats.ssCpuSystem.0 = INTEGER: 7
.11.11.0 = systemStats.ssCpuIdle.0 = INTEGER: 91
.11.50.0 = systemStats.ssCpuRawUser.0 = Counter32: 483
.11.51.0 = systemStats.ssCpuRawNice.0 = Counter32: 0
.11.52.0 = systemStats.ssCpuRawSystem.0 = Counter32: 2859
.11.53.0 = systemStats.ssCpuRawIdle.0 = Counter32: 20860
.11.55.0 = systemStats.ssCpuRawKernel.0 = Counter32: 2752
.11.56.0 = systemStats.ssCpuRawInterrupt.0 = Counter32: 107
.11.59.0 = systemStats.ssRawInterrupts.0 = Counter32: 47574
.11.60.0 = systemStats.ssRawContexts.0 = Counter32: 10795

APPENDIX G Third Party Copyrights and Licenses
Apache
Apache License
Version 2.0, January 2004
http://www.apache.org/licenses/
TERMS AND CONDITIONS FOR USE, REPRODUCTION, AND DISTRIBUTION
1. Definitions.
"License" shall mean the terms and conditions for use, reproduction, and distribution as defined by Sections 1 through 9 of this document.
"Licensor" shall mean the copyright owner or entity authorized by the copyright owner that is granting the License.
"Legal Entity" shall mean the union of the acting entity and all other entities that control, are controlled by, or are under common control with that entity. For the purposes of this definition, "control" means (i) the power, direct or indirect, to cause the direction or management of such entity, whether by contract or otherwise, or (ii) ownership of fifty percent (50%) or more of the outstanding shares, or (iii) beneficial ownership of such entity.
"You" (or "Your") shall mean an individual or Legal Entity exercising permissions granted by this License.
"Source" form shall mean the preferred form for making modifications, including but not limited to software source code, documentation source, and configuration files.
"Object" form shall mean any form resulting from mechanical transformation or translation of a Source form, including but not limited to compiled object code, generated documentation, and conversions to other media types.
291

Third Party Copyrights and Licenses
292
"Work" shall mean the work of authorship, whether in Source or Object form, made available under the License, as indicated by a copyright notice that is included in or attached to the work (an example is provided in the Appendix below).
"Derivative Works" shall mean any work, whether in Source or Object form, that is based on (or derived from) the Work and for which the editorial revisions, annotations, elaborations, or other modifications represent, as a whole, an original work of authorship. For the purposes of this License, Derivative Works shall not include works that remain separable from, or merely link (or bind by name) to the interfaces of, the Work and Derivative Works thereof.
"Contribution" shall mean any work of authorship, including the original version of the Work and any modifications or additions to that Work or Derivative Works thereof, that is intentionally submitted to Licensor for inclusion in the Work by the copyright owner or by an individual or Legal Entity authorized to submit on behalf of the copyright owner. For the purposes of this definition, "submitted" means any form of electronic, verbal, or written communication sent to the Licensor or its representatives, including but not limited to communication on electronic mailing lists, source code control systems, and issue tracking systems that are managed by, or on behalf of, the Licensor for the purpose of discussing and improving the Work, but excluding communication that is conspicuously marked or otherwise designated in writing by the copyright owner as "Not a Contribution."
"Contributor" shall mean Licensor and any individual or Legal Entity on behalf of whom a Contribution has been received by Licensor and subsequently incorporated within the Work.
2. Grant of Copyright License. Subject to the terms and conditions of this License, each Contributor hereby grants to You a perpetual, worldwide, non-exclusive, no-charge, royalty-free, irrevocable copyright license to reproduce, prepare Derivative Works of, publicly display, publicly perform, sublicense, and distribute the Work and such Derivative Works in Source or Object form.
3. Grant of Patent License. Subject to the terms and conditions of this License, each Contributor hereby grants to You a perpetual, worldwide, non-exclusive, no-charge, royalty-free, irrevocable (except as stated in this section) patent license to make, have made, use, offer to sell, sell, import, and otherwise transfer the Work, where such license applies only to those patent claims licensable by such Contributor that are necessarily infringed by their Contribution(s) alone or by combination of their Contribution(s) with the Work to which such Contribution(s) was submitted. If You institute patent litigation against any entity (including a cross-claim or counterclaim in a lawsuit) alleging that the Work or a Contribution incorporated within the Work constitutes direct or contributory patent infringement, then any patent licenses granted to You under this License for that Work shall terminate as of the date such litigation is filed.
4. Redistribution. You may reproduce and distribute copies of the Work or Derivative Works thereof in any medium, with or without modifications, and in Source or Object form, provided that You meet the following conditions:
(a) You must give any other recipients of the Work or Derivative Works a copy of this License; and (b) You must cause any modified files to carry prominent notices stating that You changed the files; and (c) You must retain, in the Source form of any Derivative Works that You distribute, all copyright, patent, trademark, and attribution notices from the Source form of the Work, excluding those notices that do not pertain to any part of the Derivative Works; and (d) If the Work includes a

"NOTICE" text file as part of its distribution, then any Derivative Works that You distribute must include a readable copy of the attribution notices contained within such NOTICE file, excluding those notices that do not pertain to any part of the Derivative Works, in at least one of the following places: within a NOTICE text file distributed as part of the Derivative Works; within the Source form or documentation, if provided along with the Derivative Works; or, within a display generated by the Derivative Works, if and wherever such third-party notices normally appear. The contents of the NOTICE file are for informational purposes only and do not modify the License. You may add Your own attribution notices within Derivative Works that You distribute, alongside or as an addendum to the NOTICE text from the Work, provided that such additional attribution notices cannot be construed as modifying the License.
You may add Your own copyright statement to Your modifications and may provide additional or different license terms and conditions for use, reproduction, or distribution of Your modifications, or for any such Derivative Works as a whole, provided Your use, reproduction, and distribution of the Work otherwise complies with the conditions stated in this License.
5. Submission of Contributions. Unless You explicitly state otherwise, any Contribution intentionally submitted for inclusion in the Work by You to the Licensor shall be under the terms and conditions of this License, without any additional terms or conditions.
Notwithstanding the above, nothing herein shall supersede or modify the terms of any separate license agreement you may have executed with Licensor regarding such Contributions.
6. Trademarks. This License does not grant permission to use the trade names, trademarks, service marks, or product names of the Licensor, except as required for reasonable and customary use in describing the origin of the Work and reproducing the content of the NOTICE file.
7. Disclaimer of Warranty. Unless required by applicable law or agreed to in writing, Licensor provides the Work (and each Contributor provides its Contributions) on an "AS IS" BASIS, WITHOUT WARRANTIES OR CONDITIONS OF ANY KIND, either express or implied, including, without limitation, any warranties or conditions of TITLE, NON-INFRINGEMENT, MERCHANTABILITY, or FITNESS FOR A PARTICULAR PURPOSE. You are solely responsible for determining the appropriateness of using or redistributing the Work and assume any risks associated with Your exercise of permissions under this License.
8. Limitation of Liability. In no event and under no legal theory, whether in tort (including negligence), contract, or otherwise, unless required by applicable law (such as deliberate and grossly negligent acts) or agreed to in writing, shall any Contributor be liable to You for damages, including any direct, indirect, special, incidental, or consequential damages of any character arising as a result of this License or out of the use or inability to use the Work (including but not limited to damages for loss of goodwill, work stoppage, computer failure or malfunction, or any and all other commercial damages or losses), even if such Contributor has been advised of the possibility of such damages.
9. Accepting Warranty or Additional Liability. While redistributing the Work or Derivative Works thereof, You may choose to offer, and charge a fee for, acceptance of support, warranty, indemnity, or other liability obligations and/or rights consistent with this License. However, in accepting such obligations, You may act
293

Third Party Copyrights and Licenses
294
only on Your own behalf and on Your sole responsibility, not on behalf of any other Contributor, and only if You agree to indemnify, defend, and hold each Contributor harmless for any liability incurred by, or claims asserted against, such Contributor by reason of your accepting any such warranty or additional liability.
END OF TERMS AND CONDITIONS
Curl, Libcurl
COPYRIGHT AND PERMISSION NOTICE
Copyright (c) 1996 - 2004, Daniel Stenberg, <[email protected]>.
All rights reserved.
Permission to use, copy, modify, and distribute this software for any purpose with or without fee is hereby granted, provided that the above copyright notice and this permission notice appear in all copies.
THE SOFTWARE IS PROVIDED "AS IS", WITHOUT WARRANTY OF ANY KIND, EXPRESS OR IMPLIED, INCLUDING BUT NOT LIMITED TO THE WARRANTIES OF MERCHANTABILITY, FITNESS FOR A PARTICULAR PURPOSE AND NONINFRINGEMENT OF THIRD PARTY RIGHTS. IN NO EVENT SHALL THE AUTHORS OR COPYRIGHT HOLDERS BE LIABLE FOR ANY CLAIM, DAMAGES OR OTHER LIABILITY, WHETHER IN AN ACTION OF CONTRACT, TORT OR OTHERWISE, ARISING FROM, OUT OF OR IN CONNECTION WITH THE SOFTWARE OR THE USE OR OTHER DEALINGS IN THE SOFTWARE.
Except as contained in this notice, the name of a copyright holder shall not be used in advertising or otherwise to promote the sale, use or other dealings in this Software without prior written authorization of the copyright holder.
Cyrus-SASL
CMU libsasl Tim Martin Rob Earhart
Copyright (c) 2000 Carnegie Mellon University. All rights reserved.
Redistribution and use in source and binary forms, with or without modification, are permitted provided that the following conditions are met:
1. Redistributions of source code must retain the above copyright notice, this list of conditions and the following disclaimer.
2. Redistributions in binary form must reproduce the above copyright notice, this list of conditions and the following disclaimer in the documentation and/or other materials provided with the distribution.
3. The name "Carnegie Mellon University" must not be used to endorse or promote products derived from this software without prior written permission. For permission or any other legal details, please contact Office of Technology Transfer Carnegie

Mellon University 5000 Forbes Avenue Pittsburgh, PA 15213-3890 (412) 268-4387, fax: (412) 268-7395 [email protected]
4. Redistributions of any form whatsoever must retain the following acknowledgment: "This product includes software developed by Computing Services at Carnegie Mellon University (http://www.cmu.edu/computing/)."
CARNEGIE MELLON UNIVERSITY DISCLAIMS ALL WARRANTIES WITH REGARD TO THIS SOFTWARE, INCLUDING ALL IMPLIED WARRANTIES OF MERCHANTABILITY AND FITNESS, IN NO EVENT SHALL CARNEGIE MELLON UNIVERSITY BE LIABLE FOR ANY SPECIAL, INDIRECT OR CONSEQUENTIAL DAMAGES OR ANY DAMAGES WHATSOEVER RESULTING FROM LOSS OF USE, DATA OR PROFITS, WHETHER IN AN ACTION OF CONTRACT, NEGLIGENCE OR OTHER TORTIOUS ACTION, ARISING OUT OF OR IN CONNECTION WITH THE USE OR PERFORMANCE OF THIS SOFTWARE.
DCC
Distributed Checksum Clearinghouse
Copyright (c) 2004 by Rhyolite Software
Permission to use, copy, modify, and distribute this software for any purpose with or without fee is hereby granted, provided that the above copyright notice and this permission notice appear in all copies.
THE SOFTWARE IS PROVIDED "AS IS" AND RHYOLITE SOFTWARE DISCLAIMS ALL WARRANTIES WITH REGARD TO THIS SOFTWARE INCLUDING ALL IMPLIED WARRANTIES OF MERCHANTABILITY AND FITNESS. IN NO EVENT SHALL RHYOLITE SOFTWARE BE LIABLE FOR ANY SPECIAL, DIRECT, INDIRECT, OR CONSEQUENTIAL DAMAGES OR ANY DAMAGES WHATSOEVER RESULTING FROM LOSS OF USE, DATA OR PROFITS, WHETHER IN AN ACTION OF CONTRACT, NEGLIGENCE OR OTHER TORTIOUS ACTION, ARISING OUT OF OR IN CONNECTION WITH THE USE OR PERFORMANCE OF THIS SOFTWARE.
Copyright (c) 1987, 1993, 1994
The Regents of the University of California. All rights reserved.
File
Copyright (c) Ian F. Darwin 1986, 1987, 1989, 1990, 1991, 1992, 1994, 1995. Software written by Ian F. Darwin and others; maintained 1994-1999 Christos Zoulas.
This software is not subject to any export provision of the United States Department of Commerce, and may be exported to any country or planet.
Redistribution and use in source and binary forms, with or without modification, are permitted provided that the following conditions are met:
1. Redistributions of source code must retain the above copyright notice immediately at the beginning of the file, without modification, this list of conditions, and the following disclaimer.
295

Third Party Copyrights and Licenses
296
2. Redistributions in binary form must reproduce the above copyright notice, this list of conditions and the following disclaimer in the documentation and/or other materials provided with the distribution.
3. All advertising materials mentioning features or use of this software must display the following acknowledgement:
This product includes software developed by Ian F. Darwin and others.
4. The name of the author may not be used to endorse or promote products derived from this software without specific prior written permission.
THIS SOFTWARE IS PROVIDED BY THE AUTHOR AND CONTRIBUTORS ``AS IS'' AND ANY EXPRESS OR IMPLIED WARRANTIES, INCLUDING, BUT NOT LIMITED TO, THE IMPLIED WARRANTIES OF MERCHANTABILITY AND FITNESS FOR A PARTICULAR PURPOSE ARE DISCLAIMED. IN NO EVENT SHALL THE AUTHOR OR CONTRIBUTORS BE LIABLE FOR ANY DIRECT, INDIRECT, INCIDENTAL, SPECIAL, EXEMPLARY, OR CONSEQUENTIAL DAMAGES (INCLUDING, BUT NOT LIMITED TO, PROCUREMENT OF SUBSTITUTE GOODS OR SERVICES; LOSS OF USE, DATA, OR PROFITS; OR BUSINESS INTERRUPTION) HOWEVER CAUSED AND ON ANY THEORY OF LIABILITY, WHETHER IN CONTRACT, STRICT LIABILITY, OR TORT (INCLUDING NEGLIGENCE OR OTHERWISE) ARISING IN ANY WAY OUT OF THE USE OF THIS SOFTWARE, EVEN IF ADVISED OF THE POSSIBILITY OF SUCH DAMAGE.
FreeBSD
Copyright 1994-2004 The FreeBSD Project. All rights reserved.
Redistribution and use in source and binary forms, with or without modification, are permitted provided that the following conditions are met:
Redistributions of source code must retain the above copyright notice, this list of conditions and the following disclaimer.
Redistributions in binary form must reproduce the above copyright notice, this list of conditions and the following disclaimer in the documentation and/or other materials provided with the distribution.
THIS SOFTWARE IS PROVIDED BY THE FREEBSD PROJECT ``AS IS'' AND ANY EXPRESS OR IMPLIED WARRANTIES, INCLUDING, BUT NOT LIMITED TO, THE IMPLIED WARRANTIES OF MERCHANTABILITY AND FITNESS FOR A PARTICULAR PURPOSE ARE DISCLAIMED. IN NO EVENT SHALL THE FREEBSD PROJECT OR CONTRIBUTORS BE LIABLE FOR ANY DIRECT, INDIRECT, INCIDENTAL, SPECIAL, EXEMPLARY, OR CONSEQUENTIAL DAMAGES (INCLUDING, BUT NOT LIMITED TO, PROCUREMENT OF SUBSTITUTE GOODS OR SERVICES; LOSS OF USE, DATA, OR PROFITS; OR BUSINESS INTERRUPTION) HOWEVER CAUSED AND ON ANY THEORY OF LIABILITY, WHETHER IN CONTRACT, STRICT LIABILITY, OR TORT (INCLUDING NEGLIGENCE OR OTHERWISE) ARISING IN ANY WAY OUT OF THE USE OF THIS SOFTWARE, EVEN IF ADVISED OF THE POSSIBILITY OF SUCH DAMAGE.
The views and conclusions contained in the software and documentation are those of the authors and should not be interpreted as representing official policies, either expressed or implied, of the FreeBSD Project.

FreeType
The FreeType Project LICENSE 2000-Feb-08 Copyright 1996-2000 by David Turner, Robert Wilhelm, and Werner Lemberg
Introduction ============
The FreeType Project is distributed in several archive packages; some of them may contain, in addition to the FreeType font engine, various tools and contributions which rely on, or relate to, the FreeType Project.
This license applies to all files found in such packages, and which do not fall under their own explicit license. The license affects thus the FreeType font engine, the test programs, documentation and makefiles, at the very least.
This license was inspired by the BSD, Artistic, and IJG (Independent JPEG Group) licenses, which all encourage inclusion and use of free software in commercial and freeware products alike. As a consequence, its main points are that:
* We don't promise that this software works. However, we will be interested in any kind of bug reports. (`as is' distribution)
* You can use this software for whatever you want, in parts or full form, without having to pay us. (`royalty-free' usage)
* You may not pretend that you wrote this software. If you use it, or only parts of it, in a program, you must acknowledge somewhere in your documentation that you have used the FreeType code. (`credits')
We specifically permit and encourage the inclusion of this software, with or without modifications, in commercial products. We disclaim all warranties covering The FreeType Project and assume no liability related to The FreeType Project.
Legal Terms ===========
Definitions --------------
Throughout this license, the terms `package', `FreeType Project', and `FreeType archive' refer to the set of files originally distributed by the authors (David Turner, Robert Wilhelm, and Werner Lemberg) as the `FreeType Project', be they named as alpha, beta or final release.
'You' refers to the licensee, or person using the project, where `using' is a generic term including compiling the project's source code as well as linking it to form a `program' or `executable'. This program is referred to as `a program using the FreeType engine'.
This license applies to all files distributed in the original FreeType Project, including all source code, binaries and documentation, unless otherwise
297

Third Party Copyrights and Licenses
298
stated in the file in its original, unmodified form as distributed in the original archive.
If you are unsure whether or not a particular file is covered by this license, you must contact us to verify this.
The FreeType Project is copyright (C) 1996-2000 by David Turner, Robert Wilhelm, and Werner Lemberg. All rights reserved except as specified below.
1. No Warranty --------------
THE FREETYPE PROJECT IS PROVIDED `AS IS' WITHOUT WARRANTY OF ANY KIND, EITHER EXPRESS OR IMPLIED, INCLUDING, BUT NOT LIMITED TO, WARRANTIES OF MERCHANTABILITY AND FITNESS FOR A PARTICULAR PURPOSE. IN NO EVENT WILL ANY OF THE AUTHORS OR COPYRIGHT HOLDERS BE LIABLE FOR ANY DAMAGES CAUSED BY THE USE OR THE INABILITY TO USE, OF THE FREETYPE PROJECT.
2. Redistribution -----------------
This license grants a worldwide, royalty-free, perpetual and irrevocable right and license to use, execute, perform, compile, display, copy, create derivative works of, distribute and sublicense the FreeType Project (in both source and object code forms) and derivative works thereof for any purpose; and to authorize others to exercise some or all of the rights granted herein, subject to the following conditions:
* Redistribution of source code must retain this license file (`LICENSE.TXT') unaltered; any additions, deletions or changes to the original files must be clearly indicated in accompanying documentation. The copyright notices of the unaltered, original files must be preserved in all copies of source files.
* Redistribution in binary form must provide a disclaimer that states that the software is based in part of the work of the FreeType Team, in the distribution documentation. We also encourage you to put an URL to the FreeType web page in your documentation, though this isn't mandatory.
These conditions apply to any software derived from or based on the FreeType Project, not just the unmodified files. If you use our work, you must acknowledge us. However, no fee need be paid to us.
3. Advertising --------------
Neither the FreeType authors and contributors nor you shall use the name of the other for commercial, advertising, or promotional purposes without specific prior written permission.
We suggest, but do not require, that you use one or more of the following phrases to refer to this software in your documentation or advertising materials: ̀ FreeType Project', `FreeType Engine', `FreeType library', or `FreeType Distribution'.
As you have not signed this license, you are not required to accept it. However, as the FreeType Project is copyrighted material, only this license, or another one contracted with the authors, grants you the right to use, distribute,

and modify it. Therefore, by using, distributing, or modifying the FreeType Project, you indicate that you understand and accept all the terms of this license.
4. Contacts -----------
There are two mailing lists related to FreeType:
Discusses general use and applications of FreeType, as well as future and wanted additions to the library and distribution. If you are looking for support, start in this list if you haven't found anything to help you in the documentation.
Discusses bugs, as well as engine internals, design issues, specific licenses, porting, etc.
* http://www.freetype.org
Holds the current FreeType web page, which will allow you to download our latest development version and read online documentation.
You can also contact us individually at:
David Turner <[email protected]> Robert Wilhelm <[email protected]> Werner Lemberg <[email protected]>
GD Graphics Library
Portions copyright 1994, 1995, 1996, 1997, 1998, 1999, 2000, 2001, 2002, 2003, 2004 by Cold Spring Harbor Laboratory. Funded under Grant P41-RR02188 by the National Institutes of Health.
Portions copyright 1996, 1997, 1998, 1999, 2000, 2001, 2002, 2003, 2004 by Boutell.Com, Inc. Portions relating to GD2 format copyright 1999, 2000, 2001, 2002, 2003, 2004 Philip Warner. Portions relating to PNG copyright 1999, 2000, 2001, 2002, 2003, 2004 Greg Roelofs. Portions relating to gdttf.c copyright 1999, 2000, 2001, 2002, 2003, 2004 John Ellson ([email protected]). Portions relating to gdft.c copyright 2001, 2002, 2003, 2004 John Ellson ([email protected]). Portions relating to JPEG and to color quantization copyright 2000, 2001, 2002, 2003, 2004, Doug Becker and copyright (C) 1994, 1995, 1996, 1997, 1998, 1999, 2000, 2001, 2002, 2003, 2004 Thomas G. Lane. This software is based in part on the work of the Independent JPEG Group. See the file README-JPEG.TXT for more information.
Portions relating to GIF compression copyright 1989 by Jef Poskanzer and David Rowley, with modifications for thread safety by Thomas Boutell.
299
Third Party Copyrights and Licenses
300
Portions relating to GIF decompression copyright 1990, 1991, 1993 by David Koblas, with modifications for thread safety by Thomas Boutell.
Portions relating to WBMP copyright 2000, 2001, 2002, 2003, 2004 Maurice Szmurlo and Johan Van den Brande.
Portions relating to GIF animations copyright 2004 Jaakko Hyvätti ([email protected])
Permission has been granted to copy, distribute and modify gd in any context without fee, including a commercial application, provided that this notice is present in user-accessible supporting documentation.
This does not affect your ownership of the derived work itself, and the intent is to assure proper credit for the authors of gd, not to interfere with your productive use of gd. If you have questions, ask. "Derived works" includes all programs that utilize the library. Credit must be given in user-accessible documentation.
This software is provided "AS IS." The copyright holders disclaim all warranties, either express or implied, including but not limited to implied warranties of merchantability and fitness for a particular purpose, with respect to this code and accompanying documentation.
Although their code does not appear in the current release, the authors also wish to thank Hutchison Avenue Software Corporation for their prior contributions.
Info-ZIP
Copyright (c) 1990-2003 Info-ZIP. All rights reserved.
For the purposes of this copyright and license, "Info-ZIP" is defined as the following set of individuals:
Mark Adler, John Bush, Karl Davis, Harald Denker, Jean-Michel Dubois, Jean-loup Gailly, Hunter Goatley, Ian Gorman, Chris Herborth, Dirk Haase, Greg Hartwig, Robert Heath, Jonathan Hudson, Paul Kienitz, David Kirschbaum, Johnny Lee, Onno van der Linden, Igor Mandrichenko, Steve P. Miller, Sergio Monesi, Keith Owens, George Petrov, Greg Roelofs, Kai Uwe Rommel, Steve Salisbury, Dave Smith, Christian Spieler, Antoine Verheijen, Paul von Behren, Rich Wales, Mike White
This software is provided "as is," without warranty of any kind, express or implied. In no event shall Info-ZIP or its contributors be held liable for any direct, indirect, incidental, special or consequential damages arising out of the use of or inability to use this software.
Permission is granted to anyone to use this software for any purpose, including commercial applications, and to alter it and redistribute it freely, subject to the following restrictions:
1. Redistributions of source code must retain the above copyright notice, definition, disclaimer, and this list of conditions.

2. Redistributions in binary form (compiled executables) must reproduce the above copyright notice, definition, disclaimer, and this list of conditions in documentation and/or other materials provided with the distribution. The sole exception to this condition is redistribution of a standard UnZipSFX binary (including SFXWiz) as part of a self-extracting archive; that is permitted without inclusion of this license, as long as the normal SFX banner has not been removed from the binary or disabled.
3. Altered versions--including, but not limited to, ports to new operating systems, existing ports with new graphical interfaces, and dynamic, shared, or static library versions--must be plainly marked as such and must not be misrepresented as being the original source. Such altered versions also must not be misrepresented as being Info-ZIP releases--including, but not limited to, labeling of the altered versions with the names "Info-ZIP" (or any variation thereof, including, but not limited to, different capitalizations), "Pocket UnZip," "WiZ" or "MacZip" without the explicit permission of Info-ZIP. Such altered versions are further prohibited from misrepresentative use of the ip-Bugs or Info-ZIP e-mail addresses or of the Info-ZIP URL(s).
4. Info-ZIP retains the right to use the names "Info-ZIP," "Zip," "UnZip," "UnZipSFX," "WiZ," "Pocket UnZip," "Pocket Zip," and "MacZip" for its own source and binary releases.
JPEG
The authors make NO WARRANTY or representation, either express or implied, with respect to this software, its quality, accuracy, merchantability, or fitness for a particular purpose. This software is provided "AS IS", and you, its user, assume the entire risk as to its quality and accuracy.
This software is copyright (C) 1991-1998, Thomas G. Lane.
All Rights Reserved except as specified below.
Permission is hereby granted to use, copy, modify, and distribute this software (or portions thereof) for any purpose, without fee, subject to these conditions:
(1) If any part of the source code for this software is distributed, then this README file must be included, with this copyright and no-warranty notice unaltered; and any additions, deletions, or changes to the original files must be clearly indicated in accompanying documentation.
(2) If only executable code is distributed, then the accompanying documentation must state that "this software is based in part on the work of the Independent JPEG Group".
(3) Permission for use of this software is granted only if the user accepts full responsibility for any undesirable consequences; the authors accept NO LIABILITY for damages of any kind.
These conditions apply to any software derived from or based on the IJG code, not just to the unmodified library. If you use our work, you ought to acknowledge us.
301

Third Party Copyrights and Licenses
302
Permission is NOT granted for the use of any IJG author's name or company name in advertising or publicity relating to this software or products derived from it. This software may be referred to only as "the Independent JPEG Group's software".
We specifically permit and encourage the use of this software as the basis of commercial products, provided that all warranty or liability claims are assumed by the product vendor.
Libspf
The libspf Software License, Version 1.0
Copyright (c) 2004 James Couzens & Sean Comeau All rights reserved.
Redistribution and use in source and binary forms, with or without modification, are permitted provided that the following conditions are met:
1. Redistributions of source code must retain the above copyright notice, this list of conditions and the following disclaimer.
2. Redistributions in binary form must reproduce the above copyright notice, this list of conditions and the following disclaimer in the documentation and/or other materials provided with the distribution.
THIS SOFTWARE IS PROVIDED ``AS IS'' AND ANY EXPRESSED OR IMPLIED WARRANTIES, INCLUDING, BUT NOT LIMITED TO, THE IMPLIED WARRANTIES OF MERCHANTABILITY AND FITNESS FOR A PARTICULAR PURPOSE ARE DISCLAIMED. IN NO EVENT SHALL THE AUTHORS MAKING USE OF THIS LICENSE OR ITS CONTRIBUTORS BE LIABLE FOR ANY DIRECT, INDIRECT, INCIDENTAL, SPECIAL, EXEMPLARY, OR CONSEQUENTIAL DAMAGES (INCLUDING, BUT NOT LIMITED TO, PROCUREMENT OF SUBSTITUTE GOODS OR SERVICES; LOSS OF USE, DATA, OR PROFITS; OR BUSINESS INTERRUPTION) HOWEVER CAUSED AND ON ANY THEORY OF LIABILITY, WHETHER IN CONTRACT, STRICT LIABILITY, OR TORT (INCLUDING NEGLIGENCE OR OTHERWISE) ARISING IN ANY WAY OUT OF THE USE OF THIS SOFTWARE, EVEN IF ADVISED OF THE POSSIBILITY OF SUCH DAMAGE.
ModSSL
Copyright (c) 1998-2004 Ralf S. Engelschall. All rights reserved.
Redistribution and use in source and binary forms, with or without modification, are permitted provided that the following conditions are met:
1. Redistributions of source code must retain the above copyright notice, this list of conditions and the following disclaimer.
2. Redistributions in binary form must reproduce the above copyright notice, this list of conditions and the following disclaimer in the documentation and/or other materials provided with the distribution.
3. All advertising materials mentioning features or use of this software must display the following acknowledgment: "This product includes software developed by Ralf S. Engelschall <[email protected]> for use in the mod_ssl project http://www.modssl.org/)."

4. The names "mod_ssl" must not be used to endorse or promote products derived from this software without prior written permission. For written permission, please contact [email protected].
5. Products derived from this software may not be called "mod_ssl" nor may "mod_ssl" appear in their names without prior written permission of Ralf S. Engelschall.
6. Redistributions of any form whatsoever must retain the following acknowledgment:
"This product includes software developed by Ralf S. Engelschall <[email protected]> for use in the mod_ssl project (http://www.modssl.org/)."
THIS SOFTWARE IS PROVIDED BY RALF S. ENGELSCHALL ``AS IS'' AND ANY EXPRESSED OR IMPLIED WARRANTIES, INCLUDING, BUT NOT LIMITED TO, THE IMPLIED WARRANTIES OF MERCHANTABILITY AND FITNESS FOR A PARTICULAR PURPOSE ARE DISCLAIMED. IN NO EVENT SHALL RALF S. ENGELSCHALL OR HIS CONTRIBUTORS BE LIABLE FOR ANY DIRECT, INDIRECT, INCIDENTAL, SPECIAL, EXEMPLARY, OR CONSEQUENTIAL DAMAGES (INCLUDING, BUT NOT LIMITED TO, PROCUREMENT OF SUBSTITUTE GOODS OR SERVICES; LOSS OF USE, DATA, OR PROFITS; OR BUSINESS INTERRUPTION) HOWEVER CAUSED AND ON ANY THEORY OF LIABILITY, WHETHER IN CONTRACT, STRICT LIABILITY, OR TORT (INCLUDING NEGLIGENCE OR OTHERWISE) ARISING IN ANY WAY OUT OF THE USE OF THIS SOFTWARE, EVEN IF ADVISED OF THE POSSIBILITY OF SUCH DAMAGE.
Mpack
(C) Copyright 1993,1994 by Carnegie Mellon University
All Rights Reserved.
Permission to use, copy, modify, distribute, and sell this software and its documentation for any purpose is hereby granted without fee, provided that the above copyright notice appear in all copies and that both that copyright notice and this permission notice appear in supporting documentation, and that the name of Carnegie Mellon University not be used in advertising or publicity pertaining to distribution of the software without specific, written prior permission. Carnegie Mellon University makes no representations about the suitability of this software for any purpose. It is provided "as is" without express or implied warranty.
CARNEGIE MELLON UNIVERSITY DISCLAIMS ALL WARRANTIES WITH REGARD TO THIS SOFTWARE, INCLUDING ALL IMPLIED WARRANTIES OF MERCHANTABILITY AND FITNESS, IN NO EVENT SHALL CARNEGIE MELLON UNIVERSITY BE LIABLE FOR ANY SPECIAL, INDIRECT OR CONSEQUENTIAL DAMAGES OR ANY DAMAGES WHATSOEVER RESULTING FROM LOSS OF USE, DATA OR PROFITS, WHETHER IN AN ACTION OF CONTRACT, NEGLIGENCE OR OTHER TORTIOUS ACTION, ARISING OUT OF OR IN CONNECTION WITH THE USE OR PERFORMANCE OF THIS SOFTWARE.
Portions of this software are derived from code written by Bell Communications Research, Inc. (Bellcore) and by RSA Data Security, Inc. and bear similar copyrights and disclaimers of warranty.
303

Third Party Copyrights and Licenses
304
NTP
Copyright (c) David L. Mills 1992-2004
Permission to use, copy, modify, and distribute this software and its documentation for any purpose and without fee is hereby granted, provided that the above copyright notice appears in all copies and that both the copyright notice and this permission notice appear in supporting documentation, and that the name University of Delaware not be used in advertising or publicity pertaining to distribution of the software without specific, written prior permission. The University of Delaware makes no representations about the suitability this software for any purpose. It is provided "as is" without express or implied warranty.
OpenLDAP
The OpenLDAP Public License
Version 2.8, 17 August 2003
Redistribution and use of this software and associated documentation ("Software"), with or without modification, are permitted provided that the following conditions are met:
1. Redistributions in source form must retain copyright statements and notices,
2. Redistributions in binary form must reproduce applicable copyright statements and notices, this list of conditions, and the following disclaimer in the documentation and/or other materials provided with the distribution, and
3. Redistributions must contain a verbatim copy of this document.
The OpenLDAP Foundation may revise this license from time to time. Each revision is distinguished by a version number. You may use this Software under terms of this license revision or under the terms of any subsequent revision of the license.
THIS SOFTWARE IS PROVIDED BY THE OPENLDAP FOUNDATION AND ITS CONTRIBUTORS ``AS IS'' AND ANY EXPRESSED OR IMPLIED WARRANTIES, INCLUDING, BUT NOT LIMITED TO, THE IMPLIED WARRANTIES OF MERCHANTABILITY AND FITNESS FOR A PARTICULAR PURPOSE ARE DISCLAIMED. IN NO EVENT SHALL THE OPENLDAP FOUNDATION, ITS CONTRIBUTORS, OR THE AUTHOR(S) OR OWNER(S) OF THE SOFTWARE BE LIABLE FOR ANY DIRECT, INDIRECT, INCIDENTAL, SPECIAL, EXEMPLARY, OR CONSEQUENTIAL DAMAGES (INCLUDING, BUT NOT LIMITED TO, PROCUREMENT OF SUBSTITUTE GOODS OR SERVICES; LOSS OF USE, DATA, OR PROFITS; OR BUSINESS INTERRUPTION) HOWEVER CAUSED AND ON ANY THEORY OF LIABILITY, WHETHER IN CONTRACT, STRICT LIABILITY, OR TORT (INCLUDING NEGLIGENCE OR OTHERWISE) ARISING IN ANY WAY OUT OF THE USE OF THIS SOFTWARE, EVEN IF ADVISED OF THE POSSIBILITY OF SUCH DAMAGE.
The names of the authors and copyright holders must not be used in advertising or otherwise to promote the sale, use or other dealing in this Software without specific, written prior permission. Title to copyright in this Software shall at all times remain with copyright holders.
OpenLDAP is a registered trademark of the OpenLDAP Foundation.

Copyright 1999-2003 The OpenLDAP Foundation, Redwood City, California, USA. All Rights Reserved. Permission to copy and distribute verbatim copies of this document is granted.
OpenSSH
The licences which components of this software fall under are as follows. First, we will summarize and say that all components are under a BSD licence, or a licence more free than that.
OpenSSH contains no GPL code.
1) Copyright (c) 1995 Tatu Ylonen <[email protected]>, Espoo, Finland All rights reserved
As far as I am concerned, the code I have written for this software can be used freely for any purpose. Any derived versions of this software must be clearly marked as such, and if the derived work is incompatible with the protocol description in the RFC file, it must be called by a name other than "ssh" or "Secure Shell".
However, I am not implying to give any licenses to any patents or copyrights held by third parties, and the software includes parts that are not under my direct control. As far as I know, all included source code is used in accordance with the relevant license agreements and can be used freely for any purpose (the GNU license being the most restrictive); see below for details.
Note that any information and cryptographic algorithms used in this software are publicly available on the Internet and at any major bookstore, scientific library, and patent office worldwide. More information can be found e.g. at "http://www.cs.hut.fi/crypto".
The legal status of this program is some combination of all these permissions and restrictions. Use only at your own responsibility. You will be responsible for any legal consequences yourself; I am not making any claims whether possessing or using this is legal or not in your country, and I am not taking any responsibility on your behalf.
NO WARRANTY
BECAUSE THE PROGRAM IS LICENSED FREE OF CHARGE, THERE IS NO WARRANTY
FOR THE PROGRAM, TO THE EXTENT PERMITTED BY APPLICABLE LAW. EXCEPT WHEN OTHERWISE STATED IN WRITING THE COPYRIGHT HOLDERS AND/OR OTHER PARTIES PROVIDE THE PROGRAM "AS IS" WITHOUT WARRANTY OF ANY KIND, EITHER EXPRESSED OR IMPLIED, INCLUDING, BUT NOT LIMITED TO, THE IMPLIED WARRANTIES OF MERCHANTABILITY AND FITNESS FOR A PARTICULAR PURPOSE. THE ENTIRE RISK AS TO THE QUALITY AND PERFORMANCE OF THE PROGRAM IS WITH YOU. SHOULD THE PROGRAM PROVE DEFECTIVE, YOU ASSUME THE COST OF ALL NECESSARY SERVICING, REPAIR OR CORRECTION.
IN NO EVENT UNLESS REQUIRED BY APPLICABLE LAW OR AGREED TO IN WRITING WILL ANY COPYRIGHT HOLDER, OR ANY OTHER PARTY WHO MAY MODIFY AND/OR REDISTRIBUTE THE PROGRAM AS PERMITTED ABOVE, BE LIABLE TO YOU FOR DAMAGES, INCLUDING ANY GENERAL, SPECIAL, INCIDENTAL OR CONSEQUENTIAL DAMAGES ARISING OUT OF THE USE OR INABILITY TO USE THE PROGRAM (INCLUDING BUT NOT LIMITED TO LOSS OF DATA OR DATA BEING RENDERED INACCURATE
305

Third Party Copyrights and Licenses
306
OR LOSSES SUSTAINED BY YOU OR THIRD PARTIES OR A FAILURE OF THE PROGRAM TO OPERATE WITH ANY OTHER PROGRAMS), EVEN IF SUCH HOLDER OR OTHER PARTY HAS BEEN ADVISED OF THE POSSIBILITY OF SUCH DAMAGES.
2) The 32-bit CRC compensation attack detector in deattack.c was contributed by CORE SDI S.A. under a BSD-style license.
Cryptographic attack detector for ssh - source code
Copyright (c) 1998 CORE SDI S.A., Buenos Aires, Argentina. All rights reserved. Redistribution and use in source and binary forms, with or without modification, are permitted provided that this copyright notice is retained.
THIS SOFTWARE IS PROVIDED ``AS IS'' AND ANY EXPRESS OR IMPLIED WARRANTIES ARE DISCLAIMED. IN NO EVENT SHALL CORE SDI S.A. BE LIABLE FOR ANY DIRECT, INDIRECT, INCIDENTAL, SPECIAL, EXEMPLARY OR CONSEQUENTIAL DAMAGES RESULTING FROM THE USE OR MISUSE OF THIS SOFTWARE.
Ariel Futoransky <[email protected]> <http://www.core-sdi.com>
3) ssh-keyscan was contributed by David Mazieres under a BSD-style license. Copyright 1995, 1996 by David Mazieres <[email protected]>.
Modification and redistribution in source and binary forms is permitted provided that due credit is given to the author and the OpenBSD project by leaving this copyright notice intact.
4) The Rijndael implementation by Vincent Rijmen, Antoon Bosselaers and Paulo Barreto is in the public domain and distributed with the following license:
@version 3.0 (December 2000) Optimised ANSI C code for the Rijndael cipher (now AES) @author Vincent Rijmen <[email protected]> @author Antoon Bosselaers <[email protected]> @author Paulo Barreto <[email protected]>
This code is hereby placed in the public domain.
THIS SOFTWARE IS PROVIDED BY THE AUTHORS ''AS IS'' AND ANY EXPRESS OR IMPLIED WARRANTIES, INCLUDING, BUT NOT LIMITED TO, THE IMPLIED WARRANTIES OF MERCHANTABILITY AND FITNESS FOR A PARTICULAR PURPOSE ARE DISCLAIMED. IN NO EVENT SHALL THE AUTHORS OR CONTRIBUTORS BE LIABLE FOR ANY DIRECT, INDIRECT, INCIDENTAL, SPECIAL, EXEMPLARY, OR CONSEQUENTIAL DAMAGES (INCLUDING, BUT NOT LIMITED TO, PROCUREMENT OF SUBSTITUTE GOODS OR SERVICES; LOSS OF USE, DATA, OR PROFITS; OR BUSINESS INTERRUPTION) HOWEVER CAUSED AND ON ANY THEORY OF LIABILITY, WHETHER IN CONTRACT, STRICT LIABILITY, OR TORT (INCLUDING NEGLIGENCE OR OTHERWISE) ARISING IN ANY WAY OUT OF THE USE OF THIS SOFTWARE, EVEN IF ADVISED OF THE POSSIBILITY OF SUCH DAMAGE.
5) One component of the ssh source code is under a 3-clause BSD license, held by the University of California, since we pulled these parts from original Berkeley code.
Copyright (c) 1983, 1990, 1992, 1993, 1995 The Regents of the University of California. All rights reserved. Redistribution and use in source and binary forms, with or without modification, are permitted provided that the following conditions are met:

1. Redistributions of source code must retain the above copyright notice, this list of conditions and the following disclaimer.
2. Redistributions in binary form must reproduce the above copyright notice, this list of conditions and the following disclaimer in the documentation and/or other materials provided with the distribution.
3. Neither the name of the University nor the names of its contributors may be used to endorse or promote products derived from this software without specific prior written permission.
THIS SOFTWARE IS PROVIDED BY THE REGENTS AND CONTRIBUTORS ``AS IS'' AND ANY EXPRESS OR IMPLIED WARRANTIES, INCLUDING, BUT NOT LIMITED TO, THE IMPLIED WARRANTIES OF MERCHANTABILITY AND FITNESS FOR A PARTICULAR PURPOSE ARE DISCLAIMED. IN NO EVENT SHALL THE REGENTS OR CONTRIBUTORS BE LIABLE FOR ANY DIRECT, INDIRECT, INCIDENTAL, SPECIAL, EXEMPLARY, OR CONSEQUENTIAL DAMAGES (INCLUDING, BUT NOT LIMITED TO, PROCUREMENT OF SUBSTITUTE GOODS OR SERVICES; LOSS OF USE, DATA, OR PROFITS; OR BUSINESS INTERRUPTION) HOWEVER CAUSED AND ON ANY THEORY OF LIABILITY, WHETHER IN CONTRACT, STRICT LIABILITY, OR TORT (INCLUDING NEGLIGENCE OR OTHERWISE) ARISING IN ANY WAY OUT OF THE USE OF THIS SOFTWARE, EVEN IF ADVISED OF THE POSSIBILITY OF SUCH DAMAGE.
6) Remaining components of the software are provided under a standard 2-term BSD licence with the following names as copyright holders:
Markus Friedl Theo de Raadt Niels Provos Dug Song Aaron Campbell Damien Miller Kevin Steves Daniel Kouril Wesley Griffin Per Allansson Nils Nordman Simon Wilkinson
Redistribution and use in source and binary forms, with or without modification, are permitted provided that the following conditions are met:
1. Redistributions of source code must retain the above copyright notice, this list of conditions and the following disclaimer.
2. Redistributions in binary form must reproduce the above copyright notice, this list of conditions and the following disclaimer in the documentation and/or other materials provided with the distribution.
THIS SOFTWARE IS PROVIDED BY THE AUTHOR ``AS IS'' AND ANY EXPRESS OR IMPLIED WARRANTIES, INCLUDING, BUT NOT LIMITED TO, THE IMPLIED WARRANTIES OF MERCHANTABILITY AND FITNESS FOR A PARTICULAR PURPOSE ARE DISCLAIMED. IN NO EVENT SHALL THE AUTHOR BE LIABLE FOR ANY DIRECT, INDIRECT, INCIDENTAL, SPECIAL, EXEMPLARY, OR CONSEQUENTIAL DAMAGES (INCLUDING, BUT NOT LIMITED TO, PROCUREMENT OF SUBSTITUTE GOODS OR SERVICES; LOSS OF USE, DATA, OR PROFITS; OR BUSINESS INTERRUPTION) HOWEVER CAUSED AND ON ANY THEORY OF LIABILITY, WHETHER IN CONTRACT, STRICT LIABILITY, OR TORT (INCLUDING
307
Third Party Copyrights and Licenses
308
NEGLIGENCE OR OTHERWISE) ARISING IN ANY WAY OUT OF THE USE OF THIS SOFTWARE, EVEN IF ADVISED OF THE POSSIBILITY OF SUCH DAMAGE.
OpenSSL
Copyright (c) 1998-2003 The OpenSSL Project. All rights reserved.
Redistribution and use in source and binary forms, with or without modification, are permitted provided that the following conditions are met:
1. Redistributions of source code must retain the above copyright notice, this list of conditions and the following disclaimer.
2. Redistributions in binary form must reproduce the above copyright notice, this list of conditions and the following disclaimer in the documentation and/or other materials provided with the distribution.
3. All advertising materials mentioning features or use of this software must display the following acknowledgment:
"This product includes software developed by the OpenSSL Project for use in the OpenSSL Toolkit. (http://www.openssl.org/)"
4. The names "OpenSSL Toolkit" and "OpenSSL Project" must not be use to endorse or promote products derived from this software without prior written permission. For written permission, please contact [email protected].
5. Products derived from this software may not be called "OpenSSL" nor may "OpenSSL" appear in their names without prior written permission of the OpenSSL Project.
6. Redistributions of any form whatsoever must retain the following acknowledgment:
"This product includes software developed by the OpenSSL Project for use in the OpenSSL Toolkit (http://www.openssl.org/)"
THIS SOFTWARE IS PROVIDED BY THE OpenSSL PROJECT ``AS IS'' AND ANY EXPRESSED OR IMPLIED WARRANTIES, INCLUDING, BUT NOT LIMITED TO, THE IMPLIED WARRANTIES OF MERCHANTABILITY AND FITNESS FOR A PARTICULAR PURPOSE ARE DISCLAIMED. IN NO EVENT SHALL THE OpenSSL PROJECT OR ITS CONTRIBUTORS BE LIABLE FOR ANY DIRECT, INDIRECT, INCIDENTAL, SPECIAL, EXEMPLARY, OR CONSEQUENTIAL DAMAGES (INCLUDING, BUT NOT LIMITED TO, PROCUREMENT OF SUBSTITUTE GOODS OR SERVICES; LOSS OF USE, DATA, OR PROFITS; OR BUSINESS INTERRUPTION) HOWEVER CAUSED AND ON ANY THEORY OF LIABILITY, WHETHER IN CONTRACT, STRICT LIABILITY, OR TORT (INCLUDING NEGLIGENCE OR OTHERWISE) ARISING IN ANY WAY OUT OF THE USE OF THIS SOFTWARE, EVEN IF ADVISED OF THE POSSIBILITY OF SUCH DAMAGE. This product includes cryptographic software written by Eric Young ([email protected]). This product includes software written by Tim Hudson ([email protected]).

PAM
Redistribution and use in source and binary forms of Linux-PAM, with or without modification, are permitted provided that the following conditions are met:
1. Redistributions of source code must retain any existing copyright notice, and this entire permission notice in its entirety, including the disclaimer of warranties.
2. Redistributions in binary form must reproduce all prior and current copyright notices, this list of conditions, and the following disclaimer in the documentation and/or other materials provided with the distribution.
3. The name of any author may not be used to endorse or promote products derived from this software without their specific prior written permission.
ALTERNATIVELY, this product may be distributed under the terms of the GNU General Public License, in which case the provisions of the GNU GPL are required INSTEAD OF the above restrictions. (This clause is necessary due to a potential conflict between the GNU GPL and the restrictions contained in a BSD-style copyright.)
THIS SOFTWARE IS PROVIDED ``AS IS'' AND ANY EXPRESS OR IMPLIED WARRANTIES, INCLUDING, BUT NOT LIMITED TO, THE IMPLIED WARRANTIES OF MERCHANTABILITY AND FITNESS FOR A PARTICULAR PURPOSE ARE DISCLAIMED. IN NO EVENT SHALL THE AUTHOR(S) BE LIABLE FOR ANY DIRECT, INDIRECT, INCIDENTAL, SPECIAL, EXEMPLARY, OR CONSEQUENTIAL DAMAGES (INCLUDING, BUT NOT LIMITED TO, PROCUREMENT OF SUBSTITUTE GOODS OR SERVICES; LOSS OF USE, DATA, OR PROFITS; OR BUSINESS INTERRUPTION) HOWEVER CAUSED AND ON ANY THEORY OF LIABILITY, WHETHER IN CONTRACT, STRICT LIABILITY, OR TORT (INCLUDING NEGLIGENCE OR OTHERWISE) ARISING IN ANY WAY OUT OF THE USE OF THIS SOFTWARE, EVEN IF ADVISED OF THE POSSIBILITY OF SUCH DAMAGE.
PHP
The PHP License, version 3.0 Copyright (c) 1999 - 2002 The PHP Group. All rights reserved.
Redistribution and use in source and binary forms, with or without modification, is permitted provided that the following conditions are met:
1. Redistributions of source code must retain the above copyright notice, this list of conditions and the following disclaimer.
2. Redistributions in binary form must reproduce the above copyright notice, this list of conditions and the following disclaimer in the documentation and/or other materials provided with the distribution.
3. The name "PHP" must not be used to endorse or promote products derived from this software without prior written permission. For written permission, please contact [email protected].
4. Products derived from this software may not be called "PHP", nor may "PHP" appear in their name, without prior written permission from [email protected]. You may indicate
309

Third Party Copyrights and Licenses
310
that your software works in conjunction with PHP by saying "Foo for PHP" instead of calling it "PHP Foo" or "phpfoo"
5. The PHP Group may publish revised and/or new versions of the license from time to time. Each version will be given a distinguishing version number. Once covered code has been published under a particular version of the license, you may always continue to use it under the terms of that version. You may also choose to use such covered code under the terms of any subsequent version of the license published by the PHP Group. No one other than the PHP Group has the right to modify the terms applicable to covered code created under this License.
6. Redistributions of any form whatsoever must retain the following acknowledgment: "This product includes PHP, freely available from <http://www.php.net/>".
THIS SOFTWARE IS PROVIDED BY THE PHP DEVELOPMENT TEAM ``AS IS'' AND ANY EXPRESSED OR IMPLIED WARRANTIES, INCLUDING, BUT NOT LIMITED TO, THE IMPLIED WARRANTIES OF MERCHANTABILITY AND FITNESS FOR A PARTICULAR PURPOSE ARE DISCLAIMED. IN NO EVENT SHALL THE PHP DEVELOPMENT TEAM OR ITS CONTRIBUTORS BE LIABLE FOR ANY DIRECT, INDIRECT, INCIDENTAL, SPECIAL, EXEMPLARY, OR CONSEQUENTIAL DAMAGES (INCLUDING, BUT NOT LIMITED TO, PROCUREMENT OF SUBSTITUTE GOODS OR SERVICES; LOSS OF USE, DATA, OR PROFITS; OR BUSINESS INTERRUPTION) HOWEVER CAUSED AND ON ANY THEORY OF LIABILITY, WHETHER IN CONTRACT, STRICT LIABILITY, OR TORT (INCLUDING NEGLIGENCE OR OTHERWISE) ARISING IN ANY WAY OUT OF THE USE OF THIS SOFTWARE, EVEN IF ADVISED OF THE POSSIBILITY OF SUCH DAMAGE.

AAccess Control via Mail Mappings 49Active Directory 15Active Directory LDAP Results Limit 55Activity screen 240, 253Admin HTTP Port 90Admin HTTPS Port 90Admin Login 36Admin User 28Advanced SMTP Settings 44Alarms 248Analysis Code Descriptions 255Annotations 43Anti-Spam Header 141Anti-Virus 80Archive Log 242Attachment Control 20, 85Attachment Types 85Authentication log 242
BBackup
FTP 191Local Disk 190Naming Conventions 193
BCC (Blind Carbon Copy) 42BorderPost 13, 164
CCached server passwords 162Centralized Management 197
Console 200Copy Configuration 201
Certificate 93Certificate Authority (CA) 94Character set encoding 91Clustering 36, 204
Activity 214, 241Adding Cluster Members 209Administration 212Backup and Restore 214Configuration 206Console 204Interface 36Network Configuration 206Reporting 214Troubleshooting Cluster Initialization 211
Configuration Information 180Content Reject Message 44Copy Configuration 201CRYPTOCard 13, 28, 148Current Admin and WebMail Users 180Customization 32Customizing Notification and Annotation Messages 273
DDaily Backup 193DCC (Distributed Checksum Clearinghouse) 12, 98, 99, 102, 119
Servers 122Trusted and Blocked List 121
1
2
Default Logo 32Default Mail Relay 42Default Policy 168Delete Strong Authentication for Admin 266Delivery Settings 41Delivery Warning 43Diagnostics 179Dictionary Spam Count 131Directory Authentication 150Directory Groups 58Directory Servers 56Directory Services 56Directory Users 61Disable Content Scan 86Disabling Reporting 238Disk Space Quota 145DMZ (Demilitarized Zone) 17DNS 35
EEAL 4 10Enable NULL Character Detect 83Enable Sending and Receiving 179Encryption 13, 90Escalation Mail 249ESMTP (Extended SMTP) 44
FF5 Load Balancer 216Factory Default Settings 269Flush Mail Queue 179, 258
GGateway 35Global Policy 168
HHALO (High Availability and Load Optimization) 14, 204HELO 44, 105, 108, 110Hostname Lookup 179, 259
IIMAP 15, 144Internationalization 16iPlanet 15
JJapanese Language 128
KKeepOpen 39Kernel Log 242
LLarge MTU 9, 35LDAP (Lightweight Directory Access Protocol) 15, 54LDAP Aliases 47, 65LDAP Recipients 8, 69, 141LDAP Routing 8, 74LDAP SMTP Authenticated relay 8, 71LDAP SMTP Authentication 79

LDAP Users 141LDAP Virtual Mappings 51, 67License Management 184Load Balancing 14
Using DNS 205Local Accounts 145Log Files 242, 254
MMail Access 78Mail Aliases 21, 46Mail History 231, 263Mail Mappings 20, 48Mail Queue Management 181Mail Routing 21, 39Mail Transport log 254MAILER-DAEMON 41Malformed messages 12, 83Manual License Activation 185Masquerade Addresses 41Maximum mailbox size 146Maximum message size 19, 78, 105Maximum Number of Mail Scanners 279Maximum Number of Parallel Deliveries 278Maximum Number of Processes 278Maximum number of recipients 19Maximum recipients per message 78, 104Maximum time in mail queue 41Message Body 109Message Disposition 233, 264Message Envelope 108Message Processing Order 271Message Variables 274Messages Log 242MIB (Management Information Base) 245, 247MIB OID Values 287MIME (Multipurpose Internet Mail Extensions) 11Mirror Accounts 64, 147MTU 9, 35
NNetwork Interfaces 35Network Settings 34Neutral Words 127NTP (Network Time Protocol) 35Number of Database Proxies 280Number of Heavy Weight Processes 279
OOCF (Objectionable Content Filter) 8, 20, 99, 115OpenLDAP 15Optional Product Licenses 185
PPattern Based Message Filtering 78, 99, 102, 104, 107
BCC Action 113Preferences 113Priority 112Spam 113
Performance Tuning 275
3

4
Personal Quarantine Controls 161Ping 179, 261, 266Policy 15, 168POP3 15, 144Problem Reporting 202
QQuarantine Expiry 183Quarantine Management 182Quarantine unopenable attachments 81Queue replication 14, 217
Interface 219
RRADIUS 152Raise Priority of Heavy Weight Processes 279Raw Mail Body 111RBL (Realtime Blackhole Lists) 12, 98, 99, 102, 117RBL Domains 118Reboot 188, 266Reject on missing addresses 19, 142Reject on missing reverse DNS 19, 142Reject on non FQDN sender 19, 141Reject on unauth pipelining 19, 142Reject on unknown recipient 19, 141Reject on unknown sender domain 19, 141Relocated Users 21, 153Remote Authentication 150Replication Client 219Replication Host 219Reporting SQL Log 242Reports 222
Automatic Report Generation 225Configuration 237Disabling 238Fields 226Filters 230Generating 223Viewing 223
Require TLS for SMTP AUTH 92Reset Network Interface 266Reset SSL Certificates 266Respond to Ping 36Restore from FTP 195Restore from Local Disk 194Restoring a Cluster Member 214Restoring from Backup 194Restoring the Cluster Console 215RFC 1323 36RFC 1644 36
SSafeWord 13, 28, 148S-Core 10Searching Log Files 243Secure WebMail 13, 160SecurID 13, 28, 149Security Connection 16, 187, 266Serial Console 267Show Dispositions 241Shutdown 188, 266

Size of Shared Memory block 281Size of Temporary Files Filesystem 281SMTP 15SMTP Authenticated Relay 79SMTP Banner 79SMTP Connect Timeout 280SMTP HELO Timeout 280SMTP Notification 45SMTP Pipelining 44SMTP Probe 179, 260SMTP Security 92SMTPD Timeout 280SNMP (Simple Network Management Protocol) 16, 36, 245
Community string 246MIBS 283
Software Updates 186Spam Quarantine 12, 102, 136Specific Access Patterns 19, 78, 99, 102, 104SPF (Sender Policy Framework) 20, 88SQL Logging 238SSL (Secure Socket Layer) 90SSL Certificates 93STA (Statistical Token Analysis) 12, 98, 99, 102, 123
Delete Training 127Rebuild database 126Token 111Training 129Troubleshooting 132
Static Routes 38Status & Utility 178Stop and Start Mail Services 179Strip Received Headers 41Strong Authentication 28, 145, 148Support Access 37Supported web browsers 24Syslog 244Syslog Host 35System Console 27, 265System event types 235System History 234System Logs 242, 254System Status 178
TTCP extensions 36Tiered Administration 29, 157Time before delay warning 41TLS (Transport Layer Security) 13, 90Traceroute 179, 262, 266Troubleshooting Content Issues 263Troubleshooting Mail Delivery 252Troubleshooting Tools 253Trusted and Untrusted Mail 100Trusted Senders List 12, 102, 133, 161Trusted Subnet 36, 101
UUPS 267
5
6
VVacation Notification 154Very Malformed Mail 45Virtual Mappings 20, 50Virus pattern files 82
WWeb Server Access Log 242Web Server Encrypted Accesses Log 242Web Server Encryption 90Web Server Encryption Engine Log 242Web Server Errors Log 242Web Server Options 31
XX-STA Header 128

CORPORATE ADDRESS15015 Avenue of ScienceSan Diego, CA 92128 USAToll Free: 800-782-3762Telephone: 858-676-2277Fax: 858-676-2299Email: [email protected]: www.stbernard.com
EUROPEAN ADDRESSUnit 4, Riverside WayWatchmoor Park, Camberley,Surrey GU15 3YQ, United KingdomTelephone: +44 (0) 1276-401640Support Telephone: +44 (0) 1276-401642Fax: +44 (0) 1276-684479Email: [email protected]
EPENT0805© 2004-2005 St. Bernard Software Inc. All rights reserved. The St. Bernard Software logo is a trademark of St. Bernard Software Inc. ePrism is a registered trademark of St. Bernard Software Inc.All other trademarks and registered trademarks are hereby acknowledged.
Protecting Your Network InvestmentProtecting Your Network Investment
WWW.STBERNARD.COM • 1-800-782-3762
ePrism User Guide
SOFTWARE VERSION: 5.0LAST REVISION: 5/19/05M 1 0 0 0 , M 2 0 0 0 , M 3 0 0 0