espresso machine user guide - sunbeam australia · 2 sunbeam’s safety precautions safety...
TRANSCRIPT

E S P R E S S O M A C H I N E
USER GUIDE
EM80
00

Important instructions – retain for future use.
Contents
Sunbeam's Safety Precautions 2
Features of your Torino 4
Torino LCD Display 9
Quick Guide to Using Your Torino 10
Tips to Coffee Making 15
Tips to Milk Texturing 19
Advanced Programming 21
Espresso Recipes 24
Care and Cleaning 26
Coffee Thermoblock Cleaning 28
Steam Thermoblock Descaling 31
Troubleshooting Guide 33

2
Sunbeam’s Safety Precautions
SAFETY PRECAUTIONS FOR YOUR SUNBEAM ESPRESSO MACHINE
• Always place the unit on a flat, level surface.• Do not operate without water in reservoir.
Fill reservoir with only clean and cold water. Observe the maximum filling volume is 2.5L.
• Do not remove the filter handle during the espresso pour or water flow as the unit is under pressure. Removing the filter handle during either of these operations can lead to a scalding or injury.
• The steam wand and hot water tap become very hot during texturing milk and water flow. This may cause burns in case of contact, therefore avoid any direct contact with the steam wand or hot water tap.
• Always disconnect the plug from the power outlet prior to cleaning the espresso machine or if there is any problem during the coffee making process.
• Do not allow the power cord to come into contact with the hot parts of the espresso machine, including the cup warming plate, hot water tap and steam wand.
• Do not place hands directly under the steam, hot water or coffee pour as this can lead to a scalding or injury.
• This appliance can be used by children aged from 8 years and above if they have been given supervision or instruction concerning use of the appliance in a safe way and understand the hazards involved.
Cleaning and user maintenance shall not be made by children unless they are older than 8 and above and supervised. Keep the appliance and its cord out of reach of children aged less than 8 years.
• Appliance can be used by persons with reduced physical, sensory or mental capabilities or lack of experience and knowledge if they have been given supervision or instruction concerning use of the appliance in a safe way and understand the hazards involved.
Children shall not play with the appliance.• The heating element surface is subject to residual
heat after use.
DISPOSAL: Do not dispose this product
as unsorted municipal waste. Collection of such waste separately for special treatment is necessary.
This product must not be disposed together with the domestic waste. This product has to be disposed at an authorized place for recycling of electrical and electronic appliances.
By collecting and recycling waste, you help save natural resources, and make sure the product is disposed in an environmental friendly and healthy way.

3
If you have any concerns regarding the performance and use of your appliance, please visit www.sunbeam.com.au or contact the Sunbeam Consumer Service Line.
Ensure the above safety precautions are understood.
Sunbeam’s Safety Precautions
Sunbeam is very safety conscious when designing and manufacturing consumer products, but it is essential that the product user also exercise care when using an electrical appliance. Listed below are precautions which are essential for the safe use of an electrical appliance:
• Read carefully and save all the instructions provided with an appliance.
• Always turn the power off at the power outlet before you insert or remove a plug. Remove by grasping the plug - do not pull on the cord.
• Turn the power off and remove the plug when the appliance is not in use and before cleaning.
• Do not use your appliance with an extension cord unless this cord has been checked and tested by a qualified technician or service person.
• Always use your appliance from a power outlet of the voltage (A.C. only) marked on the appliance.
• The temperature of accessible surfaces may be high when the appliance is operating.
• Never leave an appliance unattended while in use.• Do not use an appliance for any purpose other than
its intended use.• Do not place an appliance on or near a hot gas
flame, electric element or on a heated oven. • Do not place on top of any other appliance.• Do not let the power cord of an appliance hang over
the edge of a table or bench top or touch any hot surface.
• Do not operate any electrical appliance with a damaged cord or after the appliance has been damaged in any manner. If damage is suspected, return the appliance to the nearest Sunbeam Appointed Service Centre for examination, repair or adjustment.
• For additional protection, Sunbeam recommend the use of a residual current device (RCD) with a tripping current not exceeding 30mA in the electrical circuit supplying power to your appliances.
• Do not immerse the appliance in water or any other liquid unless recommended.
• Appliances are not intended to be operated by means of an external timer or separate remote control system.
• This appliance is intended to be used in household and similar applications such as: staff kitchen areas in shops, offices and other working environments; farm houses; by clients in hotels, motels and other residential type environments; bed and breakfast type environments.
Temperature of the surface displaying this image maybe high when the appliance is operating.

4
Warming rackPreheats cups and glasses, which helps retain the essential characteristics of true espresso - aroma and a rich, sweet taste.
Programmable control panelShows the Coffee Temperature, Steam flow rate, Pre-infusion profile and cleaning reminder.
Steam control dialTo open and close the steam for texturing milk.
LCD displayShows shot clock, low water, cleaning and programming functions.
Espresso pressure gaugeThe gauge measures the resistance to the espresso pour, indicating the quality of the espresso shot.
Steam wand
Group handleThe sloping handle is designed for improved ergonomic use and when rested on the bench provides an even tamping surface, resulting in a better tasting espresso.
Commercial size group head
Removable drip tray and grill
AccessoriesAll the essential accessories to make an authentic café-quality espresso.
Double filter basket Dual-floorDouble filter basket
Single filter basket Dual-floorSingle filter basket
Features of your Torino

5
2.5 litre water reservoirRemovable 2.5 litre water reservoir is fitted with an anti-calc filter and can be filled from the top.
1 and 2 cup buttonsChoose from 1 and 2 cup (1 shot and 2 shot) espresso serve pours. A controlled measure of water is dispensed.
Hot water control dialUsed to open and close the hot water.
Manual pour armAlternative to using the 1 and 2 cup pour buttons, this allows you to control your own length of pour.
Hot water wandDispenses a controlled flow of hot water.
Adjustable feetEnsure a level machine on level surface.
FEATURES YOU CAN'T SEE
Twin pumps and triple thermoblocks allow you to texture milk and pour an espresso at the same time.
15 BAR Italian espresso pump
PID technology controls water temperature precisely for both espresso and steam functions.
Pre-infusion; 4 programs to choose from.
Brass collar is durable and ideal for frequent use.
Advanced programming to adjust pump and temperature settings for optimal steam and brewing performance.
Stainless steel and die-cast metal design
Power saving mode helps save energy by turning off your machine after 30 minutes of inactivity.
Tamper 600ml jug
Cleaning disc
Cleaning Pin

6
Twin Pump and Triple Thermoblock SystemTrue to commercial use, the Torino has twin pumps, and a unique triple thermoblock heating system, to deliver fast water heat up and delivery at the correct pressure. There is a dedicated pump and 2 dedicated thermoblocks for the espresso, and a dedicated pump and 1 dedicated thermoblock for the steam function. Dedicated systems for each of the espresso and steam functions, allow you to pour an espresso and texture milk and at the same time; helping to eliminate temperature variations.
The thermoblock heating systems are lined with stainless steel and fitted with PID technology. The PID (proportional integral-derivative) controller continually monitors the water temperature to ensure water is delivered to the coffee grounds at the precise temperature needed.
Espresso FunctionThe Torino is fitted with a 15 BAR Italian pump and two thermoblocks for the espresso function, delivering the pressure required for a complete extraction of oils, coffee solids and aroma. Fitted with a pressure relief system, it ensures that any remaining pressure after the extraction is released internally through to the drip tray, allowing for quick, successive brews. The second thermoblock for the espresso pour is located inside the group head, ensuring the water is at the exact temperature just before it meets the coffee grinds.
Steam FunctionA 4 BAR Italian pump and one thermoblock is dedicated to the steam function, producing instant steam pressure for texturing milk.
Espresso Pressure GaugeThe espresso gauge is an indicator of the quality of the espresso pour and should be used as a guide. It measures the pressure or resistance created by water being pumped through the tamped coffee grinds into the group handle.
Optimum pour. When the needle is within the target area on the gauge, it indicates a quality serve of espresso has been made. A quality pour has a slow, but flowing pour of espresso with a consistency similar to that of warm dripping honey. The crema is dark golden in colour.
Under-extracted. If the needle is before the target area, this indicates the serve of espresso is ‘under-extracted’ as it has extracted too little of the essential oils, flavours and colours from the coffee grinds. This occurs when water passes too quickly through the tamped coffee grinds and is an indication that either the grind is too coarse (so the water flows straight through the grinds) or the filter basket has been under-dosed (too little coffee in the basket). It tastes flat and lacks flavour. The pour is quick and light in colour and the resulting crema is thin with a creamy light brown colour.
Features of your Torino continued
0
2
4
68
10
12
14
16Under Extracted Pour
Over Extracted Pour
Optimum Pour

7
Features of your Torino continued
Over-extracted. When the needle goes beyond the target area it indicates that the serve of espresso is ‘over-extracted’ as it has extracted too much of the essential oils, flavours and colours from the coffee grinds. This occurs when the water passes very slowly through the tamped coffee grinds and is an indication that either the grind is too fine (so that it is difficult for the water to pass through) or the filter basket has been over-dosed (too much coffee in the basket). In this situation the hot water is in contact with the coffee grinds for too long which creates a burnt and bitter tasting espresso. There may be no pour, or it may be slow and drip throughout the entire pour. The crema is very dark.
Shot ClockThe shot clock provides another indicator of the quality of the pour. The optimum time per shot varies between different bean types. However in general:
· Single shot = 20 – 35 seconds
· Double shot = 50 - 65 seconds
Manual Pour ArmYou can use the manual arm if you like your shot shorter or longer than the standard pour, or if you like to change the duration of the pour for different bean types which require different brew lengths.
Commercial Size Group Head & Group HandleThe exterior of the Torino, is inspired from the traditional, high polished commercial Italian machines, and the iconic Italian e61 group head. The group head and 58mm group handle are designed to commercial specifications using brass and stainless steel components for durability, and to help bring a professional espresso experience to your home.
The sloping group handle has been designed by Sunbeam for an easier, more ergonomic use;
and to provide a more even tamp. The angle of the handle provides a more ergonomic action when attaching and removing the handle from the group head. The sloping handle also allows you to rest the group handle on the bench whilst keeping the filter basket level, making it easier to produce an even tamp, ensuring an even extraction. The tamping pad on the under-side of the group handle basket allows you to position the group handle on the edge of your bench top when tamping.
Pre-InfusionPre-infusion is pre-programmed into the Torino. Pre-infusion warms and wets the coffee grounds under low pressure to bring the particles together to form one cake/ puck, before full water pressure is applied. This helps to prepare the bean oils for extraction to deliver greater body and sweetness to the espresso. It also allows the cake to bloom (expand) into the shower head so there is an even surface for an even pour.
Drip tray and grillThe large capacity drip tray is lined with plastic, preventing staining from espresso oils, lightweight for easy removal and designed with no dirt traps for simple wipe down cleaning.
Single floor filter basketsThese are the most common style of filter baskets. As the name implies, these baskets have a single floor. If you hold these up to the light, you can see many small holes. The smaller single filter is used for a single cup of coffee, and the larger double filter is used for two cups of coffee, or one single 'double strength' cup of coffee. Suitable dosage varies from bean to bean. However in general the dose for a single filter is between 10-12g, and double flter is 18-20g.

8
Tip: For optimum results Sunbeam recommends using the single floor filters with the Torino. To achieve the optimum espresso pour, it is best to grind your coffee beans as you need.
Dual floor filter basketsThese filters have 2 floors. When held up to the light and looking at the under-side of the filter you will see a single hole. Dual floor filters are designed for use with pre-ground coffee as this coffee is too coarse for use in the single floor baskets. Dual floor baskets are designed to compensate for this by slowing the flow of espresso creating a subtle aeration to ensure a golden crema. Although designed for use with pre-ground coffee, dual floor filter baskets can also be used with all ground coffee. If you are having trouble with under extracted coffees, try using dual floor filter baskets.
Power Saving ModeAfter 1 hour of non-use the machine will automatically switch to power saving mode. All the lights on the buttons will dim and the machine will power down to 75% of power. After a further 4 hours of non-use the machine will beep once and then turn off.
To bring the machine out of power saving mode simply press any of the buttons on the control panel.
Features of your Torino continued

9
Torino LCD display
Display modes
1. Pre-heat mode: display nothing (the power button flashing) See figure 22.
2. Ready mode: display "READY". See figure 23.
3. Coffee mode: Counting the brewing time. See figure 24.
4.Fill tank: remind user to fill tank by flashing "NO WATER" when low water level in water tank. See figure 25.

10
Quick Guide To Using Your Torino
For greater detail on the coffee making process, use this Quick Guide together with the Tips to Coffee Making and Tips to Milk Texturing sections.
WARNING: Before turning on the Torino, ensure the steam and hot water control dials, and the manual pour arm are in the OFF position. If these are not in the OFF position, the machine may pour when it is ready.
Preparing your Torino for the first time
1. Lift the lid and remove the water reservoir.
2. Carefully rinse the water reservoir and lid with water.
3. Carefully rinse and dry the group handle and filter baskets.
4. Reposition the water reservoir in the machine.
5. Fill water reservoir with good quality potable drinking water.

11
Quick Guide To Using Your Torino continued
Making the Espresso
Scalding hazard! Warning: Do these steps very carefully.
1. Plug into 230-240V AC powerpoint and turn on. Press POWER button. The unit will beep and button will flash.
2. When it has heated up, READY will appear in the LCD display.
3. Warm glasses and cups.
4. Fit the group handle with a filter basket.
5. Hold group handle under the group head and purge with hot water to preheat.
6. Dry wipe the basket and fill with ground coffee.
7. Tamp the coffee, ensuring the coffee level is 3-5mm below the filter basket rim.
Single filter basket
Double filter basket

12
Quick Guide To Using Your Torino continued
8. Wipe the edge of the filter to remove any loose grinds, use immediately.
9. Insert group handle up into the group head.
10. Turn group handle to the right until firmly locked into place.
11. Place glasses/ cups below pouring spouts.
12. a) Press 1 CUP or 2 CUP button to start the espresso pour.
12. b) Alternatively use the manual pour arm.
13. Once pour is finished, remove group handle by turning to the left.
14. Discard the used coffee grinds.

13
Texturing the Milk
1. Move steam wand over the drip tray, and purge by turning the steam on for a few seconds.
2. Pour about 250-300ml of cold milk into the jug.
3. Place steam wand into the milk, approx. 1cm below surface, and gradually turn steam dial fully on.
4. Ensure steam tip is just off centre at the side of the jug, to create a whirlpool action in the milk.
5. When sufficient microbubbles have formed and temperature has been reached (the jug is too hot to touch continuously), turn steam dial off.
6. Immediately wipe steam nozzle and wand with thick, damp cloth.
300ml
Using your espresso machine continued

14
Quick Guide To Using Your Torino continued
7. Move steam wand over the drip tray, and purge by turning steam on for a few seconds.
8. Tap the jug on the bench to remove larger bubbles, and swirl jug gently to prevent the milk separating.
Hot Water
Scalding hazard! Warning: Do these steps very carefully. Use the special insulated devices to move the water and steam wands.
1. Place a glass/ cup beneath the hot water wand and turn on the hot water dial.
2. Turn off the hot water by turning the knob clockwise.

15
Tips to Coffee Making
This section gives greater detail about the coffee making process, and should be used together with the Quick Guide to Using your Torino.
1. Pre-heating Glasses• Pre-heating glasses helps to preserve the
crema of the espresso and also helps to maintain the temperature of your coffee once it has been poured.
• Place glasses and cups to be used on the warming tray of the machine, or fill with hot water from the hot water wand.
2. Pre-heating the Group Handle and Filter Baskets
• This is important especially for the first coffee being made, as a cold group handle can significantly decrease the temperature of the water at the point of extraction. This in turn will alter the quality and characteristics of the resulting espresso extraction.
• Fit the group handle with your filter basket and hold under the group head and purge with hot water by pressing the 2 CUP button or by using the manual pour arm. Rotate the group handle so both the underside of the group handle and the filter basket is preheated. Dry the filter basket before filling with coffee.
3. Purge the Group Head, before & after extraction
• Always purge water from the group head before locking in the group handle. This will dislodge any ground coffee residue from the group head.
• After each extraction, remove the group handle and purge the group head. This will ensure it is clean for the next extraction and prevent residue and grinds building up. Simply press the 1 CUP button or use the manual pour arm and allow some water to run through.
4. Dosing and Tamping• Grind evenly and directly into the centre
of the filter basket, and fill with ground coffee. The amount of coffee grinds to add depends on the bean and how you like your coffee. However a good guide is to aim to have the filter basket completely full to the rim with loose coffee grinds before tamping. The easiest way to do this is to fill with ground coffee and collapse it as you go (by tapping the handle down on the bench) to create more space to fill with more coffee. End with a slight mound above the rim, so that if you smoothed the grind mound with your finger along the rim of the basket, the basket would be completely full to the rim (with no gaps). At this stage you have not tamped.
• Using the tamper, tamp straight down until there is about an 3-5mm space between the tamped grinds and the top of the filter basket. Again, this will vary depending on the bean you use, and how you like your coffee. Ensure to tamp to an even level, as this will ensure the water flows evenly through the grinds ensuring an even extraction and better flavour.
• Suitable dosage varies from bean to bean. However in general the dose for a single filter basket is between 10-12g, and double filter basket is 18-20g. When you are learning to make espresso for the first time, you may want to weigh your dose to ensure the correct dose.

16
Tips to Coffee Making continued
• To ensure a level tamp, use the Sunbeam tamper as a handy guide. Line up the black & silver dividing line on the base of the tamp, and ensure it is level with the rim of the filter basket.
• TIP. The coffee dosage and the degree of tamping should remain the same every time you make a coffee. The only thing that should vary is the particle size of the coffee grinds and this will vary depending on the bean. By keeping a consistent technique and changing one thing at a time, it’s easier to know which variable change produces a better taste for you.
NOTE: If purchasing pre-ground bagged coffee purchase a very fine grind and use the dual floor filter baskets as this coffee will still be too coarse for use with single floor filter baskets.
If having beans ground fresh for you, request a very fine grind, the same that would be used for a commercial espresso machine.
5. The Espresso Pour• Great coffees start with freshly roasted
beans that will deliver a sweet espresso that will be rich in texture, body and aroma. Controlling each part of the coffee making process is the secret.
• The way the espresso pours will tell you everything. Look out for:
1. Shot Clock Infusion time. This is when pressurised water is forced through the ground coffee. The shot clock provides a good indicator of the quality of the pour. The optimum time per shot varies between different bean types. However in general:
· Single shot = 20 – 35 seconds· Double shot = 50 - 65 seconds 2. Pressure Gauge. The pressure gauge
provides an indication of the resistance created by the dosing/ tamping of the filter basket and the grind size.
• Optimum pour. When the needle is within the target area on the gauge, it indicates a quality serve of espresso has been made. A quality pour has a slow, but flowing pour of espresso with a consistency similar to that of pouring honey. The crema is dark golden in colour.
• Under-extracted. If the needle is before the target area, this indicates the serve of espresso is ‘under-extracted’ as it has extracted too little of the essential oils, flavours and colours from the coffee grinds. This occurs when water passes too quickly through the tamped coffee grinds and is an indication that either the grind is too coarse (so the water flows straight through the grinds) or the filter basket has been under-dosed (too little coffee in the basket). It tastes flat, sour and lacks flavour. The pour is quick and light in colour and the resulting crema is thin with a creamy light brown colour.
• Over-extracted. When the needle goes beyond the target area it indicates that the serve of espresso is ‘over-extracted’ as it has extracted too much of the essential oils, flavours and colours from the coffee grinds. This occurs when the water passes very slowly through the tamped coffee grinds and is an indication that either the grind is too fine (so that it is difficult for the water to pass through) or the filter basket has been over-dosed

17
Tips to Coffee Making continued
(too much coffee in the basket). In this situation the hot water is in contact with the coffee grinds for too long which creates a burnt and bitter tasting espresso. There may be no pour, or it may be slow and drip throughout the entire pour. The crema is very dark.
3. Look for colour change. The ideal pour starts out dark brown and then soon after becomes caramel with reddish reflections. When it changes to a creamy or light colour the sweetest flavours and oils have been extracted, and this should be the end of the pour.
4. Resistance; looking for a thickness, or a nice ooziness in the pour like warm dripping honey.
6. Consistency and PracticePractice makes perfect. Using a consistent technique (eg dose, tamp pressure etc) will improve the quality of your coffee. Then, by adjusting one variable at a time (eg grind size), it will be easier to isolate those elements that will make your coffee better.coffee, use dual floor filter baskets which are designed for use with pre-ground coffee as this coffee is too coarse to use in the single floor baskets.

18
Tips to Coffee Making continued
Extraction Guide
There are extraction variations from bean to bean, and everyone’s taste is different.
Use the below as a guide to improve your espresso technique, so it’s just right for you.
MACHINE VISUAL & TASTE ISSUE/ SOLUTION *
Pressure Gauge Shot Clock Pour Speed Taste Grind **
UNDER EXTRACTION
< 20 secs FastWatery. Lacks flavour
Too coarse.
Use a finer grind, or dual
floor filter baskets.
OPTIMUM EXTRACTION
20-35 secs
Steady Flow Rich
Just right
10-12g (1 cup)
18-20g (2 cup)
OVER EXTRACTION
>40 secsNo flow, or Slow &
Drips
Burnt, bitter
Too fine.
Use a coarser grind.
Note: The coffee dosage and the degree of tamping should remain the same every time you make a coffee. The only thing that should vary is the particle size of the coffee grinds and this will vary depending on the bean.
* Ensure beans are fresh. Old beans, no matter the grind size, will not produce a good tasting coffee.
** When using pre-ground bagged coffee, use dual floor filter baskets which are designed for use with pre-ground bagged coffee. This type of coffee is too coarse to use in the single floor baskets.
0
2
4
68
10
12
14
16
0
2
4
68
10
12
14
16
0
2
4
68
10
12
14
16

19
Tips to Milk Texturing
This section gives greater detail about the milk texturing process, and should be used together with the Quick Guide to Using your Torino.Milk texturing is the steaming of milk. The steam coming out of the machine will only heat the milk. You will also need to aerate (add air to) the milk to create the micro-foam. The micro-foam contains thousands of tiny bubbles and gives the milk a silky, velvet texture. Milk that has been textured correctly looks thick and rich, with a silky sheen, and has been heated to between 60-65°C. It’s all about the positioning of the steam tip and how you move the jug up and down to immerse. Similar to making an espresso, perfecting the art of milk texturing takes time and practice.Set up• Firstly always start with fresh cold
milk from the fridge and a cold, clean stainless steel jug. You can store your jug in the fridge. Cold milk in a cold jug will assist in texturing the milk.
• Fill the jug with approximately 250-300ml of milk. An easy guide is to fill to the bottom of the ‘V’ of the pour spout on the Sunbeam jug (about 300ml). This will produce enough milk for 2 lattes or cappuccinos.
• TIP: Keep in mind that the volume of milk will increase or ’stretch’ during the texturing, so don’t overfill the jug.
• Before you begin texturing the milk, always purge the steam wand of any excess water until steam appears.
Using the Steam Wand• The correct position of the steam wand
will ensure air is added to the milk to create the micro-foam, and will ensure the milk layers remain blended together.
• Rest the spout of the milk jug up against the steam wand. Position the steam tip just under the surface of the milk and just off centre at the side of the jug. This positioning will ensure the milk moves around the jug in a whirlpool fashion. Positioning the steam tip just under the surface of the milk, will ensure that some air is drawn into the milk at the start of the texturing process. This is an important factor, as textured milk does need to have some aeration.
• Note: How air is introduced to the milk will determine the consistency of the foam. If large gulps of air are added to the milk, the quality of the foam will reflect this by having large bubbles. Introducing air to the milk in a controlled, gentle fashion indicated by a gentle hissing sound, will ensure the milk has fine aerated bead in the micro-foam.
• As the steam heats and textures the milk, the level of the milk in the jug will begin to rise. As this happens follow the level of the milk by lowering the jug, always keeping the tip of the steam nozzle just below the surface. This will create a slight hissing noise.
• After you have created the amount of foam you want for the coffee you're making, immerse the wand half way down the milk level. This will heat up all the milk and pulls in milk instead of air. This will also ensure the milk and foam is blended well throughout, preventing the milk from layering. It also helps to make the foam denser and smoother.

20
Tips to Milk Texturing continued
• Tip: The amount of foam required depends on the type of coffee being made, and how you like your coffee. Cappuccinos traditionally have more foam than a flat white.
• When the milk reaches the desired temperature, turn the steam off. We recommend around 65°C for sweet tasting milk.
• Tip: The optimum texturing temperature of milk is between 60-65°C. If the milk is not heated long enough, there will be little texturing of the milk. If the milk is heated for too long it will start to boil at around 72°C and all texture will be lost, and it will have a burnt taste. Initially, you may want to use a milk thermometer to achieve the correct temperature. Another good indication that the correct temperature has been reached is when the jug becomes too hot to leave your fingers in contact for approximately 5 seconds.
• Remember to wipe the steam wand with a clean damp cloth immediately after use and purge the wand to remove any milk that has been sucked up the steam wand.
The finishing touch• Remember the aim of texturing is to
aerate the milk to create micro-foam, and to ensure the milk remains blended well throughout. Therefore after the milk has been textured it’s essential to tap and swirl the jug. Tapping the jug on the bench top helps to release larger trapped air bubbles to ensure fine micro-foam; and swirling the jug in a circular, horizontal fashion helps the milk and froth combine for an even consistency.
• Take your glass or cup of espresso and pour from the jug in one steady motion
• Remember practice makes perfect!

21
Advanced Programming
The Torino has preset programming on many of its features. You can also vary the programs to suit your beans and how you like your coffee. Press PROGRAM button to access the program mode. Keep pressing PROGRAM to scroll through the programs available.
Press - or +, to change the setting and press PROGRAM button again to save.
1. Coffee temperature
This adjusts the water temperature for your espresso pour. Adjust the program to suit your beans and how you like your coffee.
Adjust as low as 86°C and as high as 98°C.
The optimum temperature is 92°C - 96°C.
Scroll through the programs available by pressing the PROGRAM button until CO TEMP program appears. Adjust by pressing - or + to change the setting and press PROGRAM to save.
Factory setting = 92°C.
2. Steam rate.
This changes the steam rate for milk texturing.
Setting 1 to 2 – has less liquid in the steam for no or less foam. Suits Flat Whites, Hot Chocolate
Setting 3 to 4 – has slightly more liquid in the steam, for some foam. Suits Lattes
Setting 5, 6 to 7 – maximum liquid in steam to produce more foam. Suits Cappuccino
Scroll through the programs available by pressing the PROGRAM button until ST DUTY program appears. Adjust by pressing - or + to change the setting and press PROGRAM to save.
Factory setting = 4.

22
3. Pre-infusion profile.
Pre-infusion warms and wets the coffee grounds under low pressure to bring the particles together to form one cake/ puck, before full water pressure is applied. Baristas often change the pre-infusion profile according to the type of bean. Adjusting the timing of the pre-infusion profile will change the taste of the coffee.
P1 – 1 second of pre-infusion
P2 – 2 seconds of pre-infusion
P3 – 3 seconds of pre-infusion
P4 – three dashes
Scroll through the programs available by pressing the PROGRAM button until PI RATE program appears. Adjust by pressing - or + to change the setting and press PROGRAM to save.
Factory setting = 1.
4. Cleaning reminder.
The Torino will remind you when Cleaning is due. Set the cleaning reminder, by adjusting the water usage.
50 Litres - for 6 or more extractions per day
100 Litres - for 2 to 3 extractions per day. This is the most common selection for domestic use.
180 Litres - for weekend or occasional use
Scroll through the programs available by pressing the PROGRAM button until CLEAN program appears. Adjust by pressing - or + to change the setting and press PROGRAM to save.
Factory setting = 100L.
Advanced Programming continued

23
5. Reset
To reset all programs back to factory setting, press PROGRAM button until RESET appears, then + to activate.
1 Cup volume
The volume of water has been preset for 1 cup. You can adjust the program to suit your beans and how you like your coffee.
Make a 1 cup coffee. Insert the single filter basket into the group handle, fill with grinds and tamp. Place your cup under the pouring spouts.
Press and hold 1 CUP button for 3 seconds, then the Torino will begin brewing. When the coffee volume is enough, press 1 CUP button again to save.
Note: The LCD will display the brewing time, however the water volume is determined by your programming.
2 Cup volume
The volume of water has been preset for 2 cup. You can adjust the program to suit your beans and how you like your coffee.
Make a 2 cup coffee. Insert the double filter basket into the group handle, fill with grinds and tamp. Place your cup under the pouring spouts.
Press and hold 2 CUP button for 3 seconds, then the Torino will begin brewing. When the coffee volume is enough, press 2 CUP button again to save.
Note: The LCD will display the brewing time, however the water volume is determined by your programming.
Advanced Programming continued

24
Espresso recipes
ESPRESSO (SHORT BLACK)
Espresso is a concentrated, full bodied coffee with a stable layer of cream on top – known as ‘crema’. An espresso is the foundation of all café coffee. Variations are achieved by adding different amounts of milk and froth.
• 90mL espresso glass or demitasse cup
• single espresso (30-35mL)
LONG BLACK
A standard espresso with hot water, served in a regular coffee cup or mug. The hot water is added first so that the ‘crema’ is maintained.
• 190mL cup
• hot water (to taste)
• single or double espresso
MACCHIATO
Macchiato, Italian for ‘to stain or mark’. Traditionally served as a standard espresso with a dash of milk and a small dollop of froth into the middle of the ‘crema’.
• 90mL espresso glass or demitasse cup
• single or double espresso
• marked with steamed milk froth
FLAT WHITE
Another old favourite, the Flat White is an espresso with steamed milk, served in a regular coffee cup or mug. The wider mouth of the cup, naturally produces a flat surface, which reduces the froth layer. The layer of frothed milk on top is about 2mm.
• 190mL cup
• single or double espresso
• steamed milk

25
Espresso recipes continued
LATTE
An espresso with steamed milk, typically served in a glass. The smaller mouth of the glass naturally increases the height of the froth layer. The layer of frothed milk on top is about 10mm.
• 220mL glass or cup
• single or double espresso
• steamed milk
CAPPUCCINO
Cappuccinos are similar to lattes and flat whites. It is an espresso with steamed milk, but topped with a dusting of chocolate. It is usually served in a coffee cup or mug.
• 190-240mL cup
• single or double espresso
• steamed milk
• dusted with chocolate
CAFFE MOCHA
Made in a similar way to a cappuccino but with the addition of drinking chocolate. Simply stir the chocolate into the espresso prior to adding the steamed milk.
• 190-240mL cup or tall glass
• single or double espresso
• two teaspoons of drinking chocolate
• steamed milk
AFFOGATO
Affogato is a great dessert coffee. It is an espresso topped with a serve of vanilla bean ice cream. You can add Frangelico liqueur to taste.
• 190mL cup
• single or double espresso
• scoop of vanilla ice cream
• serve with 30ml of Frangelico to taste

26
Care and cleaning
The coffee making process involves extracting oils out of coffee grinds to make espresso coffee. Deposits of these oils build up over time and affect the taste of the coffee and operation of the espresso machine.
Regular cleaning to remove these oils is essential and will maintain the quality of the coffee the espresso machine produces and result in less maintenance being required. This is easy to do by following a few quick and easy cleaning steps after each coffee making session;
Cycle water through the group head,
Purge steam through the steam wand,
Wipe the steam wand clean with a damp cloth immediately after use,
Remove the filter basket from the filter handle and clean away any old coffee oils, and
Empty the drip tray and rinse.
Important: Never wash any of the espresso machine parts or accessories in the dishwasher.
Drip tray and grillRemove the grill and drip tray at regular intervals to empty. Clean with water and a little non-abrasive washing up liquid, rinse and dry.
Group head, group handle & filter basketsThe filter baskets and group handle should be rinsed with warm water after each use and then dried thoroughly.
To clean the group head of any old coffee grinds cycle water through and wipe the group head and around the inside rim with a damp cloth.
Should the holes in the filter baskets become
clogged with coffee grinds use a fine bristled brush to remove them. Also you can use the cleaning pin which is supplied with the espresso machine. The cleaning pin is attached to the inside of the top fill lid, located at the top of the espresso machine. The cleaning pin has two pins at either end - the shorter of the two is for cleaning out the holes in the filter basket.
Group head rubber seal The group head seal is located on the underside of the group head and creates a seal against the filter handle during the espresso pour.
Note: During long periods of non-use we recommend that the filter handle not be left attached to the group head as this will reduce the life of the seal.
Over time the seal will lose its elasticity and require replacement, depending on use usually every 12 months. Signs that the seal is deteriorating are when the group handle cannot create the necessary seal and steam and or water escapes from around the group head during the espresso pour.
Note: Contact Sunbeam on 1300 881 861 should you think that the group head seal needs replacing. Please do not attempt to change the seal without first consulting Sunbeam.

27
Care and cleaning continued
Cup warming plate, hot water tap and exteriorWipe over the unit with a damp cloth and wipe dry. Do not use abrasives or metal scourers as these will scratch the exterior surface.
Steam wand Keeping the steam wand clean is essential to ensure maximum efficiency of the steam function. A build up of caramelised/dried milk on the steam wand will impair the steaming and texturing ability of the espresso machine.
Important: Wipe the steam wand clean with a damp cloth immediately after each use and purge a small amount of steam.
Should the milk dry/caramelise on the steam wand, simply wrap the wand with a clean damp cloth, turn the steam wand over the drip tray and turn the steam on for approximately 10 seconds. With the cloth still on the steam wand leave to soak for about 5 minutes and you will find that after this time the dry/caramelised milk will easily wipe away. Repeat process if still dirty.
Important: Never clean the steam wand with an abrasive pad as this will damage the steam wand.

28
Deposits of coffee oils build up over time and affect the taste of the coffee and operation of the espresso machine. Therefore the group head will require regular cleaning. It is recommended that the group head is cleaned at a minimum every 3 months, however this will vary depending on the frequency of use.
You can use the cleaning cycle when you wish. The Torino will also remind you when a cleaning cycle is required by displaying CLEAN on the LCD panel. You can adjust the frequency of the cleaning cycle reminder, see Advanced Programming section.
When the Torino requires a cleaning cycle, CLEAN will appear on the LCD display.
NOTE: During the cleaning cycle all other espresso machine operations will be locked until the cleaning cycle is completed. Should the cleaning cycle be accidentally started it can be cancelled by switching the power ‘OFF’ at the power outlet, or by pressing the POWER button on the machine.
Before starting the coffee cleaning cycle1. Remove the water reservoir and rinse
clean. Completely fill with fresh water and replace.
2. Use the cleaning disc. Lift the reservoir cover. The disc is located to the left of the reservoir. Fit the group handle with the double filter basket.
3. Position the cleaning disc into the double filter basket.
4. Place a Sunbeam Espresso Machine Cleaning Tablet (EM0020) on top of the cleaning disc.
Note: Cleaning and Descaling Tablets are not interchangeable as they are made of different ingredients.
Coffee Thermoblock Cleaning
Double filter basket

29
5. Place group handle onto the group head.
6. Place a sufficiently large container or bowl under both pouring spouts.
Starting the coffee cleaning cycleIf CLEAN appears on the LCD display, go to Step 3 below.
1. Insert the power cord into a 230-240V AC power outlet and switch the power ‘ON’.
2. Press the POWER button on the espresso machine to turn on. Wait until READY appears on the LCD display.
3. Press CLEAN button once (1) to choose Coffee Clean (Co Clean) function on the LCD display.
4. Immediately press PROGRAM button (whilst Co Clean is still on the LCD display) to start the coffee clean cycle.
5. There will be a pause, then water will slowly will cycle on and off through the machine for several minutes.
6. After the coffee clean cycle is completed, the machine will return to READY mode on the LCD display.
Note: If CLEAN still appears on the LCD display after the Coffee thermoblock clean cycle is finished, then the Torino also requires descaling using the Steam thermoblock clean cycle. See Steam Thermoblock Descaling section.
Coffee Thermoblock Cleaning continued

30
After the coffee cleaning cycle is finished 1. Remove the group handle from the group
head.2. Return the cleaning disc to the storage
compartment.3. Remove the double filter basket from the
group handle and wash in warm soapy water. Rinse well and dry.
4. Press 1 CUP button once (1) to flush clean water through the group head.
5. Remove the large container/ bowl from under the pouring spouts.
6. The machine is now ready for use. Or if CLEAN still appears on the LCD display, then the Torino also requires descaling to be completed. See Steam Thermoblock Descaling setion.
Coffee Thermoblock Cleaning continued
31
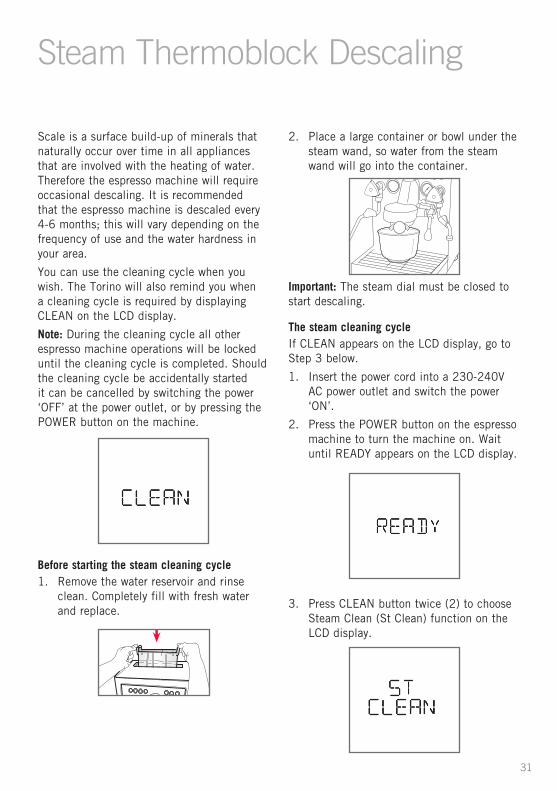
Steam Thermoblock Descaling
Scale is a surface build-up of minerals that naturally occur over time in all appliances that are involved with the heating of water. Therefore the espresso machine will require occasional descaling. It is recommended that the espresso machine is descaled every 4-6 months; this will vary depending on the frequency of use and the water hardness in your area.
You can use the cleaning cycle when you wish. The Torino will also remind you when a cleaning cycle is required by displaying CLEAN on the LCD display.
Note: During the cleaning cycle all other espresso machine operations will be locked until the cleaning cycle is completed. Should the cleaning cycle be accidentally started it can be cancelled by switching the power ‘OFF’ at the power outlet, or by pressing the POWER button on the machine.
Before starting the steam cleaning cycle 1. Remove the water reservoir and rinse
clean. Completely fill with fresh water and replace.
2. Place a large container or bowl under the steam wand, so water from the steam wand will go into the container.
Important: The steam dial must be closed to start descaling.
The steam cleaning cycle If CLEAN appears on the LCD display, go to Step 3 below.
1. Insert the power cord into a 230-240V AC power outlet and switch the power ‘ON’.
2. Press the POWER button on the espresso machine to turn the machine on. Wait until READY appears on the LCD display.
3. Press CLEAN button twice (2) to choose Steam Clean (St Clean) function on the LCD display.

32
4. Immediately press PROGRAM button (whilst St Clean is still on the LCD display) to start the steam clean cycle.
5. Purge the machine with clean water. Turn the steam dial on and allow water to run for 30-60 seconds, then turn off.
6. Pull out the water reservoir.
7. Place one (1) Sunbeam Espresso Machine Descaling Tablet (EM0010) into the water reservoir. Once tablet is dissolved, replace reservoir into the machine.
Note: Cleaning and Descaling Tablets are not interchangeable as they are made of different ingredients.
8. Turn steam dial on, and recommence the steam clean function. Allow machine to run for about 7 minutes, or until the water runs out.
9. Turn steam dial off.
10. Remove water reservoir and pour out any remaining liquid. Wash and fill with fresh water. Replace reservoir into the machine.
11. Purge the machine with clean water. Turn the steam dial on and allow water to run for 30-60 seconds, then turn off. Allow the machine to run for about 2 minutes.
12. Turn steam dial off when complete.
13. Press the CLEAN button for a few seconds, and the machine will return to READY mode on the LCD display.
NOTE: If CLEAN still appears on the LCD display after the Steam thermoblock descaling cycle is finished, then the Torino also requires cleaning using the Coffee thermoblock clean cycle. See Coffee Thermoblock Cleaning section.
14. Remove the large container/ bowl from under the steam wand.
15. The machine is now ready for use.
Steam Thermoblock Descaling continued

33
Troubleshooting Guide
Problem Possible Cause Solution
Machine has switched off
• Machine may be in power saving (sleep) mode. The machine switches off after 1 hour of inactivity.
• Simply press any of the buttons on the control panel.
Water is not being pulled in from water reservoir
• Water reservoir not positioned correctly.
• Pull up the reservoir, reinsert, and gently place the reservoir down into the machine, ensuring the bottom of the reservoir is at the bottom of the machine to engage the reservoir mechanism. You may need to do this a few times.
No coffee runs through
• No water in water reservoir.• Coffee grind is too fine.• Too much coffee in the
filter basket.• Machine was not turned on
or plugged in.
• Coffee grinds have been tamped (compacted) too firmly.
• Water reservoir not positioned correctly.
• Add water.• Use a slightly more coarse grind.• Fill filter basket with less coffee.
• Plug the machine in at the power point and turn on. And press POWER button on the unit.
• Refill filter basket, and tamp less firmly.
• Pull up the reservoir, reinsert, and gently place the reservoir down into the machine, ensuring the bottom of the reservoir is at the bottom of the machine. You may need to do this a few times.
Coffee pours through very slowly. Over Extraction.
• Coffee grind is too fine.• Too much coffee in the
filter basket.• Coffee tamped too firmly.• Unit blocked by scale and
coffee oil build up.
• Use a slightly more coarse grind.• Fill filter basket with less coffee.
• Tamp less firmly.• Descale and Clean the machine. See
‘Steam Thermoblock Descaling’ and ‘Coffee Thermoblock Cleaning’ section.
Coffee tastes burnt
• Type of coffee being used.
• Machine has not been rinsed after descaling.
• The coffee is over extracted.
• Experiment with different brands of coffee.
• Run a reservoir full of water through the machine before making another cup of coffee.
• See ‘over extraction’ section above.

34
Troubleshooting Guide continued
Problem Possible Cause Solution
Coffee pours too quickly. Under Extraction
• Coffee grind is too coarse.• Too little coffee in the filter
basket.• Coffee not tamped firmly
enough.
• Use a finer grind.• Fill filter basket with more coffee,
and/or use a dual filter basket.• Tamp more firmly.
Coffee is too weak • Using small filter basket for double shot of espresso.
• The coffee is under extracted.
• Use the double filter basket for 2 cups of coffee, or one single 'double strength' cup of coffee.
• See ‘under extraction’ section above.
Espresso does not have any crema
• Coffee is old or dry.
• Coffee not tamped firmly enough.
• Coffee grinds too coarse.• Not enough coffee in filter
basket.
• Use fresh coffee beans. Once opened, store in an airtight container quickly. Store away from heat and light. Do not store in the fridge.
• Tamp more firmly.
• Use a more fine grind.• See ‘Using your Torino’ section.
Coffee runs down the side of the filter handle
• Group handle is not attached correctly, or group handle is not tightened sufficiently.
• Too much coffee in the filter basket.
• Group head has loose coffee grinds remaining.
• Group head rubber seal is damaged or worn.
• See ‘Using your Torino’ section.
• Fill filter basket with less coffee.
• Wipe with a damp cloth.
• Contact the Sunbeam Customer Service Team.

35
Troubleshooting Guide continued
Problem Possible Cause Solution
Not enough froth in the milk
• Milk is too warm.• Frothing jug.
• Steam wand is blocked.
• Milk has been boiled.
• Not enough air has been drawn into the milk.
• Ensure the milk is refrigerated before use.• For best results, use a stainless steel jug
and if possible refrigerate or run the jug under cold water before use.
• See ‘Steam Thermoblock Descaling’ section.
• Discard burnt milk. Start again with fresh, chilled milk.
• Before starting to texture your milk, place steam wand into the milk, approx. 1cm below surface, then gradually turn steam dial fully on. This will gently draw air into the milk to create the micro-foam.
When using for the first time, the water reservoir is full, but the steam and hot water wands aren’t working
• There may be air in the pipes.
• Purge the machine. Place a large bowl under the steam wand and a large bowl under the hot water wand. Turn on both wands until steam and water appears. This may take a few minutes.
CLEAN message won’t remove from the LCD screen
• The machine requires Cleaning (coffee) and possibly Descaling (steam).
• FULLY complete both the Cleaning cycle AND the Descaling cycle. See ‘Coffee Thermoblock Cleaning’ section and ‘Steam Thermoblock Descaling’. When the machine requires cleaning, all other operations will be locked until these have been completed.

SUNBEAM TORINO ESPRESSO MACHINEUser Guide
Need help with your appliance? Contact our customer service team or visit our website for information and tips on getting the most from your appliance.
Australia | visit www.sunbeam.com.au phone 1300 881 861 mail Units 5 & 6, 13 Lord Street, Botany NSW 2019 Australia. New Zealand | visit www.sunbeam.co.nz phone 0800 786 232 mail Level 6, Building 5, Central Park, 660–670 Great South Road, Greenlane, Auckland.
Sunbeam Corporation Limited | ABN 45 000 006 771Sunbeam Corporation is a division of GUD Holdings Limited.
Sunbeam is a registered trade mark.
Made in China to Sunbeam’s specification.Due to minor changes in design or otherwise, the product you buy may differ slightly from the one shown here.Approved by the appropriate electrical regulatory authorities.
©Sunbeam Corporation Limited 2015.
08/15
EM8000
Australia
www.sunbeam.com.au 1300 881 861 Units 5 & 6, 13 Lord Street, Botany NSW 2019 Australia New Zealand
www.sunbeam.co.nz 0800 786 232 Level 6, Building 5, Central Park, 660-670 Great South Road, Greenlane, Auckland New Zealand
This Sunbeam product is covered by a 24 month repair warranty, which is in addition to your rights under the Australian Consumer Law (if your product was purchased in Australia) or New Zealand Consumer Guarantees Act (if your product was purchased in New Zealand).
RepairGuarantee


EM8000_16EM1
GCDS-SUN47252-JC
Need help with your appliance? Contact our customer service team or visit our website for information and tips on getting the most from your appliance.
Australia | visit www.sunbeam.com.au phone 1300 881 861 mail Units 5 & 6, 13 Lord Street,
Botany NSW 2019 Australia.
New Zealand | visit www.sunbeam.co.nz phone 0800 786 232 mail Level 6, Building 5, Central
Park, 660–670 Great South Road, Greenlane, Auckland.
Sunbeam Corporation PTY LTD | ACN 000 006 771Sunbeam is a registered trade mark. Made in China to Sunbeam’s specification.Due to minor changes in design or otherwise, the product you buy may differ slightly from the one shown here. Approved by the appropriate electrical regulatory authorities.©Copyright Sunbeam 2016.08/16

P R E C I S I O N G R I N D E R
USER GUIDE
EM08
00

2
Heading

Important instructions – retain for future use.
Contents
Sunbeam’s Safety Precautions 2
Congratulations 3
Features of your Torino Precision Grinder 4
Functions of your Torino Precision Grinder 6
Operating your Torino Precision Grinder 8
Adjusting the Grind Setting 11
Care and Cleaning 12
Advanced Settings for Recalibration 14

2
Sunbeam’s Safety Precautions
SAFETY PRECAUTIONS FOR YOUR SUNBEAM COFFEE GRINDER
• Check the hopper for the presence of foreign objects before using.
• Always operate the grinder with the hopper properly inserted in the grinder.
• Do not place your hand in or near the burrs while the grinder is in operation.
• Always place the unit on a flat, level surface.
• Switch off and unplug at power point before cleaning.
• Do not attempt to re-grind ground coffee.• Switch off the appliance and disconnect from
power supply before touching any part of the grinder that moves during use.
Sunbeam is very safety conscious when designing and manufacturing consumer products, but it is essential that the product user also exercise care when using an electrical appliance. Listed below are precautions which are essential for the safe use of an electrical appliance:
• Read carefully and save all the instructions provided with an appliance.
• Always turn the power off at the power outlet before you insert or remove a plug. Remove by grasping the plug - do not pull on the cord.
• Turn the power off and remove the plug when the appliance is not in use and before cleaning.
• Do not use your appliance with an extension cord unless this cord has been checked and tested by a qualified technician or service person.
• Always use your appliance from a power outlet of the voltage (A.C. only) marked on the appliance.
• This appliance is not intended for use by persons (including children) with reduced physical, sensory or mental capabilities, or lack of experience and knowledge, unless they have been given supervision or instruction concerning use of the appliance by a person responsible for their safety.
• Children should be supervised to ensure that they do not play with the appliance.
• The temperature of accessible surfaces may be high when the appliance is operating.
• Never leave an appliance unattended while in use.
• Do not use an appliance for any purpose other than its intended use.
• Do not place an appliance on or near a hot gas flame, electric element or on a heated oven.
• Do not place on top of any other appliance.• Do not let the power cord of an appliance hang
over the edge of a table or bench top or touch any hot surface.
• Do not operate any electrical appliance with a damaged cord or after the appliance has been damaged in any manner. If damage is suspected, return the appliance to the nearest Sunbeam Appointed Service Centre for examination, repair or adjustment.
• For additional protection, Sunbeam recommend the use of a residual current device (RCD with a tripping current not exceeding 30mA in the electrical circuit supplying power to your appliances.
• Do not immerse the appliance in water or any other liquid unless recommended.
• Appliances are not intended to be operated by means of an external timer or separate remote control system.
• This appliance is intended to be used in household and similar applications such as: staff kitchen areas in shops, offices and other working environments; farm houses; by clients in hotels, motels and other residential type environments; bed and breakfast type environments.
If you have any concerns regarding the performance and use of your appliance, please visit www.sunbeam.com.au or contact the Sunbeam Consumer Service Line on 1300 881 861.
Ensure the above safety precautions are understood.

3
Congratulations on the purchase of your Sunbeam Torino Precision Grinder, designed and engineered in Australia.
Sunbeam Torino delivers quality, style and superior performance capturing the essence of the commercial kitchen. Inspired by heavy-duty equipment found in restaurants, cafes and bars, the Sunbeam Torino is built to last. It brings together a range of appliances designed to expertly create authentic café food and beverages at home.
Uncompromising blends of stainless steel and die-cast alloy characterise the range. This, combined with advanced technology and functional design, guarantee that each product will surpass expectations.
When making coffee regardless of the brewing method the flavour of the resulting brew depends largely on the quality, freshness and roast of the coffee beans used. Other factors that can also affect the taste of the final cup include the purity of the brew water, the condition of the grinder and the actual design of the burr mechanism within the grinder.
Another advantage of the conical burr design is its slow rotating operation. This combined with a belt-driven motor, minimises heat transfer to the burrs and thus protects the aromatic profile of the coffee and ultimately enhances the quality of the resulting brew.
The Sunbeam Torino Precision Grinder is constructed with quality die-cast metal components and includes many features that make grinding coffee at home easy so you can enjoy a lovely fresh cup of coffee every time. We hope you enjoy your new coffee grinder and should you need any further assistance please don’t hesitate to contact the Sunbeam Consumer Hotline on
Australia 1300 881 861
New Zealand 0800 786 232
Congratulations
4
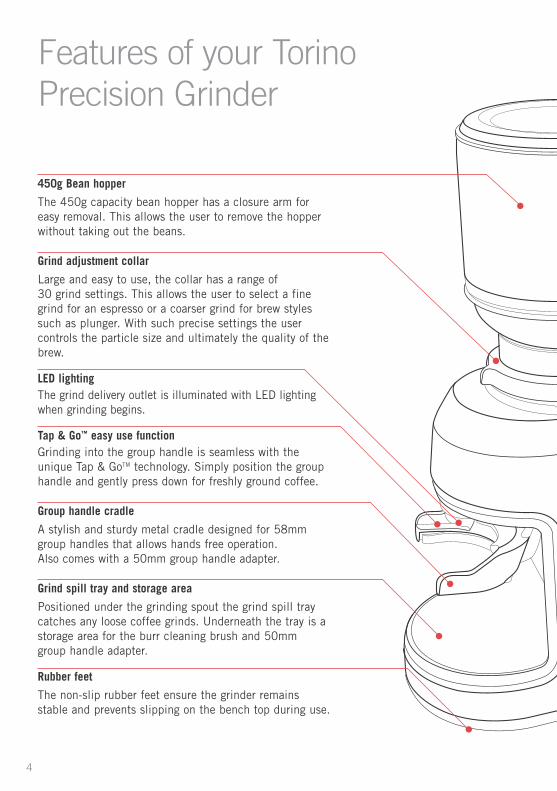
Features of your Torino
Precision Grinder
450g Bean hopper
The 450g capacity bean hopper has a closure arm for easy removal. This allows the user to remove the hopper without taking out the beans.
Grind adjustment collar
Large and easy to use, the collar has a range of 30 grind settings. This allows the user to select a fine grind for an espresso or a coarser grind for brew styles such as plunger. With such precise settings the user controls the particle size and ultimately the quality of the brew.
LED lightingThe grind delivery outlet is illuminated with LED lighting when grinding begins.
Tap & Go™ easy use functionGrinding into the group handle is seamless with the unique Tap & GoTM technology. Simply position the group handle and gently press down for freshly ground coffee.
Group handle cradle
A stylish and sturdy metal cradle designed for 58mm group handles that allows hands free operation. Also comes with a 50mm group handle adapter.
Grind spill tray and storage area
Positioned under the grinding spout the grind spill tray catches any loose coffee grinds. Underneath the tray is a storage area for the burr cleaning brush and 50mm group handle adapter.
Rubber feet
The non-slip rubber feet ensure the grinder remains stable and prevents slipping on the bench top during use.

5
Burr shield
Conical burrs
The hardened steel conical burrs achieve excellent grind consistency and minimises heat transfer to the coffee due to their slow rotation.
Hopper closure arm
Stainless steel housing
Built to last, the heavy-duty Stainless Steel body encases a powerful belt driven motor and provides a stable base foundation for the grinder.
Operation dial
Allowing both automatic and manual grinding.
Cord wrap
Cord wraps away to keep bench top clean.
Burr cleaning brushStrong bristles help sweep out grinds from the burrs.
Features of your Torino
Precision Grinder
50mm group handle adapter

6
Functions of your Torino Precision Grinder
Tap & Go™ technologyThe new patent pending Tap & Go™ function allows an easy one touch grind directly into the group handle. Simply set the operation dial to auto and place the handle into the group handle cradle then gently depress the handle downward to fill the basket with freshly ground coffee on demand.
Adjustable grind settingsAccurate and adjustable grind settings give the flexibility to create the right grind size for different coffee styles and extraction rates. The unique grind cartridge and easy recalibration system ensures ongoing precision.
Slow speed grinding The combination of a powerful yet quiet, belt-drive system and hardened steel conical burrs deliver a slow speed grinding process. This minimises the heat transfer to the coffee, protecting its aromatic profile.

7
Functions of your Torino Precision Grinder (continued)
LED Lit Grind AreaSeamless grind delivery is assisted by LED illumination that engages when grinding begins. An auto dimming feature then dims the light when grinding is complete.
Easy clean without recalibrationThe patent pending grind cartridge enables easy access to the lower burr chamber without altering your grind settings.

8
Operating your Torino Precision GrinderBefore using the coffee grinder, wipe the base exterior with a damp cloth. Wash the bean hopper and hopper lid in warm soapy water, then rinse and dry thoroughly.
Note: Do not immerse the grind cartridge in water or any other liquid.
Note: Do not place any parts of the coffee grinder in the dishwasher.
1. Place the coffee grinder on a dry, level surface.
2. To attach the bean hopper, align the arrow on the hopper with the arrow on the top of the grind cartridge and turn clockwise to lock. See figure 1.
The grinder will not function without the hopper in place.
3. Fill the bean hopper with coffee beans.
Tip: To maintain an even weight bearing down on the burrs, we recommend keeping the hopper at least half full. This ensures a more consistent grind is achieved.
Note: This coffee grinder is intended to grind whole coffee beans only.
4. Place the hopper lid onto the bean hopper and open the hopper closure arm.
5. Ensure operation dial is off, plug the power cord into a 230-240V AC power outlet and switch the power on.
6. Select the grind by turning the grind adjustment collar to the desired setting, see figure 2.
Refer to the grind setting table on page 11 to assist you in selecting the correct grind level for the desired brewing method.
Figure 1
Figure 2

9
Operating your Torino Precision Grinder (continued)
For grinding into the group handle
7. Insert the group handle into the group handle cradle at an inclined angle placing the front edge under the lip of the group handle cradle. See figure 3.
Note: The group handle cradle accepts 58mm group handles. To use a 50mm group handle attach the adapter located in the storage area under the drip tray.
8. Turn the dial to the ‘Auto’ position and gently press down on the handle to grind into the basket. See figure 4.
Note: With the dial at ‘Auto’ you have the option to leave the group handle in the group handle cradle without grinding coffee.
9. Once the basket is full, remove the group handle from the group handle cradle. See figure 5. Collapse the coffee in the basket by tapping it on the bench. Repeat the grinding process until the desired amount of coffee has been ground and tamp to finish.
Figure 3
Figure 4
Operating your Torino Precision Grinder
Figure 5
Figure 6

10
For hands free grinding
10. Insert the group handle into the group handle cradle at an inclined angle placing the front edge under the lip of the group handle cradle. See figure 3.
11. To continuously grind coffee, turn the dial to the ‘On’ position, see figure 7.
12. When the desired amount of coffee has been ground, return dial to the ‘Off’ position.
Operating your Torino Precision Grinder (continued)
Figure 7

11
The range of 30 grind settings allows for precision adjustment. The coffee maker has control of the particle size and ultimately the quality of the resulting brew.
Some things to remember when using the coffee grinder;
• The smaller the particle size the longer it will take to grind.
• After long periods of using the finer settings we recommend removing the grind cartridge and sweeping away any residual coffee to avoid clogging. See the Care and Cleaning section on page 12 for more details.
Tips1. Select the correct grind for the brewing
method you are using. 30 grind settings are available to ensure precision adjustment. The lower settings deliver finer grinds while the higher settings deliver coarser grinds. It is important to experiment with the grind settings to achieve the ideal brew that best suits your palate.
2. Coffee that is ground too fine for a particular brewing process will result in over-extraction and the coffee will taste bitter. On the other hand, coffee that is too coarse for a particular brewing method will result in under-extraction and the coffee will be thin and poor in flavour.
3. Once coffee is ground it quickly loses its flavour and aroma. For the best results we recommend you grind beans immediately prior to brewing.
4. Buy fresh whole coffee beans weekly.
5. To retain freshness, store whole coffee beans in an airtight container in a cool, dark, dry place. It is not recommended that you store beans in the grinder’s bean hopper for a prolonged period.
6. To ensure the best results from the coffee grinder clean the bean hopper and conical burrs regularly.
Adjusting the Grind Setting
Grind setting table
SETTING BREWING METHOD
0 - 7 Turkish
7 - 15 Espresso for Cafe Series®
7 - 15 Stove Top
10 - 20 Syphon Brew Method
15 - 30 Aero Press, Drip Filter, V-60 Dripper
25 - 30 Plunger, Clever Coffee Dripper

12
Important Notes:• Spots and marks on the surface of the
burrs are part of the hardening process. These marks do not affect the performance of the grinder or the taste of the coffee.
• Ensure the coffee grinder is switched off and unplugged from the power outlet prior to cleaning.
• Do not immerse the motor base of the coffee grinder in water.
• Do not immerse any part of the grind cartridge in water or any other liquid.
• Do not place any parts of the coffee grinder in the dishwasher.
• Do not use abrasive cleansers or scouring pads.
Cleaning the motor base and bean hopper
1. Close the hopper closure arm and remove the bean hopper from the motor base, see figure 8. Store unused beans in an airtight container to preserve their freshness.
2. Wipe the motor base exterior with a damp cloth and dry.
3. Wash the bean hopper in warm soapy water, then rinse and dry.
Cleaning the burrsIf the coffee grinder is used frequently (every day), the burrs need to be cleaned every three weeks to ensure best performance of the coffee grinder. Regular cleaning helps the burrs achieve consistent grinding results, which is especially important when grinding coffee for espresso.
1. Close the hopper closure arm and purge the grinder by turning on until no more grinds come out.
2. Ensure the coffee grinder is switched off and unplugged from the power outlet. Remove the bean hopper from the motor base, see figure 8.
3. To remove the grind cartridge, press and hold down the ‘RELEASE’ button on the top of the grinder base and with the other hand hold the cartridge grip tabs and turn anti-clockwise, see figure 9.
Note: Using the cartridge grip tabs enables removal of the grind cartridge without changing your grind settings.
Care and Cleaning
Figure 8
Figure 9
13
Care and Cleaning (continued)
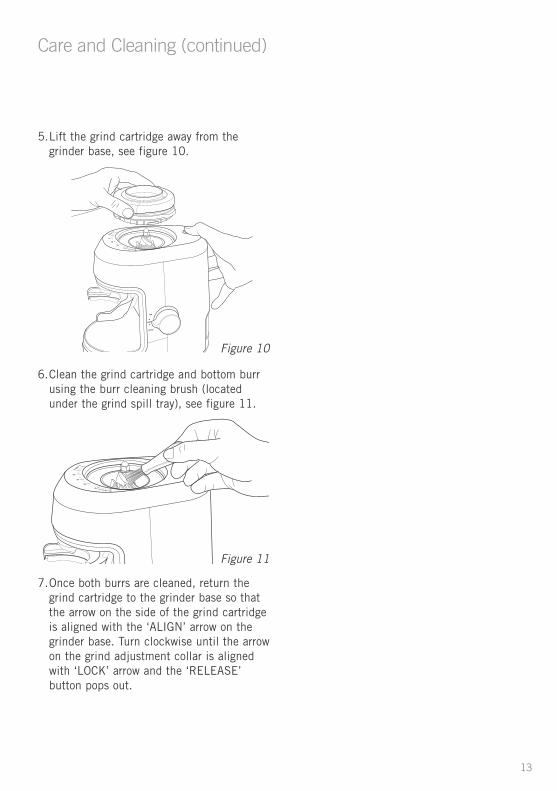
5. Lift the grind cartridge away from the grinder base, see figure 10.
6. Clean the grind cartridge and bottom burr using the burr cleaning brush (located under the grind spill tray), see figure 11.
7. Once both burrs are cleaned, return the grind cartridge to the grinder base so that the arrow on the side of the grind cartridge is aligned with the ‘ALIGN’ arrow on the grinder base. Turn clockwise until the arrow on the grind adjustment collar is aligned with ‘LOCK’ arrow and the ‘RELEASE’ button pops out.
Figure 11
Figure 10

14
Advanced SettingsRecalibration of the EM0800
To recalibrate for a coarser grind
6. Take note of your current grind setting position.
7. Rotate the grind adjustment collar to position 15 on the grind settings, see figure 12.
8. Lift the recalibration release lever and remove grind adjustment collar, see figure 13 and 14.
9. To make the grind coarser, reposition the collar to setting 10 on the grind settings.
10. Re-assemble the collar by pressing down the front and then the rear ensuring two clicks are heard.
11. Return the grind setting back to your original grind setting position. Your grind will now be coarser.
12. Attach the hopper, open the hopper closure arm and turn on the grinder.
Note: Check the new setting delivers the required grind before use.
To recalibrate for a finer grind
Note: The grinder is factory set for fine grinding. Only re-calibrate finer if the 0 setting does not achieve the desired grind fineness.
6. Rotate the grind adjustment collar to position 15 on the grind settings, see figure 12.
7. Lift the recalibration release lever and remove grind adjustment collar, see figure 13 and 14
8. To make the grind finer, reposition the collar to setting 17 on the grind settings.
9. Re-assemble the collar by pressing down the front and then the rear ensuring two clicks are heard.
10. Attach the hopper and run the grinder to ensure smooth operation.
Caution: Re-calibrating too fine may cause burrs to collide resulting in a metallic grinding noise. If this occurs turn off the grinder and move to a coarser setting (a setting towards 30) or re-calibrate for a coarser grind.
11. Open hopper closure arm and adjust grind settings to deliver required grind size.
Note: Further tuning may be required.
Note: Recalibration will change all previous settings on the grinder
1. Close hopper closure arm.
2. Purge beans through the grinder.
3. Turn the operation dial to the ‘off’ position.
4. Disconnect the plug from the power socket.
5. Remove the bean hopper by turning anticlockwise.

15
Figure 12
Figure 13
Advanced Settings (continued)
Figure 14
The Sunbeam5 Year MotorGuaranteeSunbeam has built its reputation on manufacturing quality electrical appliances. Torino Precision Grinder (EM0800) is constructed from the highest quality materials. So much so, we guarantee our Precision Grinder’s motor for five (5) years against faulty materials or manufacture. This guarantee is just another expression of our confidence in the way we make appliances at Sunbeam. In order to be eligible for this guarantee, you must retain your receipt as proof of purchase.
Your Torino Precision Grinder (EM0800) is covered for the first year against faulty material or manufacture by the Sunbeam 12 Month Replacement Guarantee. Should you experience any difficulties with your appliance within this 12 Month period, please phone our customer service line for advice on 1300 881 861 in Australia, or 0800 786 232 in New Zealand.
The Sunbeam (5) five year motor guarantee begins from date of purchase and extends for four years beyond the 12 Month Replacement Guarantee. It covers only the motor, guaranteeing it against faulty materials or manufacture. It does not cover damage caused by accident, misuse or being used in a manner not in accordance with the Instruction Book. Similarly, this motor guarantee does not cover freight or any other costs incurred in making a claim.
If a fault should develop with the motor after the period covered by the 12 Month Replacement Guarantee, please call Sunbeam Customer Service on the number listed below or send a written claim to Sunbeam at the address listed below. On receipt of your claim, Sunbeam will advise you on how to obtain a replacement motor if your motor is defective. Alternatively, you can return the Torino Precision Grinder (EM0800) to any of Sunbeam’s authorised service centres, together with your receipt. The service centre will examine the motor and if it is faulty or defective, the motor will be replaced free of charge.
For a complete list of Sunbeam’s authorised service centres visit our website or call:
Sunbeam Corporation Ltd. Australia
www.sunbeam.com.au
1300 881 861Units 5 & 6, 13 Lord Street Botany NSW 2019 Australia
Sunbeam Corporation Ltd. New Zealand
www.sunbeam.co.nz
0800 786 23226 Vestey Drive, Mt Wellington Auckland, New Zealand
The benefits given to you by this guarantee are in addition to your other rights and remedies under any laws which relate to the appliance.
Our goods come with guarantees that cannot be excluded under the Australian Consumer Law and under the New Zealand Consumer Guarantees Act. In Australia you are entitled to a replacement or refund for a major failure and for compensation for any other reasonably foreseeable loss or damage. You are also entitled to have the goods repaired or replaced if the goods fail to be of acceptable quality and the failure does not amount to a major failure.
IMPORTANT NOTE Sunbeam agrees to replace the motor in the event of the motor developing a fault or defect, within the four years after the 12 Month Replacement Guarantee.
As your Torino Precision Grinder (EM0800) needs to be assessed at a Sunbeam authorised service centre, it will not be accepted through retail stores.
If using the Torino Precision Grinder (EM0800) for commercial use this motor guarantee is limited to 12 months from the date of purchase.

SUNBEAM TORINO ESPRESSO MACHINEUser Guide
Need help with your appliance? Contact our customer service team or visit our website for information and tips on getting the most from your appliance.
Australia | visit www.sunbeam.com.au phone 1300 881 861 mail Units 5 & 6, 13 Lord Street, Botany NSW 2019 Australia. New Zealand | visit www.sunbeam.co.nz phone 0800 786 232 mail Level 6, Building 5, Central Park, 660–670 Great South Road, Greenlane, Auckland.
Sunbeam Corporation Limited | ABN 45 000 006 771Sunbeam Corporation is a division of GUD Holdings Limited.
Sunbeam is a registered trade mark.
Made in China to Sunbeam’s specification.Due to minor changes in design or otherwise, the product you buy may differ slightly from the one shown here.Approved by the appropriate electrical regulatory authorities.
©Copyright Sunbeam 2015.
08/15
EM8000
Australia
www.sunbeam.com.au 1300 881 861 Units 5 & 6, 13 Lord Street, Botany NSW 2019 Australia New Zealand
www.sunbeam.co.nz 0800 786 232 Level 6, Building 5, Central Park, 660-670 Great South Road, Greenlane, Auckland New Zealand