evotouch ext userguide
TRANSCRIPT
evotouch
GB

1
ContentsGlossary 2
actuator 2
binding 2
economy mode 2
heat demand device 2
holiday mode 2
optimisation 2
override 2
period 2
schedule 2
sensor 2
setpoint 2
zone 2
Preface 2
Quick topics 2
Holiday Mode and Economy Mode 3
To set holiday mode 3
To set economy mode 3
Main menu 3
System Overview 3
Operating Mode 3
Zoning Menu 3
Setting Menu 3
Zoning Menu 4
View/Edit Schedule 4
Guided Scheduling 4
Copy Schedule 5
Reset Schedule 5
Zoning Config 5
Zoning Configuration 6
Edit Zone 6
Zone Order 6
Add Zone 6
Delete Zone 7
Setting Menu 8
Time/Date Setting 8
Fault Logbook 8
Language Selection 8
Clean Screen 8
Display Settings 8
Safety information 9
Approvals 9
EMC compliance considerations 9
Product handling 9
Location of device 9
Disclaimer 9
WEEE directive 2002/96/EC Waste Electrical and Electronic Equipment directive 9
2
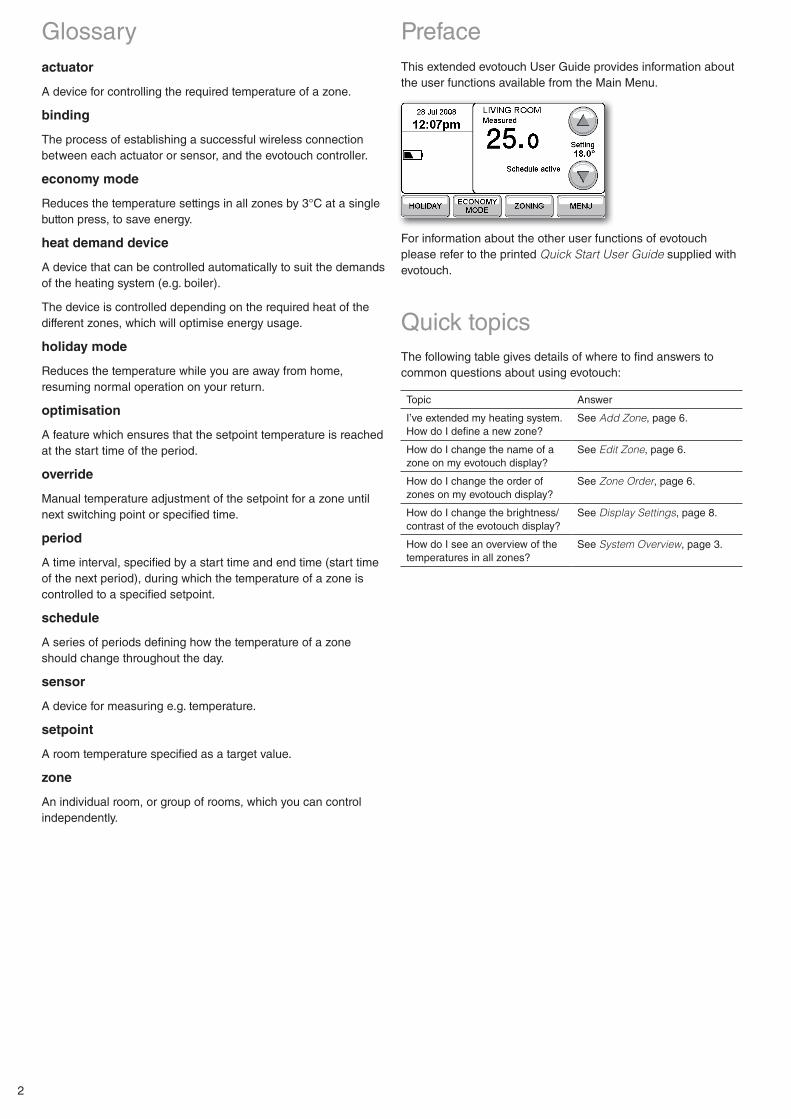
This extended evotouch User Guide provides information about the user functions available from the Main Menu.
For information about the other user functions of evotouch please refer to the printed Quick Start User Guide supplied with evotouch.
Quick topicsThe following table gives details of where to find answers to common questions about using evotouch:
Topic Answer
I’ve extended my heating system. How do I define a new zone?
See Add Zone, page 6.
How do I change the name of a zone on my evotouch display?
See Edit Zone, page 6.
How do I change the order of zones on my evotouch display?
See Zone Order, page 6.
How do I change the brightness/contrast of the evotouch display?
See Display Settings, page 8.
How do I see an overview of the temperatures in all zones?
See System Overview, page 3.
PrefaceGlossaryactuator
A device for controlling the required temperature of a zone.
binding
The process of establishing a successful wireless connection between each actuator or sensor, and the evotouch controller.
economy mode
Reduces the temperature settings in all zones by 3°C at a single button press, to save energy.
heat demand device
A device that can be controlled automatically to suit the demands of the heating system (e.g. boiler).
The device is controlled depending on the required heat of the different zones, which will optimise energy usage.
holiday mode
Reduces the temperature while you are away from home, resuming normal operation on your return.
optimisation
A feature which ensures that the setpoint temperature is reached at the start time of the period.
override
Manual temperature adjustment of the setpoint for a zone until next switching point or specified time.
period
A time interval, specified by a start time and end time (start time of the next period), during which the temperature of a zone is controlled to a specified setpoint.
schedule
A series of periods defining how the temperature of a zone should change throughout the day.
sensor
A device for measuring e.g. temperature.
setpoint
A room temperature specified as a target value.
zone
An individual room, or group of rooms, which you can control independently.
3
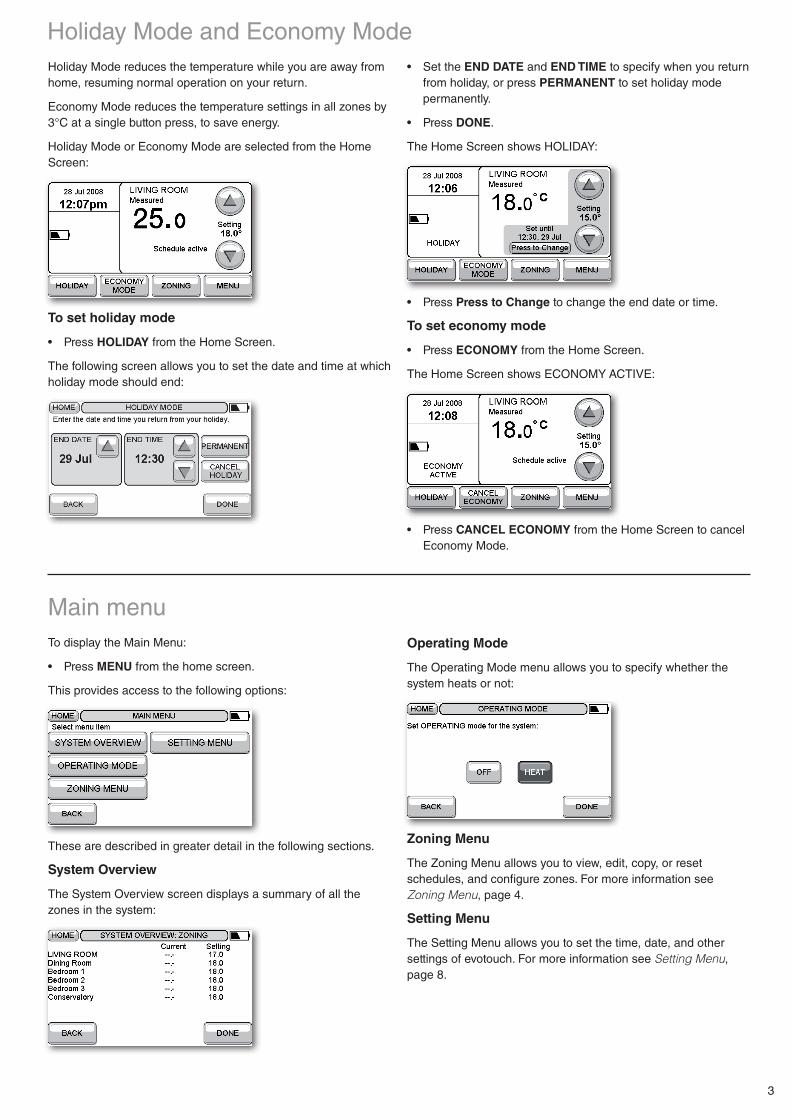
Holiday Mode reduces the temperature while you are away from home, resuming normal operation on your return.
Economy Mode reduces the temperature settings in all zones by 3°C at a single button press, to save energy.
Holiday Mode or Economy Mode are selected from the Home Screen:
To set holiday mode
• PressHOLIDAY from the Home Screen.
The following screen allows you to set the date and time at which holiday mode should end:
• SettheEND DATE and END TIME to specify when you return from holiday, or press PERMANENT to set holiday mode permanently.
• PressDONE.
The Home Screen shows HOLIDAY:
• PressPress to Change to change the end date or time.
To set economy mode
• PressECONOMY from the Home Screen.
The Home Screen shows ECONOMY ACTIVE:
• PressCANCEL ECONOMY from the Home Screen to cancel Economy Mode.
Holiday Mode and Economy Mode
Main menuTo display the Main Menu:
• PressMENU from the home screen.
This provides access to the following options:
These are described in greater detail in the following sections.
System Overview
The System Overview screen displays a summary of all the zones in the system:
Operating Mode
The Operating Mode menu allows you to specify whether the system heats or not:
Zoning Menu
The Zoning Menu allows you to view, edit, copy, or reset schedules, and configure zones. For more information see Zoning Menu, page 4.
Setting Menu
The Setting Menu allows you to set the time, date, and other settings of evotouch. For more information see Setting Menu, page 8.

4
Allows you to view, edit, copy, or reset schedules, and configure zones.
To display the Zoning Menu:
• PressZONING MENU on the Main Menu.
This provides access to the following options:
These are described in greater detail in the following sections.
View/Edit Schedule
You are first prompted to select the zone to view or edit:
This screen then allows you to edit the periods, add a period, or delete a period:
For more information see the Quick Start User Guide.
Guided Scheduling
Leads you through a sequence of steps to set up a schedule for a zone.
You are first prompted to select the zone to be configured:
• Pressthebuttoncorrespondingtothezoneyouwanttoconfigure.
The next screen allows you to configure several days with the same schedule:
• Pressoneormoredaystohighlightthem,tospecifywhichdays are to have the same schedule.
• PressDONE.
To select all the week days or weekend days press WEEK DAYS or WEEKEND DAYS respectively.
You are then prompted to set the starting time of the first period:
• SetthetimeandpressNEXT.
You are then prompted to set the temperature for the first period:
• SetthetemperatureandpressNEXT.
You are then prompted to specify if the zone will be occupied all day:
• PressYES to leave the heating on all day, or NO to turn the heating off during the day.
If you specified NO you are prompted to specify when the zone will become unoccupied:
Zoning Menu

5
• SetthetimeandpressNEXT.
You are then prompted to set the temperature for the zone while it is unoccupied:
• SetthetemperatureandpressNEXT.
Likewise, you are then given the option of creating a lunchtime period:
If you press YES you are prompted for the start time (default 12:30), temperature (default 21°), and end time (default 13:30) for the lunchtime period.
You are then prompted for:
• Thetimethatthezoneagainbecomesoccupiedintheevening (default 17:30).
• Theeveningtemperature(default21°).
• Thetimethatthezoneisnolongerusedintheevening(default 22:30).
• Thenighttimetemperature(default15°).
Finally, the following screen shows a summary of the schedule:
• PressDONE to continue.
The following options are then provided:
• Selecttheappropriateoptiontodofurtherscheduling,orpress DONE to finish.
Copy Schedule
Allows you to copy a schedule between zones.
You are first prompted to specify the zone you want to copy from:
• Pressthezoneyouwanttocopyfrom.
You are then prompted to specify the zone you want to copy to:
• Pressthezoneyouwanttocopyto.
The following screen summaries what you have selected:
• PressDONE to proceed.
After copying you are given the option of copying to a further zone.
Reset Schedule
The following menu allows you to select the zone to reset:
• Pressthezoneyouwanttoreset.
You will be prompted to confirm that you want to proceed. The zone will then be reset to the default schedule with four periods.
Zoning Config
Allows you to edit, add, and delete zones, and change the order in which zones are listed on the menus. See Zoning Configuration, page 6.

6
The Zoning Configuration menu allows you to edit, add, and delete zones, and change the order in which zones are listed on the menus.
The following warning is displayed:
• Pressthebuttonfor5seconds,asinstructed.
This provides access to the following options:
NOTE: The ZONE ORDER and DELETE ZONE options are only available if more than one zone has been created.
The options are described in the following sections.
Edit Zone
You are first prompted to specify the zone you want to edit:
• Pressthezoneyouwanttoedit.
The following menu is then displayed:
The options are explained in the following table:
Option Description
ADD ACTUATOR(S)
Prompts you to bind an actuator to the zone.
ADD ROOM SENSOR
Prompts you to bind a room sensor to the zone.
CHANGE ZONE NAME
Displays a keyboard to allow you to edit the zone name.
TEST RF SIGNAL Sends an RF signal to test the zone.
Zone Order
Displays the following menu to allow you to specify the order of the zones:
• Pressthebuttonsintheorderyouwantthezonestobearranged on the menus.
As you press each button it will disappear from the screen. Alternatively, to choose the default order press DEFAULT.
Add Zone
Allows you to add a new zone to the system.
NOTE: This option is not displayed if eight zones have already been defined.
You are first prompted to give the zone a name.
The following menu is then displayed to allow you to bind an actuator and sensor to the zone, and set up the schedule:
For information about programming a schedule see the Quick Start User Guide.
• PressBINDING MODE to bind devices to the new zone.
You are first prompted to bind the actuator in the zone:
• PuttheactuatorinBINDmodeandpressBIND:
• WhenasuccessfulresponsehasbeenreceivedpressDONE.
Zoning Configuration

7
The next step is to bind a sensor in the zone.
You are given the option of using the evotouch internal sensor, or an external room sensor:
If the zone contains the evotouch controller, and you want to use the internal sensor, press INTERNAL.
Note: Only one zone can be controlled by the internal sensor.Selecting the internal sensor automatically configures all other zones to use external sensors.
Otherwise press EXTERNAL and you will be prompted to bind a room sensor in the zone:
• PresstheBINDbuttononthesensor.
• WhenasuccessfulresponsehasbeenreceivedpressDONE.
You will be returned to the ADD ZONE menu.
Delete Zone
You are first prompted to specify the zone to be deleted:
• Pressthezoneyouwanttodelete.
You are then prompted to confirm the action:
• PressDONE to delete the selected zone.
8
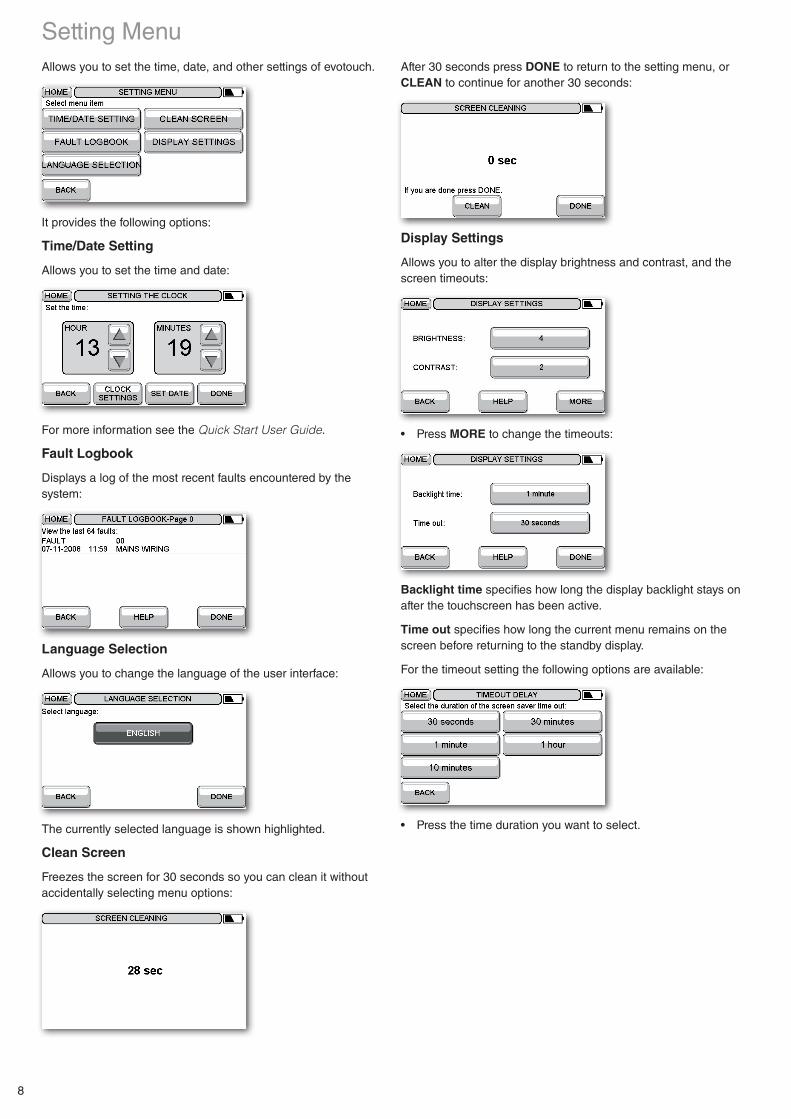
Allows you to set the time, date, and other settings of evotouch.
It provides the following options:
Time/Date Setting
Allows you to set the time and date:
For more information see the Quick Start User Guide.
Fault Logbook
Displays a log of the most recent faults encountered by the system:
Language Selection
Allows you to change the language of the user interface:
The currently selected language is shown highlighted.
Clean Screen
Freezes the screen for 30 seconds so you can clean it without accidentally selecting menu options:
After 30 seconds press DONE to return to the setting menu, or CLEAN to continue for another 30 seconds:
Display Settings
Allows you to alter the display brightness and contrast, and the screen timeouts:
• PressMORE to change the timeouts:
Backlight time specifies how long the display backlight stays on after the touchscreen has been active.
Time out specifies how long the current menu remains on the screen before returning to the standby display.
For the timeout setting the following options are available:
• Pressthetimedurationyouwanttoselect.
Setting Menu
9
Approvals
Conforms to protection requirements of the following directives: EMC: 2004/108/EC LVD: 2006/95/EC R&TTE: 1995/5/EC
EMC compliance considerations
Refer to Code of Practice standards EN61000-5-1 and -2 for guidance.
Caution: Isolate power supply and make safe before wiring the unit to prevent electric shock and equipment damage. Installation should be carried out by a competent person.
Product handling
Care should be taken with the evotouch unit while it is out of its dock or table-top stand as the unit, particularly the touchscreen display, may be damaged if the unit is dropped onto a hard surface.
Location of device
evotouch should be placed in an open space for best performance as it is a radio frequency device. Leave at least 30cm distance from any metal objects including wall boxes and at least 1 metre from any other electrical equipment eg. radio, TV, PC etc. Do not mount onto metal wall boxes.
For the best temperature control performance evotouch should not be placed near heat or cool sources (e.g. cooker, lamp, radiator, doorways, windows).
Disclaimer
This product and its associated documentation and packaging are protected by various intellectual property rights belonging to Honeywell Inc and its subsidiaries and existing under the laws of the UK and other countries. These intellectual and property rights may include patent applications, registered designs, unregistered designs, registered trade marks, unregistered trade marks and copyrights.
Honeywell reserves the right to modify this document, product and functionality without notice. This document replaces any previously issued instructions and is only applicable to the product(s) described.
This product has been designed for applications as described within this document. For use outside of the scope as described herein, refer to Honeywell for guidance. Honeywell cannot be held responsible for misapplication or the product(s) described within this document.
PLEASE RESPECT YOUR ENVIRONMENT!
Take care to dispose of this product and any packaging or literature in an appropriate way.
WEEE directive 2002/96/EC Waste Electrical and Electronic Equipment directive
• Attheendoftheproductlifedisposeofthepackagingandproduct in a corresponding recycling centre.
• Donotdisposeoftheunitwiththeusualdomesticrefuse.• Donotburntheproduct.• Removethebatteries.• Disposeofthebatteriesaccordingtothelocalstatutory
requirements and not with the usual domestic refuse.
Manufactured for and on behalf of the Environmental and Combustion Controls Division of Honeywell Technologies Sàrl, ACS-ECC EMEA, Z.A. La Pièce 16, 1180 Rolle, Switzerland by its Authorised Representative Honeywell Inc.
Honeywell Control Systems Ltd. ArlingtonBusinessPark, Bracknell,Berkshire RG121EB
Technical Help Desk: 08457 678999 www.honeywelluk.com
Safety information

50042753-001 B
© 2009 Honeywell International Inc.
evotouch