exorcist user manual the exorcist haunt controllerskulltronix.com/images/exorcist_manual.pdf ·...
TRANSCRIPT
Exorcist User Manual
1
The ExorcistHaunt
ControllerWarnings:The Exorcist Box IS NOT waterproof. Use only indoors and do not spillliquids on it.
Exorcist is not designed as a safety controller and shouldn’t be used inapplications where there is a potential danger of injury or death.
The Exorcist box accepts only dry contact style inputs. Do not applycurrent to the inputs.
The Exorcist hardware and software are Copyrighted 2007 by Bryan Davisand Jerry Jewell and may not be copied or redistributed in any form withoutthe express written permission of SkullTroniX.
Exorcist User Manual
2
IntroductionExorcist is a software and hardware package that was been designed to seamlesslytrigger VSA routines using switches and sensors or an infrared remote control.
About VSA:The VSA animation software is published by Brookshire Software(http://brookshiresoftware.com). VSA is the software shipped with every SkullTroniXtalking skull. VSA allows simple drag’n’drop animation for a variety of animatronics,robots and lighting devices.
VSA is designed to run only one routine at a time and is typically activated bypressing the ENTER key on the keyboard. A single VSA routine can control thelights, sound and animation for a single haunted house scene. But VSA doesn’t allowyou to trigger the routine with devices other than the keyboard. Nor will VSA supportmultiple routines simultaneously.
Thus was born the Exorcist. While not of much use to non-VSA users, the Exorcistallows VSA to become the heart and brains of a modern haunted attraction. With VSAand the Exorcist you can trigger and control the playback of multiple sound files andVSA routines simultaneously. This allows VSA to not only control multiple routinesfor multiple scenes but also to be interactive with both the visitors and the staff of thehaunt.
The Exorcist interfaces directly with VSA and as such greatly expands the versatilityof VSA, and even makes it possible to drive multiple animatronics or propssimultaneously from a single computer. Each animatronic can even have its ownunique sound.
System Requirements:Because the Exorcist can run multiple VSA routines simultaneously it can eat upconsiderable processing power and memory. We recommend a minimum of 1024MBRAM, Windows XP and the fastest processor you can afford. We also highlyrecommend a powered USB hub to both supply sufficient power as well as protectyour PC from shorts or surges in your USB devices. You also need VSA and VSAConsole. See below for more details.
We do not yet support running the Exorcist software under Windows Vista.
Exorcist User Manual
3
What’s in the package?The Exorcist package includes both hardware and software components. The hardwareincludes the Exorcist Input box, an IR Receiver, an IR remote control, a USB cableand a couple of AAA batteries for the remote.
The software includes the Exorcist Installation CD.
The Exorcist Input Box:The input box can be connected to up to 8 switches and/or sensors, as well as theincluded IR receiver. It also has 8 buttons that mirror the functions of the adjacentinput plugs. The input ports are standard 3.5 MM mono plugs. The IR receiver plugsinto the sub-mini plug on the end of the Exorcist input box. The other end of theExorcist Input Box has the receptacle for the USB cable , which in turn connects toyour PC’s USB port.
How it Works:In simple terms, the Exorcist Input Box detects a button or other trigger action andsends the command to the PC. The Exorcist Software sees the command come in andthen triggers various actions, depending on the rules that are set up.
The Exorcist software package gives the user the option of controlling up to 8 VSAroutines and multiple sound files
Basic features:Infra red remote control8 input channels8 VSA channels8 sound channels16 timersPoint-n-click interfacePC volume levels adjustable from the remote controlArming and disarming of Exorcist from remote control

Exorcist User Manual
4
Getting Started
Unpack Exorcist. You should have:• Exorcist Manual (this document)• Exorcist USB Input Box and USB Cable
• Exorcist CD• Remote Control (your remote control may differ) and receiver
Exorcist User Manual
5
InstallationIf you are the owner of a SkullTroniX revision 3 (or newer) skull you already haveinstalled the VSA Console program. The VSA Console is a separate product sold byBrookshire Software especially for people who want to program their own add-onproducts for VSA – like The Exorcist. In anticipation of the release of The Exorcist weincluded it secretly with SkullTroniX Rev 3 and newer VSA licenses. If you are not aSkullTroniX owner you will need to buy the $16 Console application fromhttp://brookshiresoftware.com and install it before proceeding.
StepsPlug the IR receiver and USB cable into The Exorcist Input Box. Plug the USB cableinto an unused USB port on your PC.
Insert The Exorcist CD into your PC and install the software.
Open VSA and check your VSA routines to make sure they work correctly in VSABEFORE trying them in The Exorcist. If your VSA routines don’t work in VSA theywill be guaranteed not to work in The Exorcist. You really need to be familiar with theoperation of VSA before trying to use The Exorcist.
Open the Exorcist Manual.pdf file and read it before continuing.
Quit VSA and launch The Exorcist application
You are ready to explore some of The Exorcist’s functions now. You’ll see a row oftabs across the top of the screen.
IMPORTANT READ THISIt is bad practice to allow a VSA routine to stop and leave your servos powered, forthis reason the SkullTroniX Skull has a built in relay that can power up the servos atthe start of a routine and power down at the end.
Because the Exorcist has the ability to automatically terminate a routine mid stream,this normally would leave the servos powered, however, Exorcist pulls off a neat trickthat means this doesn’t happen. It is important to know how to prepare a VSA routineto take advantage of the power down feature when using the Exorcist.
When you send Exorcist a command to stop a routine midway, playback is stoppedimmediately, but, Exorcist will then immediately play the first frame of the routine.Because of this it is important that there are no VSA commands in the first frame ofyour routine.

Exorcist User Manual
6
This trick works because, when you start a routine, VSA sets all the outputs to thedefault value, all SkullTroniX routines set the outputs to default to off, meaning theauto on/off relay in the SkullTroniX gets turned off in the first frame. This only worksfor SkullTroniX animatronics, unless you build a similar feature into your own props.
ToolTipsWhen navigating Exorcist you will notice that when you leave the cursor hoveringover many of the controls a tool tip message will popup giving a brief description ofthat controls function and use. These are provided to assist new users learn their wayround Exorcist, but after a while the help can get annoying. If you want to disable thisfeature then just go to Help and select Tool Tips OFF
.
VSA Routines Screen
The VSA Routines screen is where you tell The Exorcist which VSA routines will becontrolled and how they will be controlled. You can double click in the VSA routinesentry area to specify which VSA routines to load into each of the 8 VSA “slots”available. For testing purposes just enter in one routine.
Exorcist User Manual
7
The yellow label above the VSA routine allows you to choose a friendly name foreach routine. Just double click on the yellow name, eg: “VSA 1” and change it to aname that is more meaningful and/or is shorter – like “séance”. When you click Ok itwill take several seconds to record the changes throughout the Exorcist system.
To the right of the VSA routine name is the method that is used to start or “trigger” theroutine. The column is labeled “Play if”. Scroll through the list of possible triggers.You can see some pretty obvious triggers, like the buttons on the box or the infraredremote control buttons. For now just select “Input 1 ON”, which refers to the firstbutton on The Exorcist control box.
After the trigger column is the “Reset if” condition. The reset will stop the VSAroutine and prepare it to play again from the beginning. For practice, set the resettrigger to “Input 2 ON”. Now your routine will play each time the first button on TheExorcist Input Box is pressed. And then stop each time the second button is pressed.
NOTE, By default, routines don’t reset automatically even when they end normally,When a routine is triggered and played then that’s it. It won’t trigger and play again,unless the reset condition is met.
To test the new “program” you must first click on the “ARM” button at the lower leftof the screen. You must always DISARM The Exorcist before making programchanges and ARM it again before trying out the changes.
When Exorcist “arms”, it loads and prepares all your routines such that they can beplayed immediately. To make sure that everything is properly loaded before Exorcistis armed the Arm process has a 10 second delay built into it,. You can monitor thearming progress by the progress bar at the bottom of the screen.
ARMED? If so, press button #1. The VSA routine should start playing immediately.However if there is a period of silence at the start of your animation routine this can behard to appreciate, you can verify that the routine has triggered by monitoring theRdy/Act/Done flags. (Ready, Active, Done) If yoru VSA routine worked, press boxbutton 2 to stop and reset the routine.
Exorcist User Manual
8
The Logic Functions Screen
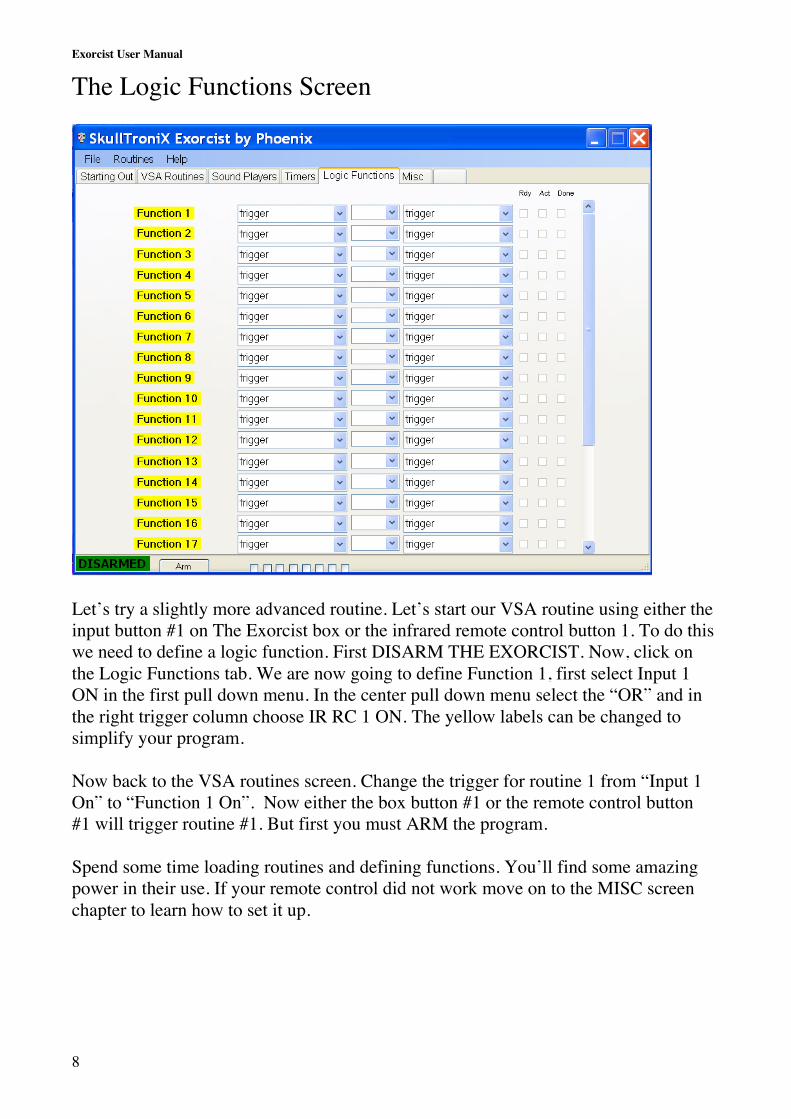
Let’s try a slightly more advanced routine. Let’s start our VSA routine using either theinput button #1 on The Exorcist box or the infrared remote control button 1. To do thiswe need to define a logic function. First DISARM THE EXORCIST. Now, click onthe Logic Functions tab. We are now going to define Function 1, first select Input 1ON in the first pull down menu. In the center pull down menu select the “OR” and inthe right trigger column choose IR RC 1 ON. The yellow labels can be changed tosimplify your program.
Now back to the VSA routines screen. Change the trigger for routine 1 from “Input 1On” to “Function 1 On”. Now either the box button #1 or the remote control button#1 will trigger routine #1. But first you must ARM the program.
Spend some time loading routines and defining functions. You’ll find some amazingpower in their use. If your remote control did not work move on to the MISC screenchapter to learn how to set it up.
Exorcist User Manual
9
State vs. EventSomething that may confuse is the difference between State and Event, a light forexample has two states ‘ON’ or ‘OFF’, however; there are also two Events, i.e.‘turning ON’ and ‘turning OFF’.
It’s important to understand this, because Exorcist is Event driven, not State Driven,Exorcist responds to the Events of turning something ON or OFF, and not to the stateof ‘being ON’ or ‘being OFF.’
Normally this difference is just semantics, something normally can’t be ON unless it’sturned on, and likewise it can’t be OFF unless it’s turned off. Sometimes whenExorcist is armed and the inputs are already ON or OFF these states may be missedand your Exorcist program logic will not seem to work properly.

Exorcist User Manual
10
THE MISC SCREEN
AA
A note about remote control unitsThe Exorcist uses Phillips RC5 control codes (there are other Phillips formats).Universal remote controllers that default to the Phillips protocol will work right out ofthe box. Other brands might need to have the codes set in order to generate compatibleremote codes. If your remote doesn’t work with the Exorcsit please read the remotemanual for instructions on how to set the codes.
On the left side of the MISC SCREEN are the defined remote keys and the remotecode used to generate them. You can double click on the yellow titles to rename them.
Just above the remote display is a series of numbers that usually begin with 12, then aspace, a number and another space and another number. EG: 12 13 1345. In thepicture above the letters No IR Code appear there. The center number is the actual keycode of the remote control button last pushed. As you press keys on the remote youwill see their numbers displayed here. If the keys you press are already defined in thelist you will also see the X appear briefly in the checkbox to the right, if the presetcodes don’t match your remote you can assign new values in the boxes next to thecode.
Exorcist User Manual
11
For simplicity sake we have already named the remote keys IR RC 1, IR RC 2, etc. Ifthese names work for you just leave them. If you would like to use different codes orrename them please feel free to change them. Note that when you change the namehere it also gets changed in the appropriate pull down menus on the other screens. Thiscan get quite confusing if you move or change the names a lot.
On the right of the MISC screen are displayed:• The serial number of the box• A reset button - in case the box processor crashes (not likely).
Below that are the labels for the box buttons. You can rename them here to make themmatch the functions you assign to them. For example: If you play the séance routinewith button 1 you can just name the button “séance”. You can then apply a matchinglabel on the box to make life even easier. Masking tape and a marker pen will workfine.
There is also an overall PC sound level adjustment on this screen.
The label control button opens a sub window where it’s possible to turn off unwantedoptions in the trigger selection boxes. In its default configuration the Exorcist has over170 options for triggers, and it may be undesirable to have them all available. Whenyou click the Label Management button a sub screen will be shown which lists alltrigger options. To remove unwanted trigger options just uncheck the enable checkboxnext to the trigger name and close the window, then when you open a trigger selectionbox you will no longer see the unwanted trigger.
It is possible to reset all trigger options to their default setting of visible by justclicking the reset to default button
Exorcist User Manual
12
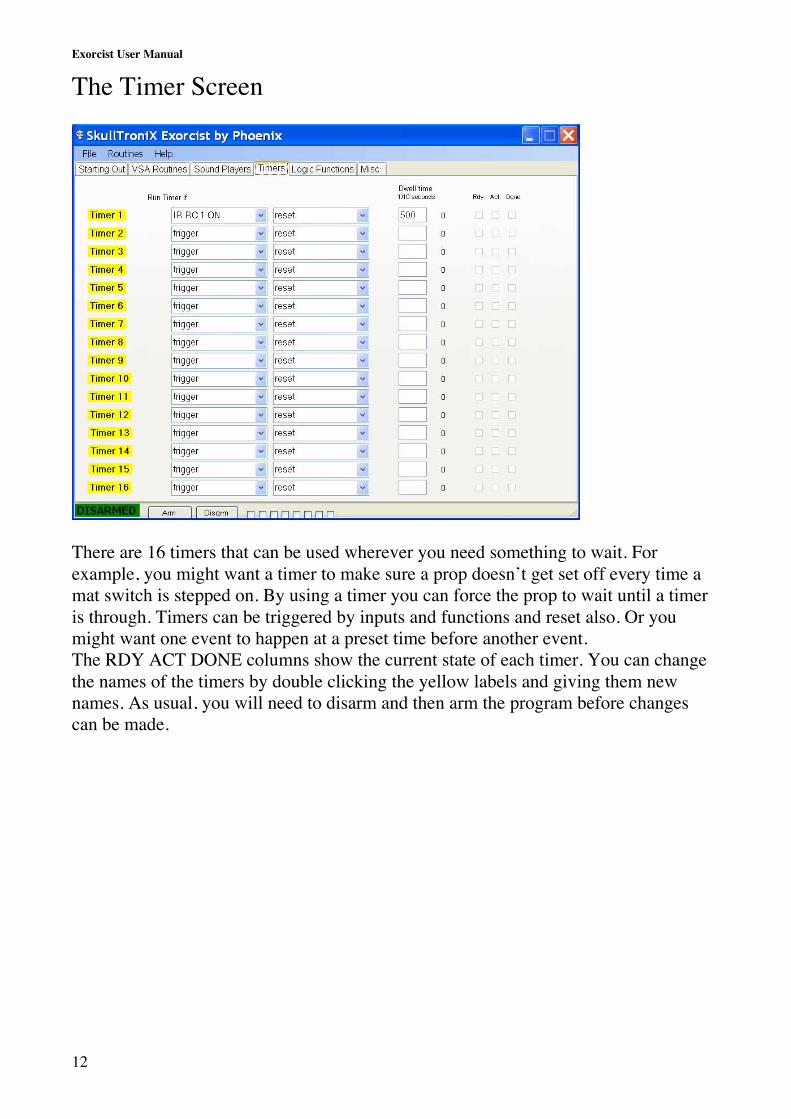
The Timer Screen
There are 16 timers that can be used wherever you need something to wait. Forexample, you might want a timer to make sure a prop doesn’t get set off every time amat switch is stepped on. By using a timer you can force the prop to wait until a timeris through. Timers can be triggered by inputs and functions and reset also. Or youmight want one event to happen at a preset time before another event.The RDY ACT DONE columns show the current state of each timer. You can changethe names of the timers by double clicking the yellow labels and giving them newnames. As usual, you will need to disarm and then arm the program before changescan be made.
Exorcist User Manual
13
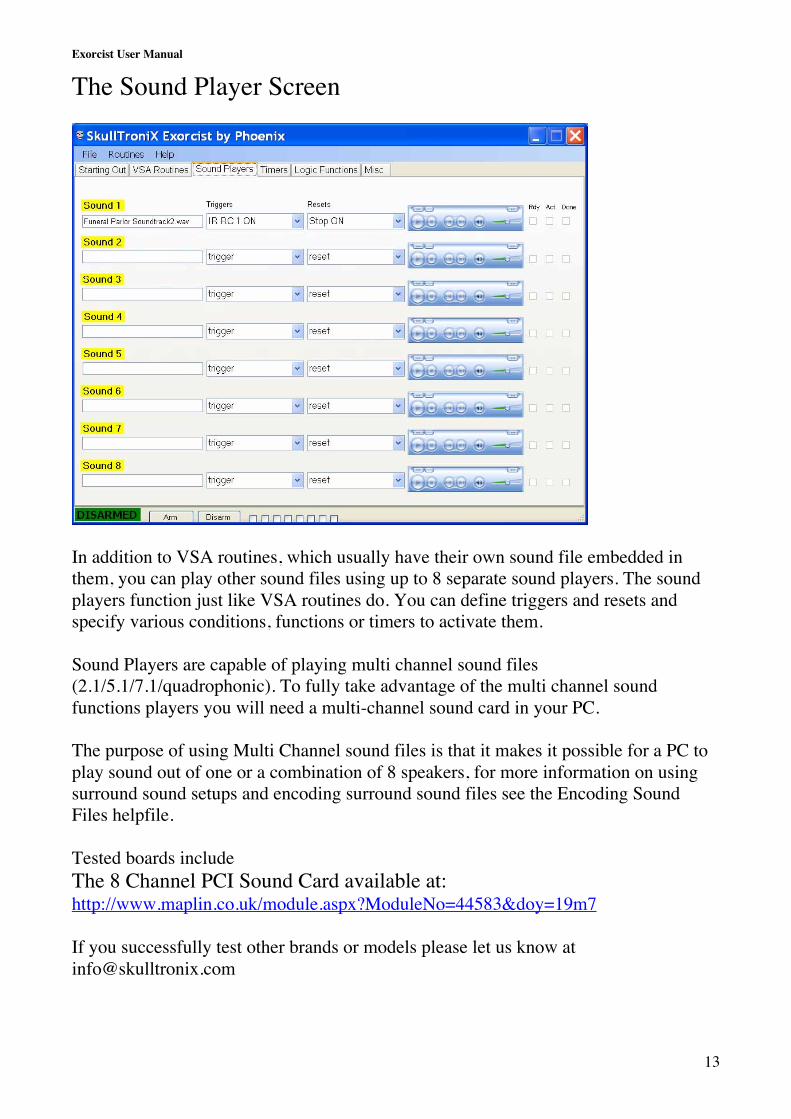
The Sound Player Screen
In addition to VSA routines, which usually have their own sound file embedded inthem, you can play other sound files using up to 8 separate sound players. The soundplayers function just like VSA routines do. You can define triggers and resets andspecify various conditions, functions or timers to activate them.
Sound Players are capable of playing multi channel sound files(2.1/5.1/7.1/quadrophonic). To fully take advantage of the multi channel soundfunctions players you will need a multi-channel sound card in your PC.
The purpose of using Multi Channel sound files is that it makes it possible for a PC toplay sound out of one or a combination of 8 speakers, for more information on usingsurround sound setups and encoding surround sound files see the Encoding SoundFiles helpfile.
Tested boards includeThe 8 Channel PCI Sound Card available at:http://www.maplin.co.uk/module.aspx?ModuleNo=44583&doy=19m7
If you successfully test other brands or models please let us know [email protected]
Exorcist User Manual
14
The Menu BarAbove the tabs are the FILE, ROUTINES and HELP menus.The FILE menu allows you to load and save the “programs” you have created,
If you find that there are some common settings that you need to make every time youuse Exorcist then you can make those settings in a blank file and save these settings asDefault, doing this will ensure that those settings are made every time you startExorcist
Under the routines menu you will find a number of routines that give examples ofcommon configurations, clicking on one of these routines will automatically load theroutine into Exorcist.
The Help Menu includes an option to turn on/off the tool tips and view the ‘About’screen which will display the current software version number.

Exorcist User Manual
15
Playing multiple routinesExorcist has the capability to play multiple routines simultaneously; however shouldmore than one routine try to access a servo board or DMX converter at the same timethen a VSA error will occur.
This means that each prop that will be required to play simultaneously with anotherprop under VSA/Exorcist control needs to have its own servo board or DMXconverter. Unless of course you have multiple props programmed in the same VSAroutine.
Example 1, two props on two separate sets each set having its own triggerEach prop requires separate DMX converters.
Example 2 Two props on the same set addressed by the same routines.Only One DMX converter needed
Example 3 Two props on the same with separate routines and triggers Each prop requires its own DMX converter
Because trying to play multiple routines at the same time without the right setup cancause problems, there are two tools to help restrict thisThe All VSA Off flag can be used in functions to check that no routines are currentlyactive To play multiple routines simultaneously you have to check the Enable Simultaneousroutine playing flag on the VSA Players screen
When playing to multiple props using surround sound you can assign each prop itsown speaker, this can be done easily with just a pair of props using Stereo speakersand remixing your MP3 or WAV file to the left or right speaker and using the remixedfile inside VSA
If you want a scene with more than two sound channels then the Sound players inVSA are not up to the job. You need to remove the sound file from VSA and remix itto a multi-channel WMA or AVI file using the supplied sound mix software. You canthen play the sound file from Exorcist in synchronization with the VSA file byassigning the Sound player the same triggers and resets as the VSA routine.
Exorcist User Manual
16
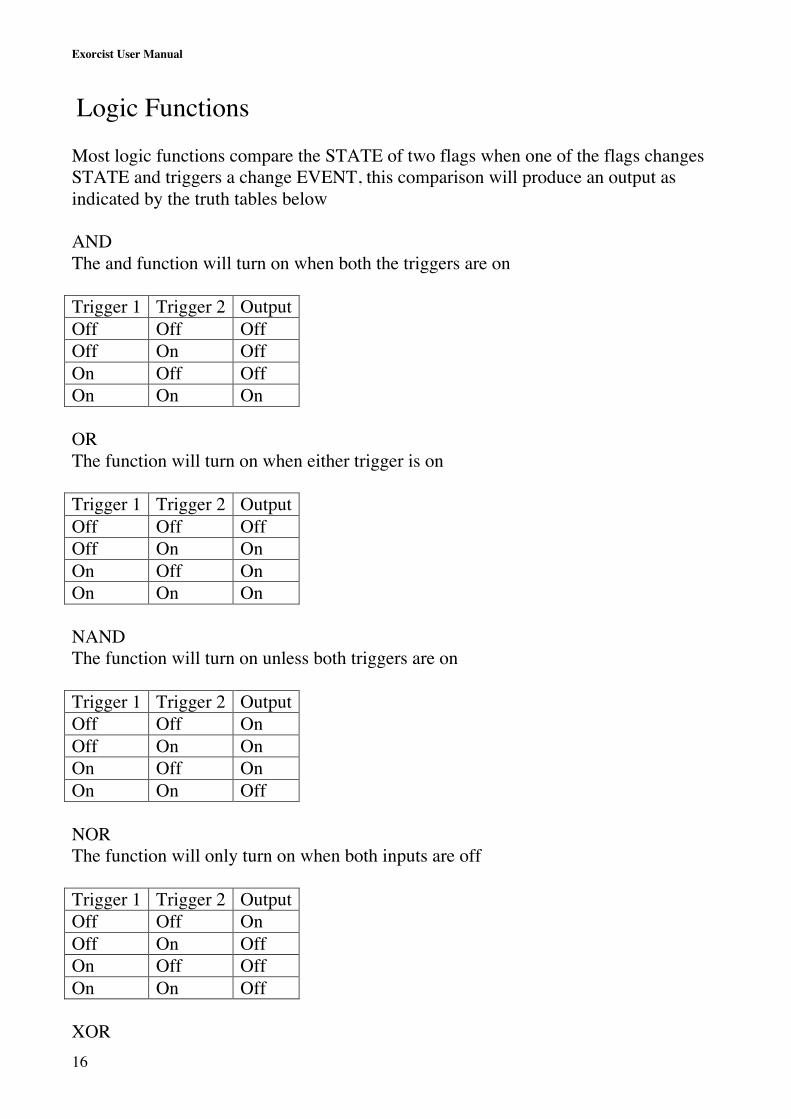
Logic Functions
Most logic functions compare the STATE of two flags when one of the flags changesSTATE and triggers a change EVENT, this comparison will produce an output asindicated by the truth tables below
ANDThe and function will turn on when both the triggers are on
Trigger 1 Trigger 2 OutputOff Off OffOff On OffOn Off OffOn On On
ORThe function will turn on when either trigger is on
Trigger 1 Trigger 2 OutputOff Off OffOff On OnOn Off OnOn On On
NANDThe function will turn on unless both triggers are on
Trigger 1 Trigger 2 OutputOff Off OnOff On OnOn Off OnOn On Off
NORThe function will only turn on when both inputs are off
Trigger 1 Trigger 2 OutputOff Off OnOff On OffOn Off OffOn On Off
XOR

Exorcist User Manual
17
The function will only turn on if one of the inputs are on, if both are on then it willturn off
Trigger 1 Trigger 2 OutputOff Off OffOff On OnOn Off OnOn On Off

Exorcist User Manual
18
NOTThe NOT function ignores the state of the second trigger, normally this shouldn’t beset to anything, but even if it is set then its condition will be ignored
The not function turns on when trigger 1 is off and turns off when trigger 1 is on
Trigger 1 Trigger 2 OutputOff Off OnOff On OnOn Off OffOn On Off
LATCHLatch is different to the other functions because it’s a latching relay not a Booleanfunction.
When trigger 1 is turned on the Latch function turns on, however it will then remainon even if trigger 1 turns off, i.e. it remembers that trigger 1 has been turned on.
The latch function will only turn on if trigger 2 is turned off, because of this you needto take the previous state of the output into consideration as well as the current state ofthe switches
Steps Trigger1
Trigger2
Output Comment
Step 1 Off Off OffStep 2 On Off On Output turns on with trigger 1Step 3 Off Off On Output Remains on even though
trigger 1 is offStep 4 Off On Off Output turns off when trigger 2 turns
onStep 5 On On Off Output remains off because reset if onStep 6 On Off On Output turns on because trigger 2
turns off

Exorcist User Manual
19
The Exorcist Input Box hardware description:
Features:• The box has four tabs for mounting.• There are 8 red input buttons on the top surface. They are numbered from the endwhere the IR Receiver plugs in. In the Exorcist software they come pre-labeled asInput One through Input Eight. The names can be changed in the software and youcan use tape or marker pens to label the box to match.• Along the side are 8 mono mini-phono jacks. This is where you plug in your matswitches or other triggering devices. The buttons and the inputs are the same. IE:pushing on button one is the same as stepping on a mat switch connected to input one.Do not connect any powered devices to these inputs. You will blow out the circuitry ifyou do.The jacks expect to have normally open switches connected. If your switch isnormally closed you can invert the signal in the software or define a function using theNOT operator.• On one end is the sub-mini phono jack for the infrared receiver.• The opposite end has the USB connector.• The red LED light on top lights up when The Exorcist Box is connected properly toyour PC.
Exorcist User Manual
20
Programming your Haunt
Exorcist has been designed with the fully automated haunt in mind, something that inpractice is a lot harder to get right than it sounds, and its not until you have tried itwithout the Exorcist that you realize how hard a job it really is.
The thing to remember is that there is no real right or wrong way, and what works forone haunt scene is unlikely to be any good for another. No matter how you configureyour control system someone is going to find a way of messing it up. The mostimportant thing to do is ensure that there is a cast iron way of resetting things so evenif one group gets a messed up experience, the system will recover in time for the nextgroup. The examples below are just illustrations of ways of using the Exorcist’sfeatures to produce different effects and demonstrate how you can make creative useof its versatility.
Lets start simple
Probably the simplest method of triggering and resetting a routine is by using theRoutine DONE flag
VSA 1Trigger: - Input 1 ON (Mat Switch)Reset: - VSA 1 Done
Using this method the routine will start playing once someone steps on the mat switchand then continue playing to the end, at which point it resets itself.
Unfortunately, if someone stands on the mat switch the routine will just repeat insteadof ending and letting boredom send them on their way.
Though despite its flaws, this may be a good method for triggering a quick/shortroutine
Using a dead zone timer
This may actually be one of the most versatile ways of controlling a routine, it’s quickand simple like 1 above, yet has a small degree of protection
VSA 1Trigger: - Input 1 ONReset: - Timer 1 Done
Timer 1Trigger: - VSA 1 Done
Exorcist User Manual
21
Reset: - Timer 1 DoneDwell: - 100
This method ties the reset to a timer. When you trigger the routine it plays and thenwill not trigger again for 10 seconds (100 tenths). This gives everyone plenty of timeto walk away before the next group arrives.
Using timers has one flaw; it doesn’t take into account people who run through yourhaunt They are likely to trigger the prop, watch the first 10 and leave with the routinerunning. The next group catches the end of the routine, wasting all your hard work..
Zone Control (Exit)
A zone control is a means of detecting if someone enters or leaves a scene.
Up to now we have discussed methods that use one input per routine, zone controlneeds more than one input in order to work.
VSA 1Trigger: - Input 1 ON (mat at viewing point)Reset: - Input 2 ON (mat at exit ‘gate’)
As you can see we are back to simple, and alas this method is could be abused ifsomeone discovers where the mats are and that running back and forth between themstarts and stops the routine. This isn’t terribly likely though.
Let’s beef it up a little.
VSA 1Trigger: - Input 1 ON (mat at viewing point)Reset: - Timer 1 Done
Timer 1Trigger: - Function 1 ONReset: -Timer 1 DoneDwell: -100
Function 1Condition 1: - Input 2 ON (mat at exit ‘gate’)Condition 2: - VSA 1 DoneOperator: - OR
The advantages of this are that it works exactly like the dead zone timer method,however, should your guests have a short attention span and leave the set then it willautomatically reset.

Exorcist User Manual
22
Exorcist User Manual
23
Zone Control (Entry and Exit)
You can of course extend your zone control to monitor entry and exit.
VSA 1Trigger: - Function 1 ONReset: - Input 3 ON (Exit Mat)
Function 1Condition 1: - Input 1 ON (viewing Mat)Condition 2: - Function 2 ONOperator: - AND
Function 2Condition 1: - Input 2 ON (Entry Mat)Condition 2: - Input 3 ON (Exit Mat)Operator: - LATCH
With this version stepping on the viewing mat alone is not enough to trigger theroutine. The viewer first has to enter the area and step on the entry mat. The latchfunction of Function 2 remembers that someone has entered. Stepping on the viewingmat will then trigger the routine. Leaving the area will reset the routine.
This example raises an interesting possibility for Exorcist, you could introduce apuzzle element to your haunt…..
If all else fails make sure you have a manual override
Whilst this chapter has dealt with fully auto haunts, sometimes it is desirable for theHauntmaster to be able to just override the program and have it do what he wants; thisis ideally what the IR remote is for.
VSA 1Trigger: - Function 1 ONReset: - Function 4 ON
Function 1Condition 1: - Function 3 ONCondition 2: - IR RC 1 ONOperator: - OR
Function 2Condition 1: - Input 2 ON (Ent Mat)Condition 2: - Function 4 ONOperator: - LATCH

Exorcist User Manual
24
Function 3Condition 1: - Input 1 ON (view Mat)Condition 2: - Function 2 ONOperator: - AND
Function 4Condition 1: - Input 3 ON (Exit Mat)Condition 2: - IR RC 2 ONOperator: - OR
This version works exactly like the previous version, only it gives the Hauntmaster anopportunity to override the mat switches (or other triggers) and control the Exorcistsystem using the infrared remote.
Exorcist User Manual
25
Mixing it up
Someone on the forums gave us this idea, it’s not actually something that was everthought about during Exorcists design and development process, but gives an excellentexample of how you can adapt Exorcist to control many situations.
The problemSuppose that you want you haunt to appeal to a broad age group, you may want tovary your routines to play a spooky mode for the under 7s and a scary mode forteenagers….. Well here’s my solution, for simplicity Ill base it on a dead zone timerroutine.
VSA 1 (Spooky)Trigger: - Function 1 ONReset: - Timer 1 Done
VSA 2 (Scary)Trigger: - Function 2 ONReset: - Timer 1 Done
Timer 1Trigger: - Function 5 ONReset: - Timer 1 DoneDwell: - 100
Function 1Condition 1: - Function 3 ONCondition 2: - Input 1 ONOperator: - AND
Function 2Condition 1: - Function 4 ONCondition 2: - Input 1 ONOperator: - AND
Function 3Condition 1: - IR RC 1Condition 2: - IR RC 2Operator: - LATCH
Function 4Condition 1: - Function 3 ONOperator: - NOT
Function 5

Exorcist User Manual
26
Condition 1: - VSA 1 DoneCondition 2: - VSA 2 DoneOperator: - OR
With this routine the hauntmaster can select the mode the haunt will operate on bypressing a button on the IR remote as his guests enter, press 1 and the haunt will workin Spooky mode, press 2 and it will work in Scary Mode
Exorcist User Manual
27
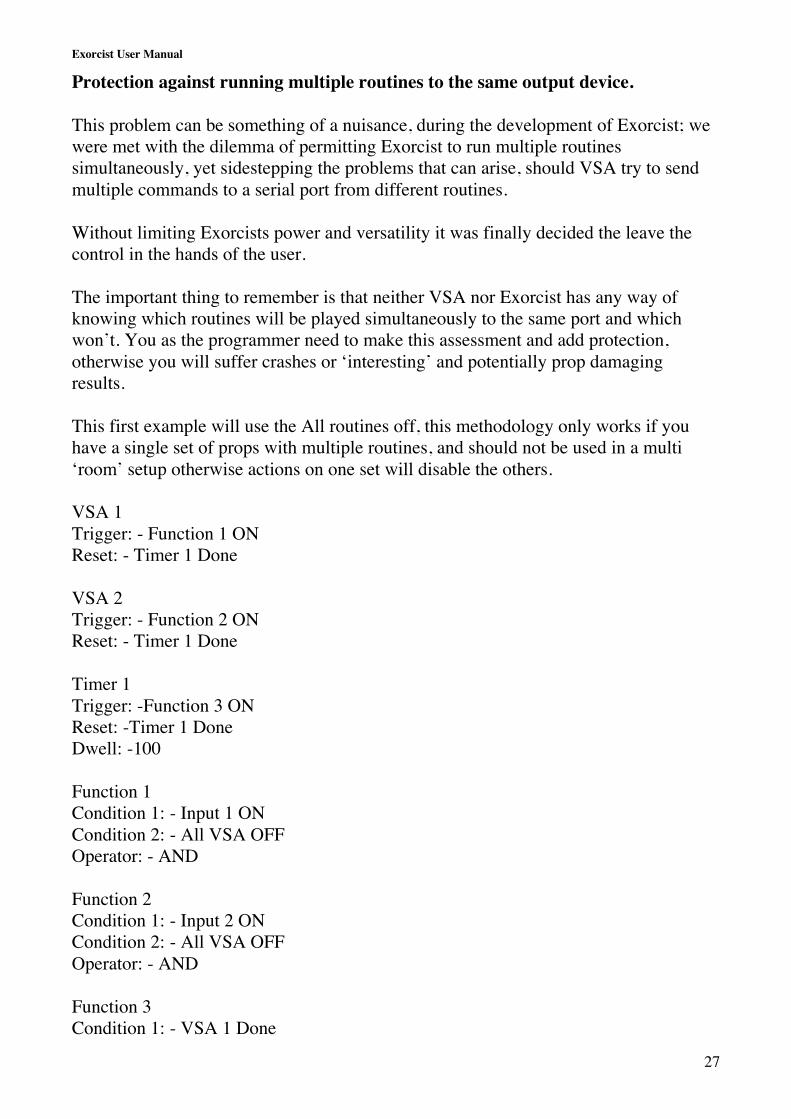
Protection against running multiple routines to the same output device.
This problem can be something of a nuisance, during the development of Exorcist; wewere met with the dilemma of permitting Exorcist to run multiple routinessimultaneously, yet sidestepping the problems that can arise, should VSA try to sendmultiple commands to a serial port from different routines.
Without limiting Exorcists power and versatility it was finally decided the leave thecontrol in the hands of the user.
The important thing to remember is that neither VSA nor Exorcist has any way ofknowing which routines will be played simultaneously to the same port and whichwon’t. You as the programmer need to make this assessment and add protection,otherwise you will suffer crashes or ‘interesting’ and potentially prop damagingresults.
This first example will use the All routines off, this methodology only works if youhave a single set of props with multiple routines, and should not be used in a multi‘room’ setup otherwise actions on one set will disable the others.
VSA 1Trigger: - Function 1 ONReset: - Timer 1 Done
VSA 2Trigger: - Function 2 ONReset: - Timer 1 Done
Timer 1Trigger: -Function 3 ONReset: -Timer 1 DoneDwell: -100
Function 1Condition 1: - Input 1 ONCondition 2: - All VSA OFFOperator: - AND
Function 2Condition 1: - Input 2 ONCondition 2: - All VSA OFFOperator: - AND
Function 3Condition 1: - VSA 1 Done

Exorcist User Manual
28
Condition 2: - VSA 2 DoneOperator: - OR
The All VSA Off flag is a shortcut flag provided to make such programming easy

Exorcist User Manual
29
A more selective method
In this example we are going to look at how inspired use of different functions cansimplify programming, but first lets look at a straightforward method.
VSA 1Trigger: - Function 1 ONReset: - Timer 1 Done
VSA 2Trigger: - Function 2 ONReset: - Timer 1 Done
Timer 1Trigger: - Function 3 ONReset: - Timer 1 DoneDwell: - 100
Function 1Condition 1: - Input 1 ONCondition 2: - Function 4 ONOperator: - AND
Function 2Condition 1: - Input 2 ONCondition 2: - Function 5 ONOperator: - AND
Function 3Condition 1: - VSA 1 DoneCondition 2: - VSA 2 DoneOperator: - OR
Function 4Condition 1: - VSA 2 ActiveOperator: - NOT
Function 5Condition 1: - VSA 1 ActiveOperator: - NOT
This routine is exactly like 7; however instead of using the All VSA off it selectivelychecks that the one routine is not playing before starting the other. It uses 4 functionsto do what was done with 2 in the previous example. However, there is a way of doingit with only two using a NOR function. Remember the NOR truth table

Exorcist User Manual
30
NORTrigger 1 Trigger 2 OutputOff Off OnOff On OffOn Off OffOn On Off
NOR is another way of saying if this AND that are OFF, where AND is saying if thisAND that are ON lets look at the routine again using NOR
VSA 1Trigger: - Function 1 ONReset: - Timer 1 Done
VSA 2Trigger: - Function 2 ONReset: - Timer 1 Done
Timer 1Trigger: - Function 3 ONReset: - Timer 1 DoneDwell: - 100
Function 1Condition 1: - Input 1 OFFCondition 2: - VSA 2 ActiveOperator: - NOR
Function 2Condition 1: - Input 2 OFFCondition 2: - VSA 1 ActiveOperator: - NOR
Function 3Condition 1: - VSA 1 DoneCondition 2: - VSA 2 DoneOperator: - OR
Please note that this routine is the same length as 7, but now the logic may appear tobe incomprehensible. This is known as negative logic and it’s the stuff that can easilygive you a headache
Looking back at the truth table Functions 1 and 2 will only trigger if both conditionsare OFF, this means the VSA routine needs to not be playing and the Input n OFF flag

Exorcist User Manual
31
needs to be OFF. Now for the headache….. The Input n OFF flag is off when Input nis ON, which means that function 1 will come on when Input 1 is ON AND VSA 2Active is OFF
Sound players and Surround sound
As yet we have made no mention of the sound players, this is because they areprogrammed in exactly the same way as VSA players. Throughout Exorcistsdevelopment it was intended to maintain as much similarity between the controls aspossible.
One of the advertised features of Exorcist was being able to play your VSA routinewith the sound coming from a selected surround sound speaker.
In order to perform this trick you must first remix the sound file to an AVI or WMAsurround sound file using the instructions for sound mixing (see the 7,1 sound mixer)
Once you have remixed your sound file to play the sound from your selected speakeryou will find that VSA will not play the remixed sound, so reset your VSA routine tocontain NO sound, just delete the sound file from VSA and have VSA play theanimation/lighting in silence.
Next you need to setup an Exorcist sound player to play your sound, and be triggeredat the same time as the VSA routine as follows
VSA 1Trigger: - Input 1 ONReset: - Timer 1 Done
Sound Player 1Trigger: - Input 1 ONReset: - Timer 1 Done
Timer 1Trigger: - VSA 1 DoneReset: - Timer 1 DoneDwell: - 100
Because the VSA player and sound player have the same triggers and resets they willnow be played in synch with each other. The Exorcist sound players are able to playAVI and WMA files so you can benefit from using a surround sound system.
Exorcist User Manual
32
Making your own switches
An Exorcist input switch should be a dry contact switch that shorts between twocontacts.
NOTEWhen making your own switches its important to ensure that you don’t pass a voltageto the Exorcist box, if the switch requires no power source then it’s usually safe toassume that it’s a dry contact switch. Switches with a power source would need to bebuffered with a transistor or relay.
Switches connect to the Exorcist Box using a 3.5mm (1/8”) mono connector, whenwiring your connector you connect one side of the switch to the tip and the other to theshank, it doesn’t matter which way round these connections are made.
When using a Stereo connector you need to tie the two shank contacts together with ajumper inside the connector.
If you’re using a transistor to buffer the input from a live switch then the ground planeof the Exorcist box is connected to the shank of the Jack, with the tip being live(approx 1.7V) the Tip should be connected to the transistors Collector and the shank tothe Emitter, the +dc input signal should be connected to the transistors Base with theand the transistors Emitter (ground plane) connected to the inputs ground.
Under no circumstances should a live voltage be passed to the Exorcist box. If you doyou will cause damage to Exorcist and potentially your computer
It is very good practice when wiring your haunt to route input cables via a differentroute from AC power cables. AC power cables can induct noise to your input cablesand cause false triggers - EVEN low voltage cables.
Never route cables in a way that would risk damaged AC or DC power cables cominginto contact with a signal cable

Exorcist User Manual
33
TroubleshootingIf your Exorcist is crashing you must quit Exorcist, load VSA and test yourroutines again. Once the routines work OK in VSA then you can save themand go back to testing in the Exorcist.
Problem Cause SolutionExorcist doesn’t respond toinfrared
Infrared receiver notplugged in properly orIR transmitter is nottransmitting RC 5 codes
Check that receiver isplugged all the way in,then on the Misc screenpress the reset IO Boardsbutton.
Watch the remote controlpanel on the Misc screen, ifthere is no response thenyou may not have yourremote configured properly
Batteries on transmitter flat Replace batteriesExorcist doesn’t respond tobuttons or inputs
Box not plugged inproperly
Check that both ends of theUSB connector areproperly plugged in, thered LED on the Exorcistbox is working, then screenpress the reset IO Boardsbutton
Exorcist wont playmultiple routinessimultaneously
Multiple routines notenabled
Click on the Enable buttonon the VSA screen
When VSA routine plays Ihear sound but no motion
VSA routine not setupproperly
Close the Exorcist and thenopen your VSA routinewith VSA and check thatyour routine worksproperly. Check that all theCom ports are set and besure to save the routineafter you get it working inVSA.
When I try start a routine Iget a communications error
This is normal if you try tostart two routinessimultaneously which bothaddress the samecommunications port, theerror is generated by VSAnot exorcist
Add protection to yourroutine so it wont allowyou to start a secondroutine while one that usesthe same port is playing
Exorcist User Manual
34
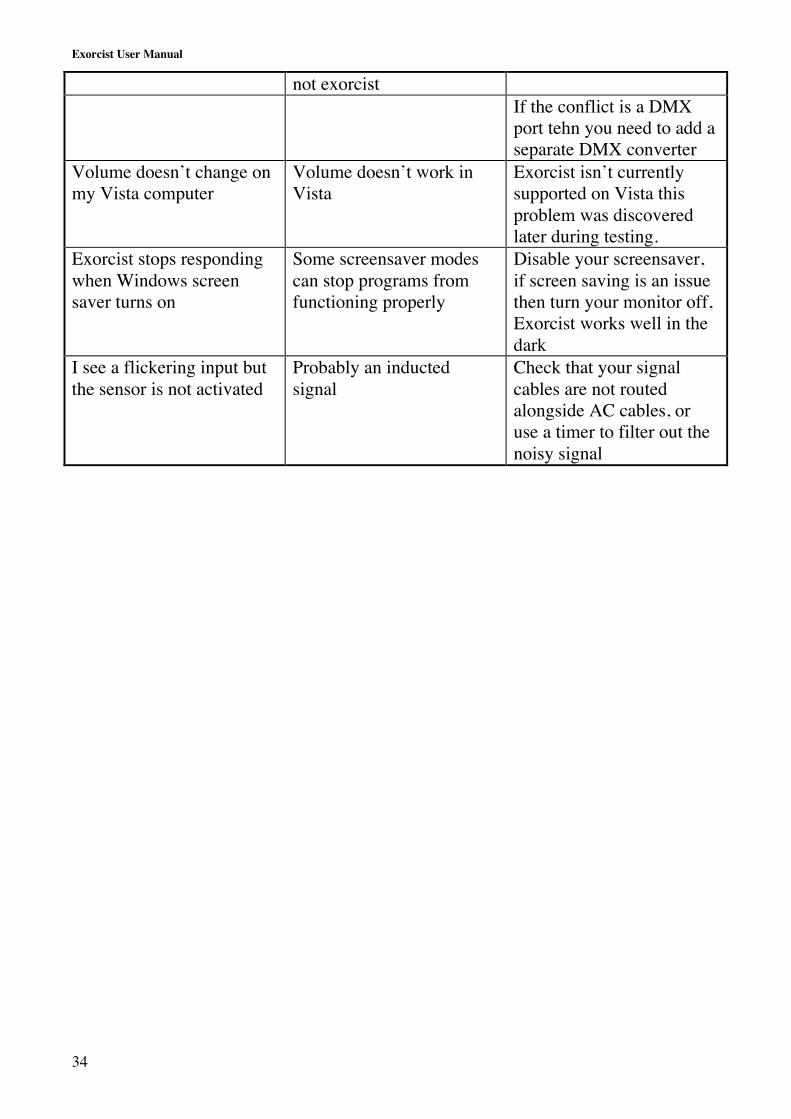
not exorcistIf the conflict is a DMXport tehn you need to add aseparate DMX converter
Volume doesn’t change onmy Vista computer
Volume doesn’t work inVista
Exorcist isn’t currentlysupported on Vista thisproblem was discoveredlater during testing.
Exorcist stops respondingwhen Windows screensaver turns on
Some screensaver modescan stop programs fromfunctioning properly
Disable your screensaver,if screen saving is an issuethen turn your monitor off,Exorcist works well in thedark
I see a flickering input butthe sensor is not activated
Probably an inductedsignal
Check that your signalcables are not routedalongside AC cables, oruse a timer to filter out thenoisy signal
Exorcist User Manual
35
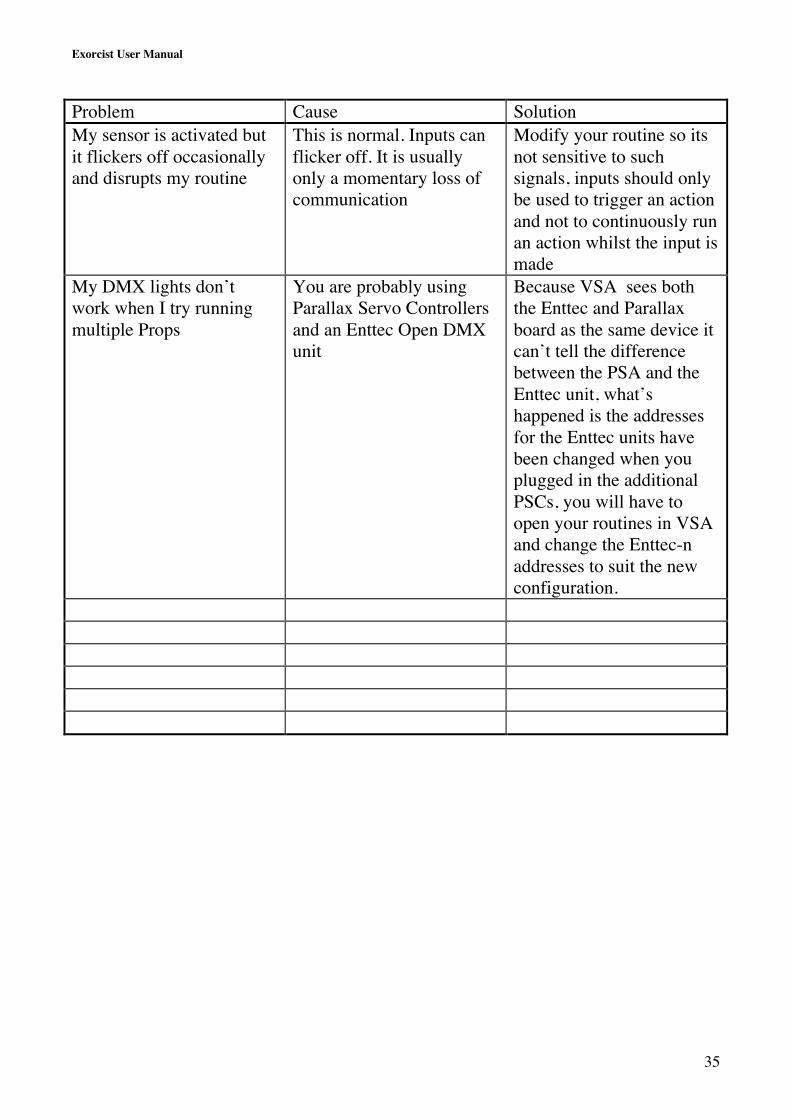
Problem Cause SolutionMy sensor is activated butit flickers off occasionallyand disrupts my routine
This is normal. Inputs canflicker off. It is usuallyonly a momentary loss ofcommunication
Modify your routine so itsnot sensitive to suchsignals, inputs should onlybe used to trigger an actionand not to continuously runan action whilst the input ismade
My DMX lights don’twork when I try runningmultiple Props
You are probably usingParallax Servo Controllersand an Enttec Open DMXunit
Because VSA sees boththe Enttec and Parallaxboard as the same device itcan’t tell the differencebetween the PSA and theEnttec unit, what’shappened is the addressesfor the Enttec units havebeen changed when youplugged in the additionalPSCs, you will have toopen your routines in VSAand change the Enttec-naddresses to suit the newconfiguration.