f300 rower owner’s manual - fuel fitness · f300 rower owner’s manual please carefully read...
TRANSCRIPT
F300 ROWER OWNER’S MANUAL
PLEASE CAREFULLY READ THIS ENTIRE MANUAL BEFORE OPERATING YOUR NEW ROWER

TABLE OF CONTENTS4
5
7
12
13
14
ATTENTION THIS Fitness rower IS INTENDED FOR RESIDENTIAL USE ONLY AND IS WARRANTED FOR THE APPLICATION. ANY OTHER APPLICATION VOIDS THIS WARRANTY IN ITS ENTIRETY.
Product Registration
Important Safety Instructions
F300 Assembly Instructions
Operation of Your Console
Program Operation
Manufacturer’s Limited Warranty
FUEL Fitness. Your new
FUEL Fitness will do all we can to make your ownership experience as pleasant as possible for many years to come. If you have questions, or if parts are missing or damaged, or you require customer service, call 1-866-697-6531. Please have your model number and serial number handy when you call.
Please take a moment to record where you purchased your machine, as well as the date of purchase FUEL Fitness and we will always remember
that you are the reason that we are in business. Please complete and mail your registration card
Yours in Health,FUEL Fitness
Congratulations On Your New Rower and Welcome to the FUEL Fitness Family!
F300_20140815 F300-2014_ver.A
4F300 ROWER 4
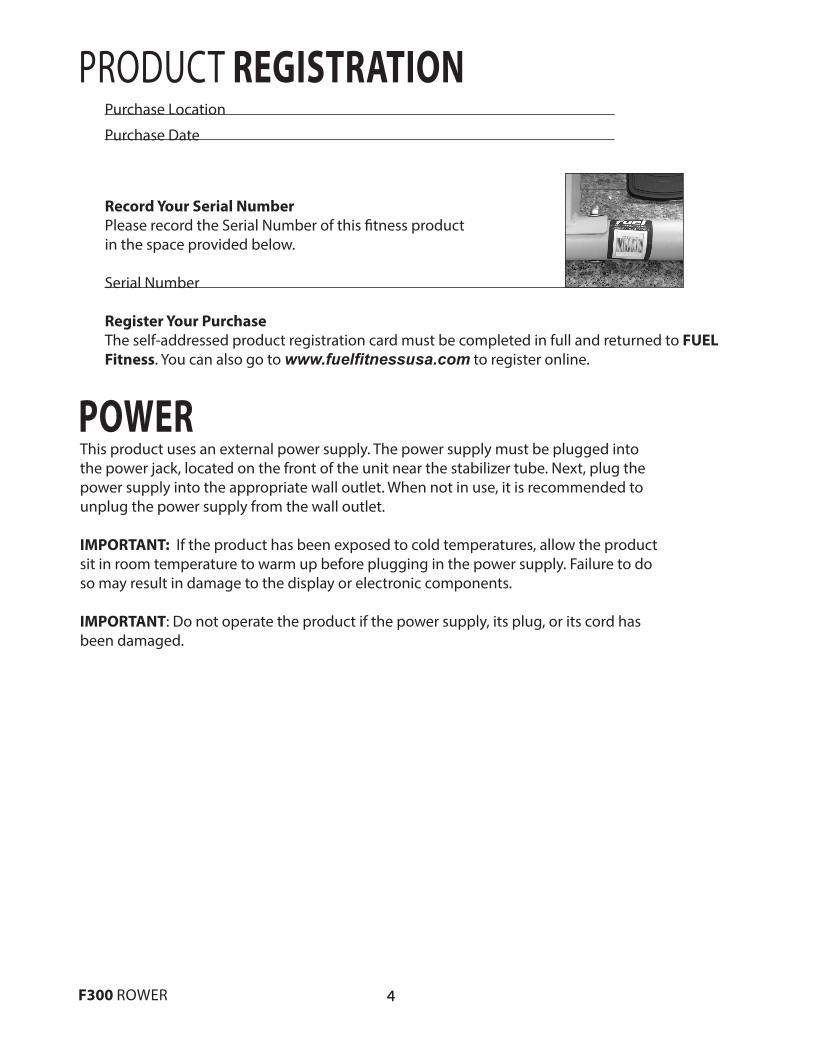
Record Your Serial NumberPlease record the Serial Number of this fitness product in the space provided below.
Serial Number
Register Your PurchaseThe self-addressed product registration card must be completed in full and returned to FUEL Fitness. You can also go to www.fuelfitnessusa.com to register online.
PRODUCT REGISTRATION
This product uses an external power supply. The power supply must be plugged into the power jack, located on the front of the unit near the stabilizer tube. Next, plug the power supply into the appropriate wall outlet. When not in use, it is recommended to unplug the power supply from the wall outlet.
IMPORTANT: If the product has been exposed to cold temperatures, allow the product sit in room temperature to warm up before plugging in the power supply. Failure to do so may result in damage to the display or electronic components.
IMPORTANT: Do not operate the product if the power supply, its plug, or its cord has been damaged.
POWER
Purchase Location
Purchase Date
5 F300 ROWER
• To disconnect, turn all controls to the off position, then remove the plug from the outlet.• Do not operate equipment on deeply padded, plush or shag carpet. Damage to both carpet and
equipment may result.• Before beginning this or any exercise program, consult a physician. This is especially important for
persons over the age of 35 or persons with pre-existing health conditions.• Keep hands away from all moving parts.• The pulse sensors are not medical devices. Various factors, including the user’s movement, may affect the accuracy
of heart rate readings. The pulse sensors are intended only as exercise aids in determining heart rate trends in gen-eral.
• Do not attempt to use your equipment for any purpose other than for the purpose it is intended.• Wear proper shoes. High heels, dress shoes, sandals or bare feet are not suitable for use on your
equipment. Quality athletic shoes are recommended to avoid leg fatigue.
When using an electrical appliance, basic precautions should always be followed, including the following:
Read all instructions before using this appliance.
DANGER - To reduce the risk of electric shock:
1. Always unplug this appliance from the electrical outlet immediately after using and before cleaning.
WARNING - To reduce the risk of burns, fire electric shock, or injury to persons: 1. An appliance should never be left unattended when plugged in. Unplug from outlet when not in use, and before
putting on or taking off parts. 2. Do not operate under blanket or pillow. Excessive heating can occur and cause fire, electric shock, or injury to per-
sons.3. Close supervision is necessary when this appliance is used by, on, or near children, invalids, or disabled persons.4. Use this appliance only for its intended use as described in this manual. Do not use attachments not
recommended by the manufacturer.5. Never operate this appliance if it has a damaged cord or plug, if it is not working properly, if it has been dropped or
damaged, or dropped into water. Return the appliance to a service center for examination and repair. 6. Do not carry this appliance by supply cord or use cord as a handle. 7. Keep the cord away from heated surfaces.8. Never operate the appliance with the air openings blocked. Keep the air openings free of lint, hair, and the like.9. Never drop or insert any object into any opening. 10. Do not use outdoors.11. Do not operate where aerosol (spray) products are being use or where oxygen is being administered. 12. Connect this appliance to a properly grounded outlet only.13. The appliance is intended for household use.
SAVE THESE INSTRUCTIONS - THINK SAFETY!
Fitness Equipment Safety Instructions
CAUTION!! Please be careful when unpacking the carton.
Failure to follow all guidelines may compromise the effectiveness of the exercise experience, expose yourself (and possibly others) to injury, and reduce the longevity of the equipment.
IMPORTANT SAFETY INSTRUCTIONS
6F300 ROWER
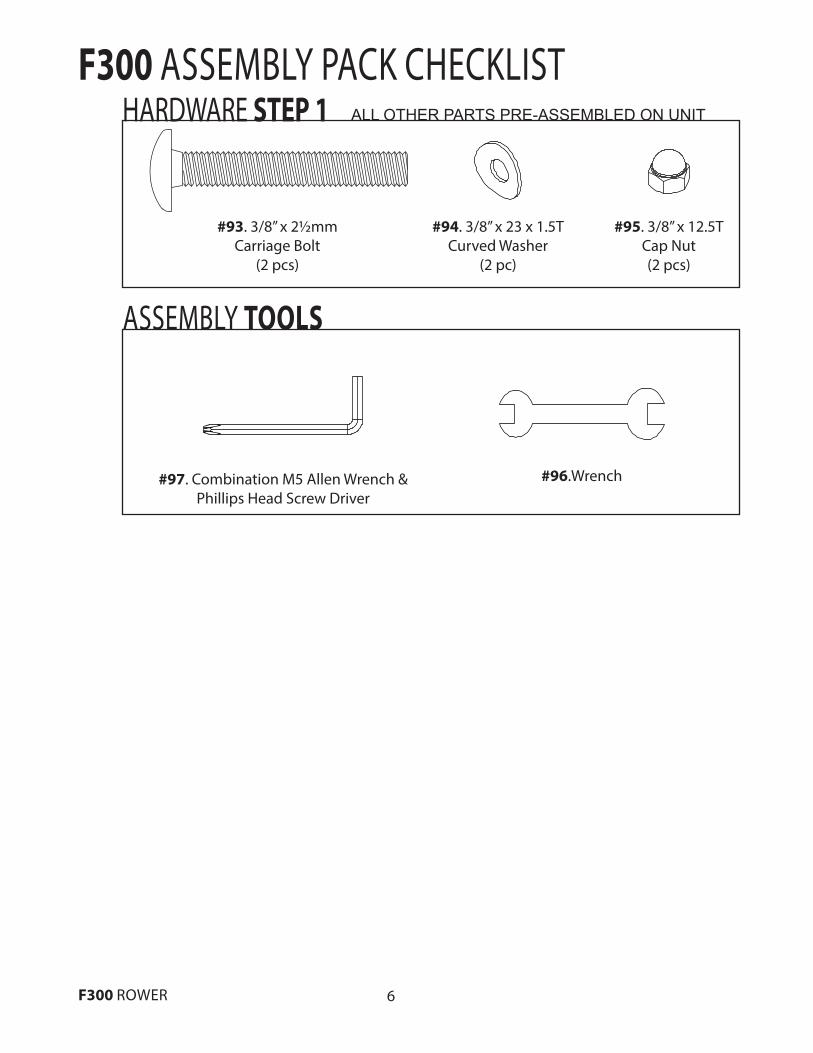
#97. Combination M5 Allen Wrench & Phillips Head Screw Driver
F300 ASSEMBLY PACK CHECKLIST
#93. 3/8” x 21/2mmCarriage Bolt
(2 pcs)
#96.Wrench
#94. 3/8” x 23 x 1.5TCurved Washer
(2 pc)
#95. 3/8” x 12.5T Cap Nut(2 pcs)
HARDWARE STEP 1
ASSEMBLY TOOLS
ALL OTHER PARTS PRE-ASSEMBLED ON UNIT
7 F300 ROWER
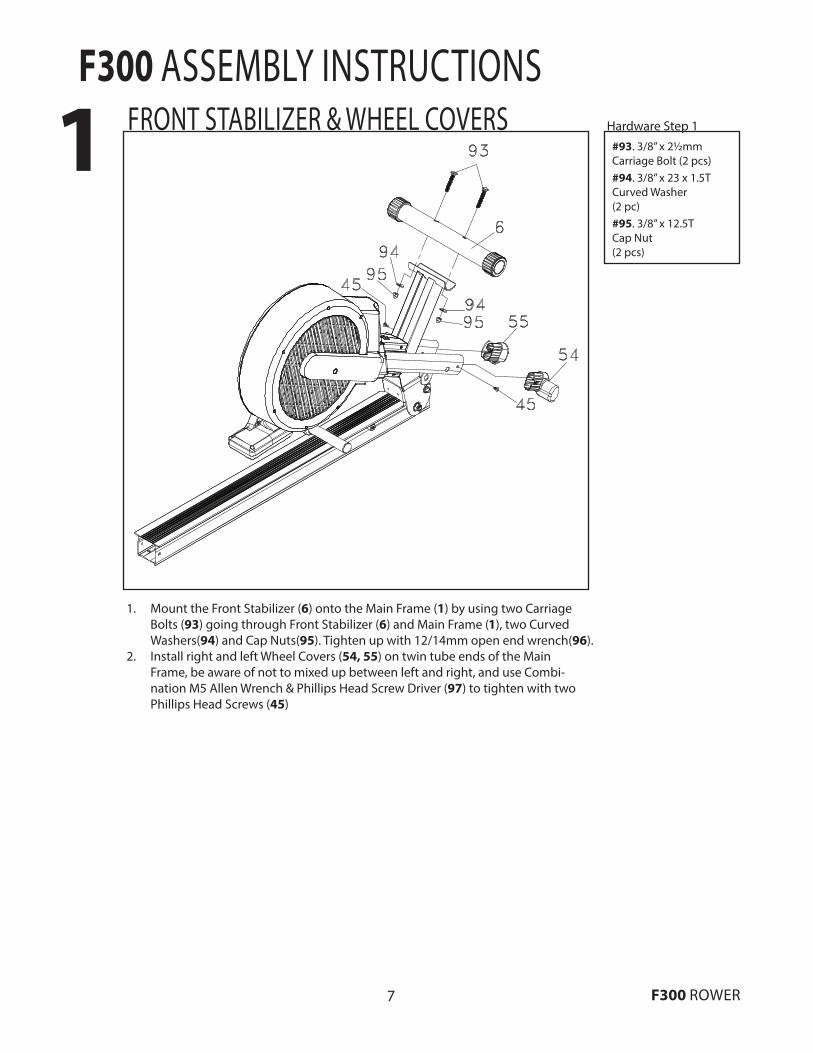
1. Mount the Front Stabilizer (6) onto the Main Frame (1) by using two Carriage Bolts (93) going through Front Stabilizer (6) and Main Frame (1), two Curved Washers(94) and Cap Nuts(95). Tighten up with 12/14mm open end wrench(96).
2. Install right and left Wheel Covers (54, 55) on twin tube ends of the Main Frame, be aware of not to mixed up between left and right, and use Combi-nation M5 Allen Wrench & Phillips Head Screw Driver (97) to tighten with two Phillips Head Screws (45)
F300 ASSEMBLY INSTRUCTIONSHardware Step 1FRONT STABILIZER & WHEEL COVERS
#93. 3/8” x 2½mmCarriage Bolt (2 pcs)#94. 3/8” x 23 x 1.5TCurved Washer (2 pc)#95. 3/8” x 12.5TCap Nut(2 pcs)
1
8F300 ROWER
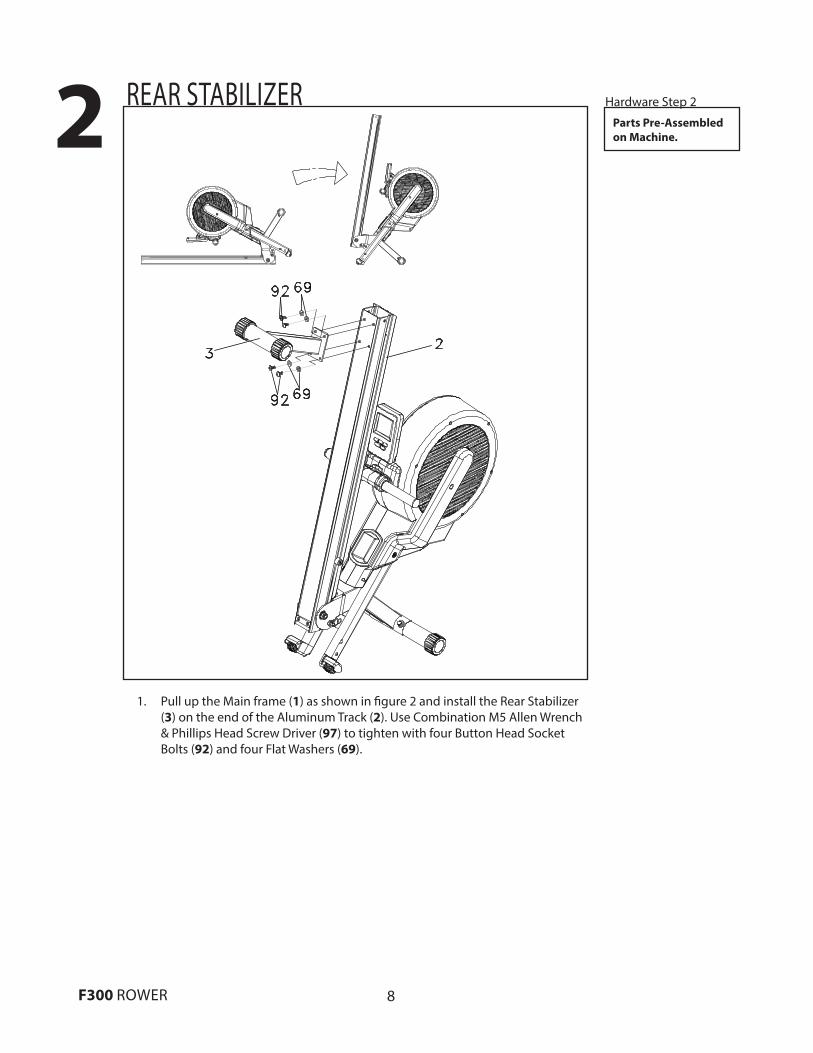
REAR STABILIZER2 Hardware Step 2
Parts Pre-Assembledon Machine.
1. Pull up the Main frame (1) as shown in figure 2 and install the Rear Stabilizer (3) on the end of the Aluminum Track (2). Use Combination M5 Allen Wrench & Phillips Head Screw Driver (97) to tighten with four Button Head Socket Bolts (92) and four Flat Washers (69).
6 8 5 _ a as e s (69)
6 8 5 _ a as e s (69)
9 F300 ROWER
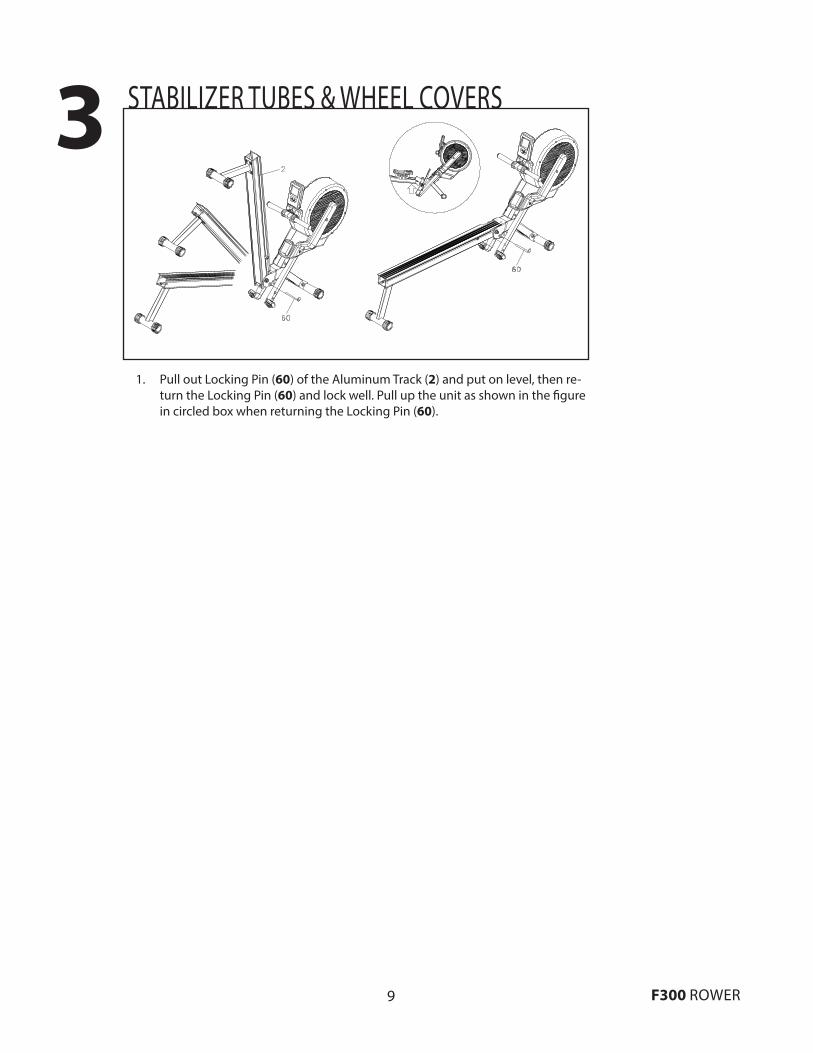
1. Pull out Locking Pin (60) of the Aluminum Track (2) and put on level, then re-turn the Locking Pin (60) and lock well. Pull up the unit as shown in the figure in circled box when returning the Locking Pin (60).
STABILIZER TUBES & WHEEL COVERS3
10F300 ROWER
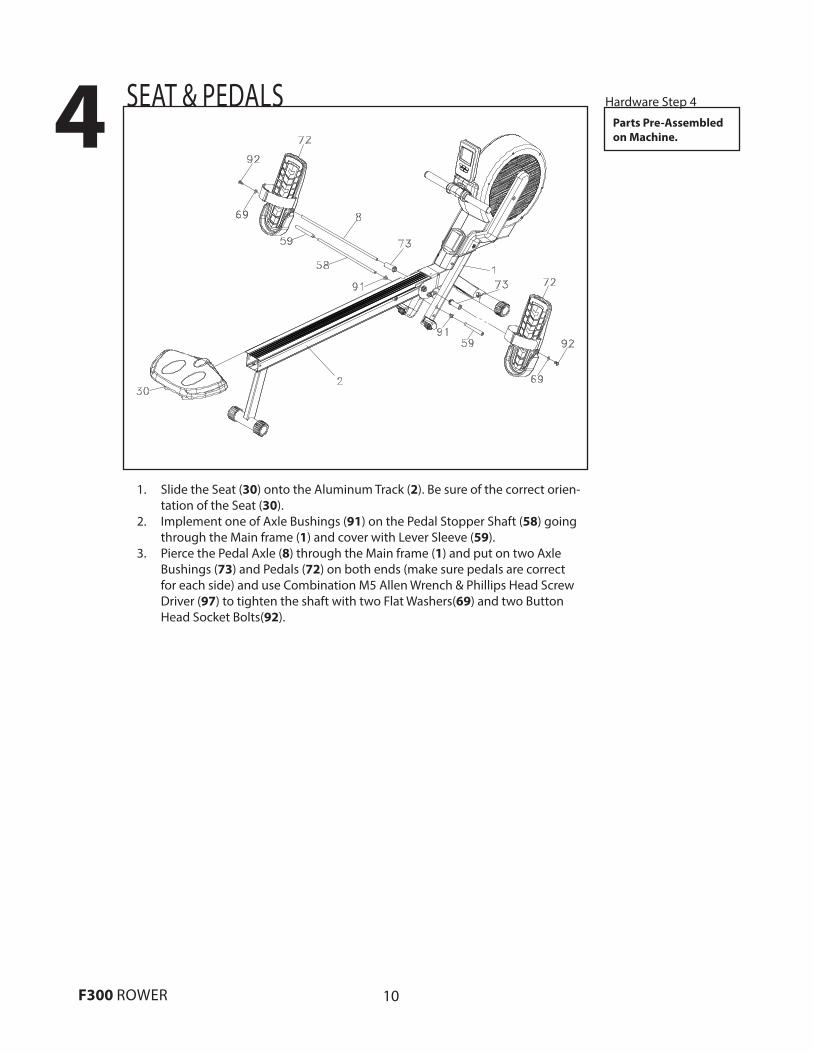
SEAT & PEDALS 4 Hardware Step 4
1. Slide the Seat (30) onto the Aluminum Track (2). Be sure of the correct orien-tation of the Seat (30).
2. Implement one of Axle Bushings (91) on the Pedal Stopper Shaft (58) going through the Main frame (1) and cover with Lever Sleeve (59).
3. Pierce the Pedal Axle (8) through the Main frame (1) and put on two Axle Bushings (73) and Pedals (72) on both ends (make sure pedals are correct for each side) and use Combination M5 Allen Wrench & Phillips Head Screw Driver (97) to tighten the shaft with two Flat Washers(69) and two Button Head Socket Bolts(92).
Parts Pre-Assembledon Machine.
11 F300 ROWER
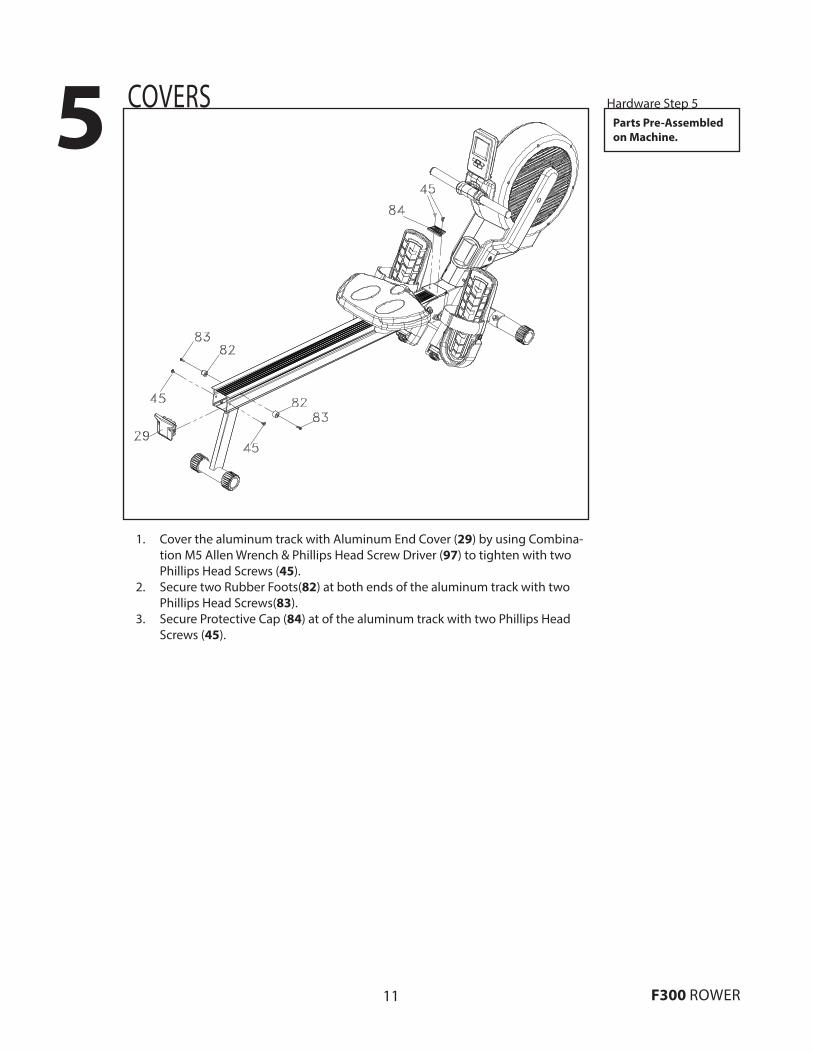
1. Cover the aluminum track with Aluminum End Cover (29) by using Combina-tion M5 Allen Wrench & Phillips Head Screw Driver (97) to tighten with two Phillips Head Screws (45).
2. Secure two Rubber Foots(82) at both ends of the aluminum track with two Phillips Head Screws(83).
3. Secure Protective Cap (84) at of the aluminum track with two Phillips Head Screws (45).
Hardware Step 5COVERS5 Parts Pre-Assembledon Machine.

12F300 ROWER
OPERATION OF YOUR CONSOLEF300 CONSOLE
START1. Pressing this key under nonoperational mode, starts P0 exercise mode. 2. Choose a program, pressing this key to into exercise mode. STOP/RESET1. Pressing this key under operational mode, the console enters pause mode.2. Pressing this key at any time resets all function, the display clears and enters idle mode auto-
matically.ENTER KEY1. Press this key for data setting. If “Enter” key is not pressed during adjustment, the data will be
also accepted.2. Press this key to confirm the setting or the data value.UP/DOWN1. Use this key to choose the program.2. Use this key to increase or decrease for data setting 3. During workout, use this key for level adjustment, with increment of 1 for each press. When
press and hold for 2 seconds or more, it enters fast key mode.
KEY FUNCTIONS
13 F300 ROWER
PROGRAM DESCRIPTION1. P0 Pressing START key in ready mode starts the unit. Adjust the resistance by using UP/DOWN
key and use START to pause. Press and hold START returns to ready mode.
2. P1~P6 In ready mode, use UP / DOWN key to choose the pre-set program and press ENTER key for TIME/DIST/CAL/COUNT editing. Pressing START key finishes editing and starts the program. During the workout, use UP/DOWN key to control the resistance, STOP to pause and press and hold STOP to return to the ready mode.
3. In ready mode, use UP/DOWN key to choose USER PROGRAM, press ENTER key to edit TIME/DIST/CAL/COUNT and 10 segments of resistance setting with setting levels 1~16. Press START key when finish and the program starts. During the workout, use UP/DOWN key to control the resistance, STOP to pause and press and hold STOP to return to the ready mode.
P1: POLLING P2: VALLEY P3: FAT BURNP4: RAMP P5: MOUNTAIN P6: MOUNTAIN
2014
14F300 ROWER
FUEL Fitness Inc. warrants all its home use rower parts for a period of time listed below, from the date of retail sale, as determined by a sales receipt or in the absence of a sales receipt, eighteen (18) months from the original factory shipping date. FUEL Fitness’s responsibilities include providing new or remanufactured parts, at FUEL Fitness’s option, and technical support to our independent dealers and servicing organizations. In the absence of a dealer or service organization, these warranties will be administered by FUEL Fitness directly to a consumer. The warranty period applies to the following components:
Home Use Limited Warranty
NORMAL RESPONSIBILITIES OF THE CONSUMERThis warranty applies only to products in ordinary household use. The consumer is responsible for the items listed below:1. The warranty registration card must be completed and returned to the address listed on the card within 10 days of the original purchase to
instructions provided in this manual, including maintenance.2.
wiring.3. Expenses for making the rower accessible for servicing, including any item that was not part of the rower at the time it was shipped from the
factory.4. EXCLUSIONSThis warranty does not cover the following:1. CONSEQUENTIAL, COLLATERAL, OR INCIDENTAL DAMAGES SUCH AS PROPERTY DAMAGE AND INCIDENTAL EXPENSES RESULTING FROM ANY
BREACH OF THIS WRITTEN OR ANY IMPLIED WARRANTY. Note: Some states do not allow the exclusion or limitation of incidental or consequential damages, so this limitation or exclusion may not apply to you.
2. Damages caused by services performed by persons other than authorized FUEL Fitness service companies, use of parts other than original FUEL
acts of God.3. Products with original serial numbers that have been removed or altered.4. Products that have been; sold, transferred, bartered, or given to a third party.5. Products that are used as store display models.6.
warranty record exists for the product.7. Product use in any environment other than a residential setting.8. THIS WARRANTY IS EXPRESSLY IN LIEU OF ALL OTHER WARRANTIES EXPRESSED OR IMPLIED, INCLUDING THE
WARRANTIES OF MERCHANTABILITY AND/OR FITNESS FOR A PARTICULAR PURPOSE. SERVICEKeep your bill of sale. Twelve (12) months from the date on the bill of sale or eighteen (18) months from the date of factory shipping as determined by the serial number establishes the warranty period should service be required. If service is performed, it is in your best interest to obtain
this warranty must be obtained by following these steps, in order:1. Contact your selling authorized FUEL Fitness dealer. OR2. Contact your local authorized FUEL Fitness service organization.3. If there is a question as to where to obtain service, contact our service department at 1-866-697-6531.4. FUEL Fitness’s obligation under this warranty is limited to repairing or replacing, at FUEL Fitness’s option, the product through one of our autho-
rized service centers. All repairs must be preauthorized by FUEL Fitness. If the product is shipped to a service center freight charges to and from the service center will be the customer’s responsibility. For replacement parts shipped while the product is under warranty, the customer will be responsible for shipping and handling charges. The owner is responsible for adequate packaging upon return to FUEL Fitness. FUEL Fitness is not responsible for damages in shipping. Make all freight damage claims with the appropriate freight carrier. DO NOT SHIP ANY UNIT TO OUR FACTORY WITHOUT A RETURN AUTHORIZATION NUMBER. All units arriving without a return authorization number will be refused.
5. For any further information, or to contact our service department by mail, send your correspondence to:
FUEL Fitness, Inc. This warranty applies only in the 48 contiguous United States. NOTE: This does not apply to Alaska or Hawaii.
FUEL Fitness, Inc.P.O. Box 2037Jonesboro, AR 72402-2037
Frame1 Year
Parts Labor1 Year 1 Year
MANUFACTURER’S LIMITED WARRANTY


www.fuelfitnessusa.com ©2014 All RIghts Reserved. F300 Owner’s Manual