rower-625f owner’s manual - lifespan fitness · 2 rower-625f table of contents . 1. important...
TRANSCRIPT

NOTE: This manual may be subject to updates or changes. Up to date manuals are available through our website at www.lifespanonline.com.au
Product may vary slightly from the item pictured due to model upgrades
Read all instructions carefully before using this product. Retain this owner’s manual for future reference.
ROWER-625F OWNER’S MANUAL

2
ROWER-625F
TABLE OF CONTENTS
1. IMPORTANT SAFETY INSTRUCTIONS 3
2. ASSEMBLY INSTRUCTIONS 6
3. FOLDING INSTRUCTIONS 11
4. OPERATION GUIDE 13
5. EXERCISE GUIDE 15
6. EXPLODED DIAGRAM 18
7. PARTS LIST 19
8. WARRANTY 21

3
ROWER-625F
1. IMPORTANT SAFETY INSTRUCTIONS WARNING - Read all instructions before using this machine.
It is important your machine receives regular maintenance to prolong its useful life. Failing to
regularly maintain your machine may void your warranty.
Please keep this manual with you at all times
a. It is important to read this entire manual before assembling and using the equipment. Safe and effective
use can only be achieved if the equipment is assembled, maintained and used properly.
Please note: It is your responsibility to ensure that all users of the equipment are informed of all
warnings and precautions.
b. Before starting any exercise program you should consult your doctor to determine if you have any
medical or physical conditions that could put your health and safety at risk, or prevent you from using
the equipment properly. Your doctor’s advice is essential if you are taking medication that affects your
heart rate, blood pressure or cholesterol level.
c. Be aware of your body’s signals. Incorrect or excessive exercise can damage your health. Stop
exercising if you experience any of the following symptoms: pain, tightness in your chest, irregular
heartbeat, and extreme shortness of breath, lightheadedness, dizziness or feelings of nausea. If you do
experience any of these symptoms, you should consult your doctor before continuing with your exercise
program.
d. Keep children and pets away from the equipment. This equipment is designed for adult use only.
e. Use the equipment on a solid, flat level surface with a protective cover for your floor or carpet. To
ensure safety, the equipment should have at least 0.5 meters of free space all around it.
f. Before using the equipment, check that the nuts and bolts are securely tightened. If you hear any
unusual noises coming from the equipment during use and assemble, stop immediately. Do not use the
equipment until the problem has been rectified.

4
ROWER-625F
g. Wear suitable clothing while using the equipment. Avoid wearing loose clothing that may get caught in
the equipment or that may restrict or prevent movement.
h. This equipment is designed for indoor and family use only.
i. Care must be taken when lifting or moving the equipment so as not to injure your back.
j. Always keep this instruction manual and assembly tools at hand for quick reference.
k. The equipment is not suitable for therapeutic use.
l. There are many functions of the computer, which value will show when using the equipment according
the amount of exercise, here warmly remind you that the value of heart pulse just give you some
reference.

5
ROWER-625F
HARDWARE IDENTIFICATION CHART:
This chart is provided to help identify the hardware used in the assembly process. Place the washers or the ends of the bolts or screws on the circles to check for the correct diameter. Use the small scale to check the length of the bolts and screws.
MILLIMETERS
After unpacking the unit, open the hardware bag and make sure that you have all the following items. Some hardware may be already attached to the part.
Part Number and Description Qty
THE FOLLOWING TOOLS ARE INCLUDED FOR ASSEMBLY:
Allen Wrench (5mm) Allen Wrench (6mm) Cross wrench Spanner
mm.
INCHES in
A. Bolt, Button Head (M8 x 60mm) 23 Bolt, Button Head (M8 x 20mm) 15 allen pan head bolt (M10x 120mm)
16 Carriage Bolt (M8 x 45mm)
8 Flat Washer (M8) 13 Flat Washer (M10)
24 Spring Washer (M8)
17 Acorn Nut (M8)
9 Nylock Nut (M8) 12 Nylock Nut (M10)
7 Screw, Round Head (M5 x 10mm) 22 Screw, Round Head (M6 x 25mm)
1 6 1
1
10 1
4
2
2 1
4 2

6
ROWER-625F
2. ASSEMBLY INSTRUCTIONS
PREPARATION:
A. Before assembling make sure that you will have enough space around the item.
B. Use the present tooling for assembling.
ASSEMBLY INSTRUCTIONS: STEP 1 (See Diagram1):
Diagram1
A): Attach the Front Stabilizer (1) to the
Main Frame (2). Secure it with two
M8x 45 Carriage bolt (16), Washers
(8), Acorn Nut (17).

7
ROWER-625F
STEP 2 (See Diagram2): Diagram2
A): Slide the seat with carriage assembly (18)
onto the rower track (4) carefully as
shown.
B): Secure the fixed block (21) onto the rower
track (4) with 2x M6X25 (22) cross-head
screws as the pictures shown. Then attach
Pedal fixed plate (5) onto the rower track
(4) with 4x Flat Washer (M8), 4x Spring
Washer (M8) and 4x Bolt, Button Head
(M8 x20mm).

8
ROWER-625F
STEP 3 (See Diagram3):
Diagram3
A): Have one person hold the rower seat track
(4) with another person connecting the
sensor wire (26) and the middle wire (25)
B): Insert the rower seat track (4) into the main
frame (2) connecting base. Then fasten it
with the Button Head (M10 x120mm)(15),
flat washer (13),Nylon Locknut (M10)(12).
Then also fasten the L knob (11).
NOTE: mind the sensor wire (26) when inserting it
into the rower seat track (4). Damaging this could
cause effect the functioning of the computer.
C): Turn the rear stabilizer (27) according to
the arrow’s direction as per the picture
shown. Secure on the rower track (4) with
2 x Bolt, Button Head M8X20 (23) and Flat
Washer (8). Then attach the Rear Cover
(28).

9
ROWER-625F
STEP 4 (See Diagram4): Diagram4
STEP 5 (See Diagram5):
Diagram5
A): Assemble the pedal shaft (20) and
the pedal(19) by fastening it with two
Nylon Locknut(9) and flat washer(8)
A): Insert two batteries in to the computer.
Check the functioning of the computer.
B): Connect the sensor wire with the up
wire(14),then fixed the computer Into the
computer post.

10
ROWER-625F
Final Check:
The Rower is now assembled. Please make the following final checks:
A): Make sure all screws / bolts are tightened.
B): Make sure the equipment is on a flat, level surface
11
ROWER-625F
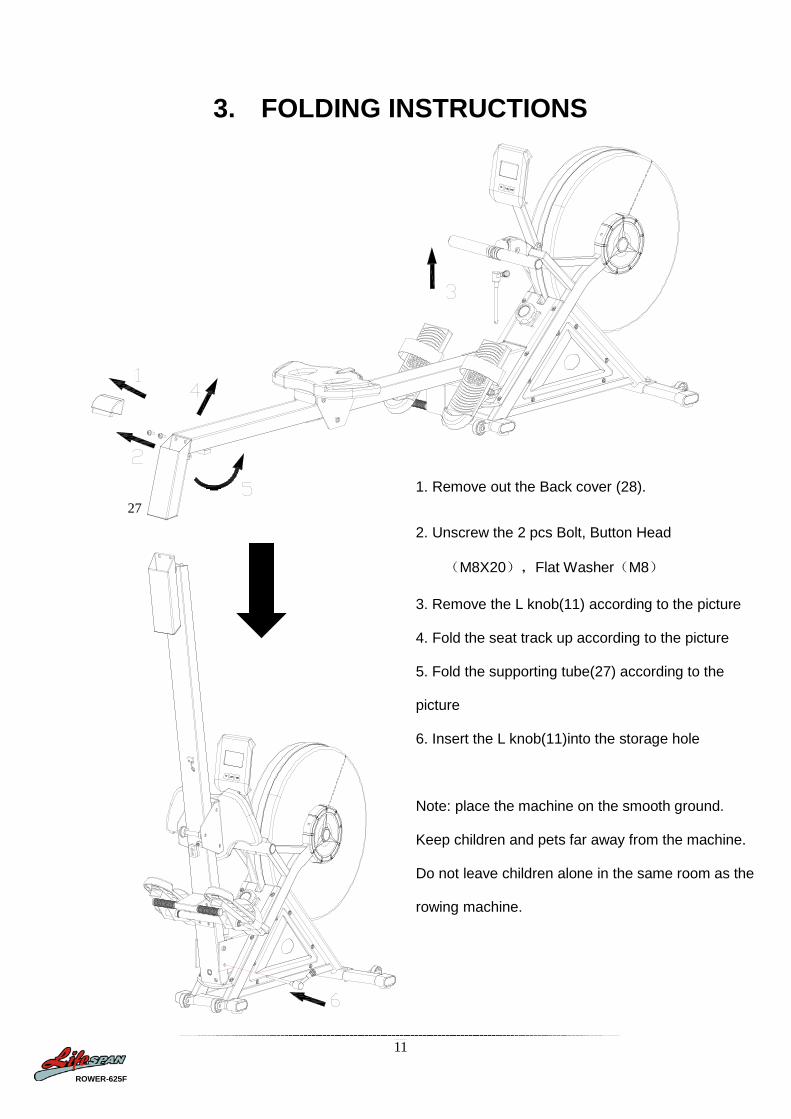
3. FOLDING INSTRUCTIONS
1. Remove out the Back cover (28).
2. Unscrew the 2 pcs Bolt, Button Head
(M8X20),Flat Washer(M8)
3. Remove the L knob(11) according to the picture
4. Fold the seat track up according to the picture
5. Fold the supporting tube(27) according to the
picture
6. Insert the L knob(11)into the storage hole
Note: place the machine on the smooth ground.
Keep children and pets far away from the machine.
Do not leave children alone in the same room as the
rowing machine.
27

12
ROWER-625F
1. Remove out the L knob(11) according to the
picture
2. Move the seat track(4) towards the ground
3. Attach the supporting tube(27) as in the
picture
4. Secure it with 2PCS Bolt, Button Head (M8
x20mm(23) and flat washer (24)
5. Attach the back cover(27) onto the supporting
tube
6. Screw in L knob(11) in the direction of the
picture
7. Adjustable tension control knob (7) with 8 levels
of resistance.
27

13
ROWER-625F
4. OPERATION GUIDE
1. OVERVIEW FUNCTIONAL BUTTONS:
MODE – select function
SET – set time value, count and calories when not in scan mode.
RESET – reset time, distance and calories.
FUNCTIONS AND OPERATIONS
1. SCAN: Press MODE until “SCAN” appears. The display will rotate through all 5 functions: Time,
Speed, CPM, COUNT CAL and SUM. Each function will remain for 4 seconds.
2. TIME: (1) Count the rowing time from exercise start to end.
(2) Press MODE until “TIME” appears. Press “SET” to set desired rowing time. When the
value reaches zero, the computer will beep for 15 seconds.
3. CPM: Display current rowing strokes per minute or the frequency per minute
4. COUNT: (1) Counts the rowing strokes from rowing start to end.
(2) Press “MODE” until “TIME” appears. Press “SET” to set rowing strokes for the workout.
When the value counts down to zero, the computer will beep for 15 seconds.
5. CAL: (1) Counts the total calories consumed from start to end of workout.
(2) Press “Mode” until “CAL” appears. Press “SET” to set total calories for the workout.
When the value counts down to zero, the computer will beep for 15 seconds.
6. SUM: Counts the total rowing strokes after batteries are installed. It is displayed in hundred
strokes.
7. ALARM: The computer will beep when “MODE”, “SET” and “RESET” buttons.
8. AUTO ON/OFF & AUTO START/STOP:
Without any exercise signal or operation for 8 minutes the machine will enter standby more. The power
will turn off automatically and the memory except SUM will be cleared. As long as the machine is active,
the machine will not enter standby mode.

14
ROWER-625F
SPECIFICATIONS
FUNCTION
Auto Scan Every 4 seconds
Time 00:00 – 99:59 (Minute: Second)
CPM The max pick-up signal is 1200
CPM(count per minute)
Count 0-9999 strokes
Calories 0 ~ 999.9~ 9999 Kcal
Sum 0 ~ 9999 Hundred strokes
Battery Type 2 pcs of SIZE-AAA or UM4
Operating Temperature 0℃ ~ +40℃(32℉~ 104℉)
Storage Temperature -10℃ ~ +60℃(14℉~ 140℉)

15
ROWER-625F
5. EXERCISE GUIDE
PLEASE NOTE: Before beginning any exercise program, consult your physician. This is important
especially if you are over the age of 45 or individuals with pre-existing health problems.
The pulse sensors are not medical devices. Various factors, including the user’s movement, may
affect the accuracy of heart rate readings. The pulse sensors are intended only as an exercise aid in
determining heart rate trends in general.
Exercising is great way to control your weight, improving your fitness and reduce the effect of aging and
stress. The key to success is to make exercise a regular and enjoyable part of your everyday life.
The condition of your heart and lungs and how efficient they are in delivering oxygen via your blood to your
muscles is an important factor to your fitness. Your muscles use this oxygen to provide enough energy for
daily activity. This is called aerobic activity. When you are fit, your heart will not have to work so hard. It will
pump a lot fewer times per minute, reducing the wear and tear of your heart.
So as you can see, the fitter you are, the healthier and greater you will feel.
Warm-up
Start each workout with 5 to 10 minutes of stretching and some light exercises. A proper warm-up increases
your body temperature, heart rate and circulation in preparation for exercise. Ease into your exercise.

16
ROWER-625F
Training Zone Exercise
After warming up, increase the intensity to your desired exercise program. Be sure to maintain your intensity
for maximum performance. Breathe regularly and deeply as you exercise.
Cool Down
Finish each workout with a light jog or walk for at least 1 minute. Then complete 5 to 10 minutes of
stretching to cool down. This will increase the flexibility of your muscles and will help prevent post-exercise
problems.
Workout Guidelines
TARGET ZONE
THIS IS HOW YOUR PULSE SHOULD BEHAVE DURING GENERAL FITNESS EXERCISE.
REMEMBER TO WARM UP AND COOL DOWN FOR A FEW MINUTES.
The most important factor here is the amount of effort you put in. The harder and longer you work, the more
calories you will burn. Effectively this is the same as if you were training to improve your fitness, the
difference is the goal.

17
ROWER-625F
Exercising with your rower: Rowing is an extremely effective form of exercise. It strengthens the heart, improves circulation, as well as exercising all the major muscle groups - back, waist, arms, shoulders, hips & legs. ALWAYS CONSULT YOUR DOCTOR BEFORE UNDERTAKING A NEW EXERCISE REGIME. IF YOU EXPERIENCE NAUSEA, DIZZINESS OR OTHER ABNORMAL SYMPTOMS DURING EXERCISE, STOP AT ONCE AND CONSULT YOUR DOCTOR. How to row: 1:Take up the initial position leaning forward, knee bent and arms straight. 2:Push yourself backwards, straightening your back and legs at the same time. 3:Continue movement until you are leaning slightly backwards, bending return to Step 1 and repeat. (1):Please ensure that fingers are not placed inside of the runner assembly when moving the product.• (2):When adjusting your exercise position and you need to steady yourself by holding onto the rower, ensure that it is the underside of the seat upholstery that you are grasping. Alternative exercise- leg only rowing: This exercise will help tone and strengthen the muscles in your legs and back. With your back straight and arms outstretched, bend your legs until the row arms are in the starting position. Use your legs to push your body back whilst keeping your arms and back straight, slowly return to start position and repeat.
1. 2. 3.
1. 2. 3.

18
ROWER-625F
6. EXPLODED DIAGRAM

19
ROWER-625F
7. PARTS LIST
NO. DESCRIPTION Qty No. DESCRIPTION Qty 1 Main frame 1 49 Safety key 1 2 Base frame 1 50 Light sensor 1 3 Left upright 1 51 Magnet Ring 1 4 Right upright 1 52 Power Switch 1 5 Computer Bracket 1 53 Power Line 1
6 Incline Bracket 1 54 Overload protection 1
7 Motor Bracket 1 55 AC Single Wire 1
8 Running board Strengthen Tube 2 56 Blue Single Wire 1
9 Rotate Tube 2 57 Brown Single Wire 1 10 Left loudspeak net 1 58 Power cord 1 11 Right loudspeak net 1 59 Ring substantial plug 2 12 wrench w/screw driver S=13、14、15 1 60 Bolt M10 4 13 #5 Allen wrench 5mm 1 61 Bolt M8 6 14 #6 Allen wrench 6mm 1 62 Bolt M6 4 15 Cylinder 1 63 washer M8*30 2 16 Front roller 1 64 Bolt M8*65 3 17 Rear roller 1 65 Bolt M10*42 3 18 Motor Belt 1 66 Bolt M10*85 1 19 Running Board 1 67 Bolt M10*65 2 20 Running Belt 1 68 Bolt 2 21 Side Rail 2 69 Bolt M8*45 4 22 Motor Cover 1 70 Bolt M8*42 1 23 Bottom Shutters 1 71 Bolt M8*40 4 24 Left back cover 1 72 Bolt M8*32 4 25 Right back cover 1 73 Bolt M8*25 2 26 Left Hand cover 1 74 Bolt M8*16 6 27 Right Hand cover 1 75 Bolt M8*12 2 28 Transportation wheel 2 76 Bolt M6*40 8
29 Transportation wheel cover 2 77 Bolt M5*15 2
30 Feet Pad 4 78 Bolt M6*16 8 31 Elastic Cusion 2 79 Bolt M5*8 4 32 Undercut Collusion 2 80 washer 10 2 33 Rubber Pad 4 81 washer 8 7 34 Rubber Feet Pad 2 82 washer 6 6 35 EVA 2 83 Lock Washer 8 6 36 Pad oblique tube plug 2 84 Lock Washer 5 2 37 Foam grip 2 85 Lock Washer 10 4 38 Console panel 1 86 Lock Washer 8 15 39 Computer top cover 1 87 Flat Washer 5 2 40 Computer bottom cover 1 88 Bolt ST4.2*45 2
41 Hand Pulse with Speed+/- button 1 89 Bolt ST4.2*20 6

20
ROWER-625F
42 Hand pulse with incline +/- button 1 90 Bolt ST4.2*19 6
43 Incline Motor 1 91 Bolt ST4.2*19 4 44 DC Motor 1 92 Bolt ST4.2*12 18 45 Control Board 1 93 Bolt ST4.2*13 27 94 Bolt ST2.9*6.5 2
47 Computer up wire 1 48 Computer bottom wire 1

21
ROWER-625F
8. WARRANTY
AUSTRALIAN CONSUMER LAW
Many of our products come with a guarantee or warranty from the manufacturer. In addition, they come with guarantees that cannot be excluded under the Australian Consumer Law. You are entitled to a replacement or refund for a major failure and compensation for any other reasonably foreseeable loss or damage. You are entitled to have the goods repaired or replaced if the goods fail to be of acceptable quality and the failure does not amount to a major failure. Full details of your consumer rights may be found at www.consumerlaw.gov.au
Please visit our website to view our full warranty terms and conditions:
http://www.lifespanonline.com.au/Warranty-Policy
Please email us through [email protected] for all warranty or support issues.