fabric robots
TRANSCRIPT

Fabric RobotsWuffy intro to your basic companion

bit.ly/FabricRobotsDownload the slides at this link

Let’s have Fun learning!
Today’s Program
Make Eyes
Make Eyes Interact
Make it Move, part 1
Sketch your Design!
Make it Move, part 2
Making Your Robot!
Share and Tell!

Let’s Make Some Eyes!
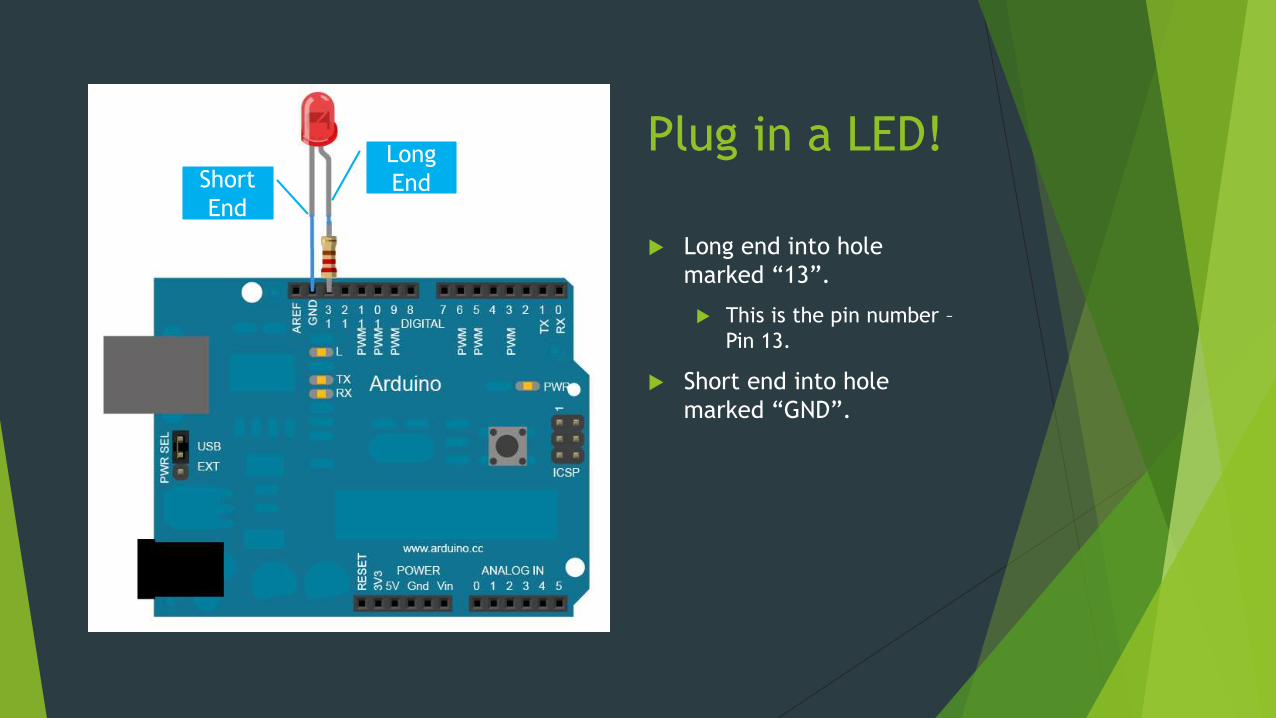
Plug in a LED!
Long end into hole
marked “13”.
This is the pin number –
Pin 13.
Short end into hole
marked “GND”.
Long
EndShort
End

Open up Arduino!

Robots are Silly!
You need to tell the Robot what parts it has
This is called “setting up”
Robots only do what you tell it to do.
These are “Commands”.

Type this into Arduino!
void setup () {
pinMode (13, OUTPUT);
}
void loop() {
digitalWrite (13, HIGH);
delay (1000);
digitalWrite (13, LOW);
}
Set Up
Commands

Arduino Grammar
void setup () {
pinMode (13, OUTPUT);
}
void loop() {
digitalWrite (13, HIGH);
delay (1000);
digitalWrite (13, LOW);
}
Set Up
Commands
If you open a
bracket…
… you must
close it
Every
“sentence”
ends with “;”

Lights, Setup and Commands
LEDs are lights we can control
Set up
pinMode (Pin_Number, OUTPUT);
Commands
digitalWrite (Pin_Number, HIGH/LOW);
digitalRead (Pin_Number);

Arduino Code is Simple!
Arduino code is split into 3 parts
1. Global variables
2. Set up
3. Functions (where you give it
commands)
[Global Variables go here]
Void setup() {
[Set up goes here]
}
Void loop() {
[Commands go here]
}

Let’s Make the Eyes Interactive!

Looks complex? No fear!

Trigger: Push button
Button can trigger other commands!
Set up
pinMode (Pin_Number, INPUT);
Commands
digitalRead (Pin_Number);

Push to Start – Pt1
const int buttonPin = 2;
int buttonState = LOW;
void setup () {
pinMode (buttonPin, INPUT);
}
Set Up
Global
Variable

Push to Start – Pt2
void loop () {
buttonState = digitalRead (buttonPin);
if (buttonState == HIGH) {
COMMANDS When Switch is on GO HERE!
}
else {
COMMANDS When Switch is off GO HERE!
}
}
Commands

Let’s Make the Robot Move!

Servos make your Robot move!
Servos are the “muscles” of a robot.
Servos can only turn in circles
Servos have to be declared as a Global variable
Declare
#include “Servo.h”
Servo Servo_Name;
Set up
Servo_Name.attach (Pin_Number);
Commands
Servo_Name.write (angle);

Let’s Connect the Servo!

Move that Servo! Pt1
const int TailPin = 9;
#include “Servo.h”
Servo Tail;
void setup() {
Tail.attach(TailPin);
}
Set Up
Global
Variable

Move that Servo! Pt2
void loop () {
Tail.write (30);
delay (500);
Tail.write (150);
delay (500);
Tail.write (0);
delay (500);
Tail.write (180);
}
How do we wave?
Commands
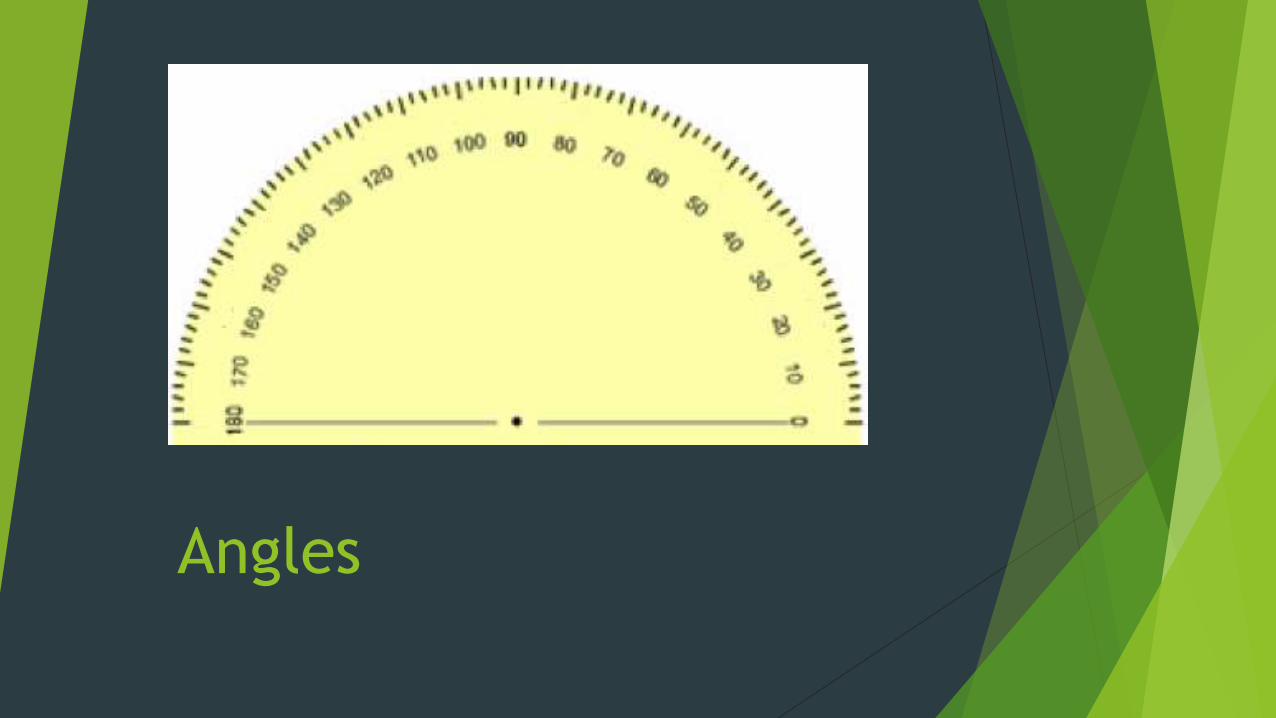
Angles

Waving! Pt1
Let’s break down how to wave!
1. Arm goes left
2. Arm stops
3. Arm goes right
4. Arm stops
Rephrase it!
1. Arm goes (1 degree) left every
second
2. Arm stops at 180 degrees
3. Arm goes (1 degree) right every
second
4. Arm stops at 0 degrees

Waving! Pt2
Int angle = 0;
void loop () {
for (angle = 0; angle <180; angle++) {
Tail.write(angle);
delay (15);
}
}
How do we wave backwards?
Commands
Global
Variable

More Robots

Extra Resources

Blinking the Eyes
Let’s break down how to blink!
1. Open eyes
2. Wait a second
3. Close eyes
4. Wait a second
5. Open eyes
Rephrase it!
1. (If eyes are closed) Open eyes
2. Wait half a second
3. (If eyes are open) Close eyes
4. Wait half a second
5. (If eyes are closed) Open eyes