fabrication of a swath vessel scale model for seakeeping
TRANSCRIPT

Fabrication of a SWATH Vessel Scale Model for Seakeeping Testsusing Rapid Prototyping Methods
by
John Robert DiMino
SUBMITTED TO THE DEPARTMENT OF MECHANICAL AND OCEANENGINEERING IN PARTIAL FULFILLMENT OF THE REQUIREMENTS FOR
THE DEGREE OF
BACHELOR OF SCIENCE IN MECHANICAL AND OCEAN ENGINEERING
AT THE
MASSACHUSETTS INSTITUTE OF TECHNOLOGY
JUNE 2013
NAASSA(>iJSETTS INSTI, E
7713BRAR, EY
© 2013 Massachusetts Institute of Technology. All rights reserved
Signature of Author: 7
Department of Mechanical and Ocean EngineeringMay 10, 2013
Certified By
Stefano BrizzolaraResearch ScientistThesis Supervisor
Accepted By
Annette HosoiProfessor of Mechanical Engineering
Undergraduate Officer
:~ xtw

Fabrication of a SWATH Vessel Scale Model for Seakeeping Testsusing Rapid Prototyping Methods
by
John Robert DiMino
Submitted to the Department of Mechanical Engineering
On May 10, 2013 in Partial Fulfillment of theRequirements for the Degree of
Bachelor of Science in Mechanical and Ocean Engineering
ABSTRACT
This paper describes the techniques used to fabricate a one meter long, 1/6 scale model of
a Small Waterplane Area, Twin Hull (SWATH) Unmanned Surface Vehicle (USV) that will beused primarily for dynamic seakeeping testing in the MIT Tow Tank. The model represents a
design conceived by Stefano Brizzolara, which will be used for launching, recovering, and
servicing Unmanned Underwater Vehicles (UUV) at sea. Construction methods included a
number of rapid prototyping methods rarely used for this kind of project, including 3D printing,lasercutting, and spraypainting. The benefits and disadvantages of each of these processes will
be discussed. Although there was insufficient time to conduct any tow tank tests, several data-
recording techniques are reviewed which may be used by future students continuing the research
of this vessel.
Thesis Supervisor: Stefano Brizzolara
Title: Research Scientist

AcknowledgementsThe author would like to thank the following people for their invaluable help throughout
the research and progress of this project.
Stefano Brizzolara is the designer of the family of SWATH designs this thesis focuseson. He provided invaluable guidance and counsel in building the model for tow tank testing. Hislectures in several classes, including Principals of Naval Architecture and Design of OceanSystems contributed to the knowledge applied in this project.
Michael Soroka of MIT SeaGrant also provided help and insight regarding the fabricationtechniques and topics of this paper.
The author's uncle, John Russel DiMino, and cousin, John Carmen DiMino who own andoperate Black Horse Auto Body in Norristown, PA generously provided their facilities andexpertise to paint the submerged bodies of the SWATH gratis.
Biographical Note
John DiMino is an MIT senior student in Mechanical and Ocean Engineering conductingresearch at MIT Sea Grant under the mentorship of Professor Stefano Brizzolara. He internedfor two summers with the Office of Naval Research in Newport, RI and West Bethesda, MDstudying marine robotics and ship design. Upon graduation, he will begin working for LockheedMartin on underwater systems.
3

ContentsABSTRACT .................................................................................................................................................................. 2
Acknowledgements ....................................................................................................................................................... 3
List of Figures .............................................................................................................................................................. 5
1. Introduction ............................................................................................................................................................... 6
1. 1 Characteristics of SW ATH Vessels .................................................................................................................... 6
1.2 Current Design .................................................................................................................................................... 6
2. Design of the Ship M odel .......................................................................................................................................... 8
2.1 Froude Scaling .................................................................................................................................................... 8
2.2 Computer Aided Design ...................................................................................................................................... 8
2.3 Internal Structure and Towing Hitches ............................................................................................................... 9
2.4 M id Struts .......................................................................................................................................................... 11
2.5 Upper Struts ...................................................................................................................................................... 11
2.6 Gantry Connection ............................................................................................................................................ 12
3. Rapid Prototyping for Hull Fabrication .................................................................................................................. 12
3.1 3D Printing the Submerged Bodies ................................................................................................................... 12
3.2 Spray Coating the Submerged Bodies ............................................................................................................... 14
3.3 Lasercutting the Strut Frames ........................................................................................................................... 16
3.4 W rapping the Struts .......................................................................................................................................... 17
3.5 Towing Apparatus ............................................................................................................................................. 18
4. M odel Verification ................................................................................................................................................. 19
4.1 Hydrostatics ...................................................................................................................................................... 19
4.2 Predictions of Behavior in W aves ..................................................................................................................... 21
5. M ovement M easurem ent Techniques ..................................................................................................................... 23
5.1 Potentiometers ................................................................................................................................................... 23
5.2 Inertial M easurement Unit ................................................................................................................................ 23
5.3 Hall Effect Sensors ............................................................................................................................................ 23
5.4 Video Recording ............................................................................................................................................... 23
6. Conclusions ............................................................................................................................................................. 24
6.1 On Construction M ethods ................................................................................................................................. 24
6.2 On Ship Performance ........................................................................................................ ................................ 24
7. Future W ork ............................................................................................................................................................ 25
References ................................................................................................................................................................... 26
4

List of Figures
Figure 1: Renderings of the X meter SWATH USV in low speed displacement mode (left) and high
speed foilborn m ode (right)...........................................................................................................................6
Figure 2: A rendering of the 6 meter SWATH USV about to recover a UUV ........................................ 7Figure 3: An isometric view of the SWATH model CAD assembly, including the towing wishbone
spanning between the two demihulls..................................................................................................... 9
Figure 4: CAD model of the port stern segment, showing the bulkhead and connecting tabs...............10
Figure 5: CAD model of the submerged body segment containing the towing points. ........................ 10
Figure 6: The leading edge of the forward mid strut (left) and the leading edge of the aft mid strut (right).Note the short connecting tabs, rounded front, and vertical edge of the forward piece, and the full length
connecting tab, the pointed front, and angled edge of the aft piece........................................................11
Figure 7: The stem section of the submerged bodies being removed from the acid bath..................... 13
Figure 8: The assembled submerged bodies. Note the gray lines where modeling putty was used to fill in
g ap s. ............................................................................................................................................................ 1 3Figure 9: the submerged body pieces after being given a coat of primer in the automobile spraypaint
b o o th ............................................................................................................................................................ 1 5
Figure 10: A close up view of the finish on the submerged bodies after several coats of polyurethane
p ain t.............................................................................................................................................................1 5Figure 11: The completed submerged bodies. Note that the bow sections are not yet permanently
attach ed ........................................................................................................................................................ 16
Figure 12: The assembled frames for the forward struts..................................................................17
Figure 13: One of the forward struts hanging up to dry after its epoxy coat ........................................ 18Figure 14: Drawing of the dimensions for the towing wishbone. Lengths are in centimeters and angles
are in d egrees...............................................................................................................................................19
Figure 15: The hydrostatic tables for the scale model SWATH ............................................................ 21
Figure 16: Graphs for the added mass and damping coefficients of heave (left) and pitch (right) with
varying w ave periods .................................................................................................................................. 22
Figure 17: The response amplitude operators for pitch and heave........................................................ 22
5
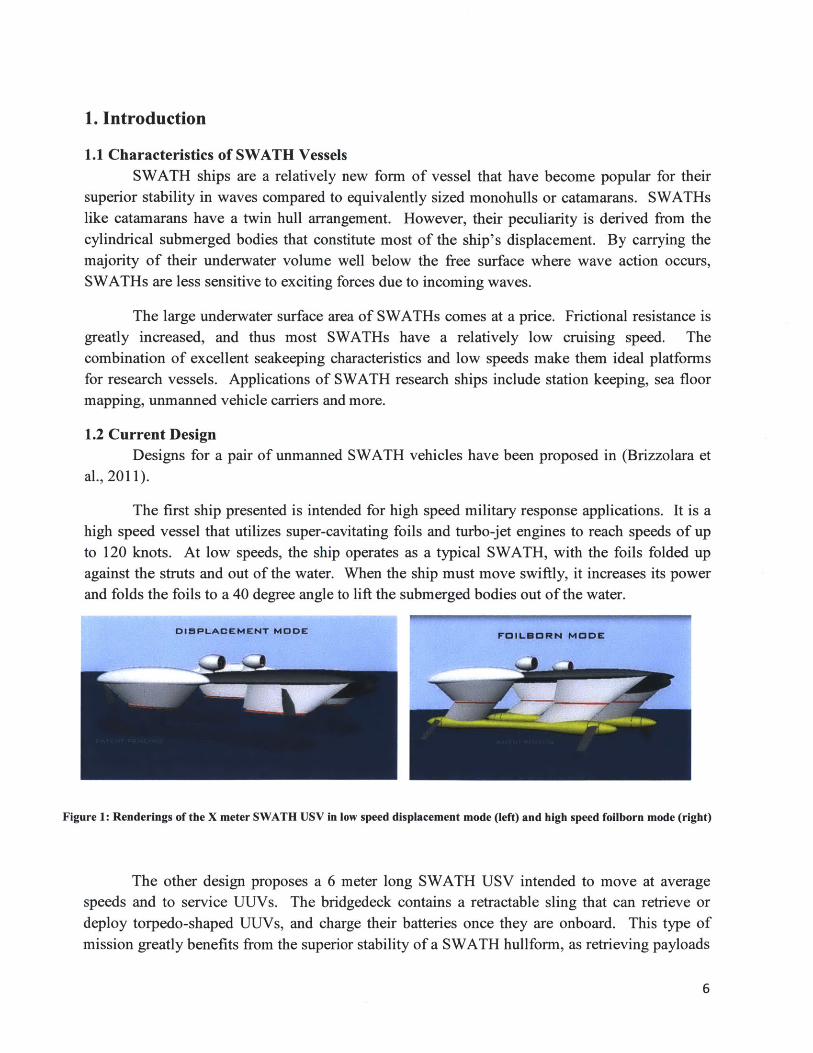
1. Introduction
1.1 Characteristics of SWATH VesselsSWATH ships are a relatively new form of vessel that have become popular for their
superior stability in waves compared to equivalently sized monohulls or catamarans. SWATHslike catamarans have a twin hull arrangement. However, their peculiarity is derived from thecylindrical submerged bodies that constitute most of the ship's displacement. By carrying themajority of their underwater volume well below the free surface where wave action occurs,SWATHs are less sensitive to exciting forces due to incoming waves.
The large underwater surface area of SWATHs comes at a price. Frictional resistance isgreatly increased, and thus most SWATHs have a relatively low cruising speed. Thecombination of excellent seakeeping characteristics and low speeds make them ideal platformsfor research vessels. Applications of SWATH research ships include station keeping, sea floormapping, unmanned vehicle carriers and more.
1.2 Current DesignDesigns for a pair of unmanned SWATH vehicles have been proposed in (Brizzolara et
al., 2011).
The first ship presented is intended for high speed military response applications. It is ahigh speed vessel that utilizes super-cavitating foils and turbo-jet engines to reach speeds of upto 120 knots. At low speeds, the ship operates as a typical SWATH, with the foils folded upagainst the struts and out of the water. When the ship must move swiftly, it increases its powerand folds the foils to a 40 degree angle to lift the submerged bodies out of the water.
OBPLACEMENT MODE FILBORN MODE
Figure 1: Renderings of the X meter SWATH USV in low speed displacement mode (left) and high speed foilborn mode (right)
The other design proposes a 6 meter long SWATH USV intended to move at averagespeeds and to service UUVs. The bridgedeck contains a retractable sling that can retrieve ordeploy torpedo-shaped UUVs, and charge their batteries once they are onboard. This type ofmission greatly benefits from the superior stability of a SWATH hullform, as retrieving payloads
6

in high sea states would otherwise prove exceedingly difficult (Brizzolara & Chryssostomidis,2013).
Figure 2: A rendering of the 6 meter SWATH USV about to recover a UUV
Some of the noticeably innovative features of the design shown in Figure 2 include thecurved submerged bodies, the use of two struts per side as opposed to a single long one, and theoutward swept angle of the struts. Each of these elements is intended to improve the stability ofthe vessel or reduce its wave-induced drag.
The unique shape of the submerged bodies has been optimized to achieve the lowest dragat its intended cruise speed of 12 knots, according to the research conducted in (Brizzolara et al.,2004). The bulb-like shape at the forward and aft ends of the vessel will create wave patternsthat positively interfere with each other, minimizing its overall wake and significantly reducingwave resistance.
The twin struts connecting the submerged bodies to the bridgedeck ensure sufficienthydrostatic longitudinal stability. Using two struts located at the extreme ends of the ship, asopposed to one long thin one going down the length of the body, pushes the concentration ofwaterplane area further from the axis of pitch rotation located near the middle of the ship. Thisincreases the moment of inertia of the waterplane area in the direction of pitch and raises thelongitudinal metacentric height, minimizing static attitude due to variation in loading conditions.
The canting on the struts is intended to increase the damping in heave, pitch, and rollmotions, with respect to a conventional vertical arrangement, by generating eddies. This adds asignificant viscous term to the radiation forces.
7

These features set this design apart as a new and innovative concept. In order to fullyunderstand its behavioral characteristics, a scale model must be built to perform seakeeping tests.
2. Design of the Ship ModelBefore a full-sized prototype can be constructed, hydrodynamic experimentation must be
conducted on a scale model of the intended design. Plans were made for a scale model of thesecond, smaller SWATH USV to be fabricated and tested in the MIT Towing Tank. The resultsof the towing tank model testing would then be compared to the Computational Fluid Dynamicspredictions being conducted in the Innovative Ship Design Lab at MIT Sea Grant, by the groupof Dr. Brizzolara.
2.1 Froude ScalingFroude scaling is a numerical method of comparing the relative speed of a full-sized ship
to the hydrodynamically equivalent speed of a scale model. For these tests, the maximum speedof the carriage mounted above the MIT tow tank was a limiting factor, and thus the scale of theship needed to be designed based off of this maximum tow speed as well as its designed cruisingspeed. The full-sized vessel is intended to be 6 meters long and have a cruising speed of 12knots (6.2 m/s). Since the carriage can safely move at only a maximum speed of roughly 2.5meters per second, the necessary length of a model can be calculated using
Fn= UM UF (1)g LM 1LF
where Fn is the Froude number, Um and UF are the model and full-sized ship speedsrespectively, and Lm and LF are the model and full-sized lengths respectively.
Solving for equation (1) with the appropriate parameters gives a Froude number for thefull sized ship of 0.81. Using this number for the model gives a necessary length of 0.97 meters.This was rounded up to a full meter for the sake of simplicity.
2.2 Computer Aided DesignOnce the scale of the model was established, the next step was to develop a 3D CAD
model of the entire vessel and all of its parts. The original design for the smaller SWATH wascreated as an IGES file as several conjoined bodies. In order to divide the ship into machinableparts, the model was imported into SolidWorks 2013 and edited. The decision was made tomanufacture the struts and submerged bodies separately. To facilitate mating the two sections,the junction between submerged body and strut was included in the submerged body segments.The upper part of the struts can then easily attach to the lower parts of the struts which aremanufactured with the submerged bodies. For reasons described in the next section, themaximum dimension of one submerged section could not exceed 8 inches (20 cm).
8

Figure 3: An isometric view of the SWATH model CAD assembly, including the towing wishbone spanning between thetwo demihulls
2.3 Internal Structure and Towing HitchesGreat care was taken to ensure that the hull would not flex or break during testing and
transportation. A thickness of 5 mm was used for the entire outer shell. To further increaserigidity, as well as prevent flooding of multiple compartments, a bulkhead was added to one sideof each submerged body segment. They also support a small ridge that runs around the edge ofeach part and is used to join the segments together. The bulkheads are 6 mm thick.
9

Figure 4: CAD model of the port stern segment, showing the bulkhead and connecting tabs.
The towing points are located in line with the main longitudinal axis of each submergedbody in the first segment of each demihull. If the model was towed from any higher, it wouldcause a forward pitching moment, driving the bow into the water. The towing points consist oftwo thick tabs extending perpendicular to the second segment's bulkhead. A quarter inch holeallows a bolt to be passed through the tabs and towing apparatus to secure them in place whileallowing for rotation between the components. The towing apparatus is shaped like a wishbonewhose ends attach to the tabs in the submerged body and extend through the strut. It holds thetwo demihulls together at the correct angle and links the hull to the gantry above the tow tank.
Figure 5: CAD model of the submerged body segment containing the towing points.
10

2.4 Mid StrutsA layer, referred to as the mid struts, was created to simplify the mating process between
the upper struts and submerged body. These connected to the top of the strut stubs built onto thesubmerged bodies, and to the bottom of the upper struts. They also serve to create the cantedangle between the submerged body and upper struts. Each mid strut was divided into two parts,for a total of eight. The parts included wider tabs on every side to make the connection to thesubmerged bodies, upper strut, and its corresponding half. In order to make room for the towingwishbone, the tabs to connect the two halves of each forward mid strut do not extend far into theinternal space. This allows the mid strut to move back and forth as the model pitches. The aftmid struts have a connecting tab that is continuous across their length, since there is no towingwishbone to take up space.
Figure 6: The leading edge of the forward mid strut (left) and the leading edge of the aft mid strut (right). Note the shortconnecting tabs, rounded front, and vertical edge of the forward piece, and the full length connecting tab, the pointed front, and
angled edge of the aft piece.
2.5 Upper StrutsThe four upper parts of the struts also posed a challenge to build. They each have the
appearance of short, low aspect ratio airfoils. The forward struts have rounded leading edges andpointed trailing edges, while the leading and trailing edges for the aft struts are both pointed.Each strut's cross section also increases in size as the height increases. The edges at the bow andstern of the ship are vertical, but the edges of the struts at the interior are angled. Thesecomponents are large and bulky, measuring roughly 19 x 8 x 4 inches. An important feature ofthe hulls is that the upper struts are not flush with the lower part of the hulls. The upper strutsextend an extra 8 millimeters from the mid struts, giving it a stepped feature. This is intended todivert spray from reaching the upper parts of the ship, as well as to prevent the vessel frompitching excessively, introducing an additional source of damping.
11

2.6 Gantry ConnectionThe model needs to be attached to the gantry above the tow tank in such a way that
restricts all yaw, roll, sway, and surge motion while allowing displacement of the vessel in pitchand heave. The towing wishbone mentioned above can be constructed in such a way as toprevent yaw and roll rotation, while confining the surge to only the motion of the gantry andeliminating all sway. A precise linkage must be made to ensure that no other forces interferewith the pitch and heave caused by wave motion. The rotation will be measured about the jointconnecting the hitches inside the submerged bodies to the towing wishbone. For heave, thewishbone will be connected to the bottom of a vertical piston that can easily slide up and down.This setup allows the relevant displacements to be recorded without any influence from factorssuch as the weight of the model affecting the results.
3. Rapid Prototyping for Hull FabricationReal world SWATH vessels are notoriously hard to build, due to their uncommon
geometry and the lack of experience with this type of design in most shipyards. It turns out thatthis problem also scales, and creates a number of issues when trying to build even a small modelof a SWATH. The submerged bodies are each a meter long and have an elliptical cross sectionthat varies drastically down its length. Furthermore, two large, foil-shaped struts protrude fromthe top of each body and complicate the design.
The most common way to fabricate a typical monohull ship model is to use a CNC millto carve out the upside-down shape of the hull. Most often the materials used are wood or plasticfoam, which are then covered in a layer of fiberglass. For this particular SWATH, the complexcontinuous geometry of the submerged bodies means that even a 5 axis mill would most likely beunable to provide a satisfactory model. The submerged bodies could not be turned on a latheeither. The cross section is elliptical rather than circular, ruling out this method.
Instead of relying on traditional methods of manufacturing ship model hull, a new set oftechniques were needed to build this intricate ship design.
3.1 3D Printing the Submerged BodiesSince typical shop machines were proven to be ineffective for making these parts, the
decision was made to 3D print the submerged bodies. The lab at Sea Grant is home to a uPrintDimension 3D printer which builds models out of ABS plastic. However, the maximum partsize that the printer can build is 8 x 6 x 6 inches. In order to build the 1 meter long parts, thebodies were divided into five 20 centimeter (just under 8 inches) segments in SolidWorks. Thesecond of these segments was further divided in half, to allow room for the towing hitches to beprinted attached to a bulkhead. As mentioned above, bulkheads and connecting tabs were addedto facilitate assembly. The segments were exported as STL files and uploaded to the printer to
12

be produced. After being printed, the model was soaked in an acid bath for several hours to meltoff the supporting material from the printer.
Figure 7: The stern section of the submerged bodies being removed from the acid bath
Once all of the parts had finally been made, they were laid in order and joined using WestSystem Marine Grade Epoxy. This resin is often used to repair and seal full-sized boats, and isextremely strong once dried. Small cracks between the joints of two parts were filled in usingTamiya modeling putty. This material is usually used on scale models, and served this purposewell. The gaps were liberally filled with the putty, allowed to dry, and then sanded smooth.
The mid strut pieces were also epoxied on top of the submerged body. The forward midstrut section was attached to the bow section of the submerged body; however these two sets ofparts have not yet been fixed to the rest of the submerged body assemblies. The reason for this isthat the towing hitches have not yet been connected to the towing wishbone or any sensors. Ifthe bow section were put on, it would be virtually impossible to later access the towing points.
Figure 8: The assembled submerged bodies. Note the gray lines where modeling putty was used to fill in gaps.
13

Although 3D printing was seen as the only viable method for producing these parts, therewere still a number of issues that were encountered. First of all, the segments were relativelylarge to be made by 3D printing, and thus the build times for each part were extremely long. Anaverage piece from the submerged body assembly would take as long as 30 hours. This placed ahuge time burden on the project, as most of the month of January, 2013 was spent waiting forparts to be built. Additional problems arose from the fact that on most segments one end wasopen and one was sealed off by a bulkhead. While a part is being made in a 3D printer, theinside of the machine heats up to about 50 degrees Celsius in order to help keep the plasticpliable. When the part is removed and exposed to the room's cooler temperature, it contractsconsiderably. The ends of the parts with bulkheads were unaffected, but the open ends wouldshrink, making the process of fitting the pieces together rather difficult. On the next iteration ofthis project, it would be prudent to include reinforcements on both ends of the part to keep theirintended shape.
In order to obtain accurate results, scale ship models must have a very smooth exteriorfinish. The 3D printer posed another issue, because the parts displayed very small ridges betweeneach layer of ABS. Both submerged bodies were rubbed down with acetone to soften the plasticand then sanded to minimize the stepping effect and make the surface smooth.
3.2 Spray Coating the Submerged BodiesA model that is made from a 3D printer is assembled by stacking a series of two
dimensional patterns on top of one another. Consequently, the model turns out to be extremelyporous. If it were to be submerged without some kind of sealant, the part would leak andbecome saturated with water. In order to prevent this from happening, the assembled submergedbodies were given a coat of polyurethane paint.
Models built at the University of Genoa, where Dr. Brizzolara began his research, arepainted with a type of polyurethane-based paint commonly used on automobiles. This paintleaves a smooth, shiny finish and is completely watertight. Unfortunately, MIT's campuspossesses none of the necessary facilities and tools to apply automobile paint.
14

Figure 9: the submerged body pieces after being given a coat of primer in the automobile spraypaint booth
The author was able to utilize the facilities present in his relative's auto body business tospraypaint the parts. This permitted the submerged bodies to be given several coats of primerand polyurethane paint. First the parts were all machine sanded until they were sufficientlysmooth. Next a coat of grey primer was applied and allowed to dry overnight. The primed partswere then given a light wet-sanding before they were sprayed with yellow polyurethane paint.This gave the bodies a very smooth finish. The color yellow is often used on experimental shipmodels because it is highly visible underwater. A few small cracks between some of the partswere later filled in with touch-up paint.
Figure 10: A close up view of the finish on the submerged bodies after several coats of polyurethane paint
15

Figure 11: The completed submerged bodies. Note that the bow sections are not yet permanently attached.
3.3 Lasercutting the Strut FramesThe four struts of the SWATH design posed a challenge to construct because of their size
and shape. These pieces were roughly 40 x 20 x 10 cm at their widest end. An attempt wasmade to fabricate them using a large piece of PVC foam on a 3 axis mill. However, the finishwas unacceptably rough and there were difficulties in aligning the two faces of each part on themachine.
The next plan was to build a sort of skeleton consisting of consecutive cross sections ofthe strut and wrap the assembly in some kind of coating. A similar technique is used to constructlightweight model airplane wings. Cross sectional shapes of the struts were taken at two inchintervals from the CAD model. This meant that each strut skeleton would consist of five crosssectional plates held together by one bracket. Each shape was given slots to fit into place on theholding brackets. They were also all given a large rectangular hole in the middle as access pointsto the submerged bodies. In order to achieve the step effect with the lower part of the hull
16

mentioned earlier, the bottom plate was made to be 8 millimeters wider all around than the top ofthe mid strut. A DXF file for each section and bracket was uploaded onto a lasercutter and cutout on 1/8h inch (3cm) acrylic. Next, the cross sectional plates were fit into place on thebrackets and epoxied together using the same epoxy as on the submerged bodies.
Figure 12: The assembled frames for the forward struts
3.4 Wrapping the StrutsOnce the frame was built, it needed to be given a skin to complete the geometry of the
struts. One type of material considered was a sheet of thermoplastic, which could be wrappedaround the skeleton and heated to shrink fit it into place. However, this method often produces ascalloping effect between each rib, and also does not provide enough strength and stiffness.Eventually a sheet of light canvas was chosen to wrap the struts with.
The next attempt was to wrap the frame in fabric. Four pieces of canvas was cut out foreach of the four struts, which would fold over the straight edge of every strut while the cut endswould meet at the angled edge. Using a hot glue gun, the canvas sheets were first attached at themiddle to the straight edge of the struts and then glued to the edges of the cross sectional plates afew inches at a time. It was very important to ensure that the canvas was held taught over theframe. Any slack causes indentations in the final shape of the struts. For the most part, this wasavoided. There were a few buckles in the canvas, but these were all located at the top of thestruts, and thus will not affect the seakeeping dynamics of the model.
17

Figure 13: One of the forward struts hanging up to dry after its epoxy coat
Once the canvas had been secured around the frame, they were given a generous coat ofmarine epoxy. This adds a great deal more rigidity to the assembly, minimizing any flexing thatcould occur during testing, and also helps to smooth out the finish of the parts. After beingallowed to dry overnight, the struts were given two coats of white acrylic spray paint.
This method did show decent results, but it is possible to achieve even more accurategeometry. Another attempt is currently being planned. This time, the frame will again belasercut, but this time there will be transverse brackets included that will prevent any scallopingbetween the plates. Although the extra brackets will add more weight, the superior rigidity andgeometry provided by this layout will be worth the extra displacement.
Additionally, new materials will need to be chosen to replace the canvas, which had avery rough finish even after being coated in epoxy and paint. The current plan is to use a verythin sheet of balsa wood. In the next iteration, the frame itself will also likely be lasercut from asheet of balsa wood. This allows certain kinds of fast-drying wood superglue to be used toquickly secure the parts together. Similar methods to this are used to build wooden remote-controlled airplanes, meaning it should be relatively easy to find guidance on this sort ofprocedure. The extra rigidity of the balsa wood compared to canvas should give a far superiorfinish. Once completed, the struts will be epoxied to the top of the mid struts.
3.5 Towing ApparatusAlthough there was insufficient time to fabricate the towing wishbone, making this part
should be a relatively straightforward procedure. A thin strip of aluminum can be bent to formthe correct angles and dimensions to hold the demihulls in the correct orientation with respect toeach other and link them to the tow tank gantry. A set of ball bearings should be mounted on an
18

axle going through the towing connectors in order to minimize the friction between the towingwishbone and axle. The necessary dimensions for the towing wishbone are given in the drawingbelow.
44 '4
Figure 14: Drawing of the dimensions for the towing wishbone. Lengths are in centimeters and angles are in degrees.
A similar strip of metal should be used to join the demihulls together from the aft struts. Thiswill prevent torsion felt by wave action from twisting the hulls with respect to each other.
4. Model VerificationOnce the majority of the model had been constructed, the final steps were to trim it with
ballast to sit evenly in the water when at rest and predict its dynamic behavior.
4.1 HydrostaticsBased on the known weight and volumetric values of the model, its hydrostatics can
accurately be predicted. First, based on the CAD model used in this project, the total submergedvolume can be obtained. This can then be used to calculate the buoyancy force with
B= pgV (2)
where p is the density of water (fresh water in this case), g is the acceleration due to gravity, andV is the underwater volume. Solving for equation (2) gives a buoyancy force of 96.31 Newtons(equivalent to 9.81 kg).
19

A precise weight of the model can be achieved by measuring the components. Althoughthe model is not completely assembled, the largest components are already built and the weightof the whole model should only be slightly heavier than what is currently measured. Adding allof the weights of each part gives a total mass of 4.43 kg (43.44 N).
The weight of the model had already been estimated using the volume of the CAD partsand the density of the ABS plastic used, so the low weight was expected. Since the buoyancyforce at the correct waterline is so much greater than the weight of the components, the modelwill easily float. In fact, it will need to be weighed down with ballast such as lead fishingweights equivalent to the difference between the two forces. Each strut has an opening in themiddle that extends all the way down into the submerged bodies just for this purpose. Weightscan be placed in any segment of the submerged body except for the middle one, which is sealedoff on both ends. This allows a high degree of precision to be used in trimming the model to beperfectly level at the correct draft. The longitudinal center of gravity must be equal to thelongitudinal center of buoyancy in order for the vessel to sit level in the water. The LCB is givenat different drafts in the hydrostatics tables below.
20

Draft Amldsh. M
Displacement (dml )
Heel to St arboard degrees
Draft at FP m
DraftatAPm
Draft at lCF m
Trim (+ve by stern) m
Wllength m
WlBeamm
Wetted Area m A2 Waterpl. Area mA2 Prl!>m ·tICCCPP
BIQc' (n"rr Mid<hlp IIr'" c""rr
, "rpl. Arn? (o"fr.
lCB from Amidsh . ( .. ve fwd) 1)1
lCF from Amld~h . (+ve fwd) m
KBm
BMtm
BMlm
KMtm
KMlm
Im!"erslon (TPct tonne/cm
MTctonne.m
Drift Amldsh. M
Displacement (dml)
Heel to Starboard degrees
DraftltFPm
DraftatAPm
DraftltLCFm
Trim (+ve by stern) m
WlLenathm
WlBeamm We tted Area mA2 Witerpi. Area mA2
w"l~rpl "r- ("n fr.
IfB from Amldsh. (+ve fwd) !" LCF from ~midsh. (+ve fwd) ~
KBm
BMtm
BMLm
KMtm
KMLm
Immersion (TPc) tonne/em
MTctonne.m
0.008 0.017 0.025 0.033 0.042
6.10 7.72 9.26 lQ.63 11.68 o 0
0.008 0.017 0.D25 0.033
0.008 0.017 0.D25 0.033 0.008 0.017 0.025 0.033
o 0 1.000 0.995 0.983 0.983' 0.9~
0.891 0.889 0.884 0.874' 0,857 0.276' 0.~10 0.345 0.388 0.376
0.1~ 0.191 O.ln 0.149 0.099 0.~3 0,...0; (177' ., 7° ~ /71
O.RS 0.8>\" O.R)
o -0.001 0
-0.002 -0.001 0.001 0.01~ 0.064 -0.103
~61
15.135
-0;.Q76 -O.~. _ -0.028
22.486 17.279 !2.726
11.639 B.855 6.588
-0.01
7.643 4.801
O.a;o 0.Q§8 0.067 0.075
12.33 12.81 13.30 13.78
o 0 0.042 O.~. 0.(58 0.067 0.042 O.a;o Q,.(58 0.067 0.04? O.a;o 0.(58 0.067
o 0
0.983 0.983 0.983 0.983 0.825 0.817 0.811 O.sa;
0.307 0.3~ 0.352 0.373 0.060 0.(5~ 0.(58 O.Cl?B O.7'·~, '1.71(. I' 7l~ n,701
1.017 " . .I'1l a.'I,}
0.4',1 fl.l\3R
0.008 0.011
0.101 0.086
0.002 4.208
3.599
0.012
3.822 3.396
,>5~ . 1.3 7
0..13?
0.014
0.086
0.024
3.624
3.273
0.016
0.086
0.036
3.441
3.158
0.0113
14.26
o 0.075
0.075
0.075
o 0.983 0.799
0.394 0.(58 n (.1\0
n.m7 '.:In? O.~1~
0.019
0.086 0.049
3.27
3.lEl
0.092
14.74
o 0.083
0.083
0.083
o 0.983 0.793
0.415
0.(5" 'l.hT'
flAA7
0.100
15.23 o
0.092
0.092 0.092
o 0.983 0.787
0.436 0.(58
0.108
15.n o
0.100
0.100 0.100
o 0.983 0.781
0.458
0.058
0.117 0.125
16.19 16.68
o 0
0.108 0.117
0.108 0.117 0.108 0.117
o 0
0.983 0.983
~.77S 0.769 0.479 0.500 0.(58 0.(58
" {~.,.,
o.,n~
0.133
17.16
o 0.125
0.125 0.125
0.983
0.763 0.521
0.058
0.142
17.64
o 0.133
0.133 0.133
0.983
0.757 0.543 0.(5_8 " r)"
,.. ;1~
0.150
18.12
o 0.142
0.142 0.142
0.983
0.751 0.564 0.(58
0.02J. 0.003833 0.004167 0.0045 0.004667 O.O(!; 0.0(!;333 0.0(!;5
0.086 0.014333 0.014333 0.014333 0.014333 0.014333 0.014333 0.014333
0.063 0.013 0.0155 0.018167 0.02QB33 0.023667 0.0265 0.0295
3.111 0.493667 0.47IE 0.448833 0.428333 0.409167 0.391 0.374 2.951 0.476333 0.461667 0.447833 0.435 0.422667 0.411167 0.400167
29.(58 22.41 17.221! 12.698 7.633 4.21 3.835 3.648 3.4n 3.319 3.174 0.506667 0.486 0.466833 0.~9167 0.432833 0.417667 0.4035
15.033 11.563 ~804 ~j~ 4.791 3.601.. 3.408~. 3J~ 3.194 3.1 3.014 0.489167 0.4nl67 0.466 0.455833 0.446333 0.437667 0.429667 0.072 0.071 0.065 0.1E5 0.037 0.022 0. (~1 0.0~1 0.021 0.021 0.021 0.021 0.021 0.021 O.O~ 0.021 0.021 0.021
0.03 0.028 0.024, 0.019, 0.013 0.008 0.007 0.007 0.007 0.006 0.006 0.006 0.006 O.O(!; O.O(!; O.O(!; O.O(!; O.O(!;
0.158 0.167 0.175 0.183 0.192 0.200 0.201 0.217 0.225
18.60 19.09 19.57 20.05 20.54 21.02 21.50 21.98 22.47
Q. 0
0.150 ~.~ 0.167 21~ 0.183 0.192 0.200 O.l<!.. ().217
0.1)0 0.158 0.167 0.175 0.183 0.192 0.200 0.208 0.217 0.150 0.158 0.167 0.175 0.183 0.192 0.200 0.208 0.217
o o o 0.983 0.983 0.983 0.983 0.983 0.983 0.983 0.983 0.983
0.745 0.739 0.733 0.726 0.720 0.714 0.708 0.702 0.696 0.585 0.606 0.628 0.649 0.670 0.692 0.713, 0. 734 0.755 0.058 0.058 0.058 0.058 0.058 0.058 0.058 0.058 0.058
0.233 0.242
22.95 23.43
o 0
0.225 0.233
0.225 0.233 0.225 0.233
o 0
0.983 0.983
0.690 0.684
o.m 0.798
0.058 0.058
0.250
23.92 o
0.242
0.242 0.242
o 0.983 0.678
0.819
0.058
0.258
24.39
o 0.250
0.250 0.250
0~983
0.672
0.840
0.058
0.267
24.89
o 0.258
0.258 0.258
1.113
0.666
1.072
0.067 ~,(1 n. r.~ 1').';0;" a 11""
(;:'"" ,6J: 01':25 f),o;'"
t 1::\ ~ ~ • t;:"" 1 •• ~} 2:
01\:''' n.!\'R 0 1JQ n~.
0.275
25.64
0.267
0.267
0.267
o 1.108
0.660
1.143
0.114
0.283
26.78
0.275
0.275
0.275
1.104
0.654
1.215
0.161
0.292
28.33
0.283
0.283
0.283
1.099
0.648 1.288 0.210
0.300
30.28
0.292
0.292
0.292
1.095
0.641
1.364
0.259
0.308
32.65
0.300
0.300
0.300
1.096
0.635 1.440
0.310
'7 '
0.317
35.45
0.308
0.308
0.308
1.117
0.629
1.517
0.361
0.005667 0.006 0.006167 0.006333 0.0065 0.006667 0.006833 0.007 0.007167 0.007333 0.0075 0.007667 0.007833 0.007833 0.006667 0.004 0.0005 -0.00317 -0.00667 -0.00933
0.014333 0.014333 0.0~4333 0.()143;33 0.014333 0.014333 0.014333 0.014333 0.014333 0.014333 0.014333 0.014333 0.014333 -0.00533 -0.04867 -0.05933 -0.05917 -0.05433 -0.0465 -0.03733 0.0325 0.035667 0.038667 0.041833 0.045167 0.048333 0.051667 0.055 0.0585 0.()61833 0.065333 0.06B833 0.072333 0.075833 0.081333 0.0895 0.099833 0.112 0.125333 0.139333
0.357833 <1347667 0.~28167 0.3145 0.3015' 0.289167 0.277333 0.26616.7 0.2555 0.245333 0.235667 0.226333 0.2172 0.209 0.199333 0.1~ 0.1~333 0.178833 0.~80333 0.187 0.389833 0.38 0.3705 0.361667 0~~31~ 0.345 0.337333 0.329833 0.322833 0.316 0.3995 0.3033~3 0.297333 0.328 0.480833 0.614833 0.734 0.8385 0.926667 0.999667
0.390333 0.378167 0.366833 0.356333 0.346667 0.3375 0.329 0.321167 0.314 0.307167 0.301 0.295167 9,.289833 0.284833 .. 0.280667 0.279167 0.282167 0.290833 0.3055 0.3265
0.4223¥ 0.4155 0.~333 0.~5 0.398333 0.3935 0.38lI 0.385 9,3811~ 0.377833 0.374833 0.372 0.3695 0.403833 0.562167 0.704333 0.833833 0.950333 1.052 1.139 0.021 0.021 0.021 0.g21 0.021 0.021 0.021 0.021 0.021 0.021 0.021 0.021 0.021 0.025 0.042 0.059 0.077 0.096 0.114 0.133
0.004 0.004 0.004 0.0Q4 0,004 0.004 0.003 0.003 0.003 0.003 0.003 0.003 0.003 0.005 0.014 0.023 0.033 0.043 0.054 0.065

The CAD model of the scaled down ship design was converted into a GDF file, whichconsists of a mesh of the ship's geometry. Next the vertical center of gravity was recorded, andthe radii of gyration were calculated. The results were input into the program files, and WAMITwas run to find the added mass and damping coefficients in every direction at wave periods from1 to 3 seconds. Since the scope of this project only focuses on pitch and heave, the 3-3 and 5-5directions were the values of interest. The results for these valued are graphed below against thewave period.
A33 and B33
--- A33- ........-- 33 :
AS5 and 855
1 1.2 1.4 1.6 1.8 2 2.2 2.4T(9)
50
40
30
20
10
2.6 2.8 3 1 1.2 1.4 1.6 1.6 2 2.2T(s)
Figure 16: Graphs for the added mass and damping coefficients of heave (left) and pitch (right) with varying wave periods
The response amplitude operators were also analyzed. These values describe how the vesselresponds to wave action. The RAOs for pitch and heave are graphed below against wave period.
RAO Heave0.7 F RAO Pitch
1.5 2 2.5 3 3.5T(s)
0.14
0.12
0.1
0.08
0.06
0.04
0.021
0'1.5 2 2.5 3 3.5
T(s)
Figure 17: The response amplitude operators for pitch and heave
22
2
2
1.5
0.5
24 2.6 2.6
0.6 -
0.5
0.4
0.3
0.2
- -B554.5
3.5-
3
2.5
0A11
0

5. Movement Measurement TechniquesThis last section will outline a number of techniques for measuring the pitch and heave of
the SWATH model as it is tested in the MIT tow tank. Unfortunately, time did not permit anytests to be conducted this year. Future members of the Brizzolara research team should considerall of these options when the tests are eventually run.
5.1 PotentiometersPerhaps the cheapest and simplest way of measuring the movement of the model would
be to fix rotational or string potentiometers to strategic locations on the model and towing gantry.For example, a standard rotational potentiometer could be installed on the joint between thetowing wishbone and the model's tow hitches, while a string potentiometer could be run from thetop of the model to the bottom of the gantry, in order to measure pitch and heave respectively.Potentiometers are inexpensive and easy to connect to a small processer to record data; however,they experience a great deal of electronic noise and would most likely not provide the accuracythat is necessary for this kind of experiment.
5.2 Inertial Measurement UnitAn inertial measurement unit, or IMU, is another sensor that would be useful for this set
of experiments. This device includes gyroscopes and accelerometers which can accuratelycalculate the precise movements and orientation of a body. Fixing an IMU on the top of themodel would allow motion in all directions, including pitch and heave, to be measured andrecorded onto a computer. It is a relatively simple technique that is very accurate, but a detailedcircuit board would need to be created in order to read the data.
5.3 Hall Effect SensorsThe Hall Effect is a measurable response that occurs when two objects with magnetic
fields change orientation with respect to each other. Sensors that measure this effect arecommonly used in brushless motors, and are relatively inexpensive. The system consists of asensor with a built in electro-magnet and feedback loop, and a permanent magnet. A number ofthese sensors can be placed in a similar manner to the potentiometers described above. Ideally,the sensor for pitch would be mounted on the towing wishbone inside the submerged body in linewith the axis of rotation of the joint. The corresponding magnet would mount onto the modelitself to record the rotation between the model and towing wishbone. As the vessel rotatesaround the towing wishbone, the change in magnetic fields is measured by the sensor andrecorded.
5.4 Video RecordingThe last method considered was to use a standard video camera to graphically analyze the
motions of the model. First a pair of high-visibility markers would need to be placed on the foreand aft end of the model. Then the test would be conducted on the model while the camerarecords the model's behavior. The recording can then be analyzed on a computer using anumber of different programs to measure the displacement of the markers, and relate this motion
23

to the whole model. This technique is best suited to tests where the model is held stationary in awave field, so the camera can be mounted in a fixed position. However, provisions can be madefor it to work with a moving model if the camera itself is fixed to the gantry via a boom or otherstructure.
6. Conclusions
6.1 On Construction MethodsThe methods described above are all relatively novel ways of constructing an
experimental scale ship model. Some techniques were quite effective, while others did not turnout as initially planned. Some of the above methods are recommended for future researchersattempting to fabricate similar models, while some should be avoided.
Although the concept of 3D printing segments of the hulls caused some problems asdescribed earlier, it still proved to be a useful technique that gave adequate results. Futureresearchers building peculiar ship models should consider this option, but alter it slightly. Inorder to avoid the issue of the open end of the part contracting during cooling, both ends of thehull should be sealed off with bulkheads to hold the desired shape. Of course, at least a smallopening must be left to allow the support material from the 3D printer to be melted out in theacid bath.
The automobile paint also worked very well for giving a smooth finish to the submergedparts of the model. The coating is completely waterproof and quite smooth. A higher level ofsmoothness could be obtained by giving the parts an extra coating of glossy clear-coat.
The technique of making large parts, such as the struts of the SWATH with a frame oftwo-dimensional parts also had some merit to it. A skeleton of the intended shape can easily beconstructed and filled with foam or wrapped in a thin layer of material to complete the part.However, the choice of using canvas was not ideal. The canvas had a relatively rough finish, andcoating it with epoxy and paint did little to alter this. After the upper struts were completed, theyappeared rough and would introduce a considerable added friction drag while runningexperiments on the model. In the future, a smoother material, such as thin plastic or woodensheets, would likely provide a more ideal finish.
6.2 On Ship PerformanceThe predictions show that the innovative SWATH design should be very stable compared
to similarly sized vessels of other hullforms. Once the physical tow tank tests have been run, theresults can be compared to the predictions to judge their accuracy.
24

7. Future WorkThere are many steps in the experimentation of the SWATH vessel that unfortunately
were not reached this year. Time did not permit for any tests to be conducted before thesubmission of this paper. Therefore, it is important that future members of Dr. Brizzolara'sresearch team continue to progress beyond the point where this report leaves off.
During the first few weeks of summer, another attempt will be made to build the upperstruts more precisely. As described earlier, the next method will involve using balsa wood asboth the structural frame and the wrapping. This assembly will then be epoxied and paintedbefore being permanently fixed to the submerged bodies.
Another important step is to build the towing wishbone and link it to the model. Makingthe wishbone itself should be straightforward, as it only requires bending a thin strip of metal tothe correct dimensions. The ends of the wishbone will be attached to a pair of ball bearings,which in turn will be aligned with the submerged body towing hitches with a / inch bolt.
After the struts and towing wishbone are in place, the bow sections of each submergedbody will be epoxied into place to complete the model.
Testing the model in a wave-generating tow tank is the main goal of this project. Themodel will need to be attached to the gantry above the tow tank so it can be pulled along at thedesired speed. Alternatively, the model can be fixed to the gantry and held in place while thewaves are sent down the length of the tank. Either way, a secure connection that only allows themodel to move in the pitch and heave directions is necessary for these seakeeping tests.
Next, researchers will need to choose one of the aforementioned measurement methods,or come up with a new and more effective one. Data will likely be sent to the computercontrolling the tow tank systems, but can also be logged on an SD card or similar devicemounted on the model. The sensors will need to be ideally located to measure the relevant shipmotions without interference.
If the results of the seakeeping tests prove to be favorable, then the next step would likelybe to build an even larger model to test in a larger tank. Ideally at some point in the future, aworking prototype of this SWATH vessel will be built to demonstrate its innovative concept.
25
References
1. Brizzolara S., Bovio M., Federici A., Vernengo G. (2011). "Hydrodynamic Design of aFamily of Hybrid SWATH Unmanned Surface Vehicles". FAST 2011, Honolulu, Hawaii, USA
2. Brizzolara S., Chryssostomidis C., (2013) "Design of an Unconventional ASV forUnderwater Vehicles Recovery: Simulation of the motions for operations in rough seas". ASNEInternational Conference on Launch and Recovery, Linthicum, MD, November 14-15 2012
3. Brizzolara S. (2004). "Parametric Optimization of SWAT-Hull Forms by a Viscous-InviscidFree Surface Method Driven by a Differential Evolution Algorithm". 25th Symposium on NavalHydrodynamics, St. John's, Newfoundland and Labrador, CANADA, 8-13 August 2004, Vol V,pp. 47-64.
4. Brizzolara S., Curtin T, Bovio M., Vernengo G. (2011). "Concept Design and HydrodynamicOptimization of an Innovative SWATH USV by CFD Methods". Ocean Dynamics, vol. 61, doi:10.1007/s10236-011-0471-y
26