faculty guide-web post into the hawkweb system using the same user id and password currently used to...
TRANSCRIPT

SIGN-IN
Go to the UMES website, www.umes.edu , and Click on HAWKWeb
Log into the HAWKWeb system using the same User ID and Password currently used to access the UMES network. On the UMES web page beside HAWKWeb click on the help icon for additional assistance.
****THIS IS NOT A COMPLETE FACULTY GUIDE.**** PLEASE EMAIL [email protected] TO RECEIVE A COPY OF THE COMPLETE FACULTY GUIDE. THIS GUIDE IS FOR ADDITIONAL ASSISTANCE IN SELF SERVICE AND ADVISEMENT FUNCTIONS.
IMPORTANT NOTE!! In order to obtain student administrative systems access all new faculty or staff members’ supervisors should first complete the online New Employee IT Assessment form at www.umes.edu/IT. This will setup their network and email accounts. This form does not give you access to HAWKWeb. In order to receive access to HAWKWeb an email MUST be sent per the supervisor to Kenneth Gaston and Balwant Singh that includes the employees name, SSN, birthdate, UMES email address and what type of access (ex: Faculty/Advisor, Dean/Chairperson or Administrative Assistant) to grant.
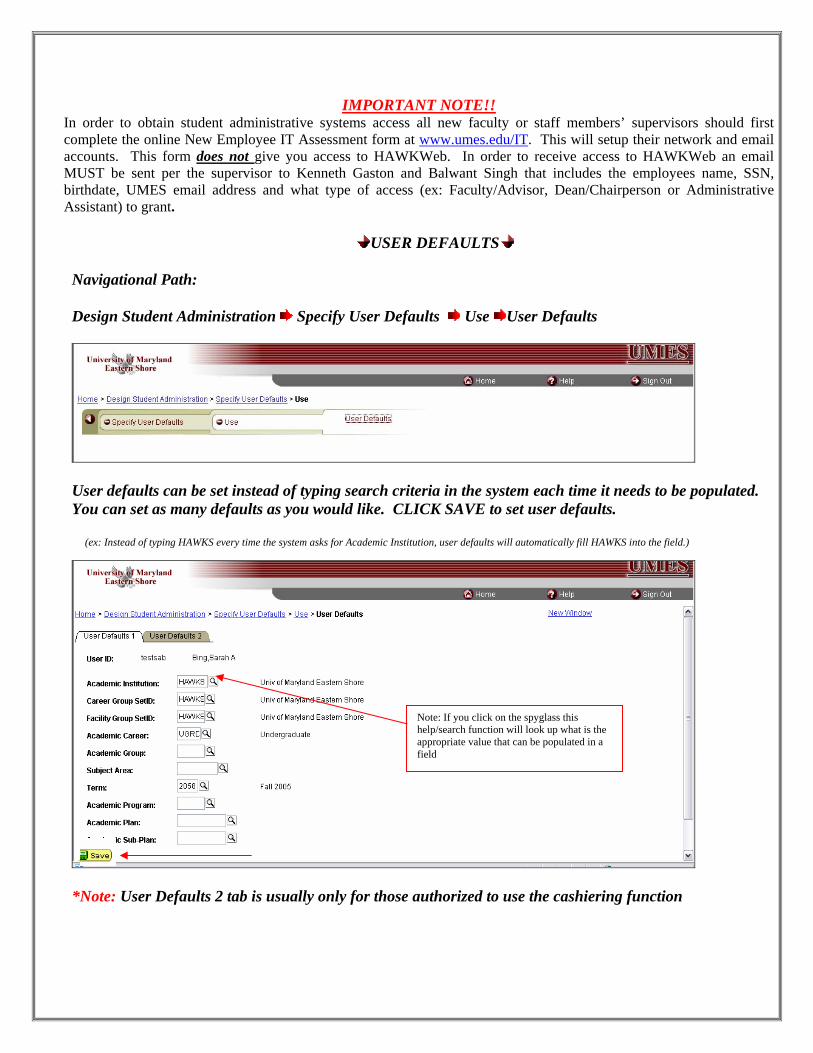
USER DEFAULTS
Navigational Path: Design Student Administration Specify User Defaults Use User Defaults
User defaults can be set instead of typing search criteria in the system each time it needs to be populated. You can set as many defaults as you would like. CLICK SAVE to set user defaults.
(ex: Instead of typing HAWKS every time the system asks for Academic Institution, user defaults will automatically fill HAWKS into the field.)
*Note: User Defaults 2 tab is usually only for those authorized to use the cashiering function
Note: If you click on the spyglass this help/search function will look up what is the appropriate value that can be populated in a field
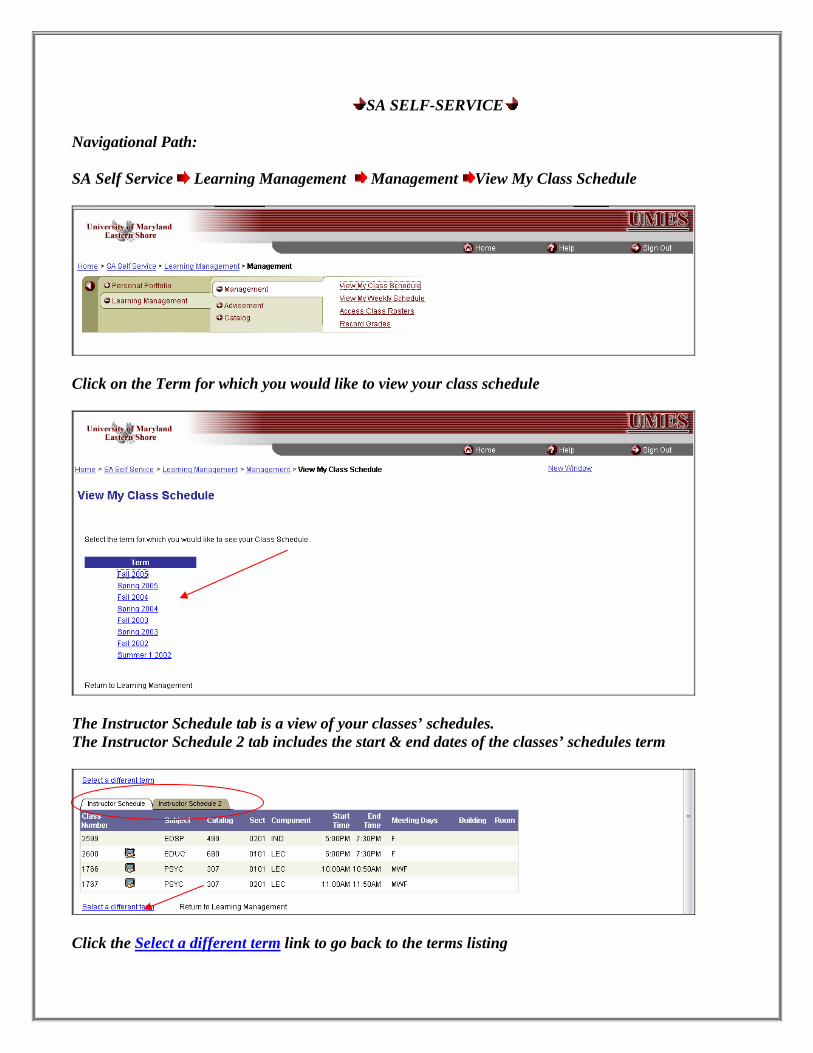
SA SELF-SERVICE Navigational Path: SA Self Service Learning Management Management View My Class Schedule
Click on the Term for which you would like to view your class schedule
The Instructor Schedule tab is a view of your classes’ schedules. The Instructor Schedule 2 tab includes the start & end dates of the classes’ schedules term
Click the Select a different term link to go back to the terms listing
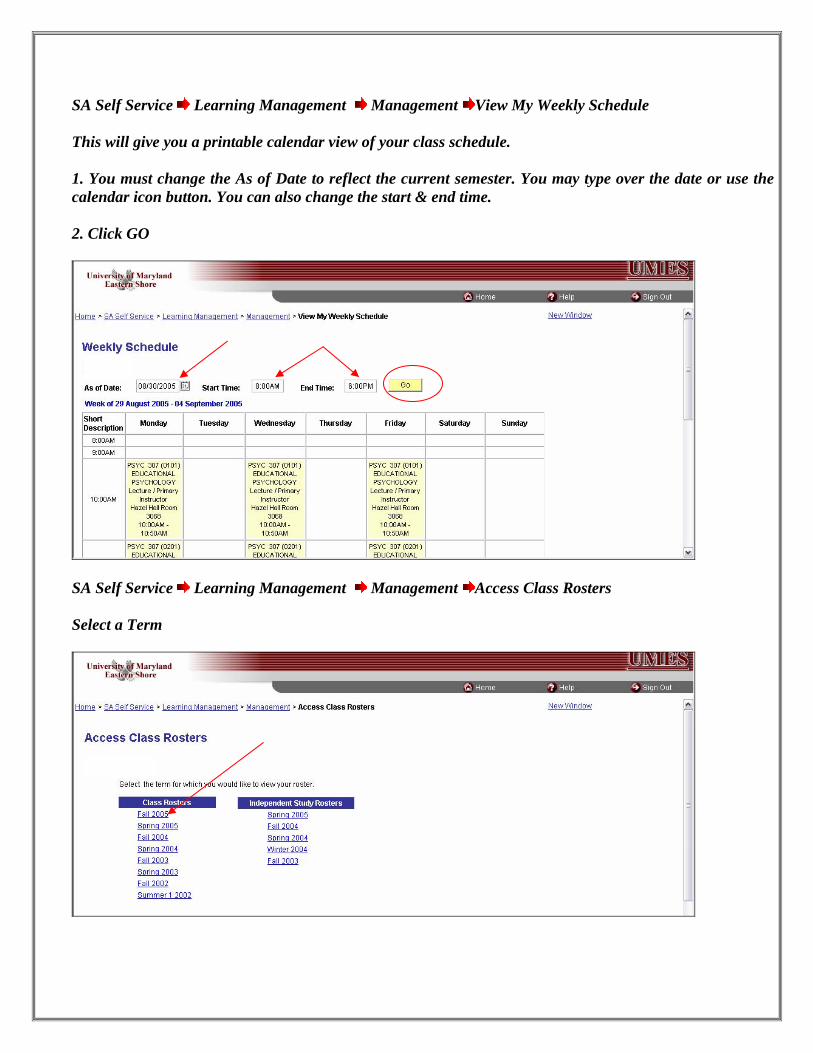
SA Self Service Learning Management Management View My Weekly Schedule This will give you a printable calendar view of your class schedule. 1. You must change the As of Date to reflect the current semester. You may type over the date or use the calendar icon button. You can also change the start & end time. 2. Click GO
SA Self Service Learning Management Management Access Class Rosters Select a Term
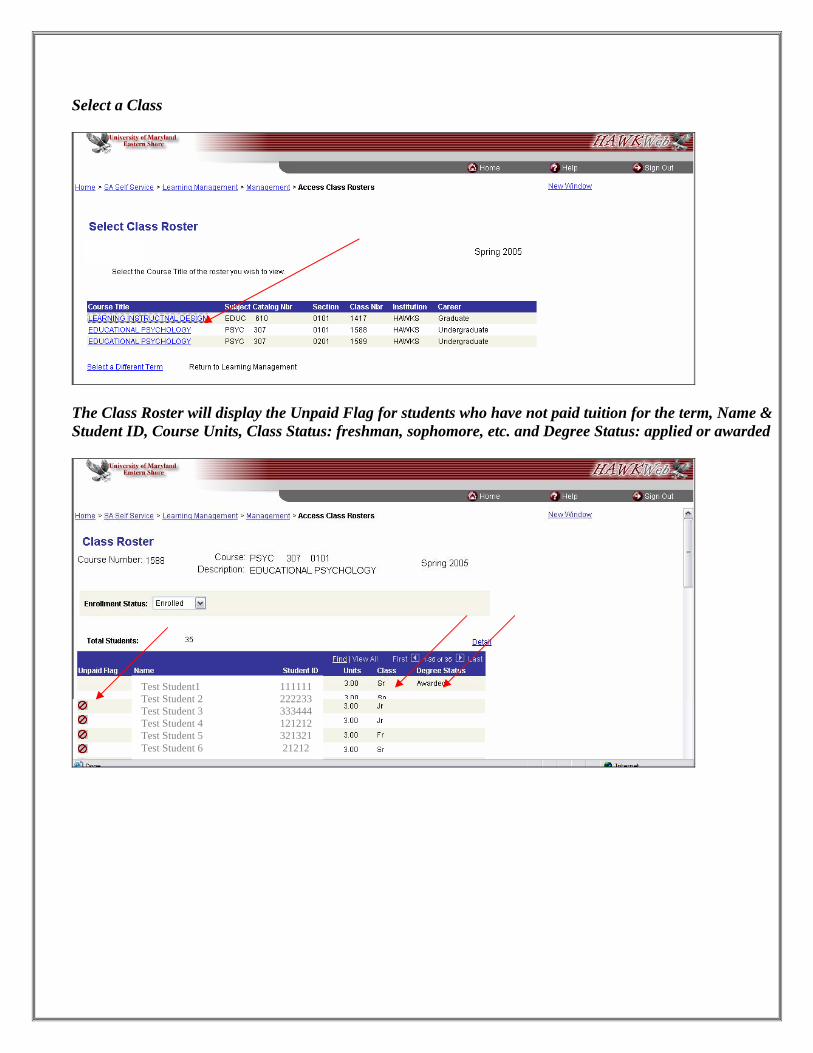
Select a Class
The Class Roster will display the Unpaid Flag for students who have not paid tuition for the term, Name & Student ID, Course Units, Class Status: freshman, sophomore, etc. and Degree Status: applied or awarded
Test Student1 111111 Test Student 2 222233 Test Student 3 333444 Test Student 4 121212 Test Student 5 321321 Test Student 6 21212

You can view students who have dropped by clicking on the Enrollment Status drop down arrow and selecting Dropped
Test Student 1 111111 Test Student 2 222233 Test Student 3 333444 Test Student 4 121212 Test Student 5 321321
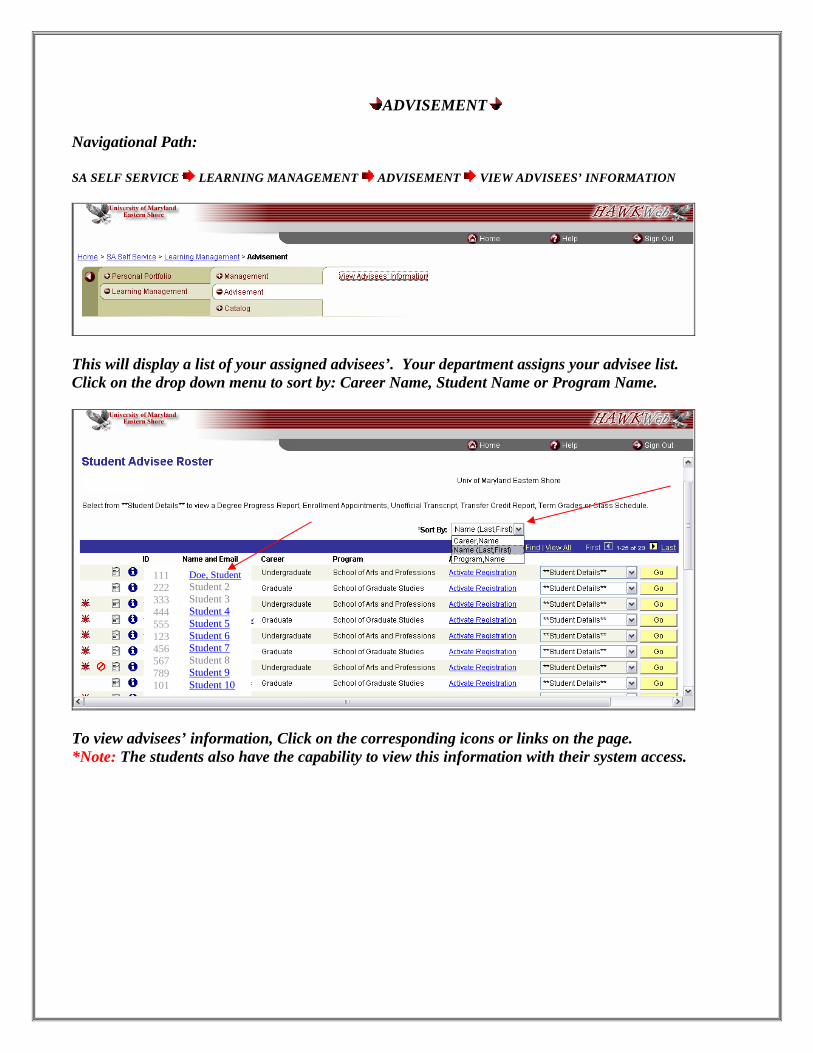
ADVISEMENT Navigational Path: SA SELF SERVICE LEARNING MANAGEMENT ADVISEMENT VIEW ADVISEES’ INFORMATION
This will display a list of your assigned advisees’. Your department assigns your advisee list. Click on the drop down menu to sort by: Career Name, Student Name or Program Name.
To view advisees’ information, Click on the corresponding icons or links on the page. *Note: The students also have the capability to view this information with their system access.
Doe, Student Student 2 Student 3 Student 4 Student 5 Student 6 Student 7 Student 8 Student 9 Student 10
111222333444555 123 456 567 789 101

Positive & Negative Service Indicators: This usually indicates whether a student has paid tuition for the term. A “star” icon indicating paid and a “no” icon indicating not paid; however specialized messages can be enter by Admissions, Financial Aid, Student Accounts or Registrar’s Offices.
To Do List: This would be a list of items the student needs to complete such as turning in a parental tax form, etc. These items may be entered by Admissions, Financial Aid, Student Accounts or Registrar’s Offices.
Academic Program: This icon lists the students’ Program: School, Career: Undergrad or Grad, Degree: BA, BS, etc. and Major.
Doe, Student J. Click on the student’s highlighted underlined name to send them an email
**STUDENT DETAILS** Select a student detail that you would like to view and click Go
Address Info Class Schedule
Degree Progress (Tentatively Not Available0 Emergency Contacts Enrollment Appointments Grade Inquiry (Tentatively Not Available) Telephone Transfer Credit Report (Tentatively Not Available) Unofficial Transcript
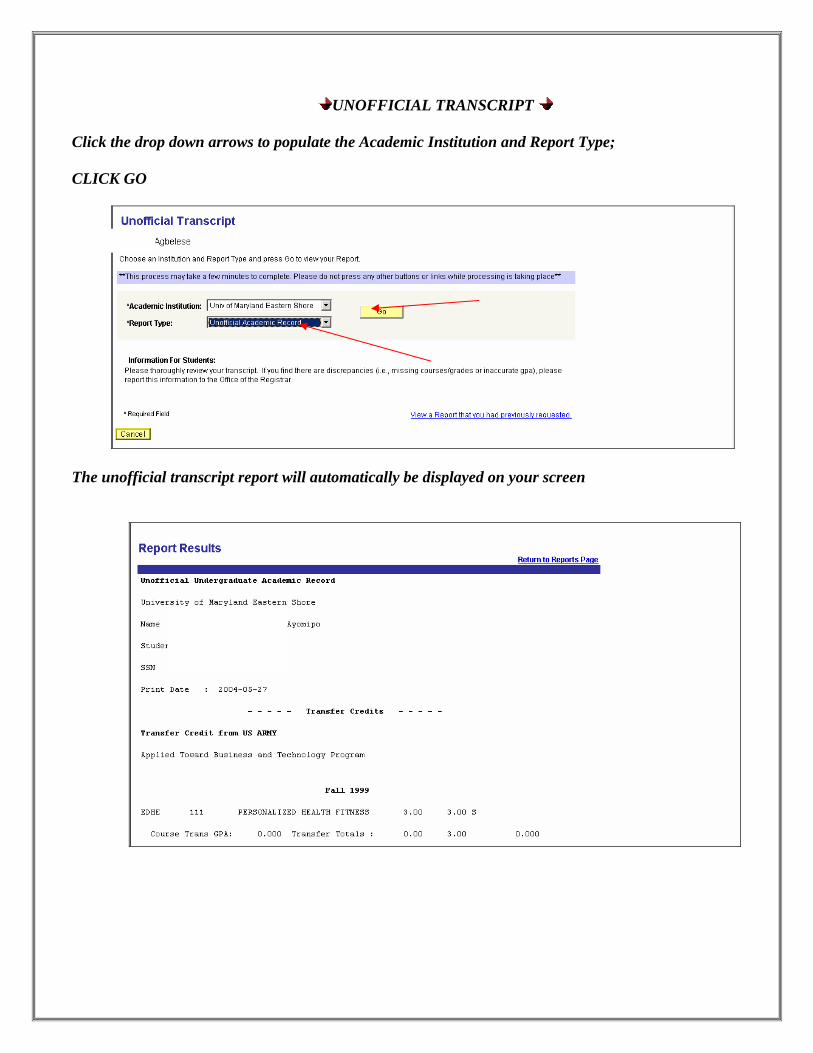
UNOFFICIAL TRANSCRIPT Click the drop down arrows to populate the Academic Institution and Report Type; CLICK GO
The unofficial transcript report will automatically be displayed on your screen
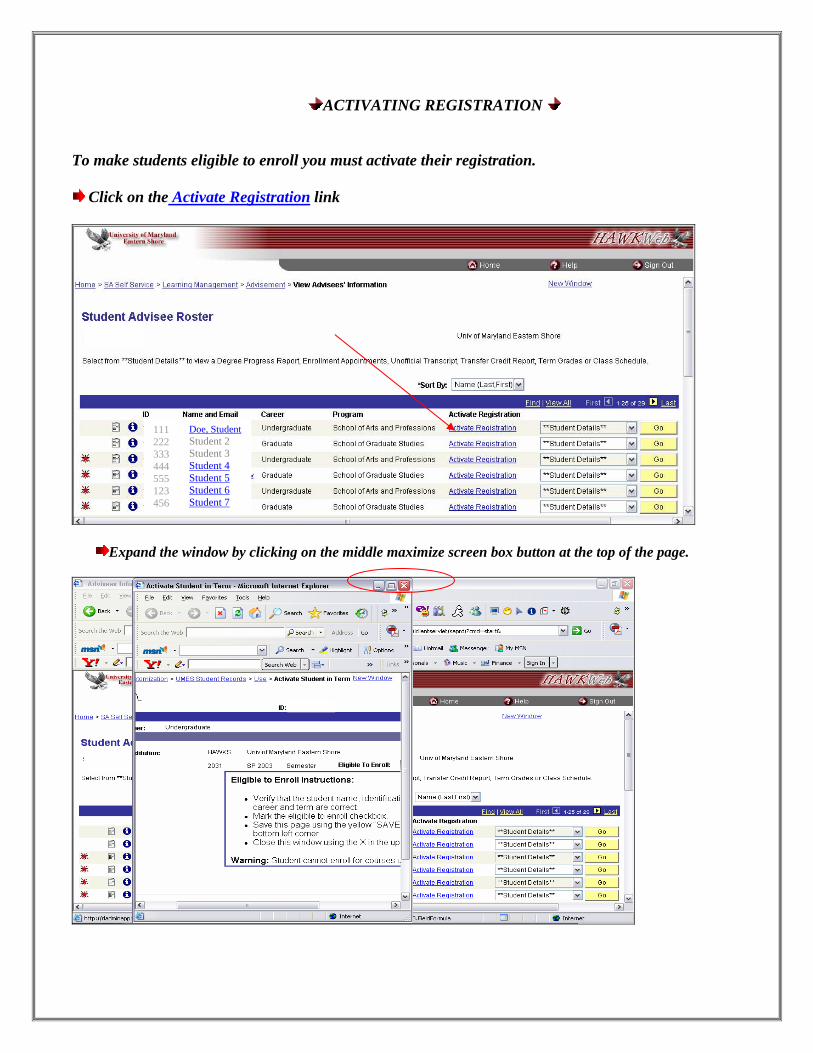
ACTIVATING REGISTRATION To make students eligible to enroll you must activate their registration.
Click on the Activate Registration link
Expand the window by clicking on the middle maximize screen box button at the top of the page.
111222333444555 123 456
Doe, Student Student 2 Student 3 Student 4 Student 5 Student 6 Student 7

IMPORTANT NOTES!!!
Students CANNOT enroll in courses until the activate registration page is SAVED. This should be performed for each semester the student is enrolling in. To view semester pages you MUST Click on View ALL or Click on the yellow arrow keys to scroll through the semesters.
Verify the student’s name, ID number, career and term.
Make sure there is a check in the Eligible to Enroll checkbox. If there is no check: Click in the box to insert a check.
You MUST SAVE the page using the yellow save button in the bottom left corner.
Close the Activate Registration page using the ‘X’ in the upper right corner.

COURSE CATALOG
avigational Path:
A Self Service
N S Learner Services Catalog View Course Catalog
Note: If you click on the spyglass this
ype in the Subject (Subjects are always 4 letter abbreviations)
R- If you don’t know the abbreviation: Click on the spyglass to select a subject area. Click on the .
T -OLookup button to view a full list of courses. To select a subject, click on the subject abbreviation link
will provide assistance with any search. Once you’ve clicked on the spyglass and entered more search criteria, click Lookup and select thecorrect result you would like to be displayed.
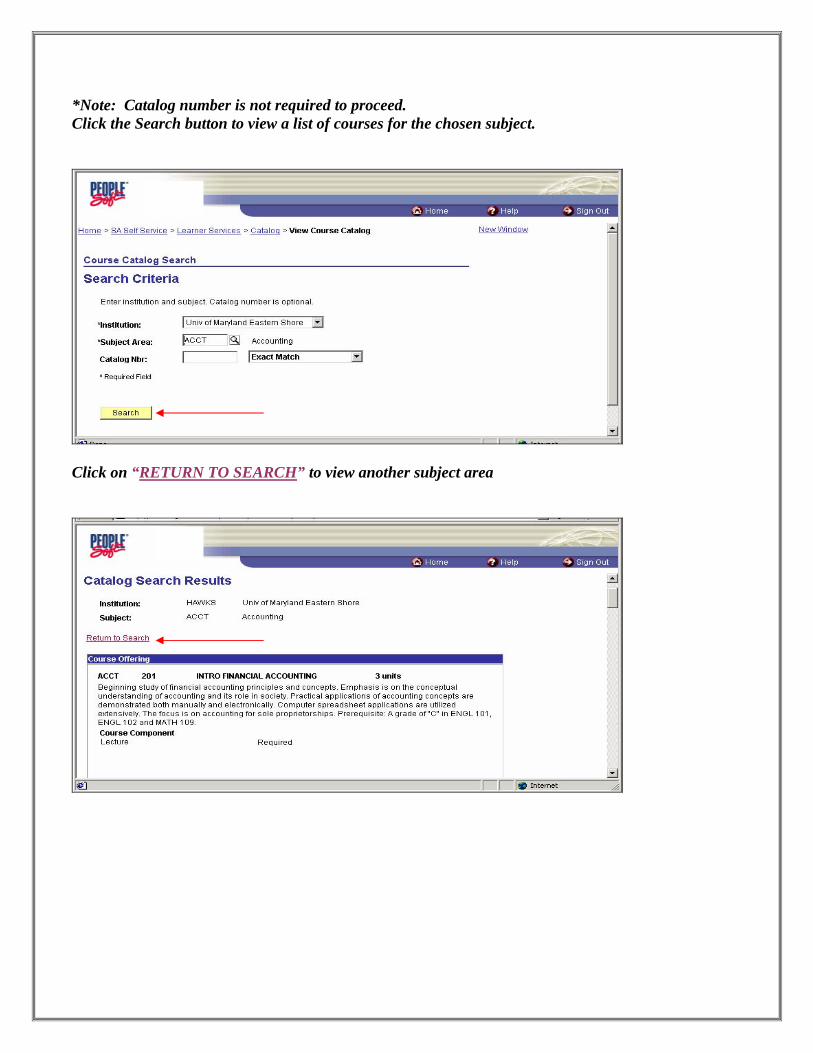
*Note: Catalog number is not required to proceed. e chosen subject. Click the Search button to view a list of courses for th
Click on “RETURN TO SEARCH” to view another subject area
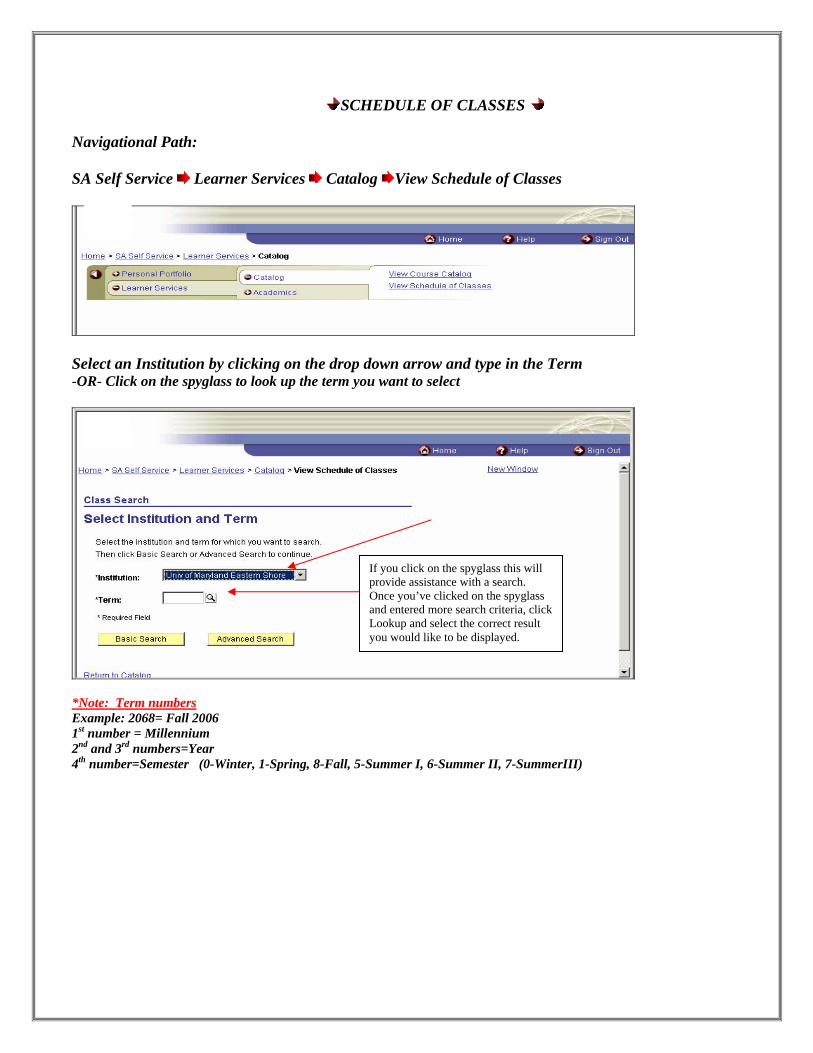
SCHEDULE OF CLASSES
avigational Path:
A Self Service
N S Learner Services Catalog View Schedule of Classes
Select an Institution by clicking on the drop down arrow and type in the Term -OR- Click on the spyglass to look up the term you want to select
If you click on the spyglass this will
Note: Term numbers*
06
inter, 1-Spring, 8-Fall, 5-Summer I, 6-Summer II, 7-SummerIII)
Example: 2068= Fall 201st number = Millennium 2nd and 3rd numbers=Year 4th number=Semester (0-W
provide assistance with a search. Once you’ve clicked on the spyglass and entered more search criteria, clickLookup and select the correct result you would like to be displayed.

Click on Basic Search to look for a specific class.
Type in the Subject and Catalog Number then Click Search
Notes: Catalog number is not required to conduct a search. The other search components allow you to refine your search (Ex:
-OR- Click on the spyglass to select a specific subject area *Course Component= Lecture, Discussion, Lab, etc., Course Career=Undergraduate or Graduate)
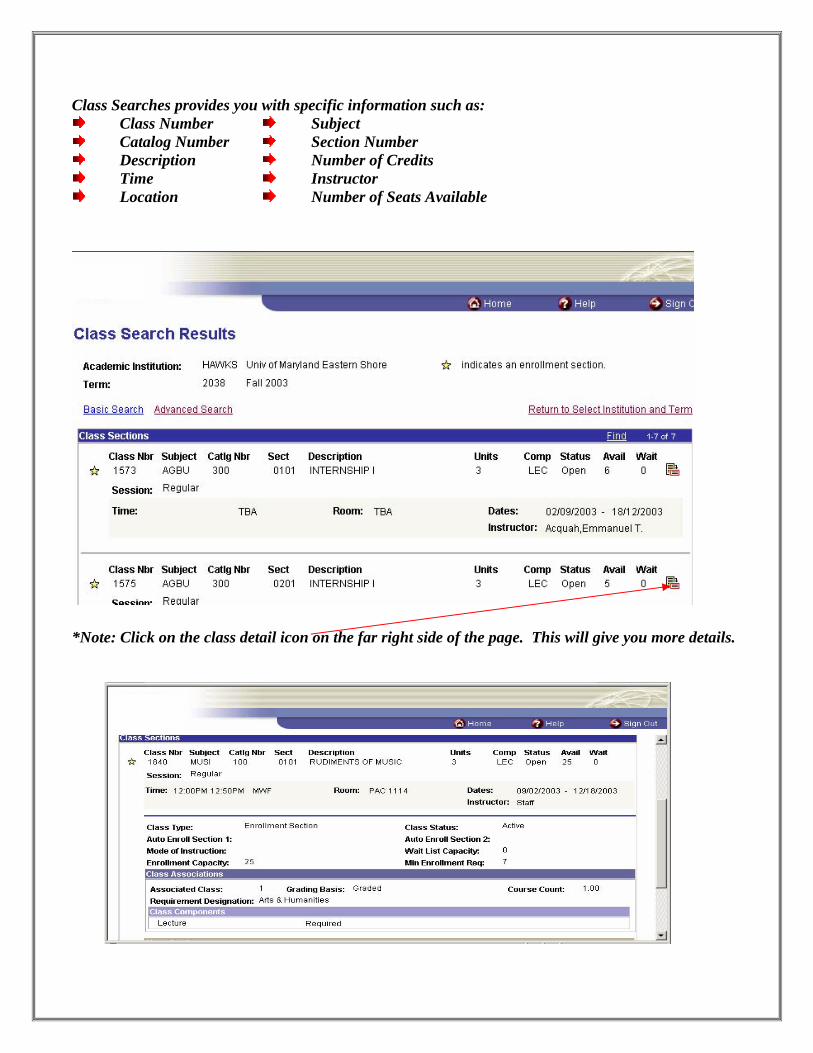
Class Searches provides you with specific information such as: Class Number Subject Catalog Number Section Number Description Number of Credits Time Instructor Location Number of Seats Available
Note: Click on the cla etails.
* ss detail icon on the far right side of the page. This will give you more d