fish & wildlife services · pdf filefish & wildlife services ... step-by-step...
TRANSCRIPT

Fish & Wildlife Services Operational Plan
FWS Enterprise Planning Tool (EP) Operational Plan
August 2006

Navigating Enterprise Planner For the Operational Plan by Region
Contents WHAT YOU NEED BEFORE LOGGING IN TO ENTERPRISE PLANNER ..................................... 3 TYPES OF USERS—CONTRIBUTORS AND REVIEWERS................................................................ 3 QUICK START FOR OPENING YOUR WORKSHEET ....................................................................... 4 STEP-BY-STEP INSTRUCTIONS FOR REGIONAL ARD REVIEWERS.......................................... 9 STEP-BY-STEP INSTRUCTIONS FOR AD REVIEWERS ................................................................. 13 STEP-BY-STEP INSTRUCTIONS FOR REGIONAL DIRECTOR REVIEWERS........................... 16 STEP-BY-STEP INSTRUCTIONS FOR THE DEPUTY DIRECTOR REVIEWER ......................... 23 STEP-BY-STEP INSTRUCTIONS FOR THE DIRECTOR REVIEWER .......................................... 27 TERMINOLOGY....................................................................................................................................... 30 TERMINOLOGY IN FULL SCREEN CONTEXT................................................................................ 34 STATE ICONS AND DESCRIPTIONS................................................................................................... 38 LIST OF USER IDS ................................................................................................................................... 39 PHASE DEFINITIONS ............................................................................................................................. 40 HIERARCHY / TIMELINE FOR OPERATIONAL PLAN WO.......................................................... 41 HIERARCHY / TIMELINE FOR OPERATIONAL PLAN REGIONS............................................... 42 DATA SUBMISSION................................................................................................................................. 43
Where can I find Enterprise Planner? Go to www.fws.gov and select Planning/ABC located in the left column.
Next, simply mouse over the “Performance Planning and Goal Tracking” button located across the top of the page and then select “Enter Targets In Enterprise Planning”.

What you need before logging in to Enterprise Planner Before logging in to Enterprise Planner, you need to have a FWS Active Directory ID, administrator rights on your computer, and an Enterprise Planner User ID.
• A FWS Active Directory ID. An Active Directory ID is now needed to access the
Service Intranet where you will find the link to Enterprise Planner. Additional information about the Operational Plan will also be at this site
(http://www.fws.gov/planning/Help/ep_opsplanweb.html). If you don’t have an Active Directory ID, you’re not sure, go to https://myaccount.fws.gov and follow these steps below
1. Enter your user id (your FWS email in the format [email protected]) and your password. If you don’t know your password, click no, and the system will send you an email with instructions for setting your password.
• Administrator rights on your computer. Enterprise Planner requires that your
user profile has administrator rights on the local computer at least for the initial logon. After logging in, Enterprise Planner will attempt to download certain components through your Internet Explorer browser. If you do not have administrator rights, this attempt will be blocked and the application will hang or you will receive an error message (a “Page Initialization Error”). Ask your local IT administrator to check and set your user profile. Also, be sure your browser is not blocking pop-ups as this affects your ability to see the help menus (In IE, go to the top menu: Tools > Pop-up Blocker)
• An Enterprise Planner User ID. You must use the User ID assigned to you located on the Enterprise Planner web site. This is your current Enterprise Planner User ID. In the near future, Enterprise Planner will implement Active Directory and the station name will no longer be used. You will set your password the first time you log in.
Types of Users—Contributors and Reviewers What you are allowed to see and what you can do depends on whether you are a Contributor or Reviewer. Contributors enter data and submit their final results to Reviewers. Reviewers can view all contributions from the Washington Office for regional ARDs (see Diagram)

.
Region 9 (WO) are “Contributors.” A Contributor can enter and edit data. Reviewers will review performance measures under their responsibility.
Quick Start for opening your worksheet Step 1. Go to the Enterprise Planner home page:
http://www.fws.gov/planning/Help/ep_opsplanweb.html (you need your Active Directory ID to access this page) and click on the link “Log In to Enterprise Planner.”
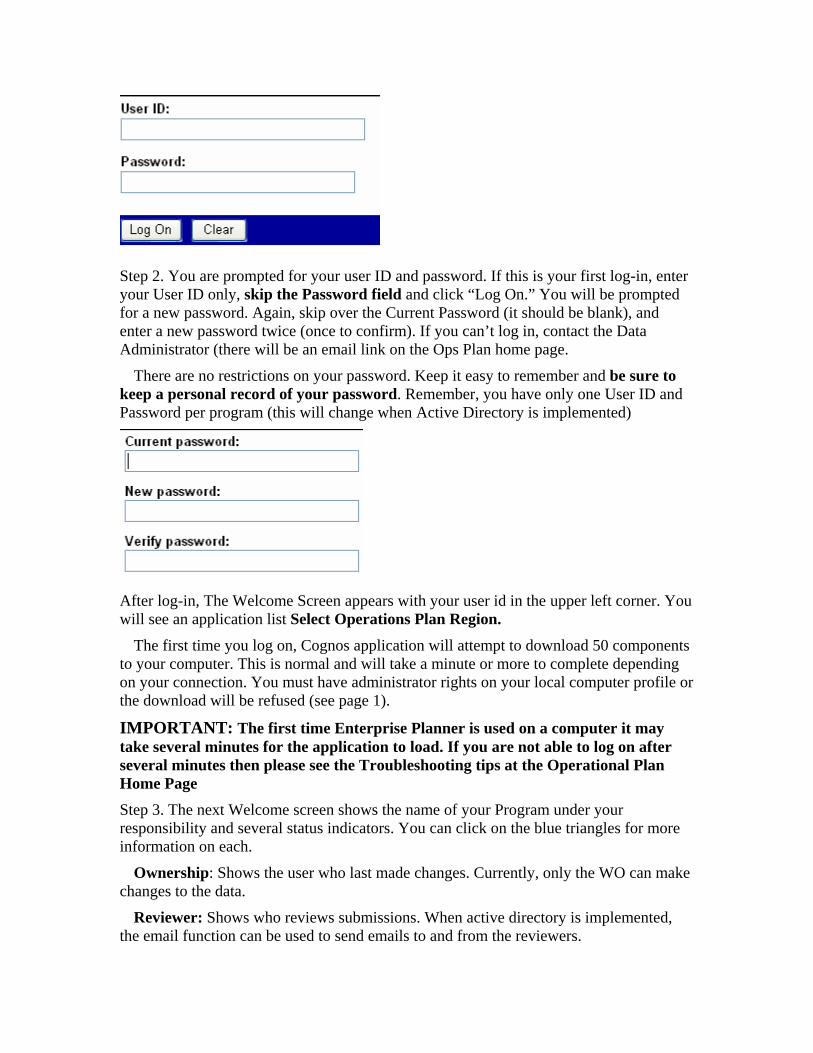
Step 2. You are prompted for your user ID and password. If this is your first log-in, enter your User ID only, skip the Password field and click “Log On.”

You will be prompted for a new password. Again, skip over the Current Password (it should be blank), and enter a new password twice (once to confirm). If you can’t log in, check the troubleshooting guide on the Enterprise Planner home page.
Step 3. An “Application List” is displayed showing the “Operational Plan Regions”, and “Operational Plan WO”.
Step 4. You will see a Welcome screen with two frames. Look to the left frame. If you are a Director, Deputy Director, AD, PES, Regional Director, or ARD your worksheet name will be proceeded by “+” sign. Click the “+” to expand the tree. The tree on the left helps you navigate if you have a long list of contributing worksheets. Click on the name to show the status information on the right frame. If you are entering data from the WO or reviewing from the lowest level of the hierarchy, you will not see the “+” sign. NOTE: If you get a blank screen or error message, see the troubleshooting guide on the Enterprise Planner Home Page.
Step 5. To start entering data into Enterprise Planner (or to view a worksheet), click the station name link on the right frame under the “Name” column. The worksheet will open. WO may go to “Actions”>”Take Ownership” to enter data.
Step-by-Step Instructions for the Washington Office Contributor Step 1. Open your web browser (Internet Explorer). Go to http://www.fws.gov/planning/Help/ep_opsplanweb.html. If you know your User-ID, click on the link to Log On to Enterprise Planner. You will be re-directed to the Cognos Server (Cognos is the company that sells the Enterprise Planner software). A logon screen appears. If this is your first time, look up your User-ID on the Ops Plan Web page.
Step 2. You are prompted for your user ID and password. If this is your first log-in, enter your User ID only, skip the Password field and click “Log On.” You will be prompted for a new password. Again, skip over the Current Password (it should be blank), and enter a new password twice (once to confirm). If you can’t log in, contact the Data Administrator (there will be an email link on the Ops Plan home page.
There are no restrictions on your password. Keep it easy to remember and be sure to keep a personal record of your password. Remember, you have only one User ID and Password per program (this will change when Active Directory is implemented)

After log-in, The Welcome Screen appears with your user id in the upper left corner. You will see an application list Select Operations Plan Region.
The first time you log on, Cognos application will attempt to download 50 components to your computer. This is normal and will take a minute or more to complete depending on your connection. You must have administrator rights on your local computer profile or the download will be refused (see page 1).
IMPORTANT: The first time Enterprise Planner is used on a computer it may take several minutes for the application to load. If you are not able to log on after several minutes then please see the Troubleshooting tips at the Operational Plan Home Page (https://http://www.fws.gov/planning/Help/ep_opsplanweb.html).
Step 3. The next Welcome screen shows the name of your Program under your responsibility and several status indicators. You can click on the blue triangles for more information on each.
Ownership: Shows the user who last made changes. Currently, only the WO can make changes to the data.
Reviewer: Shows who reviews submissions. When active directory is implemented, the email function can be used to send emails to and from the reviewers.
Step 4. To start working, Click on the “All” tab to submit to several sheets at once. This opens the worksheet where you can view and enter data. It may take a few moments for the application to load. A worksheet will appear.

When the worksheet opens it will look similar to an Excel spreadsheet. Notice the Swap Rows and Columns Icon to the left of the “Total” drop down menu . Click and drag this dimension over the 2007 until you see a red box around the rows like this:
Now your sheet should look like this
Step 5. Take Ownership. If this is the first time, the screen will be all gray (gray cells cannot be modified). Go to Actions on the menu bar and select Take Ownership. The cells that can be modified change to white.
Select all then Click “OK”. (Note if you already have ownership then you will not get this prompt.)

Step 6. Now you are ready to input your numbers.
Step 8. Enter Accomplishment Data for FY 2006 and Planning targets for FY 2007. FY06 accomplishment measures are entered in the column labeled 2006 Actuals. You can only enter data in white cells corresponding to the numbered measures. You may enter 2007 targets at this time as well or they can be entered later.
Numbers appear green prior to using the Enter key (if you use the arrow keys to move).
Using the Enter key activates any calculation fields in the worksheet (e.g., totals) and the numbers turn blue.
Use File > Save (or save icon) at top of worksheet to save your data to the server. The
numbers will turn black. You can save as many times as you like.
You may quit after saving and return another time to finish the worksheets.
Step 9. Using Annotation. You can use annotation to ‘post notes’ to the worksheet. Annotation is associated with a particular cell. Use Annotation if you want to send a note to the reviewer about a particular measure.
To annotate, right-click while in the cell of interest. Click Annotate>Annotate Cell>Add.

A small window pops up where you can write a note to explain a measure. Different users, including the reviewers, can add annotation to the same worksheet.
A cell that is annotated will show a small red triangle in the upper right corner.
View and Print a Program’s Annotation. Select View>Browse annotation to see all annotation notes submitted by a program or reviewers. You can see annotation from a single sheet or annotation from all sheets.
Step 10. Submit when you are finished with all Goals and Measures. When you are completely done, Select Actions > Submit. This will lock your data as it currently stands and let your Reviewer know you are finished.
Step-by-Step Instructions for Regional ARD Reviewers Step 1. Open your web browser (Internet Explorer). Go to http://www.fws.gov/planning/Help/ep_opsplanweb.html. If you know your User-ID, click on the link to Log On to Enterprise Planner. You will be re-directed to the Cognos Server (Cognos is the company that sells the Enterprise Planner software). A logon screen appears. If this is your first time, look up your User-ID on the Ops Plan Web page.
Step 2. You are prompted for your user ID and password. If this is your first log-in, enter your User ID only, skip the Password field and click “Log On.” You will be prompted for a new password. Again, skip over the Current Password (it should be blank), and enter a new password twice (once to confirm). If you can’t log in, contact the Data Administrator (there will be an email link on the Ops Plan home page.
There are no restrictions on your password. Keep it easy to remember and be sure to keep a personal record of your password. Remember, you have only one User ID and Password per program (this will change when Active Directory is implemented)
After log-in, The Welcome Screen appears with your user id in the upper left corner. You will see an application list Select Operations Plan Region.
The first time you log on, Cognos application will attempt to download 50 components to your computer. This is normal and will take a minute or more to complete depending on your connection. You must have administrator rights on your local computer profile or the download will be refused (see page 1).
IMPORTANT: The first time Enterprise Planner is used on a computer it may take several minutes for the application to load. If you are not able to log on after several minutes then please see the Troubleshooting tips at the Operational Plan Home Page Step 3. The next Welcome screen shows the name of your Program under your responsibility and several status indicators. You can click on the blue triangles for more information on each.
Ownership: Shows the user who last made changes. Currently, only the WO can make changes to the data.
Reviewer: Shows who reviews submissions. When active directory is implemented, the email function can be used to send emails to and from the reviewers.

Step 4. To start reviewing, Click on the “R# ARD Program Name” Worksheet.
Now your sheet should look like this
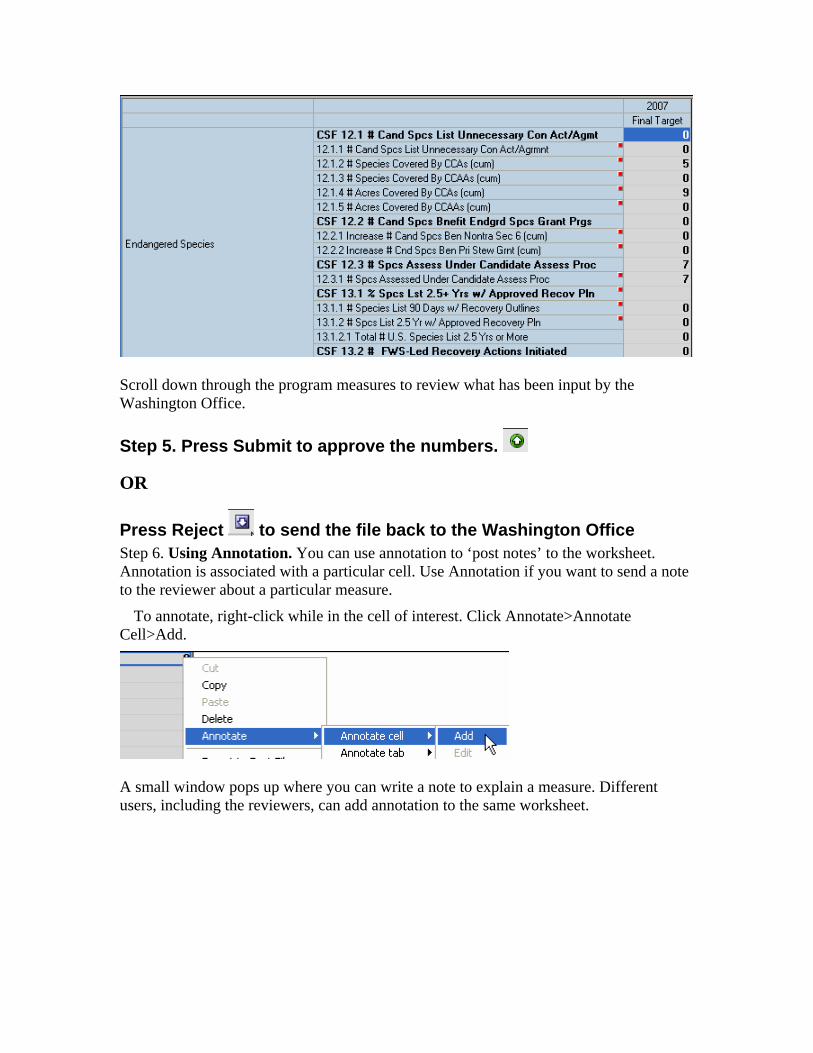
Scroll down through the program measures to review what has been input by the Washington Office.
Step 5. Press Submit to approve the numbers.
OR
Press Reject to send the file back to the Washington Office Step 6. Using Annotation. You can use annotation to ‘post notes’ to the worksheet. Annotation is associated with a particular cell. Use Annotation if you want to send a note to the reviewer about a particular measure.

To annotate, right-click while in the cell of interest. Click Annotate>Annotate Cell>Add.
A small window pops up where you can write a note to explain a measure. Different users, including the reviewers, can add annotation to the same worksheet.
A cell that is annotated will show a small red triangle in the upper right
corner.
View and Print a Program’s Annotation. Select View>Browse annotation to see all annotation notes submitted by a program or reviewers. You can see annotation from a single sheet or annotation from all sheets.

You may exit Enterprise Planning by closing the browser window “File/Close”.
.
Step-by-Step Instructions for AD Reviewers Step 1. Open your web browser (Internet Explorer). Go to http://www.fws.gov/planning/Help/ep_opsplanweb.html. If you know your User-ID, click on the link to Log On to Enterprise Planner. You will be re-directed to the Cognos Server (Cognos is the company that sells the Enterprise Planner software). A logon screen appears. If this is your first time, look up your User-ID on the Ops Plan Web page.
Step 2. You are prompted for your user ID and password. If this is your first log-in, enter your User ID only, skip the Password field and click “Log On.” You will be prompted for a new password. Again, skip over the Current Password (it should be blank), and enter a new password twice (once to confirm). If you can’t log in, contact the Data Administrator (there will be an email link on the Ops Plan home page.
There are no restrictions on your password. Keep it easy to remember and be sure to keep a personal record of your password. Remember, you have only one User ID and Password per program (this will change when Active Directory is implemented)

After log-in, The Welcome Screen appears with your user id in the upper left corner. You will see an application list Select Operations Plan Region.
The first time you log on, Cognos application will attempt to download 50 components to your computer. This is normal and will take a minute or more to complete depending on your connection. You must have administrator rights on your local computer profile or the download will be refused (see page 1).
IMPORTANT: The first time Enterprise Planner is used on a computer it may take several minutes for the application to load. If you are not able to log on after several minutes then please see the Troubleshooting tips at the Operational Plan Home Page Step 3. The next Welcome screen shows the name of your Program under your responsibility and several status indicators. You can click on the blue triangles for more information on each.
Ownership: Shows the user who last made changes. Currently, only the WO can make changes to the data.
Reviewer: Shows who reviews submissions. When active directory is implemented, the email function can be used to send emails to and from the reviewers.
Step 4. To start reviewing, Click on the “AD Endangered” Worksheet.
Now your sheet should look like this
Scroll down through the program measures to review what has been input by the Washington Office.
Step 5. Press Submit to approve the numbers.
OR
Press Reject to send the file back to the Washington Office Step 6. Using Annotation. You can use annotation to ‘post notes’ to the worksheet. Annotation is associated with a particular cell. Use Annotation if you want to send a note to the reviewer about a particular measure.
To annotate, right-click while in the cell of interest. Click Annotate>Annotate Cell>Add.
A small window pops up where you can write a note to explain a measure. Different users, including the reviewers, can add annotation to the same worksheet.

A cell that is annotated will show a small red triangle in the upper right
corner.
View and Print a Program’s Annotation. Select View>Browse annotation to see all annotation notes submitted by a program or reviewers. You can see annotation from a single sheet or annotation from all sheets.
You may exit Enterprise Planning by closing the browser window “File/Close”.
.
Step-by-Step Instructions for Regional Director Reviewers Step 1. Open your web browser (Internet Explorer). Go to http://www.fws.gov/planning/Help/ep_opsplanweb.html. If you know your User-ID, click on the link to Log On to Enterprise Planner. You will be re-directed to the Cognos Server (Cognos is the company that sells the Enterprise Planner software). A logon

screen appears. If this is your first time, look up your User-ID on the Ops Plan Web page.
Step 2. You are prompted for your user ID and password. If this is your first log-in, enter your User ID only, skip the Password field and click “Log On.” You will be prompted for a new password. Again, skip over the Current Password (it should be blank), and enter a new password twice (once to confirm). If you can’t log in, contact the Data Administrator (there will be an email link on the Ops Plan home page.
There are no restrictions on your password. Keep it easy to remember and be sure to keep a personal record of your password. Remember, you have only one User ID and Password per program (this will change when Active Directory is implemented)
After log-in, The Welcome Screen appears with your user id in the upper left corner. You will see an application list Select Operations Plan Region.
The first time you log on, Cognos application will attempt to download 50 components to your computer. This is normal and will take a minute or more to complete depending on your connection. You must have administrator rights on your local computer profile or the download will be refused (see page 1).
IMPORTANT: The first time Enterprise Planner is used on a computer it may take several minutes for the application to load. If you are not able to log on after several minutes then please see the Troubleshooting tips at the Operational Plan Home Page Step 3. The next Welcome screen shows the name of your Program under your responsibility and several status indicators. You can click on the blue triangles for more information on each.
Ownership: Shows the user who last made changes. Currently, only the WO can make changes to the data.
Reviewer: Shows who reviews submissions. When active directory is implemented, the email function can be used to send emails to and from the reviewers.
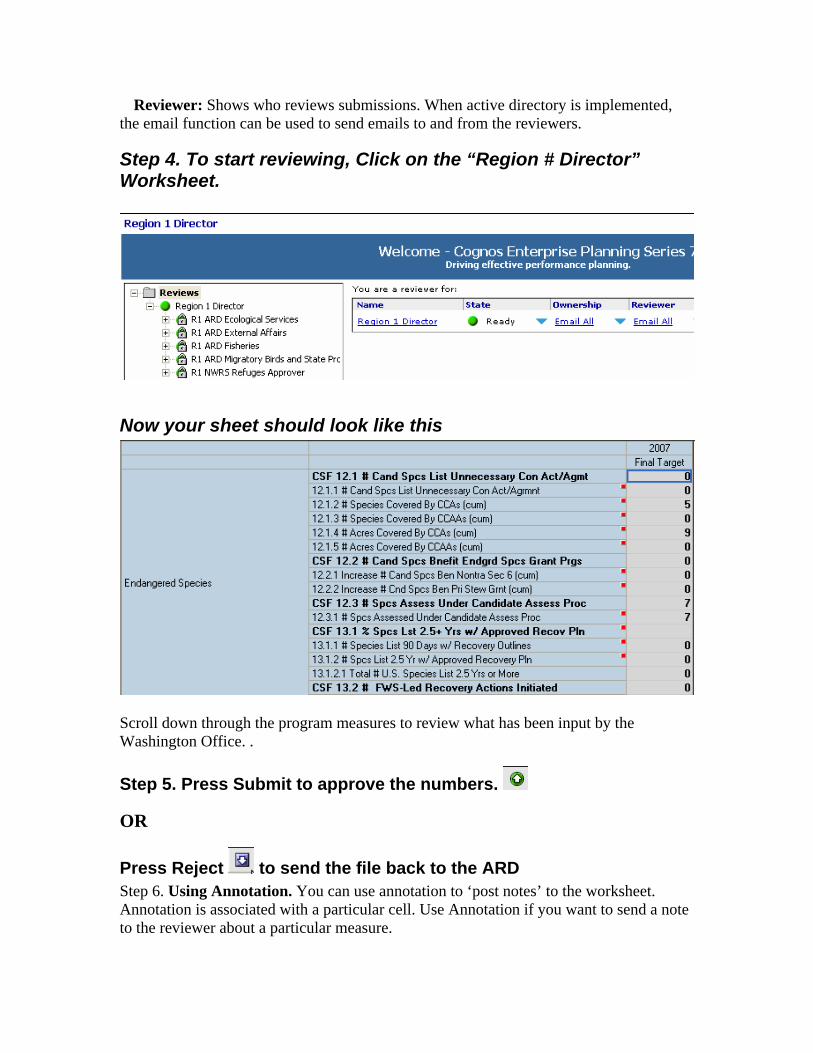
Step 4. To start reviewing, Click on the “Region # Director” Worksheet.
Now your sheet should look like this
Scroll down through the program measures to review what has been input by the Washington Office. .
Step 5. Press Submit to approve the numbers.
OR
Press Reject to send the file back to the ARD Step 6. Using Annotation. You can use annotation to ‘post notes’ to the worksheet. Annotation is associated with a particular cell. Use Annotation if you want to send a note to the reviewer about a particular measure.

To annotate, right-click while in the cell of interest. Click Annotate>Annotate Cell>Add.
A small window pops up where you can write a note to explain a measure. Different users, including the reviewers, can add annotation to the same worksheet.
A cell that is annotated will show a small red triangle in the upper right
corner.
View and Print a Program’s Annotation. Select View>Browse annotation to see all annotation notes submitted by a program or reviewers. You can see annotation from a single sheet or annotation from all sheets.

You may exit Enterprise Planning by closing the browser window “File/Close”.
.
Step-by-Step Instructions for Planning and Evaluation Staff Reviewers Step 1. Open your web browser (Internet Explorer). Go to http://www.fws.gov/planning/Help/ep_opsplanweb.html. If you know your User-ID, click on the link to Log On to Enterprise Planner. You will be re-directed to the Cognos Server (Cognos is the company that sells the Enterprise Planner software). A logon screen appears. If this is your first time, look up your User-ID on the Ops Plan Web page.
Step 2. You are prompted for your user ID and password. If this is your first log-in, enter your User ID only, skip the Password field and click “Log On.” You will be prompted for a new password. Again, skip over the Current Password (it should be blank), and enter a new password twice (once to confirm). If you can’t log in, contact the Data Administrator (there will be an email link on the Ops Plan home page.
There are no restrictions on your password. Keep it easy to remember and be sure to keep a personal record of your password. Remember, you have only one User ID and Password per program (this will change when Active Directory is implemented)

After log-in, The Welcome Screen appears with your user id in the upper left corner. You will see an application list Select Operations Plan Region.
The first time you log on, Cognos application will attempt to download 50 components to your computer. This is normal and will take a minute or more to complete depending on your connection. You must have administrator rights on your local computer profile or the download will be refused (see page 1).
IMPORTANT: The first time Enterprise Planner is used on a computer it may take several minutes for the application to load. If you are not able to log on after several minutes then please see the Troubleshooting tips at the Operational Plan Home Page Step 3. The next Welcome screen shows the name of your Program under your responsibility and several status indicators. You can click on the blue triangles for more information on each.
Ownership: Shows the user who last made changes. Currently, only the WO can make changes to the data.
Reviewer: Shows who reviews submissions. When active directory is implemented, the email function can be used to send emails to and from the reviewers.
Step 4. To start reviewing, Click on the “Planning and Evaluation Staff” Worksheet.

Now your sheet should look like this
Scroll down through the program measures to review what has been input by the Washington Office. .
Step 5. Press Submit to approve the numbers.
OR
Press Reject to send the file back to the Regional Director Step 6. Using Annotation. You can use annotation to ‘post notes’ to the worksheet. Annotation is associated with a particular cell. Use Annotation if you want to send a note to the reviewer about a particular measure.
To annotate, right-click while in the cell of interest. Click Annotate>Annotate Cell>Add.
A small window pops up where you can write a note to explain a measure. Different users, including the reviewers, can add annotation to the same worksheet.

A cell that is annotated will show a small red triangle in the upper right corner.
View and Print a Program’s Annotation. Select View>Browse annotation to see all annotation notes submitted by a program or reviewers. You can see annotation from a single sheet or annotation from all sheets.
You may exit Enterprise Planning by closing the browser window “File/Close”.
.
Step-by-Step Instructions for the Deputy Director Reviewer Step 1. Open your web browser (Internet Explorer). Go to http://www.fws.gov/planning/Help/ep_opsplanweb.html. If you know your User-ID, click on the link to Log On to Enterprise Planner. You will be re-directed to the Cognos Server (Cognos is the company that sells the Enterprise Planner software). A logon screen appears. If this is your first time, look up your User-ID on the Ops Plan Web page.

Step 2. You are prompted for your user ID and password. If this is your first log-in, enter your User ID only, skip the Password field and click “Log On.” You will be prompted for a new password. Again, skip over the Current Password (it should be blank), and enter a new password twice (once to confirm). If you can’t log in, contact the Data Administrator (there will be an email link on the Ops Plan home page.
There are no restrictions on your password. Keep it easy to remember and be sure to keep a personal record of your password. Remember, you have only one User ID and Password per program (this will change when Active Directory is implemented)
After log-in, The Welcome Screen appears with your user id in the upper left corner. You will see an application list Select Operations Plan Region.
The first time you log on, Cognos application will attempt to download 50 components to your computer. This is normal and will take a minute or more to complete depending on your connection. You must have administrator rights on your local computer profile or the download will be refused (see page 1).
IMPORTANT: The first time Enterprise Planner is used on a computer it may take several minutes for the application to load. If you are not able to log on after several minutes then please see the Troubleshooting tips at the Operational Plan Home Page Step 3. The next Welcome screen shows the name of your Program under your responsibility and several status indicators. You can click on the blue triangles for more information on each.
Ownership: Shows the user who last made changes. Currently, only the WO can make changes to the data.
Reviewer: Shows who reviews submissions. When active directory is implemented, the email function can be used to send emails to and from the reviewers.

Step 4. To start reviewing, Click on the “Deputy Director” Worksheet.
Now your sheet should look like this
Scroll down through the program measures to review what has been input by the Washington Office. .
Step 5. Press Submit to approve the numbers.
OR
Press Reject to send the file back to PES Step 6. Using Annotation. You can use annotation to ‘post notes’ to the worksheet. Annotation is associated with a particular cell. Use Annotation if you want to send a note to the reviewer about a particular measure.
To annotate, right-click while in the cell of interest. Click Annotate>Annotate Cell>Add.

A small window pops up where you can write a note to explain a measure. Different users, including the reviewers, can add annotation to the same worksheet.
A cell that is annotated will show a small red triangle in the upper right
corner.
View and Print a Program’s Annotation. Select View>Browse annotation to see all annotation notes submitted by a program or reviewers. You can see annotation from a single sheet or annotation from all sheets.
You may exit Enterprise Planning by closing the browser window “File/Close”.
.

Step-by-Step Instructions for the Director Reviewer Step 1. Open your web browser (Internet Explorer). Go to http://www.fws.gov/planning/Help/ep_opsplanweb.html. If you know your User-ID, click on the link to Log On to Enterprise Planner. You will be re-directed to the Cognos Server (Cognos is the company that sells the Enterprise Planner software). A logon screen appears. If this is your first time, look up your User-ID on the Ops Plan Web page.
Step 2. You are prompted for your user ID and password. If this is your first log-in, enter your User ID only, skip the Password field and click “Log On.” You will be prompted for a new password. Again, skip over the Current Password (it should be blank), and enter a new password twice (once to confirm). If you can’t log in, contact the Data Administrator (there will be an email link on the Ops Plan home page.
There are no restrictions on your password. Keep it easy to remember and be sure to keep a personal record of your password. Remember, you have only one User ID and Password per program (this will change when Active Directory is implemented)
After log-in, The Welcome Screen appears with your user id in the upper left corner. You will see an application list Select Operations Plan Region.
The first time you log on, Cognos application will attempt to download 50 components to your computer. This is normal and will take a minute or more to complete depending on your connection. You must have administrator rights on your local computer profile or the download will be refused (see page 1).
IMPORTANT: The first time Enterprise Planner is used on a computer it may take several minutes for the application to load. If you are not able to log on after several minutes then please see the Troubleshooting tips at the Operational Plan Home Page

Step 3. The next Welcome screen shows the name of your Program under your responsibility and several status indicators. You can click on the blue triangles for more information on each.
Ownership: Shows the user who last made changes. Currently, only the WO can make changes to the data.
Reviewer: Shows who reviews submissions. When active directory is implemented, the email function can be used to send emails to and from the reviewers.
Step 4. To start reviewing, Click on the “Director” Worksheet.
Now your sheet should look like this
Scroll down through the program measures to review what has been input by the Washington Office. .

Step 5. Press Submit to approve the numbers.
OR
Press Reject to send the file back to Deputy Director Step 6. Using Annotation. You can use annotation to ‘post notes’ to the worksheet. Annotation is associated with a particular cell. Use Annotation if you want to send a note to the reviewer about a particular measure.
To annotate, right-click while in the cell of interest. Click Annotate>Annotate Cell>Add.
A small window pops up where you can write a note to explain a measure. Different users, including the reviewers, can add annotation to the same worksheet.
A cell that is annotated will show a small red triangle in the upper right
corner.
View and Print a Program’s Annotation. Select View>Browse annotation to see all annotation notes submitted by a program or reviewers. You can see annotation from a single sheet or annotation from all sheets.

You may exit Enterprise Planning by closing the browser window “File/Close”.
.
Terminology The following terms and their meanings will help to eliminate any misunderstandings. Additional details about each of the terms will be described throughout this document where appropriate.
Login – The procedure used to gain access to the application
Cognos Contributor – Part of the Cognos Enterprise Planning Suite of software, Contributor is the name of the software that is used to collect data to populate reports.
Application – The custom designed application used to collect data
Tree – A structure to group items together

e.List Items – An item that appears in a Tree
Table – A space that contains items that are related to each other
User Instructions – Administrator provided guidance for the application
Help – Cognos-provided online help for Contributor functionality
Default Screen – The screen(s) that are displayed when the application is opened
Cube(s) – A multidimensional object containing rows and columns
Tabs – Cubes appear as tabs for easier navigation within the application
Web-client Grid – The user input area within each cube

Dimension – A list of items that are used to create a multidimensional cube
Drop-down – A list that expands when a down-arrow is clicked on
Input Cells – Located within a grid for data entry
Rights – Permissions assigned to a user within the application
Save – A mode to save and store input data
Submit – A mode to submit saved input data to an approver
Reject – A mode for an approver to send an analyst back rights to re-enter data
Print– You can print data either using Excel Print, if enabled by your administrator, or using Contributor Print. Using Excel Print, you can print the current view of Contributor

data using the Microsoft Excel print formatting and preview features. For more information, click online Help at the Cognos Welcome Page (not the Help button while in the worksheet). In Contributor print, only the current tab is printed. To print, click File, Print.
You can set the following print options: • Fit to page width • Fit to page height
Then Click OK Export To Excel – To export the Enterprise Planner data to an Excel spread sheet, simply go to Tools/Excel
Then select
Excel will then launch with the EP data displayed.
Annotations – An application function that allows users to enter comments into the application at the cell level

Toolbar – A collection of actions the user is permitted to perform within the application where the actions are in words across the top of the application as well as corresponding icons located under the words
Terminology In Full Screen Context • When you log on to Contributor, you will see the Workflow Screen which includes A.) all
the areas you are responsible for, and B.) the status of the data.
• Notice the area C.) where User Instructions are displayed. These User Instructions are maintained by the EP Administrator to post important information for Users.

B
CA
The Contributo Workflow Screen The Workflow Screand the Table.
r Web Interface
en appears when you log on to Contributor. It consists of a Tree, e.List item
s,

B
A
Tree
A
C
Ta
The Tree on tcontributing toon your rightsTree, a Table
e.List Items An item in thee.List item in window.
B
C Table The Table onthe item, the cinformation abcan close by reject a subm
ble
• To show modown arrow
he left side of the screen shows the areas that you are responsible for (Contributions) and reviewing (Reviews) in a hierarchical form. Depending , you may see Contributions, Reviews, or both. When you click an item in the with the details for the item appears on the right side of the screen.
Tree or Table is known as an e.List item. Users will click the name of the the Tree or Table to open a web-client grid (data input screen) in a new
the right side of the screen gives informaurrent Owner, the Reviewer, and when tout an item, click the blue down arrow. T
clicking either of the arrows. If you are a itted item from this screen by clicking the
re information about a particular item wi associated with it. This opens a B.) Deta
tion such as the Workflow State of he item last changed. To show more his opens a details panel that you
Reviewer of an e.List item, you can reject button.
thin the Table, click on the A.) blue ils panel specific to that item.

• To send E-Mail, click on the C.) Name of the person in the Ownership column in the table.
• To begin the approval process, click the D.) Name of the e.List item in the table. This will open a web-client grid specific to the e.List item plan in a new window.
1)
D
Web-client A web-client gobject containicalculations. Atheir organizatdefault input s
C
A
Grid (data input screen)
rid is a compilation of cubes relang rows and columns. Cells wit grid is where users will enter, eion(s) and assigned user privilecreen.
B
ted to e.List item. A cube is a multidimensional hin cubes can either contain user entered data or dit, annotate, review, and reject data specific to ges. Below is an example of what is known as the

C
A B
Cubes A
St
Are multidimensional objects containing rows and columns. Cells in cubes can either contain entered data or calculations. A cube corresponds to a tab on the web client grid.
B Dimensions The rows, columns, and pages of a cube are created from dimensions. Dimensions are lists of related items such as Program Types, Years, and Phases.
C Input Cells
Input cells are located within the grid. Users will enter dUsers can also enter and edit data using various commamore information on entering data, refer to the Contributbe accessed by clicking on the Help link located on the Wate Icons and Descriptions
ata into the cells in the grid area. nds such as, copy, paste. For or Browser User Guide which can
orkflow Screen.

List of User IDs user IDs are posted on the Ops Plan web site http://www.fws.gov/planning/Help/ep_opsplanweb.html
Phase Definitions
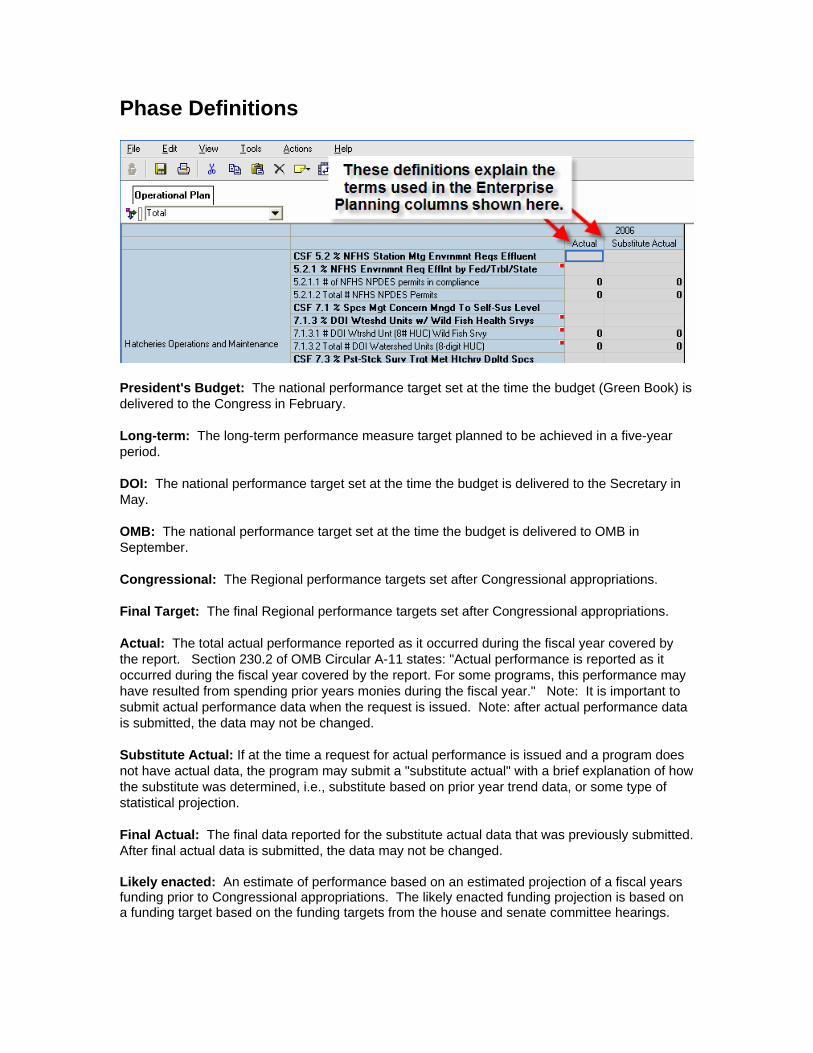
President's Budget: The national performance target set at the time the budget (Green Book) is delivered to the Congress in February. Long-term: The long-term performance measure target planned to be achieved in a five-year period. DOI: The national performance target set at the time the budget is delivered to the Secretary in May. OMB: The national performance target set at the time the budget is delivered to OMB in September. Congressional: The Regional performance targets set after Congressional appropriations. Final Target: The final Regional performance targets set after Congressional appropriations. Actual: The total actual performance reported as it occurred during the fiscal year covered by the report. Section 230.2 of OMB Circular A-11 states: "Actual performance is reported as it occurred during the fiscal year covered by the report. For some programs, this performance may have resulted from spending prior years monies during the fiscal year." Note: It is important to submit actual performance data when the request is issued. Note: after actual performance data is submitted, the data may not be changed. Substitute Actual: If at the time a request for actual performance is issued and a program does not have actual data, the program may submit a "substitute actual" with a brief explanation of how the substitute was determined, i.e., substitute based on prior year trend data, or some type of statistical projection. Final Actual: The final data reported for the substitute actual data that was previously submitted. After final actual data is submitted, the data may not be changed. Likely enacted: An estimate of performance based on an estimated projection of a fiscal years funding prior to Congressional appropriations. The likely enacted funding projection is based on a funding target based on the funding targets from the house and senate committee hearings.

Hierarchy / Timeline for Operational Plan WO
Operational Plan WO
Phase 1 DOI (4/1/YY-5/1/YY)
Start Date End Date R9 Program 4/1/YY 4/14/YY
PES/ Deputy Director/ Director
4/17/YY 5/1/YY
Phase 2 OMB (7/1/YY-9/1/YY)
Start Date End Date R9 Program 7/1/YY 7/31/YY
PES/ Deputy Director/ Director
8/1/YY 9/1/YY
Phase 3 Congressional (12/1/YY-2/1/YY)
Start Date End Date R9 Program 12/1/YY 1/13/YY
PES/ Deputy Director/ Director
1/16/YY 2/1/YY

Hierarchy / Timeline for Operational Plan Regions Operational Plan Regions
Acutals / Substitute Actuals (9/15/YY-10/2/YY)
Start Date End Date R9 Program 9/18/YY 10/02/YY
ARD /(RD/AD) 10/02/YY 10/05/06 PES/ Deputy Director/
Director 10/05/06 10/06/YY

Final Actuals / Next Year Targets (10/15/YY-12/1/YY) Start Date End Date
R9 Program 10/15/YY 10/31/YY ARD /(RD/AD) 11/1/YY 11/13/YY
PES/ Deputy Director/ Director
11/30/YY 12/1/YY
Data Submission R9 Contributors will submit their hand entered data to Regional ARDs for review. The data in the Operational Plan must agree with the data in the various program's databases, i.e., ECOS, TESS, FIS, Habits, Refuge Annual Performance Plan (RAAP), etc.