fmj pi e - arcam manual/p1e_manual.pdf · 2 3 english using this handbook thank you for buying this...
TRANSCRIPT

Pre Amplifier C30Power Amplifier P35Power Amplifier P1
Préamplificateur C30Amplificateur de Puissance P35Amplificateur de Puissance P1
Vorverstärker C30Vollverstärker P35Vollverstärker P1

22 3
En
gli
sh
Safety guidelines
CAUTION: To reduce the risk of electric shock, do not remove cover (or back). No user serviceable parts inside. Refer servicing to qualified service personnel.
WARNING: To reduce the risk of fire or electric shock, do not expose this apparatus to rain or moisture.
The lightning flash with an arrowhead symbol within an equilateral triangle, is intended to alert the user to the presence of uninsulated ‘dangerous voltage’ within the product’s enclosure that may be of sufficient magnitude to constitute a risk of electric shock to persons.
The exclamation point within an equilateral triangle is intended to alert the user to the presence of important operating and maintenance (servicing) instructions in the literature accompanying the product.
CAUTION: In Canada and the USA, to prevent electric shock, match the wide blade of the plug to the wide slot in the socket and insert the plug fully into the socket.
IMPORTANT SAFETY INSTRUCTIONS
This product is designed and manufactured to meet strict quality and safety standards. However, you should be aware of the following installation and operation precautions:
1. Take heed of warnings and instructions
You should read all the safety and operating instructions before operating this appliance. Retain this handbook for future reference and adhere to all warnings in the handbook or on the appliance.
2. Water and moisture
The presence of electricity near water can be dangerous. Do not use the appliance near water – for example next to a bathtub, washbowl, kitchen sink, in a wet basement or near a swimming pool, etc.
3. Object or liquid entry
Take care that objects do not fall and liquids are not spilled into the enclosure through any openings. Liquid filled objects such as vases should not be placed on the equipment.
4. Ventilation
Do not place the equipment on a bed, sofa, rug or similar soft surface, or in an enclosed bookcase or cabinet, since ventilation may be impeded. We recommend a minimum distance of 50mm (2 inches) around the sides and top of the appliance to provide adequate ventilation.
5. Heat
Locate the appliance away from naked flames or heat producing equipment such as radiators, stoves or other appliances (including other amplifiers) that produce heat.
6. Climate
The appliance has been designed for use in moderate climates.
7. Racks and stands
Only use a rack or stand that is recommended for use with audio equipment. If the equipment is on a portable rack it should be moved with great care, to avoid overturning the combination.
8. Cleaning
Unplug the unit from the mains supply before cleaning.
The case should normally only require a wipe with a soft, damp, lint-free cloth. Do not use paint thinners or other chemical solvents for cleaning.
We do not advise the use of furniture cleaning sprays or polishes as they can cause indelible white marks if the unit is subsequently wiped with a damp cloth.
9. Power sources
Only connect the appliance to a power supply of the type described in the operating instructions or as marked on the appliance.
10. Power-cord protection
Power supply cords should be routed so that they are not likely to be walked on or pinched by items placed upon or against them, paying particular attention to cords and plugs, and the point where they exit from the appliance.
11. Grounding
Ensure that the grounding means of the appliance is not defeated.
12. Power lines
Locate any outdoor antenna/aerial away from power lines.
13. Non-use periods
If the unit has a standby function, a small amount of current will continue to flow into the equipment in this mode. Unplug the power cord of the appliance from the outlet if left unused for a long period of time.
14. Abnormal smell
If an abnormal smell or smoke is detected from the appliance, turn the power off immediately and unplug the unit from the wall outlet. Contact your dealer immediately.
15. Servicing
You should not attempt to service the appliance beyond that described in this handbook. All other servicing should be referred to qualified service personnel.
16. Damage requiring service
The appliance should be serviced by qualified service personnel when:
A. the power-supply cord or the plug has been damaged, or
B. objects have fallen, or liquid has spilled into the appliance, or
C. the appliance has been exposed to rain, or
D. the appliance does not appear to operate normally or exhibits a marked change in performance, or
E. the appliance has been dropped or the enclosure damaged.
SAFETY COMPLIANCE
This product has been designed to meet the IEC 60065 international electrical safety standard.
RISQUE DE CHOC ELECTRIQUENE PAS OUVRIR
ATTENTIONCAUTIONRISK OF ELECTRIC
SHOCK DO NOT OPEN

22 3
En
gli
sh
Using this handbook
Thank you for buying this quality Arcam product.
This handbook is for the following items:
C30 pre-amplifier
P35 power amplifier
P1 power amplifier.
The handbook is designed to give you all the information you need to install and use these products. The C30 is described first, followed by the P35 and the P1. Use of the CD-389 remote control supplied with the C30 is also described.
If your amplifier(s) have been installed and set-up by an authorised Arcam dealer, you may wish to go directly to the sections on how to use this equipment. Otherwise we recommend reading the installtion instructions carefully for your product before proceeding.
SAFETYSafety guidelines are set out on the page 4 of this handbook.
Many of these items are common sense precautions, but for your own safety, and to ensure that you do not damage the unit, we strongly recommend that you read them.
OTHER LANGUAGESIf you would like this handbook in another language, either visit our web-site (www.arcam.co.uk), or ask your dealer. Most of our handbooks are available in a number of different languages.
CONTENTS
Safety guidelines ............................................................................. 2Important safety instructions ...........................................................2Safety compliance...................................................................................2
Using this handbook...................................................................... 3
Installation: C30 pre-amplifier..................................................... 4Positioning the unit ................................................................................4Connecting to a power supply .......................................................4Power amplifier connection ............................................................4Connecting to other equipment....................................................5Front panel controls..............................................................................6
Using your C30 pre-amplifier ..................................................... 6Recording ....................................................................................................7
Setting up your C30 pre-amplifier ............................................. 8
Using the remote control ............................................................ 9
Installation: P35 and P1 power amplifiers...............................10Positioning the unit ............................................................................. 10Connecting to a power supply .................................................... 10Connecting to other equipment................................................. 11Connecting loudspeakers................................................................ 11Remote switching ................................................................................ 11Three channel option (P35 only) ............................................... 11
Using your power amplifier.......................................................12
Bi-wiring and bi-amping loudspeakers.....................................13Before you start ................................................................................... 13Bi-wiring your loudspeakers .......................................................... 13Bi-amping your system...................................................................... 13
Technical specifications...............................................................14
Remote-control codes ...............................................................15
Guarantee......................................................................................16
Service information .....................................................................16On-line registration ............................................................................ 16
44 5
En
gli
sh
POSITIONING THE UNIT
Place your amplifier on a level, firm surface.
Avoid placing the unit in direct sunlight or near sources of heat or damp.
Ensure adequate ventilation. Do not place the unit in an enclosed space such as a bookcase or cabinet as both of these will impede air flow through the unit.
CONNECTING TO A POWER SUPPLY
MAINS LEAD
The appliance is normally supplied with a moulded mains plug already fitted to the lead. If for any reason the plug needs to be removed, it must be disposed of immediately and securely, as it is a potential shock hazard when inserted into the mains socket. Contact your Arcam dealer if you need a new mains lead.
WRONG PLUG?Before plugging in, check that the plug supplied with the unit fits your supply and that your mains supply voltage agrees with the voltage setting (115V or 230V) indicated on the rear panel of the unit 2.
If your mains supply voltage or mains plug is different, consult your Arcam dealer.
This product must be earthed.
PLUGGING INPush the plug (IEC line socket) of the power cable supplied with the unit into the socket (POWER INLET) 1 in the back of the unit. Make sure it is pushed in firmly.
Put the plug on the other end of the cable into your power supply socket and switch the socket on.
STAND-BY POWERFor remote stand-by operation, the amplifier’s control power supply is kept powered up all the time the unit is connected to the mains supply. The front panel power switch powers down all other circuitry. Power consumption in this mode is less than 2W.
This means that even though the power switch is off, it may be possible to hear a slight residual hum coming from the mains transformer inside
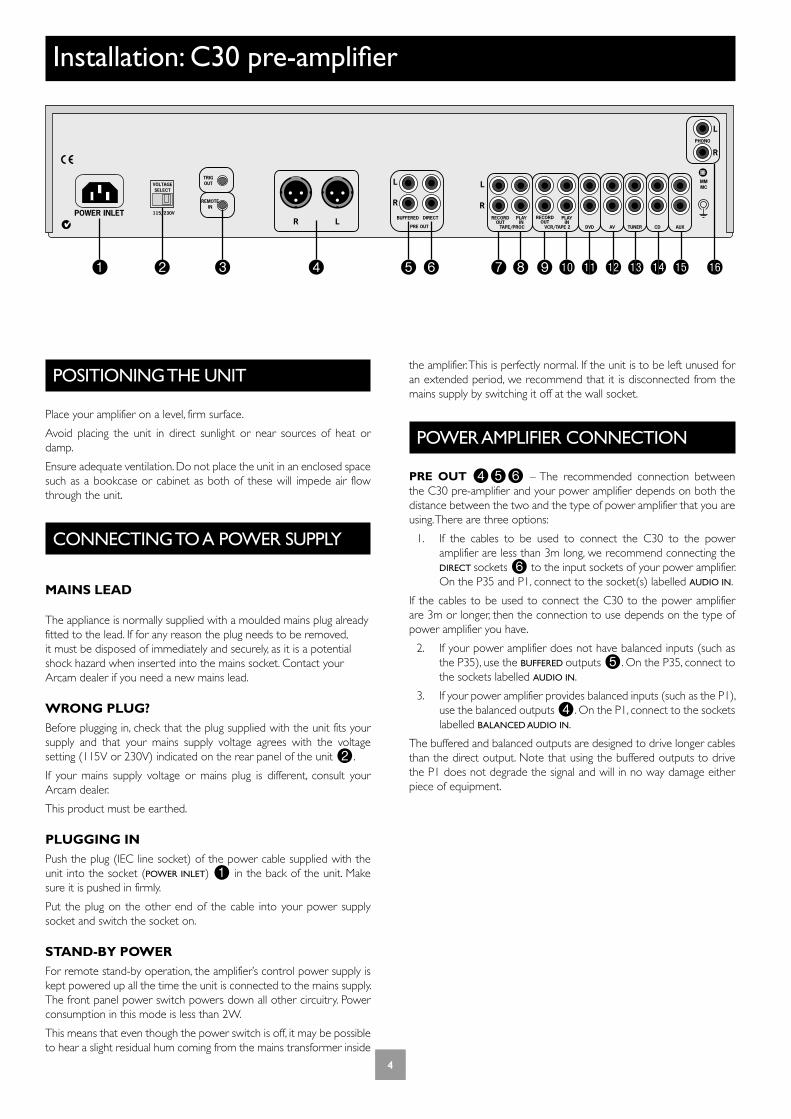
Installation: C30 pre-amplifier
LR
PHONO
POWER INLET
PRE OUT
BUFFERED
L
R
L
R
L
R
VOLTAGESELECT
RECORDOUT
PLAYIN
TAPE/PROC
RECORDOUT
PLAYIN
VCR/TAPE 2 DVD AV TUNER CD AUX
MMMC
REMOTEIN
TRIGOUT
115/230VDIRECT
the amplifier. This is perfectly normal. If the unit is to be left unused for an extended period, we recommend that it is disconnected from the mains supply by switching it off at the wall socket.
POWER AMPLIFIER CONNECTION
PRE OUT 456 – The recommended connection between the C30 pre-amplifier and your power amplifier depends on both the distance between the two and the type of power amplifier that you are using. There are three options:
1. If the cables to be used to connect the C30 to the power amplifier are less than 3m long, we recommend connecting the DIRECT sockets 6 to the input sockets of your power amplifier. On the P35 and P1, connect to the socket(s) labelled AUDIO IN.
If the cables to be used to connect the C30 to the power amplifier are 3m or longer, then the connection to use depends on the type of power amplifier you have.
2. If your power amplifier does not have balanced inputs (such as the P35), use the BUFFERED outputs 5. On the P35, connect to the sockets labelled AUDIO IN.
3. If your power amplifier provides balanced inputs (such as the P1), use the balanced outputs 4. On the P1, connect to the sockets labelled BALANCED AUDIO IN.
The buffered and balanced outputs are designed to drive longer cables than the direct output. Note that using the buffered outputs to drive the P1 does not degrade the signal and will in no way damage either piece of equipment.
44 5
En
gli
sh
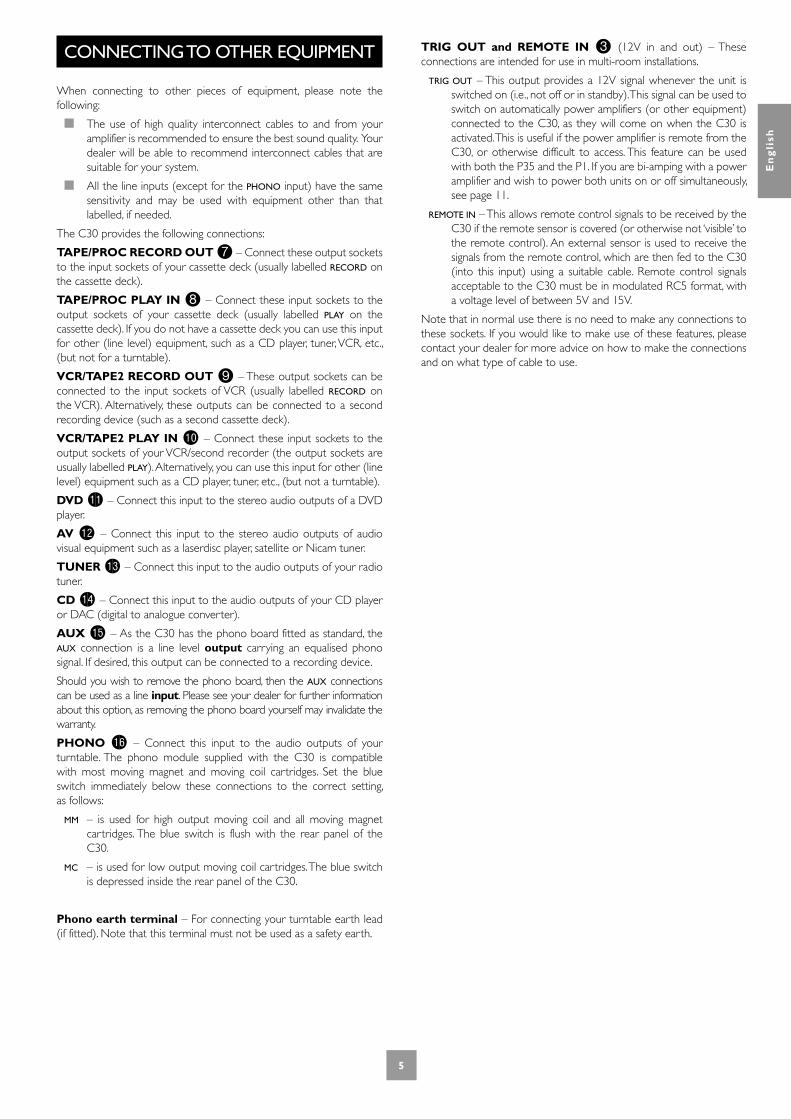
CONNECTING TO OTHER EQUIPMENT
When connecting to other pieces of equipment, please note the following:
The use of high quality interconnect cables to and from your amplifier is recommended to ensure the best sound quality. Your dealer will be able to recommend interconnect cables that are suitable for your system.
All the line inputs (except for the PHONO input) have the same sensitivity and may be used with equipment other than that labelled, if needed.
The C30 provides the following connections:
TAPE/PROC RECORD OUT 7 – Connect these output sockets to the input sockets of your cassette deck (usually labelled RECORD on the cassette deck).
TAPE/PROC PLAY IN 8 – Connect these input sockets to the output sockets of your cassette deck (usually labelled PLAY on the cassette deck). If you do not have a cassette deck you can use this input for other (line level) equipment, such as a CD player, tuner, VCR, etc., (but not for a turntable).
VCR/TAPE2 RECORD OUT 9 – These output sockets can be connected to the input sockets of VCR (usually labelled RECORD on the VCR). Alternatively, these outputs can be connected to a second recording device (such as a second cassette deck).
VCR/TAPE2 PLAY IN bk – Connect these input sockets to the output sockets of your VCR/second recorder (the output sockets are usually labelled PLAY). Alternatively, you can use this input for other (line level) equipment such as a CD player, tuner, etc., (but not a turntable).
DVD bl – Connect this input to the stereo audio outputs of a DVD player.
AV bm – Connect this input to the stereo audio outputs of audio visual equipment such as a laserdisc player, satellite or Nicam tuner.
TUNER bn – Connect this input to the audio outputs of your radio tuner.
CD bo – Connect this input to the audio outputs of your CD player or DAC (digital to analogue converter).
AUX bp – As the C30 has the phono board fitted as standard, the AUX connection is a line level output carrying an equalised phono signal. If desired, this output can be connected to a recording device.
Should you wish to remove the phono board, then the AUX connections can be used as a line input. Please see your dealer for further information about this option, as removing the phono board yourself may invalidate the warranty.
PHONO bq – Connect this input to the audio outputs of your turntable. The phono module supplied with the C30 is compatible with most moving magnet and moving coil cartridges. Set the blue switch immediately below these connections to the correct setting, as follows:
MM – is used for high output moving coil and all moving magnet cartridges. The blue switch is flush with the rear panel of the C30.
MC – is used for low output moving coil cartridges. The blue switch is depressed inside the rear panel of the C30.
Phono earth terminal – For connecting your turntable earth lead (if fitted). Note that this terminal must not be used as a safety earth.
TRIG OUT and REMOTE IN 3 (12V in and out) – These connections are intended for use in multi-room installations.
TRIG OUT – This output provides a 12V signal whenever the unit is switched on (i.e., not off or in standby). This signal can be used to switch on automatically power amplifiers (or other equipment) connected to the C30, as they will come on when the C30 is activated. This is useful if the power amplifier is remote from the C30, or otherwise difficult to access. This feature can be used with both the P35 and the P1. If you are bi-amping with a power amplifier and wish to power both units on or off simultaneously, see page 11.
REMOTE IN – This allows remote control signals to be received by the C30 if the remote sensor is covered (or otherwise not ‘visible’ to the remote control). An external sensor is used to receive the signals from the remote control, which are then fed to the C30 (into this input) using a suitable cable. Remote control signals acceptable to the C30 must be in modulated RC5 format, with a voltage level of between 5V and 15V.
Note that in normal use there is no need to make any connections to these sockets. If you would like to make use of these features, please contact your dealer for more advice on how to make the connections and on what type of cable to use.

66 7
En
gli
sh
Using your C30 pre-amplifier
FRONT PANEL CONTROLS
This section describes how to operate your amplifier.
If your amplifier has not been installed for you, you should first read the section ‘Installation: C30 pre-amplifier’ on page 5.
POWER bnSwitches the unit on and off.
The power indicator light (directly above the switch) shows the status of the amplifier. A red light means the amplifier is in stand-by mode (press the POWER/STANDBY button on the remote control, or the POWER button on the front panel, to switch between stand-by and powered-up modes).
Remote control receiver 1The remote control’s infrared receiver is positioned behind the ‘FMJ’ badge. Ensure the receiver is in a clear line of sight from the remote control to allow signals to be received.
MODE 2, UP and DOWN 5
These buttons are intended for use with any future optional modules that may become available for the C30. The UP and DOWN buttons, however, are used with the existing C30 pre-amplifier to move the cursor when customising the ‘Welcome message’ (see page 9).
Control knob 7, SELECT 4 and ENTER 6The control knob has two functions:
as a volume control, to adjust the output of the headphones and of the pre-amp output (PRE OUT).
when used in conjunction with the SELECT and ENTER buttons, to customise amplifier settings (see page 9).
VOLUME CONTROL SETTINGSIt is important to realise that volume level shown on the display is not an accurate indication of the power delivered to your loudspeakers. The amplifier often delivers its full power long before the volume control reaches its maximum position, particularly when listening to heavily recorded compact discs. However the amplifier also has to be capable of giving full power output from much lower level sources, such as tuners and cassette decks. Using these sources, the volume control setting may be much higher before distortion (audible overload) sets in.
It is possible to compensate for these input level differences by using the ‘Input trims’ menu item. See page 9 for further details on how to do this. Adjusting the input levels of each source individually will help to avoid accidental overload.
Source selectors 8
These buttons select the source connected to the corresponding input. A light above the relevant button indicates which input is currently selected and it will also usually be shown on the display. See page 6 for more information on connecting audio sources to the C30.
TONE 9Switches the tone circuits on and off, including settings for individual sources. Note that the tone LED does not light unless a tone setting has been made. See page 9 for further information on the tone controls.
MUTE bk Silences all main analogue outputs when selected.
DISPLAY bl This switches the display brightness between Off/Dim/Bright. This is provided to set the display brightness to a level that is comfortable for you. Switching the display off may give a small improvement in sound quality.
PHONES bmThis 1/4-inch stereo jack plug socket accepts headphones with an impedance rating between 32Ω and 600Ω.
The headphone socket is always active. To avoid possible damage, always disconnect headphones prior to switching the amplifier on or off.
C30 PRE-AMPLIFIER
MUTE DISPLAY POWERPHONESPHONO/AUX CD TUNER AV DVD VCR TAPE TONE
ENTER
MODE RECORD SELECT

66 7
En
gli
sh
RECORDING
With the C30 it is possible to listen to and record from one source, or to listen to one source while recording another.
Both sets of tape sockets are identical in sensitivity and suitable for use with almost any type of recorder (cassette, CDR, MD, VCR, reel-to-reel, etc.). The record signal is sent to both the TAPE and VCR output sockets.
RECORD 3To record the currently selected source, press RECORD until the display shows ‘RECORD SOURCE’. After a few seconds the display reverts to showing the volume level and you are ready to record.
To listen to one source while recording another, press RECORD again until the display shows ‘RECORD’ followed by the name of an input (e.g. ‘AUX’, ‘CD’, ‘TUNER’, etc.). Now press the source selector button on the front panel for the source you wish to record. Your selection is shown on the display for a few seconds, after which it reverts to showing the volume level and you are ready to record.
The RECORD button can also be used as a second zone selector, sending a source signal at line level to a second amplifier operating in another room. If you need help with this, contact your Arcam dealer or Arcam customer support.
TAPE-TO-TAPE COPYING (DUBBING)You can perform tape dubbing from VCR to TAPE, but not from TAPE
to VCR.
For example, to copy from a cassette recorder connected to the VCR/
TAPE2 socket to a cassette recorder connected to the TAPE socket, first use the RECORD button as explained above and select ‘RECORD VCR’. This routes the VCR signal to the TAPE output.
Set the cassette recorder connected to the TAPE socket into its record mode and the other to playback mode to start dubbing.
TAPE 8To play back the recording from a cassette deck attached to the TAPE input, press TAPE. ‘TAPE’ is shown on the display. Selecting this input overrides the other source selectors.
It is also possible to monitor a recording while it is being made, provided your cassette deck is a 3-head type. To do this, press TAPE. Pressing this button on/off allows an A/B comparison between the source signal and the recorded signal.

88 9
En
gli
sh
Setting up your C30 pre-amplifier
LEFT RIGHT
–dB +dB
–dB +dB
‘Switch on’state
–dB +dB
Volume Resolution – Standard, fine or Reference. ‘Standard’ and ‘Fine’ represent different levels of volume control sensitivity. The ‘Reference’ setting gives absolute increments in 0.5dB steps.
Volume display mode – graphic or numeric shows the volume either as a bar graph or as a number. If Volume resolution is set to ‘Reference’ a numeric volume display shows the actual decibel figure.
Input Trims – use the source select buttons and Control knob to set input trims for each source. Input trims are used to compensate for variations in output levels of different source equipment.
Max. ‘On’ Volume – This can be used to limit the maximum volume the amplifier operates at when it is first switched on. The system comes on at this volume if the last used volume exceeds this value. If this is set to ‘Disabled’, the amplifier comes on at the last used volume.
Tone Control – Global or Per source. This specifies the scope of changes for ‘Bass’ and ‘Treble’ tone settings. The default setting is ‘Global’ which affects all inputs equally. ‘Per source’ allows you to set tone controls for individual inputs: once set, the amplifier remembers tone settings for each input.
Processor Mode – This mode enables you to adjust the gain of the amplifier. The amplifier can then be used to drive the front left and right speakers in a surround sound system when fed from a separate processor. The volume of the entire system can then be controlled using the processor. Feed the sound from the processor into the TAPE input. Set the gain to match the amplifiers that drive your other loudspeakers.
Welcome message – You can change the power on ‘Welcome message’ from ‘Arcam Amp’ to display your name, postcode, etc. When customising the message, use the UP and DOWN buttons to select the cursor position and the Control knob to change the letter.
Phono/Aux Text – The C30 is fitted with a phono module, so when the phono input is selected as the source, ‘PHONO’ is displayed. Should you wish to remove the phono board, then the AUX connections can be used as a line input. In this case, change the text displayed to ‘AUX’, using this menu option.
Restore Settings – this restores all amplifier settings, including input trims and the welcome message, to their factory defaults.
INTRODUCTIONThe C30 allows you to adjust listening settings to suit your taste, and to customize various features of the amplifier to fit your system. Use this diagram to help you navigate through the settings available.
The ENTER and SELECT buttons from the front panel are represented in the
diagram by the symbols and respectively.
The Control knob is shown as .
ADJUSTING LISTENING SETTINGSThe default display mode is VOLUME, where the Control knob is used to adjust the sound level.
Press SELECT once to enter edit mode, then repeatedly to cycle through the other sound settings: BALANCE, BASS and TREBLE. When a setting is selected (shown on the display), it can be adjusted by using the control knob. Press ENTER
to store the change you have made and return to default (volume) mode, or press SELECT again to move to the next setting.
CUSTOMISING AMPLIFIER SETTINGSIt is possible to customise (change to your preference) many of the features of the C30. To do this, proceed as follows:
1. Press SELECT repeatedly until the display shows ‘CUSTOMISE->’;
2. Rotate the Control knob to choose which setting you wish to alter;
3. Press SELECT to adjust the chosen setting with the Control knob;
4. Press ENTER to confirm the adjustment, or press SELECT to confirm the adjustment and move on to the next item.
Press ENTER twice to leave the Customise menu.

88 9
En
gli
sh
Using the remote control
NOTE
Remember to install the two AAA batteries supplied before trying to use your remote control.
Do not place anything in front of the FMJ badge on the top left of the C30 (where the IR receiver is located), or the remote control may not work.
CR-389 Remote Control
The CR-389 remote control gives access to all functions available on the front panel of the C30. It also has controls to operate Arcam CD players, AM/FM tuners and DAB tuners. The remote control transmits Philips RC-5 type codes.
FM DAB
PROG DISP
RPT
MODE BAND
1-9 2-10 3-11
FMDAB
SEL
TUNER
CR-389
CD
AMPLIFIER
VCRDVD TAPEAV
TUNERCDAUXPHONO
ENTER
SP1
SP2 DISP
MENU DISP
4-12
5-13 6-14 7-15 8-16
TUNER
These buttons are used to control tuner functions.
Note that the FM/DAB lights indicate into which mode you are switching the remote control. The lights only illuminate for five
seconds to conserve battery power. If neither light is illuminated this does not mean that the
remote control is not working!
(UP and DOWN)
Perform the same function as the buttons on the front panel (see page 7).
SELECT
Performs same function as the SELECT button on the front panel. It allows you to use the remote’s volume switch in the
same way you use the control dial on the front panel – to adjust various amplifier settings (see page 7).
Note that pressing + corresponds to turning theControl knob clockwise, – to anticlockwise.
ENTER
Performs the same function as the ENTER button on the front panel (see page 7).
Source selection buttons
These operate in the same way as the source selectors on the front panel of your C30.
Power/Stand-by
Toggles the amplifier between stand-by mode and full power mode. The power indicator light next to the power button on the front panel is red if the amplifier is in stand-by, amber while the amplifier is powering up (this only takes a few seconds) and green when the amplifier is powered up.
SP1 and SP2
These buttons are for use with the P35 amplifier, to allow you to select and deselect the main (SP1) and secondary (SP2) sets of speakers attached to it (see page 13 for further information).
DISP (display)
Cycles through the settings ‘Off ’, ‘Dim’ and ‘Bright’. Turning the display ‘Off ’ may give a slight improvement in sound quality.
Volume and (mute)
Press + to increase volume or – to decrease the output volume of the amplifier.
Press to mute the pre-amp outputs of the C30. Note that both tape outputs and the headphone socket will remain active. Mute is disabled either by pressing again, or by adjusting the volume.
You can use the remote’s volume control in conjunction with the SELECT button to adjust balance, tone and amplifier settings.
CD controls
These offer basic control of Arcam CD players

1010 11
En
gli
sh
POWER INLET OUT
VOLTAGESELECT
230V
GAIN XLR/PHONO
TRIGOUT
REMOTEIN
4 – 16 OHMS
–+SPEAKERS
–+
AUDIOIN
P1
ARCAM
XLR
PHONO
BALANCED AUDIO
OUT IN
Installation: P35 and P1 power amplifiers
POSITIONING THE UNIT
Place your amplifier on a level, firm surface.
Avoid placing the unit in direct sunlight or near sources of heat or damp.
Ensure adequate ventilation. Do not place the unit in an enclosed space such as a bookcase or cabinet as both of these will impede air flow through the unit, which is necessary for cooling.
CONNECTING TO A POWER SUPPLY
MAINS LEADThe appliance is normally supplied with a moulded mains plug already fitted to the lead. If for any reason the plug needs to be removed, it must be disposed of immediately and securely, as it is a potential shock hazard when inserted into the mains socket. Should you require a new mains lead, contact your Arcam dealer.
WRONG PLUG?Check that the plug supplied with the unit fits your supply and that your mains supply voltage agrees with the voltage setting (115V or 230V) indicated on the rear panel of the unit before plugging in.
If your mains supply voltage or mains plug is different, consult your Arcam dealer.
This product must be earthed.
PLUGGING INPush the plug (IEC line socket) of the power cable supplied with the unit into the socket (POWER INLET) in the back of the unit. Make sure it is pushed in firmly.
Put the plug on the other end of the cable into your power supply socket and switch the socket on.
STAND-BY POWERFor remote stand-by operation, the amplifier’s control power supply is kept powered up all the time the unit is connected to the mains supply. The front panel power switch powers down all other circuitry. Power consumption in this mode is less than 2W.
This means that even though the power switch is off, it may be possible to hear a slight residual hum coming from the mains transformer inside the amplifier. This is perfectly normal. If the unit is to be left unused for an extended period, we recommend that it is disconnected from the mains supply by switching it off at the wall socket
IMPORTANT:
Ensure that the amplifier is switched off before attempting to connect the speakers, and check carefully any connections made before turning the unit back on.
P35 POWER AMPLIFIER: REAR PANEL
P1 POWER AMPLIFIER: REAR PANEL
+ R/CH1 –
CTR/CH3
SP1
SP2
POWER INLET OUTIN
L
R
VOLTAGESELECT
230V
4 – 16 OHMS
+ L/CH2 –
+ R/CH1 – + L/CH2 –
AUDIO
SP1
SP2
4 – 16 OHMS
+ CTR/CH3 –
+ CTR/CH3 –
AUDIOIN
OUT
LINK
REMOTEIN
TRIGOUT
Optional Third Channel Module – provides a third 90W channel suitable for Home Cinema or multi-channel audio use.

1010 11
En
gli
sh
CONNECTING TO OTHER EQUIPMENT
The P35 and P1 amplifiers provide the following connections:
AUDIO IN (P35)AUDIO IN and BALANCED AUDIO IN (P1)
Connect one of these inputs to the output sockets of your pre-amplifier or the PRE OUT sockets of an integrated amplifier. Please read the notes on page 5, which give information on the type of connection that should be used to connect your pre-amplifier and power amplifier together.
MONO LINK (P35) – The P35 power amplifier can be adapted to provide two mono loudspeaker outputs from a single input. Pull out the link supplied and use it to connect the L and R AUDIO OUT sockets together. Using one power amplifier per loudspeaker will enable you to bi-amplify bi-wireable loudspeakers. This is particularly beneficial for top quality stereo installations with a separate pre-amplifier, or where amplifiers are provided for the left, centre and right channel loudspeakers in a five speaker Dolby Pro Logic or Dolby Digital system.
If you wish to take advantage of this feature, please contact your Arcam dealer for more information.
INPUT SELECTOR SWITCH (P1) – This switch allows either unbalanced signals (through the phono connector) or balanced signals (through the XLR connector) to be selected. The switch should be pressed in to select the phono inputs and out to select the XLR connector. Note that only one type of input connector will be switched to the input of the amplifier ; if you select (for example) the XLR connector, then you will not be able to hear signals connected to the phono inputs.
AMPLIFIER GAIN SWITCH (P1) – This switch is to allow the gain of the P1 amplifier to be changed to suit your system requirements. Two settings are available: with the switch in the IN position the gain is set to standard ARCAM gain of 31.5dB. This allows the P1 to be used in systems where there are other ARCAM power amplifiers. When the switch is set to OUT then the gain is set to ‘THX standard gain’. In this mode it can be used in systems containing amplifiers with THX gain (for example, the P7).
DAISY CHAININGBoth the P35 and the P1 can also be connected to further power amplifiers to drive more speakers (e.g., those in other rooms or tri-amplified speakers, etc). This technique is called ‘Daisy chaining’.
To daisy chain power amplifiers, connect the AUDIO OUT sockets on the power amplifier to the input of the extra power amplifier – left to left and right to right.
CONNECTING LOUDSPEAKERS
The red and black terminals on the back of the amplifiers are used to make the connections to the loudspeakers. It is possible to connect two pairs of speakers; the pair designated “speaker 1” (SP1) are connected to the lower set of terminals, while the pair designated “speaker 2” (SP2) are connected to the upper set of terminals.
When connecting the speaker terminals of the amplifier with the terminals on the speakers make sure that like polarities are matched (i.e., match “+” with “+” (usually red) and “–” with “–” (usually black)). Mismatching of polarities will result in a weak central sound, unclear orientation of the instruments and the sense of direction of the stereo being impaired.
There are two options for connecting the speaker cable to the amplifier :
USING BARE WIRE ENDED LEADS:1. Strip back the insulation on the wire to reveal about 2cm of
conductor (the metal inside the cable).
2. If the conductor is stranded, twist the strands together tightly to avoid loose strands making contact with the adjacent terminals or the back panel.
3. Loosen the terminal by turning it anti-clockwise
4. Insert the twisted wire through the hole in the terminal.
5. Tighten by turning clockwise.
When making connections with stranded bare ended wires, take great care that no individual strands of wire come into contact with the adjacent terminals or with the back panel. If this should happen, it will cause a short circuit on the output of the amplifier and could damage the amplifier.
USING SPADE TERMINALS:1. Loosen the terminal by turning it anti-clockwise
2. Insert the spade connecter under the terminal.
3. Tighten by turning clockwise.
REMOTE SWITCHING
By making a connection from the TRIG OUT socket of the C30 pre-amplifier to the REMOTE IN socket of the P35/P1 power amplifier, you can use the C30 to switch the power amplifier on and off. If configured in this way, the front panel POWER button of the C30 (or the POWER/
STANDBY button on the remote control) switches both amplifiers on and off together. This facility allows you to conceal the power amplifier yet still control it.
The connecting cable required is a 3.5mm to 3.5mm jack lead (stereo or mono) and it is possible to connect several power amplifiers to C30 by ‘daisy chaining’ from TRIG OUT of one P35/P1 into the REMOTE IN of the next.
THREE CHANNEL OPTION (P35 ONLY)
The P35 power amplifier can be upgraded from stereo to three channels by adding a “third channel module”. (If this is performed, the model is called the P35/3.)
The module offers extra loudspeaker terminals together with a third set of AUDIO IN and OUT phono sockets and converts the P35 into a 3 x 90W (RMS per channel into 8Ω) amplifier suitable for Home Cinema or multi-channel audio use (such a unit may be used to amplify left, right and centre channels in a multi-channel system, for example).
If you wish to take advantage of this feature, please contact your Arcam dealer for more information.

1212 13
En
gli
sh
Using your power amplifier
POWER (AND POWER INDICATOR LIGHT)This button switches the unit on and off. The light indicates the status of the amplifier.
When you switch your amplifier on, the light glows amber for a few seconds, during which time the speakers are disconnected. The light changes to green when the amplifier is ready for use. A red light means the amplifier is in standby mode.
FAULT INDICATIONSThe power light may flash if a fault has occurred, with the colour of the flashing light indicating the nature of the fault:
green – a D.C. offset fault has occured
amber – a thermal fault has occured (the P35/P1 is too hot)
red – a short circuit fault has occured (this can happen if the speaker cables are not connected correctly and are making contact with each other or with the chassis)
red and amber – more than one fault has occured.
Except for a thermal fault, if one of the above faults is detected by your amplifier the unit waits for six seconds before checking to see if the fault has cleared. If the fault clears within six seconds, then the unit continues operation; otherwise the unit shuts itself down. In the case of a thermal fault, the unit waits until its sensor temperature lowers before resuming operation.
If the amplifier has shut itself down, you should unplug the amplifier and leave it for a few minutes before reconnecting. If the fault cannot be cleared, unplug your amplifier and contact your Arcam dealer.
P35 POWER AMPLIFIER
SP1 SP2 POWER
NOTE: If both lights are out the amplifier will appear not to work, as all speakers are switched off.
SP1 AND SP2 (P35 ONLY)These buttons allow you to switch on and off the main (SP1) and secondary (SP2) sets of speakers attached to your amplifier. If the indicator light (the light above the switch) is on, it shows that the output for the speaker is switched on. If no secondary set of speakers is connected, we recommend that this output be switched off.
P1 POWER AMPLIFIER
POWER
P35 POWER AMPLIFIER: FRONT PANEL
P1 POWER AMPLIFIER: FRONT PANEL
1212 13
En
gli
sh
Bi-wiring and bi-amping loudspeakers
BEFORE YOU START
WARNING: Do not make any connections to your amplifier while it is switched on or connected to the mains supply.
Before switching on please check all connections thoroughly, making sure bare wires or cables are not touching the amplifier in the wrong places (which could cause short circuits) and you have connected positive (+) to positive and negative (–) to negative.
Always ensure that the volume control on your amplifier is set to minimum before starting these procedures.
BI-WIRING YOUR LOUDSPEAKERS
Bi-wiring improves the sound of your system because it divides the high and low frequency signal currents into separate speaker cables. This avoids signal distortions arising from the high and low frequency currents interacting with one another within a single cable, as in conventionally wired systems.
You will need:
Speakers – with four input terminals each: these will be marked HF (High Frequency) and LF (Low Frequency).
Loudspeaker cables – two pairs of cables per loudspeaker (which may be joined at the amplifier end if your amplifier has only one pair of output terminals per channel). Or, a suitably terminated cable set (a loom, probably prepared by your dealer and capable of being used for bi-wiring in one length).
How to bi-wire loudspeakers
1. Remove the terminal links on the rear of your loudspeakers
WARNING: This step is essential or damage to your amplifier may result which is not covered under warranty.
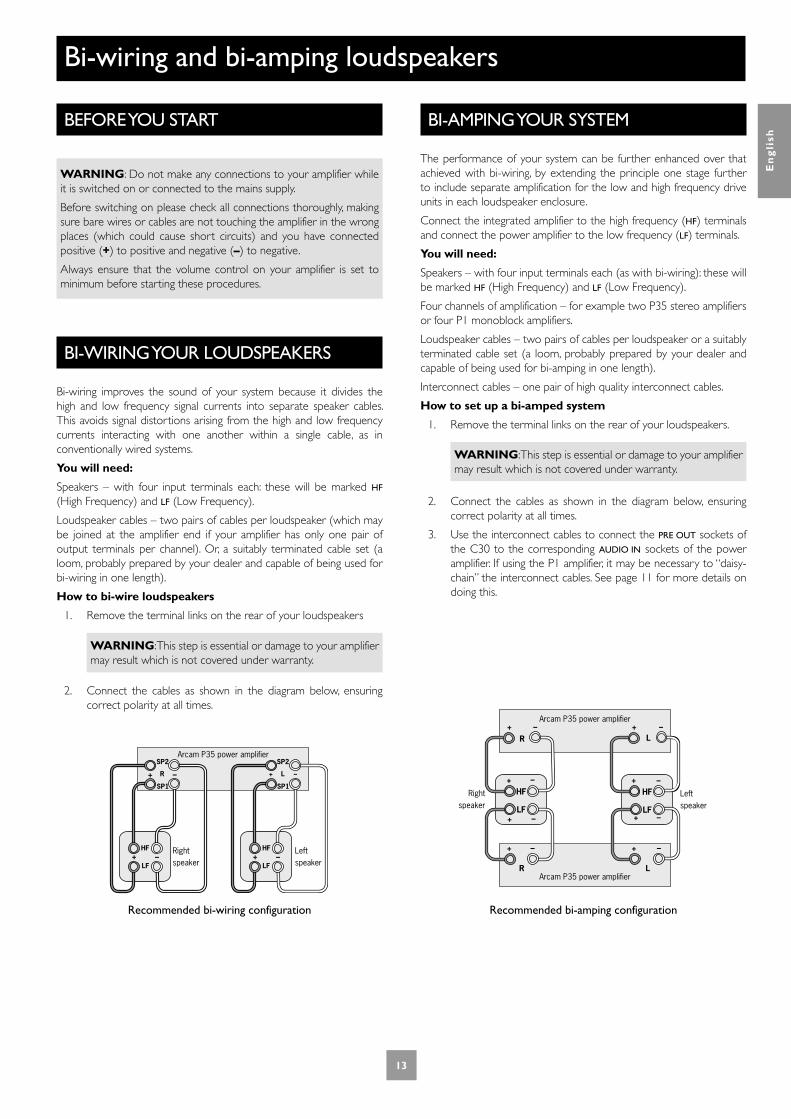
2. Connect the cables as shown in the diagram below, ensuring correct polarity at all times.
Recommended bi-wiring configuration Recommended bi-amping configuration
Arcam P35 power amplifier
R
Rightspeaker
HF
LF+ –
+ –
Leftspeaker
L
HF
LF+ –
+ –
SP2
SP1
SP2
SP1
R LArcam P35 power amplifier
+ –+ –
R L+ –+ –
Rightspeaker
HF
LF
+
–+ –
–HF
LF+
–
–
+
Leftspeaker
Arcam P35 power amplifier
BI-AMPING YOUR SYSTEM
The performance of your system can be further enhanced over that achieved with bi-wiring, by extending the principle one stage further to include separate amplification for the low and high frequency drive units in each loudspeaker enclosure.
Connect the integrated amplifier to the high frequency (HF) terminals and connect the power amplifier to the low frequency (LF) terminals.
You will need:
Speakers – with four input terminals each (as with bi-wiring): these will be marked HF (High Frequency) and LF (Low Frequency).
Four channels of amplification – for example two P35 stereo amplifiers or four P1 monoblock amplifiers.
Loudspeaker cables – two pairs of cables per loudspeaker or a suitably terminated cable set (a loom, probably prepared by your dealer and capable of being used for bi-amping in one length).
Interconnect cables – one pair of high quality interconnect cables.
How to set up a bi-amped system
1. Remove the terminal links on the rear of your loudspeakers.
WARNING: This step is essential or damage to your amplifier may result which is not covered under warranty.
2. Connect the cables as shown in the diagram below, ensuring correct polarity at all times.
3. Use the interconnect cables to connect the PRE OUT sockets of the C30 to the corresponding AUDIO IN sockets of the power amplifier. If using the P1 amplifier, it may be necessary to “daisy-chain” the interconnect cables. See page 11 for more details on doing this.
1414 15
En
gli
sh
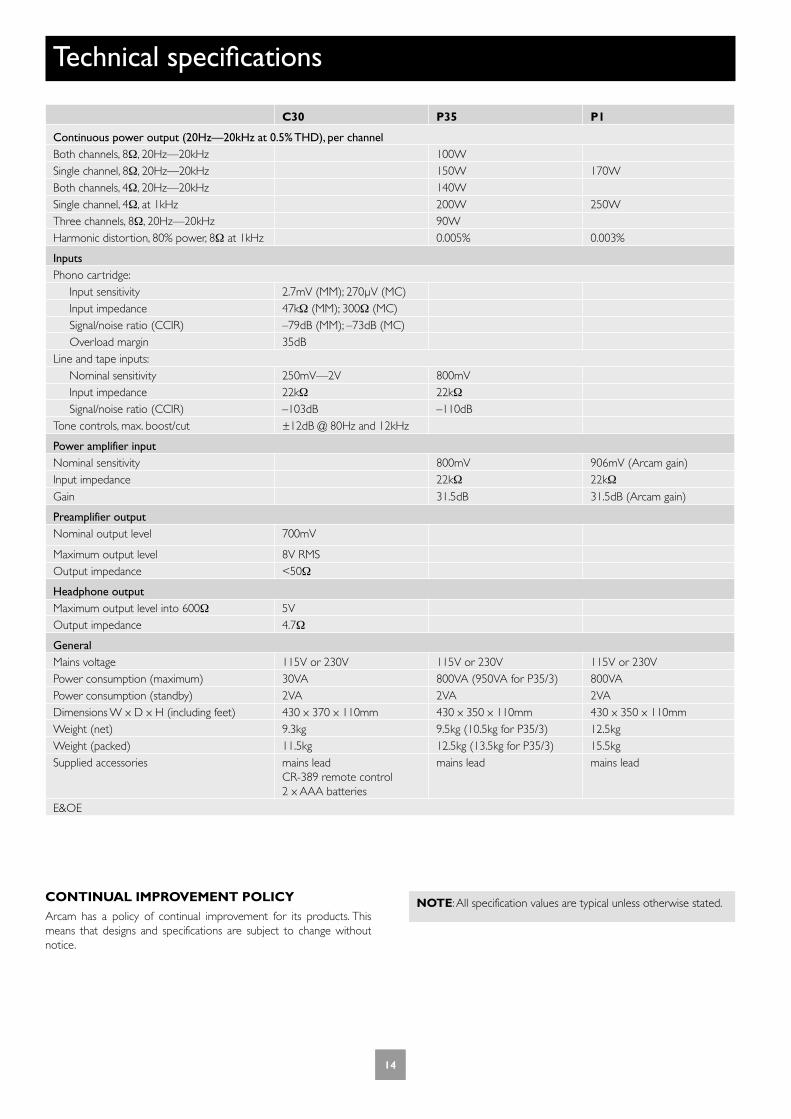
Technical specifications
NOTE: All specification values are typical unless otherwise stated.CONTINUAL IMPROVEMENT POLICYArcam has a policy of continual improvement for its products. This means that designs and specifications are subject to change without notice.
C30 P35 P1
Continuous power output (20Hz—20kHz at 0.5% THD), per channelBoth channels, 8Ω, 20Hz—20kHz 100WSingle channel, 8Ω, 20Hz—20kHz 150W 170WBoth channels, 4Ω, 20Hz—20kHz 140WSingle channel, 4Ω, at 1kHz 200W 250WThree channels, 8Ω, 20Hz—20kHz 90WHarmonic distortion, 80% power, 8Ω at 1kHz 0.005% 0.003%
InputsPhono cartridge: Input sensitivity 2.7mV (MM); 270µV (MC) Input impedance 47kΩ (MM); 300Ω (MC) Signal/noise ratio (CCIR) –79dB (MM); –73dB (MC) Overload margin 35dBLine and tape inputs: Nominal sensitivity 250mV—2V 800mV Input impedance 22kΩ 22kΩ Signal/noise ratio (CCIR) –103dB –110dBTone controls, max. boost/cut ±12dB @ 80Hz and 12kHz
Power amplifier inputNominal sensitivity 800mV 906mV (Arcam gain)Input impedance 22kΩ 22kΩ
Gain 31.5dB 31.5dB (Arcam gain)
Preamplifier outputNominal output level 700mV
Maximum output level 8V RMSOutput impedance <50Ω
Headphone outputMaximum output level into 600Ω 5VOutput impedance 4.7Ω
GeneralMains voltage 115V or 230V 115V or 230V 115V or 230VPower consumption (maximum) 30VA 800VA (950VA for P35/3) 800VAPower consumption (standby) 2VA 2VA 2VADimensions W x D x H (including feet) 430 x 370 x 110mm 430 x 350 x 110mm 430 x 350 x 110mmWeight (net) 9.3kg 9.5kg (10.5kg for P35/3) 12.5kgWeight (packed) 11.5kg 12.5kg (13.5kg for P35/3) 15.5kgSupplied accessories mains lead
CR-389 remote control2 x AAA batteries
mains lead mains lead
E&OE
1414 15
En
gli
sh
Remote-control codes
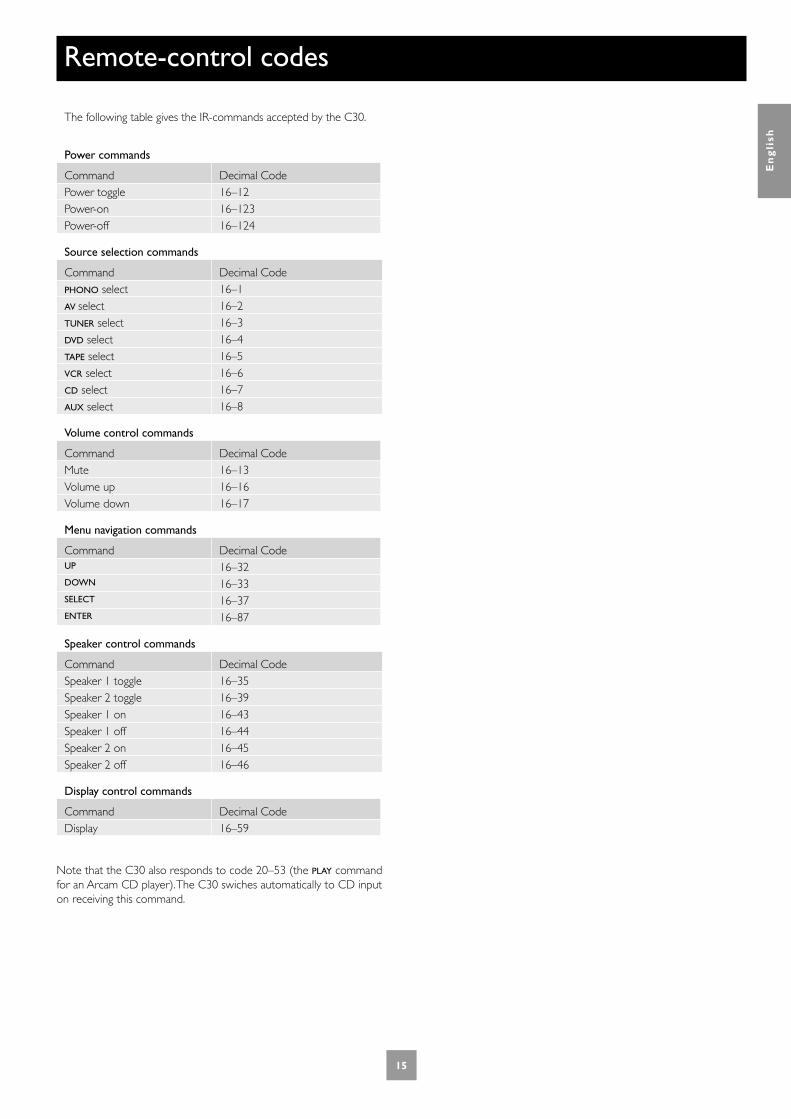
The following table gives the IR-commands accepted by the C30.
Power commands
Command Decimal CodePower toggle 16–12Power-on 16–123Power-off 16–124
Source selection commands
Command Decimal CodePHONO select 16–1AV select 16–2TUNER select 16–3DVD select 16–4TAPE select 16–5VCR select 16–6CD select 16–7AUX select 16–8
Volume control commands
Command Decimal CodeMute 16–13Volume up 16–16Volume down 16–17
Menu navigation commands
Command Decimal CodeUP 16–32DOWN 16–33SELECT 16–37ENTER 16–87
Speaker control commands
Command Decimal CodeSpeaker 1 toggle 16–35Speaker 2 toggle 16–39Speaker 1 on 16–43Speaker 1 off 16–44Speaker 2 on 16–45Speaker 2 off 16–46
Display control commands
Command Decimal CodeDisplay 16–59
Note that the C30 also responds to code 20–53 (the PLAY command for an Arcam CD player). The C30 swiches automatically to CD input on receiving this command.
1616 17
En
gli
sh
Service information
Before returning your amplifier for service, please check the following:
SOUND CUTS OUT FOR NO REASONIf the temperature of the internal heatsink rises above a safe level, then a thermal cutout inside the amplifier will operate.
The power indicator on the front panel flashes and the protection system temporarily removes the power to the speakers. The system resets itself as the heatsink cools down.
Note that because of the high output voltage from a CD player, it is possible to drive the P35/P1 at full power even though the C30 volume is not set at maximum.
AMPLIFIER DOES NOT SWITCH BACK ONThe C30, P35 and P1 amplifiers have a protection mechanism which is activated if you switch the unit on immediately after turning it off. If this mechanism activates, wait 30 seconds then try again.
WORLDWIDE GUARANTEEThis entitles you to have the unit repaired free of charge, during the first two years after purchase, at any authorised Arcam distributor provided that it was originally purchased from an authorised Arcam dealer or distributor. The manufacturer can take no responsibility for defects arising from accident, misuse, abuse, wear and tear, neglect or through unauthorised adjustment and/or repair, neither can they accept responsibility for damage or loss occurring during transit to or from the person claiming under the guarantee.
The warranty covers:
Parts and labour costs for two years from the purchase date. After two years you must pay for both parts and labour costs. The warranty does not cover transportation costs at any time.
CLAIMS UNDER GUARANTEEThis equipment should be packed in the original packing and returned to the dealer from whom it was purchased, or failing this, directly to the Arcam distributor in the country of residence. It should be sent carriage prepaid by a reputable carrier -– NOT by post. No responsibility can be accepted for the unit whilst in transit to the dealer or distributor and customers are therefore advised to insure the unit against loss or damage whilst in transit.
For further details contact Arcam at:
Arcam Customer Support Department,Pembroke Avenue, Waterbeach, CAMBRIDGE, CB5 9QR, England
Telephone: +44 (0)1223 203200 Fax: +44 (0)1223 863384Email: [email protected]
PROBLEMS?Always contact your dealer in the first instance.
If your dealer is unable to answer any query regarding this or any other Arcam product please contact Arcam Customer Support on +44 (0) 1223 203200 or write to us at the above address and we will do our best to help you.
ON-LINE REGISTRATION
You can register your Arcam product on-line at:
www.arcam.co.uk
Guarantee

1616 17
En
gli
sh
NOTES

1818 19
Fra
nç
ais
Consignes de sécurité
ATTENTION : Pour éviter tout risque de choc électrique, ne pas enlever le couvercle (ou le panneau arrière). Aucune intervention n’est possible pour l’utilisateur. Pour le service, voir un personnel qualifié.
AVERTISSEMENT : Pour éviter tout risque d’incendie ou de choc électrique, ne pas exposer l’appareil à la pluie ou à l’humidité.
Le symbole d’un éclair dans un triangle a pour objet d’avertir l’utilisateur de la présence à l’intérieur du boîtier de l’appareil de “tension électrique dangereuse” non-isolée et de force suffisante à constituer un risque de choc électrique.
Le point d’exclamation dans un triangle a pour objet d’avertir l’utilisateur de la présence de renseignements importants concernant l’utilisation et la maintenance (le service après vente) dans la documentation fournie avec le produit.
ATTENTION : Au Canada et aux États-Unis, pour éviter tout risque de choc électrique, alignez la lame large de la fiche secteur avec la fente large de la prise murale, puis enfoncez la fiche complètement.
CONSEILS DE SÉCURITÉ IMPORTANTS
Cet appareil a été conçu et fabriqué conformément aux normes de qualité et de sécurité les plus strictes. Vous devez cependant observer les précautions suivantes lors de son installation et de son utilisation.
1. Avertissements et consignes
Il est conseillé de lire les consignes de sécurité et d’utilisation avant de mettre cet appareil en marche. Conservez ce manuel pour pouvoir vous y référer par la suite et respectez scrupuleusement les avertissements figurant dans ce manuel ou sur l’appareil lui-même.
2. Eau et humidité
L’installation d’un appareil électrique à proximité d’une source d’eau présente de sérieux risques. Il ne faut pas utiliser l’appareil à proximité d’un point d’eau : près d’une baignoire, d’un lavabo, d’un évier, dans une cave humide ou à côté d’une piscine, etc.
3. Chute d’objets ou infiltration de liquides
Veillez à ne pas laisser tomber d’objets ni faire couler de liquides à travers l’une des ouvertures du boîtier. Ne posez pas d’objet contenant du liquide sur l’appareil.
4. Ventilation
Évitez de placer l’appareil sur un lit, un canapé, un tapis ou une surface similaire instable, ou dans une bibliothèque ou un meuble fermé, ce qui risquerait d’empêcher une ventilation correcte. Pour permettre une ventilation appropriée, il est conseillé de prévoir au minimum un espace de 5 cm de chaque côté et au-dessus de l’appareil.
5. Exposition à la chaleur
Ne placez pas l’appareil près d’une flamme nue ou d’un dispositif produisant de la chaleur, tel un radiateur, un poêle ou autre appareil (y compris les amplificateurs).
6. Conditions climatiques
L’appareil est conçu pour fonctionner dans des climats modérés.
7. Étagères et supports
Utilisez uniquement des étagères ou des supports pour appareils audio. Si l’appareil est posé sur un support mobile, déplacez celui-ci avec précaution, pour éviter tout risque de chute.
8. Nettoyage
Débranchez l’appareil du secteur avant de le nettoyer.
Pour le nettoyage, utilisez un chiffon doux, humide et non pelucheux. N’utilisez pas de diluant pour peinture ou de solvant chimique.
L’emploi d’aérosols ou de produits de nettoyage pour meubles est déconseillé, car le passage d’un chiffon humide risquerait de laisser des marques blanches indélébiles.
9. Alimentation secteur
Branchez l’appareil uniquement sur une alimentation secteur du type mentionné dans le manuel d’utilisation ou indiqué sur l’appareil lui-même.
10. Protection des cordons secteur
Veillez à ce que les cordons secteur ne se trouvent pas dans un lieu de passage ou pincés par un objet quelconque. Prêtez particulièrement attention aux cordons et fiches secteur à leurs points de sortie de l’appareil.
11. Mise à la terre
Assurez-vous que l’appareil est correctement mis à la terre.
12. Câbles haute tension
Évitez de monter une antenne extérieure à proximité de câbles haute tension.
13. Périodes de non-utilisation
Si l’appareil possède une fonction de mise en veille, un courant faible continuera de circuler lorsqu’il est réglé sur ce mode. Débranchez le cordon secteur de la prise murale si l’appareil doit rester inutilisé pendant une période prolongée.
14. Odeur suspecte
Arrêtez et débranchez immédiatement l’appareil en cas de fumée ou d’odeur anormale. Contactez immédiatement votre revendeur.
15. Service
Ne tentez pas d’effectuer d’autres opérations que celles mentionnées dans ce manuel. Toute autre intervention doit être effectuée par un personnel qualifié.
16. Entretien par un personnel qualifié
L’appareil doit être entretenu par du personnel qualifié lorsque :
A. la fiche ou le cordon secteur a été endommagé,
B. des objets sont tombés ou du liquide a coulé dans l’appareil,
C. l’appareil a été exposé à la pluie,
D. l’appareil ne semble pas fonctionner normalement ou présente des altérations dans son fonctionnement,
E. l’appareil est tombé ou le boîtier a été endommagé.
CONFORMITÉ AUX NORMES DE SÉCURITÉ
Cet appareil est conçu pour répondre à la norme internationale de sécurité électrique IEC 60065.
RISQUE DE CHOC ELECTRIQUENE PAS OUVRIR
ATTENTIONCAUTIONRISK OF ELECTRIC
SHOCK DO NOT OPEN

1818 19
Fra
nç
ais
Utilisation de ce manuel
Merci d’avoir acheté cet appareil Arcam de qualité.
Cette notice porte sur les appareils suivants :
Préamplificateur C30
Amplificateur de puissance P35
Amplificateur de puissance P1.
Elle contient tous les renseignements dont vous avez besoin pour installer et utiliser ces appareils. Elle décrit d’abord le C30, puis le P35 et le P1. Elle décrit aussi comment utiliser la télécommande CD-389, qui accompagne le C30.
Si vos amplificateurs ont été installés et réglés par un concessionnaire Arcam agréé, vous pouvez passer directement aux sections décrivant comment utiliser cet équipement. Sinon, nous vous conseillons de lire attentivement les directives d’installation de votre appareil avant de commencer.
CONSIGNES DE SÉCURITÉLes consignes de sécurité se trouvent à la page 18 de cette notice.
Il s’agit surtout de précautions élémentaires, mais pour votre propre sécurité, et pour ne pas endommager vos appareils, nous vous conseillons vivement de les lire.
AUTRES LANGUESPour obtenir cette notice dans une autre langue, visitez notre site Web (www.arcam.co.uk) ou adressez-vous à votre concessionnaire. La plupart de nos manuels sont disponibles dans plusieurs langues.
TABLE DES MATIÈRES
Consignes de sécurité ................................................................18Conseils de sécurité importants ................................................. 18Conformité aux normes de sécurité........................................ 18
Utilisation de ce manuel.............................................................19
Installation : Préamplificateur C30...........................................20Positionnement de l’appareil ......................................................... 20Raccordement à une alimentation électrique ..................... 20Branchement de l’amplificateur de puissance ..................... 20Branchement sur un autre appareil........................................... 21Commandes du panneau avant .................................................. 22
Utilisation du préamplificateur C30 ........................................22Enregistrement ...................................................................................... 23
Réglage du préamplificateur C30.............................................24
La télécommande.........................................................................25Positionnement de l’appareil ......................................................... 26Raccordement À Une Alimentation Électrique ................. 26
Installation: Amplificateurs de puissance P35 et P1..............26Branchement sur un autre appareil........................................... 27Branchement des haut-parleurs.................................................. 27Mise sous tension et hors tension à distance...................... 27Option trois canaux(P35 uniquement)................................... 27
Utilisation de l’amplificateur de puissance .............................28Avant de commencer ....................................................................... 29Bi-câblage des haut-parleurs ......................................................... 29
Bi-câblage et bi-amplification des haut-parleurs ...................29Système à double amplification................................................... 29
Spécifications techniques ...........................................................30
Tableau des commandes IR .......................................................31
Garantie .........................................................................................32
Service............................................................................................32Inscription en ligne.............................................................................. 32
2020 21
Fra
nç
ais
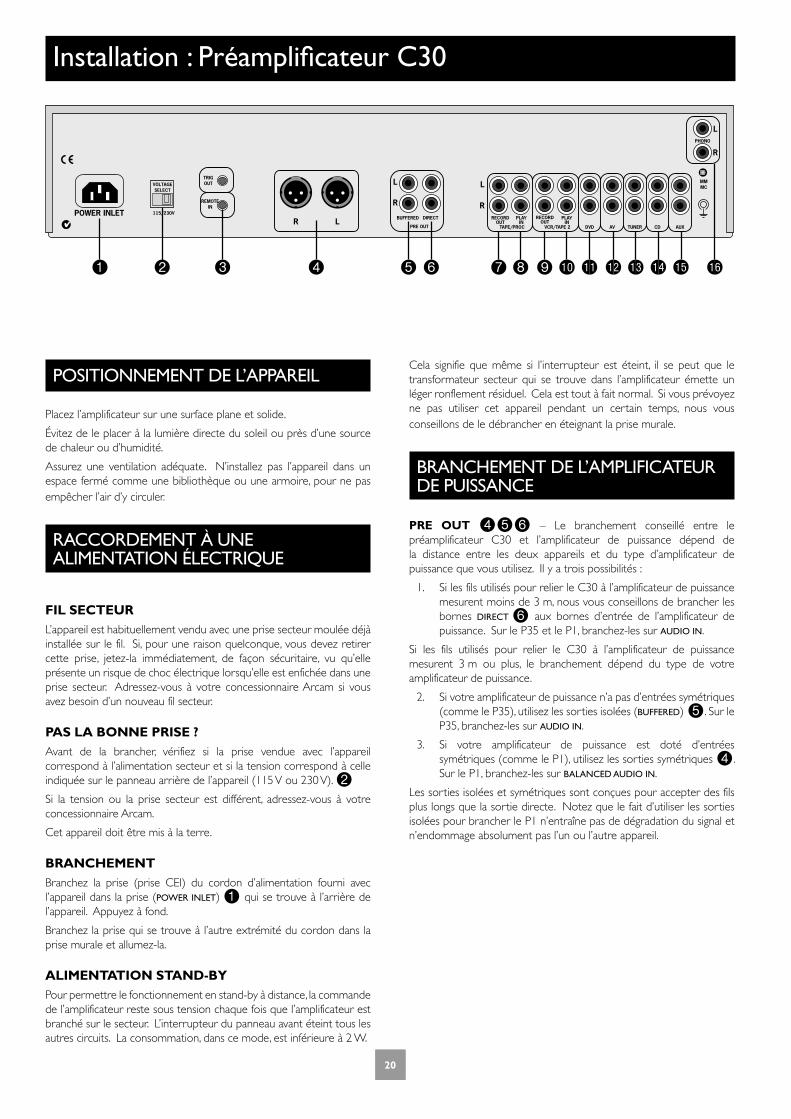
POSITIONNEMENT DE L’APPAREIL
Placez l’amplificateur sur une surface plane et solide.
Évitez de le placer à la lumière directe du soleil ou près d’une source de chaleur ou d’humidité.
Assurez une ventilation adéquate. N’installez pas l’appareil dans un espace fermé comme une bibliothèque ou une armoire, pour ne pas empêcher l’air d’y circuler.
RACCORDEMENT À UNE ALIMENTATION ÉLECTRIQUE
FIL SECTEURL’appareil est habituellement vendu avec une prise secteur moulée déjà installée sur le fil. Si, pour une raison quelconque, vous devez retirer cette prise, jetez-la immédiatement, de façon sécuritaire, vu qu’elle présente un risque de choc électrique lorsqu’elle est enfichée dans une prise secteur. Adressez-vous à votre concessionnaire Arcam si vous avez besoin d’un nouveau fil secteur.
PAS LA BONNE PRISE ?Avant de la brancher, vérifiez si la prise vendue avec l’appareil correspond à l’alimentation secteur et si la tension correspond à celle indiquée sur le panneau arrière de l’appareil (115 V ou 230 V). 2Si la tension ou la prise secteur est différent, adressez-vous à votre concessionnaire Arcam.
Cet appareil doit être mis à la terre.
BRANCHEMENTBranchez la prise (prise CEI) du cordon d’alimentation fourni avec l’appareil dans la prise (POWER INLET) 1 qui se trouve à l’arrière de l’appareil. Appuyez à fond.
Branchez la prise qui se trouve à l’autre extrémité du cordon dans la prise murale et allumez-la.
ALIMENTATION STAND-BYPour permettre le fonctionnement en stand-by à distance, la commande de l’amplificateur reste sous tension chaque fois que l’amplificateur est branché sur le secteur. L’interrupteur du panneau avant éteint tous les autres circuits. La consommation, dans ce mode, est inférieure à 2 W.
Installation : Préamplificateur C30
LR
PHONO
POWER INLET
PRE OUT
BUFFERED
L
R
L
R
L
R
VOLTAGESELECT
RECORDOUT
PLAYIN
TAPE/PROC
RECORDOUT
PLAYIN
VCR/TAPE 2 DVD AV TUNER CD AUX
MMMC
REMOTEIN
TRIGOUT
115/230VDIRECT
Cela signifie que même si l’interrupteur est éteint, il se peut que le transformateur secteur qui se trouve dans l’amplificateur émette un léger ronflement résiduel. Cela est tout à fait normal. Si vous prévoyez ne pas utiliser cet appareil pendant un certain temps, nous vous conseillons de le débrancher en éteignant la prise murale.
BRANCHEMENT DE L’AMPLIFICATEUR DE PUISSANCE
PRE OUT 456 – Le branchement conseillé entre le préamplificateur C30 et l’amplificateur de puissance dépend de la distance entre les deux appareils et du type d’amplificateur de puissance que vous utilisez. Il y a trois possibilités :
1. Si les fils utilisés pour relier le C30 à l’amplificateur de puissance mesurent moins de 3 m, nous vous conseillons de brancher les bornes DIRECT 6 aux bornes d’entrée de l’amplificateur de puissance. Sur le P35 et le P1, branchez-les sur AUDIO IN.
Si les fils utilisés pour relier le C30 à l’amplificateur de puissance mesurent 3 m ou plus, le branchement dépend du type de votre amplificateur de puissance.
2. Si votre amplificateur de puissance n’a pas d’entrées symétriques (comme le P35), utilisez les sorties isolées (BUFFERED) 5. Sur le P35, branchez-les sur AUDIO IN.
3. Si votre amplificateur de puissance est doté d’entrées symétriques (comme le P1), utilisez les sorties symétriques 4. Sur le P1, branchez-les sur BALANCED AUDIO IN.
Les sorties isolées et symétriques sont conçues pour accepter des fils plus longs que la sortie directe. Notez que le fait d’utiliser les sorties isolées pour brancher le P1 n’entraîne pas de dégradation du signal et n’endommage absolument pas l’un ou l’autre appareil.

2020 21
Fra
nç
ais
BRANCHEMENT SUR UN AUTRE APPAREIL
Si vous devez brancher ces appareils à d’autres appareils, sachez :
Qu’il est conseillé d’utiliser des fils d’interconnexion de qualité entre l’amplificateur et l’autre appareil afin d’obtenir un son d’excellente qualité. Votre concessionnaire vous conseillera sur les fils qui conviennent à votre système.
Toutes les entrées (exception faite de l’entrée PHONO) ont la même sensibilité et peuvent être utilisées avec d’autres appareils que ceux indiqués le cas échéant.
Le C30 permet les branchements suivants :
TAPE/PROC RECORD OUT 7 – Branchez ces sorties sur les entrées de la platine à cassettes (en général intitulées RECORD sur la platine).
TAPE/PROC PLAY IN 8 - Branchez ces sorties sur les entrées de la platine à cassettes (en général intitulées PLAY sur la platine). Si vous n’avez pas de platine à cassettes, vous pouvez utiliser cette entrée pour un appareil similaire, comme un lecteur de CD, un syntoniseur, un magnétoscope, etc. (mais pas un tourne-disque).
VCR/TAPE2 RECORD OUT 9 – Vous pouvez brancher ces sorties sur les entrées d’un magnétoscope (en général intitulées RECORD sur le magnétoscope). Vous pouvez aussi brancher ces sorties sur un autre appareil d’enregistrement (comme une deuxième platine à cassettes).
VCR/TAPE2 PLAY IN bk - Branchez ces entrées sur les sorties du magnétoscope ou du deuxième appareil d’enregistrement (les sorties sont en général intitulées PLAY). Vous pouvez aussi utiliser cette entrée pour un appareil similaire, comme un lecteur de CD, un syntoniseur, etc. (mais pas un tourne-disque).
DVD bl – Branchez cette entrée sur les sorties audio stéréo du lecteur de DVD.
AV bm - Branchez cette entrée sur les sorties audio stéréo d’un équipement audiovisuel comme un lecteur de disque laser, un syntoniseur satellite ou Nicam.
TUNER bn - Branchez cette entrée sur les sorties audio du syntoniseur.
CD bo - Branchez cette entrée sur les sorties audio du lecteur de CD ou du CNA (convertisseur numérique-analogique).
AUX bp – Le C30 est doté d’une plaque phono en standard. De ce fait le branchement AUX est une sortie qui achemine un signal phono égalisé. Vous pouvez, si vous le souhaitez, brancher cette sortie sur un appareil d’enregistrement.
Si vous n’avez pas besoin de la carte phono, vous pouvez utiliser les connexions AUX comme entrée de ligne. Adressez-vous à votre concessionnaire pour de plus amples renseignements sur cette option. Vous risquez d’invalider la garantie en retirant vous-même la carte phono.
PHONO bq - Branchez cette entrée sur les sorties audio du tourne-disque. Le module phono vendu avec le C30 est compatible avec la plupart des cartouches électromagnétiques et électrodynamiques. Réglez le commutateur bleu qui se trouve sous ces connexions de la façon suivante :
MM – Pour les cartouches électromagnétiques et électrodynamiques à rendement élevé. Le commutateur bleu est au ras du panneau arrière du C30.
MC – Pour les cartouches électrodynamiques à faible rendement. Le commutateur bleu est enfoncé dans le panneau arrière du C30.
Borne de mise à la terre phono – Pour brancher le fil de terre (le cas échéant) du tourne-disque. Cette borne ne doit pas être utilisée comme terre de sécurité.
TRIG OUT et REMOTE IN 3 (entrée et sortie 12 V) – Ces connexions sont prévues pour les installations multipièces.
TRIG OUT – Cette sortie émet un signal de 12 V chaque fois que l’appareil est allumé (c’est-à-dire lorsqu’il n’est pas éteint ou en stand-by). Ce signal peut être utilisé pour allumer automatiquement les amplificateurs de puissance (ou tout autre appareil) branchés sur le C30, du fait qu’ils s’allumeront lorsque le C30 sera activé. Cette fonction est utile lorsque l’amplificateur de puissance est loin du C30 ou d’accès difficile. Elle est aussi valable pour le P35 et le P1. Si vous avez un amplificateur de puissance en plus d’un autre amplificateur et souhaitez allumer et éteindre les deux appareils en même temps, allez à la page 11.
REMOTE IN – Permet au C30 de recevoir les signaux de la télécommande lorsque le télédétecteur est caché (ou « invisible » pour la télécommande). Un détecteur externe permet de recevoir les signaux de la télécommande, qui sont alors envoyés au C30 (à cette entrée) à l’aide d’un fil adéquat. Pour que le C30 puisse accepter des signaux de télécommande, il faut que ces derniers soient modulés en code RC5, avec un niveau de tension entre 5 V et 15 V.
Notez qu’en temps ordinaire, il est inutile de brancher quoi que ce soit sur ces entrées. Si vous souhaitez utiliser ces fonctions, adressez-vous à votre concessionnaire, qui vous dira comment faire ces branchements et quel type de fil utiliser.

2222 23
Fra
nç
ais
Utilisation du préamplificateur C30
COMMANDES DU PANNEAU AVANT
Cette section décrit comment utiliser votre amplificateur.
Si votre amplificateur n’a pas été installé par le concessionnaire, lisez d’abord la section Installation : Préamplificateur C30, à la page 20.
POWER bnAllume et éteint l’appareil.
Le voyant de mise sous tension (qui se trouve directement au-dessus de l’interrupteur) reflète l’état de l’amplificateur. S’il est rouge, c’est que l’appareil est en stand-by (appuyez sur le bouton POWER/STANDBY de la télécommande ou sur le bouton POWER du panneau avant, pour passer du mode stand-by au mode sous tension).
Récepteur de la télécommande 1Le récepteur à infrarouge de la télécommande se trouve derrière l’insigne « FMJ ». Le récepteur doit être en visibilité directe de la télécommande pour que cette dernière puisse recevoir les signaux.
MODE 2, UP et DOWN 5
Ces boutons sont prévus pour les modules en option qui seront proposés plus tard pour le C30. Les boutons UP (haut) et DOWN (bas) servent toutefois à déplacer le curseur lors de la personnalisation du message d’accueil du préamplificateur C30 actuel (voir page 24).
Bouton de commande 7, SELECT 4 et ENTER 6Le bouton de commande a deux fonctions :
Celle de dispositif de réglage de la puissance, pour régler la puissance du casque d’écoute ou du préamplificateur (PRE OUT).
Lorsqu’il est utilisé avec les boutons SELECT et ENTER, il permet de personnaliser les réglages de l’amplificateur (voir page 24).
RÉGLAGE DE LA PUISSANCEIl est important de comprendre que la puissance sonore affichée ne reflète pas avec précision la puissance des haut-parleurs. Souvent, l’amplificateur donne sa pleine puissance bien avant que le réglage de la puissance atteigne sa position maximale, notamment dans le cas de certains disques compacts. Toutefois, l’amplificateur doit aussi être capable de donner une pleine puissance à partie de sources de niveau moindre, comme les syntoniseurs et les platines à cassettes. Avec ces sources, le réglage de la puissance peut-être nettement plus élevé avant qu’il y ait distorsion (surcharge audible).
Il est possible de compenser ces différences de niveau d’entrée en utilisant le menu « Input trims ». Voir tous les détails à la page 24. En réglant les niveaux d’entrée de chaque source séparément, vous éviterez les surcharges accidentelles.
Sélecteurs de source 8
Ces boutons permettent de sélectionner la source reliée à l’entrée correspondante. Un voyant situé au-dessus du bouton indique quelle est la source actuellement sélectionnée, cette dernière étant aussi habituellement affichée sur l’écran. Voir page 20 pour plus de détails sur le branchement des sources audio sur le C30.
TONE (TONALITÉ) 9Allume et éteint les circuits de tonalité, y compris les réglages de chacune des sources. Notez que les DEL de tonalité ne s’illuminent pas à moins qu’un réglage de tonalité ait été fait. Voir page 24 pour plus de détails sur le réglage des tonalités.
MUTE bk
Lorsque sélectionné, met en sourdine les principales sorties analogiques.
DISPLAY bl
Ces commutateurs permettent d’éteindre l’écran ou de mettre la luminosité à faible ou à forte. Vous pouvez ainsi obtenir l’éclairage qui vous convient. En éteignant l’écran, vous obtiendrez peut-être une légère amélioration de la qualité du son.
PHONES bmCette borne stéréo d’un quart de pouce accepte les casques d’écoute dont l’impédance varie entre 32Ω et 600Ω.
Cette borne est toujours active. Pour éviter tout dommage, débranchez toujours le casque avant d’éteindre ou d’allumer l’amplificateur.
C30 PRE-AMPLIFIER
MUTE DISPLAY POWERPHONESPHONO/AUX CD TUNER AV DVD VCR TAPE TONE
ENTER
MODE RECORD SELECT

2222 23
Fra
nç
ais
ENREGISTREMENT
Le C30 permet d’écouter et d’enregistrer à partir d’une même source ou d’écouter à partir d’une source et d’enregistrer à partir d’une autre.
Les deux ensembles de bornes sont identiques en terme de sensibilité et acceptent à peu près tous les types d’appareils d’enregistrement (cassette, lecteur de CD, MD, magnétoscope, bobine, etc.). Le signal d’enregistrement est envoyé aux deux bornes, TAPE et VCR.
RECORD 3Pour enregistrer la source sélectionnée, appuyez sur RECORD jusqu’à ce que ‘RECORD SOURCE’ s’affiche sur l’écran. Après quelques secondes, l’écran affiche de nouveau la puissance et vous pouvez commencer à enregistrer.
Pour écouter à partir d’une source et enregistrer à partir d’un autre, appuyez encore une fois sur RECORD jusqu’à ce que ‘RECORD’ s’affiche sur l’écran, suivi du nom d’une entrée (comme AUX, CD, TUNER, etc.). Appuyez maintenant, sur le panneau avant, sur le bouton de sélection de la source à partir de laquelle vous souhaitez enregistrer. L’écran affiche votre sélection pendant quelques secondes, avant de revenir à la puissance. Vous pouvez alors commencer à enregistrer.
Le bouton RECORD peut aussi être utilisé comme second sélecteur pour envoyer un signal de source au niveau de ligne à un second amplificateur utilisé dans une autre pièce. Pour plus de renseignements, adressez-vous à votre concessionnaire Arcam ou au service à la clientèle Arcam.
ENREGISTREMENT DE BANDE À BANDE (REPRODUCTION)Vous pouvez enregistrer à partir de VCR sur TAPE mais pas l’inverse.
Par exemple, pour enregistrer à partir d’un enregistreur à cassette branché sur VCR/TAPE2 sur un enregistreur à cassette branché sur TAPE, appuyez sur le bouton RECORD tel qu’indiqué ci-dessus et sélectionnez ‘RECORD VCR’. Le signal du magnétoscope sera envoyé à la sortie TAPE.
Réglez l’enregistreur à cassette branché sur TAPE en mode enregistrement et l’autre en mode playback pour reproduire la bande.
TAPE 8Pour écouter une cassette d’une platine branchée sur TAPE, appuyez sur TAPE. L’écran affiche ‘TAPE’. En sélectionnant cette entrée, vous invalidez tous les autres sélecteurs de source.
Il est aussi possible de contrôler un enregistrement, à condition que vous disposiez d’une platine à cassettes à trois têtes. Pour cela, appuyez sur TAPE. En allumant et en éteignant ce bouton, vous pouvez faire une comparaison A/B entre le signal source et le signal enregistré.

2424 25
Fra
nç
ais
Réglage du préamplificateur C30
GAUCHE DROIT
–dB +dB
–dB +dB
État initial
StandardFineReference
GraphicNumeric
Max on volumeVol 05
GlobalPer Source
TapeFixed 01...
Welcome messageARCAM PRE AMPLIFIER
ARCAM PRE AMPLIFIER
Customize Settings
Treble CD
Bass CD
Balance CD
Restore SettingsYes
Customize SettingsVolume resolution
Customize SettingsVolume display mode
Customize SettingsInput trims
Customize SettingsMax on volume
Customize SettingsTone control mode
Customize SettingsProcessor mode
Customize SettingsWelcome message
Customize SettingsPhono/Aux text
Customize SettingsRestore settings
Volume CD
Input trimsCD -8
Phono/Aux textPhono
–dB +dB
Résolution de la puissance – Standard, Fine ou Reference. « Standard » et « Fine » représentent différents niveaux de sensibilité de réglage de la puissance. Le réglage « Reference » se traduit par des incréments absolus de 0,5 dB.
Volume display mode – Graphic ou Numeric Indique la puissance sous forme d’un diagramme à barres ou d’un chiffre. Si la résolution de la puissance a été réglée à « Reference », un chiffre indique le nombre réel de décibels.
Input Trims – Utilisez les boutons de sélection de la source et le bouton de commande pour régler la compensation de chaque source. Ce réglage permet de compenser les variations des niveaux d’entrée des différents appareils utilisés en entrée.
Max. ‘On’ Volume – Permet de limiter la puissance maximale de l’amplificateur lorsqu’il est mis sous tension. Le système s’allume à cette puissance lorsque la puissance, la dernière fois qu’il a été utilisé, dépassait cette valeur. Si ce réglage est mis à « Disabled », l’amplificateur s’allume à la dernière puissance utilisée.
Tone Control – Global ou Per Source. Cette commande indique l’étendue des changements des basses et des aigus. Le réglage par défaut est « Global » et il affecte toutes les entrées de la même manière. « Per source » vous permet de régler la tonalité de chacune des entrées : lorsque vous avez terminé, l’amplificateur se souvient de ces réglages pour chacune d’elle.
Mode Processeur – Ce mode vous permet de régler le gain de l’amplificateur. Vous pouvez alors alimenter l’amplificateur à partir d’un processeur distinct pour commander les haut-parleurs avant gauche et droit et ainsi obtenir une enceinte d’ambiance. La puissance du système est commandée à partir du processeur. Envoyez le son du processeur à TAPE. Réglez le gain en fonction des amplificateurs qui commandent les autres haut-parleurs.
Welcome message – Vous pouvez changer la puissance du message d’accueil de « Arcam Amp » pour afficher votre nom, code postal, etc. Lorsque vous personnalisez le message, utilisez les boutons UP et DOWN pour sélectionner l’emplacement du curseur, et le bouton de commande pour changer les lettres.
Phono/Aux Text – Le C30 est doté d’un module phono. Lorsque vous sélectionnez ce module comme source, ‘PHONO’ s’affiche. Si vous retirez la carte phono, vous pouvez utiliser les connexions AUX comme entrée de ligne. Dans ce cas, modifiez l’affichage pour qu’il indique ‘AUX’, en utilisant l’option de ce menu.
Restore Settings – Cette fonction vous permet de remettre tous les réglages de l’amplificateur, y compris la compensation des entrées et le message d’accueil, à ceux faits à l’usine par défaut.
INTRODUCTIONLe C30 peut être réglé en fonction de vos préférences d’écoute et diverses fonctions permettent de l’adapter à votre système. Référez-vous à ce schéma pour naviguer parmi les divers réglages.
Les boutons ENTER et SELECT qui se trouvent sur le panneau avant sont représentés sur le schéma
par les symboles et respectivement.
Le bouton de commande est
représenté par .
RÉGLAGES D’ÉCOUTELe mode d’affichage par défaut est VOLUME, dans lequel le bouton de commande permet de régler le niveau sonore.
Appuyez une fois sur SELECT pour entrer en mode de réglage, puis à plusieurs reprises par la suite pour sélectionner BALANCE, BASS ou TREBLE. Lorsque l’un de ces critères s’affiche sur l’écran, vous pouvez le régler à l’aide du bouton de commande. Appuyez sur ENTER pour mémoriser le changement que vous venez de faire et retourner au mode par défaut (volume) ou appuyez de nouveau sur SELECT pour faire un autre réglage.
PERSONNALISATION DES RÉGLAGES DE L’AMPLIFICATEURIl est possible de personnaliser (modifier en fonction de vos préférences) plusieurs des caractéristiques du C30. Pour ce faire, suivez les consignes ci-dessous :
1. Appuyez sur SELECT plusieurs fois, jusqu’à ce que l’écran affiche ‘CUSTOMISE->’;
2. Tournez le bouton de commande pour choisir le réglage souhaité ;
3. Appuyez sur SELECT pour faire le réglage souhaité;
4. Appuyez sur ENTER pour confirmer le réglage ou sur SELECT pour confirmer le réglage et en faire un autre.
Appuyez deux fois sur ENTER pour quitter le menu de personnalisation.

2424 25
Fra
nç
ais
La télécommande
NOTA
N’oubliez pas d’installer les deux piles AAA fournies avant d’utiliser la télécommande.
Ne mettez rien devant l’insigne FMJ, en haut à gauche du C30 (où se trouve le récepteur à infrarouge), pour ne pas nuire au fonctionnement de la télécommande.
TÉLÉCOMMANDE CR-389La télécommande CR-389 permet d’accéder à toutes les fonctions du panneau avant du C30. Elle est aussi dotée de boutons commandant les lecteurs de CD, les syntoniseurs AM/FM et les syntoniseurs radio numériques Arcam. Cette télécommande transmet les codes Philips de type RC-5.
FM DAB
PROG DISP
RPT
MODE BAND
1-9 2-10 3-11
FMDAB
SEL
TUNER
CR-389
CD
AMPLIFIER
VCRDVD TAPEAV
TUNERCDAUXPHONO
ENTER
SP1
SP2 DISP
MENU DISP
4-12
5-13 6-14 7-15 8-16
Commandes CD
Permettent de régler les lecteurs de CD Arcam.
Power/Stand-by
Permet de faire passer l’amplificateur du mode stand-by à celui de pleine puissance. Le voyant de mise sous tension qui se trouve à côté de l’interrupteur, sur le panneau avant, est rouge lorsque l’appareil est en stand-by, ambre à la mise sous tension (pendant quelques secondes seulement) et vert lorsque l’appareil est allumé.
SP1 et SP2
Ces boutons s’utilisent avec l’amplificateur P35, et vous permettent de sélectionner et de désélectionner les groupes principal (SP1) et auxiliaire (SP2) de haut-parleurs qui lui sont branchés (voir page 29 pour de plus amples renseignements).
DISP (display)
Passe de « Off » à « Dim » et à « Bright ». En éteignant l’écran, vous obtiendrez peut-être une légère amélioration de la qualité du son.
Volume et (sourdine)
Appuyez sur + pour augmenter la puissance de sortie de l’amplificateur et sur – pour la diminuer.
Appuyez sur pour mettre en sourdine les sorties du préamplificateur C30. Notez que les sorties cassettes et casque d’écoute restent actives. Pour invalider la sourdine, il suffit de réappuyer sur le bouton ou de régler la puissance.
Vous pouvez utiliser le réglage de la puissance à distance et le bouton SELECT pour modifier les réglages d’équilibrage, de tonalité et de l’amplificateur.
(HAUT et BAS)
Jouent le même rôle que les boutons du panneau avant (voir page 22).
ENTER
Jouent le même rôle que le bouton ENTER du panneau avant (voir page 22).
Boutons de sélection de la source
Jouent le même rôle que les sélecteurs de source du panneau avant du C30.
SYNTONISEUR
Ces boutons servent à contrôler les fonctions du syntoniseur.
Notez que les voyants FM/DAB indiquent dans quel mode vous passez la télécommande. Ces voyants s’illuminent
pendant 5 secondes seulement, pour économiser les piles.
Si ces voyants ne s’illuminent pas, cela ne veut pas dire que la télécommande ne fonctionne pas !
SELECT
Jouent le même rôle que le bouton SELECT du panneau avant. Il vous permet d’utiliser la télécommande de puissance
de la même façon que le cadran de commande du panneau avant – pour faire les divers réglages de l’amplificateur
(voir page 22).
Notez que lorsque vous appuyez sur +, c’est comme si vous tourniez le bouton de commande vers la droite, et vers la
gauche lorsque vous appuyez sur –.

2626 27
Fra
nç
ais
+ R/CH1 –
CTR/CH3
SP1
SP2
POWER INLET OUTIN
L
R
VOLTAGESELECT
230V
4 – 16 OHMS
+ L/CH2 –
+ R/CH1 – + L/CH2 –
AUDIO
SP1
SP2
4 – 16 OHMS
+ CTR/CH3 –
+ CTR/CH3 –
AUDIOIN
OUT
LINK
REMOTEIN
TRIGOUT
POWER INLET OUT
VOLTAGESELECT
230V
GAIN XLR/PHONO
TRIGOUT
REMOTEIN
4 – 16 OHMS
–+SPEAKERS
–+
AUDIOIN
P1
ARCAM
XLR
PHONO
BALANCED AUDIO
OUT IN
Installation: Amplificateurs de puissance P35 et P1
POSITIONNEMENT DE L’APPAREIL
Placez l’amplificateur sur une surface plane et solide.
Évitez de le placer à la lumière directe du soleil ou près d’une source de chaleur ou d’humidité.
Assurez une ventilation adéquate. N’installez pas l’appareil dans un espace fermé comme une bibliothèque ou une armoire, pour ne pas empêcher l’air d’y circuler, ce qui est nécessaire au refroidissement.
RACCORDEMENT À UNE ALIMENTATION ÉLECTRIQUE
FIL SECTEURL’appareil est habituellement vendu avec une prise secteur moulée déjà installée sur le fil. Si, pour une raison quelconque, vous devez retirer cette prise, jetez-la immédiatement, de façon sécuritaire, vu qu’elle présente un risque de choc électrique lorsqu’elle est enfichée dans une prise secteur. Adressez-vous à votre concessionnaire Arcam si vous avez besoin d’un nouveau fil secteur.
PAS LA BONNE PRISE ?Avant de la brancher, vérifiez si la prise vendue avec l’appareil correspond à l’alimentation secteur et si la tension correspond à celle indiquée sur le panneau arrière de l’appareil (115 V ou 230 V).
Si la tension ou la prise secteur est différent, adressez-vous à votre concessionnaire Arcam.
Cet appareil doit être mis à la terre.
BRANCHEMENTBranchez la prise (prise CEI) du cordon d’alimentation fourni avec l’appareil dans la prise (POWER INLET) qui se trouve à l’arrière de l’appareil. Appuyez à fond.
Branchez la prise qui se trouve à l’autre extrémité du cordon dans la prise murale et allumez-la.
ALIMENTATION STAND-BYPour permettre le fonctionnement en stand-by à distance, la commande de l’amplificateur reste sous tension chaque fois que l’amplificateur est branché sur le secteur. L’interrupteur du panneau avant éteint tous les autres circuits. La consommation, dans ce mode, est inférieure à 2 W.
Cela signifie que même si l’interrupteur est éteint, il se peut que le transformateur secteur qui se trouve dans l’amplificateur émette un léger ronflement résiduel. Cela est tout à fait normal. Si vous prévoyez ne pas utiliser cet appareil pendant un certain temps, nous vous conseillons de le débrancher en éteignant la prise murale.
IMPORTANT:
N’oubliez pas d’éteindre l’amplificateur avant de brancher les haut-parleurs et vérifiez tous les branchements avant d’allumer l’appareil.
AMPLIFICATEUR DE PUISSANCE P35 : PANNEAU ARRIÈRE
AMPLIFICATEUR DE PUISSANCE P1 : PANNEAU ARRIÈRE
Module troisième canal en option – fournit un troisième canal de 90 W pour cinéma maison ou système d’amplification à canaux multiples.

2626 27
Fra
nç
ais
BRANCHEMENT SUR UN AUTRE APPAREIL
Les amplificateurs P35 et P1 permettent les branchements suivants :
AUDIO IN (P35)AUDIO IN et BALANCED AUDIO IN (P1)
Branchez l’une de ces entrées sur les sorties du préamplificateur ou sur les bornes PRE OUT d’un amplificateur intégré. Lisez attentivement les consignes données en page 5 : elles vous indiquent comment brancher le préamplificateur à l’amplificateur de puissance.
MONO LINK (P35) – L’amplificateur de puissance P35 peut être réglé pour donner deux sorties haut-parleurs mono à partir d’une seule entrée. Retirez le lien fourni et utilisez-le pour relier entre elles les bornes L et R AUDIO OUT. En utilisant un amplificateur de puissance par haut-parleur, vous pourrez amplifier et câbler les haut-parleurs deux à deux. C’est là un avantage intéressant pour les installations stéréo de qualité dotées d’un préamplificateur distinct, où avec des amplificateurs pour les haut-parleurs des canaux gauche, centre et droit dans le cadre d’un système Dolby Digital ou Dolby Pro Logic à cinq haut-parleurs.
Si vous souhaitez utiliser cette fonction, adressez-vous à votre concessionnaire Arcam, qui vous donnera plus de renseignements.
SÉLECTEUR D’ENTRÉE (P1) – Ce commutateur permet de sélectionner des signaux asymétriques (par le connecteur phono) ou symétriques (par le connecteur XLR). Enfoncez le sélecteur pour sélectionner les entrées phono et tirez dessus pour sélectionner le connecteur XLR. Notez qu’un seul type de connecteur d’entrée est sélectionné pour l’entrée de l’amplificateur ; si vous sélectionnez (par exemple) le connecteur XLR, vous ne pourrez pas entendre les signaux des entrées phono.
COMMUTATEUR DE GAIN D’AMPLIFICATEUR (P1) – Ce commutateur permet de modifier le gain de l’amplificateur P1 en fonction des exigences de votre système. Deux réglages sont possibles : lorsque le commutateur est en position IN, le gain est le gain ARCAM standard de 31,5 dB. Cela permet d’utiliser le P1 dans des systèmes intégrant d’autres amplificateurs de puissance ARCAM. Lorsque le commutateur est en position OUT, le gain est réglé à « THX standard gain ». Dans ce mode, l’appareil peut être utilisé dans des systèmes intégrant des amplificateurs ayant un gain THX (le P7 par exemple).
CONNEXION EN GUIRLANDELe P35 et le P1 peuvent être branchés sur d’autres amplificateurs de puissance, pour alimenter d’autres haut-parleurs (dans d’autres pièces, par exemple, ou des haut-parleurs à trois amplificateurs, etc.). On parle alors de connexion en guirlande.
Pour connecter des amplificateurs en guirlande, branchez les bornes AUDIO OUT de l’amplificateur de puissance sur l’entrée de l’amplificateur de puissance supplémentaire – gauche sur gauche et droite sur droite.
BRANCHEMENT DES HAUT-PARLEURS
Les bornes rouges et noires qui se trouvent à l’arrière des amplificateurs servent à brancher les haut-parleurs. Il est possible de brancher deux paires de haut-parleurs ; la paire désignée « haut-parleurs 1 » (SP1) se branche sur les bornes du bas, et celle désignée « haut-parleurs 2 » (SP2) se branche sur les bornes du haut.
Lorsque vous reliez les bornes de l’amplificateur à celles des haut-parleurs, assurez-vous que les polarités correspondent (branchez le « + » sur le « + », en général rouge et le « – » sur le « – », en général noir). Une erreur de ce branchement se traduit par un son central faible, une orientation imprécise des instruments et nuit au sens de la direction du son.
Le fil du haut-parleur peut être branché sur l’amplificateur de deux façons :
EN DÉNUDANT L’EXTRÉMITÉ DES FILS :1. Retirez l’isolant pour dégager environ 2 cm de conducteur (le
métal à l’intérieur du fil) ;
2. S’il s’agit d’un conducteur multibrin, torsadez les brins en les serrant bien pour ne pas risquer qu’un brin soit en contact avec les bornes adjacentes ou le panneau arrière ;
3. Desserrez la borne en la tournant vers la gauche ;
4. Insérez le fil torsadé dans le trou de la borne ;
5. Resserrez la borne en la tournant vers la droite.
Lorsque vous faites un branchement en dénudant l’extrémité des fils, vérifiez bien qu’aucun brin ne soit en contact avec les bornes adjacentes ou avec le panneau arrière. Il se produirait alors un court-circuit à la sortie de l’amplificateur, ce qui risquerait de l’endommager.
EN UTILISANT DES BORNES EMBROCHABLES :1. Desserrez la borne en la tournant vers la gauche ;
2. Insérez la cosse rectangulaire sous la borne ;
3. Resserrez la borne en la tournant vers la droite.
MISE SOUS TENSION ET HORS TENSION À DISTANCE
En branchant la borne TRIG OUT du préamplificateur C30 à la borne REMOTE IN de l’amplificateur de puissance P35/P1, vous pouvez utiliser le C30 pour allumer et éteindre l’amplificateur de puissance. Dans cette configuration, le bouton POWER du C30 (ou le bouton POWER/STANDBY de la télécommande) allume et éteint en même temps les deux amplificateurs. Cette fonction vous permet de cacher l’amplificateur de puissance et de le commander néanmoins.
Il vous faut un fil de connexion de 3,5 mm à un fil à jack de 3,5 mm (stéréo ou mono) et il est possible de connecter plusieurs amplificateurs de puissance au C30 en cascade, de la borne TRIG OUT d’un P35/P1 à la borne REMOTE IN du suivant.
OPTION TROIS CANAUX(P35 UNIQUEMENT)
L’amplificateur de puissance P35 stéréo peut être modifié en un appareil trois canaux par l’ajout d’un module trois canaux. (Dans ce cas, on parle d’un modèle P35/3.)
Le module offre des bornes supplémentaires pour haut-parleurs ainsi qu’un troisième ensemble de bornes phono AUDIO IN et OUT, et convertit le P35 en un amplificateur 3 x 90 W (valeur efficace par canal dans 8 ohms) utilisable pour le cinéma maison ou les installations multicanaux (cet appareil peut être utilisé pour amplifier les canaux gauche, droit et centre d’un système à canaux multiples, par exemple).
Si vous souhaitez utiliser cette fonction, adressez-vous à votre concessionnaire Arcam, qui vous donnera plus de renseignements.

2828 29
Fra
nç
ais
Utilisation de l’amplificateur de puissance
POWER (ET VOYANT DE MISE SOUS TENSION)Ce bouton allume et éteint l’appareil. Le voyant reflète l’état de l’amplificateur.
Lorsque vous allumez l’amplificateur, le voyant est de couleur ambre pendant quelques secondes, pendant lesquelles les haut-parleurs sont déconnectés. Puis il passe au vert lorsque l’amplificateur est prêt. Lorsque le voyant est rouge, c’est que l’appareil est en stand-by.
VOYANTS DE PANNELe voyant de mise sous tension peut clignoter en cas de problème, la couleur indiquant la nature de la défaillance :
vert – problème de décalage en continu
ambre – problème thermique (le P35/P1 est trop chaud)
rouge – court-circuit (cela peut se produire lorsque les fils des haut-parleurs ne sont pas bien raccordés et qu’il y a contact entre eux ou avec le châssis).
rouge et ambre – plusieurs problèmes.
Sauf dans le cas d’un problème thermique, si l’amplificateur signale l’une de ces défaillances, attendez six secondes avant de vérifier si le problème s’est éliminé. Si le problème s’élimine en l’espace de six secondes, l’appareil continue de fonctionner ; sinon, il s’éteint. Dans le cas d’un problème thermique, l’appareil attend que la température qui arrive au détecteur baisse avant de se remettre en marche.
Si l’amplificateur s’arrête, débranchez-le et attendez quelques minutes avant de le rebrancher. Si vous ne pouvez éliminer le problème, adressez-vous à votre concessionnaire Arcam.
P35 POWER AMPLIFIER
SP1 SP2 POWER
NOTA : Si les deux voyants sont éteints, vous aurez l’impression que l’amplificateur ne fonctionne pas puisque tous les haut-parleurs sont éteints.
P1 POWER AMPLIFIER
POWER
AMPLIFICATEUR DE PUISSANCE P35 : PANNEAU AVANT
AMPLIFICATEUR DE PUISSANCE P1 : PANNEAU AVANT
SP1 ET SP2 (P35 UNIQUEMENT)Ces boutons vous permettent d’allumer et d’éteindre les ensembles de haut-parleurs principal (SP1) et auxiliaire (SP2) branchés sur l’amplificateur. Si le voyant (qui se trouve au-dessus du commutateur) est allumé, c’est que la sortie du haut-parleur est allumée. Si vous n’utilisez pas de haut-parleurs auxiliaires, nous vous conseillons d’éteindre cette sortie.

2828 29
Fra
nç
ais
Bi-câblage et bi-amplification des haut-parleurs
AVANT DE COMMENCER
AVERTISSEMENT : Ne faites aucun branchement sur l’amplificateur lorsqu’il est allumé ou branché sur le secteur.
Avant de l’allumer, vérifiez avec soin toutes les connexions, pour vous assurer qu’il n’y a pas de fil nu en contact avec l’amplificateur là où il ne faut pas (ce qui pourrait causer un court-circuit), et que vous avez bien raccordé toutes les bornes positives (+) aux bornes positives et les bornes négatives (–) aux bornes négatives.
Réglez toujours la puissance de l’amplificateur au minimum avant de commencer.
BI-CÂBLAGE DES HAUT-PARLEURS
Un double filage améliore la qualité du son, car il divise les courants des signaux de fréquences hautes et basses dans deux fils de haut-parleurs. Cela évite la distorsion des signaux qui découle de l’interaction des courants de fréquence hautes et basses dans un fil, comme c’est le cas dans les systèmes câblés de façon conventionnelle.
Ce qu’il vous faut :
Haut-parleurs – Avec quatre bornes d’entrée chacun : elles sont identifiées HF (hautes fréquences) et LF (basses fréquences).
Fils de haut-parleurs – Deux paires de fils par haut-parleur (qui peuvent être réunis au niveau de l’amplificateur si ce dernier n’a qu’une seule paire de bornes de sortie par canal). Ou bien un jeu de câbles à bornes adéquat (un faisceau de fils, probablement préparé par votre concessionnaire, que vous pourrez utiliser pour le double filage en une longueur).
Comment installer un double filage :
1. Retirez les liens des bornes qui se trouvent à l’arrière des haut-parleurs.
AVERTISSEMENT : Cette étape est essentielle, vous risqueriez sinon d’endommager votre amplificateur, qui ne serait alors pas couvert par la garantie.
2. Branchez les fils tel qu’illustré ci-dessous, en vérifiant toujours la polarité.
Configuration de double filage recommandée Configuration de double amplification recommandée
Amplificateur de puissance Arcam P35
R L
HF
LF
+
+
+ –
HF
LF
+
+
–
–
+ –
–
–
Encientedroite
Encientegauche
R LAmplificateur de puissance Arcam P35
+ –+ –
R L+ –+ –
HF
LF
+
–+ –
–HF
LF+
–
–
+
Amplificateur de puissance Arcam P35
Encientedroite
Encientegauche
SYSTÈME À DOUBLE AMPLIFICATION
Vous pouvez encore améliorer les performances de votre système en poussant plus loin ce même principe et en ayant une amplification séparée pour les hautes et les basses fréquences de chaque haut-parleur.
Branchez l’amplificateur intégré sur les bornes hautes fréquences (HF) et branchez l’amplificateur de puissance sur les bornes basses fréquences (LF).
Ce qu’il vous faut :
Haut-parleurs – Avec quatre bornes d’entrée chacun (comme pour le double filage): elles sont identifiées HF (hautes fréquences) et LF (basses fréquences).
Quatre canaux d’amplification – Par exemple deux amplificateurs stéréo P35 ou quatre amplificateurs mono P1.
Fils de haut-parleurs – Deux paires de fils par haut-parleur (qui peuvent être réunis au niveau de l’amplificateur si ce dernier n’a qu’une seule paire de bornes de sortie par canal). Ou bien un jeu de câbles à bornes adéquat (un faisceau de fils, probablement préparé par votre concessionnaire, que vous pourrez utiliser pour la double amplification en une longueur).
Fils d’interconnexion – Une paire de fils d’interconnexion de bonne qualité.
Comment installer un système à double amplification :
1. Retirer les liens des bornes qui se trouvent à l’arrière des haut-parleurs.
AVERTISSEMENT : Cette étape est essentielle, vous risqueriez sinon d’endommager votre amplificateur, qui ne serait alors pas couvert par la garantie.
2. Branchez les fils tel qu’illustré ci-dessous, en vérifiant toujours la polarité.
3. Utilisez les fils d’interconnexion pour raccorder les bornes PRE OUT du C30 aux bornes AUDIO IN correspondantes de l’amplificateur de puissance. Si vous avez un amplificateur P1, il vous faudra peut-être relier les fils d’interconnexion en guirlande. Voir les détails à la page 27.

3030 31
Fra
nç
ais
Spécifications techniques
NOTA : Sauf indication contraire, les valeurs spécifiées sont des valeurs caractéristiques.
POLITIQUE D’AMÉLIORATION CONTINUEArcam a une politique d’amélioration continue de ses produits. Autrement dit, les modèles et spécifications sont sujets à changement sans préavis.
C30 P35 P1
Puissance de sortie continue (20Hz—20kHz à 0,5 % THD), par canalDeux canaux, 8Ω, 20Hz—20kHz 100 WUn canal, 8Ω, 20Hz—20kHz 150 W 170 WDeux canaux, 4Ω, 20Hz—20kHz 140 WUn canal, 4Ω, à 1kHz 200 W 250 WTrois canaux, 8Ω, 20Hz—20kHz 90 WHarmonic distortion, 80% power, 8Ω à 1kHz 0,005 % 0,003 %
EntréesCartouche phono : Sensibilité d’entrée 2,7 mV (MM); 270 µV (MC) Impédance d’entrée 47 kΩ (MM); 300 Ω (MC) Rapport signal/bruit (CCIR) –79 dB (MM); –73 dB (MC) Marge de surcharge 35 dBEntrées de ligne et de bande : Sensibilité nominale 250 mV—2 V 800 mV Impédance d’entrée 22 kΩ 22 kΩ Rapport signal/bruit (CCIR) –103 dB –110 dBCommandes de tonalité,amplification/arrêt max.
±12 dB @ 80 Hz et 12 kHz
Entrée de l’amplificateur de puissanceSensibilité nominale 800 mV 906 mV (gain Arcam)Impédance d’entrée 22 kΩ 22 kΩ
Gain 31,5 dB 31,5 dB (gain Arcam)
Sortie du préamplificateurNiveau de sortie nominale 700 mV
Niveau de sortie maximum 8 V RMSImpédance de sortie <50 Ω
Sortie du casque d’écouteNiveau de sortie maximum dans 600Ω 5 VImpédance de sortie 4,7 Ω
GénéralitésTension secteur 115 V ou 230 V 115 V ou 230 V 115 V ou 230 VConsommation (maximum) 30 VA 800 VA
(950 VA pour le P35/3)800 VA
Consommation (en stand-by) 2 VA 2 VA 2VADimensions L x P x H (avec les pattes) 430 x 370 x 110 mm 430 x 350 x 110 mm 430 x 350 x 110 mmPoids (net) 9,3 kg 9,5 kg
(10,5 kg pour le P35/3)12,5 kg
Poids (emballé) 11,5 kg 12,5 kg(13,5 kg pour le P35/3)
15,5 kg
Accessoires fournis fil secteurTélécommande CR-3892 piles AAA
fil secteur fil secteur
SEO
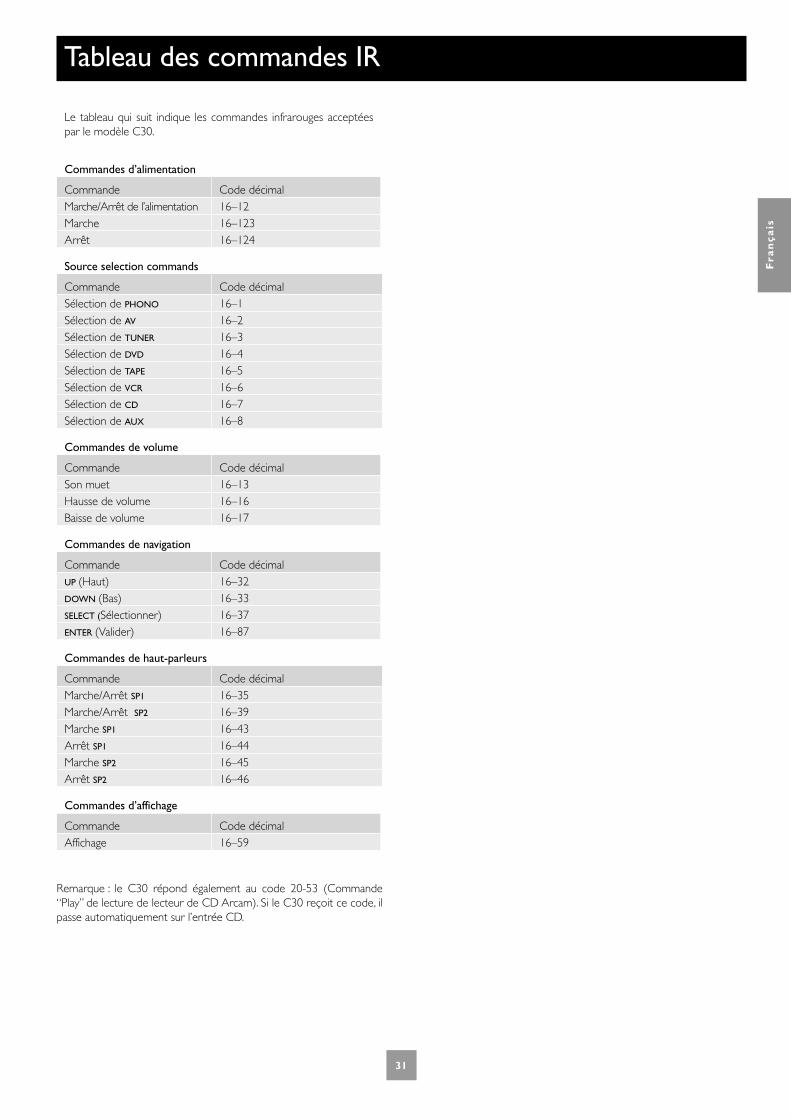
3030 31
Fra
nç
ais
Tableau des commandes IR
Le tableau qui suit indique les commandes infrarouges acceptées par le modèle C30.
Commandes d’alimentation
Commande Code décimalMarche/Arrêt de l’alimentation 16–12Marche 16–123Arrêt 16–124
Source selection commands
Commande Code décimalSélection de PHONO 16–1Sélection de AV 16–2Sélection de TUNER 16–3Sélection de DVD 16–4Sélection de TAPE 16–5Sélection de VCR 16–6Sélection de CD 16–7Sélection de AUX 16–8
Commandes de volume
Commande Code décimalSon muet 16–13Hausse de volume 16–16Baisse de volume 16–17
Commandes de navigation
Commande Code décimalUP (Haut) 16–32DOWN (Bas) 16–33SELECT (Sélectionner) 16–37ENTER (Valider) 16–87
Commandes de haut-parleurs
Commande Code décimalMarche/Arrêt SP1 16–35Marche/Arrêt SP2 16–39Marche SP1 16–43Arrêt SP1 16–44Marche SP2 16–45Arrêt SP2 16–46
Commandes d’affichage
Commande Code décimalAffichage 16–59
Remarque : le C30 répond également au code 20-53 (Commande “Play” de lecture de lecteur de CD Arcam). Si le C30 reçoit ce code, il passe automatiquement sur l’entrée CD.
3232 33
Fra
nç
ais
Service
Avant d’envoyer votre amplificateur pour le faire réparer, vérifiez ce qui suit :
COUPURE DU SON SANS RAISONSi la température de la plaque de refroidissement interne dépasse le seuil de sécurité, un coupe-circuit qui se trouve à l’intérieur de l’amplificateur se déclenche.
Le voyant lumineux qui se trouve sur la panneau avant clignote et le système de protection interrompt temporairement le courant qui alimente les haut-parleurs. Le système se remet en marche automatiquement dès que la température baisse.
Notez que, étant donné la tension de sortie élevée du lecteur de CD, il est possible de faire fonctionner le P35/P1 à pleine puissance même si la puissance du C30 n’est pas réglée au maximum.
L’AMPLIFICATEUR NE SE RALLUME PASLes amplificateurs C30, P35 et P1 sont dotés d’un mécanisme de protection qui se déclenche lorsque vous rallumez l’appareil tout de suite après l’avoir éteint. Si ce mécanisme se déclenche, attendez 30 secondes et réessayez.
GARANTIE INTERNATIONALECette garantie vous permet de faire réparer l’appareil gratuitement dans les deux années suivant la date d’achat par n’importe quel distributeur Arcam agréé, à condition que vous l’ayez acheté chez un concessionnaire ou un distributeur Arcam agréé. Le fabricant n’assume aucune responsabilité quant aux défaillances résultant d’un accident, d’un mauvais usage, d’abus, d’usure ou de réglages et de réparations non autorisés, et n’assume aucune responsabilité quant aux dommages ou pertes se produisant en cours de transport en provenance ou à destination de la personne faisant une réclamation dans le cadre de cette garantie.
La garantie couvre :
Les frais de pièces et de main-d’œuvre pendant deux ans à partir de la date d’achat. Après deux ans, vous devez payer les pièces et la main-d’œuvre. La garantie ne couvre pas les frais de transport.
RÉCLAMATIONS DANS LE CADRE DE LA GARANTIEL’appareil doit être emballé dans sa boîte d’origine en envoyé au concessionnaire chez qui il a été acheté ou directement chez le distributeur Arcam du pays de résidence. L’envoi doit être fait, port payé, par l’entremise d’un coursier fiable – PAS par la poste. Aucune responsabilité ne sera acceptée pour cet appareil pendant le transport vers le concessionnaire ou le distributeur et les clients sont donc avisés d’assurer leur appareil contre les pertes et dommages en cours de transport.
Pour de plus amples renseignements, communiquer avec :
Arcam Customer Support Department,Pembroke Avenue, Waterbeach, CAMBRIDGE, CB5 9QR, Angleterre
Telephone: +44 (0)1223 203200 Fax: +44 (0)1223 863384Email: [email protected]
DES PROBLEMS ?Communiquez toujours en premier avec votre concessionnaire.
Si votre concessionnaire est incapable de répondre à vos questions sur cet appareil ou sur tout autre appareil Arcam, communiquez avec le service à la clientèle Arcam au +44 (0) 1223 203200 ou par écrit, à l’adresse ci-dessus, et nous ferons de notre mieux pour vous aider.
INSCRIPTION EN LIGNE
Vous pouvez inscrire votre appareil Arcam par Internet à :
www.arcam.co.uk
Garantie

3232 33
Fra
nç
ais
NOTES

3434 35
De
uts
ch
Sicherheitsrichtlinien
ACHTUNG: Um das Risiko eines Elektroschocks zu minimieren, sollten Sie die Abdeckung (Rückseite) nicht entfernen. Die Bauteile im Gerät können vom Benutzer nicht gewartet werden. Überlassen Sie die Wartung des Gerätes einem Fachmann.
WARNUNG: Um das Risiko von Brand oder Elektroschock zu reduzieren, sollten Sie dieses Gerät weder Regen noch Feuchtigkeit aussetzen.
Das Blitzsymbol in einem Dreieck weist den Anwender auf eine nicht isolierte „gefährliche Spannungsquelle“ im Gehäuse des Gerätes hin, die stark genug sein kann, um einen Stromschlag auszulösen.
Das Ausrufezeichen in einem gleichschenkligen Dreieck weist den Anwender auf wichtige Anweisungen zum Betrieb und zur Instandhaltung (Wartung) in der Dokumentation hin.
ACHTUNG: Um Stromschläge zu vermeiden, stecken Sie den breiten Kontaktstift eines kanadischen oder amerikanischen Steckers in den breiten Schlitz der Steckdose. Stellen Sie sicher, dass der Stecker vollständig in die Steckdose eingeführt wurde.
WICHTIGE SICHERHEITSANWEISUNGEN
Dieses Gerät wurde unter Berücksichtigung strikter Qualitäts- und Sicherheitsbestimmungen entworfen und gefertigt. Sie sollten jedoch bei der Installation und dem Betrieb folgende Vorsichtsmaßnahmen treffen:
1. Beachten Sie die Warnungen und Anweisungen
Vor der Inbetriebnahme dieses Gerätes sollten Sie die entsprechenden Sicherheits- und Betriebsanweisungen lesen. Heben Sie dieses Handbuch gut auf, und beachten Sie die enthaltenen Warnungen sowie die Hinweise auf dem Gerät.
2. Wasser und Feuchtigkeit
Das Betreiben von elektrischen Geräten in der Nähe von Wasser kann gefährlich sein. Verwenden Sie das Gerät nicht in einer feuchten Umgebung (z.B. in der Nähe von Badewannen, Waschbecken, Swimming Pools oder in einem feuchten Keller).
3. Eindringen von Flüssigkeiten oder Schmutz
Achten Sie darauf, dass keine Flüssigkeiten oder Schmutz in das Geräteinnere gelangen. Sie sollten keine mit Flüssigkeit gefüllten Behälter (z.B. Blumenvasen) auf dem Gerät abstellen.
4. Belüftung
Stellen Sie das Gerät nicht auf ein Bett, ein Sofa, einen Teppich oder eine andere weiche Oberfläche, oder in ein abgeschlossenes Bücherregal bzw. einen Schrank, da hierdurch die Belüftung beeinträchtigt werden könnte. Es wird empfohlen, einen Mindestabstand von 50 mm um die Seiten- und Oberkanten des Gerätes freizuhalten.
5. Wärme
Stellen Sie das Gerät nicht in der Nähe von offenem Feuer oder Wärme abgebenden Geräten wie Heizkörpern, Herden oder anderen Elektrogeräten (z.B. anderen Verstärkern) auf.
6. Klima
Das Gerät wurde für den Betrieb in gemäßigten Klimazonen ausgelegt.
7. Racks und Regale
Benutzen Sie nur Racks und Regale, die für die Verwendung mit Audiogeräten geeignet sind. Bewegen Sie die Anlage sehr vorsichtig, wenn sie sich auf einem fahrbaren Regal befindet, um ein Umfallen zu vermeiden.
8. Reinigung
Ziehen Sie vor dem Reinigen des Gerätes den Netzstecker.
In den meisten Fällen reicht es aus, wenn Sie das Gehäuse mit einem weichen, fusselfreien und angefeuchteten Tuch abwischen. Verwenden Sie keine Verdünner oder andere chemische Lösungsmittel.
Von der Verwendung von Polituren oder Möbelsprays wird abgeraten, da diese Substanzen weiße Spuren hinterlassen können, wenn das Gerät danach mit einem feuchten Tuch abgewischt wird.
9. Stromversorgung
Verwenden Sie nur eine Stromquelle, die den Hinweisen im Handbuch oder auf dem Gerät entspricht.
10. Schutz der Netzkabel
Verlegen Sie die Netzkabel nicht frei im Raum. Achten Sie darauf, dass sie nicht geknickt oder gedehnt werden und dass keine Gegenstände darauf zu stehen kommen. Gehen Sie besonders sorgfältig mit Kabelenden an Steckern und Gerätebuchsen um.
11. Erdung
Achten Sie darauf, dass die Erdung des Gerätes nicht beeinträchtigt wird.
12. Stromleitungen
Bringen Sie Außenantennen nicht in der Nähe von Stromleitungen an.
13. Nichtnutzung
Ist die Anlage mit einem Standby-Modus ausgestattet, fließt in diesem Modus ein geringer Strom durch das Gerät. Ziehen Sie den Netzstecker, wenn Sie das Gerät für längere Zeit nicht nutzen.
14. Seltsamer Geruch
Sollten Sie einen ungewöhnlichen Geruch bemerken oder Rauch am Gerät entdecken, schalten Sie es aus und ziehen Sie den Netzstecker. Wenden Sie sich dann sofort an Ihren Arcam-Händler.
15. Wartung
Sie sollten nicht versuchen, das Gerät selbst zu warten. Führen Sie nur die in diesem Handbuch beschriebenen Maßnahmen aus. Überlassen Sie die Wartung des Gerätes einem qualifizierten Fachmann.
16. Zu behebende Schäden
Das Gerät sollte von einem Fachmann gewartet werden, wenn:
A. das Netzkabel oder der Netzstecker beschädigt wurde, oder
B. Gegenstände in das Gerät gefallen oder Flüssigkeiten eingedrungen sind, oder
C. das Gerät Regen ausgesetzt war, oder
D. das Gerät nicht ordnungsgemäß funktioniert oder einen erheblichen Leistungsabfall aufweist, oder
E. das Gerät zu Boden gefallen oder das Gehäuse beschädigt ist.
EINHALTUNG VON SICHERHEITSBESTIMMUNGEN
Dieses Gerät entspricht der internationalen Sicherheitsnorm für Elektrogeräte IEC 60065.
RISQUE DE CHOC ELECTRIQUENE PAS OUVRIR
ATTENTIONCAUTIONRISK OF ELECTRIC
SHOCK DO NOT OPEN

3434 35
De
uts
ch
Hinweise zum Handbuch
Danke, dass Sie sich für dieses Qualitätsprodukt von Arcam entschieden haben.
Dieses Handbuch dient für die folgenden Artikel:
C30 Vorverstärker
P35 Vollverstärker
P1 Vollverstärker.
Mit diesem Handbuch erhalten Sie alle Informationen, die Sie zur Installation und Inbetriebnahme dieser Produkte benötigen. Artikel C30 wird zuerst beschrieben, dann P35 und schließlich P1. Ferner wird die Verwendung der Fernbedienung CD-389 beschrieben, die mit dem C30 geliefert wird.
Wenn Ihr(e) Verstärker von einem autorisierten Arcam-Händler installiert und aufgestellt wurde(n), lesen Sie nur die Kapitel zur Verwendung dieser Geräte. Andernfalls lesen Sie bitte die Montageanleitung für Ihr Produkt sorgfältig durch, bevor Sie fortfahren.
SICHERHEITDie Sicherheitsrichtlinien werden auf Seite 34 dieses Handbuchs beschrieben.
Viele der beschriebenen Hinweise sind selbstverständlich, trotzdem bitten wir Sie zu Ihrer eigenen Sicherheit und damit das Gerät nicht beschädigt wird, dass Sie alles durchlesen.
ANDERE SPRACHENWenn Sie dieses Handbuch in einer anderen Sprache wünschen, besuchen Sie bitte entweder unsere Webseite (www.arcam.co.uk) oder wenden Sie sich an Ihren Händler. Die meisten unserer Handbücher sind in vielen Sprachen erhältlich.
INHALT
Sicherheitsrichtlinien...................................................................34Wichtige Sicherheitsanweisungen .............................................. 34Einhaltung von Sicherheitsbestimmungen.............................. 34
Hinweise zum Handbuch ...........................................................35Inhalt............................................................................................................ 35
Montage: C30 Vorverstärker .....................................................36Aufstellen Des Geräts....................................................................... 36Netzanschluss ........................................................................................ 36Verbindung Mit Dem Vollverstärker ........................................ 36Anschliessen An Andre Geräte ................................................... 36
Verwendung Ihres Vorverstärkers C30...................................38Bedienelemente An Der Frontblende ..................................... 38Aufnahme................................................................................................. 39
Einstellen Ihres Vorverstärkers Typ C30.................................40
Verwendung der Fernbedienung ..............................................41Aufstellen Des Geräts....................................................................... 42Netzanschluss ........................................................................................ 42
Montage: Vollverstärker P35 und P1 ........................................42Anschluss An Andere Geräte ....................................................... 43Lautsprecher Anschliessen.............................................................. 43Fernschaltung ......................................................................................... 43Dreikanaloption (Nur P35)............................................................ 43
Verwendung Ihres Vollverstärkers............................................44Vorbereitungsmaßnahmen ............................................................. 45Doppelte Verkabelung Ihrer Lautsprecher ............................ 45
Doppelte Verkabelung und Verstärkung von Lautsprechern...............................................................................45
Doppelte Verstärkung Ihres Systems........................................ 45
Technische Spezifikationen ........................................................46
Codes für die Fernbedienung....................................................47
Garantie .........................................................................................48
Kundendienstinformation ..........................................................48Online-Registrierung.......................................................................... 48
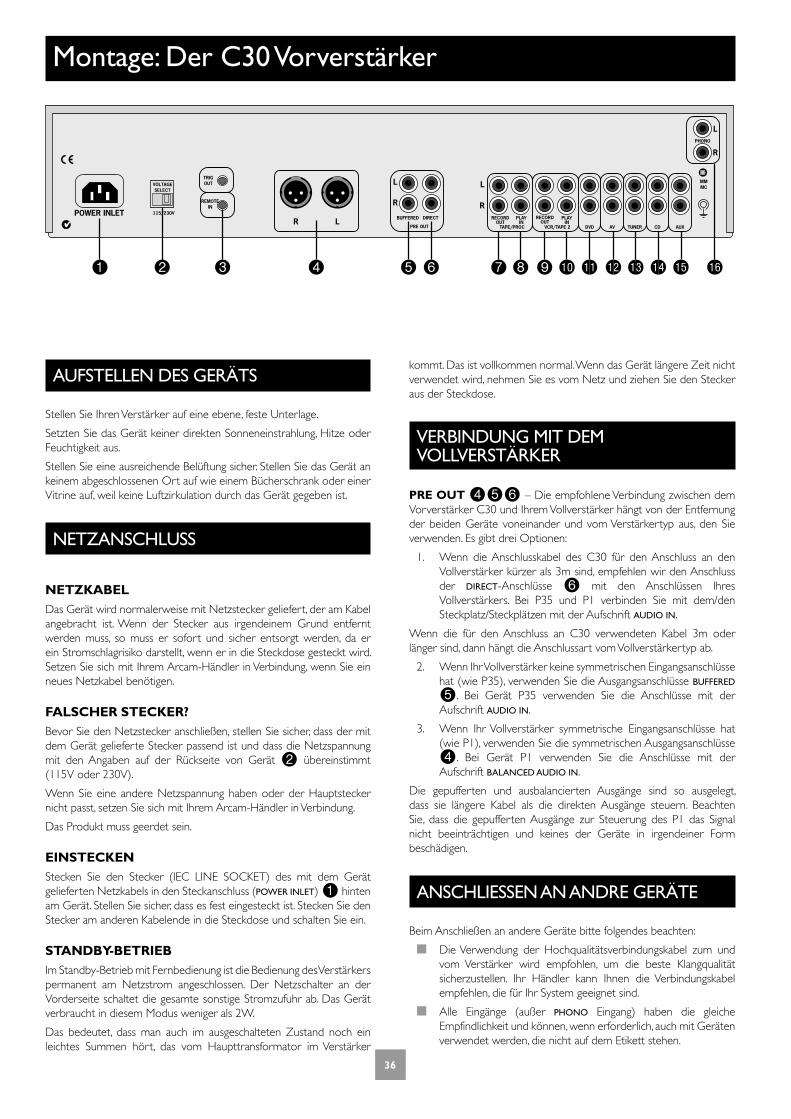
3636 37
De
uts
ch
AUFSTELLEN DES GERÄTS
Stellen Sie Ihren Verstärker auf eine ebene, feste Unterlage.
Setzten Sie das Gerät keiner direkten Sonneneinstrahlung, Hitze oder Feuchtigkeit aus.
Stellen Sie eine ausreichende Belüftung sicher. Stellen Sie das Gerät an keinem abgeschlossenen Ort auf wie einem Bücherschrank oder einer Vitrine auf, weil keine Luftzirkulation durch das Gerät gegeben ist.
NETZANSCHLUSS
NETZKABELDas Gerät wird normalerweise mit Netzstecker geliefert, der am Kabel angebracht ist. Wenn der Stecker aus irgendeinem Grund entfernt werden muss, so muss er sofort und sicher entsorgt werden, da er ein Stromschlagrisiko darstellt, wenn er in die Steckdose gesteckt wird. Setzen Sie sich mit Ihrem Arcam-Händler in Verbindung, wenn Sie ein neues Netzkabel benötigen.
FALSCHER STECKER?Bevor Sie den Netzstecker anschließen, stellen Sie sicher, dass der mit dem Gerät gelieferte Stecker passend ist und dass die Netzspannung mit den Angaben auf der Rückseite von Gerät 2 übereinstimmt (115V oder 230V).
Wenn Sie eine andere Netzspannung haben oder der Hauptstecker nicht passt, setzen Sie sich mit Ihrem Arcam-Händler in Verbindung.
Das Produkt muss geerdet sein.
EINSTECKENStecken Sie den Stecker (IEC LINE SOCKET) des mit dem Gerät gelieferten Netzkabels in den Steckanschluss (POWER INLET) 1 hinten am Gerät. Stellen Sie sicher, dass es fest eingesteckt ist. Stecken Sie den Stecker am anderen Kabelende in die Steckdose und schalten Sie ein.
STANDBY-BETRIEBIm Standby-Betrieb mit Fernbedienung ist die Bedienung des Verstärkers permanent am Netzstrom angeschlossen. Der Netzschalter an der Vorderseite schaltet die gesamte sonstige Stromzufuhr ab. Das Gerät verbraucht in diesem Modus weniger als 2W.
Das bedeutet, dass man auch im ausgeschalteten Zustand noch ein leichtes Summen hört, das vom Haupttransformator im Verstärker
Montage: Der C30 Vorverstärker
LR
PHONO
POWER INLET
PRE OUT
BUFFERED
L
R
L
R
L
R
VOLTAGESELECT
RECORDOUT
PLAYIN
TAPE/PROC
RECORDOUT
PLAYIN
VCR/TAPE 2 DVD AV TUNER CD AUX
MMMC
REMOTEIN
TRIGOUT
115/230VDIRECT
kommt. Das ist vollkommen normal. Wenn das Gerät längere Zeit nicht verwendet wird, nehmen Sie es vom Netz und ziehen Sie den Stecker aus der Steckdose.
VERBINDUNG MIT DEM VOLLVERSTÄRKER
PRE OUT 456 – Die empfohlene Verbindung zwischen dem Vorverstärker C30 und Ihrem Vollverstärker hängt von der Entfernung der beiden Geräte voneinander und vom Verstärkertyp aus, den Sie verwenden. Es gibt drei Optionen:
1. Wenn die Anschlusskabel des C30 für den Anschluss an den Vollverstärker kürzer als 3m sind, empfehlen wir den Anschluss der DIRECT-Anschlüsse 6 mit den Anschlüssen Ihres Vollverstärkers. Bei P35 und P1 verbinden Sie mit dem/den Steckplatz/Steckplätzen mit der Aufschrift AUDIO IN.
Wenn die für den Anschluss an C30 verwendeten Kabel 3m oder länger sind, dann hängt die Anschlussart vom Vollverstärkertyp ab.
2. Wenn Ihr Vollverstärker keine symmetrischen Eingangsanschlüsse hat (wie P35), verwenden Sie die Ausgangsanschlüsse BUFFERED
5. Bei Gerät P35 verwenden Sie die Anschlüsse mit der Aufschrift AUDIO IN.
3. Wenn Ihr Vollverstärker symmetrische Eingangsanschlüsse hat (wie P1), verwenden Sie die symmetrischen Ausgangsanschlüsse
4. Bei Gerät P1 verwenden Sie die Anschlüsse mit der Aufschrift BALANCED AUDIO IN.
Die gepufferten und ausbalancierten Ausgänge sind so ausgelegt, dass sie längere Kabel als die direkten Ausgänge steuern. Beachten Sie, dass die gepufferten Ausgänge zur Steuerung des P1 das Signal nicht beeinträchtigen und keines der Geräte in irgendeiner Form beschädigen.
ANSCHLIESSEN AN ANDRE GERÄTE
Beim Anschließen an andere Geräte bitte folgendes beachten:
Die Verwendung der Hochqualitätsverbindungskabel zum und vom Verstärker wird empfohlen, um die beste Klangqualität sicherzustellen. Ihr Händler kann Ihnen die Verbindungskabel empfehlen, die für Ihr System geeignet sind.
Alle Eingänge (außer PHONO Eingang) haben die gleiche Empfindlichkeit und können, wenn erforderlich, auch mit Geräten verwendet werden, die nicht auf dem Etikett stehen.

3636 37
De
uts
ch
Der C30 bietet folgende Anschlüsse:
TAPE/PROC RECORD OUT 7 – Schließen Sie diese Ausganganschlüsse an die Einganganschlüsse Ihres Kassettendecks an (normalerweise als RECORD auf dem Kassettendeck gekennzeichnet).
TAPE/PROC PLAY IN 8 – Schließen Sie diese Einganganschlüsse an die Ausganganschlüsse Ihres Kassettendecks an (normalerweise als PLAY auf dem Kassettendeck gekennzeichnet). Wenn Sie kein Kassettendeck haben, können Sie diesen Einganganschluss für andere Geräte (mit Leistungssignal) wie CD-Player, Tuner, VCR etc. verwenden (jedoch nicht Plattenspieler).
VCR/TAPE2 RECORD OUT 9 – Diese Ausganganschlüsse können mit den Einganganschlüssen des VCR verbunden werden (normalerweise mit RECORD auf dem VCR gekennzeichnet). Alternativ können diese Anschlüsse an einen zweiten Recorder angeschlossen werden (z.B. zweites Kassettendeck).
VCR/TAPE2 PLAY IN bk – Schließen Sie diese Eingangsanschlüsse an die Ausgangsanschlüsse ihres VCR/zweiten Recorders an (die Ausgangsanschlüsse werden normalerweise mit PLAY gekennzeichnet). Alternativ können Sie diesen Eingang für anderes Equipment (mit Leistungssignal) verwenden wie CD-Player, Tuner etc (jedoch nicht Plattenspieler).
DVD bl – Schießen Sie diesen Eingang and die Stereo-Audio-Ausgänge eines DVD-Players an.
AV bm – Schließen Sie diesen Eingang an die Stereo-Audio-Ausgänge audiovisueller Geräte an wie Laserdisk-Player, Satelliten oder Nicam-Tuner.
TUNER bn – Schließen Sie diesen Eingang an die Audio-Ausgänge Ihres Radiotuners an.
CD bo – Schließen Sie diesen Eingang an die Audio-Ausgänge Ihres CD-Players oder DAC (Digital zu Analog Konverter) an.
AUX bp – Da das Gerät C30 standardmäßig mit Phonoboard ausgestattet ist, ist der AUX-Anschluss ein Leistungssignalausgang, der ein ausgeglichenes Phonosignal trägt. Wenn gewünscht, kann dieser Ausgang an ein Aufnahmegerät angeschlossen werden.
Falls Sie das Phonboard entfernen wollen, können die AUX-Anschlüsse als Leistungssignaleingang verwendet werden. Fragen Sie bitte Ihren Händler, wenn Sie weitere Informationen über diese Option benötigen. Wenn Sie das Phonoboard selbst entfernen, verfällt u.U. der Garantieanspruch.
PHONO bq – Schließen Sie diesen Eingang an die Audio-Ausgänge Ihres Plattenspielers an. Das Phonomodul, das im Lieferumfang des C30 enthalten ist, ist mit den meisten Tonabnehmern mit Magnetsystem und MC-Tonabnehmern kompatibel. Stellen Sie den blauen Schalter direkt unter diesen Anschlüssen wie folgt auf die korrekte Position:
MM - wird für alle Tonabnehmer mit Magnetsystem und MC-Tonabnehmer mit hoher Ausgabe verwendet. Der blaue Schalter ist in der hinteren Blende des C30 versenkt.
MC - wird für alle Tonabnehmer mit Magnetsystem und MC-Tonabnehmer mit niedriger Ausgabe verwendet. Der blaue Schalter wird in die hintere Blende des C30 gedrückt.
Phono-Erdungsklemme - Zum Anschluss des Erdungskabels Ihres Plattenspieler (wenn montiert). Beachten Sie, dass diese Klemme nicht als Sicherheitserdung verwendet werden darf.
TRIG OUT und REMOTE IN 3 (12V Ein und Aus) – Diese Anschlüsse sind für den Gebrauch in Mehrraum-Installationen gedacht.
TRIG OUT – Dieser Ausgang bietet ein 12V-Signal, wo immer das Gerät eingeschal-tet wird (d.h. nicht Aus oder im Standby-Modus). Dieses Signal kann verwendet werden, um die Vollverstärker (oder andere Geräte) automatisch einzuschalten, weil sie einschalten, sobald der C30 aktiviert wird. Das ist nützlich, wenn der Vollverstärker vom C30 entfernt steht oder schwer zugänglich ist. Diese Option kann sowohl mit dem P35 als auch dem P1 verwendet werden. Wenn Sie mit einem Vollverstärker zwei Geräte betreiben und beide Geräte gleichzeitig ein- und ausschalten möchten, lesen Sie Seite 11.
REMOTE IN – Hiermit können Fernsteuerungssignale von dem C30 empfangen werden, wenn der Fernsteuerungssensor verdeckt ist (oder anderweitig für die Fernbedienung ‚unsichtbar‘ ist). Ein externer Sensor wird verwendet, um die Signale von der Fernbedienung zu empfangen. Diese Signale werden dann mit einem geeigneten Kabel in den C30 gespeist (in diesen Eingang). Die Fernsteuerungssignale, die für den C30 verwendbar sind, müssen im modulierten RC5-Format erfolgen und einer Spannung von 5V bis 15V.
Beachten Sie, dass bei normaler Verwendung kein Anschluss an diesen Buchsen erforderlich ist. Wenn Sie diese Optionen verwenden möchten, fragen Sie bitte Ihren Händler für nähere Angaben zu den Anschlüssen und den zu verwendenden Kabeltypen.
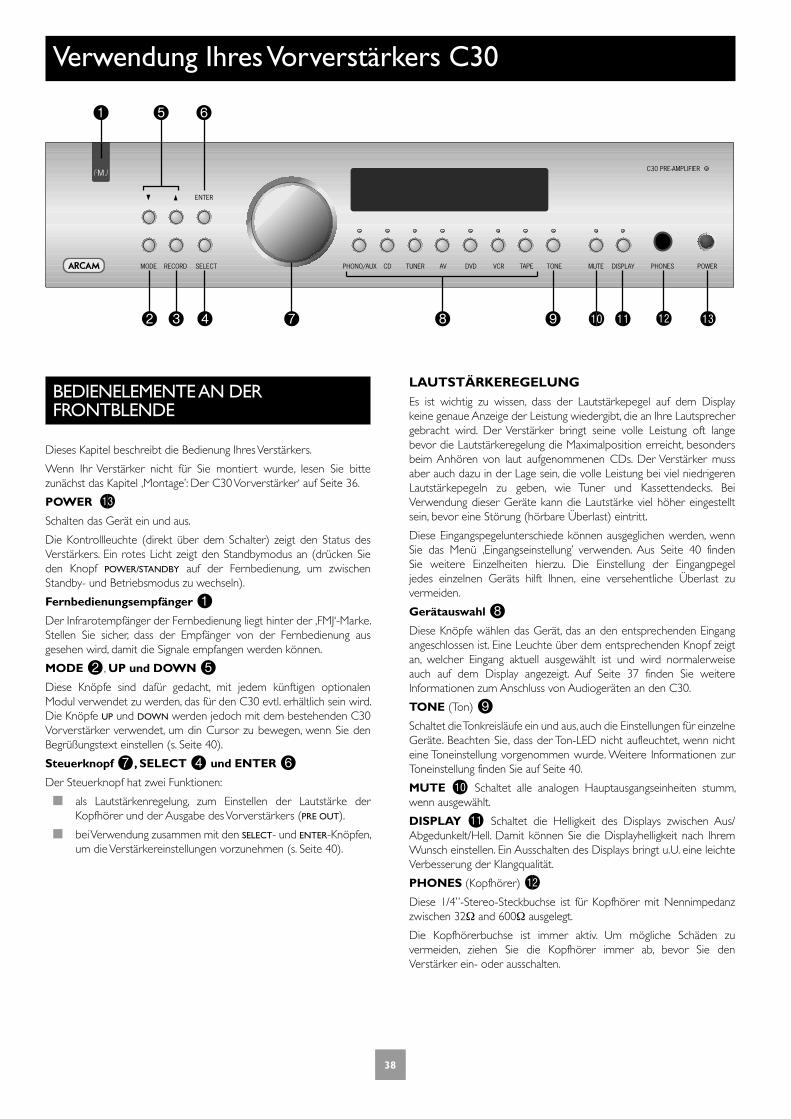
3838 39
De
uts
ch
Verwendung Ihres Vorverstärkers C30
BEDIENELEMENTE AN DER FRONTBLENDE
Dieses Kapitel beschreibt die Bedienung Ihres Verstärkers.
Wenn Ihr Verstärker nicht für Sie montiert wurde, lesen Sie bitte zunächst das Kapitel ‚Montage’: Der C30 Vorverstärker‘ auf Seite 36.
POWER bnSchalten das Gerät ein und aus.
Die Kontrollleuchte (direkt über dem Schalter) zeigt den Status des Verstärkers. Ein rotes Licht zeigt den Standbymodus an (drücken Sie den Knopf POWER/STANDBY auf der Fernbedienung, um zwischen Standby- und Betriebsmodus zu wechseln).
Fernbedienungsempfänger 1Der Infrarotempfänger der Fernbedienung liegt hinter der ‚FMJ‘-Marke. Stellen Sie sicher, dass der Empfänger von der Fernbedienung aus gesehen wird, damit die Signale empfangen werden können.
MODE 2, UP und DOWN 5
Diese Knöpfe sind dafür gedacht, mit jedem künftigen optionalen Modul verwendet zu werden, das für den C30 evtl. erhältlich sein wird. Die Knöpfe UP und DOWN werden jedoch mit dem bestehenden C30 Vorverstärker verwendet, um din Cursor zu bewegen, wenn Sie den Begrüßungstext einstellen (s. Seite 40).
Steuerknopf 7, SELECT 4 und ENTER 6Der Steuerknopf hat zwei Funktionen:
als Lautstärkenregelung, zum Einstellen der Lautstärke der Kopfhörer und der Ausgabe des Vorverstärkers (PRE OUT).
bei Verwendung zusammen mit den SELECT- und ENTER-Knöpfen, um die Verstärkereinstellungen vorzunehmen (s. Seite 40).
LAUTSTÄRKEREGELUNGEs ist wichtig zu wissen, dass der Lautstärkepegel auf dem Display keine genaue Anzeige der Leistung wiedergibt, die an Ihre Lautsprecher gebracht wird. Der Verstärker bringt seine volle Leistung oft lange bevor die Lautstärkeregelung die Maximalposition erreicht, besonders beim Anhören von laut aufgenommenen CDs. Der Verstärker muss aber auch dazu in der Lage sein, die volle Leistung bei viel niedrigeren Lautstärkepegeln zu geben, wie Tuner und Kassettendecks. Bei Verwendung dieser Geräte kann die Lautstärke viel höher eingestellt sein, bevor eine Störung (hörbare Überlast) eintritt.
Diese Eingangspegelunterschiede können ausgeglichen werden, wenn Sie das Menü ‚Eingangseinstellung’ verwenden. Aus Seite 40 finden Sie weitere Einzelheiten hierzu. Die Einstellung der Eingangpegel jedes einzelnen Geräts hilft Ihnen, eine versehentliche Überlast zu vermeiden.
Gerätauswahl 8
Diese Knöpfe wählen das Gerät, das an den entsprechenden Eingang angeschlossen ist. Eine Leuchte über dem entsprechenden Knopf zeigt an, welcher Eingang aktuell ausgewählt ist und wird normalerweise auch auf dem Display angezeigt. Auf Seite 37 finden Sie weitere Informationen zum Anschluss von Audiogeräten an den C30.
TONE (Ton) 9Schaltet die Tonkreisläufe ein und aus, auch die Einstellungen für einzelne Geräte. Beachten Sie, dass der Ton-LED nicht aufleuchtet, wenn nicht eine Toneinstellung vorgenommen wurde. Weitere Informationen zur Toneinstellung finden Sie auf Seite 40.
MUTE bk Schaltet alle analogen Hauptausgangseinheiten stumm, wenn ausgewählt.
DISPLAY bl Schaltet die Helligkeit des Displays zwischen Aus/Abgedunkelt/Hell. Damit können Sie die Displayhelligkeit nach Ihrem Wunsch einstellen. Ein Ausschalten des Displays bringt u.U. eine leichte Verbesserung der Klangqualität.
PHONES (Kopfhörer) bmDiese 1/4”-Stereo-Steckbuchse ist für Kopfhörer mit Nennimpedanz zwischen 32Ω and 600Ω ausgelegt.
Die Kopfhörerbuchse ist immer aktiv. Um mögliche Schäden zu vermeiden, ziehen Sie die Kopfhörer immer ab, bevor Sie den Verstärker ein- oder ausschalten.
C30 PRE-AMPLIFIER
MUTE DISPLAY POWERPHONESPHONO/AUX CD TUNER AV DVD VCR TAPE TONE
ENTER
MODE RECORD SELECT

3838 39
De
uts
ch
AUFNAHME
Mit dem C30 können mit einem Gerät hören und aufnehmen oder mit einem Gerät hören und einem weiteren aufnehmen.
Beide Kassettenbuchsen sind gleich empfindlich und geeignet für die Verwendung mit fast jedem Recordertyp (Kassetten, CRD, MD, VCR, Spulengeräte etc.). Das Aufnahmesignal wird sowohl an die TAPE- (Band) als auf VCR-Ausgangbuchsen gesendet.
RECORD (Aufnahme) 3Um vom ausgewählten Gerät aufzunehmen, halten Sie RECORD gedrückt, bis auf der Anzeige ‚RECORD SOURCE‘ (Aufnahmegerät) erscheint. Nach einigen Sekunden zeigt das Display den Lautstärkepegel an, und Sie können aufnehmen.
Um von einem Gerät anzuhören und mit einem anderen aufzunehmen, halten Sie RECORD noch einmal gedrückt bis das Display ‚RECORD’ gefolgt von der Bezeichnung eines Eingangs anzeigt, (z.B. ‚AUX‘, ‚CD‘, ‚TUNER‘, etc.). Drücken Sie jetzt den Knopf für die Gerätauswahl auf der Frontblende um das Gerät zu erhalten, von dem Sie aufnehmen möchten. Ihre Auswahl wird einige Sekunden auf dem Display angezeigt, danach zeigt es den Lautstärkepegel an, und Sie können aufnehmen.
Der RECORD-Knopf kann auch als Zonenauswahl verwendet werden. Es sendet ein Quellsignal auf Leistungssignalebene an einen zweiten Verstärker in einem anderen Raum. Wenn Sie hierbei Hilfe benötigen, fragen Sie Ihren Arcam-Händler oder den Arcam-Kundendienst.
KOPIEREN VON BAND ZU BAND (DUBBING)Dubbing von VCR zum TAPE (Band) ist möglich, aber nicht von TAPE zu VCR.
Wenn Sie beispielsweise von einem Kassettenrekorder, der an der VCR/TAPE2-Buchse angeschlossen ist, auf einen Kassettenrekorder kopieren möchten, der mit der TAPE-Buchse verbunden ist, verwenden Sie zunächst den RECORD-Knopf wie oben beschrieben und wählen Sie ‚RECORD VCR’. Das leitet das VCR-Signal zum TAPE-Ausgang.
Stellen Sie den Kassettenrekorder, der mit der TAPE-Buchse verbunden ist, auf Aufnahme und den anderen auf Wiedergabe, um das Dubbing zu starten.
TAPE (Band) 8Um die Aufnahme von mit dem TAPE-Eingang verbundenen Kassettendeck abzuspielen, drücken Sie TAPE. Das Display zeigt ‚TAPE’ an. Die Auswahl dieses Eingangs überlagert alle anderen Gerätewähler.
Man kann eine Aufnahme auch überwachen, während sie durchgeführt wird, sofern Sie ein 3-Kopf-Typ-Kassettendeck haben. Dazu drücken Sie TAPE. Wenn Sie diesen Knopf auf ein/aus drücken, ermöglichen Sie einen A/B-Vergleich zwischen dem Quellsignal und dem aufgenommenen Signal.

4040 41
De
uts
ch
Einstellen Ihres Vorverstärkers Typ C30
LINKS RECHTS
–dB +dB
–dB +dB
Status „Eingeschaltet“
StandardFineReference
GraphicNumeric
Max on volumeVol 05
GlobalPer Source
TapeFixed 01...
Welcome messageARCAM PRE AMPLIFIER
ARCAM PRE AMPLIFIER
Customize Settings
Treble CD
Bass CD
Balance CD
Restore SettingsYes
Customize SettingsVolume resolution
Customize SettingsVolume display mode
Customize SettingsInput trims
Customize SettingsMax on volume
Customize SettingsTone control mode
Customize SettingsProcessor mode
Customize SettingsWelcome message
Customize SettingsPhono/Aux text
Customize SettingsRestore settings
Volume CD
Input trimsCD -8
Phono/Aux textPhono
–dB +dB
EINLEITUNGMit dem C30 können Sie die Abhöreigenschaften nach Belieben einstellen und den Verstärker an Ihr System anpassen. Verwenden Sie dieses Schaubild, um durch die verschiedenen Einstellmöglichkeiten zu navigieren.
Die ENTER und SELECT-Knöpfe auf der Frontblende werden auf dem
Schaubild mit den Symbolen
bzw. dargestellt.
Der Regler wird dargestellt als .
ABHÖREIGENSCHAFTEN EINSTELLENDer standardmäßige Displaymodus ist volume (Lautstärke), bei dem der Regler ver-wendet wird, um die Lautstärke einzustellen.
Drücken Sie einmal SELECT (Wählen) um in den Editiermodus zu wechseln. Weiteres Drücken zeigt die anderen Einstellungen an: BALANCE, BASS und TREBLE (Höhenrege-lung). Wenn eine Einstellung ausgewählt wird (auf dem Display angezeigt) kann sie mit dem Regler eingestellt werden. Drücken Sie ENTER (Eingabe), um die Ände-rung zu speichern, die Sie vorgenommen haben und kehren Sie zum Eingangsmodus (Volume) zurück oder drücken Sie SELECT, um zur nächsten Einstellungsoption zu gelangen.
VERSTÄRKER EINSTELLENViele der Leistungsmerkmale des C30 können Sie individuell einstellen. Gehen Sie dazu folgendermaßen vor:
1. Drücken Sie wiederholt SELECT, bis das Display ‚CUSTOMISE->’ anzeigt;
2. Drehen Sie den Regler, um die zu ändernde Einstellung auszuwählen;
3. Drücken Sie SELECT zum Regeln der gewählten Einstellung;
4. Drücken Sie ENTER, um die Einstellung zu bestätigen oder drücken Sie SELECT, um die Einstellung zu bestätigen und zur nächsten Einstellung zu gelangen.
Drücken Sie zweimal ENTER, um das Einstellungsmenü zu verlassen.
Volume Resolution (Klangauflösung) – Standard, Fine (Fein) oder Reference (Referenz). ‚Standard’ und ‚Fein’ stellen unterschiedliche Empfindlichkeitsgrade der Klangregelung dar. ‚Referenz’ steht für einen absoluten Lautstärkeanstieg in Schritten von 0,5dB.
Anzeigemodus Lautstärke – graphisch oder numerisch zeigt die Lautstärke als Diagramm oder Zahl. Wenn die Klangauflösung auf ‚Referenz’ steht, zeigt eine numerische Anzeige den tatsächlichen Dezibelwert.
Input Trims (Eingangseinstellungen) – verwenden Sie die Geräte-auswahlschalter und den Regler um die Eingangseinstellungen für jedes Gerät vorzunehmen. Eingangs-einstellungen werden verwendet, um die Ausgang-unterschiede von unterschiedlichen Geräten auszugleichen.
Max. ‚ON’ Volume (max. Lautstärke ‚An’) – Kann verwendet werden, um die maximale Lautstärke des Verstärkers zu begrenzen, wenn er erstmals eingeschaltet wird. Das System wird bei dieser Lautstärke eingeschaltet, wenn die zuletzt verwendete Lautstärke diesen Pegel überschreitet. Wenn diese Einstellung ausgeschaltet wird (‚Disabled’), läuft der Verstärker mit der zuletzt gewählten Lautstärke.
Tone Control (Tonsteuerung) – Alle (Global) oder pro Gerät (Per Source). Das definiert den Bereich für Änderungen der Toneinstellungen ‚Bass’ und ‚Treble’. ‚Global’ ist die Standardeinstellung und regelt jeden Eingang gleich. Mit ‚Per Source’ können Sie die Toneinstellungen für jeden einzelnen Eingang regeln. Der Verstärker speichert die einmal vorgenommenen Toneinstellungen für jeden einzelnen Eingang.
Processor Mode (Prozessormodus) – Dieser Modus ermöglicht Ihnen die Einstellung des Verstärkungsfaktors des Geräts. Der Verstärker kann dann verwendet werden, um die vorderen linken oder rechten Lautsprecher in einem Surround-System bei Einspeisung von einem separaten Prozessor zu betreiben. Die Lautstärke des gesamten Systems kann dann mithilfe des Prozessors geregelt werden. Speisen Sie den Klang vom Prozessor in den TAPE-Eingang. Stellen Sie den Verstärkungsfaktor ein, um die Verstärker aufeinander auszurichten, die Ihre anderen Lautsprecher antreiben.
Welcome Message (Begrüßung) – Sie können die Standardbegrüßung ‚Arcam Amp’ beim Einschalten so ändern, dass Ihr Name, Ihre Postleitzahl etc. angezeigt wird. Verwenden Sie die Knöpfe UP (Nach oben) und DOWN (Nach unten) zur Auswahl der Cursorposition und den Regler zum Ändern der Buchstaben.
Phono/Aux-Text – Der C30 ist mit Phonomodul ausgestattet. Wenn als Gerät Phono-Eingang gewählt ist, wird ‚PHONO’ angezeigt. Wenn Sie die Phonoanzeige wegnehmen möchten, können die AUX-Anschlüsse als Signaleingang verwendet werden. Ändern Sie in diesem Fall den angezeigten Text in ‚AUX’ unter Verwendung dieser Menüoption.
Restore Settings (Zurücksetzen der Einstellungen) – setzt alle Verstärkereinstel-lungen, auch Eingangs-einstellungen und Begrüßungstext auf die werksseitige Standardeinstellung zurück.
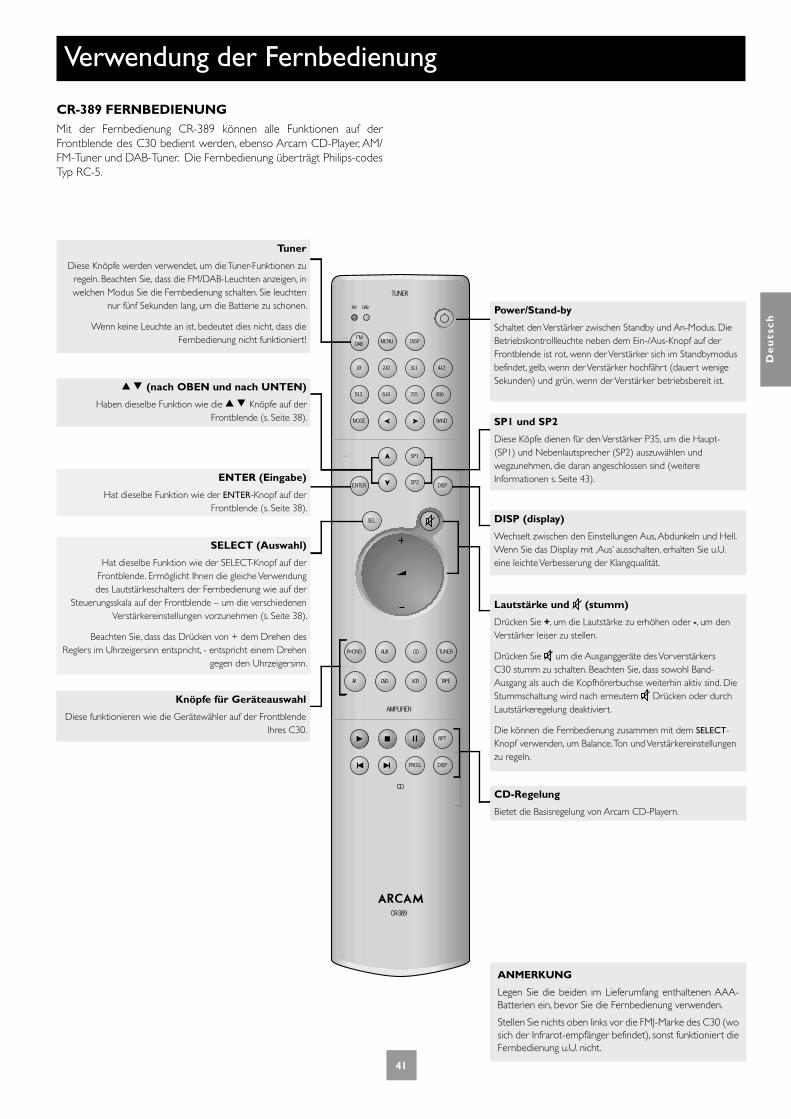
4040 41
De
uts
ch
Verwendung der Fernbedienung
ANMERKUNG
Legen Sie die beiden im Lieferumfang enthaltenen AAA-Batterien ein, bevor Sie die Fernbedienung verwenden.
Stellen Sie nichts oben links vor die FMJ-Marke des C30 (wo sich der Infrarot-empfänger befindet), sonst funktioniert die Fernbedienung u.U. nicht.
CR-389 FERNBEDIENUNGMit der Fernbedienung CR-389 können alle Funktionen auf der Frontblende des C30 bedient werden, ebenso Arcam CD-Player, AM/FM-Tuner und DAB-Tuner. Die Fernbedienung überträgt Philips-codes Typ RC-5.
FM DAB
PROG DISP
RPT
MODE BAND
1-9 2-10 3-11
FMDAB
SEL
TUNER
CR-389
CD
AMPLIFIER
VCRDVD TAPEAV
TUNERCDAUXPHONO
ENTER
SP1
SP2 DISP
MENU DISP
4-12
5-13 6-14 7-15 8-16
Tuner
Diese Knöpfe werden verwendet, um die Tuner-Funktionen zu regeln. Beachten Sie, dass die FM/DAB-Leuchten anzeigen, in welchen Modus Sie die Fernbedienung schalten. Sie leuchten
nur fünf Sekunden lang, um die Batterie zu schonen.
Wenn keine Leuchte an ist, bedeutet dies nicht, dass die Fernbedienung nicht funktioniert!
(nach OBEN und nach UNTEN)
Haben dieselbe Funktion wie die Knöpfe auf der Frontblende (s. Seite 38).
SELECT (Auswahl)
Hat dieselbe Funktion wie der SELECT-Knopf auf der Frontblende. Ermöglicht Ihnen die gleiche Verwendung des Lautstärkeschalters der Fernbedienung wie auf der
Steuerungsskala auf der Frontblende – um die verschiedenen Verstärkereinstellungen vorzunehmen (s. Seite 38).
Beachten Sie, dass das Drücken von + dem Drehen des Reglers im Uhrzeigersinn entspricht, - entspricht einem Drehen
gegen den Uhrzeigersinn.
ENTER (Eingabe)
Hat dieselbe Funktion wie der ENTER-Knopf auf der Frontblende (s. Seite 38).
Knöpfe für Geräteauswahl
Diese funktionieren wie die Gerätewähler auf der Frontblende Ihres C30.
Power/Stand-by
Schaltet den Verstärker zwischen Standby und An-Modus. Die Betriebskontrollleuchte neben dem Ein-/Aus-Knopf auf der Frontblende ist rot, wenn der Verstärker sich im Standbymodus befindet, gelb, wenn der Verstärker hochfährt (dauert wenige Sekunden) und grün, wenn der Verstärker betriebsbereit ist.
SP1 und SP2
Diese Köpfe dienen für den Verstärker P35, um die Haupt- (SP1) und Nebenlautsprecher (SP2) auszuwählen und wegzunehmen, die daran angeschlossen sind (weitere Informationen s. Seite 43).
DISP (display)
Wechselt zwischen den Einstellungen Aus, Abdunkeln und Hell. Wenn Sie das Display mit ‚Aus’ ausschalten, erhalten Sie u.U. eine leichte Verbesserung der Klangqualität.
Lautstärke und (stumm)
Drücken Sie +, um die Lautstärke zu erhöhen oder -, um den Verstärker leiser zu stellen.
Drücken Sie um die Ausganggeräte des Vorverstärkers C30 stumm zu schalten. Beachten Sie, dass sowohl Band-Ausgang als auch die Kopfhörerbuchse weiterhin aktiv sind. Die Stummschaltung wird nach erneutem Drücken oder durch Lautstärkeregelung deaktiviert.
Die können die Fernbedienung zusammen mit dem SELECT-Knopf verwenden, um Balance, Ton und Verstärkereinstellungen zu regeln.
CD-Regelung
Bietet die Basisregelung von Arcam CD-Playern.
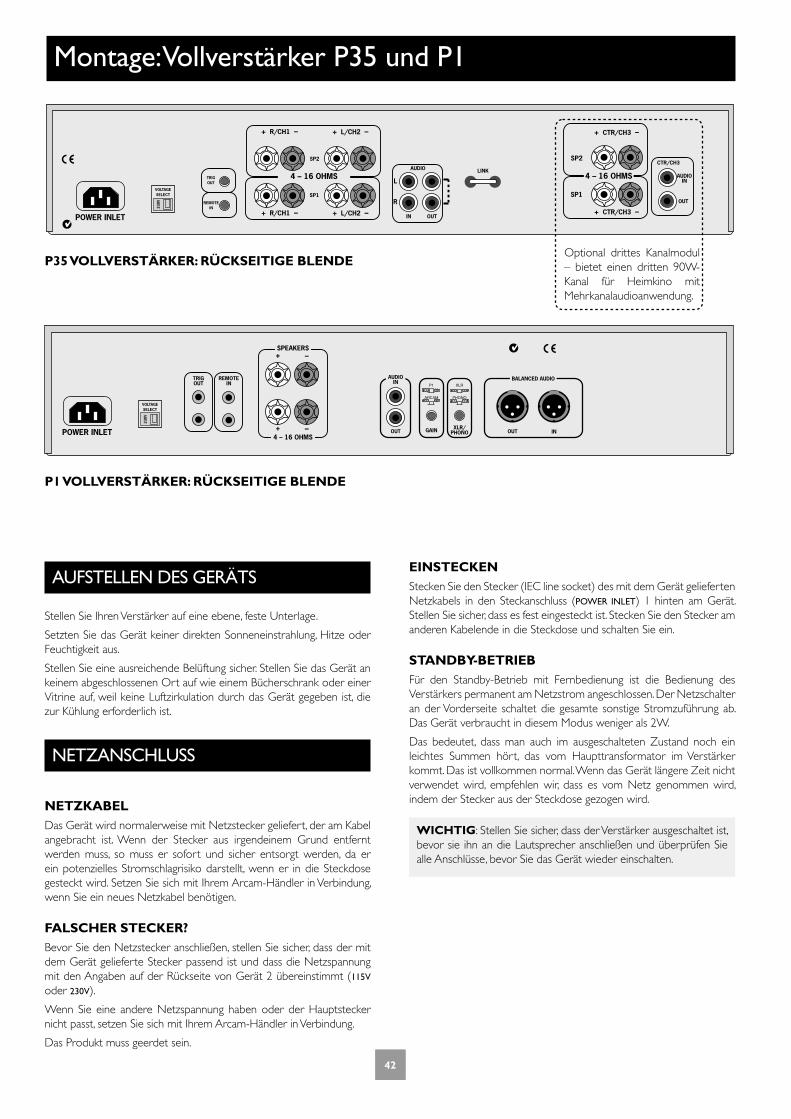
4242 43
De
uts
ch
+ R/CH1 –
CTR/CH3
SP1
SP2
POWER INLET OUTIN
L
R
VOLTAGESELECT
230V
4 – 16 OHMS
+ L/CH2 –
+ R/CH1 – + L/CH2 –
AUDIO
SP1
SP2
4 – 16 OHMS
+ CTR/CH3 –
+ CTR/CH3 –
AUDIOIN
OUT
LINK
REMOTEIN
TRIGOUT
POWER INLET OUT
VOLTAGESELECT
230V
GAIN XLR/PHONO
TRIGOUT
REMOTEIN
4 – 16 OHMS
–+SPEAKERS
–+
AUDIOIN
P1
ARCAM
XLR
PHONO
BALANCED AUDIO
OUT IN
Montage: Vollverstärker P35 und P1
AUFSTELLEN DES GERÄTS
Stellen Sie Ihren Verstärker auf eine ebene, feste Unterlage.
Setzten Sie das Gerät keiner direkten Sonneneinstrahlung, Hitze oder Feuchtigkeit aus.
Stellen Sie eine ausreichende Belüftung sicher. Stellen Sie das Gerät an keinem abgeschlossenen Ort auf wie einem Bücherschrank oder einer Vitrine auf, weil keine Luftzirkulation durch das Gerät gegeben ist, die zur Kühlung erforderlich ist.
NETZANSCHLUSS
NETZKABELDas Gerät wird normalerweise mit Netzstecker geliefert, der am Kabel angebracht ist. Wenn der Stecker aus irgendeinem Grund entfernt werden muss, so muss er sofort und sicher entsorgt werden, da er ein potenzielles Stromschlagrisiko darstellt, wenn er in die Steckdose gesteckt wird. Setzen Sie sich mit Ihrem Arcam-Händler in Verbindung, wenn Sie ein neues Netzkabel benötigen.
FALSCHER STECKER?Bevor Sie den Netzstecker anschließen, stellen Sie sicher, dass der mit dem Gerät gelieferte Stecker passend ist und dass die Netzspannung mit den Angaben auf der Rückseite von Gerät 2 übereinstimmt (115V oder 230V).
Wenn Sie eine andere Netzspannung haben oder der Hauptstecker nicht passt, setzen Sie sich mit Ihrem Arcam-Händler in Verbindung.
Das Produkt muss geerdet sein.
EINSTECKENStecken Sie den Stecker (IEC line socket) des mit dem Gerät gelieferten Netzkabels in den Steckanschluss (POWER INLET) 1 hinten am Gerät. Stellen Sie sicher, dass es fest eingesteckt ist. Stecken Sie den Stecker am anderen Kabelende in die Steckdose und schalten Sie ein.
STANDBY-BETRIEBFür den Standby-Betrieb mit Fernbedienung ist die Bedienung des Verstärkers permanent am Netzstrom angeschlossen. Der Netzschalter an der Vorderseite schaltet die gesamte sonstige Stromzuführung ab. Das Gerät verbraucht in diesem Modus weniger als 2W.
Das bedeutet, dass man auch im ausgeschalteten Zustand noch ein leichtes Summen hört, das vom Haupttransformator im Verstärker kommt. Das ist vollkommen normal. Wenn das Gerät längere Zeit nicht verwendet wird, empfehlen wir, dass es vom Netz genommen wird, indem der Stecker aus der Steckdose gezogen wird.
WICHTIG: Stellen Sie sicher, dass der Verstärker ausgeschaltet ist, bevor sie ihn an die Lautsprecher anschließen und überprüfen Sie alle Anschlüsse, bevor Sie das Gerät wieder einschalten.
P35 VOLLVERSTÄRKER: RÜCKSEITIGE BLENDE
P1 VOLLVERSTÄRKER: RÜCKSEITIGE BLENDE
Optional drittes Kanalmodul – bietet einen dritten 90W-Kanal für Heimkino mit Mehrkanalaudioanwendung.

4242 43
De
uts
ch
ANSCHLUSS AN ANDERE GERÄTE
Die Verstärker P35 und P1 haben die folgenden Anschlüsse:
AUDIO IN (P35)AUDIO IN Und BALANCED AUDIO IN (P1)
Schließen Sie einen dieser Eingangs an die Ausganganschlüsse Ihres Vorverstärkers oder die PRE OUT-Anschlüsse Ihres integrierten Verstärkers an. Bitte lesen Sie die Hinweise auf Seite 36, die Sie darüber informieren, welche Anschlussart zum Verbinden des Vorverstärkers mit Ihrem Vollverstärker verwendet werden sollte.
MONO LINK (P35) – Der Vollverstärker P35 kann so angepasst werden, dass er zwei Mono-Lautsprecherausgänge einem einzigen Eingang bietet. Ziehen Sie das mitgelieferte Verbindungsstück heraus und verwenden Sie es zum Verbinden der Buchsen L und R AUDIO OUT. Ein Vollverstärker pro Lautsprecher ermöglicht Ihnen das doppelte Verstärken von Lautsprechern, die zweifach verkabelt werden können. Das lohnt sich besonders für qualitativ hochwertige Stereoinstallationen mit separatem Vorverstärker oder mit Verstärkern für die Lautsprecher im linken, mittleren oder rechten Kanal in einem Dolby Pro Logic oder Dolby Digital-System mit fünf Lautsprechern.
Wenn Sie diese Option nutzen möchten, bitten Sie Ihren Arcam-Händler um weitere Informationen.
Wählschalter Eingang (P1) – Dieser Schalter ermöglicht die Auswahl zwischen unausgeglichenen (über Phonokonnektor) oder ausgeglichenen Signalen (durch XLR-Konnektor). Mit eingedrücktem Schalter kann man den Phonoeingang wählen, ein herausstehender Schalter wählt den XLR-Konnektor. Beachten Sie, dass nur eine Eingangskonnektorart zum Eingang des Verstärkers geschaltet wird. Wenn Sie (beispielsweise) den XLR-Konnektor wählen, können Sie keine Signale hören, die mit den Phonoeingang verbunden sind.
Verstärkungsfaktorschalter (P1) – Mit diesem Schalter kann der Verstärkungsfaktor des P1 so verändert werden, dass er zu Ihren Systemanforderungen passt. Zwei Einstellungen sind möglich: Mit Schalter in der IN-Position wird der Faktor auf den Standardfaktor von ARCAM von 31,5dB gesetzt. Damit kann der P1 in Systemen genutzt werden, in denen weitere ARCAM Vollverstärker genutzt werden. Wenn der Schalter auf OUT steht, wird der Verstärkungsfaktor auf‚THX standard gain’ (THX-Standardfaktor) gesetzt. In diesem Modus kann das Gerät in Systemen mit Verstärkern mit THX-Verstärkungsfaktor genutzt werden (z.B. der P7).
VERKETTUNGModell P35 und P1 können an weitere Vollverstärker angeschlossen werden, um mehr Lautsprecher zu betreiben (d.h. in anderen Räumen oder dreifach verstärkte Lautsprecher etc.). Diese Technik nennt sich ‚Verkettung’.
Um Vollverstärker miteinander zu verketten, verbinden Sie die AUDIO OUT Anschlüsse auf dem Vollverstärker mit dem Eingang des zusätzlichen Vollverstärkers – links nach links und rechts nach rechts.
LAUTSPRECHER ANSCHLIESSEN
Die roten und schwarzen Anschlüsse auf der Rückseite des Verstärkers werden für den Anschluss an die Lautsprecher verwendet. Man kann zwei Lautsprecherpaare anschließen, das Paar, das als „speaker 1“ (SP1) bezeichnet wird, wird an den unteren Anschlüssen verbunden, das Paar „speaker 2“ (SP2) an den oberen Anschlüssen.
Wenn Sie diese Anschlüsse des Verstärkers mit denen der Lautsprecher verbinden, stellen Sie eine korrekte Polung sicher (d.h. „+“ mit „+“ (gewöhnlich rot) und „–“ mit „–“ (gewöhnlich schwarz)). Eine fehlerhafte Polung führt zu schwachem mittleren Klang, einer unklaren Orientierung der Instrumente und die Richtung des Stereos wird beeinträchtigt. Es gibt zwei Möglichkeiten, das Lautsprecherkabel mit dem Verstärker zu verbinden:
LEITUNGEN MIT BLANKEN DRAHTENDEN:1. Isolierung auf dem Draht abziehen und ca. 2 cm des Leiters
freigeben (das Metall im Kabel).
2. Wenn der Leiter verseilt ist, verwinden Sie die beiden Stränge fest miteinander, damit keine losen Stränge mit dem angrenzenden Anschluss oder der rückseitigen Blende Kontakt haben.
3. Lockern Sie den Anschluss, indem Sie ihn gegen den Uhrzeigersinn drehen.
4. Führen Sie den Draht durch das Loch im Anschluss ein.
5. Durch Drehung im Uhrzeigersinn befestigen.
Wenn sie Verbindungen mit verseilten blanken Drahtenden machen, achten Sie sorgfältig darauf, dass keine Einzelnen Drähte mit den angrenzenden Anschlüssen oder der rückseitigen Blende Kontakt haben. Dies führt zu einem Kurzschluss am Ausgang des Verstärkers und kann ihn beschädigen.
VERWENDUNG VON OFFENEN KABELSCHUHEN1. Lockern Sie den Anschluss, indem Sie ihn gegen den
Uhrzeigersinn drehen.
2. Führen Sie den Kabelstecker unter dem Anschluss ein.
3. Ziehen Sie durch Drehen im Uhrzeigersinn fest.
FERNSCHALTUNG
Bei Verbindung von der TRIG OUT Buchse des Vorverstärkers C30 zur REMOTE IN Buchse des P35/P1 Vollverstärkers können Sie den C30 verwenden, um den Vollverstärker ein- und auszuschalten. Wenn er so konfiguriert ist, schaltet der NETZSCHALTER des C30 (oder der NETZ-/
STANDBY-SCHALTER der Fernbedienung) beide Verstärker zusammen ein und aus. Damit können Sie den Vollverstärker verdecken und doch regeln.
Das erforderliche Anschlusskabel ist ein 3,5 mm : 3,5 mm Kabel (Stereo oder Mono). Es können mehrere Verstärker durch Verkettung von TRIG
OUT eines P35/P1 in den REMOTE IN des nächsten Verstärkers mit dem C30 verbunden werden.
DREIKANALOPTION (NUR P35)
Der Vollverstärker P35 kann von Stero auf Dreikanal aufgerüstet werden, indem ein „drittes Kanalmodul“ zugefügt wird. (Das entsprechende Modell nennt sich P35/3).
Das Modul bietet zusätzliche Lautsprecheranschlüsse und einen dritten Satz AUDIO IN und OUT Phonobuchsen und konvertiert den P35 in einen 3x 90W (RMS pro Kanal in 8Ω) Verstärker, der für Heimkino oder Mehrkanalaudioanwendungen geeignet ist (ein solches Gerät kann z.B. verwendet werden, um die linken, rechten oder mittleren Kanäle in einem Mehrkanalsystem zu verstärken).
Wenn Sie diese Option nutzen möchten, gibt Ihnen Ihr Arcam-Händler nähere Informationen.

4444 45
De
uts
ch
Verwendung Ihres Vollverstärkers
NETZSCHALTER (UND NETZKONTROLLLEUCHTE)Dieser Knopf schaltet das Gerät ein und aus. Die Leuchte zeigt den Status des Verstärkers an.
Wenn Sie Ihren Verstärker einschalten, leuchtet die Lampe einige Sekunden gelb, währenddessen sind die Lautsprecher nicht abgeschaltet. Wenn das grüne Licht leuchtet, ist der Verstärker betriebsbereit. Ein rotes Licht zeigt den Standbymodus an.
FEHLERANZEIGEDie Kontrollleuchte blinkt, wenn ein Fehler aufgetreten ist. Die Farbe des Blinklichts zeigt die Fehlerart an:
Grün – Gleichstromdifferenz
Gelb – Temperatur (der P35/P1 ist zu heiß).
Rot – Kurzschluss (kann vorkommen, wenn die Lautsprecherkabel nicht korrekt verbunden sind und miteinander oder mit dem Gehäuse Kontakt haben).
Rot und gelb – mehrere Fehler sind aufgetreten.
Mit Ausnahme des Temperaturfehlers wartet das Gerät nach Erkennen eines der o.g. Fehler sechs Sekunden lang, bevor geprüft wird, ob der Fehler abgestellt wurde. Wenn der Fehler innerhalb von sechs Sekunden behoben ist, funktioniert das Gerät weiter, ansonsten fährt es herunter. Im Falle eines Temperaturfehlers wartet das Gerät, bis der Temperatursensor die Temperatur senkt, bevor sie wieder in Betrieb ist.
Wenn der Verstärker heruntergefahren ist, sollten Sie den Netzstecker ziehen und ein paar Minuten abwarten, bevor Sie ihn wieder ans Netz nehmen. Wenn der Fehler nicht behoben werden kann, ziehen die den Netzstecker ab und treten Sie mit Ihrem Arcam-Händler in Kontakt.
P35 POWER AMPLIFIER
SP1 SP2 POWER
ANMERKUNG: Wenn beide Leuchten aus sind, sieht es so aus, dass der Verstärker nicht im Betrieb ist, da alle Lautsprecher ausgeschaltet sind.
SP1 UND SP2 (NUR P35)Mit diesen Knöpfen können Sie die Haupt-(SP1) und Zweitsatz (SP2) der Lautsprecher, die mit Ihrem Verstärker verbunden sind, bedienen. Wenn Die Kontrollleuchte (über dem Schalter) an ist, so bedeutet dies, dass der Ausgang für die Lautsprecher eingeschaltet ist. Wenn kein Zweitsatz von Lautsprechern angeschlossen ist, empfehlen wir diesen Ausgang auszuschalten.
P1 POWER AMPLIFIER
POWER
P35 VOLLVERSTÄRKER: VORDERE BLENDE
P1 VOLLVERSTÄRKER: VORDERE BLENDE

4444 45
De
uts
ch
Doppelte Verkabelung und Verstärkung von Lautsprechern
VORBEREITUNGSMAßNAHMEN
WARNUNG: Nehmen Sie keine Anschlüsse an Ihrem Verstärker vor, wenn er eingeschaltet ist oder am Netz hängt.
Vor Einschalten überprüfen Sie bitte alle Anschlüsse sorgfältig und achten Sie darauf, dass keine blanken Kabel oder Drähte den Verstärker an der falschen Stelle berühren (was einen Kurzschluss verursachen kann), und dass Sie positiv (+) mit positiv und negativ (-) mit negativ verbunden haben.
Achten Sie darauf, dass die Lautstärkeregelung immer auf ganz leise steht, bevor Sie diese Dinge vornehmen.
DOPPELTE VERKABELUNG IHRER LAUTSPRECHER
Die doppelte Verkabelung verbessert den Klang Ihres Systems, weil sie die Stromsignale hoher und niedriger Frequenz in separate Lautsprecherkabel teilt. Dadurch werden Signalverzerrungen vermieden, die dadurch entstehen, dass hohe und niedrige Frequenzen in einem einzelnen Kabel aufeinander einwirken, wie dies in konventionell verkabelten Systemen der Fall ist.
Sie benötigen:
Lautsprecher – mit je vier Einganganschlüssen: Diese sind gekennzeichnet mit HF (hohe Frequenz) und LF (niedrige Frequenz).
Lautsprecherkabel – zwei Kabelpaare pro Lautsprecher (die am Verstärker zusammengeführt werden können, wenn Ihre Verstärker nur ein Paar Ausgangsanschlüsse pro Kanal aufweist). Oder ein Kabelsatz mit passenden Anschlüssen (ein Isolierschlauch, eventuell von Ihrem Händler vorbereitet, der für doppelte Verkabelung in einer Länge verwendet werden kann).
Doppelte Verkabelung von Lautsprechern – Vorgehensweise
1. Entfernen Sie die Anschlussverbindungen auf der Hinterseite Ihrer Lautsprecher
WARNUNG: Dieser Schritt ist unabdingbar. Wenn Ihr Verstärker beschädigt wird, erlischt der Garantieanspruch.
2. Verbinden Sie die Kabel wie im Diagramm unten gezeigt und stellen Sie die korrekte Polarität immer sicher.
Empfohlene Konfiguration der doppelten Verkabelung Empfohlene Konfiguration für doppelte Verstärkung
Endstufe P35
R L
HF
LF
+
+
+ –
HF
LF
+
+
–
–
+ –
–
–
Lautsprecher rechts Lautsprecher links
R LEndstufe P35
+ –+ –
R L+ –+ –
HF
LF
+
–+ –
–HF
LF+
–
–
+
Lautsprecherrechts
Lautsprecherlinks
Endstufe P35
DOPPELTE VERSTÄRKUNG IHRES SYSTEMS
Die Leistung Ihres Systems kann über die doppelte Verkabelung hinaus weiter verbessert werden, indem Sie die das System mit einer separaten Verstärkung der Antriebe für die niedrigen und hohen Frequenzen in jedem Lautsprecher erweitern.
Verbinden Sie den integrierten Verstärker mit den Hochfrequenzanschlüssen (HF) und verbinden Sie den Vollverstärker mit den Niedrigfrequenzanschlüssen (LF).
Dazu benötigen Sie:
Lautsprecher – mit je vier Eingangsanschlüssen (wie bei der doppelten Verkabelung): Diese sind mit HF (hohe Frequenz) und LF (niedrige Frequenz) gekennzeichnet.
Vier Kanäle für die Verstärkung – z.B. zwei P35 Stereoverstärker oder vier P1-Monoblockverstärkern.
Lautsprecherkabel - zwei Kabelpaare pro Lautsprecher oder ein Kabelsatz mit passenden Anschlüssen (ein Isolierschlauch, eventuell von Ihrem Händler vorbereitet, der für doppelte Verstärkung in einer Länge verwendet werden kann).
Verbindungskabel – ein Paar Hochqualitätsverbindungskabel.
Aufbau eines doppelt verstärkten Systems
1. Entfernen Sie die Anschlussverbindungen auf der Rückseite Ihrer Lautsprecher.
WARNUNG: Dieser Schritt ist unabdingbar. Wenn Ihr Verstärker beschädigt wird, erlischt der Garantieanspruch.
2. Verbinden Sie die Kabel wie auf dem Diagramm unten gezeigt und stellen Sie immer die korrekte Polarität sicher.
3. Verwenden Sie die Verbindungskabel zum verbinden der PRE OUT Buchsen des C30 mit den entsprechenden AUDIO IN Buchsen des Vollverstärkers. Wenn Sie den P1 Verstärker verwenden, müssen die Verbindungskabel u.U. verkettet werden. Weitere Informationen hierzu finden Sie auf Seite 43.

4646 47
De
uts
ch
Technische Spezifikationen
ANMERKUNG: Alle spezifizierten Werte sind typisch, wenn nicht anders angegeben.
KONTINUIERLICHE VERBESSERUNGArcam verfolgt eine Politik der ständigen Verbesserung für die Produkte. Dies bedeutet, dass Design und Spezifikation ohne vorherige Ankündigung geändert werden können.
C30 P35 P1
Kontinuierliche Nutzleistung (20Hz—20kHz bei 0,5% THD), pro KanalBeide Kanäle, 8Ω, 20Hz—20kHz 100WEinzelner Kanal, 8Ω, 20Hz—20kHz 150W 170WBeide Kanäle, 4Ω, 20Hz—20kHz 140WEinzelner Kanal, 4Ω, bei 1kHz 200W 250WDrei Kanäle, 8Ω, 20Hz—20kHz 90WHarmonieverzerrung,80% Leistung, 8Ω bei 1kHz
0,005% 0,003%
EingangPhonokassette: Eingangsempfindlichkeit 2.7mV (MM); 270µV (MC) Eingangsimpedanz 47kΩ (MM); 300Ω (MC) Signal-/Geräuschverhältnis (CCIR) –79dB (MM); –73dB (MC) Überlastmarge 35dBLeistungssignal und Bandeingang: Nominale Empfindlichkeit 250mV—2V 800mV Eingangsimpedanz 22kΩ 22kΩ Signal-/Geräuschverhältnis (CCIR) –103dB –110dBTonsteuerung, max. Boost/Cut ±12dB @ 80Hz und 12kHz
Vollverstärker EingangNominale Empfindlichkeit 800mV 906mV
(Arcam-Verstärkungsfaktor)Eingangsimpedanz 22kΩ 22kΩ
Verstärkungsfaktor 31.5dB 31.5dB(Arcam-Verstärkungsfaktor)
Ausgang VorverstärkerNominales Ausgangsniveau 700mV
Maximales Ausgangsniveau 8V RMSAusgangsimpedanz <50Ω
KopfhörerausgangMaximales Ausgangsniveau in 600Ω 5VAusgangsimpedanz 4.7Ω
AllgemeinNetzspannung 115V oder 230V 115V oder 230V 115V oder 230VStromverbrauch (maximal) 30VA 800VA (950VA für P35/3) 800VAStromverbrauch (Standby) 2VA 2VA 2VAAbmessungen L x T x H (mit Füßen) 430 x 370 x 110mm 430 x 350 x 110mm 430 x 350 x 110mmGewicht (netto) 9.3kg 9.5kg (10,5kg für P35/3) 12,5kgGewicht(verpackt) 11,5kg 12.5kg (13,5kg für P35/3) 15,5kgMitgeliefertes Zubehör Netzkabel
CR-389 Fernbedienung2 x AAA Batterien
Netzkabel Netzkabel
E&OE

4646 47
De
uts
ch
Codes für die Fernbedienung
Die folgende Tabelle zeigt die Infrarotbefehle, die vom C30 akzeptiert werden.
Betriebsbefehle
Befehl DezimalcodeAn/Aus-Taste 16–12Ein 16–123Aus 16–124
Gerätwahlbefehle
Befehl DezimalcodePHONO-Auswahl 16–1AV-Auswahl 16–2TUNER-Auswahl 16–3DVD-Auswahl 16–4TAPE-Auswahl 16–5VCR-Auswahl 16–6CD-Auswahl 16–7AUX-Auswahl 16–8
Befehle zur Lautstärkeregelung
Befehl DezimalcodeStumm 16–13Lauter 16–16Leiser 16–17
Befehle zur Menünavigation
Befehl DezimalcodeUP 16–32DOWN 16–33SELECT 16–37ENTER 16–87
Befehle zur Regelung der Lautsprecher
Befehl DezimalcodeLautsprecher 1 Ausgleich 16–35Lautsprecher 1 aus 16–39Lautsprecher 1 an 16–43Lautsprecher 1 aus 16–44Lautsprecher 2 an 16–45Lautsprecher 2 aus 16–46
Befehle zur Displayregelung
Befehl DezimalcodeDisplay 16–59
Beachten Sie, dass der C30 auch auf Code 20-53 reagiert (der PLAY-Befehl für Arcam-CD-Player). Der C30 schaltet automatisch in den CD-Eingang beim Empfang dieses Befehls.

4848 49
De
uts
ch
Kundendienstinformation
Bevor Sie Ihren Verstärker zur Reparatur einreichen, prüfen Sie bitte wie folgt:
KLANG SCHALTET OHNE GRUND ABWenn die Temperatur des internen Hitzeschachts über den sicheren Punkt steigt, wird ein Temperaturbegrenzer im Verstärker aktiv.
Die Betriebsanzeige an der Frontblende blinkt und das Schutzsystem schaltet vorübergehend die Stromzufuhr zu den Lautsprechern ab. Das System setzt sich selbst zurück, sobald die Temperatur sinkt.
Beachten Sie, dass man die P35/P1 bei voller Leistung laufen lassen kann, obwohl die C30-Lautstärke nicht auf Maximum steht, weil der CD-Player eine hohe Ausgangsspannung hat.
VERSTÄRKER SCHALTET NICHT WIEDER EINDie Verstärker C30, P35 und P1 haben einen Schutzmechanismus, der aktiviert wird, wenn Sie das Gerät sofort nach Abschalten wieder Einschalten. Wenn dieser Mechanismus aktiviert wird, warten Sie 30 Sekunden und versuchen Sie es noch einmal.
WELTWEITE GARANTIESie sind berechtigt, das Gerät während der ersten zwei Jahre nach Kaufdatum bei einem autorisierten Arcam-Fachhändler kostenlos reparieren zu lassen, unter der Voraussetzung, dass es ursprünglich bei einem Arcam-Händler erworben wurde. Der Hersteller übernimmt keine Verantwortung für Schäden, die durch Unfall, Missbrauch, Verschleiß, Vernachlässigung oder unautorisierte Veränderungen bzw. Reparaturen entstehen. Außerdem wird keinerlei Verantwortung für Schäden oder Verlust des Gerätes während des Transports zum oder vom Garantienehmer übernommen.
Die Garantie umfasst Folgendes:
Teile- und Arbeitsstundenkosten bis zu zwei Jahre nach dem Kaufdatum. Nach Ablauf von zwei Jahren müssen Sie die vollen Kosten für Ersatzteile und Arbeitsstunden tragen. Versandkosten werden nicht übernommen.
INANSPRUCHNAHME DER GARANTIEDas Gerät sollte in der Originalverpackung an den Händler zurückgegeben werden, bei dem es erworben wurde. Ist dies nicht möglich, können Sie es auch direkt an den Arcam-Vertreter in Ihrem Land schicken.
Der Versand sollte frei Haus durch ein etabliertes Transportunternehmen erfolgen. Da keine Verantwortung für Schäden oder Verlust während des Transports zum Händler übernommen wird, sollten Sie das Gerät entsprechend versichern.
Weitere Informationen erhalten Sie von Arcam direkt:
Arcam Customer Support Department, Pembroke Avenue, Waterbeach, CAMBRIDGE CB5 9QR, England
Telefon: +44 (0)1223 203200Fax: +44 (0)1223 863384E-Mail: [email protected]
PROBLEME?Wenn Ihr Händler Ihre Fragen zu diesem oder einem anderen Arcam-Produkt nicht beantworten kann, wenden Sie sich telefonisch an:
Arcam Deutschland Vertrieb:BRIDGE AUDIO Vertriebs GmbH
Telefon: 0 41 94 / 98 10 10Fax: 0 41 94 / 98 10 12
E-Mail: [email protected]: www.bridgeaudio.de
ONLINE-REGISTRIERUNG
Sie können Ihr Arcam-Produkt online unter folgender Adresse registrieren:
Arcam Deutschland Vertrieb:BRIDGE AUDIO Vertriebs GmbH
Tel.: 0 41 94 / 98 10 10Fax: 0 41 94 / 98 10 12
E-Mail: [email protected]: www.bridgeaudio.de
Garantie

4848 49
De
uts
ch
NOTIZEN

5050 51
De
uts
ch
NOTIZEN

5050 51
De
uts
ch
NOTIZEN

PEMBROKE AVENUE, WATERBEACH, CAMBRIDGE CB5 9QR, ENGLAND
telephone +44 (0)1223 203200 fax +44 (0)1223 863384 email [email protected] website www.arcam.co.uk
SH139Issue 1