food and culture cookbook - facultyweb.kennesaw.edufacultyweb.kennesaw.edu/blundy/food and culture...
TRANSCRIPT
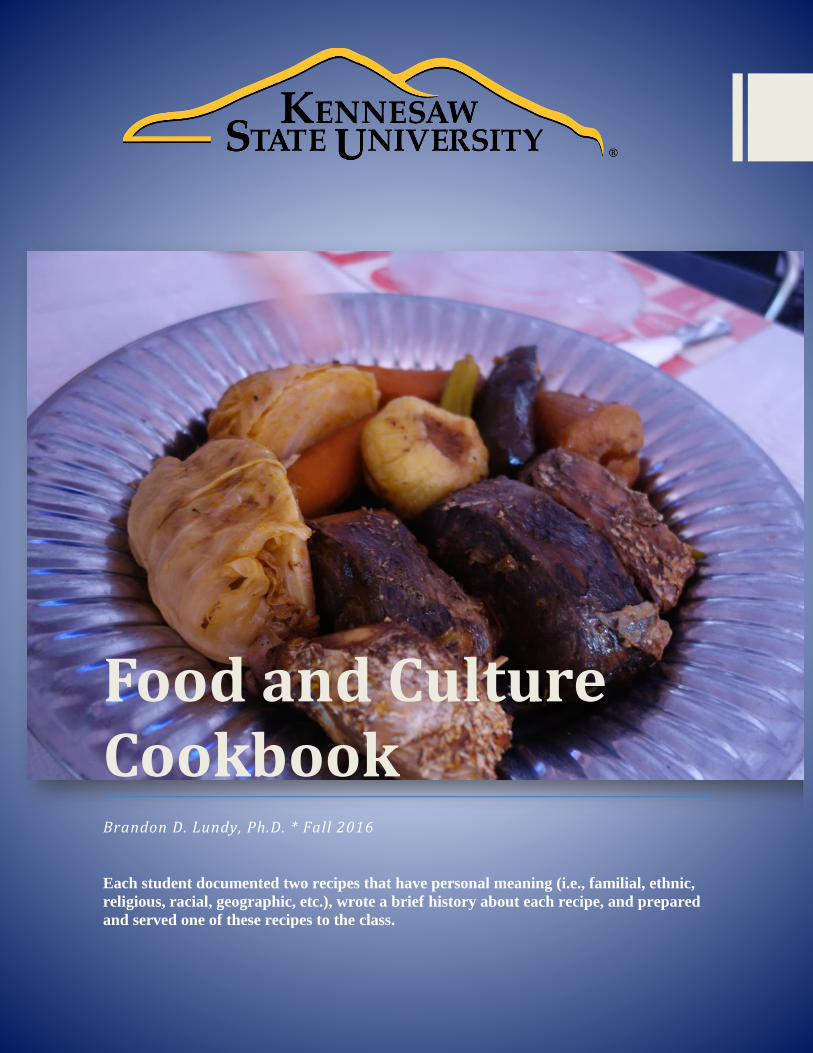
Food and Culture Cookbook Brandon D. Lundy, Ph.D. * Fall 2016
Each student documented two recipes that have personal meaning (i.e., familial, ethnic,
religious, racial, geographic, etc.), wrote a brief history about each recipe, and prepared
and served one of these recipes to the class.
1 | P a g e
Table of Contents
Appetizers Page
Chex Party Mix 4
Mini Waffle BLTs 6
Tortilla Roll Ups 7
Sides
Gritney Biscuits 9
Soups
Potato Soup for the Soul 11
Tomato Vegetable Soup 12
Curried Butternut Squash Soup 13
Main Dishes
Kita Firfir 15
Macaroni and Cheese 16
Cajun Macaroni & Cheese 17
“Gumbo” 19
Jambalaya 21
Tuna Casserole 22
Hamburger Casserole 23
Chicken Casserole 24
Caribbean chicken Roti 25
Fondue Savoyarde 26
2 | P a g e
Romanian Stuffed Peppers 28
Shredded Chicken Burritos (Tinga de Pollo) 30
Spicy Red Lentil Chili (vegan) 31
Chicken Marsala 32
Desserts
Pie Crust 34
Apple Pies from Heaven 35
May’s Apple Pie 37
Cinnamon Roll Apple Pie 38
Peanut Butter Pie 39
Jane’s Peanut Butter Pie 40
Apple Delight Cake 41
Cream Cheese Pound Cake 42
Blinda’s Oatmeal Crunch Cookies 43
Pfefernusse Cookies 44
Honey Almond Date Balls (Vegan) 45
“Anise Cookies” 47
Monster Cookies 48
Christmas Pizzelles 50
Buckeye Candies 51
Bernie Miller Fudge 52
Bran Muffins 53
Banana Nut Bread 55
Oreo Mint Ice Cream 56

3 | P a g e
Appetizers
4 | P a g e
Chex Party Mix
Allison Chipman
Ingredients: 3 cups Corn Chex cereal
3 cups Rice Chex cereal
3 cups Wheat Chex cereal
1 cup of cocktail peanuts
1/3 cup of almonds
1/3 cups of cashews
1/3 cups of pecans
1 cup pretzel sticks
1 cup garlic-flavor, bite-size bagel chips or regular-size bagel chips, broken into 1-inch pieces
8 tablespoons butter
2 tablespoons Worcestershire sauce
1½ teaspoons seasoned salt
¾ teaspoon garlic powder
½ teaspoon onion powder
Preparation Process:
Step 1. Heat oven to 250℉. In large bowl, mix cereals, nuts, pretzels, and bagel chips; set aside. Step 2. In
ungreased large roasting pan, melt butter in oven. Stir in seasonings. Gradually stir in cereal mixture until
evenly coated.
Step 3. Bake 1 hour, stirring every 15 minutes.
Step 4. Spread on paper towels to cool, about 15 minutes. Store in airtight container.
Narrative
While there is a recipe printed on the boxes of Chex cereal, the recipe for Chex Party Mix is
almost never followed exactly. In fact, it is known for having endless variations. The recipe listed above
is not the Original Chex Party Mix; it is my family’s variation. It reflects our tastes and preferences. For
example, we prefer using pretzel sticks instead of pretzel twists. We also tend to use less Worcestershire
sauce than the official recipe calls for.
For most people, Chex Party Mix is only a holiday party snack, but it is much more than that for
me. Since my family changes its diet based on the latest recommendations from dieticians, there are not
many foods I have consistently eaten throughout my life. However, Chex Party Mix is one of the few
dishes that I have continuously consumed. Therefore, it has become a comfort food to me over the years.
According to my mother, it all started when I was very young and spent a lot of time at my grandparents’
house. She noted that I would often sneak into the dining room- where the snack was kept- and take
handfuls of it with me around the house. Despite its long history at my grandparents’ house, this tradition
didn’t end with my grandmother’s death. For the past ten years, my mother has made it at our house
instead. Since then, on every other weekend during the fall and winter, our house has smelled like
Worcestershire sauce.

5 | P a g e
Not only is it tasty, it’s also a convenient snack. It can be enjoyed at a slower pace, but when I’m
busy and don’t feel like using brain power to pick out food, I can often resort to grabbing some Chex
Party Mix before moving onto my next task. That is, if there is any left in the bowl. Like me, many of my
family members tend to grab it by the handfuls and take it wherever they need to go. So, in many ways,
the snack is highly valued and often jokingly fought over. I wish I was kidding when I said that our
family makes territorial claims over it. Chex Party Mix has been a part of our family for a very long time,
and it’s a tradition that I would never change.
6 | P a g e
Mini Waffle BLTs
Cooper Lewis
Ingredients: 6 slices fully cooked bacon
24 frozen mini waffles
6 leaves Bibb lettuce
½ cup light mayonnaise
2 teaspoons prepared horseradish
2 plum tomatoes
Preparation Process:
Step 1. Heat bacon and cook waffles following package instructions. Tear lettuce into 2-inch pieces. Cut
bacon into fourths.
Step 2. Combine mayonnaise and horseradish; set aside. Cut tomatoes into 12 round slices.
Step 3. Spread 1 teaspoon mayonnaise over each waffle. Top half of the waffles with: 2 pieces of bacon,
lettuce, 1 tomato slice, and another waffle. Serve.
Narrative
This recipe was actually provided to me by my mother. She collected a lot of recipes for me and
put them all into a cookbook. I have never been known to cook too many different recipes so early this
year she took a bunch of recipes from Publix. Publix actually has a great design for recipes and are all
quite easy to understand, and they are free! My mother has always been a fantastic cook and used to have
me help her in the kitchen; thankfully she never pushed me to try and cook on my own when I was young
so now I still love cooking, food, and the experience of learning all about food.
This specific recipe was one of the first ones I used out of the book and it has been a favorite ever
since. This is actually a recipe I have had a lot of fun with because you can change the type of waffles or
veggies, meat, etc. Little changes have made my whole experience of cooking with these recipes more
enjoyable and thankfully I can keep adding more ideas and recipes to the book my mom gave me.
7 | P a g e
Tortilla Roll Ups
Mallory Thomley
Ingredients: 1 package (8 ounces) cream cheese, softened
1/2 cup sour cream
1/4 cup chopped green onions
1/4 cup sliced pimento-stuffed olives
5 flour tortillas (8 inches), room temperature
Preparation Process:
Mix cream cheese and sour cream together. Stir in chopped green onions and sliced pimento-stuffed
olives. Divide mixture evenly and spread over individual tortillas and roll. Refrigerate 2 hours to set
(optional). Cut rolled tortillas into 1 inch sections. Refrigerate until ready to serve.
Narrative
For as long as I can remember, my family has used hors d'oeuvres as a replacement meal for
special occasions or gatherings. Occasions such as Christmas Eve, New Year’s Eve, birthdays, and other
celebrations are typically where we see the hors d’oeuvres being served. During these events, each family
member is required to prepare one or more hors d’oeuvres to be served and shared and snacked on for the
day, along with having a large number of leftovers for the following day. We use this method to get a
little bit of everything at one time, salty, sweet, healthy, and unhealthy, all of our bases are covered. This
method of using food in a celebratory way is how I hope to continue to do these events when I have a
family of my own.
This recipe is from my mom’s childhood best friend’s mom, Mrs. Lemay, and is her go to recipe
to make for one of our family snack potluck events. They are a small salty snack that really hit the spot.
Many of our other family recipes also come from Mrs. Lemay’s stash. She had a big influence on my
mom growing up because she was the total opposite of my mom’s mom. She was strict and focused on
having a clean house and hot meals on the table for when her husband got home from work, while my
mom’s mom worked outside of the home and used convenience frozen meals or fast food to feed the
family. When my mom and dad got married and moved away, Mrs. Lemay presented them with family
recipes to have and make. These are the recipes that I grew up with and that I hope to continue to make
for my family one day.

8 | P a g e
Sides
9 | P a g e
Gritney Biscuits
Natasha Lee
Ingredients: 2 cups self-rising flour
1 stick butter
About 1/3 cup of milk
Preparation Process:
Add flour to a medium sized-bowl and cut in the butter using a pastry blender or food processor. It should
be dry and crumbly. After it’s mixed, add the milk, adjusting flour or milk as needed. You don’t want it
too dry or too wet. It shouldn’t be too sticky and should be able to form a ball. Flour your hands and pat
into a biscuit-shape. Oil a baking pan, cookie sheet, etc. and put the biscuits on. Cook for about ten
minutes at 400oF, but watch them. They should get slightly brown and a little pointy. I like them more
white than brown, so that’s up to you. Makes about nine biscuits.
Note: Make biscuits as directed, but then serve with strawberries. We call that strawberry shortcake for
some reason.
Narrative
These biscuits come to me from my paternal grandmother, but I believe they are a family recipe
from longer than that. My dad tells me she would always make them for her husband in the morning
because she believed in starting the day off with a hot breakfast. My dad did not appreciate this always as
a kid (I want Captain Crunch!) but now he does. My maternal grandmother used to make biscuits with
strawberries, and I guess after my mom got married she started using this recipe. My mom’s family likes
my mother to make these biscuits for dessert, but I prefer mine to be more pure so I just eat them with
butter.
Gritney is located in the panhandle of Florida down a bumpy country road an hour from Dothan,
Alabama. This is the place where my father’s mother comes from and where we go for Thanksgiving
every year since I can remember, with few exceptions.
The biscuits, when my mother makes them, fall apart very easily. This is the best consistency,
honestly. They are far from commercial, but so delicious. We have tried using buttermilk and it just tastes
wrong. However, I do think that might make them stick better. When my dad’s cousin makes these
biscuits, they don’t fall apart and have a different consistency. She adds more flour than we do.
The original recipe actually is a big bowl of flour, which is used more than once to make biscuits,
and mayonnaise and sugar is added to it, in addition to the above ingredients. My dad says it’s delicious
but I have never had them. My dad’s cousin or my mother, we are not positive about this, began making
the biscuits without the mayonnaise and sugar, and this is the recipe I have always known. Biscuits are typically a breakfast food in America, but they can also be substituted for dinner rolls. We eat
Gritney biscuits as breakfast usually, but whenever we have Gritney peas (a type of field peas), we also have the
aptly named biscuits.

10 | P a g e
Soups
11 | P a g e
Potato Soup for the Soul
Kelcey Bartkowiak
Ingredients: 4 Potatoes
3 Carrots
2 Celery Sticks
1 Box Chicken Broth (32-48 oz.)
1 Stick of Butter
About ¼ Cup Flour
Milk (Approx. 2 Cups)
½ Tbs. Minced Garlic (Powdered can also be used)
½ Cup of cheese
Salt/Pepper to Taste
Preparation Process: Dice potatoes and slice celery and carrots into pieces. Place chicken broth, potatoes, carrots, and celery
together in a large boiling pot. Boil this mixture approx. 20-30 minutes, or until potatoes are tender but
not breaking apart. Toward the end of the boiling process you will need to make a roux. Take a skillet pan
and melt the stick of butter until it is completely liquefied. Add the garlic. Then, take the flour and slowly
add it to the butter while whisking it. This will begin to thicken into a roux. Once the mixture is frothy,
but not dry do not add any more flour. Slowly begin adding the milk to the mixture while whisking out
any clumps. It will be watery at first, but will thicken with time. Once the mixture heats up and begins to
thicken, add it to the chicken broth mixture. Stir and simmer on low for another 10 minutes. You can add
the cheese while you simmer. ENJOY!
Narrative
Potatoes have been a cash crop in many places throughout the world. The Americas have
revolutionized the potato making it one of the most versatile crops in the nation. With the wide variety of
preparation methods, it’s no wonder potatoes are found on almost every menu. Worldwide, there are
about 5,000 varieties of potato. The potato yields well with little effort, but does not store well.
Fortunately, though, they can be dried and rehydrated to aid in conservation.
A roux is a staple part of French cuisine and is used in many sauces of French classical cooking.
This method is used to thicken sauces, gravies, soups, and stews. It is a simple combination of fat, milk,
and flour. Personally, I use roux mostly for gravy. After making bacon, use the grease, add the flour, add
the milk, and thicken. Oh, it is wonderful. Roux is typically French, but is also a known staple in Cajun
cooking as well. The difference is in the fats used and the spices.
Wintertime is a time for soul food in my opinion. I am always looking for the next best comfort
food recipe. I especially love soups. I also love anything that is “creamy.” When I see roux, I know that’s
what it means. I have also never, ever, met a potato I did not like. I love potatoes. Probably more than any
individual person should. So, this recipe makes me very happy. And the simplicity is also great. It doesn’t
take much effort, and you can even wing it on measurements for the most part. It’s a win-win. I hope you
enjoy it as much as I do!

12 | P a g e
Tomato Vegetable Soup
Thea Darnell
Ingredients: 1 lb. ground beef or turkey
2 bags of frozen vegetables or you can use canned vegetables
2 cans of small tomatoes
1 can of tomato sauce
2 cans of beef broth
Preparation Process:
Step 1. Cook the meat and drain it.
Step 2. Put the meat in the pot.
Step 3. Add the rest of the ingredients.
Step 4. Cook the soup on medium until the vegetables are cooked.
Narrative
My mother started making this soup when I was in high school. She found the recipe on some
website. This soup made me realize that I really liked tomatoes especially chunks of it in things. Besides
my mother, I was the only one that liked having big chunks of tomatoes in the soup. My mother did not
cook a lot, but this is one of my favorite things she made. Now that I live on my own, I will have
moments where I crave this soup. Lucky for me, my mother is more than happy to make it for me.
The soup itself is versatile. You can add any type of vegetable you want in the soup. You can also
change out the meat. So if you want to use turkey, you can. The soup is not hard to make. All it is cooking
the meat then adding all the other ingredients into a pot and letting the vegetables cook. You can add any
spice you want to make it your own. It is not an expensive soup to make. With the proportions above, you
can make a good amount of soup. So you can make it stretch over a couple of days.
13 | P a g e
Curried Butternut Squash Soup
Caroline Johnston
Ingredients: 1 tbsp. (15 ml.) coconut or grape seed oil
2 shallots, thinly diced
2 cloves garlic, minced (1 tbsp.)
6 cups butternut squash (~1 small butternut squash)
Pinch each sea salt + black pepper, plus more to taste
1½ tbsp. curry powder
1/4 tsp ground cinnamon
1 14-ounce (414 ml.) can light coconut milk
2 cups (480 ml.) vegetable broth
2-3 tbsp. (30-45 ml.) maple syrup (or coconut sugar)
optional: 1-2 tsp. chili garlic paste
FOR SERVING optional
Toasted pumpkin seeds
Chili garlic paste
Full fat coconut milk
Preparation Process:
Heat a large pot over medium heat. Once hot, add oil, shallots, and garlic. Sauté for 2 minutes, stirring
frequently. Add butternut squash and season with a pinch of salt and pepper, curry powder, and ground
cinnamon. Stir to coat, then cover and cook for 4 minutes, stirring occasionally. Add coconut milk,
vegetable broth, maple syrup or coconut sugar, and chili garlic paste (optional - for heat). Bring to a low
boil over medium heat and then reduce heat to low, cover, and simmer for 15 minutes, or until butternut
squash is fork tender. Use an immersion blender, or transfer soup to a blender, and purée on high until
creamy and smooth. If using a blender, return soup back to pot. Taste and adjust seasonings, adding more
curry powder, salt, or sweetener as needed. Continue cooking for a few more minutes over medium heat.
Serve as is or with garnishes of choice (options above). Store leftovers covered in the refrigerator for 3-4
days, or in the freezer up to 1 month. Best when fresh.
Narrative
This was the first recipe I made for my family for Thanksgiving dinner when I first became vegan
two years ago. While everyone present was hesitant to try the soup at first (everyone seemed confused
about what ‘vegan’ really meant), once they had a bite, many said they would have had no idea it did not
contain dairy! I plan on making this soup every Thanksgiving for my family to always remember my
transition to veganism (plus it is always requested!)
Recipe source: http://minimalistbaker.com/curried-butternut-squash-soup/

14 | P a g e
Main Dishes
15 | P a g e
Kita Firfir
Yasmin Alamin
Ingredients: 1½ cups wheat flour or 1½ cups white flour
½ cup barley
3 tablespoon butter
1 teaspoon baking powder
1 tablespoon Berbere (Ethiopian chili powder) or chili powder
2 cups water
Honey
Salt
Preparation Process:
Step 1. Place the wheat and barley flour and baking powder (salt if necessary) in a bowl; mix it well; add
a small amount of water to the flour, blend it with hand or blender, gradually adding water. Blend it well
until the dough is smooth and elastic.
Step 2. In a non-stick medium pancake pan, place the dough; make it flat to cover the pan; cook it in a
lower heat on both sides until golden and crusty. Remove from the pan when golden.
Step 3. Melt the butter in a lower heat; in a bowl mix with chili pepper (berbere).
Step 4. Cut the Kita (pancake or bread) into very small pieces by hand. Mix the melted-spiced butter and
the bread pieces until well combined.
Add honey as much as you would like. And you have a traditional Ethiopian breakfast; kita firfir.
Narrative
Everyone has that one type of food that they can eat all day every day and never get tired of it.
Kita firfir is that favorite food for me. Kita firfir is one of the many Ethiopian traditional breakfasts; kita
firfir translates to cut up pieces of bread.
The ingredients listed are the main ingredients but sometimes the taste of kita firfir differs from
house to house because everyone likes to add their own twist to it. For example, I like to prepare mine
with a lot of honey because I prefer it sweet and some people do not put honey at all but serve it with sour
cream; sour cream is used to minimize the spiciness. One can use a blender to cut up the bread and use a
fork to eat it, but to have it authentically, one should cut it up and eat it with their hand. Many drink tea
while eating kita firfir.
Kita firfir has been a breakfast meal in Ethiopia for a very long time. In Ethiopia people take kita
firfir to other people’s houses on two occasions; one if they’re visiting a sick person, and two if they are
visiting someone who recently gave birth. Even though kita firfir is a breakfast meal and can be consumed
every day, Ethiopians usually tend to prepare this meal on the weekends when all the family members are
at home in the morning. This is because we like to serve it on a big plate for everyone to sit around and
eat together from the same plate. Whenever I eat kit firfir, it brings back my childhood memories of when
I was back home in Ethiopia. Also if a guest comes to your house before noon and you don’t offer to
make them kita firfir, it is viewed rude.
16 | P a g e
Macaroni and Cheese
Richonna Sanders
Ingredients: 1 box of macaroni noodles
2 packages of shredded sharp cheddar cheese
1 can of cream of mushroom soup
3 slices of extra sharp cheddar cheese
1 tbsp. of olive oil
1 package of saltine crackers
Preparation Process:
Heat oven to 350 degrees. Fill pot with water and bring to a boil. After the water has boiled, put in the
noodles to cook. Add the olive oil to cook with the noodles. (Do not cook the noodles too long because
they have to bake.) Put the cream of mushroom soup into a pot to warm. Add the slices of cheese to the
soup while it is heating. Stir. When the noodles are done, add to the heated soup. Put in layers into a
baking pan. Add small layer to the bottom and put some shredded cheese over top. Do this until all of the
noodle mixture and shredded cheese is used. When done, add crushed saltine crackers to the top. Put in
the oven for 20-30 minutes, or until crackers have browned.
Narrative
My family has been making mac n’ cheese this way since my grandmother’s mother was a kid.
Her mother decided to put the soup in instead of milk because they did not have much at the time of
making the dish. We make it this way every time we make the dish. We make it for every holiday. Easter,
Thanksgiving, and Christmas we double the recipe because there are more people eating it. When we
make mac n’ cheese, it becomes family gathering time. We talk and laugh and have so much fun, so when
making the dish, we associate it with family fun. We are always making more food with it, so we are all
waiting to get full bellies at the end of cooking.
17 | P a g e
Cajun Macaroni & Cheese (Serves 4-6)
Cooper Lewis
Ingredients: ½ (14-ounce) package andouille sausage, cut into ½-inch slices
½ (14-ounce) package spicy (chicken/beef/pork) sausage, cut into triangle slices
1 cup chopped red bell pepper
1 cup chopped green bell pepper
⅓ cup all-purpose flour
2 teaspoons Cajun seasoning
1 teaspoon chili powder
1 teaspoon ground white pepper
½ teaspoon cumin powder
1 quart whole milk
8 ounces shredded American cheese
8 ounces shredded provolone cheese
3 cups shredded mild cheddar cheese
½ (16-ounce) package elbow pasta, cooked (8-10min.) and kept warm
½ (16-ounce) package pasta of choice (that is ready in 8-1 0min.)
Preparation Process:
Step 1. In a large skillet, cook sausage over medium heat until lightly browned, about 2 minutes.
Step 2. Add red and green bell pepper; cook until tender, about 6 minutes.
Step 3. Sprinkle with flour and Cajun seasoning; cook, stirring constantly, for 2 minutes.
Step 4. Let the sausage simmer on low while preparing pasta.
Step 5. Cook pastas in boiling water (8-10 min. until the pastas will almost stick to the cabinet – oh yes
definitely throw a sample pasta at the cabinet).
Step 6. When done, drain water and gradually add milk, and cook, stirring occasionally, until thickened
and bubbly. Reduce heat to low, add cheeses, and cook, stirring constantly, until cheese is melted and
mixture is smooth.
Step 7. Add cooked pasta to sausages and let simmer together for about 10-15 minutes, stirring gently and
only occasionally.
Step 8. Serve immediately.
Narrative
I decided to prepare this dish because of ethnic, familial, and personal reasons. I am one half
Cajun French on my mother’s side, which meant we had a lot of Cajun cooking and especially around
Thanksgiving when the family would get together. Louisiana has always been quite far away and no one
in the family lives there anymore so I have only been able to visit the area once on my own. Cooking
using this recipe along with other Cajun dishes lets me take a little time during the year to reconnect with
this side of my ancestry. I also love cooking this dish because it is a piece of the Thanksgiving layout that
I have contributed to for years now and my family loves it every time. Of course I change the recipe each
year because it makes the experience even more enjoyable, but this year I chose this recipe because the
18 | P a g e
original recipe was very popular online. I altered the recipe and preparation, but was still able to capture
the sense of spice and wild variety the Cajun culture is known for.
This recipe focuses a lot of attention on the mix of spice and the andouille sausage. Andouille
sausage is a traditional Cajun protein and is made from mixing pork with garlic and various types of
onion, wine, and pepper. This sausage is the spiciest Cajun sausage and is critical component in gumbo,
entrée dishes, and my recipe. The Cajun culture is based on Acadian people having to relocate from
Europe to the New World. The Acadians were known for serving large meals consisting of some kind of
rice dish, protein (e.g., chicken, sausage mixes, shrimp, crawfish), and any vegetable available during the
season. With this history and need for large amounts of servable meat, Andouille sausage was a perfect
addition because of its unique flavor and the ability to make it with easily found ingredients. I personally
chose macaroni because I can add cheese and the spices mix the two together well. However, I will enjoy
trying rice components in the future.
19 | P a g e
“Gumbo”
Olivia Rader
from Mrs. Jodie Daigle (Olivia’s great grandmother)
Port Arthur, Texas
Ingredients: 1 cup flour
½ cup bacon drippings
1 large onion
1 green pepper
5 stalks celery
5 pods garlic
1 can tomatoes – ½ the tomatoes, all of the juice
Salt and red pepper to taste
1 tsp. sugar
6 tomato cans water
Parsley, fresh, chopped
1½ cups green onions, chopped
Preparation Process:
“Make a roux with 1 cup flour, ½ cup bacon drippings. When done add 1 large onion, 1 green pepper,
about 5 stalks celery, 5 pods garlic. Chopped or grated, I prefer grated. Saute this, but do not brown. Add
about ½ can tomatoes, all the juice but only ½ the tomatoes. Season with salt, red pepper, and 1 tsp.
sugar. Add about 6 tomato cans of water – sprinkle with parsley, thyme, and about 1½ cups chopped
green onions. Simmer for at least 3 hours. Add seafood, cook for about 30 min. or until not foamy and
clears. With crabs I add ½ tsp. turmeric. For okra gumbo, use only ½ roux measurements, then add okra,
cook until okra is no longer slick, proceed then as above. I prefer to cook okra separately, then add to
gumbo when served.”
(Side note from Jim Henry, Jodie’s son: “If oysters or chicken used – do not add tomatoes.”)
Narrative
This recipe has been handed down from my mother’s side of the family, hailing from various
parts of Louisiana, Port Arthur, Texas, and now Houston. A copy of this recipe was emailed to my mother
by her great aunt – her father’s sister – years ago, but the differences in its retelling were obvious this
summer during our visit to see our extended family there. We made gumbo together, and she noted that
there were several variations in the recipe according to her personal experience watching her mother
cook, and the word-of-mouth recipe that she transcribed onto a notecard before she died, particularly the
proportion of thyme and amount of tomatoes, which she later only added in a very small amount “just for
color.”
20 | P a g e
Diane recalled some of her memories of her father, Wiley, my great grandmother’s second
husband (the first husband begot my mother’s father), cooking gumbo when she was a girl living in Port
Arthur. He would make a very simple chicken and okra gumbo, an amalgamation of both Cajun and
Creole styles, like most gumbos, omitting the filé powder (powdered sassafras root) found in Cajun, and
without tomatoes, found in Creole.1 She remembers very few seasonings being added, but it was very
spicy and contained an extremely dark and flavorful roux, and that he could “whip up a gumbo in two
hours that tasted like it had been goin’ for 10!” Low and slow cooking is a feature that is extremely
prevalent in my family’s, and other southern families’, culinary heritage – they would “tend to it,” and
“babysit it,” as my mom has described, indicating a tender but fierce love for their culinary traditions.
Wiley was born in Raine, Louisiana to a full-blooded Cajun family, and attended school up until
the third grade, when his teacher told him not to come back to school the next day unless he had shoes on.
“He didn’t own any, so he never went back!” Diane recalled. His mother taught him to make a rich, roux-
based gumbo without stock or tomatoes, and he then taught his second wife to make it, which was passed
on to Diane.
1 Ducote, Jay D. "Cajun vs. Creole Food - What Is the Difference?" Louisiana Travel. March 14, 2016. Accessed
November 29, 2016. http://www.louisianatravel.com/articles/cajun-vs-creole-food-what-difference.
21 | P a g e
Jambalaya
Samantha Richmond
Ingredients: 2 lbs. of sausage
1 lb. of shrimp
2 lbs. chicken
1 ham
1 green pepper
1 onion
¼ tablespoon of basil
1 tsp. white peppers
½ cup Cajun seasoning
2 can's dried tomato
4 oz. seafood base
8 cups cooked rice
Preparation Process:
Step 1. Cook meats first. Step 2. Add seasoning and tomatoes. Step 3. Add in cooked rice.
Narrative
Though I am not personally from New Orleans, I grew up having a lot of food that is popular
there. My parents met in the 1980s when they both worked on Bourbon Street. My mom was a waitress
and across the street my father managed a restaurant. This was the start of my father working in the food
industry. He eventually became a manager of the restaurant Houlihan's and this jambalaya recipe was
actually found on a Houlihan's standard recipe for creole gumbo.
A family friend of my mother, who photographed my parent's wedding and eventually became
like an uncle to me, cooked jambalaya for my family every time he visited. His name was Dave. I am not
100% sure, but it seems my dad's recipe has influence from Dave's cooking.
22 | P a g e
Tuna Casserole
Jesi Montoya
Ingredients: 1 (12 oz.) package of wide egg noodles
1 can (10½ oz.) of cream of celery soup
2 cups of milk
2 5 oz. cans of tuna
Parsley
Salt
Pepper
Butter
Preparation Process:
Bring a pot of water to a boil and dump in the wide egg noodles. Let cook until noodles are almost soft.
Drain water and dump the noodles into a casserole dish. Next, in a medium size bowl, add a can of cream
of celery soup. Once the can is empty use the can to measure out one and a half cans of milk (equals to
about 2 cups of milk). Drain the can of tuna and add into the bowl. Next, sprinkle in some parsley, salt,
and pepper. Mix it all together and then stir into the noodles in the dish. Top it off with slices of butter. I
usually put a slice in each corner and then one in the center. Cover it with a lid and cook for 30 minutes at
300 degrees Fahrenheit.
Narrative
The reason I love tuna casserole is because it is a dish my grandma used to make as a quick
dinner. It was simple enough that all my siblings and I would eat it (my sisters were picky eaters), but it
tastes delicious. Since it is a casserole, it feeds a lot of people which was perfect since I have a big family,
and it works great as leftovers. From since I can remember, my grandma would make it for us, and
eventually my sister picked up on how to make it so we had something tasty for the nights when the kids
had to feed themselves. My family still loves this dish that to this day, my siblings and I still text each
other asking for the recipe. It brings a sense of togetherness for me. When my grandma passed we all
made foods that reminded us of her, which included this meal. The only hard part about this dish is the 30
minute wait to eat it, other than that it is very easy to make.
As sides to our meal, we would always have corn and green beans. Personally, I do not like green
beans, but I loved to mix the corn into my casserole. This dish is very versatile and as I have gotten older
I sometimes add other items to make the dish more complex. For example, adding cracker crumbles on
top brings it to a whole new level. Sometimes I’ll change the cream of celery soup to cream of broccoli or
mushroom soup and add more veggies into the dish. I even add some sort of hot sauce to give it more
flavor. This casserole dish is so easy to modify, but I have to say nine times out of ten I still make it the
simple way my grandma did.
23 | P a g e
Hamburger Casserole
Thea Darnell
Ingredients: 1 lb. ground beef or turkey
3-5 Russet potatoes (depends on their size)
1 can of cream of mushroom soup
Cheese (whatever kind you prefer)
Preparation Process:
Step 1. Brown the hamburger meat.
Step 2. Cut up the potatoes into slices.
Step 3. Cook the potatoes on the stove until they are tender.
Step 4. In a dish, layer the meat and the potatoes.
Step 5. Add the can of cream of mushroom over the meat and potatoes.
Step 6. Add your cheese of choice on top.
Step 7. Set the oven for 350oF.
Step 8. Put in oven until the cheese is melted and is slightly brown around the edges.
Narrative
My grandmother lived with us my whole childhood and she was the one who did all the cooking.
She is the old school southern woman type. She knows how to make a fulfilling meal with a few
ingredients. She learned this from her mother when they did not have a lot of money. She told me that this
recipe is a similar version to something her mother used to cook. This is one of my favorite things she
made when I was younger. This recipe is definitely good for college students because you can make a
good bit of it and have it last for days. And it still tastes just as good as it did the day you cooked it. The
recipe does not cost a lot to make and is really easy to make. This recipe is similar to hamburger helper
but this recipe tastes a lot better and is less heavy. You can change out the different ingredients. You can
choose any type of meat you want as well as any type of potato.
24 | P a g e
Chicken Casserole
Elizabeth Henry
Ingredients: 1 16oz container of sour cream
2 10oz cans of cream of chicken soup
2 pounds of chicken
1 sleeve of Ritz crackers
½ stick of butter
Preparation Process:
Step 1. Preheat the oven to 350 degrees.
Step 2. Boil the raw chicken for 10 minutes or until cooked fully.
Step 3. While the chicken is boiling, mix the sour cream and cream of chicken soup together.
Step 4. Crush the whole sleeve of Ritz crackers and pour into a bowl and pour the butter, melted, overtop
and mix together.
Step 5. Drain and shred chicken and place in a large casserole dish.
Step 6. Pour the mixed sour cream and cream of chicken mixture evenly over top of the chicken and even
it out.
Step 7. Evenly distribute the butter and Ritz crackers over the top of the whole casserole.
Step 8. Place the finished casserole in the oven for 10 mins. or till the top is golden brown.
Step 9. Finish off by placing a spoon full over rice or not, it is good either way.
Narrative
This recipe has familiar meaning to me because this has always been my favorite meal my mom
made. When I had a good or bad day or a sad day, my mom would always try to make it for me. This dish
is my happy comfort food. As I got older my mom taught me how to make it and we would make it
together. This means so much to me and to her as well.
25 | P a g e
Caribbean chicken Roti
Yasmin Alamin
Ingredients: 1 ½ teaspoons curry powder
½ teaspoon ground allspice
1 teaspoon salt
Pepper
6 skinless, boneless chicken thighs (about 1 ½ pounds)
1 13.5-ounce can unsweetened coconut milk
1 onion, chopped
2 cloves garlic, minced
2 tablespoons chopped fresh cilantro
1 10-ounce package lavash flatbread
1 cup frozen peas and carrots, thawed
Preparation Process:
Step 1. Combine the curry powder, allspice, chopped thyme, 1 teaspoon salt, and a few grinds of pepper
in a medium bowl. Add the chicken and toss to coat; set aside.
Step 2. Skim 2 tablespoons of the solid cream off the top of the coconut milk; melt over medium-high
heat. Add the chicken and cook, turning, until browned, about 5 minutes; place it on a plate.
Step 3. Add the onion, garlic, cilantro, to a pot and cook, stirring, until the onion is softened, about 5
minutes. Return the chicken to the pot along with ¼ cup water; stir. Add the coconut milk.
Step 4. Tear 1 lavash (flat bread) into small pieces; add to the pot and bring to a simmer. Reduce the heat
to medium low, cover and cook until thickened, about 15 minutes.
Step 5. Just before serving, warm the remaining lavash in the microwave. In a medium-high heat stir
thawed carrots and peas in a pot. Cook until warmed through, about 2 minutes. Season with salt and
pepper. Top with cilantro and serve with the remaining lavash (flat bread).
Narrative
I’m obsessed with the Caribbean culture and tasting Caribbean food. Chicken roti is one of my
favorite dishes from the Caribbean. I chose to share this recipe not only because it tastes good, but
because it holds so much meaning and memories.
This recipe was given to me by my first roommate in college. My roommate was an exchange
student from St. Lucia, an island in the Caribbean. Her mom gave her this recipe to make her feel like she
was home even though she was thousands of miles away. My roommate always made it whenever she felt
homesick. This recipe made us bond because whenever we ate this dish, we would sit in our living room
and reminisce about how our life used to be back home, and compare our cultures and traditions to
American culture.
After a year, my roommate had to return to the islands. When she left, she passed on the recipe to
me. Now whenever I miss her, I make chicken roti and think about the good times we had in our dorm
room.

26 | P a g e
Fondue Savoyarde
Allison Chipman
Ingredients: 1 clove garlic, peeled and crushed
1½ cups Savoyarde white wine, or other light, dry white wine
1 1b. beaufort or gruyere cheese, grated or cubed
1 tsp. freshly grated nutmeg
Freshly ground black pepper
¼ cup kirsch
8 slices French bread, cut into 1” cubes, each one with a piece of crust
Preparation Process:
Step 1. Rub a medium heavy pot with garlic; discard garlic. Add wine and bring to a boil over high heat.
Reduce heat to medium and gradually add cheese, stirring constantly with a wooden spoon, until cheese
has melted. Do not boil. Continue to cook, stirring frequently, until mixture has thickened, about 20
minutes. Add nutmeg, pepper to taste, and kirsch. Transfer fondue to a chafing dish or fondue pot.
Step 2. Serve with bread cubes and fondue forks. Stir frequently. If fondue becomes too thick, stir in ¼
cup of dry white wine.
Narrative
Fondue is eaten around the world, but it is far more popular in France and Switzerland. In fact,
France is the only place that I have ever eaten fondue. When I was there over the past summer, I ate
fondue on two separate occasions. These meals went on to become my favorite meals from my time in
France. While the fondue was delicious, the dish itself was more meaningful to me socially. By nature,
fondue is a social food considering that it is shared. It forces people to speak with each other because they
are not confined to their plates. Interestingly enough, there’s an unspoken rule that if the bread falls off of
someone’s fondue fork and into the cheese, they have to pay for the next round of drinks. It’s almost
comical to see people struggle to save the bread from the fondue. That’s why eating fondue is all about
sharing a unique social experience.
The first time I ever ate fondue was a particularly interesting experience. At the time, I had
recently arrived in Paris, and I was still unfamiliar with many of the other students who had come to
France on a study abroad trip with me. For a meal one night, all of them wanted to grab crepes and eat
them back in the hostel, but I wanted a real meal. So, my professor kindly offered to accompany me to a
restaurant, and while I thought it might be awkward, I agreed to go with him. After a lot of deliberation
over the restaurant, he chose to take me to a hole-in-the-wall fondue restaurant. The whole atmosphere of
the restaurant made me nervous, and it didn’t really help that I was there with my professor. This
restaurant was so small that whoever sat on the inside booth seat had to climb over the table. In addition,
those who drank wine had to drink it out of a baby bottle in order to prevent spilling. However, that
fondue dinner has found a special place in my heart because once I started talking to my professor, I
found that he was very personable and easy to talk to. As we talked, we got into some deep topics and had

27 | P a g e
a rather intellectual conversation. Every so often, we struggled with the fondue, and it wound up acting as
an ice-breaker. In many ways, that dinner marked the beginning of a friendship.
If this wasn’t enough, I got to eat at another fondue restaurant in Nice, just a few days before I
left France. This time I was there with the entire group, and for many of them, it was their first time eating
fondue. I knew them all by now, so I didn’t form any new friendships, but that’s not to say that I didn’t
strengthen any friendships. In general, it was a night full of food and laughter. Since the two dinners
began and ended my trip, fondue also symbolizes my trip to France. That says a lot since my weeks in
France were some of the best of my life. Overall, while I would have enjoyed eating fondue by myself, it
was so much better to share it with others.
28 | P a g e
Romanian Stuffed Peppers
Evelyn Iacobucci
Ingredients: 6 bell peppers (red or yellow, large enough to stuff)
13 ounces ground beef
13 ounces ground pork
3 ounces of white rice
Salt
Pepper
Paprika
Water
1 tablespoon of sugar
3 Onions (diced)
Preparation Process:
Step 1. Carefully cut a “lid” off of the peppers by cutting a circle around the stem. Save for later.
Step 2. Rinse the peppers with cold water then stand them upside down to dry.
Step 3. While the peppers are drying, mix the beef, pork, and diced tomatoes together to make the
stuffing.
Step 4. Add a dash of salt, pepper, and paprika for flavor into the mix.
Step 5. Stuff the mix into the peppers making sure that they are filled enough so that they do not lose their
shape, but not to where they are over stuffed.
Step 6. Place peppers in a large pot in which they are able to fit together without any space.
Step 7. Fill the pot with water until it reaches a little below the top of the pepper.
Step 8. Place a lid on the top of the pot and boil for about 45 minutes.
Step 9. Serve peppers, typically with French bread and enjoy!
Narrative
This is one of my favorite meals that my step-mother makes. We always knew not to snack before
dinner because we wanted as much room as possible for her stuffed peppers. I knew this recipe was going
to be the one that I researched for this assignment, but it ended up being a little harder than expected. My
sister and I had helped her prepare and make the peppers numerous times, but there never was a “recipe.”
My step-mother always just told us what to do and how much to put in, but each time it was always a
little different than the last.
When I went to ask her about the recipe, she was confused. She asked how I didn’t know it
already after helping her make them many times in the past. I explained that I needed the exact
measurements for my class to give to the other students, but she said she did not have exact
measurements. She told me that this recipe had been passed down through generations, and that she just
added in different ingredients depending on how she wanted it to taste. There was no written recipe, so we
both had to look up one that was close enough to how she made it to have exact ingredients.
In this process we found so many different variations of the recipe, and made plans to find the
best ones to try in the future. This recipe is not only delicious, but was the core of some of my favorite

29 | P a g e
memories with my family. My childhood would not be the same without our stuffed pepper nights, and I
plan on passing it down to my children as well.
30 | P a g e
Shredded Chicken Burritos (Tinga de Pollo)
Evelyn Iacobucci
Ingredients: Package of chicken breasts, no skin or bones
1 can of tomatoes with garlic and onions
2 Tablespoons olive oil
1 Bay leaf
5 shakes or 1 tablespoon of Goya All Purpose Mexican Seasoning
Corn or flour tortillas
Sour cream
Cheese
Preparation Process:
Step 1. Cut the chicken into small pieces.
Step 2. Combine all of the ingredients, including the water from the can of tomatoes, into a slow cooker
and sprinkle the oregano on top.
Step 3. Let the mixture cook slowly for at least 4 hours on high or until the chicken is tender enough to
fall apart.
Step 4. Remove bay leaf and shred chicken with two forks until completely shredded.
Step 5. Thoroughly stir, then let sit for another two or three minutes.
Step 6. Serve on your choice of corn or flour tortillas. Top with cheese and sour cream.
Narrative
My mother’s Tinga is my favorite meal of all time. She used to make it on special occasions
when I was little, but now makes it almost every time I come home on breaks. It is a dish that she taught
me to make, and watched while I taught my little sisters. Tinga is a Mexican dish that originated in
Puebla, Mexico. Our family recipe was a simplified version of the original. One of the major differences
is the lack of a chipotle style sauce. We also tend to use flour tortillas instead of corn tortillas, but that
was more of our American influence.
My mother is incredibly proud of her Tinga, and she told me to make sure my class knew that she
only used organic and healthy ingredients. The best part about making Tinga is the time you get to spend
with your family while you wait for the chicken to cook. That is (for us) four hours of sitting around
telling stories and playing games with the ones you love most, and that is why this dish is so close to my
heart.
31 | P a g e
Spicy Red Lentil Chili (vegan)
Caroline Johnston
Ingredients: 2 red bell peppers, diced
1 white onion, diced
5 garlic cloves, minced
2 cups red lentils
6 cups water
1 tbsp. chili powder
1 tbsp. smoked paprika
1 tsp. cayenne pepper (or to taste)
¼ cup dark brown sugar
2 tbsp. apple cider vinegar
1 can tomato paste (6 oz.)
I can diced tomatoes
Preparation Process:
Prepare and place all of your ingredients in a large pot on stove. Bring to a boil. Lower heat to simmer
and cover. Let cook about 30 minutes or until thick.
Narrative
This recipe has become a staple in my house since I have become vegan. I love this chili because
it is hearty and thick and makes a lot to eat throughout the week! Instead of relying on traditional family
recipes, I have had to research recipes to add to my weekly routine as none of my family follows the same
diet as me. Luckily there are many vegan bloggers online who provide so many great tasting, healthy
recipes!
Source: http://www.rawtillwhenever.com/spicy-red-lentil-vegan-chili-instant-pot/
32 | P a g e
Chicken Marsala
Sarah Kelsey
Ingredients: 4 boneless chicken breast halves without skin
½ cup all-purpose flour
½ cup breadcrumbs
½ teaspoon salt or garlic salt
¼ teaspoon pepper
½ teaspoon dried leaf basil
1 teaspoon paprika
3 tablespoons butter or margarine
3 tablespoons olive oil
4 to 8 ounces fresh mushrooms (sliced)
1½ cups of Marsala wine (not the cooking wine)
Preparation Process:
Step 1. Pound chicken to ¼ in. thickness between 2 sheets of plastic wrap.
Step 2. Combine flour, breadcrumbs, salt, pepper, basil, paprika; mix well. Heat oil and butter in a heavy
non-stick skillet over medium high heat. Dredge chicken in seasoned flour/breadcrumb mixture.
Step 3. Cook chicken until lightly browned on first side (about 2 to 3 minutes). Turn chicken and add
mushrooms around the chicken. Cook about 2 minutes longer, until lightly browned; stir mushrooms.
Step 4. Add Marsala wine to pan around chicken and mushrooms. Reduce heat to medium low; cover and
simmer 10 minutes or until done. Add 1 tablespoon corn starch and ½ cup of water if sauce needs
thickening along with optional 1 teaspoon of powdered chicken broth.
Narrative
Chicken Marsala was the first dish that I learned to cook on my own. I first learned its recipe in
middle school. However, the initial recipe came from my church’s youth leader who doubled as the
caterer for church events. I enjoyed his recipe, but felt like the dish needed something more so I scoured
the internet for other recipes and experimented combining them until I came up with the current
incarnation.
The most unique parts in this recipe, in my opinion, are the use of paprika and breadcrumbs and
refusal to use Marsala cooking wine. The paprika I use adds a slightly smoky flavor while the
breadcrumbs add more crunch and texture. The use of a non-cooking wine Marsala also improves the
flavor of the dish.

33 | P a g e
Desserts
34 | P a g e
Pie Crust
Samuel Sims
Makes one 10 inch crust.
*This recipe is highly dependent on technique and learning how to “read” the dough, which can only come from
watching the process. It is difficult to explain in words what exactly you are looking for. For best results, you
need to watch the process.
Ingredients: 2 cups sifted flour
1 tsp. salt
1/3 cup shortening
1/3 cup butter
Ice water as needed
Preparation Process:
Sift flour and salt together. Cut shortening and cold butter into flour/salt until the fat is pea sized. Use a
pastry cutter or two butter knives slicing in against each other in opposite directions. The fat has to stay
cold to cool during the entire process until the dough is in the oven. Refrigerate as needed. Add half a
tablespoon of ice water at a time, as needed into a small area of your dough bowl and work it in until the
dough just begins to bind together. Once you have a portion of the dough bonded, move to the next
section of unbonded dough. Repeat previous step until all the dough is bound together. The dough should
NOT be wet, but looks almost dry while still being one solid mass. Chill again if needed. Roll dough out
into a 10 in. circle on a lightly floured surface and fit to pan.
Narrative
Whenever there was a pie or cobbler made in the Sims household it was for a good reason.
Making the pie crust and filling isn’t something you just throw together. The crust itself is a labor of love
and holds that significance in my family. Making a batch of pie crust takes finesse and a lot of experience
to know what looks “right” during the whole process. My ability to make a successful pie crust is the
pinnacle of my baking skill and has taken a lot of time and failures to be able to successful produce a
crust every time. The lessons I attended on this topic with my mother were the most intensive and
grueling due to the lengthy process of making an entire whole pie/cobbler and the hurdle of training my
eye to see what looks correct during the various stages.
Pies have been around since the ancient Egyptians, but were made popular by the ancient
Romans, who may have picked up the idea from the Greeks. Romans initially used the coffyn (crust)
simply as a container for the filling and the coffyn was not eaten. Eventually the idea of pies spread across
Europe where the Oxford English Dictionary site explains that the word pie became popular by the 14th
century. Most early pies were meat pies and fruit; tart pies did not come around till the 1500s. The
English brought them over to the Americas, where they, like the Romans did not eat the coffyn. It was not
until after the American Revolution that the word crust was used in the place of coffyn and eaten as part
of the dish.
35 | P a g e
Apple Pies from Heaven
Kelcey Bartkowiak
Ingredients: 6 Apples
1 8-count can of biscuits
Confectioners’ Sugar (Powdered Sugar)
1 Cup Brown Sugar
½ Cup White Sugar
1 Tsp. Nutmeg
1 Tbsp. Cinnamon
Preparation Process:
Preheat oven to 350 degrees.
First, dice the apples into small pieces. Place the apples, brown sugar, white sugar, nutmeg, and cinnamon
in a boiling pot with about ¼ cup water (use less water for a smaller number of apples). The apples should
be above the water. Boil this mixture until the apples are breaking apart (10-15 minutes); be sure to stir so
it does not stick and the ingredients are mixed evenly.
Take the biscuits from the can and roll them out individually. Flatten them into patties, but leave them
thick enough to close. Once the apple mixture is done and cooled to a temperature that is manageable,
take a spoonful and place it in the center of each biscuit patty. Close each patty with the mixture inside
and place in a muffin tin. Bake at 350 degrees until breading is golden brown. Sprinkle powdered sugar
on top and ENJOY!
Narrative
In American culture, apple pies are a symbol of prosperity and national pride. For me, they are a
symbol of my childhood, each one different, but equally as wonderful as the last. Apple pie was
introduced to the colonies by the Swedes, Brits, and Dutch back in the 17th and 18th century. Back then,
apples were not widely available yet in the New World, so the colonists made due with the crabapples.
Ciders were the main use for apples in the beginning, but as seed planting became more and more
prevalent, the rise in apple varieties also increased. Soon, people discovered apples could be dried and
rehydrated to produce the sweet dessert year around, and by the early 1900s, apple pie was a staple in
every American home.
For me, just smelling an apple pie brings back memories of cold mornings with my grandma in
the kitchen. She’d have my sisters and I go out to the trees in the yard and collect as many apples as we
could. She preferred crabapples, somehow the sour apple contrasted the sugar, but the product spoke for
itself. Once the apples were collected, she’d slice each one and dice them all perfectly square. Into the pan
they went with the sugars, cinnamon, and nutmeg. She boiled them till they were breaking, always
watching and constantly stirring.
Most of the time I use store bought biscuits, but occasionally I still make the dough from scratch
like Nanny did. She’d make her dough and cut each circle with a glass from the cupboard. Once she filled
them she turned them to the side and carefully pressed them closed with the prongs of a fork so they

36 | P a g e
looked like tiny turnovers. I was always mesmerized by this. She was careful to make sure they all
matched in size and shape. Each had just the right amount of filling each time. She was a wizard.
Apple pies mean a lot to me. I enjoy making them and, of course, eating them. The memories I
have of making apple pies as a child are cherished, and each time I make my grandma’s recipe, I am
reminded that she will always reign supreme in the kitchen.
37 | P a g e
May’s Apple Pie
Richonna Sanders
Ingredients: 5-7 Granny Smith apples (depending on size of apple)
Store bought pie crust in refrigerator section- pack of two
1 cup brown sugar
1 cup melted butter
1½ cup flour
1 tsp. soft butter
2 tbsp. brown sugar
1 tbsp. vanilla extract
1 tsp. cinnamon
1 tsp. nutmeg
Preparation Process:
Heat oven to 350oF. Peel, core, and cut apples into thin slices and put into mixing bowl. Melt butter and
add 1 cup flour, brown sugar, cinnamon, nutmeg, and vanilla extract. Mix together until a creamy
mixture. Pour onto apples and mix. Let sit while putting crust into pan. Lay one crust down and flatten
out around bottom of pie pan. Let edged hang over the side if able. Mix apples again then pour into pie
pan. Empty out all the juice inside mixing bowl for all the flavor. Lay second pie crust on top. Squeeze
sides onto first pie crust to connect them so the apple juice doesn’t seep out. Decorate as desired around
the edges. Make 4 slots into the top crust so it will be able to breathe. In another mixing bowl, mix the
soft butter, ½ cup flour, 2 tbsp. brown sugar together. Create a lumpy mixture (can add more flour if
needed just make sure it’s not runny). Sprinkle the mixture on top of pie crust. Put pie in oven for 45
minutes. At 30 minutes, put foil around crust edges so it won’t burn. Take out of over after time and let
cool to gel.
Narrative
I chose this recipe because it’s actually my own. My grandma and I love baking together and one
day we decided to make an apple pie. Apple pie is the staple dessert for my family. Every special
occasion we have an apple pie. Even for birthdays, we might get that instead of cake. I did not feel like
going out to buy a pie, so I decided to make it from scratch. It took me about a year to perfect it and still
it’s not perfect every time, but close. I have used other apples in the recipe, and anyone can, it’s just
certain ones don’t sit well and certain ones make the pie too sweet since it has so much brown sugar.
38 | P a g e
Cinnamon Roll Apple Pie
Elizabeth Henry
Ingredients: 2 Granny Smith Apples
1 Golden Delicious Apple
2 Fuji Apples
2 Cans of Cinnamon Rolls
1 Cup sugar
1 Tablespoon Cinnamon
1/4 Cup flour
Preparation Process:
Step 1. Peel and cut apples to desired thickness.
Step 2. Add sugar, cinnamon, and flour, to the cut up apples and add more sugar and cinnamon to desired
taste.
Step 3. Preheat oven to 350 degrees.
Step 4. Take one can of the cinnamon rolls and roll them out flat with a rolling pin and place them in a
slightly greased 9 in. pie pan and stick them together to create a pie crust.
Step 5. Once the crust is in and there are no holes in it, pour the apples into the pan.
Step 6. With the second can of cinnamon rolls, roll them out all together to make a whole sheet of rolled
cinnamon rolls and place on top of the apples and tuck any excess in around to make a seal to keep the
apples from drying out.
Step 7. Place the pie in the preheated oven for 35 minutes or until golden brown on top.
Step 8. Take the icing that was provided for the cinnamon rolls and heat it up for 10 seconds and drizzle
on top of the pie and serve.
Narrative
This recipe is a new one for me, but it has become a favorite. I had to make something for my
company potluck and tried a new spin on an old classic. My mom always makes apple pie for
Thanksgiving and it is always the first thing to get eaten. This is already becoming a comfort food for me
and the people I have had try it have always really like it.
39 | P a g e
Peanut Butter Pie
Mallory Thomley
Ingredients: 25 chocolate sandwich cookies, such as Oreos, crushed
4 tablespoons butter, melted
1 cup creamy peanut butter
1 (8 ounce) package cream cheese, softened
1¼ cups powdered sugar
1 (8 ounce) package whipped topping, such as Cool Whip, thawed
Preparation Process:
Mix butter & Oreos together; pat into 9 inch round pie pan. In a stand mixer, mix together peanut butter
and cream cheese. Once combined, gradually add in powdered sugar. Fold in Cool Whip. Pour into pie
pan and spread evenly. Freeze 2 hours; cut and serve.
Narrative
Peanut Butter Pie is hard to resist and so easy to prepare; it is a staple in my family. It combines
chocolate and peanut butter together in a creamy rich frozen dessert that should be loved by everyone.
The pie is a more substantial ice cream like dessert that is more filling than any other dessert. I was not a
fan of this dessert at first, looking back I have no idea why, but now it holds a special place in my heart
and stomach. The base of the pie is an Oreo crust giving it a buttery chocolate layer to encompass the
peanut butter making it the perfect type of dessert.
This dessert started by my older sister, Lindsey, when we lived in Minnesota around 2002. When
asked, she did not remember where she found the recipe, but it probably came from an American Girl
Magazine or something similar to that. She made it on multiple occasions throughout her tween years, but
stopped when we moved to Georgia in 2004. Around 2010 this recipe made a comeback when I made a
variation of it in a culinary class in high school and it became an instant familial hit all over again.
Nowadays, my mom and I make this when we need an easy and delicious chocolate and peanut butter fix.
The recipe can be changed to incorporate Reese’s and/or Oreos into the batter or even a peanut butter or
fudge topping; any alterations like this will cause the dessert to become more rich and sugary.
40 | P a g e
Jane’s Peanut Butter Pie
Vivien N. Kibble
Ingredients: 1 Frozen Pie Dough Crust
1 Jar of Creamy Peanut Butter
1 Package of Jell-O Vanilla Pudding (follow directions on box)
1 Cup of Powdered Sugar
1 Container of Frozen Cool whip
Preparation Process:
Poke holes, using a fork, into the pie crust and place the oven to the temperature suggested by the
directions on the pie crust. Using the directions on the box, cook the vanilla pudding. Keep the
temperature low and stir constantly. Once the pudding comes to a low boil, remove the pot from heat.
While the pudding is cooling and thickening, mix the powdered sugar with the peanut butter by hand.
Mixing should take some time and is complete when the result is a well-mixed dusting of the two
ingredients. Once complete, lay a small layer of the mixture in the base of the pie crust. Place the pie crust
in to cook for the allotted time and allow it to cool once removed from the oven. Once cooled, pour the
vanilla pudding into the pie crust and allow the pie to chill in the refrigerator for several hours. After
cooled, sprinkle more of the peanut butter and powdered sugar mixture on the top of the pie.
Narrative
Jane’s peanut butter pie came from my late grandmother, on my father’s side, Jane Kibble. My
grandmother was a devoted cook and spent years coming up with wonderful recipes. Sadly, I never was
able to ask her when she developed the recipe for peanut butter pie, but my father says it’s at least 60
years old. My grandmother stopped cooking about six years ago when she began losing her memory.
The first thing I ever cooked with my grandmother Jane was peanut butter pie. She forced me to
make one and she made her own with anticipation that mine would be horrible since it is easy to burn the
pudding (and I did). But she told me that cooking is about more than the food itself, it’s about what the
food leads to. Food brought my family together and kept us staying to eat dessert long after we were full.
For the first time in six years, I plan on making Jane’s Peanut Butter pie because I think it’s important to
pass down her craft and her message. Jane may have forgotten her recipes, but I will remember them for
her and pass them down to create more moments for families to gather.
41 | P a g e
Apple Delight Cake
Jesi Montoya
Ingredients: 4 cups sliced apples
2 cups sugar
2 cups flour
1½ tsps. baking powder
½ tsps. salt
2 tsps. cinnamon
2 eggs, beaten
2 tsps. vanilla
¾ cup oil
Preparation Process:
Mix apples and sugar and let stand 10 minutes. Mix flour, baking powder, salt, and cinnamon and stir into
apples. Stir together eggs, vanilla, and oil and blend into apples. Spread onto greased pan. Bake at 350
degrees Fahrenheit for about 50 minutes.
Narrative
I have great memories with this dessert recipe. This apple cake is my great grandma’s recipe. It’s
old enough that she wrote down the ingredients and directions using a typewriter. She gave the recipe to
my grandma, and since then my mom has had the recipe, along with other recipes from my great grandma
in her kitchen.
I like making this cake with my mom. When I was younger we used to have apple trees in our
backyard. My siblings and I would go outside and pick a lot of apples. We would run back and forth
dropping off the apples to my mom while she sat in the kitchen washing, peeling, and slicing the apples.
The recipe does not specify what kind of apples to use, but the ones that grew in our backyard were green
apples so that’s what I’ve always used when making this cake. There is a lot to mix together and it uses
arm strength, but it is worth it in the end. Follow the recipe even if you start to think something is wrong
about the directions. The first time my mom and I tried making it we thought we completely messed up
somehow. When it comes time to mix everything together, it turns into a brown sticky mess that does not
look all too appetizing. This is just due to the cinnamon-the cake will still come out amazing.
It is a pretty large cake. It is best to consume warm, and as an extra effect I like to make it a la
mode by adding a scoop of vanilla ice cream on top. Since the cake is large, I tend to only make it for
family get togethers or little house parties. It is a classic dish, but it means a lot to me because this was the
way that my great grandma liked to eat the American apple pie.
42 | P a g e
Cream Cheese Pound Cake
Samuel Sims
Ingredients: 3 sticks salted butter
3 cups sugar
3 scant cups flour
8 oz. cream cheese
6 large eggs
¼ tsp. salt
1½ tsp. vanilla extract
Preparation Process:
Cream softened butter, sugar, and cream cheese together until light and fluffy. Add salt and vanilla, beat
well. Add eggs, one at a time, beating well after each. Stir in flour. Spoon mixture into greased tube pan.
Bake at 325oF for 1½ hours. Check for doneness with wooden toothpick at approx. 1 hour and frequently
after. Rather undercook than over. When done, the very moist cake will be almost playdoh like when
stuck with a toothpick.
Narrative
A thick slice of warm pound cake has always been one of my all time favorite desserts. It is
extraordinarily simple in its contents and making, yet it carries so much flavor and decadence. No other
dessert that I can think of perfectly illustrates that simplicity often results in the best outcome. Pound cake
is one of my mother’s notorious specialties and because of that I have eaten my weight in the dense,
yellow cake. One of the primary mediums in which my mother and I would spend time is cooking in the
kitchen. Due to how straightforward the process is, pound cake was one of the first desserts that I learned
to make.
Pound cake originated in Europe, typically thought to be in England, though there is some debate
as to whether it was created in the UK or France. The original iteration called for a pound each of the four
ingredients: flour, eggs, sugar, and butter, and nothing more. This resulted in an extremely dense cake that
weighed almost four pounds! Due to its dense nature, a single pound cake could be served to a large
group of people and because of that (and in part due to its rich and buttery flavor), it grew in popularity in
the south. This old style is still popular in the south, though most recipes have been modified to add a
little leavening, or flavoring such as lemon or vanilla. The pound cake has now become one of the more
versatile desserts for Americans due to its seasonal adaptability.

43 | P a g e
Blinda’s Oatmeal Crunch Cookies
Sarah Kelsey
Ingredients: 2 cups of rolled oats
1¾ cups whole wheat flour
1½ cups Grape Nuts Cereal
¾ teaspoon baking soda
¾ teaspoon baking powder
½ teaspoon salt
¾ teaspoon cinnamon
½ teaspoon nutmeg
1 cup chocolate chips (optional)
2 sticks unsalted butter at room temperature
1½ cups dark brown sugar (packed)
¼ cup sugar
2 large eggs
1 tablespoon vanilla extract
Preparation Process:
Step 1. In a large bowl combine: rolled oats, whole wheat flour, Grape Nuts Cereal, baking soda, baking
powder, salt, cinnamon, nutmeg, and optional chocolate chips.
Step 2. In a large bowl or mixer combine and beat until blended: butter, dark brown sugar, sugar, eggs,
and vanilla extract.
Step 3. Add oatmeal mixture to butter mixture and stir just until well blended. Scoop by the tablespoon
onto cookie sheets that have been greased or lined with parchment paper and bake 10 to 12 minutes, or
until golden brown.
Step 4. Let stand 2 minutes after removing from the oven and carefully loosen cookies with a spatula. (If
they cool off too much and stick, put them back in the oven for a minute or two.)
Narrative
My recipe for oatmeal crunch cookies actually comes from a chapter book I read in middle
school. Unfortunately, I cannot remember the title of the book and Google searches have been fruitless.
All I remember is that there was a character in the book named Blinda who was a good witch and enjoyed
baking cookies to serve to the other characters. Described as incredibly tasty, the cookies often served as
a “comfort food” after a negative event had taken place within the book. At the end of the book, the
author provided Blinda’s “patented” cookie recipe.
I scribbled the recipe down on a loose leaf of paper which still hangs on the kitchen refrigerator
today. The cookies have been popular in my family since I first made them in seventh grade and are
traditionally made at least twice a year by me each winter.
I am very proud of the recipe and the slight changes I have made to it. I think part of this is
because it was the first baking recipe I ever made on my own and it was made entirely from scratch rather
than a boxed mixture.
44 | P a g e
Pfefernusse Cookies
Ashley Dawson
Ingredients: ½ cup sugar
¼ cup Crisco
1 cup honey
1 egg
¼ cup sour milk (add 1 tsp. vinegar)
2¼ tsp. baking soda
¼ tsp. allspice
1¼ tsp. cinnamon
1 tsp. anise
½ tsp. cloves
1 tsp. white pepper
4 cups flower
Preparation Process:
Step 1. Add all ingredients together in a mixing bowl and mix thoroughly.
Step 2. Refrigerate overnight.
Step 3. Roll into balls and place on cookie sheet.
Step 4. Bake at 350 degrees for about 20 minutes, or until cookies are a light golden brown.
Narrative
My whole life, I’ve only had connections to my nuclear family. I do not know a great deal about
our cultural roots. I enjoy the traditions and shared recipes between my family and me, but have never
shared anything outside of our unit, until I became best friends with a girl from Germany. I met Apple my
junior year in high school. She moved here from Stuttgart, Germany and we hit it off instantly. As best
friends, we shared a lot of common interests, including, our love for food.
Apple and I began cooking together regularly and even more so around the holiday seasons.
Sharing food and family recipes became a tradition for us. I’ll never forget the year she taught me how
make pfefernusse cookies. She started off the lesson by teaching me about the history of the cookie.
When translated, the name, pfefernuse, means pepper nut. The cookie, she said, is a treat traditionally
eaten during the feast celebrating what she calls, “German Christmas,” which begins December 6. I
remember having my suspicions as she presented the ingredients. I thought, “Pepper…that’s interesting.”
and could not wait to be amazed by the paring of these peculiar ingredients.
The cookies turned out to be fantastic! I learned a new recipe and broaden my perspectives. This
recipe means a lot to me, and my family. Apple and I have been friends now for over a decade and our
families always visit one another during the holidays. Before I met her, I had not yet experienced, or
incorporated another culture’s food ways into my life outside of the restaurant scene. These cookies have
expanded my family tree and holiday traditions. Preparing this recipe gives me a small feeling of
connection to a culture and a country I hope to one day explore.

45 | P a g e
Honey Almond Date Balls (Vegan)
Ashley Dawson
Ingredients: ½ pound raw almonds
2 pints pitted dates
1 cup coconut shavings
¼ cup agave honey
Vegetable oil, for forming balls
Salt (optional)
1 tbsp. Vanilla extract (optional)
Preparation Process:
Step 1. Grind almonds in a food processor until finely chopped.
Step 2. Place chopped almonds on a baking sheet and toast in the oven at 350 degrees for 5 to 7 minutes,
or until they are a shade darker.
Step 3. Chop dates into small pieces.
Step 4. Place roasted almonds, chopped dates, agave honey, vanilla extract, and coconut shavings together
in a mixing bowl.
Step 4. Mix the ingredients thoroughly (add a pinch of salt if desired).
Step 5. Use hands to form the mixture into small/medium sized balls (add small drops of vegetable as
needed to ease the task).
Narrative
Preparation of this delicious, vegan treat has been a holiday tradition of mine for three years now.
I have a small nuclear family made up of my twin sister, older brother, mother, father, and 93-year-old,
legendary grandfather. Every year, we all come together at my parent’s house in Athens, Georgia to share
the holidays together. Thanksgiving and Christmas day at the Dawson’s are dedicated to music, good
conversation, laughter and, of course, lots of yummy dishes.
Because each family member is unique, everyone has a dish that is tailored to their taste buds.
Traditionally my mother prepares the meal, and cooks holiday classics, such as, turkey, mashed potatoes,
and stuffing. She then goes the extra mile by preparing custom dishes for each family member. Each year,
my mother stuns us with tasty, exciting new holiday meals. Once I stopped eating meat, her toughest task
became cooking for me. Traditional holiday trimmings can become very mundane over time, especially
for someone who eats vegetables daily.
Upon the first holiday season following my vegetarianism, I knew I wanted to help my mom in
the kitchen. My mother and I enjoy being creative and trying new things. Because I am the only
vegetarian in my tribe, I wanted to prepare a nontraditional, meatless dish that everyone could enjoy.
After finding the recipe for Honey Almond Balls online, I decided to incorporate it into our holiday
tradition. I made some small adjustments by adding coconut shavings, salt, and vanilla extract. I also used
agave honey to make the recipe vegan friendly, and the treats were a hit! Vegan or not, these almond balls
are worth a try. I enjoy preparing this simple snack with family and friends. Enjoy them during or after a

46 | P a g e
meal for a light, refreshing desert. Try a couple of them with a scoop of cashew milk ice cream if you
really have a sweet tooth.
47 | P a g e
“Anise Cookies”
Olivia Rader
From Mr. Robert E. Rader (Olivia’s grandfather)
Ingredients: 4 eggs
½ tsp. anise oil
½ tsp. baking soda
2 cups light brown sugar
3 1/3 – 4 cups sifted flour
Pinch of salt
Preparation Process:
“Beat eggs, sugar and anise oil ½ hour. Add flour, soda, and salt. Roll and cut. Let stand overnight. Bake for 12
minutes on floured pan.”
Narrative
Anise cookies have always been a holiday favorite on my dad’s side – but ironically, only a
favorite to him and his father. “Nobody else would touch them,” said my aunt, since the heady flavor of
black licorice tends to commonly incite disgust in many. But these cookies, along with their butterscotch
cookie sisters, are related to a German tradition in our family passed down from Mennonite ancestors who
settled in Virginia sometime during the Revolutionary war. The tradition was actively carried on to the
present generation by my father’s Swiss great-great-grandmother, who had married into the Rader family
in Illinois, and continued to pass down this recipe to her children.
I spoke with my father about his memories of the cookies during the holidays, and he recalled his
father going to the drugstore to purchase the aniseed oil, and being particular about preparing them a
week in advance so that the anise flavor “aged” and developed over time. He also remembers their storage
in an earthenware crock during this aging period. Also notable is the “setting” period between rolling and
cutting the cookies (as in gingerbread) overnight. This step bears an important link with springerle, a
German Christmas cookie dating back to the Renaissance that was flavored with aniseed, and historically
stamped with designs featuring Christian symbolism and Biblical scenes.2 The drying period between
preparation and baking allowed better preservation of the intricate designs.3 Resemblance to springerle
also exists in its fatless dough, long-whipped eggs, and sugar mixture, and addition of baking soda, a
modern substitute for the ammonia-based leavening agent Hartshorn salt – these three characteristics
produce the “spring” in springerle, causing the dough to rise and create “feet” on the bottom.4
2 "Springerle." Sweetooth Design Company | Food & Design | Oakland, USA. Accessed November 29, 2016.
http://www.sweetoothdesign.com/cookie-springerle. 3 Samu-Kuschatka, Anikó. "History of Springerle." And All The King's Men. Accessed November 29, 2016.
http://andallthekingsmen.bizhosting.com/history.html. 4 Matterer, James. "A Brief History of Springerle." Gode Cookery. 2004. Accessed November 29, 2016.
http://www.godecookery.com/cookies/history.html.
48 | P a g e
Monster Cookies
Cameron Dunlap
Ingredients: 2 sticks of softened butter
1 cup of sugar
1 cup of brown sugar
3 large eggs
½ teaspoon vanilla extract
2 teaspoons baking soda
1½ cups creamy peanut butter
4½ cups quick-cooking rolled oats
2 cups chocolate chips
2 cups plain M&Ms
Preparation Process:
First preheat the oven to 350 degrees F. Combine the cream, butter, and both sugars in a bowl. Add the
eggs one at a time, mixing each egg as it is added. After, add the vanilla, corn syrup, baking soda, and
peanut butter. Mix everything until it appears smooth. Next add in the oats and mix them in. Then add the
chocolate chips and M&M’s and continue to mix them in well. Scoop out the batter onto a baking sheet
ensuring that each cookie is spaced 2 inches apart. Bake 10-12 minutes or until the edges appear golden
brown. Let them cool before diving in.
Narrative
Monster cookies are a more recent addition to my family’s baked-goods repertoire. My mother as
a stay-at home-mom, more or less, spoiled my appetite. Someone who cooks and bakes often tend to
develop their own recipes or put certain twists on already created ones. When new products are
introduced, some research and development is always a great way to ensure the continued success of said
product. In the case of my home growing up, my mother used us all as research assistants to test these
new creations. Of course, almost all of these new creations were cookies and my family members and I
were more than willing to provide some assistance.
Monster cookies were some of the first new cookies my mother experimented with. Prior,
chocolate chip cookies, peanut butter cookies, and oatmeal cookies were the household standard. One
could almost always find one on hand at most times throughout the year. Monster cookies were new to us
but seemed to draw features from all the cookies we were used to eating. I am not sure where the name
derives from, but these cookies appear to be monstrous. They are dense, filled with many ingredients, and
usually one is enough. Monster cookies were a huge success in my household and it is still a cookie often
found within the Dunlap residence.
Similar to making ice cream, I can always recall my mother in the kitchen baking some sort of
treats. Now, monster cookies seem to be one of the recipes I am most fond with seeing made and baked
by my mother. Cookies are also reminiscent of the holiday season in December. It is around this time that

49 | P a g e
the cookie production in our home would sky rocket. Each year, my mother baked enormous amounts of
various cookies so that they could be bundled up and delivered to various family friends and neighbors.
Coincidentally, I always seem to gain weight around this time of the year because I am exposed to all the
aforementioned cookies. Monster cookies found their way into the mix of the baked goods to be
delivered. It is because of this that I also associate cookies with generosity and content.
50 | P a g e
Christmas Pizzelles
Vivien N. Kibble
Ingredients: 1 lb. Butter - Melt and let Cool to Room Temperature
1 Dozen Eggs - Remove from Refrigerator and allow to warm to Room Temperature (Approx. 1 Hour)
3½ Cups White Granulated Sugar
1 oz. Orange Extract
1 oz. Lemon Extract
1 oz. Anise Extract
2 tbs. Vanilla Extract (Pure not Imitation)
1 Jigger of Whiskey [Approx. 1½ oz.]
7 ½ Cups All Purpose Flour
Pizzelle Iron
Preparation Process:
In a large mixing bowl (large stand mixer), put butter that has been melted and cooled to room
temperature. Add eggs that have been warmed to room temp.; add sugar and mix until blended. Add
orange, lemon, and anise extracts, vanilla, and whiskey. Mix well. Add flour, one cup at a time and then
½ cup. Mix well as added. Place mix in refrigerator and allow to cool for at least 4 hours or overnight.
Place 1 tbs. of batter to each side of pre-heated Pizzelle Iron. Cook for approx. 60 seconds. Adjust time
for preferred doneness. You may have to discard the first 2 Pizzelles.
Narrative
My grandmother on my mother’s side, Naomi Wolfe, has been making pizzelles since before I
was born. Every Christmas, my family would meet for dinner and all of us grandchildren would wait in
anticipation for Christmas Pizzelles and Secret Santa gifts. All of the adult women in my family would
participate in making the cookies. The Christmas after I had turned sixteen, was the first time I helped my
mother make them.
Every year after that Christmas, my mother and I would make the Christmas Pizzelles and we
would strive to give them to everyone. They were some of our most favored gifts. One of the secrets to
keeping the cookies crisp and fresh was to store them in Christmas tins and we would spend hours
picking out the perfect tins to give. Even now that my mother lives in Indiana, we still make it a tradition
to spend our time together making cookies.
This year, 2016, will be the first year that I make the Christmas Pizzelles in my own home and
inherit the family recipe. My father and I will make a batch of pizzelles before we head up to share them
with our family in Michigan. The most important part about this family recipe is that it brought my family
together and still does today despite any changes that have happened.

51 | P a g e
Buckeye Candies
Jamie Rauch
Ingredients: ½ cup (1 stick) butter, room temperature
1 cup creamy peanut butter
2 cups confectioners’ sugar
6 squares semisweet chocolate, coarsely chopped (or 6 ounces chocolate chips)
1 square unsweetened chocolate, coarsely chopped
Preparation Process:
With an electric mixer, cream the butter, peanut butter, and confectioners’ sugar until smooth. Form
medium/small balls from peanut butter mixture and place on a cookie sheet (note: if mixture is too sticky
to work with, it can be refrigerated until more firm). Freeze balls for 30 to 45 minutes or until firm. Over
a double broiler or on low in the microwave, melt both of the chocolates together. Using a toothpick in
the center of the frozen peanut butter ball, dip into the chocolate, leaving the very center uncoated to
establish a two-toned “authentic” buckeye. Place dipped buckeyes on another cookie sheet lined with wax
paper and allow to set up in the freezer for 20 to 30 minutes, or until set chocolate is firm to the touch.
Store in refrigerator. Makes around 30 candies.
Narrative
In keeping with the general philosophy of my mom, simple is best. This recipe is incredibly easy,
but holds particular sentimental value for me, especially around the holidays. This dessert is
commemorative of my family’s roots (especially my mom’s childhood) and their own traditions as these
candies were, and still are, made each year during Christmastime. This recipe comes from my mom’s
side, as her family is originally from Ohio, the buckeye state. The buckeye tree is the state tree of Ohio,
producing recognizable nuts that look just like these candies and lending its name to sports’ teams and
Ohio residents themselves.
The ease of this recipe is a pathway to inclusive creation as people of any age can help! As a
child, this was huge to me because it was a special way to spend time with my mom and sister since mom
has always been pretty independent in her cooking habits. More than that, I really felt closer to my far-
away family, knowing that this was a recipe from them, because we saw them so little growing up. I
would think of my grandparents in particular, who I saw rarely, and I felt that lack even as a child. So,
I’ve always enjoyed this recipe because it feels like a connection to loved ones far away and their
memory. Making these candies at Christmastime is great too because they are so easy to share and have
helped us foster community with our neighbors as the holidays are when we really make time to catch up
with those who live around us by sharing all the treats whipped up in an often over-abundance of cheer
(and sugar).
52 | P a g e
Bernie Miller Fudge
Samantha Richmond
Ingredients: 4½ Cups Sugar
1 1/3 Sticks of butter or margarine
1 can evaporated milk (12 oz.)
3 cups of chocolate chips made with real chocolate
1 jar marshmallow cream (14-16 oz.)
Nuts if desired
Preparation Process:
Step 1. Mix sugar, butter, and milk into a 4-quart saucepan and bring to a boil while stirring frequently.
Step 2. Boil 10 minutes. Step 3. Remove from heat and add the chocolate chips, marshmallow cream, and
nuts if desired. Step 4. Stir until well blended and pour into an 11x14 cake pan. Set aside until completely
cool before cutting. Step 5. Enjoy!
Narrative
My Grandma Marty received this from her mother, my Great Grandmother Williamson. In 1999,
by older sister Jessica requested the recipe and it was sent to her and kept by my mother until now. This
recipe is one of the regular items that would be made for my family and cousins growing up when we
would gather together for family reunions. My Grandma always lived far from me growing up and the
smell and taste of fudge is a wonderful memory of the time I had with her. My Grandma and Granddad
lived in Saint Louis, Missouri when this recipe was sent to my sister. They had a large home with a pool
and would host all of my cousins as often as possible, which was about once a year. We all enjoyed the
food our grandparents would make as we played outside, including my Grandma's fudge.
Once my Grandma sent the recipe to us here in Georgia, my sister mastered the skill of making
the fudge. Once my parents divorced, we saw my Grandma and cousins less frequently. My Grandma
Marty is my father's step-mother and I grew up living with my mother. Because of this, my sister and I
were left home a lot as my mom had to work and my dad lived in other states. My sister and I enjoyed
passing the time by baking, including baking the amazing fudge! It was one of the few things we could do
where we wouldn't fight. Bernie Miller Fudge has been a wonderful family recipe that has become a
tradition that I will be sure to pass on.

53 | P a g e
Bran Muffins
Natasha Lee
Ingredients: 2 cups all-purpose flour
1 cup sugar
1 cup milk
6 teaspoons baking powder
¾ teaspoon salt
1 teaspoon ground cinnamon [plus a couple shakes from the dispenser]
1 cup shortening [warning: if butter is used, you cannot store this recipe as a dry mix; you need something like
Crisco]
4 cups bran cereal
1 cup chopped almonds [walnuts and pecans work fine too]
Preparation Process:
In a large bowl, combine the first six ingredients. Cut in the shortening with a pastry blender or food
processor until crumbly. Only when the shortening is no longer chunky should the cereal and nuts be
added. If dry milk powder was used, this mix can be stored in a cool, dry place or in the freezer for up to
two months. To awaken the muffins inside, add an egg and a cup of water to four cups of the dry mix and
mix well. If real milk was used, then add an egg and mix it up again. This recipe can now be stored in the
refrigerator for no more than a week. Or, you can just make up all the muffins and eat one whenever.
They are especially good slightly toasted. To bake, fill greased muffin cups about 2/3 full and bake for
about ten minutes at 400oF or until a toothpick comes out clean. Some ovens may vary so adjust time as
needed.
This recipe makes 2 batches (8 cups of mix) or about a dozen normal-sized muffins.
Narrative
This is my favorite muffin recipe and is the only muffin recipe I use anymore. It comes to me
from a grocery store magazine called Taste of Home. The selling point of this particular magazine is
“Gifts in a Jar,” so this recipe is actually meant to be stored as dry mix for up to two months. However, I
have more often been skipping the step that allows the mix to be stored dry, which is using the dry milk
powder. The last few times I made the muffins, I used actual milk and left off the water. The reason I do
this is because I learned that in Jamaica they waste gallons and gallons of milk because of the trend in dry
milk powder. I don’t know if I’m helping just as this one person not using dry milk powder. I don’t even
know how to help the Jamaican market but if I knew how, I’d totally buy their milk so it isn’t wasted. I
adore milk so seeing all that go to waste really bothers me. Using milk instead of water also reduces the
time this recipe can be stored, but I tend to eat all these muffins too quick for this to be a problem.
This muffin recipe is certainly a mixture as opposed to a compound, I like to think. I say this
because I feel I can taste individual ingredients even after it has been baked. Because of that, it is very
important to mix the ingredients well before putting in the cereal. Otherwise the ingredients do not mix
completely and you taste little bits of the shortening in the muffin.

54 | P a g e
My improvements on the original recipe have been the result of trial and error over the many
times I’ve made these muffins. Lately, I’ve become more inclined to experiment with my baked goods, so
much so that I’m already calculating improvements while looking at a new recipe, usually a reduction of
the sugar as a starter.
In addition to sugar, I also tend to reduce salt in my baked goods by at least a small amount. For
example instead of a whole teaspoon, I’ll just not fill up the spoon to the brim. Unless you like salted
caramel or similar things, baked goods do not need to taste salty. Some people think salt brings out the
sweet, but to me it just distracts from everything else in the mix.
I have a few optional notes. Technically all my improvements are optional, but these ones are
extra preferential. I tend to always add more cinnamon when a recipe calls for it. I can never taste the
amount they ask to be added. In addition, I add more cereal than the recipe calls for because it cannot be
tasted otherwise. I also omit the raisins because I do not like them, but that choice is purely personal. If
nuts are not desired, they can be left out entirely and the muffins will probably not suffer in flavor. If nuts
are used, however, I recommend using nuts that are preferred. The different nuts each add a different taste
to the muffins, and walnuts in particular have a strong flavor. For the crunch without too much extra
flavor, I suggest using almonds. The pecans are a good middle ground, but still have a bit of a flavor to
them. For me, I simply like the crunch so I always add nuts.
55 | P a g e
Banana Nut Bread
Jamie Rauch
Ingredients: 3 eggs
1 1/3 cup mashed ripe banana (2 large; with brown speckles!)
2/3 cup sugar
¼ cup milk
3 tbsp. vegetable oil
½ tsp. vanilla extract
2 2/3 cups Bisquick
½ cup chopped nuts (I suggest walnuts!)
Preparation Process:
In a large bowl, combine ingredients together one at a time in order listed above, being sure to mix
thoroughly. Bake mixture in a greased 9x5x3 loaf pan at 320 degrees for 1 hour. Once the hour is up, turn
off the oven, but let the bread rest inside as the oven cools. Let bread cool completely before removing
from pan and slicing.
Narrative
Making this simple bread will always be for me a memorial of my dad. Don’t worry, he’s still
alive (thank the Lord!), but it still has the effect of reminding me of all the ways he is an incredible dad
when I spend time making this bread. To be honest, this recipe probably came from the back of a
Bisquick box, but in my house, it holds a place of honor because it is scrawled on a small recipe card by
the hand of my late Grandma Bohn, my dad’s mom. All through my life I have listened to story after
story about my dad’s Wisconsin childhood, where his big German family all dwelt together, and I feel
reminiscent of a past that is not even mine.
Growing up, this bread was a tag-team effort between me and my dad whenever we had ripe
bananas. He did all the measuring, I did all the stirring, and it is such a consistent and vivid memory from
all throughout my childhood that it is easy for me to put myself back in those moments and appreciate all
over again my dad’s patience and silliness that made everything fun. When I make this bread to share
with others, I really feel like I am sharing with them something special, like a piece of my own history
and the contentment of precious memories. Yes, this bread is good, but it is the legacy of the making of it,
from grandma to dad to me, that makes it so special.
56 | P a g e
Oreo Mint Ice Cream
Cameron Dunlap
Ingredients: 2 cups of heavy or whipping cream
¾ cup sugar
2/3 cup half-and-half
1 teaspoon of peppermint extract
1 cup of coarsely chopped Oreo cookies
Preparation Process:
Pour the cream into a mixing bowl. Whisk in the sugar, a little at a time, then continue to whisk until
completely blended. Pour in the half-and-half and the peppermint extract. Continue to whisk until
blended. Take mixture and add it to an ice cream churner. Just before the mixture begins to hard and
stiffen, add in the Oreo cookies (approximately two minutes before the ice cream is finished). After the
ice cream has fully churned, remove and place in freezer to harden before enjoying.
Narrative
When I was young, I could always remember helping my mother make homemade ice cream. She
actually owns a Ben and Jerry’s cookbook featuring dozens of the recipes featured in stores. I always
enjoyed anything mint and chocolate related. During the hot days in the summer, homemade ice cream
paired family cohesion with creating tasty treats.
One item crucial to good, homemade ice cream is the churner. We own an electric ice cream
machine that churns using electrical power. This machine of course simplifies the process of making the
ice cream. In fact, the cold shell used to hold the ice cream as it churns was always a hot commodity
following the production of the sweet treat. My mother would tend to scoop out most of the ice cream, but
there was always some left in that cold shell that would need to be dug out with a wooden spoon and a
determined belly. Often the ice cream was not ready for consumption immediately following the churning
process so it would be placed in a plastic container and then in the freezer to harden. As a child, and even
as an adult, it requires immense patience to make something delicious that can not be eaten right away
following its completion. However, the ice cream left over in the cold shell would satiate those appetites
as there was just enough cold, frozen dairy dessert left that could steer away those hunger pains
momentarily.
Making ice cream is also something I view as family oriented much like baking. My mother was
a stay at home mom ever since my third sibling was born. While my father is out working, my mother
would always stay at home to be with us and the house. Making ice cream together is often how we
would spend a summer day. It is a very nostalgic activity despite not carrying a huge cultural significance.
Ice cream is popular all over the world with different takes on the consistency and ratios of cream and
sugar or toppings and items mixed in. In Italy, gelato is their unique style. It comes with standard flavors
that we would find in the U.S. with the addition of some regional twists, such as Nutella ice cream.
Though my family is mostly Italian by heritage, American flavors, such as the combination of mint and
chocolate, grew on me and my family more than the gelato-style production.