foundational principles in ergonomics lab manual
TRANSCRIPT

1
Ergonomics: Foundational Principles, Applications
and Technologies
Pamela McCauley Bush, Ph.D., CPE
University of Central Florida, Orlando, USA UCF, FL, USA
LABORATORY MANUAL

2
Acknowledgements
I wish thank the hundreds of students I have had the pleasure to teach over the last two
decades as you inspired me to develop resources to enhance your learning experience.
This manual was created with significant input from my graduate students, Fatina
Gammoh, Susan Gaines, Larry Lowe, my research assistant Ms. Deborah LaClair and
Professional Ergonomist, Ms. Johnine Mowatt. Thank you all for the support and the
inspiration you give as it continues to fuel my love for research, teaching and working in
the critically important field Ergonomics.

3
Objective
This manual was created to provide a hands-on resources to support teaching and learning
goals for an ergonomics course. I have provided exercises that have been used for several
years and they have been designed to be performed individually or in a group.
Additionally, select exercises may also be performed by students working remotely or
taking the course via distance learning technology.

4
Lab Report Guidelines
Goal:
The goal of the laboratory assignments is provide an environment to enhance the learning
experience by teaching through the use of ergonomic tools, equipment and analysis tools.
The students will work in teams in the lab to gain experience in ergonomic team
dynamics, data collection, analysis, interpretation and presentation. The labs are designed
to prepare the students to use ergonomic equipment in both research and application
environments.
Ergonomic Labs:
Labs will be conducted in class during regularly scheduled attendance according
to the syllabus or at alternative times that are compatible with lab team member
schedules.
Remote students will be given a similar assignment that can be done by one
person; Remote students are always welcome to join the class in person for the
labs.
Labs may be done in groups of 2 to 4 depending on class size.
One lab report is submitted per group and a single grade is given to all names on
the lab report.
Lab reports will be due the following class, unless otherwise stated.
Although you will be answering specific questions in the lab, format the responses
in a report when feasible.
At the end of the semester each member of the lab team is required to submit a
peer evaluation form for the other lab members participation
Lab Reports
All lab reports are to be submitted as formal written reports by the lab group. Your lab
should have as a minimum the following headings:
Cover Page
Introduction
Purpose of Lab
Methodology for lab
Subject information
Equipment utilized
Laboratory environment
Process of data collection
Analysis
Results
Discussion/Conclusions
How these lab results pertains to society, your work, your life etc…, or how this
information may be useful.
References, if any

5
Lab Report Grade Sheet
Lab Group Members:________________________________________________
Lab title:___________________________________________________________
(10 points) Introduction/Overview of Lab _______________
(10 points) Discussion of Methodology _______________
(i.e. equipment, subjects, processes)
(30 points) Effective use of tools and techniques _______________
(Ergonomic Approach and analysis)
(10 points) Presentation of Results _______________
(25 points) Interpretation/Discussion of Results _______________
(5 points) Application of knowledge _______________
(10 points) Conclusion and Significance of Lab _______________
(implications, where results can be
useful, etc.)
Comments: ____________________________________________________
(Attach a Copy of this Form to all Lab Report Submissions)
6
Laboratory Assignments
I. Classroom Labs
1. Equipment Evaluation Lab
2. Human Senses Lab
3. Anthropometric Lab
4. MMH & Lifting Lab
5. Information Processing Lab
6. Cumulative Trauma Disorder (Work related musculoskeletal disorder) Lab
7. Work Place Evaluation Lab
8. Human Senses & Human Systems
9. Anthropometric & Segment Weight Lab
10. Lifting Lab
11. Locations of Centers of Gravity on Human Segments
12. Biomechanical Modeling Lab
13. Two-Joint Angle Influence on Adjacent Joint Mobility
14. Seated Work Assessment Lab
15. Warning Label Lab
16. Muscle Contraction Lab

7
II. Ergonomic Application Labs – Prepared by Ms. Johnine Mowatt, M.S.
1. Anthropometry
2. Manual Material Handling (MMH)
3. Ergonomics by Design
4. Design an Operator Job
5. Manufacturing Key Measures (Cost Justification)
6. Rotation
7. Cumulative Trauma Disorders
8. Administrative and Engineering Controls
III. Additional Hand Outs

8
I. Classroom Labs
9
1. Equipment Evaluation Lab
On-site students:
As a lab group, identify a piece of equipment to study in the ergonomics laboratory.
Make sure you do not use a piece of equipment that another team is evaluating.
For the piece of equipment that your team selects do the following:
1) Review any manual or material that describes the tool
2) Practice using the tool
3) Identify applications or research environments where this piece of equipment or
software would be useful in an ergonomic setting
4) Go to the internet and identify an application where this tool or a similar tool was
used in a research or application environment.
5) Prepare a presentation to teach the class how to use the equipment
a. PowerPoint presentation should be approximately 5 minutes long
b. Summarize how to use this equipment in a 1-2 page summary.
c. Email both documents to Instructor so that it can be placed on the course
site for classmates.
6) Be prepared to present this information in class in two weeks and demonstrate
how the equipment is used.

10
Remote or Off-site students:
Identify a piece of ergonomic equipment in your office, on the internet or that you may
have previously used. You may use a piece of equipment or software that is not fully
available to you. Write a 1-2 page overview of this piece of ergonomic equipment and
include the following:
1) Identify applications or research environments where this piece of equipment or
software would be useful in an ergonomic setting
2) Go to the internet and identify at least two applications where this tool or a similar
tool was used in a research or application environment.
3) Provide costs associated with the purchase of the equipment or software
4) Include all references and sources

11
2. Human Senses & Human Systems Lab
This lab is designed to teach about the descriptions, functions and operation of the following
human senses and human systems:
Visual Sense
Auditory Sense
Cardiovascular System
Skeletal System
1. Methodology
This lab consists of a series of questions having to do with describing the various
senses and systems of the human body. The method of research involves using the
internet and the class textbook as research tools for general information.
_____________________________________________________________
Part A – Visual Sense: Describe the operations of the eye from the time that an object
is perceived by the eye until the image is received in the brain.
a) Describe the various elements of the eye

12
Figure 1 is a pictorial showing the major elements of the eye.
Figure 1. Human Eye
Source: Encyclopedia Britannica, Inc.
b) Describe the process that the eye is going through to perform the receipt of the
image
1) Light coming into the eye first interacts with the cornea. The cornea is the
clear, transparent outer portion on the front of the eye and is responsible for 2/3 of
the focusing power of the eye.
2) The light now passes through the iris. The iris is the colored part of the eye and
regulates the amount of light that passes through the eye. It does this by moving
the dilator and sphincter muscles of the pupil.

13
3) The light now passes through the lens. The lens focuses the light on the back of
the eye. For distant objects, the lens is kept thin and flat by the eye muscles, while
for closer objects the lens is thicker and rounder.
After passing through the lens, the light passes through a vitreous body of
fluid, which is the consistency of a gel, having the refractory properties, similar
to water.
4) The light now shines upon the retina. The retina consists of light sensitive
nerve tissue that converts images into electrical impulses. The retina has two
different types of light sensors.
A) Approximately 120 million rods respond to low-intensity light for black and
white vision.
B) Approximately 20 million cones respond to colored light. Pigments in the
cones respond to the wavelength of the light, differently for blue, green or red.
A corresponding electrical signal is produced which is then sent to the brain
by way of the optic nerve.
Because the optic nerve is offset approximately 15o from the center, and
there are no light sensors, this creates a blind spot in the eye. The blind spots of
both eyes do not overlap, so you are not aware of the blind spots, as they do not
appear in your field of vision.

14
Part B – Auditory Sense: Describe the operation of the ear.
a) Describe the various elements of the ear by three segments
Figure 3is a pictorial showing the major elements of the ear.
Figure 2. Human Ear
b) Describe the process of receiving sound
1) The outer ear consists of the pinna and outer ear canal. The pinna funnels
sound into the outer ear canal, which sends the sound to the eardrum.
2) The middle ear consists of the eardrum, hammer, anvil and stirrup. The
middle ear amplifies the sound. The eardrum area is 25x larger than the surface
going into the inner ear and the ear bones (including the hammer, anvil and
stirrup) mechanically increase the intensity of the sound. Both of these together
increase the effective sound pressure by 22x2.
3) The vibration from the middle ear is transferred to the cochlea (snail shaped).
The cochlea is lined with sensitive hair, which generates nerve signals to the
brain via the auditory nerve5.
Outer Ear Middle Inner
15
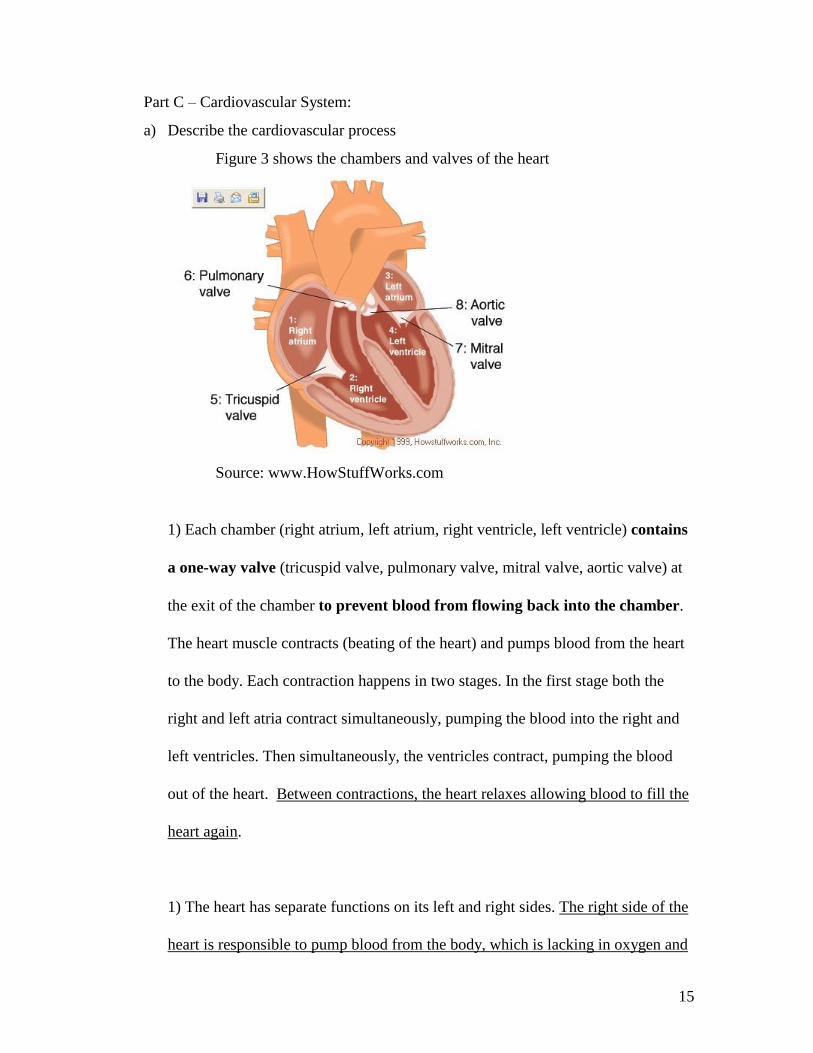
Part C – Cardiovascular System:
a) Describe the cardiovascular process
Figure 3 shows the chambers and valves of the heart
Source: www.HowStuffWorks.com
1) Each chamber (right atrium, left atrium, right ventricle, left ventricle) contains
a one-way valve (tricuspid valve, pulmonary valve, mitral valve, aortic valve) at
the exit of the chamber to prevent blood from flowing back into the chamber.
The heart muscle contracts (beating of the heart) and pumps blood from the heart
to the body. Each contraction happens in two stages. In the first stage both the
right and left atria contract simultaneously, pumping the blood into the right and
left ventricles. Then simultaneously, the ventricles contract, pumping the blood
out of the heart. Between contractions, the heart relaxes allowing blood to fill the
heart again.
1) The heart has separate functions on its left and right sides. The right side of the
heart is responsible to pump blood from the body, which is lacking in oxygen and
16
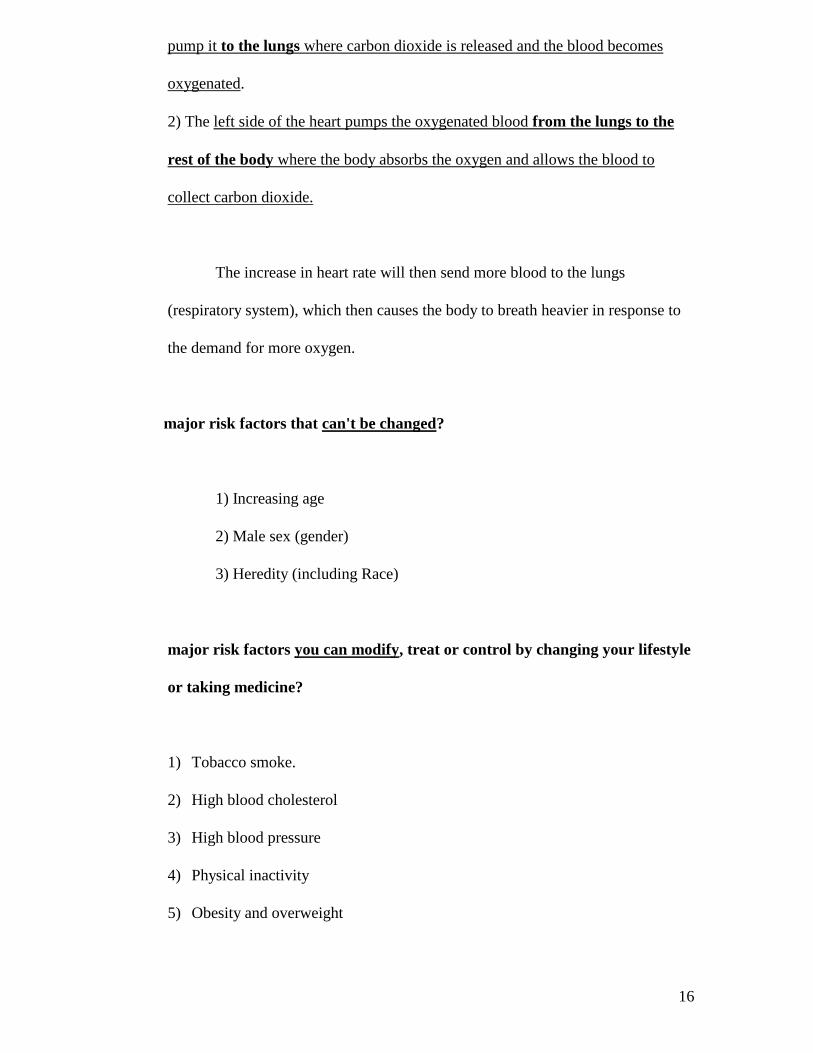
pump it to the lungs where carbon dioxide is released and the blood becomes
oxygenated.
2) The left side of the heart pumps the oxygenated blood from the lungs to the
rest of the body where the body absorbs the oxygen and allows the blood to
collect carbon dioxide.
The increase in heart rate will then send more blood to the lungs
(respiratory system), which then causes the body to breath heavier in response to
the demand for more oxygen.
major risk factors that can't be changed?
1) Increasing age
2) Male sex (gender)
3) Heredity (including Race)
major risk factors you can modify, treat or control by changing your lifestyle
or taking medicine?
1) Tobacco smoke.
2) High blood cholesterol
3) High blood pressure
4) Physical inactivity
5) Obesity and overweight
17
What other factors contribute to heart disease risk?
1) Stress
2) Drinking too much alcohol
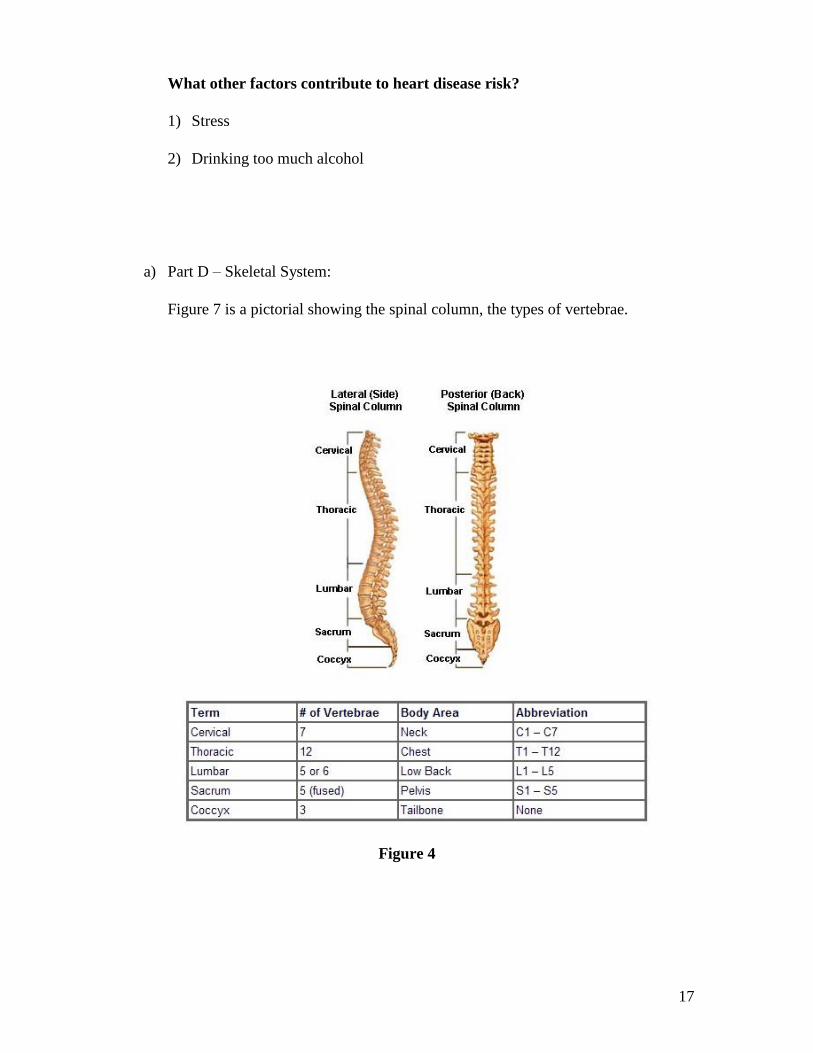
a) Part D – Skeletal System:
Figure 7 is a pictorial showing the spinal column, the types of vertebrae.
Figure 4

18
The spine provides mobility and strength.
The disc material is called fibrocartilage. Fibrocartilage is a cartilage, which
consists of a dense matrix of collagen fibers.
The purpose of the disc is to absorb and distribute the force from movement,
such as walking, and also prevent the vertebrae from grinding against each
other.
Figure 5
19
3. Anthropometric Lab
Remote or Off-site Students:
Remote or off-site students, please use a tape measure, measuring stick and standard scale
to collect your measurements. Collect the information for two people. Contact the TA
for a supplemental data set to support your calculations in Part 4 of the assignment
On Campus Students
Laboratory Instructions: The data for this lab is to be collected in the Ergonomic Lab
during your scheduled lab time. Use the anthropometric tools for linear and angular
measurement and the lab scale for body weight. You will also use the hand dynamometer
to measure grip strength. The lab is to be performed in your designated lab groups.
Part A: Obtain the following measurements for a sample group of three to four lab
members.
1. Ankle to knee distance
2. Elbow to wrist length
3. Wrist to end of finger tip length
4. Shoulder to top of head length
5. Sitting eye level
6. Horizontal range of motion for the wrist
7. Breadth of index finger

20
8. Grip strength with dominant hand (REMOTE OR OFF-SITE students use Grip
Strength tables to obtain an estimate for a population norm compatible with your two
subjects)
9. Persons overall height
10. Persons total body weight (you may estimate this value)
1) Record the data in an excel spreadsheet with the following headings:
Su
bje
ct
Gen
der
Ag
e
An
kle
to
kn
ee
Elb
ow
to
wri
st
len
gth
Wri
st t
o e
nd
of
mid
dle
fin
ger
len
gth
Sh
ou
lder
to
top
of
hea
d
len
gth
Sit
tin
g E
ye
Lev
el
Ho
rizo
nta
l
ran
ge
of
mo
tio
n f
or
wri
st
Bre
adth
of
ind
ex f
ing
er
Gri
p S
tren
gth
Hei
gh
t
(in
ches
)
Wei
gh
t (l
bs)
1
2
3
2) Briefly state how each of these anthropometrics can be useful in engineering design
3) State the tools, equipment and procedure used to collect each measurement
Part B:
1) Post your data on WebCourses so that the entire class can create one data set with all
input.
2) Using the comprehensive data set do the following:
a) Calculate summary statistics for the data (measures of central tendency, measures
of variation; determine if there are any outliers in the data set)
b) Construct a 95% confidence interval for each of the measurements
21
Part C: Take 4 additional anthropometric measurements that would be important in
automobile design. Explain how or where they would be useful in automobile design.
Part D: Using the proportional relationship (see chart) between body segment length and
height (h) calculate the estimated height for measurements 1 – 7 for the subjects in your
lab group.
Determine the difference in the estimated length of segments 1 – 7 and the actual
measurements obtained for each of the items.
a) Prepare a table that shows the estimates compared to the actual measurements
b) Briefly discuss the differences in the estimates and the actual measurements
Part E: Using the “Percentage Distribution of Total Body Weight” and the subjects‟ body
weight, calculate the estimated weight of the following body segments and state a work
place, product development, etc. environment where it would be useful to have this
information.
1. Head and Neck
2. Torso
3. Hand
4. Thigh

22
Anthropometric Height Chart – Female
Source: Kroemer et al, 2003
This figure illustrates the major body segments for females. The equations to predict the length of arm and
leg segments from height (H) for American females appears next to each sement. The height distribution
for a mixed population of females is shown in the upper right corner. Measured values should be used in
workplace design instead of estimates whenever possible. (Adapted from Kroemer et al, 2003)
Reference: K. Kroemer, H. B., and Kroemer-Elbert, K. E. (2003, amended reprint). Ergonomics: How to
Design for Ease and Efficiency. (2nd. ed.). Upper Saddle River, NJ: Prentice Hall.

23
Anthropometric Height Chart – Male
Source: Kroemer et al, 2003
This figure illustrates the major body segments for males. The equations to predict the length of arm and leg
segments from height (H) for American males appears next to each sement. The height distribution for a
mixed population of males is shown in the upper right corner. Measured values should be used in
workplace design instead of estimates whenever possible. (Adapted from Kroemer et al, 2003)
Reference: K. Kroemer, H. B., and Kroemer-Elbert, K. E. (2003, amended reprint). Ergonomics: How to
Design for Ease and Efficiency. (2nd. ed.). Upper Saddle River, NJ: Prentice Hall.

24
Anthropometric Lab
Prediction Equations to Estimate Segment Mass (in kg) from Total Body Weight
Prediction Equations to Estimate Segment Mass (KG) from
Total Body Weight W (KG)
Segment
Empirical equation
Standard error of
Estimate
Head 0.306W + 2.46 0.43
Head and neck 0.0534W + 2.33 0.60
Neck 0.0146W + 0.60 0.21
Head, neck and torso 0.5940W - 2.20 2.01
Neck and torso 0.5582W - 4.26 1.72
Total arm 0.0505W + 0.01 0.35
Upper arm 0.0274W - 0.01 0.19
Forearm and hand 0.0233W - 0.01 0.20
Forearm 0.0189W - 0.16 0.15
Hand 0.0055W + 0.07 0.07
Total leg 0.1582W + 0.05 1.02
Thigh 0.1159W - 1.02 0.71
Shank and foot 0.0452W + 0.82 0.41
Shank 0.0375W + 0.38 0.33
Foot 0.0069W + 0.47 0.11
Source: K. Kroemer, H. B., and Kroemer-Elbert, K. E. (2003, amended reprint).
Ergonomics: How to Design for Ease and Efficiency. (2nd. ed.). Upper Saddle River, NJ:
Prentice Hall.
Reference: K. Kroemer, H. B., and Kroemer-Elbert, K. E. (2003, amended reprint).
Ergonomics: How to Design for Ease and Efficiency. (2nd. ed.). Upper Saddle River, NJ:
Prentice Hall.
25
4. MMH & Lifting Lab
Part 1. MMH Evaluation
1. For the lifting task, ask a person to serve as the subject that is in reasonably good
health. This task will evaluate the persons change in heart rate and consider their
subjective rating of exertion using the Borg Scale while performing a physical
activity.
2. The activity will be walking up and down the stairs with a box in the subjects‟ hand.
Instructions: You will need one subject, one person to keep time and tell when the heart
rate is to be taken and the rating of perceived exertion is to be collected. You will also
need two people to record this information.
Process for lab
1. Take Resting Heart Rate
2. Ask questions about previous intake of caffeinated products.
3. Ask the person to begin performing the lifting or MMH
4. The heart rate (pulse) and Rating of Perceived Exertion(RPE) is to be taken every 60
seconds for 20 minutes using the Borg Scale.
5. At the cessation of the activity the H.R. will be taken for approximately 5 more
minutes.

26
This information is to be analyzed by the group doing the following:
1. State experiment conditions
2. Subject information
3. How data was collected
4. Provide a graph of the heart rate information throughout task performance.
5. Using the numeric values for the RPE determine if there is a correlation between H.R.
and the values obtained for the RPE.
6. Summarize your results.
27
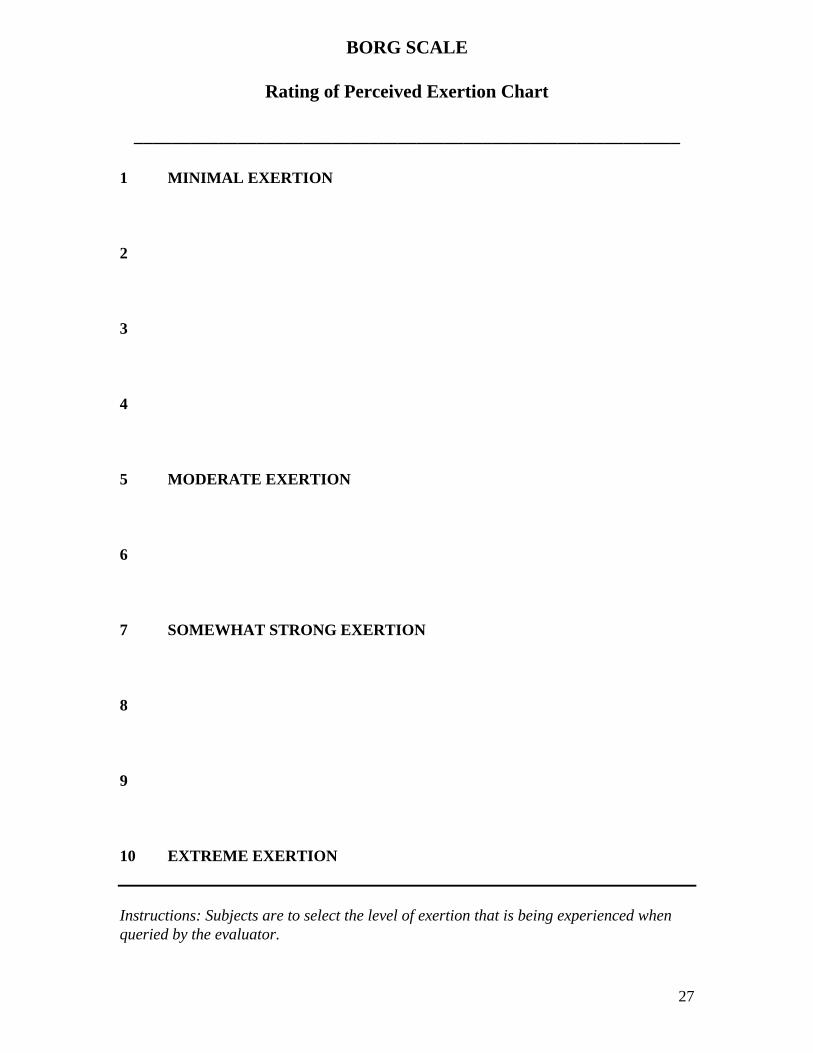
BORG SCALE
Rating of Perceived Exertion Chart
__________________________________________________________
1 MINIMAL EXERTION
2
3
4
5 MODERATE EXERTION
6
7 SOMEWHAT STRONG EXERTION
8
9
10 EXTREME EXERTION
Instructions: Subjects are to select the level of exertion that is being experienced when
queried by the evaluator.
28
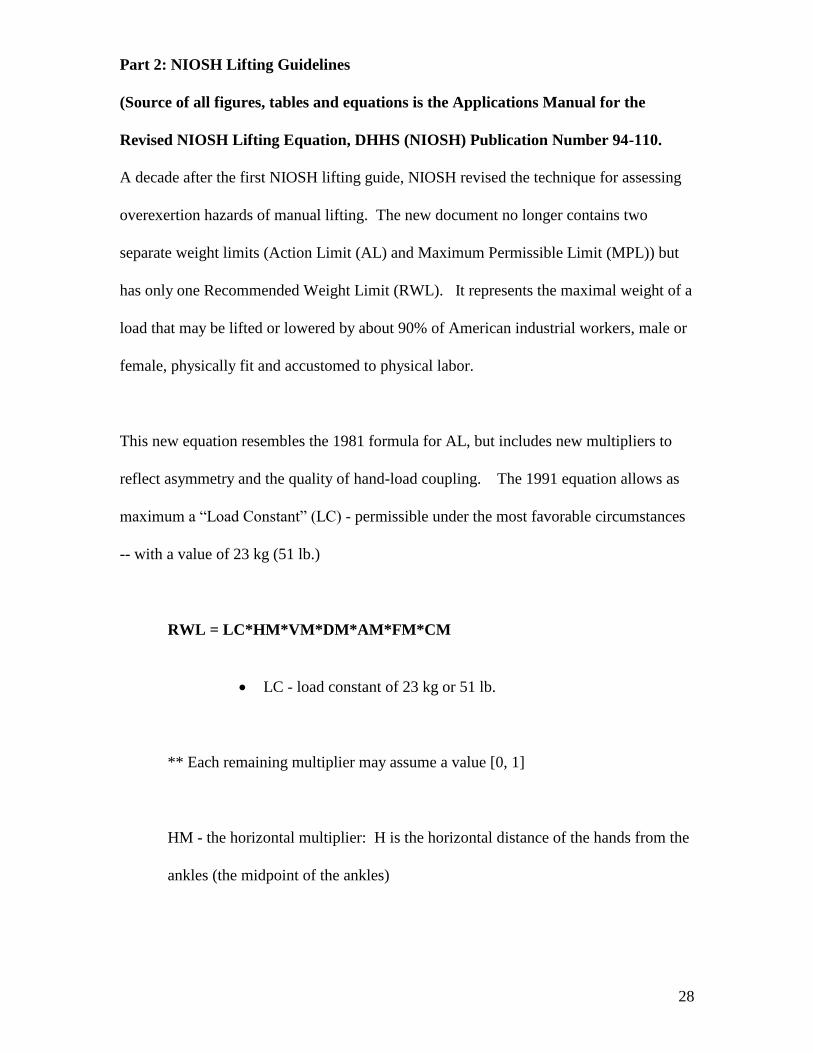
Part 2: NIOSH Lifting Guidelines
(Source of all figures, tables and equations is the Applications Manual for the
Revised NIOSH Lifting Equation, DHHS (NIOSH) Publication Number 94-110.
A decade after the first NIOSH lifting guide, NIOSH revised the technique for assessing
overexertion hazards of manual lifting. The new document no longer contains two
separate weight limits (Action Limit (AL) and Maximum Permissible Limit (MPL)) but
has only one Recommended Weight Limit (RWL). It represents the maximal weight of a
load that may be lifted or lowered by about 90% of American industrial workers, male or
female, physically fit and accustomed to physical labor.
This new equation resembles the 1981 formula for AL, but includes new multipliers to
reflect asymmetry and the quality of hand-load coupling. The 1991 equation allows as
maximum a “Load Constant” (LC) - permissible under the most favorable circumstances
-- with a value of 23 kg (51 lb.)
RWL = LC*HM*VM*DM*AM*FM*CM
LC - load constant of 23 kg or 51 lb.
** Each remaining multiplier may assume a value [0, 1]
HM - the horizontal multiplier: H is the horizontal distance of the hands from the
ankles (the midpoint of the ankles)

29
VM - the Vertical Multiplier: V is the vertical location (height) of the hands
above the floor at the start and end points of the lift.
DM - the Distance Multiplier: where D is the vertical travel distance from the start
to the end points of the lift
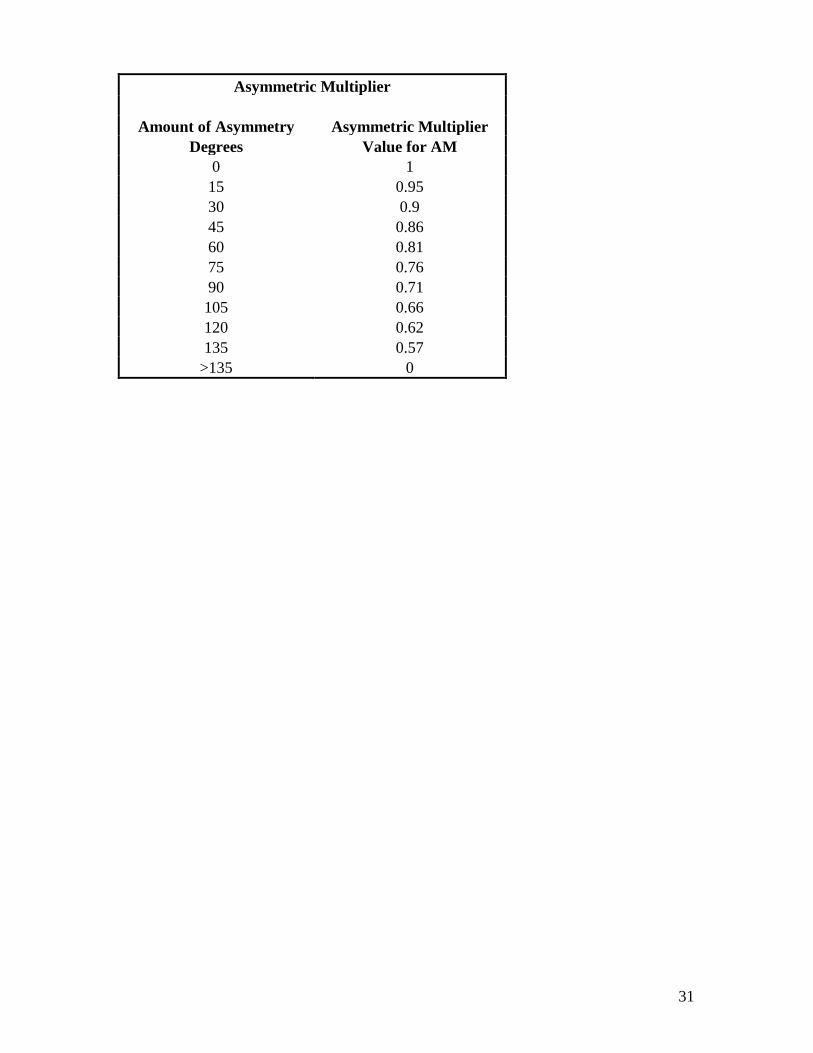
AM - the Asymmetry Multiplier: where A is the Angle of asymmetry, i.e., the
angular displacement of the load from the medial (mid-saggital plane) which
forces the operator to twist the body. It is measured at the start and end points of
the lift.
FM - the frequency multiplier: where F is the frequency rate of lifting, expressed
in lifts per minute.
CM - the coupling multiplier: where C indicates the quality of coupling between
hand and load.
NIOSH LIFTING EQUATION PARAMETERS
Abbreviation Metric U.S. Customary
Load Constant LC 23 kg 51 lb
Horizontal Multiplier HM (25/H) (10/H)
Vertical Multiplier VM 1-(0.003|V-75|) 1-(0.0075|V-30|)
Distance Multiplier DM 0.82 + (4.5/D) 0.82 + (1.8/D)
Asymmetric Multiplier AM 1- (0.032A) 1- (0.032A)
Frequency Multiplier FM From Frequency MultiplierTable From FM Table
Coupling Multiplier CM From Frequency MultiplierTable From CM Table

30
Instructions: Using the NIOSH lifting equation, perform an analysis of the lift below for
the same person and then perform the same analysis for a second person. Calculate the
RWL and LI for the origin and destination of both lifts.
Lifting Index (LI) = Load/RWL
Task: The subject is picking up a box directly in front of him/her. The box is located on
the floor. After lifting the box, the subject must twist approximately 90 degrees at the
waist to place the box on a table. The subject is required to perform this task
approximately 10 times per minute. The anticipated task duration is approximately 1
hour. (This is hypothetically speaking; do NOT ask a subject to perform the task for an
hour. Ask them only to demonstrate holding a load it for purposes of the lab)
Discussion: For each task present the following:
1. Description of each task
2. List any necessary assumptions
3. Explain the values for each of the parameters from the NIOSH lifting equation
4. Do the task requirements seem excessive? Explain
5. Compare and contrast the results of the two tasks
31
Asymmetric Multiplier
Amount of Asymmetry Asymmetric Multiplier
Degrees Value for AM
0 1
15 0.95
30 0.9
45 0.86
60 0.81
75 0.76
90 0.71
105 0.66
120 0.62
135 0.57
>135 0

32

33
Hand-to-Container Coupling Classification
GOOD FAIR POOR
1. For containers of optimal design,
such as some boxes, crates, etc., a
"Good" hand-to-object coupling
would be defined as handles or
hand-hold cut outs of optimal
design. See notes (1 to 3 below)
1. For containers of optimal design,
a "Fair" hand-to-object coupling
would be defined as handles or
hand-hold cut outs of less than
optimal design. (See notes 1 to 4)
1. Containers of less than optimal
design or loose parts or irregular
objects that are bulky, hard to handle,
or have share edges (see note 5
below)
2. For loose parts or irregular
objects which are not usually
containerized, such as castings,
stock and supply materials, a
"Good" hand-to-object coupling
would be defined as a comfortable
grip in which the hand can be easily
wrapped around the object (see
note 6 below)
2. For containers of optimal design
with no handles or hand hold cut-
outs or for loose parts or irregular
objects, a "Fair" hand-to-object
coupling is defined as a grip in
which the hand can be flexed about
90 degrees (see note 4 below)
2. Lifting non-rigid bags (i.e., bags
that sag in the middle)
34
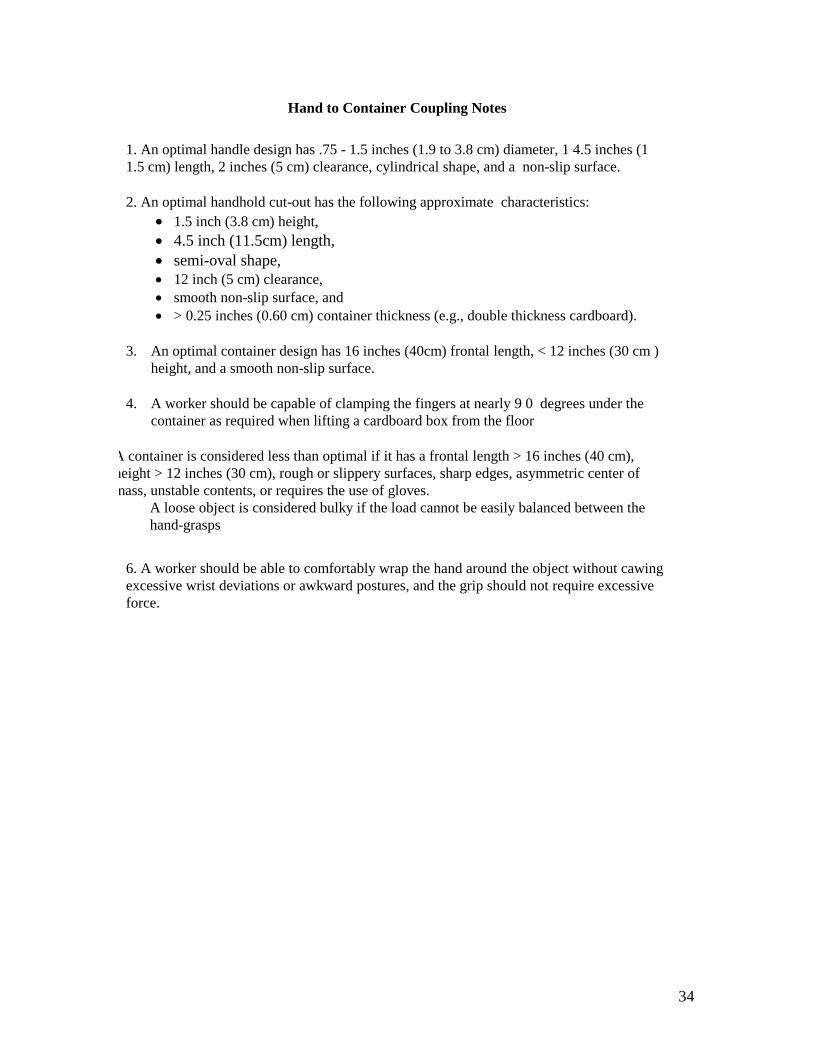
Hand to Container Coupling Notes
1. An optimal handle design has .75 - 1.5 inches (1.9 to 3.8 cm) diameter, 1 4.5 inches (1
1.5 cm) length, 2 inches (5 cm) clearance, cylindrical shape, and a non-slip surface.
2. An optimal handhold cut-out has the following approximate characteristics:
1.5 inch (3.8 cm) height,
4.5 inch (11.5cm) length,
semi-oval shape,
12 inch (5 cm) clearance,
smooth non-slip surface, and
> 0.25 inches (0.60 cm) container thickness (e.g., double thickness cardboard). 3. An optimal container design has 16 inches (40cm) frontal length, < 12 inches (30 cm )
height, and a smooth non-slip surface.
4. A worker should be capable of clamping the fingers at nearly 9 0 degrees under the
container as required when lifting a cardboard box from the floor
5. A container is considered less than optimal if it has a frontal length > 16 inches (40 cm),
height > 12 inches (30 cm), rough or slippery surfaces, sharp edges, asymmetric center of
mass, unstable contents, or requires the use of gloves.
A loose object is considered bulky if the load cannot be easily balanced between the
hand-grasps
6. A worker should be able to comfortably wrap the hand around the object without cawing
excessive wrist deviations or awkward postures, and the grip should not require excessive
force.

35
Coupling Multiplier Decision Tree
36
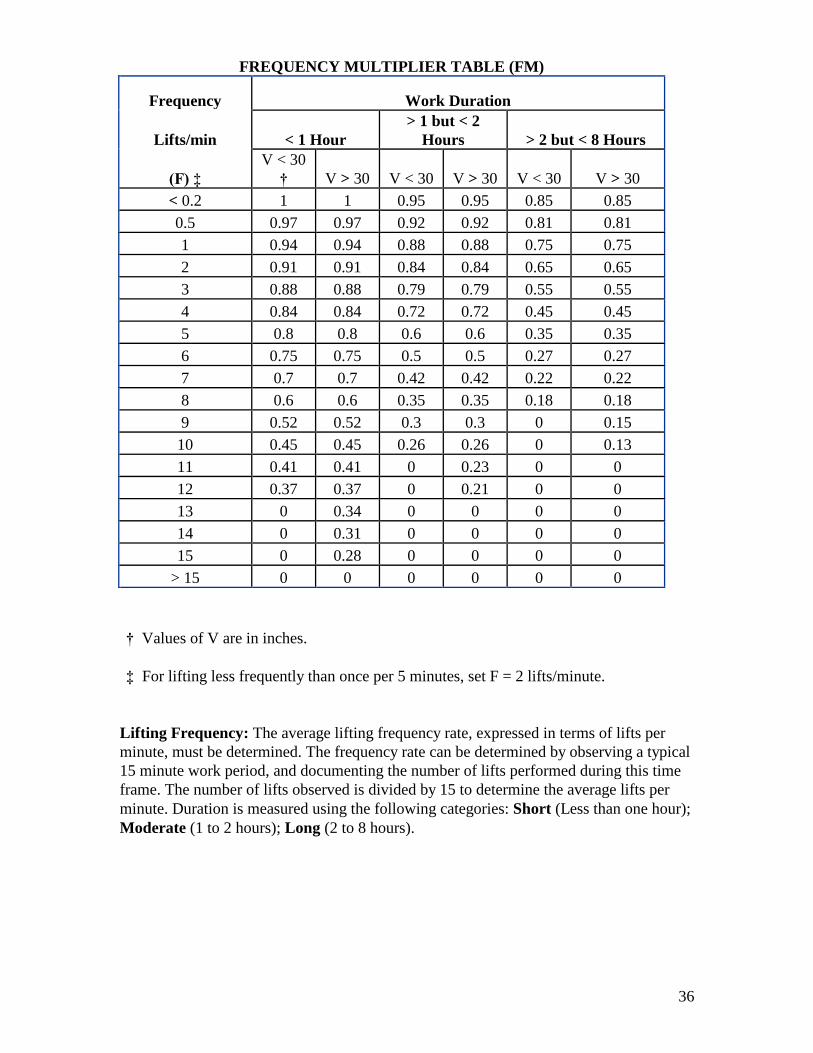
FREQUENCY MULTIPLIER TABLE (FM)
Frequency Work Duration
Lifts/min < 1 Hour
> 1 but < 2
Hours > 2 but < 8 Hours
(F) ‡
V < 30
† V > 30 V < 30 V > 30 V < 30 V > 30
< 0.2 1 1 0.95 0.95 0.85 0.85
0.5 0.97 0.97 0.92 0.92 0.81 0.81
1 0.94 0.94 0.88 0.88 0.75 0.75
2 0.91 0.91 0.84 0.84 0.65 0.65
3 0.88 0.88 0.79 0.79 0.55 0.55
4 0.84 0.84 0.72 0.72 0.45 0.45
5 0.8 0.8 0.6 0.6 0.35 0.35
6 0.75 0.75 0.5 0.5 0.27 0.27
7 0.7 0.7 0.42 0.42 0.22 0.22
8 0.6 0.6 0.35 0.35 0.18 0.18
9 0.52 0.52 0.3 0.3 0 0.15
10 0.45 0.45 0.26 0.26 0 0.13
11 0.41 0.41 0 0.23 0 0
12 0.37 0.37 0 0.21 0 0
13 0 0.34 0 0 0 0
14 0 0.31 0 0 0 0
15 0 0.28 0 0 0 0
> 15 0 0 0 0 0 0
† Values of V are in inches.
‡ For lifting less frequently than once per 5 minutes, set F = 2 lifts/minute.
Lifting Frequency: The average lifting frequency rate, expressed in terms of lifts per
minute, must be determined. The frequency rate can be determined by observing a typical
15 minute work period, and documenting the number of lifts performed during this time
frame. The number of lifts observed is divided by 15 to determine the average lifts per
minute. Duration is measured using the following categories: Short (Less than one hour);
Moderate (1 to 2 hours); Long (2 to 8 hours).
37
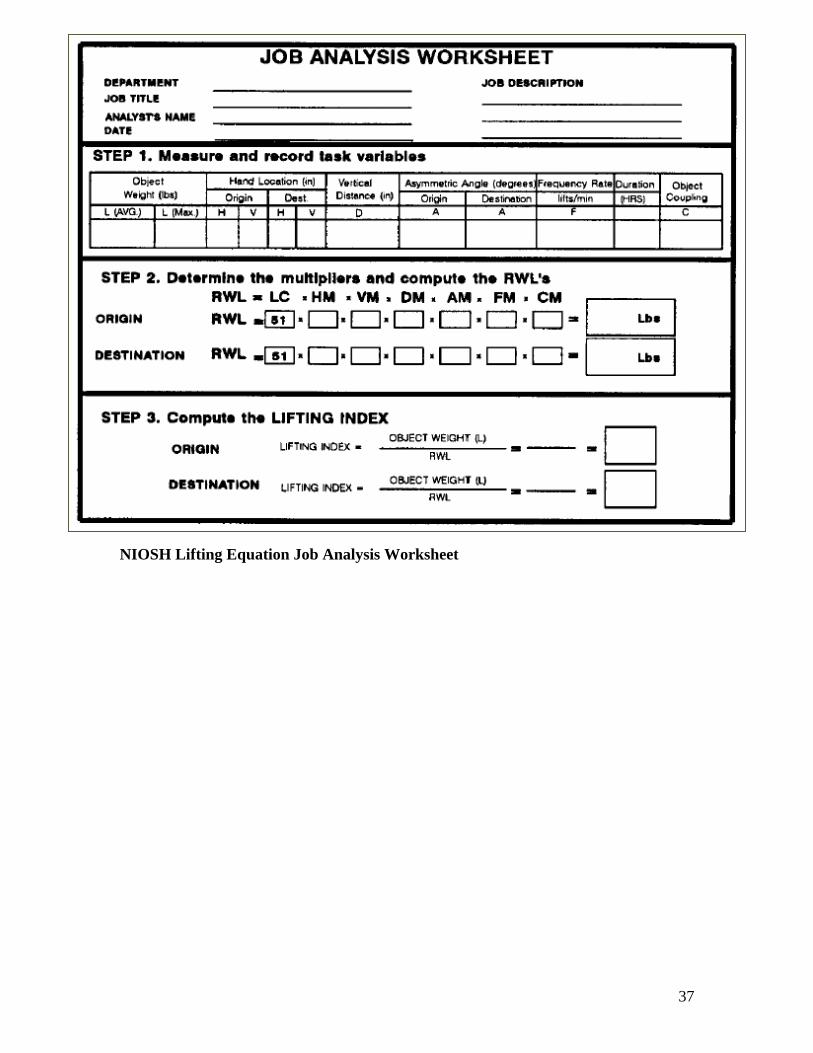
NIOSH Lifting Equation Job Analysis Worksheet
38
5. Information Processing Lab
Each of the following exercises is to be performed for one person in your group. Record
the results of this study graph the outputs and discuss the results with respect to the
human engineering expectations.
Exercise 1:
Primary task - word find puzzle;
Secondary task – look at flash card and solve math problem.
In this exercise the subject is required to do the following:
1. Solve a word find puzzles for 15 minutes and
2. During puzzle solving a secondary task is introduced.
3. The secondary task is the solving of a math problem
4. At 60 second intervals, the person is interrupted with a math problem presented on a
flash card.
5. The subject is to provide a verbal answer for the math problem and then resume the
word-find puzzle.
The group is to do the following for this exercise:
1. Time the exercise using a stop watch
2. Present the subject with the secondary task at one minute intervals
39
3. Record the accuracy of the response on the secondary task
4. Record the number of words found on each word find puzzle
5. Replace the word find puzzle when approximately 80% of the words are found
6. Count the number of words found during each minute of the exercise.
6. Record the subjects heart rate each minute
7. At the completion of the task ask the subject to rate the difficulty of task
performance based on the Borg Scale
Directions:
Sit the subject in a chair with the word find puzzle directly in from of him/her. Begin the
task by asking the person to start solving the word find puzzle. If the subject nears the
completion of the word find puzzle present him/her with another puzzle and continue the
task.
Exercise 2: Primary task: solving math problems by hand. Secondary task: Counting
number of flashes of a lamp.
In this task the subject is required to solve math problems by hand for 15 minutes. At 60
second intervals, the subject will be asked to count the number of times a light flashes.
This activity is to be continued until the subject reaches fifteen minutes. If the subject
completes the math problems present him/her with another sheet of problems. The group
will perform the following:
1. Count the number of math problems solved/minute

40
2. Present the secondary task (flashing of the light) every 60 seconds
3. Count the number of times the subject is correct about the number of flashes
of light
4. Record correct/incorrect solutions to math problems per minute
5. Graph results
6. Take subjects pulse every 60 seconds
7. Ask the subject to rate the perceived difficulty of the mental workload each
minute by asking the following question
“Give me a rating for your perceived mental workload on a scale from 6 to
20”
8. At the completion of each minute ask the subject to rate the difficulty of task
performance using the rating of perceived exertion (perceived mental level
of the effort) from the Borg Scale (see attached).
These results are to be presented in the group report.
Group report: Your report should contain the following sections:
- Introduction: Purpose of the lab, why this information is important
- Application areas for this knowledge in industry
- Laboratory equipment used: puzzles, math problems, etc.
- Design of the exercise:
- Present results: tables, graph
- Determine if a correlation exists between

41
Percentage of correct responses and change in heart rate.
Number of words found (problems solved) and time: (i.e. did the subject
adjust to the task?)
- Conclusion: What the lab results suggest
42
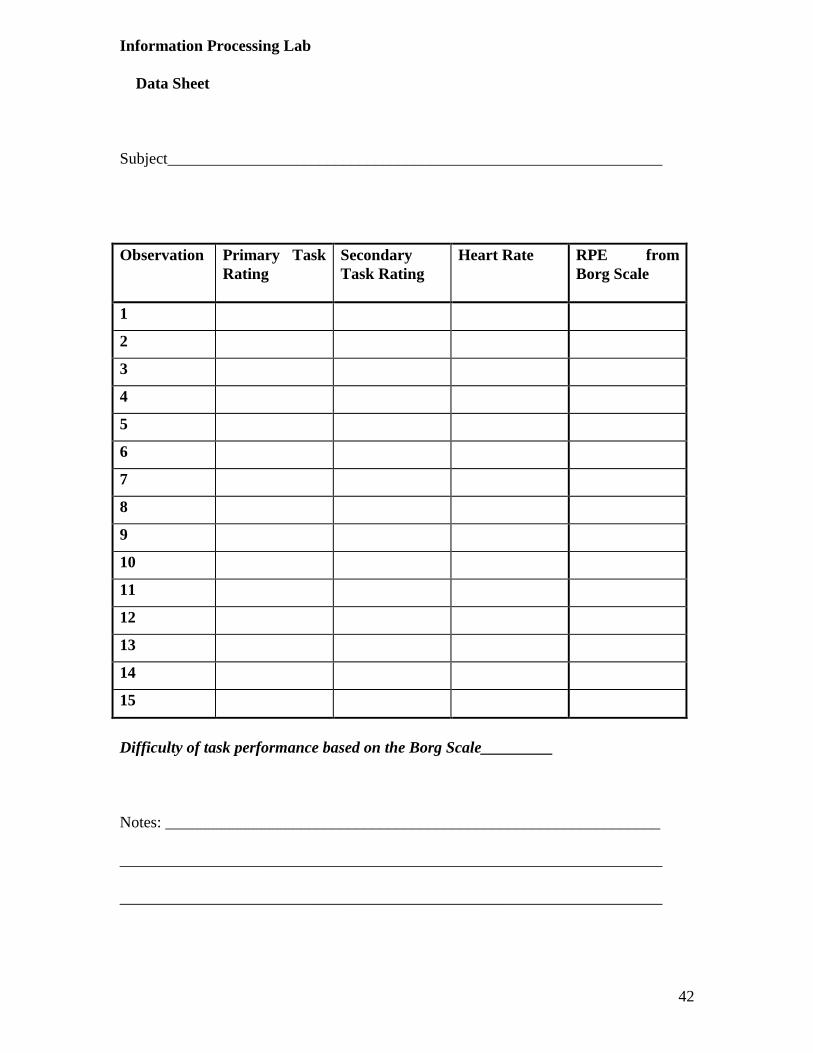
Information Processing Lab
Data Sheet
Subject______________________________________________________________
Observation Primary Task
Rating
Secondary
Task Rating
Heart Rate
RPE from
Borg Scale
1
2
3
4
5
6
7
8
9
10
11
12
13
14
15
Difficulty of task performance based on the Borg Scale_________
Notes: ______________________________________________________________
____________________________________________________________________
____________________________________________________________________

43
BORG SCALE
Rating of Perceived Exertion Chart
__________________________________________________________
1 MINIMAL EXERTION
2
3
4
5 MODERATE EXERTION
6
7 SOMEWHAT STRONG EXERTION
8
9
10 EXTREME EXERTION
Instructions: Subjects are to select the level of exertion that is being experienced when queried by the
evaluator.

44
Word Search Puzzle

45
6. Cumulative Trauma Disorder (CTD)/Work Related Musculoskeletal Disorder
Lab
Application of McCauley Bush Fuzzy Rating Scale for Evaluation of Cumulative
Trauma Disorder Risk
INSTRUCTIONS: Before the lab begins please excerpt from the article I wrote on pages
2-6. This article explains the mathematical model you will be using to calculate risk of
CTD.
Lab Objective:
To quantify risks of CTD using this linear weighted function.
To gain experience in performing an assessment
Environment and Subject:
Identify a workplace that you can gain access to in order to perform this lab. This
should be an area that has some know CTD risks such as an office, grocery store,
assembly environment, etc.
Using the three categories of risk factors, rate the level of existence for each of the
task related risk factors. Provide a brief explanation of your rankings
Apply the model to the work environment and a real or “hypothetical” employee.

46
Consider the organizational or psychosocial characteristics associated with the work
environment. Make any necessary assumptions to rate each of the different
characteristics.
Application:
Provide a summary table for each of the categories of risk factors
Calculate the risk for each category
Calculate the risk for each employee (REMOTE OR OFF-SITE students only one
employee)
Calculate the organizational risks for the given workplace
Calculate comprehensive risk level for each set of conditions.
Subjects:
Apply the model to 3 workers and at least one work environment. (REMOTE OR
OFF-SITE Students apply to one worker)
Compare this methodology to the Rapid Upper Limb Assessment tool and provide
and brief discussion of the similarities and differences.
Please follow the lab report guidelines to develop your report.

47
Application of McCauley- Bush Fuzzy Rating Scale for Evaluation of Cumulative
Trauma Disorder Risk
(The following is an excerpt from McCauley-Bell, Crumpton and Badiru, 1999)
The six to seven items identified as risk factors for each of the three modules
(task, personal and organizational) were evaluated for relative significance. The priority
weights for the risk factors in the task-related and personal modules are listed in Tables
11 and Table 12, respectively.
Table 11. AHP Results: Task-Related Risk Factors
Ranking
Factor
Relative Weight
1 Awkward joint posture 0.299
2 Repetition 0.189
3 Hand tool use 0.180
4 Force 0.125
5 Task duration 0.124
6 Vibration 0.083
Table 11b. Levels of Existence for each factor
Posture Repetition Hand Tool Force Task
Duration
Vibration
High 1.0 1.0 1.0 1.0 1.0 1.0
Medium 0.5 0.5 0.5 0.5 0.5 0.5
Low 0.2 0.2 0.2 0.2 0.2 0.2
None 0.0 0.0 0.0 0.0 0.0 0.0
In the evaluation the organizational risk factors; equipment was the most significant
factor. In the knowledge acquisition, the term equipment refers to the degree of
automation for the machinery being used in the task under evaluation. The order of
importance and priority weights for each of the risk factors is listed in Table 13. This
module evaluated the impact of seven risk factors. However, upon further analysis and
discussion, the awareness and ergonomics program categories were combined because

48
according to the experts and the literature, one of the goals of an ergonomics program is
to provide awareness about the ergonomic risk factors present in a workplace.
Table 12. AHP Results: Personal Risk Factors
Ranking
Factor
Relative Weight
1 Previous CTD 0.383
2 Hobbies and habits 0.223
3 Diabetes 0.170
4 Thyroid problems 0.097
5 Age 0.039
6 Arthritis 0.088
Table 12b. Levels of Existence for Personal Risk Factors
Previous
CTD
Hobbies &
Habits
Diabetes Thyroid
Problems
Age Arthritis or
DJD
High 1.0 1.0 1.0 1.0 1.0 1.0
Medium 0.5 0.5 0.5 0.5 0.5 0.5
Low 0.2 0.2 0.2 0.2 0.2 0.2
None 0.0 0.0 0.0 0.0 0.0 0.0
Table 13. AHP Results: Organizational Risk Factors
Ranking
Factor
Relative Weight
1 Equipment 0.346
2 Production rate/layout 0.249
3 Ergonomics program 0.183
4 Peer influence 0.065
5 Training 0.059
6 CTD level 0.053
7 Awareness 0.045
49
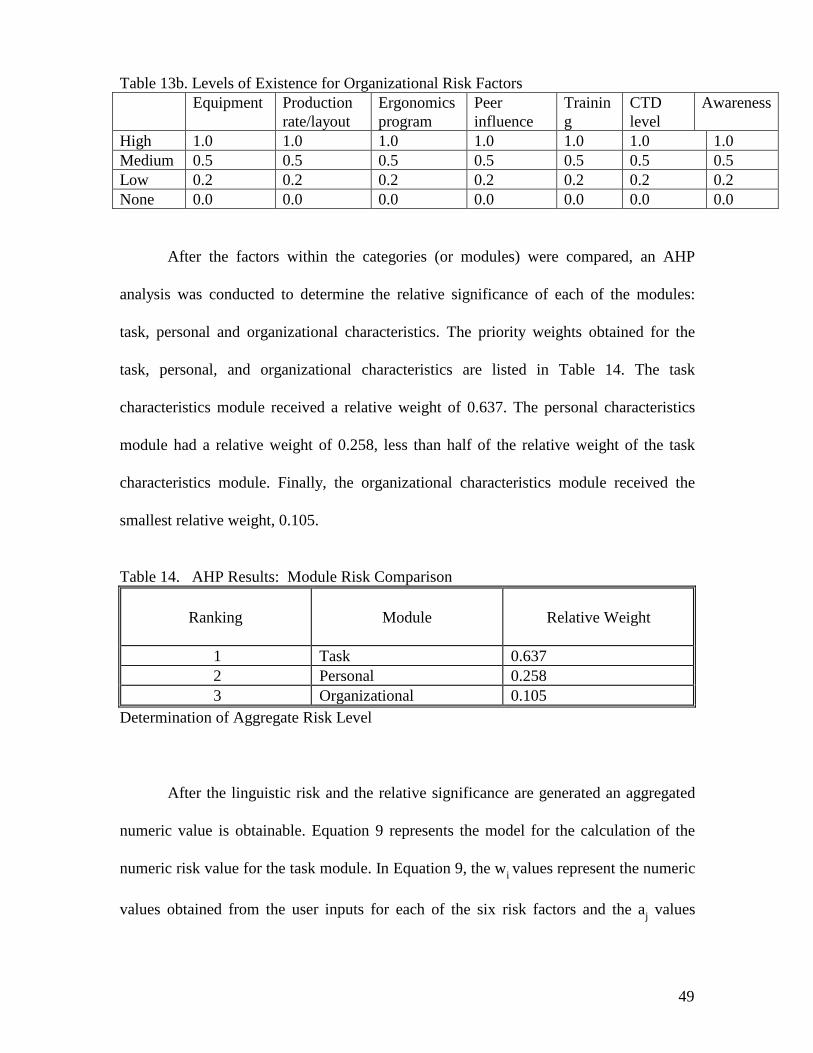
Table 13b. Levels of Existence for Organizational Risk Factors
Equipment Production
rate/layout
Ergonomics
program
Peer
influence
Trainin
g
CTD
level
Awareness
High 1.0 1.0 1.0 1.0 1.0 1.0 1.0
Medium 0.5 0.5 0.5 0.5 0.5 0.5 0.5
Low 0.2 0.2 0.2 0.2 0.2 0.2 0.2
None 0.0 0.0 0.0 0.0 0.0 0.0 0.0
After the factors within the categories (or modules) were compared, an AHP
analysis was conducted to determine the relative significance of each of the modules:
task, personal and organizational characteristics. The priority weights obtained for the
task, personal, and organizational characteristics are listed in Table 14. The task
characteristics module received a relative weight of 0.637. The personal characteristics
module had a relative weight of 0.258, less than half of the relative weight of the task
characteristics module. Finally, the organizational characteristics module received the
smallest relative weight, 0.105.
Table 14. AHP Results: Module Risk Comparison
Ranking
Module
Relative Weight
1 Task 0.637
2 Personal 0.258
3 Organizational 0.105
Determination of Aggregate Risk Level
After the linguistic risk and the relative significance are generated an aggregated
numeric value is obtainable. Equation 9 represents the model for the calculation of the
numeric risk value for the task module. In Equation 9, the wi values represent the numeric
values obtained from the user inputs for each of the six risk factors and the aj values

50
represent the relative significance or factor weight obtained from the AHP analysis. The
numeric risk levels for the personal and organizational characteristics are represented by
Equations 10 and 11, respectively. Likewise, the values of xi and y
i represent the user
inputs while; the bi and c
j values represent the AHP weights for the task and
organizational characteristics, respectively. These linear equations are based on Fuzzy
Quantification Theory I (Terano, 1994). The objective of Theory I is to find the
relationships between the qualitative descriptive variables and the numerical object
variables in the fuzzy groups. An alternative to this approach is to use CTD
epidemiological data to establish the regression weights rather than the relative weights
were derived from the AHP analysis with the experts. However, the lack of availability of
comprehensive data for a regression model prevented the application of regression
analysis. The resulting equations represent the numeric risk levels for each category.
Task-Related Risk:
R1 = F(T) = a1 w1 + a2 w2+ a3 w3 + a4 w4 + a5 w5 + a6 w6 [9]
Personal Risk:
R2 = F(P) = b1 x1+ b2 x2+ b3 x3+ b4 x4 + b5 x5 + b6 x6 [10]
Organizational Risk:
R3 = F(O) = c1 y1 + c2 y2 + c3 y3 + c4 y4 + c5 y5 + c6 y6 [11]
Interpretation of Results
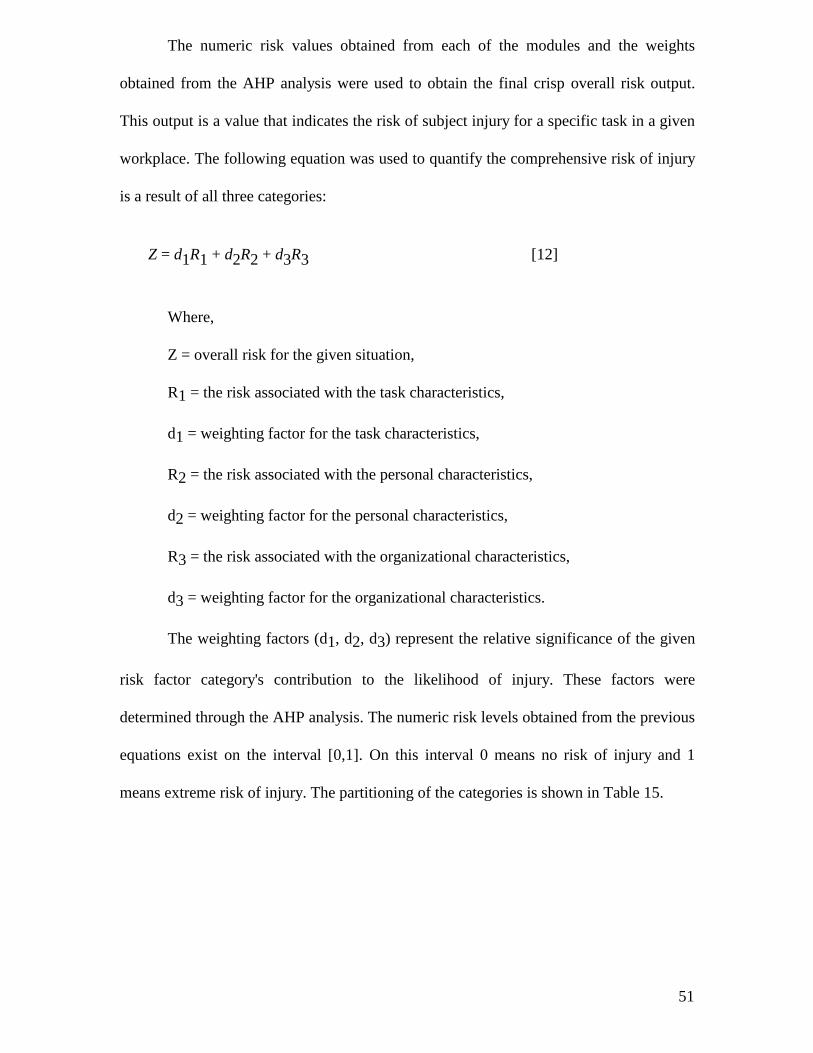
51
The numeric risk values obtained from each of the modules and the weights
obtained from the AHP analysis were used to obtain the final crisp overall risk output.
This output is a value that indicates the risk of subject injury for a specific task in a given
workplace. The following equation was used to quantify the comprehensive risk of injury
is a result of all three categories:
Where,
Z = overall risk for the given situation,
R1 = the risk associated with the task characteristics,
d1 = weighting factor for the task characteristics,
R2 = the risk associated with the personal characteristics,
d2 = weighting factor for the personal characteristics,
R3 = the risk associated with the organizational characteristics,
d3 = weighting factor for the organizational characteristics.
The weighting factors (d1, d2, d3) represent the relative significance of the given
risk factor category's contribution to the likelihood of injury. These factors were
determined through the AHP analysis. The numeric risk levels obtained from the previous
equations exist on the interval [0,1]. On this interval 0 means no risk of injury and 1
means extreme risk of injury. The partitioning of the categories is shown in Table 15.
Z = d1R1 + d2R2 + d3R3 [12]

52
Table 15. Categorization of aggregate numeric risk levels
Numeric Risk Level Expected Amount of Risk Associated with
Numeric Value
0.00 - 0.20 Minimal risk: Individual should not be
experiencing any conditions that indicated
musculoskeletal irritation
0.21 - 0.40 Some risk: may be in the very early stages of
CTD development. Individual may
experience irregular irritation but is not
expected to experience regular
musculoskeletal irritation
0.41 - 0.60 Average risk: Individual may experience
minor musculoskeletal irritation on a regular
but not excessive irritation
0.61 - 0.80 High risk: Individual is expected to be
experiencing regular minor or major
musculoskeletal irritation
0.81 - 1.00 Very high risk: Individual is expected to
presently experience ongoing or regular
musculoskeletal irritation and/or medical
correction for the condition

53
7. Warning Label Laboratory
This lab is designed to teach the elements of warning label assessment and design. Please
provide a photo or drawing of the warning labels that you evaluate in problem #1 and
provide a drawing of the warning you develop in problem #2. (REMOTE OR OFF-SITE
STUDENTS please do the following assignment but only evaluate ONE label in problem
#1)
1) Find three warning labels on different items and answer the following questions.
(a) What is the action that is being warned against?
(b) What are the consequences of that action?
(c) Where is the warning located and why do you think that location was selected?
(d) How durable is the warning label?
(e) How many languages are used in the warning?
(f) In what sense is the warning “complete?”
(g) Is the warning appropriate for the target audience?
(h) What is the anticipated range of skill level for the product users/operators
(i) Provide photos or drawings of the warnings your team evaluated
2) Develop a warning label for a product that your team is familiar with or has used in
the past.
a) Provide an explanation for the choice of signal word
b) What would you warn against,

54
c) what consequences would you state, and
d) Where would you put the label?
e) Provide a drawing of your label and a detailed description
3) Provide a list or summary of guidelines for warning development that can be used in
an industrial environment. In other words, a succinct list that a layperson could use to
design warning labels in a workplace.
4) Include references in your lab report

55
8. Work Place Evaluation Lab
IN CLASS STUDENTS & REMOTE OR OFF-SITE STUDENTS
INSTRUCTIONS:
This lab is to be conducted outside of the ergonomic laboratory and is designed to prepare
you for your class projects.
Identify an occupational environment that contains a potential physical ergonomic
problem(s).
This may be a work area of your choosing but make sure you have access to this
work area for at least 1 hour.
Follow the steps listed below in Process for Ergonomic Evaluation to assess the
work environment.
Your lab report should include a thorough discussion of each of the following
steps
Follow the format for lab reports included in your syllabus in the preparation of
your lab report.
56
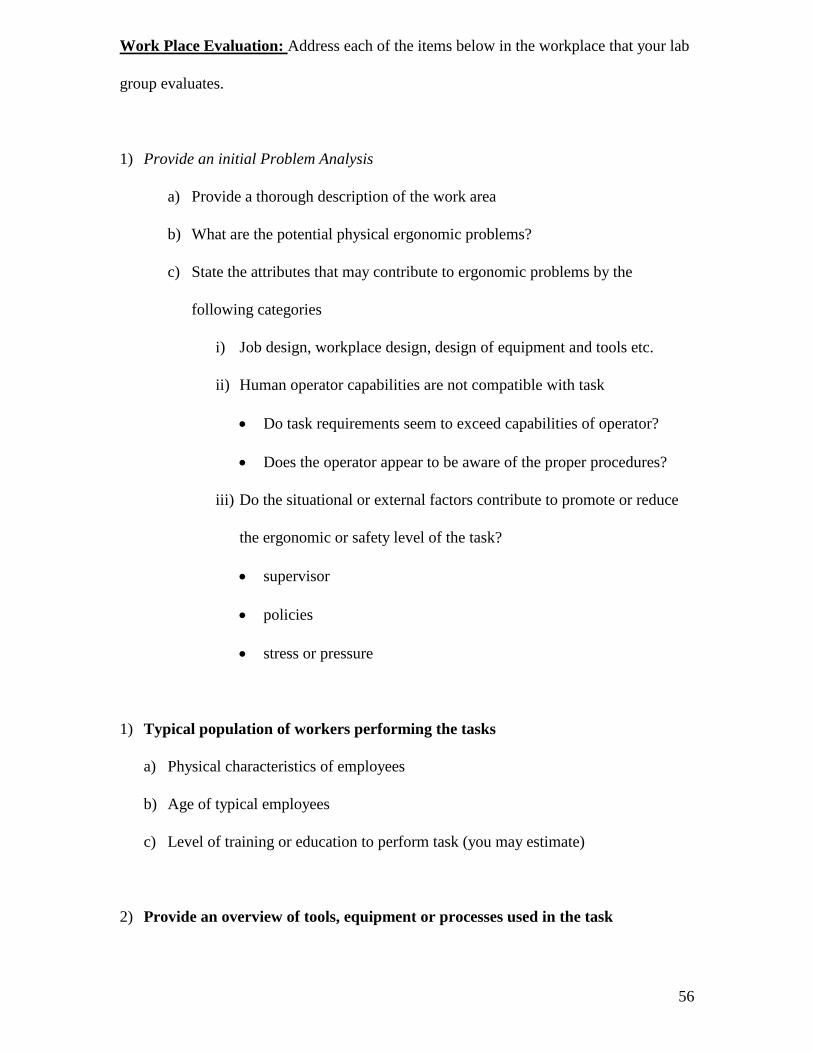
Work Place Evaluation: Address each of the items below in the workplace that your lab
group evaluates.
1) Provide an initial Problem Analysis
a) Provide a thorough description of the work area
b) What are the potential physical ergonomic problems?
c) State the attributes that may contribute to ergonomic problems by the
following categories
i) Job design, workplace design, design of equipment and tools etc.
ii) Human operator capabilities are not compatible with task
Do task requirements seem to exceed capabilities of operator?
Does the operator appear to be aware of the proper procedures?
iii) Do the situational or external factors contribute to promote or reduce
the ergonomic or safety level of the task?
supervisor
policies
stress or pressure
1) Typical population of workers performing the tasks
a) Physical characteristics of employees
b) Age of typical employees
c) Level of training or education to perform task (you may estimate)
2) Provide an overview of tools, equipment or processes used in the task

57
a) Provide a discussion of the tools, equipment and processes required for task
performance
b) Provide an approach for how you would perform an evaluation of tools and/or
equipment in this work environment; you do NOT have to evaluate the tools and
equipment but provide a description of HOW you would do the evaluation.
3) Provide a more detailed explanation of suspected ergonomic problem areas and
classify the nature of the problem in one or more ergonomic areas
a) anthropometric
b) physiological
i) musculoskeletal, cardiovascular, biomechanical
c) psychological
i) information overload
d) environmental
i) noise, heat
4) Investigate and Quantify Job Requirements –STATE CLEARLY HOW YOU WOULD
CONDUCT THIS ANALYSIS BUT DO NOT PERFORM THE ANALYSIS
c) Responsibilities for task performance
d) Describe duties of at least three elements of the task?
e) How much time is required on the task and major task elements?
f) What skill level is required?
g) Does the task have performance standards to be met (i.e. is a certain level of
production required in the task)?

58
h) What additional working conditions need to be evaluated?
i) Other
5) Determine the guidelines, references or legislation that you would apply to determine
if the work area is ergonomically sound; You may use suggest the use of the types of
guidelines listed below in your response or any validate methodology
a) NIOSH Guidelines
b) OSHA Standards
c) ANSI Standards
d) ISO Standards
e) Ergonomic literature sources or other accepted methodologies (i.e. RULA)
6) Analysis of Human Performance and Physiological Response – STATE CLEARLY
HOW YOU WOULD CONDUCT THIS ANALYSIS BUT DO NOT PERFORM THE
ANALYSIS ; where appropriate in your workplace evaluation, describe how the
following measures would be obtained and why.
a) Performance measures
i) productivity over the shift
a) Total unit completed units per hour, idle time, time on arbitrary
tasks, interruptions, distractions, accidents, etc.
b) Performance measures
ii) quality of output
a) Number of defects, number of mistakes, and number of times
referenced instructions, etc...

59
c) Physiological measures
a) Direct measurements
heart rate, blood pressures, breathing rate, muscle activity (EMG reading),
body/skin temperature, oxygen consumption
Anthropometric measurements
b) Psychophysical measures (subjective techniques)
a) Perceived exertion, difficulty, energy expended, level of fatigue
7) Design or Redesign Strategies-STATE CLEARLY THE PROPOSED DESIGN
IMPROVEMENTS THAT YOU BELIEVE WOULD RESULT FROM EFFECTIVE
ERGONOMIC APPLICATIONS
a) Engineering approach
i) Eliminate the problem by design
b) Administrative controls
i) Work aids, assistive devices, etc.
c) Personal protective equipment

60
9 . Human Senses & Human Systems Lab
ON-CAMPUS STUDENTS
Laboratory Instructions: The data for this lab is to be collected in the Ergonomic Lab
during your scheduled lab time and the equipment may be removed to collect data. The
equipment MUST be returned by the completion of your lab time.
Use the laboratory models of the ear, eye and heart to perform this lab. Use the sound
level meter and light meters to collect the data as required. The lab is to be performed in
your designated lab groups unless you are a REMOTE OR OFF-SITE student.
REMOTE OR OFF-SITE STUDENTS
Instructions: Identify a piece of ergonomic equipment on the internet that is a model or
mock up for each of the four categories below. Write a summary page overview of this
piece of ergonomic equipment and include the following (NOTE: You are required to do
this for all four categories below):
5) Identify applications or research environments where this piece of equipment or
software would be useful in an ergonomic setting
6) Go to the internet and identify at least two applications where this tool or a similar
tool was used in a research or application environment.
7) Provide costs associated with the purchase of the equipment or software
8) Include all references and sources

61
Part A - Visual Sense: Use the model in the laboratory to describe the operation of the
eye from the time that an object is perceived by the eye until it image is received in the
brain. Your discussion should include the following:
a) Description of the various elements of the eye
b) Description of the process that the eye is going through to perform the receipt of
the image
c) List an example task activity where this visual action is required.
d) Use the light meter to assess the light level in the following three different
environments
a. Environments
i. Student Center
ii. Parking garage (any) or Stairwell in Engineering 2
iii. Ergonomics laboratory
b. Explain a type of task that could be done in this environment and
determine if the illumination level is appropriate
Part B – Auditory Sense: Use the model of the ear in the laboratory to describe the
operation of the ear. Your discussion should include the following:
a) Description of the various elements of the ear by three segments
b) Description of the process of receiving sound

62
c) List an example task activity where this auditory sense action is required.
d) Use the sound level meter to determine the sound level in the following
environments
a. Environments
i. Student Center – pick a restaurant or location
ii. Atrium area of Engineering 2
iii. Parking garage (exit or entrance)
b. Explain a type of task that could be done in this environment and
determine if the noise level is acceptable
Part C – Cardiovascular System:
Using the model of the heart, describe what happens when a person is required to engage
in aerobic activity. Your discussion should include the following:
a) Description of the major segments of the heart
b) Description of the cardiovascular process
c) Description of what happens when a rapid increase in cardiovascular activity is
required.
d) List of potential risk factors that limit the functionality of the heart
e) List an example task activity where this auditory sense action is required.
Part D – Skeletal System
Using the model of the skeletal system and the individual spinal disc address the
ergonomics questions below regarding the skeletal system:

63
a) Describe the natural form of the spine by type of vertebrae
b) Discuss the role of the spinal disc and type of occupational deterioration that can
occur
c) Discuss how aging impacts the health of the intervertebral discs
d) Discuss of importance of the spinal system in the stability of the worker

64
9. Anthropometric and Segment Weight Lab
IN CLASS INSTRUCTIONS: Utilize the anthropometric tools and height distribution chart
to answer Part 1 through Part 4 of the lab assignment below.
REMOTE OR OFF-SITE INSTRUCTIONS: Please use a tape measure, meter stick and
standard scale to obtain measurements listed below for one person. Follow the instructions in
Part 2, 3 and 4 to obtain response for the data collected in Part 1.
Part 1:
Anthropometric measurements: Using the anthropometric measuring tools obtain the
following measurements for two people within your group
11. Knee to hip height
12. Ankle to knee height
13. Knee to Shoulder height
14. Wrist to Shoulder height
15. Wrist to elbow height
16. Shoulder to top of head height
17. Sitting eye level height
18. Persons overall height
65
Part 2:
Using the Body segment length in proportion to stature charts, calculate the estimated
length of segments 1 – 6 using the relationship between height and segment length. How
does this compare to the actual measurements obtained for each person? Discuss the
usefulness and disadvantages of this type of estimation.
Part 3:
Using the “Percentage Distribution of Total Body Weight” and the subjects‟ body weight,
calculate the estimated weight of the following body segments.
6. Head and Neck
7. Torso
8. Forearm
9. Wrist to elbow
10. Thigh
11. Shank
Part 4:
Describe an environment where “Anthropometric Measurements” listed in Part 1 and
corresponding “Percentage Distribution of Total Body Weight” are used in design.
Explain how these measurements would be used to support design decisions or analysis.
Anthropometric Terminology

66
Height: A straight line, vertical point to point measurement
Breadth: A straight line, horizontal vertical point to point measurement
Depth: A straight-line, point to point horizontal measurement running fore-aft
Distance: A straight-line, point to point measurement between landmarks
Circumference: A closed measurement following a body contour
Curvature: A point-to-point measurement following the contour, usually not circular

67
10. Lifting Lab
OBJECTIVE: To utilize the NIOSH lifting analysis in a biomechanical analysis.
INSTRUCTIONS: Using the NIOSH lifting equation, perform an analysis of two lifts for the
same person and then perform the same analysis for a second person.
Task 1:
a. The subject is picking up a box directly in front of him/her. The box is located on
the floor. After lifting the box, the subject must twist approximately 90 degrees at
the waist to place the box on a table. The subject is required to perform this task
approximately 10 times per minute. The anticipated task duration is
approximately 1 hour.
Task 2: The subject picks a load from the table and places it above shoulder level on a shelf.
This task is performed approximately 10 times per minute. Assume that the task duration is 3
hours (the person does not have to perform the task for this amount of time).
Discussion: For each task present the following:
6. Description of each task
7. List any necessary assumptions
8. Use the NIOSH lifting equation to obtain the necessary values for evaluation
68
9. Explain the values for each of the parameters from the NIOSH lifting equation
10. Apply the Snook & Cirello, Liberty Mutual Tables to this task to determine the
appropriateness of the lift
11. Do the task requirements seem excessive based on the NIOSH Lifting Equation?
Explain
12. Do the task requirements seem excessive based on the Liberty Mutual Tables?
Explain
13. Compare and contrast the results of the two tasks
NIOSH Lifting Guidelines
A decade after the first NIOSH lifting guide, NIOSH revised the technique for assessing
overexertion hazards of manual lifting. The new document no longer contains two
separate weight limits (Action Limit (AL) and Maximum Permissible Limit (MPL)) but
has only one Recommended Weight Limit (RWL). It represents the maximal weight of a
load that may be lifted or lowered by about 90% of American industrial workers, male or
female, physically fit and accustomed to physical labor.
This new equation resembles the 1981 formula for AL, but includes new multipliers to
reflect asymmetry and the quality of hand-load coupling. The 1991 equation allows as
maximum a “Load Constant” (LC) - permissible under the most favorable circumstances
-- with a value of 23 kg (51 lb.)
RWL = LC*HM*VM*DM*AM*FM*CM

69
LC - load constant of 23 kg or 51 lb.
** Each remaining multiplier may assume a value [0,1]
HM - the horizontal multiplier: H is the horizontal distance of the hands from the
ankles (the midpoint of the ankles)
VM - the Vertical Multiplier: V is the vertical location (height) of the hands
above the floor at the start and end points of the lift.
DM - the Distance Multiplier: where D is the vertical travel distance from the start
to the end points of the lift
AM - the Asymmetry Multiplier: where A is the Angle of asymmetry, i.e., the
angular displacement of the load from the medial (mid-saggital plane) which
forces the operator to twist the body. It is measured at the start and end points of
the lift.
FM - the frequency multiplier: where F is the frequency rate of lifting, expressed
in lifts per minute.
CM - the coupling multiplier: where C indicates the quality of coupling between
hand and load. (see figure)

70
BORG SCALE
Rating of Perceived Exertion Chart
_________________________________________________________
1 MINIMAL EXERTION
2
3
4
5 MODERATE EXERTION
6
7 SOMEWHAT STRONG EXERTION
8
9
10 EXTREME EXERTION
Instructions: Subjects are to select the level of exertion that is being experienced when
queried by the evaluator.
71
11. Location of Centers of Gravity on Human Segments Lab
Objective of Lab: This lab is designed to help you understand how to locate the centers of
gravity or mass for various segments in the body.
IN CLASS INSTRUCTIONS: Select two people in your group to serve as subjects for Part
1.
REMOTE OR OFF-SITE STUDENTS INSTRUCTIONS: Select one subject and please
do the same activities in Part 1 and Part 2 below.
Part 1:
In this part LIVE students don’t need to estimate the length for the below segments.
a. For the subjects being measured, obtained the lengths of the following links.
Also, using the attached figures estimate the length, location for the center of gravity
for each person for the following segments.
1. Forearm
2. Thigh
3. Calve
4. Torso, Neck and Head

72
b. Describe an occupational or product design environment where this information
would be useful in biomechanics research or applications.
Part 2:
Assume you have been hired as a consultant for the National Basketball Association and
the Women's National Basketball Association. They are presently redesigning the
weights used to train the athletes and you been asked to obtain the center of gravity for
the average NBA player and WNBA player. The only anthropometric information that
you have been provided is the average height of the players.
Suppose the average height for NBA players is 6'5" and the average height for WNBA
players is 5'10".
a. Use the "height ratio to segment link" to obtain the segments lengths
below:
Upper Arm
Forearm
Hands
Calve
Thigh
b. Then use the center of gravity figure to obtain the c.g. for four
segments that you think are most important for in athletic equipment
design. Provide all results in your lab report
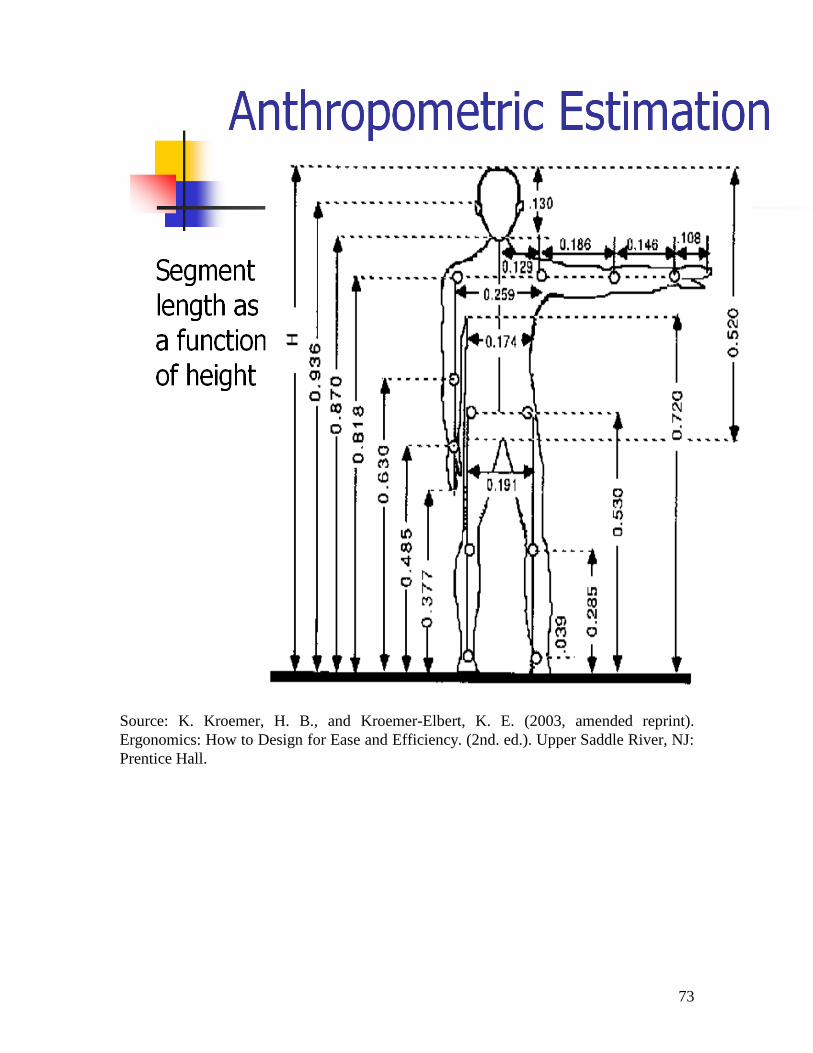
73
Source: K. Kroemer, H. B., and Kroemer-Elbert, K. E. (2003, amended reprint).
Ergonomics: How to Design for Ease and Efficiency. (2nd. ed.). Upper Saddle River, NJ:
Prentice Hall.

74
Segment
Centers-of-
Gravity
shown as
percentage of
segment
lengths
[Dempster,
1955].
Source: K. Kroemer, H. B., and Kroemer-Elbert, K. E. (2003, amended reprint).
Ergonomics: How to Design for Ease and Efficiency. (2nd. ed.). Upper Saddle River,
NJ: Prentice Hall.
75
12. Two-Joint Angle Influence on Adjacent Joint Mobility Lab
Objective of Lab: This lab is designed to help you understand the importance of adjacent
joint angle in joint mobility.
INSTRUCTIONS: Select two subjects from your lab group and obtain the
measurements listed below in Part 1; Ask a single subject to perform the movements
described in Part 2 and
If you are a REMOTE OR OFF-SITE students you are only required to take
measurements for 1 subject in Part 1. If you do not have a goniometer, we will provide
you with data from one of the in class lab groups.
Part 1:
Data collection:
–Using the Goniometer, take the following joint angle measurements for 2 subjects
a. Shoulder flexion
•Shoulder flexion when the elbow is straight
• Shoulder flexion elbow flexed
b. Knee flexion
• Knee flexion when the hip is not flexed
• Knee flexion when the hip is flexed
c. Ankle Angle

76
• Ankle dorsiflesion when the knee is flexed
• Ankle dorsiflexion when the knee is not flexed
For the data obtained in parts a through c:
a. Generate a mean and standard deviation for your data set
b. Compare these means (when adjacent angle not flexed) to the values
obtained in Table 4.3 of your text
c. Create a graph that shows the angle of the joint when it is flexed Vs. not
flexed for the adjacent angle.
Part 2:
Description of movement using anthropometric, biomechanical and anatomically
appropriate terminology
a. Ask a subject to perform the following motions
d. Movement of the lower limb up and out
e. Movement of the shoulder forward and down
f. Movement of the foot up and out
b. For each of these motions
g. Describe the movement using any anatomically correct convention
of movement terms (for example, Table 4.1 text),
h. Describe the plane(s) in which the movement takes place.
77
13. Seated Work Assessment Lab
Instructions: During the lecture, you will be observing your professor performing the
task required to provide a lecture using the computer workstation set-up in the classroom.
REMOTE OR OFF-SITE STUDENTS: perform an assessment of a typical office
workers workstation
1. During your observation analysis, use the class notes to answer the
following questions:
a. Does the work area promote proper posture
b. What are the estimated loads on the spine for the various postures
c. Does the seat accommodate the requirements of the work area
d. Do the work envelopes (vertical and horizontal) accommodate the
needs of the workplace
e. Is there an appropriate work distribution
f. Is there adequate lighting in the work area
2. After the lecture, you will perform an analysis of the equipment, chair and
movement required for her to perform the job of lecturing for two hours.
3. After completion of your observation complete the Workstation checklist
provided in with your hand outs.

78
Prepare your results as a group lab report and answer the following questions
Do the seating accommodations support the body optimally for the task
performed
What appear to be the major biomechanics‟ violations of this task
What are the primary improvements that can be made to improve the work
area

79
Ergonomic Workstation Checklist
Yes No
1. ( ) ( ) Does the working space allow for a full range of movement?
2. ( ) ( ) Are mechanical aids and equipment available?
3. ( ) ( ) Is the height of the work surface adjustable?
4. ( ) ( ) Can the work surface be tilted or angled?
5. Does the workstation require:
( ) ( ) · bending or twisting at the waist?
( ) ( ) · reaching above the shoulder?
( ) ( ) · Static muscle loading?
( ) ( ) · extending the arms?
( ) ( ) · bending or twisting the wrists?
( ) ( ) · raised elbows?
6. ( ) ( ) Is the employee able to vary posture?
7. ( ) ( ) Are hands and arms free from pressure from sharp edges on work surfaces?
8. ( ) ( ) Is an armrest provided where needed?
9. ( ) ( ) Is a footrest provided where needed?
80
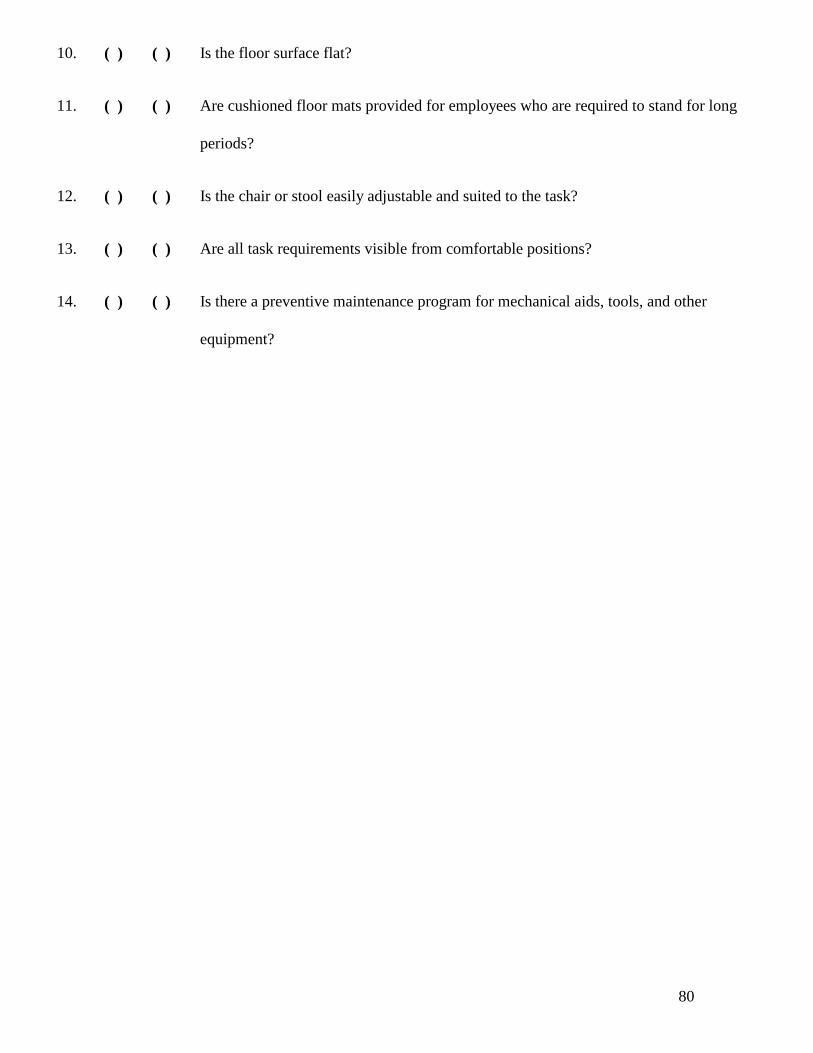
10. ( ) ( ) Is the floor surface flat?
11. ( ) ( ) Are cushioned floor mats provided for employees who are required to stand for long
periods?
12. ( ) ( ) Is the chair or stool easily adjustable and suited to the task?
13. ( ) ( ) Are all task requirements visible from comfortable positions?
14. ( ) ( ) Is there a preventive maintenance program for mechanical aids, tools, and other
equipment?

81
Observation Analysis in Assessment of Seated/Office Work
Things to look for:
Possible solutions, depending on further analysis:
Prolonged hunched or elevated
shoulder while holding the phone
Telephone headset
Speakerphone
Elbows splayed out (shoulder
abduction)
Lower work surface
Lower chair armrests
Bring chair armrests in closer
Awareness and habit training
Raised or tensed shoulders Habit or tension training
Lower work surface or keyboard
Lower chair armrests
Raise chair, if foot contact with the floor can be
maintained
Twisting the head to the side Bring viewed item closer to centerline of view
Elbow flexed for long periods using
the telephone
Telephone headset
Speakerphone
Elbow or forearm resting for long
periods on hard or sharp work
surface, chair armrests
Pad or round surfaces, corners, and armrests
Replace armrests
Telephone headset
Habit training
Wrists bent to the sides when using
side keys
Habit training
Keyboard with more accessible keys or split keyboard
design
Wrists bent back (extended) or
forward (flexed) for prolonged
periods
Habit training, Wrist rest
Lower, raise, or change slope of the keyboard
Wrists or palms resting for long
periods on hard or sharp keyboard or
worksurfaces
Habit training
Wrist rest
Padded or rounded surfaces, corners

82
Hands held actively over the
keyboard during keying pauses
Habit training
Wrist or forearm rest
Rapid, sustained, or prolonged
keying
Greater work variety
Aggressive break schedule
Reduce overtime
Forceful keying, key pounding Habit training
Light-touch keyboard
Significant amounts of hand
stapling, punching, lifting, opening
mail, or other forceful exertions,
especially combined with awkward
postures
Mechanical aids, such as electric stapler or punch
Reduce size of lifted loads
Bring heavy loads close to the body, at a medium height
Substitute sliding (worksurface) or wheeling (floor)
Sharpen letter openers
Prolonged mouse use Greater work variety
Aggressive break schedule
Alternate hands
Alternative pointer devices
Arm support, including small table
Mouse close to body (extended keyboard tray)
Learn keystroke substitutes for menus
Prolonged sitting, especially in only
one posture
Greater work variety
Aggressive break schedule
Chair that supports posture change, through movement,
size, or easy adjustability
Habit training
Move phone to the other side of the office to force
standing, or suggest standing when on phone
Check chair fit
Monitor in-out mechanism
Sit-stand work surface
Lumbar back area not supported Lumbar cushion
Backrest height and tilt
Check chair fit, especially backrest/lumbar height
Feet dangling, not well supported, or
a posture which seems to put
pressure on the backs of the thighs
Lower chair
Lower work surface
Habit training
Foot rest (last resort)
83
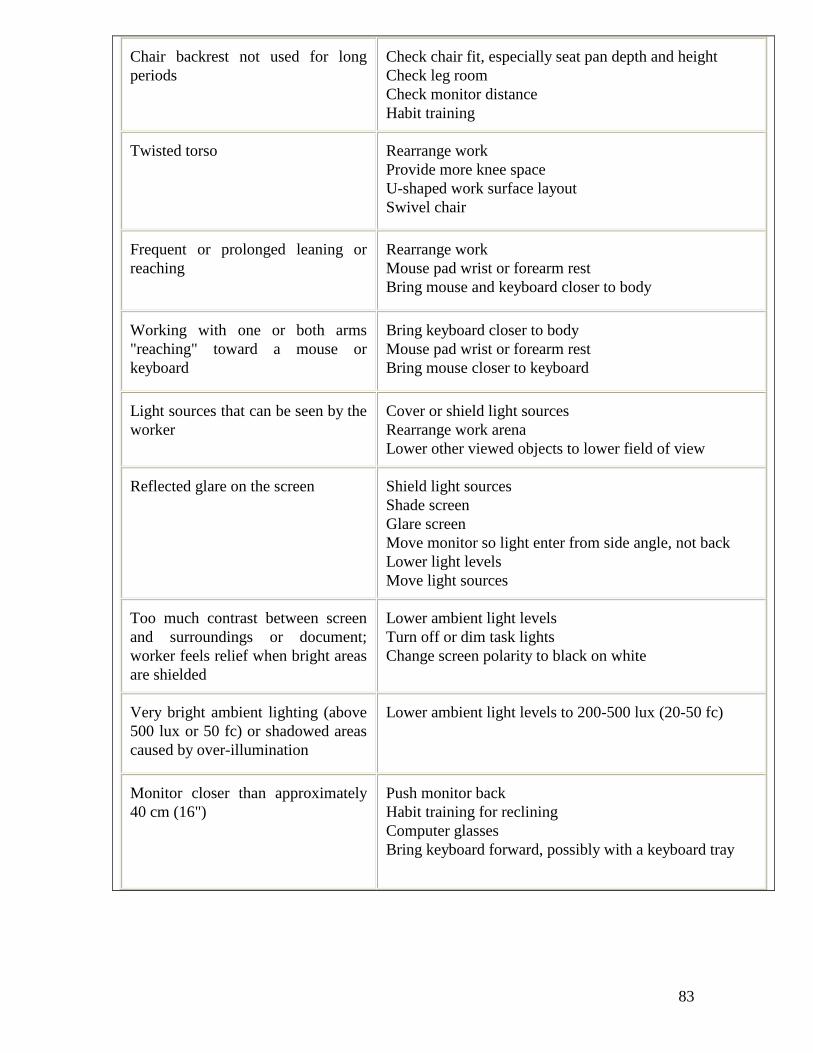
Chair backrest not used for long
periods
Check chair fit, especially seat pan depth and height
Check leg room
Check monitor distance
Habit training
Twisted torso Rearrange work
Provide more knee space
U-shaped work surface layout
Swivel chair
Frequent or prolonged leaning or
reaching
Rearrange work
Mouse pad wrist or forearm rest
Bring mouse and keyboard closer to body
Working with one or both arms
"reaching" toward a mouse or
keyboard
Bring keyboard closer to body
Mouse pad wrist or forearm rest
Bring mouse closer to keyboard
Light sources that can be seen by the
worker
Cover or shield light sources
Rearrange work arena
Lower other viewed objects to lower field of view
Reflected glare on the screen Shield light sources
Shade screen
Glare screen
Move monitor so light enter from side angle, not back
Lower light levels
Move light sources
Too much contrast between screen
and surroundings or document;
worker feels relief when bright areas
are shielded
Lower ambient light levels
Turn off or dim task lights
Change screen polarity to black on white
Very bright ambient lighting (above
500 lux or 50 fc) or shadowed areas
caused by over-illumination
Lower ambient light levels to 200-500 lux (20-50 fc)
Monitor closer than approximately
40 cm (16")
Push monitor back
Habit training for reclining
Computer glasses
Bring keyboard forward, possibly with a keyboard tray

84
Different viewed objects (screen,
documents) at different distances
from the eyes
Use document stand or otherwise equalize distances to
within about 10 cm (4")
Screen or documents not oriented
perpendicular to the line of sight
Change monitor, document stand angle
Prolonged near focusing throughout
the day with few far-focusing
opportunities
Habit training
Rearrange space to provide view
Introduce glazing
Monitor image dim, fuzzy, flickery,
small, or otherwise difficult to read
Upgrade monitor
Use software to enlarge image
Shiny, low-contrast, or small-print
documents
Improve lighting on documents if documents cannot be
changed
Forward position of the head
(peering) or squinting
Check for monitor image quality problems or monitor
distance
Suggest consultation with vision specialist
Eyestrain complaints Check all aspects of visual environment
Suggest consultation with vision specialist
Neck extended backwards, head
tilted back, even slightly
Remove CPU from under monitor
Remove tilt-swivel base from monitor (leave ventilation
space)
Check for bifocals and suggest full-frame "computer
glasses" prescription
Neck flexed (downward) Raise document or monitor to a comfortable height
Adjust posture
Habit retraining
Check glasses for inadequate prescription

85
14. Work Place Observational Analysis
Lab Objective: To allow biomechanics students to refresh their workplace evaluation
skills through an observation. This lab is designed to teach the application of ergonomic
and biomechanics knowledge in the evaluation and determination of biomechanics related
work place risk factors.
LLaabb EEnnvviirroonnmmeenntt:: AAnnyy rreessttaauurraanntt oorr wwoorrkk eennvviirroonnmmeenntt iinn tthhee aarreeaa..
IInnssttrruuccttiioonnss::
aa)) IIddeennttiiffyy aa ttaasskk bbeeiinngg ppeerrffoorrmmeedd iinn tthhee ssttuuddeenntt cceenntteerr,, CCeennttrraall FFlloorriiddaa oorr llooccaall aarreeaa..
bb)) PPrroovviiddee aa ddeettaaiilleedd ddeessccrriippttiioonn ooff tthhee ttaasskk wwhhiicchh yyoouu ddoo yyoouurr eevvaalluuaattiioonn aanndd tthhee
eennvviirroonnmmeenntt iinn wwhhiicchh iitt iiss ppeerrffoorrmmeedd
cc)) OObbsseerrvvee tthhee ttaasskk ffoorr aatt lleeaasstt 3300 mmiinnuutteess ((eexxppllaaiinn ttoo tthhee wwoorrkkeerrss tthhaatt tthhiiss iiss aa ccllaassss
llaabb)) –– DDOO NNOOTT IINNTTEERRFFEERREE WWIITTHH TTAASSKK PPEERRFFOORRMMAANNCCEE
dd)) CCoommpplleettee tthhee wwoorrkkssttaattiioonn aannaallyyssiiss cchheecckklliissttss aattttaacchheedd wwhhiillee oobbsseerrvviinngg tthhee ttaasskk
((ssuubbmmiitt tthhiiss sshheeeett aass aann aappppeennddiixx ttoo yyoouurr llaabb rreeppoorrtt))..
ee)) AAllssoo,, dduurriinngg aanndd aafftteerr ttaasskk oobbsseerrvvaattiioonn,, ccoonnssiiddeerr tthhee ccaatteeggoorriieess bbeellooww.. UUssiinngg tthhee
ccaatteeggoorriieess iiddeennttiiffyy tthhee ttyyppeess ooff eerrggoonnoommiicc iissssuueess aassssoocciiaatteedd wwiitthh eeaacchh ccaatteeggoorryy;;

86
yyoouu aarree ttoo uussee tthhee cchheecckklliisstt bbuutt iiff tthheerree aarree rriisskk ffaaccttoorrss nnoott sshhoowwnn oonn tthhee cchheecckklliisstt
pplleeaassee lliisstt aanndd ddiissccuussss tthheemm..
AAnntthhrrooppoommeettrriicc iissssuueess:: PPoossttuurree,, lliiffttiinngg && ssttrreennggtthh rreeqquuiirreemmeennttss
WWoorrkkppllaaccee llaayyoouutt
EEqquuiippmmeenntt:: TToooollss,, EEqquuiippmmeenntt ((ii..ee.. eevvaalluuaattiioonn ooff nneeeeddeedd hhaanndd ttoooollss))
EEnnvviirroonnmmeennttaall ffaaccttoorrss ((uusseerr iinntteerrffaaccee wwiitthh eeqquuiippmmeenntt,, tteemmppeerraattuurree,, eettcc..))
CCaarrddiioovvaassccuullaarr:: DDuurraattiioonn aanndd iinntteennssiittyy ooff ttooooll uussee ((hhaanndd ttoooollss,, ppoowweerr
ttoooollss,, eettcc..))
Use the Washington State WISHA Screening tool developed by Dr. Thomas Bernard to
assess the level of risk associated with the different aspects of the work environment.
Discuss the findings of your analysis and prepare your Lab Report using the course
guidelines.

87
15. Muscle Contraction Lab
Objective:
The purposes of this lab are to: (1) distinguish between 3 types of muscle contractions;
and (2) identify the type of muscle contraction(s) being performed during selected phases
of movement through visual analysis.
Terminology:
Concentric – shortening contraction during which the overall length of the muscle
becomes shorter
Eccentric – a lengthening, in a controlled manner, of a previously tensed muscle
Isometric – a contraction where no change in muscle length takes place
Activities:
A. Perform the following simple movements. With regard to the muscles of interest
listed below, identify the type of contraction taking place, concentric, eccentric, or
isometric.
1. (Wrist flexors) Holding your pencil in your fist with your forearm supinated, curl the
pencil upward.
2. (Shoulder abductors) Holding your arms straight out by your sides in a “T” position,
slowly lower your arms down to your sides.

88
3. (Elbow flexors) Make a fist and place it under, but touching, your desktop with your
elbows flexed at approximately 90 degrees. The table weighs approximately 300 pounds.
Lift up on the table.
4. (Elbow extensors) Perform the down phase of a push-up against a wall.
5. (Elbow extensors) Perform the up phase of a push-up against a wall.
6. (Knee flexors) With your back and heels against a wall, try to curl your leg bringing
your heel to the back of your thigh.
B. You need to go to a gym for the below activities; or you can "simulate" them in the
ergonomics lab or at home if you are a REMOTE OR OFF-SITE student.
1. Knee Extensions:
a) Perform an extension with a comfortable weight. What type of contraction is the
quadriceps exhibiting?
b) Have your partner put the pin in at 2-3 plates heavier. Then, have your partner assist
you in lifting this weight until you are in a terminal extension. Without the help of your
partner, slowly lower the weight. What kind of contraction is the quadriceps exhibiting?
2. Knee Flexion: (you would be in a prone position on your stomach for this exercise)

89
a) Perform a curl with a comfortable weight. Before you lower the weight, have your
partner gently push down on the machine pads at your feet giving you resistance as you
lower. What kind of contraction are the biceps femoris exhibiting?
b) Have your partner put the pin in at the very bottom plate. Attempt to lift the load.
What kind of contraction are the hamstrings exhibiting?
3. Bench Press:
a) Perform a bench press, up and down phases, with a comfortable weight. What kind of
contraction is exhibited by the pectoral muscles during the up phase?
b) What kind of contraction is exhibited by the pectoral muscles during the down phase?
4. Sit-ups:
a) Perform a sit-up any way you feel comfortable. What kind of contractions are the
abdominals exhibiting during the up phase?
b) What kind of contractions are the abdominals exhibiting during the down phase?
5. Bicep Curls:
a) Using a dumbbell of comfortable weight, perform a full bicep curl. What kind of
contraction is the bicep exhibiting during the lowering phase?

90
b) Curl the dumbbell up approximately 45 degrees. Have your partner apply force on the
dumbbell that is equal to your curling force. What kind of contraction are the biceps
performing with your partner‟s involvement?
Discussion:
1. List at least one example in a sport or exercise of each type of muscle contraction
discussed in this lab (concentric, eccentric, isometric). Be specific as to a joint and phase
of skill.
2. Explain how gravity by itself is a resistive force.
3. Which type of contraction, concentric or eccentric, do you think would cause more
fatigue to occur in a muscle? Why? (Make sure you justify your answer)

91
II. Ergonomic Application Labs
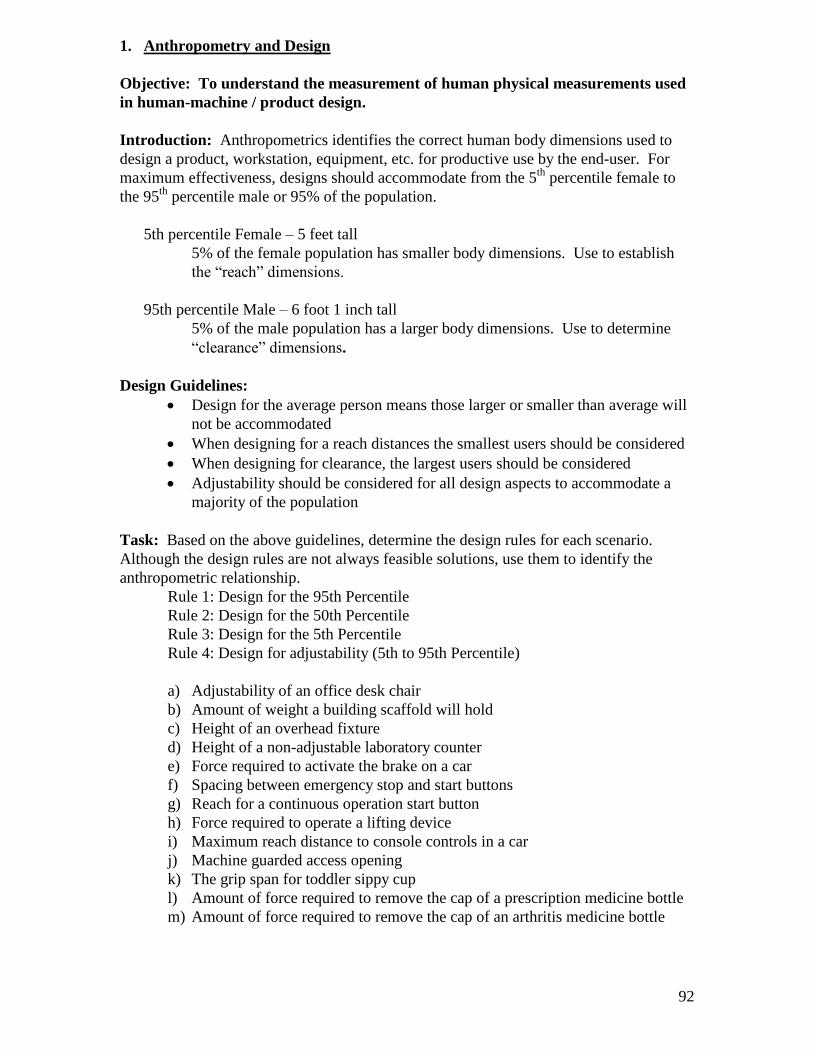
92
1. Anthropometry and Design
Objective: To understand the measurement of human physical measurements used
in human-machine / product design.
Introduction: Anthropometrics identifies the correct human body dimensions used to
design a product, workstation, equipment, etc. for productive use by the end-user. For
maximum effectiveness, designs should accommodate from the 5th
percentile female to
the 95th
percentile male or 95% of the population.
5th percentile Female – 5 feet tall
5% of the female population has smaller body dimensions. Use to establish
the “reach” dimensions.
95th percentile Male – 6 foot 1 inch tall
5% of the male population has a larger body dimensions. Use to determine
“clearance” dimensions.
Design Guidelines:
Design for the average person means those larger or smaller than average will
not be accommodated
When designing for a reach distances the smallest users should be considered
When designing for clearance, the largest users should be considered
Adjustability should be considered for all design aspects to accommodate a
majority of the population
Task: Based on the above guidelines, determine the design rules for each scenario.
Although the design rules are not always feasible solutions, use them to identify the
anthropometric relationship.
Rule 1: Design for the 95th Percentile
Rule 2: Design for the 50th Percentile
Rule 3: Design for the 5th Percentile
Rule 4: Design for adjustability (5th to 95th Percentile)
a) Adjustability of an office desk chair
b) Amount of weight a building scaffold will hold
c) Height of an overhead fixture
d) Height of a non-adjustable laboratory counter
e) Force required to activate the brake on a car
f) Spacing between emergency stop and start buttons
g) Reach for a continuous operation start button
h) Force required to operate a lifting device
i) Maximum reach distance to console controls in a car
j) Machine guarded access opening
k) The grip span for toddler sippy cup
l) Amount of force required to remove the cap of a prescription medicine bottle
m) Amount of force required to remove the cap of an arthritis medicine bottle

93
Task: Use the anthropometric wheel to answer the following.
2) A stationary table needs to be installed that will accommodate product re-work. The
re-work requirements include opening the packaging (2x4x6 inches), removing the paper
inserts and replacing with a new paper insert. The re-worked packaging is then placed in
a shallow bin.
a) What is the required height of the table? Which body dimensions and percentiles were
used to determine the height?
b) What are the maximum vertical and horizontal reaches for placing the packaging in
the bins? Which percentiles were used to determine the reaches?
3) A visual display control needs to be placed on a machine. The operator must
frequently monitor the controls to collect data, start and stop the machine. The controls
will be placed on an articulating arm, however, the arm can not move vertically, only
horizontally. The visual controls are on a 17 inch computer monitor.
a) At what height should the visual control be mounted? What body dimension and
percentile were used to determine the height?
b) What are the minimum and maximum horizontal distances for the articulating arm?
What factors need to be considered to determine these distances?
4) Five separate components are required to complete a product. All components can be
stored at one workstation. This is a one operator job with small components and each
requiring precise quality checks prior to assembly. The job requires the operator to
retrieve a single component from five separate bins and assemble them in order.
a) Should this job be a seated or standing workstation?
b) What reach should be considered for this job?
c) What body dimension and percentile were used to determine the reach?

94
2. Manual Material Handling
Objective: To identify the needs required to maintain the safety of the operator
while maximizing the production capabilities of the operation
Introduction: Manual material handling can be one of the most physically demanding
jobs in industry. Controls to reduce the risk of injury include training proper manual
lifting and transporting methods to providing appropriate handling equipment.
Task: The job requires palletizing 1950 cases per shift. The schedule permits for 1 or 2
employees to palletize for an 8 hour shift with breaks totaling 1 hour. Therefore 1
employee would palletize for 7 hours and 2 employees palletizing 3.5 hours each. The
operator(s) are required to palletize 5 cases per minute to meet production needs. Each
case weighs 22.5 lbs (10.2 kg). The cases are not always palletized at the strongest lifting
posture. Some lifts require continuous bending in non-neutral postures.
What are the risk factors?
What are the posture risks?
What are the force risks?
What are the repetition risks?
Is this considered a high risk job for 1 employee? For 2 employees?
How many cases would significantly reduce the job to minimal risk?
What is the case weight that would significantly reduce the job to a minimal
risk?
If 2 employees are scheduled for the job, what other tasks would increase the
risk of injury to the operators?
Would an increase in the number of cases retrieved (2 or 3 at a time) reduce or
increase the risk of injury?

95
3. Ergonomics by Design
Objective: To identify the pros and cons of including ergonomics in the various
stages of a product development process. Identify the link between product
development and ergonomics. Costs related to proactively implementing
ergonomics in the design stages vs. costs associated with adding during the
production stages. Costs include injury potential.
Introduction: 7 Phases of a Product Development Process
1) Concept Formation - Creating the business plan for a new product idea.
This includes market research, understand the customer and visualization.
2) Concept Evolvement – Refining the idea into a saleable product. This phase includes
acquiring quoting, benchmarking similar products, establishing feasibility.
3) Collaboration Development – The program is commissioned and formal teams are
created. Cross functional teams established to determine engineering needs, timing and
budgets, supplier selection, etc.
4) Product Engineering – Engineering the product through drawings, prototype builds,
functional and quality testing.
5) Equipment Development - Building tooling and equipment to manufacture the
product. Creating and prove-out of the manufacturing process is conducted. Operator
jobs are defined and created. Pilot builds are completed during this phase.
6) Validation – Compliance testing of all processes, equipment and products. Final
evaluation of all requirements needed for production. Final testing, dimensional
inspections and appearance approvals are completed in this phase.
7) Production – Manufacturing Operating System is in operation building customer-
ready products.
Task:
What is (are) the most cost effective phase(s) to implement ergonomics for operator-
equipment interaction?
What is the most costly phase(s)? Why?
What is the least costly phase(s)? Why?
What are the pros and cons (if any) of implementing ergonomics in the early phases?
What are the pros and cons (if any) of implementing ergonomics in the final phases?
96
4. Design an operator job
Objective: Creating a production line with ergonomics a major component in the
development of each operator job.
Introduction: When a product is manufactured, how the operator will interact with the
process is a key decision. If full automation is not an option, the manual process will
require the operator to handle product components. This includes assembly and final
packaging.
Task: Create a product and outline the manufacturing process. Allow the product to
have 5 workstations including a utility operator (responsible for replenishing the line with
product components) all working simultaneously, each depending on the next operator.
For each job, identify the ergonomic concerns and how they will be avoided. Discuss the
operator-equipment/components/product interaction.
1) Where are the components placed? (include reach distances)
2) Are all the workstations seated or standing or a mixture of both?
3) Is this a cell or line formation?
4) What types of tools are used to minimize ergonomic risks?
5) Are operators skilled to the particular task or are they job sharing/rotating? What are
the pros and cons of job sharing/rotating?
97
5. Manufacturing Key Measures (Cost Justification)
Objective: Understand how ergonomics enhances operations based on
manufacturing key measures.
Introduction: Production lines that have not incurred injuries are difficult to justify the
cost of implementing ergonomics. However, if highly repetitive tasks are present,
prevention is important. Because ergonomic injuries are cumulative, there is a high
probability that injuries will occur. In order to make a case for the cost required to
implement ergonomics, changes need to positively affect the manufacturing key
measures.
Task: Identify 5 manufacturing key measures and indicate how ergonomics can
positively impact the operation. What ergonomic impacts are directly related to each key
measure?
Sample Key Measures: Quality, Efficiency, Materials, Delivery, Inventory, Floor Space,
Build Consistency, Productivity
Quality – rotation, boredom
Efficiency – minimize movements
Materials – minimize the number of components
Build Consistency – products of the same quality, all products built the same.

98
6. Rotation
Objective: To understand the importance of rotation, how to create a line rotation
and how to account for restricted operators on a production line.
Introduction: Rotation is a quick and effective way of reducing the stresses that cause
ergonomic related injuries. This includes the reduction of mental fatigue. Rotation is
included in a production line to prevent injuries. This is accomplished by varying the use
of muscle groups which avoids muscle fatigue. When rotation is implemented properly,
the operation can create a variety of skills in its workforce and maintain the quality and
consistency of the manufactured product. In a proper rotation, alternating muscle groups
and job difficulty is most important.
Task: Refer to the „Design an operator job‟ lab:
1. Create a rotation for 4 healthy operators on the production line.
2. Create a rotation for 3 healthy operators and one restricted operator (the
restricted operator is complaining of shoulder pain). What are the
restricted movements of a person with shoulder pain?
Example:
Body Part Most Affected Hard, Moderate, Easy
Task 1: Hands/Wrists Hard
Task 2: Shoulders Easy
Task 3: Shoulders Moderate
Task 4: Neck/Eyes Easy
Task 5: Back Hard
Rotation: 1, 2, 5, 4, 3

99
7. Cumulative Trauma Disorders
1) Choose a job to analyze.
2) By visual analysis, identify the physical and personal risk factors that are present.
3) Complete an ergonomic job analysis of this job using two different ergonomic analysis
tools.
4) What are the risk factors identified using the job analysis tool?
5) What are the controls to reduce the risk factors of the job?
6) What are the potential Cumulative Trauma Disorders associated with this job?
*7) When an operator is hurt, what are the essential steps to full recovery?

100
8. Administrative and Engineering Controls
Objective: To identify the use of administrative controls in settings where engineering
controls are unavailable.
Introduction: Administrative and Engineering controls are two types of solutions used to
control ergonomic-related risks.
Administrative controls are changes in work procedures such as written policies,
supervision and training with the goal of reducing the effects of ergonomic risk factors.
These controls include job rotation, wellness exercise, methods training, biomechanics
training, work scheduling, medical management and job conditioning.
Engineering controls are physical changes to a job or equipment that reduces or
eliminates ergonomic hazards. These include workstation and tool design, work methods
design, equipment development, product design and design for maintainability.
The uses of administrative solutions many times are the result of complaints by the
operator from physical stress and/or an increase in injuries. When engineering solutions
are not available, administrative solutions must not jeopardize the success of the
operation or positively impact the operations key measures (ie. productivity, efficiency,
quality).
Task: Sometimes administrative controls are considered quick fixes for situations that
require resources to implement engineering controls that are not readily available. In the
following scenarios, assume engineering controls are not an option. Identify the type(s)
of administrative controls that will reduce the risk of ergonomic-related injuries.
1. The job requires three operators to hand cap thousands of 2ml vials daily. Only
one operator can hand cap at a time. The hand capping is highly repetitive,
requiring pinch grip forces and awkward postures. Operators two and three
replenish the line of raw materials and package the hand capped completed vial
respectively. There are recurring complaints of physical discomfort and
symptoms of DeQuervain‟s disease. Justify administrative controls that will assist
in reducing the affects of the CTD.
2. The job requires two operators to palletize 23 lb cases. Each operator must handle
975 cases in 3.5 hours. The cases are delivered by conveyor to the operator 5 per
minute and are placed on a pallet. The risks include repetition, lifting (depending
on the origination of the lift) and pushing (depending on the placement of the
case. What administrative controls should be implemented to minimize the risks
of this physically demanding job?
3. An operator is required to retrieve bottles from a conveyor line and place them in
a packaging box. Due to the set up of the production line, high repetition and
awkward postures (extreme shoulder and elbow abductions and wrist flexion) are
required to perform the job. There are 3 operators on the line. Two operators are
responsible for packing the bottles simultaneously. The third operator restocks the
line and palletizes the completed boxes. Palletizing poses additional risks.
101
Thoughts of reducing the line speed were discussed, however, this would slow
down the production and operation needs would not be met.
4. The operation requires 100% manual finishing. This process is hand intensive
requiring high repetition and awkward postures. This job requires very skilled
operators. The average age of the 15 operators is 49 and the average length of
employment performing the same task, 10 years. There have been numerous
complaints of symptoms and diagnoses of Epicondylitis, carpal tunnel syndrome
and other upper extremity injuries. Management would like to replace the manual
process with an engineering solution. However, because the product only
captures a small market, an engineering solution would not be cost effective.
What would be appropriate administrative control(s) for this aging workforce?
5. The utility operator‟s job is to maintain working materials at all the workstations.
He is also responsible for palletizing the packaged finished product. The
materials needed for the line are retrieved from the inventory rooms. The
materials are packaged in boxes weighing 10 to 25 lbs. Boxes are lifted from the
floor to levels requiring ladders or step stools. These boxes are placed on large
three tier carts and transported from the inventory room to the line. To restock the
line, the utility operator transfers the materials from the boxes to the line bins.
Movements include bending, lifting (levels from the floor to above shoulder
height), carrying, and squatting. Lower back and shoulder discomfort are
prevalent in this job. There are several types of mechanical equipment already in
place however, the job is physically demanding. What administrative controls can
be used to reduce the affects of the physical discomfort?

102
II. Additional Handouts

103
OVERVIEW OF ERGONOMIC ANALYSIS
Analysis Techniques
Techniques: Ergonomic evaluations, safety evaluations, surveys, interviews, task
evaluation, observation of the jobs, utilization of validated task evaluation and
measurement tools.
An investigation technique to analyze work tasks to determine human
performance requirements, physiological requirement, and other job requirements. In
other words, it measures what the person is doing on the job. Investigative techniques
include resources such as the NIOSH lifting guideline, Rapid Upper Limb Assessment
Tool (RULA), and a hybrid of multiple techniques to address unique problems.
Purpose:
1) To identify task elements or user expectations that may be reducing
productivity or making job unnecessarily difficult, or causing injuries or
illnesses or promoting preventable risks.
2) To identify factors and categories of ergonomic, biomechanics or safety
problems
3) To develop solutions to ergonomic problems
Benefits:
1) identify sources of injuries, fatigue, discomfort, and reduced productivity
2) information on type of capabilities needed to perform the job
3) information on percentage of population capable of performing the job
How is the analysis done?
1) Initial problem analysis
2) Problem Classification – may be more than one category of risk/concern
3) Investigate and quantify job requirements
4) Analyze human performance and physiological requirements
5) Determine user/operator population
6) Identify validated ergonomic and biomechanics resources to be used to assess the
ergonomic status of the given environment
7) Develop strategies for design or redesign when needed(as many design solutions;
more than 1)
8) Discuss financial implications
9) Develop draft implementation plan
2) Initial Problem Analysis
d) thorough description of the problem
e) Analysis of attributes that contribute to the problem
iii) job design, workplace design, design of equipment and tools etc.

104
iv) human operator
1) requirements exceeds capabilities of operator?
2) Operator or user knowledge of the procedures or operational requirements?
iv) situational or external factors
1) supervisor
2) policies
3) stress or pressure
3) Upon identification of the problem attempt to classify the nature of the problem in
one or more ergonomic areas
e) anthropometric
f) physiological
i) musculoskeletal, cardiovascular
g) psychological
i) information overload
h) environmental
i) noise, heat
3) Investigate and Quantify Job Requirements
j) Describe duties of each task
k) Percent of time spent on each task
l) Job responsibilities
m) Analysis of knowledge and skill needed
n) Performance standards to be met
o) Evaluation of working conditions, safety hazards
p) Evaluation of tools and equipment used
Perform evaluations of tools and equipment for adherence to ergonomic
principles.
4) Analysis of Human Performance and Physiological Response
b) Performance measures
ii) productivity over the shift
c) total unit completed, units per hour, idle time, time on arbitrary
tasks, interruptions, distractions, accidents, etc.
d) Performance measures
iii) quality of output
b) number of defects, number of mistakes, number of times
referenced instructions, etc..
b) Physiological measures
i) direct measurements
a) heart rate, blood pressures, breathing rate, muscle activity
(EMG reading), body/skin temperature, oxygen consumption
c) Psychophysical measures (subjective technique)
i) perceived exertion, difficulty, energy expended, level of fatigue
4) Design or Redesign Strategies: Develop methodologies or tools to support the
followings levels of ergonomic intervention
b) Engineering approach
ii) eliminate the problem by design or redesign

105
c) Administrative controls
ii) Suggest appropriate work aids, assistive devices, etc.
c) Personal protective equipment (Caution: treat symptoms not the cause of the
problem)
5) Determine characteristics of user populations (physical, cognitive, etc.)
6) Develop draft implementation strategy for incorporating ergonomic interventions into
system
7) Discuss economic implications (when feasible)
8) Project report development
What is involved in a survey technique:
1) Analyze existing data - accident reports, medical visits, absenteeism,
environmental conditions etc..
2) Discuss with supervisory people to obtain information on
a) production pressures and perceived staffing adequacy for production
goals
b) seasonal or infrequent work demands
c) specific jobs or tasks of concern from a safety or performance stand-
point, such as heavy lifting or difficult visual work
d) What is done to accommodate worker with reduced capacity, etc..
3) Much of the information can be collected from the person doing the job
4) Make sure all of the factors of concern have been identified
Examples of Job Task characteristics
Examples under three main categories:
1) Physical demands: strength, heavy lifting or force exertion, endurance requirements
2) Mental load: skill requirements, training time needed, monotony of job
3) Perceptual needs: visual acuity needs, color vision needs

106
CTD sample case study & in-class assignment
Handling Baggage at Airports
Airline employees, including
ticket agents and ramp agents,
handle passenger baggage at
several points throughout the baggage handling process. The
body postures, repetitions, and forces required to lift, lower,
push, pull, or carry passenger baggage can create potentially serious ergonomic
hazards for the agents.
Assumptions regarding Risk Factors:
Task Factors
1. Repetition – multiple bags are handled in one load
2. Duration – takes approximately 30 minutes to load or unload for a team
3. Operator can unload up to 16 aircraft in a 8 hour work period
4. Force – suitcases up to 32kg pounds are handled individually and over 32 kg are
handled by two operators
5. Awkward posture of the upper body
6. Awkward hand and joint posture
7. Manual material handling
8. Operators wear gloves

107
9. Heavy objects are labeled
Personal Characteristics
1. 80% of employees are men and 20% are women
2. Most are less than 55 years old
3. Employees are accustom to physical labor
Organizational Factors
1. Non-union organization
2. No current risk of layoffs
3. History of CTD‟s (including back injuries) in approximately 20% of employees;
this rate has been fairly consistent for the last 5 years however, the proportion of
back injuries has been reduced while upper extremity CTD‟s is gradually
increasing
4. The work environment varies with the weather and time of day
CASE STUDY EXERCISE
1. Select one of the following baggage handling environments:
a. Airline employees or baggage handlers of checked baggage at the check in
counters for the airport
b. Baggage handlers that load and remove bags from the aircraft

108
2. Develop a methodology to do a task analysis for assessment of MMH and CTD
risk factors
3. Briefly describe what you believe the task entails
4. What do you expect the primary risk factors to be in this environment?
5. Who are the individuals that you will consult in the organization to work with you
in the ergonomic evaluation?

109
Source: OSHA etools, US Occupational Safety & Health website; www.osha.gov
Ticket Counter (Check-In Area)
Ticket agents generally encounter hazards while working at a computer
workstation and while transferring baggage. Agents often stand at a
computer workstation for long periods of time, which may result in
fatigue and awkward postures. They also retrieve, weigh, and tag the
passenger baggage as well as move it onto a feeder conveyer. Lifting
heavy or awkward baggage can lead to various ergonomic hazards
resulting in injuries. However, these hazards may be avoided by
implementing simple controls in the following areas.
Potential Hazards:
Standing on hard floors or sitting for long periods of
time can fatigue the back and leg muscles.
Working while assuming awkward neck and wrist
postures can cause discomfort and may lead to
musculoskeletal disorders (MSDs). (Figure 1)
Figure 1
Awkward neck and wrist
postures

110
Potential Hazards:
Awkward neck and wrist postures from using monitors
(VDTs), keyboards, and mouse devices that are placed too
low may create stress in the joints and muscles.
Contact stress to wrists may result from contact with
counter edges.
Extended or repetitive reaches across the counter to
retrieve items from passengers (bag tags, boarding cards,
etc.) or to lift or tag baggage can cause back and shoulder
injuries. (Figure 3)
Figure 3
Extended reaches across the
counter
o

111
EXTERNAL LOADING & UNLOADING
Baggage - Manual Handling
Potential Hazards:
Handling heavy, large, or oddly shaped baggage requires
use of excessive force and awkward postures, increasing
the risk of musculoskeletal injury.
Handling uneven loads, such as when grabbing two bags
of different weights or carrying a single bag with one
hand, can lead to uneven muscle exertions and poor
postures, making muscles, ligaments, and discs more
prone to injury.
Repeatedly handling baggage can increase the risk of
musculoskeletal injuries.
o Frequent lifting may not allow sufficient recovery
time and increase the risk of muscle fatigue
Figure 1
Lifting baggage by the handles
can lead to awkward postures.
Lifting a bag by the handle can result in awkward postures and may cause injury if handles
break. (Figure 1)
Baggage straps getting snagged or caught on a beltloader may cause injury.
Falling baggage can cause injury to unsuspecting workers as well as those who try to stop or
catch the falling bags.
Potential Hazards:
Positioning the end (closest to the cart) of the
beltloader too low may cause agents to bend at the
waist when placing or removing baggage. This can
lead to unnecessary stresses on the body.
Positioning the end of the beltloader too high may
cause agents to raise their shoulders or extend their
elbows away from their body when placing or
removing baggage.
Figure 10
Position of beltloader when
unloading the carts.

112
Figure 11
Position of beltloader when loading
the carts (between waist and chest
height)
Potential Hazards:
Positioning the end of the beltloader (near cargo bin)
too low forces agents to bend and lift bags up to put
them into the cargo bin.
Positioning the end of the beltloader too far away
from the cargo bin may require agents to reach and
pull bags into the compartment.
Figure 12
Position of beltloader when
loading the cargo bin
Figure 13
Position of beltloader when
unloading the cargo bin

113
Cargo Bin
Potential Hazards:
Handling heavy, awkward, and large bags in a limited
space (Figure 14) places the handler in stressful
positions that can result in injury.
Frequent lifting may lead to insufficient recovery time
and muscle fatigue.
Performing extended reaches while working in
limited spaces can stress the neck and shoulders.
Figure 14
Large or heavy baggage
Sitting on the edge of the cargo bin while lifting or
arranging baggage (Figure 15) causes the handler to
twist while lifting or sliding baggage.
Figure 15
Avoid sitting on the edge of the
cargo bin.
Figure 16
When pulling or pushing bags, use
this kneeling position.
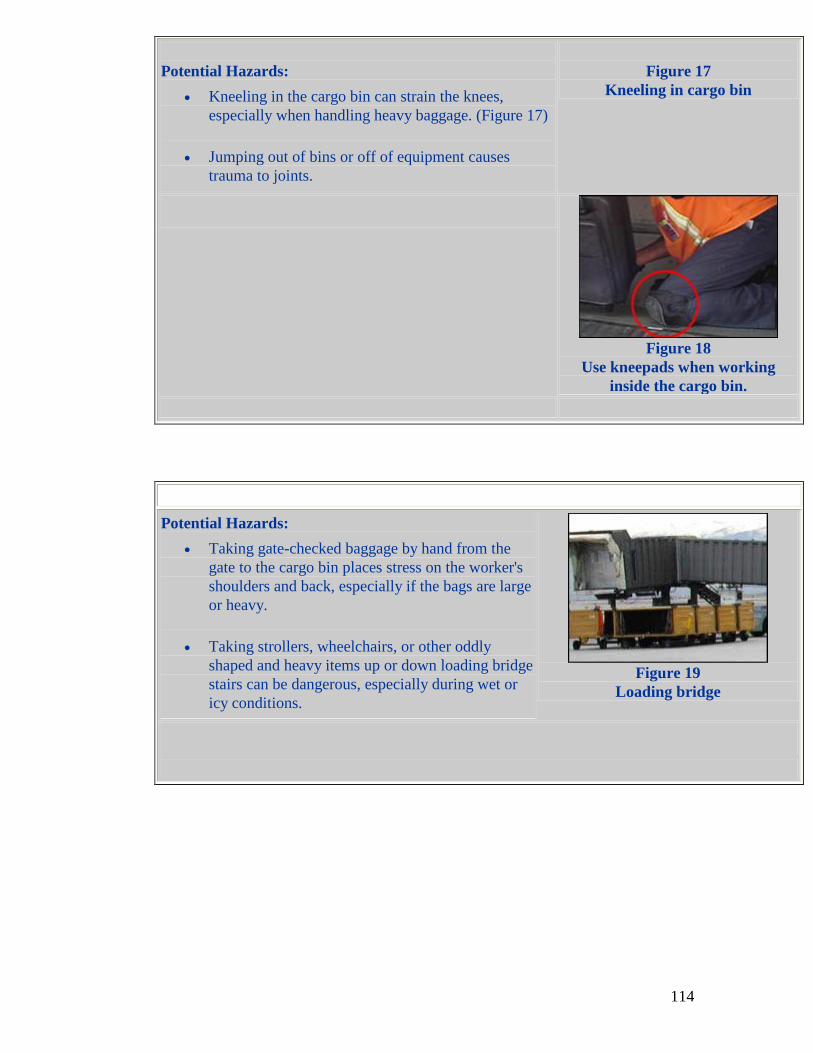
114
Potential Hazards:
Kneeling in the cargo bin can strain the knees,
especially when handling heavy baggage. (Figure 17)
Jumping out of bins or off of equipment causes
trauma to joints.
Figure 17
Kneeling in cargo bin
Figure 18
Use kneepads when working
inside the cargo bin.
Loading Bridge
Potential Hazards:
Taking gate-checked baggage by hand from the
gate to the cargo bin places stress on the worker's
shoulders and back, especially if the bags are large
or heavy.
Taking strollers, wheelchairs, or other oddly
shaped and heavy items up or down loading bridge
stairs can be dangerous, especially during wet or
icy conditions.
Figure 19
Loading bridge