frank lloyd wright age 22 in about 1889 age 89 in 1956 architect, interior designer, writer and...
TRANSCRIPT

Frank Lloyd WrightAge 22 in about 1889 AGE 89 IN 1956
ARCHITECT, INTERIOR DESIGNER, WRITER AND EDUCATOR
PROJECT
DATE CLIENT1889 FRANK LLOYD WRIGHT
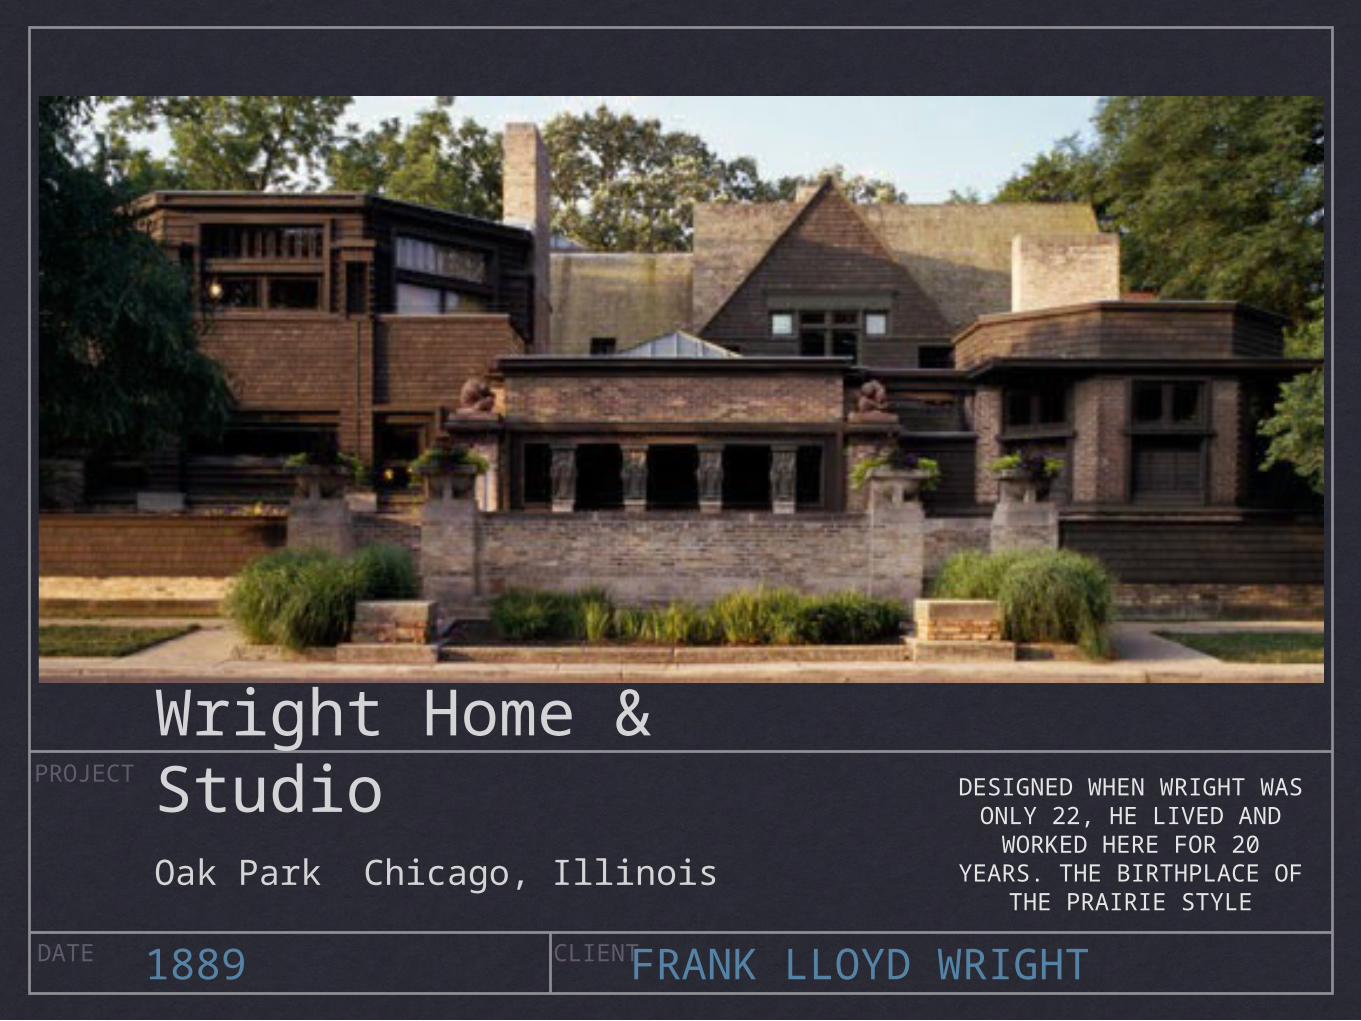
Wright Home & StudioOak Park Chicago, Illinois
DESIGNED WHEN WRIGHT WAS ONLY 22, HE LIVED
AND WORKED HERE FOR 20 YEARS. THE BIRTHPLACE OF
THE PRAIRIE STYLE

PROJECT
DATE CLIENT1910 FREDERICK C. ROBIE
Robie HouseChicago, Illinois
LONG AND LOW PRAIRIE STYLE WITH INNOVATIVE FEATURES SUCH AS AN INTERCOM SYSTEM AND
THE 3-CAR GARAGE

PROJECT
DATE CLIENT1911 FRANK LLOYD WRIGHT
TaliesinSpring Green, Wisconsin
HIS SUMMER HOME, DESIGNED TO RISE NATURALLY FROM THE LANDSCAPE “...NOT ON THE LAND, BUT OF THE LAND”. HERE HE USED ORGANIC ARCHITECTURE IN THE FORM OF LOCAL LIMESTONE CHIMNEYS.

PROJECT
DATE CLIENT1923 PRIVATE OWNERS
Imperial HotelTokyo, Japan
HIS BEST KNOWN BUILDING IN JAPAN. IT FAMOUSLY SURVIVED
THE GREAT KANTO EARTHQUAKE MONTHS AFTER IT OPENED.

PROJECT
DATE CLIENT1937 FRANK LLOYD WRIGHT
Taliesin WestScottsdale, Arizona
WRIGHT’S WINTER HOME AND STUDIO. HE APPLIED ORGANIC ARCHITECTURE AGAIN USING NATURAL ELEMENTS FROM THE DESERT TO BLEND INTO IT’S SURROUNDINGS.
PROJECT
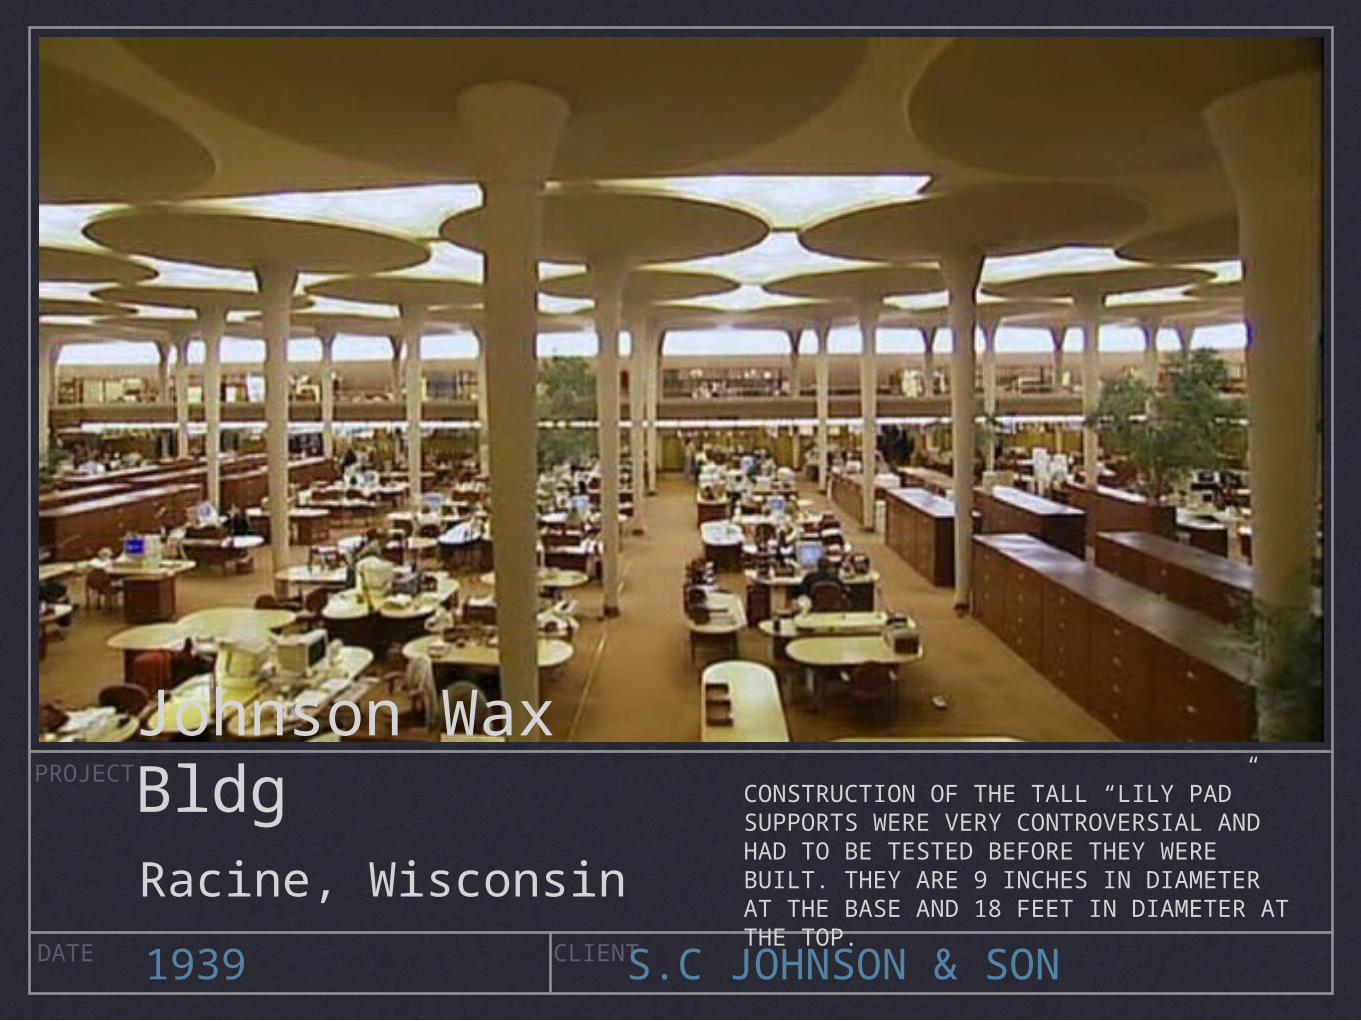
DATE CLIENT1939 S.C JOHNSON & SON
Johnson Wax BldgRacine, Wisconsin
CONSTRUCTION OF THE TALL “LILY PAD” SUPPORTS WERE VERY CONTROVERSIAL AND HAD TO BE TESTED BEFORE THEY WERE BUILT. THEY ARE 9 INCHES IN DIAMETER AT THE BASE AND 18 FEET IN DIAMETER AT THE TOP.

PROJECT
DATE CLIENT1959 SOLOMON R. GUGGENHEIM
Guggenheim MuseumNew York City, New York
TEXT
INTERIOR IS SIMILAR TO THE INSIDE OF A SEASHELL. DESIGNED FOR
VISITORS TO TAKE AN ELEVATOR TO THE TOP, THEN VIEW ARTWORKS BY
WALKING DOWN THE CENTRAL SPIRAL RAMP
PROJECT
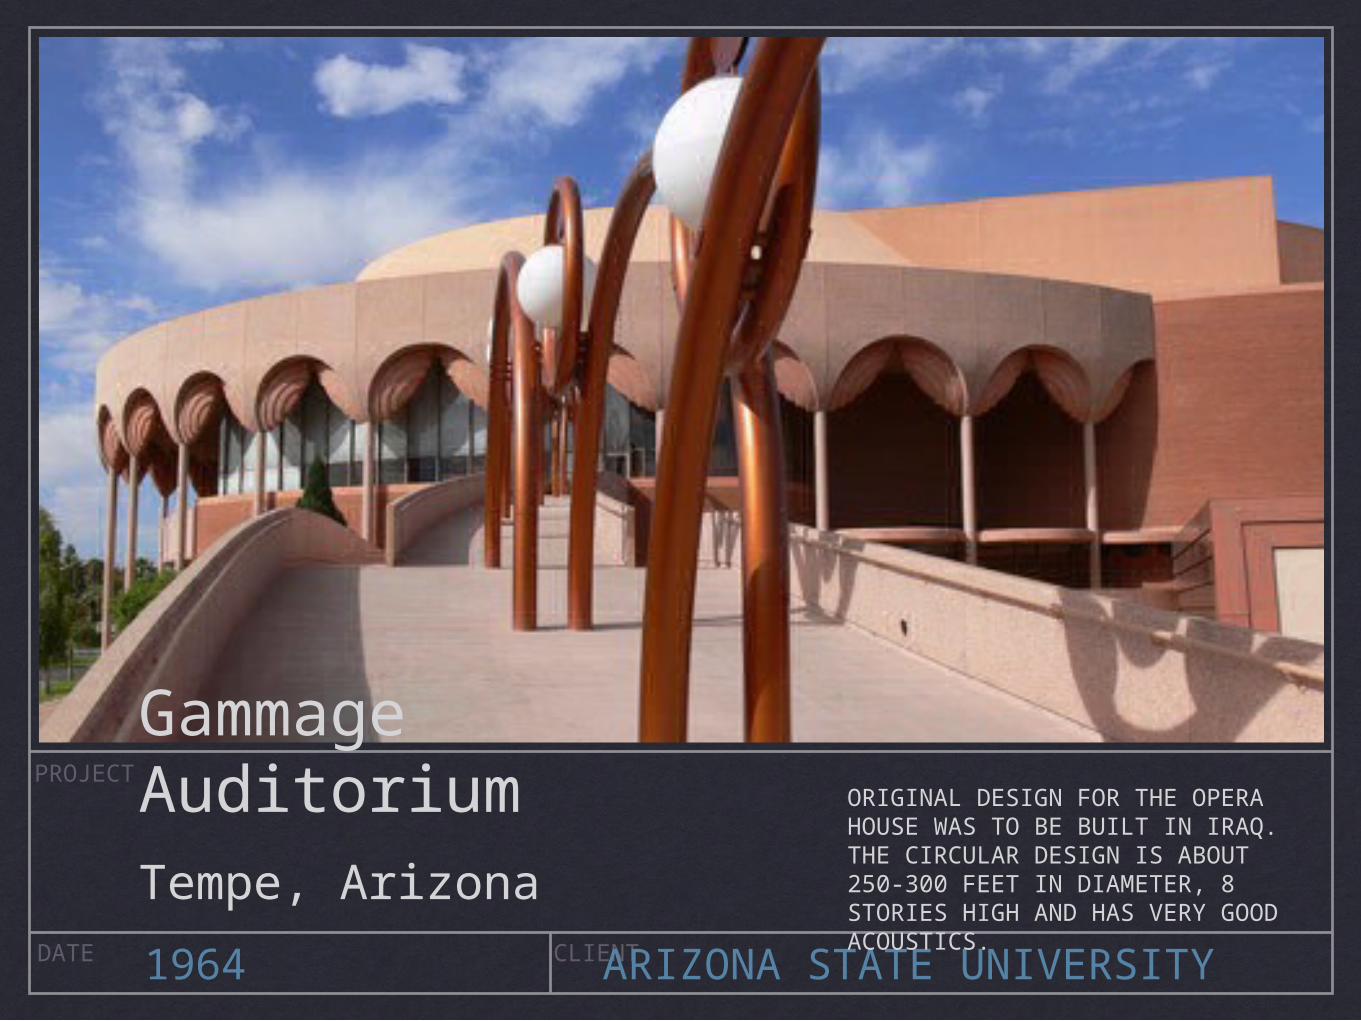
DATE CLIENT1964 ARIZONA STATE UNIVERSITY
Gammage AuditoriumTempe, Arizona
ORIGINAL DESIGN FOR THE OPERA HOUSE WAS TO BE BUILT IN IRAQ. THE CIRCULAR DESIGN IS ABOUT 250-300 FEET IN DIAMETER, 8 STORIES HIGH AND HAS VERY GOOD ACOUSTICS.

PROJECT
DATE CLIENTS1936 THE KAUFMANNS
FallingwaterMill Run, Pennsylvania
THE MOST FAMOUS PRIVATE HOME THAT HE DESIGNED HAS BEEN CALLED "THE BEST
ALL-TIME WORK OF AMERICAN ARCHITECTURE". THIS CANTILEVERED HOME
SEEMS TO DEFY GRAVITY ABOVE THE FLOWING WATER.

PROJECT
DATE CLIENT1936 THE KAUFMANNS
FallingwaterMill Run, Pennsylvania
PERSPECTIVE DRAWING BY FRANK LLOYD WRIGHT. NOTICE THE RED HORIZONTAL LINE (HORIZON) AND THE LINES OF PERSPECTIVE THAT GO OFF TO THE RIGHT AND TO THE LEFT.

Stop here... until you’re ready for the step by step instructions for the two point perspective architectural drawing

Step 1:Using your ruler and a regular pencil, LIGHTLY draw a horizontal line (horizon) in the lower third of your paper.
LIGHTLY

Step 2:Using your ruler, draw a vertical line near the center of the paper (a little to the left of center) Emphasize that ALL lines be done lightly because some will be erased at the end of the project.
LIGHTLY! YOU’LL BE ERASING
LATER

Step 3:Place a dot (vanishing point) at both ends of the horizontal line (horizon).

Step 4:Using a ruler, draw a line from the vanishing points to the top and bottom of the vertical line.
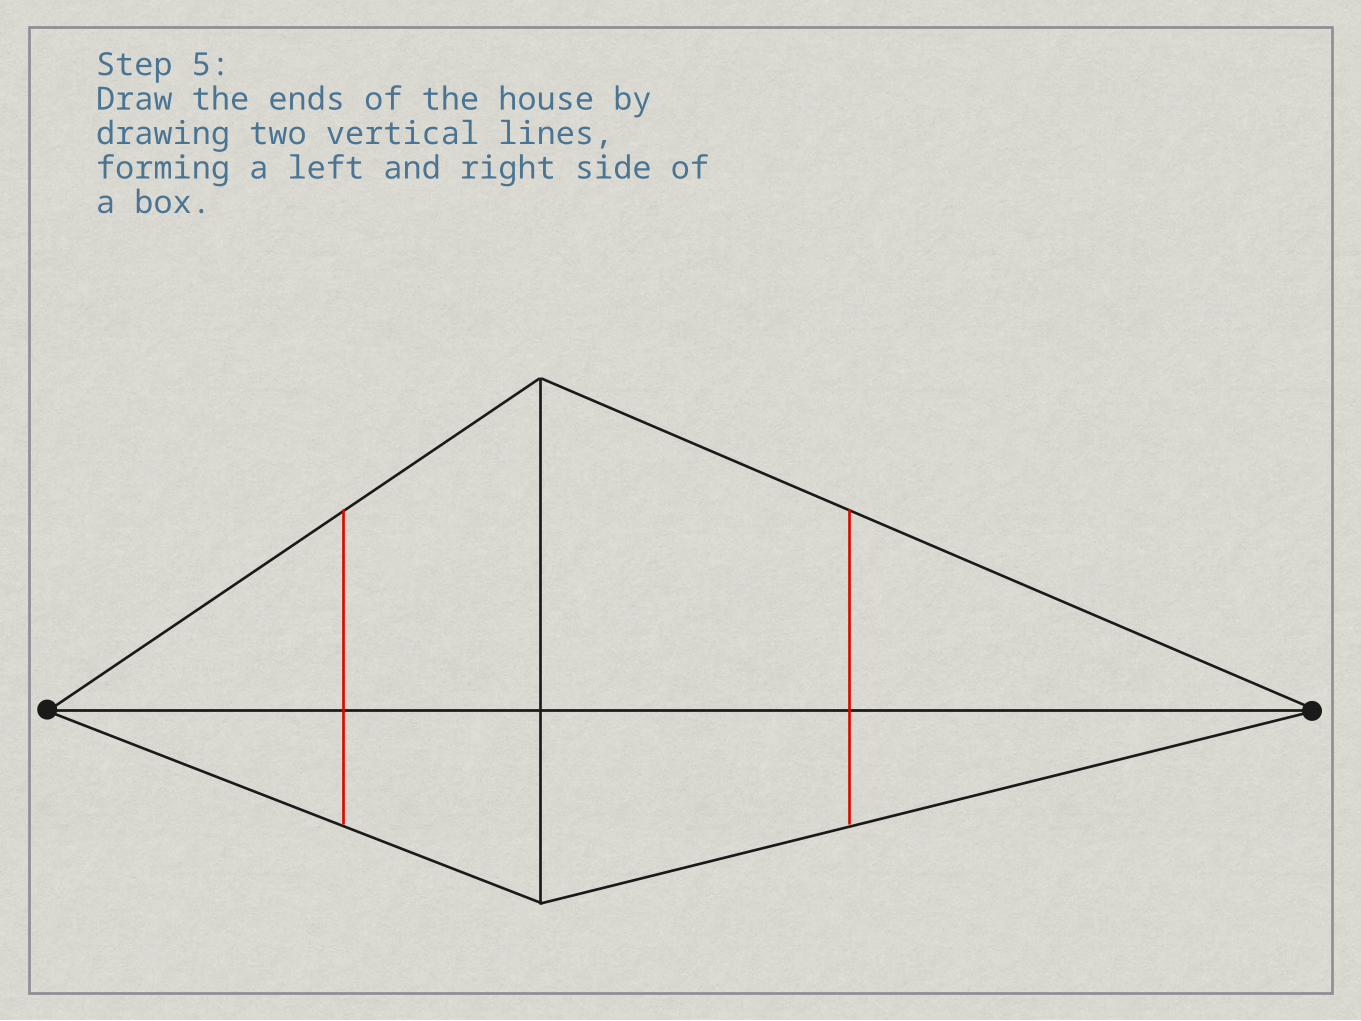
Step 5:Draw the ends of the house by drawing two vertical lines, forming a left and right side of a box.

Step 6:To draw the roof, first make an “X” on the short side of the house from corner to corner. Where the “X” intersects, draw a vertical line into the air.

Step 7:The triangle that forms the peak of the roof is made from this vertical line.

Step 8:The top of the roof is drawn from the top of the triangle to the right hand vanishing point. Match the angle of the roof peak to the angle of the opposite peak (slide your ruler).

Step 9:Erase extra lines so that the outline of the house is defined. Keep part of the horizon line as well.
WOW - YOU’VE JUST COMPLETED A DRAWING OF A
HOUSE USING TWO POINT
PERSPECTIVE!

Step 10:Continue to add other features to your house, like a door and windows, using your ruler and one vanishing point. Remember that the sides will be vertical (just like the sides of the house).

Step 11:If you wish, you may add a fence and/or sidewalk(s), using one vanishing point at a time.

Step 12:Erase all extra lines.

Step 13:Using watercolor pencils, darken lines on the house and lightly color in your masterpiece. Add some scenery like sky, trees, flowers and grass or cactus and rocks.

Step 14: FINAL STEPDip watercolor brush in water, then lightly wash over individual areas. Watercolor pencils will soften and blend. Make sure to rinse the brush between colors to avoid a brown muddy mess. Sign your artwork then glue to mounting paper. Congratulations - you’re done!