freedomlite setup guidestatic.ivrweblink.com/freedomvoice/freedomlite setup guide.pdfall of the...
TRANSCRIPT


2
Introduction Thank you for ordering your FreedomVOICE System. After you explore your new system and learn its features, we believe you will find that it makes a big difference in the way your business operates. There are many different features available with your new system, and we hope we can help you customize your voice system to meet your needs. We understand that many people in the fast paced business world may not have the time to fully explore all of the possibilities of their new voice system. We are here to help you find the best solutions for your business. You can contact us Monday-Friday from 6 am to 6 pm PST. We are happy to help you with your scripting, and we also offer professional voiceovers. You can contact us at (800) 477-1477 ext 2, or you can e-mail [email protected].

3
Table of Contents
What Your FreedomLITE System Looks Like...................................................................................... 4 Basic Set Up............................................................................................................................................... 5
Step 1: Set up your Main Menu .......................................................................................................... 5 Step 2: Make your Mailbox Recordings ............................................................................................. 6 Step 3: Setting up Call Forwarding..................................................................................................... 7
Basic Usage ................................................................................................................................................ 8 Checking Your Mailbox Messages..................................................................................................... 8 Changing your Pin Number ................................................................................................................ 8
Standard Features..................................................................................................................................... 9 Immediate Call Forward ..................................................................................................................... 9 Operator Revert/Live Call Transfer .................................................................................................... 9 List of Extensions ............................................................................................................................. 10 Cardless Calling Card ....................................................................................................................... 10 Call-Back Notification ...................................................................................................................... 11 Pager Notification ............................................................................................................................. 12 Question and Answer Mailbox ......................................................................................................... 13 Call Whisper ..................................................................................................................................... 14 Call Announcement .......................................................................................................................... 15
Call Block/ Allow…………………………………………………………………………………..16 Additional Features to Upgrade Your System ..................................................................................... 17
Ultimate Sales Tool/ Voice on Demand (additional $5 a month) .................................................... 17 Ultimate Sales Tool Fax Back .......................................................................................................... 19 NEWCall Record (additional $49.95 a month) ................................................................................ 21 NEW TalkText.................................................................................................................................. 22 Transfer Existing Toll Free Numbers ............................................................................................... 22 Vanity Numbers ................................................................................................................................ 22 Fax Back/ Fax on Demand (additional $5 a month)......................................................................... 23 Web Interface (additional $15 a month)........................................................................................... 23 Voice Blaster (included with Web Interface (additional $15 a month) ........... Error! Bookmark not defined. E-mail Delivery (additional $10 a month) ....................................................................................... 23
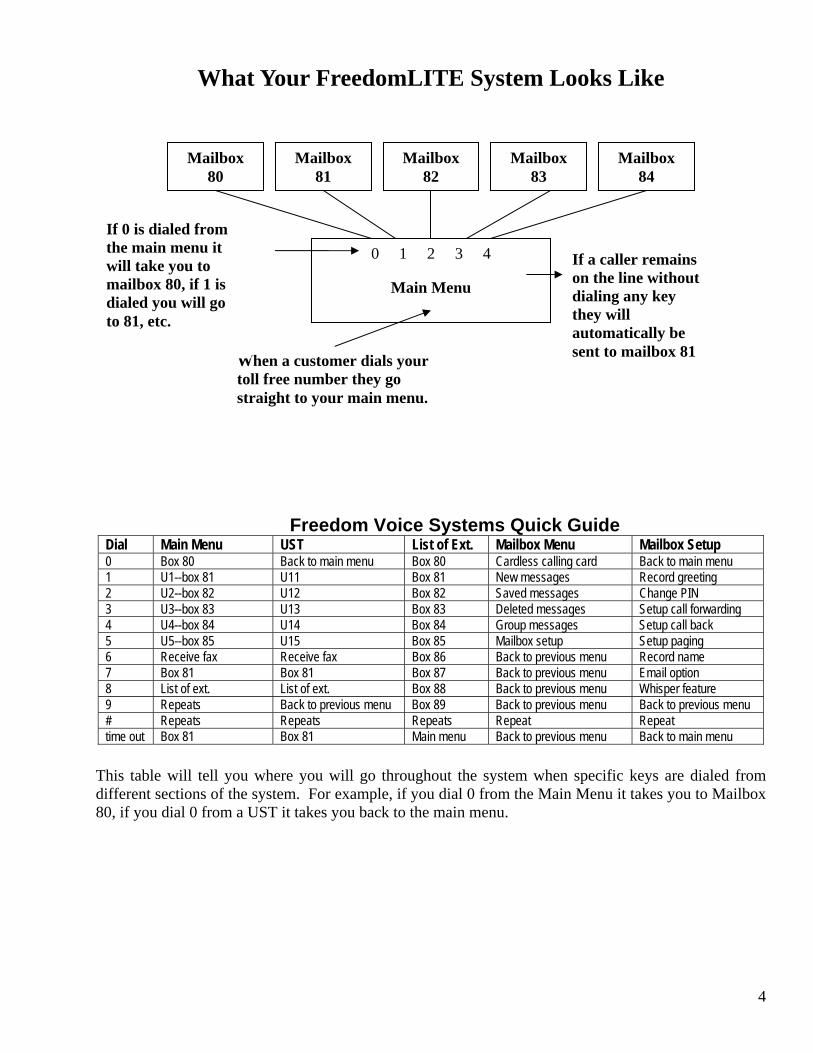
What Your FreedomLITE System Looks Like
0 1 2 3 4
Main Menu
Mailbox 80
Mailbox 81
Mailbox 82
Mailbox 83
When a customer dials your toll free number they go straight to your main menu.
If a caller remains on the line without dialing any key they will automatically be sent to mailbox 81
If 0 is dialed from the main menu it will take you to mailbox 80, if 1 is dialed you will go to 81, etc.
Mailbox 84
Freedom Voice Systems Quick Guide
Dial Main Menu UST List of Ext. Mailbox Menu Mailbox Setup 0 Box 80 Back to main menu Box 80 Cardless calling card Back to main menu 1 U1--box 81 U11 Box 81 New messages Record greeting 2 U2--box 82 U12 Box 82 Saved messages Change PIN 3 U3--box 83 U13 Box 83 Deleted messages Setup call forwarding 4 U4--box 84 U14 Box 84 Group messages Setup call back 5 U5--box 85 U15 Box 85 Mailbox setup Setup paging 6 Receive fax Receive fax Box 86 Back to previous menu Record name 7 Box 81 Box 81 Box 87 Back to previous menu Email option 8 List of ext. List of ext. Box 88 Back to previous menu Whisper feature 9 Repeats Back to previous menu Box 89 Back to previous menu Back to previous menu # Repeats Repeats Repeats Repeat Repeat time out Box 81 Box 81 Main menu Back to previous menu Back to main menu
This table will tell you where you will go throughout the system when specific keys are dialed from different sections of the system. For example, if you dial 0 from the Main Menu it takes you to Mailbox 80, if you dial 0 from a UST it takes you back to the main menu.
4
5
Basic Set Up
Step 1: Set up your Main Menu Description
This is the first greeting a caller will hear when they dial your toll free number. It is not using up one of your five mailboxes, 80-84. It is its own recording.
Sample Main Menu Greetings
1. “Hello and thank you for calling Alexis Inc. If you know your party’s extension, you may dial it at anytime, for sales dial 1, for billing dial 2, for technical support dial 3, for marketing dial 4, or to speak with a representative dial 0.”
2. “Hello and thank you for calling Alexis Inc. If you know your party’s extension, you may dial it now; otherwise dial 8 for a list of extensions”.
3. “Hello and thank you for calling Alexis Inc. We are unavailable to take your call at this time. Please leave a message after the tone, and we will return your call as soon as possible.” (If you decide to set up your system like this, you are done. Your caller will automatically be sent to the default mailbox (81) where they will hear a beep, and they can leave a message).
How to Record Your Main Menu Greeting
• Dial your toll free number You will hear a brief tutorial of how to set up your system. Feel free to skip this and continue on to the next step.
• Dial STAR 2 (* 2) • Enter your pin number followed by # • Dial 2 to begin recording
Once you have recorded your message, press any key to stop recording. The system will give you three options: press 1 to listen to the message, press 2 to re-record, and press 3 to save.
NOTE: If no key is dialed from the main menu, the caller will automatically be sent to mailbox 81.

6
Step 2: Make your Mailbox Recordings Description
Your mailbox recordings will be heard right away when a caller dials the extension, or if you have your mailbox set up to call forward, the message will be heard after we’ve tried finding you, and you were unavailable. You have 5 mailboxes, 80-84. When setting up your mailboxes you must use the 2 digit number, however, when directing them from the main menu, a caller can dial 0, 1, 2, 3, or 4, respectively (ex- dialing 0 takes you to mailbox 80, dialing 1 takes you to 81, etc).
Sample Mailbox Greetings
1. “Thank you for calling our sales department, all of our representatives are currently assisting other customers. Please leave a message after the tone, and we will return your call promptly.”
2. “Thank you for inquiring about our fitness plus program. This program focuses on … To receive more information about this program, please leave your name, telephone number, and e-mail or mailing address. We will send the information to you shortly.”
How to Record Your Mailbox Greetings
• Dial your toll free number • Dial * and the mailbox number (80-84) • Enter your pin number followed by # • Dial 5 This takes you to your mailbox set-up. • Dial 1 This takes you to your greeting set-up. • Dial 2 to begin recording
Once you have recorded your message, press any key to stop recording. The system will give you four options: press 1 to listen to the message, press 2 to re-record, press 3 to save, or press 5 to delete.

7
Step 3: Setting up Call Forwarding Description
Call Forwarding can be set up with any of your mailboxes. For example, if your main greeting says dial 1 for Tom, and Tom would like to take his calls live, you would set up mailbox 81 to forward to Tom’s number or numbers. We can try to find Tom in as many places as he would like before the caller goes to voicemail. Important! You must set up your voicemail according to the PST time zone. All times must be entered in 24 hour format.
How to set up call forwarding
• Dial your toll free number • Dial * and the mailbox number (80-84) • Enter your pin number followed by # • Dial 5 This takes you to your mailbox set-up. • Dial 3 This takes you to the call forwarding set-up. • Enter the area code and telephone number followed by #
The system will confirm the number with you, and ask you to dial 1 to add the number or 2 to delete the number
• The system default is to call-forward 24 hours/7 days a week o Dial 1 to modify the hours/days calls are forwarded o Dial 2 to turn call forwarding on or off o Dial 3 to change the order in which it is called o Dial 4 to delete this number o Dial 9 to return to the previous menu o Dial # to repeat the options
NOTE: Callers will be immediately connected when the call has been answered unless “Call Announcement” or “Call Whisper” have been activated (pages 15 and 16). With either of these features active the call will first be announced to you by the auto attendant voice and will give the option to accept or reject the call

8
Basic Usage Checking Your Mailbox Messages
• Dial your toll free number • Dial * and the mailbox number (80-84)
If you did not set up more than one mailbox, dial *81. This is your default mailbox. • Enter your pin number followed by # • Select the messages you wish to listen to
o Dial 1 to listen to your new messages o Dial 2 to listen to your saved messages o Dial 3 to listen to your deleted messages
• While listening to messages: o Dial * to rewind 5 seconds o Dial # to fast forward 5 seconds
• After listening to each message, you will hear a time and date o Dial 1 to delete message o Dial 2 to save message o Dial 3 to repeat message o Dial 4 to skip message o Dial 5 to return the call o Dial 6 to hear the time/date of the message o Dial 7 to hear the telephone number of the caller o Dial 8 to send the message to another mailbox o Dial 9 to return to the previous menu o Dial 0 to place a call
Changing your Pin Number
• Dial your toll free number • Dial * and the mailbox number (80-84) • Enter your pin number followed by # • Dial 5 This takes you to your mailbox set up. • Dial 2 to change your pin number • Enter your new pin number • Enter your new pin number again for confirmation
You have completed the basic setup of the FreedomLITE System! The next section will walk you through the standard features that the FreedomLITE System offers in order to make your life easier and more convenient.

9
Standard Features Immediate Call Forward
Description
The Immediate Call Forward feature is useful when you would like to have the caller ring directly through your voicemail system to the forwarding number on your default mailbox. This feature will not allow callers to hear your main greeting; however will allow them to leave you a message in your mailbox.
How to Set Up Your Immediate Call Forward
• Dial your toll free number • Dial *5 • Enter your pin number followed by #
The system will announce the current state of Immediate Call Forwarding. • Dial 1 to turn ON • Dial 2 to turn OFF
Operator Revert/Live Call Transfer
Description
Operator Revert/Live Call Transfer allows you to transfer a caller to a desired location within your system. For instance, if a caller dials one for technical support, but they really have a billing question, you can transfer them to the appropriate department. You can also transfer a caller to a number outside your system. For example, you answered the call on your cell phone, however you are in your office and would rather take the call on your business line, you may transfer them to the business line.
How to Use Operator Revert/Live Call Transfer
• While on a “live call” on your FreedomVOICE toll free number o Press * # (this places the caller on hold and takes you to the options menu)
o Dial 1 to transfer the call (enter area code and phone number or the mailbox number followed by #)
o Dial 2 to send the caller to voicemail (enter the mailbox number followed by #) o Dial 3 to identify the caller (this will announce the phone number of the caller, the
mailbox they dialed, and play the name recorded on the mailbox (if recorded)) o Dial 5 to hang-up on this caller o Dial 9 to exit this menu o Dial # to repeat the options in this menu

10
List of Extensions Description
The List of Extensions feature is useful when you have several employees working for you, and you do not want to list all of their extensions in the initial greeting but want to make a list available for callers. This does not take up one of your mailboxes.
Sample List of Extensions Recording
“You have reached the listing of extensions, for Tom dial 0, for Lisa dial 1, for Paul dial 2, for Sandy dial 3, and for Monica dial 4.”
How to Set Up Your List of Extensions
• Dial your toll free number • Dial 8 *2 • Enter your pin number followed by # • Dial 2 to make your recording
Once you have recorded your message, press any key to stop recording. The system will give you three options: press 1 to listen to the message, press 2 to re-record, or press 3 to save.
NOTE: When setting up your main greeting, you will need to have your caller dial 8 in order to access the list of extensions. Example- “Thank you for calling Alexis Inc, for sales dial 1, for billing dial 2, for technical support dial 3, for a company directory dial 8.”
Cardless Calling Card
Description
Accessed from within any mailbox, the cardless calling card feature allows you to place long distance calls and charge them to your FreedomVOICE system as opposed to a calling card or credit card.
How to Use Your Cardless Calling Card
• Dial your toll free number • Dial * and the mailbox number (80-89) • Enter your pin number followed by # • Dial 0 • Enter the area code and telephone number you wish to call • Dial # to return to the previous menu once the call is completed
NOTE: If the line is busy or does not answer, you will automatically be sent to the previous menu. NOTE: You may not dial out to a toll free number.

11
Call-Back Notification Description
Call-Back Notification will call you to let you know someone has left a message in your FreedomVOICE voicemail box. When a message is left the system places a call-back immediately, second call-back in two minutes, third call-back in five minutes, fourth call-back in 15 minutes, fifth call-back in 30 minutes, sixth call-back in one hour, and then a call-back every hour thereafter until the message is picked up.
How to Set Up Call-Back Notification
• Dial your toll free number • Dial * and the mailbox number (80-84) • Enter your pin number followed by # • Dial 5 This takes you to your mailbox set-up. • Dial 4 This takes you to your callback set-up. • Enter the area code and telephone number followed by pound
The system will confirm the number and ask you to dial 1 to add the number or 2 to delete the number.
• The system default is to call-back 24 hours a day, 7 days a week o Dial 1 to modify the hours/days your calls are forwarded o Dial 2 to turn call-back on or off for this number o Dial 3 to change the order this number is called in o Dial 4 to delete this number o Dial 9 to return to the previous menu o Dial # to repeat the options
.

12
Pager Notification Description
Pager Notification will page you to let you know you have a message waiting for you in your FreedomVOICE voicemail. When a message is left the system pages you immediately, second page in two minutes, third page in five minutes, fourth page in 15 minutes, fifth page in 30 minutes, sixth page in one hour, and then a page every hour thereafter until the message is picked up.
How to Set Up Pager Notification
• Dial your toll free number • Dial * and the mailbox number (80-84) • Enter your pin number followed by # • Dial 5 This takes you to your mailbox set-up. • Dial 5 This takes you to your pager set-up. • Enter the area code and telephone number followed by #
The system will confirm the number and ask you to dial 1 to add the number or 2 to delete the number.
• The system default is to page 24 hours a day, 7 days a week o Dial 1 to modify the hours/days your calls are forwarded o Dial 2 to turn call-back on or off for this number o Dial 3 to change the order this number is called in o Dial 4 to delete this number o Dial 9 to return to the previous menu o Dial # to repeat the options
NOTE: You may not enter a toll free number for your pager number.

13
Question and Answer Mailbox Description
The Question and Answer feature allows you to record multiple questions, each followed by a beep in order to get an answer. This can be set up on any of your mailboxes. This is great for 24/7 automated order taking!
Sample Question and Answer Mailbox Greeting
“In order to get your order processed most efficiently please answer the following questions. After answering each question dial any key to continue on to the next question.” First question- “What is your name? Please dial any key to continue on to the next question.” The caller will then hear a beep, respond to your question and then dial any key to continue on to the next question. Second question- “What is your address? Please dial any key to continue on to the next question.” There is no limit to the number of questions you can ask.
How to set up your Question and Answer Mailbox
• Dial your toll free number • Dial * and the mailbox number (80-84) • Enter your pin number followed by # • Dial 5 This takes you to your mailbox set up. • Dial 1 This takes you to your greeting set up. • Dial 2 to record your introduction and first question • Dial any key when you are finished
The system will then prompt you to dial 1 to listen, 2 to re-record, or 3 to save. DO NOT SAVE AT THIS POINT!
• Dial 4 to continue to your next question • Repeat this process for each question • Dial 3 to save once you have recorded all of your questions

14
Call Whisper Description
Call Whisper is used alongside the Call Forwarding Feature. It is used to find out who is calling before the call is accepted. You can turn this feature on or off for any of your mailboxes.
Example
A caller dials in to your toll free number, and they are instructed to dial one to speak with a customer support representative. When the caller dials one there will be a recording, provided by FreedomVOICE, which says, “To tell your party who’s calling, please say your name after the tone and press any key when finished.” The caller will then hear hold music, while we try to find you. When you pick up the phone, you will hear a recording that says, “You have a call from John Smith, dial any key to accept this call.” If you choose to take the call you will dial a key, if not the caller will be sent to your FreedomVOICE voicemail where they can leave you a message.
How to activate Call Whisper
• Dial your toll free number • Dial * and the mailbox number (80-84) • Enter your pin number followed by # • Dial 5 This takes you to your mailbox set up. • Dial 8 This takes you to the call whisper set up.
o Dial 1 to turn call whisper on o Dial 2 to turn call whisper off

15
Call Announcement Description
Call Announcement is used in conjunction with the Call Forwarding feature. It allows you to name your mailboxes, so when you get a call you know what mailbox or department the call is coming from.
Example
A caller dials in to your toll free number, and they are instructed to dial one for the sales department. When the caller dials one there will be a recording that says, “Please hold while we transfer your call to sales.” The only thing that you will record in that sentence is sales, the “Please hold while we transfer your call to” is provided by FreedomVOICE. The caller will then hear hold music, while we try to find you. When you pick up the phone, you will hear a recording that says, “You have a call from sales, dial any key to accept this call.” If you choose to take the call you will dial a key, if not the caller will be sent to your FreedomVOICE voicemail where they can leave you a message.
How to set up Call Announcement
• Dial your toll free number • Dial * and the mailbox number (80-84) • Enter your pin number followed by # • Dial 5 This takes you to your mailbox set up. • Dial 6 This takes you to your call announcement set up. • Dial 2 to make your recording
Remember that you only need to record the department or the person’s name here, for example, “sales.”
• Dial any key when you are done recording o Dial 1 to listen to your recording o Dial 2 to re-record o Dial 3 to save
NOTE: If you are using both call whisper and call announcement your call will sound something like “You have a call from (person calling), for (department name), press any key to accept the call. If no one is available to answer the call the system will send the caller to your FreedomVOICE voicemail. NOTE: With call announcement or call whisper active, if no one is available to answer the call or the call is rejected any additional call forwarding numbers will be attempted. If no other call forwarding numbers exist the caller will be reverted to the FreedomVOICE mailbox.

16
Call Block/Allow Description
Allows you to block any particular number from calling your 800 number and/or allows only a certain number of calls per day from any number. With the call blocking list you can use area code, area code with exchange, or the entire number.
Example 619 All calls beginning with this area code will be blocked. 7605551212 Only this phone number will be blocked. 858555 All calls with this area code and prefix will be blocked.
The call allow list will ONLY allow certain area codes, area codes with exchanges, or entire numbers to call your toll free number. 619 All calls beginning with this area code will be allowed. 7605551212 Only this phone number will be allowed. 858555 All calls with this area code and prefix will be allowed.
How to set up Call Block/Allow
1. Log onto your account on www.freedomweblink.com 2. Click on the System tab 3. Click on Call Block/Allow on the left hand side 4. Enter the phone numbers you would like to block or allow 5. Click Save to save the numbers.
NOTE: If you do not see a system tab, this means you have not logged in with your master password. From the freedomweblink.com sign in page click on “I don’t know my password” to have your password and PIN numbers emailed to you.

Additional Features to Upgrade Your System To Order call a client services representative at 800-477-1477 ext 1
If you have already added any of these features, please contact client services for instructions.
Ultimate Sales Tool/ Voice on Demand (additional $5 a month)
The Ultimate Sales Tool allows you to have access to an unlimited amount of informational extensions. These extensions do not take messages, and they cannot be set up to call forward. However, you can transfer a caller from an Ultimate Sales Tool extension to one of your mailboxes (80-84) where they could leave a message, or if the mailbox is set up to forward the caller would be able to speak to a live person. (Ex- If a caller dials 80 from UST 1 they will be transferred to mailbox 80 where they can be forwarded or leave you a message). You will be given 4 Ultimate Sales Tool extensions, 1-5, that can branch down infinitely. Each Ultimate Sales Tool extension can branch down into 5 more extensions. NOTE: When a caller dials 1 from the main menu, they now go to UST 1. If you want your customer to reach mailbox 81 from the main menu they must dial the two digit extension 81, etc. NOTE: If a caller remains on the line from UST 1 or any sublevel of UST 1 they will go to MB 81. If a caller remains on the line from UST 2 or any sublevel of UST 2 they will go to MB 82, etc.
FreedomLITE System utilizing the Ultimate Sales Tool Boxes
UST 1
UST 2
UST 3
UST 4
11 12 13 1 4 15 21 25 24 23 22 31 35 41 32 33 34 42 43 44 45
MAIN
151 152 154 153 155
1531 1532 1533 1534 1535
Mailbox 81
Mailbox 82
Mailbox 83
Mailbox 84
The following keys will take you to different spots throughout the system if dialed from a UST box:
0- takes customer back to the Main Menu 6- allows the customer to request a fax if you have one loaded 7- sends the customer to Mailbox 81 8- sends the customer to the List of Extensions if set up 9- sends the customer to the Previous Menu #- repeats whatever the customer is currently listening to
Mailbox 80
17

18
Example of a Script using the Ultimate Sales Tool Boxes Main Menu-“Thank you for calling Auto Town, to get a listing of our featured cars this week dial 1, for a listing of our locations dial 2, to reach a sales representative dial 80. UST 1 (caller dials 1 from the Main Menu) - “This weeks featured cars are broken down into several categories, please choose from the following: for Mazdas dia1 1, for Toyotas dial 2, for Acura’s dial 3. UST 11 (caller dials 1 from UST 1) - “Thank you for inquiring about our Mazdas, for our Mazda Protégé dial 1, for our Mazda 626 dial 2, for our Mazda Miata dial 3. UST 111 (caller dials 1 from UST 11) - “Thank you for inquiring about the Mazda Protégé. It is beige, 1997, and is in good condition… UST 112 (caller dials 2 from UST 11) - “Thank you for inquiring about the Mazda 626. It is a black, 1999 beauty! UST 113 (caller dials 3 from UST 11) - “Thank you for inquiring about the Mazda Miata. It is a red, 1995… UST 12 (caller dials 2 from UST 1) - “Thank you for inquiring about our Toyotas, for our Toyota Camry dial 1, for our Toyota 4 Runner dial 2. UST 121 (caller dials 1 from UST 12) - “Thank you for inquiring about the Toyota Camry. It is a 2000, white… UST 122 (caller dials 2 from UST 12) - “Thank you for inquiring about the Toyota 4 Runner. It’s a 2001, black… UST 13 (caller dials 3 from UST 1) - “Thank you for inquiring about our Acuras, for our Acura Integra dial 1. UST 131 (caller dials 1 from UST 13) - “Thank you for inquiring about our Acura Integra. It is a 2001 model… UST 2 (caller dials 2 from Main Menu) - “We have locations in north and south county, for our north county location dial 1, for our south county location dial 2, or to speak with a representative dial 80.” UST 21 (caller dials 1 from UST 2) - “Our north county location is at 2325 W Lindale…” UST 22 (caller dials 2 from UST 2) - “Our south county location is at 1568 Mooreland Ave…” Mailbox 80 (caller dials 80 from main menu or from within any of the UST’s) - “I’m sorry all representative are currently assisting other callers. Please leave a message after the tone, and we will return your call. Thank you!” Note: If a caller remains on the line from within one of the UST boxes, meaning they don’t dial a key, they will be transferred to a mailbox. If they are in UST 1 or any sublevel of UST 1, they will default to Mailbox 81. If they are in UST 2 or any sublevel of UST 2, they will default to Mailbox 82. If they are in UST 3 or any sublevel of UST 3, they will default to Mailbox 83. If they are in UST 4 or any sublevel of UST 4, they will default to Mailbox 84.

19
How to set up a UST Greeting
• Dial your toll free number • Dial the UST you would like to record followed by *2 (ex- 1*2 for UST 1) • Enter your pin number followed by # • Dial 2 to record your greeting
Once you have recorded your message, press any key to stop recording. The system will give you three options: press 1 to listen to the message, press 2 to re-record, or press 3 to save.
Tip! To figure out which UST you need to record think of it like this, whatever a customer would need to dial to get to that box is the UST box number. So, if you told your customer to dial 1 for your selection of cars and then 2 for your Toyota’s and then 1 for your Camry’s, the UST to record the information about the Camry’s would be 121.
Ultimate Sales Tool Fax Back
You can load faxes into any of your ultimate sales tool boxes. You would need to purchase the “Fax Back” for this to work. This costs an additional $5 a month.
Example If you tell a caller to press 1 for driving instructions and then you would like them to be able to have a map faxed to them, you would load a map into UST 1.
Main Menu- “…for driving instructions dial 1”
UST 1- “We are located at 2326 Main, to have a map faxed to you dial 6.” Once the customer dials 6, a greeting provided by FreedomVOICE will come on that says, “Please enter your 10 digit fax number now.” Once the caller has entered the number, the system will confirm the number with them, and then a greeting provided by us will come on that says, “Thank you, your fax will be sent to you shortly.”
How to load a UST Fax Back document
• Place the documents you would like faxed into the fax machine • Dial your toll free number from a fax machine • Dial the UST you want to access followed by *3 once connected
Example: if you wish to load a map into UST 1 you would dial 1*3. • Enter your pin number followed by # • Press send on your fax machine

20
Fax Send (additional $5 a month) Send faxes from any computer! It’s simple! Using your Personal Internet Control Panel, you have the ability to browse documents on your computer, and select the one you’d like to fax out. We support most every popular office and image file format, Word, Excel, Power Point, Adobe Photoshop, and many more! Dedicated Fax ($5 additional per month) Allows you to have a separate number to give out as your fax number but have it tie into your FreedomVOICE System so you can have your faxes available through fax mail. You can have the faxes conveniently emailed to you making it even better. When using Dedicated Fax you can select any of your system mailboxes as the fax. Email Delivery ($10 additional per month) The E-mail Delivery feature will e-mail all of your voice messages and faxes to your e-mail address as audio file (wav) attachments. You will need to have an audio player on your computer for this to work, such as Winamp, Real Player or Windows Media Player. You can download these programs for free if you don’t already have one installed. Each of your mailboxes can have different e-mail addresses set up for them. For instance, if mailbox 81 is sales, you may want those e-mails to go to [email protected], and if mailbox 82 is billing, you may want those e-mails to go to [email protected]. Afterhours Greeting ($5 additional per month) Let your customers know when you're not in the office. Have a separate greeting come on after your operating hours. This will give them the confidence that you will get back in touch with them as soon as possible during working hours. The caller can still navigate throughout your system, listening to product information, requesting "Fax Back" documents, go through your "Automated Order Taking," etc, but they will know not to expect a live person. If you have purchased this option you will need to send an email to [email protected] with your regular business hours and time zone so that we can configure your after hours greeting. Once your after hours greeting has been configured you can set it up by either calling after hours and pressing *2 or if you want to change the after hours greeting during hours you would call your toll free number, when the main menu answers press *#. This will take you to the after hours greeting. You can then press *2 to change it. ____________________________________________________________________________________ Dial by Name ($10 additional per month) This feature allows you to very easily create a dial by name directory using the WebLINK web interface. Dial by Name allows you to offer your callers access to the party they are trying to reach by having them dial # and then part of the name of their party. Using this feature allows you to avoid having to list numerous extensions for them to choose from and has the added benefit for smaller companies of giving the appearance of larger size. Please Note: if you've named your mailboxes already in WebLINK you can use Autogenerate to set up your dial by name in literally SECONDS.

21
Personalized On Hold Music ($5 additional per month) We can load any selection of music on your system for callers to hear while they are waiting to be connected with you. Want something even more specific to your company? We can load informational recordings about your company as your hold music! What a great way to inform customers of your business! If you have purchased this option you will need to email your audio file to [email protected] so we can load your hold music. The file can be in .wav, .aiff, or .mp3. Mailbox Rotation ($50 setup fee, $5 additional per month) Callers are distributed equally to employees on a 'round robin' basis, whether employees are in the same office or scattered around the country. Call Record ($49.95 additional per month) Call Record* is an ideal solution for call center managers or order verification/payment authorization. Choose to record every call you receive, or use call recording only on certain mailboxes. Your system will come, by default with call record turned off for all mailboxes. If you wish to turn call record off for any of your mailboxes, please contact client services at 800-477-1477 ext. 2. • Train employees • Monitor and maintain the best customer service • Improve Customer Relations for higher profits • Protect your business from misunderstandings • Record disputes and verbal abuse • Check the accuracy of order fulfillment * This service includes 2GB of storage and 20GB of transfer per month. Additional storage and transfer can be added at $9.95 per 2GB of storage and 20GB of transfer. Five Additional mailboxes ($5 additional per month) Additional mailboxes can be added to any plan in lots of five at the same price. All of your employees can have access to voicemail, improving the image of your company, for about six cents per day for each mailbox
22
. TalkText ($10/mo + 25¢/30sec) TalkText, powered by SimulScribe™ for busy professionals on the go! TalkText utilizes top of the line voice recognition technology to convert your voice mail messages into text messages. These transcribed messages are then sent, along with your original audio, directly to your cell phone, Blackberry, Treo, e-mail account, or they can be accessed through your WebLINK Personal Internet Control Panel. • Read your voicemail • Save time with long winded talkers by replying to voicemail in text or forward the message to someone else • Instantly see who called and what was said, no matter if you’re in a meeting, traveling or on the golf course • Boost efficiency and productivity by scanning messages for important information • Save time by omitting the need to write down information from a voice mail • Important information will never get lost even once the voice mail has been deleted • Archive and label your transcribed messages for easy access • Empower each of your employees or multiple office locations with this cutting edge technology. • Choose to turn this feature on/off by mailbox. Transfer Existing Toll Free Numbers If you already have a toll free number of your own, we will be happy to transfer the number to work alongside our system. We will even give you a start up number so you don't have to waste time in getting your system set up! • 1st resporg = $30.00 initially and $0.00 monthly. • All resporgs thereafter = $0.00 initially and $5.00 monthly. Vanity Numbers A vanity number can greatly improve your marketing results by making your number that much easier to remember. We can search for as many numbers as you'd like until we find a perfect match for you! We also not only have 888, 877, and 866 prefixes, but TRUE "800" numbers! • 1st vanity = $30.00 initially and $0.00 monthly. • All vanities thereafter = $0.00 initially and $5.00 monthly.

23
Fax Back/ Fax on Demand (additional $5 a month)
The Fax Back feature allows you to load a fax into your main menu, or if you have the Ultimate Sales Tool you can load faxes into any of those UST boxes. You need to have a caller dial 6 in order to request one of these faxes you have loaded.
Example Main Menu -“Thank you for calling XYZ Company. To have information about our company faxed to you, please dial 6 now.” Once the caller dials 6, they will be asked to enter their 10 digit fax number. The system will confirm that the number they entered is correct, and then it will say, “Thank you, your fax will be sent to you shortly.”
How to Load a Fax Back document onto your Main Menu
• Place the documents you would like faxed into the fax machine • Dial your toll free number from your fax machine • Dial *3 once connected • Enter your pin number followed by # • Press send on your fax machine
Web Interface (additional $15 a month)
Description WebLINK allows you to manage your FreedomVOICE account online, by being able to
change your pin numbers, set-up delivery options, modify call forwarding, call back, and paging numbers, etc. It also comes with e-mail delivery, which will send all of your voice messages and faxes to your e-mail address.
E-mail Delivery (additional $10 a month) Description The E-mail Delivery feature will e-mail all of your voice messages and faxes to your e-mail address as audio file (wav) attachments. You will need to have an audio player on your computer for this to work, such as Winamp, Real Player or Windows Media Player. You can download these programs for free if you don’t already have one installed. Each of your mailboxes can have different e-mail addresses set up for them. For instance, if mailbox 81 is sales, you may want those e-mails to go to [email protected], and if mailbox 82 is billing, you may want those e-mails to go to [email protected].