from sketch to vector illustration - mrs. st....
TRANSCRIPT
Did you know we have a podcast? Subscribe now! (http://www.gomediazine.com/tag/podcast/)
(http://www.gomediazine.com)
Design insights & tutorials.
search…
INSIGHTS (HTTP://WWW.GOMEDIAZINE.COM/CATEGORY/INSIGHTS/) TUTORIALS (HTTP://WWW.GOMEDIAZINE.COM/CATEGORY/TUTORIALS/)
DOWNLOADS (HTTP://WWW.GOMEDIAZINE.COM/CATEGORY/DOWNLOADS/) INSPIRATION (HTTP://WWW.GOMEDIAZINE.COM/CATEGORY/INSPIRATION/)
From Sketch to Vector Illustration
(http://www.gomediazine.com/tutorials/from-sketch-to-vector-illustration/)
(http://www.gomediazine.com/author/wbeachy/)
(http://www.gomediazine.com/tutorials/from-
Hey everyone! Welcome back to the GoMediaZine. There has been such a wonderful response on
my vector art tutorial “Beautiful Vector Illustration” that I thought I better write another one. If you
recall in that tutorial I discussed how to create vector illustrations using photographs as your
starting point. A technique of vector illustrating that takes a little bit more skill that I did not cover
is starting with a hand drawn sketches. I will focus on that technique of vector illustrating for this
tutorial.
For those of you without good sketching ability – please don’t jump ship just yet! I will also discuss
a number of tips and techniques to using your pen tool that applies to ALL vector artists – so keep
reading. You’ll still learn a thing or two. And who knows – maybe you try to sketch something
anyway.(http://www.gomediazine.com/wp-content/plugins/adrotate-pro/adrotate-out.php?track=MiwxLDAsaHR0cDovL3d3dy5qYWtwcmludHMuY29tL2NpcmNsZS1wcmludGluZz91dG1fc291cmNlPUdvTWVkaWEmdXRtX21lZGl1bT1iYW5uZXImdXRtX2NhbXBhaWduPUNpcmNsZStQb3N0Y2FyZHM)
Home (Http://Www.Gomediazine.Com) > Tutorials (Http://Www.Gomediazine.Com/Category/Tutorials/) > Illustrator (Http://Www.Gomediazine.Com/Category/Tutorials/Illustrator/) >From Sketch to Vector Illustration

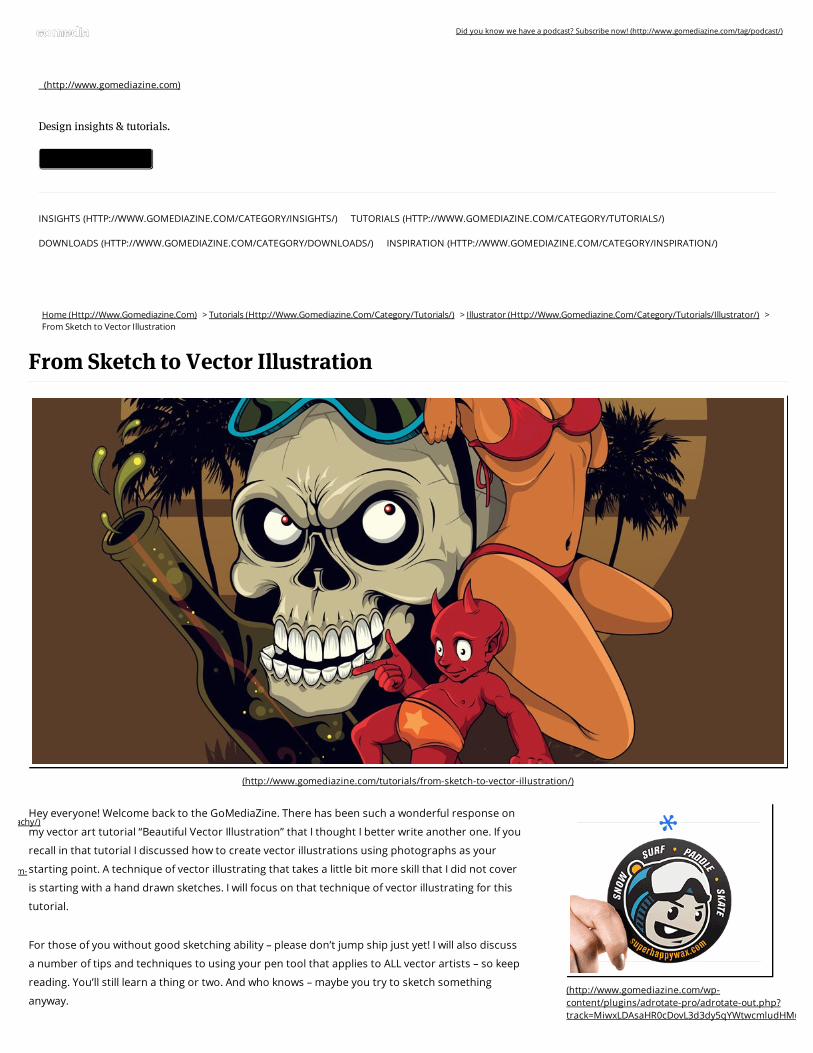
I am going to meander a bit between different sketches, but here is one example of a vector
illustration that was based off of a sketch.
This is a design our firm was hired to do for the rock band Mr. Gnome
(http://www.myspace.com/mrgnome). The theme was straight forward, a gnome with a guitar in a
dynamic pose.
The tools you’ll need for this tutorial are:
1. Pencil
2. Paper
3. Scanner
4. Computer (with a monitor)
5. Adobe Illustrator (and Photoshop wouldn’t hurt either)
This tutorial will cover:
1. Sketching – How detailed to get in your sketch?
2. What resolution to scan your sketch.
3. How to set up your Illustrator file.
4. Tips and Techniques to digitally inking your sketch using vector lines.
5. Tips and Techniques to coloring your vector illustration.
Step 1. Sketching.
Ok here we go. Since we will not be using photographs – we’re going to have to rely on our ability
to draw. As I mentioned in my tutorial “Comic Book Style Graphic Design
(http://www.gomediazine.com/12/11/2006/comic_book_style/)” I will not be able to go into the fine
details of how to draw here, but I want to try and give you a few tips.
First, I believe that learning how to draw is like learning any other skill. It takes time, practice and it
doesn’t hurt if you study a little. So go buy yourself books on drawing, find tutorials online or sign
up for classes at your local college. And of course, nothing in the world can replace practice.
This sketching phase of the process should be a fun relaxing part of the process. If you put
pressure on yourself you will surely struggle. When I am drawing I try to let go of all expectations.
When you sit down to draw tell yourself: “I may draw for the next three hours and may draw
nothing good. But I am going to enjoy the process.” Have a pile of paper, a pencil sharpener and an
eraser. Always start by sketching as loosely as possible; just work on basic shapes. Get yourself to
relax. Turn on some good tunes, have a can of Coke, whatever it takes to get yourself into a good
place. I really think this is a big part of getting yourself in the right frame of mind to draw well. It
advertise here(http://buysellads.com/buy/detail/161990/zone/1281055?utm_source=site_161990&utm_medium=website&utm_campaign=cpmadhere&utm_content=zone_1281055)
may seem silly – but imagine if you sat down with one sheet of paper, a thirty minute deadline and
a rigorous expectation of what you needed to draw. Wow… what pressure! You would be setting
yourself up for failure! That’s no fun. So, sit down, relax, let go of any expectations you put on
yourself and have some fun.
Also, you need to know that the final sketch will usually be achieved through a process. Many
amateur artists don’t truly realize all the “steps” that go into creating a final piece of art like the
one I drew. The assumption is that I sat down and in one fell swoop illustrated this final sketch.
Frequently there are a lot more steps to this process. Here is a typical process that a professional
illustrator might go through to produce a final illustration:
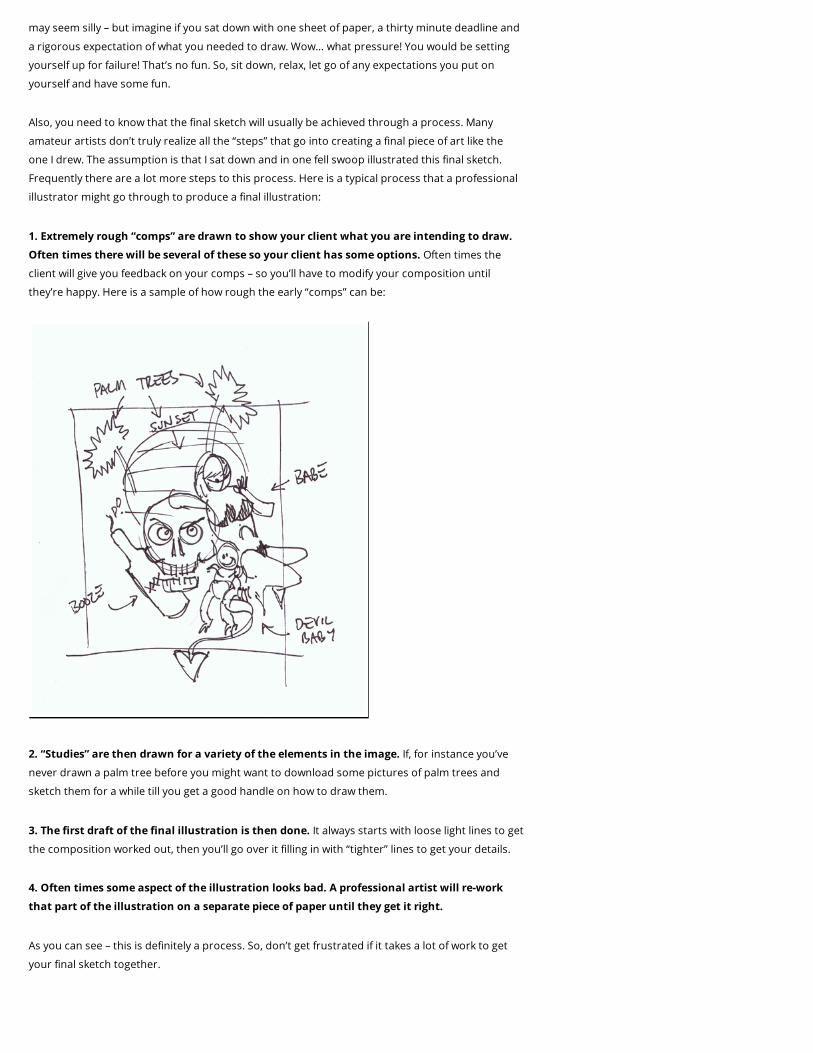
1. Extremely rough “comps” are drawn to show your client what you are intending to draw.
Often times there will be several of these so your client has some options. Often times the
client will give you feedback on your comps – so you’ll have to modify your composition until
they’re happy. Here is a sample of how rough the early “comps” can be:
2. “Studies” are then drawn for a variety of the elements in the image. If, for instance you’ve
never drawn a palm tree before you might want to download some pictures of palm trees and
sketch them for a while till you get a good handle on how to draw them.
3. The first draft of the final illustration is then done. It always starts with loose light lines to get
the composition worked out, then you’ll go over it filling in with “tighter” lines to get your details.
4. Often times some aspect of the illustration looks bad. A professional artist will re-work
that part of the illustration on a separate piece of paper until they get it right.
As you can see – this is definitely a process. So, don’t get frustrated if it takes a lot of work to get
your final sketch together.

How detailed you get with your sketch is up to you. Personally, I find that it is always easier to
decide where I want lines while I am in the sketching phase. So I will get fairly detailed in my
drawing before I scan it into the computer. Deciding where to put lines when I’m vectorizing
(digitally inking) my sketch is much harder. So I will err on the side of a “tight” sketch (lots of detail)
versus a “loose” sketch. Here are two examples of illustrations. This first one is the fairly tight
sketch of a demon that I drew for Ozz Fest.

The second sketch is a much more loose drawing:
Lines are not well defined and there is a lot that you would have to make decisions about once you
get the drawing into Illustrator. You have to be extremely skilled in your ability to work through a
drawing on-the-fly. If you are, you can take a very rough sketch like this and make inking
(vectorizing) decisions as you work. I don’t think most people have this ability, so I would
recommend that you try to get a little bit more detail into your sketch before you scan it into
Illustrator.
While I am endorsing a “tighter” sketch I want to mention the fact that one of the biggest
advantage of creating a vector illustration off of a sketch is that the over-all feeling of it is MUCH
looser than what you create when you work off of a photo. When, for instance you are working off
of a photograph – you are somewhat bound by the natural laws of nature. But in a sketch you can
really go over-board with exaggerated features. When you combine these loose exaggerated
features of a sketch with the tight clean lines of vector art you really get a wonderfully unique
looking illustration. So, don’t be too tight with your drawing! You don’t want to lose your
personality.
Step 2. Scanning your Artwork.
HHmm.. not sure why I made this into a whole section of this tutorial. I guess it’s just an important
step – you need to get your sketch into your computer. Here are a few tips to scanning your
sketch:
1. Make sure to scan your sketch in “photo” mode at 300dpi or higher. You may want to go as high
as 600dpi. It really helps to zoom in on your sketch while you’re vectorizing (digitally inking and
coloring) it. At this zoomed in state you might be looking at a part of the sketch 300% – 400% bigger
than the size you drew it, so you’ll need that extra resolution to see where to put your lines.

2. If your sketch is bigger than your scanner – you’ll have to scan it in pieces and stitch them
together in Photoshop. One little tip that helps make this process easier is to make sure that you
butt one side of the paper up against the edge of the scanning surface. Scan it, then slide the
paper keeping that same side flush up against the edge of the scanning surface. This process
insures that your different parts of the sketch are not rotated differently. It is much easier to piece
together two images that don’t need to be rotated. Once your sketch pieces are in Photoshop,
open one and enlarge the canvas area to make room for the other pieces. Copy-and-Paste the
other pieces so that they are all in one image. Set the properties of each layer to “multiply.” This
will allow you to see through each layer and more easily line them up. Once you have them all lined
up, change the layer properties back to “normal,” flatten the image, and save it as a .jpeg
Step 3. Setting up your Illustrator file.
I like to create 3 layers in Illustrator when vectorizing a sketch. The bottom layer is where I place my
sketch. I will lock this layer so I don’t accidentally select it or move it. The middle layer is my color
layer. This is where I will fill in my shapes with colors. I will also lock this layer until I get to the
coloring part of the process. The top layer is the inks (the lines) of the drawing.
I should take a moment here to mention that you can illustrate vector art without lines. The
artwork can be comprised completely of solid shapes with no “line art.” Here is an example of
each:
This is a vector illustration without any lines defining the shapes. It simply uses color and value to
define the shapes.

This illustration does have lines to separate the shapes.
Whether you choose to make line art or not is up to you, but we WILL be making the line art first
on this project.
Step 4. Tips and Techniques to digitally inking your sketch using vector lines.
Ok.. now we get to drawing our vector lines. I don’t have one set style for creating these lines; in
fact I have several. I will discuss each. But before I do, I want to discuss our goals. The goals with
these lines are that they have character. And by “character” what I mean to say is: “they look cool.”
So, how do we make our lines look cool?
For starters, we need our lines to vary in what is known as “weight.” “Weight” of a line basically
means how thick or thin your lines are. A lot of weight is thick a little weight is thin. Making your
lines vary in weight adds a LOT of character (makes them look cool.)
And where we put this character into the lines is also important. I use three general rules when
making a determination of where to put weight:
1. Most important is how close an object is to you. So, if you have a drawing where the super-hero
is punching out towards you, the fist would be the closest thing to you. The closer something is to
you, the thicker the lines should be. The further away something is – the thinner the lines should
be. The city in the background, for instance, should be illustrated with very thin lines. This creates
an illusion of depth.
2. The outer-most line of each separate object I will also tend to make a little thicker than the
interior lines. This helps define that object apart from the other objects.
3. I will also pay attention to light source. If, for instance, the sun is just over the right shoulder of a
character – I might thin that line so much that it ends… there is actually a gap where the line ends
then re-starts. The side of the object opposite of the light source will have thicker lines.
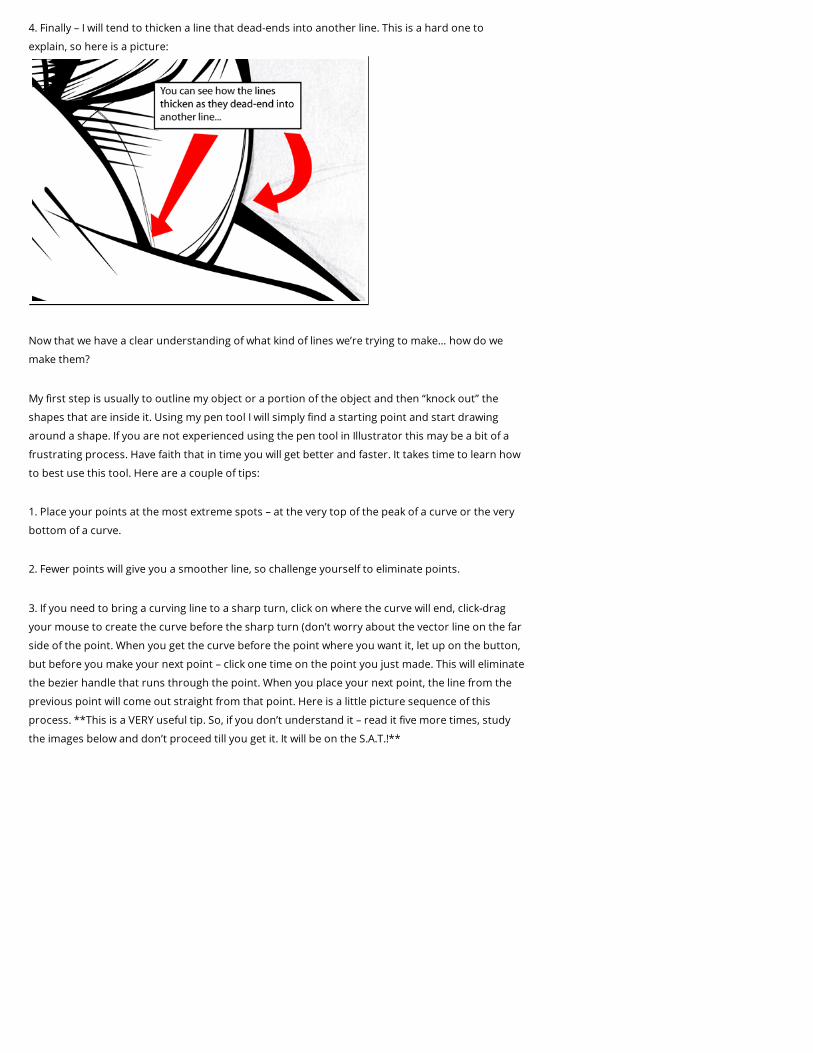
4. Finally – I will tend to thicken a line that dead-ends into another line. This is a hard one to
explain, so here is a picture:
Now that we have a clear understanding of what kind of lines we’re trying to make… how do we
make them?
My first step is usually to outline my object or a portion of the object and then “knock out” the
shapes that are inside it. Using my pen tool I will simply find a starting point and start drawing
around a shape. If you are not experienced using the pen tool in Illustrator this may be a bit of a
frustrating process. Have faith that in time you will get better and faster. It takes time to learn how
to best use this tool. Here are a couple of tips:
1. Place your points at the most extreme spots – at the very top of the peak of a curve or the very
bottom of a curve.
2. Fewer points will give you a smoother line, so challenge yourself to eliminate points.
3. If you need to bring a curving line to a sharp turn, click on where the curve will end, click-drag
your mouse to create the curve before the sharp turn (don’t worry about the vector line on the far
side of the point. When you get the curve before the point where you want it, let up on the button,
but before you make your next point – click one time on the point you just made. This will eliminate
the bezier handle that runs through the point. When you place your next point, the line from the
previous point will come out straight from that point. Here is a little picture sequence of this
process. **This is a VERY useful tip. So, if you don’t understand it – read it five more times, study
the images below and don’t proceed till you get it. It will be on the S.A.T.!**

Once I have my outline I will simply start drawing the shapes that are inside it that need to be
subtracted (or for us old-school designers: “knocked out.”) Be aware that the “lines” you’re creating
will be comprised of the outline minus the interior shapes. So, in terms of giving your final lines
varying weight, you will have to vary how close your interior shapes are to the outline.

Here is an example of how I will draw an outline, then subtract (or knock-out) the interior with a
second shape:

One way to deal with this varying line weight issue is to deal with it in the sketching phase. This way
– you don’t have to think about it while vectorizing. You can just follow your sketch lines.
While you are drawing these knock-out shapes you may want to ignore little detail lines that might
be hard to draw. If for instance you have some cross-hatching lines that extend from a large black
shape – I won’t try to draw them both at the same time. I will start by just drawing the black shape,
then will go back and draw the hatch-lines. I can merge these shapes using the Pathfinder tool
later if I want to. Here is a sample of that:
Once you have all of your interior shapes in place, you’ll now need to knock them out of your
outline. You will do this by
1. Grouping all of the interior shapes.
2. Bringing these grouped interior shapes to the front: Object>Arrange>Bring To Front
3. Selecting both your grouped interior shapes and your outline
4. Clicking on the knock-out (or “subtract”) function of your pathfinder tool.
5. Fill with black! (or whatever color you want your lines.)
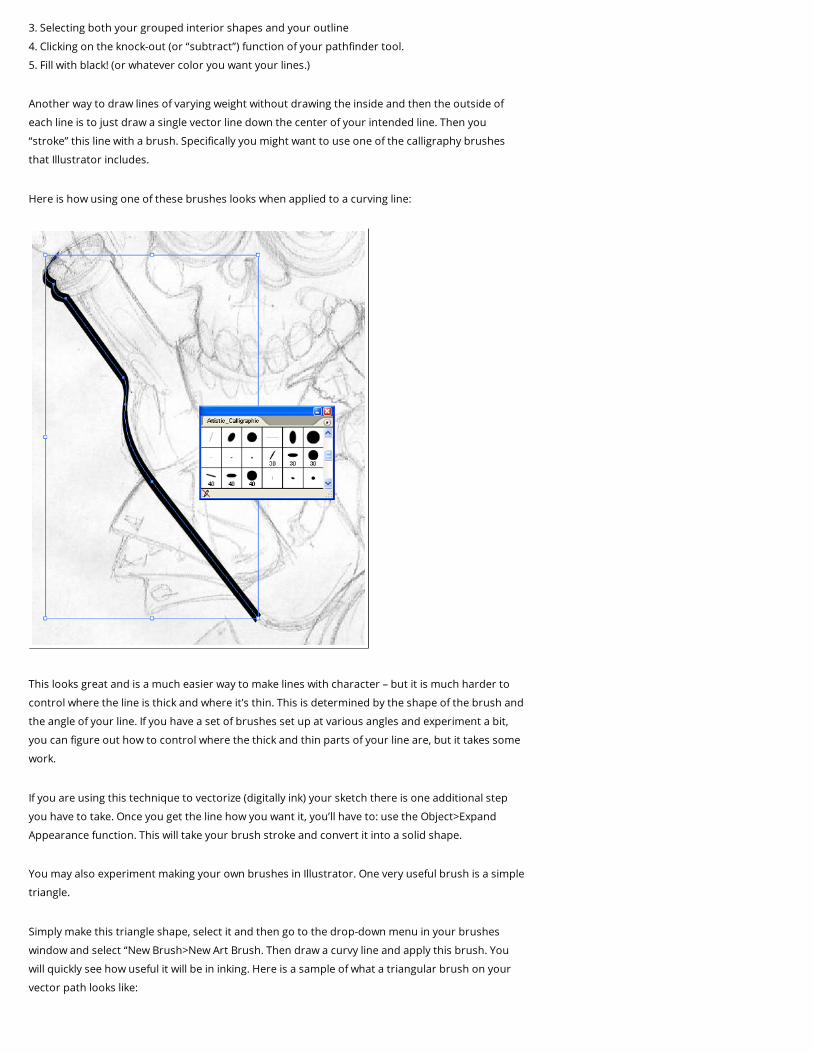
Another way to draw lines of varying weight without drawing the inside and then the outside of
each line is to just draw a single vector line down the center of your intended line. Then you
“stroke” this line with a brush. Specifically you might want to use one of the calligraphy brushes
that Illustrator includes.
Here is how using one of these brushes looks when applied to a curving line:
This looks great and is a much easier way to make lines with character – but it is much harder to
control where the line is thick and where it’s thin. This is determined by the shape of the brush and
the angle of your line. If you have a set of brushes set up at various angles and experiment a bit,
you can figure out how to control where the thick and thin parts of your line are, but it takes some
work.
If you are using this technique to vectorize (digitally ink) your sketch there is one additional step
you have to take. Once you get the line how you want it, you’ll have to: use the Object>Expand
Appearance function. This will take your brush stroke and convert it into a solid shape.
You may also experiment making your own brushes in Illustrator. One very useful brush is a simple
triangle.
Simply make this triangle shape, select it and then go to the drop-down menu in your brushes
window and select “New Brush>New Art Brush. Then draw a curvy line and apply this brush. You
will quickly see how useful it will be in inking. Here is a sample of what a triangular brush on your
vector path looks like:

I suggest experimenting with brushes like this. I will not reveal all of Go Media’s secrets here – but
this should get you started.
Now you have the meticulous job of “inking” your illustration. Depending on how complex your
drawing is – this process may take an entire day or more, so settle in and try to enjoy yourself.
After all – that’s why we’re here right?
Here is the finished inking I did on this sketch… Pretty sharp if I do say so myself!!
First the pencil sketch:

Now the final inked illustration:
Ok, now to the really fun part – coloring.
Step 5. Tips and Techniques to coloring your vector illustration.
This tutorial is going to cover coloring in Adobe Illustrator. At this point you could also export your
line art to Photoshop and color your drawing in it. In fact, most professional coloring you’ll see of
illustrations is done in either Photoshop or Painter. Making a vector coloring – as we are in this
tutorial is a very different process with a different look and feel to it. In Photoshop for instance,
you can much more easily make soft-edged transitions between your various colors. Here in
Illustrator your color shapes will have sharp edges.
Now I will make a confession – I don’t think I have a very good sense of color. I think I am a bad
colorist. So, hopefully I can give you some tips I use to “fake it.” Remember: “Fake it till you make it!”
Now, you’ll be coloring on your color layer, so lock your inking layer and unlock your color layer.
Usually I will try to pick the colors I’m going to use before I start coloring. I will start with 2-4 main
color themes that work well together. For each of these colors I will try to get a range of color
values from dark to light. Once I have this palette of colors I try very hard to stick with it. Since I
don’t have a good sense of color, I’m afraid to stray too far from a nice color palette once I’ve made
one. Here is an example of a color palette I put together:
I will usually assemble my color palettes by opening a Pantone Swatch Library (located in the
Swatch window drop-down in the Swatch Libraries drop down). I’ll then see a color I like and grab
the entire value range from dark to light of that color.
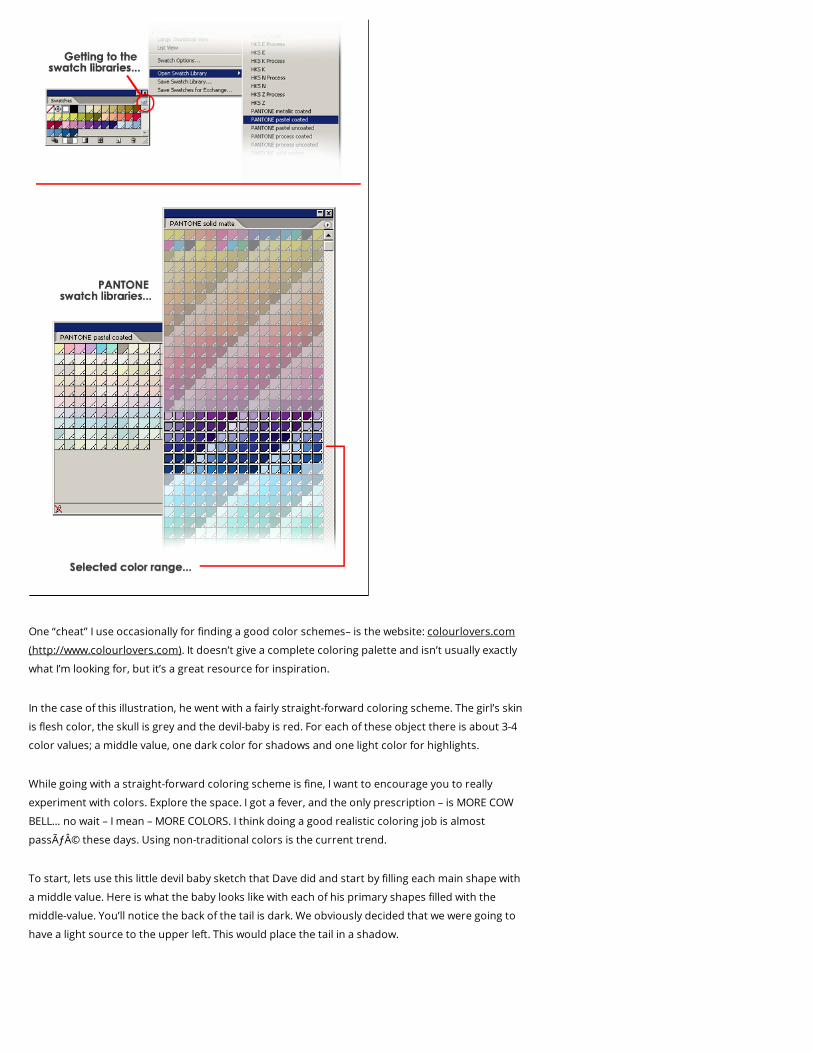
One “cheat” I use occasionally for finding a good color schemes– is the website: colourlovers.com
(http://www.colourlovers.com). It doesn’t give a complete coloring palette and isn’t usually exactly
what I’m looking for, but it’s a great resource for inspiration.
In the case of this illustration, he went with a fairly straight-forward coloring scheme. The girl’s skin
is flesh color, the skull is grey and the devil-baby is red. For each of these object there is about 3-4
color values; a middle value, one dark color for shadows and one light color for highlights.
While going with a straight-forward coloring scheme is fine, I want to encourage you to really
experiment with colors. Explore the space. I got a fever, and the only prescription – is MORE COW
BELL… no wait – I mean – MORE COLORS. I think doing a good realistic coloring job is almost
passé these days. Using non-traditional colors is the current trend.
To start, lets use this little devil baby sketch that Dave did and start by filling each main shape with
a middle value. Here is what the baby looks like with each of his primary shapes filled with the
middle-value. You’ll notice the back of the tail is dark. We obviously decided that we were going to
have a light source to the upper left. This would place the tail in a shadow.

When I say “We filled each main shape..” what I mean specifically is that we stole the line art and
used the vector lines that were already drawn to fill the main shapes.
In order to do this you need to make sure you’ve used your Pathfinder tool to subtract (knock-out)
and consolidate all your line art into one complete path, then you will:
1. Unlock your inking layer (if it isn’t already)
2. Select your Inks (lines)
3. Edit>Copy
4. Switch to your color layer (I’ll even re-lock my inking layer)
5. Edit>Paste In Front – this will drop a copy of the inks into the coloring layer in the exact same
location that it was taken from – so it lines up perfectly.
6. Select the line art and then Object>Compound Path>Release. This will break all of these shapes
back up into their own pieces of art. You can then delete the outline and simply deal with the fill
shapes. By selecting them you can fill them with the appropriate color.
Using this technique will save you a lot of time. Here is the single-color initial fill of the devil-baby:
If you are not familiar with the Pathfinder tool in Illustrator, let me just say: please take the time to
explore this tool. It is indispensable. I use it constantly.

Once the main color fill is in place, we can start adding shadows and highlights. Since your
highlights and shadows will be contained within the area we’ve already established with our fill,
you really only need to draw the line that will distinguish the barrier between your middle value
and shadow.
In this first image you can see where I drew the dark red shape to define the shadow area. I only
concerned myself with where my shape intersected with the red fill of the devil baby’s body.
I then need to make a copy of the devil-baby’s fill shape so I won’t lose it when I use the pathfinder
tool. I use the Copy and Paste-In-Front function to create two duplicate shapes that are directly on
top of one another. Then I select the main fill shape and the shadow shape as well.
Then, using the Pathfinder tool use the overlap Pathfinder tool. I’m not sure what the technical
term is for this function, but it basically takes two shapes and removes any parts of them that do
not over-lap. Here’s a pic:
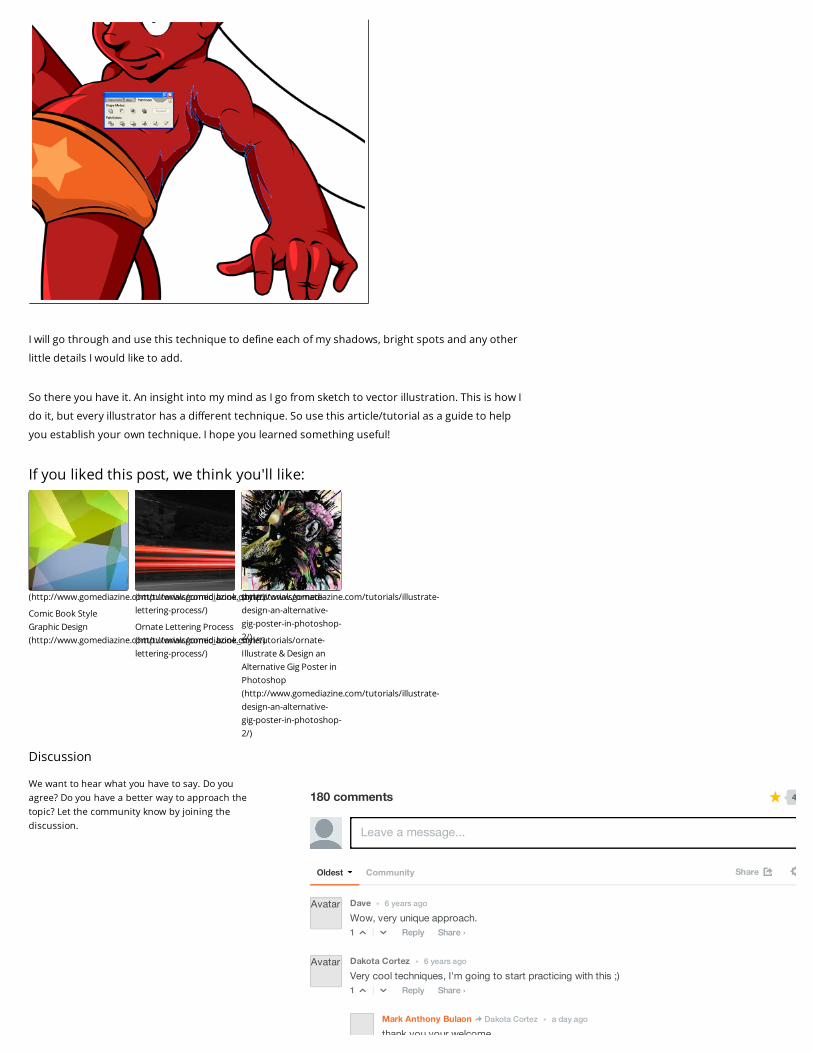
I will go through and use this technique to define each of my shadows, bright spots and any other
little details I would like to add.
So there you have it. An insight into my mind as I go from sketch to vector illustration. This is how I
do it, but every illustrator has a different technique. So use this article/tutorial as a guide to help
you establish your own technique. I hope you learned something useful!
If you liked this post, we think you'll like:
Discussion
We want to hear what you have to say. Do you
agree? Do you have a better way to approach the
topic? Let the community know by joining the
discussion.
(http://www.gomediazine.com/tutorials/comic_book_style/)
Comic Book Style
Graphic Design
(http://www.gomediazine.com/tutorials/comic_book_style/)
(http://www.gomediazine.com/tutorials/ornate-
lettering-process/)
Ornate Lettering Process
(http://www.gomediazine.com/tutorials/ornate-
lettering-process/)
(http://www.gomediazine.com/tutorials/illustrate-
design-an-alternative-
gig-poster-in-photoshop-
2/)
Illustrate & Design an
Alternative Gig Poster in
Photoshop
(http://www.gomediazine.com/tutorials/illustrate-
design-an-alternative-
gig-poster-in-photoshop-
2/)
180 comments
Leave a message...
Oldest Community Share
Reply
Dave • 6 years ago
Wow, very unique approach. 1
Reply
Dakota Cortez • 6 years ago
Very cool techniques, I'm going to start practicing with this ;) 1
Mark Anthony Bulaon • a day ago Dakota Cortez
thank you your welcome
49
Avatar
Share ›
Avatar
Share ›