fx 9002 protective mask user instruction guide · • the fx®9002 protective mask has been...
TRANSCRIPT
Trademarks and registered trademarks of General Dynamics Ordnance and Tactical Systems-Canada Inc. are denoted by TM and ® respectively. www.simunition.com
Page 1 of 16 © 2018 GD-OTS Canada 8971791.FTSIM_rev10
FX® 9002 Protective Mask User Instruction Guide
Product No.: 8971790 (Black) and 8971800 (Blue)
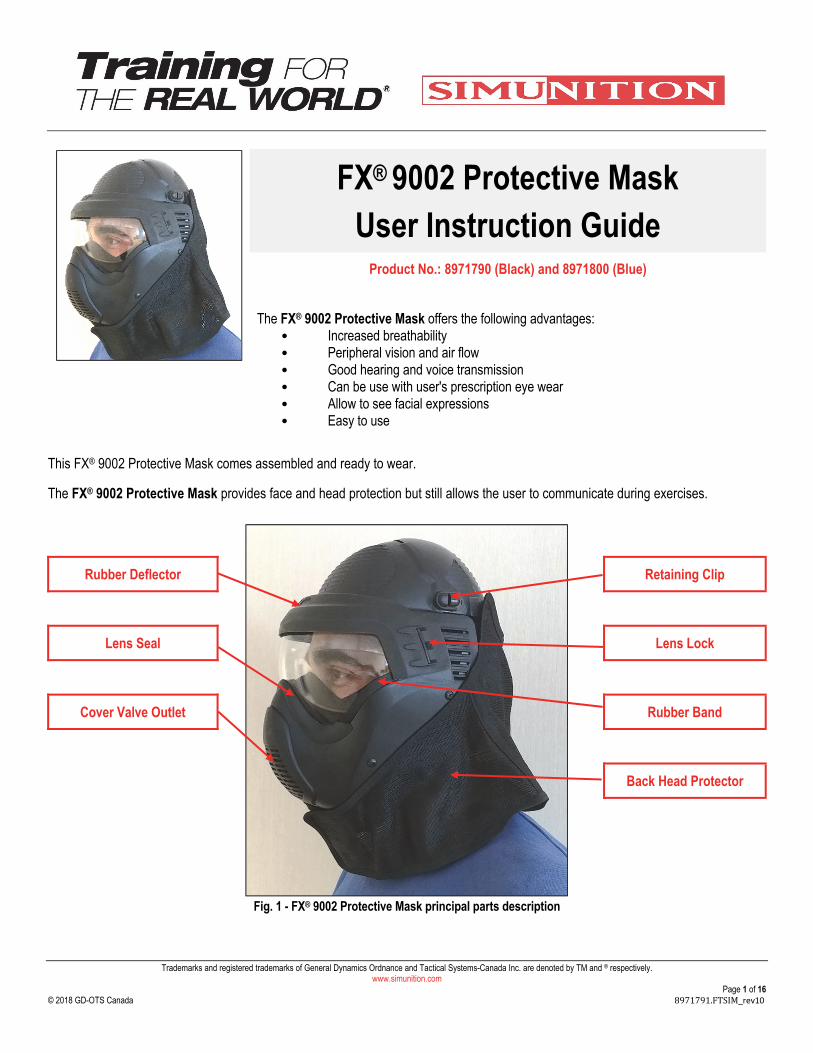
The FX® 9002 Protective Mask offers the following advantages: • Increased breathability • Peripheral vision and air flow • Good hearing and voice transmission • Can be use with user's prescription eye wear • Allow to see facial expressions • Easy to use
This FX® 9002 Protective Mask comes assembled and ready to wear.
The FX® 9002 Protective Mask provides face and head protection but still allows the user to communicate during exercises.
Fig. 1 - FX® 9002 Protective Mask principal parts description
Rubber Deflector Retaining Clip
Lens Seal Lens Lock
Cover Valve Outlet Rubber Band
Back Head Protector

Trademarks and registered trademarks of General Dynamics Ordnance and Tactical Systems-Canada Inc. are denoted by TM and ® respectively. www.simunition.com
Page 2 of 16 © 2018 GD-OTS Canada 8971791.FTSIM_rev10
WARNING
FX® Marking cartridges 9 mm, .38 cal. and 5.56mm
• The FX®9002 Protective Mask has been designed and developed to be used only with the followings FX® interactive Marking Training ammunition; 9 mm, .38 cal. or 5.56 mm Simunition® FX® Marking cartridges only.
• DO NOT USE WITH ANY OTHER TYPE OR CALIBER OF AMMUNITION
• The use of this equipment is MANDATORY in order to prevent serious personal injury to head and face during training with FX® marking cartridges, however this product will not provide unlimited face and head protection
This FX® 9002 Protective Mask comes assembled and ready to wear.
The FX® 9002 Protective Mask and must be worn in order to provide the required protection to the head area. In order to provide complete neck and head protection all Simunition® masks have to be worn in conjunction with the FX® 9000 Throat Protection (8971764) and FX® 9000 Groin Protection (male 8971770 and female 8971771).
The use of approved Simunition® Protective equipment is MANDATORY in order to prevent serious personal injury to ears and face during training with 9 mm, .38 cal. or 5.56 mm FX® Marking cartridges.
FOR SAFE AND EFFECTIVE USE OF THIS EQUIPEMENT, FOLLOW ALL INSTRUCTIONS.
GD-OTS Canada assumes no responsibility for injuries, loss or damage resulting from misuse of this equipment. THIS PRODUCT WILL NOT PROVIDE UNLIMITED FACE AND EAR PROTECTION.
Intended only for supervised law enforcement and military training conducted in accordance with Simunition® safety guidelines
Should protective lens become fogged or dirty during training, DO NOT REMOVE IT! OBTAIN ASSISTANCE FROM THE INSTRUCTOR TO REMOVE YOURSELF FROM THE TRAINING AREA WITH FX® 9002 PROTECTIVE MASK IN PLACE
Check the lens before each use and replace immediately if cracks or dents are observed. No lens can protect the wearer from all potential impacts or will not protect against all chemical splashes. NOT FOR USE IN THE SPORT OF PAINTBALL
Do Not Use Abrasive Cleaning Products or Liquids Containing Ammonia or Alcohol, or Chlorine, or other chemical products on any surface of the Lens surfaces (Interior Fog-Resistant and Exterior FX® -Scratch resistance).
N.B.: DO NOT PUT ANY MASK COMPONENTS IN THE WASHING MACHINE OR SPIN DRYER
REPLACE FX® 9002 Lens (8971010) IF DAMAGED.

Trademarks and registered trademarks of General Dynamics Ordnance and Tactical Systems-Canada Inc. are denoted by TM and ® respectively. www.simunition.com
Page 3 of 16 © 2018 GD-OTS Canada 8971791.FTSIM_rev10
Donning the FX® 9002 Protective Mask 1. Undo the Velcro® fastenings of the back head
protection hood and then flip over the mask hard shell.
Note: Make sure that the top portion of Velcro® fastenings of the back head protection hook stay attached to the mask shell.
2. Loosen the upper head strap and unbuckle the lower head strap.
3. Hold the upper head strap outside the mask shell with your hands and place your chin first into the mask (Fig. 2). Pull the mask over your head and tighten the upper head strap (Fig. 6). Ensure that the lower head strap is behind your neck before fastening the quick buckle and tightening the lower head strap (Fig. 7).
4. Secure the lower head strap against the back of the head but loose enough to get two fingers thick between the head strap and your neck.
5. Attach the back head protection hood to the mask fastening Velcro® loop and make sure the back head protection hood overlaps the peripheral edge of the mask shell (Fig. 3).
6. Attach both ends of your Mask's back flap Velcro® fastening by overlapping the Velcro® hook and loop attachment (see fig. 4). Ensure that your mask's back flap is tight, in order to get a good foam seal around the nose bridge and face, this will help prevent fogging.
7. Then, make sure that the mask's textile cover (front & sides) is properly adjusted over your shoulders (see fig. 5).
Fig. 2 – Place your chin first into the
mask FX® 9002 Fig. 3 – Adjusting the mask’s textile
Fig. 4 - Velcro®
Fig. 5 – Mask’s textile cover
Fig. 6 - Upper head strap Buckle
Fig. 7 – Lower head strap Buckle

Trademarks and registered trademarks of General Dynamics Ordnance and Tactical Systems-Canada Inc. are denoted by TM and ® respectively. www.simunition.com
Page 4 of 16 © 2018 GD-OTS Canada 8971791.FTSIM_rev10
FX® 9002 Protective Mask – Foam pieces identification
Fig. 8 – Inside mask
Starship Foam
Crown Foam
Nasal Foam
Wing Foam
Note: The FX® 9002 Protective Mask must be worn with FX® Throat (8971764) and FX® groin protector (8971770-Male or 8971771-Female). These items are not included with the FX® 9002 Protective Mask.

Trademarks and registered trademarks of General Dynamics Ordnance and Tactical Systems-Canada Inc. are denoted by TM and ® respectively. www.simunition.com
Page 5 of 16 © 2018 GD-OTS Canada 8971791.FTSIM_rev10
FX® 9002 Lens removal 1. Remove the two lens lock which are located on the side of the mask
by exerting outward pressure on the black locking bar and pull out (see fig. 9);
2. With the help of your hand, remove the Rubber Deflector by gently pulling-out the three stems who are inserted through the air intake grill (see fig. 10A & 10B)) and keep it for reused.
3. From the interior of mask, remove the Nasal foam piece by simply tear free, remove the plastic lens seal by unscrewing the two screws (See fig. 11A) located under the nasal foam inside the mask. Pull-out the lens seal by exercising a pull in direction of outside;
4. Remove lens by exerting downward pressure on the ridge (Fig. 11B) of the lens and pushing in. Repeat on other side. Remove the two rubber extruded bands from the old lens and keep-it for reuse.
Fig. 9 – Lens lock pull out
Fig. 10A – Ruber Defletor
Fig. 10B – Rubber Deflector
Fig. 11A – Screws’ Nasal Foam
Fig. 11B – Lens ridge

Trademarks and registered trademarks of General Dynamics Ordnance and Tactical Systems-Canada Inc. are denoted by TM and ® respectively. www.simunition.com
Page 6 of 16 © 2018 GD-OTS Canada 8971791.FTSIM_rev10
FX® 9002 Lens replacement
1. Re- Install the rubber extruded bands on the bottom edge of each side of lens. (See fig. 13A)
2. Insert the new FX 9002 lens by positioning it over the mask while ensuring that the top ridge of the lens is aligned with the opening slot located in the top of the frame (Fig. 12).
3. With the help of your hand, push down with equal pressure on each side the lens to insert the lens ridges into the mask frame (Fig. 13B & 15).
4. Re-install the plastic lens seal by inserting at first the lens seal central post into the small hole located at the top of nose bridge (Fig. 14)
5. From the interior, by using a Philip style screw driver, re-install the two screws that has been previously removed and tighten by using a normal force (Fig. 11A).
Note: Make sure that the extruded rubber bands remains in place during installation.
Fig. 14 – Nose Bridge small hole
Fig. 12 – Opening Groove
Fig. 13A – FX® 9002 Lens
Fig. 13B – Lens installation
Fig. 15 – Lens ridge – Final position
1/8" / 3.0mm
Lens Seal‐
Central Post
Nose bridge
small hole

Trademarks and registered trademarks of General Dynamics Ordnance and Tactical Systems-Canada Inc. are denoted by TM and ® respectively. www.simunition.com
Page 7 of 16 © 2018 GD-OTS Canada 8971791.FTSIM_rev10
6. Place (re-install) the Rubber Deflector over the lens then, insert the three Stems through the dedicated grill opening with a gentle pull-in force by using your fingers (see fig. 16A & 16B). You should be able to hear a click noise which indicate that the stem has been installed properly at its place, then.
7. Re-install the lens locks by inserting the lens lock marked R through the Rubber Deflector opening which is marked R by pushing the lens locks up to the rubber stopper. Repeat this operation for the lens lock marked L (see fig. 17), then,
8. Reviews steps 1 to 5 to ensure a properly installed lens.
Note: Some physical effort may be necessary to insert the lens lock in their places
Note: Prior to reinstalling a new FX® 9002 Lens; make sure there is no dirt inside the location where the FX® 9002 Lens will be installed.
Fig. 16A – Center of the mask
Fig. 16B – Side of the mask
Fig 17 - Side designation
Center grill opening
Central Stem
Side grill opening
Side Stem
Rubber deflector side designation
Lens lock side designation

Trademarks and registered trademarks of General Dynamics Ordnance and Tactical Systems-Canada Inc. are denoted by TM and ® respectively. www.simunition.com
Page 8 of 16 © 2018 GD-OTS Canada 8971791.FTSIM_rev10
FX® 9002 Protective Mask
Cleaning instruction for the FX® 9002 Protective Mask
For use in FX® interactive training with 9 mm, .38 cal. or 5.56 mm Simunition®
FX® Marking cartridges only.
DO NOT USE WITH ANY OTHER TYPE OR CALIBER OF AMMUNITION.
Cleaning the FX® 9002 Protective Mask
Fig. 18 – Inside mask
Starship Foam
Crown Foam
Nasal Foam
Wing Foam
The FX® 9002 Protective Mask cleaning procedure shall be carried out as follows:
1. Preparation of cleaning solution:
1.1. By using a clean container, fill the container with water at a temperature of (35°C/ 95°F) and add two (2) teaspoons of detergent (mild dish-hand washing liquid with antibacterial) for every (4 liters / 1 gallon) of hot water.

Trademarks and registered trademarks of General Dynamics Ordnance and Tactical Systems-Canada Inc. are denoted by TM and ® respectively. www.simunition.com
Page 9 of 16 © 2018 GD-OTS Canada 8971791.FTSIM_rev10
Cleaning the FX® 9002 Protective Mask (cont’d) 2. Parts removal prior to wash
2.1. Remove the Back Head protection hood by simply tear free, then,
2.2. From the interior of mask, remove the Nasal Starship and the Crown Foam pieces by simply tear free (See fig. 18), then
2.3. Loose the Upper head strap from the top head lock buckle, push-on the buckle and strap’s end through the opening of the foam, then, Unbuckle the lower head strap and push-on the buckle and strap’s end through the opening of the foam, then, to remove the wing foam simply tear free.
2.4. Remove the Cover Valve Outlet by reaching into the mask and pressing firmly on the top release snap which is located at the interior of the mask (Some physical effort may be necessary to release the top release snap). This allows the user to access the Anti-soap baffle for cleaning. The Anti-soap baffle can now be removed for cleaning by simply tear free (See fig. 19), then
2.5. Remove the two lens lock which are located on the side of the mask by exerting outward pressure on the black locking bar and pull out (Fig. 20), then
2.6. With the help of your hand, remove the Rubber Deflector by gently pull-out the three stems who are insert through the air intake grill (Fig. 21A & 21B).
Note: Usually, it's not necessary to remove the lens from the mask to wash. When immersed in hot water (35oC/95oF), by the effect of soaking will help to the dirt and to the marking compound to coming-off easily
Fig. 19 – Front mask, side view
Fig. 20 – Lens lock pull out
Fig. 21A – Ruber Defletor
Fig. 21B – Rubber Deflector
Top release snap
Cover Valve Outlet
Anti-soap baffle

Trademarks and registered trademarks of General Dynamics Ordnance and Tactical Systems-Canada Inc. are denoted by TM and ® respectively. www.simunition.com
Page 10 of 16 © 2018 GD-OTS Canada 8971791.FTSIM_rev10
3. Mask cleaning
3.1. Completely immerged the FX® 9002 Protective Mask and wash the interior and exterior of mask by using a clean cloth, then, in the same water, completely immerged, all foam parts, Cover Valve Outlet, Anti-Soap Baffle and Rubber Deflector that were previously disassembled from the mask. Wash these parts with a clean cloth.
3.2. Then, rinse the FX® 9002 Protective Mask, foams and plastics parts thoroughly with cold clean water and drain water from the inside and outside of mask.
Drying the FX® 9002 Protective Mask 1. Using a clean dry cloth, wipe the inside and outside of the FX® 9002 Protective Mask, foam parts, plastic parts and Rubber
Deflector. Make sure there is no excess moisture, then,
2. Wipe the lens carefully with a soft (non-abrasive) dry cloth, making sure the water stains from the inside and outside surfaces of lens are removed.
3. Then, allow the FX® 9002 Protective Mask, foam parts, plastic parts and Rubber Deflector to dry completely prior to re-installing them.

Trademarks and registered trademarks of General Dynamics Ordnance and Tactical Systems-Canada Inc. are denoted by TM and ® respectively. www.simunition.com
Page 11 of 16 © 2018 GD-OTS Canada 8971791.FTSIM_rev10
Assembly of mask after cleaning
Fig. 22 - FX® 9002 Protective Mask principal parts description
Rubber Deflector Retaining Clip
Lens Seal Lens Lock
Cover Valve Outlet Rubber Band
Back Head Protector
1. Place (re-install) the Rubber Deflector over the external of the lens, then, insert the three Stems through the dedicated grill opening by using a gentle pull-in force by using your fingers, to grasp the stem (see fig. 16A & 16B). You should begin by inserting the center stem at first following by each stem at each side. You should be able to hear a click noise which indicate that the stem has been installed properly at its place, then
2. Re-install the lens locks by inserting the lens lock marked R through the Rubber Deflector opening which is marked R by pushing the lens locks up to the rubber stopper. Repeat this operation for the lens lock marked L (see fig 17) , then,
Note: Some physical effort may be necessary to insert the lens lock in their places

Trademarks and registered trademarks of General Dynamics Ordnance and Tactical Systems-Canada Inc. are denoted by TM and ® respectively. www.simunition.com
Page 12 of 16 © 2018 GD-OTS Canada 8971791.FTSIM_rev10
3. Re-install the Anti-Soap Baffle by inserting the posts in the rectangular opening (4) (see fig. 23) Make sure that the FX 9002 logo wording which is embossed is properly oriented, then
4. Re-install the Cover Valve Outlet by inserting the lower post (1) into the lowered opening (Fig. 24) and then, flip the Cover Valve Outlet and insert the top Flap into the opening and snap it by pressing firmly. You should hear a click noise which will indicate that Cover Valve Outlet is properly installed (Fig 25).
5. Re-install the Wing foam part by inserting at first the upper head strap ends through the foam opening (2) which are located at the end of both sides of the Starship, then, thread the loosen installation strap end through the strap buckle openings as showed in figure 27.
6. Then insert the lower head strap ends through the foam openings (2) which are located in the lower chin portion of the Wing and leave it unbuckle
7. Re-install the Crow, Wings, Starship and Nasal foams (see fig. 18)
8. Re-install the Back Head protection by starting to install at first the upper Velcro hooks (2) (square shape) facing the Velcro Loop (2) which are located on the back of the hard FX 9002 Mask’s Shell (see fig. 26) and to conclude,
9. Attach the back head protection hood to the mask fastening Velcro® loop and make sure the back head protection hood overlaps the peripheral edge of the mask shell (Fig. 28).
Fig. 23 – Rectangular vs posts
Fig. 24 – Lower post
Fig. 25 – Opening
Fig. 26 – Velcro hook
Fig 27 – Strap buckle installation
Fig. 28 – Mask’s textile cover
Posts (4)
Rectangular
opening (4)
Cover Valve
Outlet
Lower post
Lower
opening

Trademarks and registered trademarks of General Dynamics Ordnance and Tactical Systems-Canada Inc. are denoted by TM and ® respectively. www.simunition.com
Page 13 of 16 © 2018 GD-OTS Canada 8971791.FTSIM_rev10
FX® 9000 Protective Mask storage (8971315) A storage pouch is supplied with this FX® 9002 Protective Mask to ensure protection of the lens. Make sure that the FX® 9002
Protective Mask is cleaned and dried before storing. The storage pouch can also be washed by hand by immersion into a soapy water
using the cleaning procedure. The storage pouch shall by hung for drying.
WARNING
Do not use detergents that may contain reactive cleaning/disinfecting chemicals such as alcohol, hydrocarbons, ammonium, chlorine bleach, etc., to clean the mask and lens. Such chemicals may reduce the ballistic properties of the lens. Mild dish-hand washing liquid with antibacterial is specified.
Do not wash or dry the FX® 9002 Protective Mask in a washing machine or spin drier.
WARRANTY: General Dynamics Ordnance and Tactical Systems-Canada Inc. (GD-OTS Canada) warrants that the goods shall be
free from defect in materials and workmanship during the period of three (3) months following the date of delivery. This warranty is the
exclusive warranty given by GD-OTS Canada.
LIMITATION OF WARRANTY: The Simunition® - FX® Protective Mask series are designed for use with 9mm, .38 FX® and/or 5.56
mm FX® Marking cartridges only. Use of any other ammunition including Paint Ball is dangerous and shall void this warranty.
GD-OTS Canada assumes no responsibility for injuries, loss or damage resulting from misuse of this equipment. THIS PRODUCT
WILL NOT PROVIDE UNLIMITED FACE AND EAR PROTECTION.

Trademarks and registered trademarks of General Dynamics Ordnance and Tactical Systems-Canada Inc. are denoted by TM and ® respectively. www.simunition.com
Page 14 of 16 © 2018 GD-OTS Canada 8971791.FTSIM_rev10
Spart parts of the FX® 9002 Protective Mask Replacement Coated Eye Piece Clear. Simunition® product no. 8971010SP
Back Head Protector Black. Simunition® product no. 8971125SP
Set of Closed Cell Foam Inserts Black. Simunition® product no. 8971323SP
Rubber Deflector – Black Simunition® product no. : 8971291SP
Cover Valve Outlet - Black. Simunition® product no. 8971020SP
Anti-Soap Baffle - Black. Simunition® product no. 8971420SP
Set of Lens Lock - Black
(Right 8971081 and left 8971091) Simunition® product no.: 8971082SP
Note: These Lens Lock work only with the FX 9002 Mask equipped with the Rubber
Deflector If your currently FX 9002 Mask is equipped with the old version of plastic
Deflector, please order part: 8971291SP
Rubber Deflector with Set of Lens Lock – Black Simunition® product no.: 8971291SP

Trademarks and registered trademarks of General Dynamics Ordnance and Tactical Systems-Canada Inc. are denoted by TM and ® respectively. www.simunition.com
Page 15 of 16 © 2018 GD-OTS Canada 8971791.FTSIM_rev10
FX® 9000 Series Protective Equipment All FX® 9000 Protective Equipment is designed to withstand all calibers FX® Marking Cartridges:
FX® 9000 THROAT COLLAR (OSFA)
This one size fits all Throat Protection fits snugly around the neck, the FX® 9000 throat collar is produced of high-strength textile. Available in black in one size: (14”-21”).
8971764
MANDATORY PROTECTION
FX® 9000 ARM PROTECTORS
FX® 9000 arm protectors slip on and off easily. These one-size-fits-all are made of high-strength textile. Available in black.
8971517
FX® 9000 GLOVES
New and Improved FX® 9000 gloves are made of high-quality, low-maintenance materials for all-weather handgun use. They feature a synthetic leather palm providing an excellent grip, a longer wrist cuff with added protection to the wrist, top of hand, thumb and finger tips. Available in small, medium, large, X-large and XX-large. S-8971880 M-8971881 L-8971882 XL-8971883 XXL-8971884
FX® 9000 GROIN PROTECTORS
Designed for external wear, FX® 9000 groin protectors are made of high-strength textile and feature three adjustable straps. Available in black in both male and female models. MALE: 8971770
FEMALE : 8971771
MANDATORY PROTECTION
FX® 9000 VEST
Providing outstanding torso protection, the FX® 9000 vest is produced from high-strength textile. Resistant to wear and tear. Two models: male and female (extra chest padding). Available in black.
MALE : 8971830
FEMALE : 8971835
FX® 9000 PANTS
FX® 9000 pants provide buttock and thigh protection. Made of high-strength textile and compatible with the user’s duty belt. Available in black.
S (30”-34”), M (36”-38”), L (40”-42”), XL (44”-46”). S-8971215 M-8971216 L-8971217 XL-8971218
FX® 9000 SLEEVES
FX® 9000 sleeves provide shoulder protection. Made of high-strength textile. One-size-fits-all. Available in black. S-M: 8971281 L-XL: 8971286

www.simunition.com www.gd-otscanada.com Trademarks and registered trademarks of General Dynamics Ordnance and Tactical Systems-Canada are denoted by TM and ® respectively. © 2010 General Dynamics Ordnance and Tactical Systems Distributed worldwide exclusively through the Simunition® network © 2018 General Dynamics Ordnance and Tactical Systems Distributed worldwide exclusively through the Simunition® network
Canada (Home office)
5 Montée des Arsenaux Repentigny, Québec Canada J5Z 2P4 Tel.: 1-450-581-5999 Fax: 1-450-581-0231 Management System Certified ISO 9001, ISO 14001 & OHSAS 18001
USA
Simunition Operations P.O. Box 576 Avon, CT 06001-0576 USA Tel. USA only: 1-800-465-8255 Tel.: 1-860-404-0162 Fax: 1-860-404-0169
Page 16 of 16
8971791.FTSIM_rev10